The Odoo 18 Point of Sale Module is a comprehensive solution for restaurant management, integrating table service, kitchen operations, inventory control, and customer engagement. It streamlines operations, improves customer experiences, and drives profitability. It features a Point of Sale system, kitchen displays, real-time communication tools, robust inventory systems, and CRM capabilities.
To start a new Restaurant or Bar session in Odoo Point of Sale, you must have to create some flexible menu items for ingredient tracking, customizable options, and seamless kitchen operations by allowing easy categorization, automatic purchasing, and seamless integration with inventory. This can be done through the ‘Products’ menu.
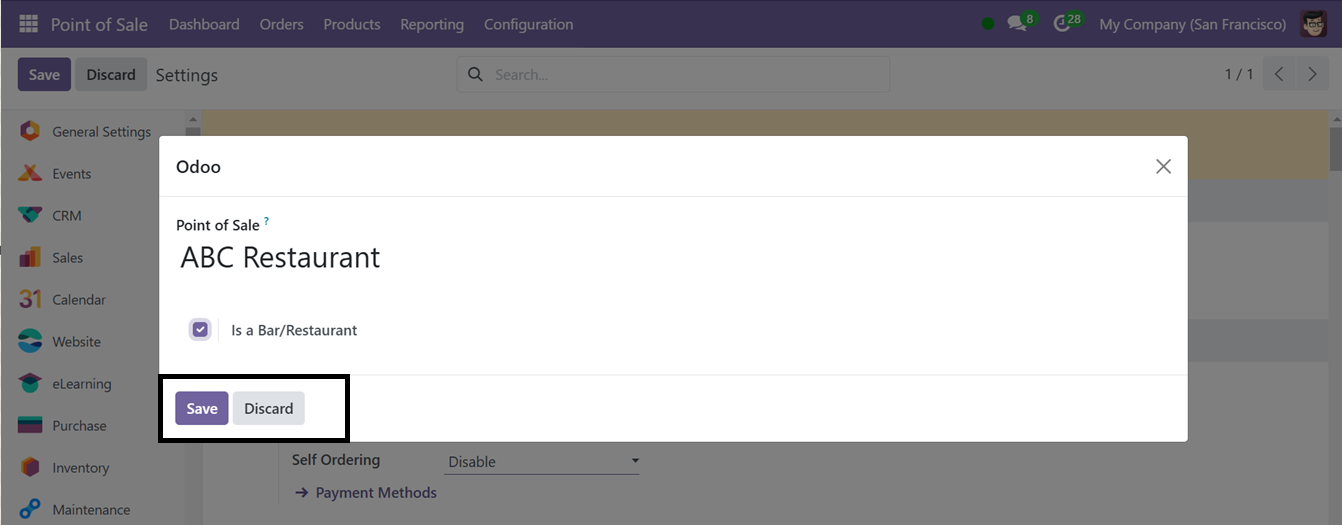
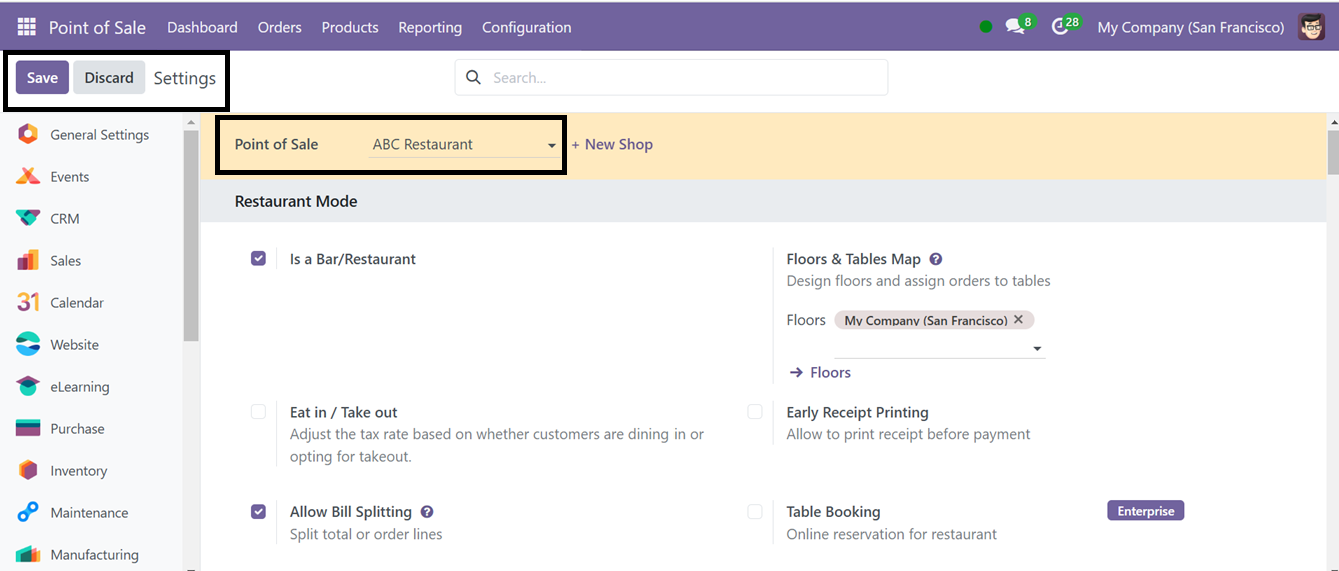
To create a new Restaurant, go to the ‘Settings’ window of the ‘Configuration’menu and choose the Point of Sale session or create a new one using the ‘+New Shop’ button. This will open a pop-up window, where you have to provide the Restaurant name and activate the ‘Is a Bar/ Restaurant’ option and save the shop using the ‘Save’ button, as illustrated in the screenshot below.
After saving the restaurant, the restaurant-specific settings will be displayed in the settings window, along with the standard Point of Sale settings. To initiate a new restaurant setup, you can configure essential restaurant features available under the 'Restaurant Mode' and 'Mobile Self-Order & Kiosk' settings tabs. The remaining settings options are the same as those outlined in the Point of Sale settings, as discussed in a previous section of this book.

Floors & Tables Settings
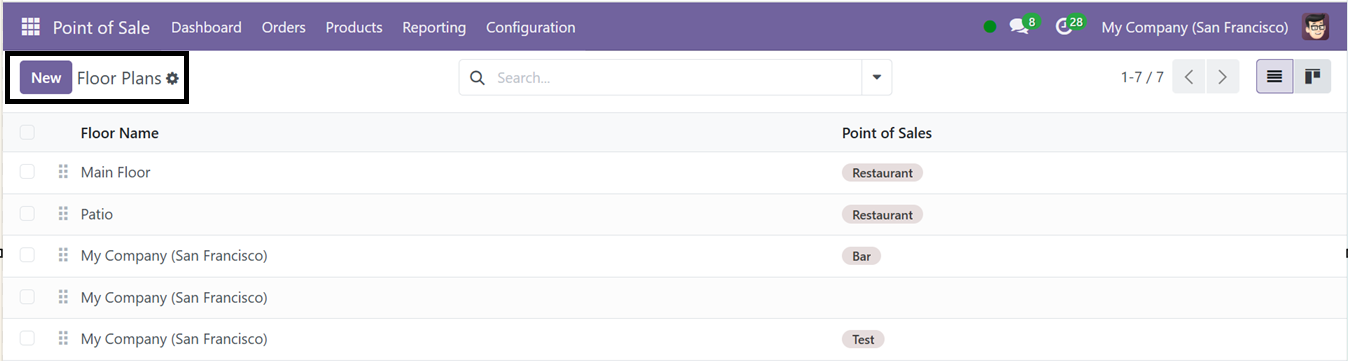
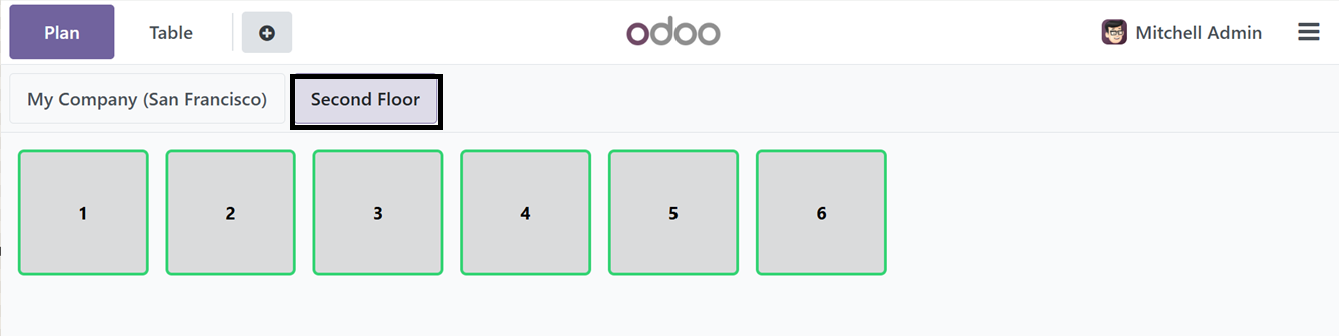
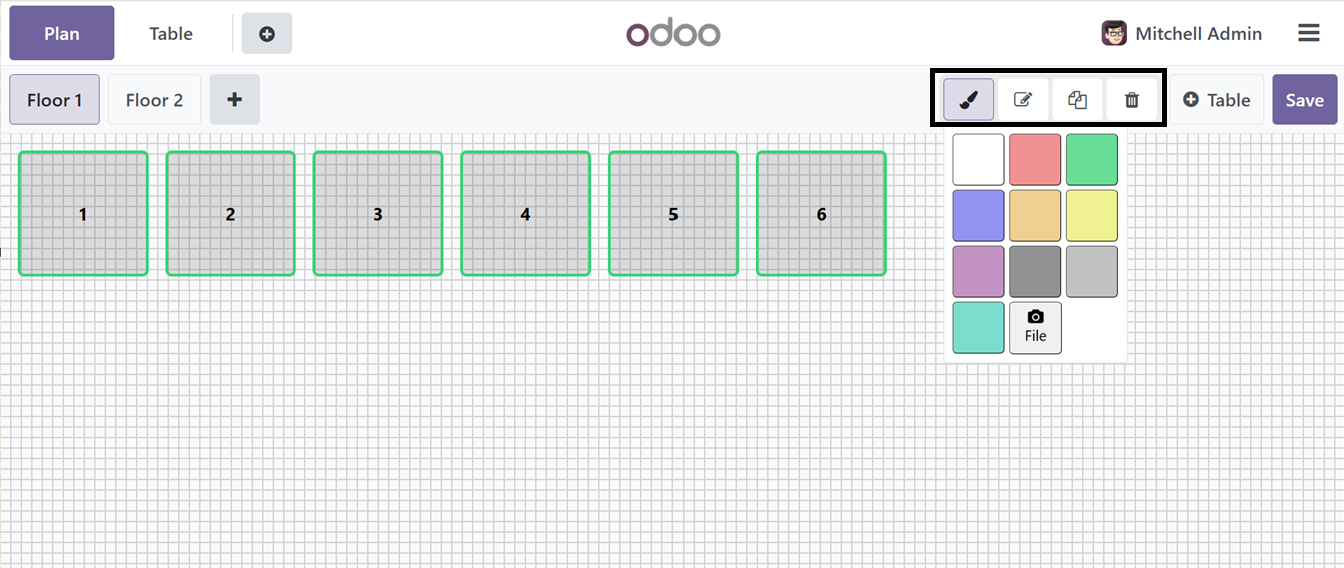
The Configuration menu offers the Floor Plans feature, allowing users to configure various floor layouts. The page displays a list of existing layouts with floor names and points of sale, and a new floor plan can be created by clicking the New option.
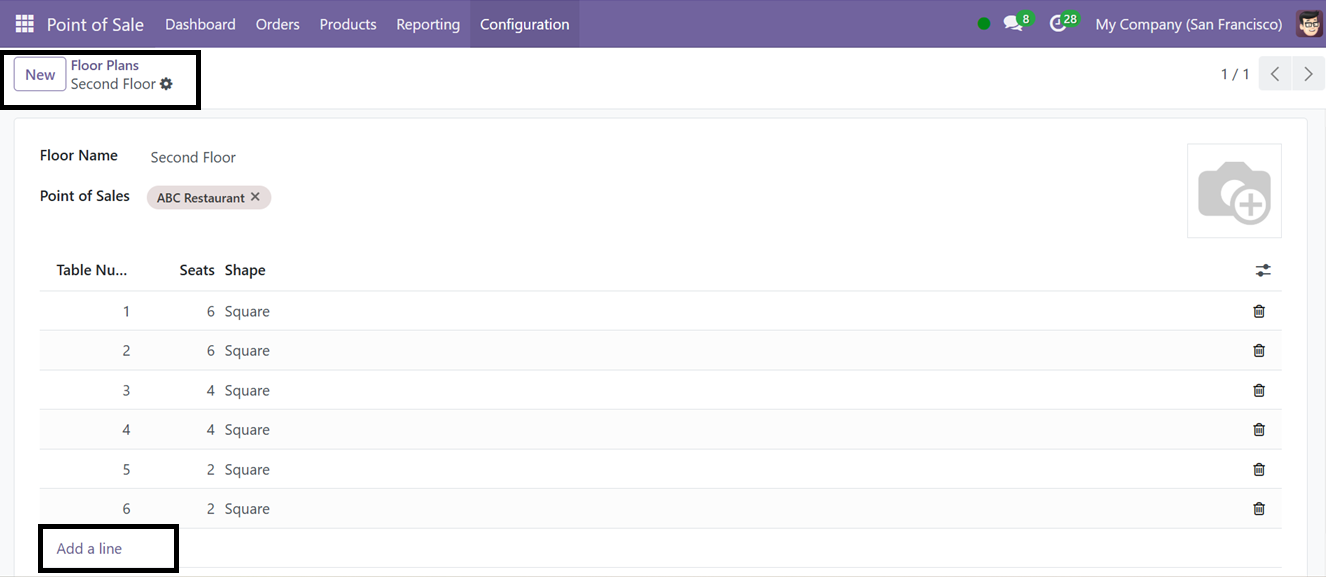
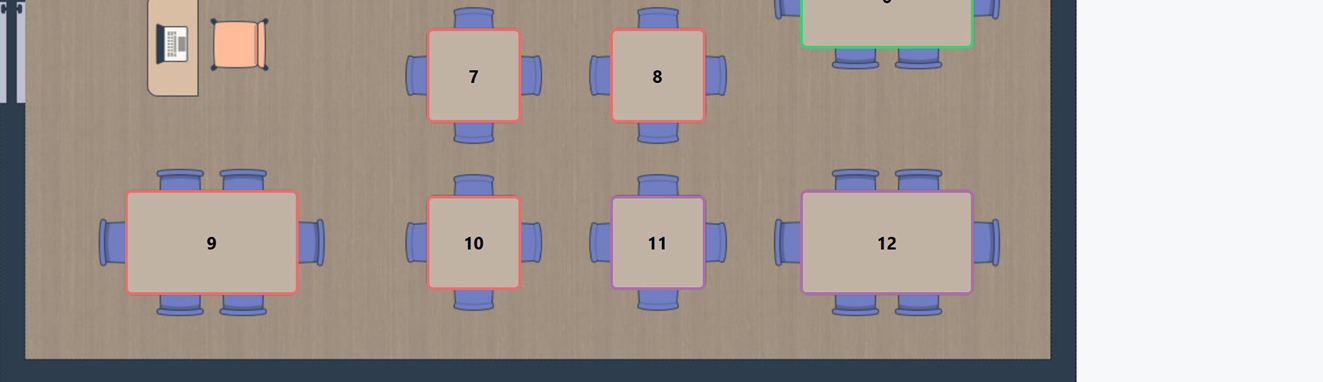
Enter the point of sale and the floor plan name in the ‘Floor Name’ field of the floor plan creation page. After adding tables and defining their numbers and seat forms using the ‘Add a line’ option, save the updated layout.
Now, this floor plan design will be added to your Point of sale session and you can choose the Tables as per the choice as shown in the screenshot below.
Eat-in or Take-out
With the Eat-in or Take-out settings in Odoo 18's Point of Sale module allows businesses to differentiate between on-site dining and takeaway orders, enabling staff to define order types, implement personalized pricing, and improve operational efficiency. This feature also aids in sales tracking, decision-making, and customer experience.
When configuring Eat-in or Take-out orders, you can adjust tax rates accordingly by assigning a fiscal position based on the order type. So, you can set different taxes for Eat In orders as well as Take-Out orders as per your business policies.
To check this feature, go to the Point of Sale Restaurant session and create a new order. Then, to check how the Eat-in or Take-out Eat-in or Take-out feature works, click on the ‘Action’ button, as illustrated in the screenshot below.
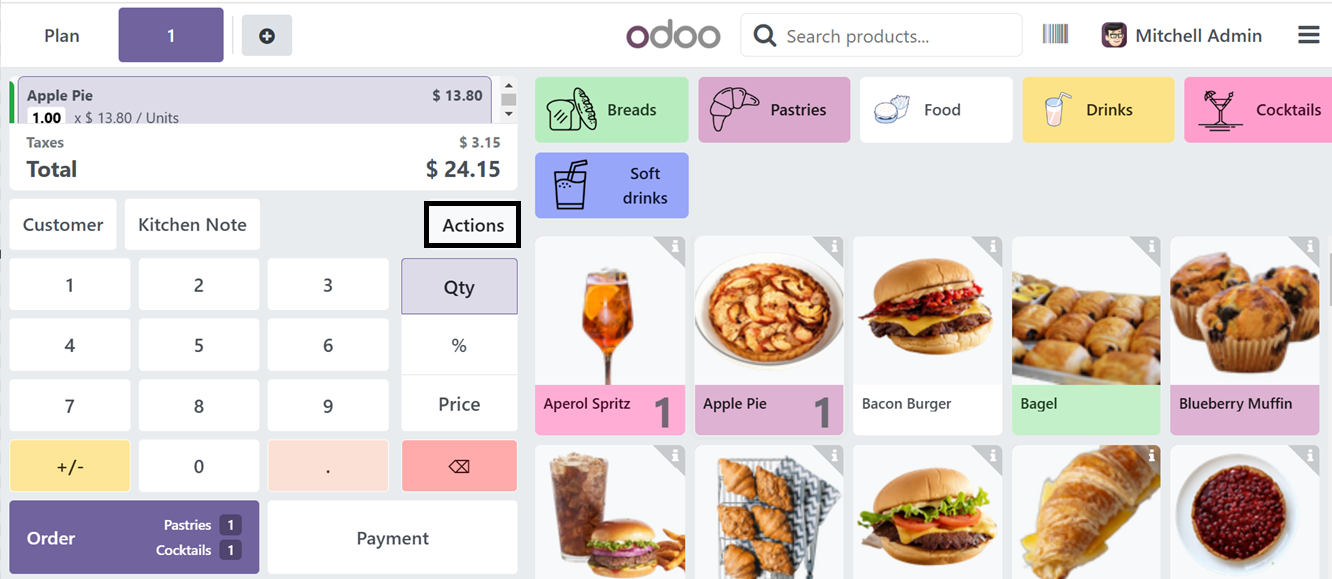
Here, you can see some action button options including ‘Switch to Takeaway’ option,as illustrated below.
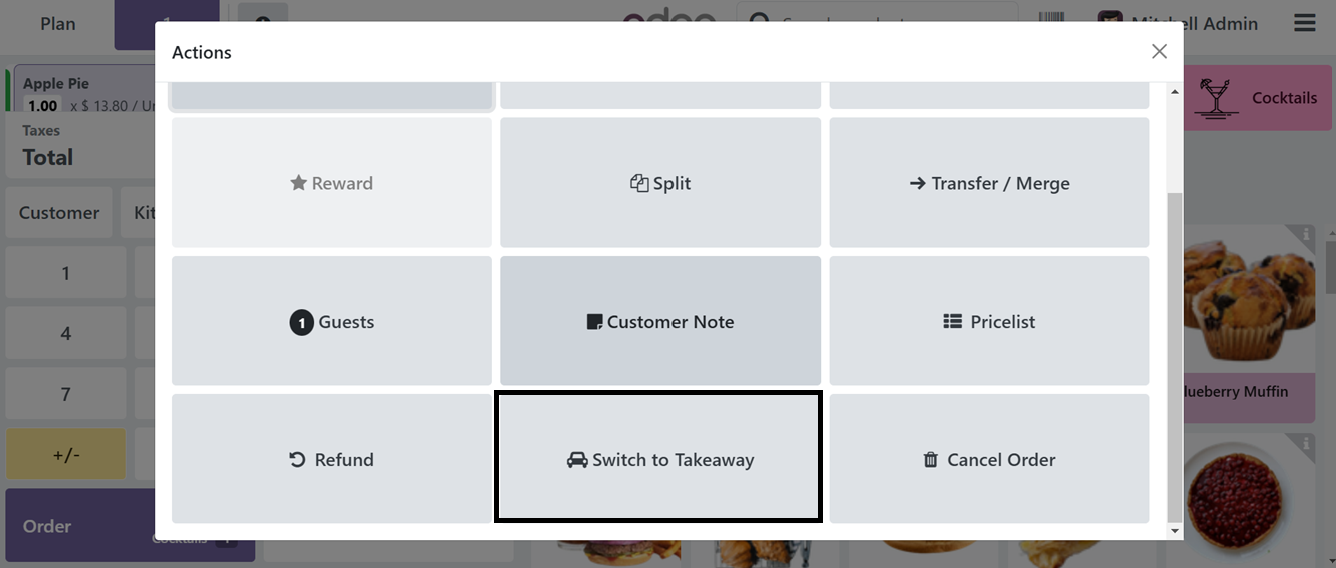
By clicking the 'Switch to Takeaway' button, the order will be designated as a Takeout Order. You can then proceed with processing the order and selecting the payment options as per the standard workflow.
Then, the 'Early Receipt Printing' feature in Odoo's Point of Sale Settings lets businesses print receipts before payment, enhancing customer experience, streamlining workflows, and ensuring accuracy.
Allow Bill Splitting
The 'Allow Bill Splitting' function in Odoo's Point of Sale module enables companies, especially those in the Restaurant and bar sector, to divide a bill into many payments, increasing customer ease and productivity. This option is perfect for group orders or shared payments since it allows for flexibility in dividing by goods or groups, simplifies cashier operations, and accommodates a variety of payment demands.
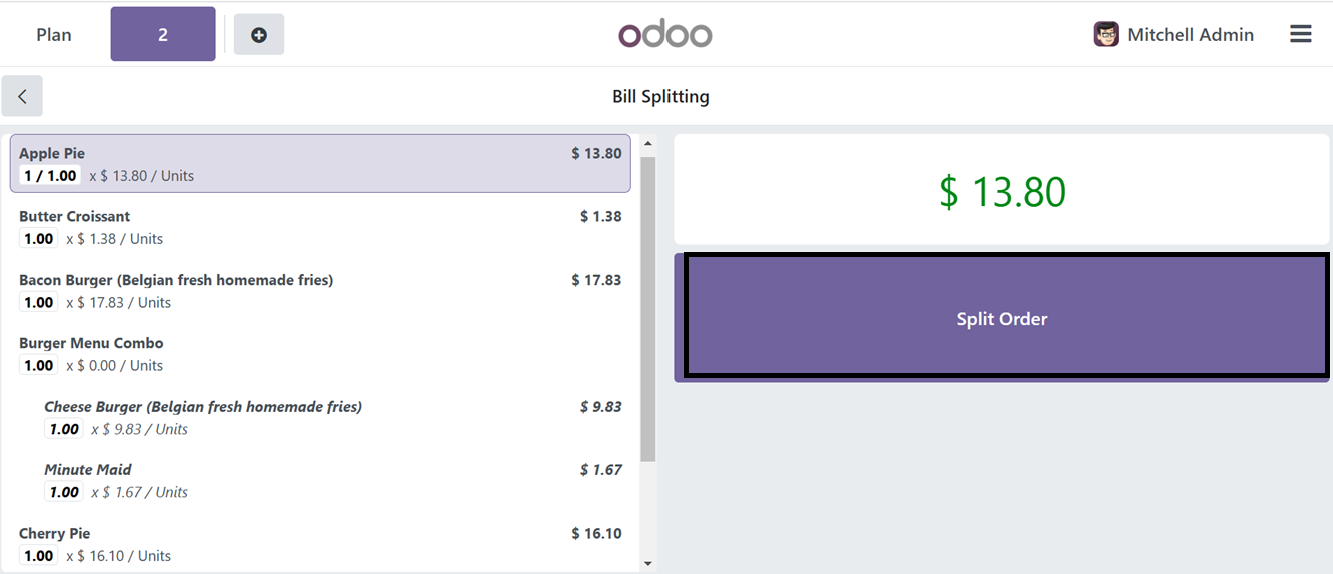
Once this feature is enabled, you can verify its functionality by initiating a new Restaurant Point of Sale session and selecting the desired products. Then, click on the 'Action' button, which will display the 'Split' option, allowing access to the bill-splitting functions, as illustrated in the screenshot below.
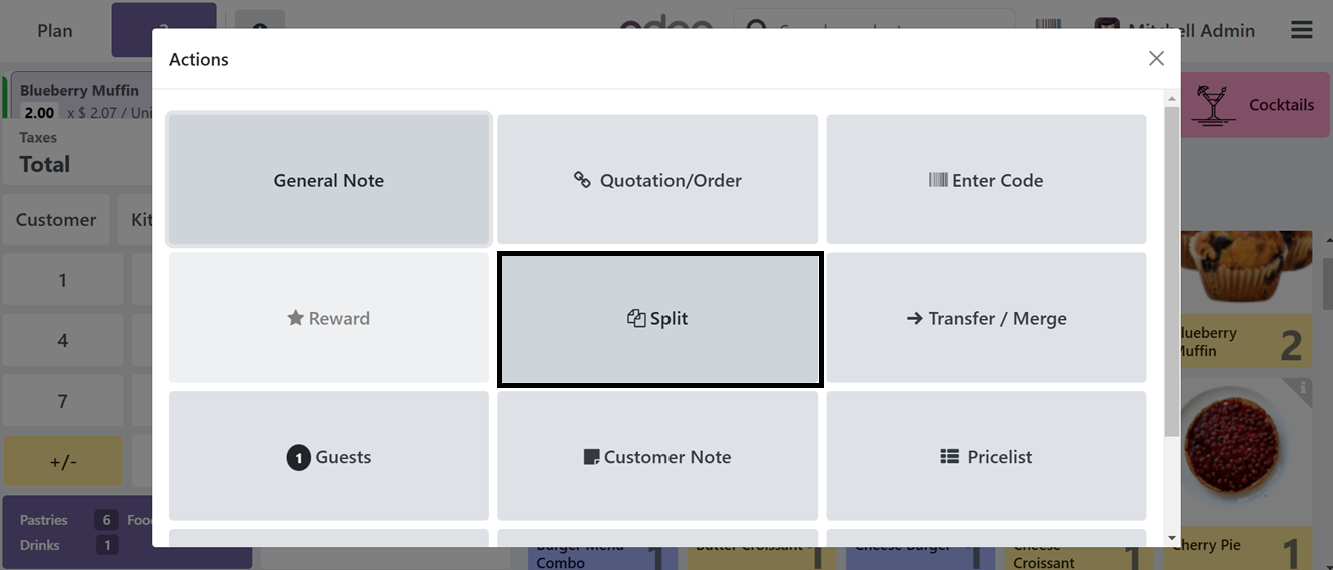
The ‘Split’ button will open another window, where you can split the order amounts based on products or customers using the ‘Split Order’ button. So, here, I have chosen a product and chosen the ‘Split Order’ button.
Then, we can assign the bill of this particular product to a customer as usual by selecting the ‘Order’ button.
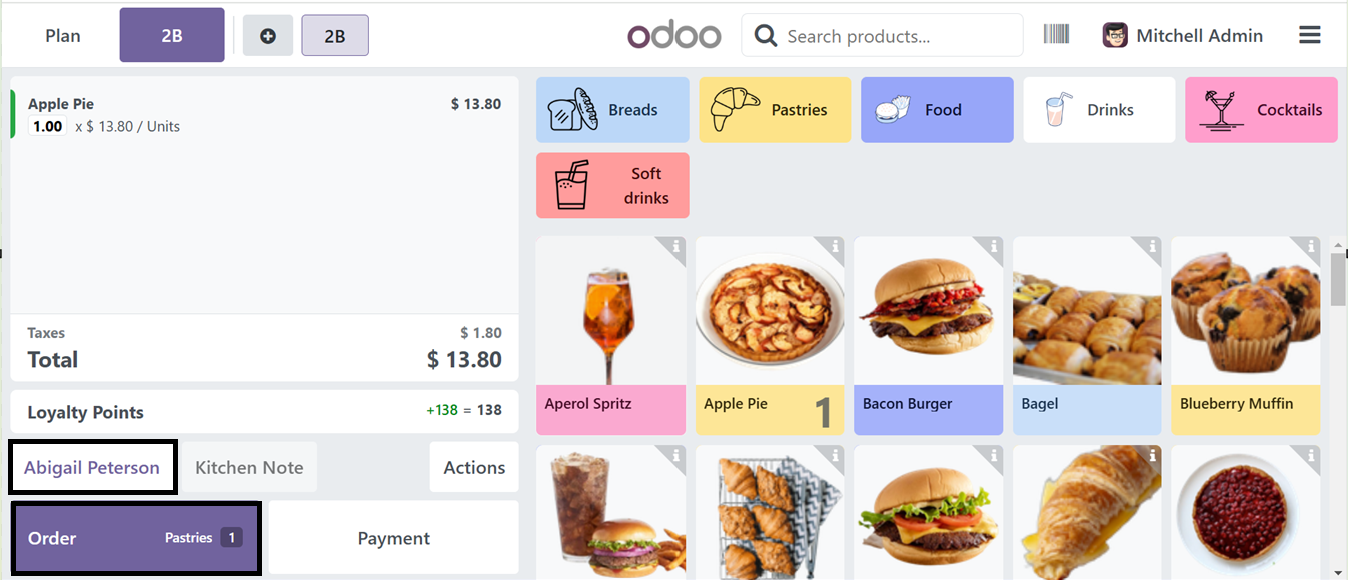
The order will then be assigned to the specified customer, and the payment process will proceed accordingly. Upon validation, the payment for the selected product will be recorded as received from the customer, and the bill will be generated, as demonstrated in the illustration below.
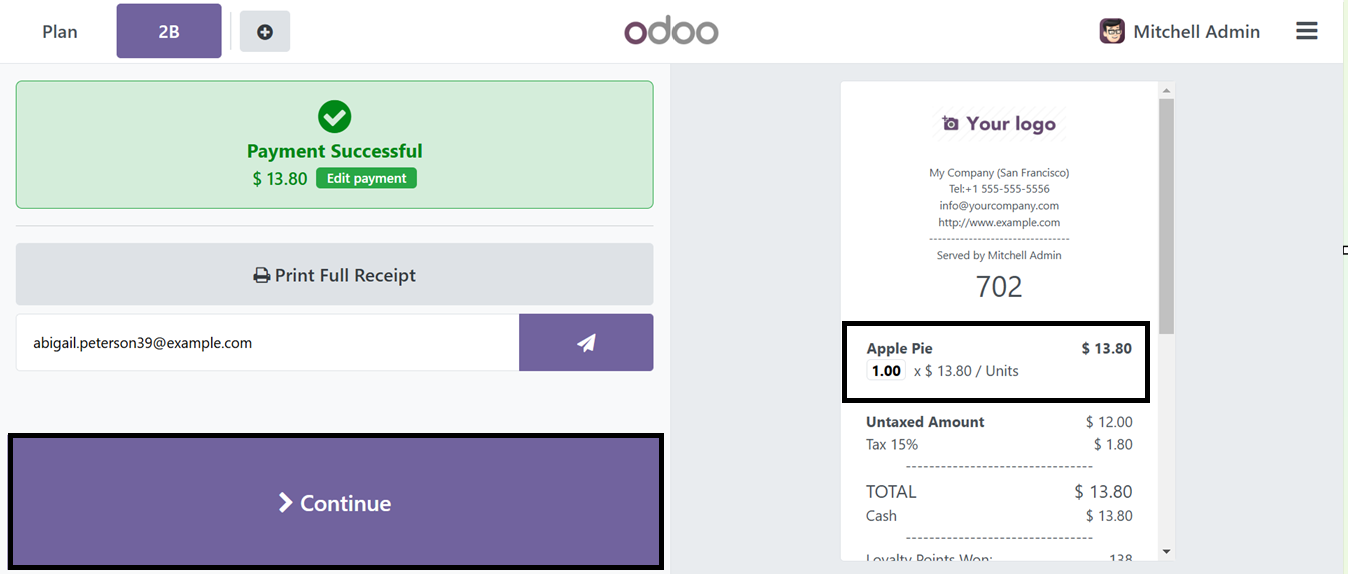
Once the payment is completed, you may proceed with the order by selecting the 'Continue' button. The payment can be further split and processed as per the customer's requirements until the full order amount is settled.
Mobile Self-order & Kiosk
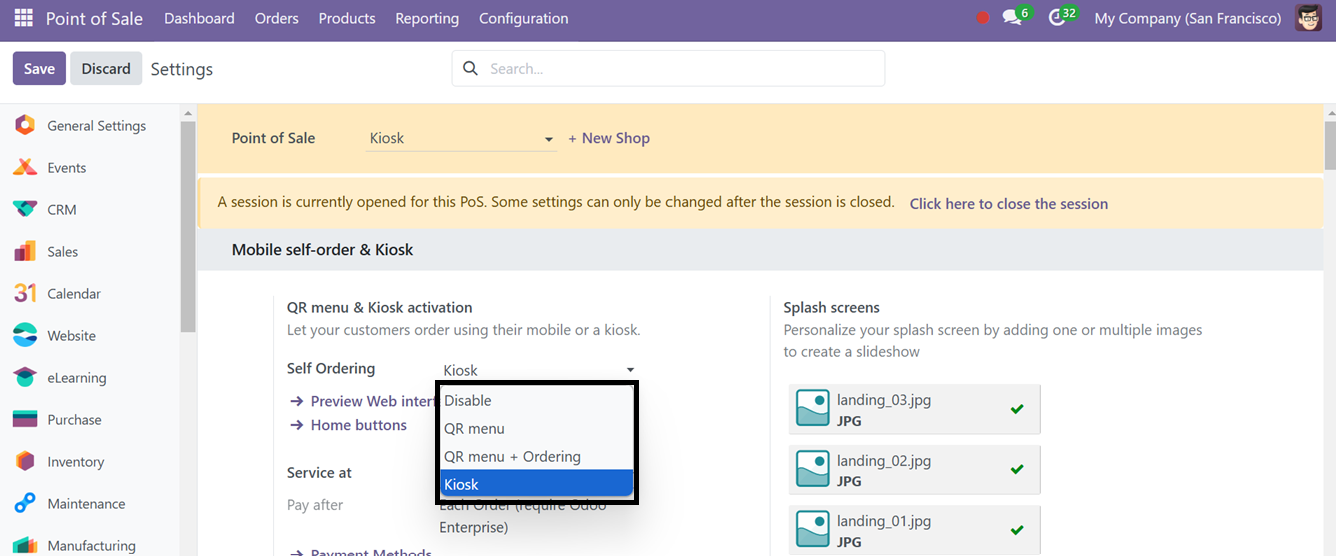
Odoo 18 introduces Mobile Self-order & Kiosk functionality, allowing customers to place orders via kiosks or mobile devices. You can configure Self-ordering as a QR Menu, Kiosk, or QR Menu + Ordering. So choose the ‘Kiosk’ from the ‘Point of Sales’ field in the settings window.
To check how the Kiosk interface displays, click on the ‘Preview Web Interface’ link. This will open the interface as shown below.
The ‘Home Buttons’ link can be used to create and manage the home buttons that appear on the Kiosk display window. You can see the dashboard of all the available buttons with the facility for creating new ones.

After opening a new home button creation window using the ‘New’ button, edit the Label Name, URL, Point Os Sale Session, Style and button Preview as illustrated in the screenshot below.
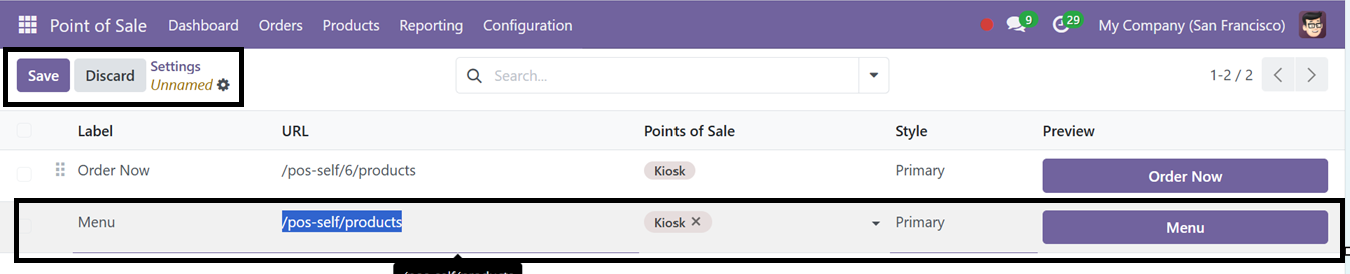
The new button will be added to the kiosk home page and you can utilize this to check the products catalog.
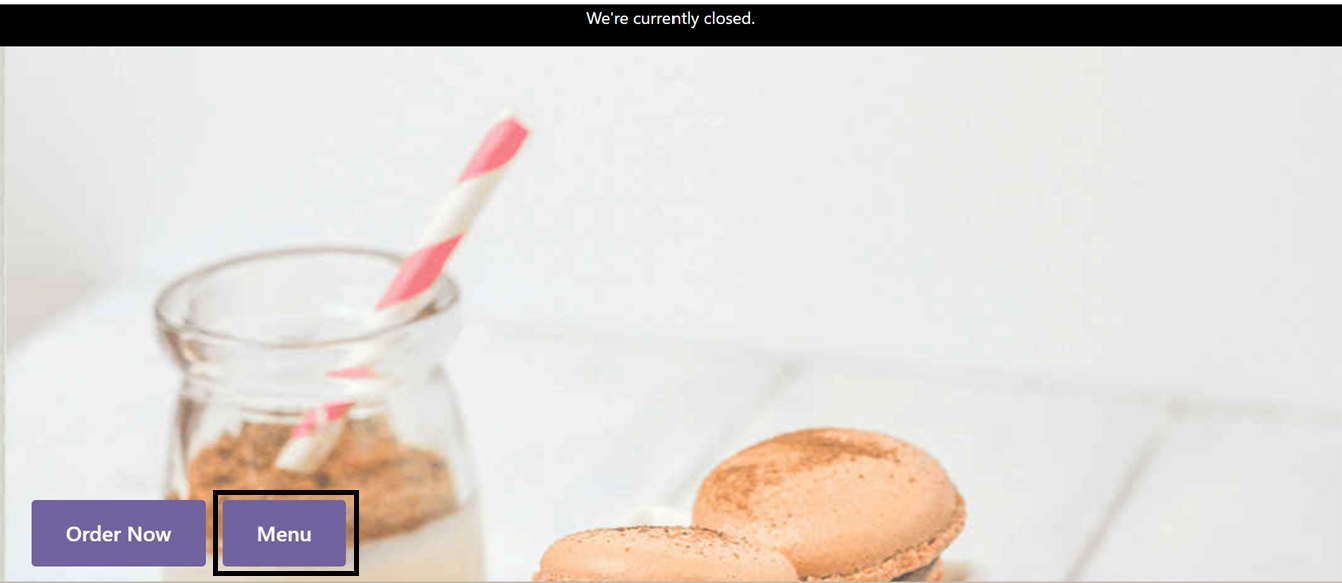
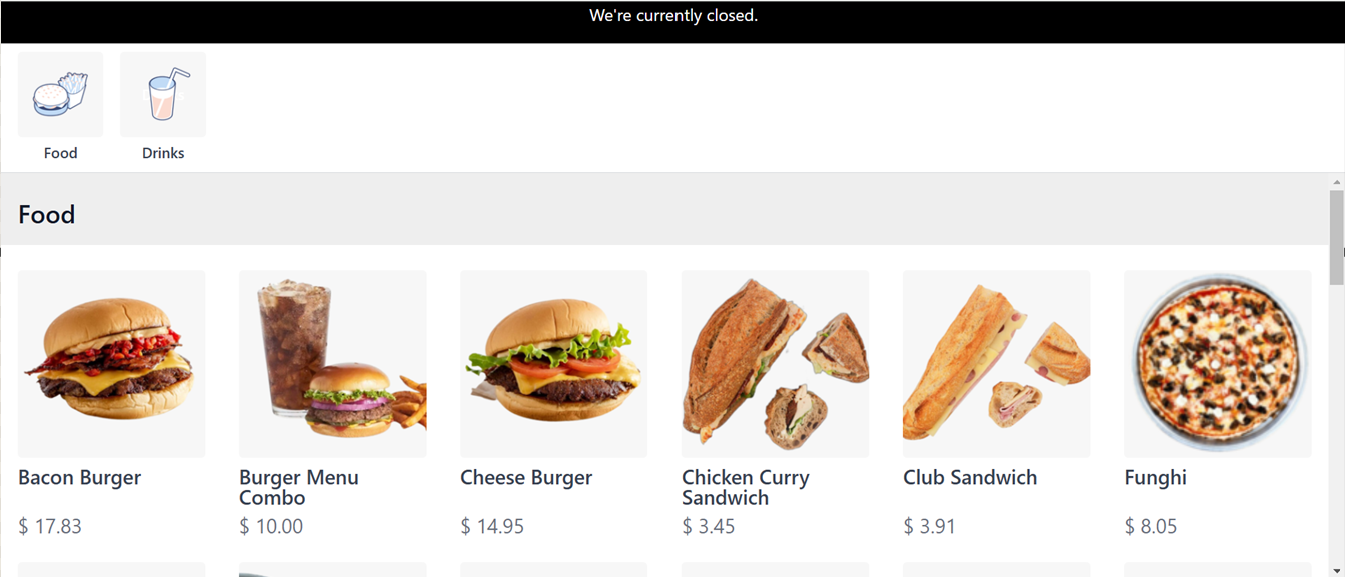
After clicking on the new ‘Menu’ home button, you will direct to the products menu as shown below.
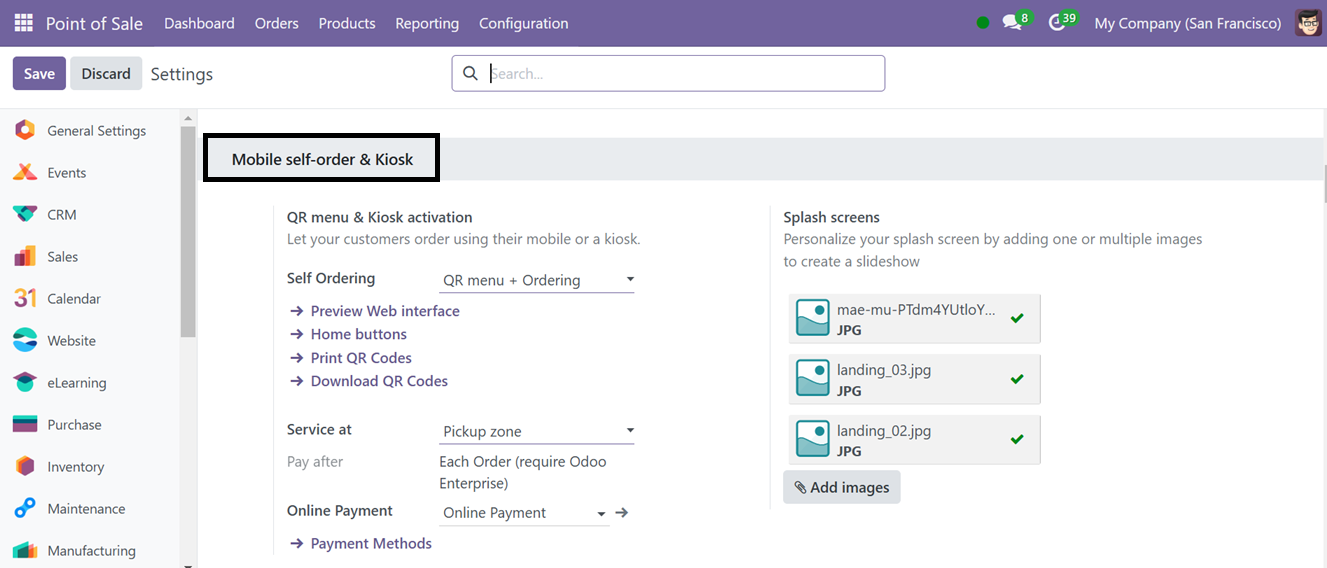
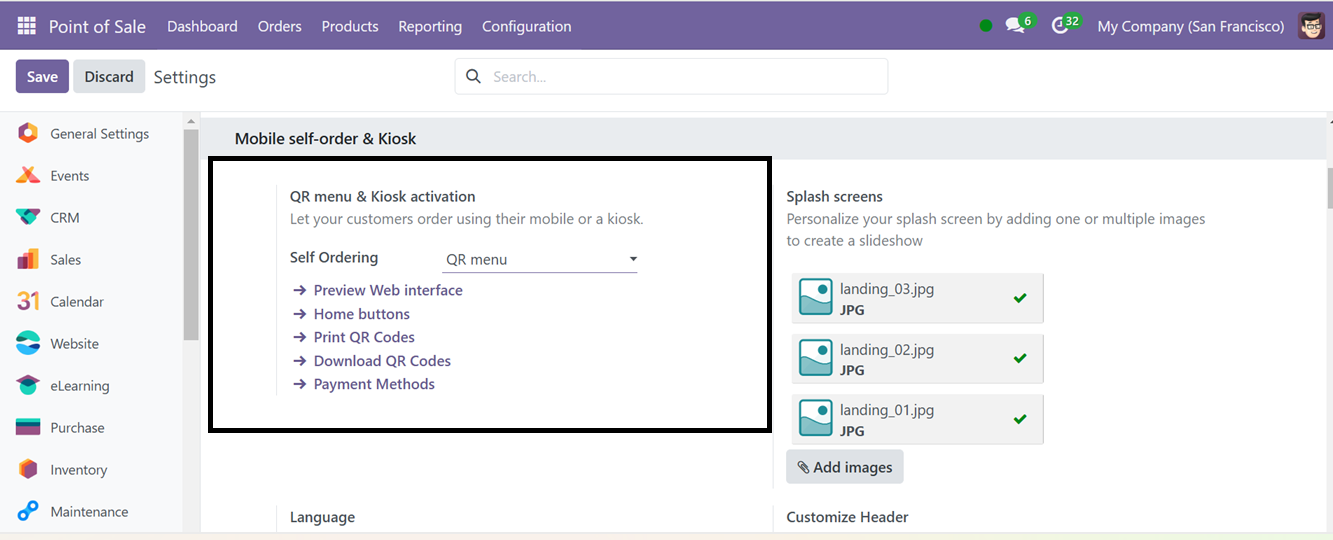
Odoo also provides other two self ordering options rather than the Kiosk self ordering system. You can choose these options from the ‘Self Ordering’ field of the ‘Mobile self order & kiosk’ tab from the Settings window, as shown below.
Then, you can customize settings like Print QR Codes, Download QR Codes, Payment Methods, and Available and Default Languages.
QR Menu
Businesses like cafés and restaurants that want to minimize manual involvement would benefit from Odoo’s ‘QR Menu’ functionality, which streamlines the customer experience by enabling customers to peruse menus and make orders directly on their mobile devices.
After selecting the’QR Menu’ option for the self ordering system, Odoo will display' Print QR Codes,’ and ‘Download QR Codes,’ links that can be used to configure QR Codes for self ordering Kiosk interface.
Depending on how many tables and floors your restaurant has, the "Download QR Codes" button will instantly download the necessary number of QR Codes. To print the QR codes, click on the ‘Print QR Codes’ link and in the displayed window, configure the document layout for your invoices.
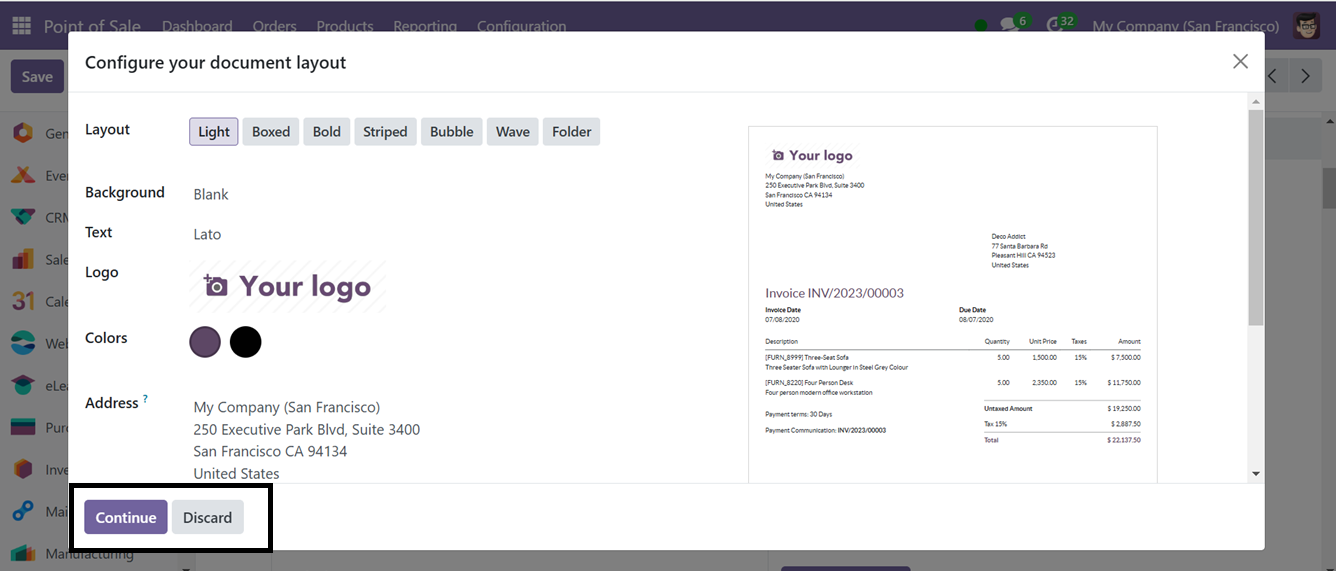
After configuring the document layouts, click the ‘Continue’ button and this action will download the QR Codes into your system as shown below.
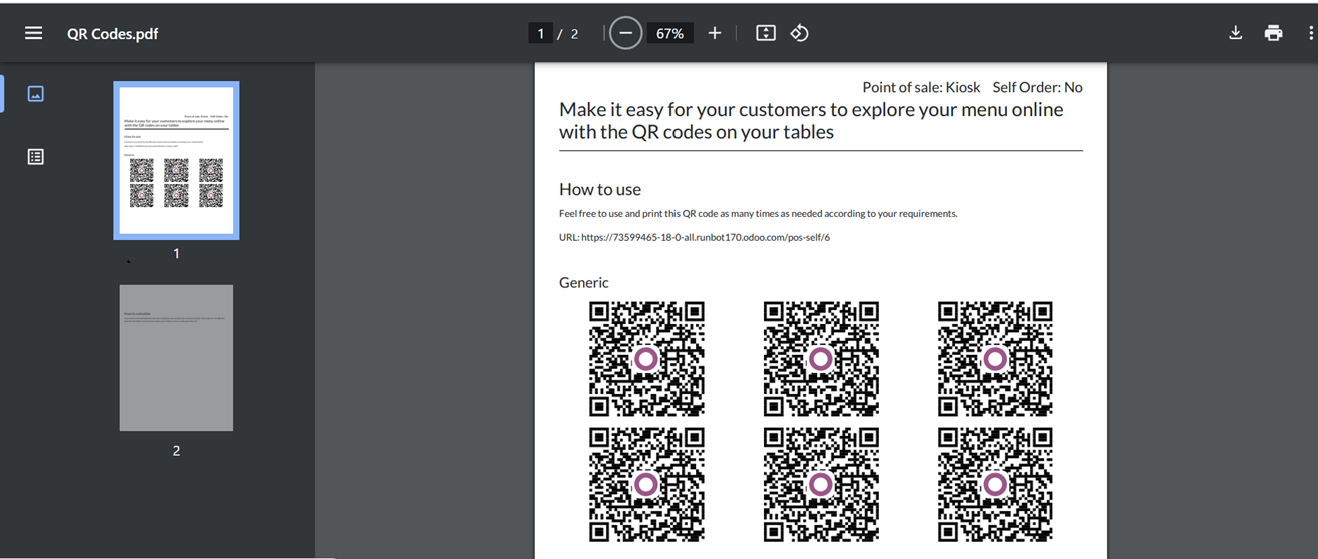
Then, these QR codes may be placed effectively across a restaurant so that visitors can use their smartphones to scan them. This takes visitors to an online menu where they may peruse, personalize their meals, and place orders right from their phones. This not only expedites the ordering process but also lessens the effort for the personnel, freeing them up to concentrate on other areas of service.
To manage and create the payment methods for the Kiosk shopping session, click on the ‘Payment Methods’ link and choose or create payment methods from the dashboard window.
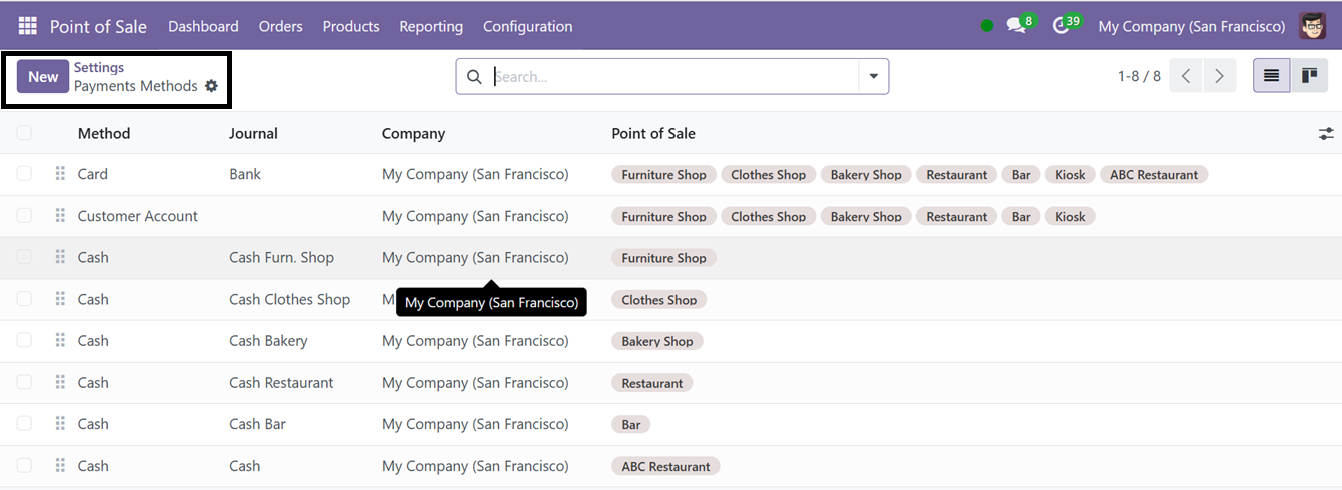
To create a new payment method, click on the ’New’ button and edit the payment method name in the ‘Method’ field. Then, activate the ‘Online Payment,’ and ’Identify Customer’ fields according to the payment mode.
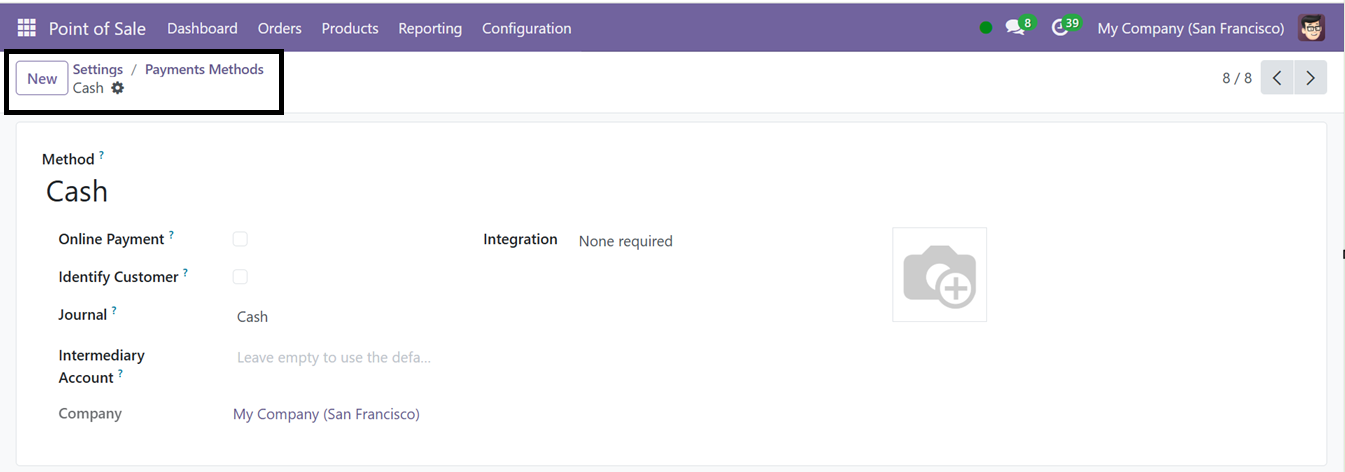
You may also specify the Journal, Intermediary Account, and Integration options for a more detailed payment method configuration. The comprehensive process for creating a new payment method is outlined in the Point of Sale Settings section of this book.
Splash Screens
In Odoo's POS module, Splash Screens are pop-up notifications that provide order summaries, promotions, payment alerts, or customer instructions, improving efficiency and communication.
You can add attractive and customized splash screen images to the kiosk window by pressing the ‘Add images’ link provided under the Splash Screen Images field. The ‘Add images’ button will open your device storage. You can choose the required image and add them as a kiosk splash screen.
Deleting and managing the previous images can also be done by simply deleting the images and replacing another using the ‘Add images’ button. Then you can add a brand image for the Kiosk shop using the ‘Upload your file’ link provided under the ‘Customize Headers’ option.
To display the kiosk web interface contents in different languages, you can customize the Default and Available languages under the ‘Language’ settings. To add new languages into the PoS web interface from Odoo database, you can utilize the ‘Add Languages’ button.
After configuring the languages settings, you can see the available languages from the web interface as illustrated in the screenshot below.
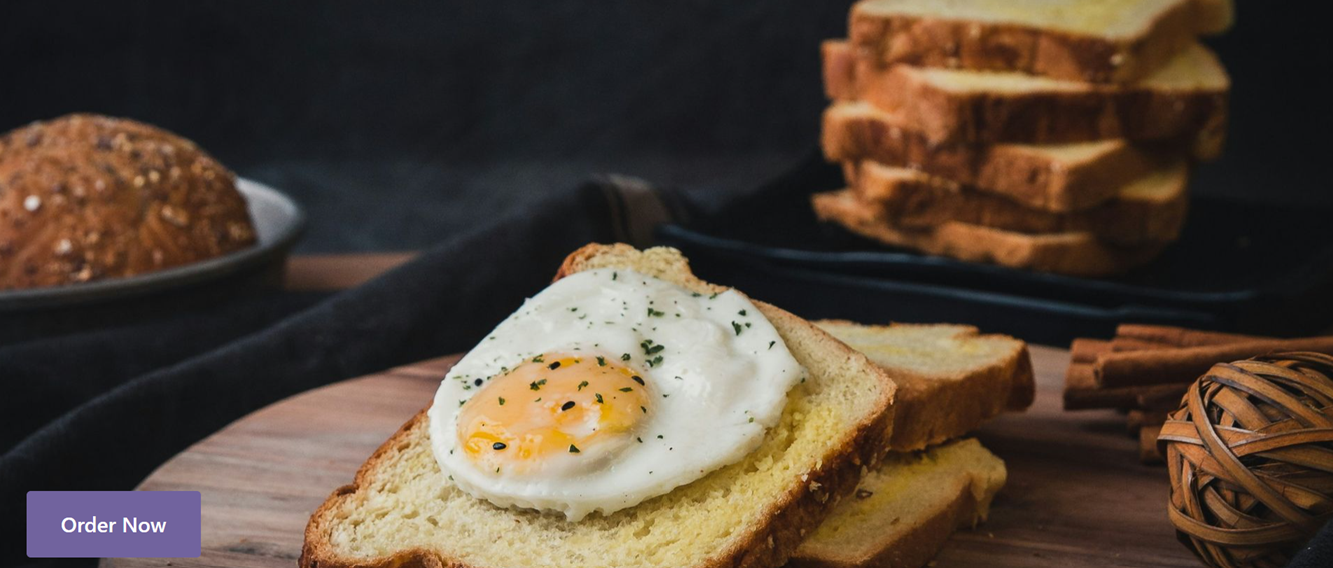
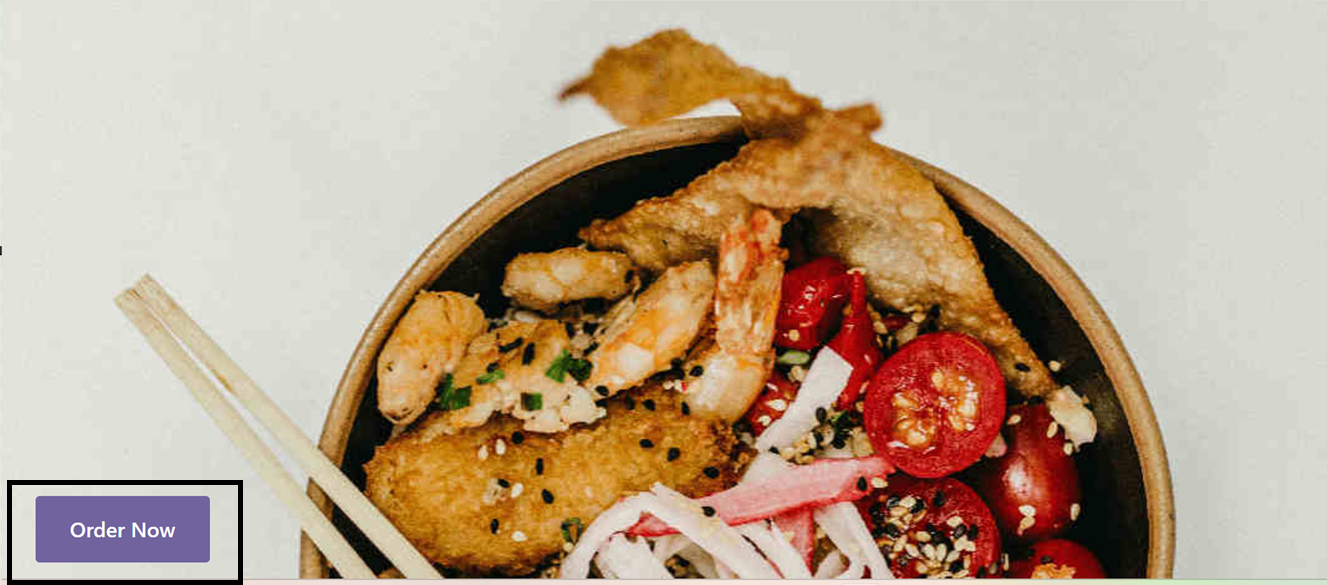
You can customize the web content by selecting your preferred language from the available options for better clarity. Once all settings are saved, customers can place orders during active sessions by selecting products and tables using the "Order Now" button. The order will then be displayed within the corresponding session.
Ordering through a Kiosk Interface
By facilitating self-service transactions, the Kiosk Interface in Odoo's Point of Sale module enhances consumer ordering. With its interactive and user-friendly interface, this system improves order efficiency and lessens staff burden.
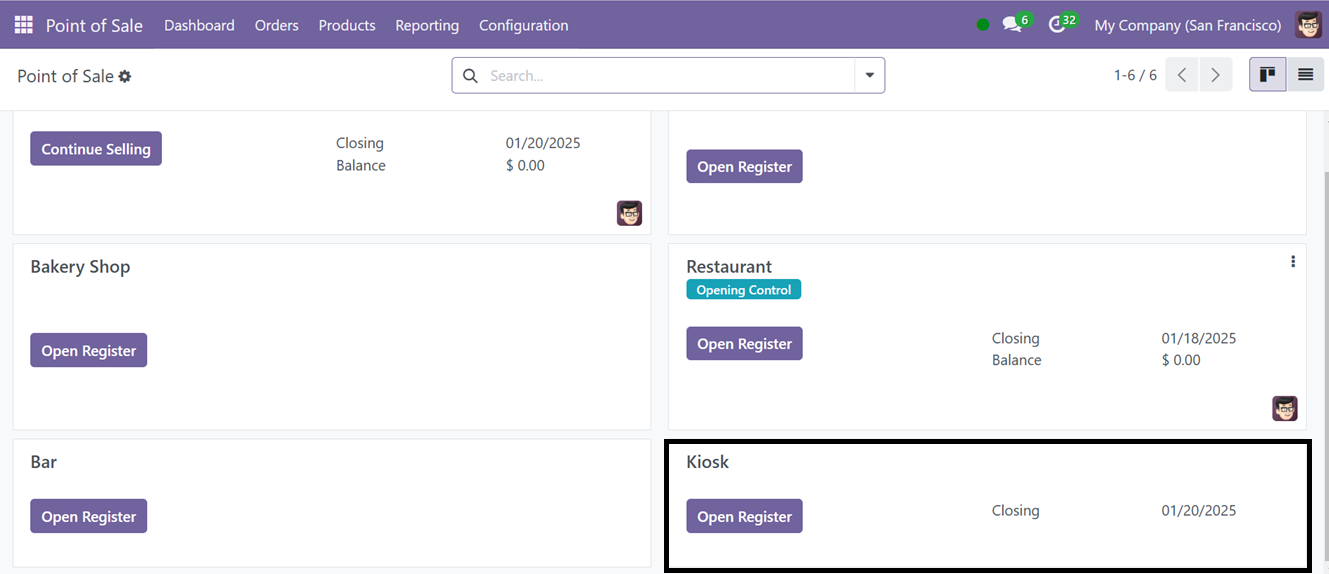
To start a Kiosk sales session, you can go to the Point of Sale’s Dashboard Menu and choose the Kiosk Session.
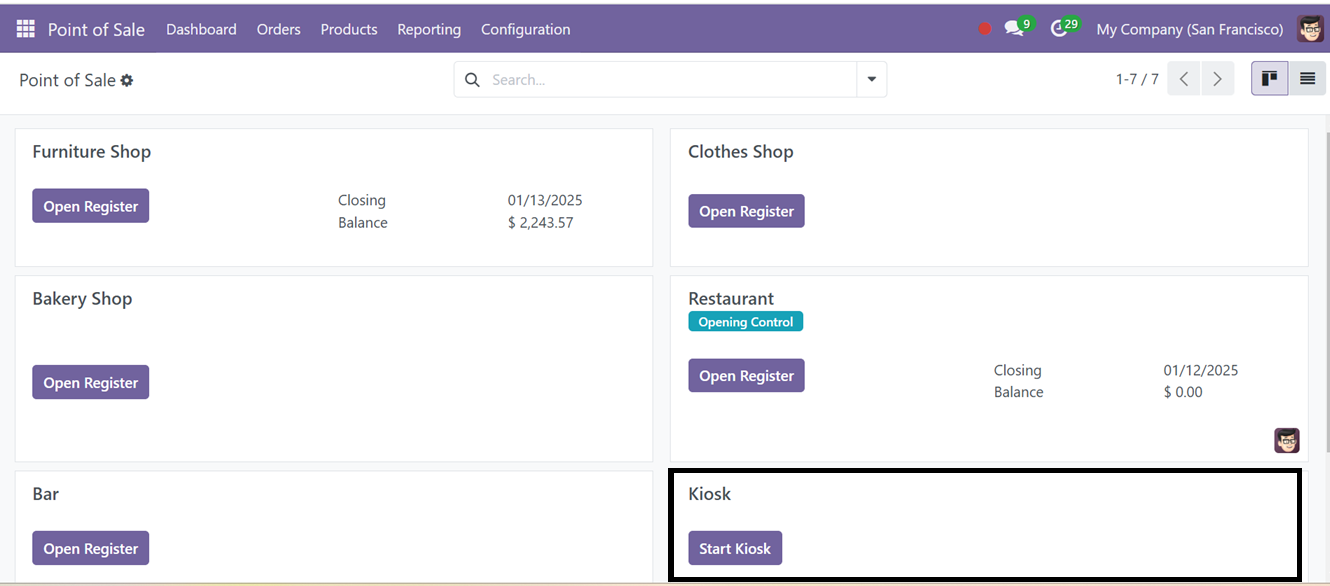
For kiosk use, after configuration, click "Start Kiosk" from the dashboard, and a URL will be provided to access the kiosk interface.
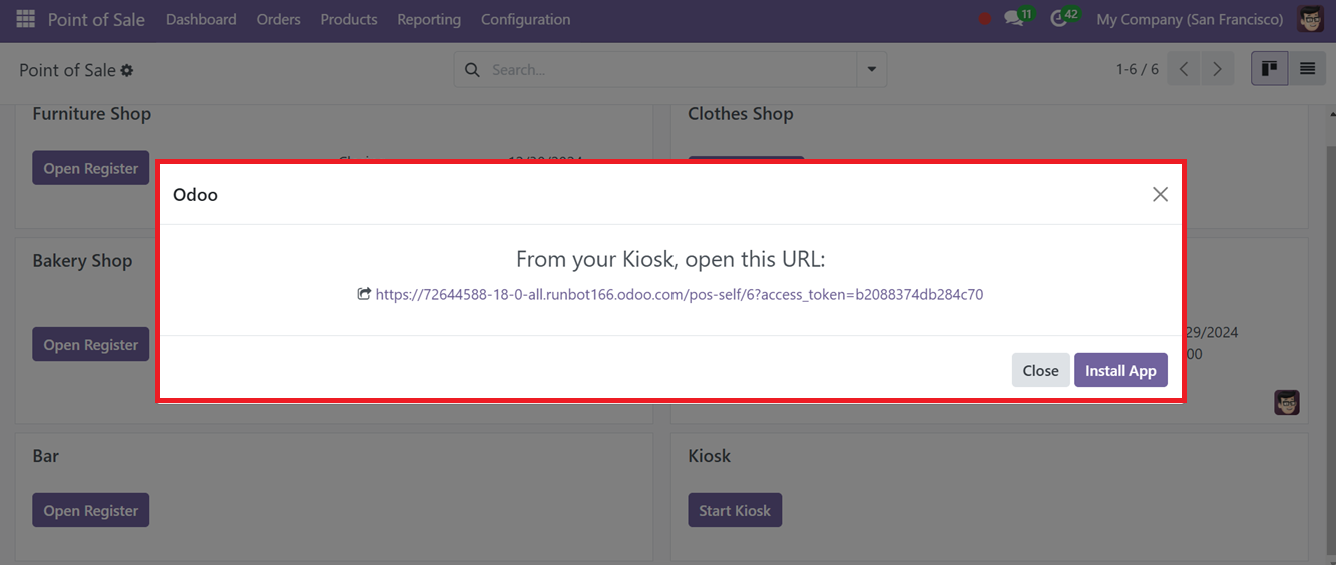
Then, you can click on the ‘Install App’ button to install the Kiosk app and login into the Kiosk sale system. This will lead you to another window where you can install the app using the ‘Install’ button.
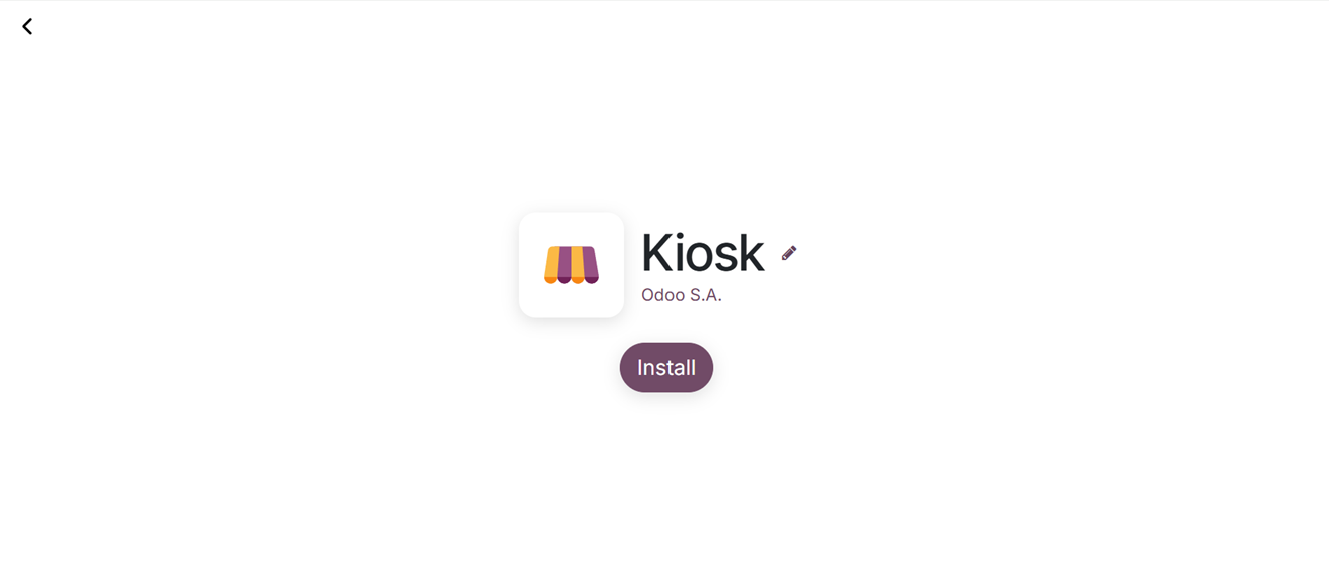
Installing the app will launch the app into your system database and you can quickly order the items from the Kiosk-Odoo Self Order window as illustrated in the screenshot below.
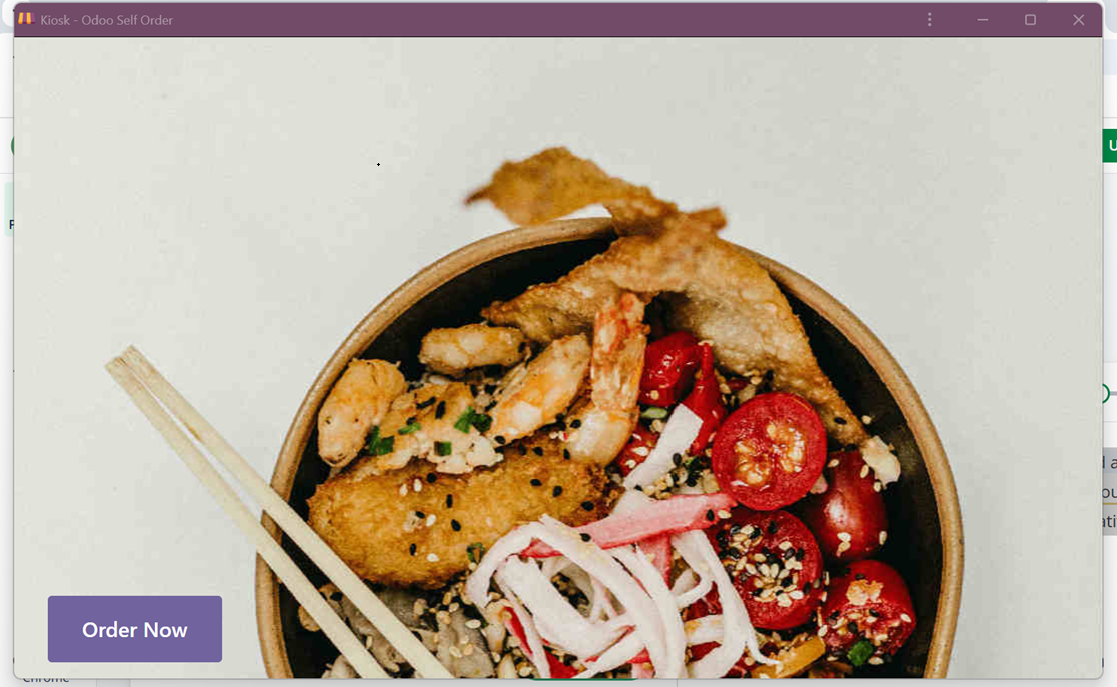
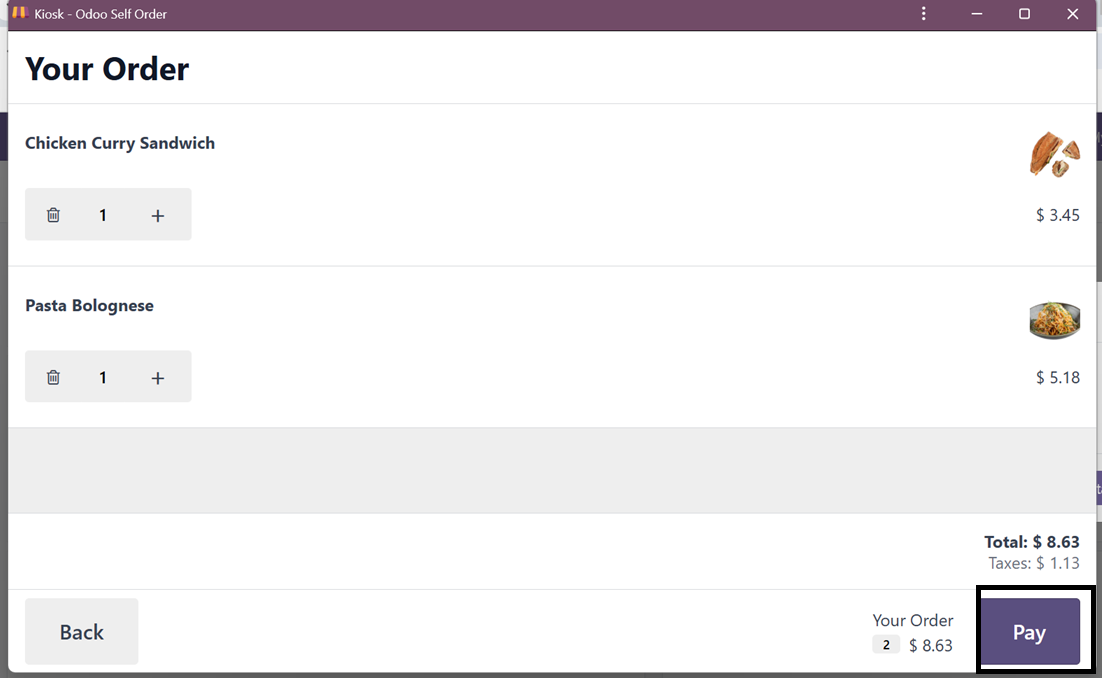
Then, press the ‘Order Now’ button and start picking the products from the catalog and proceed with the ‘Order’ button.
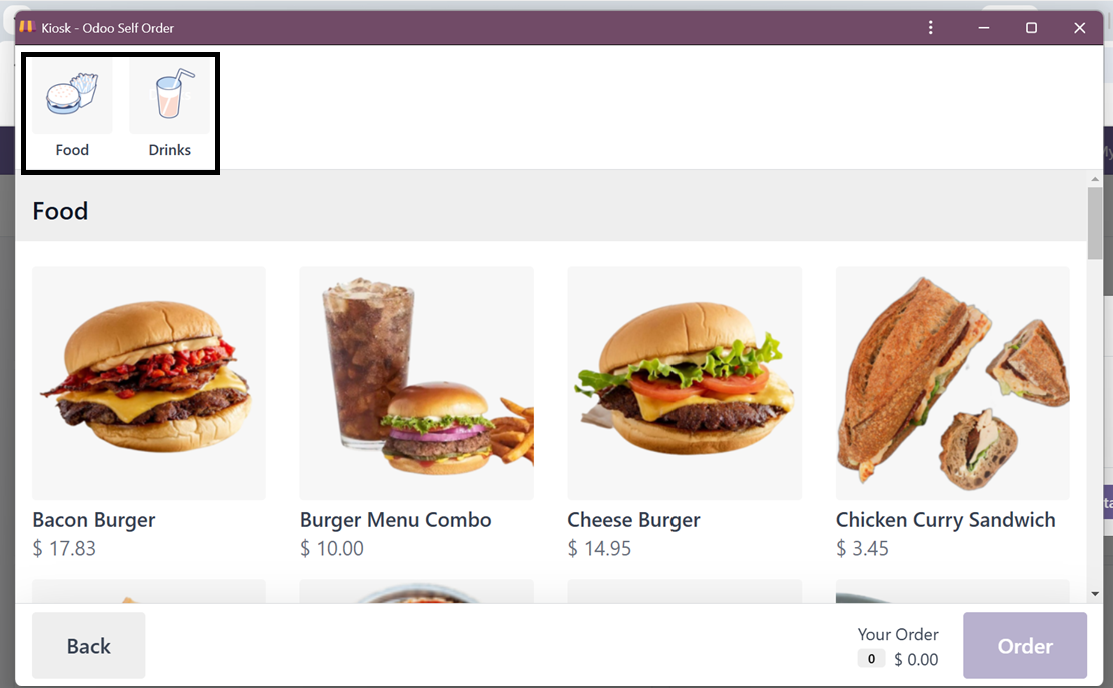
Then, after ordering the products, go to the payment procedure using the ‘Pay’ button.
The ‘Pay’ button will complete the order and you will get the Order Number to pick-up from the counter as shown in the screenshot below.
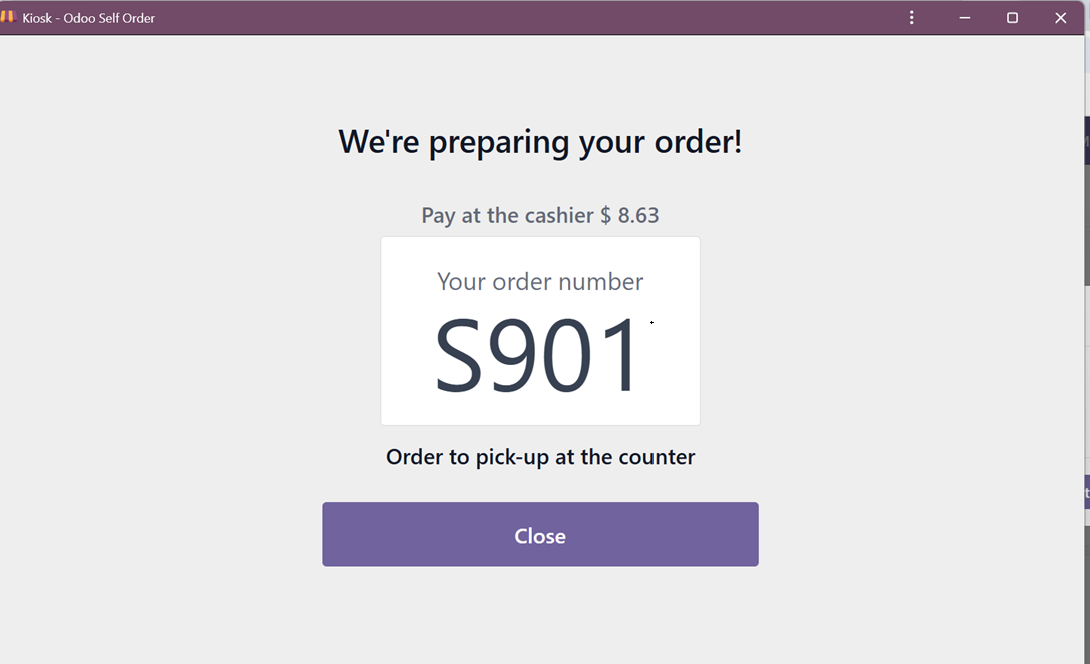
Finally, you can collect the products and pay the amount directly from the shop counter.
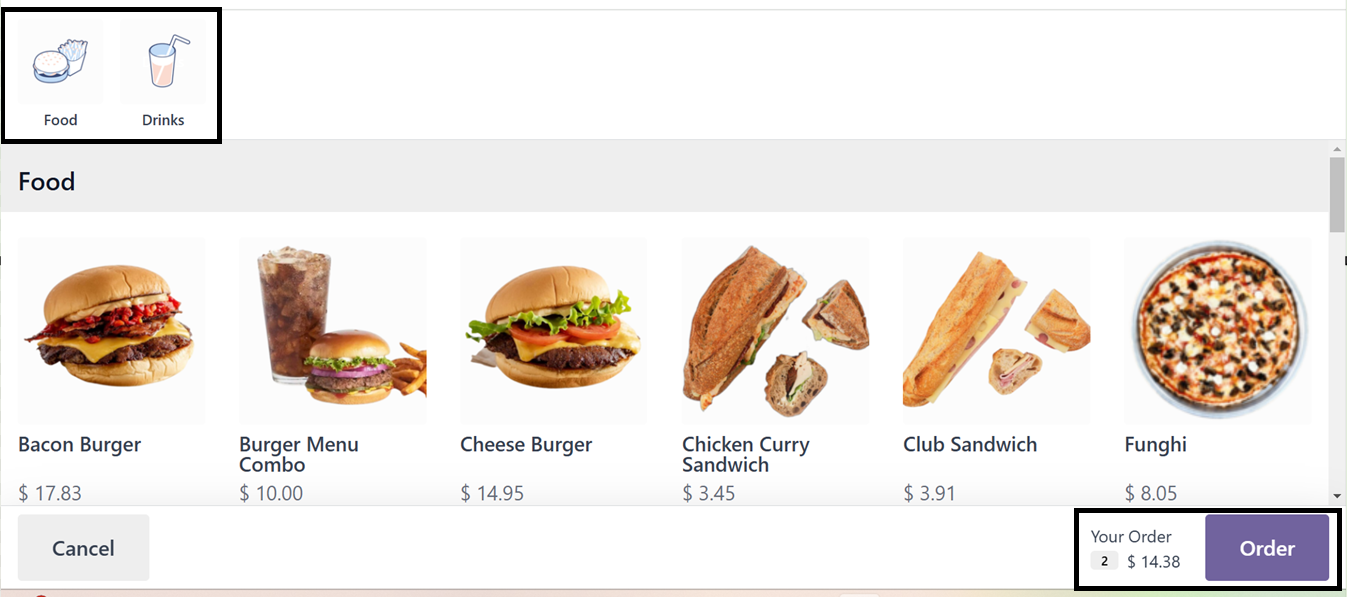
After setting the QR Menu Kiosk settings, open the Kiosk session and start shopping for the products. So, you can go to the point of sale ‘Dashoard’ window and open the Kiosk by clicking on the ‘Open Register’ button and providing an opening note.
After opening the kiosk mode, you will be entered into the restaurant section, with the floor plan and table view while we open a normal restaurant session as shown in the screenshot below.
Then, choose the table and the products catalog will appear. Then, you can choose the products and proceed with the order using the ‘Order’ button and then the payment completion.
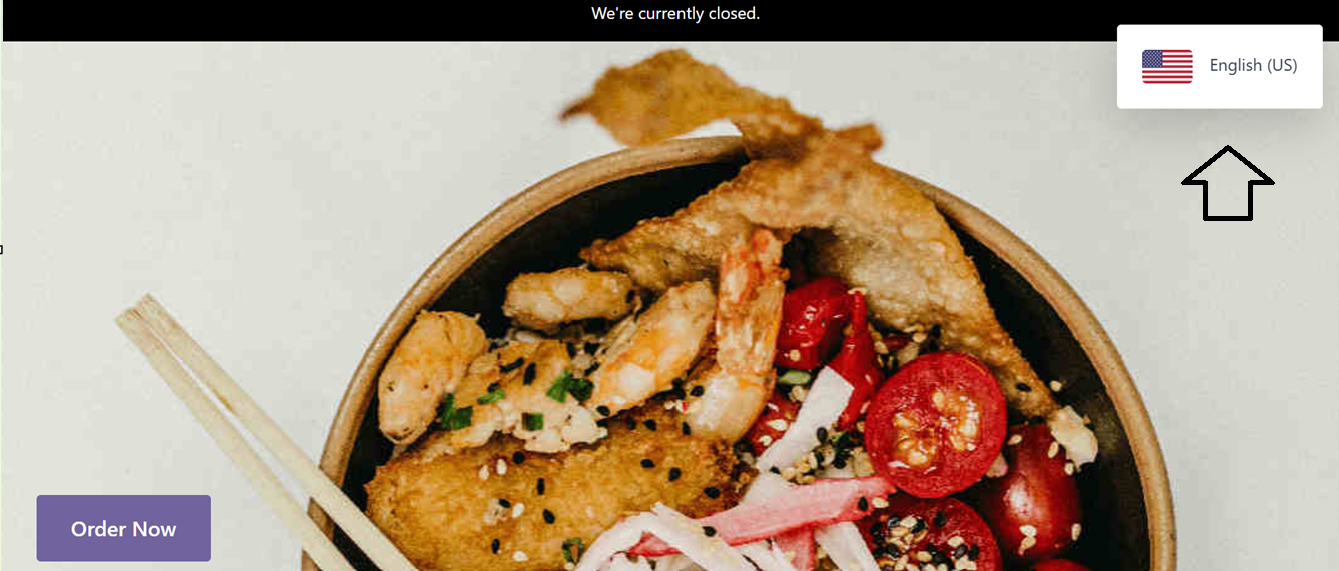
While ordering through a QR Menu application interface, you can see the web page interface as shown below.
QR Menu+Ordering
The 'QR Menu+Ordering' option allows customers to access digital menus and place orders directly from their mobile devices, enhancing the dining experience and streamlining operations.
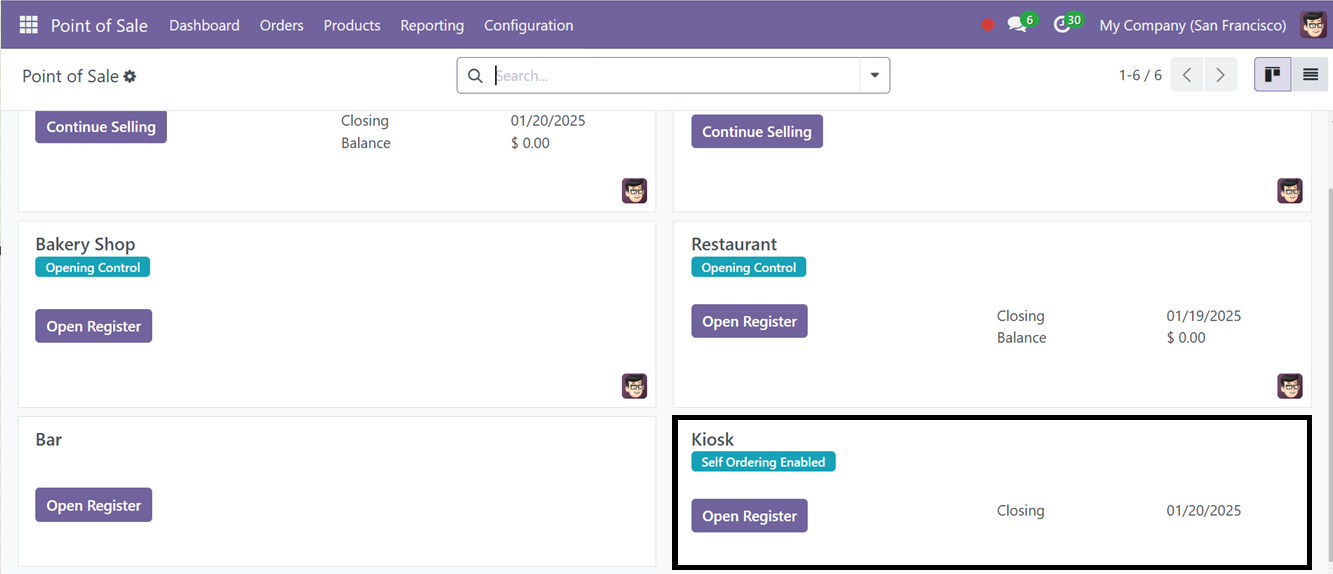
Activating this option will show an ‘Self Ordering Enabled’ feature on the kanban view of the particular shop inside the POS dashboard, allowing real-time monitoring and management of self-orders, ensuring efficient tracking of incoming orders and smooth operations during busy periods.
Then, you can open the kiosk session by clicking on the ‘Open Register’ button and providing the opening note.
The ‘Preview Web Interface’ button from the Self Ordering settings window can be used to check how the kiosk interface looks.
Then, choose the products and proceed with the ordering process.
You can choose items and place orders using the ‘Orders’ button. While using the smartphones, you can see this window as a mobile window preview.
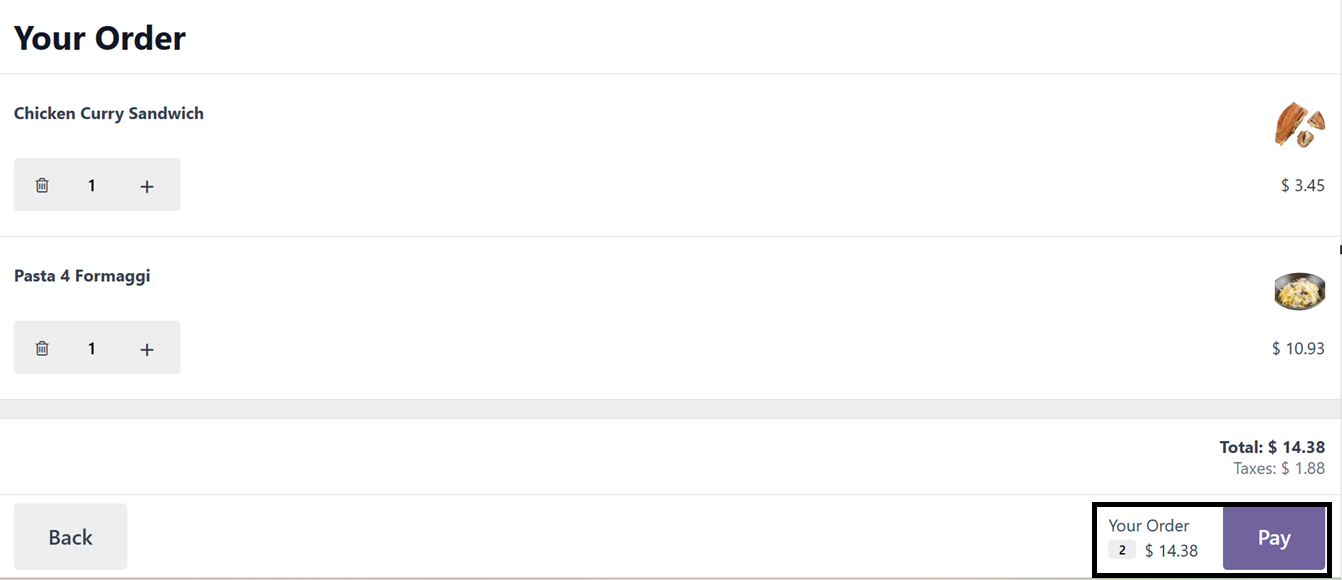
After placing orders, proceed with the ‘Pay’ button and next payment procedure using the point sales ordering methods.
Then, configure other settings as per the requirements including Floors, Tables, Eat in/Take Out and other settings specifics as per the requirements.
Managing a Restaurant Session
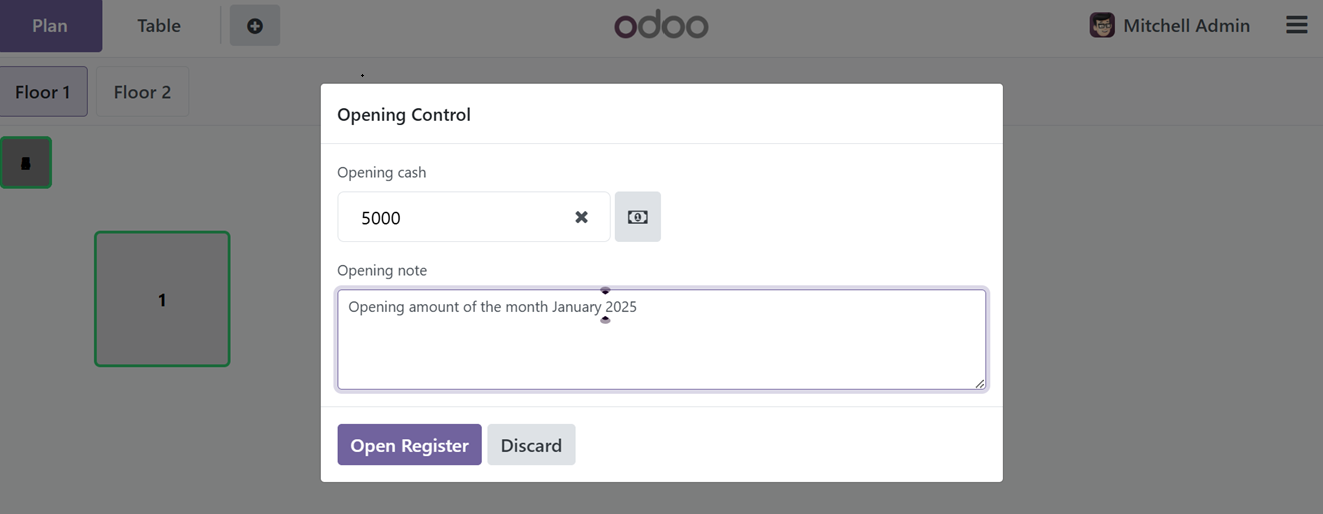
To initiate a restaurant point of sale session, follow these basic settings, then customize other configurations like Sales, Taxes, Accounting, Payment, and Pricing as per your requirements. Now, open the restaurant session from the Point of Sale dashboard.
You can start the process by clicking on the ‘Open Register’ button and this will take you to the opening control panel, where you can edit the Opening cash for the current day and a Opening note as illustrated in the screenshot below.
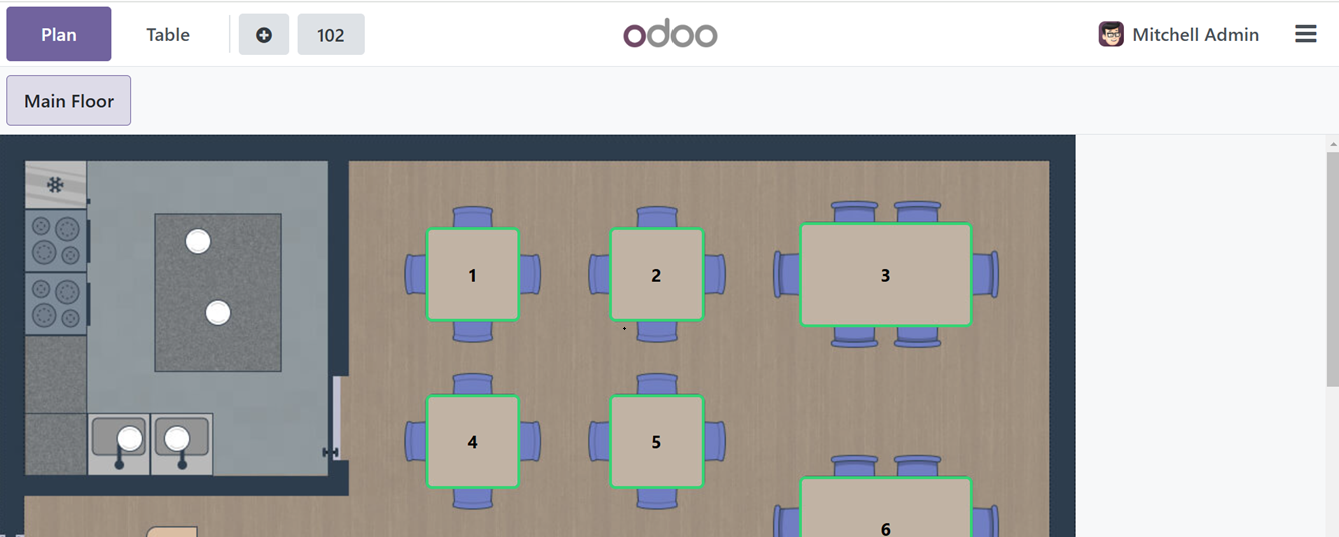
After proceeding with the ‘Open Register’ button, you will be directed to the restaurant session and it will display the floor plans as shown below.
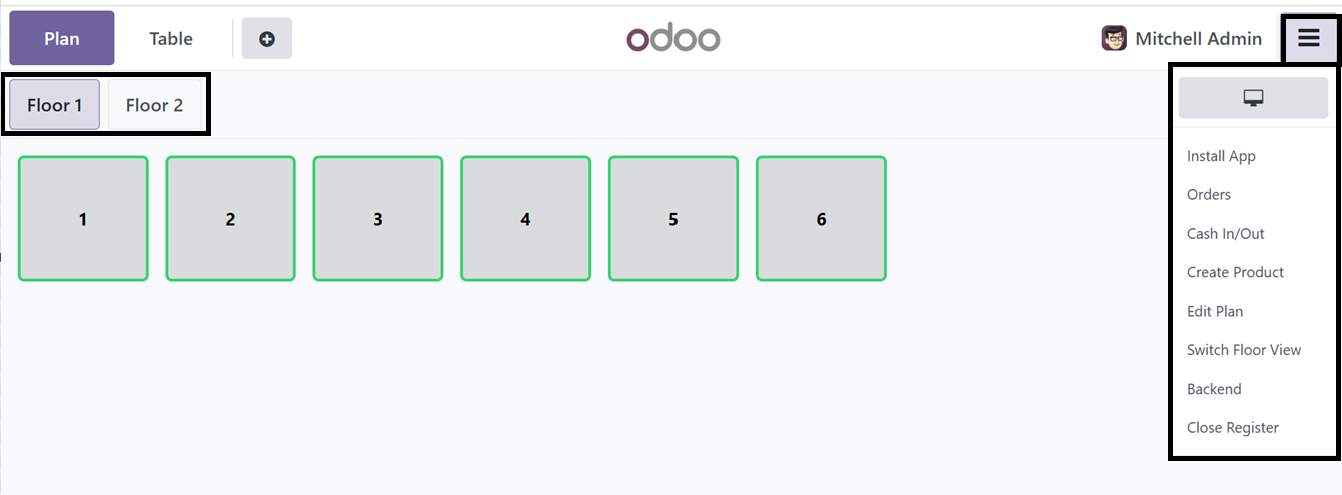
From the above screenshot, you can see the two floors and the available seats and tables. The menu icon provided at the right side of the window can be used to Edit the floor plan, Switch floor view, Close Register, go to Backend, Create Product, Go to Orders Session etc.
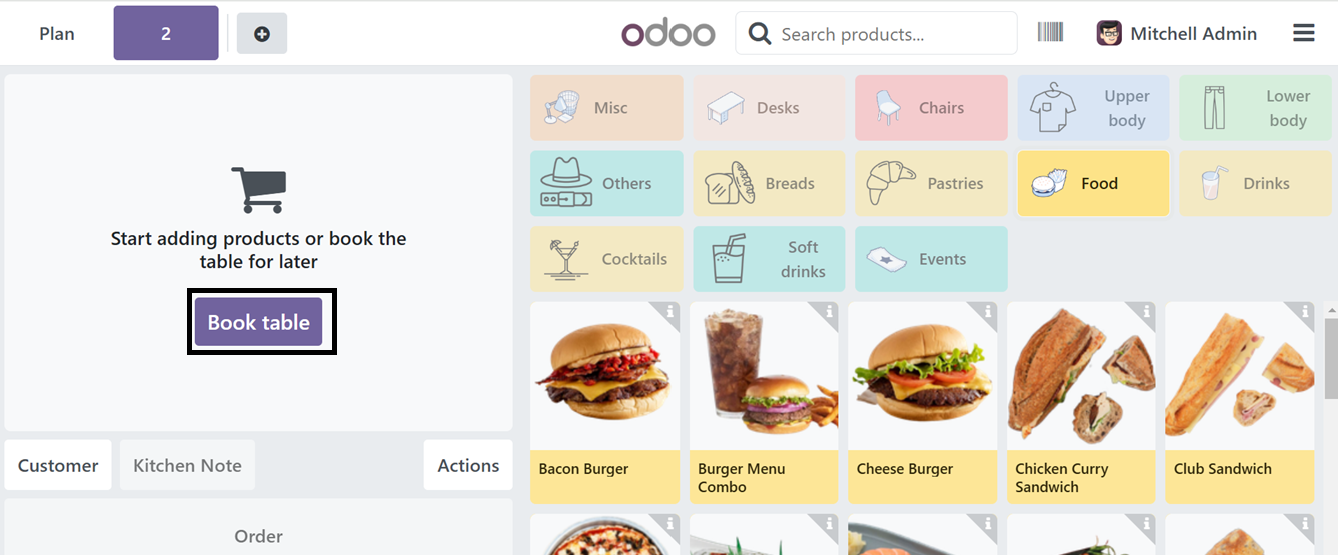
From the available floors and tables, choose the tables. Clicking on a table will take you to the restaurant session with all the products and product categories. Where, you have to book a table using the ‘Book table’ button.
Then, choose the button from the Floor and Tables window. Here, you can see the table arrangement of a floor as shown in the screenshot below.
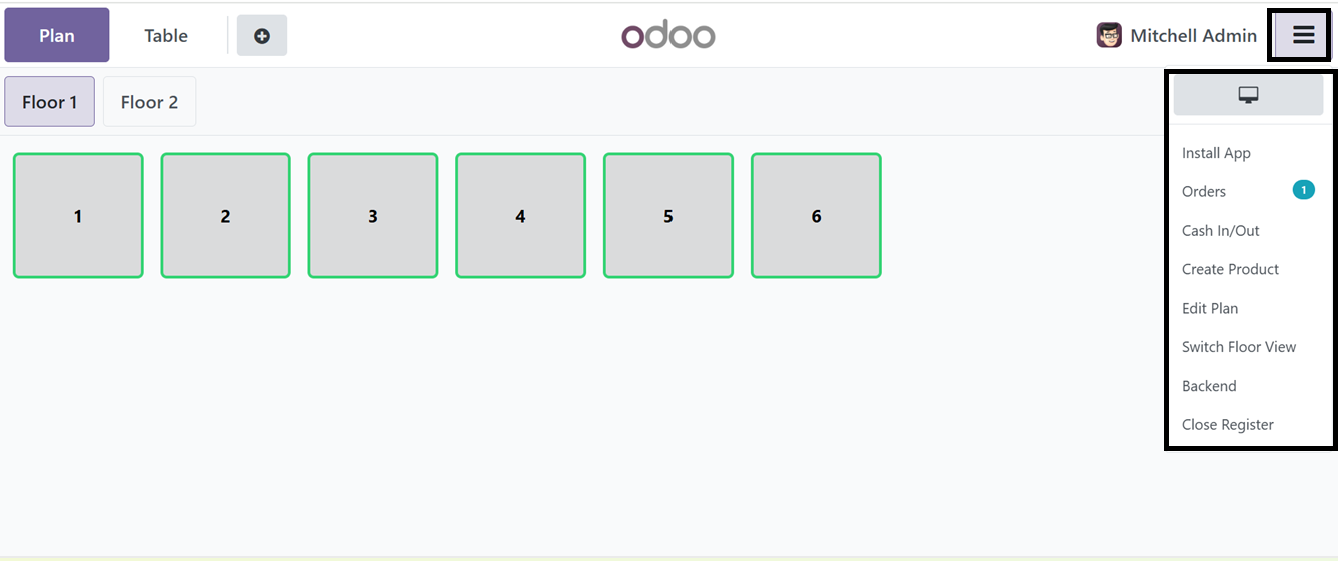
You can utilize the point of sale terminal menu to install the Restaurant application, check the order history, mention the Cash In/Out transactions, Create new sales product, edit plan, switch the table view into a floor view, go to the Point of sale backend and close the cash register using the relevant button options as depicted in the above screenshot.
Editing Floor Plans
The 'Edit Plan' option in the Odoo 18's Point of Sale module lets users alter their virtual floor plan to fit their actual layout within the Point of Sale interface, improving service effectiveness, maximizing seating capacity, and guaranteeing optimal table configurations. Clicking on this option from the point of sale terminal menu will display some editing options as shown below.
You can customize the floor background color and table colors using the 'Color' icon. In this instance, the floor color has been modified, and a specific table has been selected and recolored accordingly.
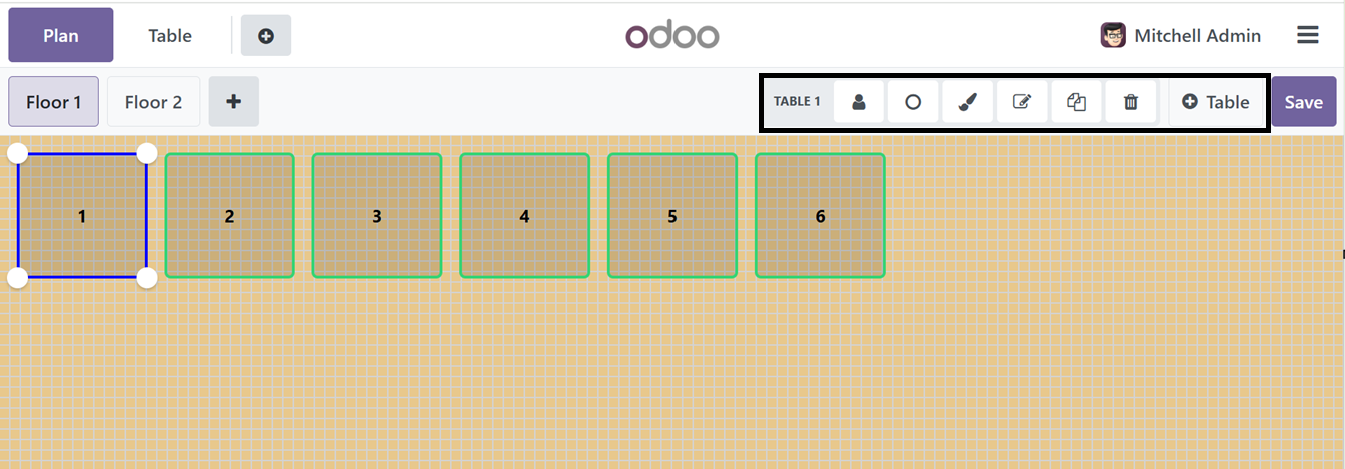
After selecting a table, you can edit the table specifics including modifying the Seat capacity, Changing the table shape, Coloring the table, Renaming the table name, Copying the exact table and Delete tables using the Seatings, Shape, Color, Rename, Clone and Delete icons provided at the upper right corner of the window respectively. Adding new tables is also quickly done through the ‘+Table’ button. Once the Floor and Table Plan has been edited, save the plan using the ‘Save’ button.
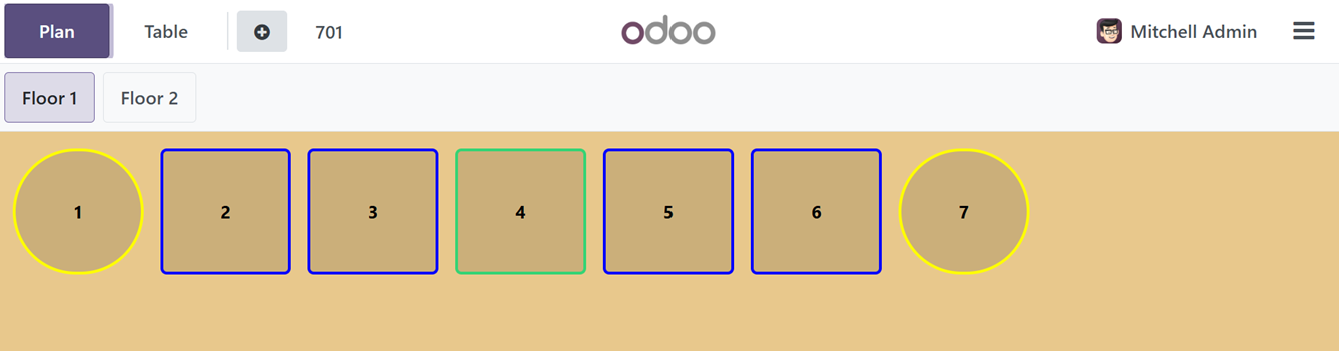
After saving the plan, you can see the final floor and table arrangement plan as illustrated in the above screenshot and proceed with the sales process. This feature can be utilized at any time based on operational requirements.
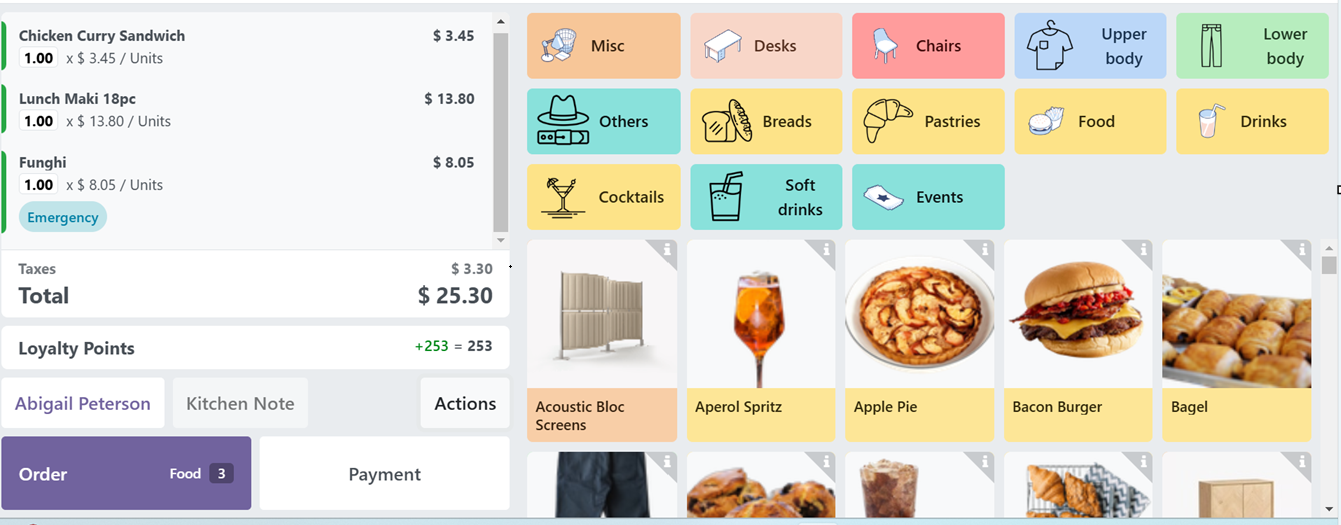
Then, choose the products from the catalog as per the requirement. This will display the detailed options at the left side of the screen.
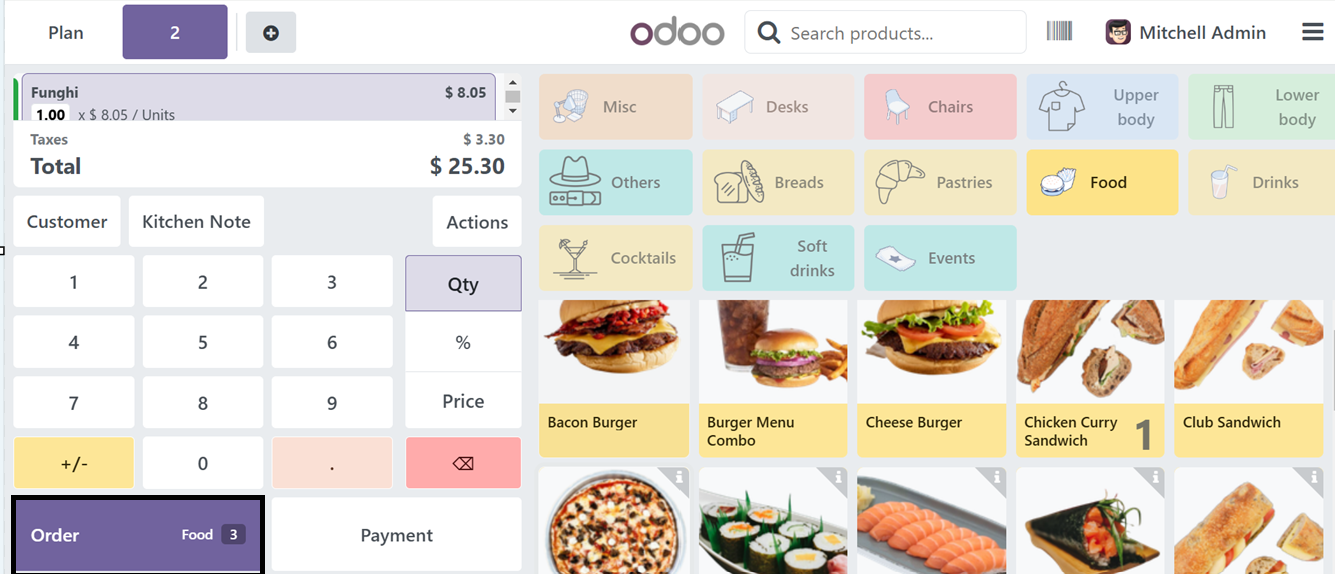
Here, you can see the total bill amount with the tax rates under the ‘Total’ section. Then, provide the customer name using the ‘Customer’ button. This will display the list of previous customers.
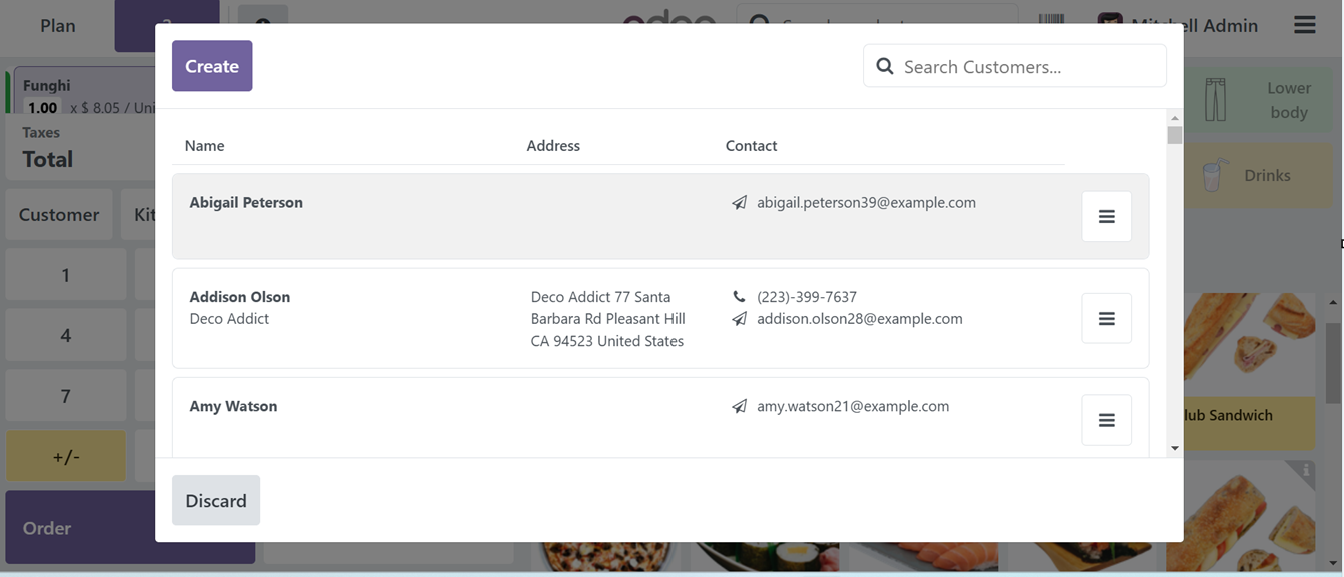
After choosing a customer name it will display inside the sales session window. Then you can add any notes to the kitchen members using the ‘Kitchen Note’ button. This will trigger another pop-up where you can edit the message or notes regarding the dishes or orders.
It is also possible to choose from the available kitchen notes for a quick process. So, we can choose an ‘Emergency’ note, as shown below.
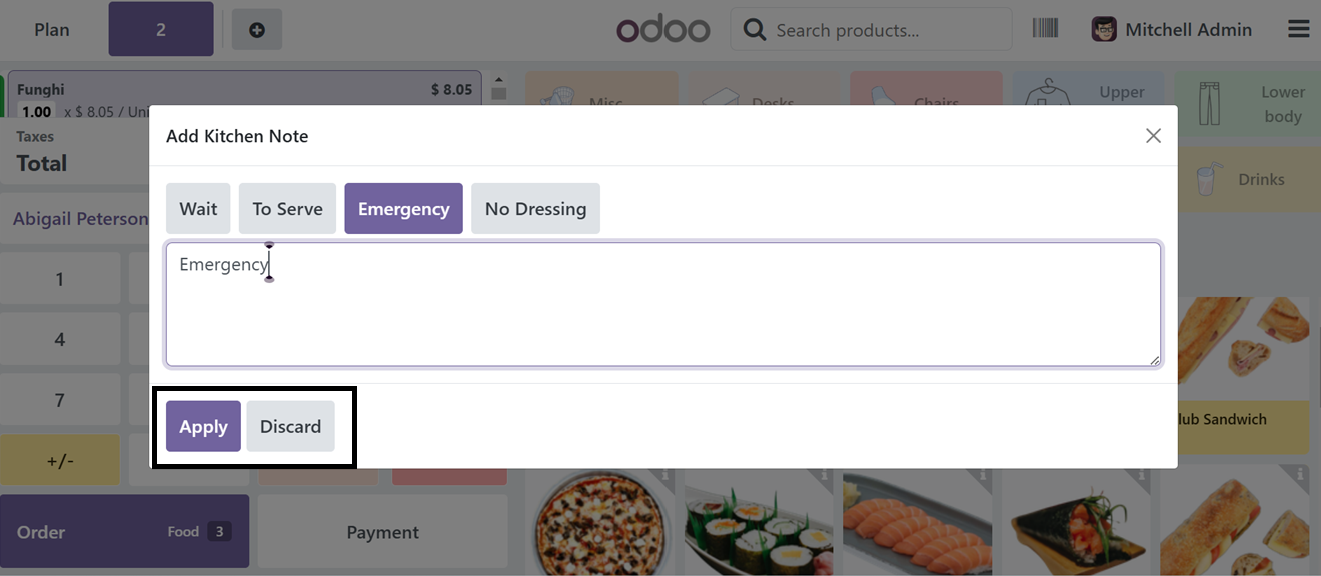
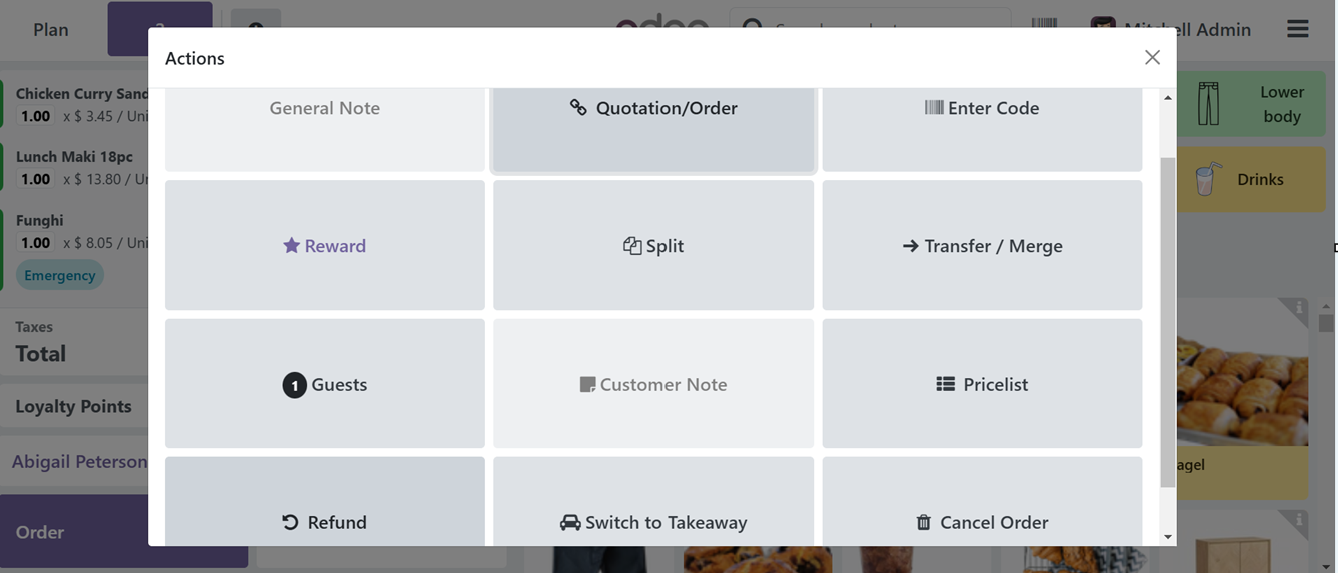
After applying the note using the ‘Apply’ button, you can utilize the ‘Action’ button of the main window to perform certain actions including adding General Note, Quotation/Order, Split Bills, Enter Promotion/Discount Codes, Check Rewards, Transfer/ Merge Orders, Customer Note, Pricelists, Refund, Switch to Takeaway Order and Cancel Orders using the irrespective button options as shown in the screenshot given below.
After selecting the products and adding any coupons or editing actions, you can confirm the order using the ‘Order’ button from the sales window.
This action will complete the order process and after getting the products, you can make payments using the ‘Payment’ button. Immediately after pressing the ‘Payment’ button, you will be taken to a payment window where you have to select the payment method from the available options.
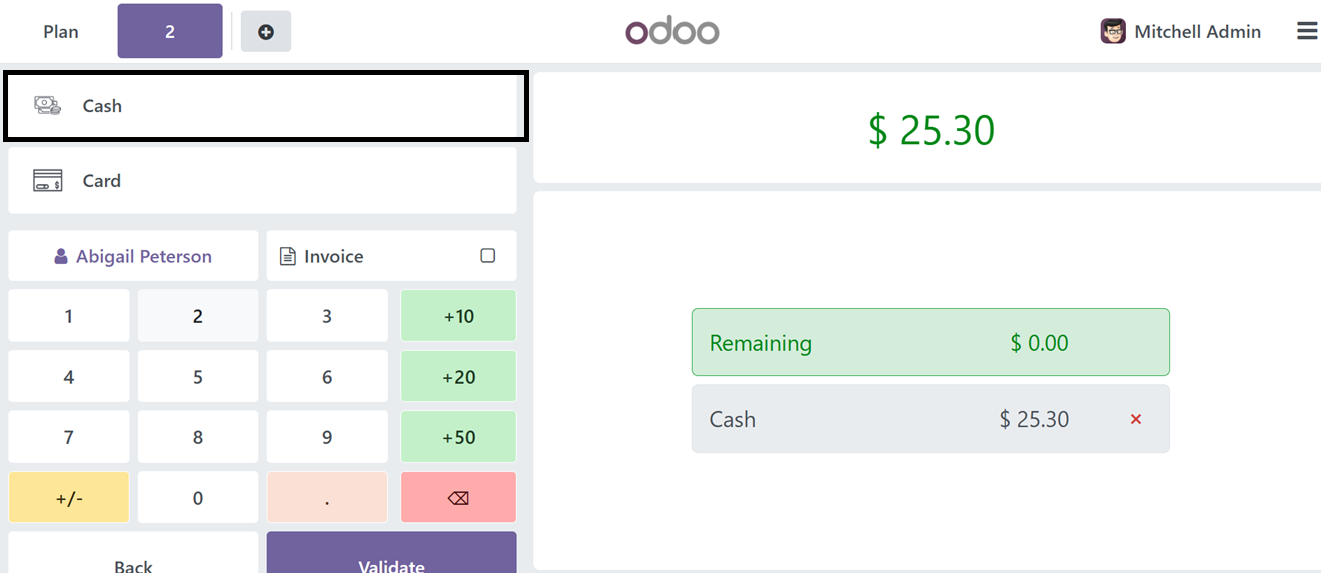
In this scenario, we have selected the ‘Cash’ payment method and it will be displayed on the screen. Then you can add a tip to the payment using the ‘+amount’ buttons. Here, you can choose from the +10,+20 and +50 tip amounts. Finally, validate the payment using the ‘Validate’ button.
After validating the payment, you can see the payment completion window with an invoice receipt preview as shown in the screenshot below.
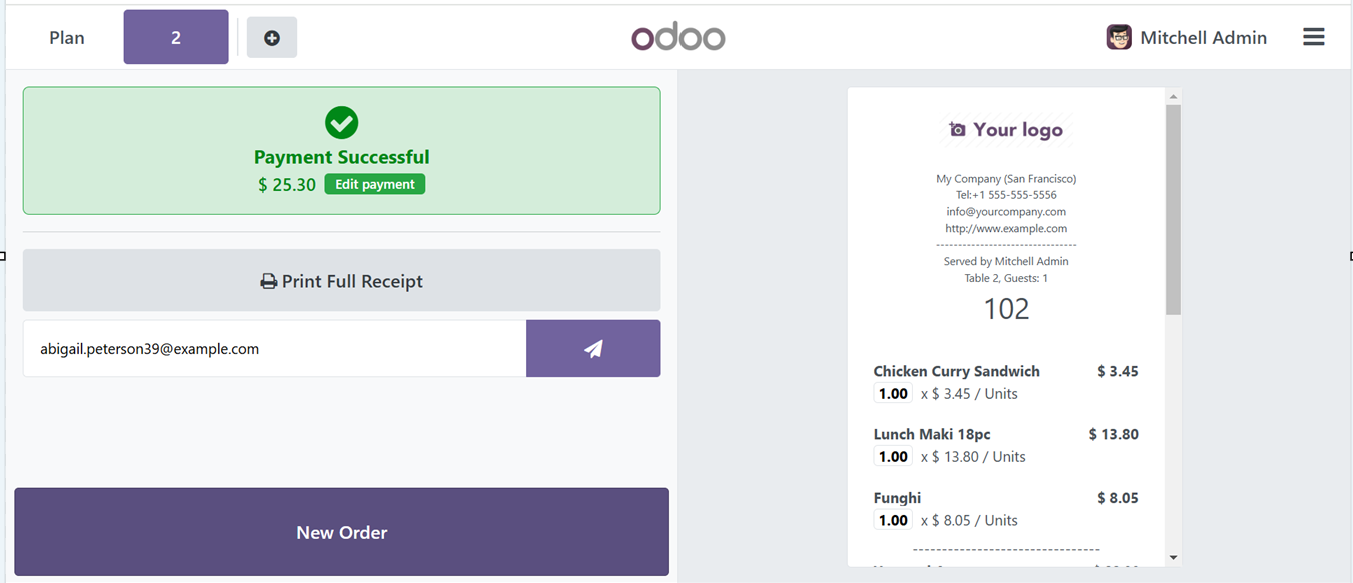
The ‘Print Full Receipt' button can be used to print the detailed bill or you can send the bill using the send icon provided next to the customers mail address area. Finally, you can create a fresh new order using the ‘New Order’ button. Then, you can utilize the ‘Close Register’ option from the Point of Sales terminal menu to close the cash register.
Odoo 18's Point of Sale (POS) and Restaurant Module provide a comprehensive solution for retail and hospitality operations. The POS module offers multi-payment options, real-time inventory updates, customer loyalty programs, and offline functionality. The Restaurant module enhances dining experiences with table management, order routing, tipping, and course-based preparation. By offering a comprehensive, integrated solution, Odoo 18's Point of Sale and Restaurant modules help businesses modernize their operations and stay competitive in a fast-paced market.