The "Products" menu is available in the main window of the module, displaying a catalog of various products that can be used for retail within the company. The product list is shown in Kanban view with some important product details including the Product Reference Code, Price, Quantity On Hand etc.
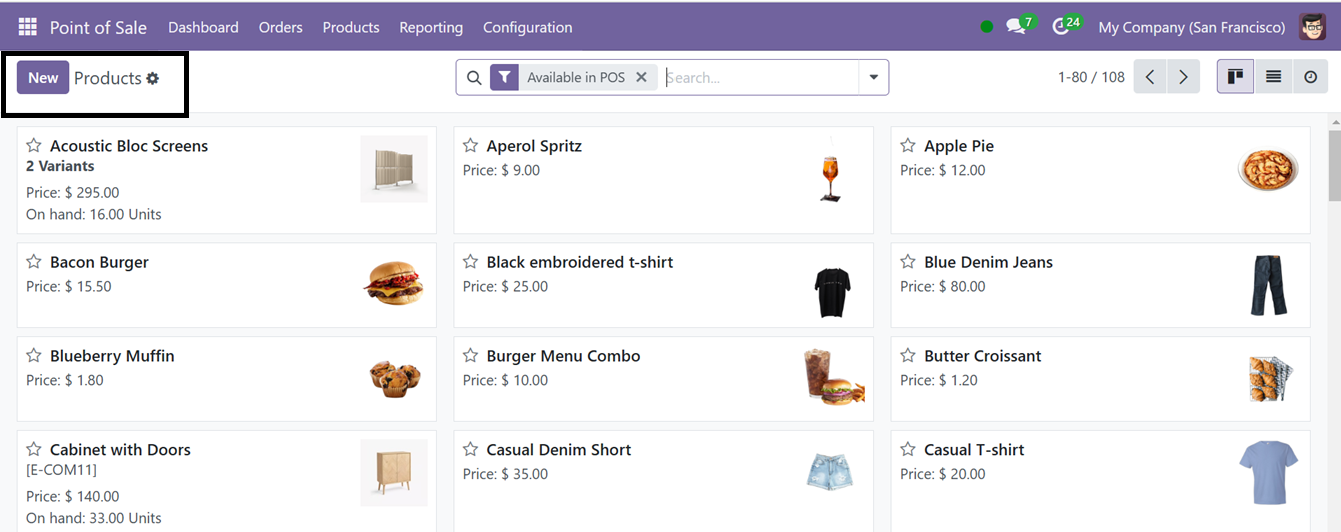
Here, you have the option to switch to List view and by selecting a product, you can view more detailed information about it in a form view. You can use the "Filters" and "Group By" options to sort products based on specific criteria, making it easier to organize them according to your preferences. In this section, we will explore the process of creating a new product.
The procedure for adding a product is similar to the one we are using in the purchasing module. To create a new product, click the "New" icon. Start by entering the product name in the designated field, and you can also upload an image of the product.
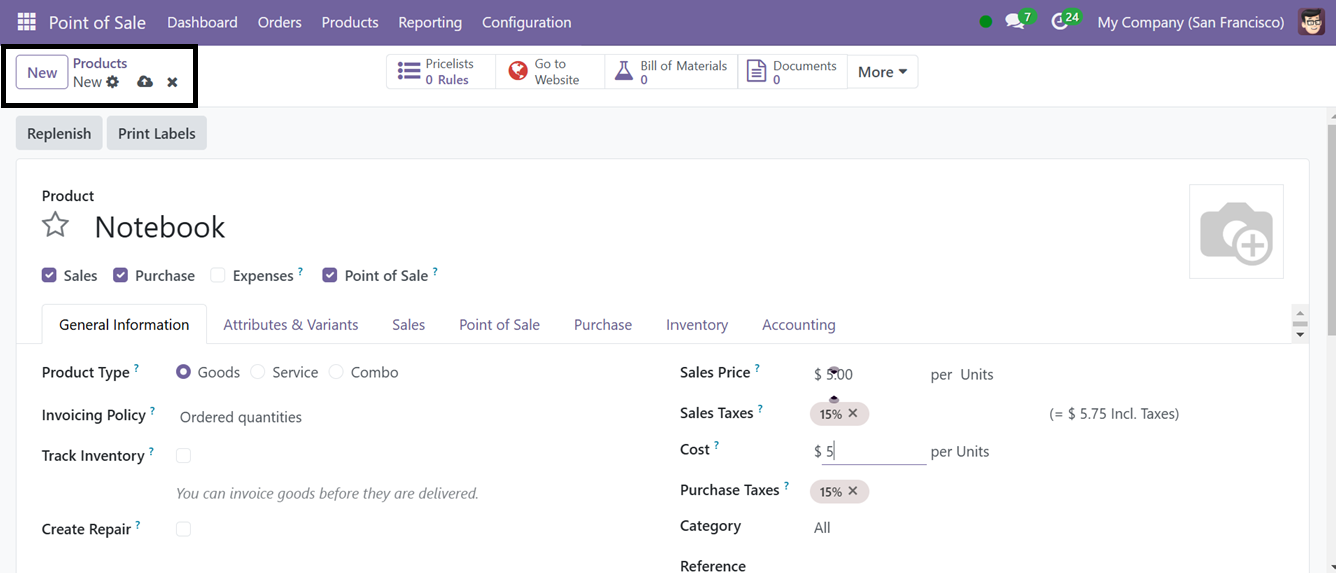
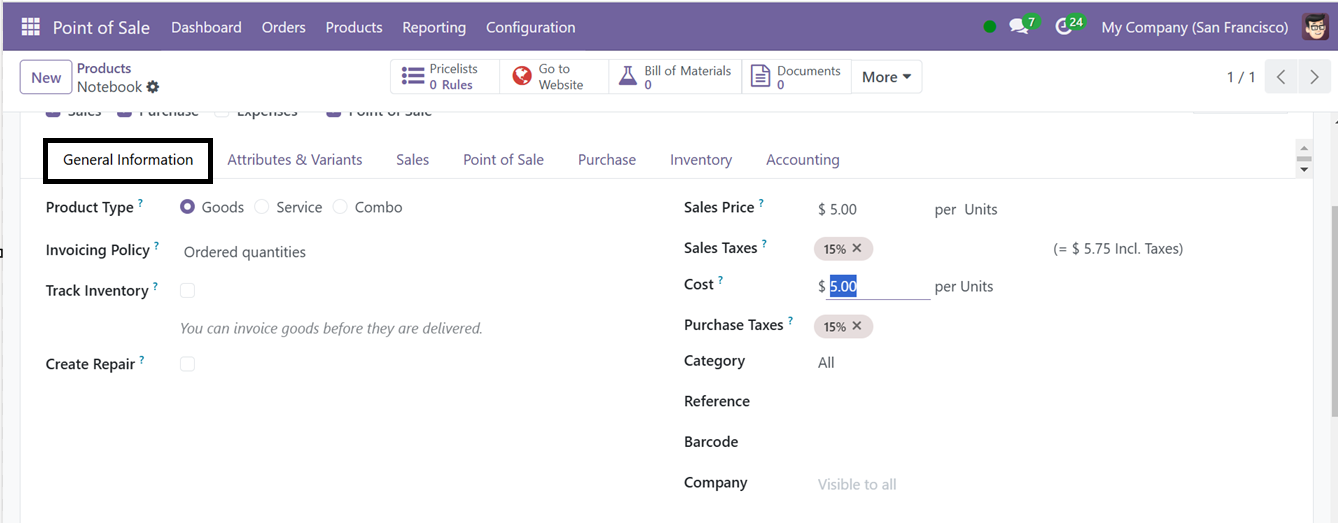
You can specify whether the product is for purchase or sale. Under the "General Information" tab, additional details such as product type, invoicing policy, delivered or ordered quantities, units of measure, sales price, customer tax, cost, product category, Reference, barcode, and company can be filled in. There is also an option to add an internal product note in the provided section.
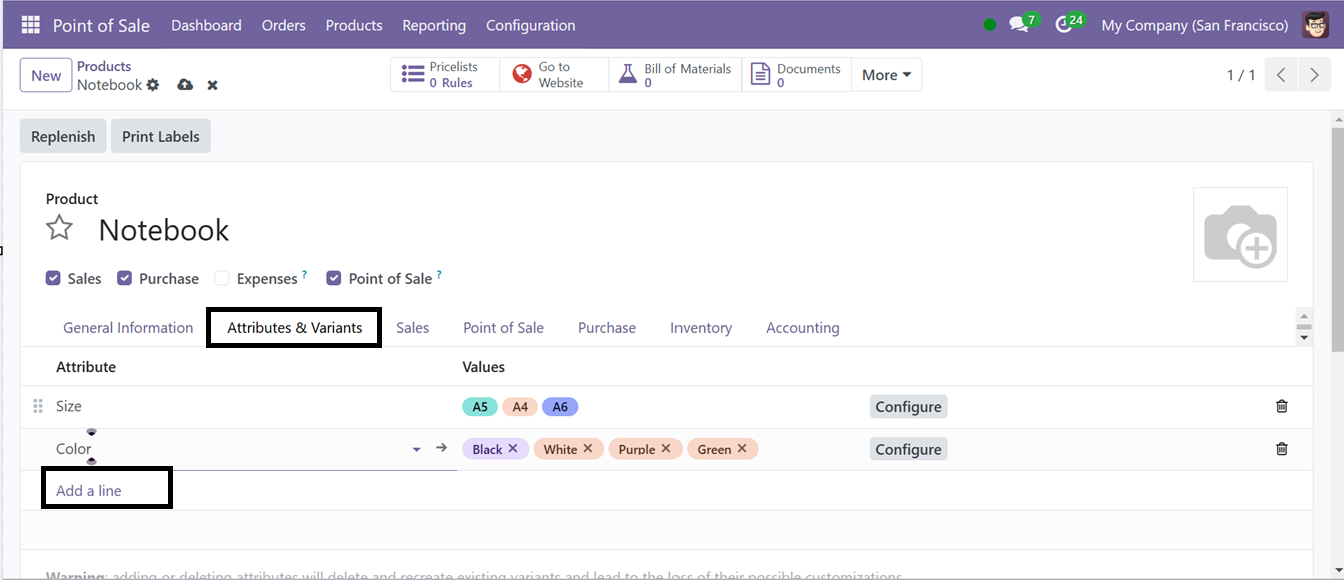
Under the "Attributes and Variants" tab, you can add other product variations by using the "Add a line" option, displaying different properties and values.
The "Sales" tab contains information on upsells and cross-sells, points of sale, additional product media, sales descriptions, eCommerce shops, and sales warning options. You can specify optional, supplemental, and alternative products for upsell and cross-sell sections.

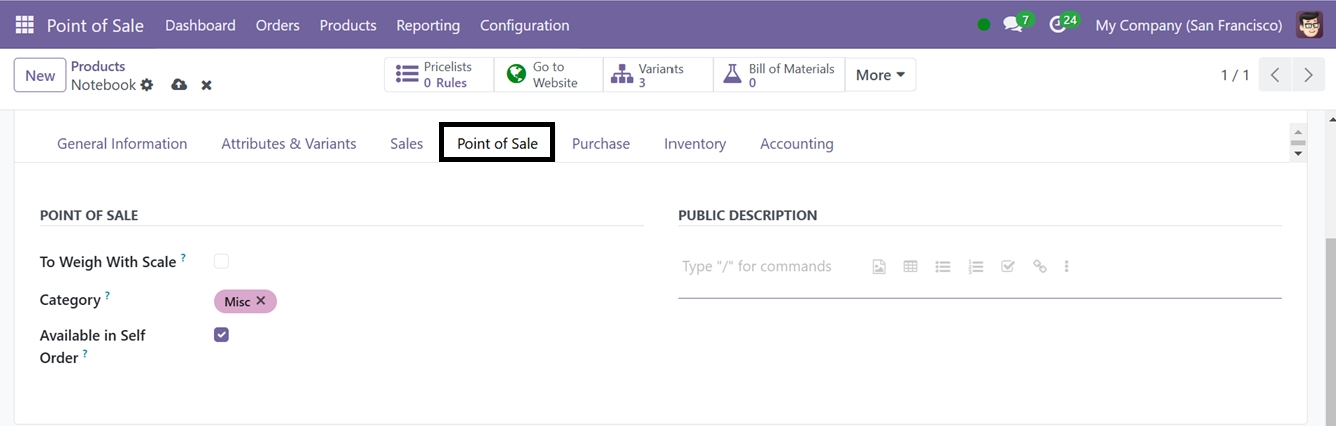
For Point of Sale (PoS), you can select the display options, PoS product categories, available in self order, and specific settings related to PoS. Under the eCommerce option, you can define the categories and websites for publishing the product. You can also add media such as images or videos and write a brief sales description for the product.
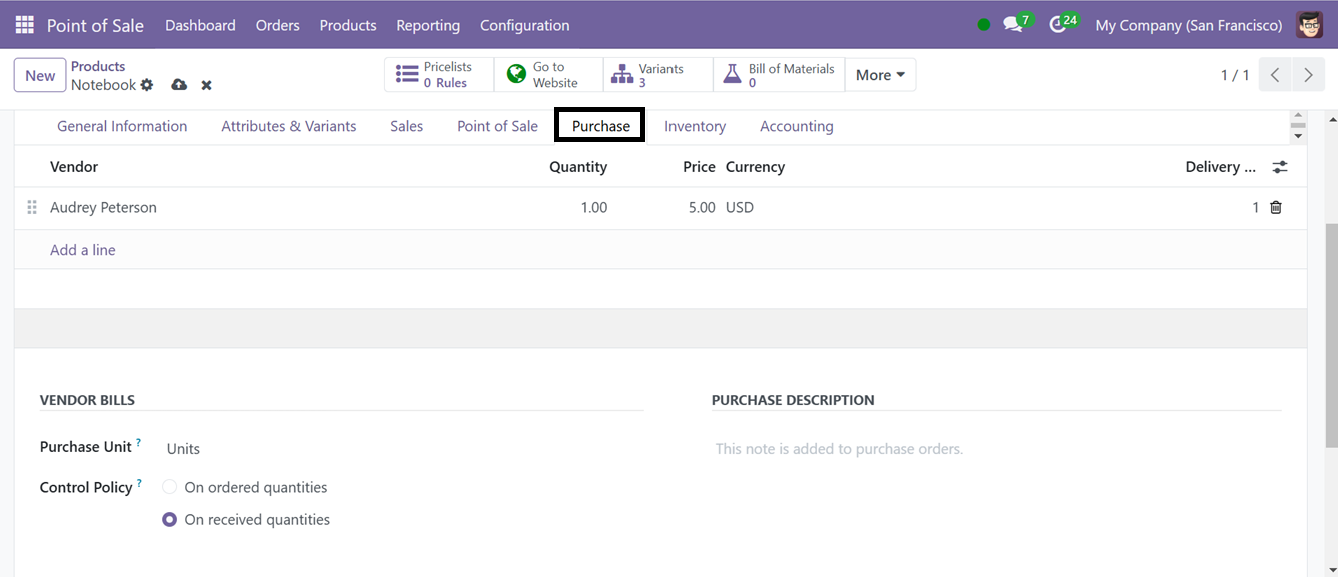
In the "Purchase" tab, you can add vendors easily by using the "Add a Line" option. Specify details such as vendor, currency, price, and delivery lead time. Vendor taxes and control policies can be provided under the "Vendor Bills" option, along with a brief description of the product purchase.
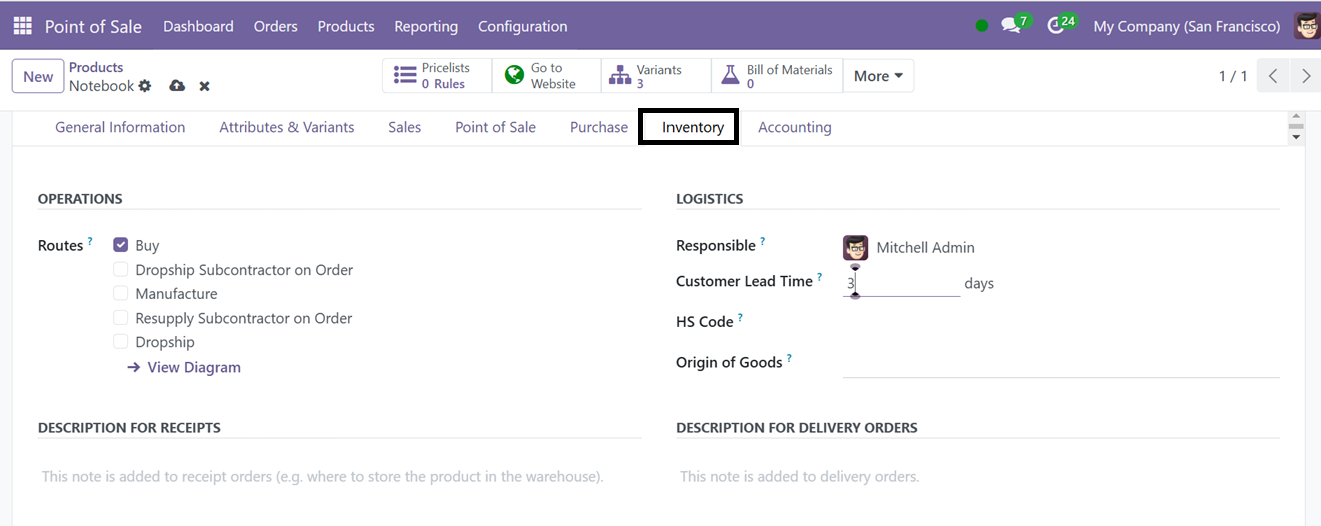
The "Inventory" tab lists operational routes, including options like buy, repair, manufacture, restock, subcontract on order, and dropship. You can view logistics details such as responsible officers for inventory, weight, volume, lead times, HS codes, and origin of goods. Customer lead time refers to the requested delivery time off while manufacturing lead time is the time it takes to produce a product. You can also set production and inventory locations and provide descriptions for delivery orders, internal transfers, and receipts.
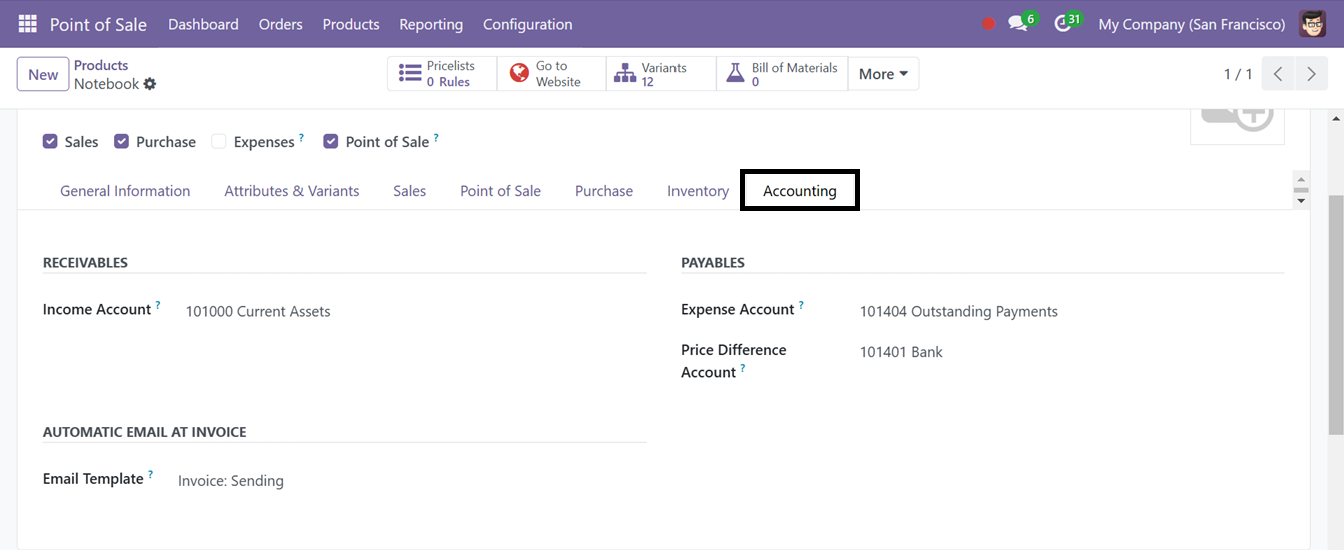
Under the "Accounting" tab, the ‘RECIEVABLES’ section allows you to reference the income account, while the ‘PAYABLES’ section enables you to set expense and price difference accounts. You can also add an email template for automated invoicing emails in the ‘AUTOMATIC EMAIL AT INVOICE’ area. Finally, click the "Save" icon to add the product to the list.
After saving the product data. Now, the new product will be available to sell in the Point of Sale sessions. Then you can configure and check more details about the product from the Pricelists, Go to Website, Variants, Bill of Materials, Documents, Putaway Rules and other tabs from the smart tab sections.
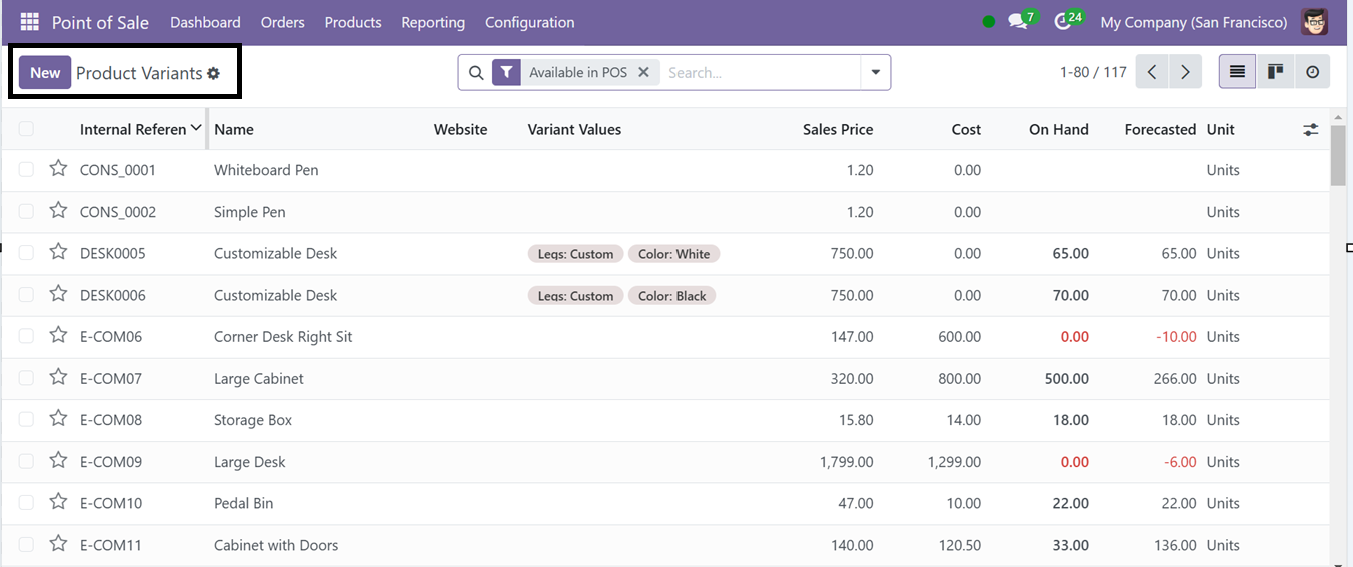
Product Variants
The Point of Sale module in Odoo 18 simplifies product variant configuration. Accessed from the ’Products Variants’ section of the "Products" menu, it provides a list of previously created variants, including internal reference, product name, website, variation values, sales price, cost, quantity on hand, anticipated quantity, and units of measurement, enabling easy management and overview.
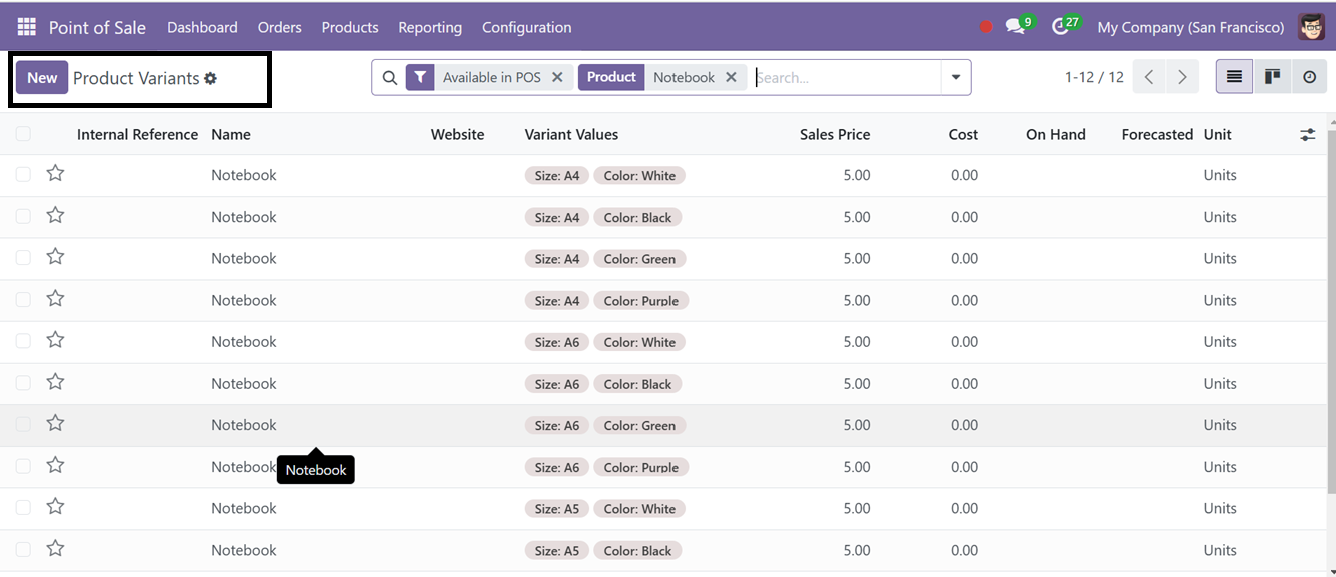
Then, you can see the different product variant options available for the previously created product ‘Notebook’ with different size and color options from this ‘Product Variants’ dashboard. You can categorize product variants using the "Group By" and customizable filter options, as shown below.
Then,you can check how this product and its variants appear on a Point of sales session by opening a shop session and choosing the product ‘Notebook’ from the product catalog. Immediately after clicking on the product, an attribute selection window will be displayed as shown below.
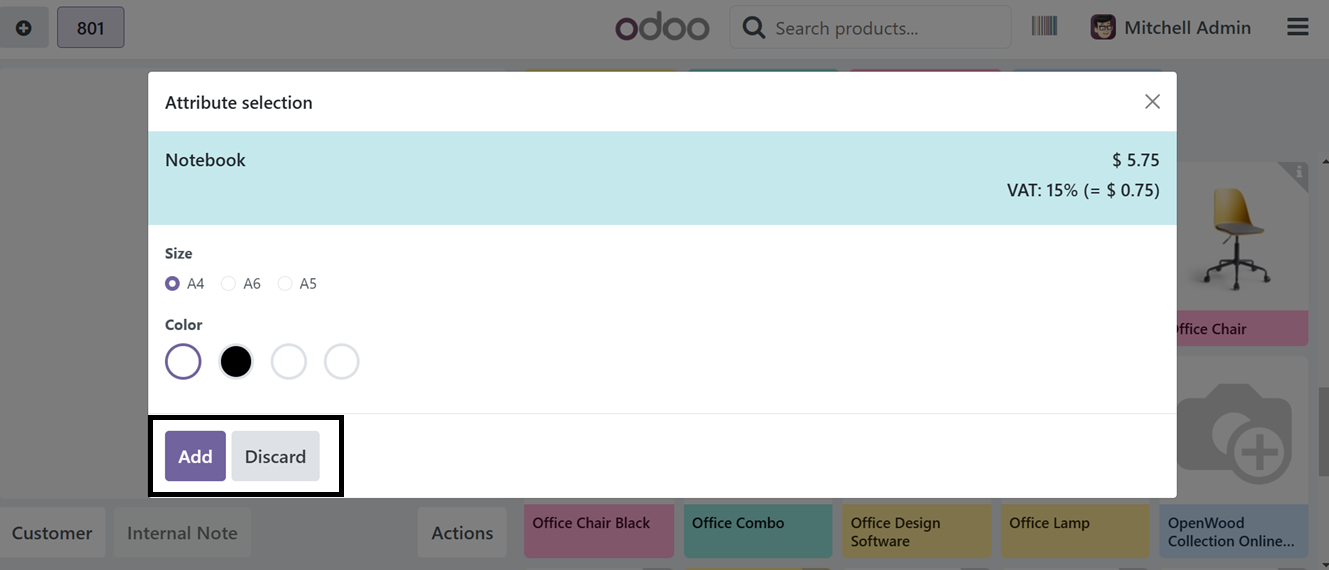
According to your needs, you can select the product in a range of sizes and colors here, then click the "Add" button to continue.
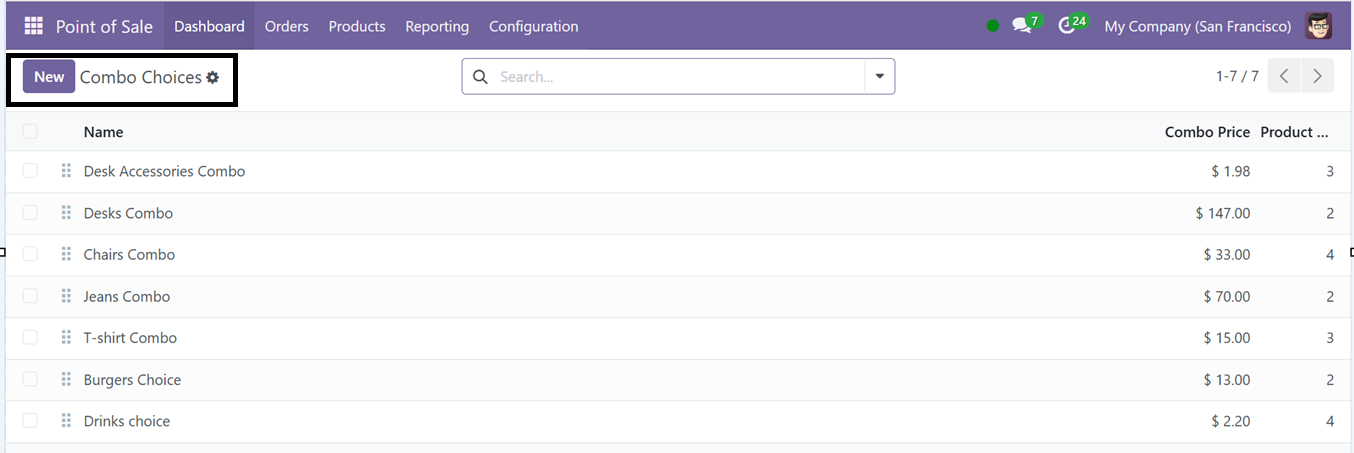
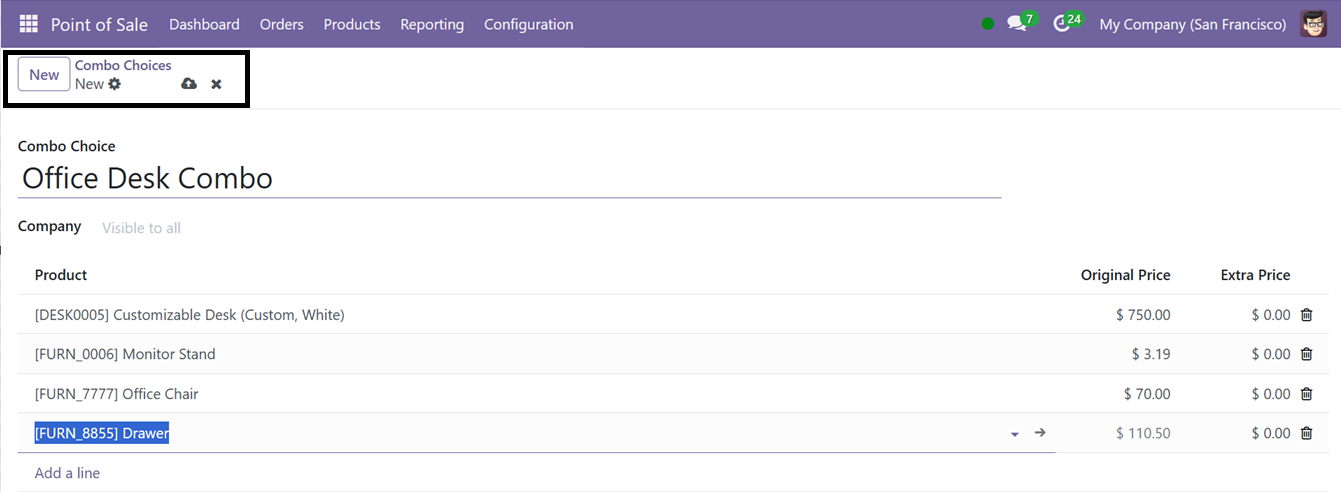
Combo Choices
Odoo 18 enables the creation of product combos in point-of-sale (PoS) sessions. To do so, navigate to the "Combo Choices" option under the "Products" tab. This section displays combo names, product prices, and product numbers.
To create a new combo, click the "New" button, enter the combo name, select products, and set prices.
Price Lists
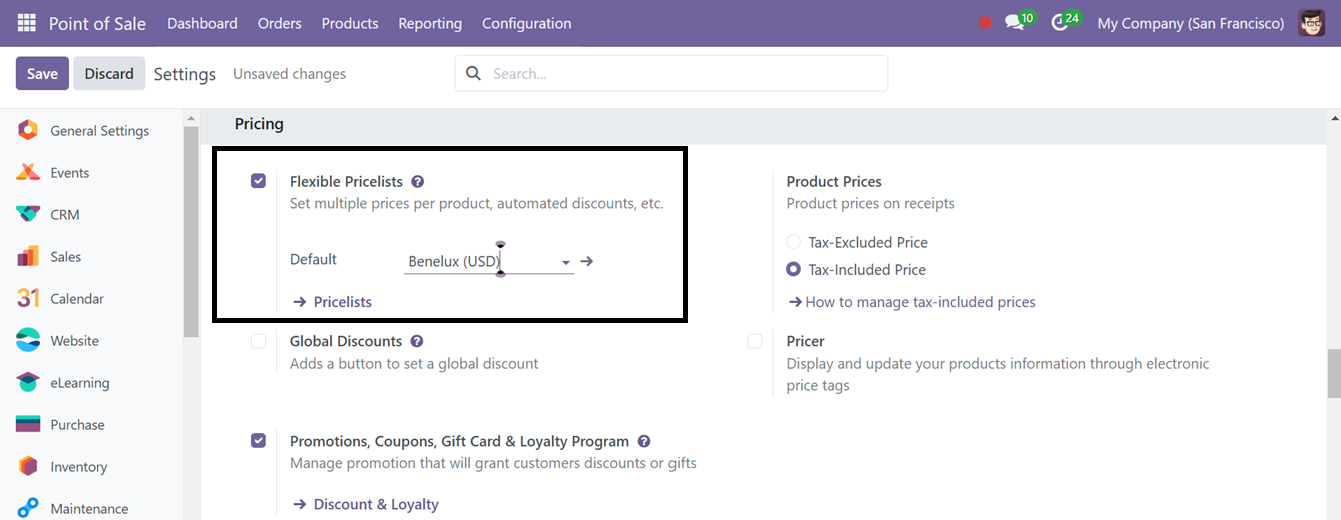
Prices or pricing recommendations based on predetermined criteria might be included in a bespoke price list that is made for a particular customer. This option can be done through the ‘Pricelists’ section of the ‘Products’ menu.
To avail of this feature on the Products menu, you have to turn on the ‘Flexible Pricelists’ option from the Pricing tab of the Odoo point of sales’s configuration Settings window as you can see from the screenshot given below.
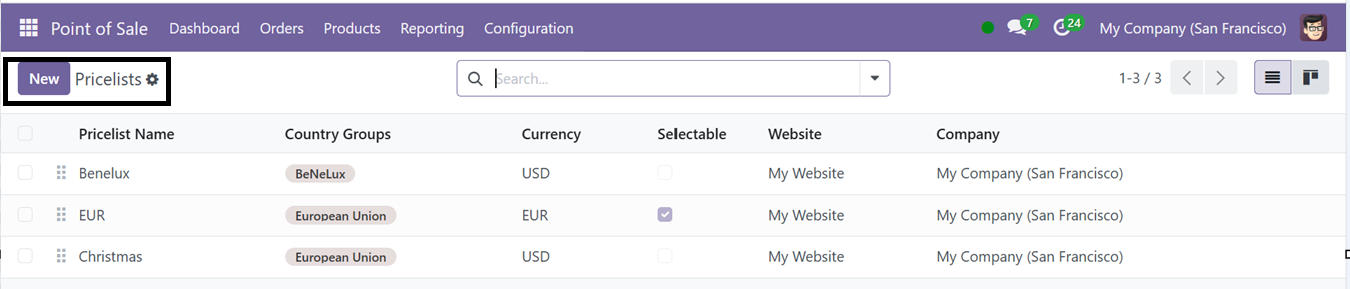
After it is active, the Pricelists option will appear under this field, you can create a new pricelist by clicking on this link or going to the ‘Pricelists’ section from the Products menu. So opening this will show the different pricelists on a dashboard with the Pricelist Name, Country Groups, Currency, Website, and Company as shown below.
This page allows you to switch to the Kanban view. The ‘New’ button can be used to generate a new pricing list. To create a new price list, enter the name in the designated field. You will also need to specify the Company, Currency, and supported Country Groups.

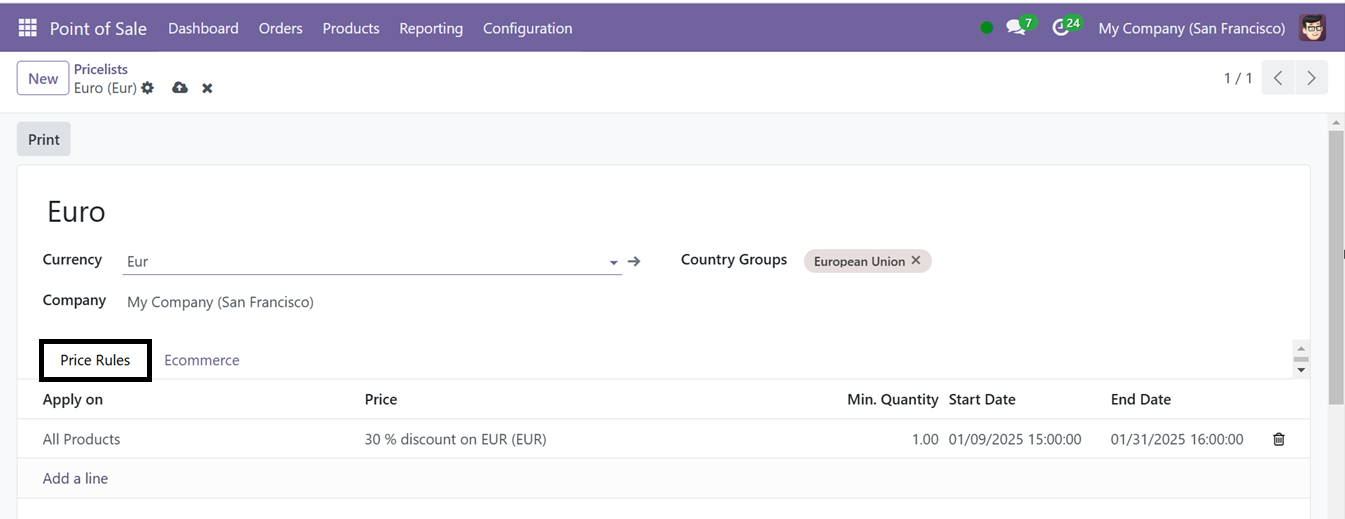
In the Price Rules tab, use the Add a Line option to define pricing rules. This will open a new pop-up window as illustrated below.
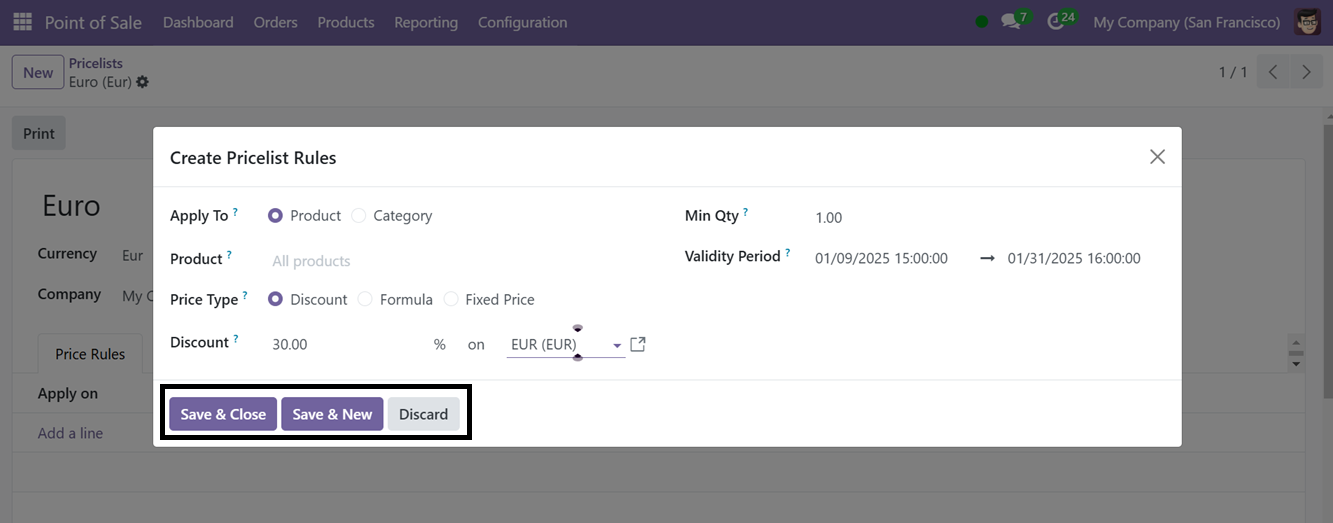
You can provide the products or categories that come under this price list in the ‘Apply To’ field. Then mention the ‘Products’, ‘Price Type’, ‘Discount,’ ‘Minimum Quantity’ and Validity Period’ to get these price list benefits and save the data.
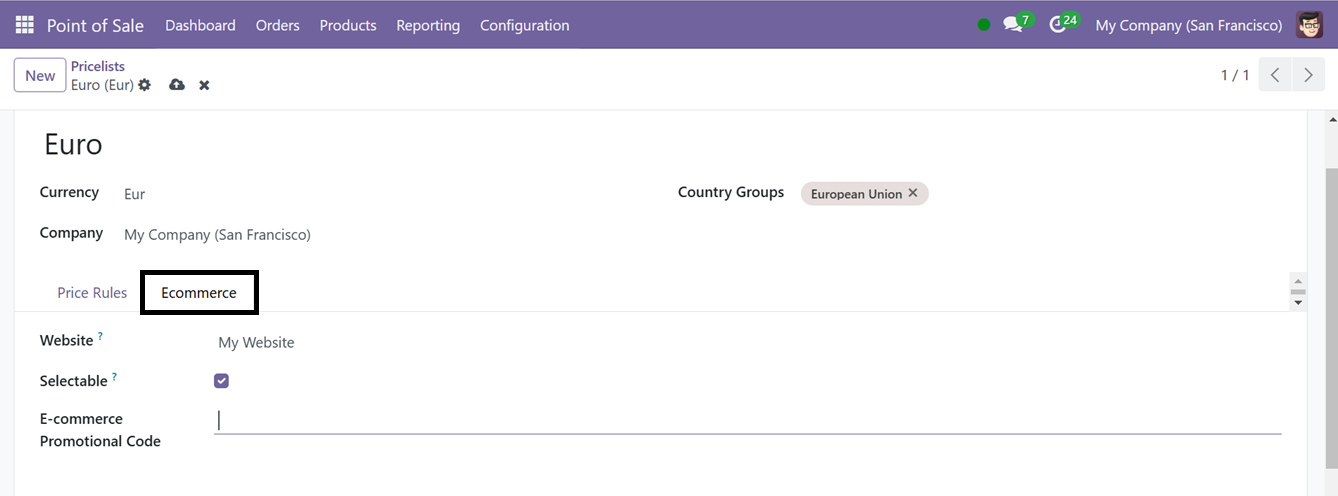
The pricing list's accessibility under the E-commerce tab can be used to mention the ‘Website’ that allows this pricelist feature in the e-commerce website. Users can pick this pricing list by turning on the ‘Selectable’ option. The ‘E-commerce promotional code’ option allows for the configuration of promotional codes for the eCommerce website.
Once the procedure is completed, click the Save icon to add the price list to the current list. You can also set various pricelist options including the Available and Default Pricelists from the ‘Pricing’ section of the Settings window.
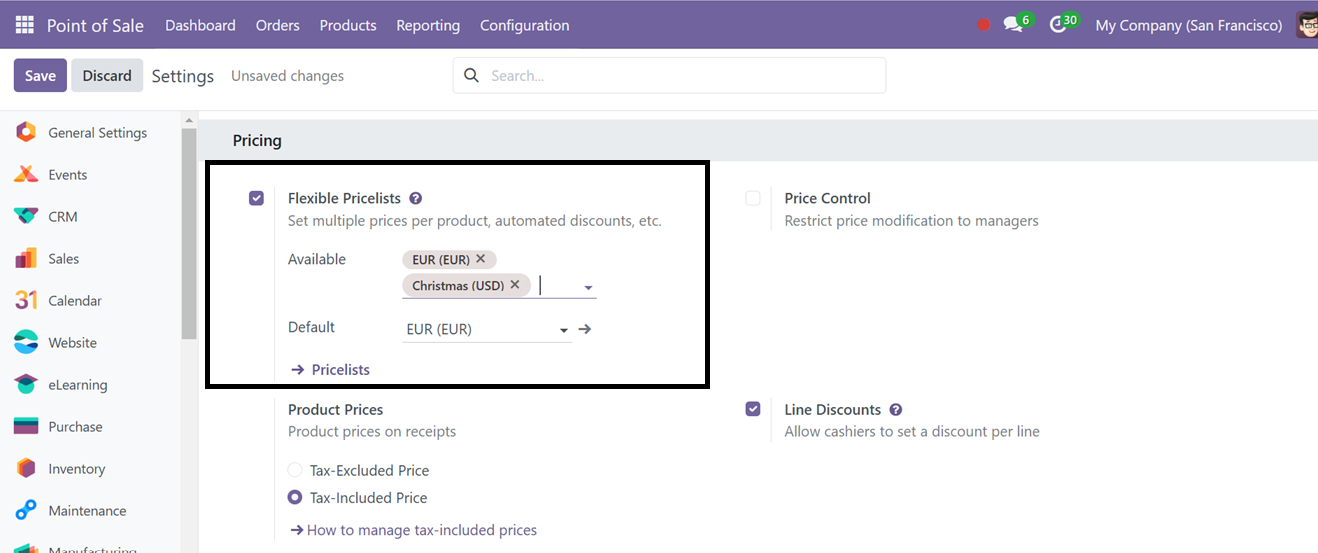
● Available Pricelists: These are the price lists that can be created for different customers or conditions. Users can choose these price lists based on factors like customer-specific prices, discounts, time of day/week changes, and geographical pricing.
● Default Pricelists: The Default pricelist is the baseline price list for all products in the system.
Then, open a Point of Sale shop session to check this functionality and choose the required product from the sales interface as illustrated in the screenshot below.
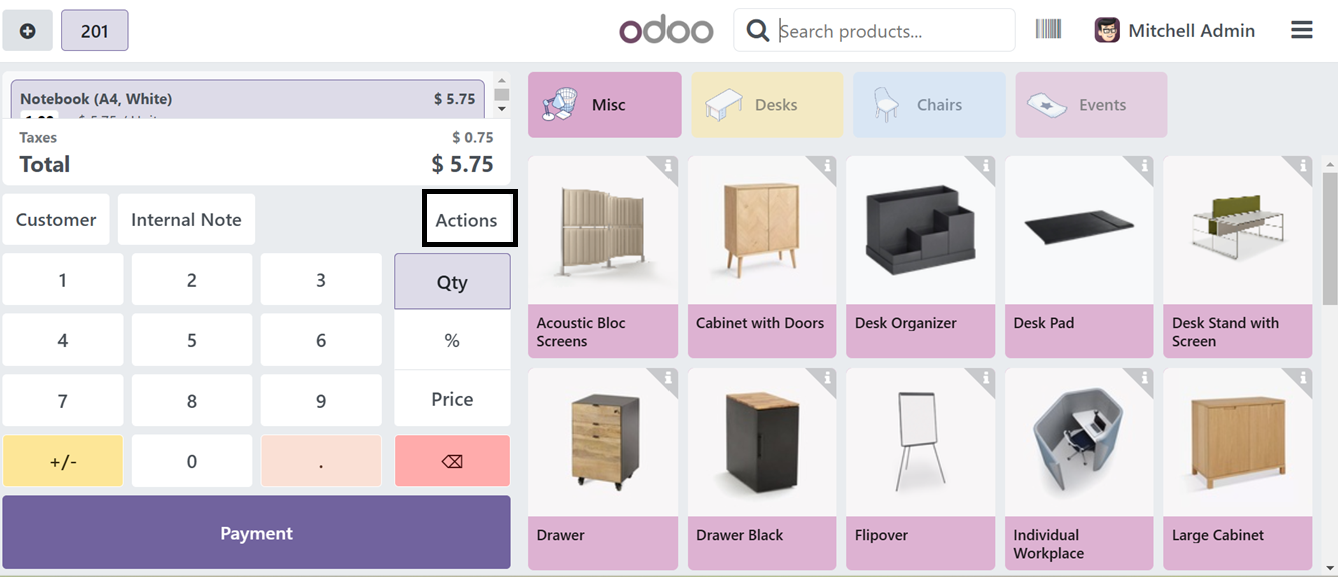
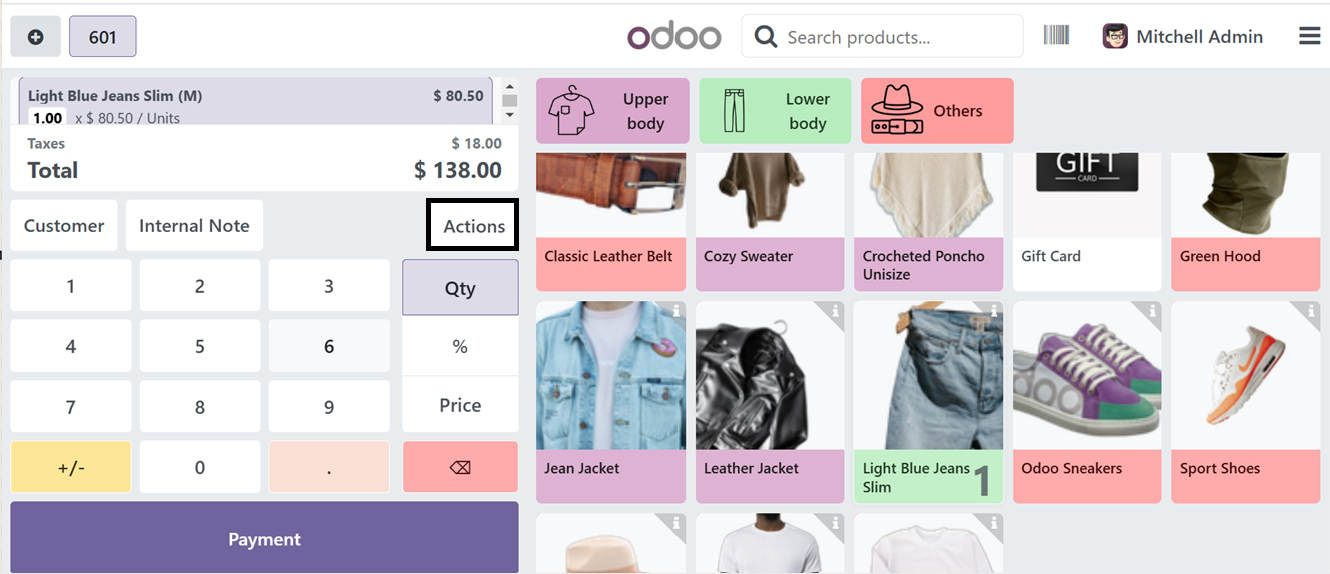
After choosing the products, you can check or apply price lists for this particular product using the ‘Actions’ button. Clicking on this button will open an action options window that can be used to apply or perform various actions including Enter promotional &discount codes, Cancel Orders, Quotations/Orders, Taxes, Refunds, Pricelists etc.
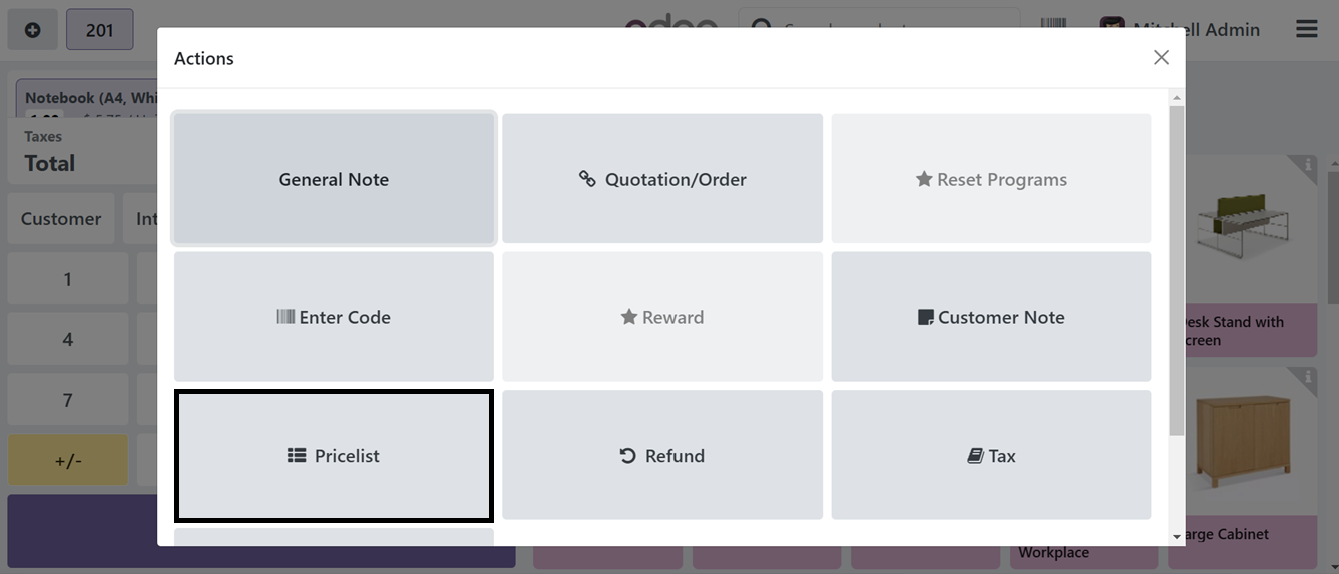
Click on the ‘Pricelist’ button to choose the available pricelist options. You can see the ‘Default Pricelist’ as well as the available options in a pop-up window, as highlighted in the screenshot below.
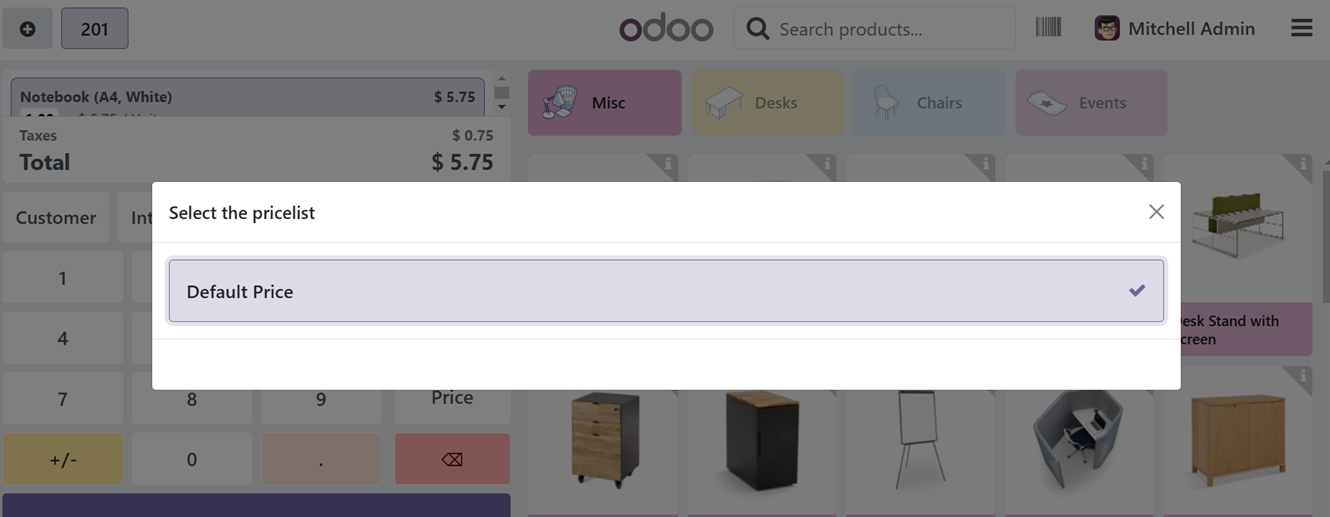
After choosing the price list, go back to the Point of Sales session and proceed with the next actions and payment procedure.
Discount and Loyalty
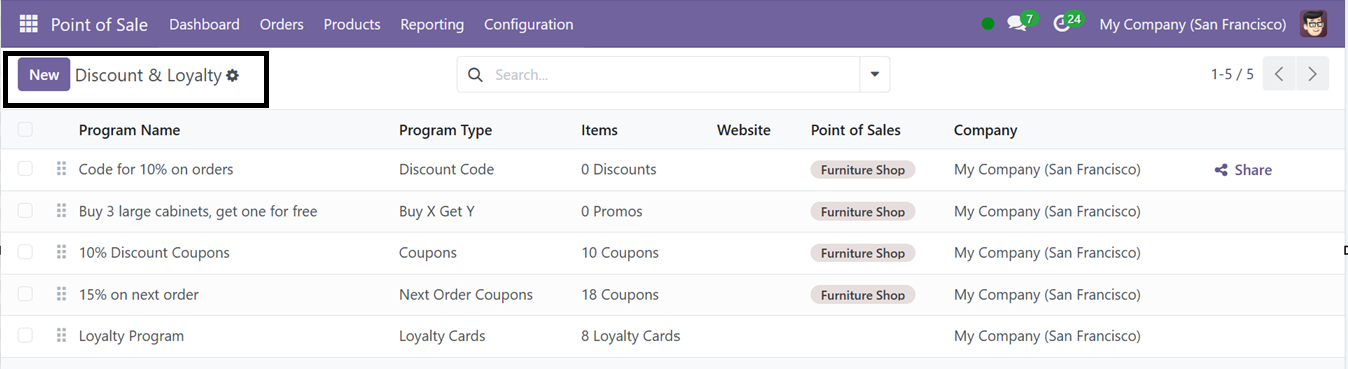
The Point of Sale module allows users to apply discounts and manage loyalty programs across various products through the ‘Discount and Loyalty’ section of its ‘’Products’ menu. It provides a list of previously created discount and loyalty programs for specific products, with options for Group By and Filters. The page also includes the program name, type, products, point of sale, website, and company name. To create a new program, click the New icon.
You must select the program type (such as coupon, loyalty, or promotion) and input the program name on the creation page. Next, decide on a currency and establish a system of points. Turn on the Show Points on Sale function and, if necessary, include a validity date. Limit Usage is another option that you may activate. Points of sale, sales, and websites are more choices that let you define the program's availability.
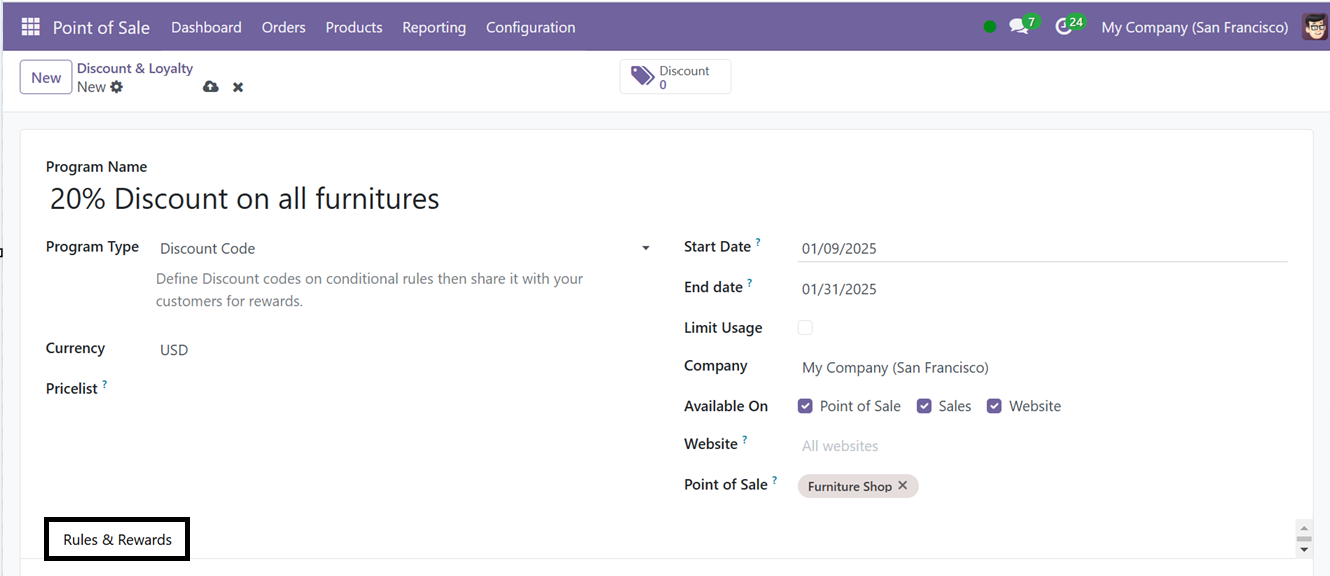
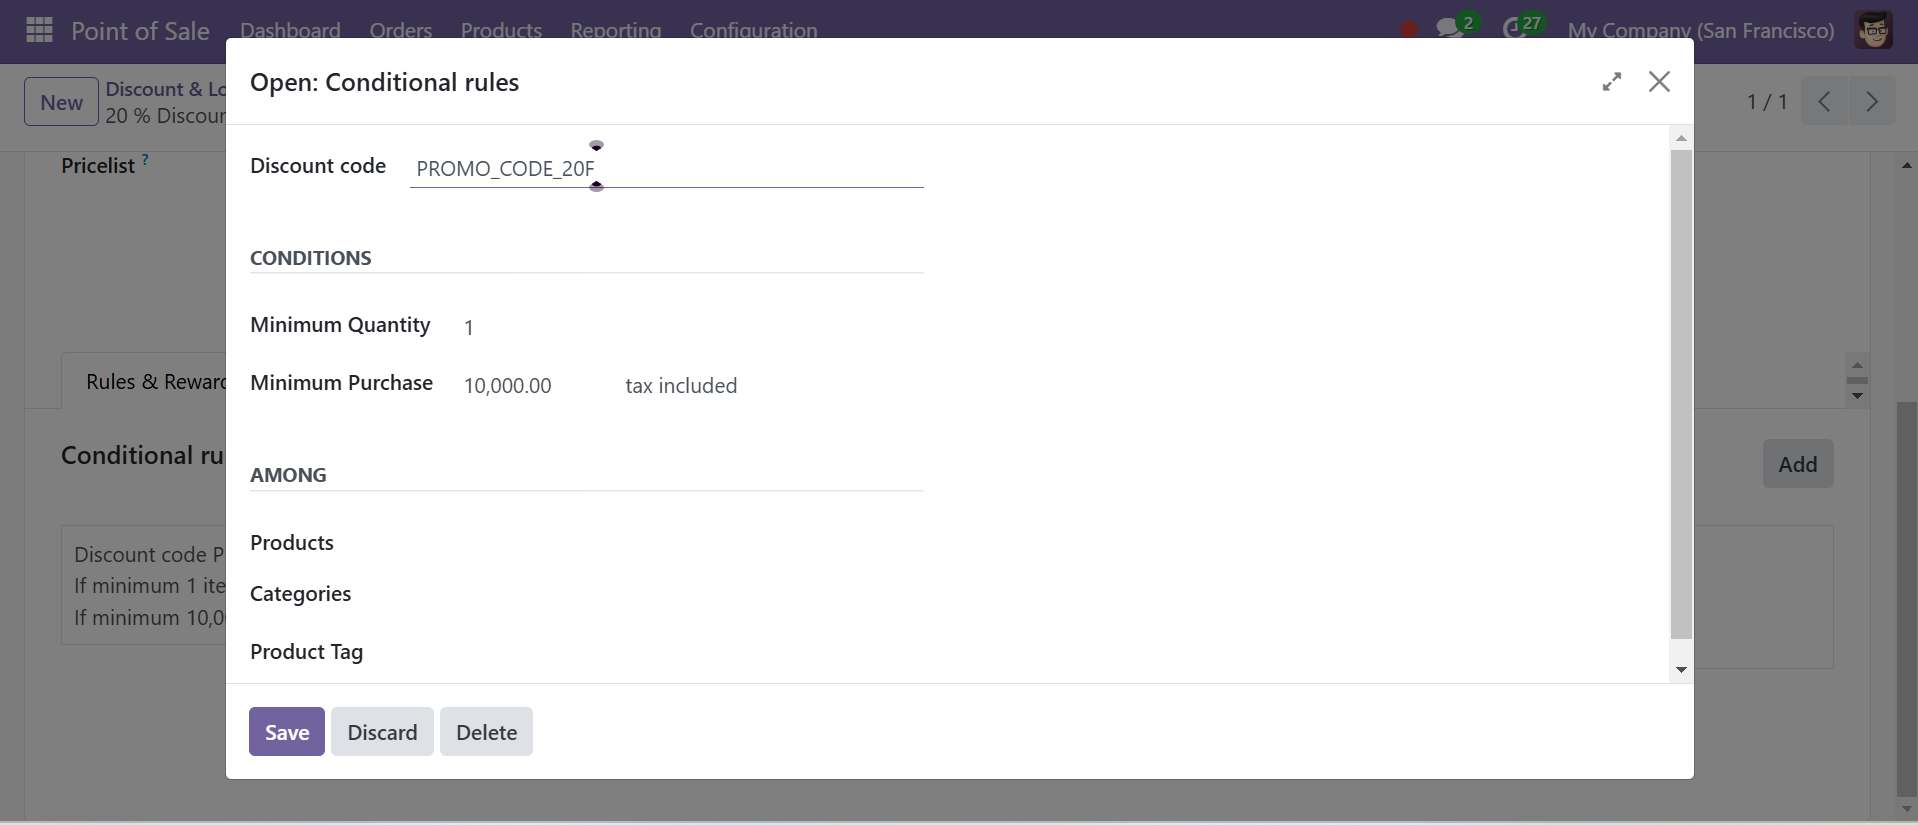
You may add conditional rules to get the discount by selecting the ‘Add’ option under the ‘Rules & Rewards’ menu. This will open a small pop-up window, where you can enter the Discount Code, Conditions, and the Products, Category, and Product Tags that are applicable to this particular condition to avail of the discount as illustrated below.
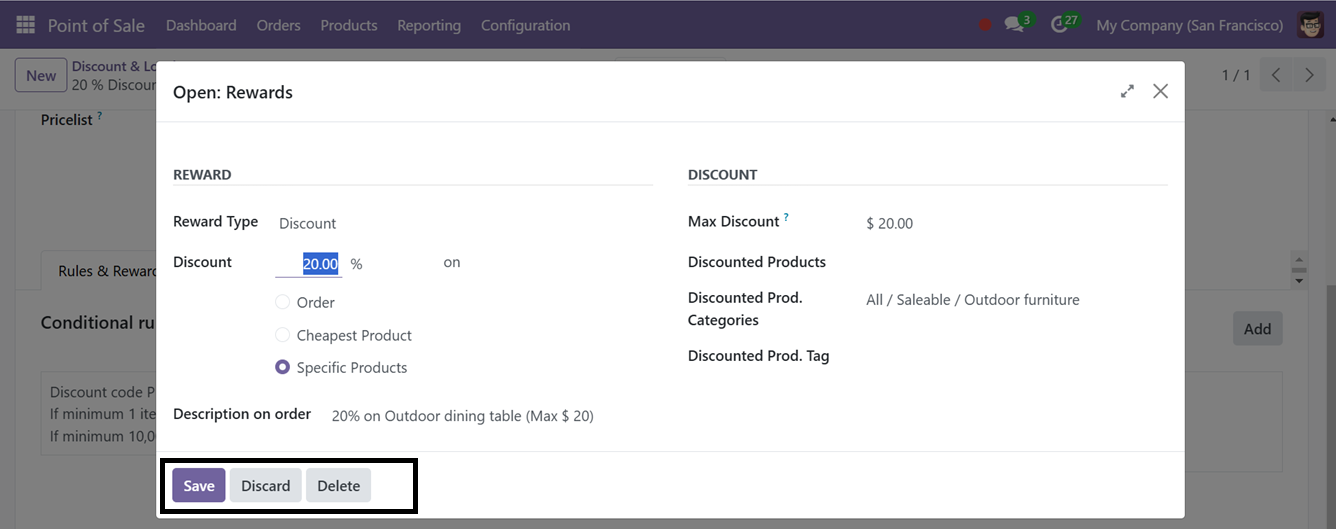
Likewise, by selecting the ‘Add’ icon found under the ‘Rewards’ section, you may add Reward details including the Reward Type, Discount, Maximum Discount, Discounted Products, Discounted Product Categories, and Product Tags as per the company policies as shown in the screenshot below.
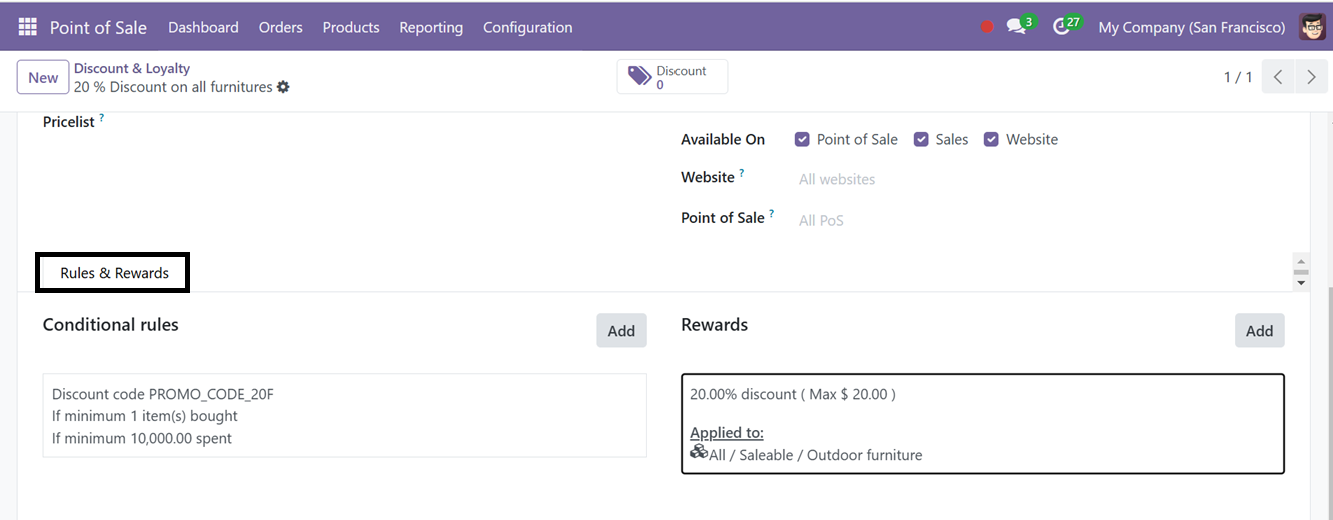
To complete the program, click the ‘Save’ icon after entering all required information. The Rules &Rewards to avail of this discount will be added to the configuration form.
You may set up loyalty programs using the same procedure. The only thing to remember is to update the main configuration form's "Program Type" to "Loyalty Cards." then, utilize the ‘Discount’ smart tab option to manage and create discount coupons. Opening this smart tab will show the available discount coupons as shown in the screenshot below.

From the dashboard, you can send the discount coupons to the targeted customers using the ‘Send’ and ‘Share’ buttons. To generate a new discount coupon, hit the 'New’ button and the discount coupon code will be automatically generated. Then, set an Expiration Date and Partner.
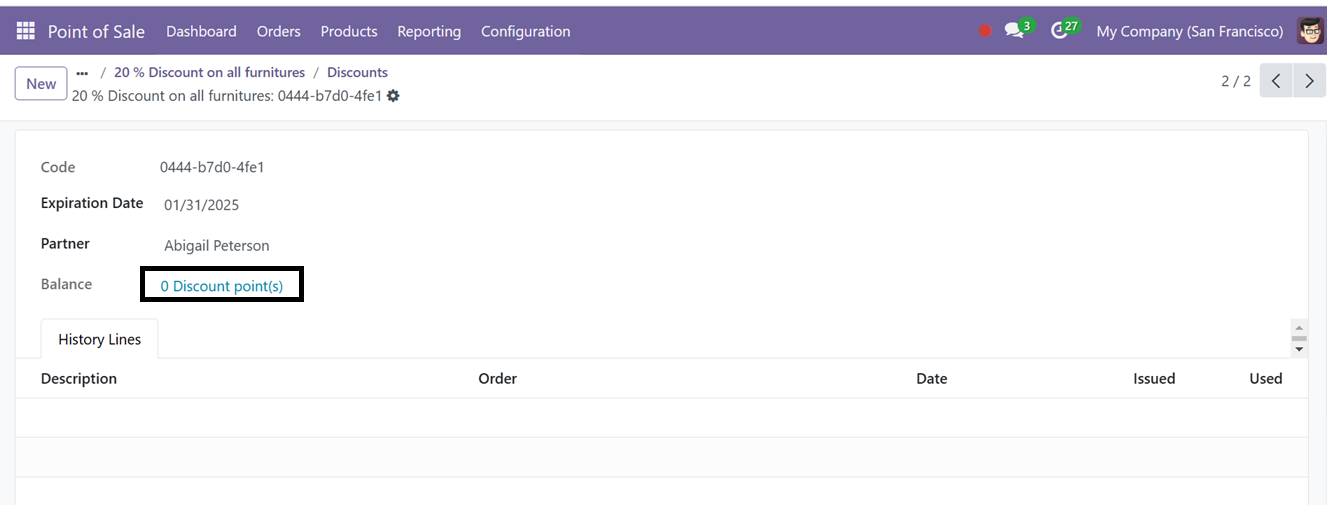
Click on the ‘Discount points’ of the Balance’ field to set the balance points. In the opened window, set or update the balance points in the ‘New Balance’ and a ‘Description’ in the relevant fields and save the balance.
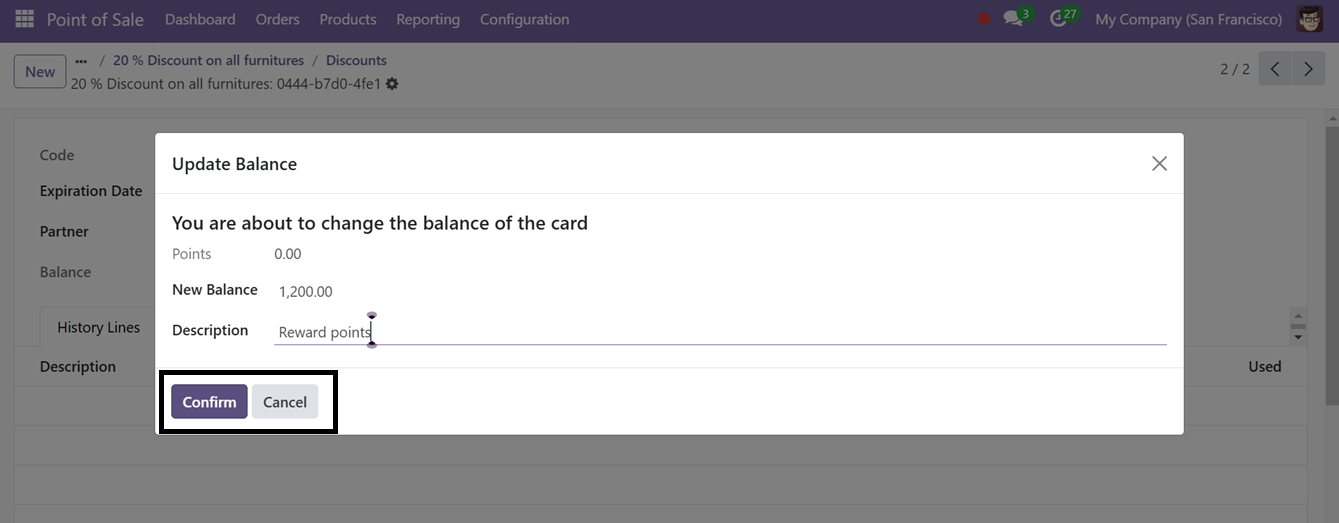
After confirming the balance points and discount coupons, save the form and you can see this balance from the ‘History Lines’ tab of the discount configuration form. Then, you can utilize these discount coupons inside a Point of Sale session. So, here, you can see a new point of sale session.
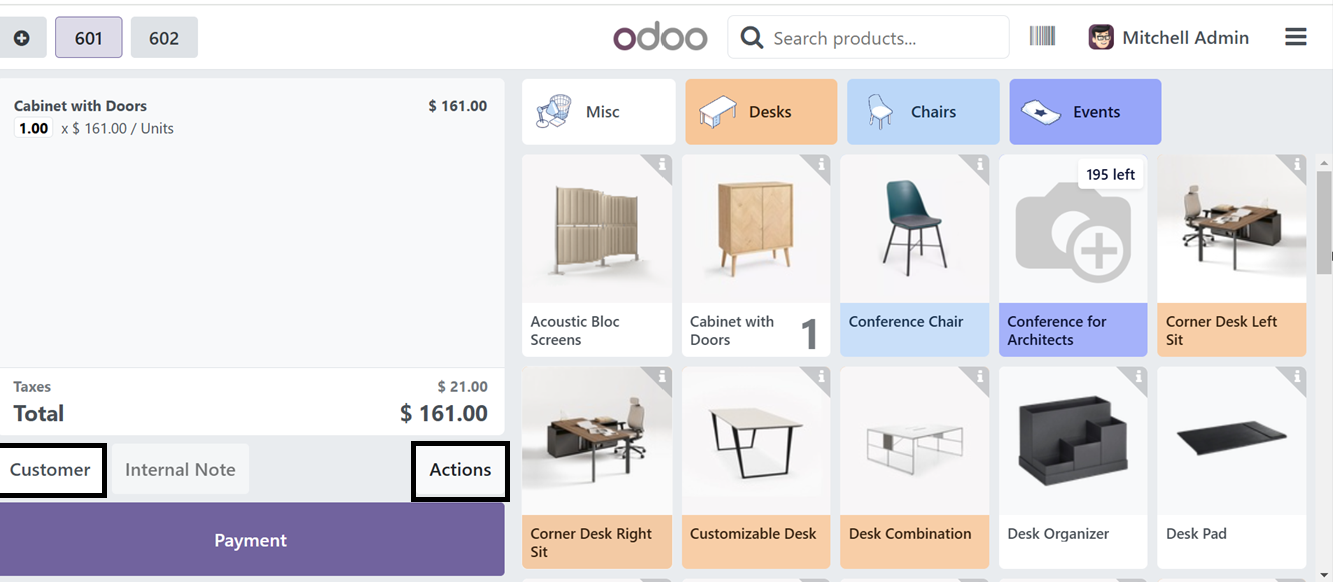
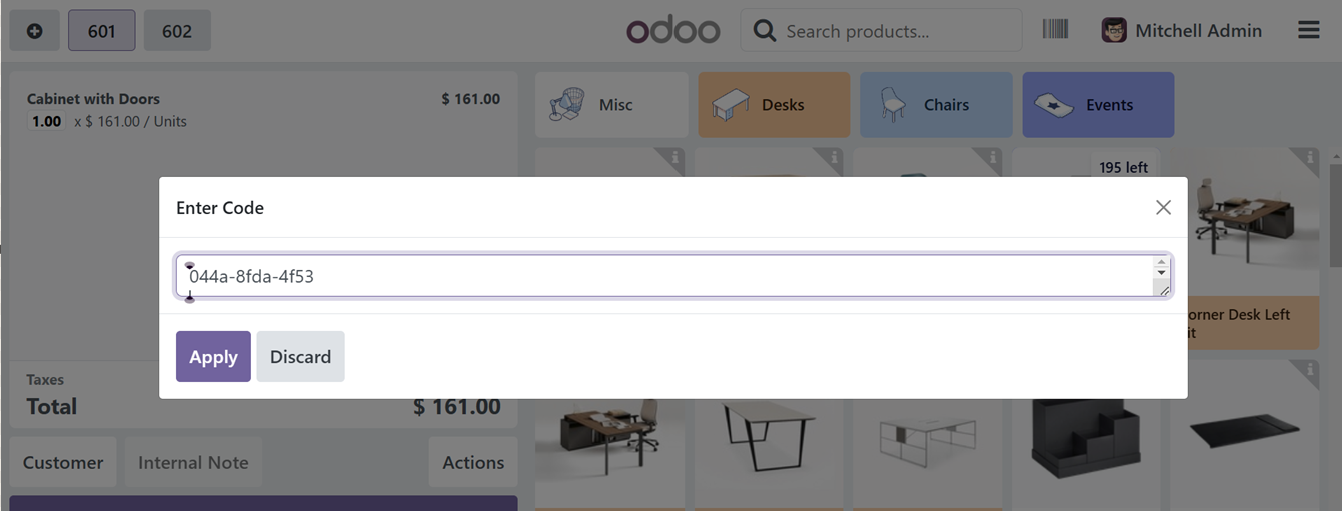
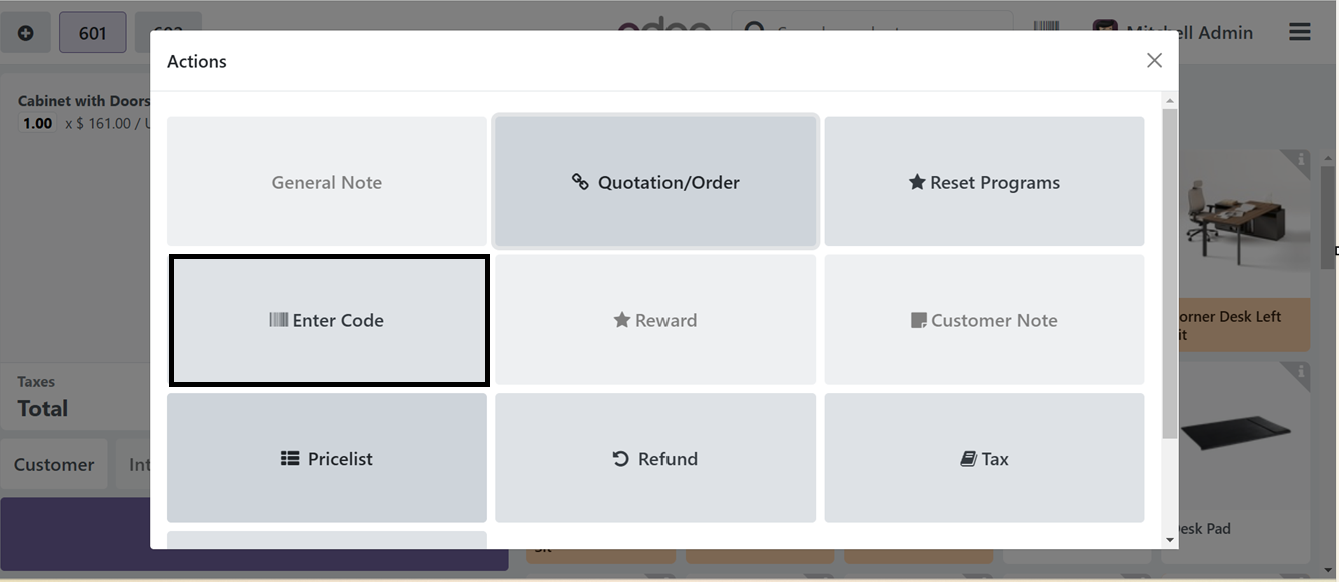
Inside the Sales session window, go to the ‘Actions’ button and this will open another window, where you can choose the ‘Enter Code’ option to enter the discount code.

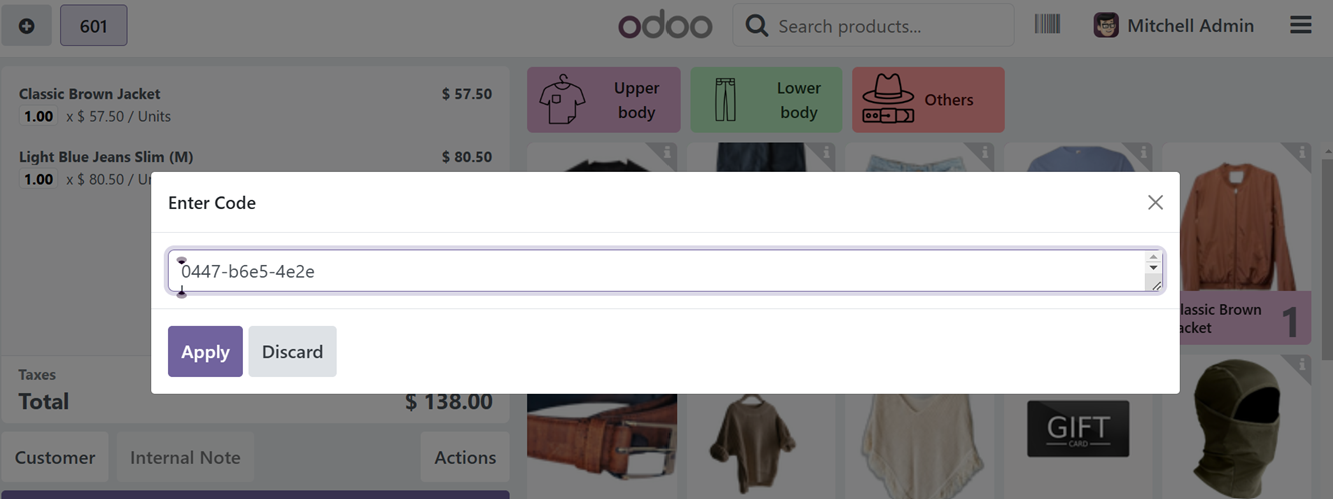
This will open another code editing field, where you can paste or edit the Discount coupon code in the ‘Enter Code’ page and click on the ‘Apply’ button, as illustrated in the screenshot below.
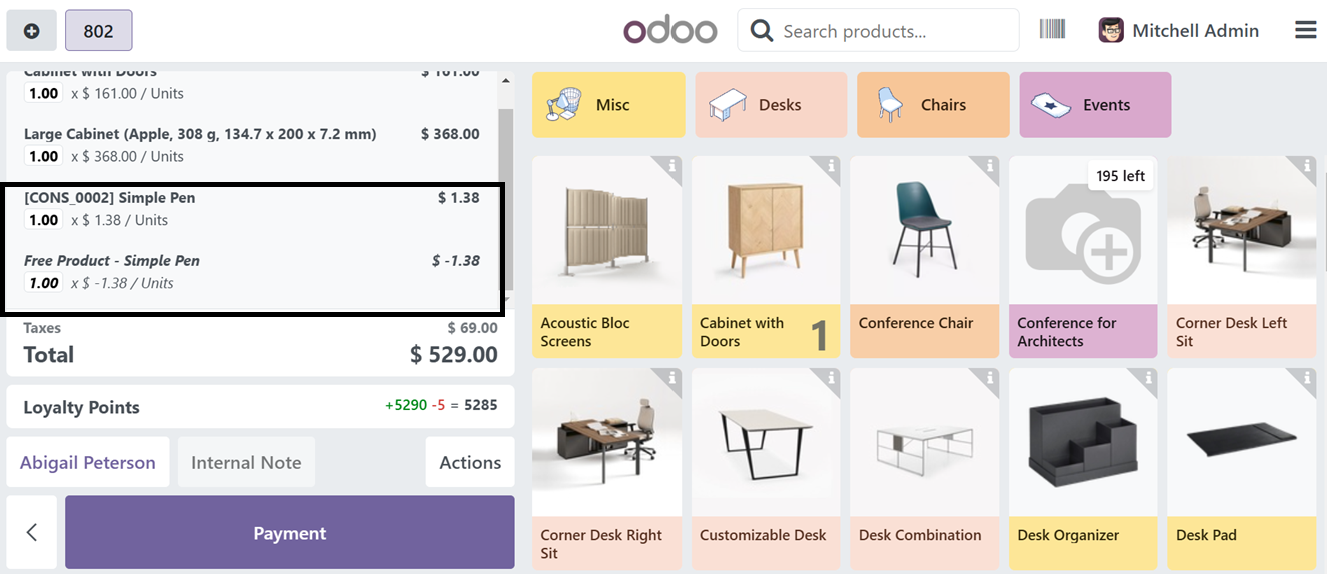
After applying the discount code, it will be reflected in the sales invoice and the total amount of the product. Then, you can also utilize the ‘Reward’ button to apply the discount and promotion codes. So, choose the products that you want to shop for from the sales session as illustrated below.
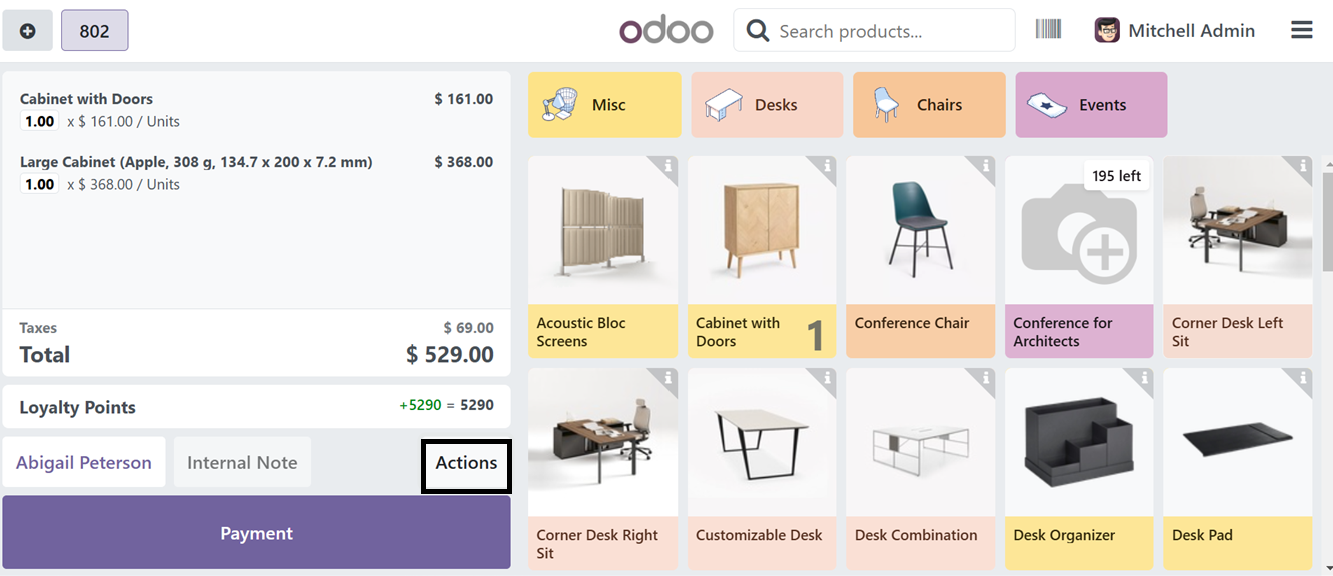
Then, go to the “Action’ menu section and choose the ‘Rewards’ option. This will open a pop-up window with the list of available reward program details as illustrated in the screenshot below.

To continue, select the reward program. The reward advantages will then be included in the goods section. If the amount is a discount, it will be subtracted from the total. Alternatively, it will be free of charge if it is a gift item as you can see from the screenshot given below.
Gift Cards & eWallets
The Point of Sale module makes it simple to create gift cards and eWallets. You can find the option ‘Gift Cards & eWallets’ under the Products menu. Information on current gift card programs, including the Program Name, Type, Items, Website, Point of Sale, and Company can be found on the Gift Cards window as shown below.

The data may be arranged using the Group By and Filters options. Click the New icon in the Point of Sale module to create a new gift card.
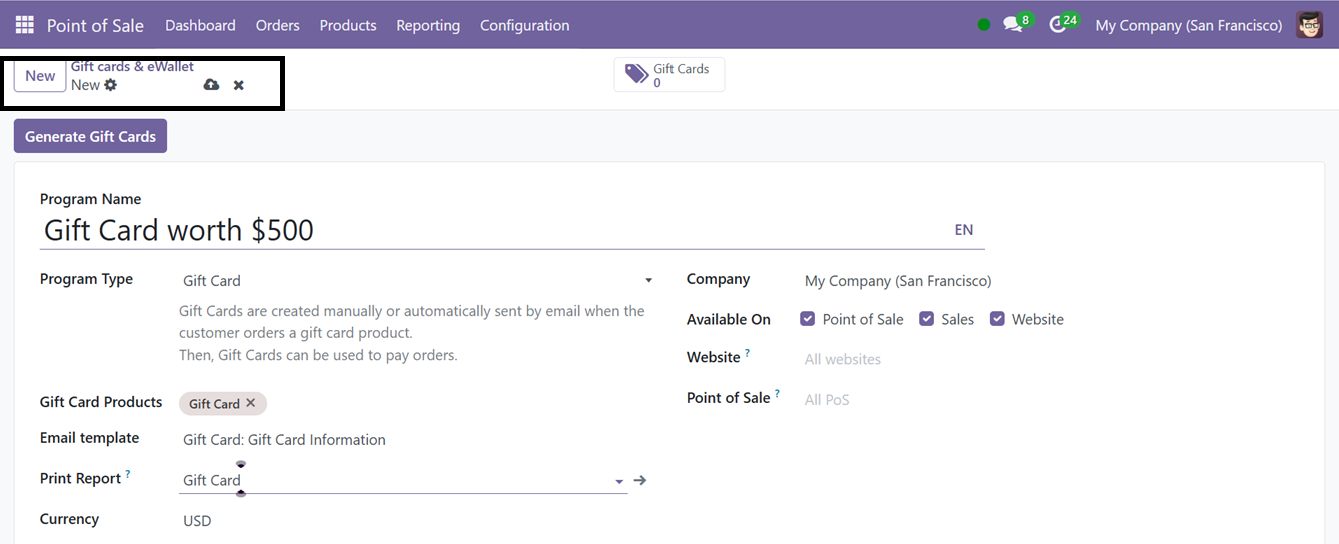
On the gift card creation page, you can enter the Program Name and select the Program Type. Products associated with the gift card can be added in the Gift Card Products section. Additionally, please fill out the fields for Currency, Print Report, and Email Template. You can specify the Company and choose the availability of these gift card options for the Point of Sale, Sales, and Website. If the gift card is only available for specific websites and sales sessions, then state the website and point of sale session. To complete the gift card program, click the Save icon after entering all the information.
Next, you may use the "Generate Gift cards" option at the top of the setup form to create the specific number of gift cards you need. This will open another window that can be used to generate the gift cards with the relevant information as shown in the screenshot below.
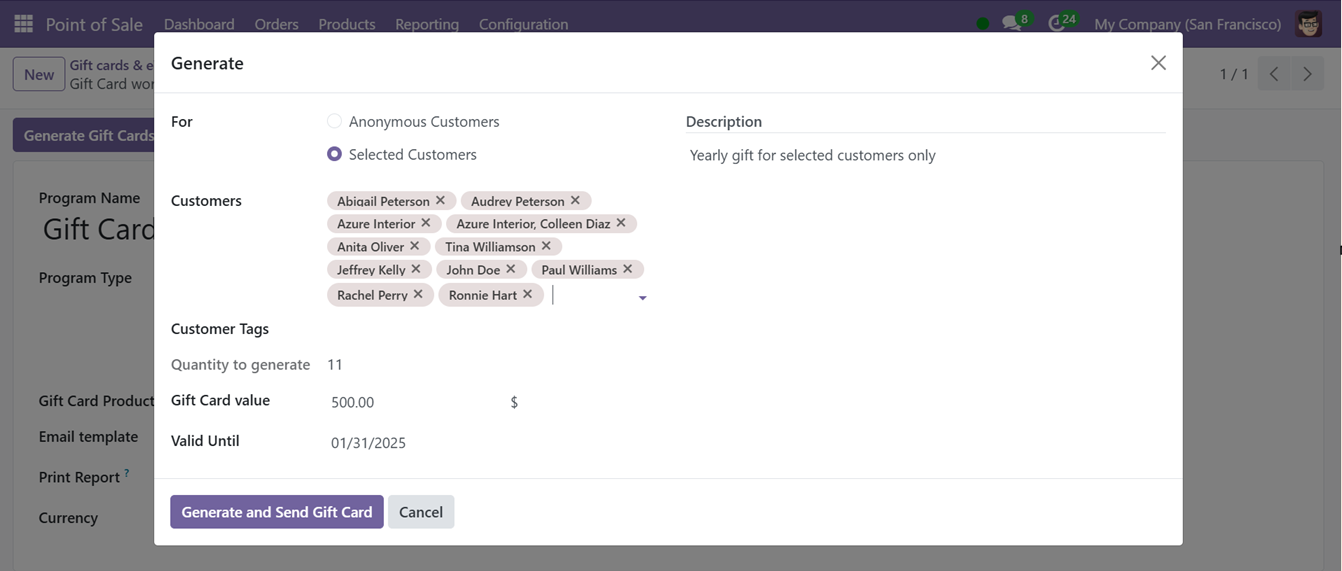
This tool allows users to create gift cards for both Anonymous and Selected Customers. Users can enter Customer Names and Tags, then, the Quantity of cards will be automatically set in the case of selected customers scenario, and add points for the gift card in the Gift Card Value field. The Valid Until field specifies the validity period for the gift cards. To generate and send a gift card, click the ‘Generate and Send Gift Card’ button now. This will generate the required quantities.
Then, you can get the list of them by opening the ‘Gift Cards’ smart button from the form view. The Gift Cards, dashboard provides the quick overview of all the generated gift cards s shown below
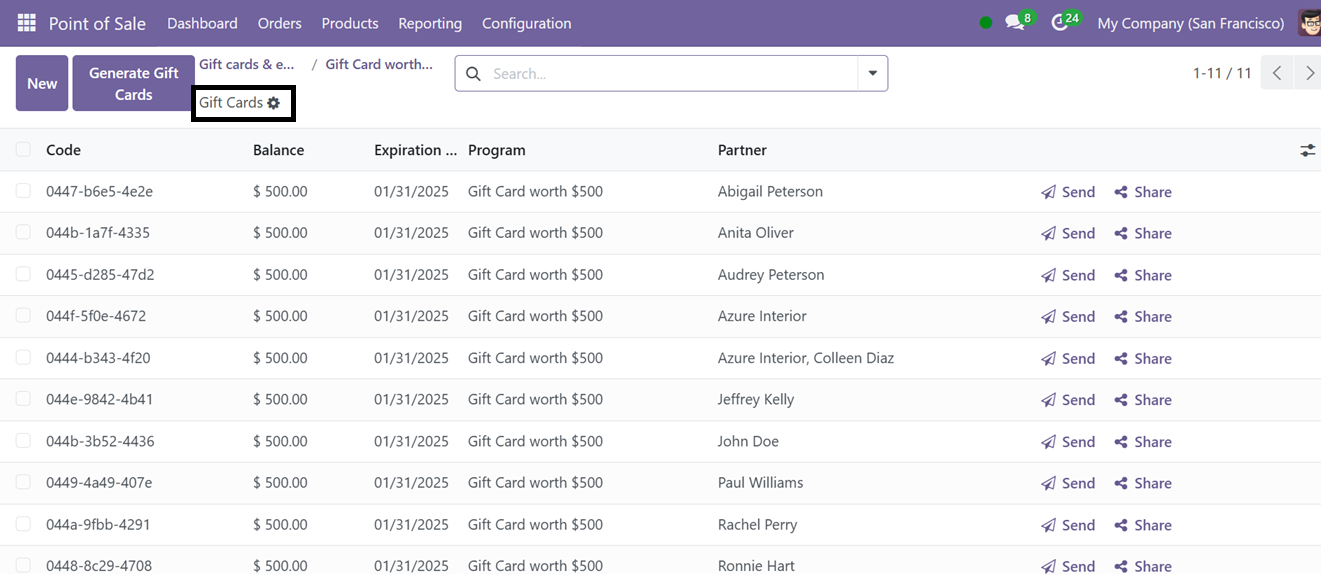
You can send the gift cards directly from this dashboard using the ‘Send’ and ‘Share’ buttons provided on each column. So, the customers can receive them via Email links. The "Generate Gift cards" option can also be used to create new cards in the instance that the currently available ones expire or become out of supply.
Sending gift cards
To send the gift cards, click on the ‘Send’ button of a selected gift card column from the dashboard. This will open a Compose Mail window, where you can see the Gift Card Code, Expiry Date, Value etc. Then, edit the Mail address and the Subject as shown below.
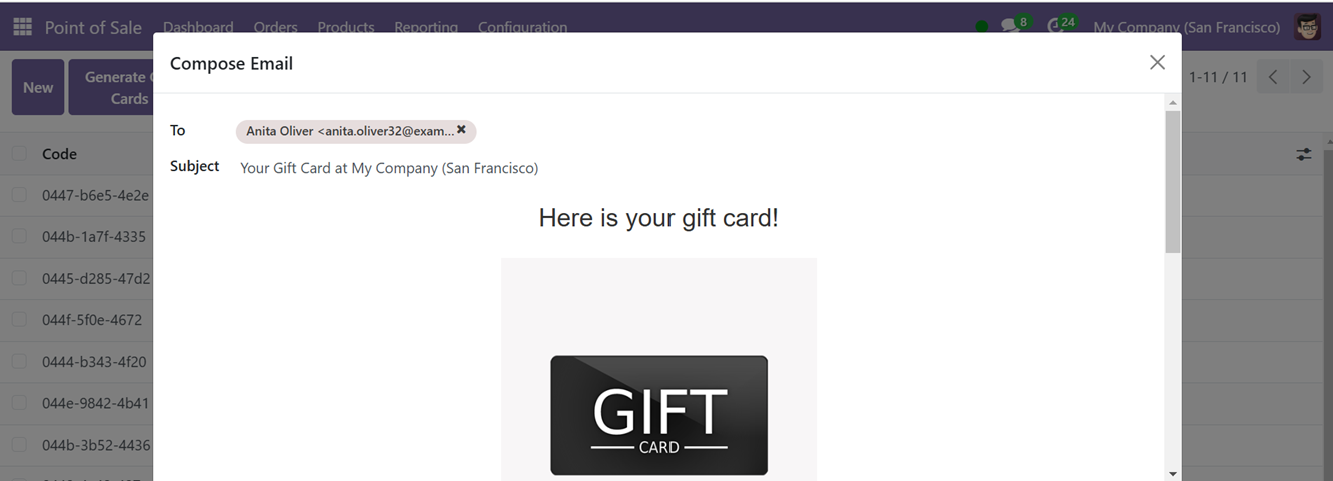
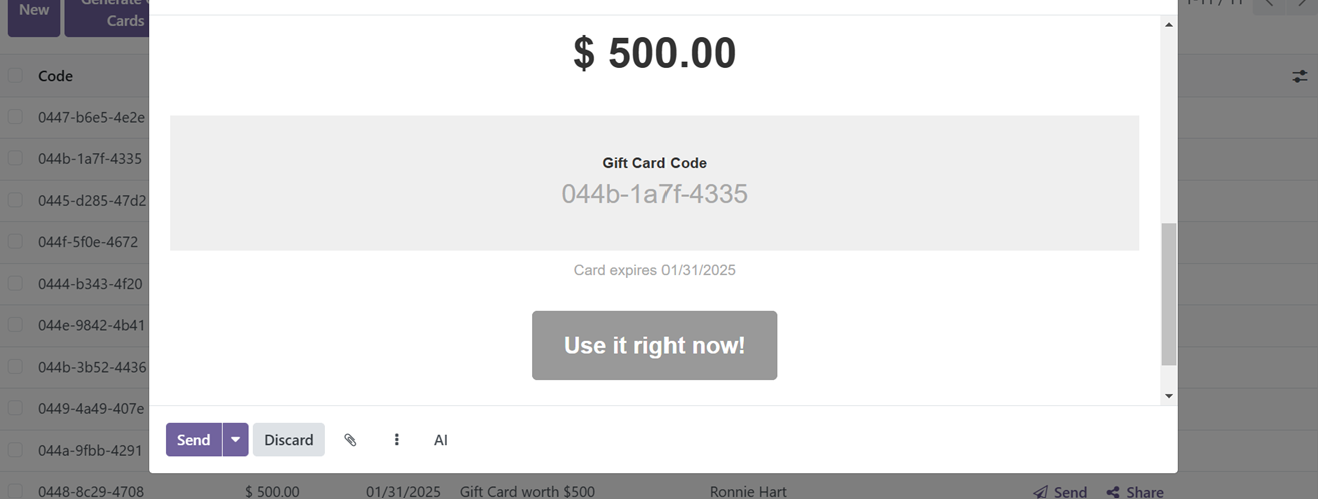
After editing the mail, send it using the 'Send ‘Send’ button. The receiving user can directly copy the gift card code from the mail or use the ‘Use it right now!’ button.
Sending gift cards
Sharing the gift cards can be done using the ‘Share’ button. Pressing this button will trigger a pop-up window where you can see the URL Share link of the gift card along with the Website and Redirect links as shown below.
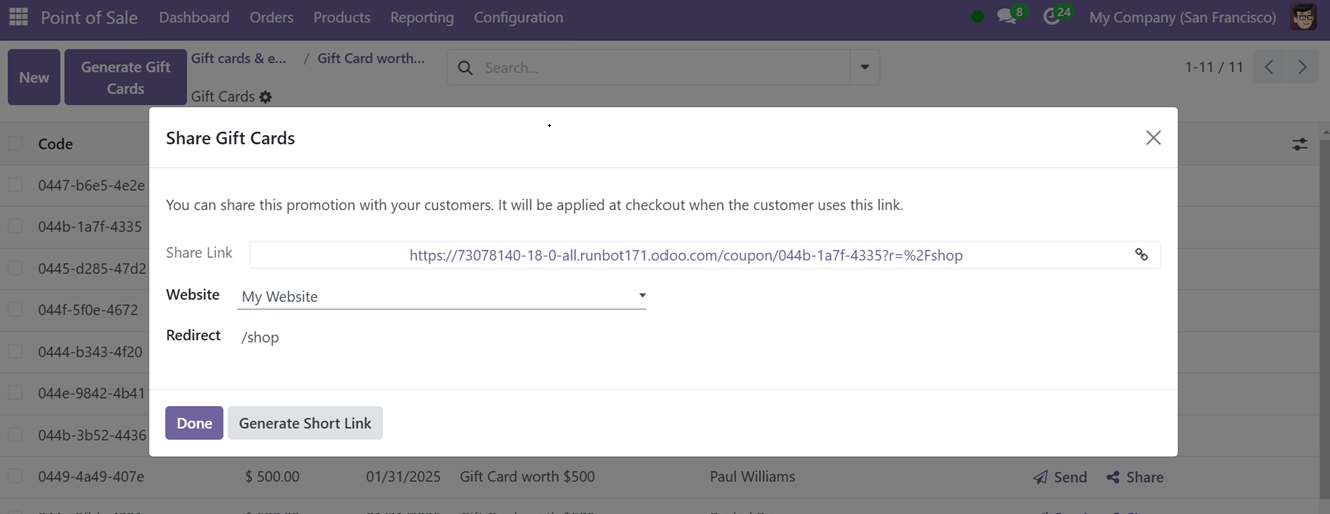
After copying the link you can send it to others or create another short link using the ‘Generate Shot Link’ button.
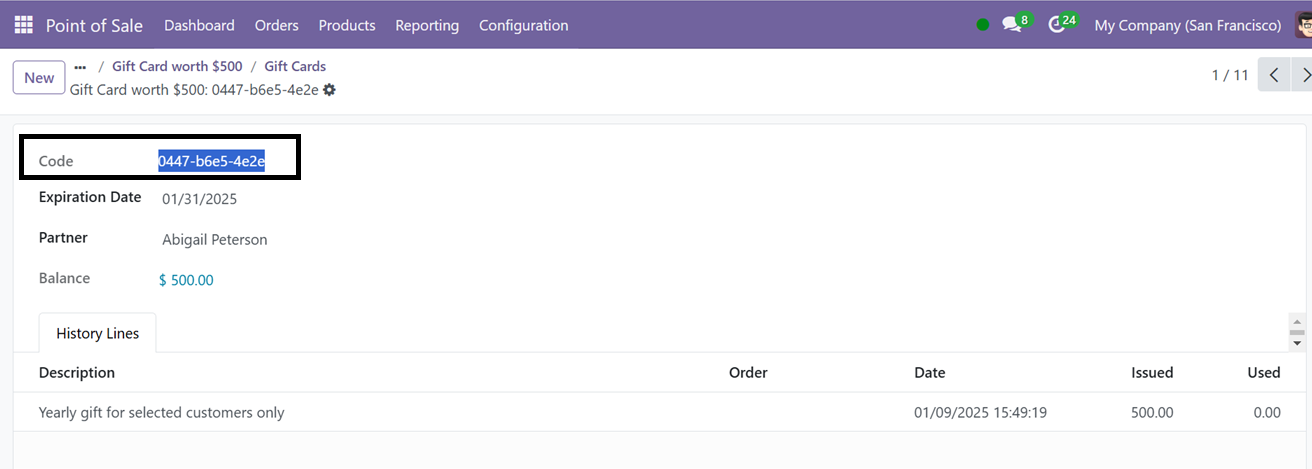
To copy a gift card code directly from its form view, click on the relevant column and this will open its form view as shown in the screenshot below.
Then, you can utilize these gift card codes while shopping through a Point of Sale session. So, open the session and choose the products.
Clicking on the ‘Action’ button will open another window, where you can provide the coupon codes and other promotional coupons.
To enter the gift card code, click on the ‘Enter Code’ button and click on the ‘Apply’ button after editing the coupon code in the displayed editing field as you can see from the screenshot below.
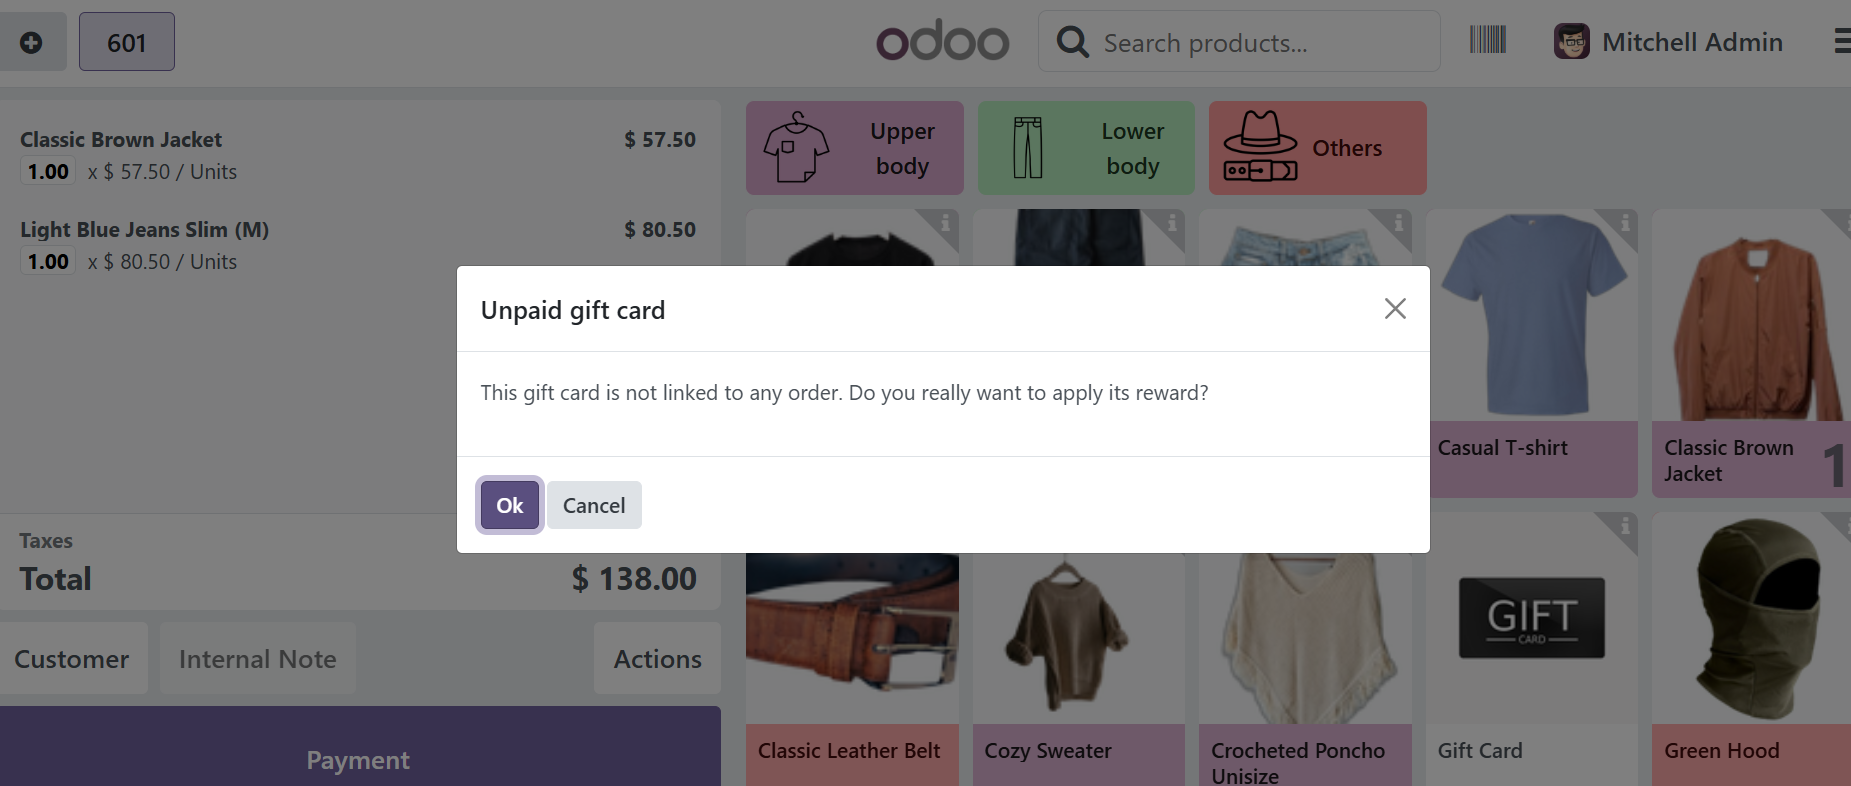
After applying the coupon code, you have to confirm again to apply for the gift card.
After confirming, the gift card balance will be applied to the bill amount and it will be reflected on the total amount.
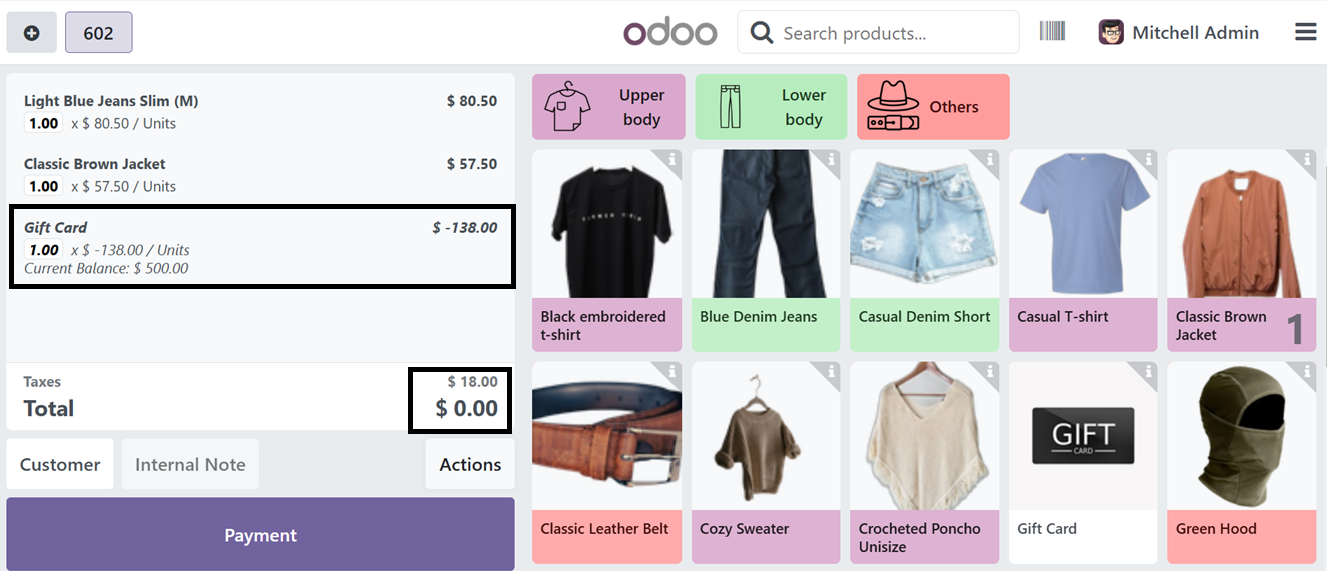
After applying the Gift cards, you can proceed with the other payment options. The process for creating eWallets is also the same as this process. But in the ‘Gift Cards & eWallets’ configuration form, change the ‘Program Type’ as ‘eWallets’ as illustrated in the screenshot below.
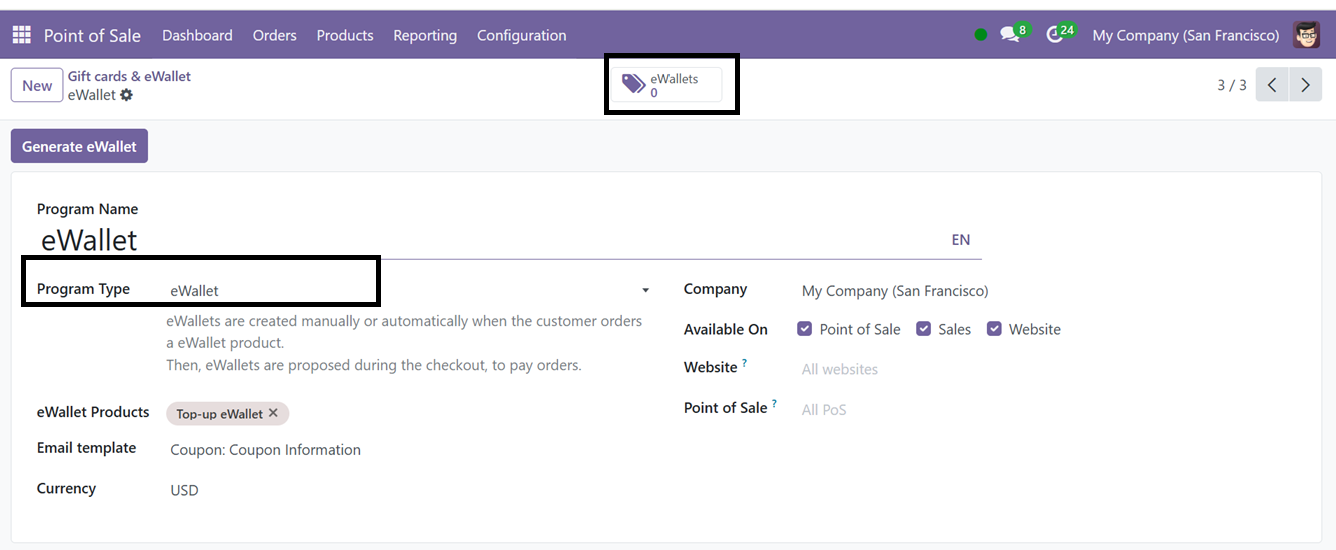
After completing all the configurations, this window allows users to access the total eWallets created and create new ones using the ‘Generate eWallet’ button. This will open another pop-up window, where you can generate new eWallets by specifying the Customers, Customer Tags, eWallet value, Quantity to generate, Validity and a Description etc as illustrated in the screenshot below.
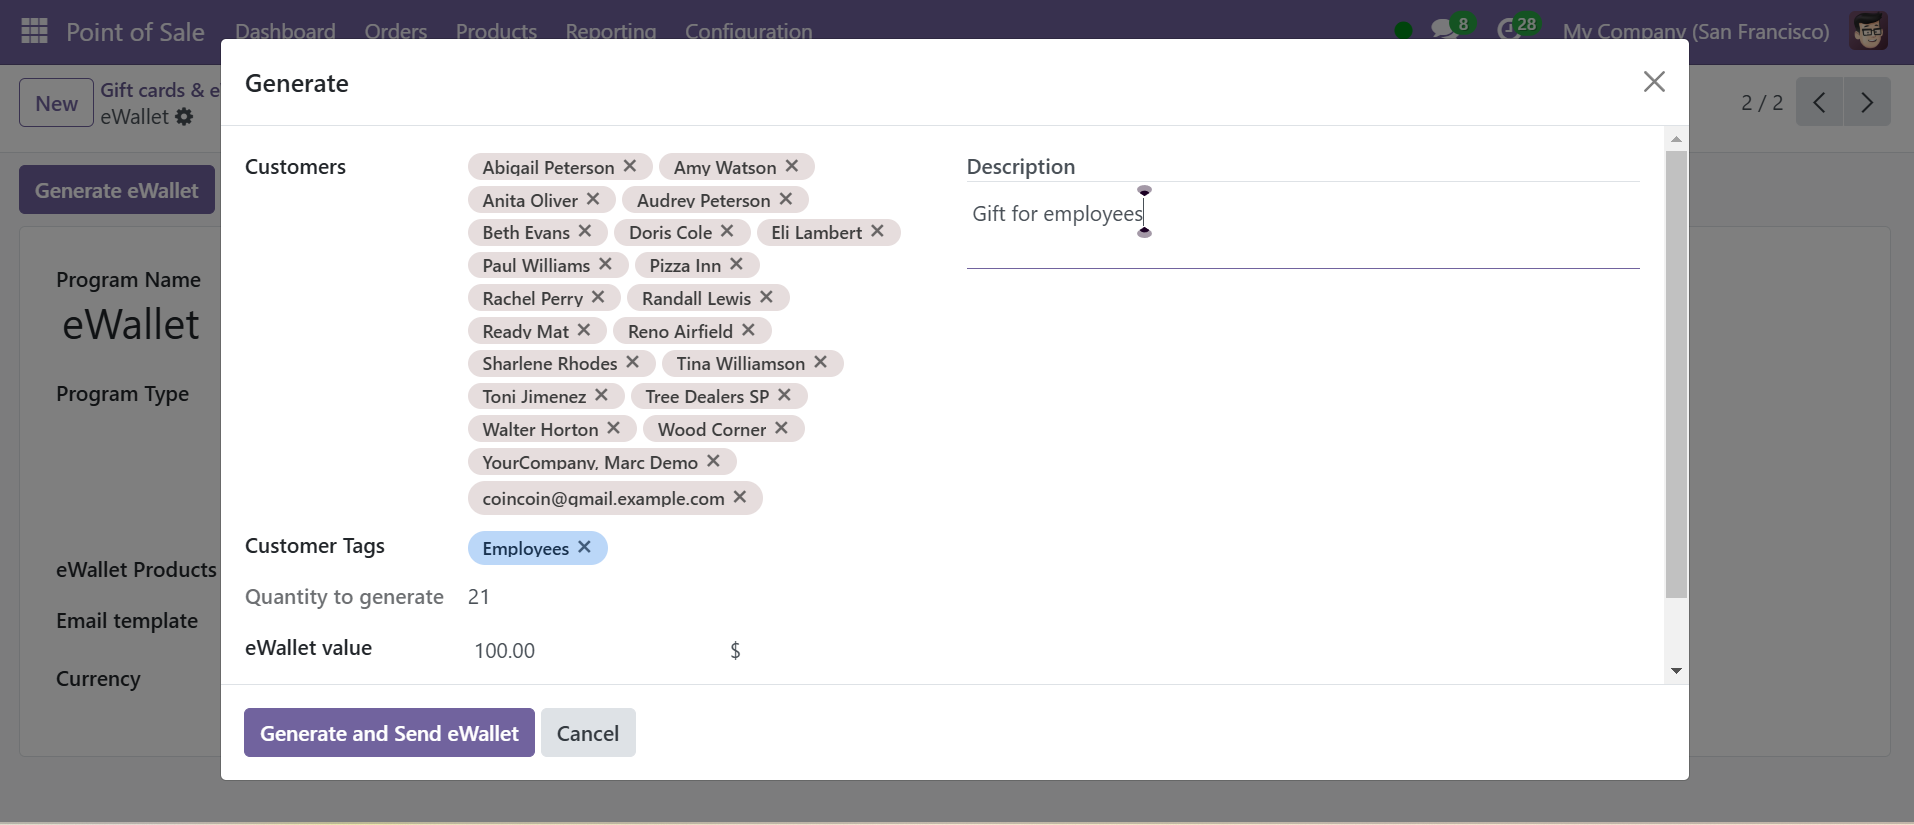
To boost sales, users can mail gift cards and promote eWallets through emails by pressing the ‘Generate and Send eWallet’ button. After generating the eWallets, it can be managed from the ‘eWallets’ smart button provided at the top of the configuration page.