The 'Configurations Menu offers a diverse array of configuration options for your Point of Sale sessions and their associated features. This includes common Settings, Payment Methods, Floor Plans, Restaurant Mode, Note Models, POS Categories, etc.
Payment Methods
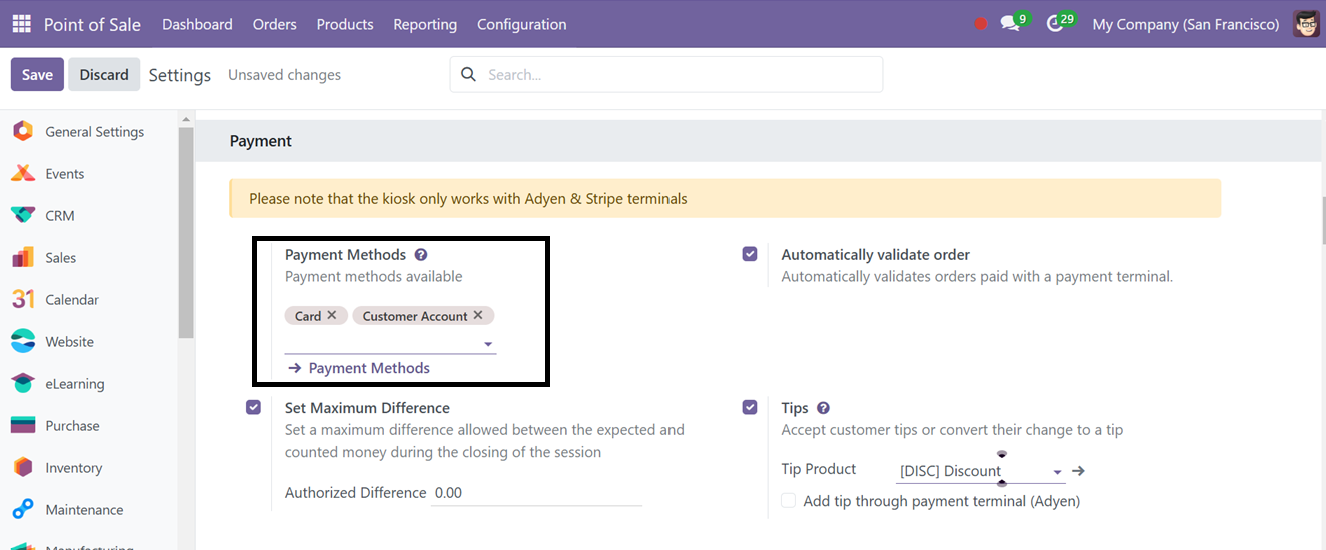
The Point of Sale module provides a variety of payment methods to initiate different business processes in order to guarantee a smooth sales process. This procedure has been made simpler with Odoo 18. The Point of Sale module's Configuration menu contains the opportunity to set up payment methods. Here, you can choose the payments for your current POS Session from the available list.
Then, clicking on the ‘Payment Methods’ link will open the list of different payment methods configured earlier with their respective Names, Journal, Company and Point of Sale session as illustrated in the screenshot below.
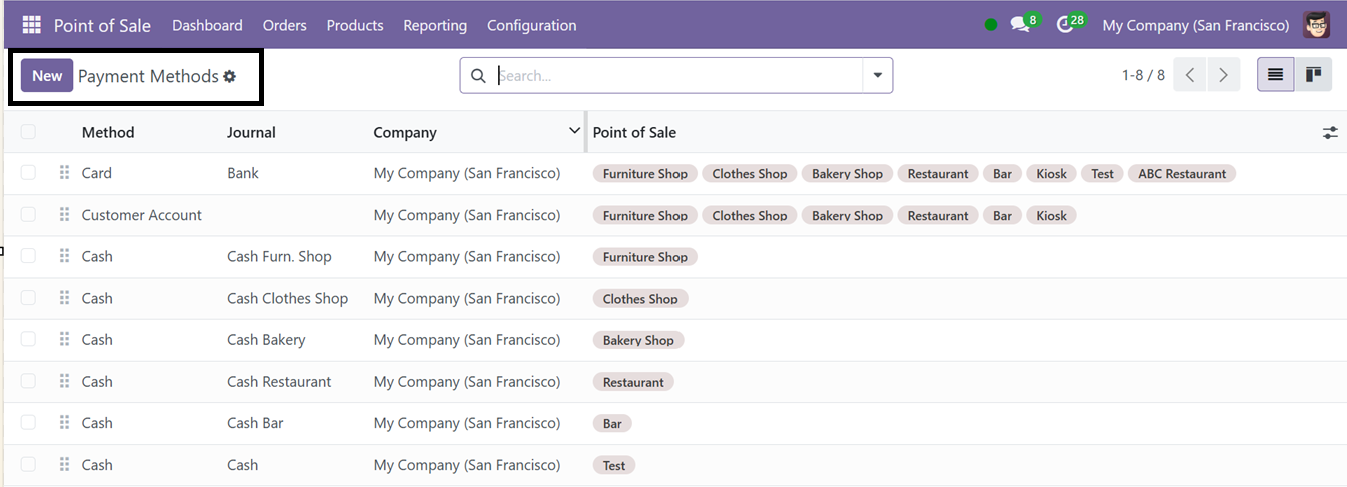
A list of previously used payment methods and transaction data are shown on the screen. Users may access the list view in Kanban view, change details using the Edit icon, or choose a payment method to read additional details. Group By choices and filters aid in the effective organization of approaches. The technique type, journal, and firm name are important data. On the right side of the client identification window are further choices. Click the New icon on the left side of the page to add a new payment method.
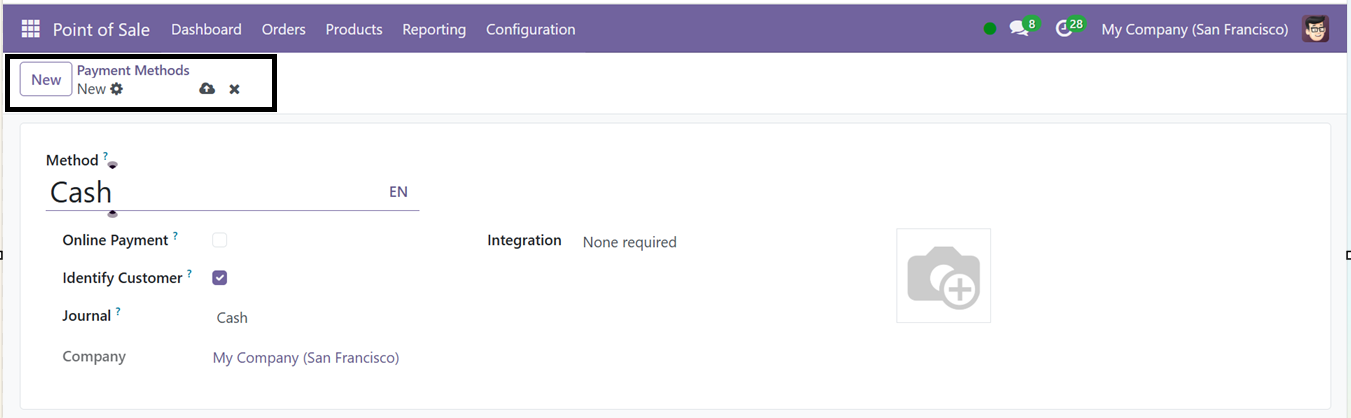
Enter the method's name in the ‘Method’ field, and choose whether it is a ‘Online Payment’ or not. Then, choose the associated ‘Journal', and activate the ‘Identify Customer’ feature when creating a new payment method. Lastly, to include the new payment method in the list, click the ‘Save’ icon. Finally, you can utilize this payment method while completing the payment process after a Point of sale transaction.
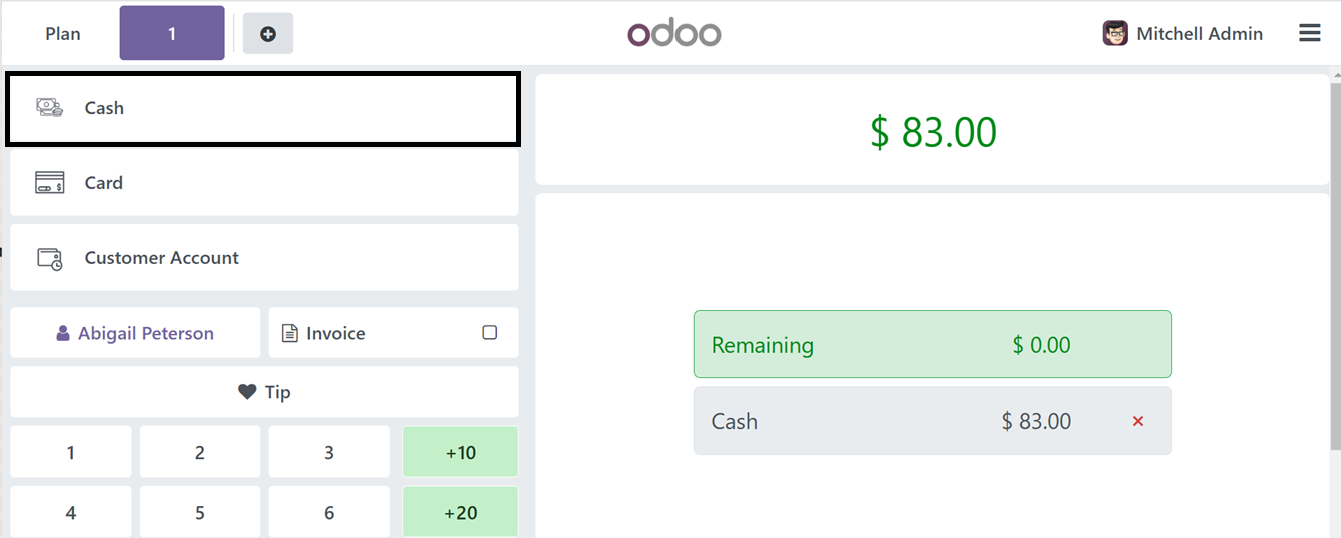
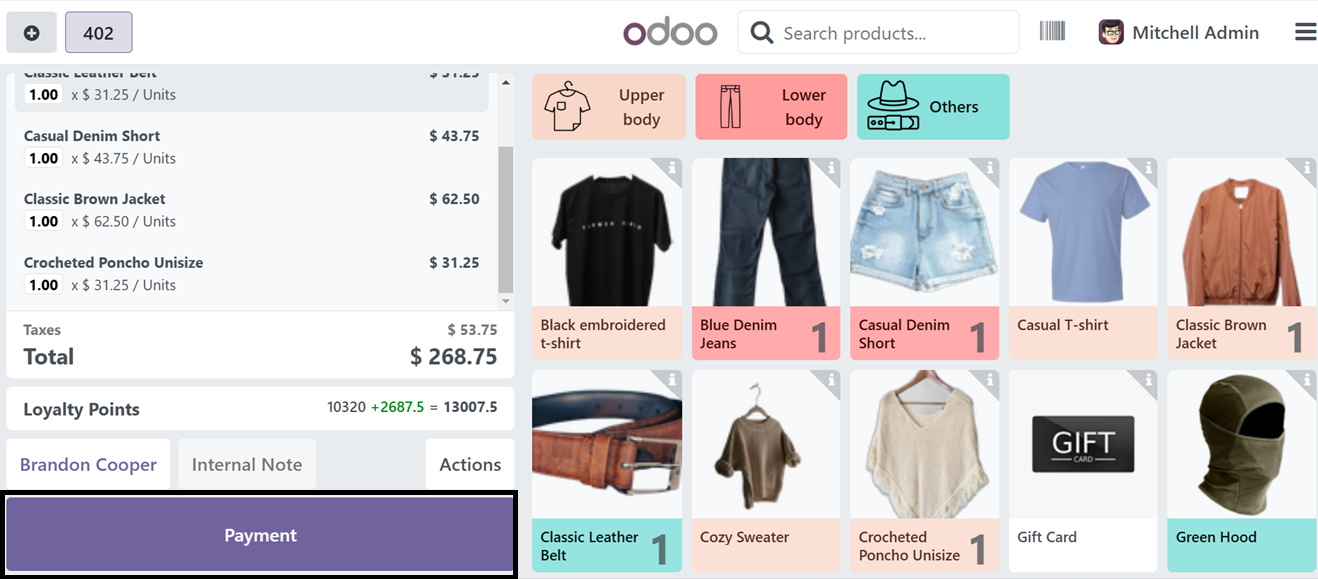
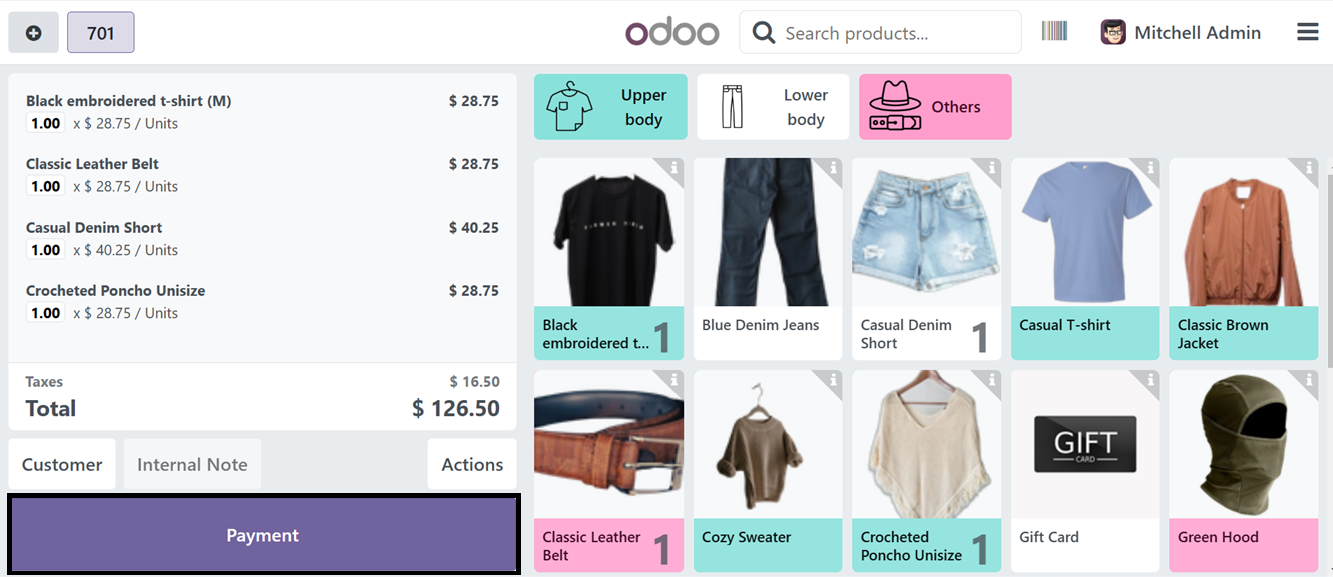
To check this feature, go to a point of sales session and choose the products and proceed to the payment procedure using the ‘Payment’ button. This will take you to the payments window where you can choose the appropriate Payment Methods from the left side of the screen as depicted in the screenshot below.
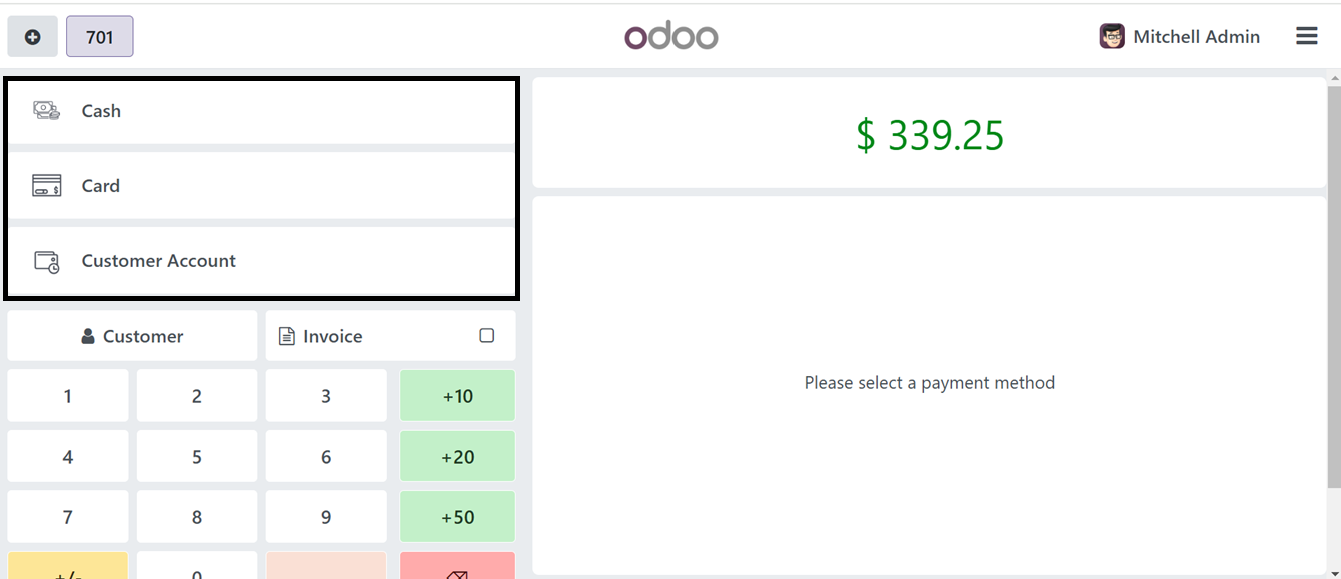
Here, you can choose the payment methods including; Cash, Card and Customer Account.
By choosing the ‘Customer Account’ option, Odoo 18's Point of Sale module allows businesses to manage customer credits and payments directly within the system, making it ideal for credit-based transactions.
Customer Account and Credit Purchases
Customers can use the ‘Customer Account’ payment method for credit transactions and advance payments, allowing them to settle their balance at a later date and apply credit to new orders. To check this process, we can make a new order.
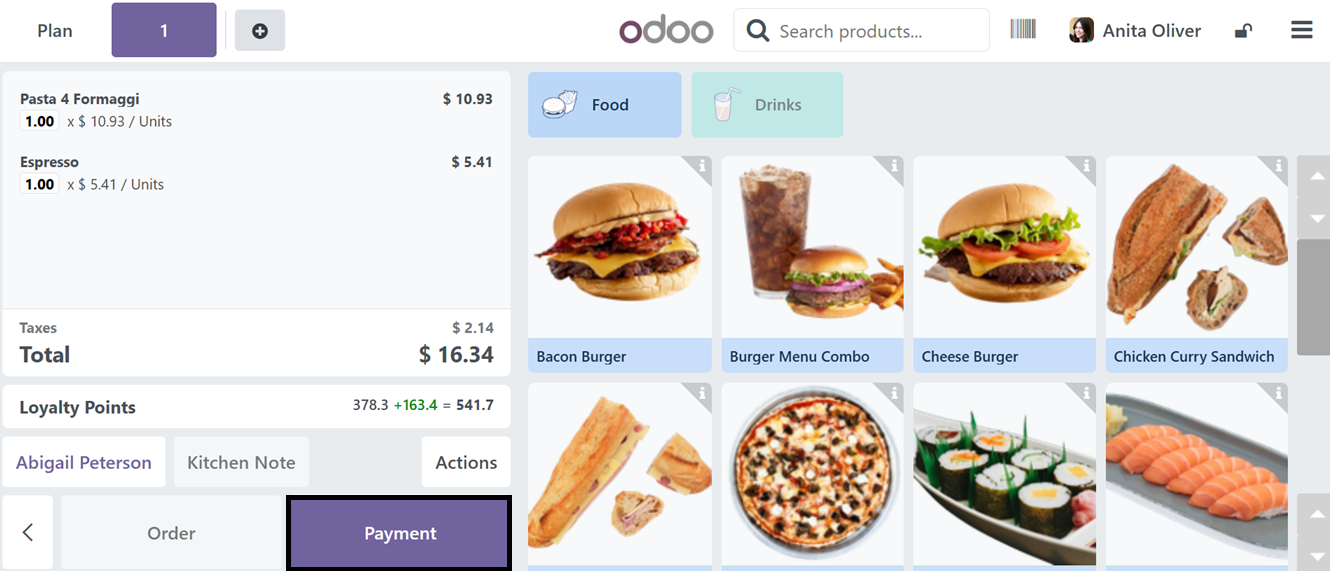
After choosing the products, order the items using the ‘Order’ button and proceed with the ‘Payment’ button.


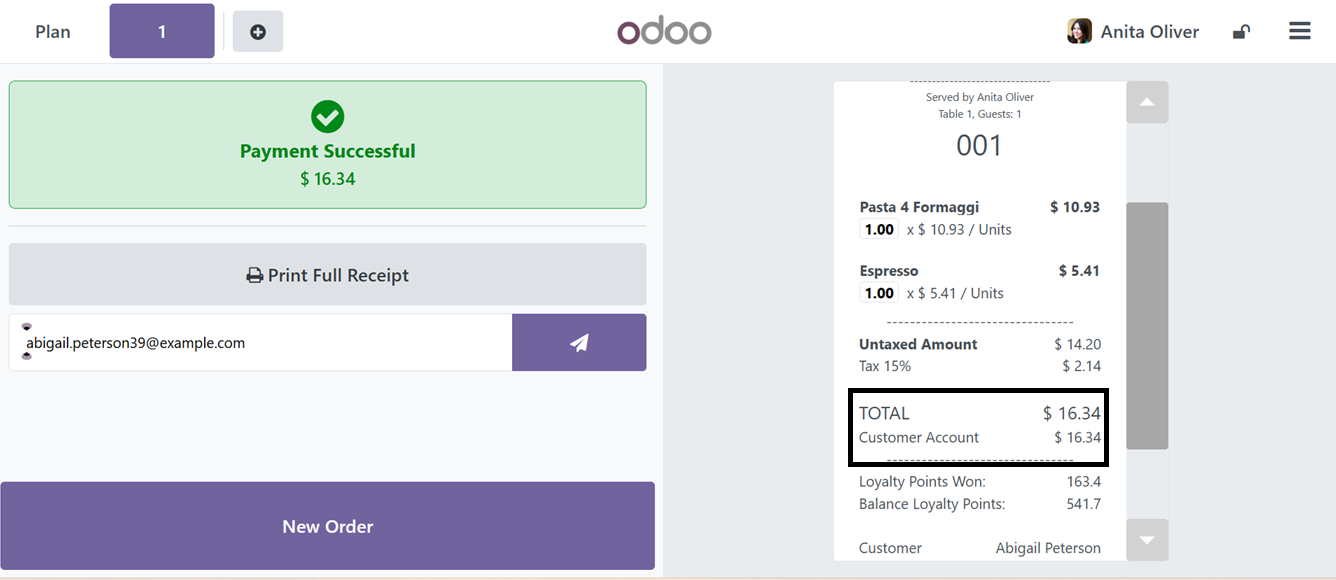
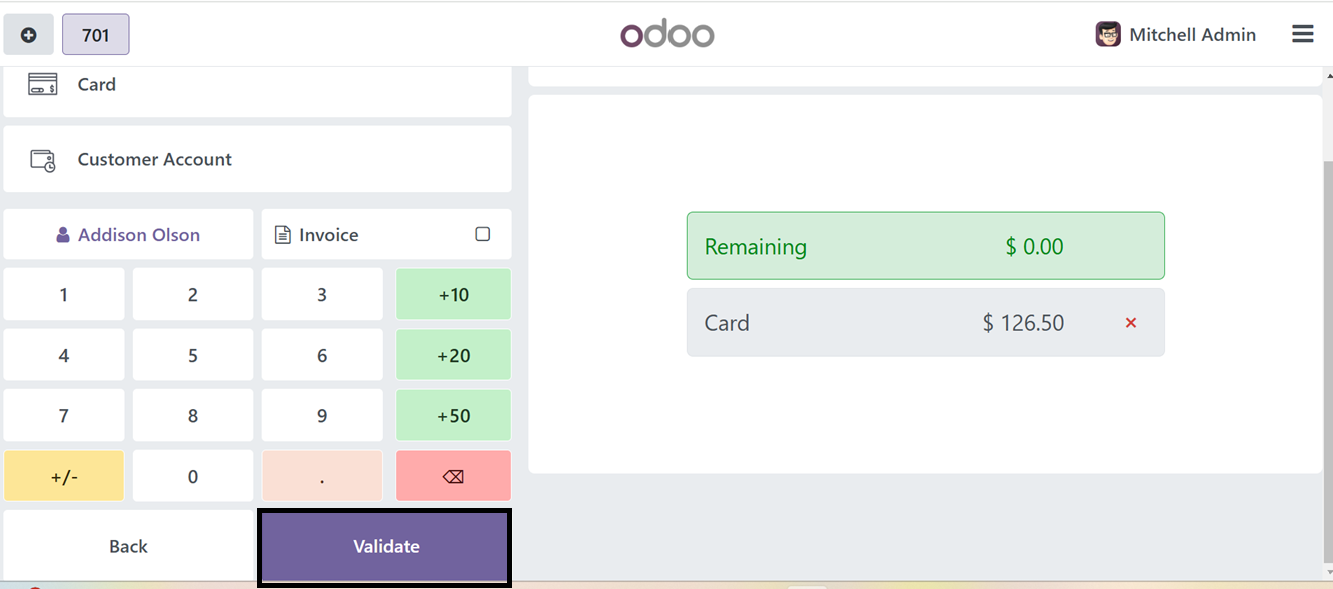
Using the 'Validate' button, you can confirm the payment method and receive a sales invoice with the total product amount for the 'Customer Account' mode of payment.
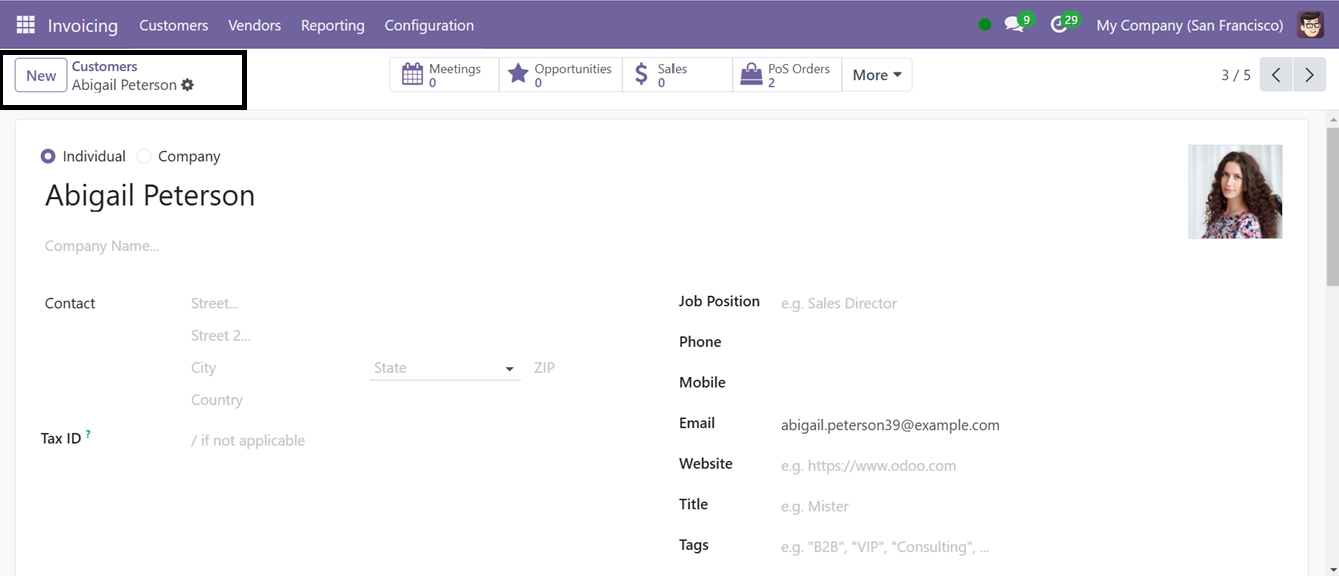
After completing the process, you can check the customer Account details from the Odoo Invoicing Module’s ‘Customers’ menu. So, open the customer dashboard and go to the particular customers from view and check the ‘Invoicing’ tab.
Inside the ‘Invoicing’ tab, you can check the credit limit and the receivable payment from the ‘CREDIT LIMITS’ section as shown in the screenshot below.
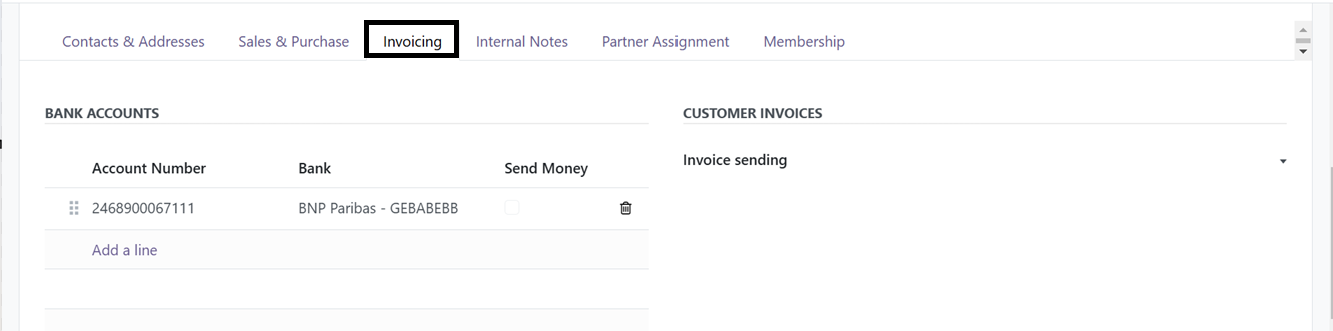
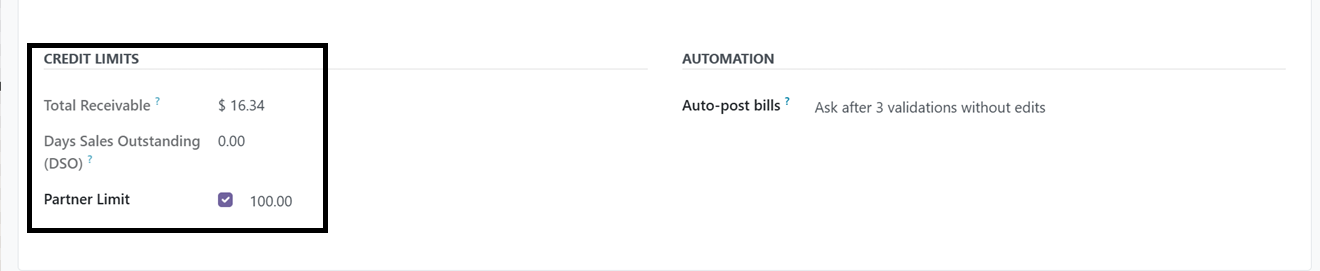
You can see the receivable amount of $16.34 that the customer has purchased from the ‘Customer Account’ in the previous point of sale session. Also, you can check and update the credit limit of the customer from the ‘Partner Limit’ field.
Payment Settings
The Odoo Point of Sale also allows users to activate the Cash Rounding feature to designate the lowest currency denomination for cash payments.
Cash Rounding
Cash rounding is a practice where the lowest physical currency denomination is higher than the minimum unit of account. It is often mandated by countries for companies to round up or down invoice amounts when payments are made in cash. Odoo points of sale can apply cash rounding to their bills or receipts.
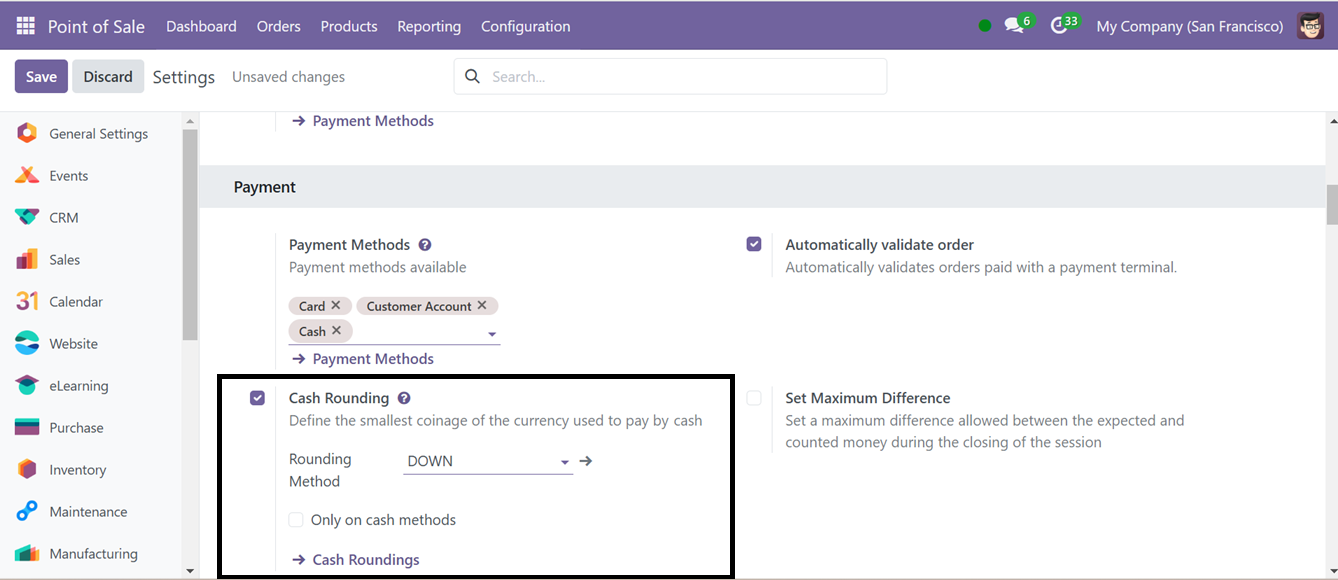
Activating this ‘Cash Rounding’ feature in the settings window will display a field to choose the ‘Rounding Method.’
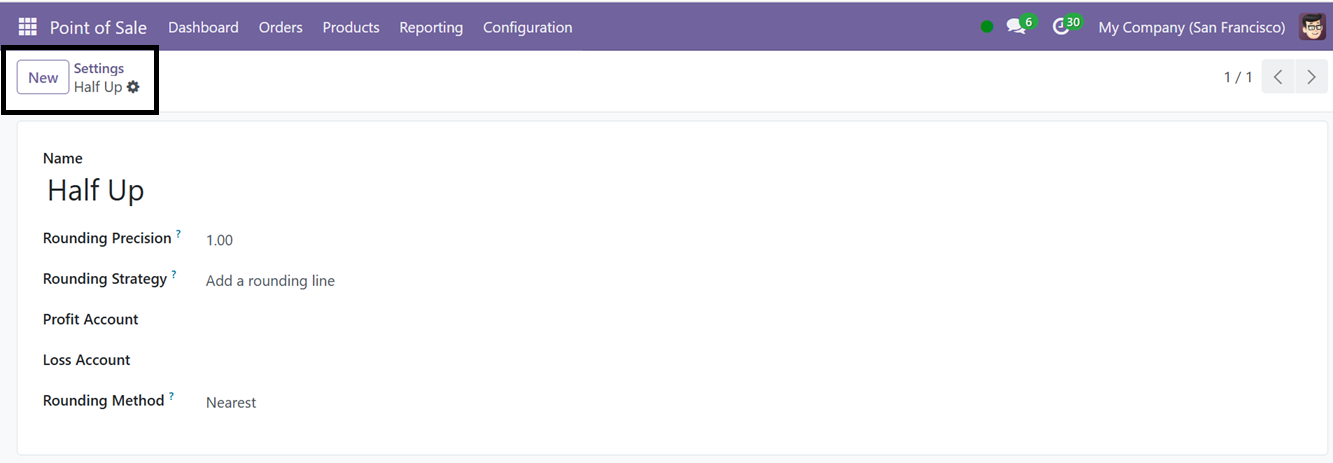
Then, you can choose the available rounding methods or create new ones by clicking the ‘Cash Rounding’ interlink provided near the field. This will show the list of the available cash rounding methods with their Name, Rounding Precision, and Rounding Method details, as shown below.

Clicking on the ‘New’ button opens the form view of the current Cash Rounding Method as shown below.
To create a new cash rounding procedure, click on the ‘New’ button, enter the name of the procedure in the form view, and specify the smallest non-zero currency value using the 'Rounding Precision' argument. In the "Rounding Strategy" section, define the methodology for rounding the invoice amount to the specified accuracy.
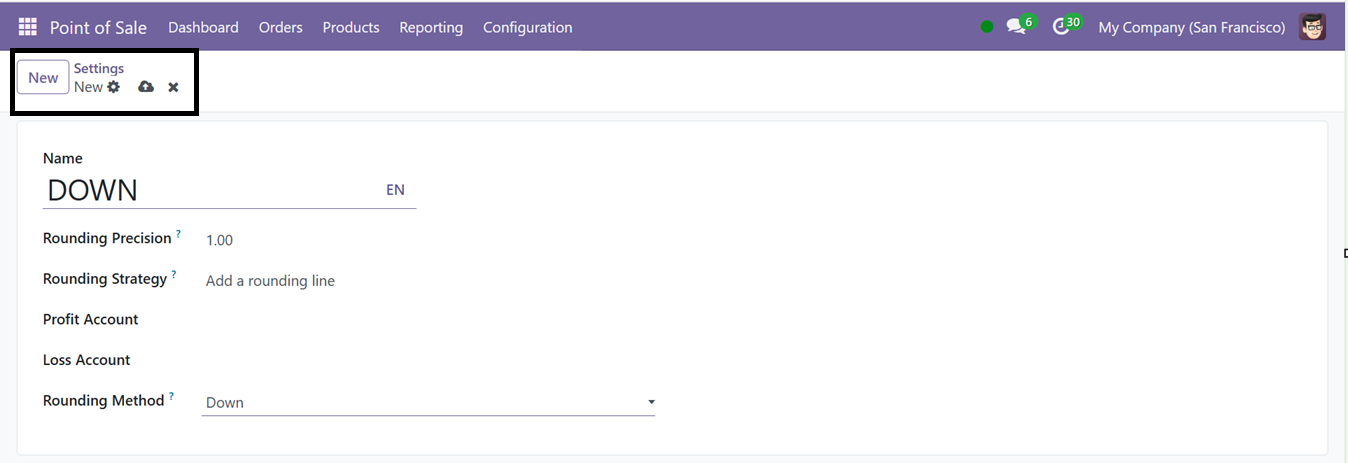
Options include adjusting the tax amount or appending a rounding line, with the 'Profit Account' and 'Loss Account' designated in the respective fields. Three options for the "Rounding Method" are UP, Down, and Nearest.
● Up: Result rounded towards positive infinity, adhering to rounding precision.
● Down: Result rounded towards negative infinity, based on rounding accuracy.
● Nearest: The ‘Nearly’ strategy is successful for fractional values, rounded down for fractional components less than 0.5.
After configuring the settings, save the Cash Rounding method and verify the functionality of defining the smallest denomination of a currency within the Odoo 18 Accounting Module. From the above example, we have created the Cash Rounding method as ‘Down’ with a rounding precision of 1. Then, we can configure this method in the settings window.

We can test the new Cash Rounding Method's functioning by starting a fresh Point of Sale session and selecting a few products after saving it. Following product selection, the cash rounding technique will be applied to the product price. The screenshot below shows the rounding price in the "Rounding" area located in the product pricing section.
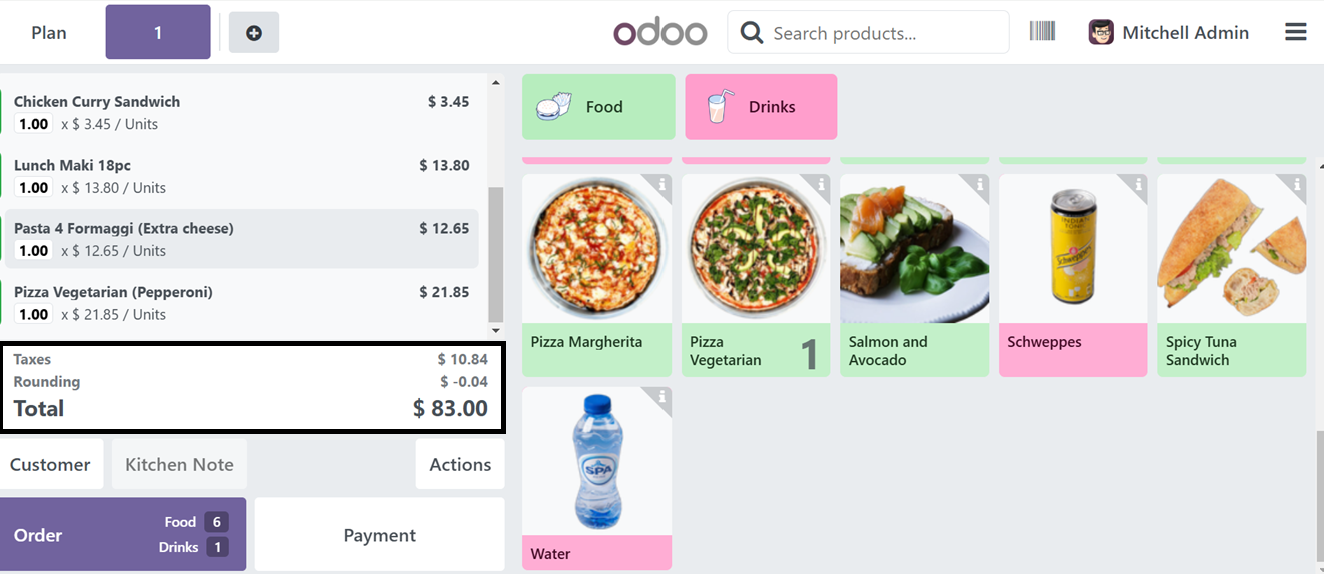
Here, the Rounding price goes towards a negative infinity of ‘$-0.04’ as per the ‘Down’ Rounding accuracy.
After choosing the products and the customer, order the products using the ‘Order’ button and go to the payment procedure using the ‘Payment’ button. This will open the payments window, where you have to choose the Payment Methods and validate the payment using the ‘Validate’ button.

After validating the payment, you can see the cash rounding amount from the ‘Total’ area of the sales invoice as shown below.

Then, you can use various Cash Rounding methods with different rounding precisions as per the business policies.
Customers can also take tips or convert their change into a tip using the Tips option. The Set Maximum Difference box allows for a maximum difference between expected and counted money, which can be defined using the Authorized Difference option.
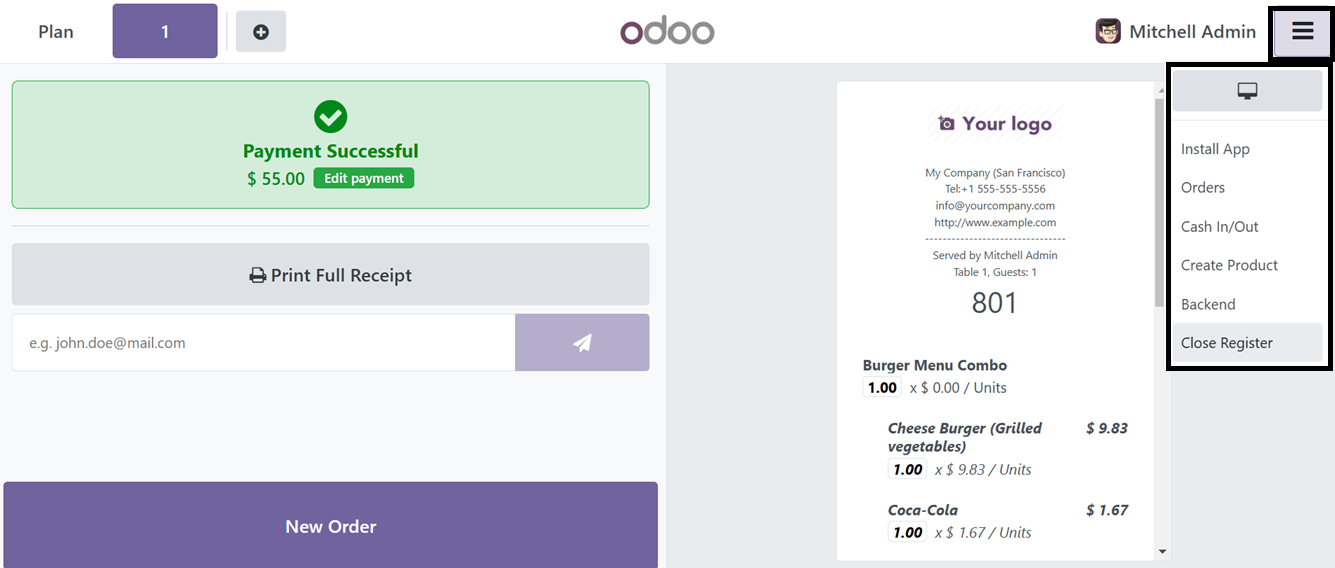
To check this feature, Open a Point of sale session and complete the ordering process and payment validation. Then, go to the menu provided at the upper right corner of the payment completion window and choose the ‘Close Register’ button to close the sales session.
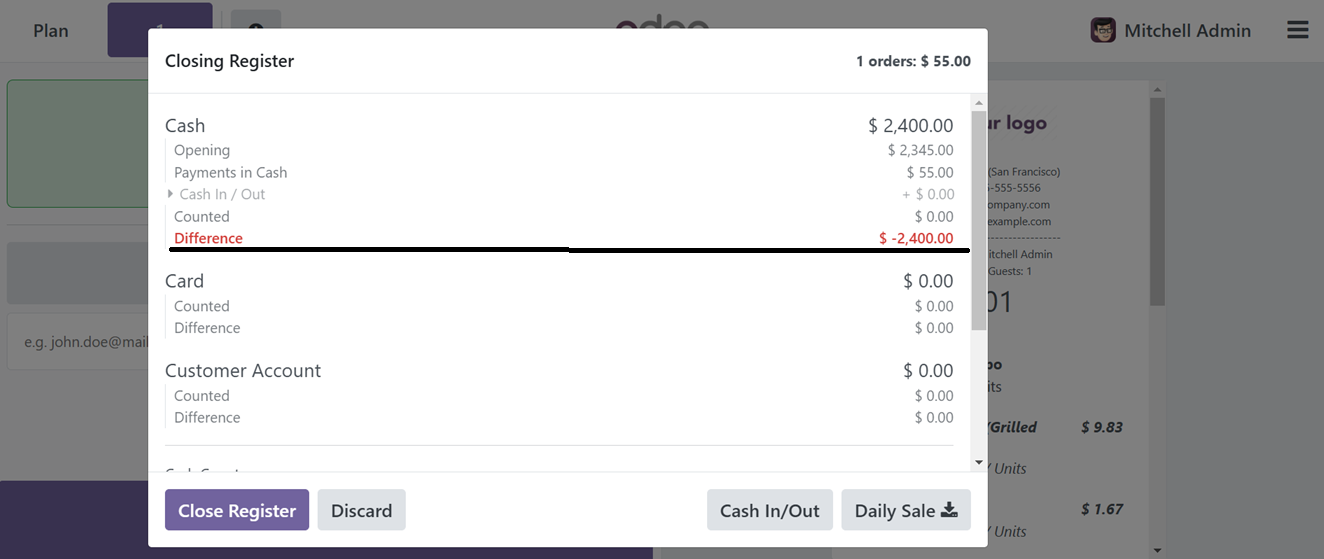
Clicking on the ‘Close Register’ button will open a new window with the payments and sales transaction details. Here, you can see the maximum difference between expected and counted money in the ‘Difference’ field highlighted in red color, as shown below.
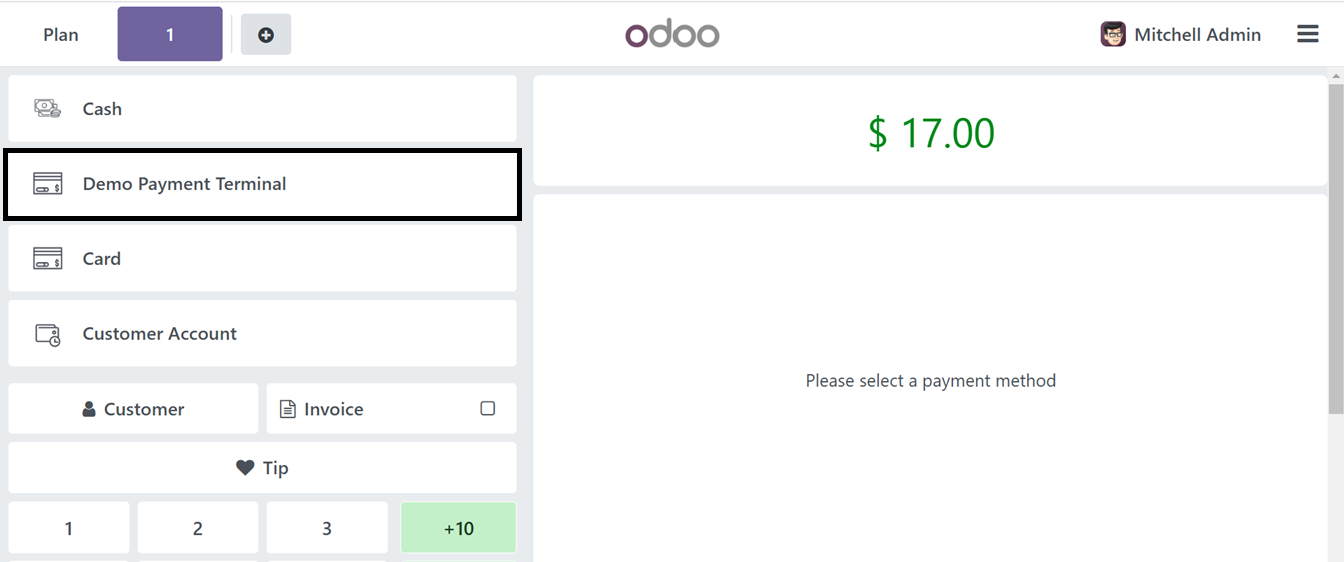
Orders paid through the payment terminal can be automatically validated using the ‘Automatically validate orders’ feature. To check this feature, open a new Point of Sales Session, complete the order and go to the Payment session.
This feature is only available for Online Payment Terminals. So, I have chosen a ‘Demo Payment Terminal’ as the ‘Payment Method’ as illustrated below.

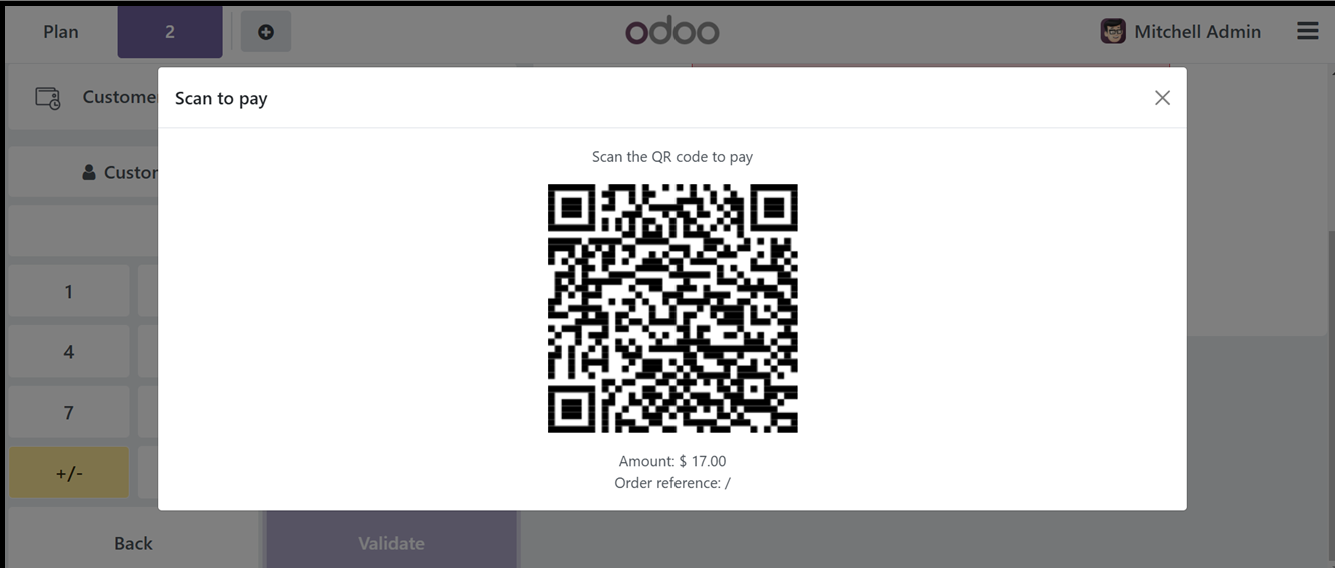
Upon selecting the Payment Terminal, a QR code window will appear, allowing users to scan and pay transactions without manually validating the payment.
Then, you can activate the ‘Tips’ feature that enables the users to accept customer tips or convert their bill balance amounts to a tip amount.
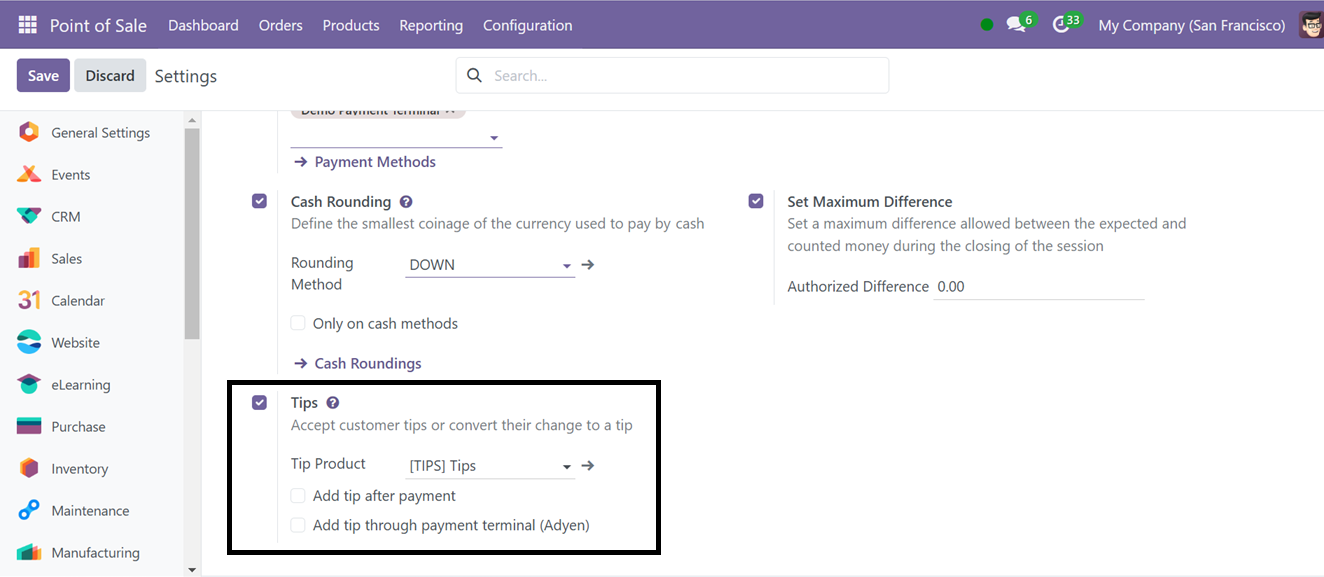
Here, you can also set a tip product by entering or choosing the product name to create a new tip product in the Tip Product section. This simplifies the tipping procedure within Odoo's POS system and guarantees proper tip recording on client receipts.
The ‘Add tip after payment’ button can be enabled to allow tip-adding features only after making the payment. Then, the ‘Add tip through payment terminal (Adyen)’ option allows customers to add a gratuity directly during checkout through the Adyen payment terminal, prompting them to specify a tip amount before completing their payment.
Here, we can simply add a tip product or amount while making a payment in a point of sale session using the ‘Tip’ button.
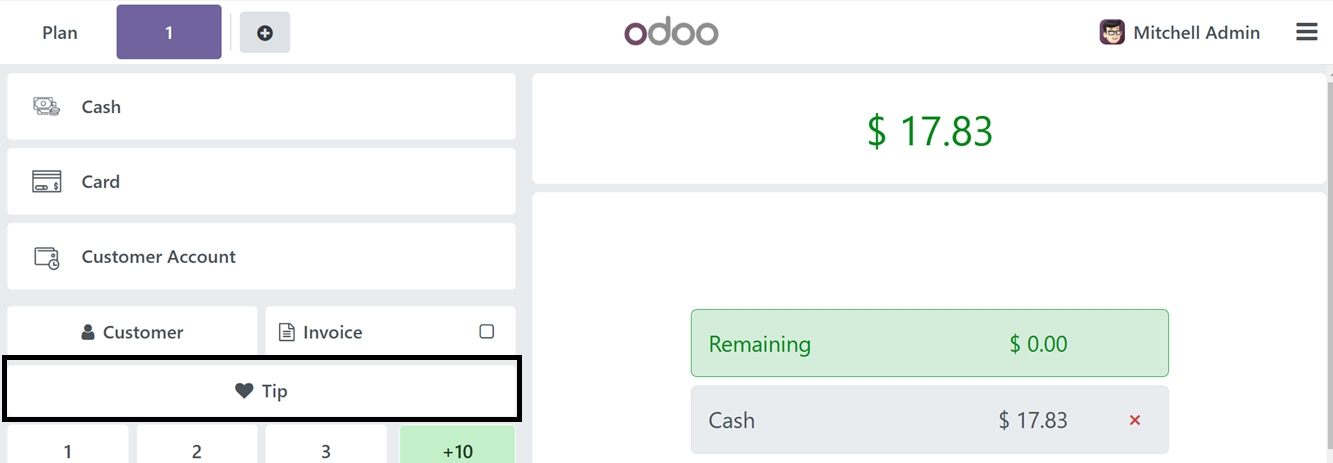

Clicking on this button will open a pop-up window, where you can add the tip amount as shown below.
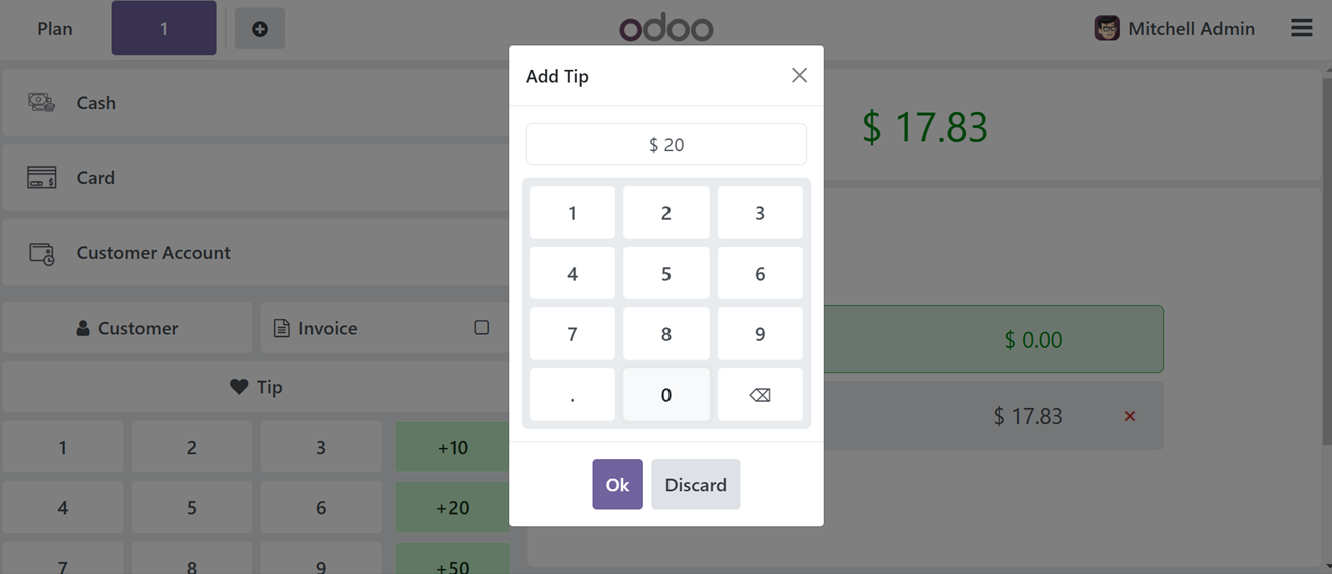
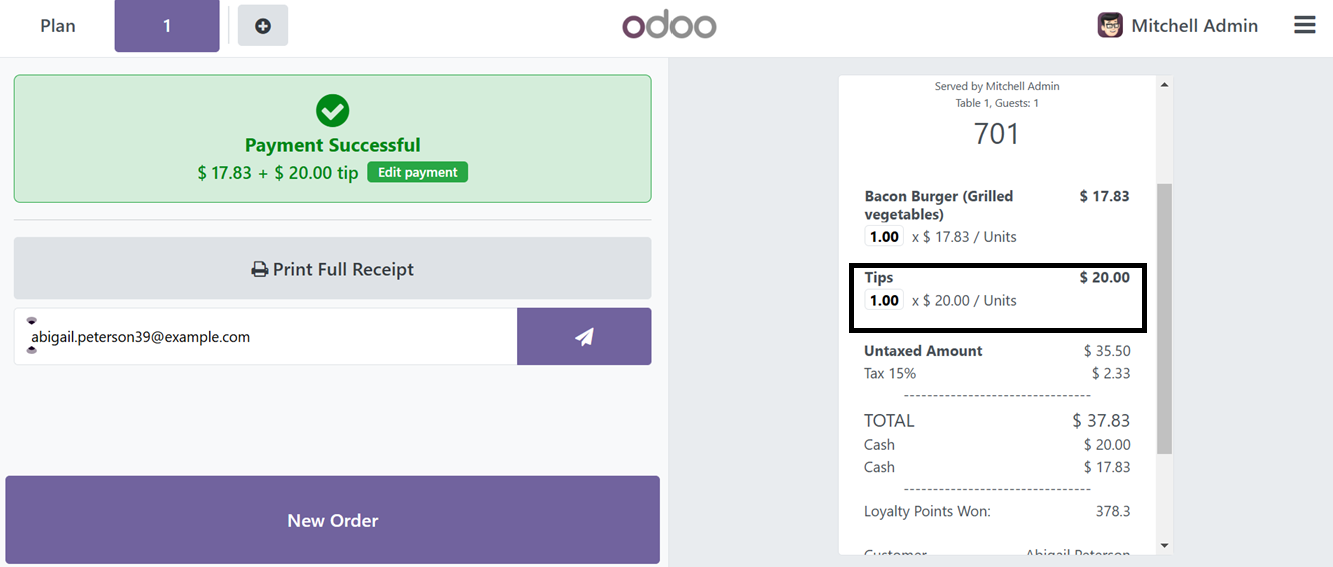
Click the ‘Ok’ button after entering the tip amount and this will be added to the Total bill amount in the ‘Tips’ field. Then, the tip will also be added to the invoice bill as illustrated in the screenshot below.
PoS Interface Settings
The PoS Interface settings can be used to hide or display product pictures in a POS session or interface. To activate or deactivate the Show product images,’ and ‘Show category images’ options are provided under the ‘Hide pictures in POS’ area.
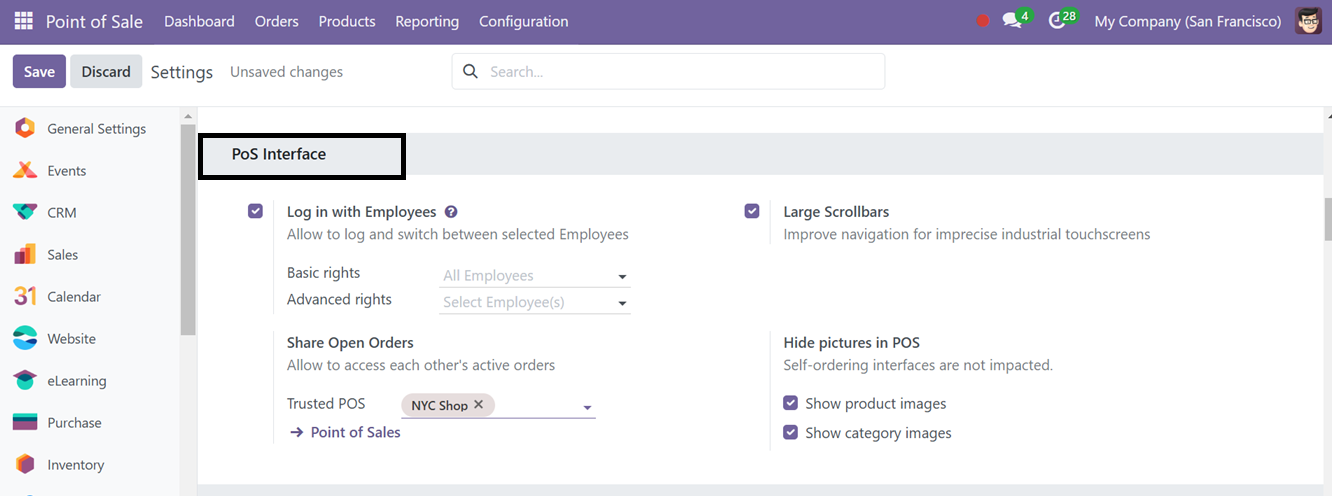
Enabling the 'Login with Employees' feature allows users to access and switch between employees with basic and advanced login rights. So, you can choose the employees who can only access the ‘Basic rights’ and ‘Advanced rights’ fields.
Login with Employee PIN or Badge ID
Odoo 18's Point of Sale (POS) module features a 'Login with Employees' feature to ensure security and accountability. By enabling the ‘Multi Employees per Session’ option while creating a new shop, users can specify which employees can access the system.
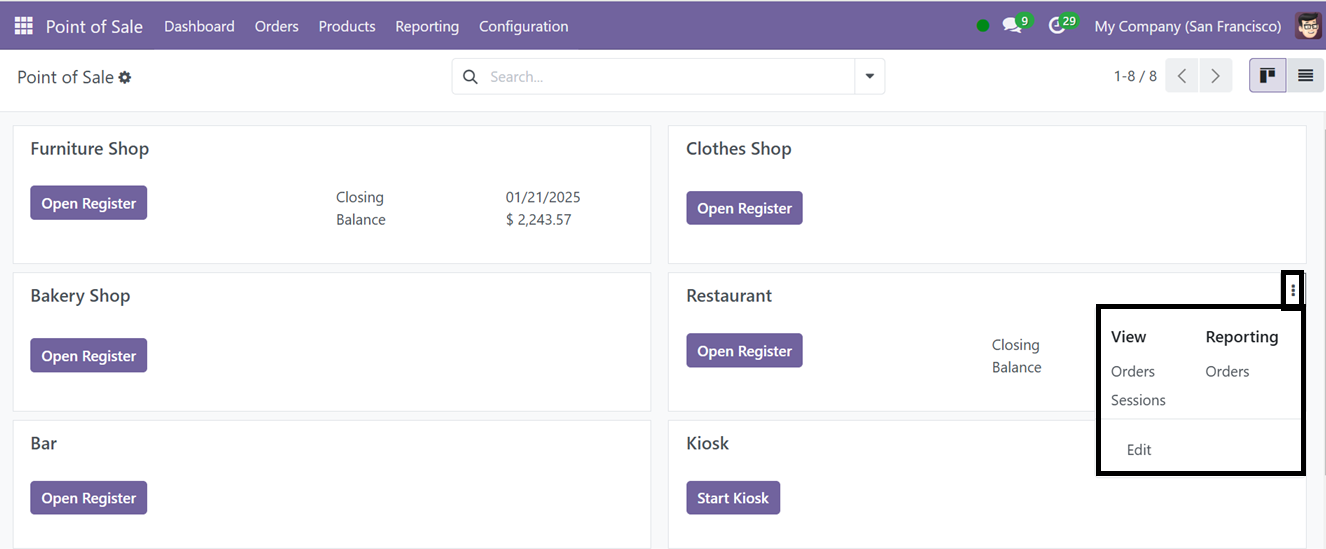
To configure this feature in an existing shop, click on the 'Edit' button in the three-dotted menu of the kanban view from the Point of Sale dashboard.
The ‘Edit’ button will open the settings window as shown below. Here, you can choose the Employees with Basic & Advanced login rights.
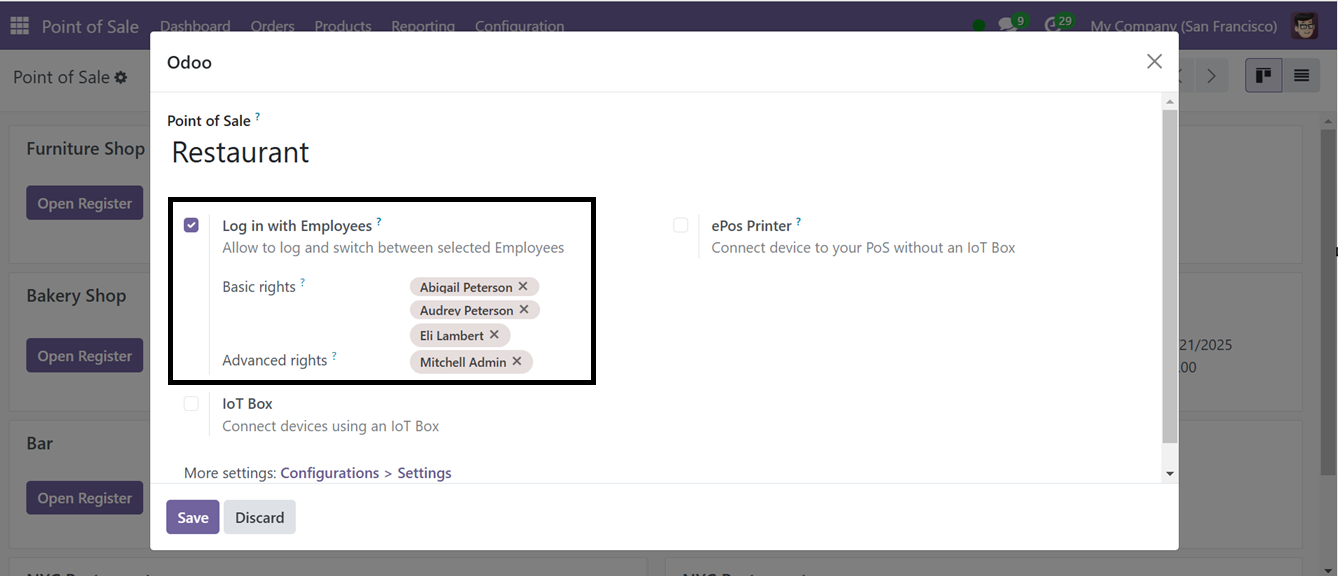
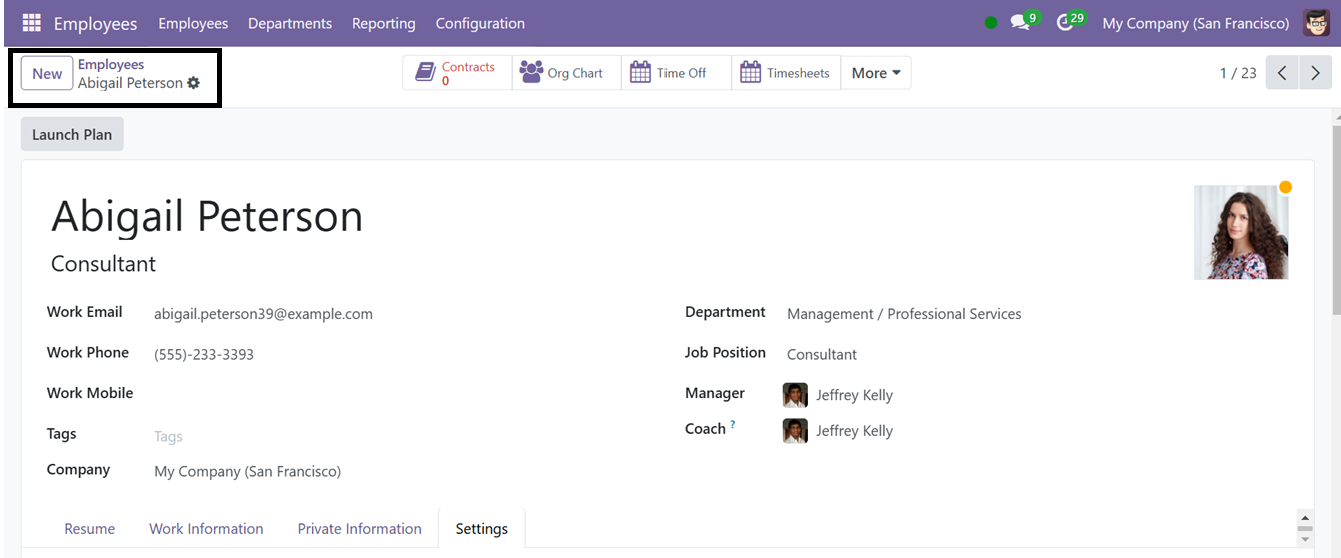
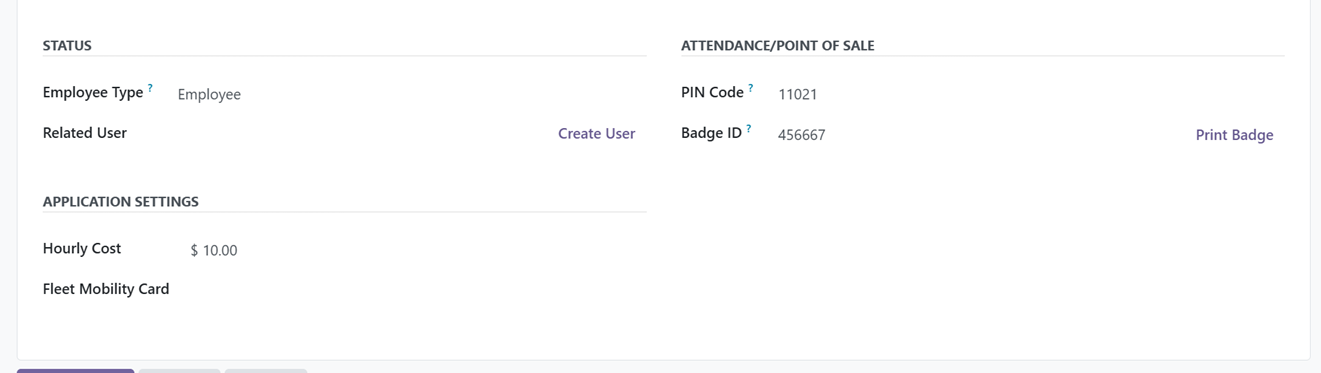
This allows for accurate tracking of sales activities and prevents unauthorized access. Employees can log in using their assigned Badge ID or unique PIN code, which can be assigned in the HR Settings tab of the Employees Module. This helps maintain the integrity of sales data.
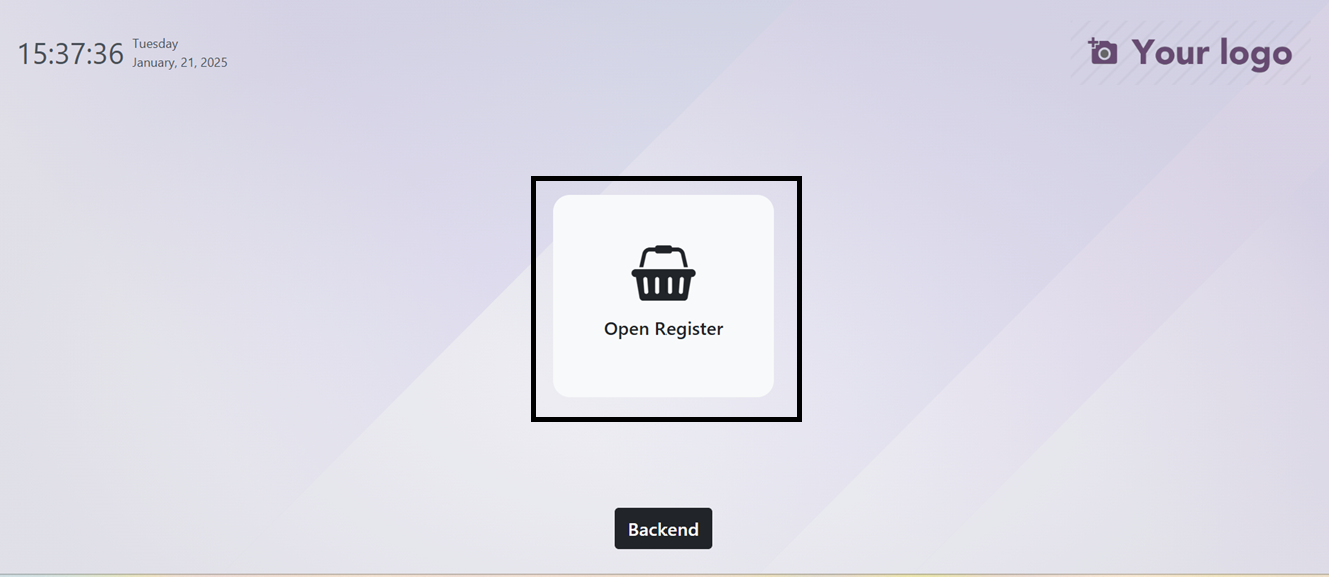
After setting the PIN Code and Badge ID, go back to the Point of sale module and start login to the sales session. While trying to open the Session/Register, you will get the ‘Open Register’ button as shown below.
Clicking on the ‘Open Register’ button will open an editing field where you have to enter the employee PIN Code to login to that particular shop session.
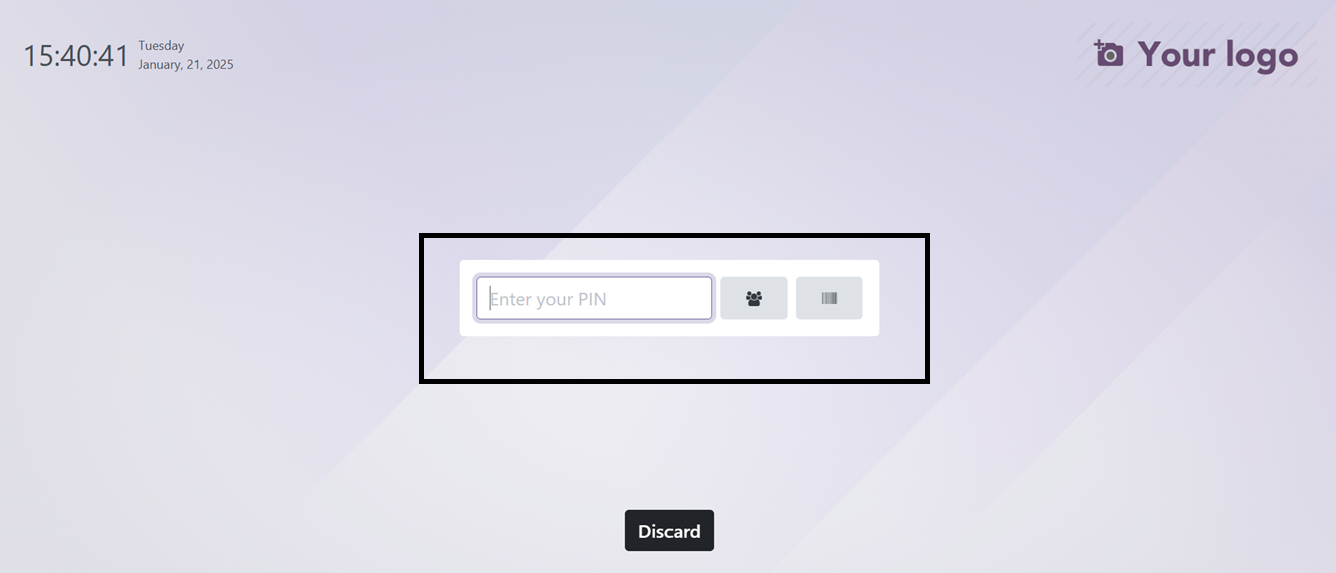
Using the ‘Employees’ icon provided near the editing field, you can see the available Employee list that we have configured earlier in the ‘Login with Employees’ settings area.
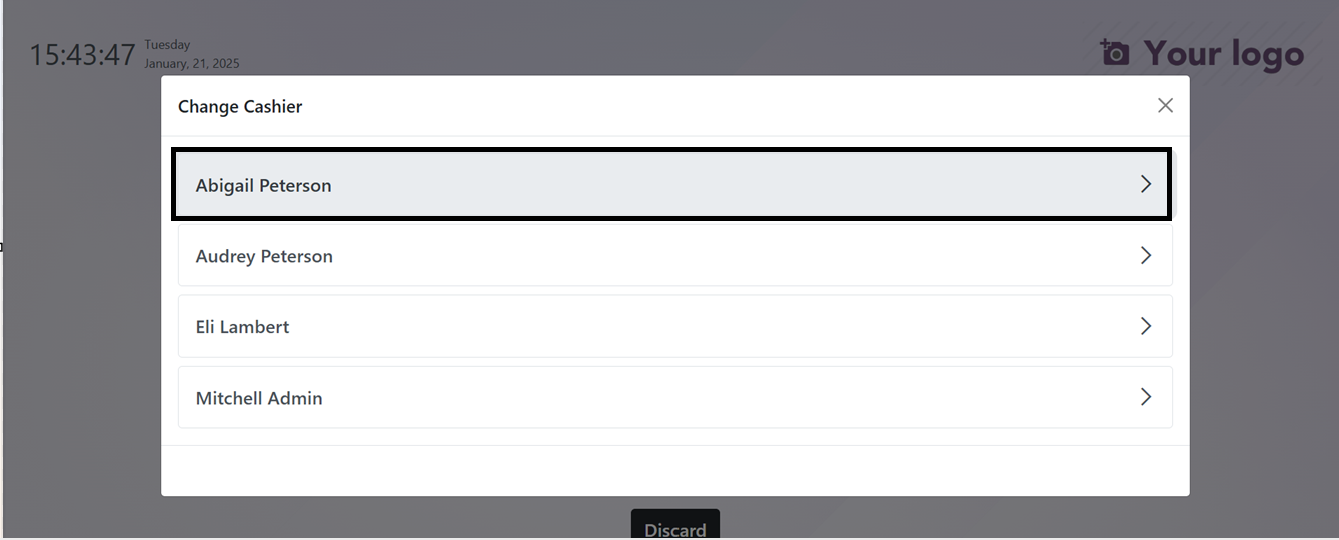
After choosing the employee name from the list, a new password editing keypad will appear that can be used to edit the Employee PIN Code.

Pressing the ‘Ok’ button after editing the PIN will login the employee into the point of sale session. Then, you can enter the Opening Register details including Opening Balance and Opening Description and continue the sales procedures.
Employees can easily switch cashier posts by logging out and in using their individual PIN Codes, and Advanced rights users can access the Point of Sale system without security passwords.
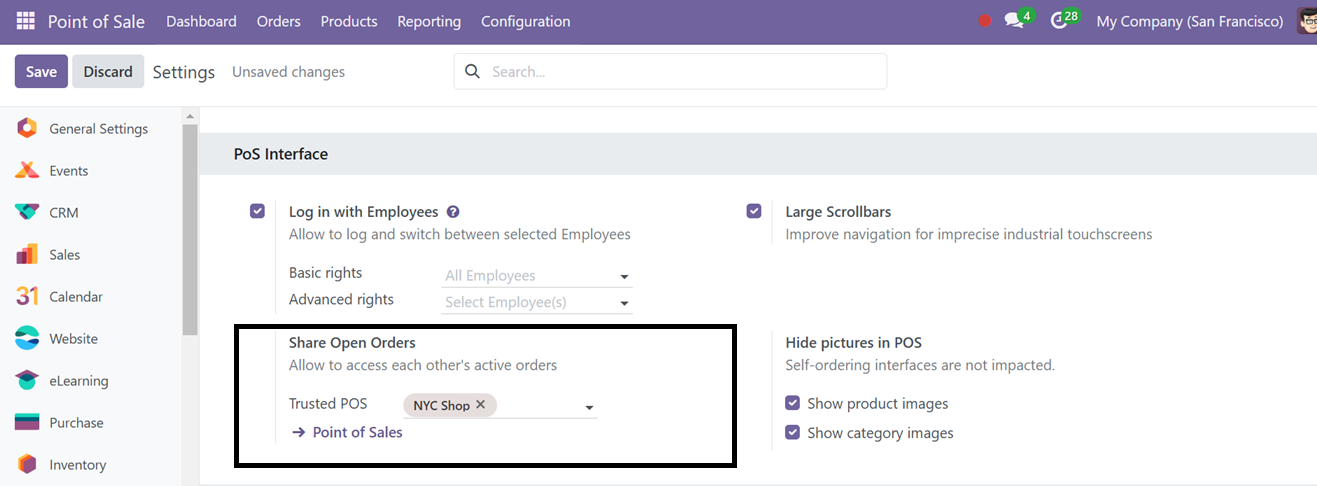
The "Share Open Orders" feature in Odoo 18's Point of Sale (POS) settings enables multiple users or cashiers to access and manage the same open orders within a single POS session. The ‘Trusted PoS’ functionality allows orders to be saved on one POS terminal and seamlessly transferred to another, ensuring smooth collaboration between staff members. It is particularly useful in environments like restaurants or retail stores where orders may need to be updated or finalized from different terminals.
After configuring the Trusted POS shop section, you can create a new sales order in two Point of Sale sessions simultaneously. During the process, you can save an order inside a PoS and monitor the ongoing orders of the other PoS session through the 'Orders' section in the three-lined menu of the Point of Sale terminal.
Here, we can order a product, a ‘Mojito’ from a shop session to check this functionality.
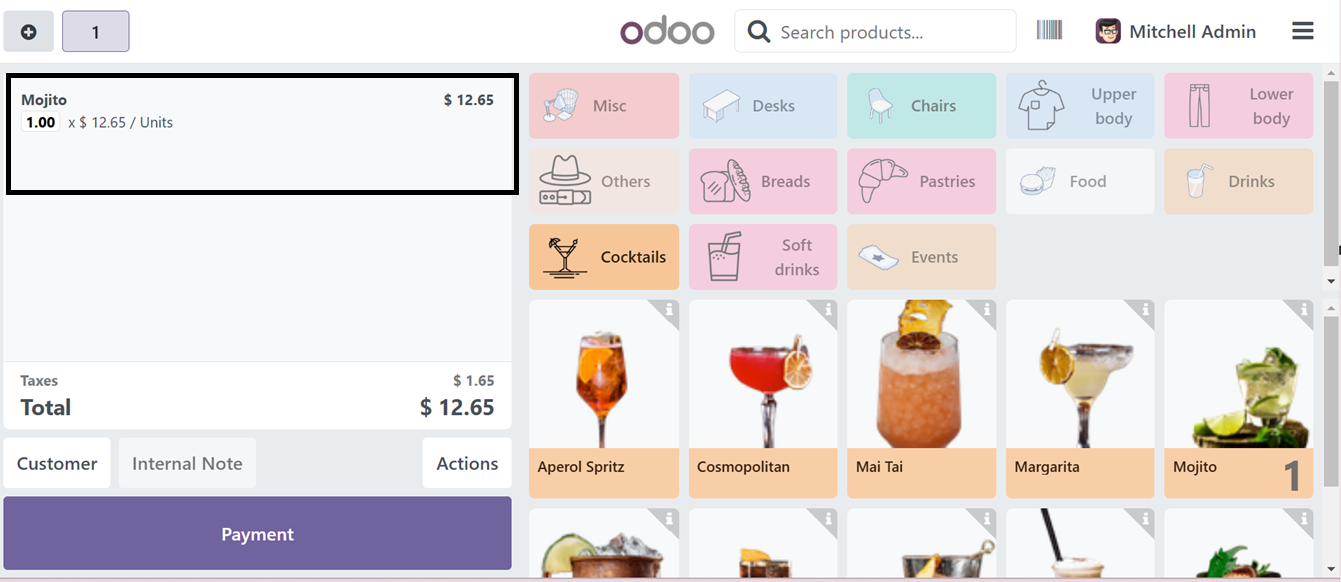
Next, navigate to the Point of Sale Dashboard and open another session, which is also a shared Point of Sale session. This will display the ongoing order details from the previous sales session, as shown below.

By providing real-time access and flexibility, this feature enhances operational efficiency and improves customer service.
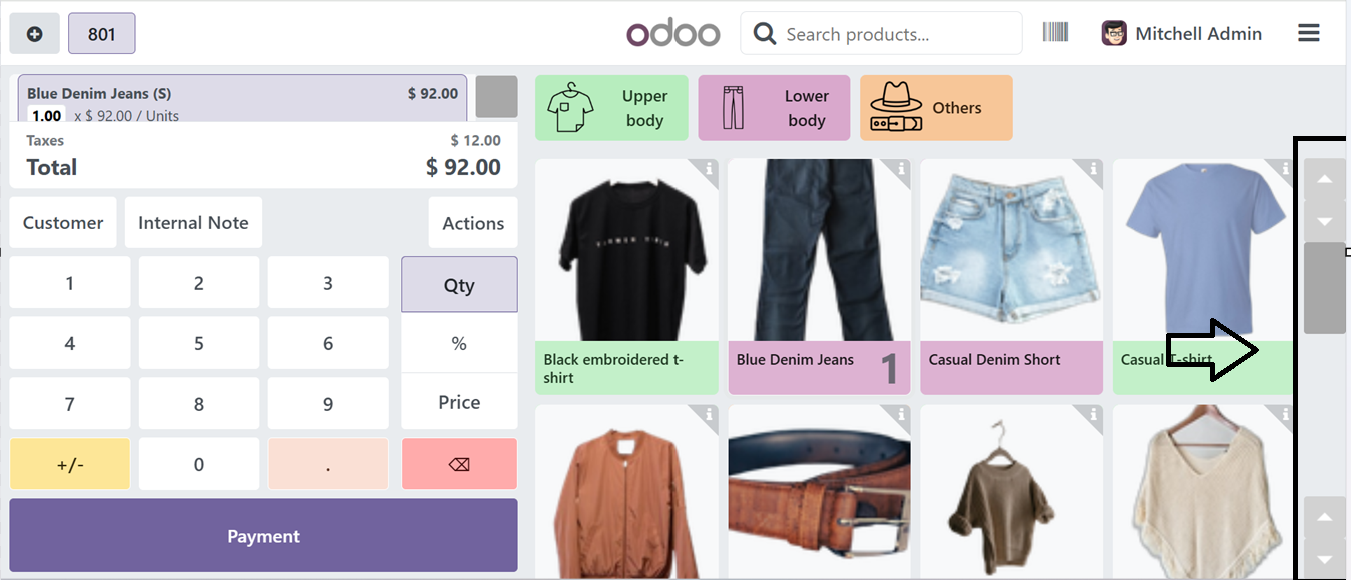
The ‘Large Scrollbars” settings improves usability for mobile touchscreens and devices with limited precision, optimizing accessibility and visibility in fast-paced settings while using the Restaurant or any Point of Sale shop session.
Then, enabling or disabling the ‘Hide Pictures in POS” option can be used to Hide or Show product images and Category images. After disabling the ‘Show product images’ and ‘Show Category images’ options, the point of sale product catalog window will never show any images, as you can see from the screenshot below.
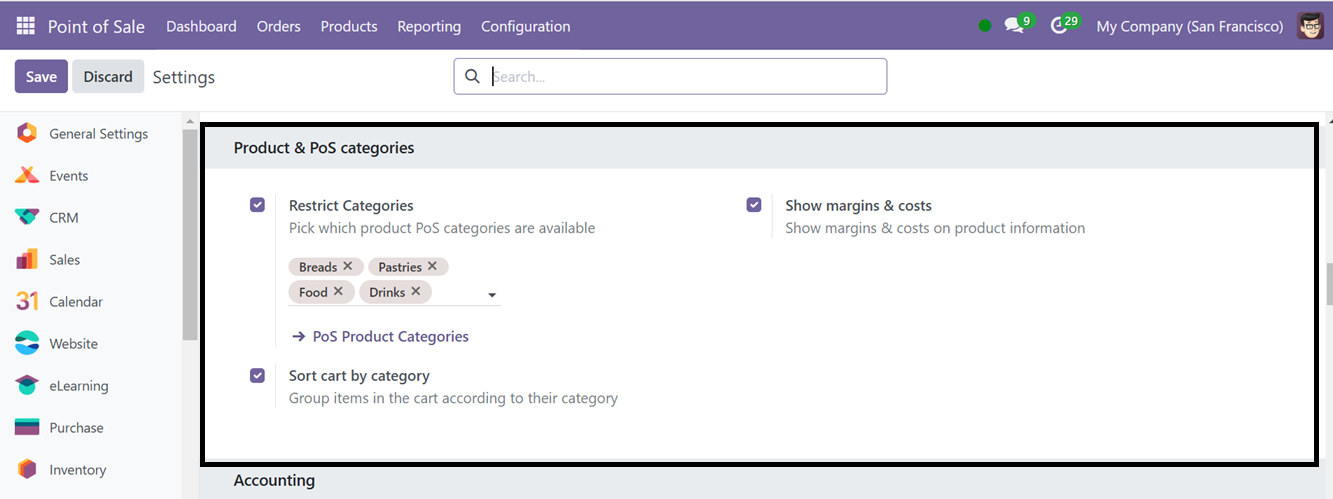
Then, you can manage the products and categories from the ‘Product & PoS Categories’ section. This tab will help you to manage which PoS product categories are available for this current Point of Sale Session by enabling the ‘Restrict Categories’ option.
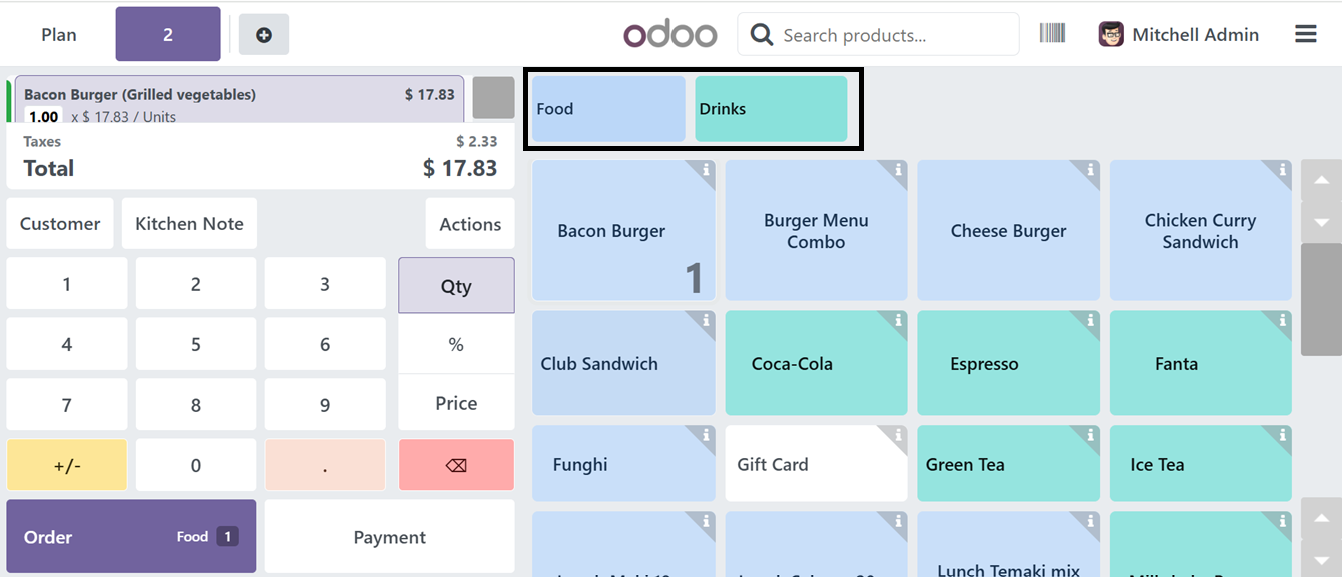
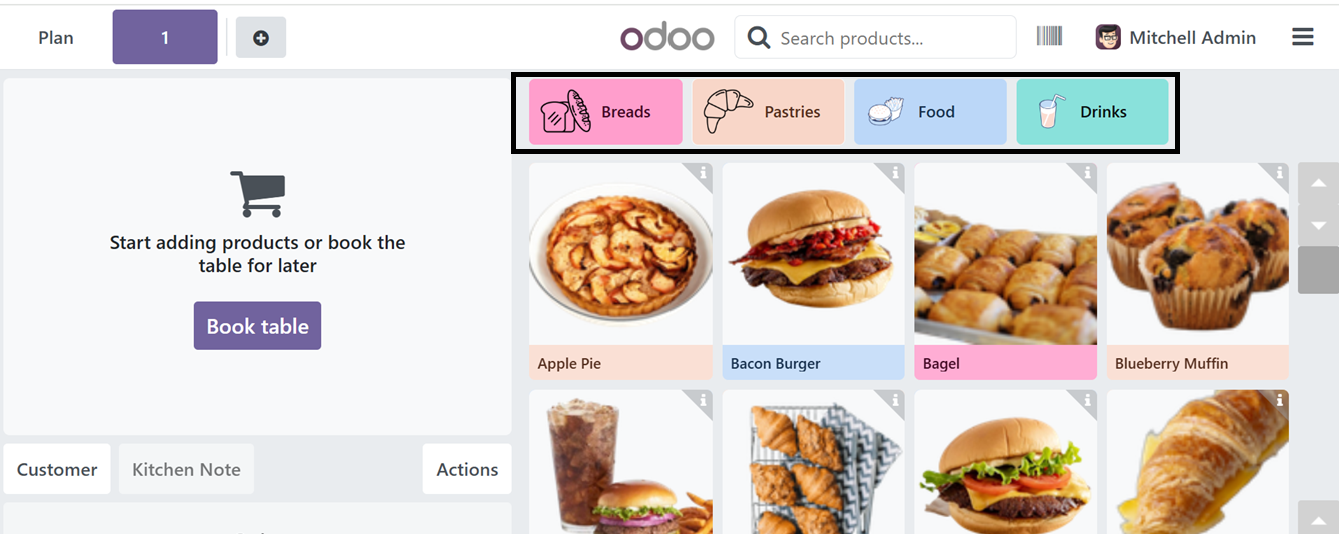
After choosing the required categories, you can see these categories at the top of the product catalog window of the sales session as shown below.
Then utilize the ‘Sort by category’ option to group products or items into categories. After enabling this feature, the products will be grouped into their respective categories in the shopping cart area while ordering. These categories can be shown inside the ‘Orders’ button as ‘Pastries,’ and ‘Drinks,’ as you can see from the screenshot below.

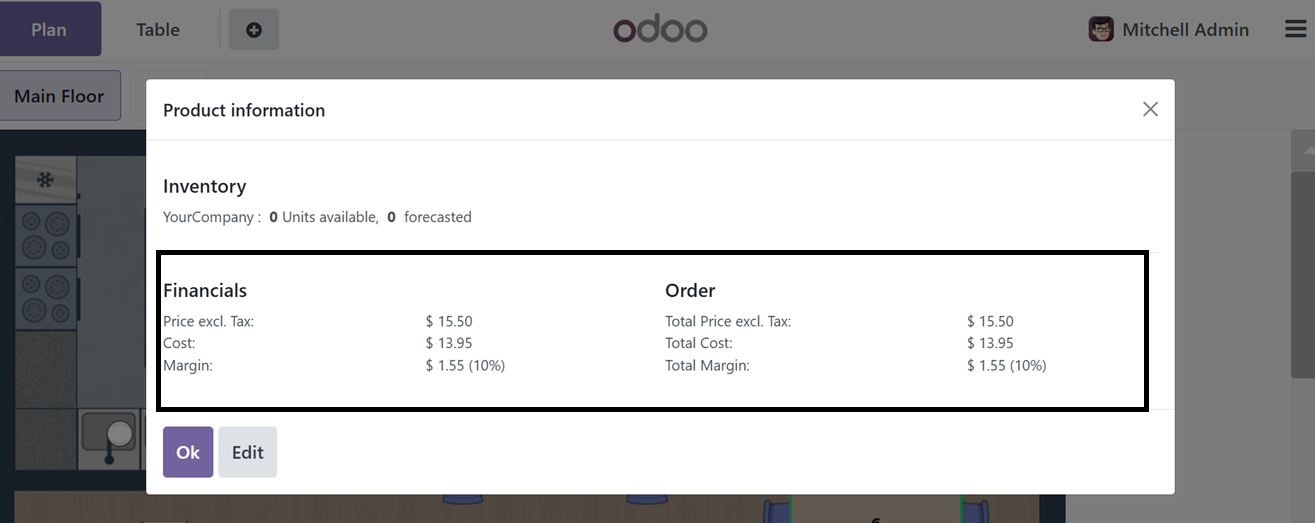
Then, the “Show margins & cost’ option can be used to show or hide product margins and costs in a product catalog of the point of sale session.
After enabling the feature, click on the ‘i’ button provided at the upper right corner of any product to check its product information. This will open the product information window. Here, you can check the product’s Cost, Margin, Total Cost and Total Margin from the screenshot below.
Accounting Settings
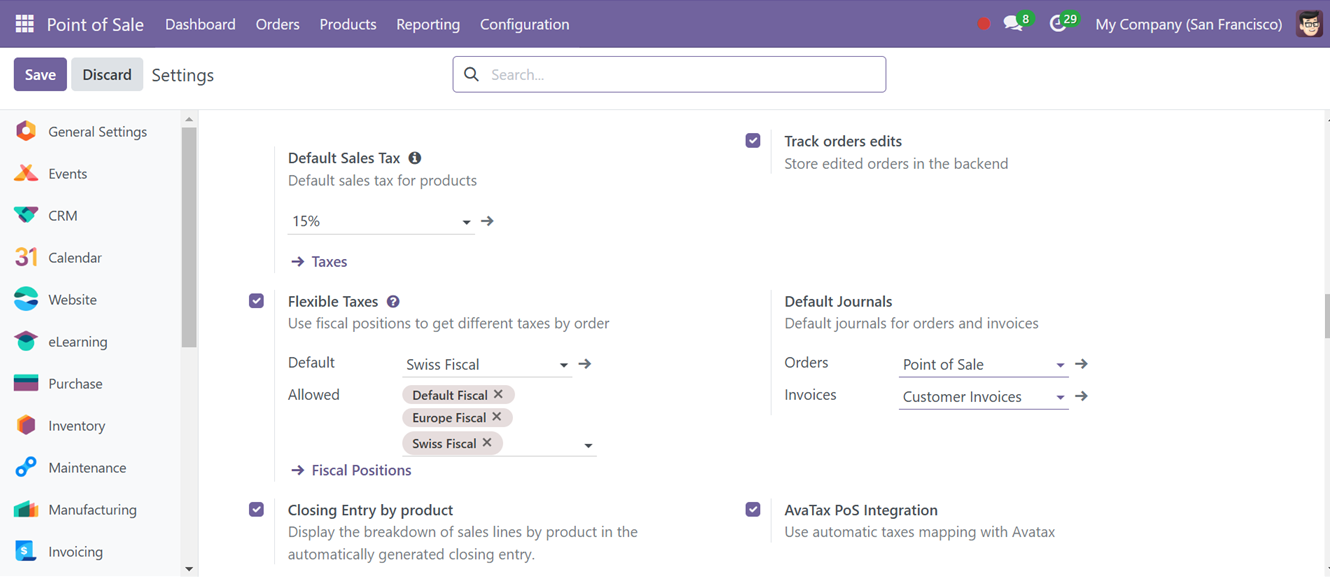
The Accounting tab allows users to select the Default Sales Tax for newly added items in the catalog. To manage available sales taxes, click the provided external link. Customers can select a fiscal position at the time of order using Flexible Taxes.
Odoo's Flexible Taxes feature is advantageous for companies who operate in several countries since it enables them to modify their tax administration to comply with local or sector-specific laws.
Fiscal Flexibility
From the ‘ Flexible Taxes settings area, you can set the Default and Allowed Fiscal Positions. These Fiscal Positions automate tax and account mappings based on customer or vendor location, tax-exempt status, and other criteria, ensuring accurate tax application during sales, purchases, or invoicing. To create a new Fiscal position, click on the ‘Fiscal Position’ link. This will open the dashboard of all the available positions as shown below.

Click on the ‘New’ button to create a new fiscal position and edit the details including the name of the Fiscal Position and Company.
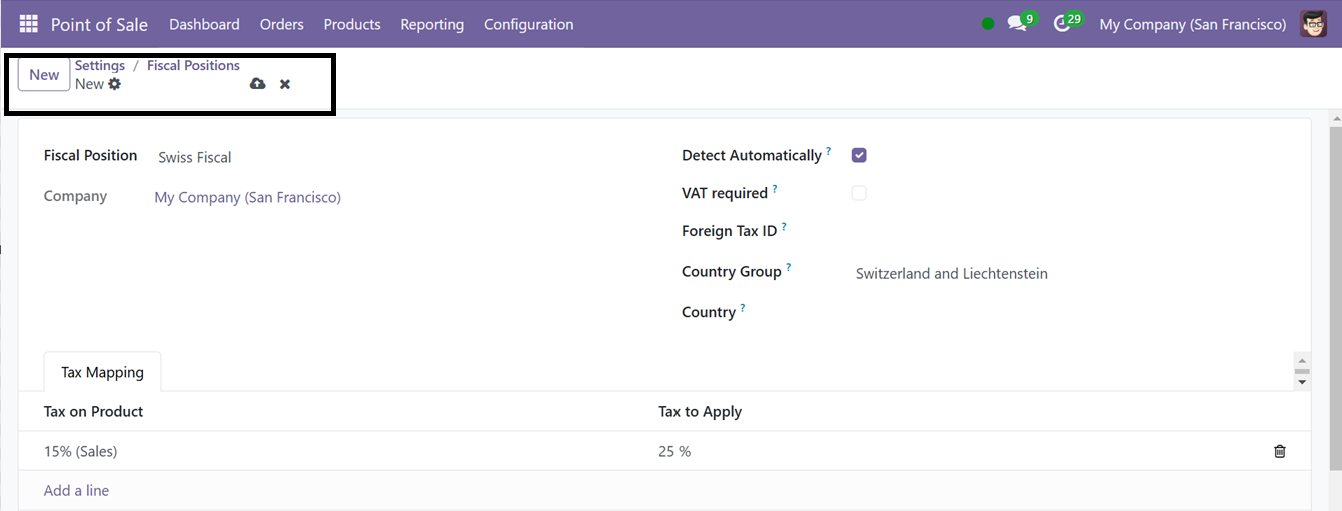
Enabling the ‘Detect Automatically’ button will automatically apply a fiscal position based on the location you choose. Activating the above field will display another two form fields including ‘VAT Required’ and ‘Country Group’ options. The ‘Foreign Tax ID’ field can be used to specify your company's tax identification number in the fiscal situation region.Odoo offers two options for partners with VAT numbers: VAT Required and Country Group. The ‘VAT Required’ option only considers partners with a VAT number.
The delivery country must correspond to the specified country group or nations provided in the ‘Country Group’ and ‘Country’ fields in order to be eligible for this fiscal position. The ‘Tax Mapping’ tab allows you to add taxes to the fiscal position. The ‘Tax on Product’ section allows you to specify the tax to apply to the fiscal position and the ‘Tax to Apply’ field allows you to substitute the tax you want to apply. After saving the data, you can configure the fiscal position in the ‘Flexible Taxes’ area.
Here, we have selected the ‘Default’ fiscal position as ‘Swiss Fiscal.’ So the taxes will be applied based on that fiscal position. To check the functionality of this feature, create a new Point of sale order as shown below.
Then, select a Swiss customer just to examine the fiscal position functionality in this scenario.
After choosing the customer, choose the payment method and validate the payment.


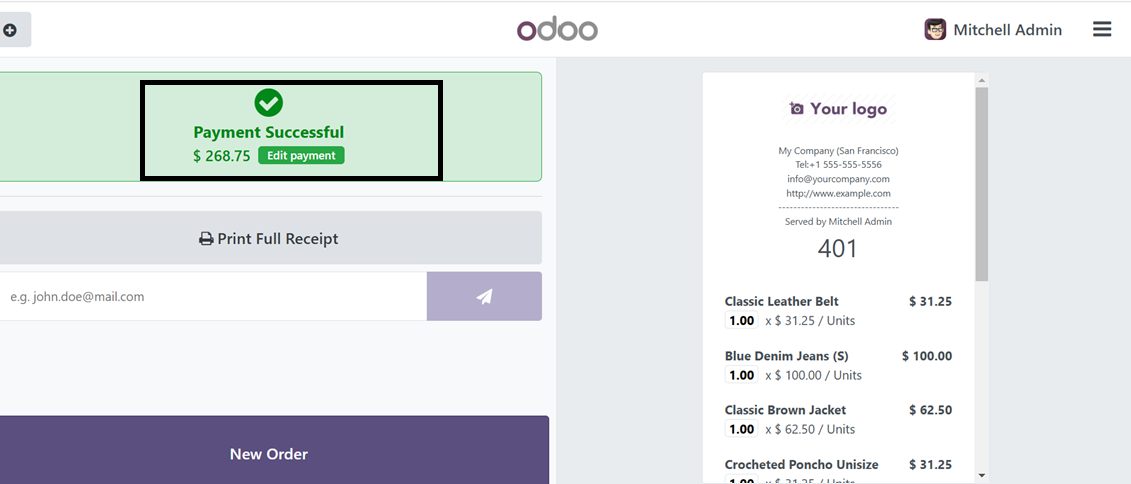
After completing the payment, you can click on the ‘Edit Payment’ button to check the order details and edit any changes to the order.
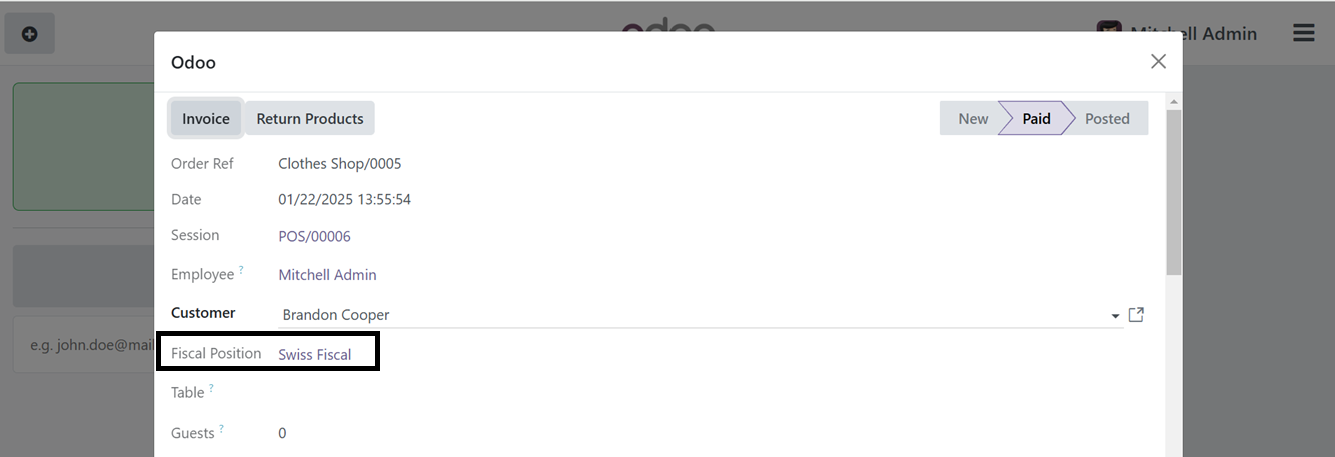
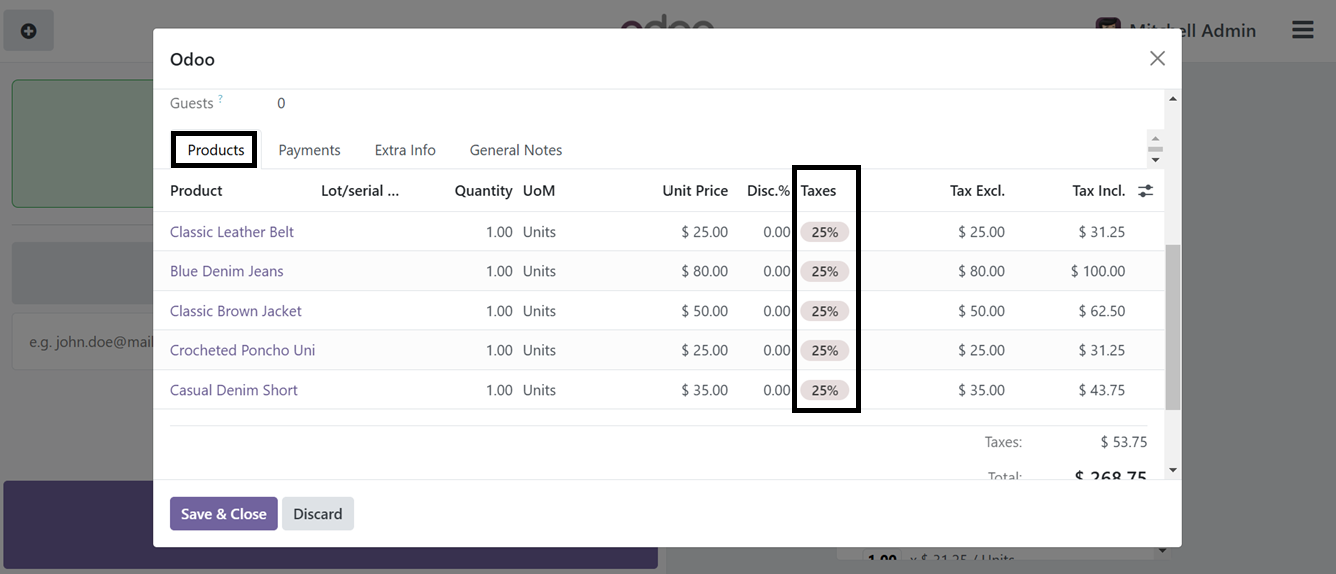
The ‘Edit Orders’ button will open the orders details view from the Odoo backend. From this window, you can see the ‘Swiss Fiscal’ fiscal position is applied for this particular order and the tax rates according to this fiscal position is applied to the journal entries as illustrated in the screenshot below.
You can also check the fiscal position and tax rates from the ‘Orders’ menu of the Odoo Point of sale module.
Then, you can designate the default journal for ordering and invoicing using the Default Journals field of the Settings window. Selecting the Default Journals for Invoices and Orders enables you to specify the journal entries used for recording financial transactions for sales and invoicing, which is crucial for accurate accounting and reporting.
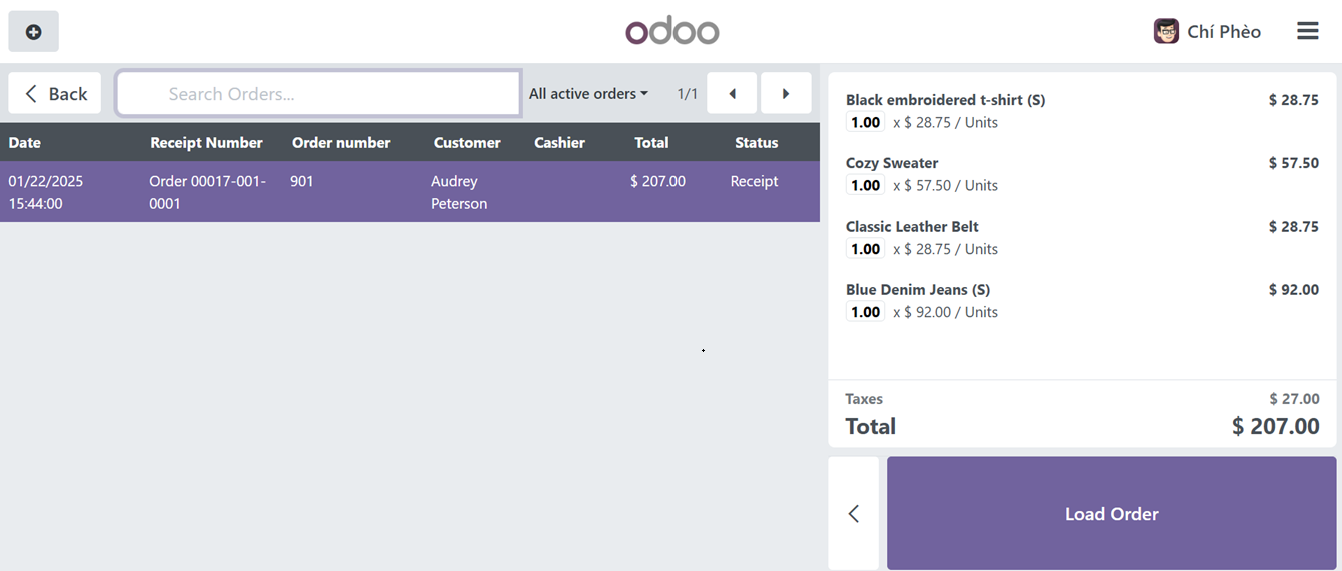
You can view this journal information after closing a Point of Sale order by accessing the 'Orders' section from the available menu options in the Point of Sale interface.
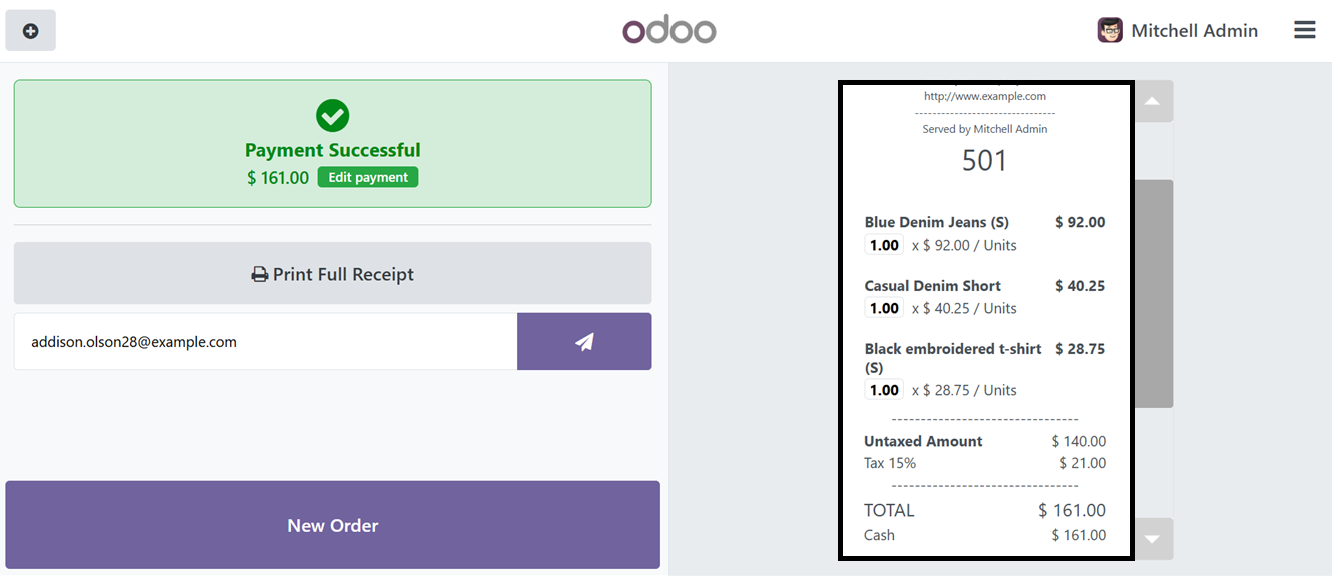
After completing the payment procedures, click on the ‘Edit payment’ button from the payment success screen.

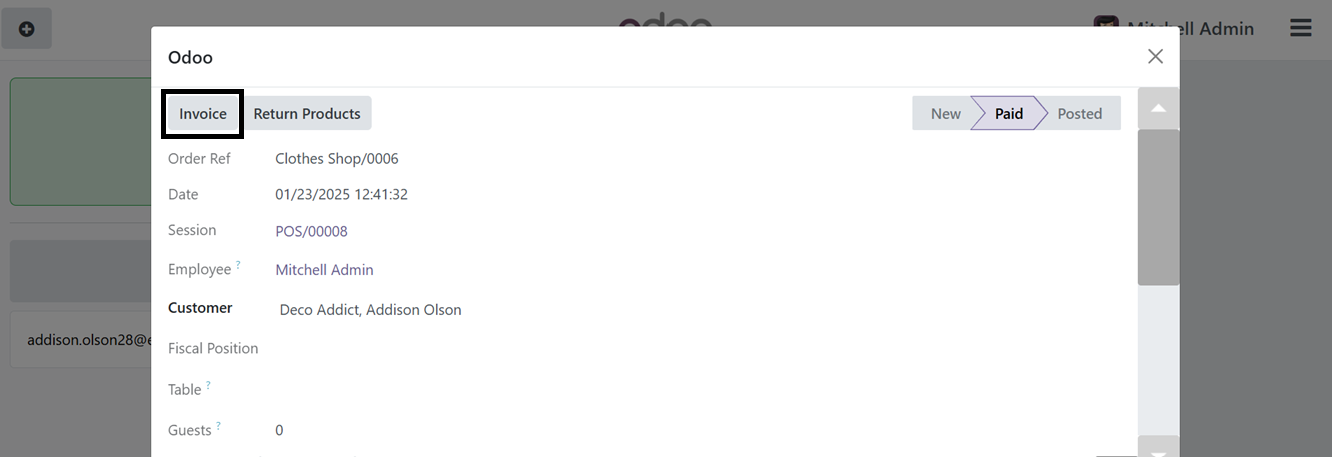
From the displayed Odoo backend interface, edit any changes, check the journal entries and create the invoice using the ‘Invoice’ button.
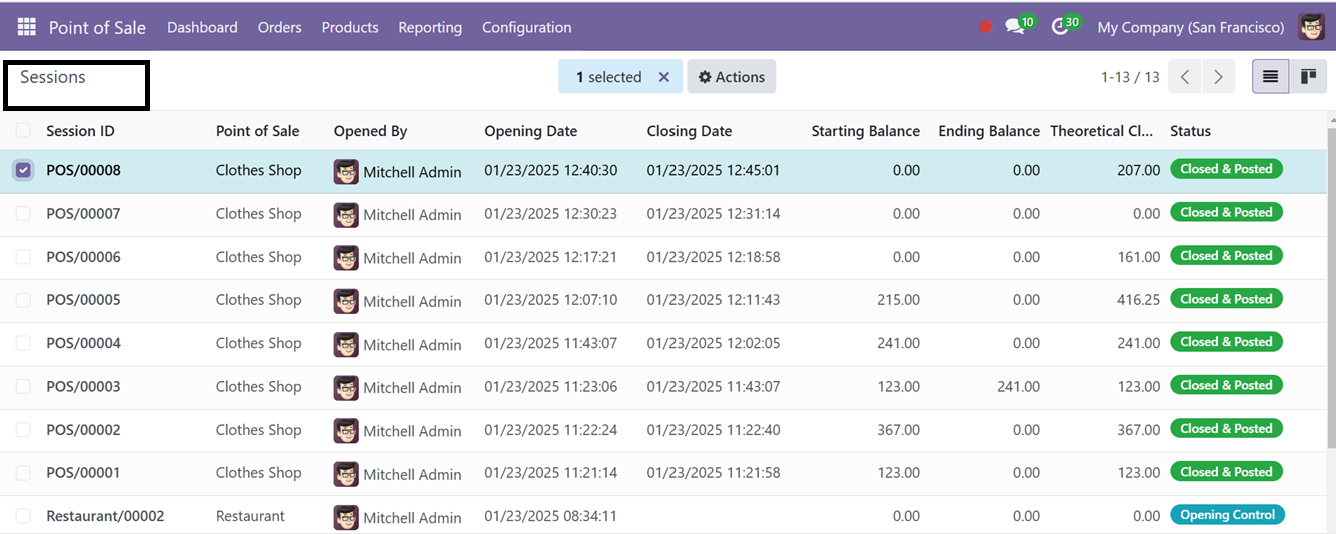
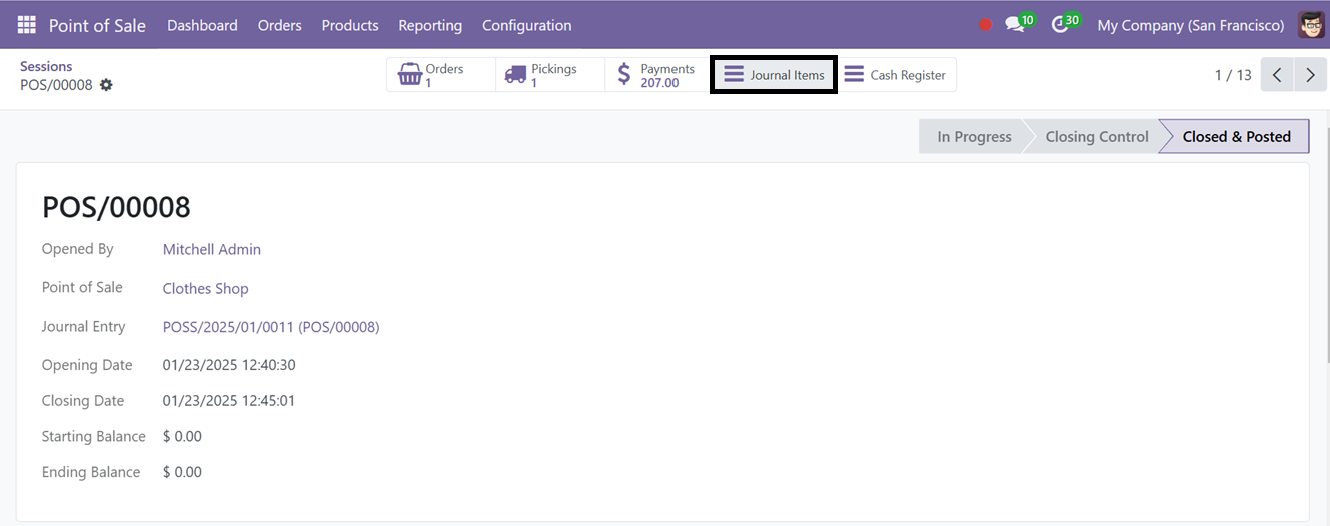
After creating the invoice, you can close the current shop session and navigate to the ‘Sessions’ window from the ‘Orders’ menu in the Point of Sale backend. Select the column corresponding to the currently closed session.
After opening the session form, choose the ‘Journal Items’ smart tab and open it.
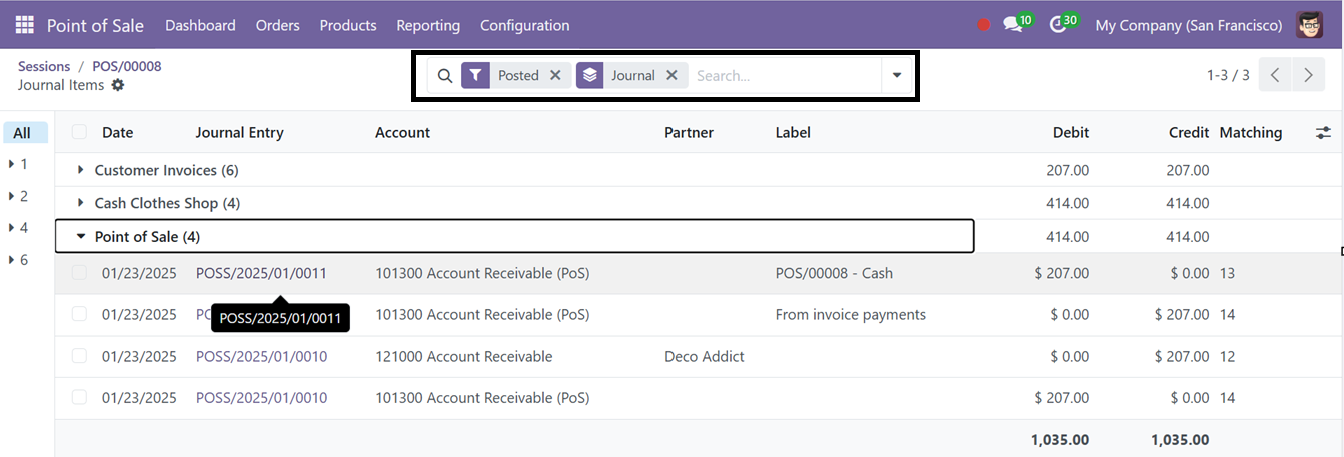
The ‘Journal Items’ tab will open all the journal item details in a dashboard. So, you can sort the relevant Journal details using the ‘Group By’ filter options. Here, you can view the journal entries recorded under both the customer invoice and Point of Sale sections, as shown in the screenshot below.
Activating the ‘Avatax PoS Integration’ feature will automatically map the tax amounts with the corresponding Avatax. The AvaTax PoS Integration in Odoo allows real-time, region-specific tax calculations by integrating Avalara's AvaTax service into the PoS system. This ensures accurate sales computations, comprehensive tax coverage for UN-chartered countries, inter-border transactions, and automatic updates to reflect changes in tax laws and special conditions. The functionality of this feature is the same as the Fiscal Position.
Then, the ‘Track orders edit’ settings option allows for the monitoring and recording of order modifications, enhancing transparency, accountability, and aiding in auditing and resolving discrepancies from the Odoo POS backend.
Users have the ability to modify an already completed order in situations requiring adjustments. For instance, if a customer's order has been finalized and payment has been processed using a card, but an issue arises with the card payment, the cashier may need to change the payment method to cash. In such a scenario, the Track Orders Edit feature facilitates the modification of the order, allowing the cashier to alter the payment method or make any other necessary changes related to the order.
After enabling this feature, create a new point of sale order and choose the products and finalize the order using the ‘Payment’ button.
After the order completion, I have chosen the ‘Payment Method’ as Card and validated the payment using the ‘Validate’ button
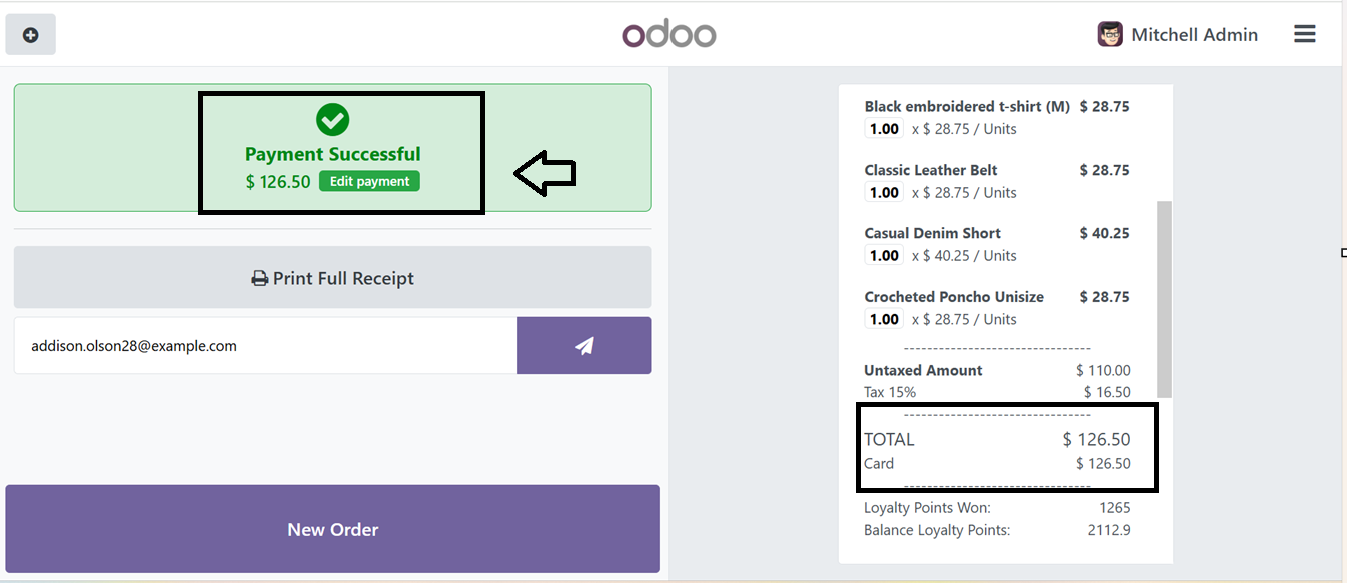
Then, the payment process has been completed. The order receipt with the bill details is also generated in the Payment Successful window with the Card payment method.
Enabling the Track Orders Edit feature in Odoo adds an Edit Payment button to the payment success window. This feature provides the ability to re-edit a payment or make adjustments to an already completed order, as illustrated in the screenshot below.
Clicking the Edit Payment button opens the order editing window of the Point of Sale in the Odoo backend, as demonstrated in the screenshot below.
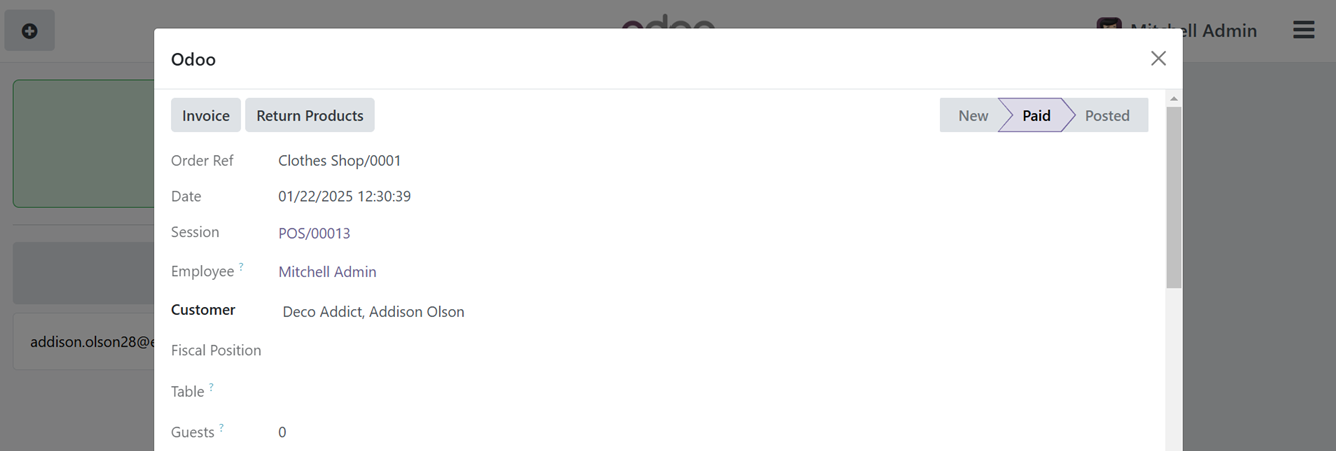
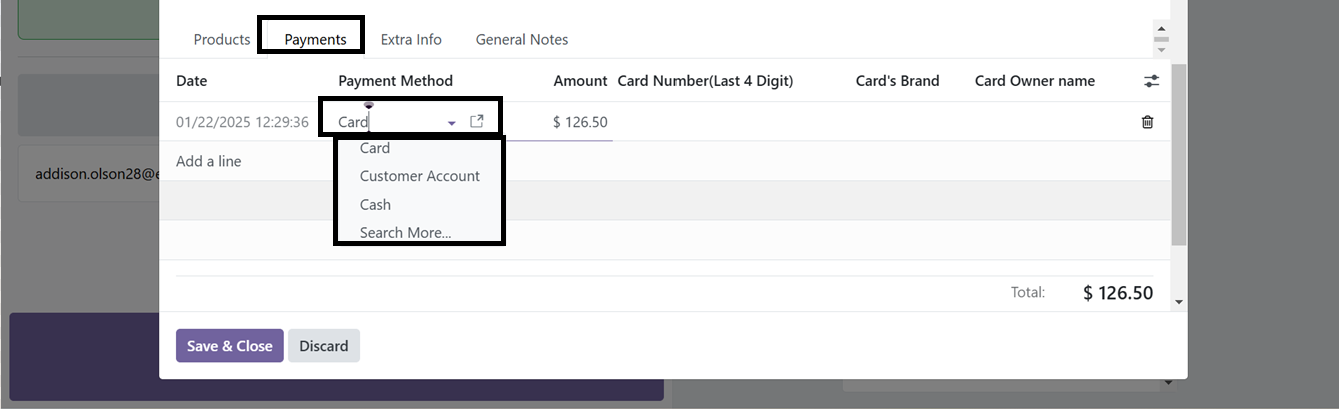
From the Odoo backend you can edit and change the Payment Method from Card to Cash. Save the changes, and the edited field will be reflected in the point of sale terminal, allowing you to view the updated payment method from the receipt.
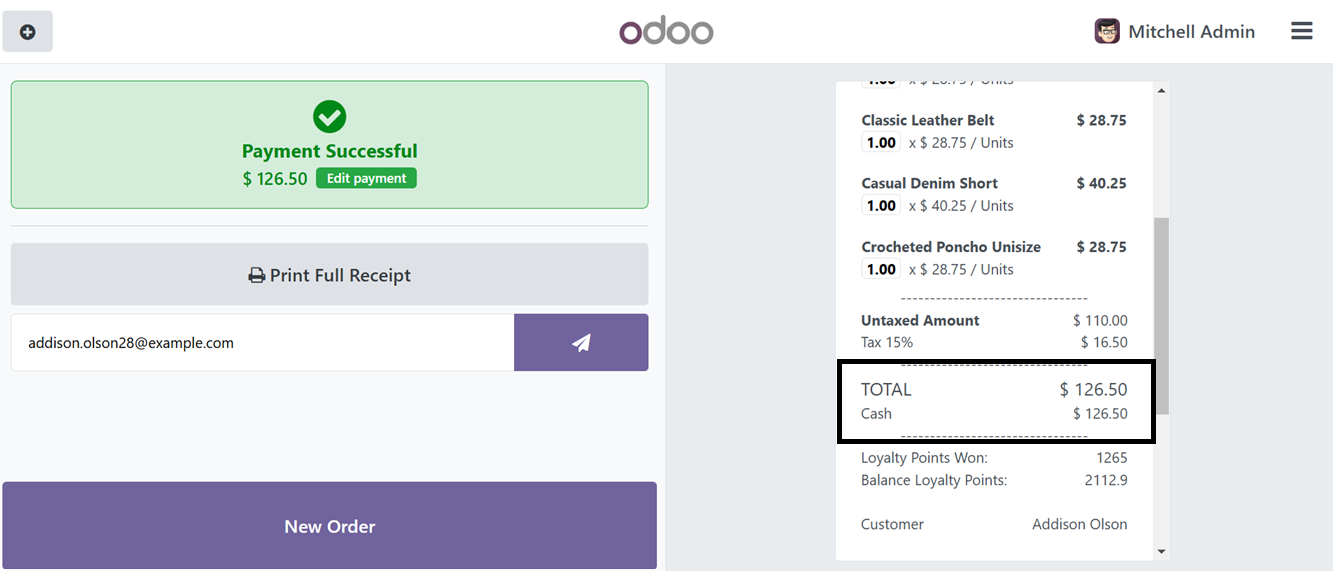
This feature allows you to edit any order specifics in case of any errors occurring while validating an order payments. Then, you can check these details and edited information from the Orders menu of the Point of sale Module.
The breakdown of each sales line by product will be shown in the automatically created closing record when the PoS Session is closed, after enabling the "Closing Entry by product" option. To check this feature, let’s create a new sales order and complete the payment and close the Point of sale session.
After completing the payment and closing a specific Point of Sale session, navigate to the Odoo Invoicing Module’s Dashboard menu. From there, access the Point of Sale Invoicing Dashboard to view recent invoices and journal entries. In the Journal Entries section, select the details of the recently completed order and open its form view.
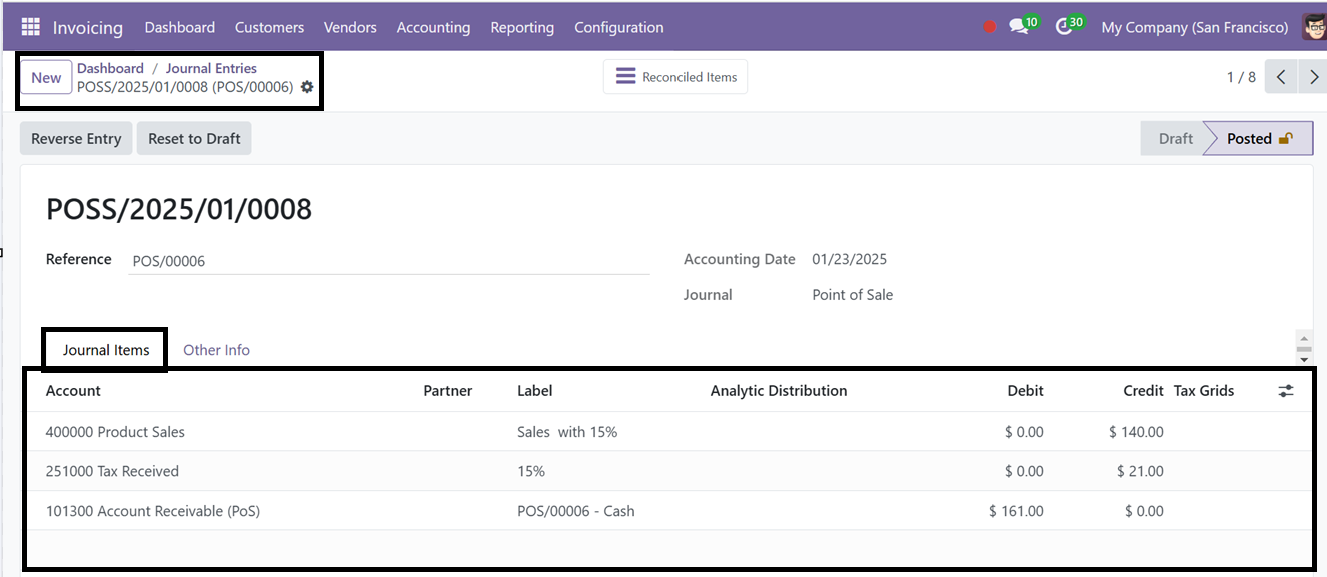
Here, you will find journal entries listed without specifying individual sales products in the 'Journal Items' tab. The invoicing amount reflects only the total sales amount. However, by utilizing the ‘Closing Entry By Product’ feature, you can generate journal entries that break down each sales product, allowing for a detailed view in the Journal Items tab.
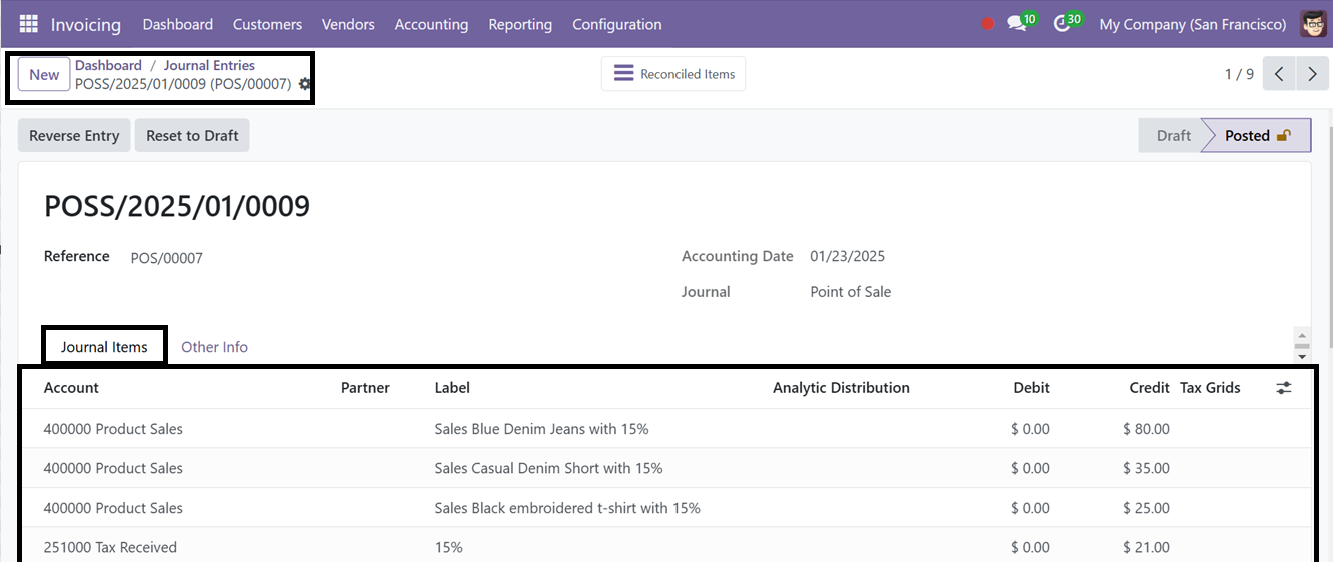
So, we can create another order by choosing the same product, close the POS Register and check the Journal Entries in the Invoicing Module. Here, you can see the journal items posted based on each sales product.

Sales and Pricing Settings
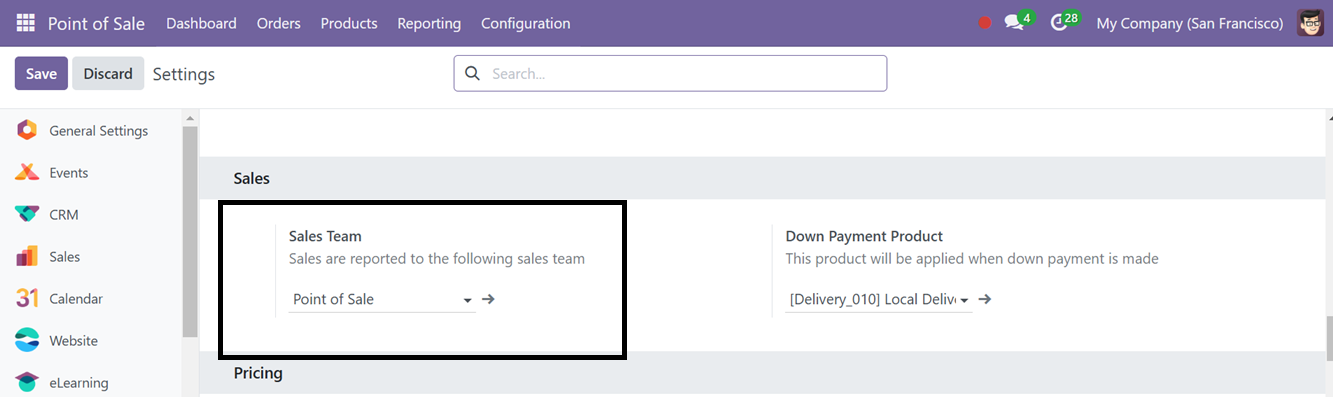
The new PoS allows users to assign a Sales Team from the ‘Sales’ section of the configuration settings window. To create and manage new Kiosk Sales Teams, click on the interlink provided under the ‘Sales Team’ area. This will lead you to the former view of the existing sales team. You can edit the details, add team members using the form view.
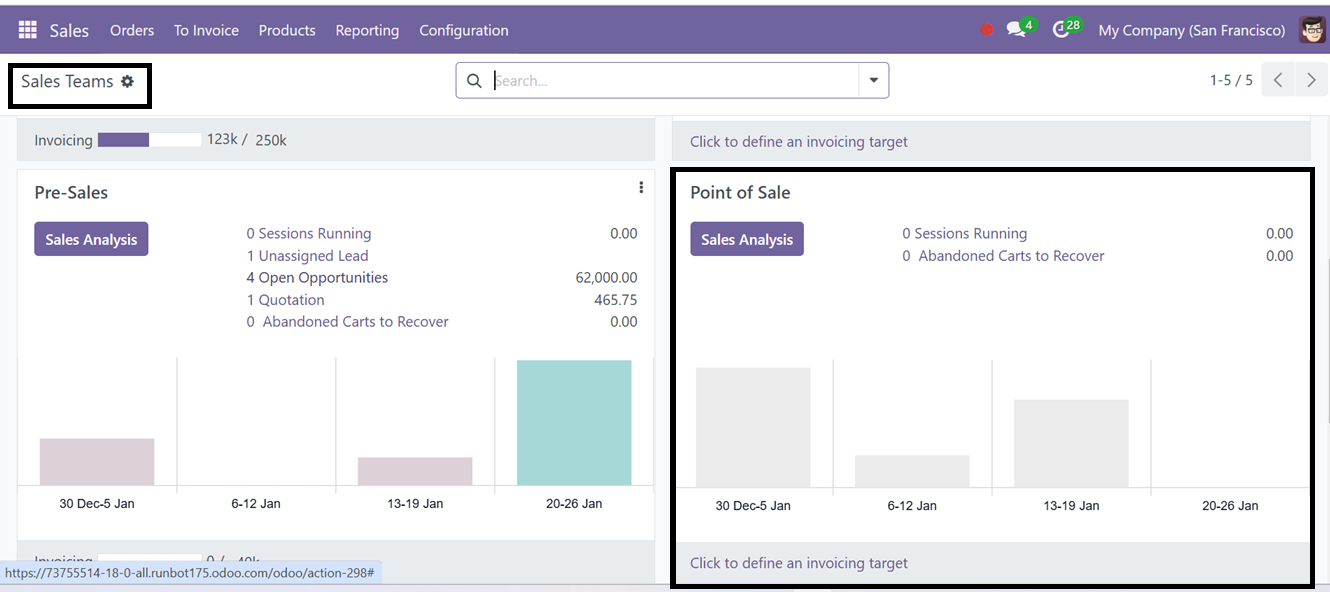
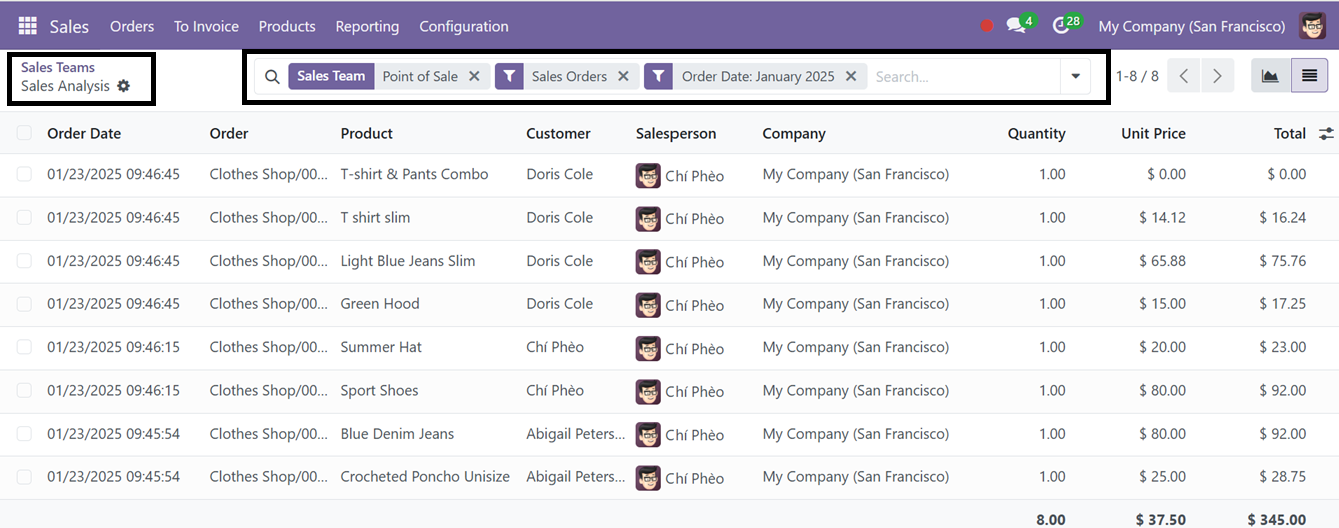
In Odoo, you can create and manage multiple sales teams through the Sales Module. The existing teams are accessible under the 'Sales Team' menu within the Sales Module, where they are displayed in a tile view format. The ‘Sales Analysis’ button will take you to the detailed report of all the sales operations attended by this particular team, as shown in the screenshot below.
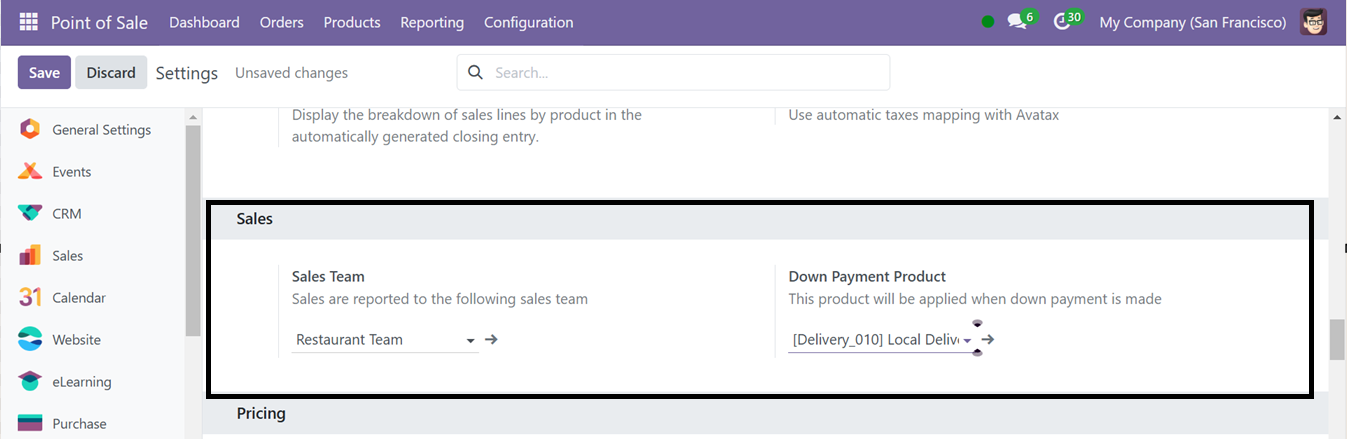
You can create various sales teams from the Sales Module and assign the sales responsibility for managing Point of Sale operations inside the 'Sales Team' settings in the Point of Sale module.
After conducting Point of Sale operations, you can review the sales sessions performed by this specific team through the Orders menu in the Sales Module. Within this menu, select the 'Sales Team' option and locate the desired team's tile view. Click on the 'Sales Analysis' button to access the dashboard, which provides a detailed overview of all sales conducted by this “Point of Sale” team, as illustrated in the screenshot below.
In the Sales Team settings area of point of sale, you can see another option named ‘Down Payment Product.’ The ‘Down Payment Product’ product is a service-type product designed to handle advanced customer payments, allowing businesses to manage partial payments before finalizing a sale.
You can select a product from the dropdown list to apply to a sales order, either as a service or inventory item when a customer makes a down payment.
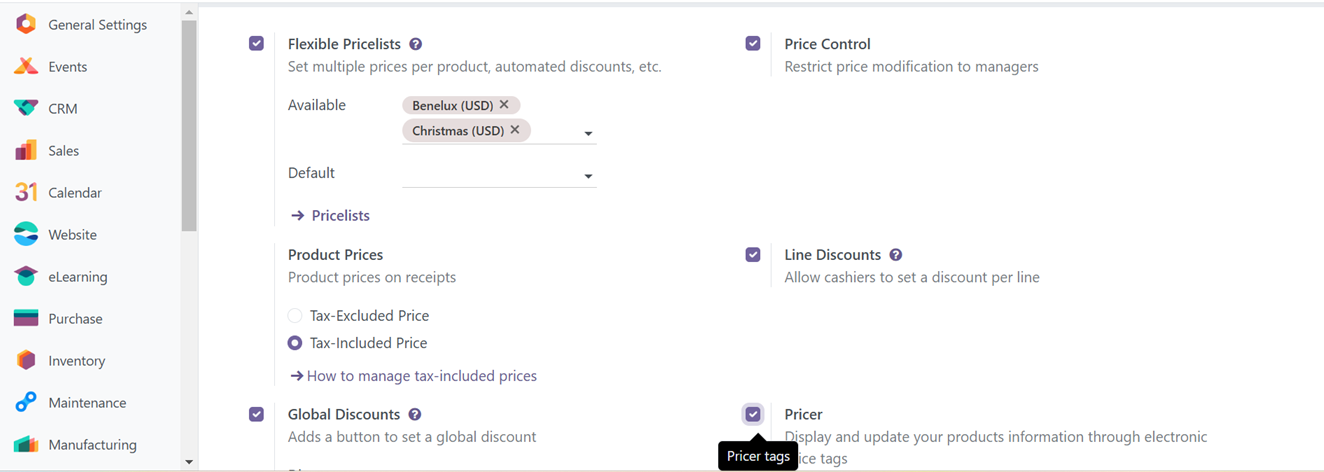

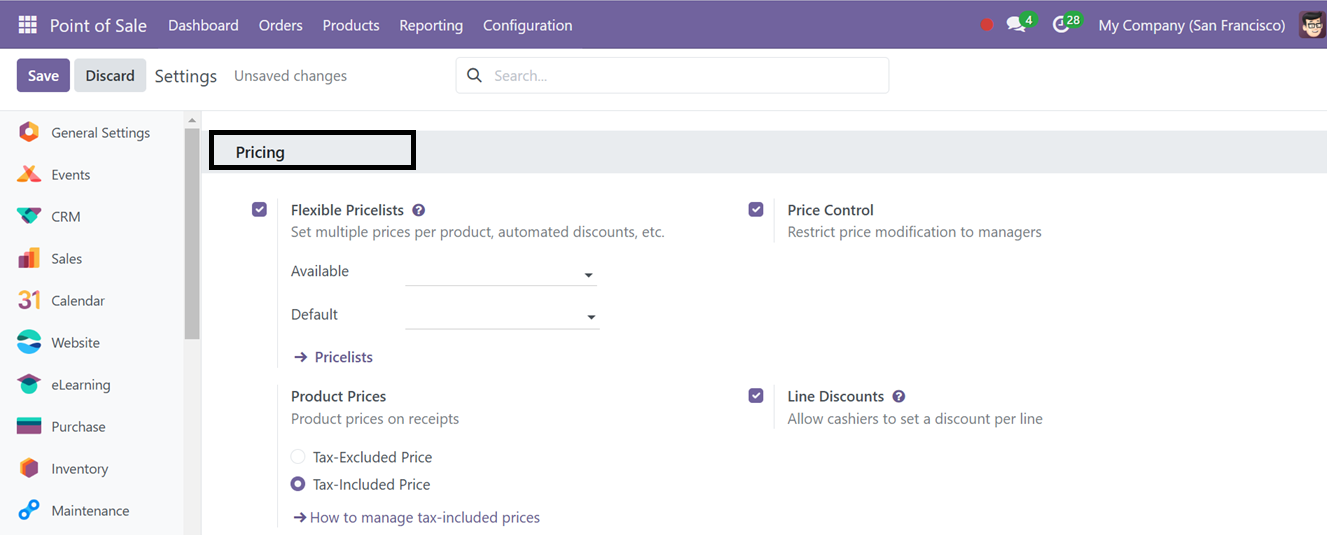
Then, Odoo18's Flexible Price Lists functionality allows users to select which price lists are used for items in the PoS, either multiple per product or advanced price regulations. The default and accessible pricing lists can be entered in designated areas.
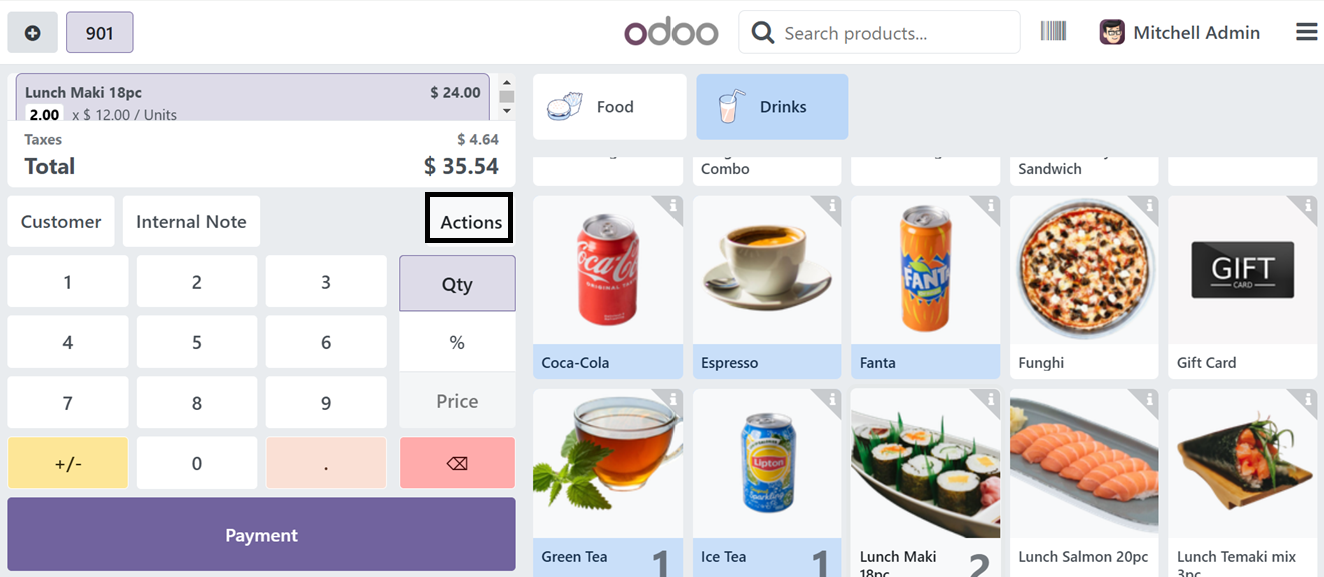
To check this price list feature,open a point of sale session and order the products. Then, click on the ‘Action’ button to check the availability of price lists.
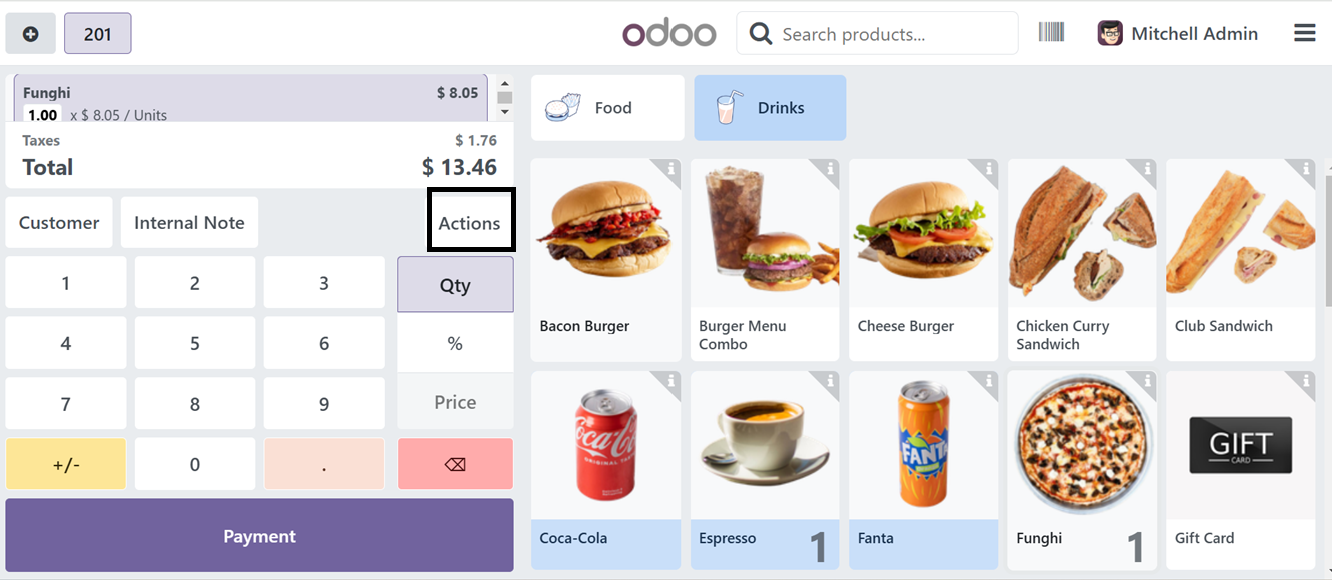
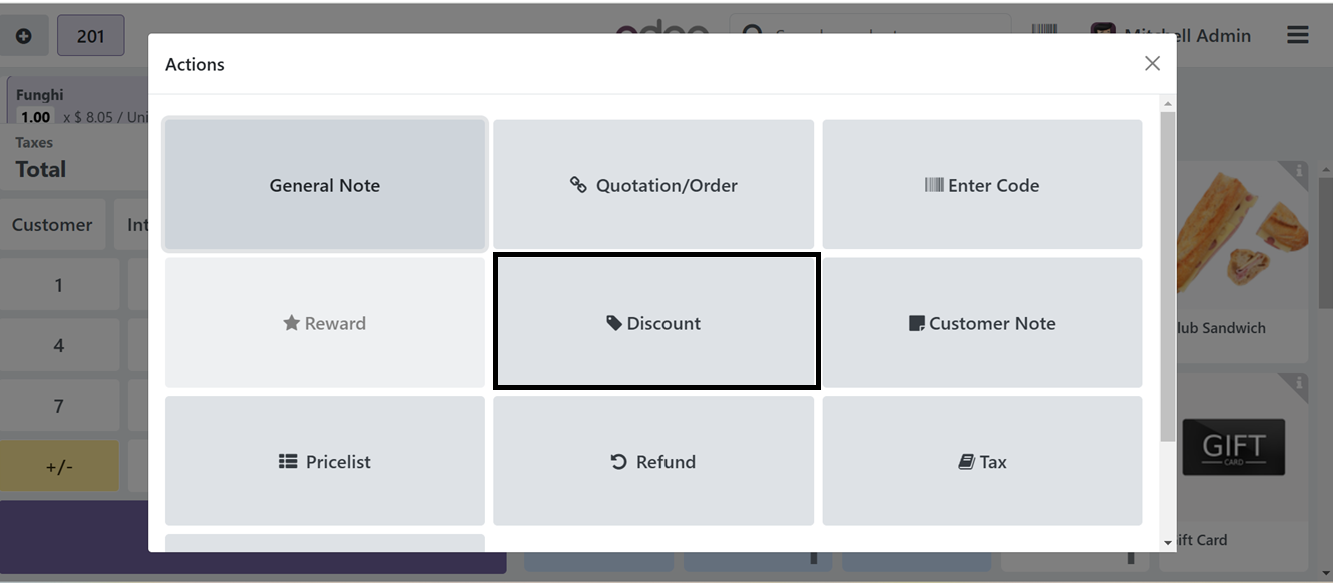
From the displayed actions window, choose the ‘Pricelist’ button.
You can see the available pricelists and choose any relevant one as per the requirement, as shown in the screenshot below.

Then, this price list features and tax rates will be applied to your ordered products.
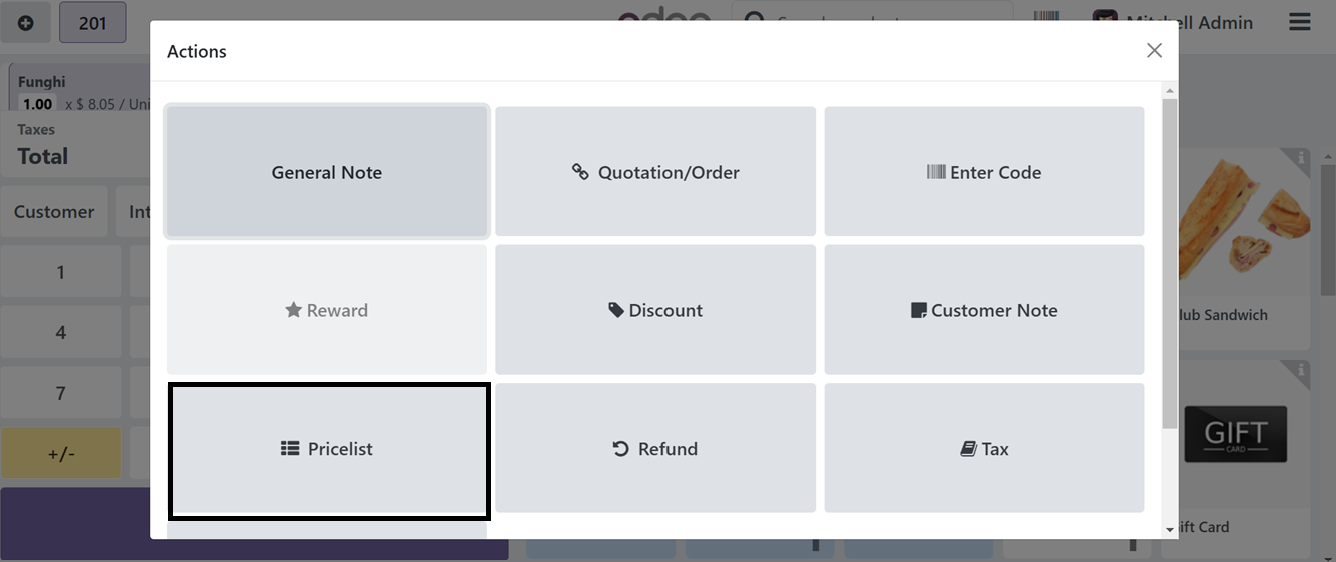
The ‘Promotions, Coupons, Gift Card & Loyalty Program’ option can be used to manage all the discounts and promotion programs that we have discussed in the earlier section of this book. To apply this promotion and coupon codes in a point of sale order, you can utilize the ‘Action’ button while ordering products.
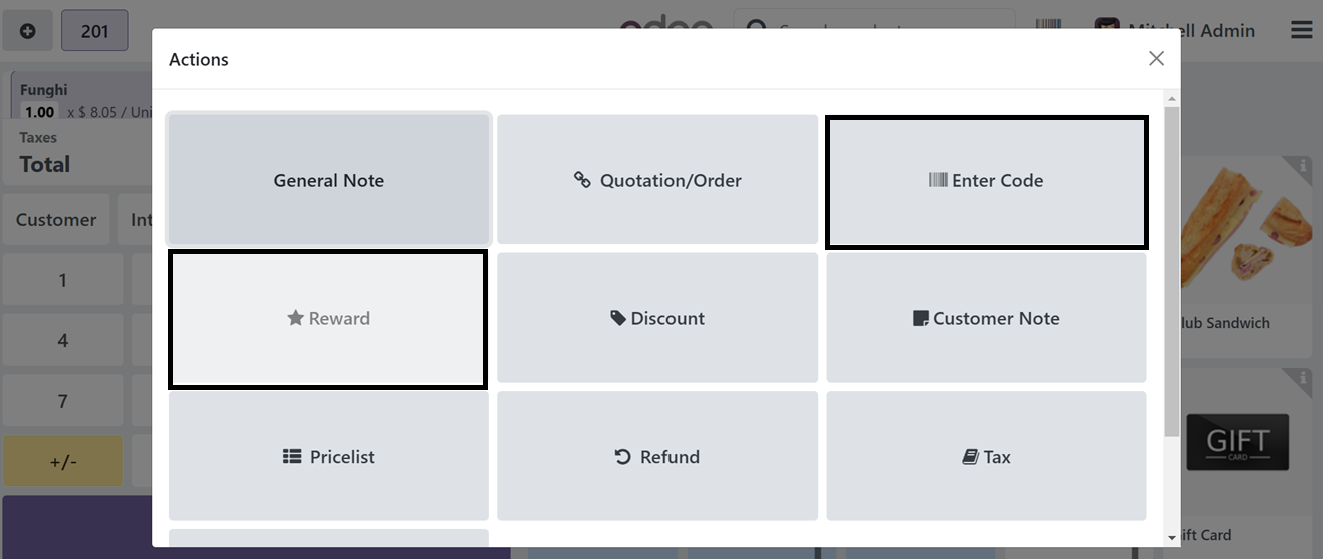
You can utilize the ‘Reward’ and ‘Enter Code’ buttons to enter any gift card or any coupon codes. The ‘Enter Code’ button will display an editing field where you can enter the gift card or coupon code as shown below.
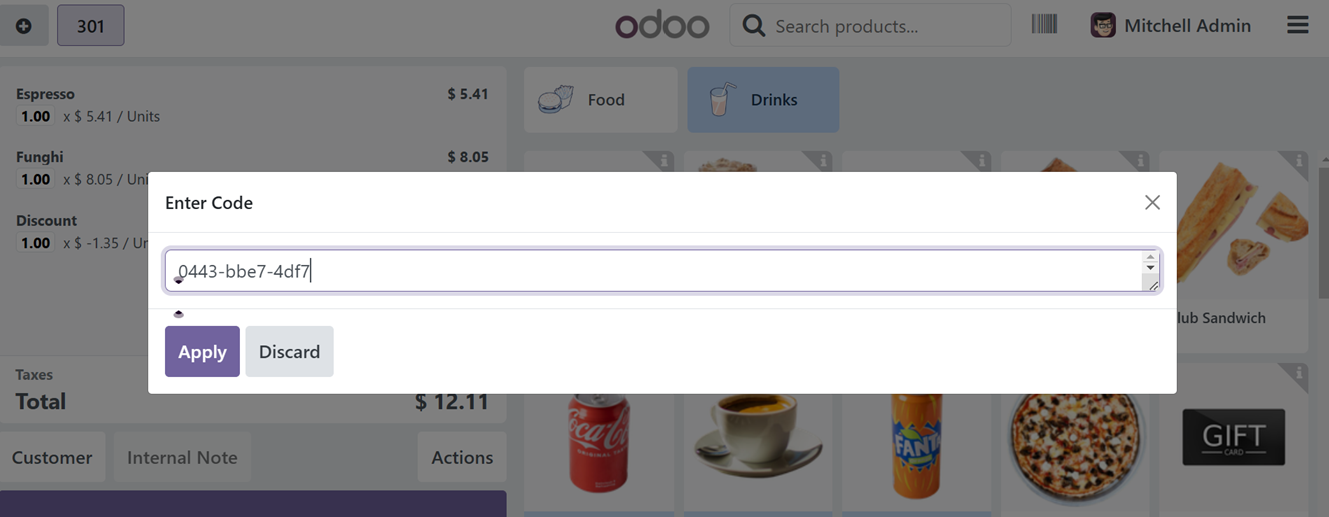
Clicking on the ‘Apply’ button will apply the discount code and its benefits to the current sales order.
Tax-Included Price and Tax-Excluded Price
You can manage the product prices on receipts after completing the payments by choosing the ‘Product Prices’ options which have two options: Tax-Included Price and Tax-Excluded Price which features dictate the way product prices are shown.
● The Tax-Included Price represents the final price that encompasses taxes, making it suitable for retail environments and guaranteeing transparency for customers.
● The Tax-Excluded Price shows the base price before taxes, with applicable taxes added during billing; this is commonly used in B2B transactions.
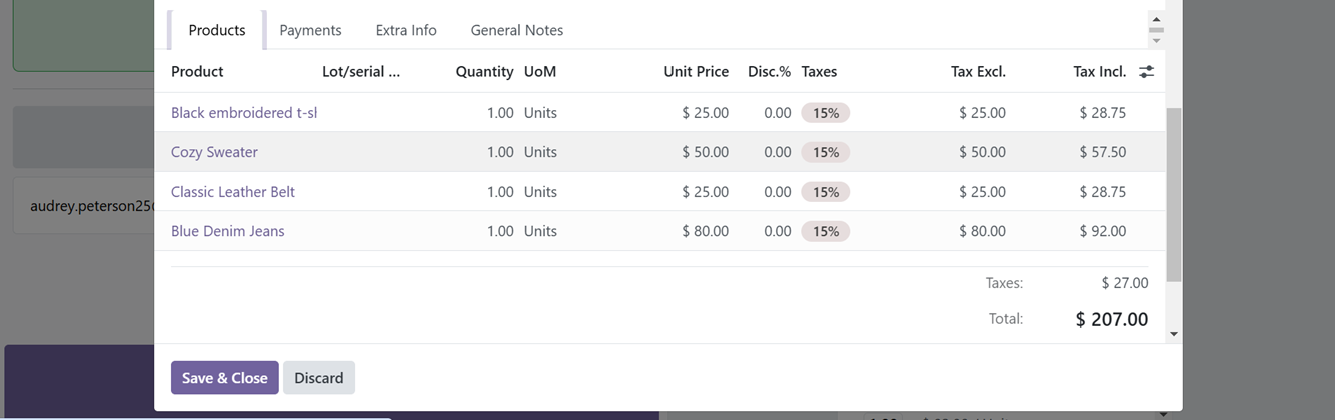
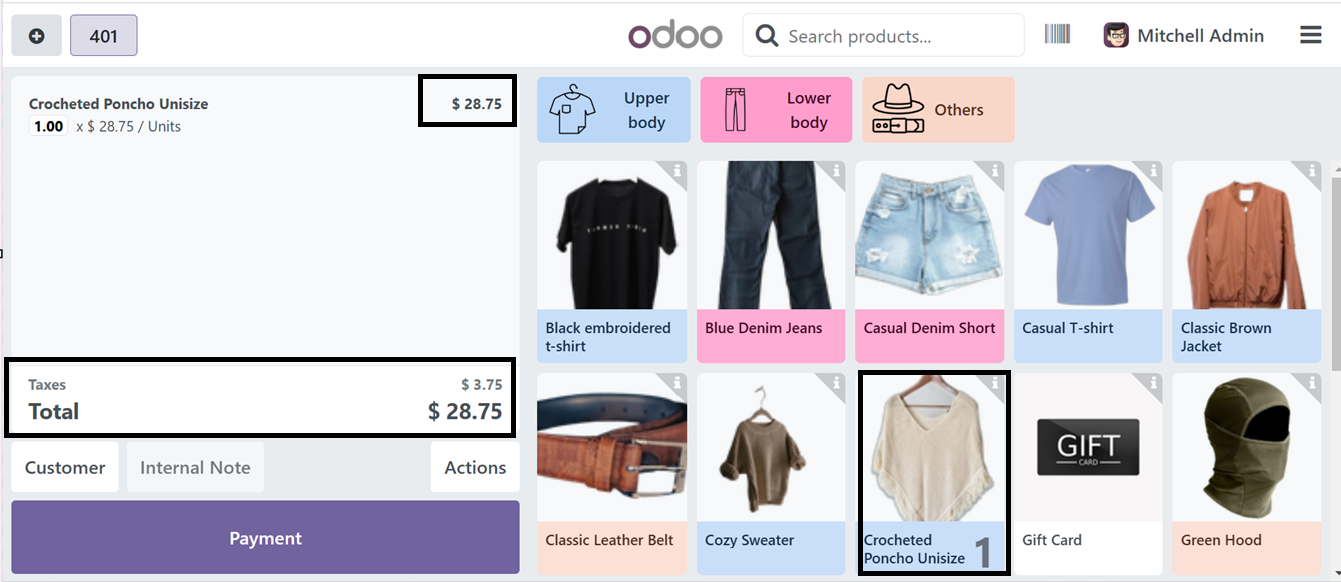
These characteristics provide flexibility to accommodate various business needs and regional tax requirements, all the while improving transparency and compliance. To check the functionality, we can choose a product and open its configuration form. You can see the Tax Excluded Sales price of the product is ‘25$’ and with the 15% tax rate the Tax-Included price will be 28.75$ as depicted in the screenshot below.

Then, choosing the 'Tax-Included' option from the ‘Product Prices’ settings displays the product's total price and tax amount from an products line of the cart, as depicted in the screenshot below.
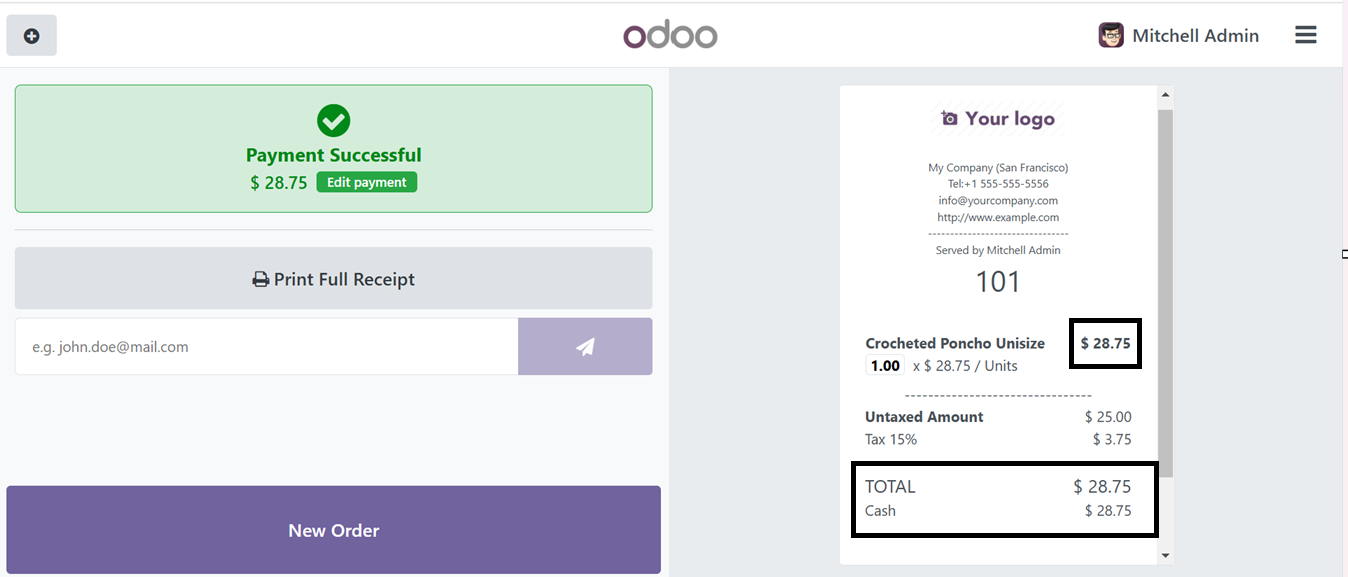
After processing the payments, the tax-inclusive amount is displayed on the receipt alongside the product cost. However, the tax amount is also added to the total amount, as demonstrated in the screenshot below.
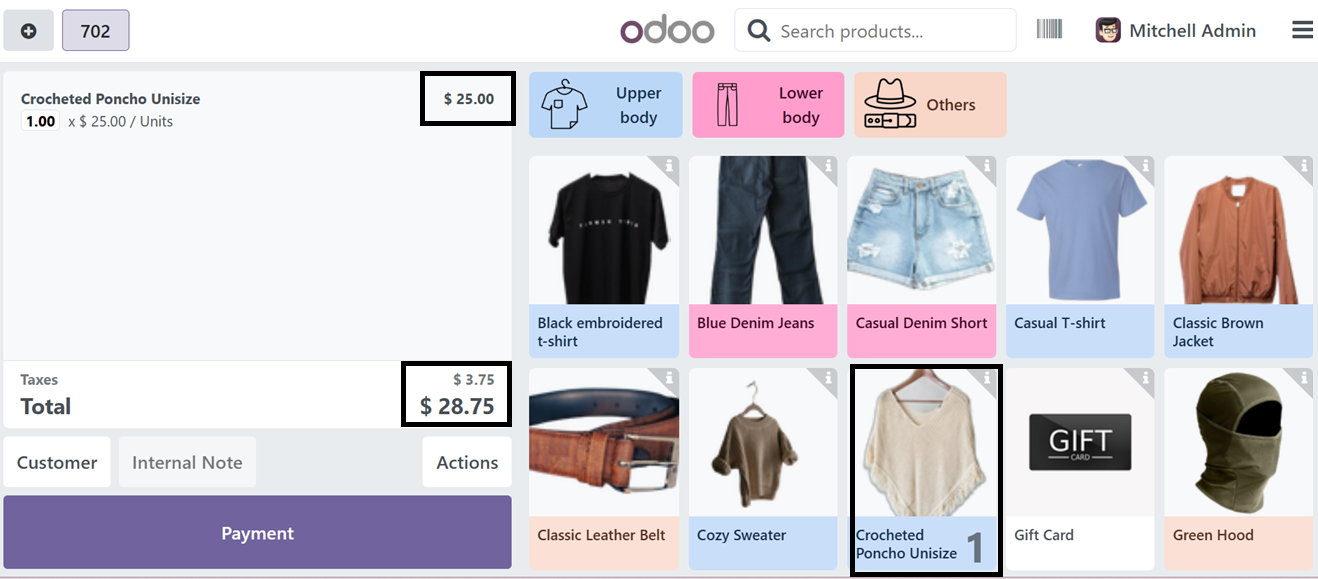
Then, we can change the option to ‘Tax-Excluded’ and check the Tax-Excluded rate is shown inside the product lines area. But the tax amount is added to the Total amount section.
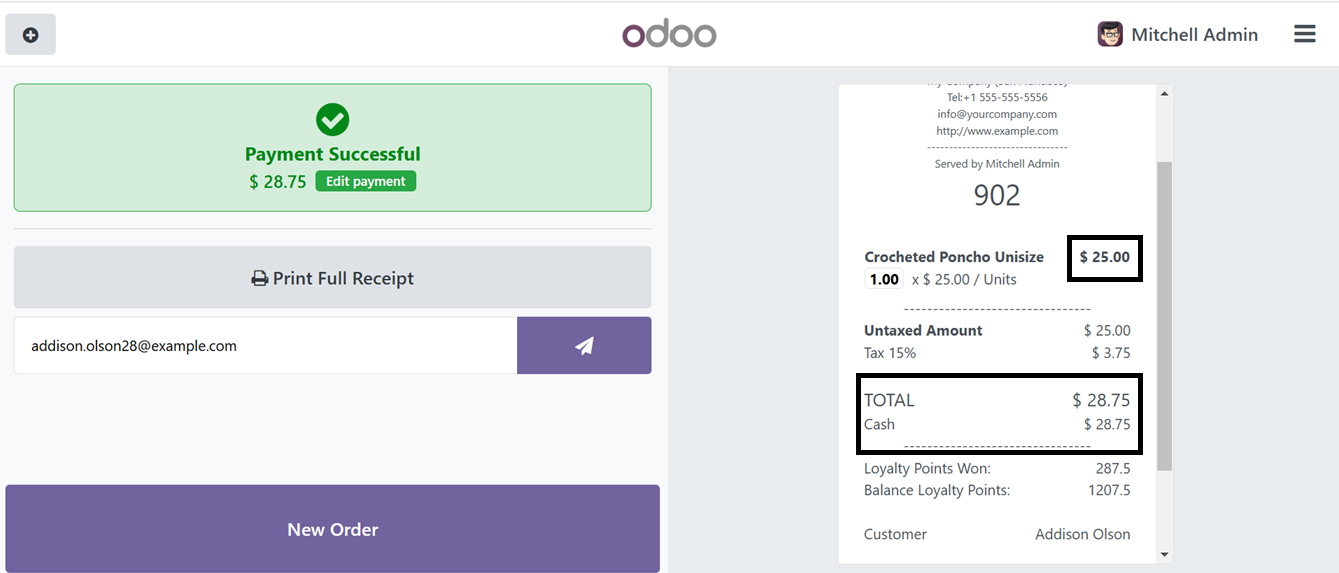
Upon completing the payment, the receipt will display the product price as the tax-exclusive rate in the product price section. However, the total bill amount will include the applicable tax, which is added separately to reflect the final payable amount.
Finally, the ‘Pricer’ option can be used to manage the product prices such as, display and update the product information through electronic price tags. This Price feature allows only Managers with Manager access capabilities to modify product pricing on orders.
So, the users can change or edit the product price by clicking on the ‘Price’ button provided in a sales session after activating the feature. After activating the ‘Global Discounts’ option, then you can set a Discount Product and a Discount Percentage accessible for every customer in the relevant fields, as depicted below.
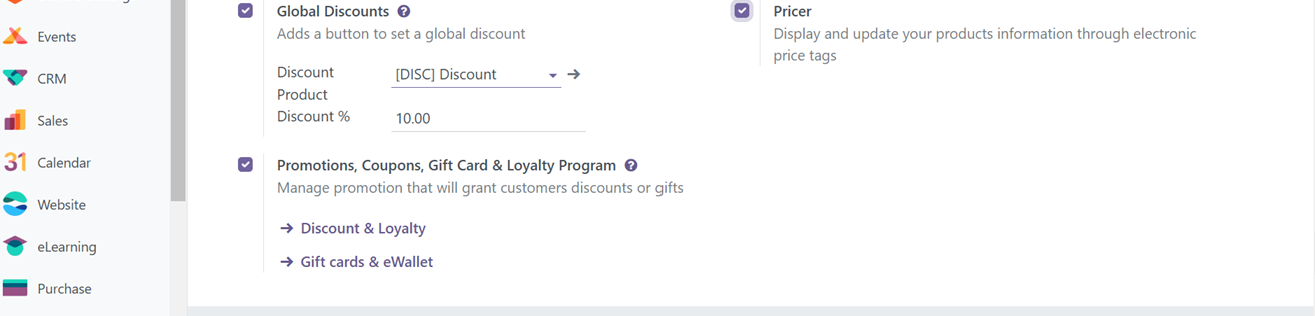
You can create or manage the discount products or services from the ‘Products’ menu. The procedure is the same as creating a normal sales product. The discount percentage provided in the ‘Discount %’ field can also be updated according to the company policies. Here, we are setting the discount percentage as ‘10.’
Then, go to the point of sale dashboard and create a new sales order and choose the required products. To check the Global Discount functionality, click on the ‘Actions’ button as depicted in the screenshot below.
You can see the ‘Discount’ action button from the displayed window after clicking the ‘Action’ button.
To view a global customer's discount rate, click on the 'Discount' button, which will display a Discount Percentage window with a preset 10% discount value, as shown below.
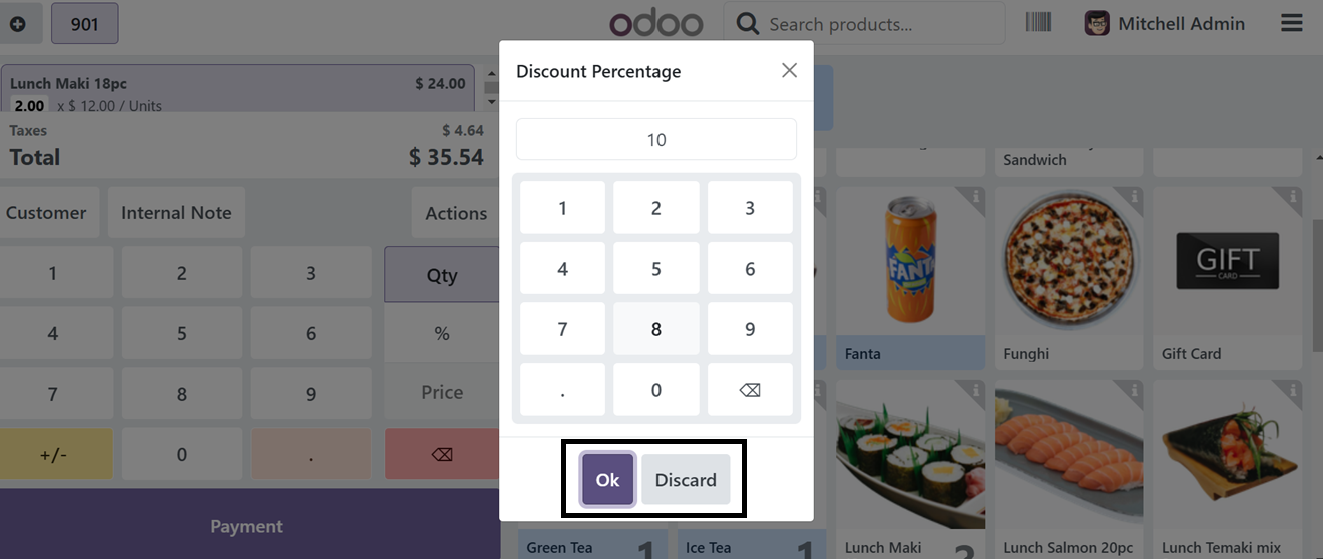
Then, click the ‘Ok’ button to apply the discount to your currently ordered products.
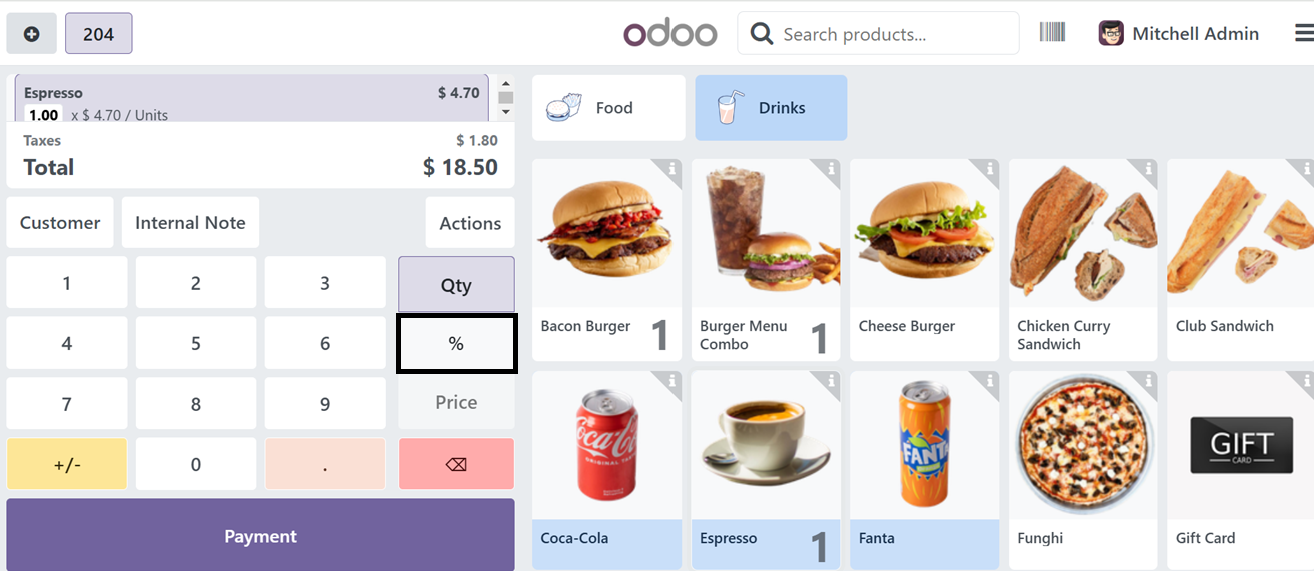
The ‘Line Discounts’ settings option will allow the point of sale cashier employees to set a discount per line. After activating the feature, you can see the functionality from a new point of sale order.
To open a new PoS session, click Open Register, add desired products, select a discount line, click the Discount icon (%), as depicted in the screenshot below.
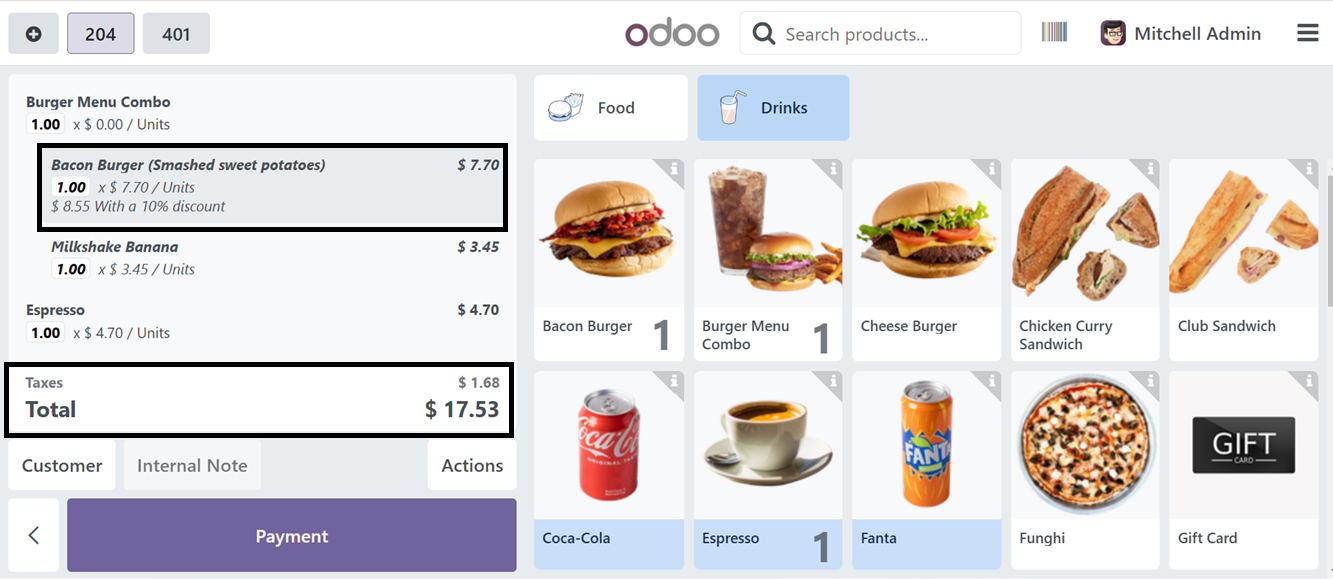
Then, enter the discount percentage (e.g., 2%), and the discount is applied, adjusting the product line's price and the total product price. Here, I have applied a 10% discount for a product line, so it will be applied and you can see the new price details as shown in the screenshot below.
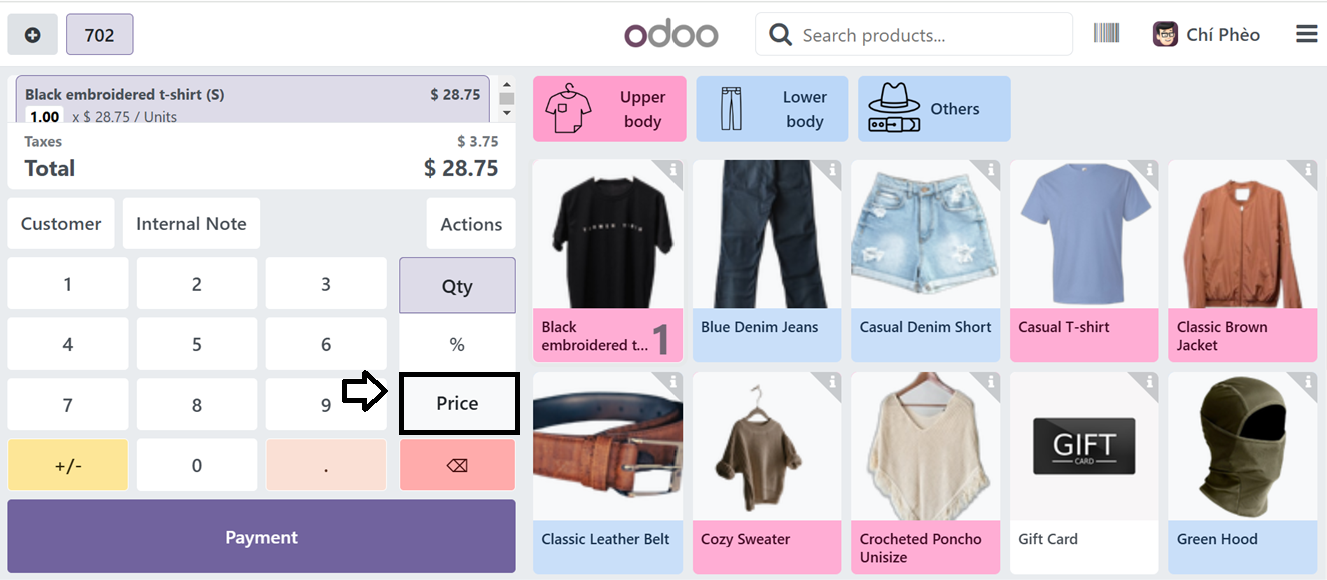
The 'Price Control' feature in the 'Price' settings ensures that only managers have the authority to modify prices when processing a Point of Sale order.
Deactivating this option will enable a 'Price' button within the Point of Sale terminal, granting all sales employees the ability to modify prices. Conversely, activating this option will disable the 'Price' button, restricting price editing access to only the manager, as illustrated in the screenshot below.
Finally, the ‘Pricer’ settings can be used to enable the product Pricer tags which are digital shelf labels that display product information on shelves, eliminating the need for manual price updates and label printing when product details change.
Bills & Receipts Settings
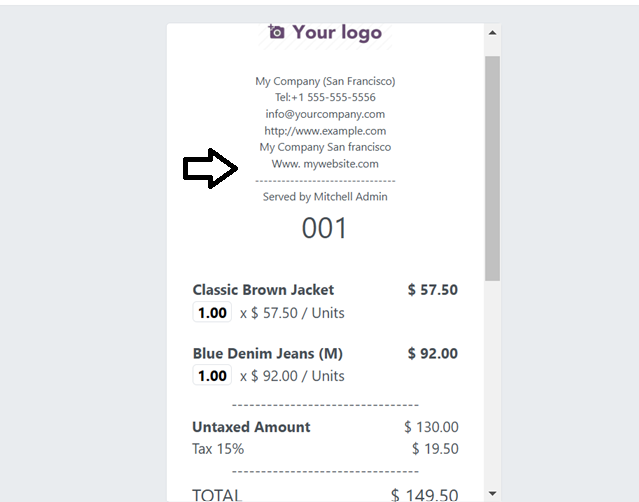
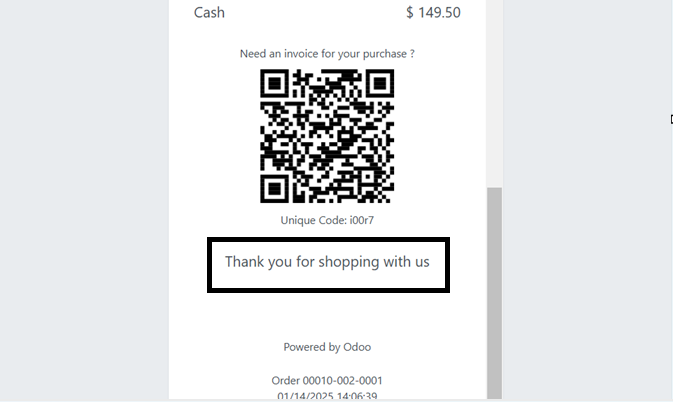
The ‘Custom Header & Footer’ function in the ‘Bills & Receipts’ Settings tab allows users to customize the header and footer of invoices and receipts, with additional fields for notes.

After editing the footer and header messages, this will be displayed in your bills or receipts after completing the payment process as shown below.
The ‘SMS Enabled’ feature helps you send receipts through SMS text messages. After enabling the option, choose a ‘Receipt Template’ from the dropdown section.
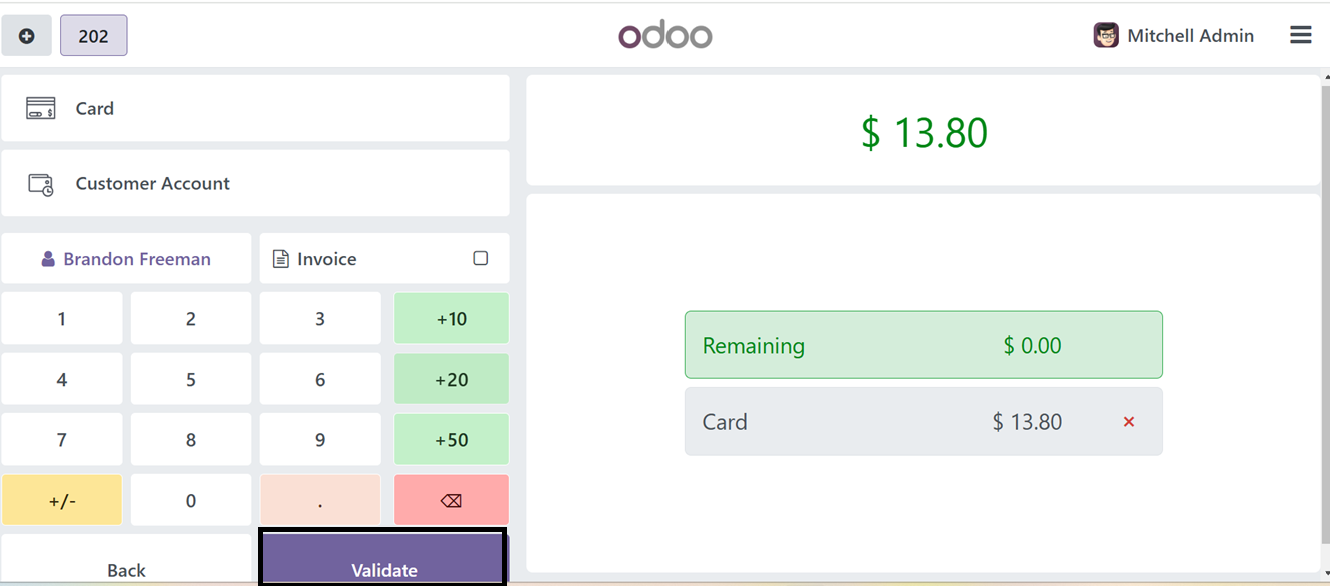
The Automatic Receipt Printing tool allows for the automatic creation of receipts after payment registration. To check this feature, create a point of sales order, choose the customer and payment method, as shown below.
After validating the payment, Odoo will automatically generate the invoice receipt and this will open an automatic receipt printing settings window as shown below.
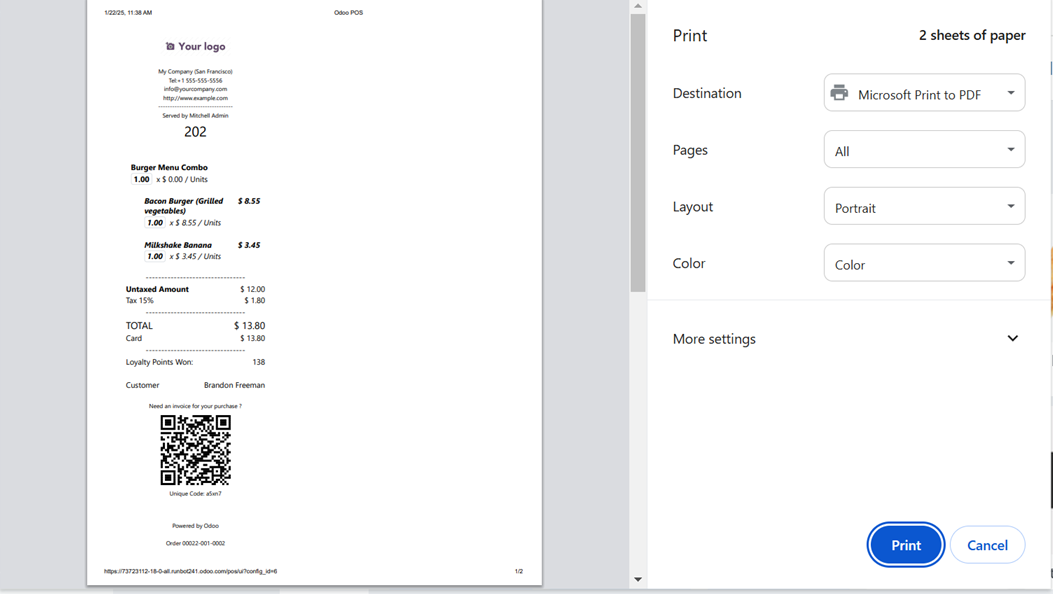
You will get receipts without the price details using the ‘Basic Receipt' feature. Lastly, the ‘Self-service invoicing’ receipt features a QR code for customers to easily request an invoice from Odoo's portal, and a five-digit code can be created on the ticket for easy access to the order's invoice.
Payment Terminals Settings
The Point of Sale module's Settings menu offers the Payment Terminals option, which simplifies checkout transactions by providing authorization for some payment terminals, including Adyen, Six, Paytm, Mercado Pago, Stripe, Viva Wallet and Razorpay as shown in the screenshot below.
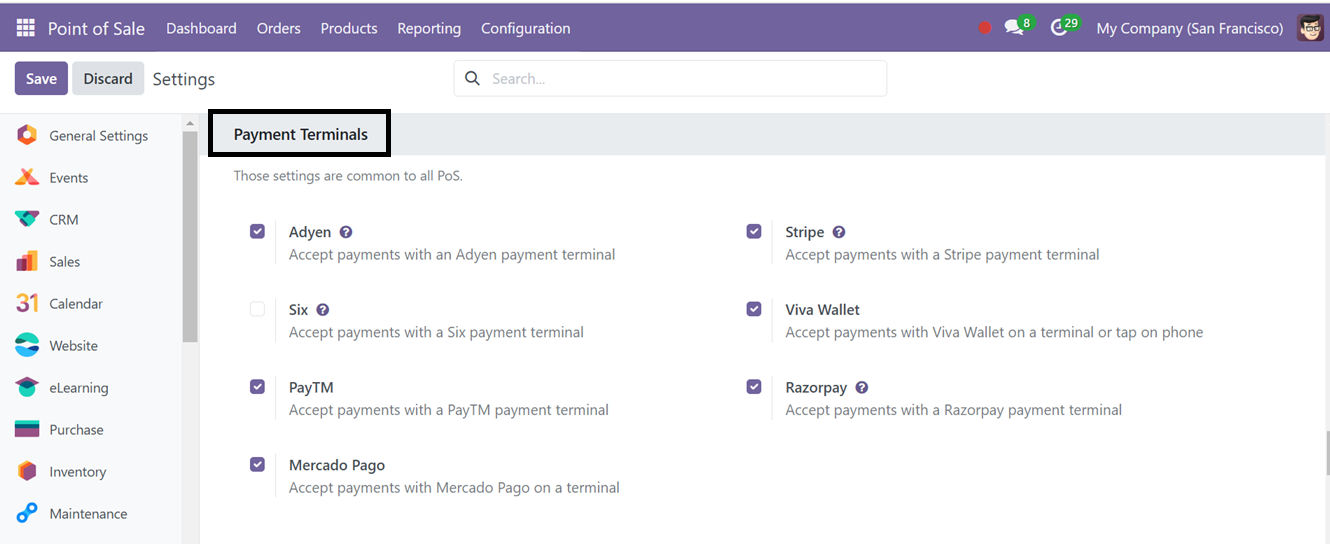
You can manage your payment terminals according to your company policies and flexibility.
Connected Devices Settings
Additionally, Odoo allows device communication without the need for an IoT Box. To connect printers activate ePos Printers feature. Enable the Customer Display functionality to show the checkout process to customers through a second display window. Using the ‘Background Image’ feature you can set an attractive display image for the customer display window. Additionally, barcode scanners, card readers, scales, and receipt printers may be connected to the IoT Box.

Preparation Settings
The Odoo 18 POS Module's Preparation Settings section streamlines customer order management, enabling businesses like restaurants to efficiently organize their workflow. This setting section is only available for the Restaurants and Bar shop setups. After enabling the ‘Is a Bar/Restaurant’ button while adding a new shop session, these settings tab will be displayed.
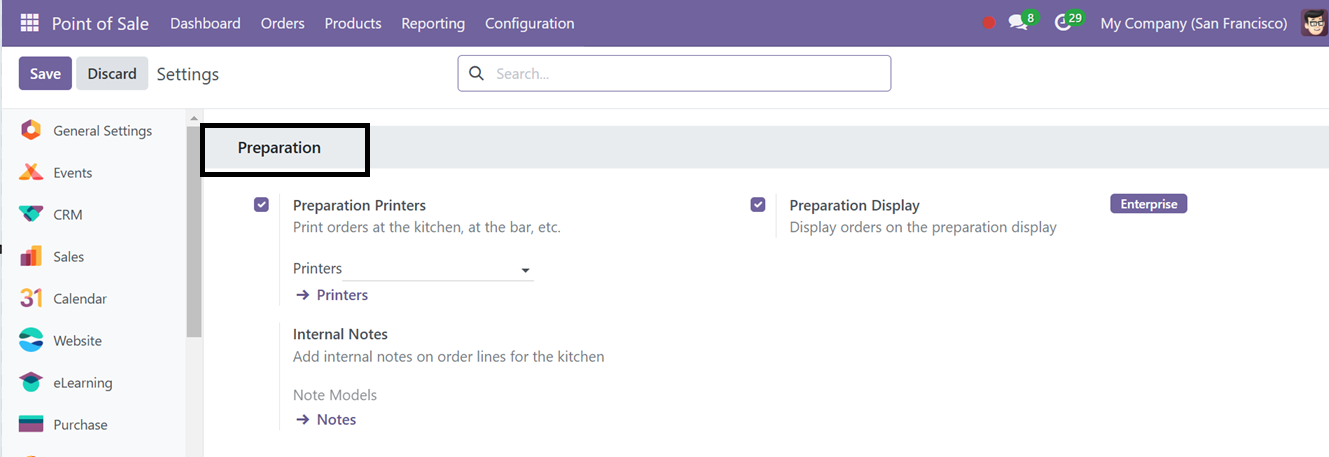
In the community edition, you can activate and configure kitchen printers using the ‘Preparation Printers’ and ‘Internal Notes’ features to allow kitchen/bar printing and adding internal notes to assure the staff about what needs to be prepared.
Inventory Settings
In the Inventory tab, The Operation Type options in the Odoo Point of Sale module determine whether to source products during sales from a predetermined location or straight from stock. Since the retrieval process begins at the source site, this guarantees precise inventory control and transaction correctness.
In this view, the source location for the Point of Sale is set as ‘YourCompany: PoS Order,’ as illustrated in the screenshot below. Therefore, when receiving orders during a Point of Sale session, products will be sourced from this specific inventory location,
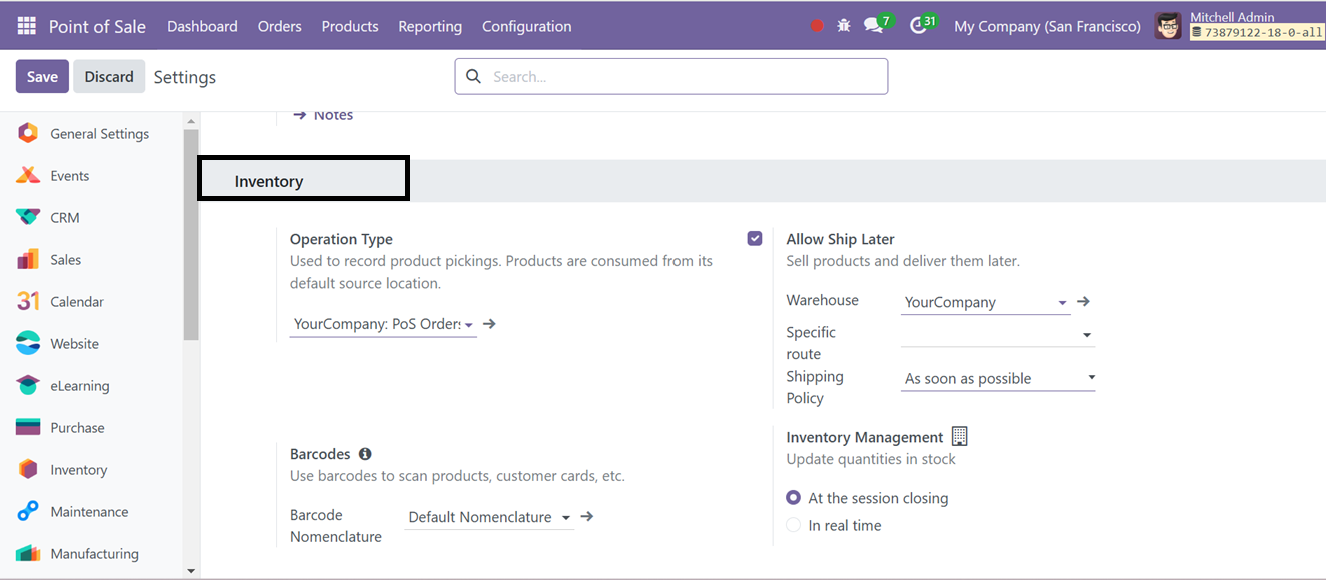
The Allow Ship Later feature allows customers to purchase items now and have them shipped later, with settings for warehouse, route, and shipping policies.
After enabling the ‘Allow Ship Later’ feature, Odoo will display a ‘Ship Later’ button inside the Point of Sale terminal after ordering the product inside the payment confirmation window as depicted in the screenshot below.
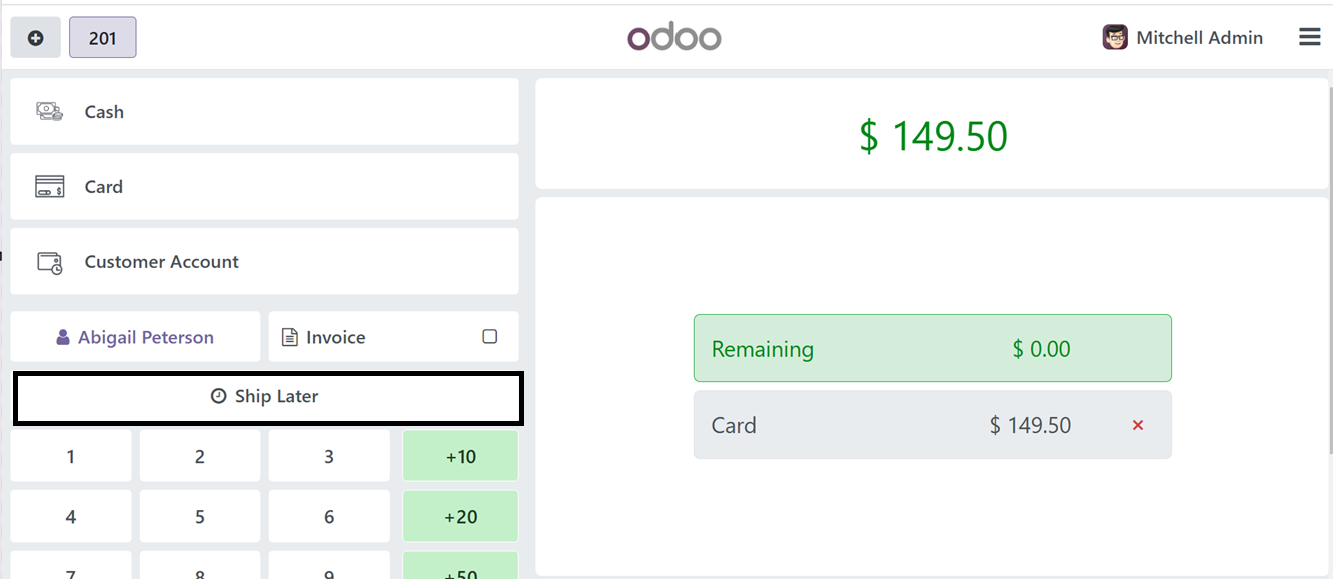
After choosing the Customer and a Payment Method,you can click on the ‘Ship later’ button and this will open a shipping date selection window with a calendar facility.
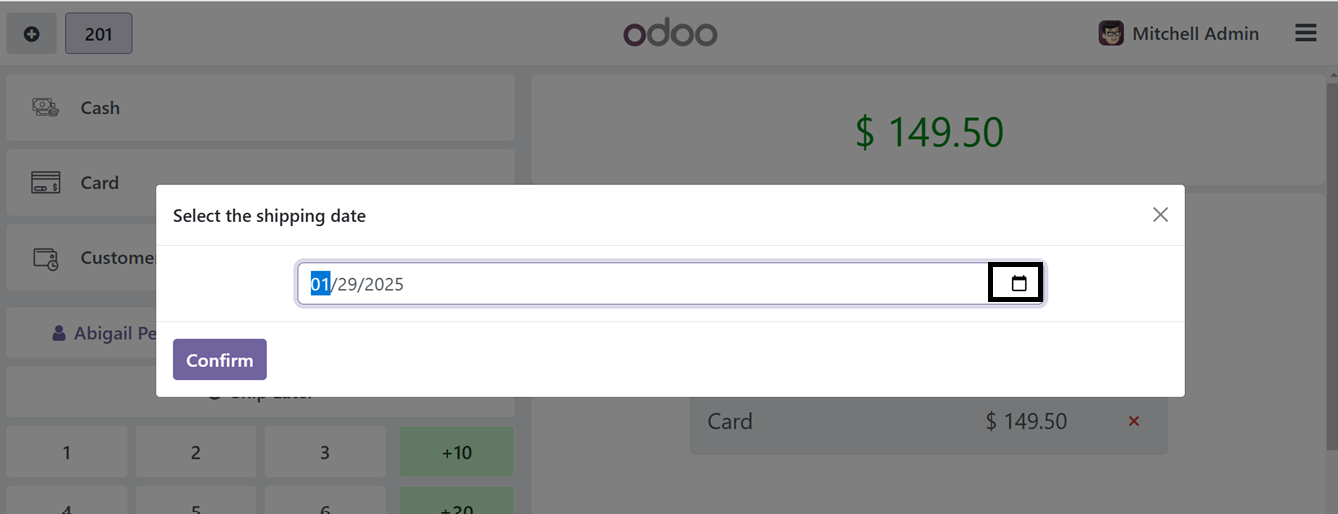
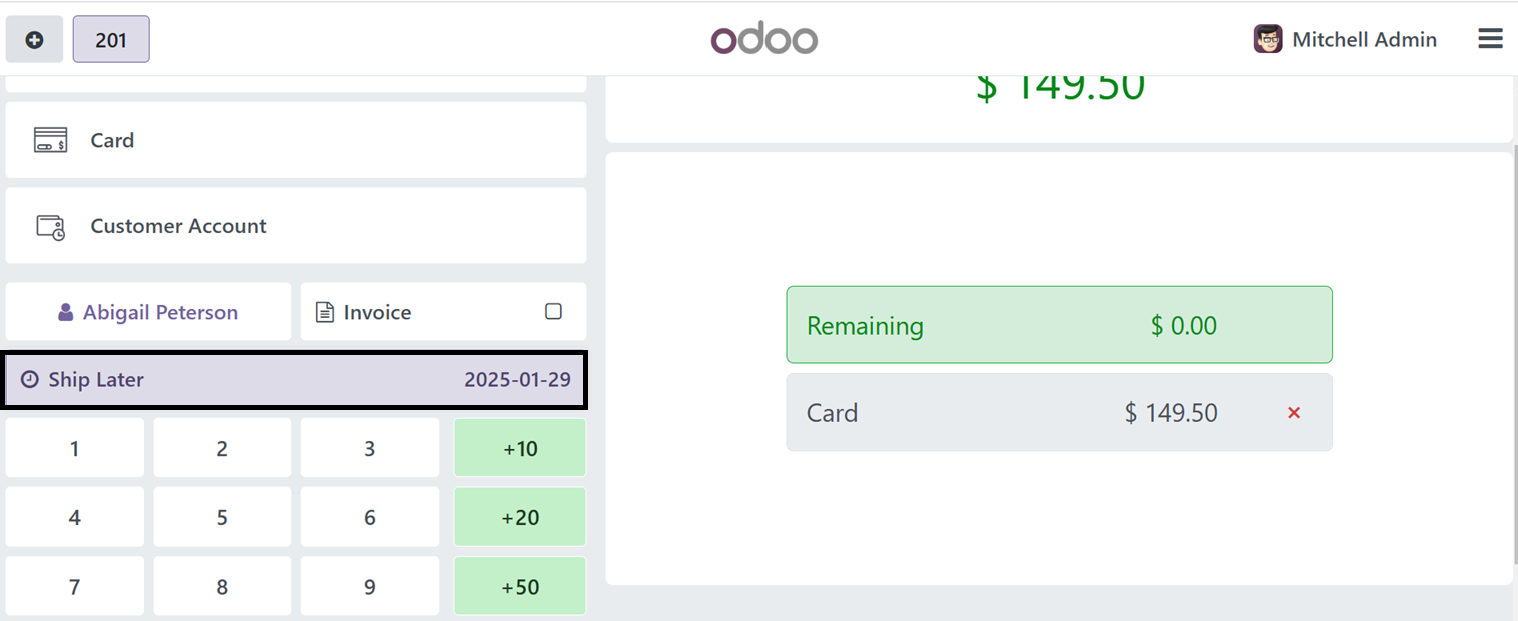
Choose the relevant shipping date and click the ‘Confirm’ button and validate the payment. The shipping date will be displayed on the ‘Ship later’ field as shown in the screenshot below.

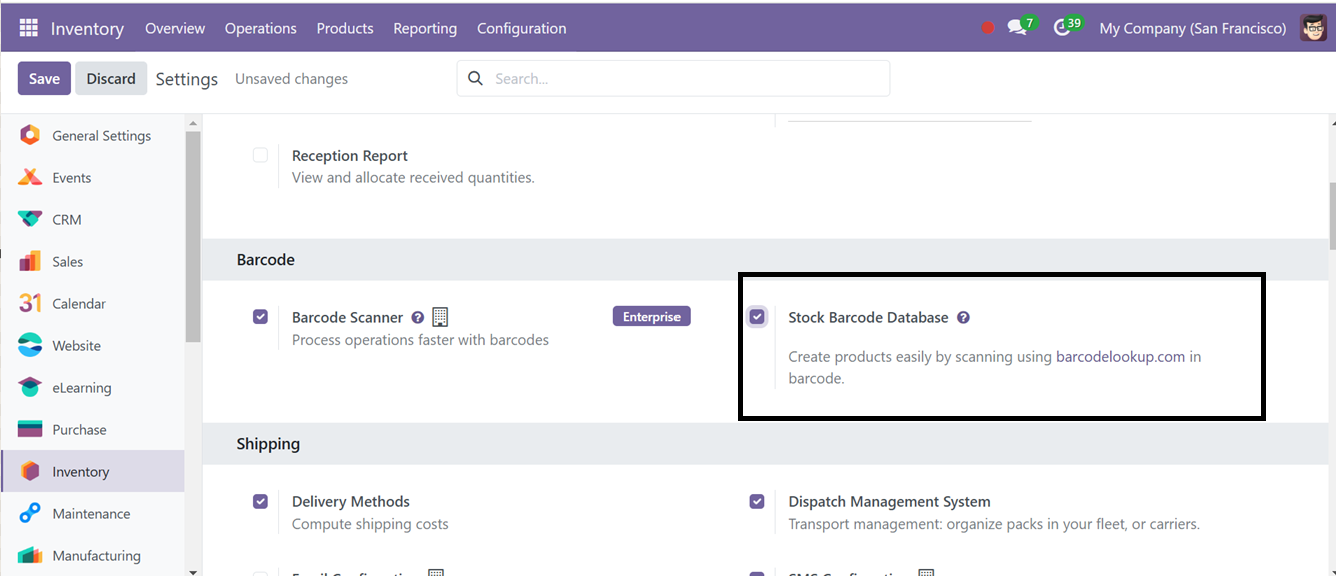
Then, the ‘Barcodes’ option can be used to scan product, customer cards etc by setting a Barcode Nomenclature in the designated area. To check this feature, go to the ‘Inventory’ module and activate the ‘Stock Barcode Database’ option to create inventory products easily by scanning the barcode.
Activating the Barcode settings from the Inventory settings will open a ‘Barcode Nomenclature’ menu, where you can configure new barcode settings or check the barcode setting rules, as illustrated in the screenshot below.
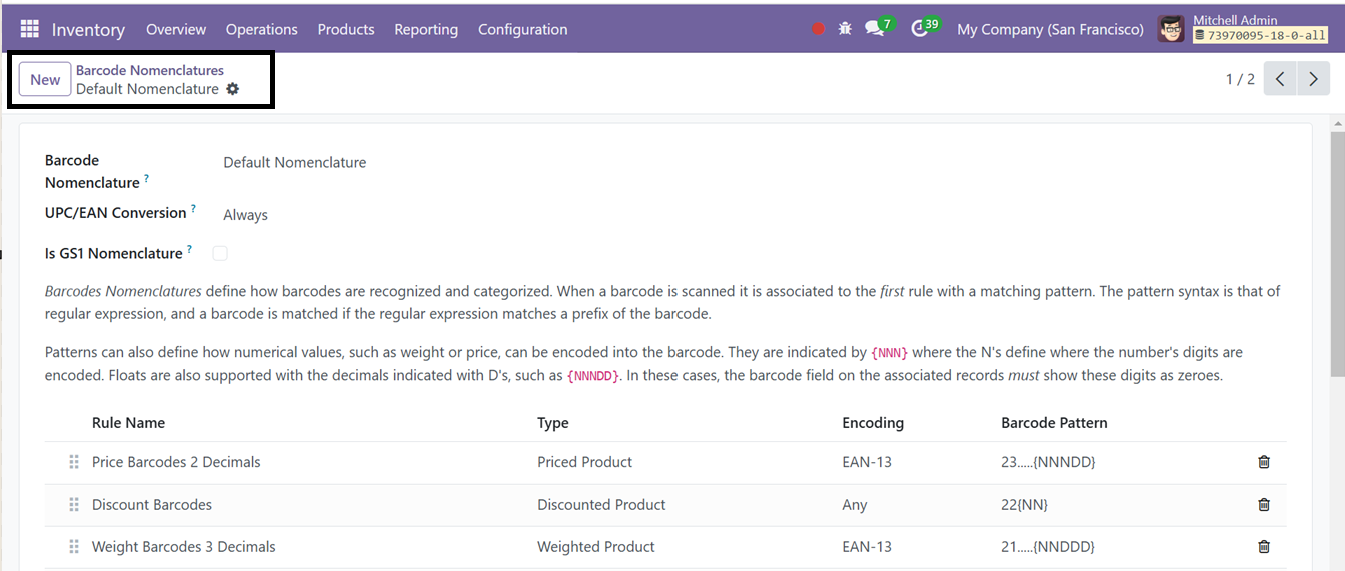
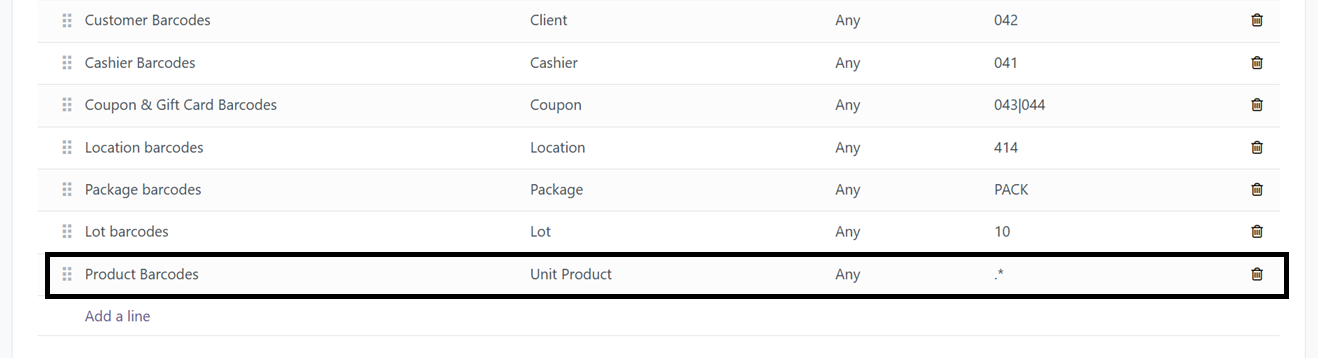
According to the Barcode Rule Name, edit the Barcode Pattern. After checking the barcode rules, assign the barcodes for the required products. So, you can create or choose a product configuration form of any product from the Inventory Module and configure a barcode inside the ‘General Information’ tab, as illustrated in the screenshot below.
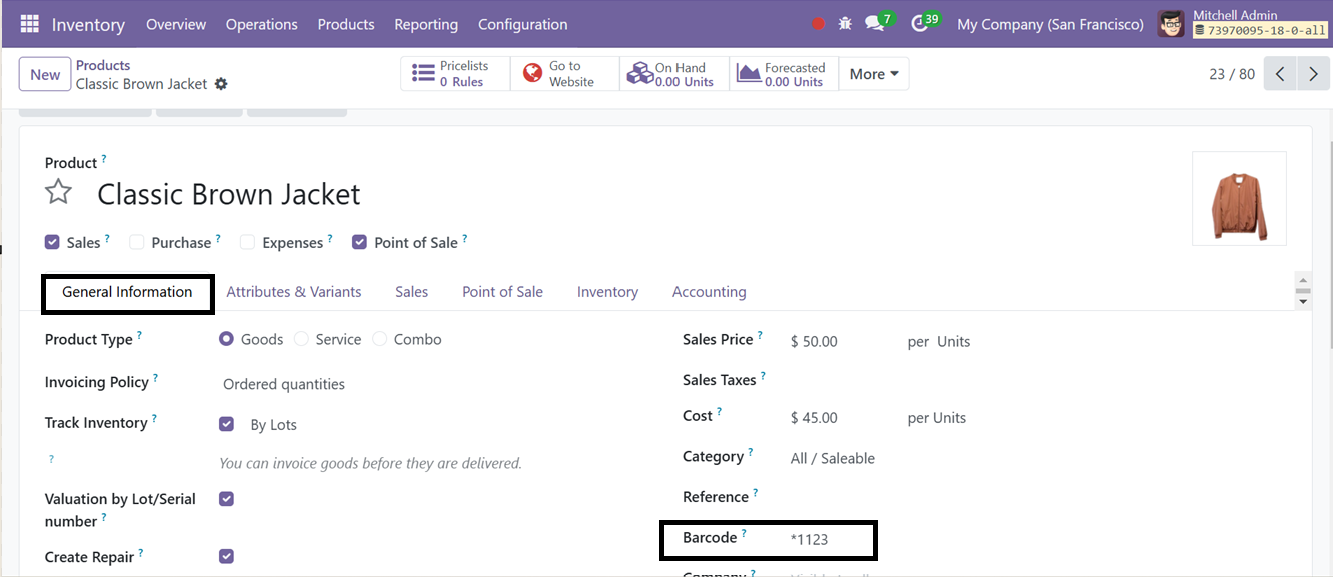
Here, I have just configured a simple product barcode for the demonstration. Now, go to the PoInt of Sale Module and open a sales session and click on the menu provided at the point of sale terminal.
From the Point of Sale terminal menu, select the ‘Debug Window’ option. Enter the product's barcode number into the ‘Barcode Scanner’ field and click the ‘Scan’ button. This process will manually simulate the scanning of the product barcode, adding the corresponding product to the cart, as demonstrated in the screenshot below.
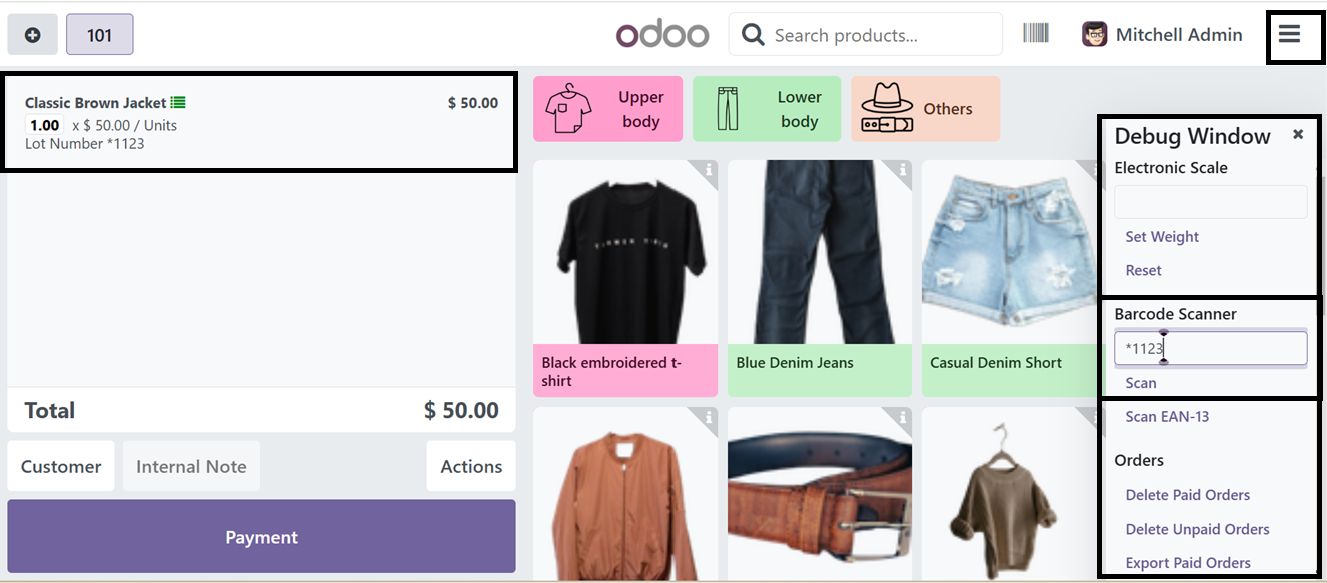
By utilizing an external scanner device, you can seamlessly scan product barcodes during a Point of Sale session. This functionality is facilitated by Odoo's barcode-enabled feature, ensuring efficient and streamlined shopping.
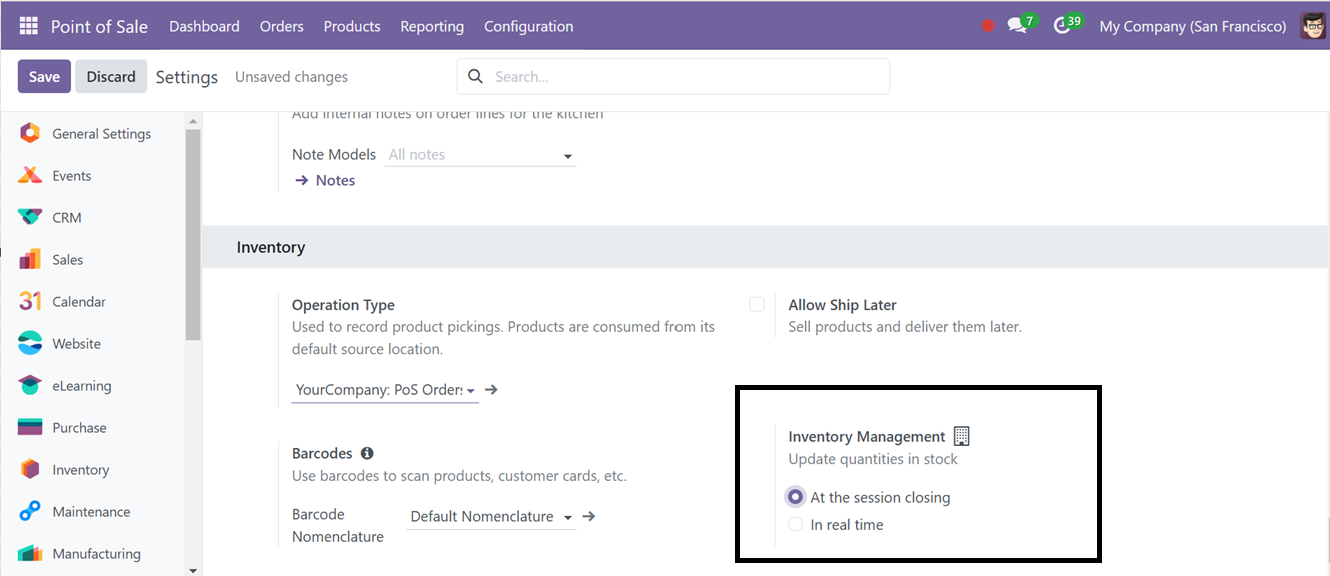
Then, the ‘Inventory Management’ feature provides flexible stock updates with 'At the session closing' and 'In real time' modes. 'After the session closes, updated inventory; perfect for bulk reconciliation. ‘In real time’ updates stock immediately during sales, ideal for businesses that require instant synchronization across channels. With these options, businesses can customize inventory management to fit their workflows.
Coins/Bills
The ‘Coins/Bills’ is an option in the Configuration menu of the Point of Sale module that lets you produce coins or bills. In the window, a collection of coin Names, Values, and related point of sale choices are displayed on the Coins/Bills page as depicted in the screenshot below.
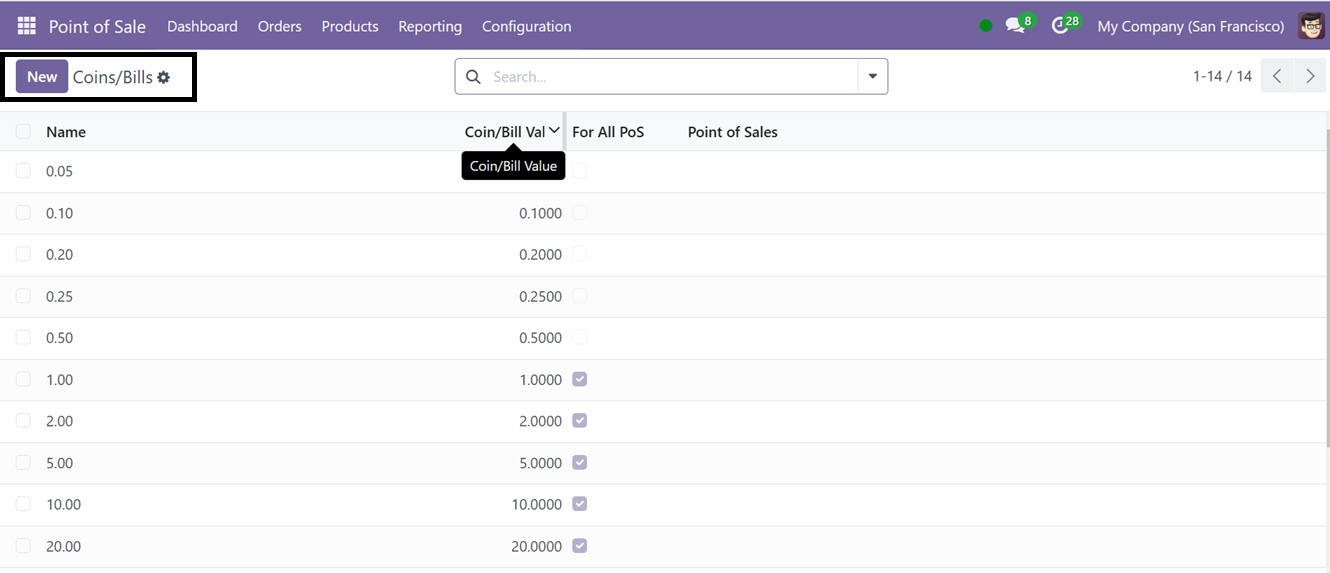
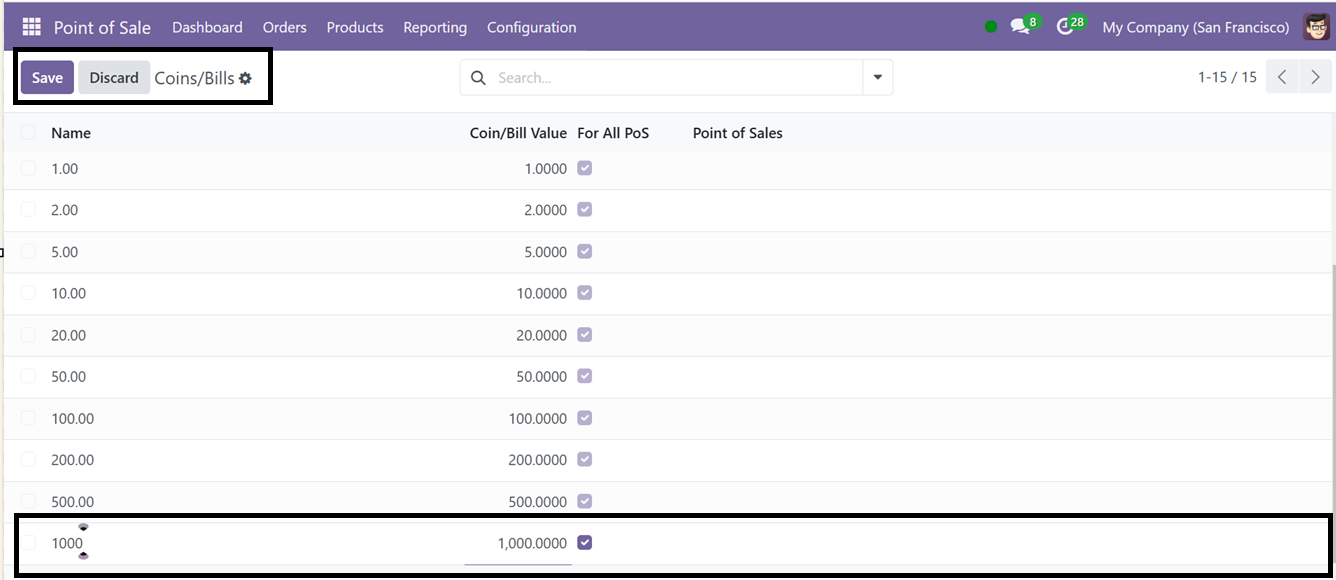
Click the ‘New’ icon to create new coins or notes, input the Coin Name, Coin/Bill Value and activate the Point of sale feature in the editing field. Finally, save the coins or notes to the list using the ‘Save’ icon.
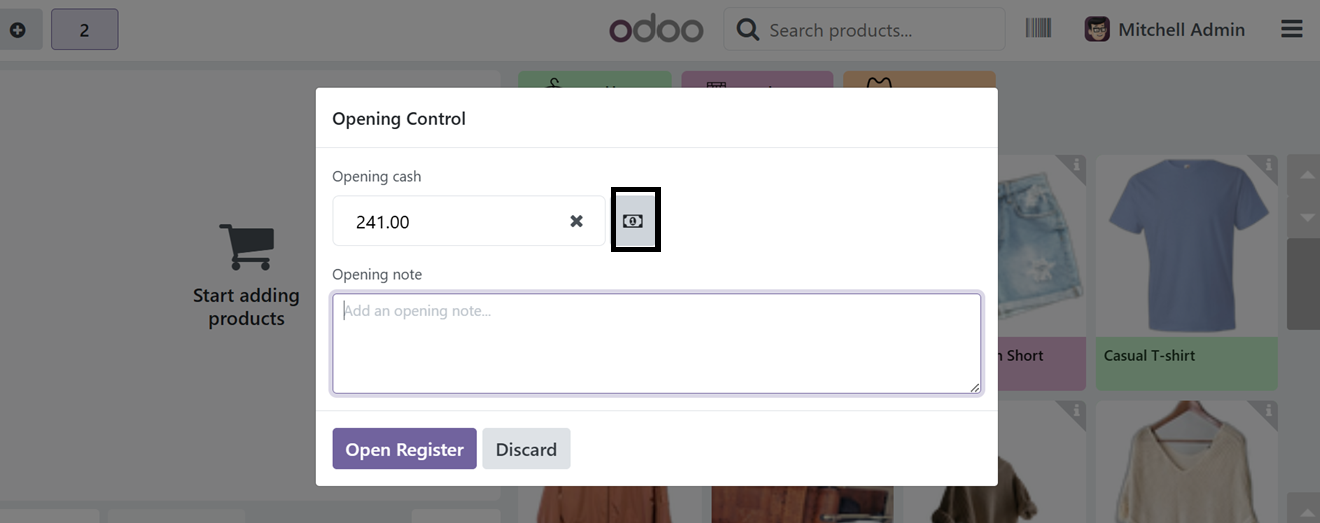
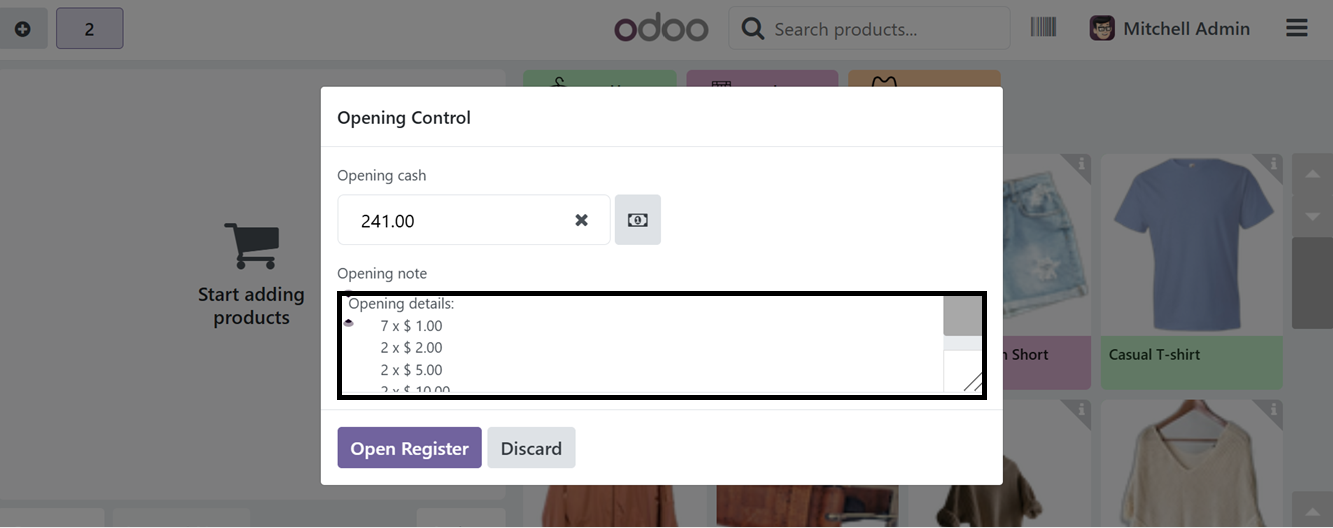
After configuring the required Coins/Bills, you can utilize them while Opening and Closing a Point of Sales Session to add cash denominations. While opening a new shop session, click on the 'Open Register’ button to get the “Opening Control” form, where you can set the opening cash balance. To add the cash using the ‘Coins’ feature, click on the coin icon as depicted in the screenshot below.
This will open the available ‘Coins/Notes’ list from the list you can add the opening cash denominations using the ‘+,’ and ‘-’ buttons and press the ‘Confirm’ button.
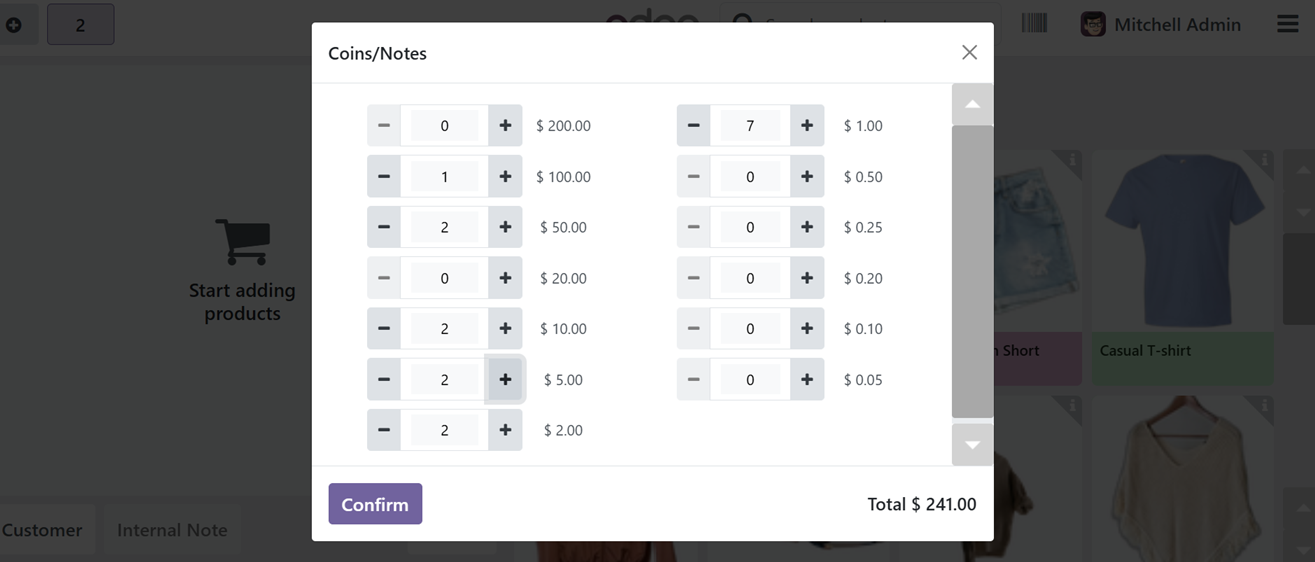
After confirming the available coins, you can see the added denominations from the ‘Opening note’ area as illustrated below.
The same procedure of mentioning the coin denominations can also be done while closing a shop session from its ‘Cash Count’ area.
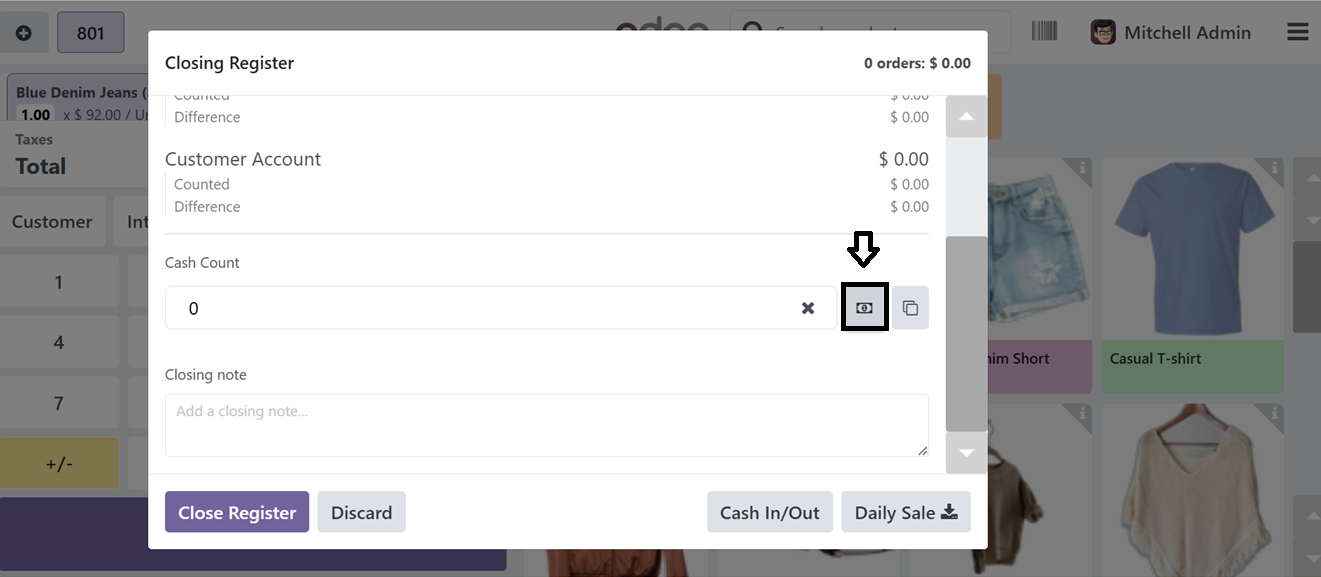
After choosing the denominations, it will be added to the ‘Closing note’ area.This system aids in accurate cash payment tracking during sales transactions by enabling cashiers to input specific coins, thereby reducing errors and improving accountability.
Point Of Sale
To create and manage a new Point Of Sale shop session, go to the ‘Point of Sale’ option from the ‘Configuration’ menu. This will show the Point of Sale dashboard window with the available shop or restaurant sessions with their Point of Sale Name, Company, Closing Date, Balance and Status as illustrated in the screenshot below.
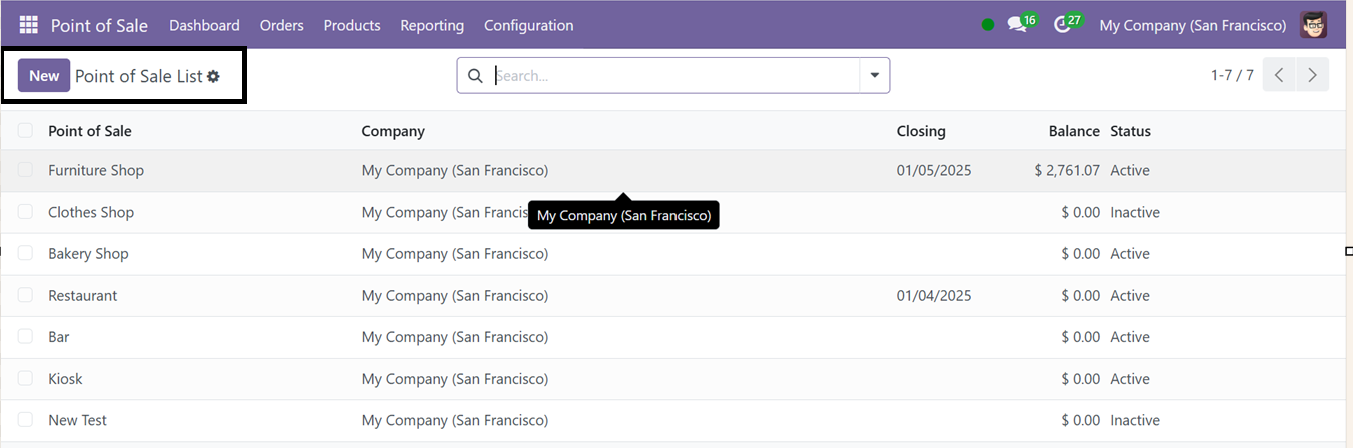
Then, to create a new shop or restaurant, click on the ‘New’ button. So, this will open a new form view as shown below.
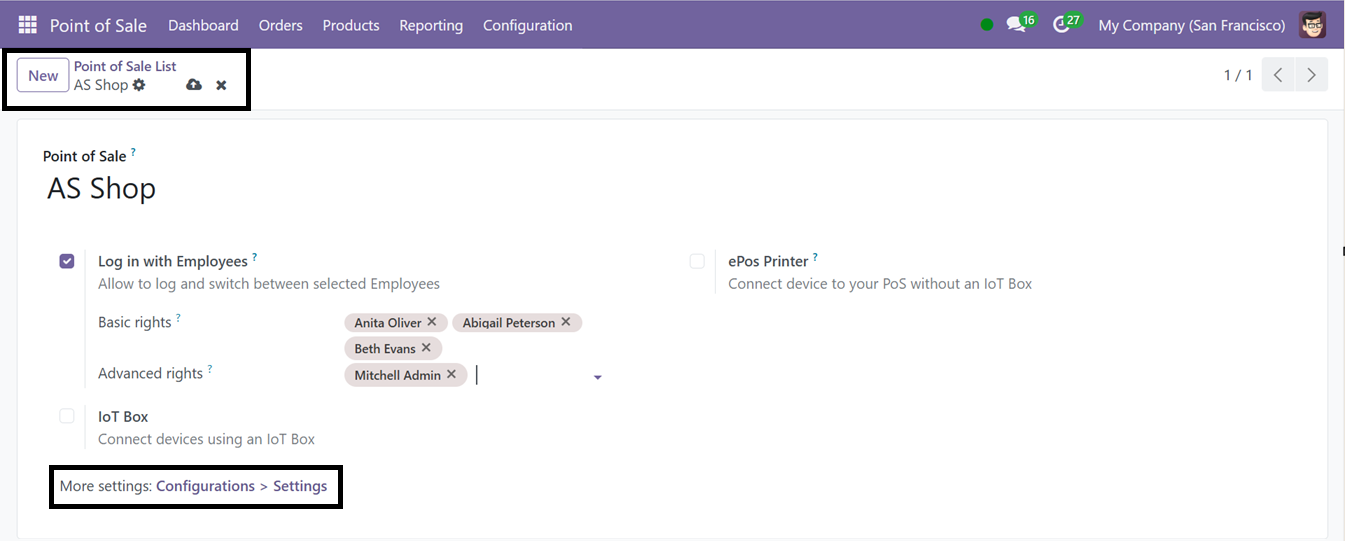
In the displayed window, enter the ‘Point of Sale’ name choices for allowing logging between multiple employees per session in the ‘Log in with Employees,’ field. Then, enable the ‘ePoS printer,’ and ‘IoT box’ options. Activate the "‘Log in with Employees" and mention the employees with the ‘Basic rights,’ and in the ‘Advanced rights’ in the relevant fields as per the requirement.
● Basic Rights: Employees with Basic Rights in Odoo Point of Sale are able to carry out routine sales tasks including product access, sales, and payment processing.
● Advanced Rights: More access is made possible by Advanced Rights permissions, which are perfect for managers or supervisors who are in charge of managing sales sessions and making operational changes. These rights also allow for price control, establishing configuration, and comprehensive reporting. Then, you can go to the Point of Sale Settings window to configure more configuration options.
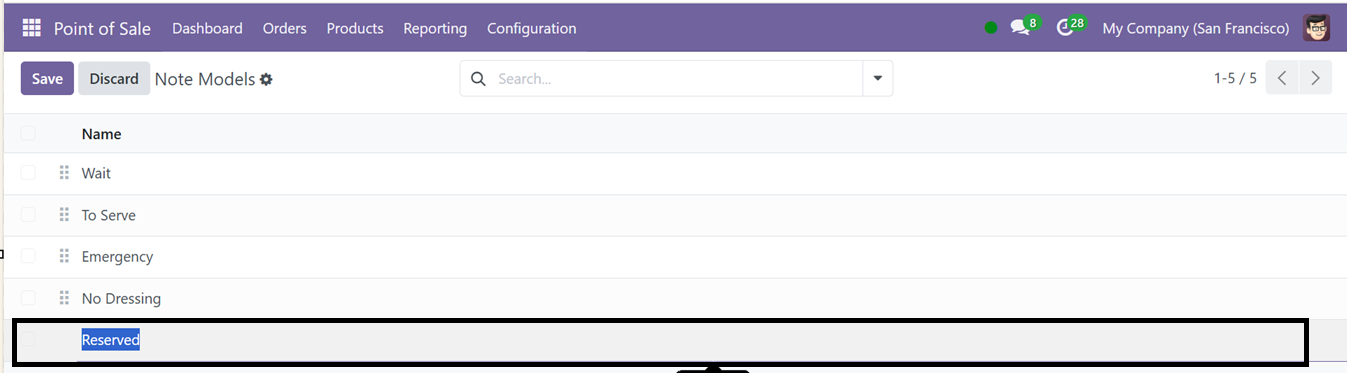
Note Models
Odoo 18's Point of Sale (POS) module features Note Models, allowing businesses to manage and configure additional notes or comments on orders or products. These notes convey specific instructions, customer preferences, or details to be included in the order or product line. Users can view available Note Models from the dashboard, create new ones by clicking the 'New' button, and save them for later use.
POS Product Categories
When operating a product sales company, it is crucial and effective to classify products into several groups or categories. With the Odoo Point of Sale Module, classifying various product categories is simple. The Configuration menu's PoS Product category option allows for this classification. This dashboard demonstrates a variety of sales product categories.
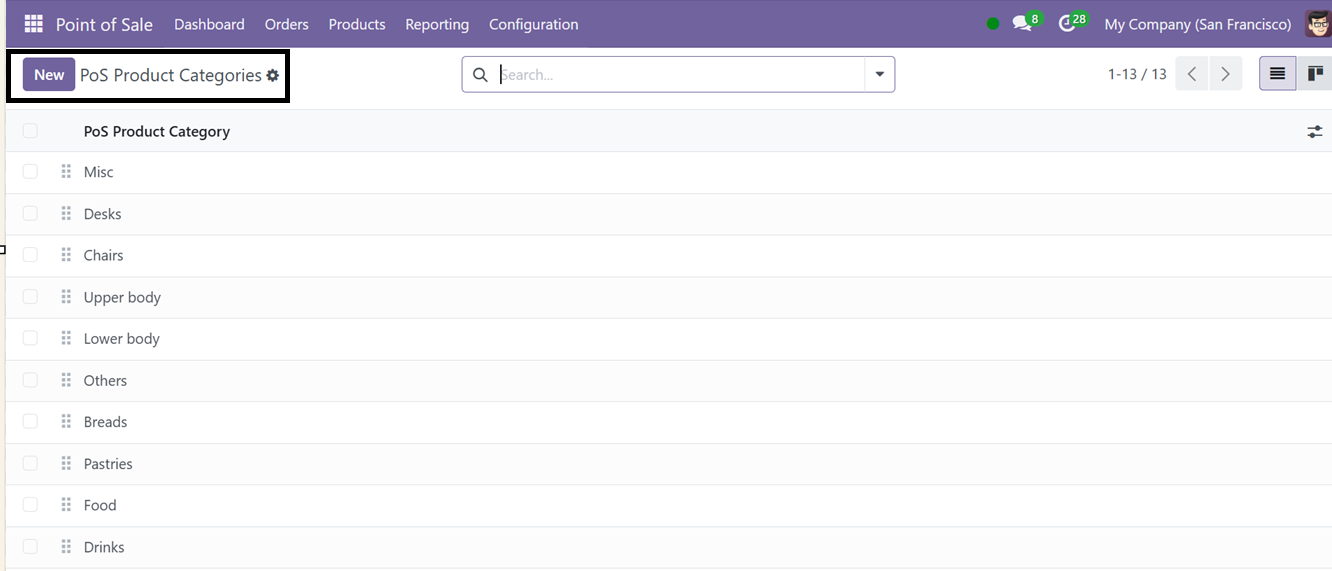
This window can also be viewed in a Kanban state view for better understanding. Filtering, Grouping and Favorites options are also available inside the search bar area. You can create a new product category using the ‘New’ button.
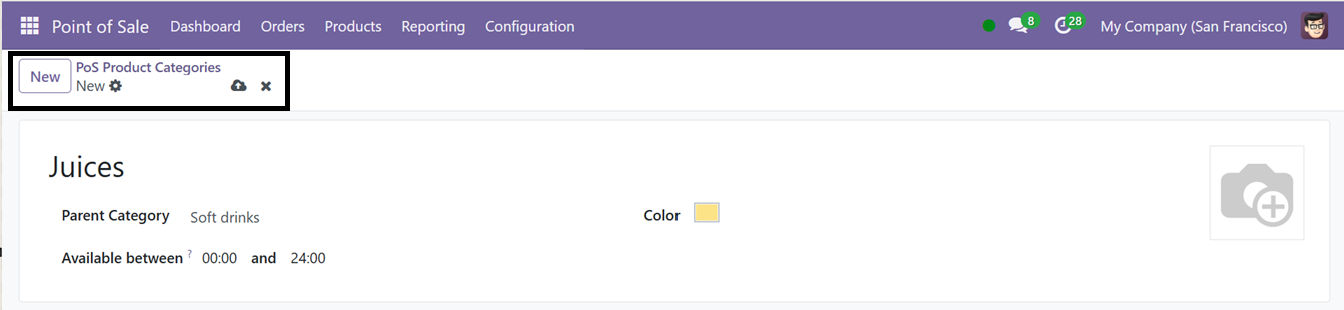
In the new category configuration form, just enter the Category Name, Parent Category and Available between time range as shown in the above screenshot. Then highlight the category with a preferred color and save the data.
Attributes
Attributes in Odoo are crucial for managing product variations, inventory, pricing, and sales processes, representing specific characteristics like size, color, or material. The Point of Sale module can be customized with various variants using the Attributes option in the Configuration menu.
The attributes list, including eCommerce Category, Display Type, Variant Creation mode, and eCommerce Filter Visibility, can be easily accessed from this dashboard window.
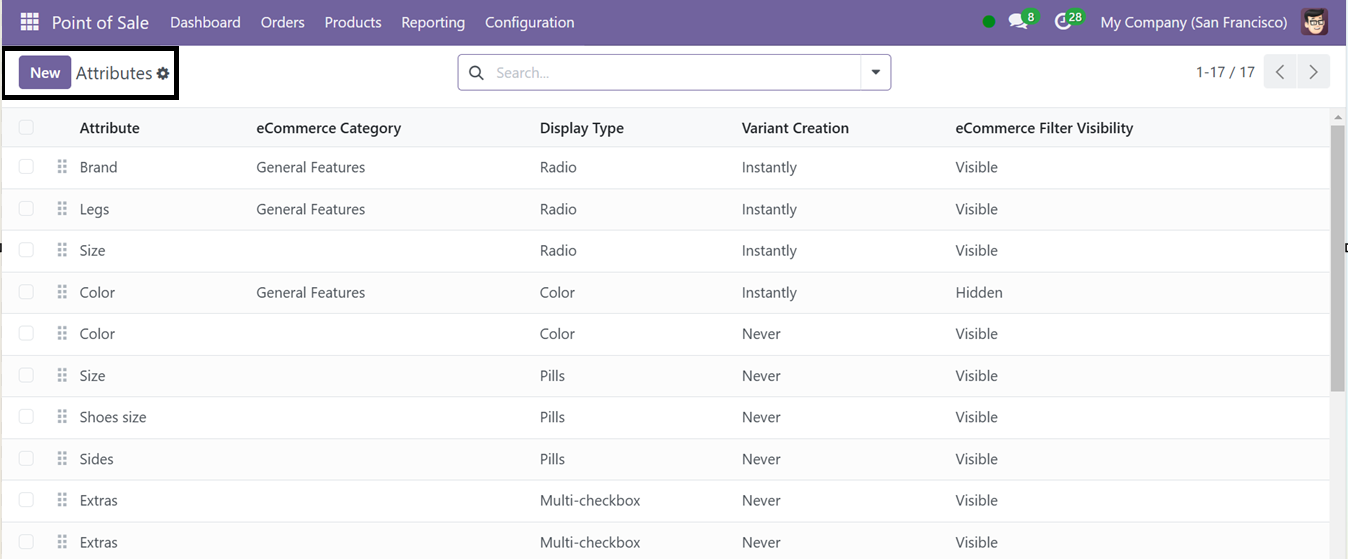
Adding a new attribute to the product is a simple process using the ‘New’ icon. In the displayed form view, edit the relevant details including the Attribute Name.
The ‘Display Type’ might be either radio, pills, select, or color. Creating variations can be done rapidly, dynamically, or never at all by mentioning it in the ‘Variant Creation’ field. Potential variances are allowed for by the instantaneous production of alternatives once the traits and values are provided. Only by adding values to a sales order's attributes may variants be made using dynamic choices. Additionally, the never option never creates the properties. The visibility of eCommerce may be changed to either visible or hidden in the ‘ eCommerce Filter’ area. Then, choose the ‘eCommerce Category,’ as shown in the screenshot below.
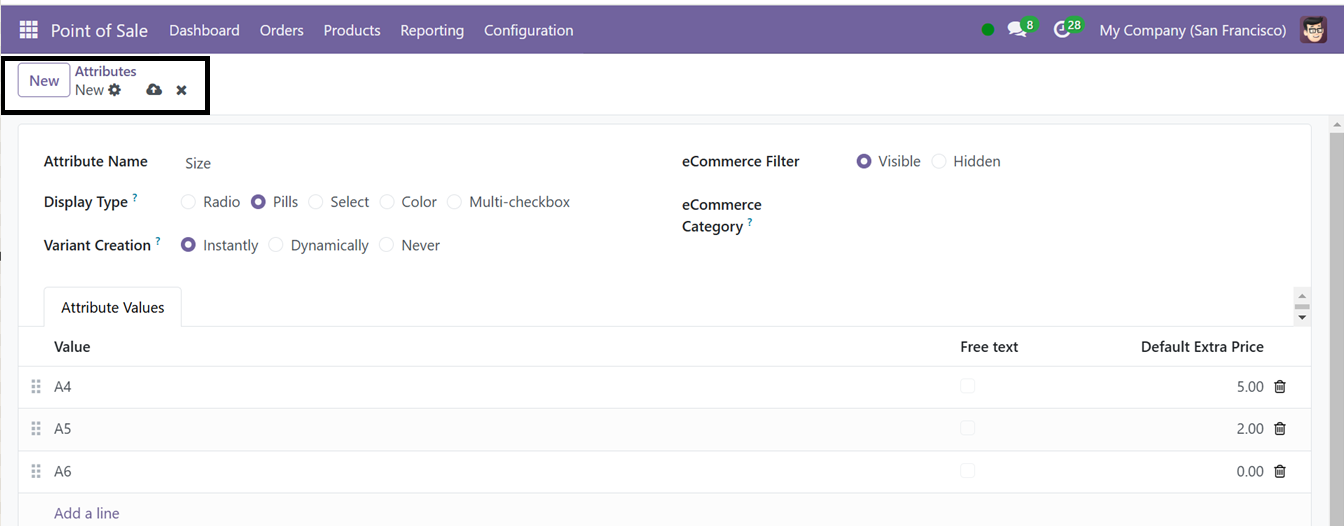
To add the value to the product attributes, utilize the Add a line option. Finally, click on the Save symbol.
Creating a New Point of Sales Shop
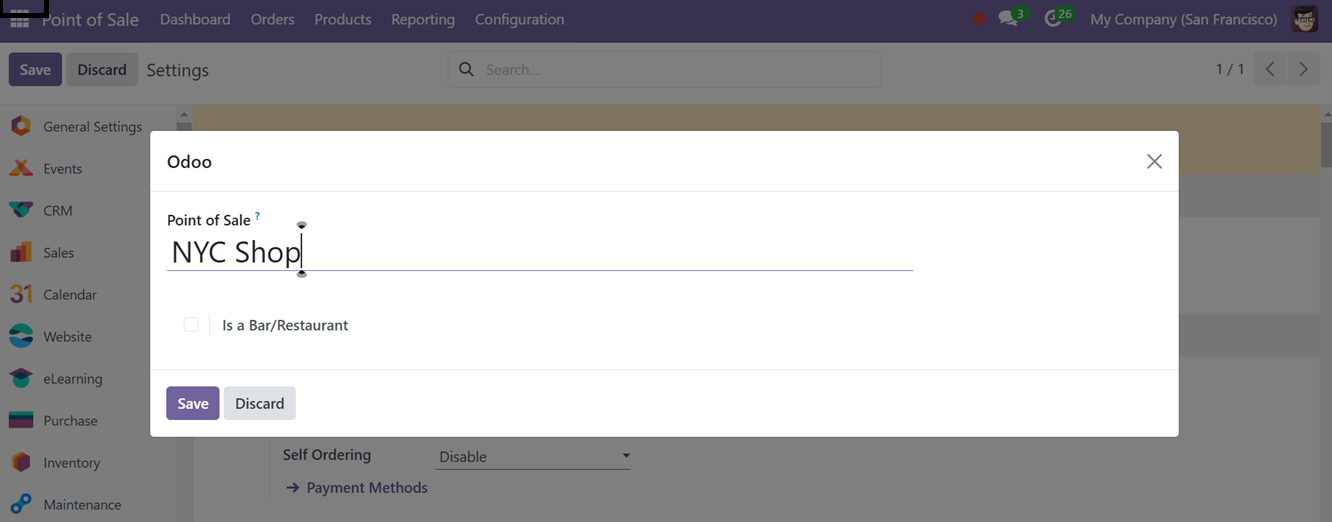
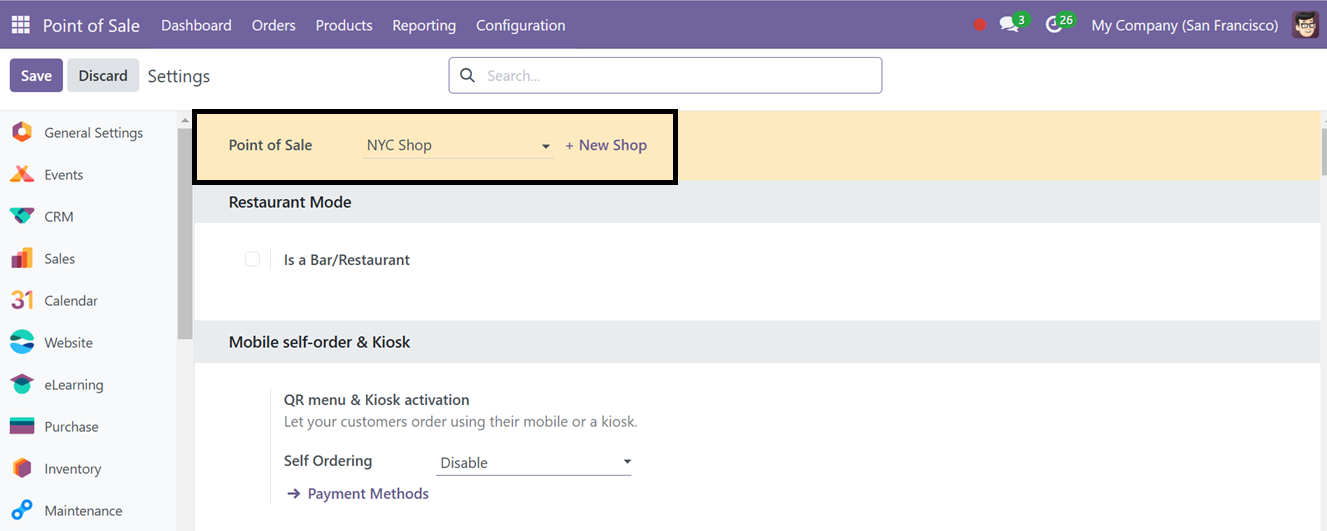
You can modify the parameters of any Point of Sale (PoS) by selecting the "Settings" option under the Configuration menu. To adjust a specific PoS shop or restaurant, choose it from the "Point of Sale" field. If you want to create a new shop, click the "+New Shop" button.
Inside the displayed window, edit the shop name in the ‘Point of Sale’ editing field and activate the ‘Is a Bar/Restaurant’ button, if it is a restaurant session. Here, we are going to configure a normal point of sale shop session.
After saving the point of sale session details, save the shop using the ‘Save’ icon of the point of sale’s Settings window. This will enable all the settings options related to a shop in the configuration settings window as shown in the screenshot below.
Odoo's Point of Sale module features Mobile Self-Order & Kiosk settings, allowing businesses to configure self-service options for customers. This is beneficial in restaurants and retail stores. The kiosk mode transforms a device into a self-service terminal, simplifying navigation and ordering. Mobile self-ordering allows customers to access the ordering system through a QR code, providing a convenient and contactless ordering experience.
After configuring all the shop settings, you can see the new shop session is added in the Point of Sale dashboard as shown below.
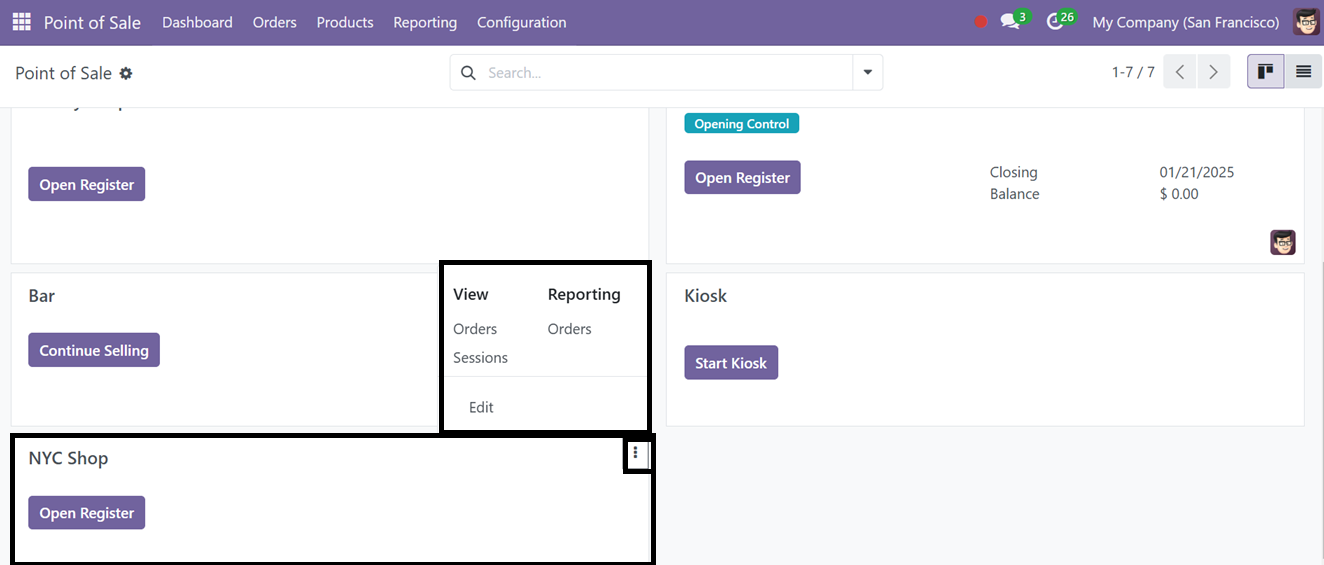
From the three dotted menu of the point of sale’s kanban view, you can edit or manage the required settings using the ‘Edit’ button. The ‘Orders,’ and ‘Sessions’ in the ‘View’ section can be used to manage all the orders and sessions of this particular shop session. The ‘Orders’ in the ‘Reporting’ area can be used to analyze all the orders to get a quick overview of your product sales.
The ‘Open Register’ button in a Point of Sale acts as a starting point of a sales session. Clicking on this button starts a new session, expediting the sales process and giving cashiers the ability to efficiently monitor transactions. In the displayed Opening control window,you have to provide an ‘Opening cash’ and ‘Opening note’ according to the shop’s cash register.
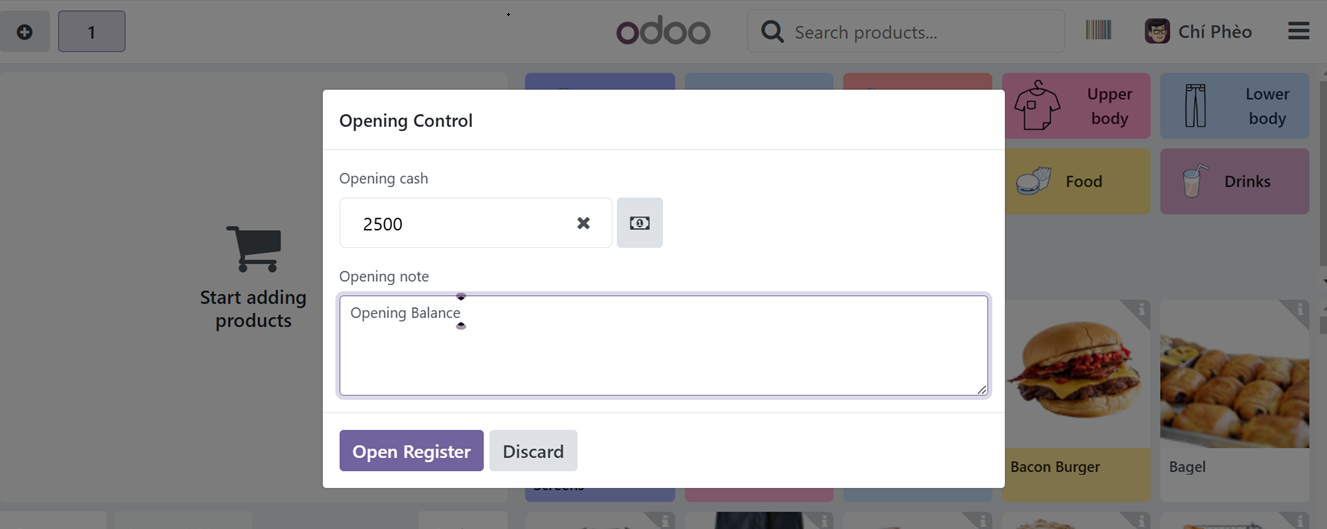
Click on the ‘Open Register’ button to proceed. This will lead you to the point of sale terminal as illustrated in the screenshot below.
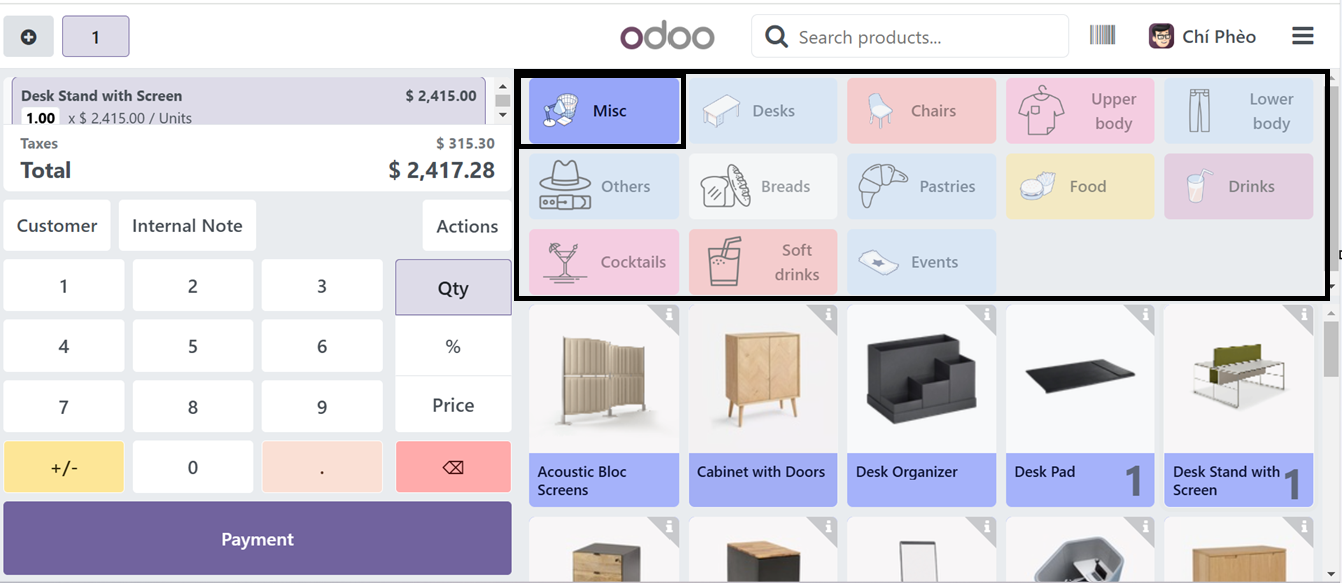
You can see the various product categories from the top part of the window. To restrict and customize relevant product categories for this shop, you can activate the ‘Restrict Categories’ option from the Configuration Settings window.
Select desired products from the catalog and add them to your cart. You can utilize the ‘Action’ button to edit your order and perform various actions including Applying Coupon codes, Rewards, Discount, Edit Orders, General Notes, Taxes, Customer Note, Choosing Pricelists, Refunds etc.

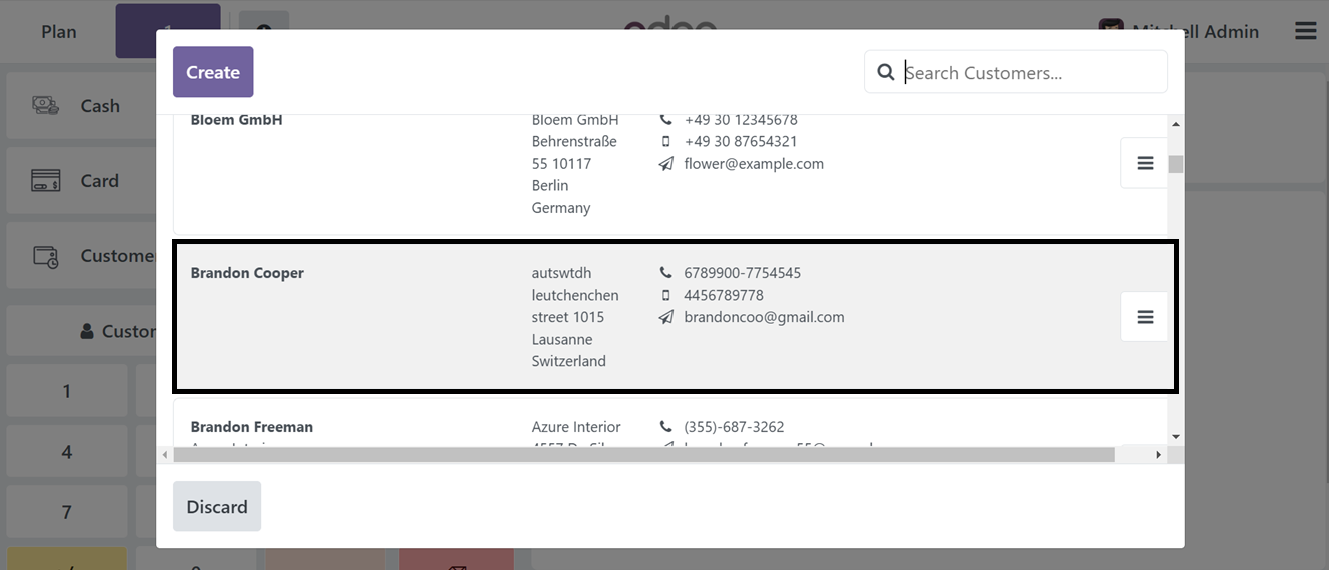
To proceed with the next product order procedures, simply click on the 'Customer' button from the point of sale terminal. You can add any notes or messages regarding the order by clicking on the ‘Internal Note’ button. Clicking on the ‘Customer’ button will open the available customer address list that has been previously saved in your Point of Sale customer database.
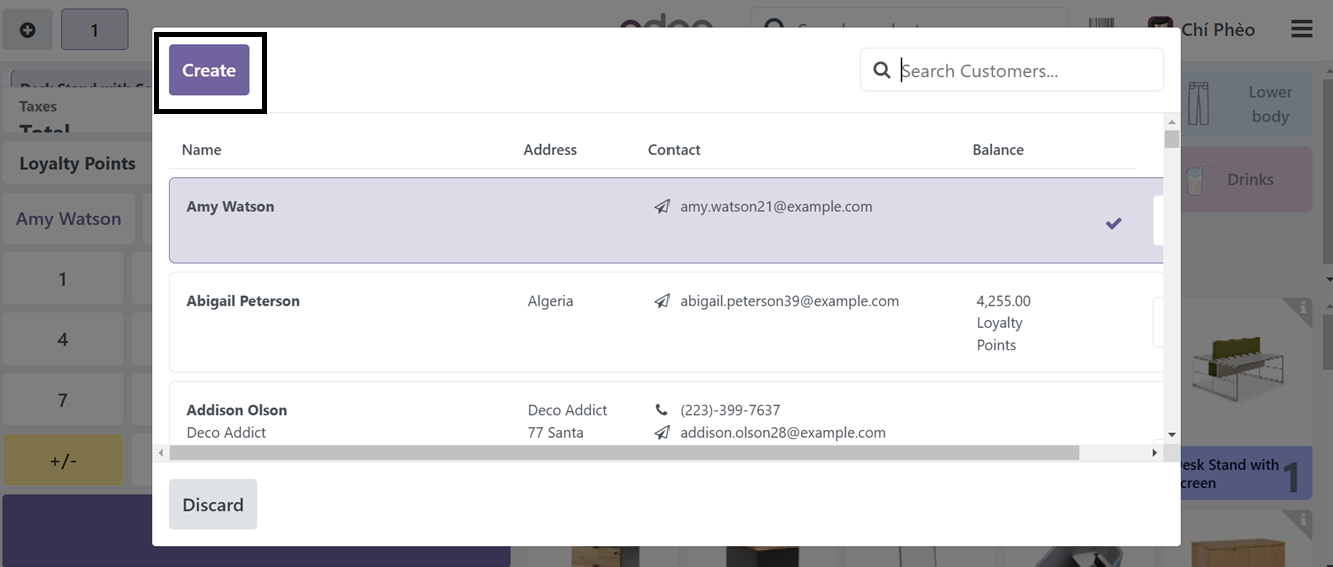
Just click on the relevant customer address to continue the ordering process, if it is a new customer, you can quickly create a new customer data using the ‘Create’ button. The selected customer name will be added to the new order and then, you can click on the ‘Payment’ button to proceed.
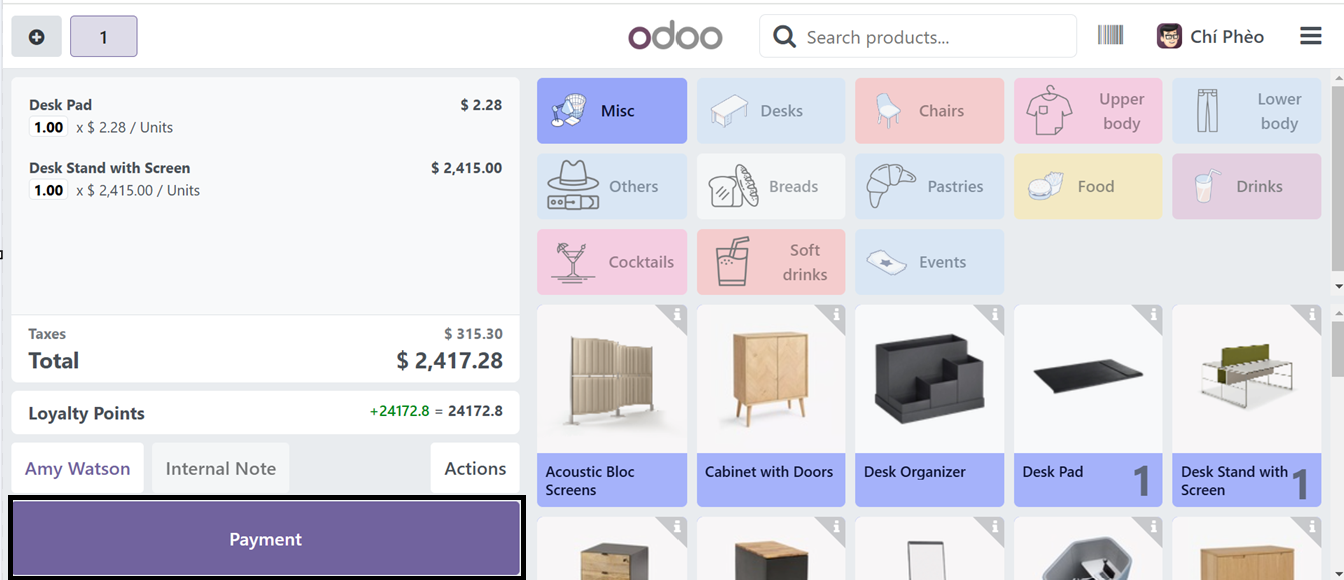
The ‘Payment’ button will open a payment interface, where you have to choose an appropriate Payment Method. You can see the available payment methods from the upper left side of the screen. Choose the payment method and validate the payment using the ‘Validate’ button.
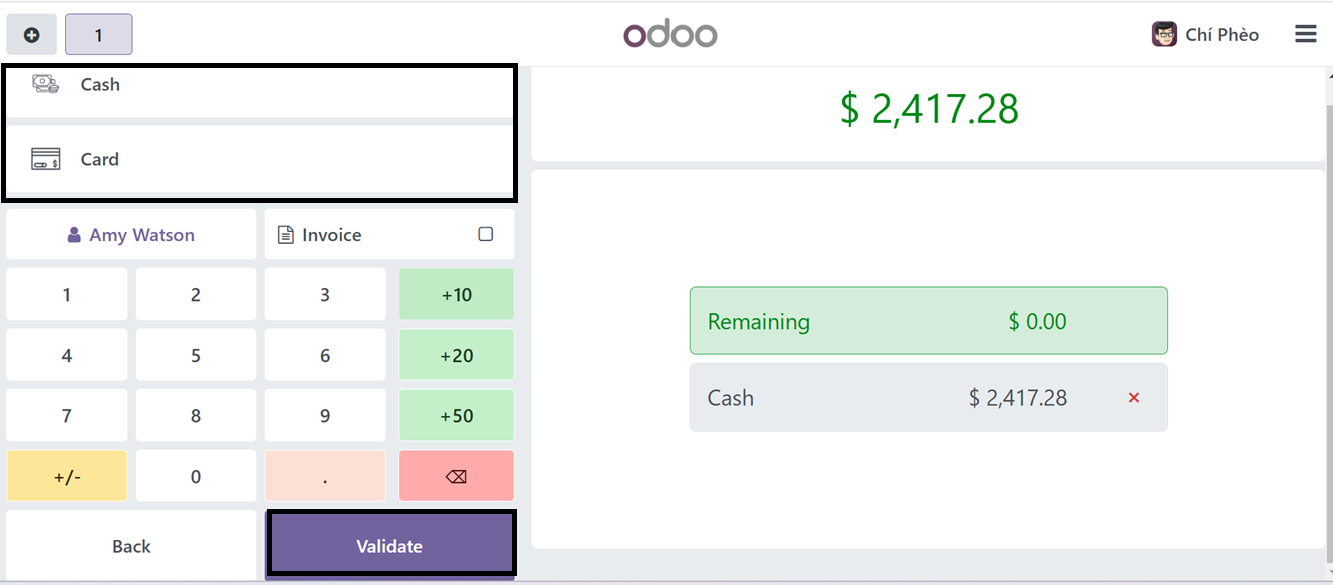
Validating the payment will complete the payment process and you can see the payment success window with a payment receipt.
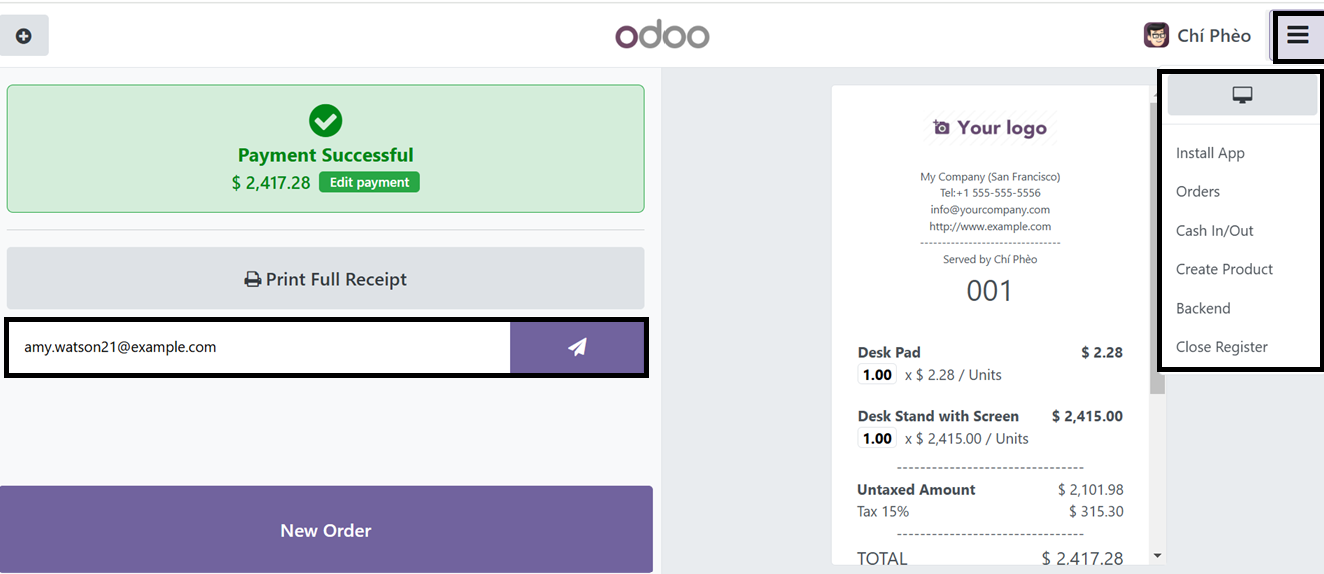
Here, you have the option to’Print Full Receipt,’ send the payment receipt to the customer mail id and start a ‘New Order.’ Then, you can Install the point of sale shop application as PWA using the ‘Install App’ option.
The small menu icon provided at the top right corner of the point of sale terminal will help you to go to the orders history, check the Cash In/Out details, Create new sales products, Go to the Odoo application backend and Close the cash register using the designated menu options available.
Product Creation from PoS Interface
To create a product directly from the Point of Sale interface, just click on the ‘Create Product’ button from the PoS Terminal menu. This will open a new product configuration form as a pop-up window as shown below.
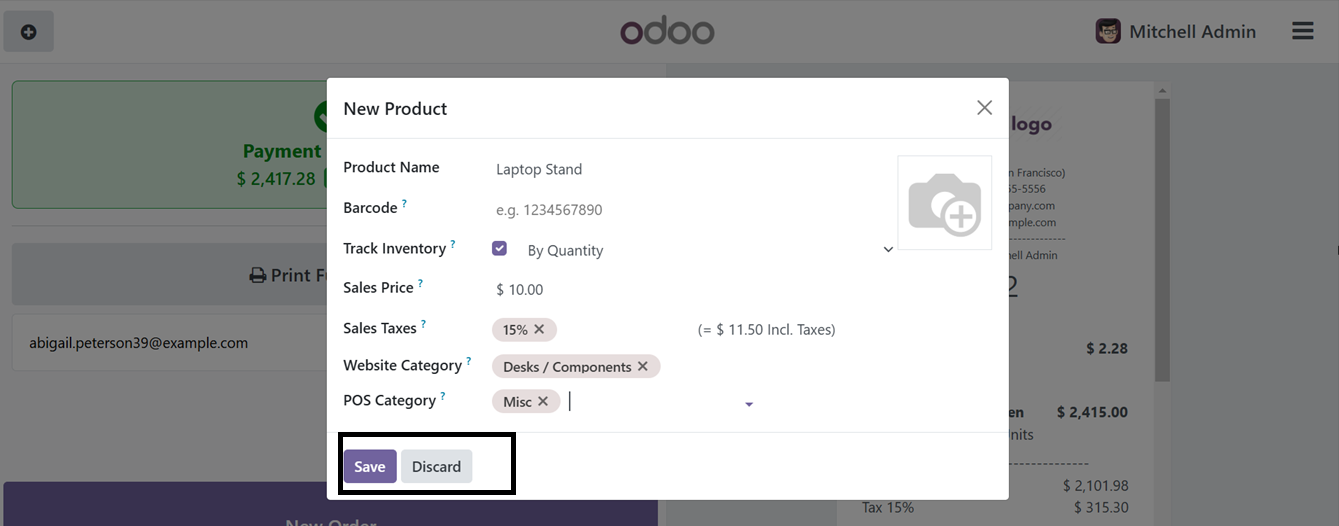
In the displayed window, input the Product Name, Barcode, Sales Price, and applicable Sales Taxes. You may also add an image by selecting the 'Edit' image button. To monitor product availability based on quantity, enable the 'Track Inventory' option. Specify the 'Website Category' to which the product belongs on the Point of Sale website, and select the appropriate 'POS Category' for the product within the Point of Sale sales terminal.
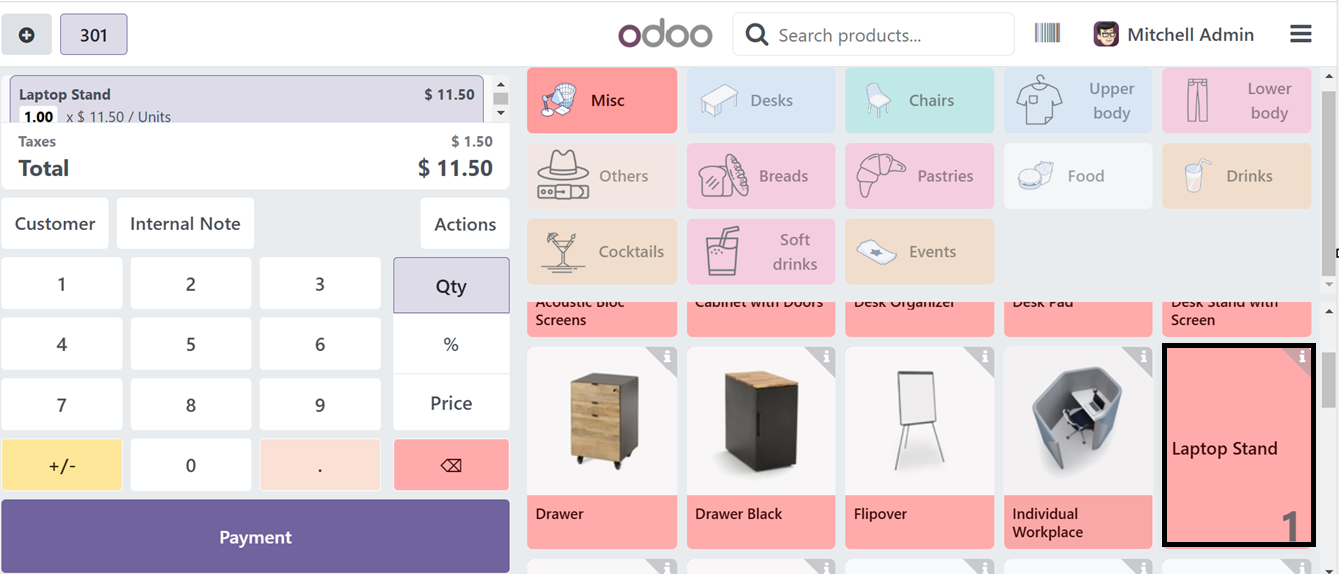
After saving the new product details, it will create the new product database and added to the product catalog of the point of sale session as shown in the screenshot below.
Cash In/Out
The ‘Cash In/Out’ feature in the Odoo Point of Sale module enables businesses to manage cash transactions outside sales. This feature enables recording cash in, such as starting balances or deposits, and out, for payouts, refunds, or transfers. It also maintains a detailed audit trail to ensure accountability and transparency in cash management to ensure accurate tracking, accountability, transparency, and efficient cash operations management.
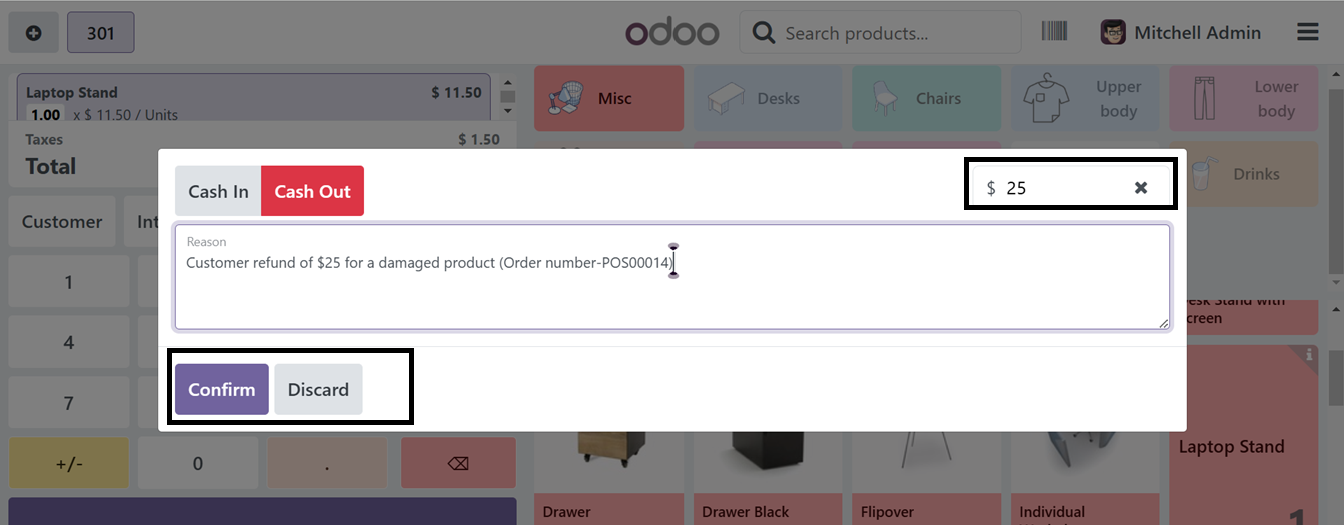
To record cash transactions, click on the ‘Cash In/Out’ button and select the appropriate transaction type, either Cash In or Cash Out, by toggling the button. Then, enter the reason and amount in the fields provided at the upper right corner of the pop-up window, as shown in the screenshot below.
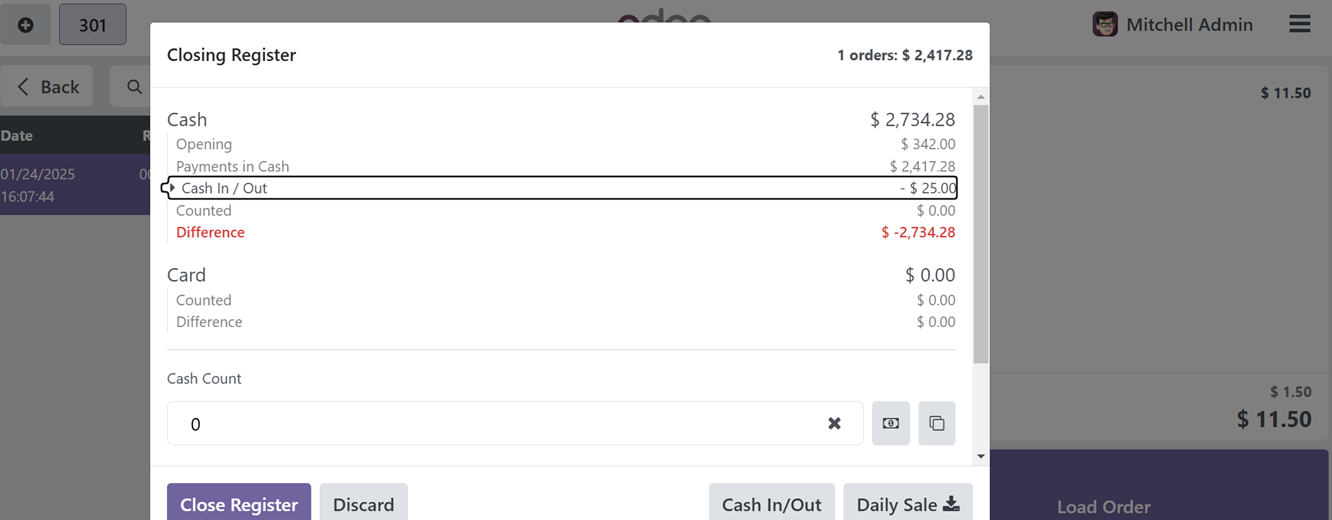
After confirming the details by clicking the ‘Confirm’ button, you will receive a notification regarding the transaction. The new ‘Cash Out’ transaction data will be recorded in the daily cash register of the Point of Sale session. This record can be accessed when closing the cash register at the end of the shop session, as depicted in the screenshot below.
Closing a Cash Register
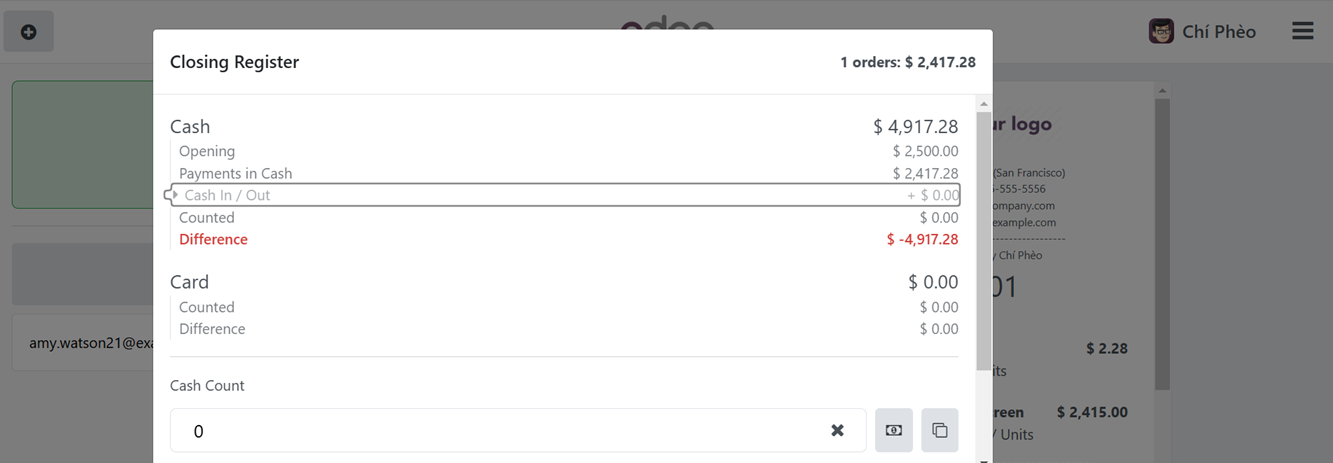
After completing all the sales orders of a day, you can close the shop session and cash register using the ‘Close Register’ button. This will generate the Closing Register with all the details of point of sale orders including the total number of orders, Total amount for the day, Payments in Cash, Card and all the available payment methods and Cash Count, Opening note. Then you can also edit a Closing note, as illustrated in the screenshot below.

Clicking on the ‘Daily Sale’ button will download the sales report for this particular day. Then, click on the ‘Close Register’ button to close the sales session. This will open another dialogue box containing the Payments Difference notification.
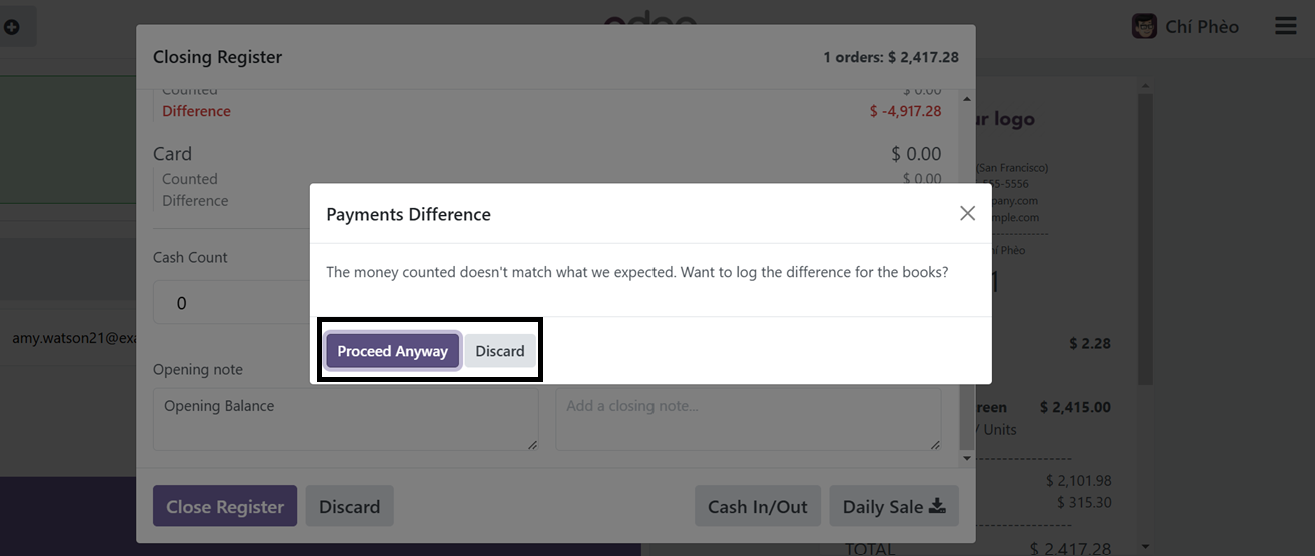
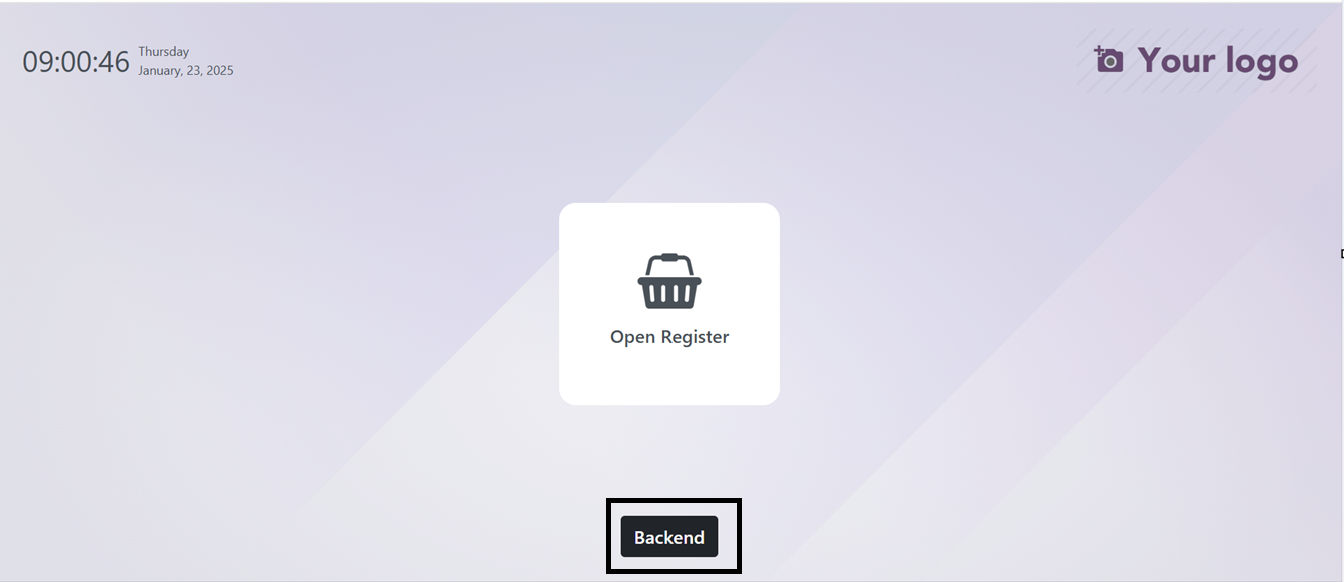
Then, proceed to close the register by clicking the 'Proceed Anyway' button. Finally, the session will be closed, and you will return to the Point of Sale opening terminal, where you can either open a new cash register or navigate to the Odoo backend using the 'Backend' button.
Similar to a typical store experience, the Odoo point of sale application makes order administration, cash movement tracking, and payment processing smooth. Configuring payment methods, turning on sophisticated features, or connecting with other Odoo modules for improved functionality are examples of customization choices.
Let's now examine how the Odoo Point of Sale module functions during a restaurant shop session. This includes tools made especially for effectively managing restaurant workflows