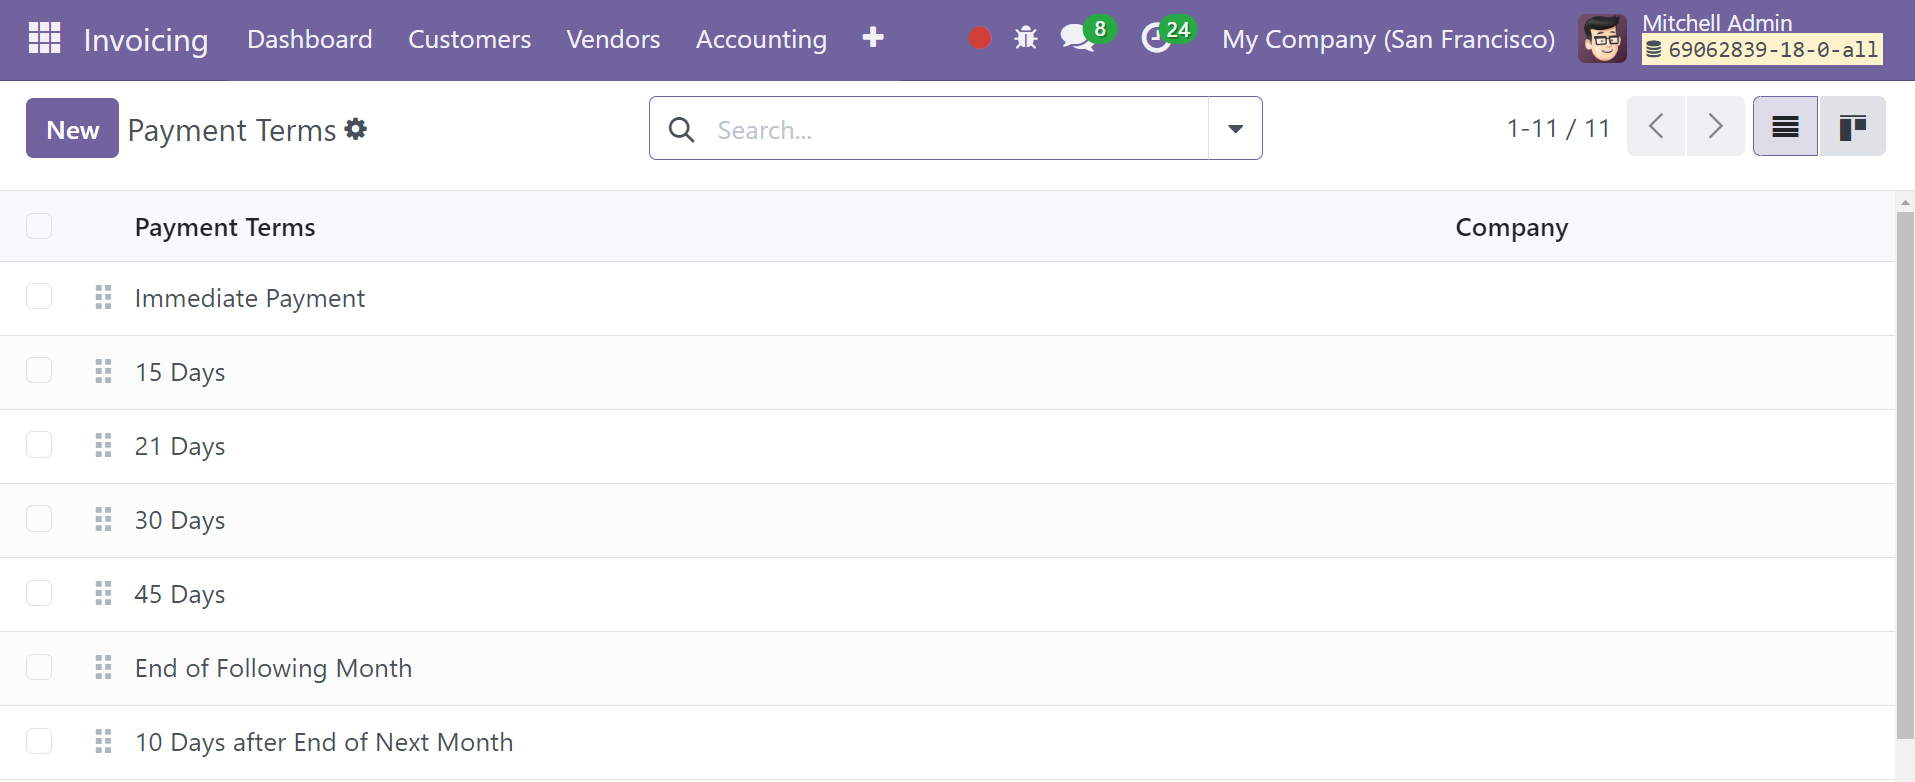
Payment Terms
To make transactions easier, businesses usually employ a range of payment providers and techniques. Regardless of the payment mechanism you associate with your business, setting up appropriate terms for payment is essential if you want to get paid consistently. The establishment of payment conditions is crucial as it aids in the preservation of transaction flow. The Odoo 18 Invoicing module allows for the establishment of several payment conditions. In Odoo 18, you can utilize these terms of payment when generating new contracts, bills, or invoices.
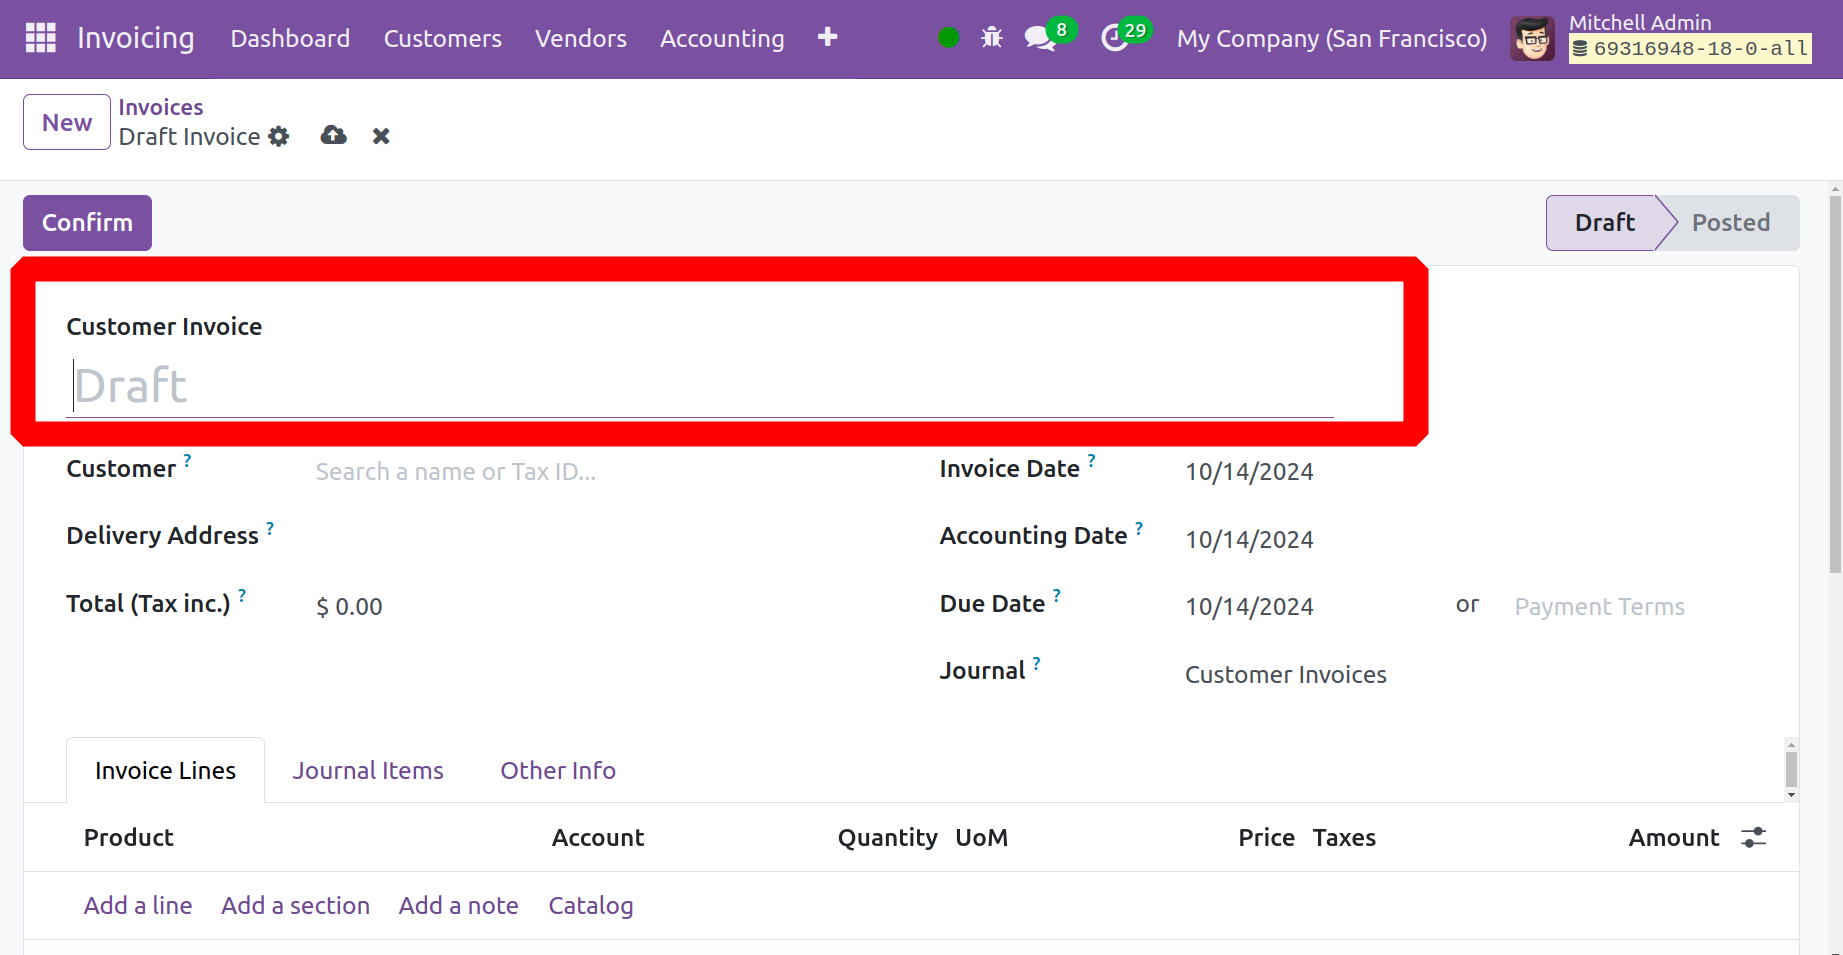
The Configuration menu of the Invoicing module leads to the Payment Terms platform. The window will display pre-configured terms for payments in your system.
To switch to a different available payment period, click on the relevant one. You can select a view that fits this platform from the available alternatives. Click the New button to bring up the new creation window. Here is a screenshot of the form view of the payment term creation window.
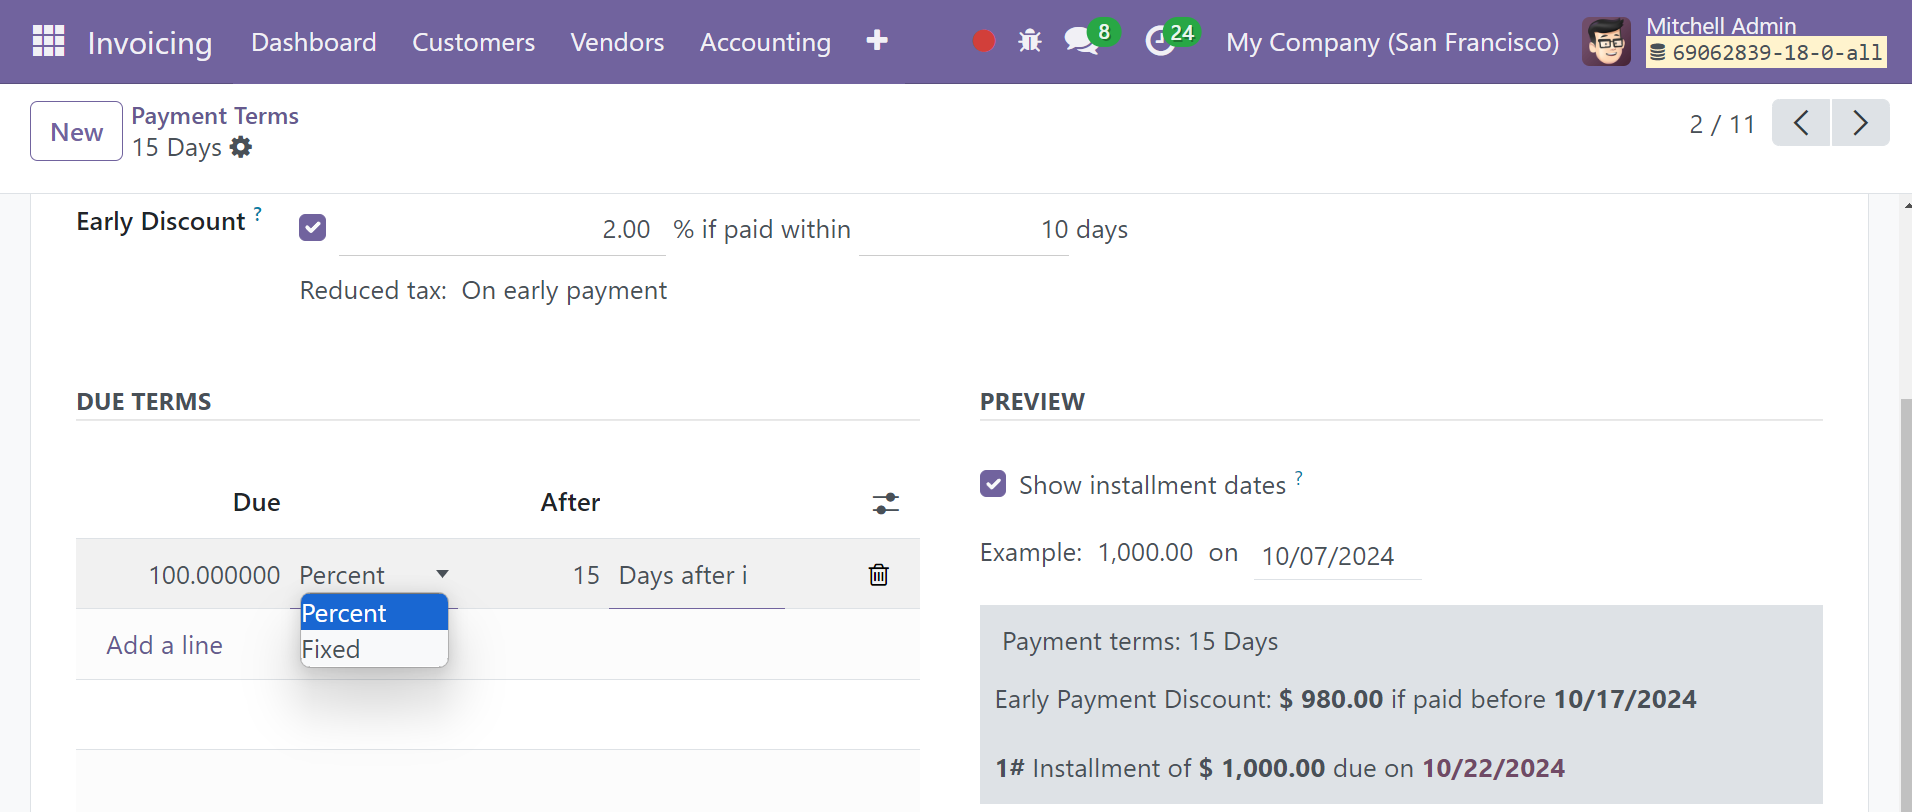
In the allotted space, mention the new Payment Term. The information you provide in the invoice description will be used to explain the payment terms to customers. In the Company field, enter the name of your business. Early discount is one form of trade finance in which a buyer pays less than the full invoice amount due by paying the supplier earlier than the invoice maturity date. You can activate the option as well.
You can specify the terms for this payment by using the specify a Add a Line' button in the window. The due type can be a fixed Sum or Percentage. The computation type for the last line should be set to "Balance" in order to ensure that the full amount will be allocated. This method can be used to develop new terms for payments.
Incoterms
Incoterms are terms used in international commerce that are utilized in terms of terminology. The duties and transactions between a seller and a buyer shall be described in these terms. These standardized words are universally accepted to enable smooth international business transactions. These Incoterms can be configured in the Odoo 18 Invoicing module and used to oversee international business transactions for your organization.
The Configuration menu of the Invoicing module contains the Incoterms option, which opens access to the platform below. The pre-configured Incoterms list is available here. Use the New button to add a new Incoterm to the module. Clicking the New button will cause the window to display a new line where you can enter the Incoterms code and name. To save you may make use of the Save icon.

You can choose a default invoice term for your company activities in Odoo 18 by going to the Settings menu of the Invoicing module.
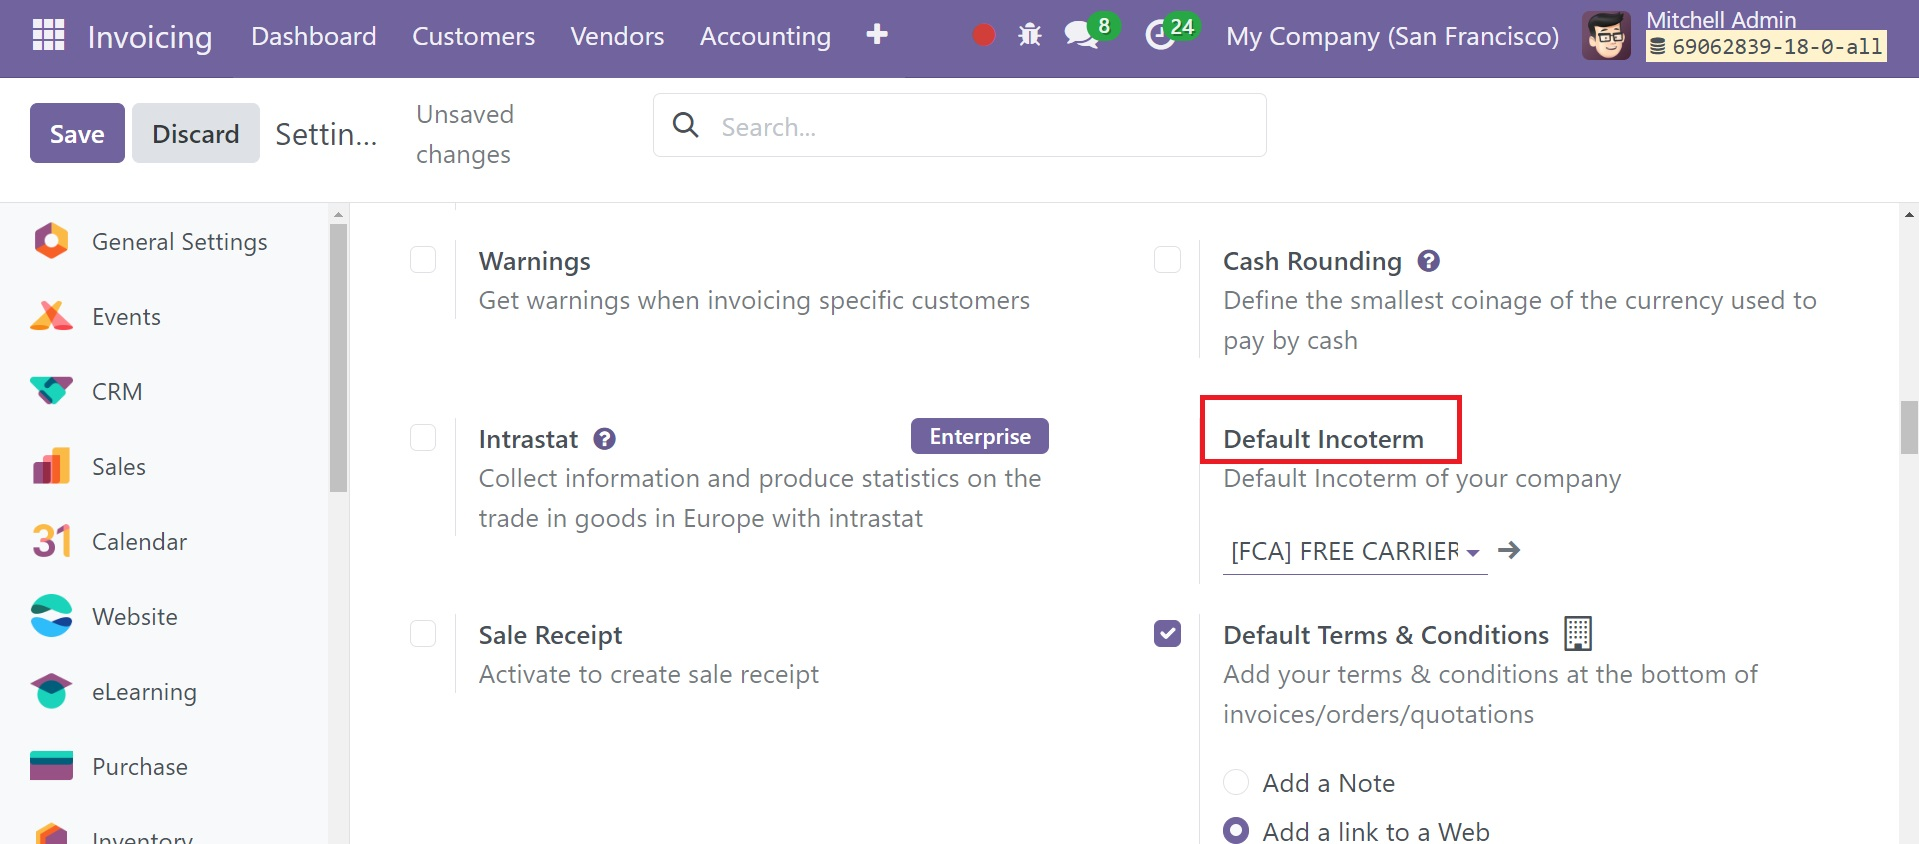
Here, you can enter your company's default Incoterm in the designated field.
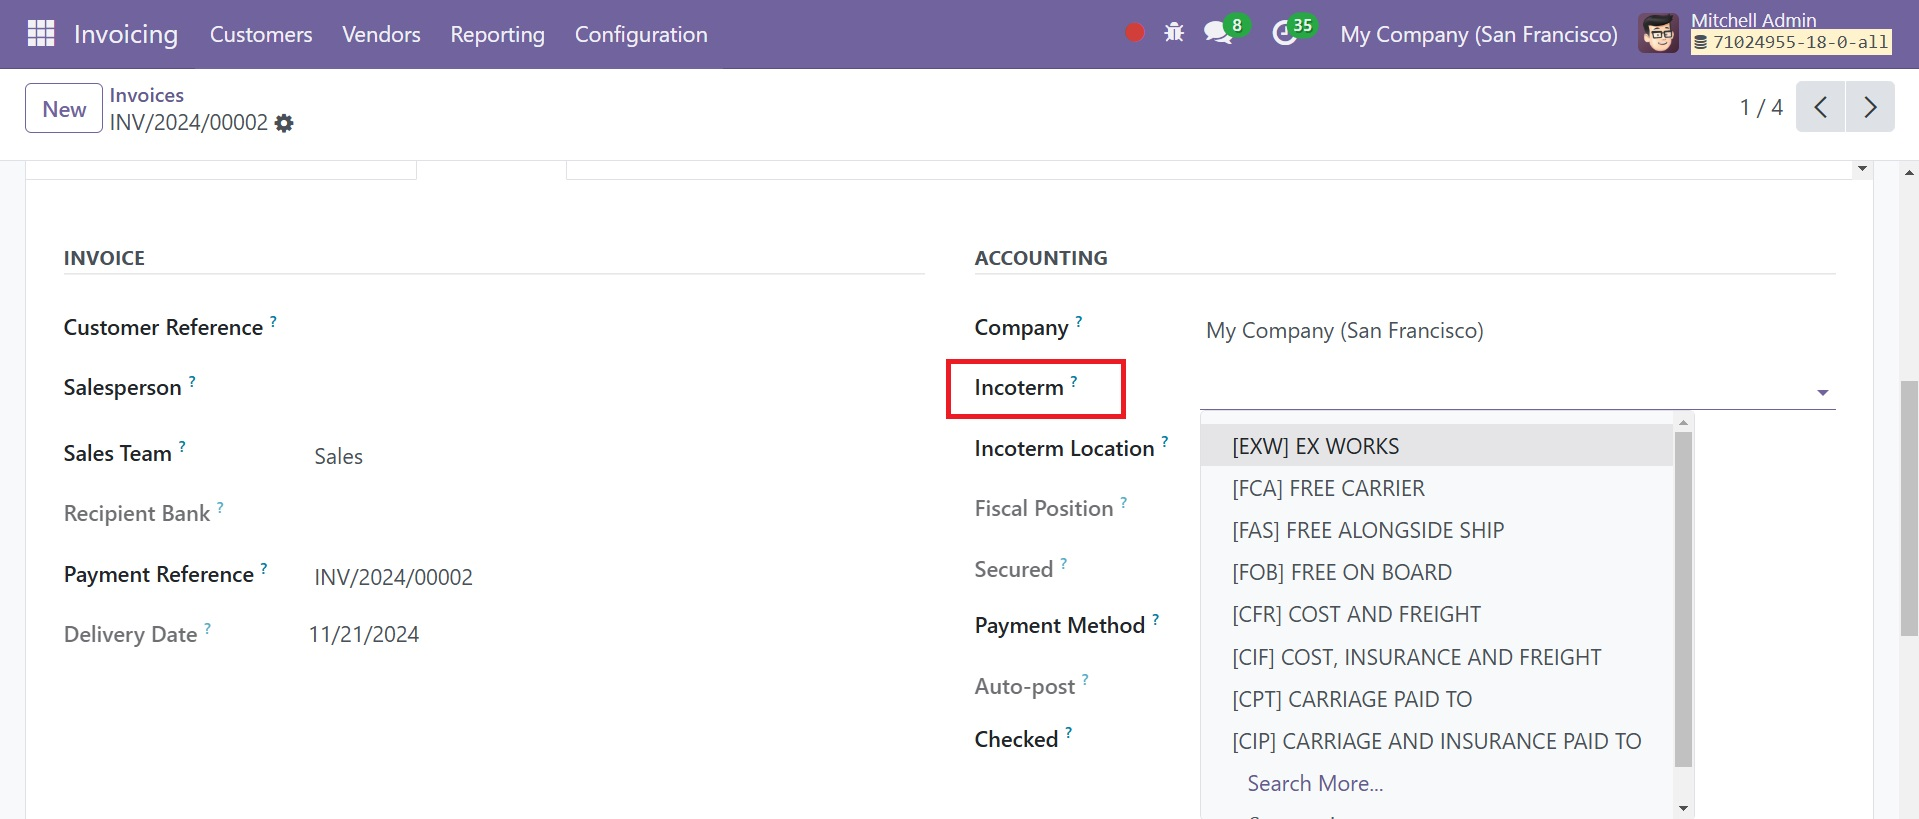
In an invoice, under the other info tab, you can add the incoterm from the drop-down menu, as shown in the screenshot above.
Add a Bank Account
To add new bank account information to the Odoo 18 Invoicing module, use the Add Bank Account option located under the Banks menu in the Configuration menu of the module. The bank account information needs to be set up in the Invoicing module in order for transaction and accounting processes to function properly.

When you choose the 'Add a Bank Account' option, as seen in the screenshot below, a pop-up box will appear on the screen. You can create an account with a bank using this window.
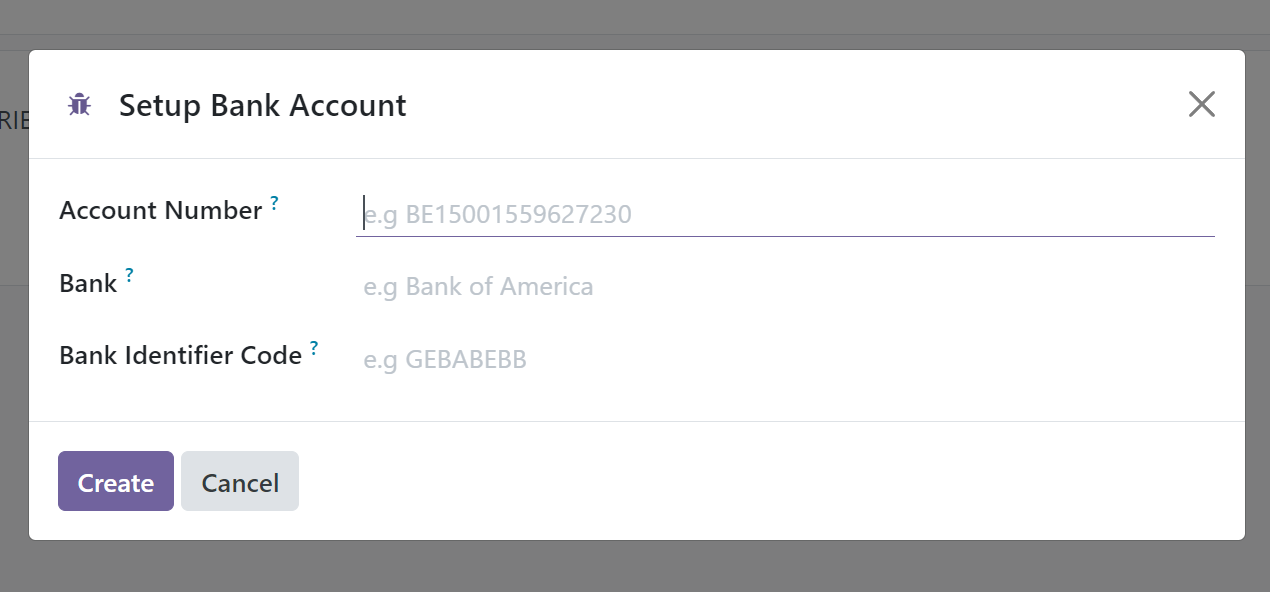
In the designated space, you can enter the Account Number, Bank, Bank Identifier Code, and related journal ID. When you click the Create button, Odoo will add this bank account to your Invoicing module.
Reconciliation Models
Ensuring that the data from the cash accounts matches the financial statements is crucial when performing various financial operations within an organization. With the use of the Bank Reconciliation feature, you may apply the Odoo 18 Invoicing module to compare the cash data with the bank. Account reconciliation is made simple by the feature. The Configuration menu of the module contains a link to this platform.
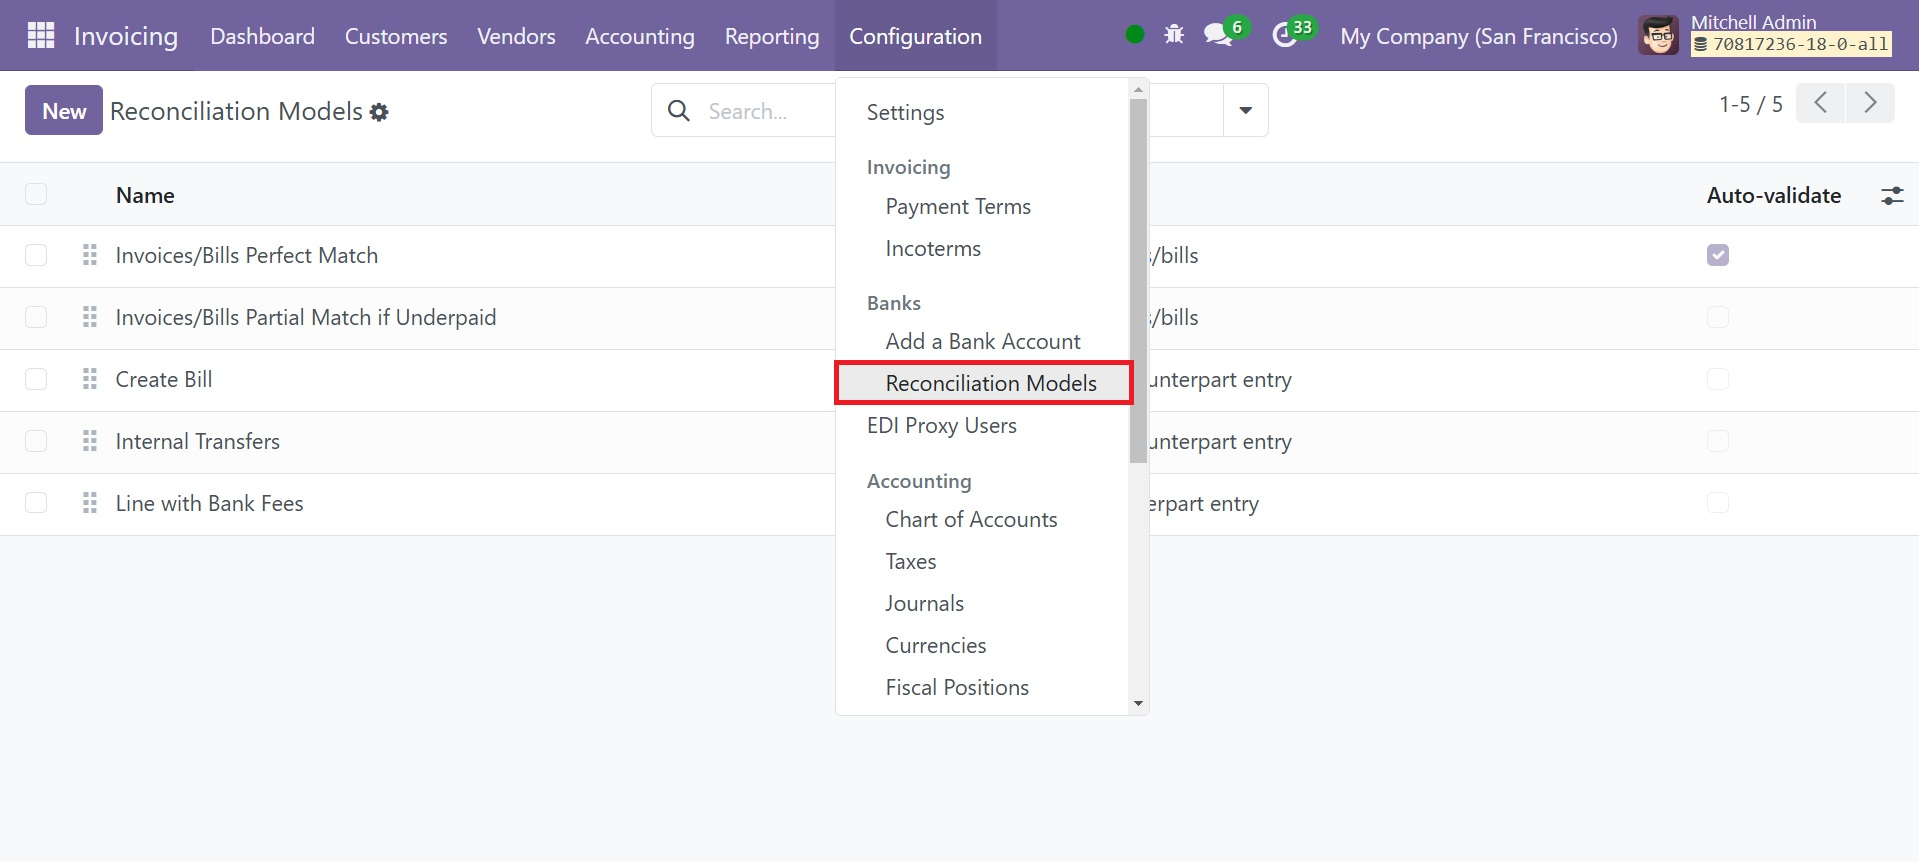
The transaction must be accurately recorded in the cash and the bank account in order to preserve transparency. Pre-made Reconciliation Models will be visible on the site.
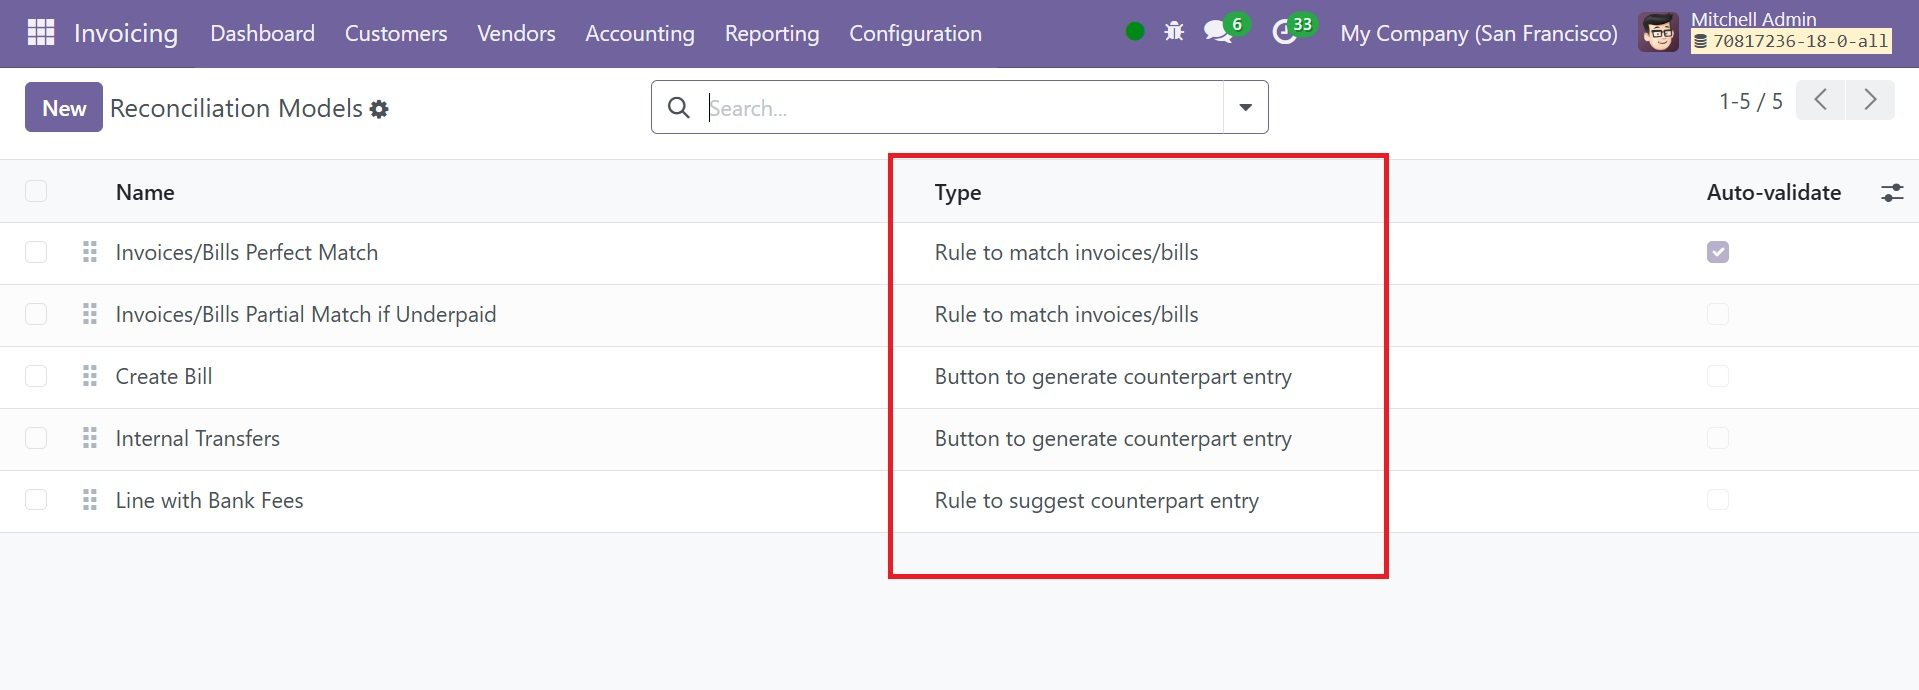
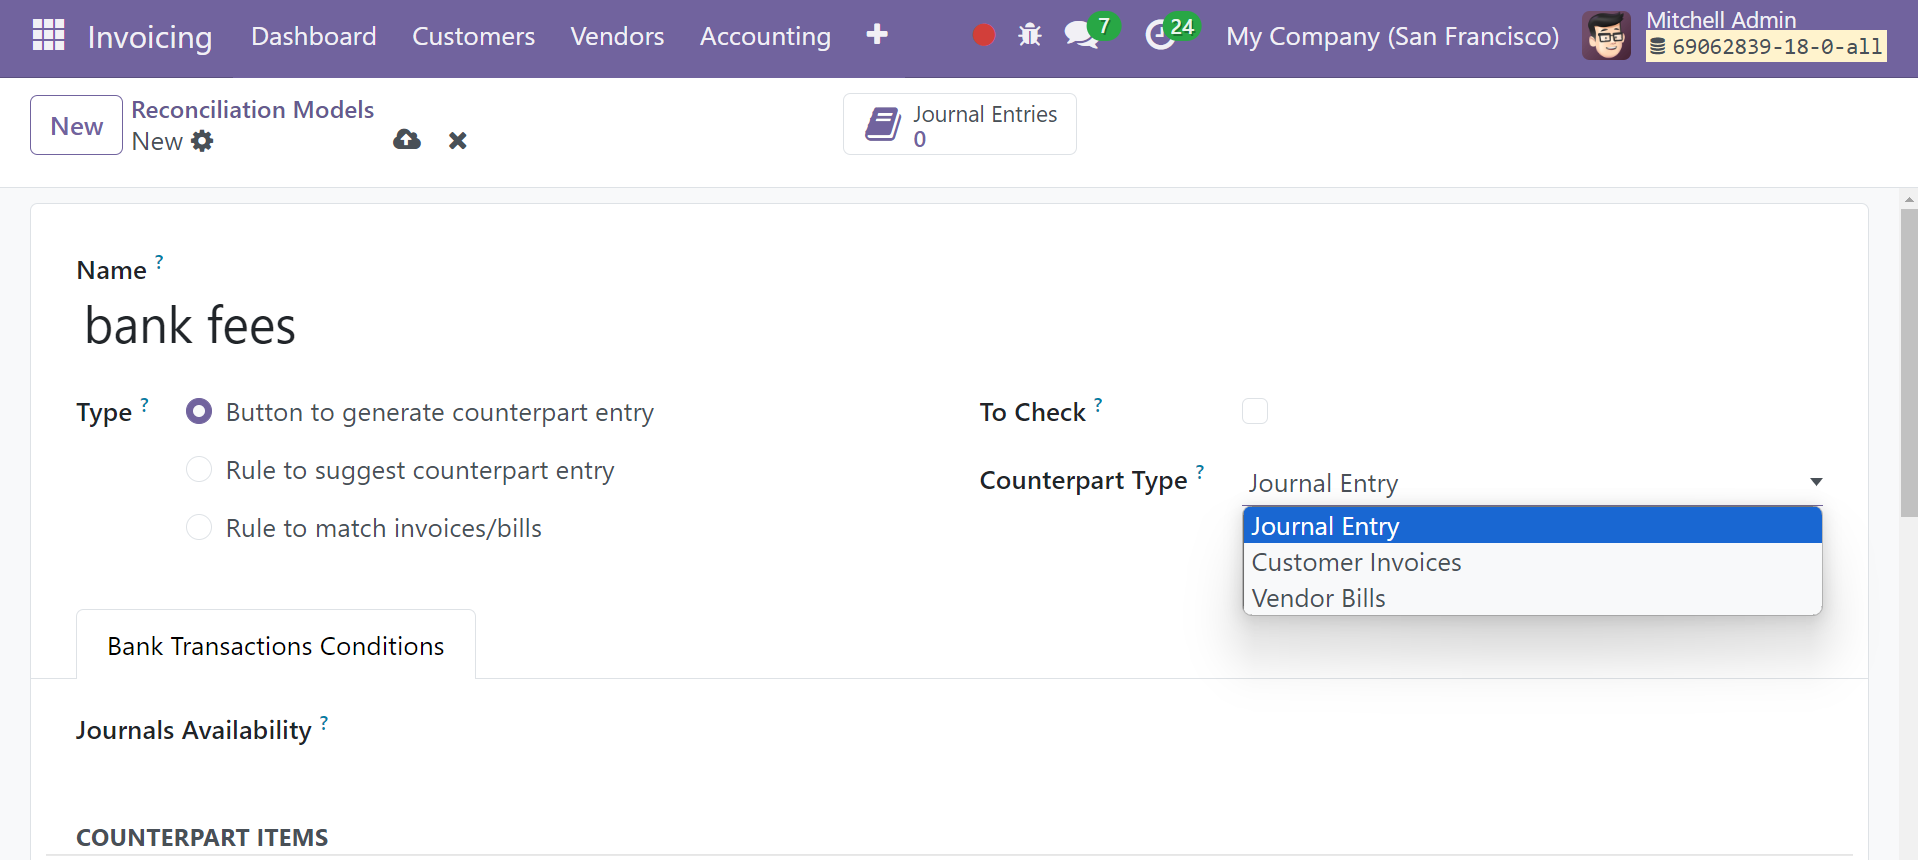
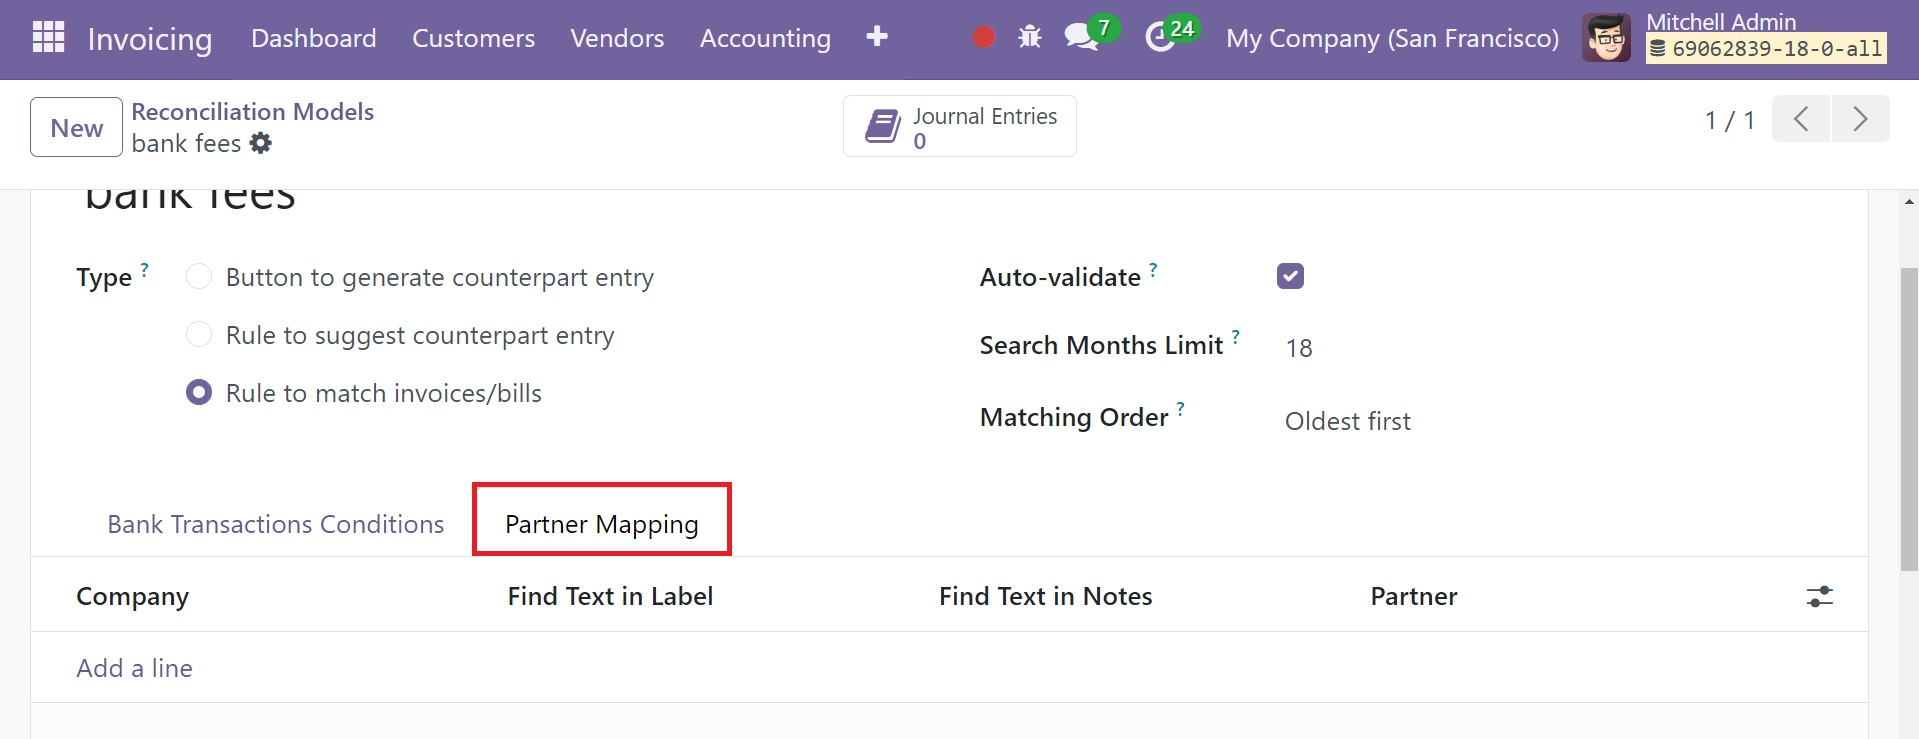
The Name of the Reconciliation Model, Type, and Auto-Validate state are visible from the list preview. You can create a new bank reconciliation model by using the window's New button. You will be able to enter the details of the new reconciliation model in a new creation window that appears, as shown in the picture below.
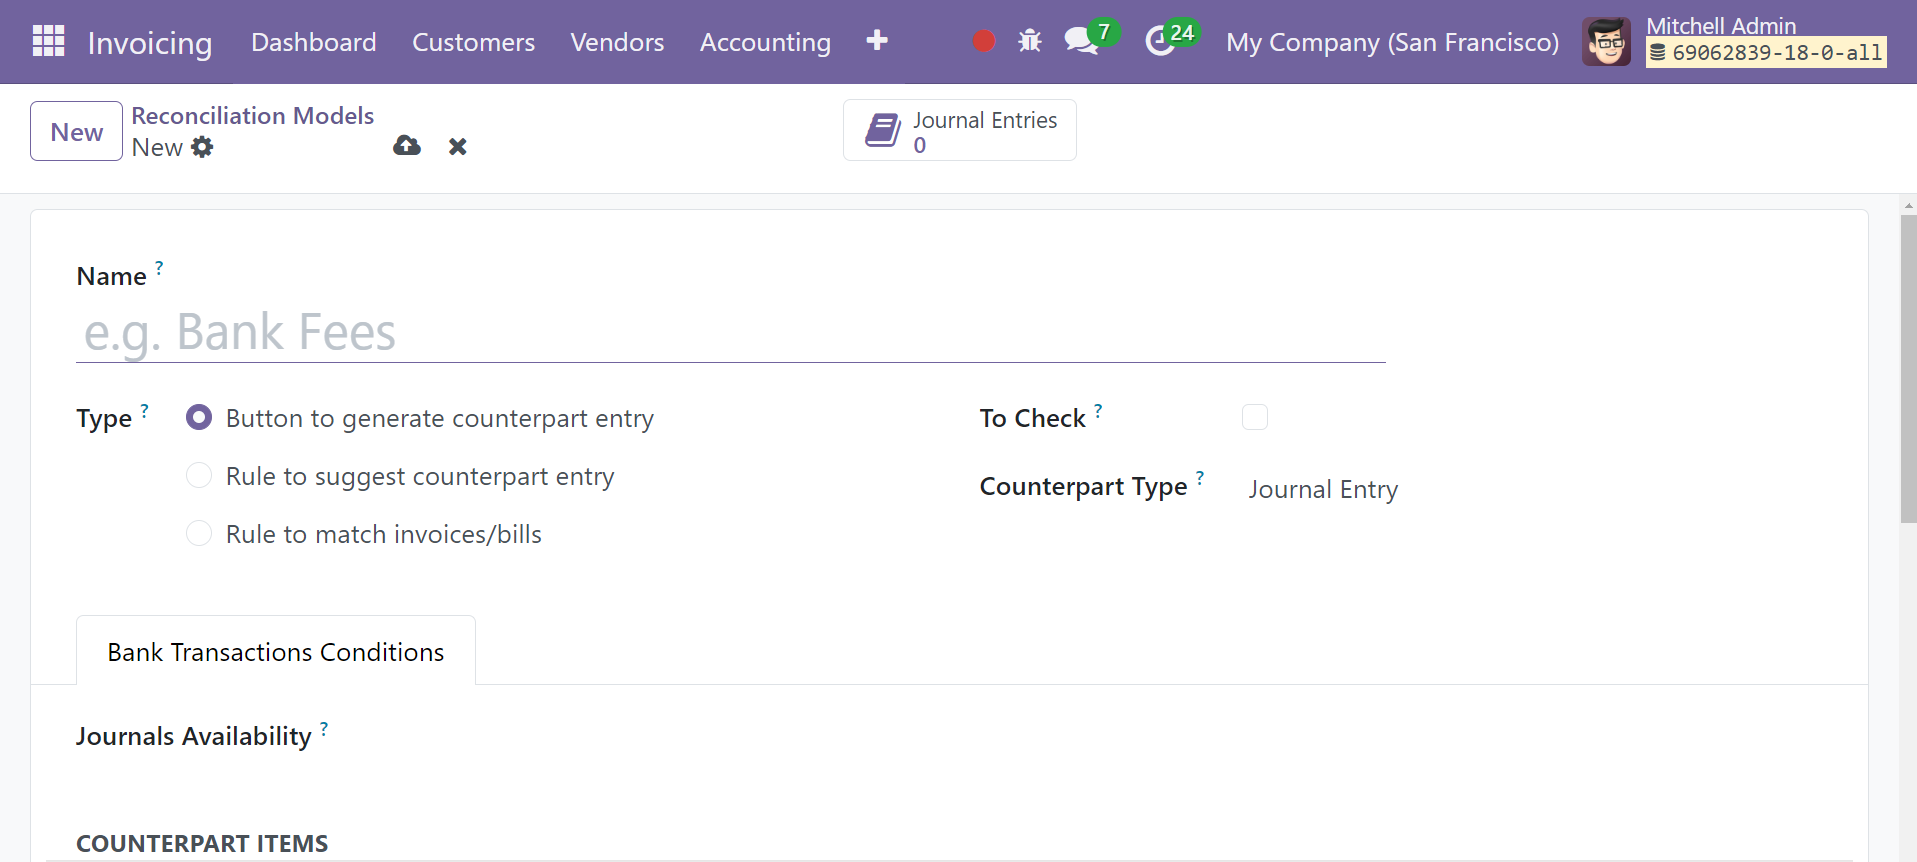
In the designated area, you can state the name of the new reconciliation model. To select the type of reconciliation, you will have three alternatives. Below is a list of the reconciliation types that are available.
Button to Generate Counterpart Entry
You can select the right type of counter entry after providing the name of the reconciliation model when using the button to create one.
In situations where the user is unsure of every aspect about the counterpart, this matching rule will be implemented when they choose the "To Check" option. Under the Bank Transactions Conditions, enter the journal entry to be utilized in the Journals Availability area. This will guarantee that the reconciliation model can only be obtained via the designated journal.
Go to the Bank Transactions Conditions tab and enter the counterpart entries by using the enter a Line button. By choosing this option, you can define the Account, Amount Type, Amount, Analytic, and Journal Item Label. In the Amount Type field, you have the option of selecting Fixed, Percentage of Balance, Percentage of Statement Line, or From Label as the amount type. Upon clicking the button,counterparts will be created with the help of counterpart entries.
Rule to Suggest Counterpart Entry
In the second scenario, select the reconciliation type "Rule to Suggest Counterpart Entry".
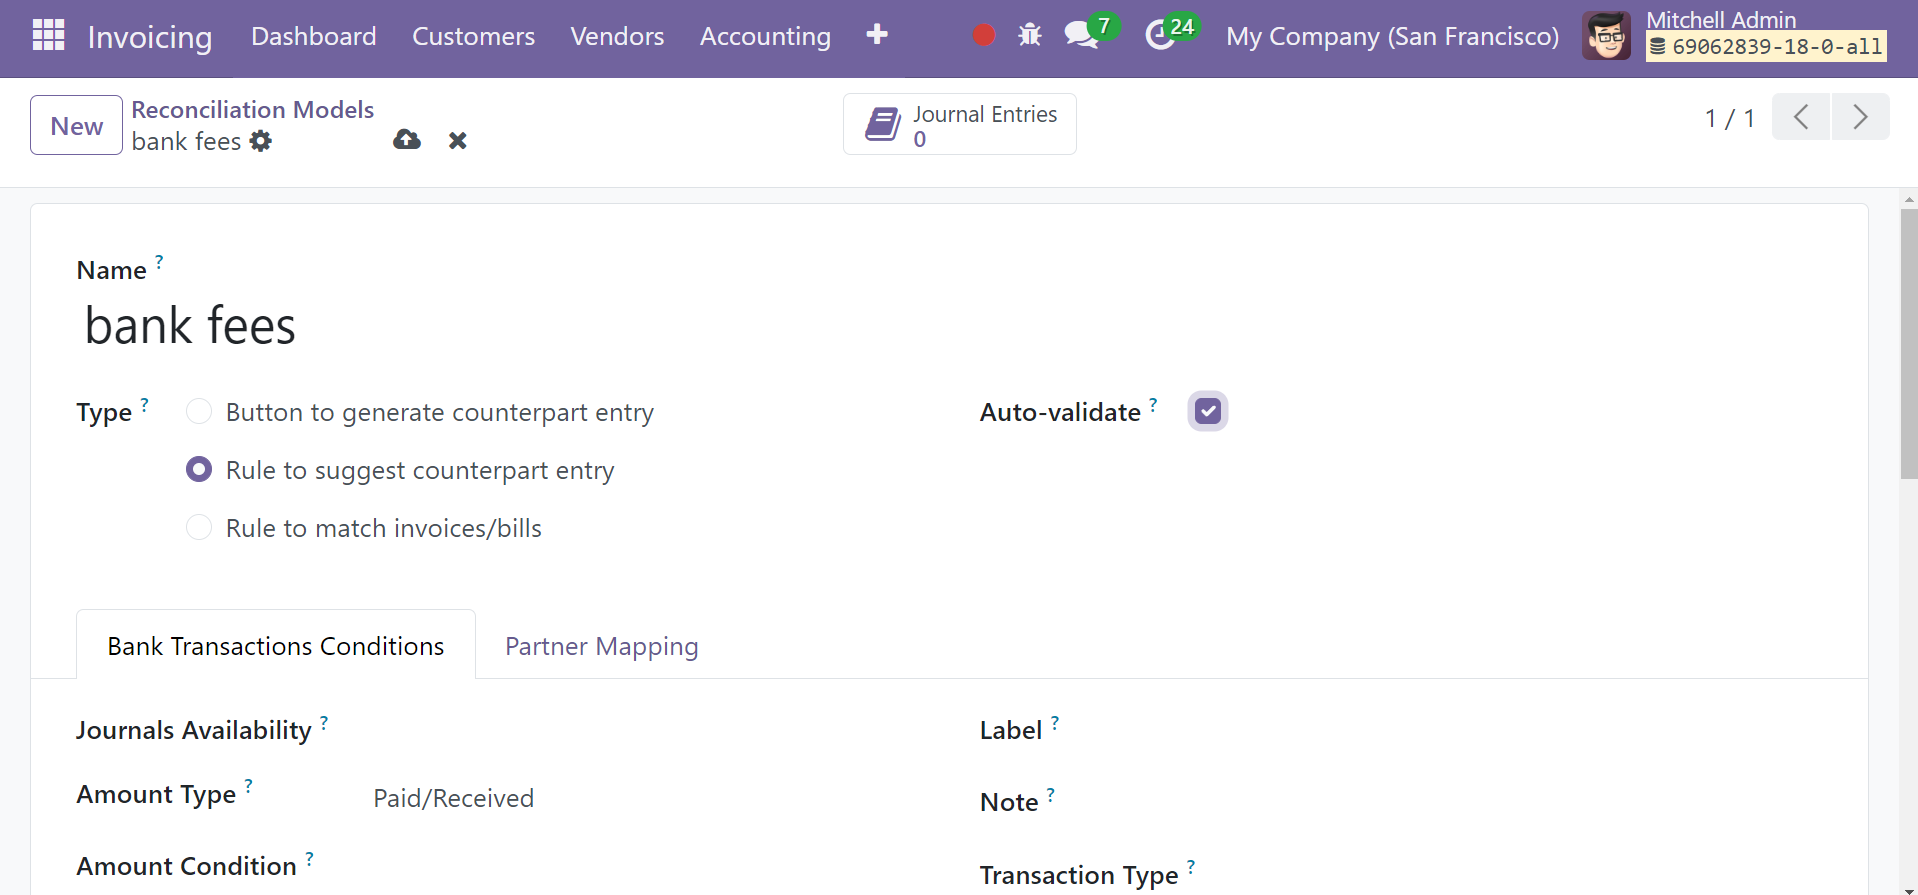
From here, you can turn on the Auto-Validate field. By using this option, the statement line can be validated automatically. You can specify rules for the Journals Availability, Amount Type, Amount Condition, Label, Note, and Transaction Type by using the available choices. The reconciliation model will only be utilized if a vendor or customer is set if the option "Partner is Set" is enabled. Similar to the preceding instance, you may choose the Account, Amount Type, Amount, Analytic, and Journal Item Label data by selecting the 'Add a Line' button under the Counterpart Entries.
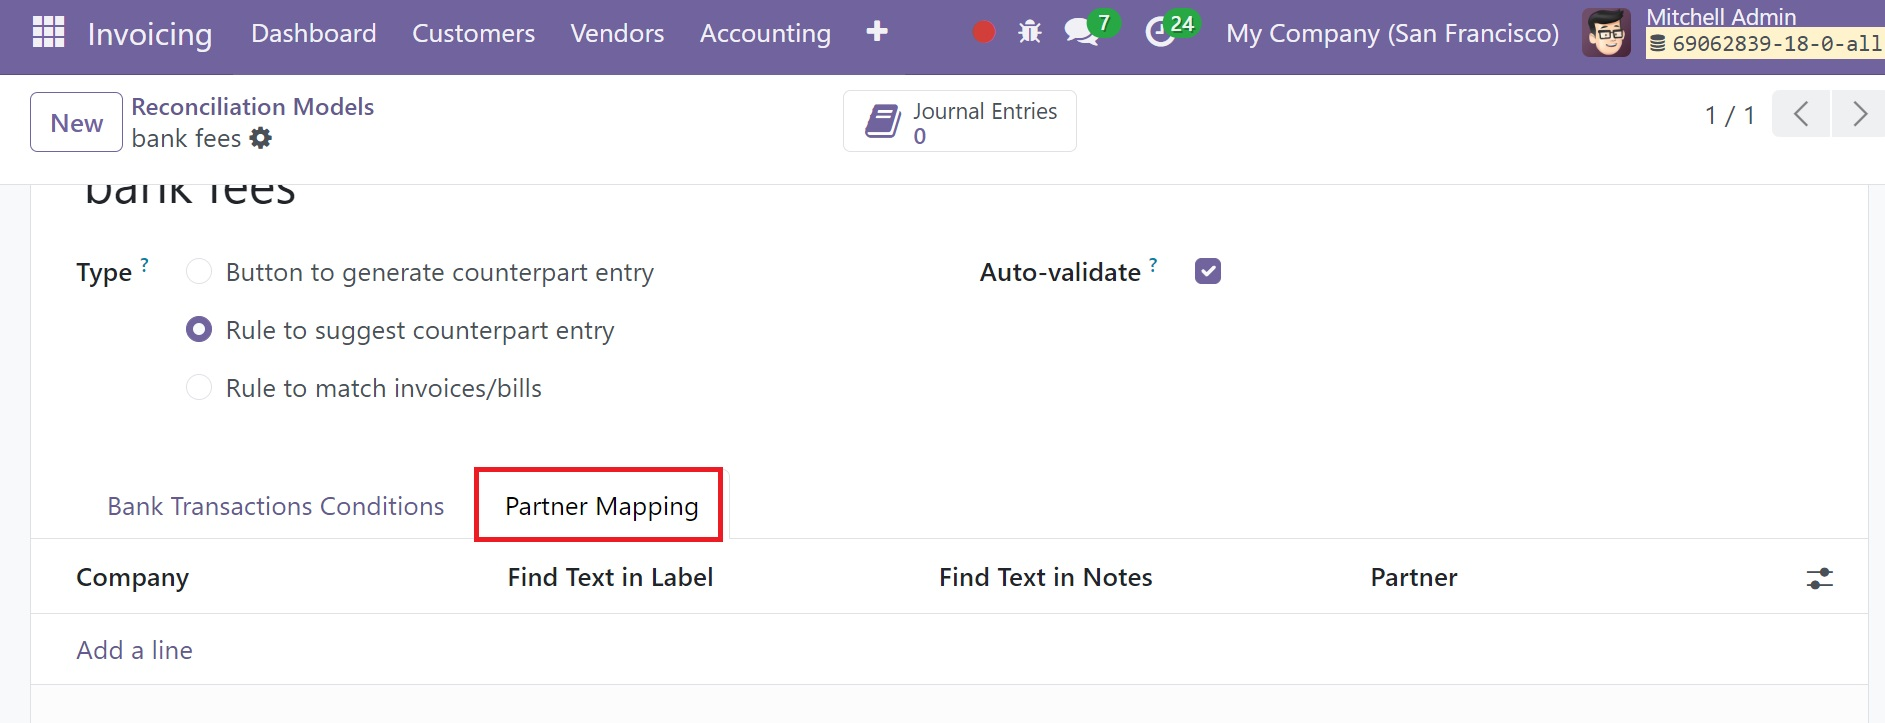
To add Find Text in Label, Find Text in Notes, and Partner information, use the 'Add a Line' option found under the Partner Mapping tab.
Rule to Match Bills and Invoices
In the third scenario, select "Rule to Match Invoice/Bills" as the reconciliation type. As indicated earlier, it is possible to enable the Auto-validate field. This is the Search Months Limit to Mention, which indicates how many entries from prior months should be considered when utilizing this model. The Matching Order can be set to either Oldest First or Newest First.
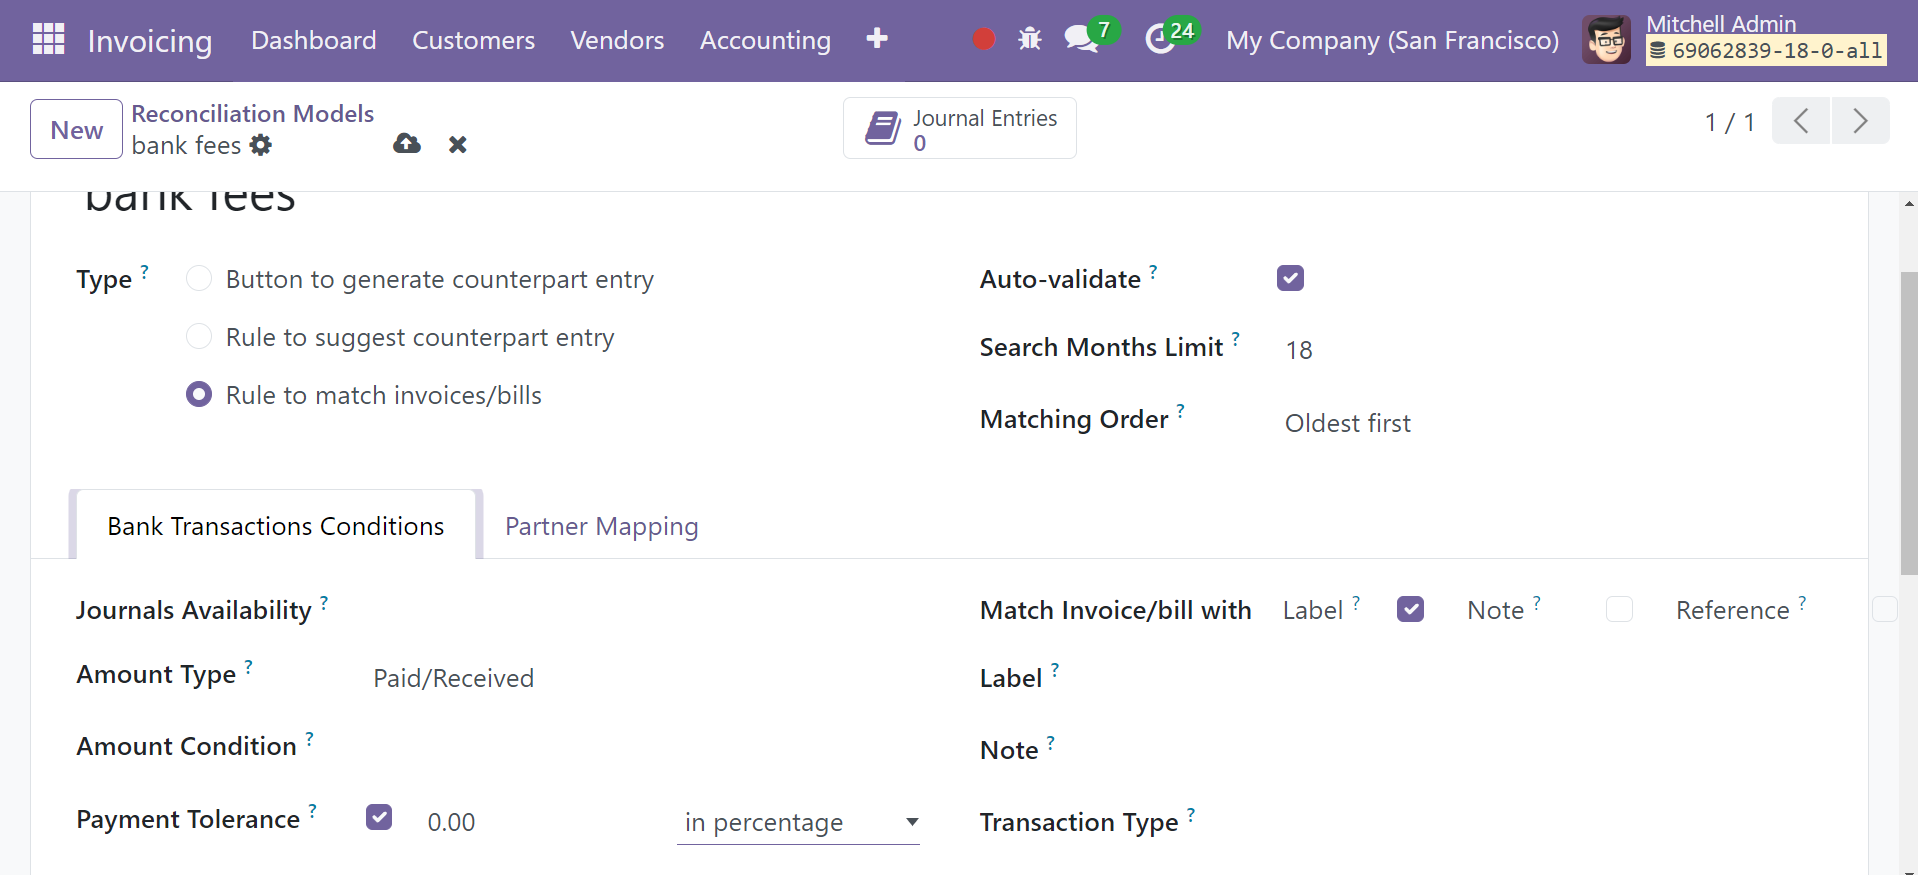
On the Bank Transactions Conditions tab, fill in the relevant fields with Journal Availability, Amount Type, Amount Condition, Label, Note, and Transaction Type. The Partner is Set field can be turned active if necessary. Should you choose to enable payment tolerance, any shortfall will be accepted. Only when the Same Currency option is enabled will proposals with the same currency as the statement line be accepted. Create criteria to ensure that bills and invoices from the given list fit specific Labels, Notes, and Transaction Types.
Complete the Partner Mapping form as directed above.
By selecting the proper sort, you can utilize the reconciliation model to reconcile your bank accounts.
Chart of Accounts
The chart of accounts, as its name implies, lists every configured account in Odoo 18. These accounts are all used by a firm for different financial processes. Every company transaction will be accurately tracked and documented by it. You can keep a continuous record of your financial transactions using these accounts. Through the use of the chart of accounts, you can ensure that the financial administration of your business operates efficiently.
You can maintain and set up a chart of accounts in the Invoicing module according to your company's requirements. You may reach this platform via the Configuration menu of the module. You are able to manage many business accounts with this platform.
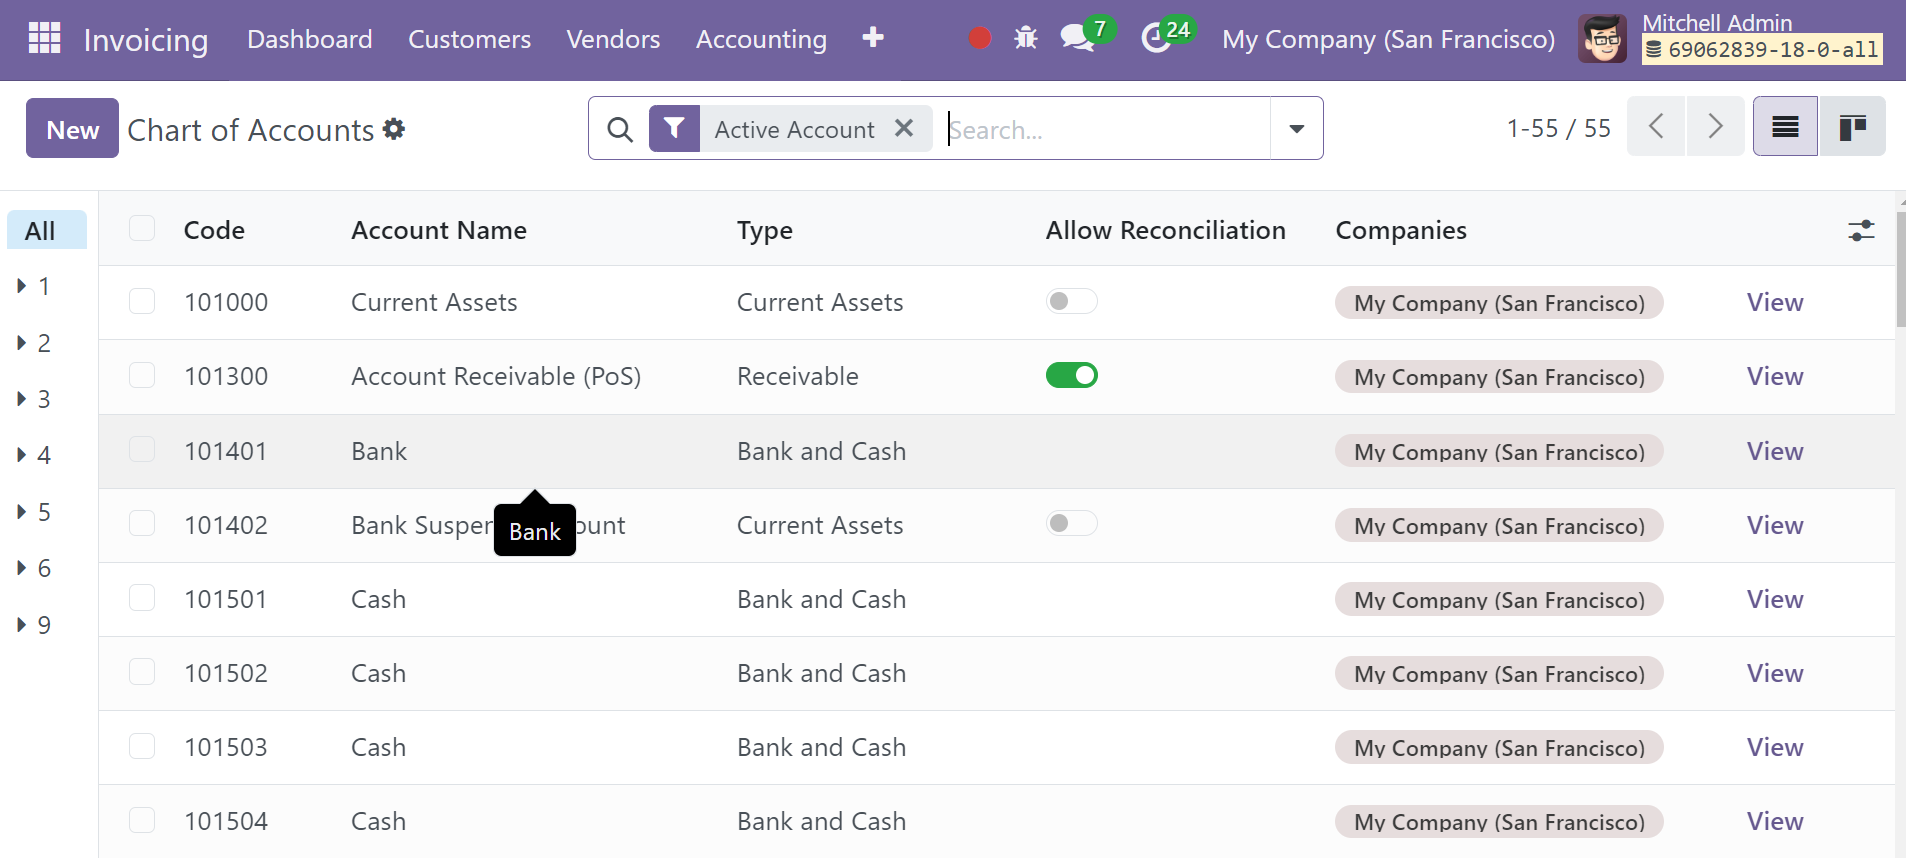
As seen in the above screenshot, the platform will present a list of charts of accounts that have already been set up along with details on the Code, Account Name, Type, Allow Reconciliation, Account Currency, Company name, and View option.
Among the filtering possibilities are Receivable, Payable, Equity, Liability, Assets, Income, Expense, Account with Entries, and Active Accounts. The Account Type is one grouping option. By selecting the New option, you may create a new account in this chart.
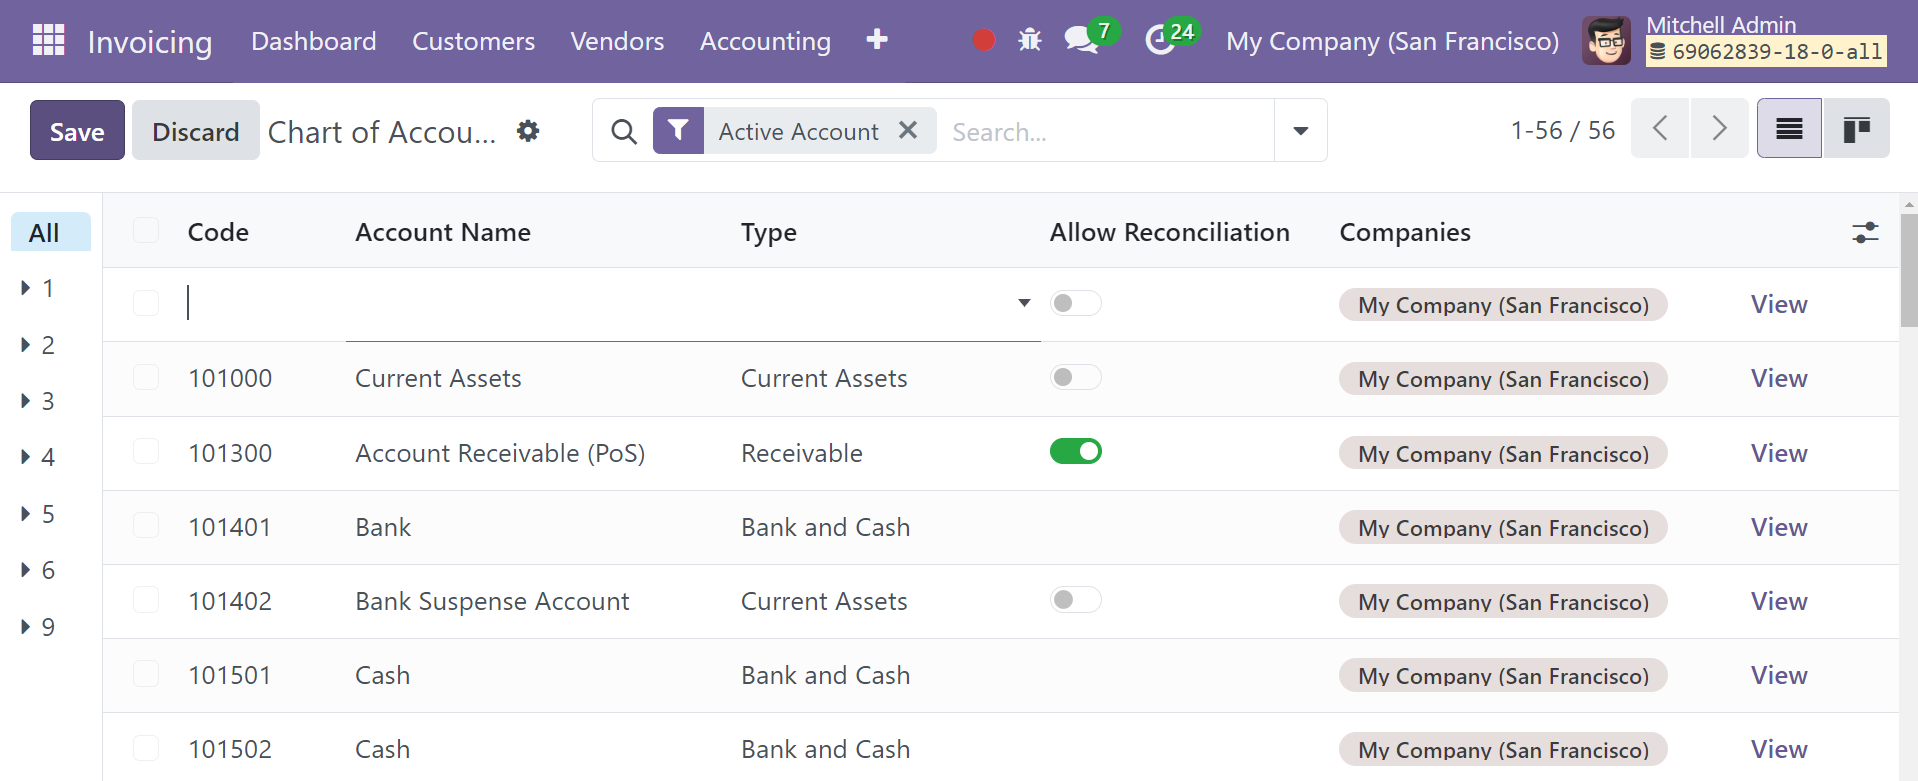
As seen in the above screenshot, as soon as you click the New button, a new line will appear. In the appropriate fields, you can enter the Code, Account Name, Type, Account Currency, and Company. To approve reconciliation for this new account, you can select the Allow Reconciliation option. The View option appears on the screen; select it to edit the accounting details of the related account.

Odoo 18 will take you to the form view of the relevant account, as shown in the picture above. The Code and Account Name will appear in the corresponding fields. The main purpose of the Accounting Type is informational. It can be used to create legal reports specific to a country, as well as to set up guidelines for ending a fiscal year and creating opening entries. Enter Default Taxes in the designated section. Mentioning Tags in custom reports will help you. List the approved journals that are compatible with this account. If the Deprecated option is enabled in Odoo 18, you will be able to deactivate the account without having to delete it. Mention the Account Currency, Group, and Company in the appropriate fields.
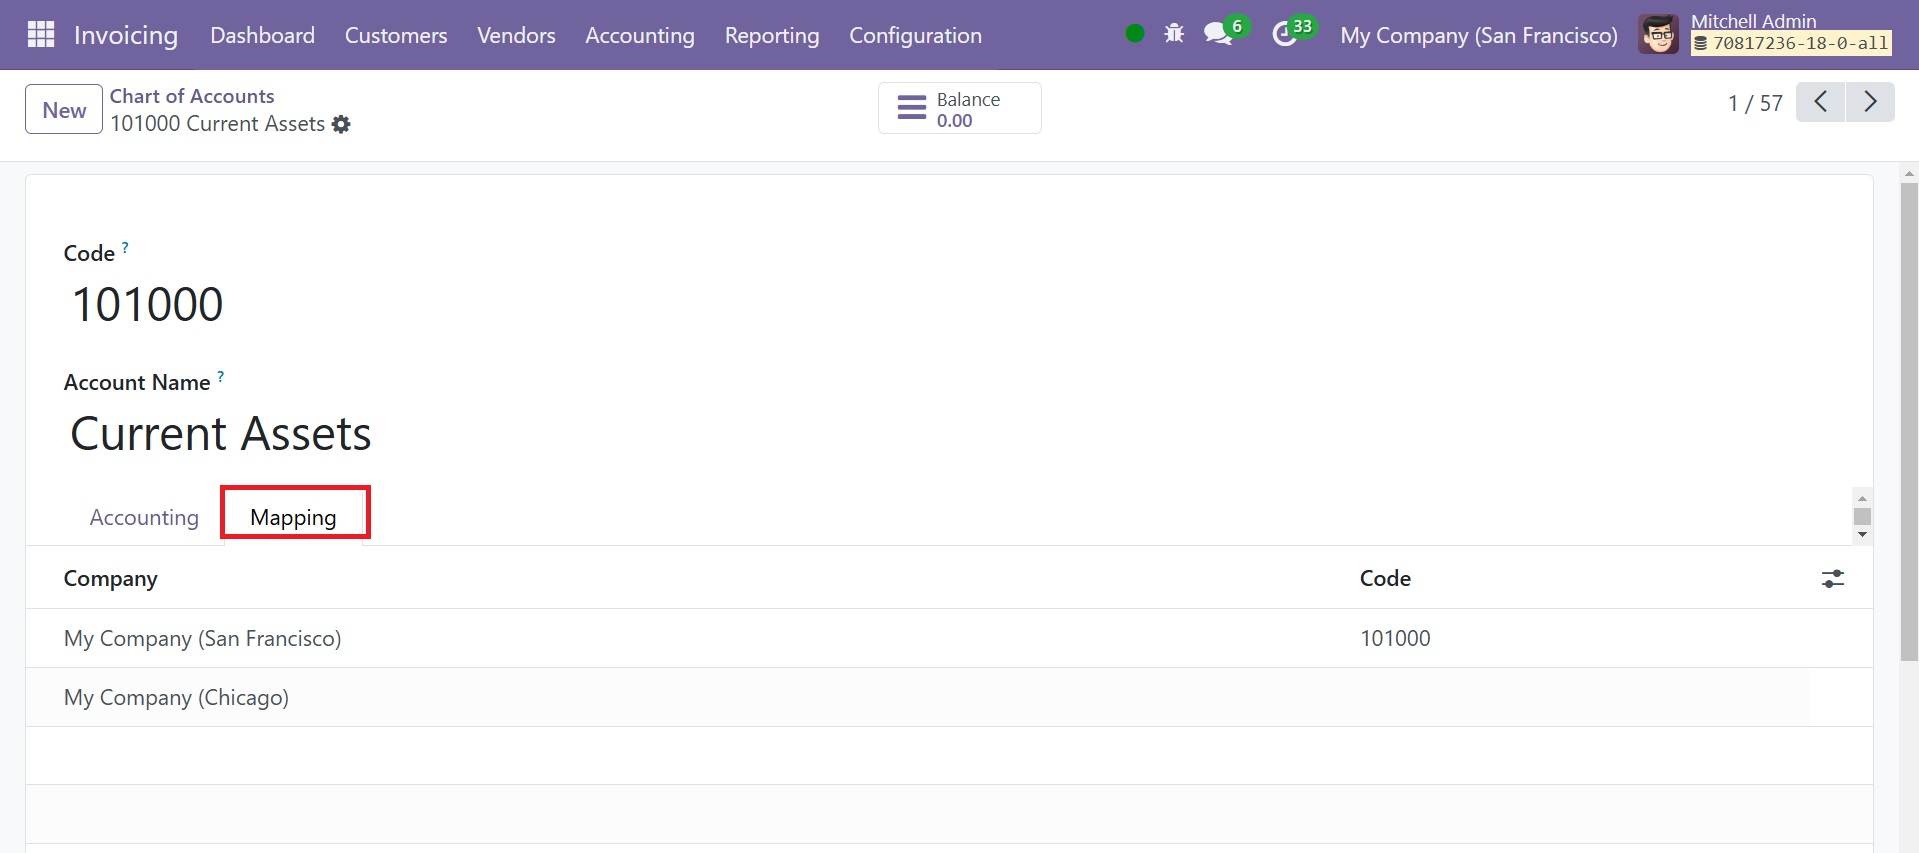
Mapping option were you have the code related to your company. When you switch the company, you have all the codes related to those companies. The Balance smart button will be given to you to see the account balance when the configuration is completed.
Taxes
One of the trickier accounting administration responsibilities for a company is managing and computing taxes, which calls for a higher level of accuracy and focus. With the help of Odoo 18 ERP's comprehensive accounting management system, you can guarantee accuracy and transparency in tax-related procedures. You can quickly configure and manage different taxes for your business with the help of the invoice module. The Taxes option will be available in the Configuration menu of the module.
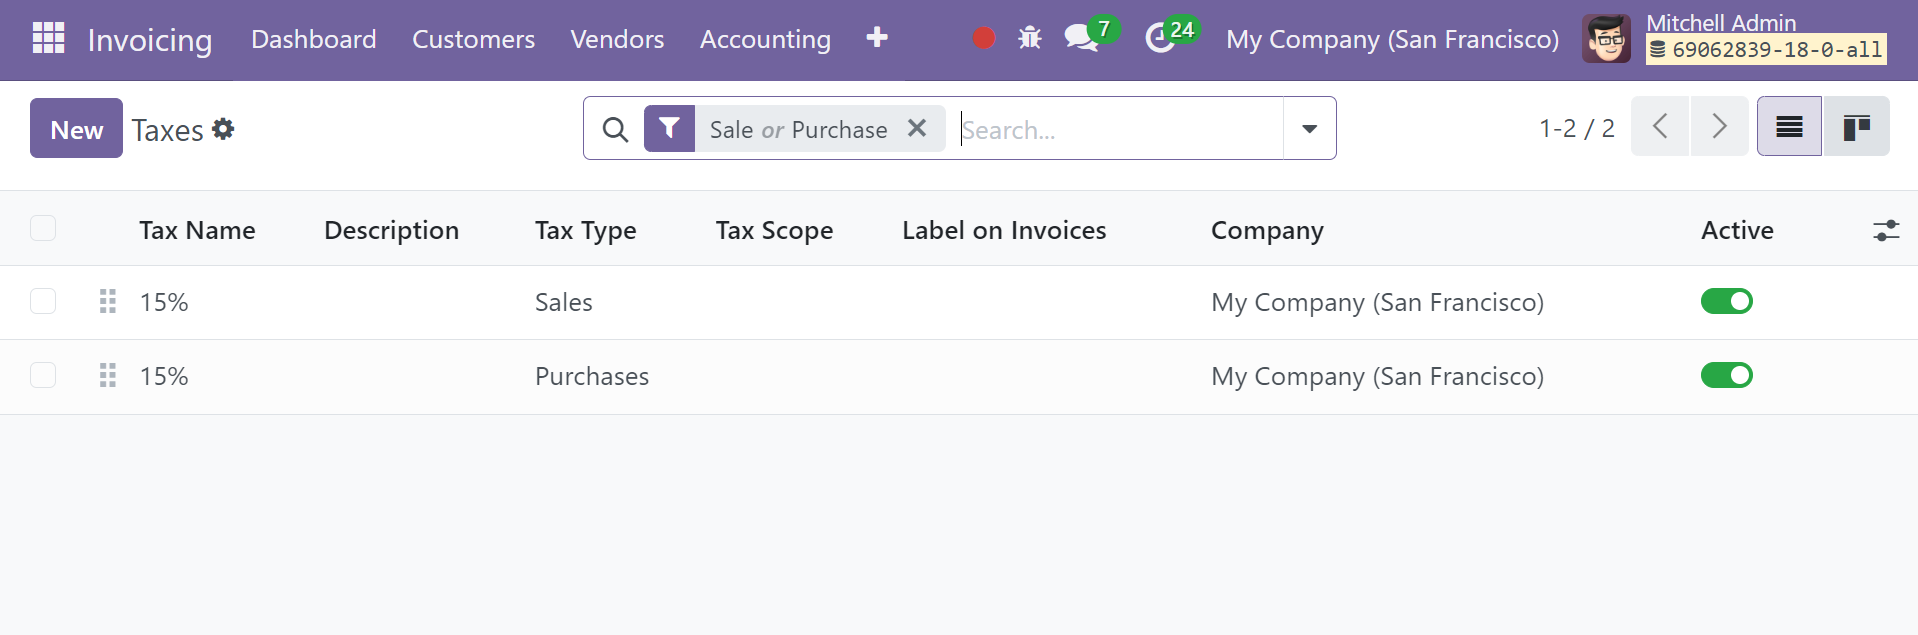
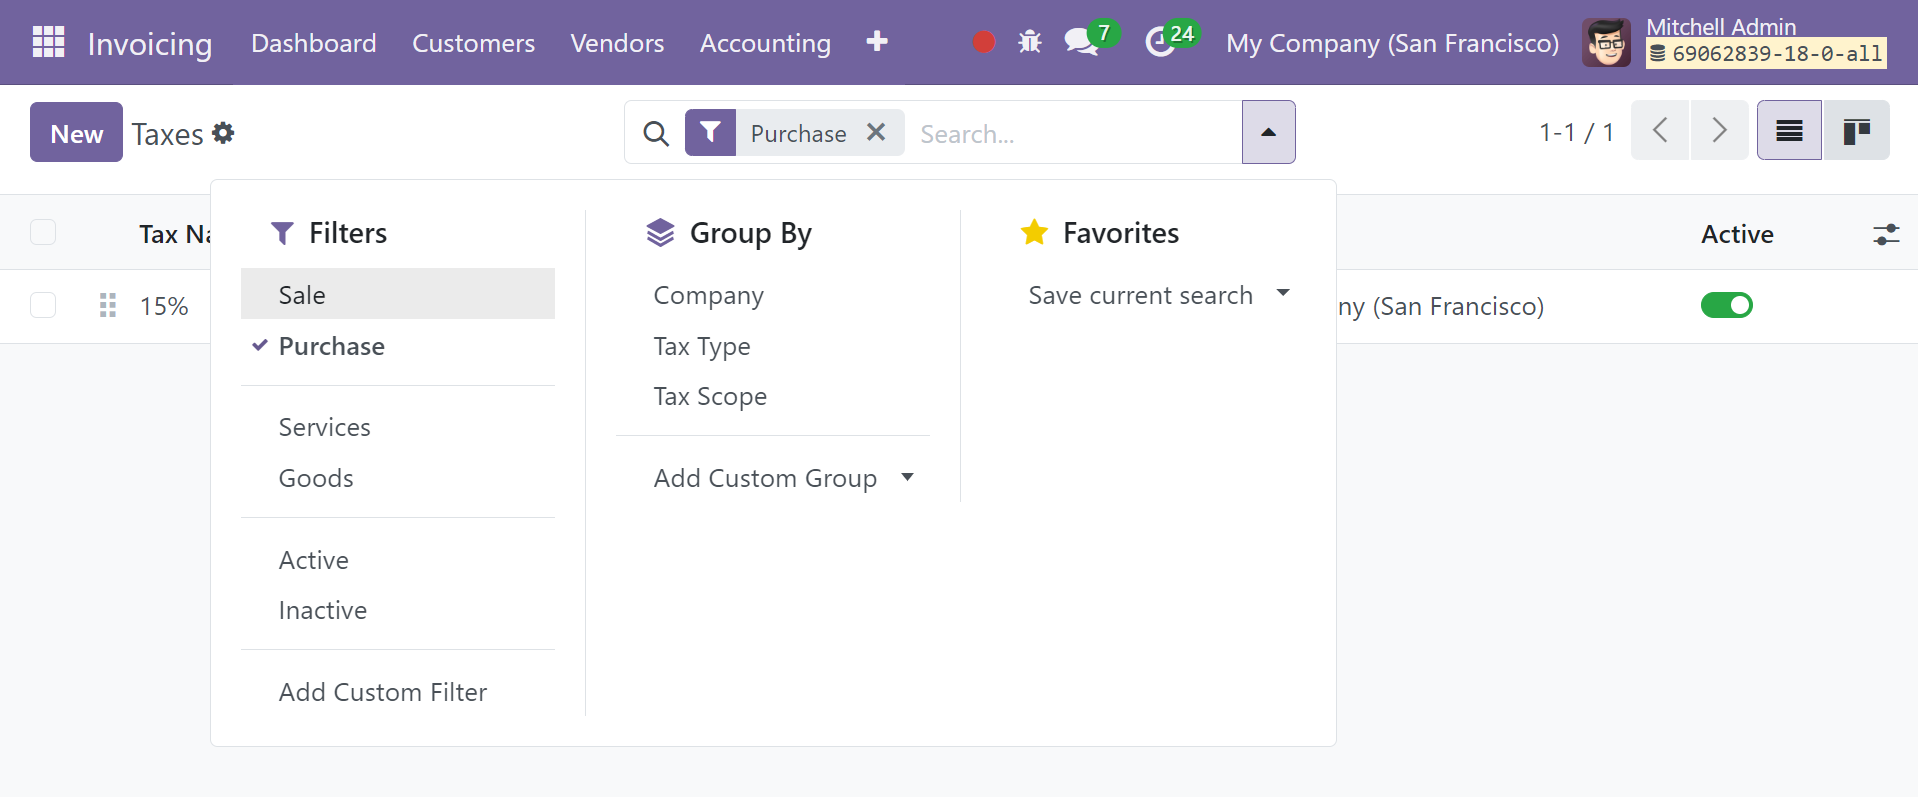
This is the list view of the Taxes window. The pre-configured taxes for the module will be shown in the list. You can also view the platform in Kanban view by clicking on the appropriate symbol. The pane displays information about the Tax name, Tax type, Tax scope, Invoice label, Company, and Active status. To make any necessary changes, click on the applicable taxes and make changes. You will be presented with the following default filters: Sales, Purchase, Services, Goods, Active, and Inactive. You can select Company, Tax Group, and Tax Scope as the default Group By options. Using the Custom option, you can modify the filters and group by options to fit your needs.
Click the New button now to create a new tax for your company. You will be presented with a new form view, as shown below, which will help you configure the data required to create a new tax.
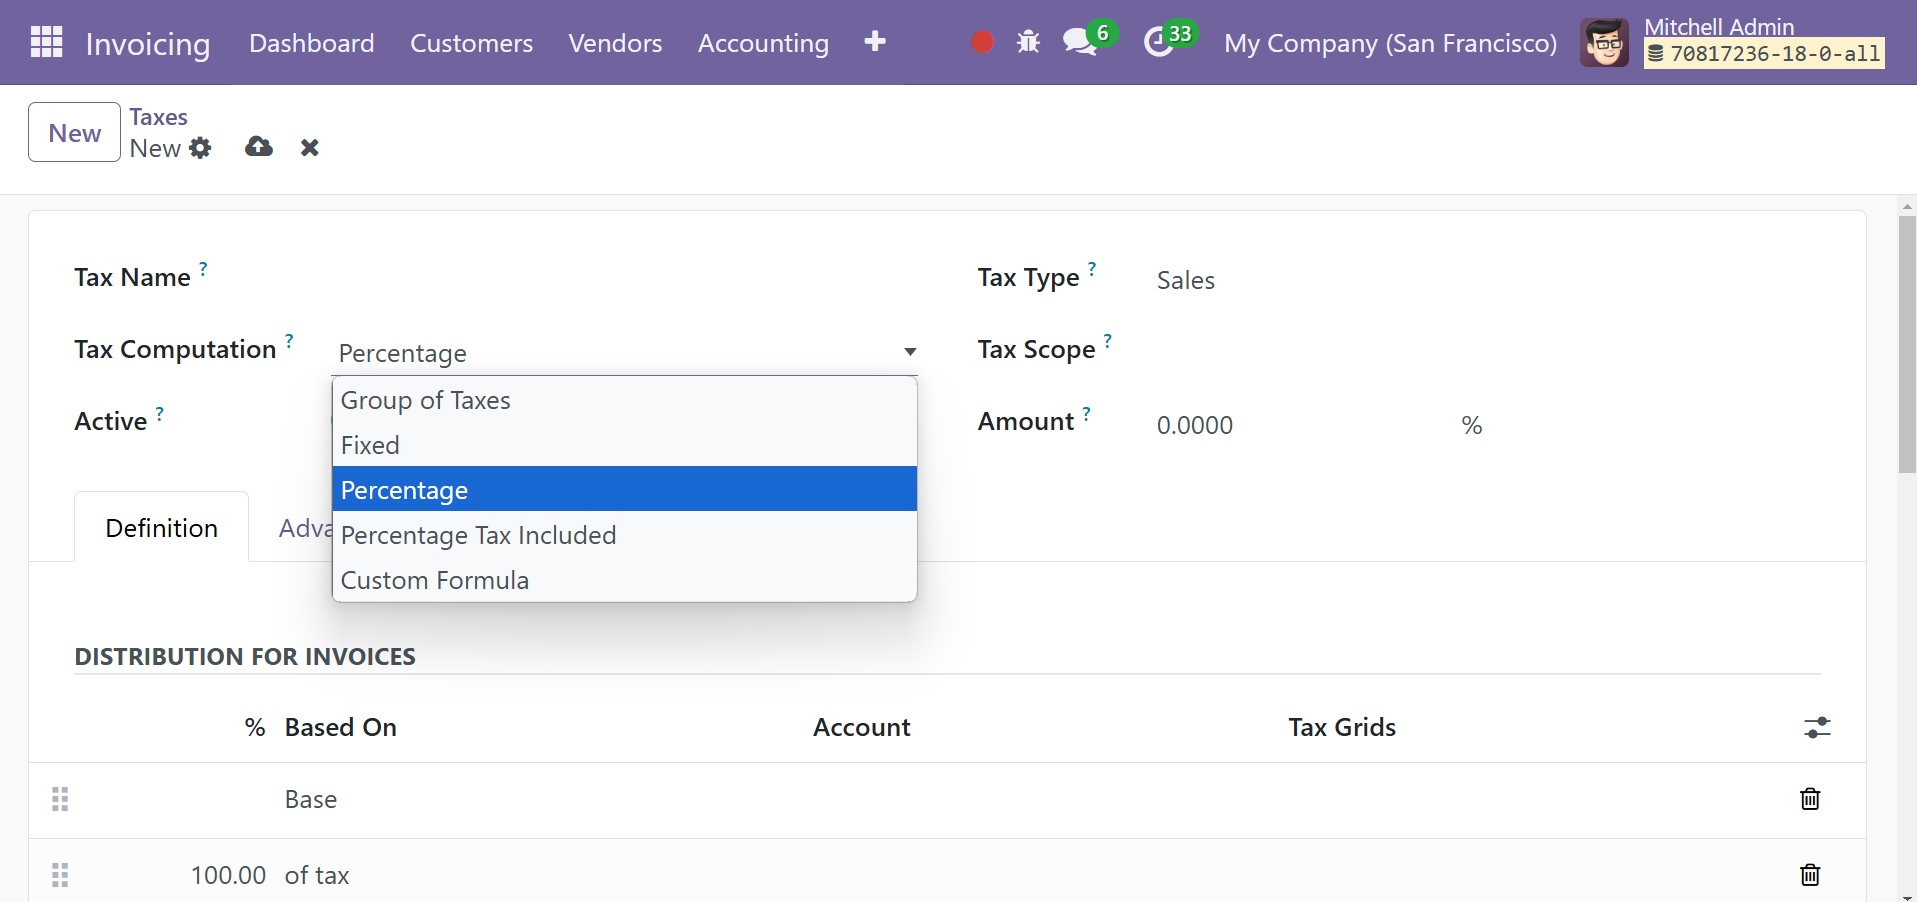
You can enter the name of the new tax in the Tax Name area. To specify the computation method for this specific tax, you can utilize the Tax Computation field. To choose an appropriate tax computation technique, you can choose from the drop-down menu's Group of Taxes, Fixed, Percentage of Price, Percentage of Price Tax Included, and Custom Formula options.
Tax group: The tax will consist of multiple minor charges.
Fixed: The amount of tax is fixed and does not change with changes in prices.
Percentage of Price: Taxation will be applied to a portion of the price.
Percentage of Price tax: The tax will be computed by dividing the total price by two. This will get the percentage of price tax included.
Custom Formula: Python formulas can be used to calculate the tax.
The Tax type will dictate the locations where this particular tax is selectable. Sales or Purchase are both feasible. If you would like to restrict the application of this tax to a specific category of items, you can indicate so in the Tax Scope section. You can select between goods or services for this choice. Except for the Group of Taxes option, all tax computation methods require you to provide the Amount in the designated field. In the case of the Group of Taxes, the tax will be computed using the set of sub-taxes that were added to the setup.
Under the Definitions tab, you may add the tax rule for the distribution of invoices and refunds.

The data you enter in the Distribution for Invoices section will be used if the tax is used to create an invoice, and the Distribution for Refunds field will be used if the tax is used to create a refund. Click the Add a Line button to define the required data.
Provide a description to the Label on Invoices field in the Advanced Options tab when you apply this particular tax to invoices.
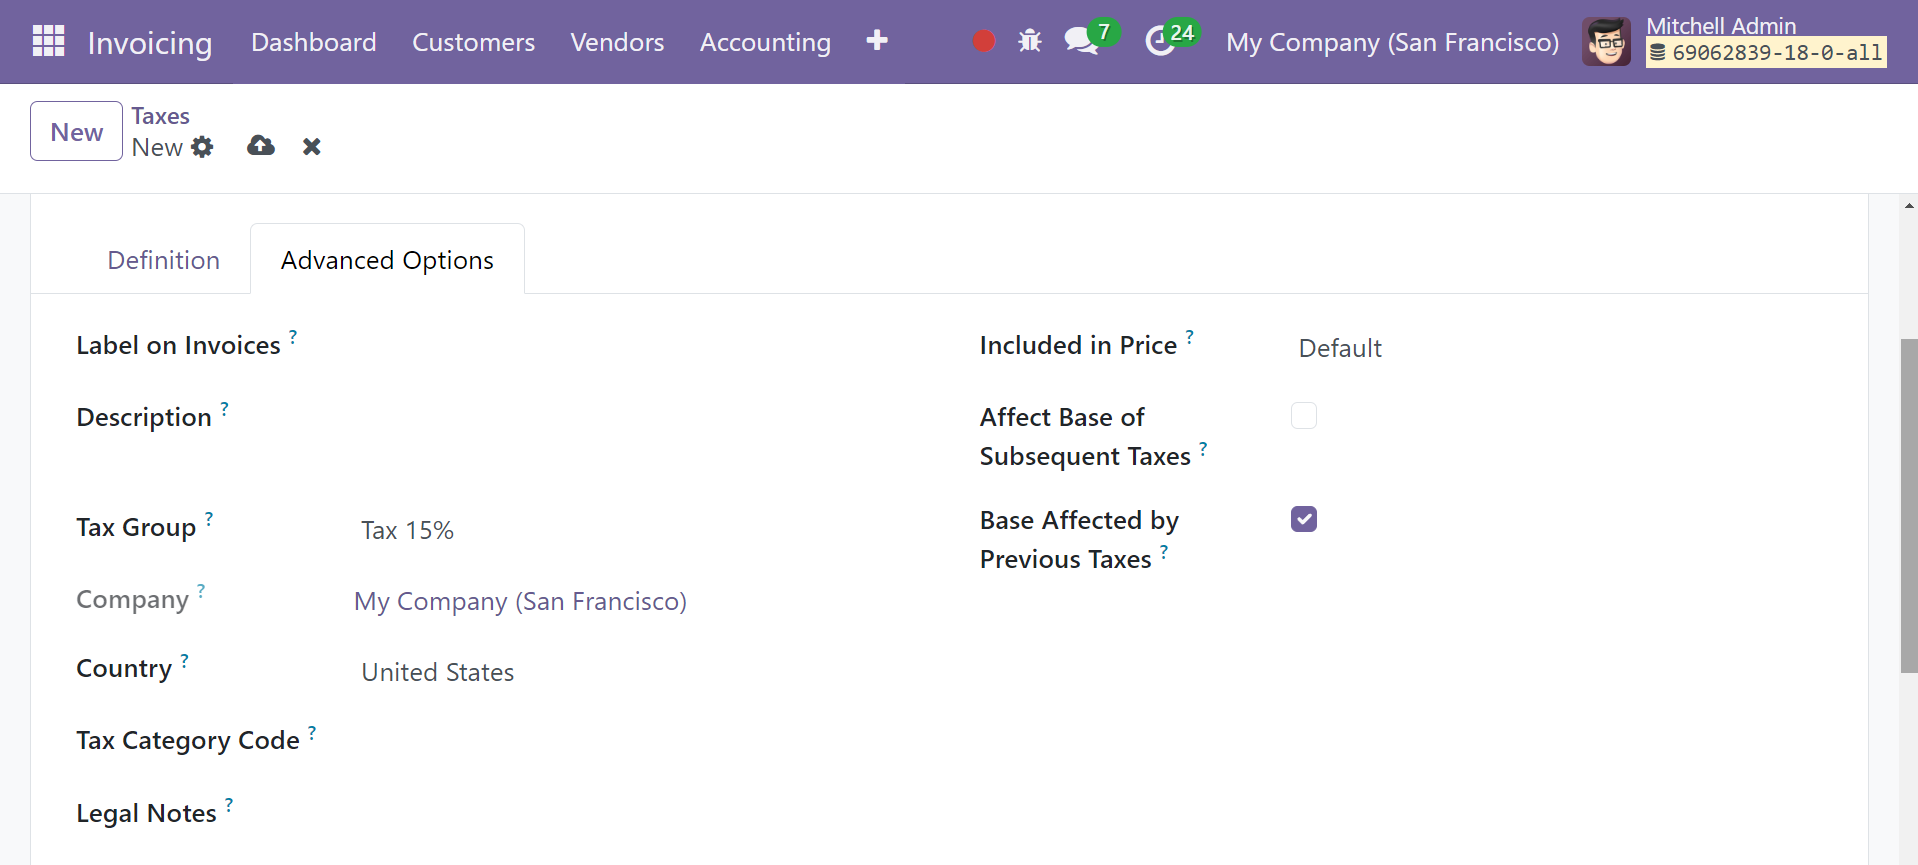
The invoices will display this description. Mention the company, the country, and the tax group in the relevant fields. Here, you can choose the tax group to which the tax belongs. In tax report and exported invoices, the tax group name appears above the total line.
Tax groups comprise various variations of the same tax. When you have to report the same tax differently depending on your fiscal status, this can be helpful.
You can make this particular tax active in the Included in Price area if it is included in the price you use for the product and invoice. If you enable the Affect Base of Subsequent Taxes field, the taxes that are computed after this one will be based on the price tax included. When you enable the Base Affected by Previous Taxes, taxes with a lower sequence may have an impact on this tax. Legal Notes are an option that will subsequently show up on invoices.
You can set default taxes in the Invoicing module's Settings menu by selecting the Taxes tab. Accounting procedures will automatically apply the default taxes if no other taxes are specified in the operation setting. It will also be immediately applied to new goods.
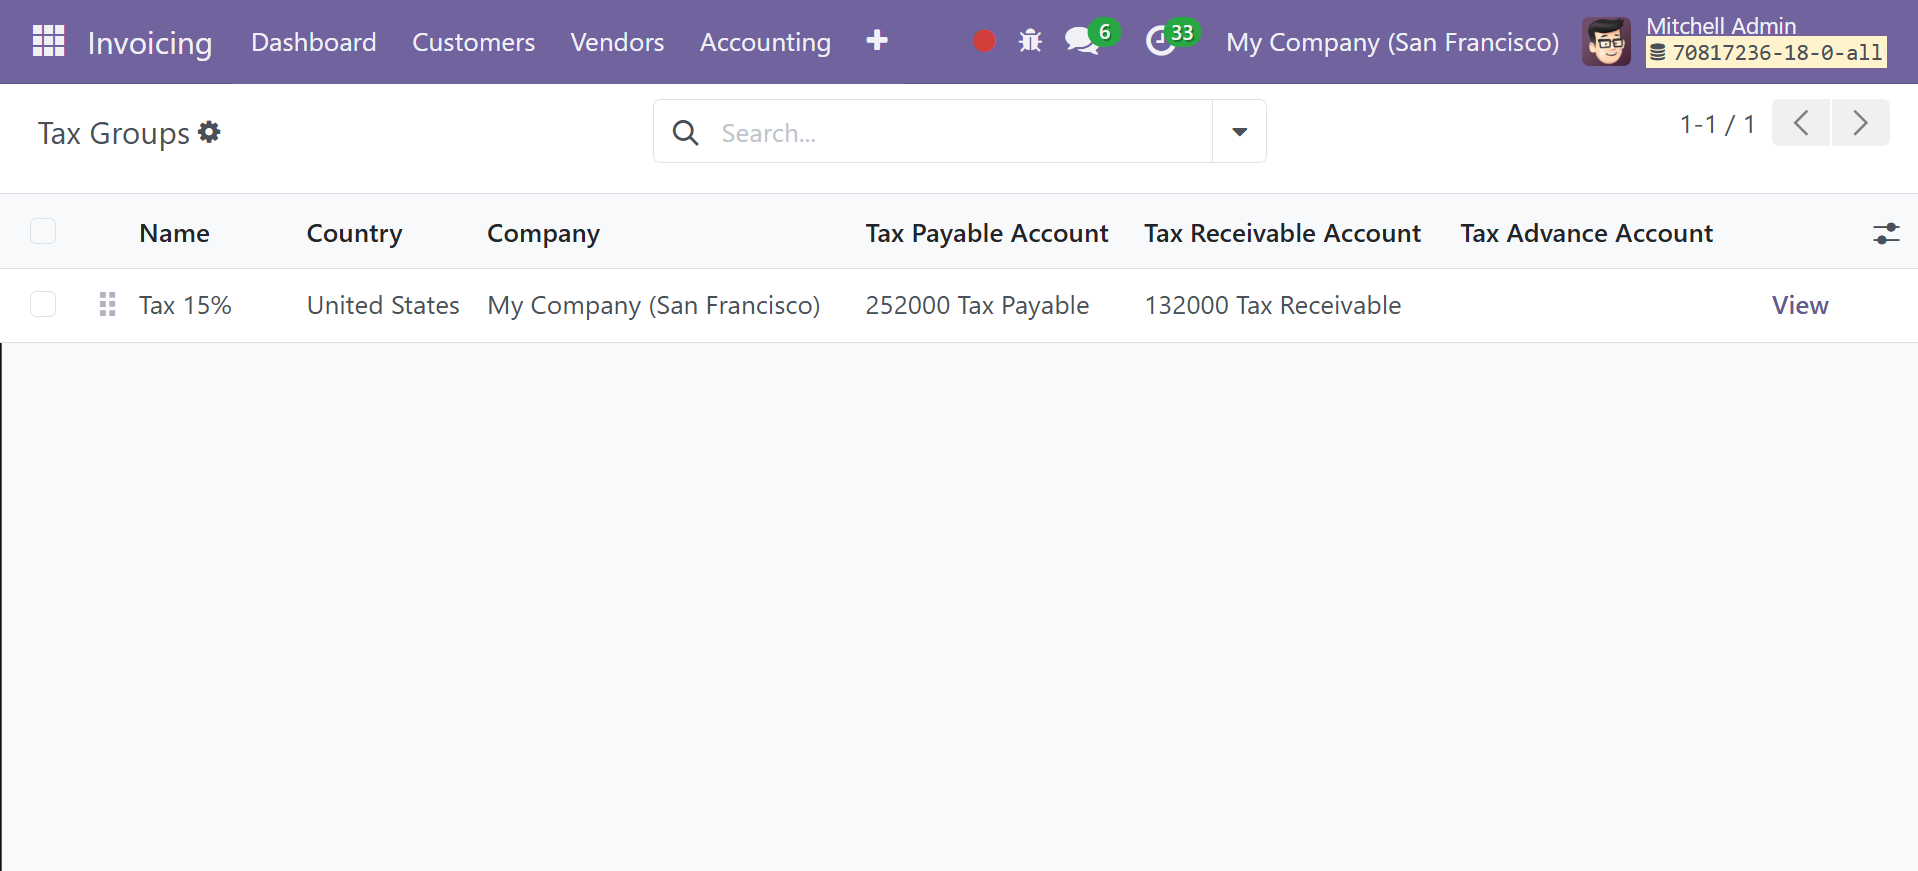
Tax Group
When creating a new tax, the Configuration menu contains the Tax Group option, which is visible in the image below. It will record all tax groups that are specified. This box shows the Tax Groups' Name, Country, Tax Payable Account, Tax Receivable Account, and Tax Advance Account data.
Journal
Every accounting entry a company makes is documented in its accounting journals. Accounting journals are regarded as transaction records arranged in a chronological manner. Vendor bills go in the company's Purchase Journal; customer invoices go in the Sales Journal; bank transactions go in the Bank Journal; and other infrequent operations are recorded in the Miscellaneous Journal. You may manage these kinds of journals more effectively if you use the invoicing module. The transaction records are included in the journal entries found in these journals. You can maintain up-to-date journal entries in your journals that contain all of the financial records you have on different business operations and transactions. The option of journal is available under the Configuration menu of the Invoicing module.
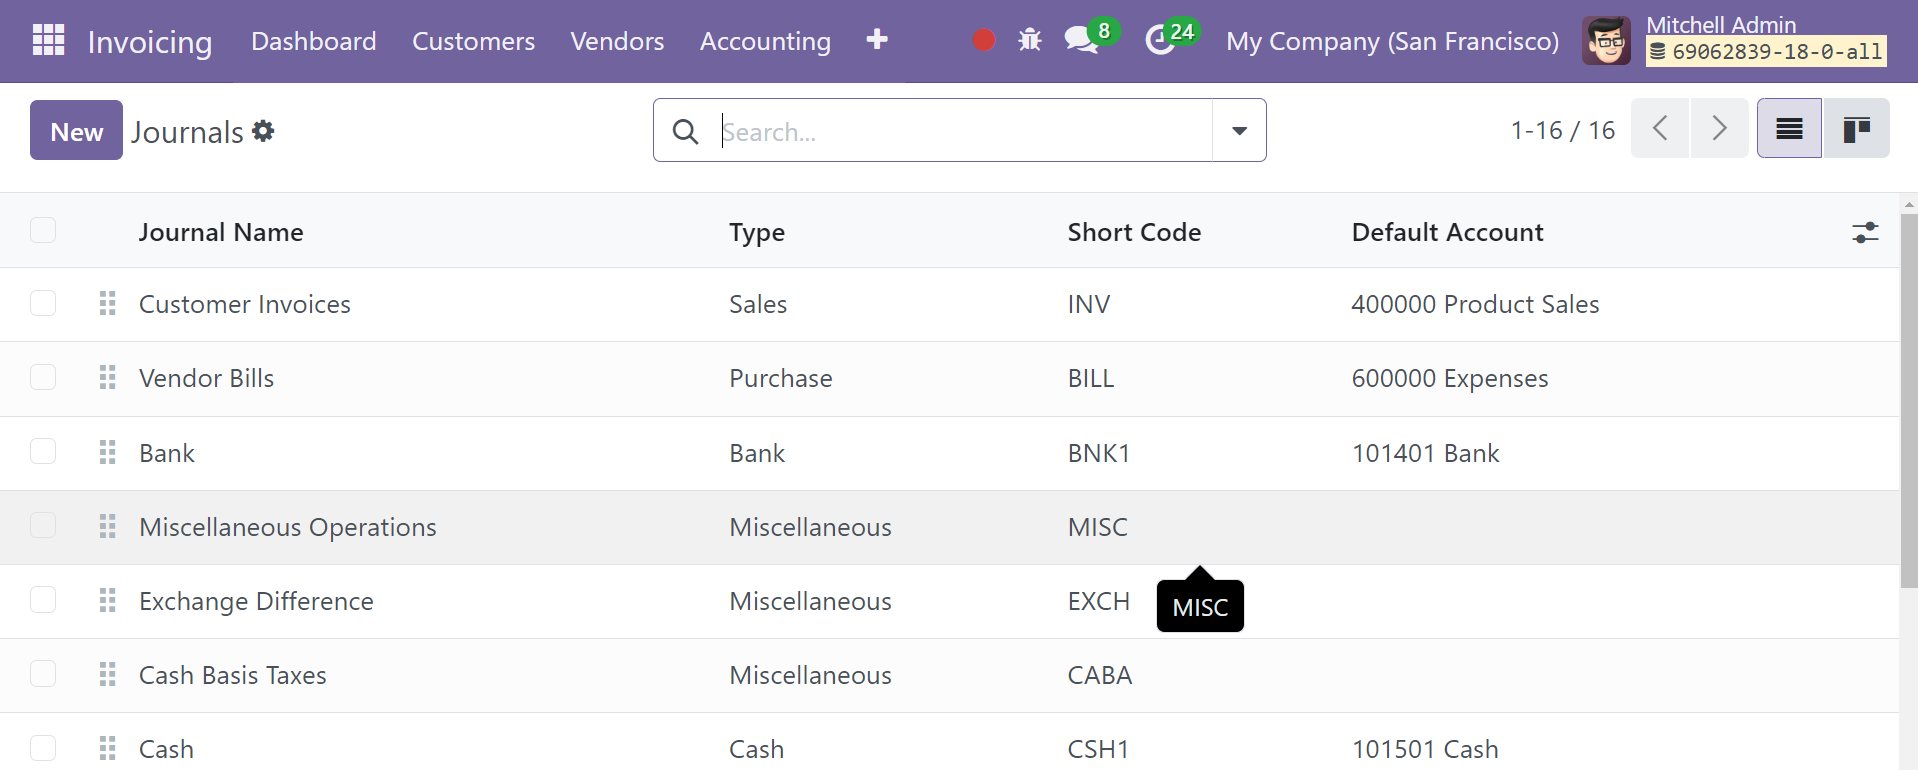
The window is additionally displayed in Kanban view. The Journal Name, Type, Journal Groups, Short Code, and Default Account are visible in the list view. A detailed view of the data listed in that particular journal shows when you pick it, and you may make any necessary edits to the data. There are both default and adjustable parameters to facilitate the sorting processes. The default filters you will see are Favorites, Sales, Purchase, Liquidity, Miscellaneous, and Archived.
Click the New button to open a new journal for your accounting activities. By selecting the New button, you may start a new journal. This will open the form view that is displayed below.
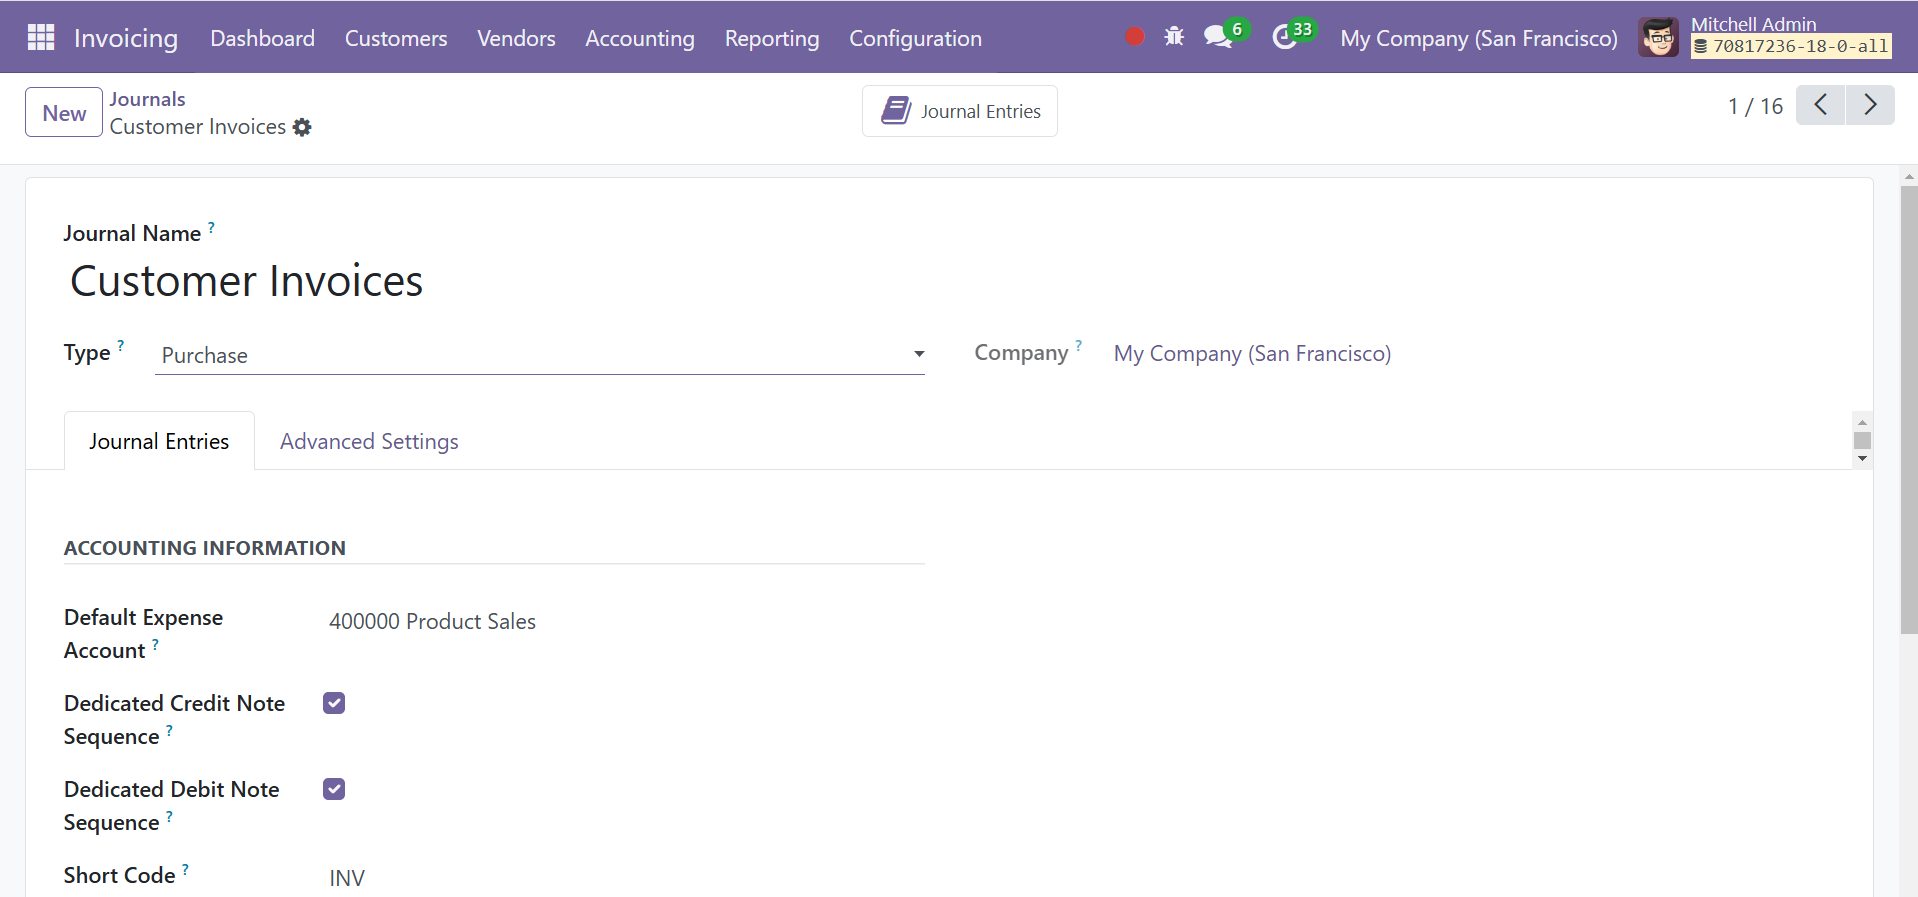
Here, you can enter the names of the Company and Journal in the corresponding fields. You can create journals in Odoo under five different categories: Miscellaneous, Cash, Bank, Sales, and Purchases. Depending on the kind you select, the remaining tabs in the form view will alter. Let's look at each type of journal one by one.
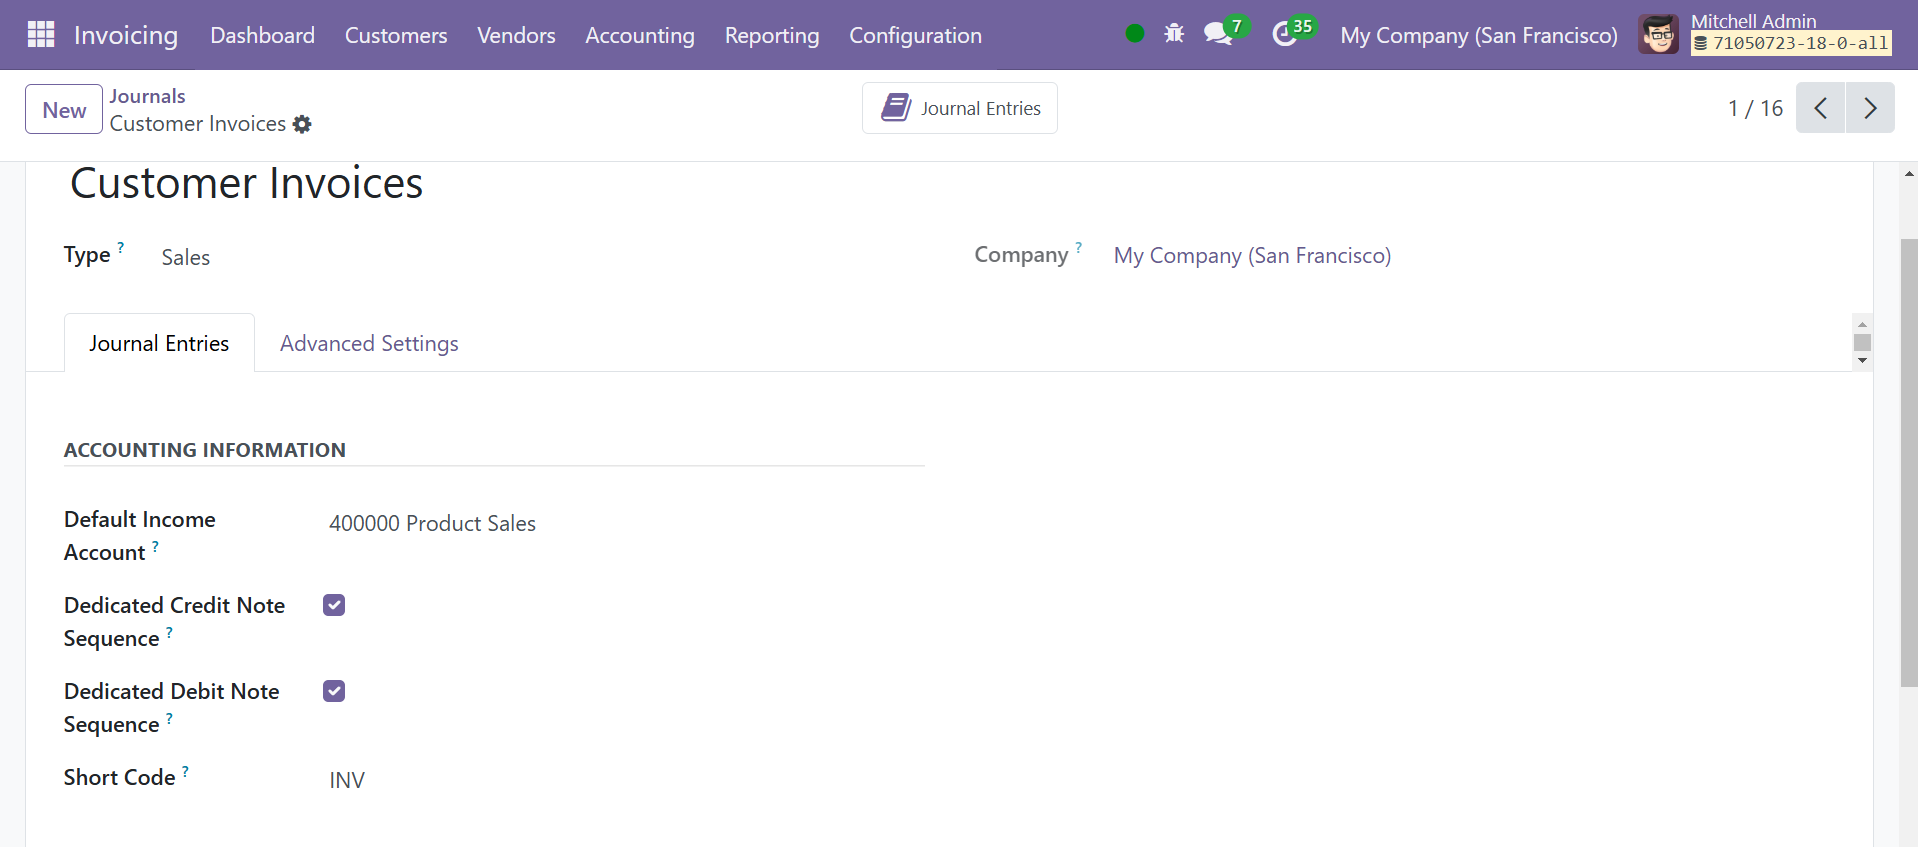
Sales
Every transaction involving sales is documented in the sales journal. To generate journals for client invoices, select the Sales option under the Journal Type section. After selecting the Type, under the Journal Entries tab, you can designate a Default Income Account for this journal. Under journal entries, you have the option of dedicated credit note sequence, dedicated debit note sequence, and short code, as in the screenshot above.
Dedicated credit note sequence: This option prevents the sharing of credit notes and invoices from a journal.
Dedicated debit note sequence: the option enables you to set up a distinct sequence for debit notes, eliminating the need to share them with other journal credit notes and invoices.
Shortcode: You can choose a shortcode for the journal.
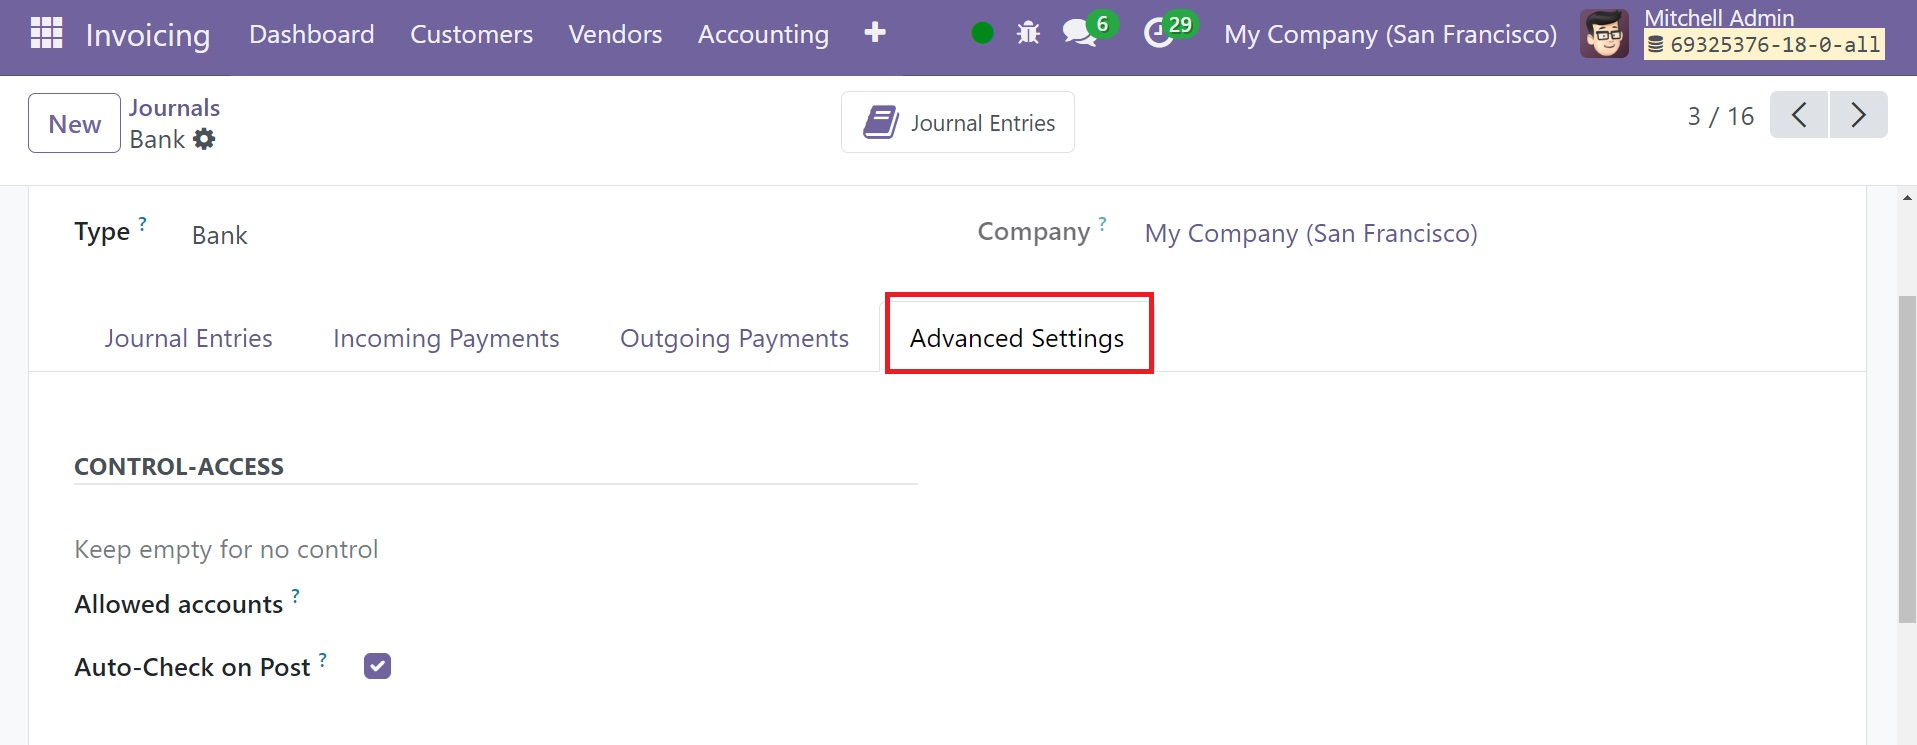
The Advanced options tab contains Control-Access options, under which you have the allowed accounts and auto check on post options. The Allowed accounts option are used to restrict specific types of financial transactions to certain accounts. And, on enabling the Auto-Check on post option, and an invoice is paid with the help of this journal, the ‘checked’ feature get enabled on its own, on confirming the bill. This means that, the invoice is checked and posted and everything is entered correctly. You can leave the fields blank if you'd rather have no control. In the relevant field, list the accounts that are permitted.
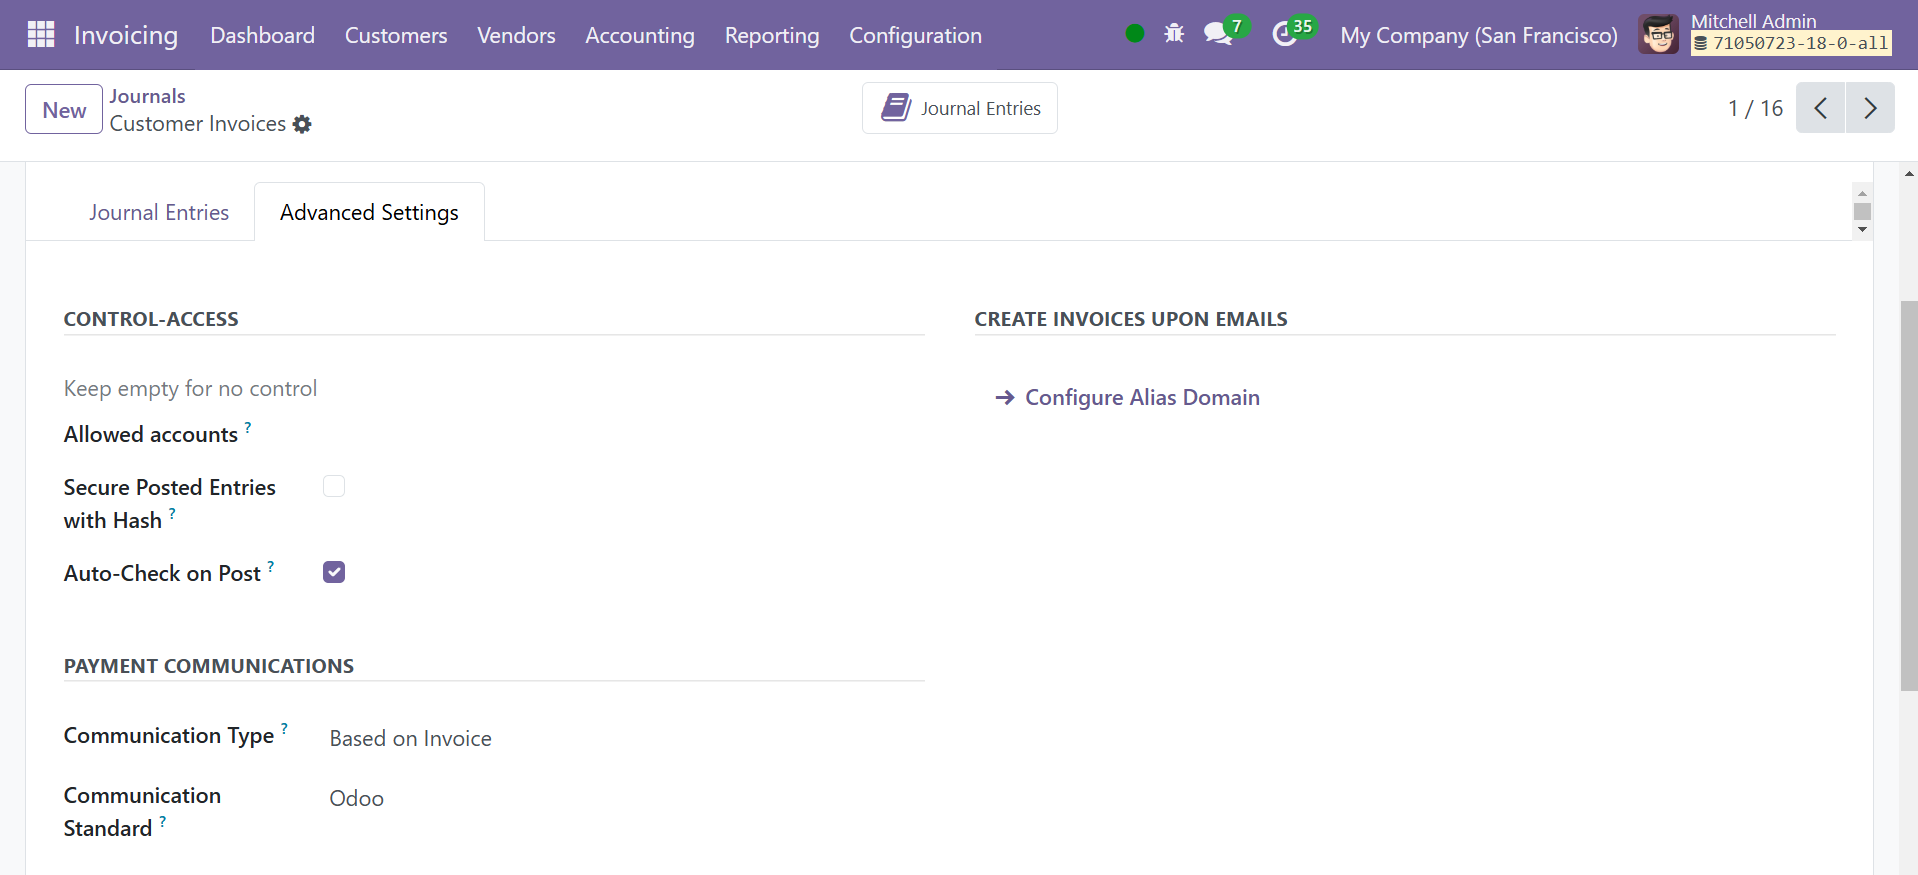
In the PAYMENT COMMUNICATIONS area, you may choose a Communication Type that will appear on customer invoices after validation, making it simpler for the customer to refer to that particular invoice when paying. Set up suitable guidelines for communication in the designated area. You will find a box in Odoo 18 where you may configure email servers to send invoices depending on emails.
Purchase
You can select the Purchase option in the journal Type section if you want to start keeping diaries for vendor bills.
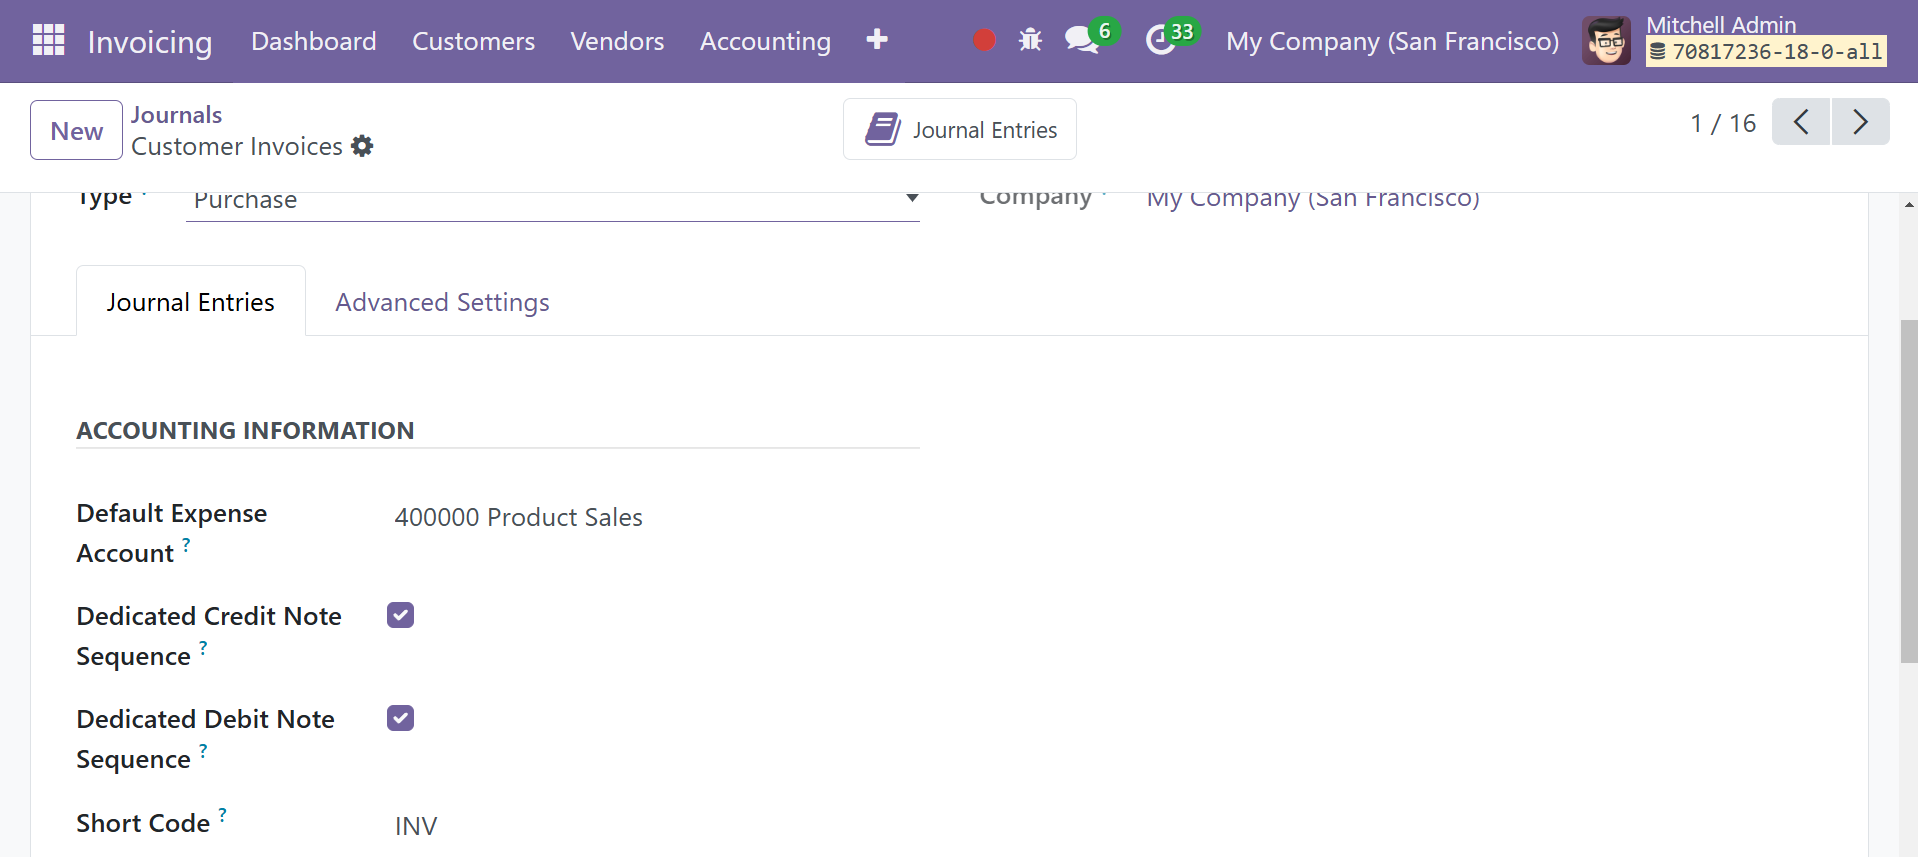
You can enter the Default Expense Account, and Short Code in the corresponding fields on the Journal Entries tab. If necessary, turn on the Dedicated Credit Note Sequence.
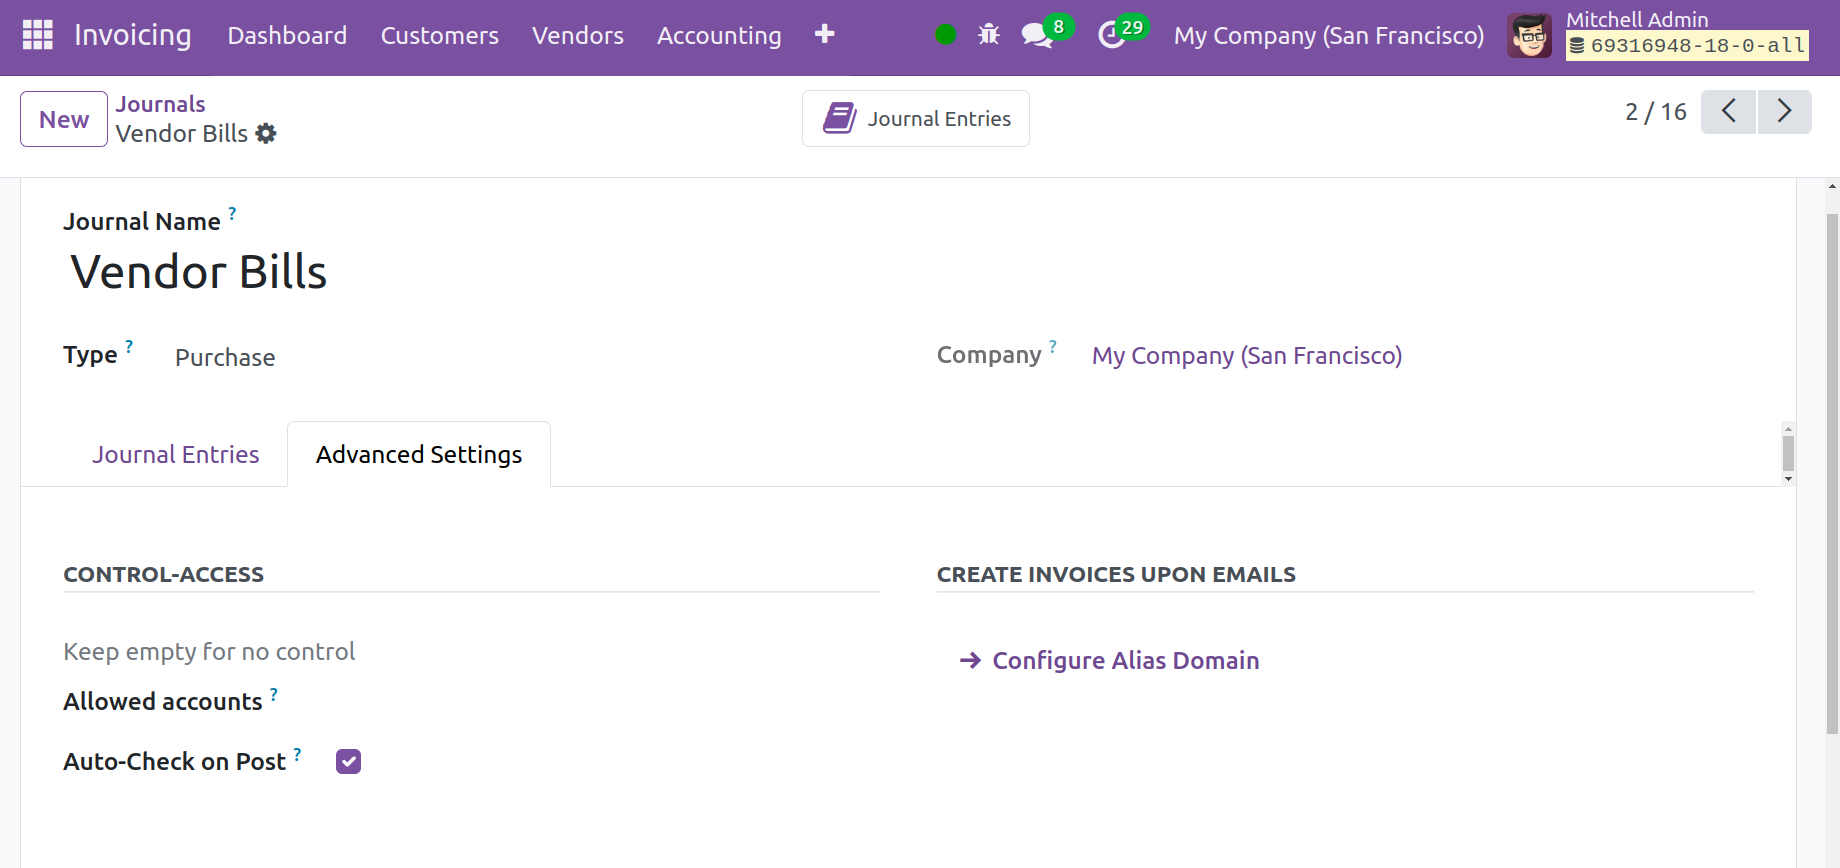
On the Advanced Settings page, you can enter the Allowed Account in the Control-Access box. Configure email servers to produce invoices in response to messages received. Depending on the specifications, you can utilize the Hash option to activate the Lock Posted Entries.
Cash and Bank
You still need to complete the Incoming Payment and Outgoing Payment pages, depending on whether you select "Cash" or "Bank" under the Type of Journal. Use Cash and Bank Journals to record your cash transactions and bank statements.
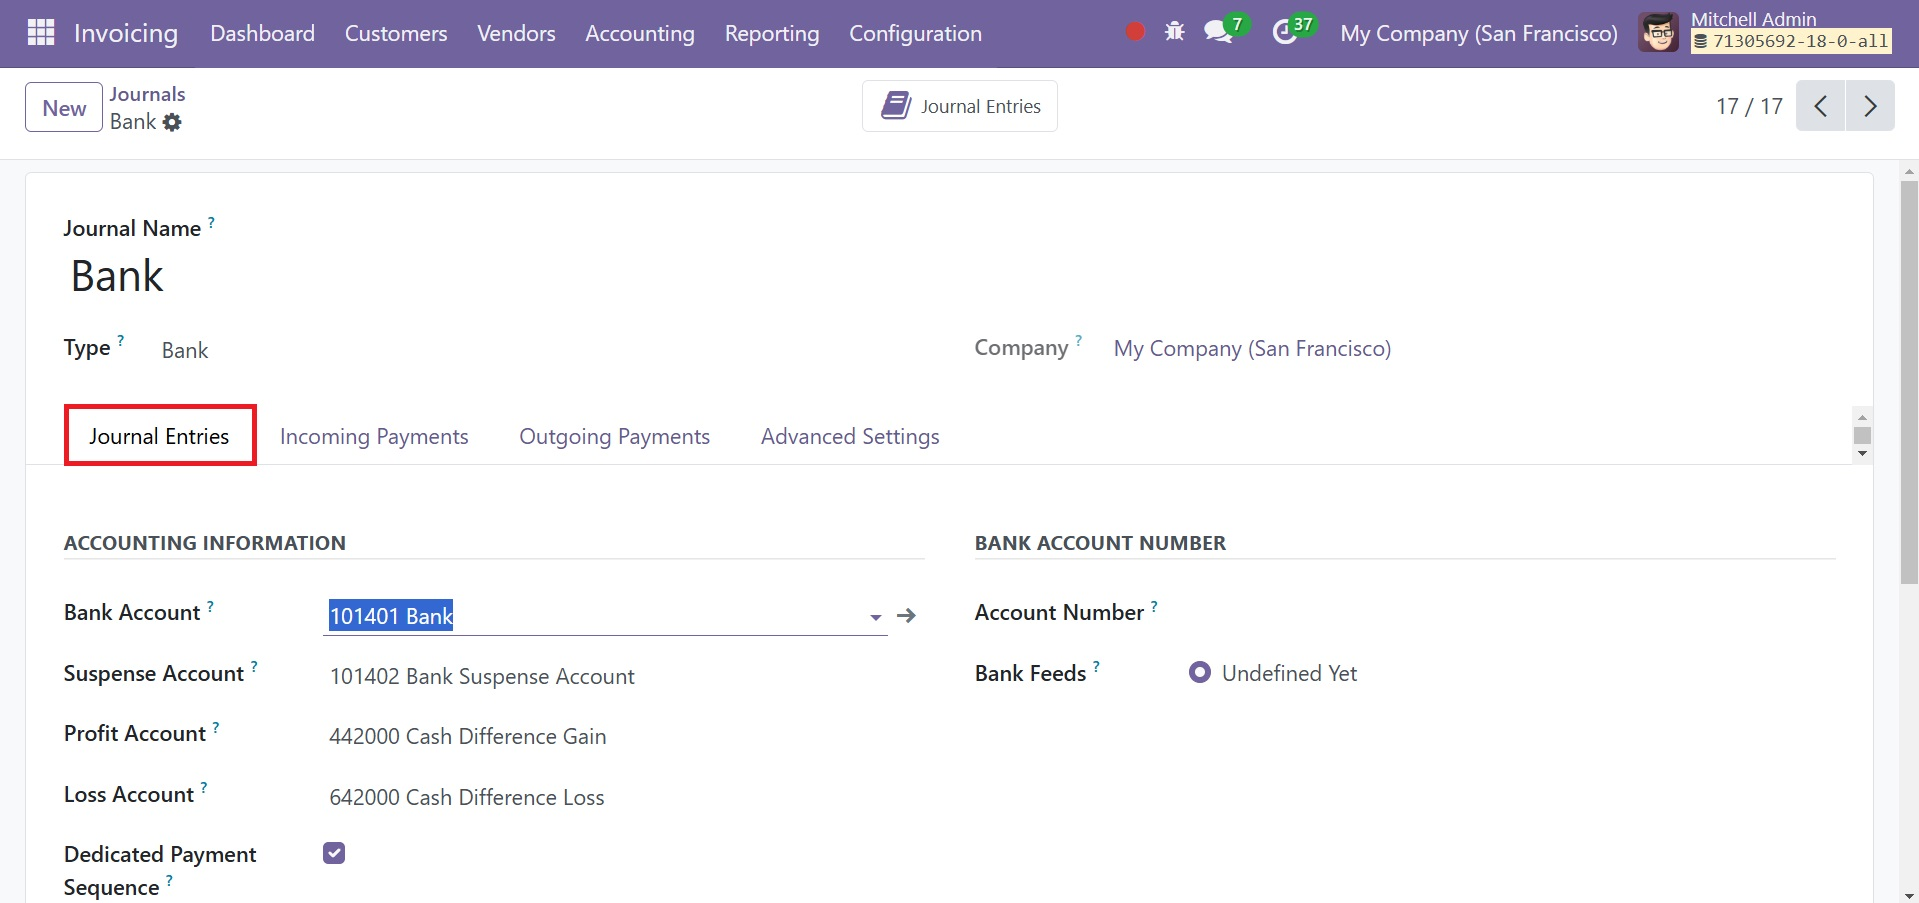
When choosing the Cash/Bank option, you have to consult the ACCOUNTING INFORMATION listed on the Journal Entries tab. Here are some places to mention the Cash/Bank Account, Suspense Account, Profit Account, and Loss Account. The fields that are left match the ones we have already covered. If a cash register's closing balance differs from what the system calculates, a profit or loss will be noted in the corresponding profit or loss account. When you choose the Bank option, you have to enter the Account Number and Bank Account in the corresponding fields.
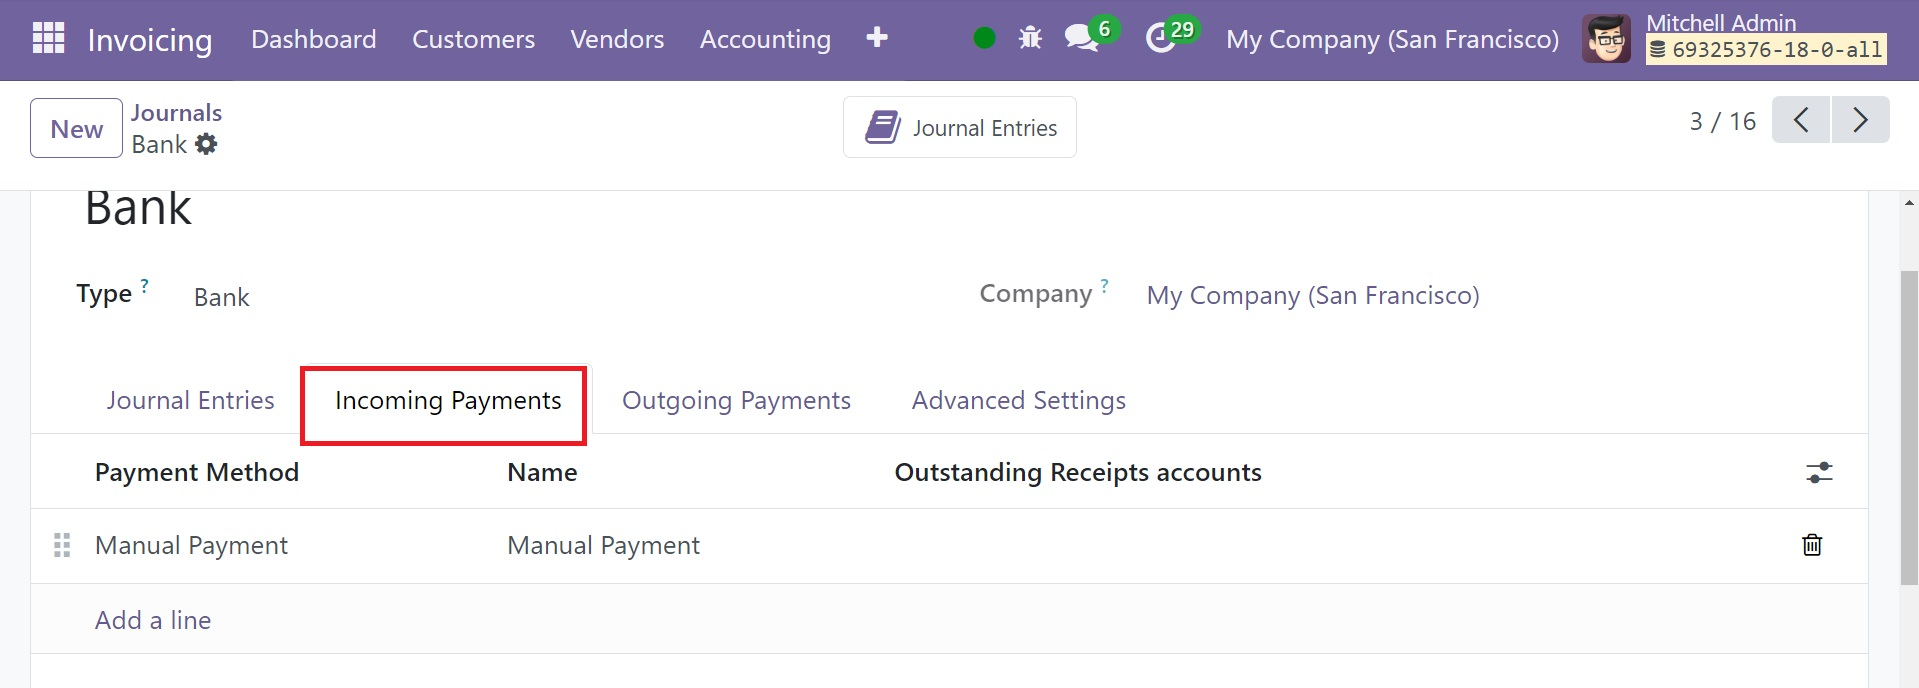
For both Bank and Cash choices, the Incoming Payments, Outgoing Payments, and Advanced Settings sections are similar in options. You accept incoming money from your clients in exchange for goods or services in the case of incoming payment, as show in the screenshot below.
You should submit outgoing payments to suppliers for goods or services you received, as well as for other amounts in the case of outgoing payment, as shown in the screenshot below.
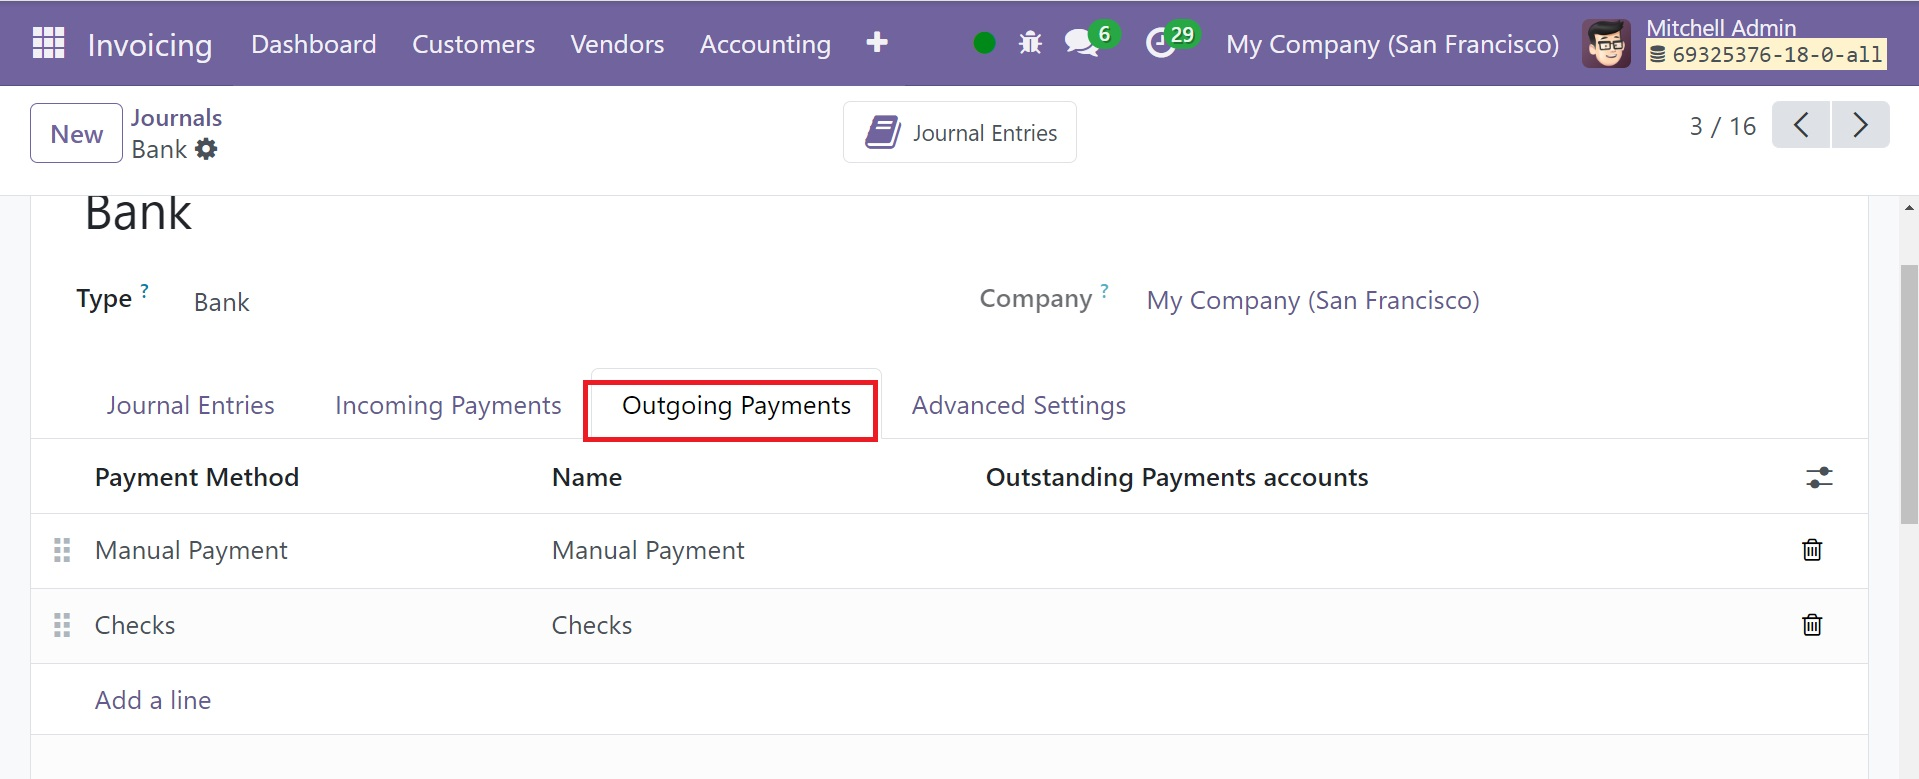
Using the Add a Line button, you can add the Payment Method and Name under the Incoming Payments and Outgoing Payments headings.
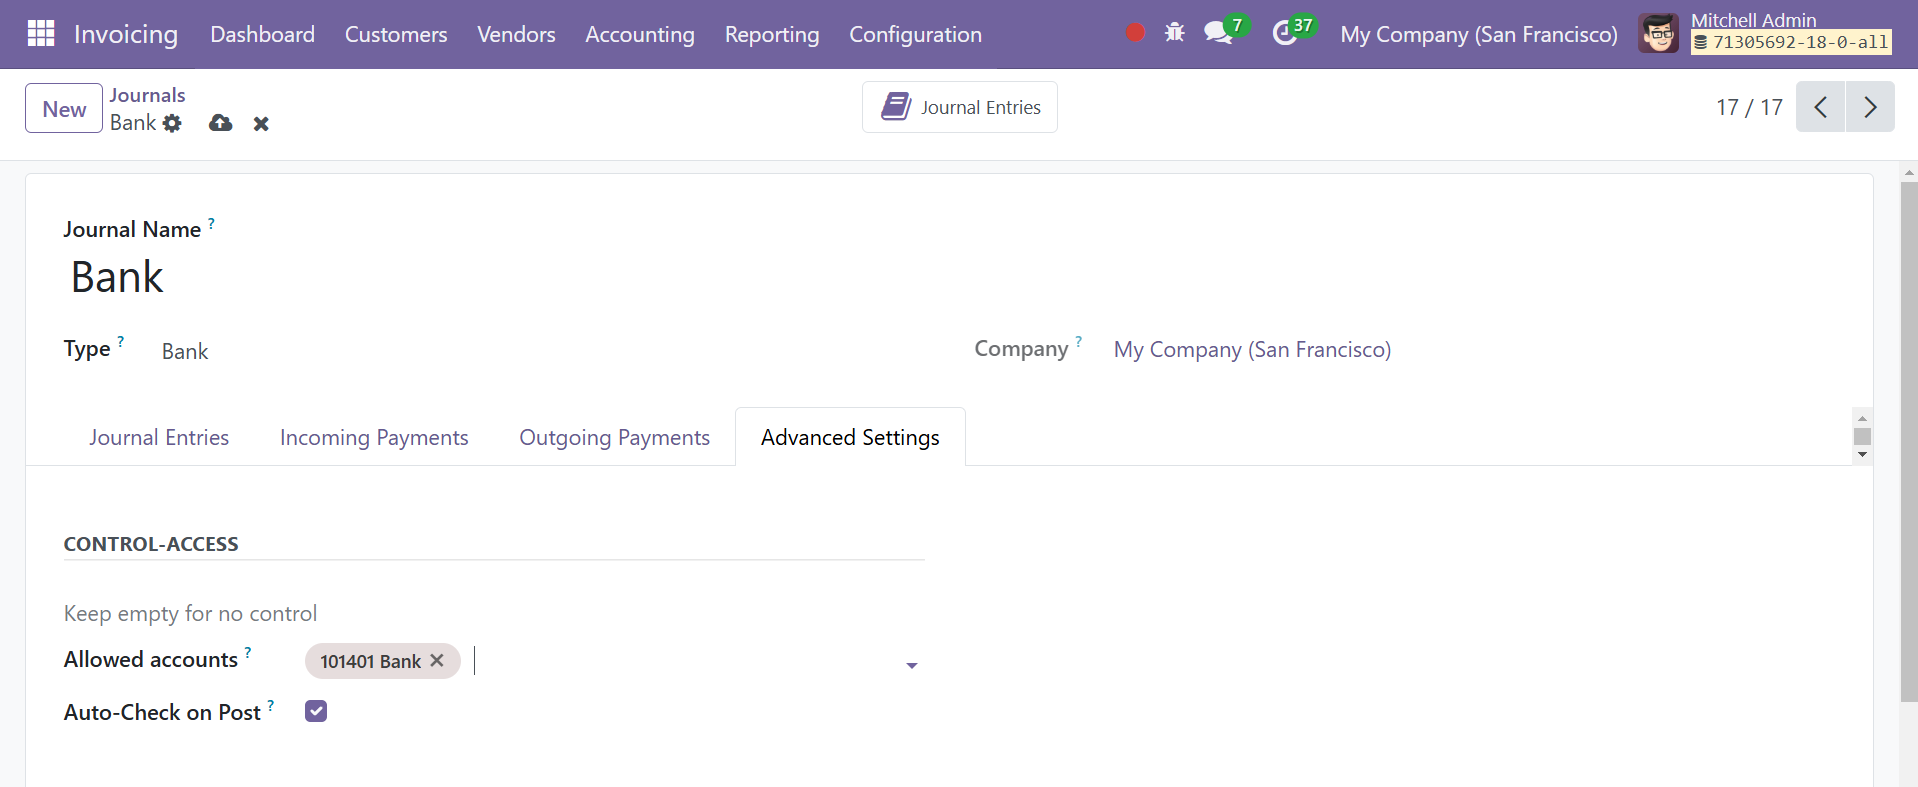
You can enter the Allowed Account in the Control-Access box under the Advanced Settings page. You can choose the allowed accounts depending on the Journal Type that you have chosen. Users can limit which accounts can be used in a journal by using the "Allowed Accounts" option. By restricting the number of accounts that can be used, this helps to avoid data entering errors.
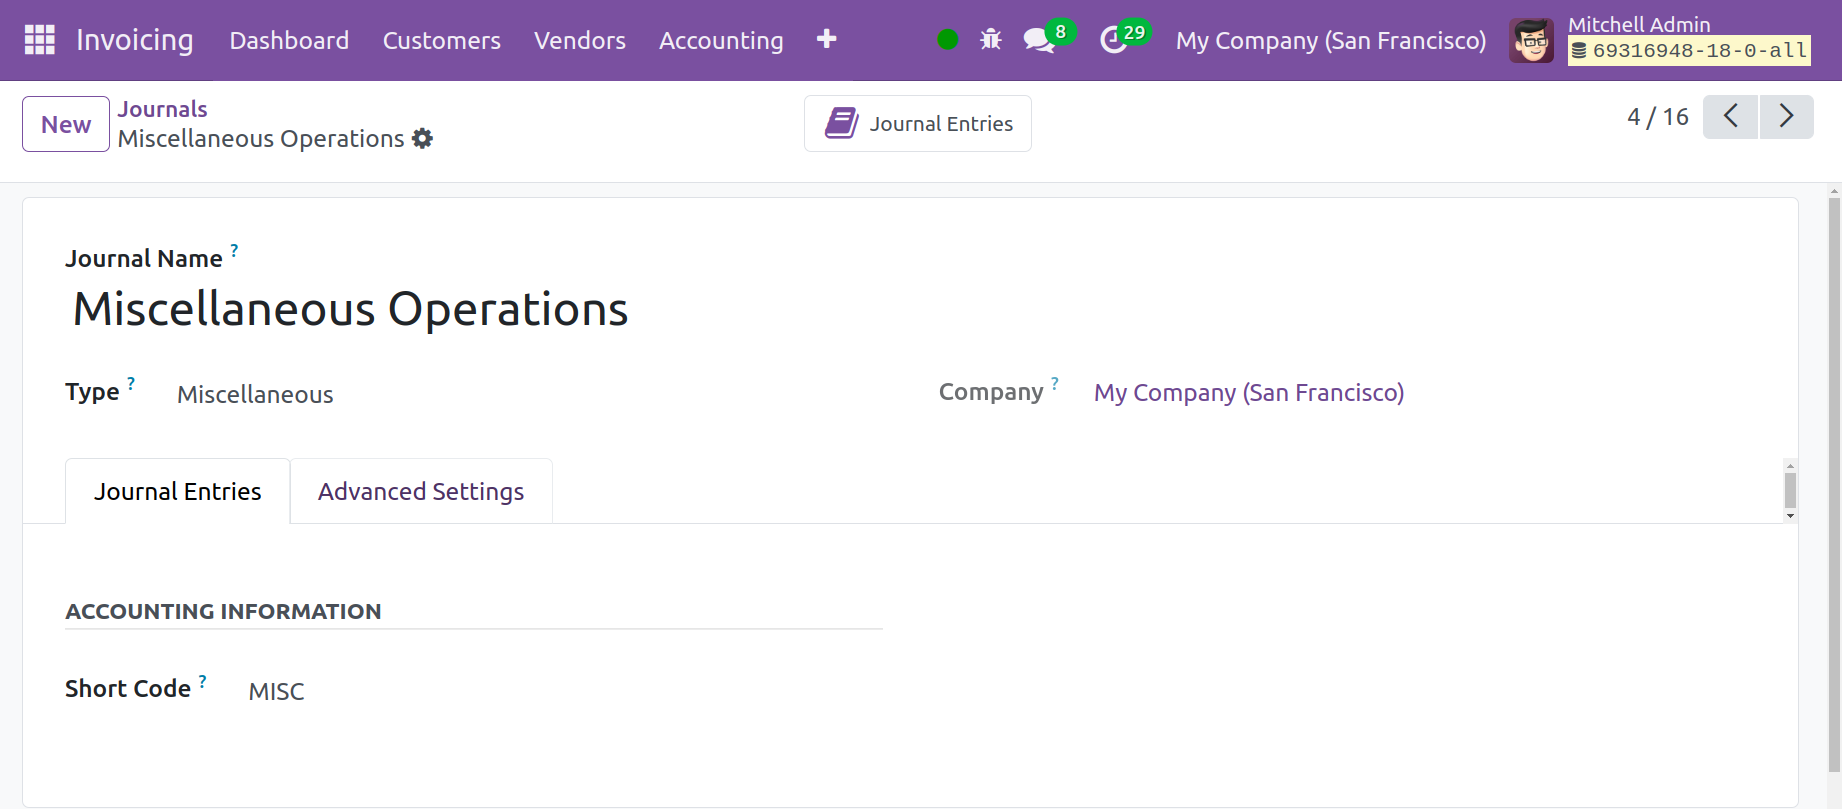
Miscellaneous
Any further commercial transactions might be recorded in the Miscellaneous Journals. You can create a record that works with your accounting procedures right from this window.
Credit Card
Managing transactions related to credit card payments can be done with a credit card journal type.

Here, you have the sub options, such as journal account, suspense account, dedicated payment sequence option to activate, a short code, and currency to add. This is also a payment journal like bank and cash, which can be used to record credit card payment journal entries.
Journal Entries
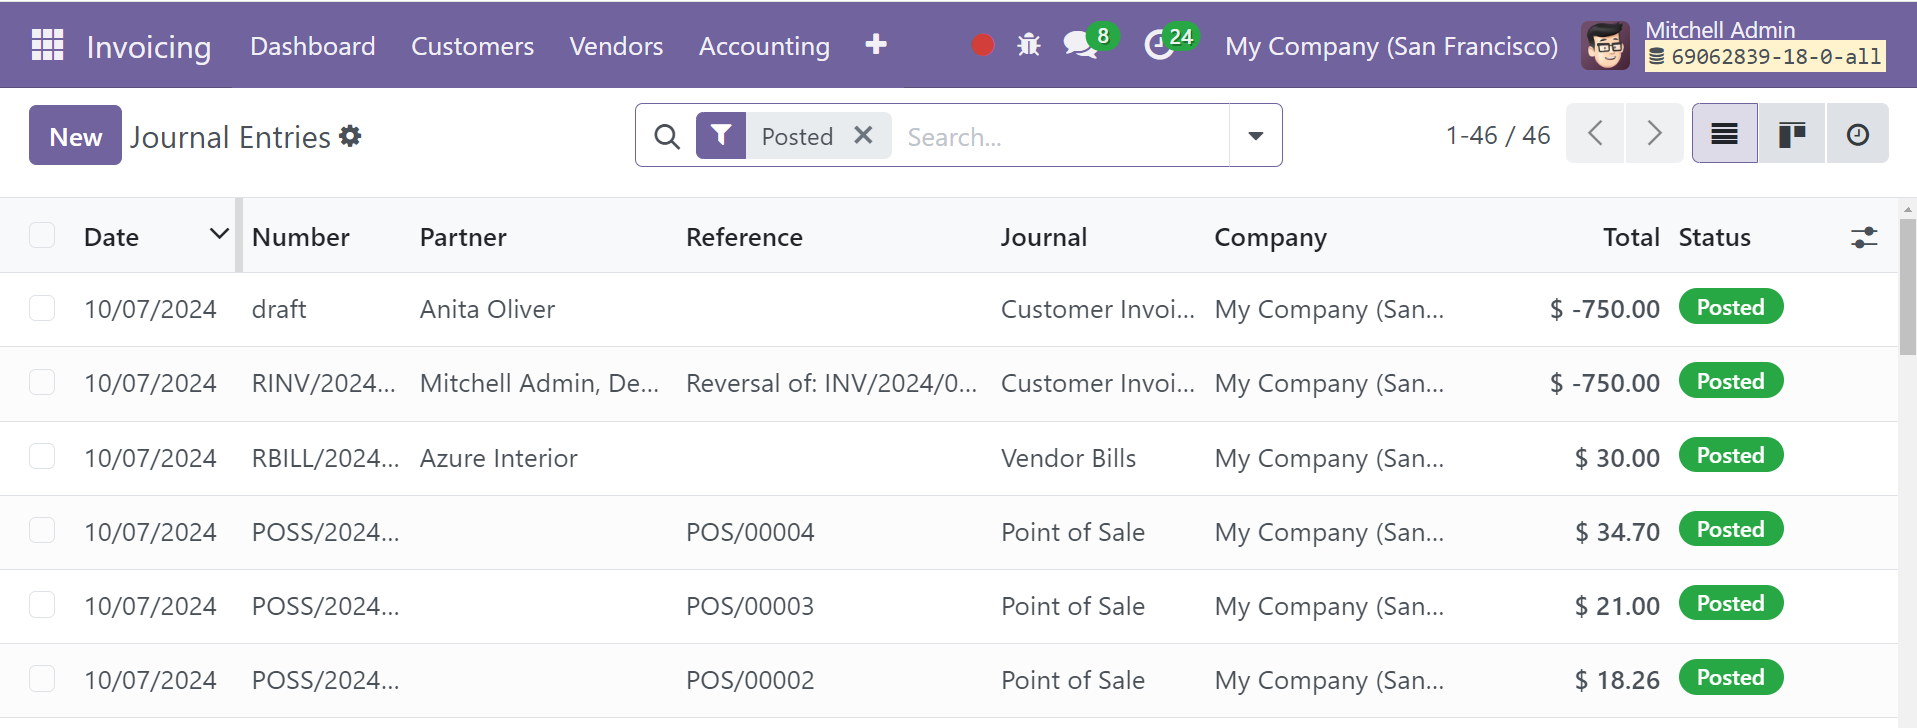
Your company's financial statements and transactions will be added as journal entries to the accounting journals detailing its business activities. Once you enable the Show Full Accounting Feature for user from Odoo 18's General Settings, you will see the Journal Entries function in the Odoo 18 Invoicing module under the Accounting menu. The Invoicing module's journal entries platform will display all entries made to the different journals.
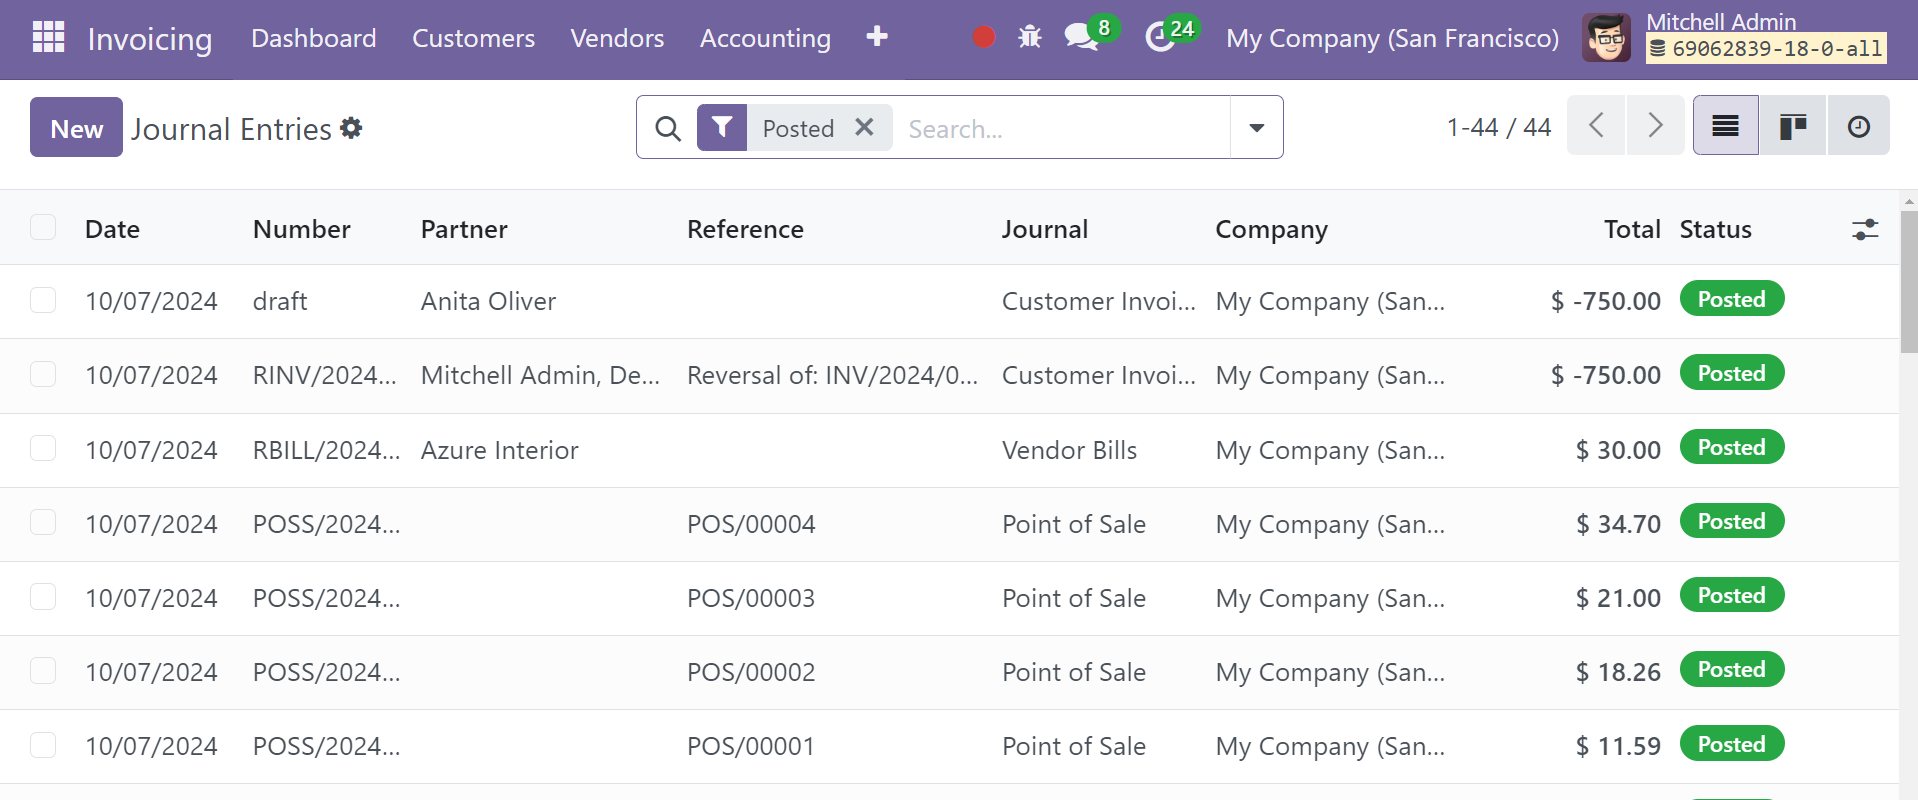
This list view of the entries shows the date, number, partner, reference, journal, company, total, and status of the journal entries. You will see Unposted, Posted, Reversed, To Check, Sales, Purchase, Bank, Cash, Miscellaneous, and Date as the default criteria. The default group options you can choose are Partner, Journal, Status, Date, and Company.You can include a list of references for this journal entry in the space provided. In the corresponding fields, enter the Journal and Accounting Date. To add the details for the Account, Partner, Label, Debit, Credit, and Tax Grids, select the Add a Line button located on the Journal Items tab, as in the screenshot below.
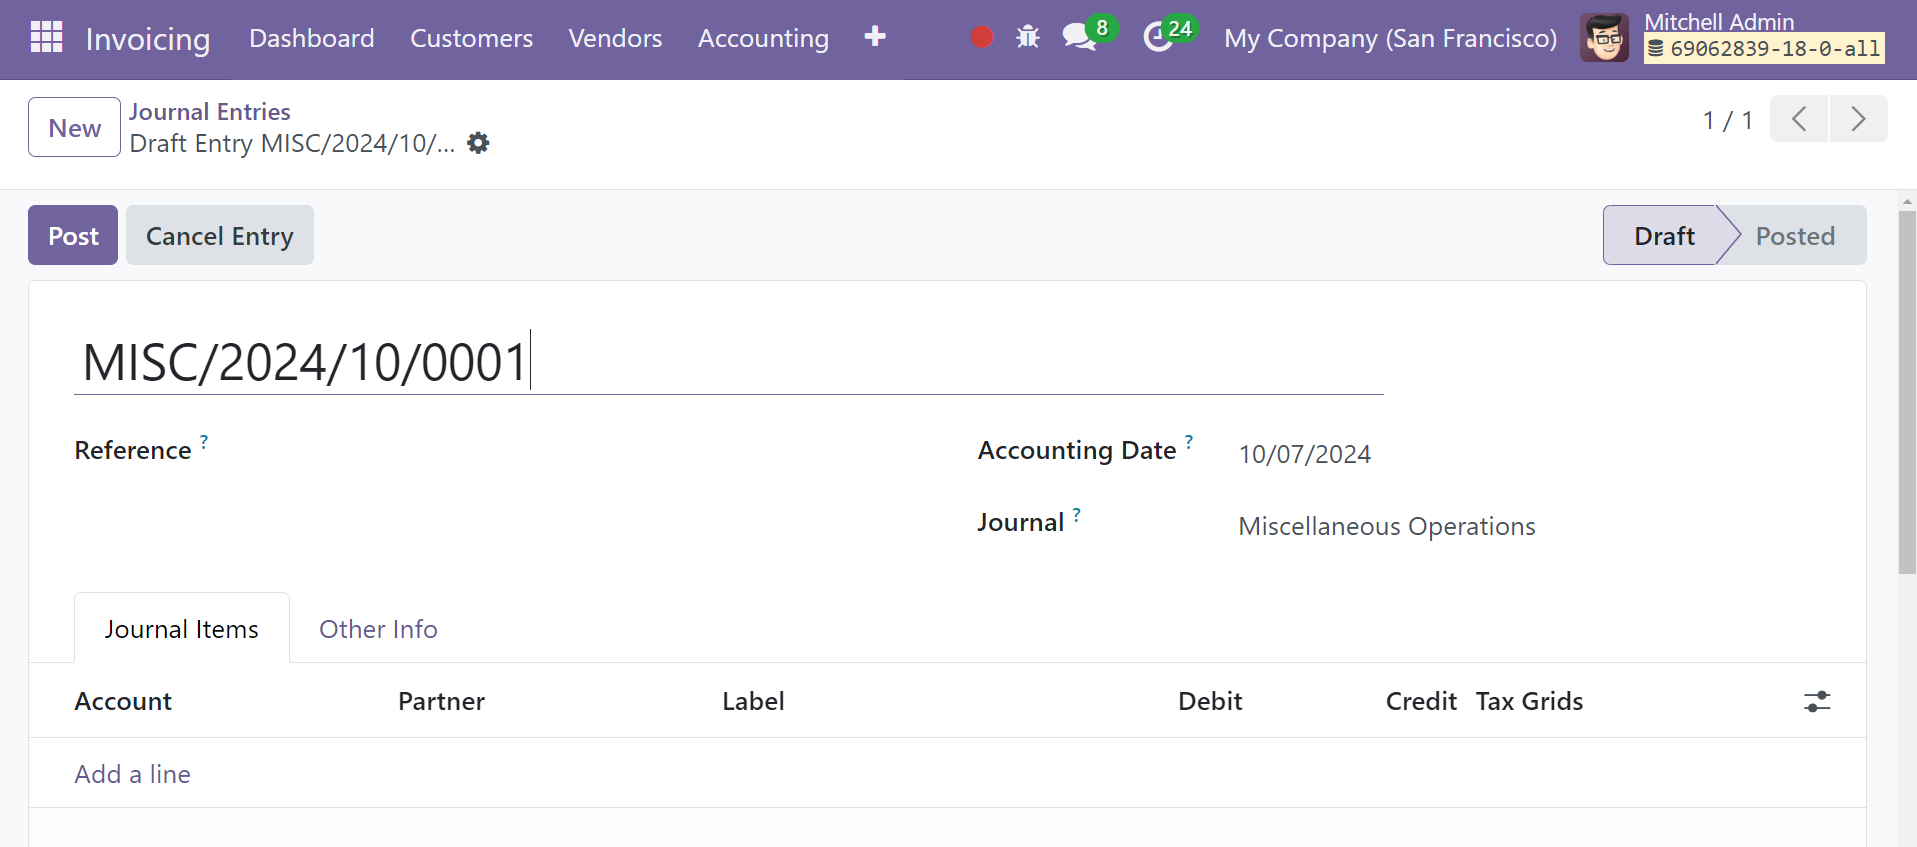
Go to the Other Info page and select the Auto-Post option if you would like the entry to post automatically on the designated date.
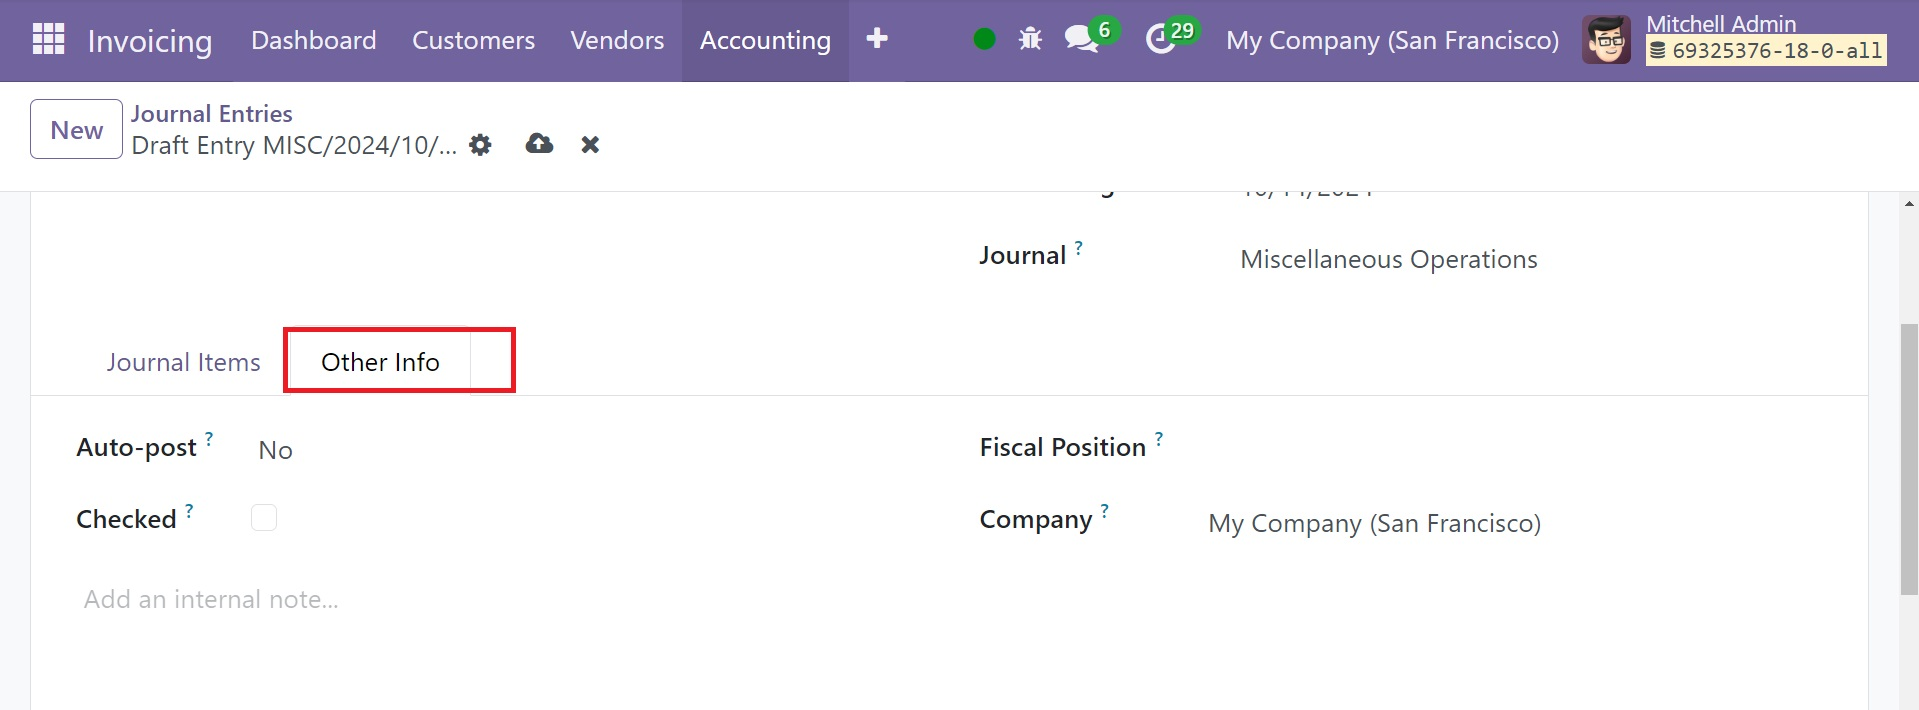
By selecting the To Check option, you can verify the information you entered into the journal entry once more. You can include the Company and the Fiscal Position in the appropriate fields. In the designated space, you can write an internal message regarding this particular journal post.
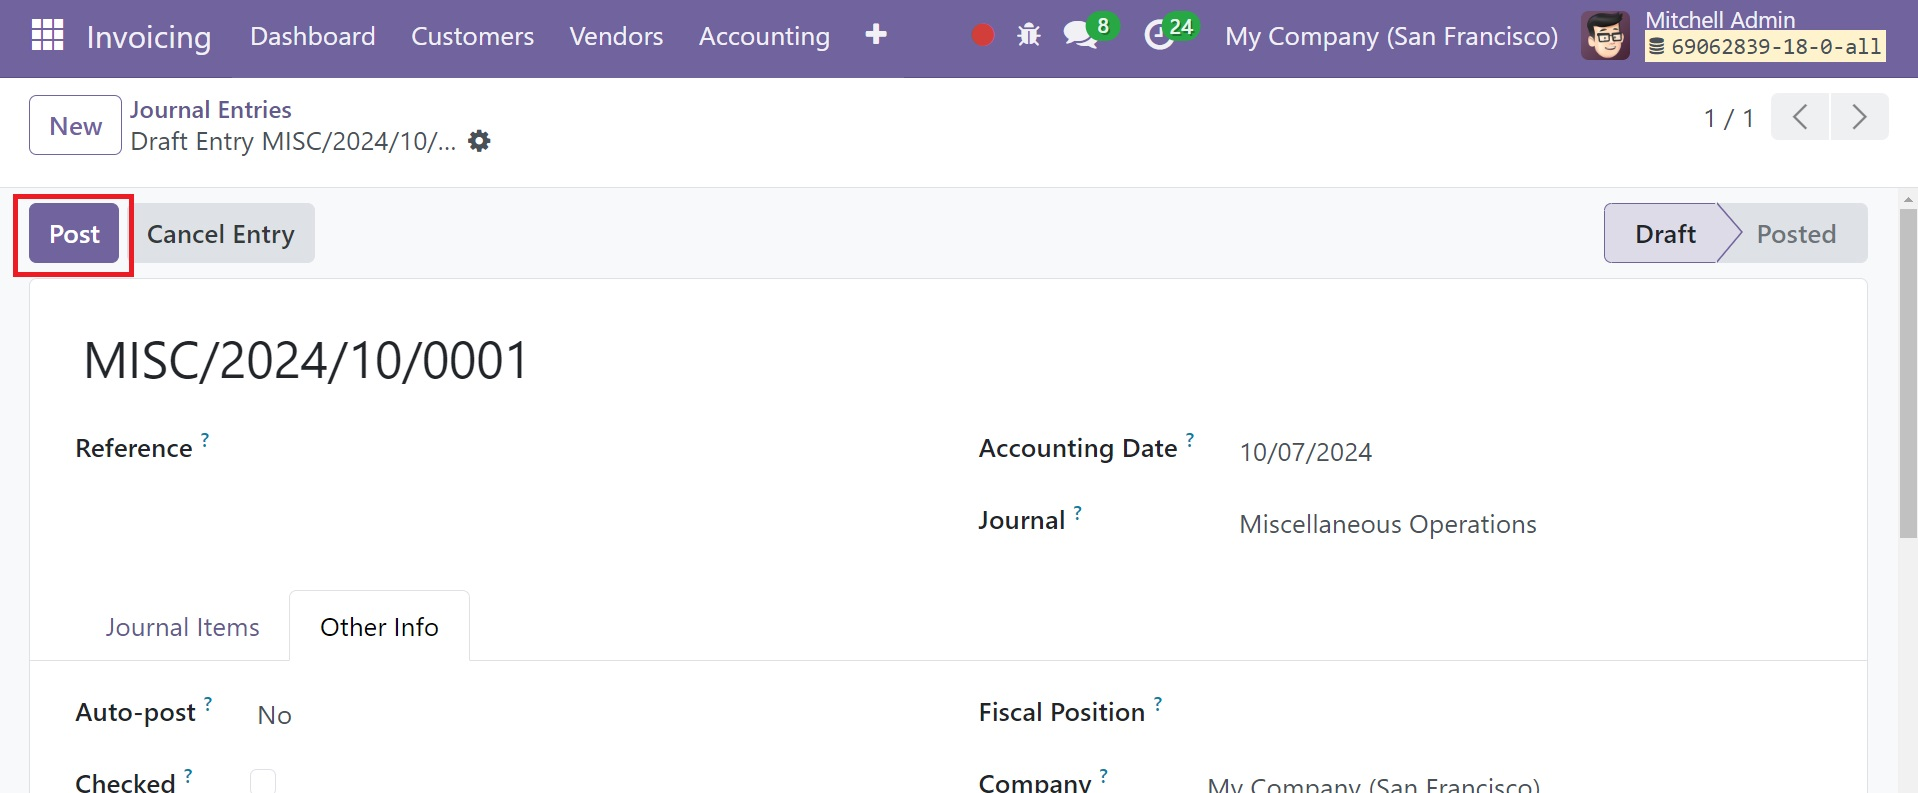
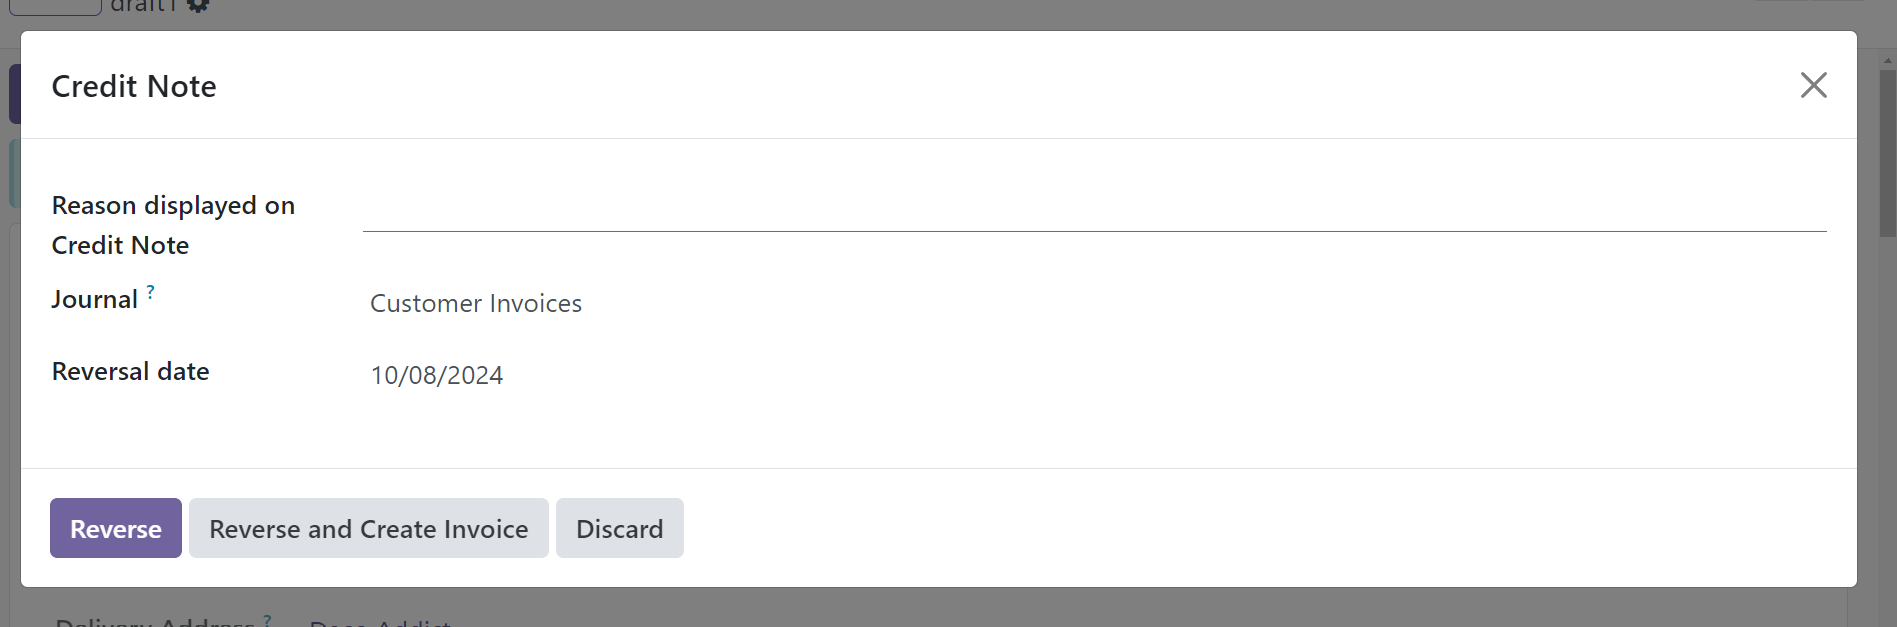
This Post button will cause a new pop-up window to appear, allowing you to enter the data required to undo the current journal entry.
The Reversal Entry button will cause a new pop-up window to appear and allow you to enter the data required to make the current journal entry reversed.
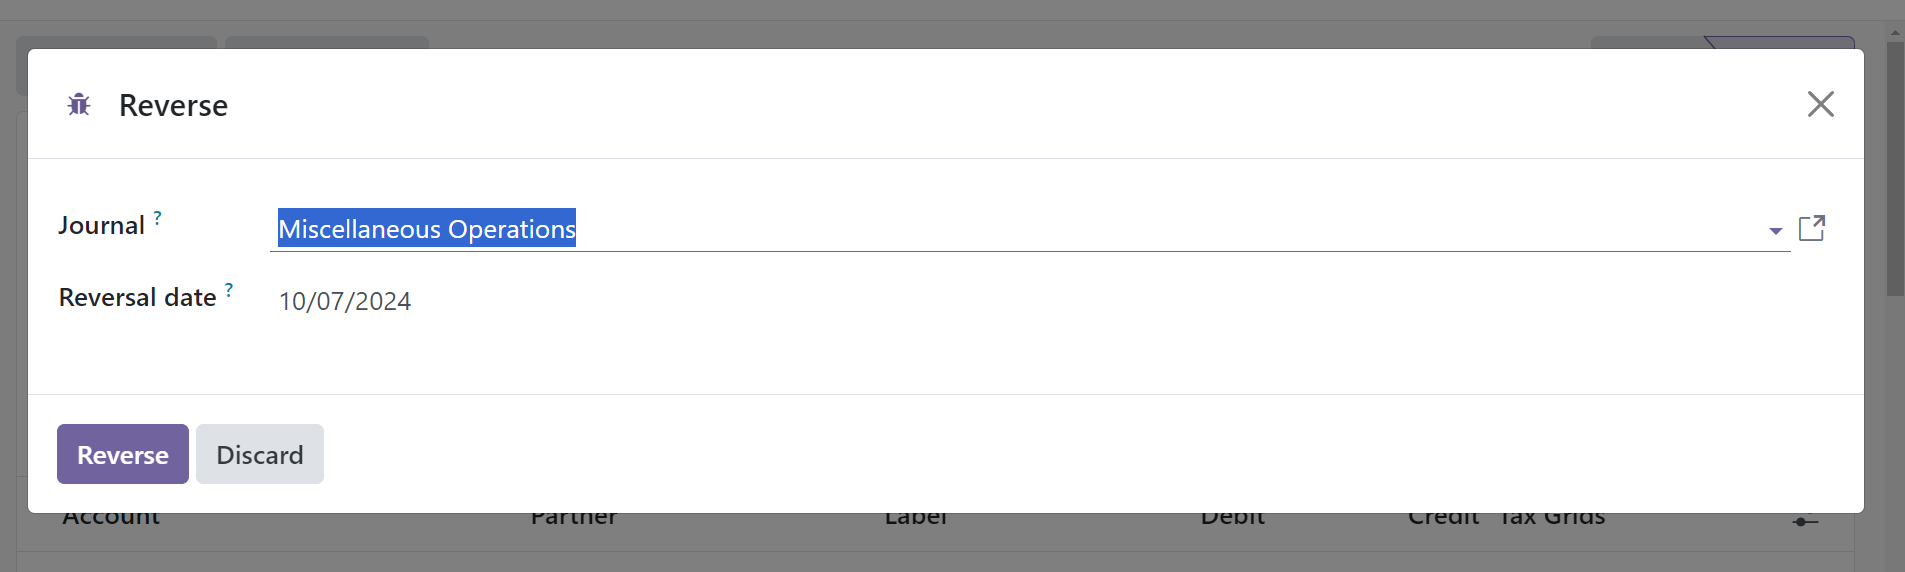
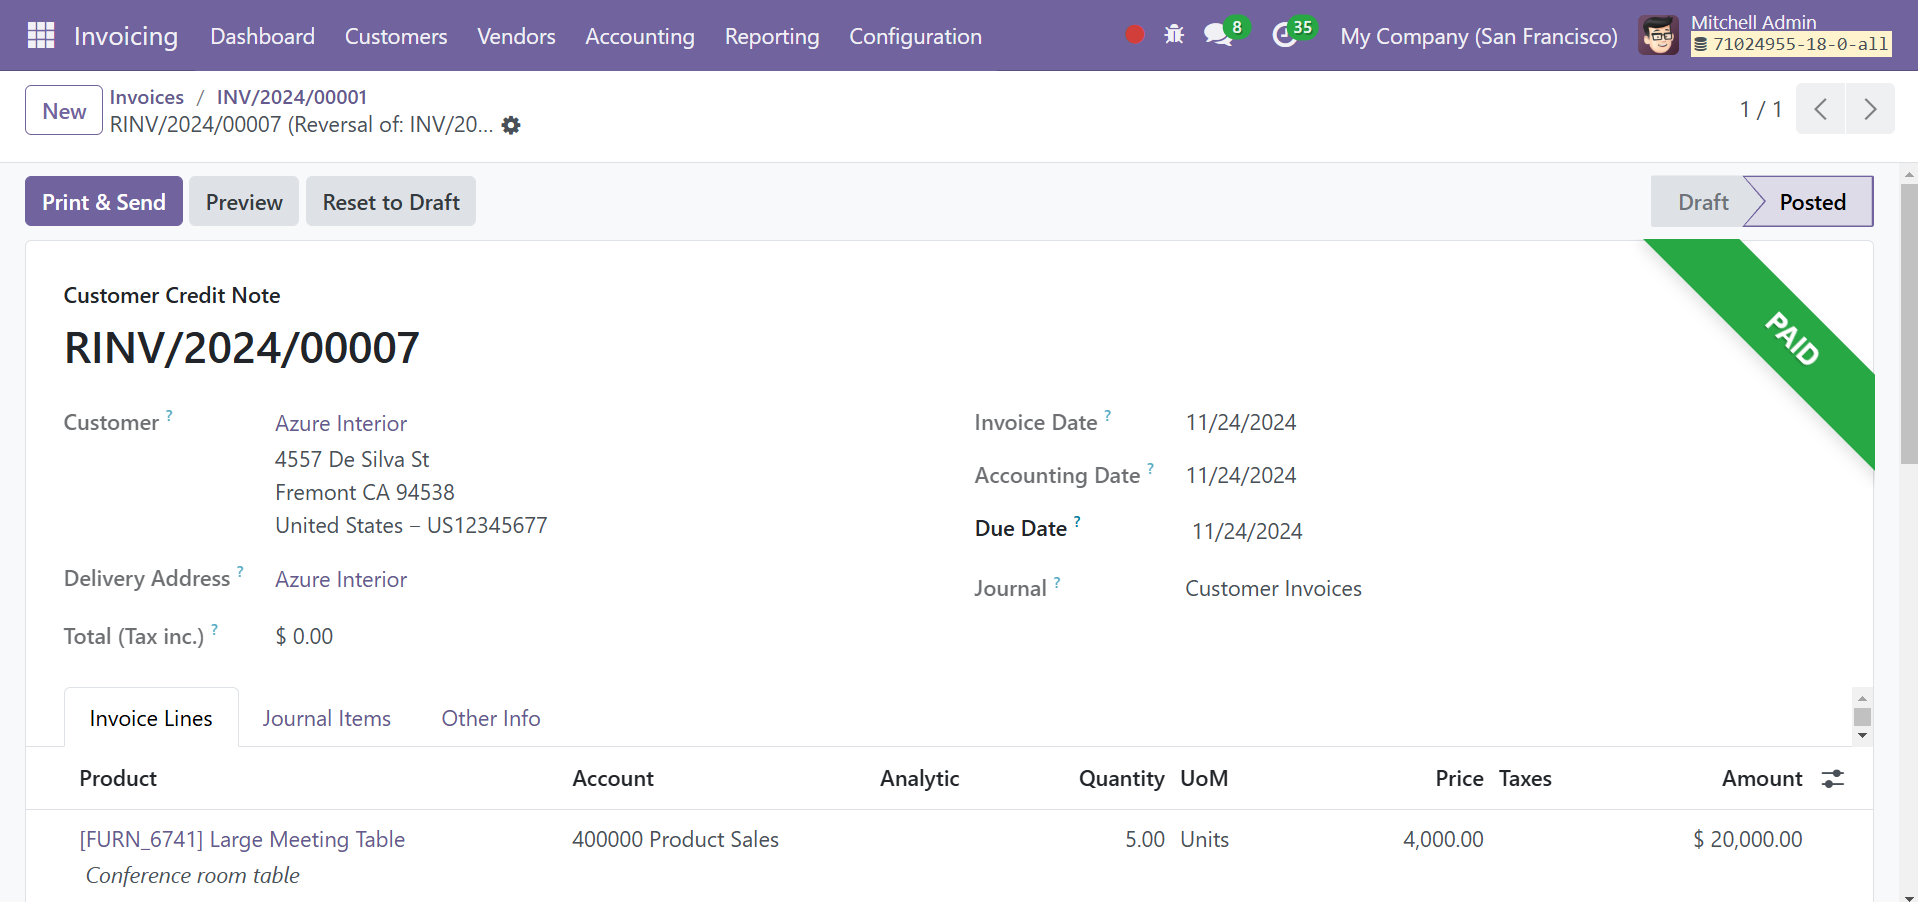
After entering the required data, you can undo the journal entry by selecting the Reverse option. The Journal Items that you attach to Odoo journal entries will be recorded in a specific platform that you may reach via the Accounting menu.
Every configuration for each journal item that is set up in different journal entries will be tracked by the Journal Items in the Odoo Invoicing module.
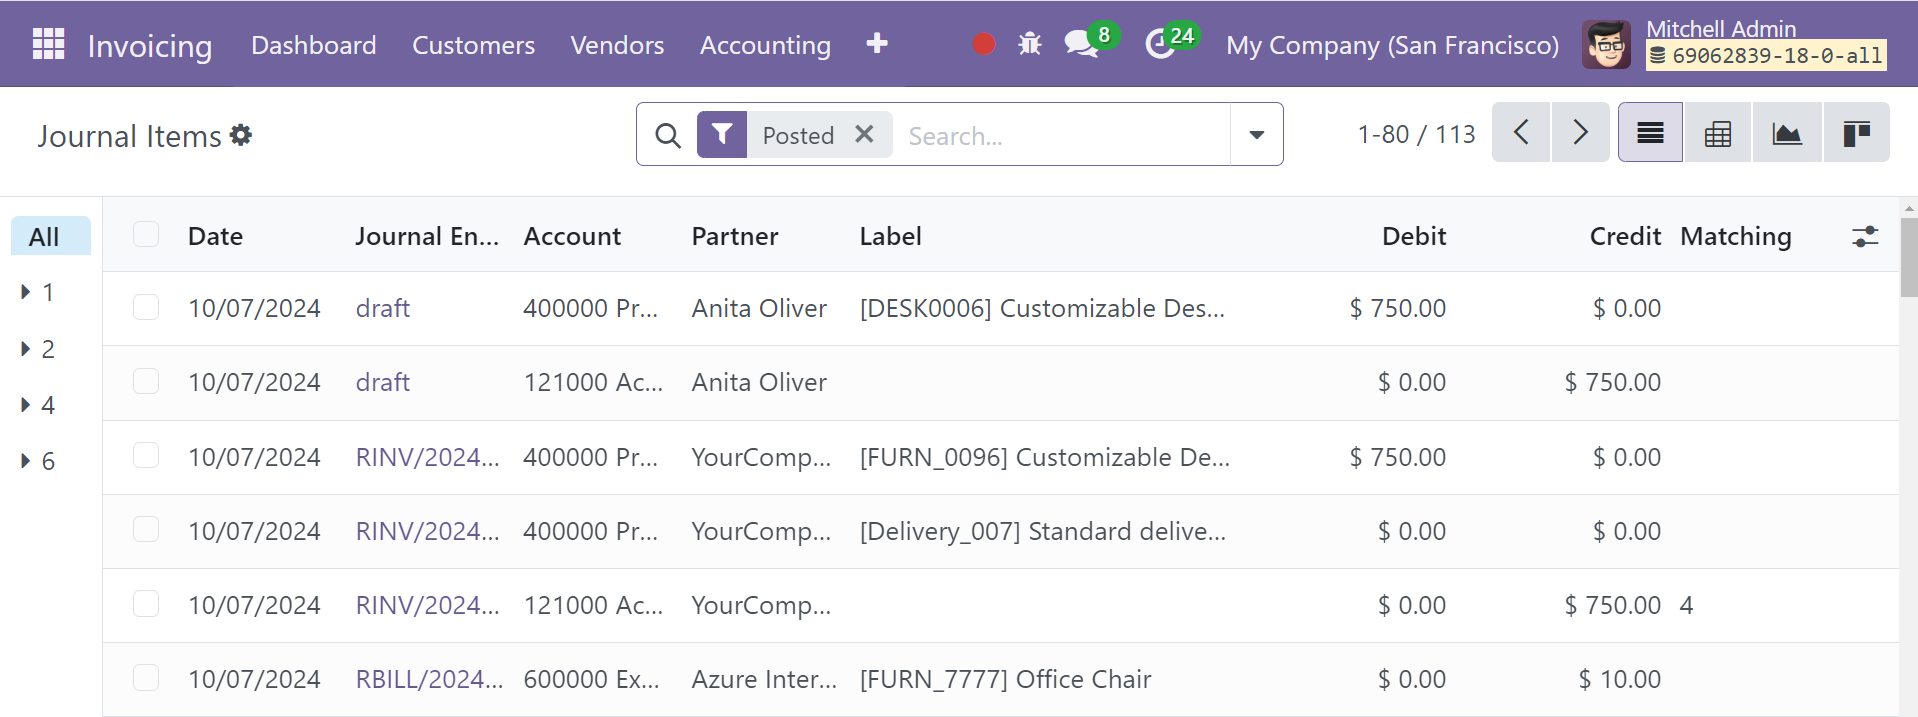
On the platform, you have a choice between List, Kanban, Pivot, and Graphical views. From the list view, you may get details about the Date, Journal Entry, Account, Partner, Label, Amount in Currency, Debit, and Credit.
Fiscal Position
With the aid of Fiscal Position in Odoo 18, you can rapidly modify the tax computation in compliance with your company's tax regulations. It is possible to construct maps that are pertinent to a country or group of countries about accounts and taxes. You can use the Fiscal Position feature in Odoo 18 to put up suitable criteria so that the system can choose a country's taxes and accounts automatically while doing commercial operations.
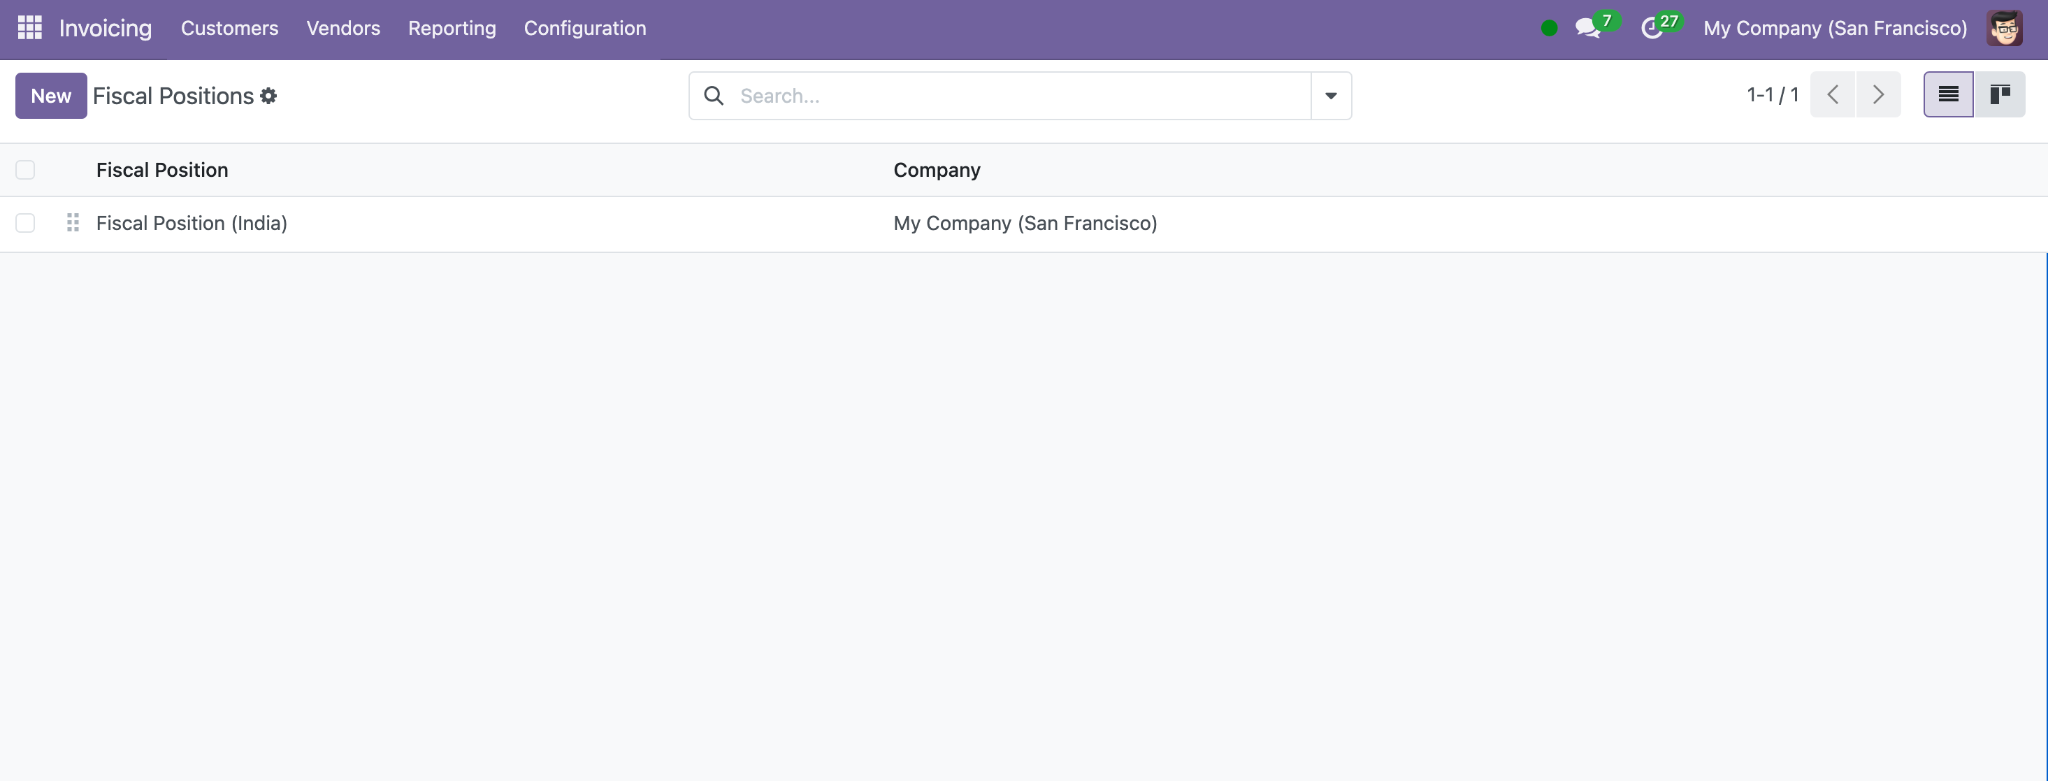
Go to the Odoo 18 Invoicing module's Configuration menu to reach the platform where various Fiscal Positions can be specified. The window will provide the list of fiscal positions that have already been configured. From this window, you may create a new fiscal position by clicking the New button.
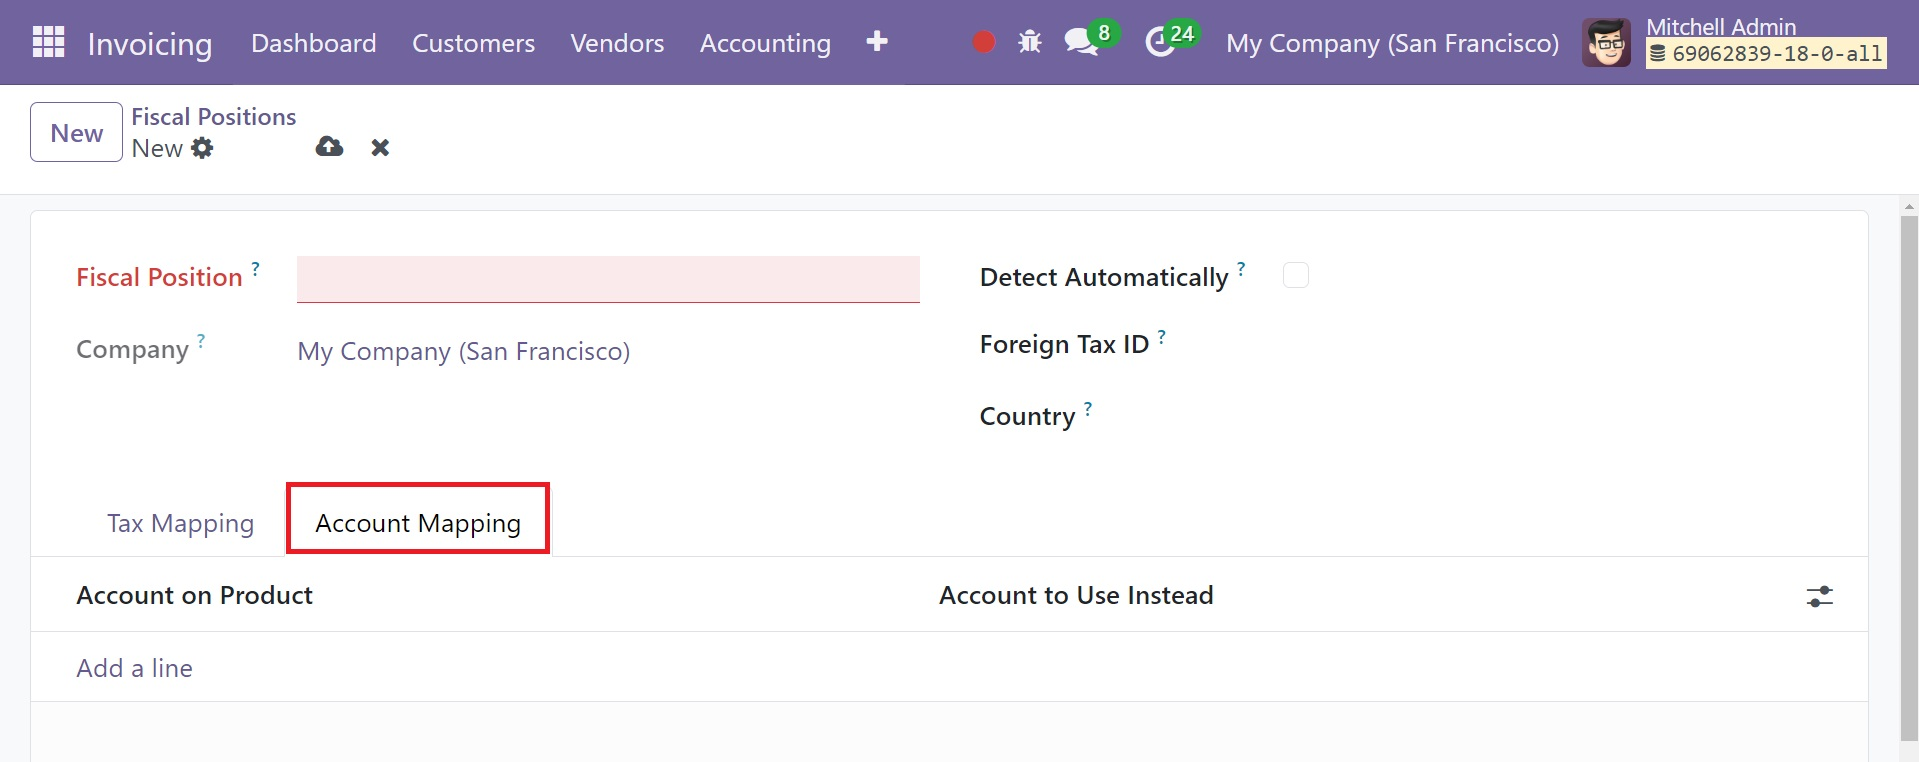
Enter the new fiscal position's name in the designated field. The name of the Company will appear in the appropriate field. To apply this fiscal situation automatically, utilize the Detect Automatically option. In the area where this fiscal position corresponds to the Foreign Tax ID box, you can add your company's tax ID. Only when the delivery nation corresponds with the specified country will the financial position be applicable.
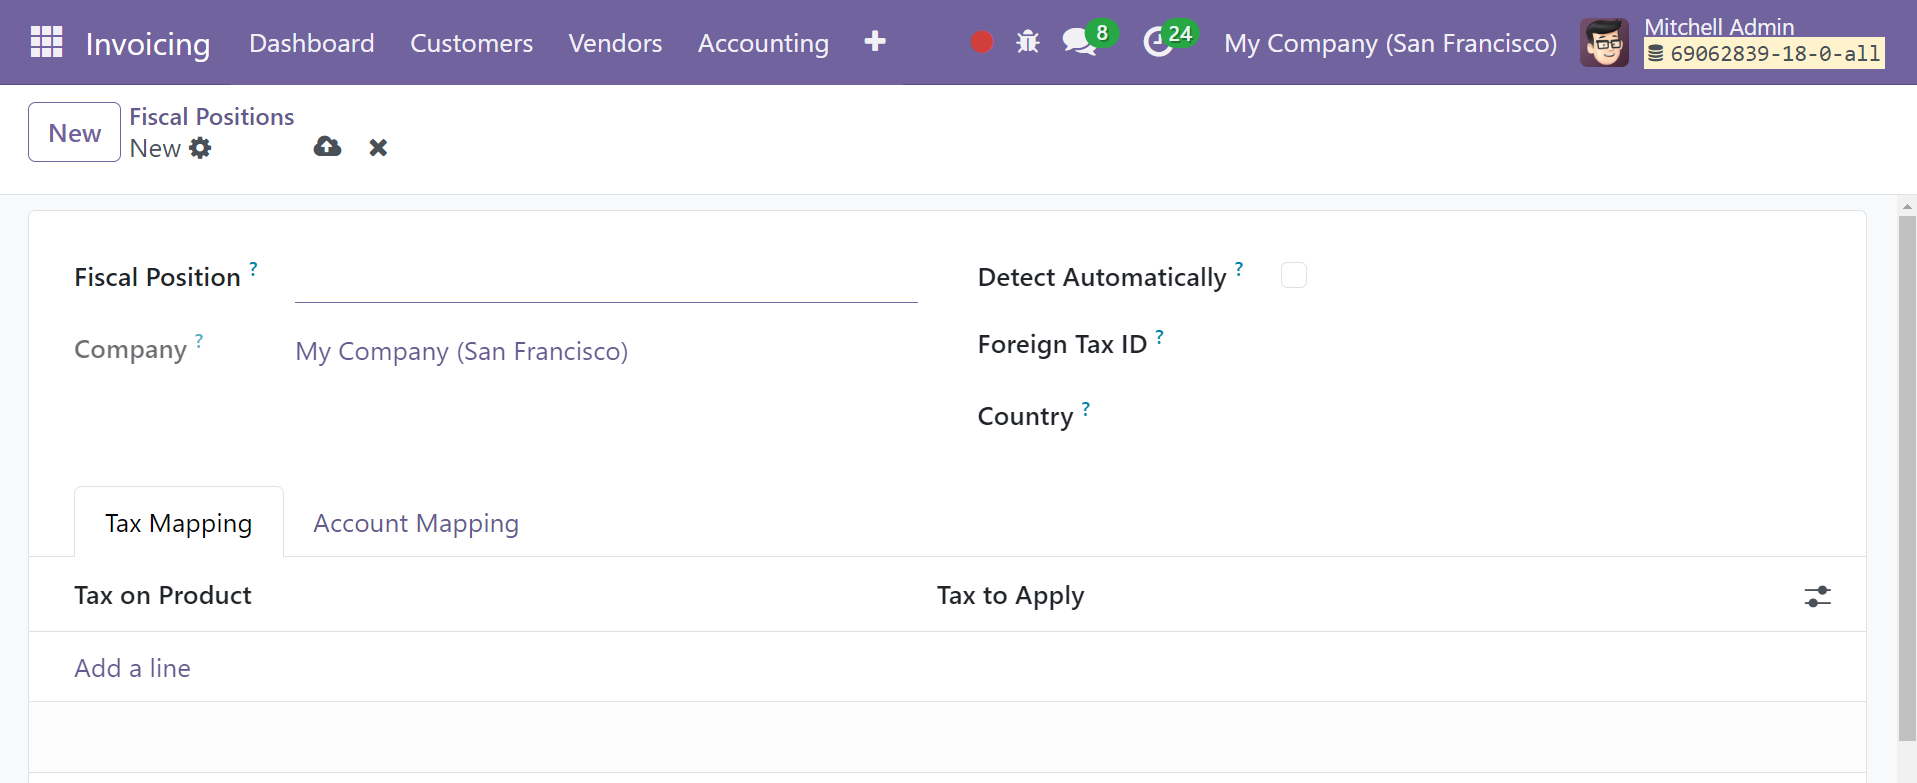
Choose the Tax Mapping tab and enter the Tax on Product and Tax to Apply data using the "Add a Line" tool. Odoo will use these details to map taxes. Afterwards, invoices will have the option of Legal Notes.
By adding the Account on Product and Account to Use Instead data to the Account Mapping section, you can map accounts more quickly, as in the screenshot below. In Odoo 18, you can create new fiscal positions in this manner.
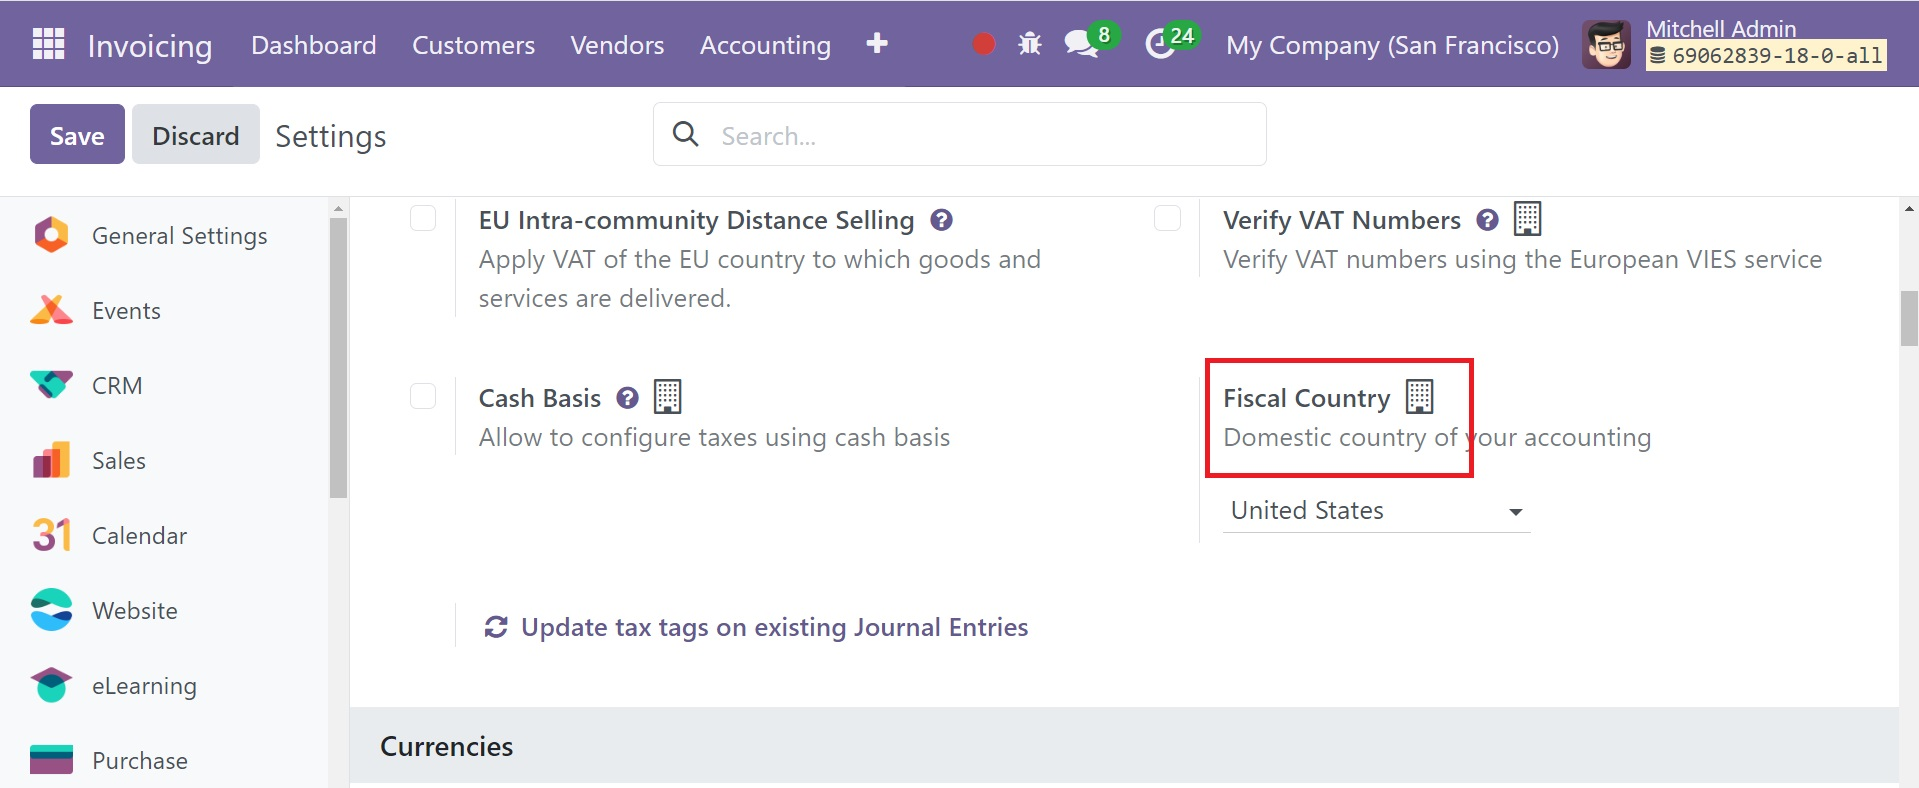
Using the Fiscal Country option under the Taxes tab in the Module's Settings menu, you may designate the domestic country of your accounting.
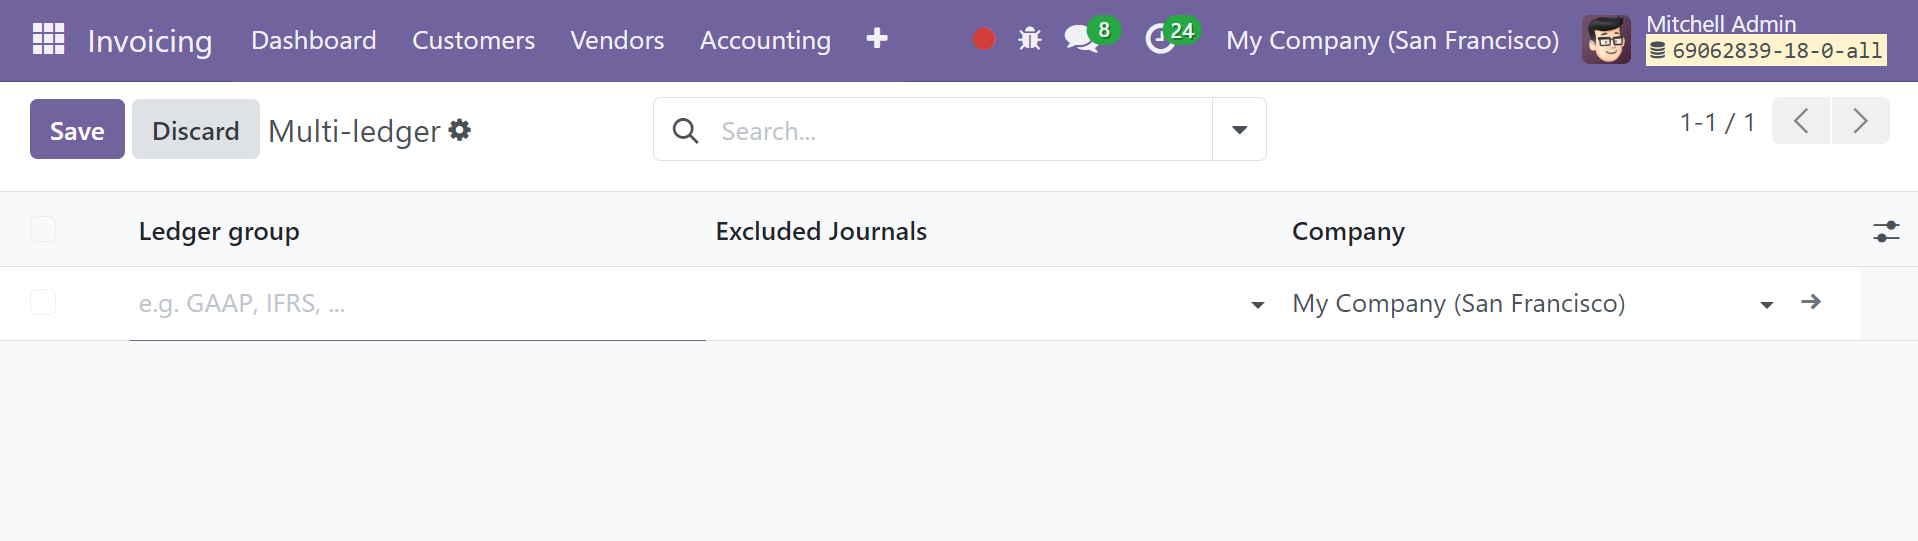
Multi-ledger
It is to ensure compliance with various requirements, create as many ledger groups as necessary to keep distinct ledgers for local GAAP, IFRS, or fiscal adjustments. The page of multi ledger will be, as shown in the screenshot below.
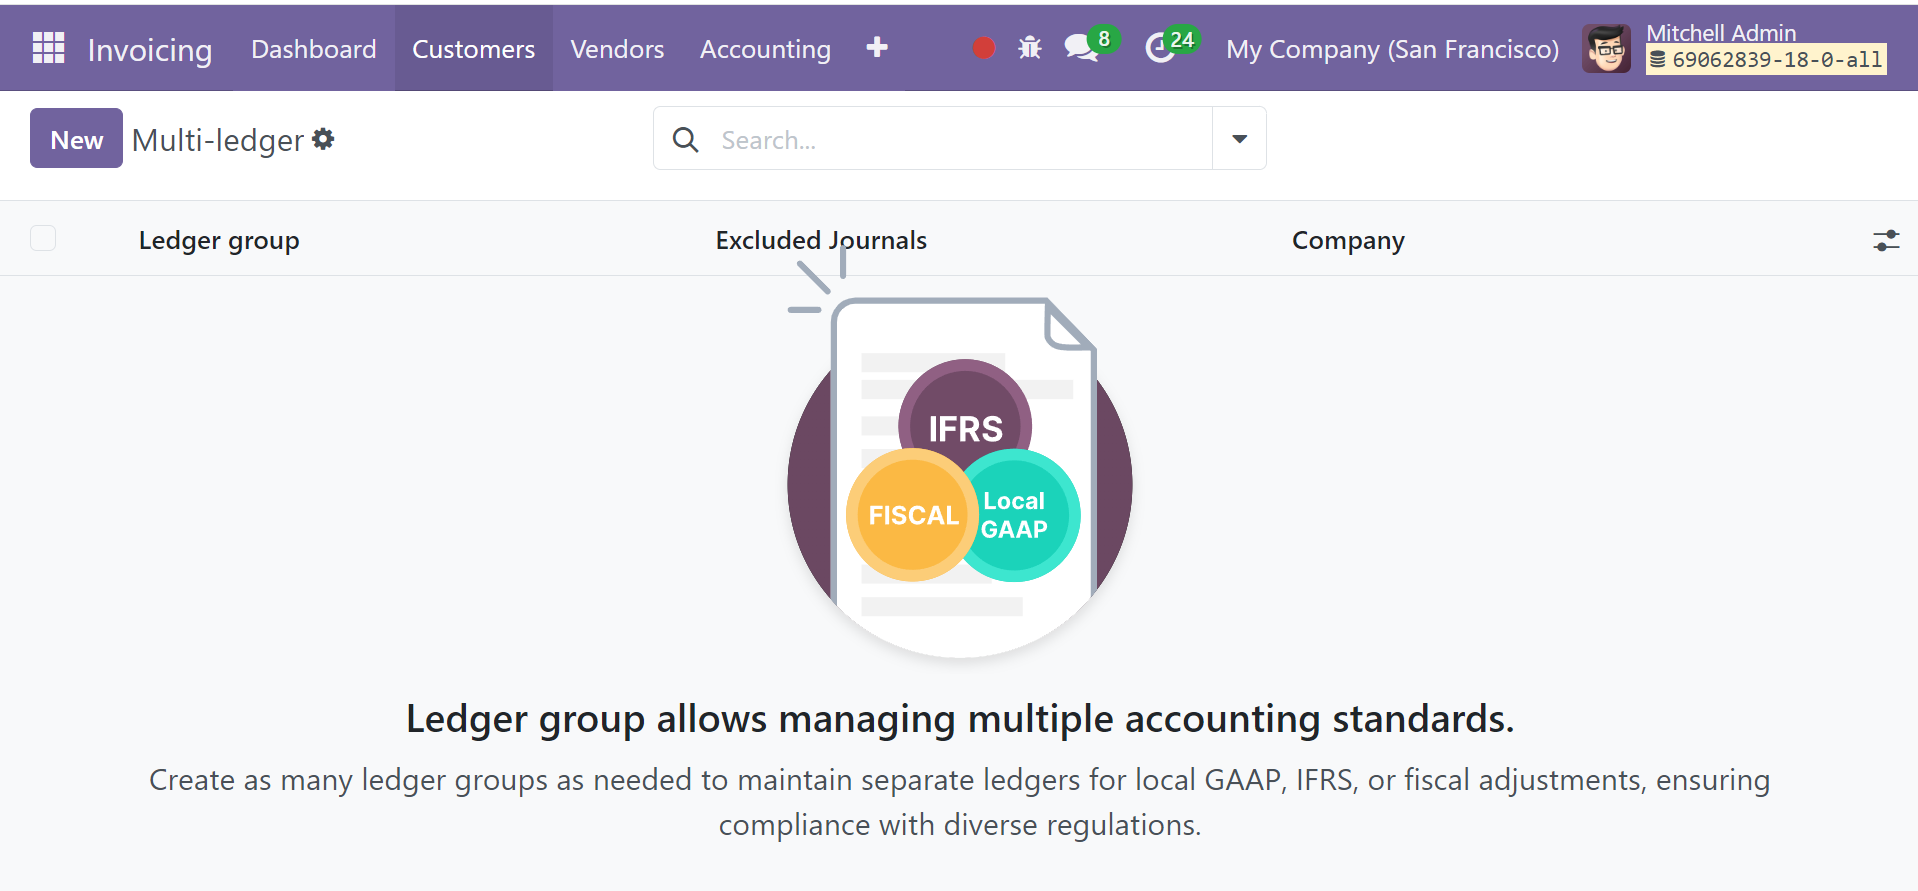
Using the New icon, you can create a new one very easily by providing ledger group, excluded journal, and company, respectively. A set of ledgers used to apply general ledger accounting procedures and functions to the group as a whole is called a ledger group. Ledger groups can be used in invoicing to categorize sales accounts according to various sales kinds, including export and domestic sales.
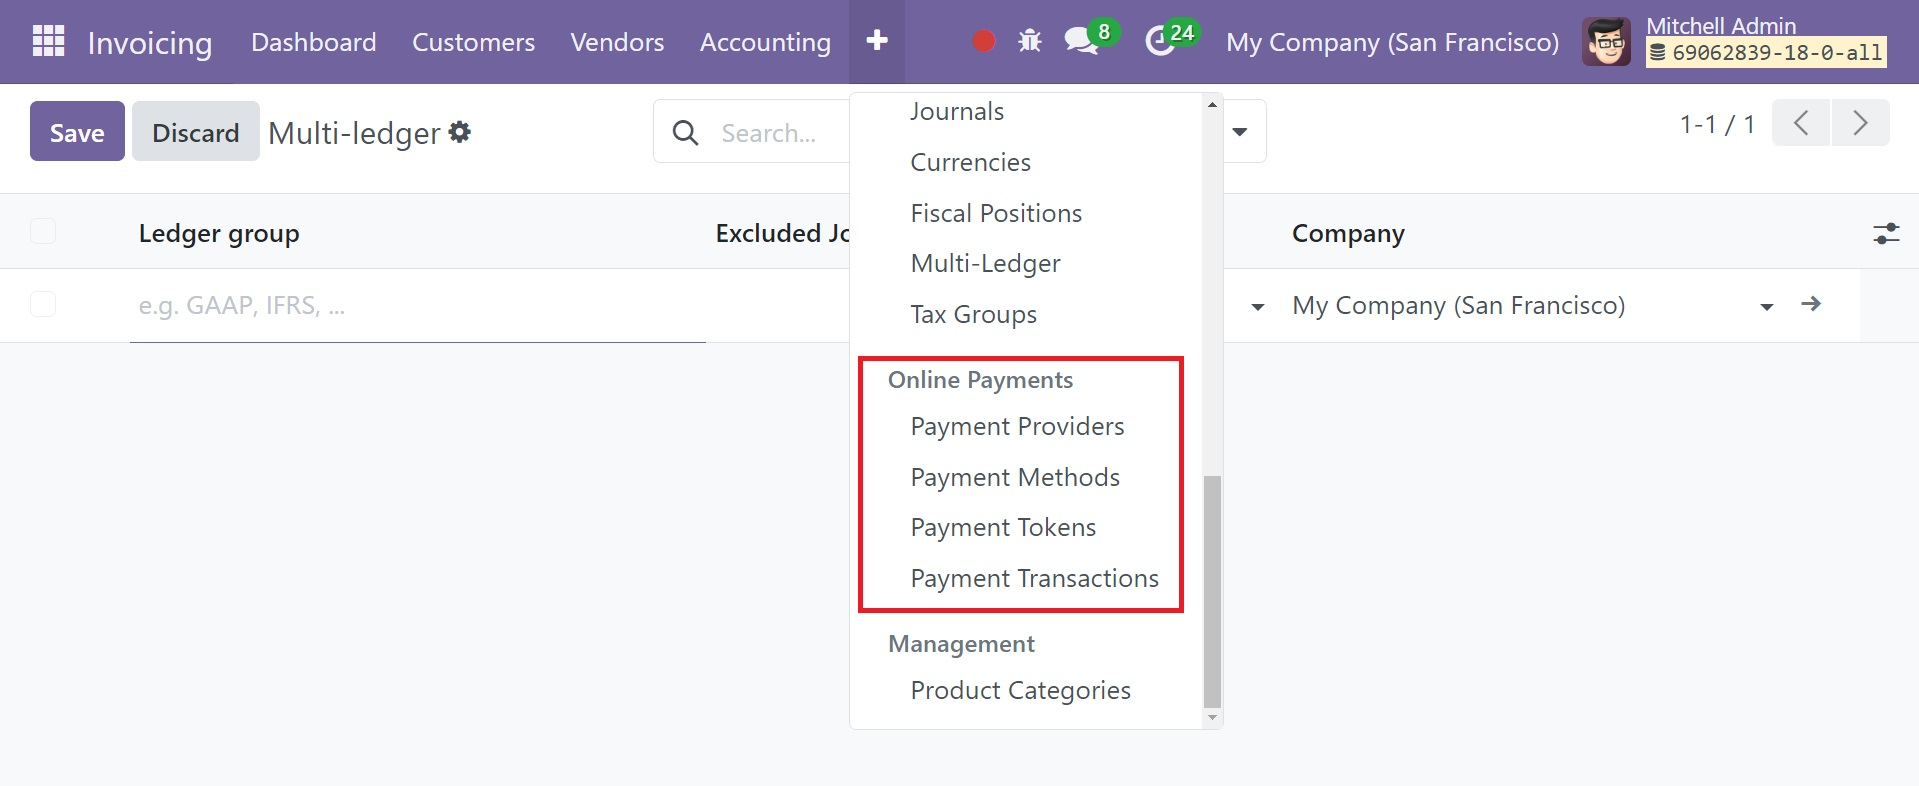
Online Payments
After looking through the Configuration menu of the Invoicing module in Odoo 17, you will notice a number of settings under the Online Payments tab that can be used to manage Online payments. Options for Payment Providers, Payment Icons, Payment Tokens, and Payment Transactions are available under the Online Payments tab. Later on, we will go over each of these options in further depth.
Payment Providers
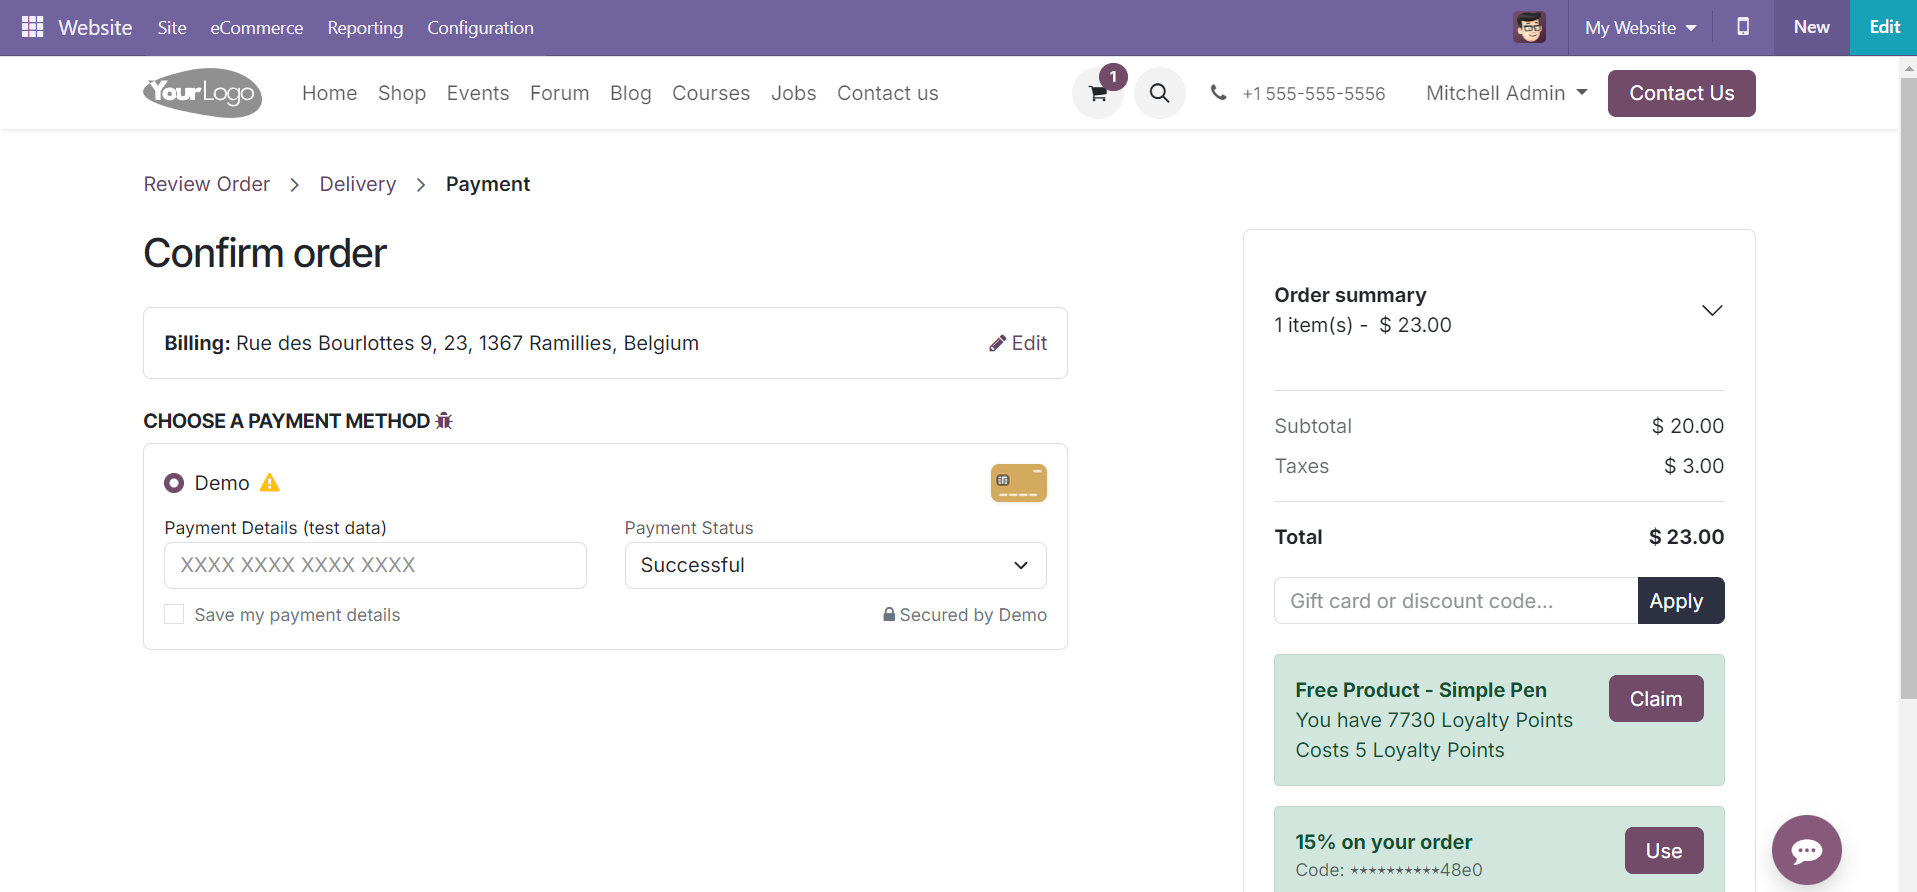
The Payment Providers in Odoo 18 will give the customer the option to choose the best method for paying their bills via e-payment portals. Many payment processors are supported by the Odoo ERP system, which helps businesses improve online transactions efficiently and swiftly. Customers are able to choose a suitable payment method based on their personal preferences.
Select the Payment Providers option to open the window shown in the figure below.
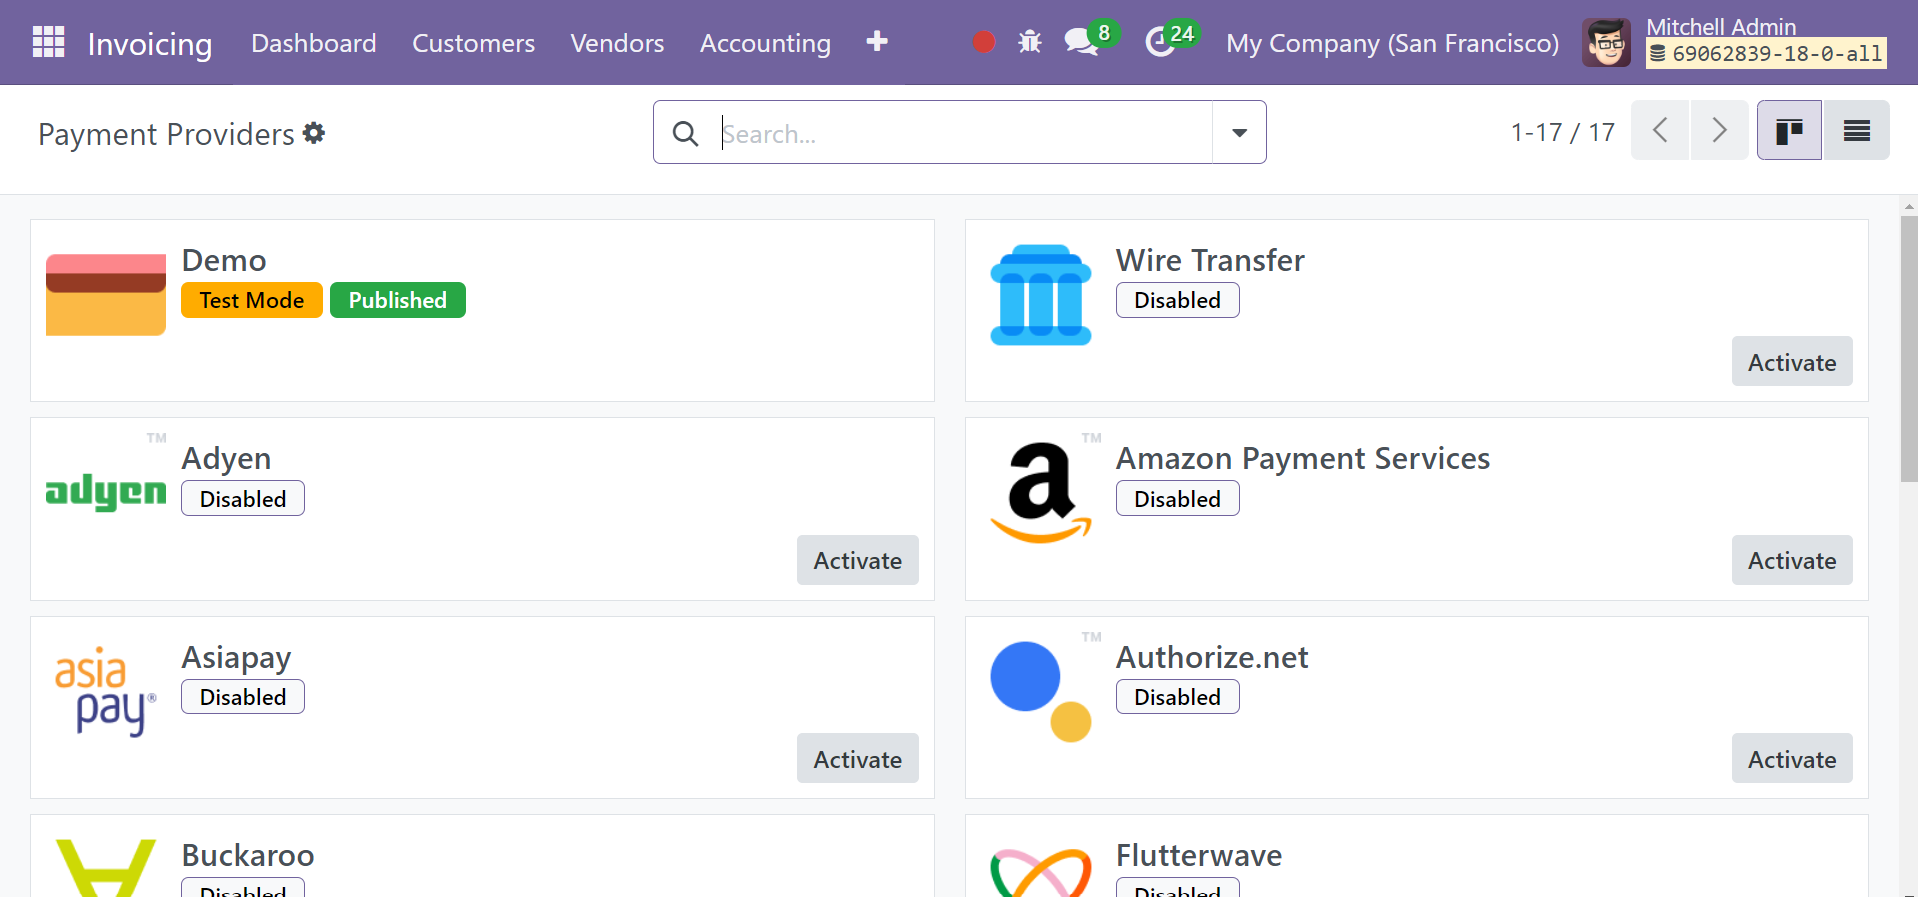
You may see every payment method that Odoo accepts in this window. Using the Activate button on each of them, you can enable the relevant payment provider. If you would like to make any adjustments, you can click on the relevant payment provider and alter its options.
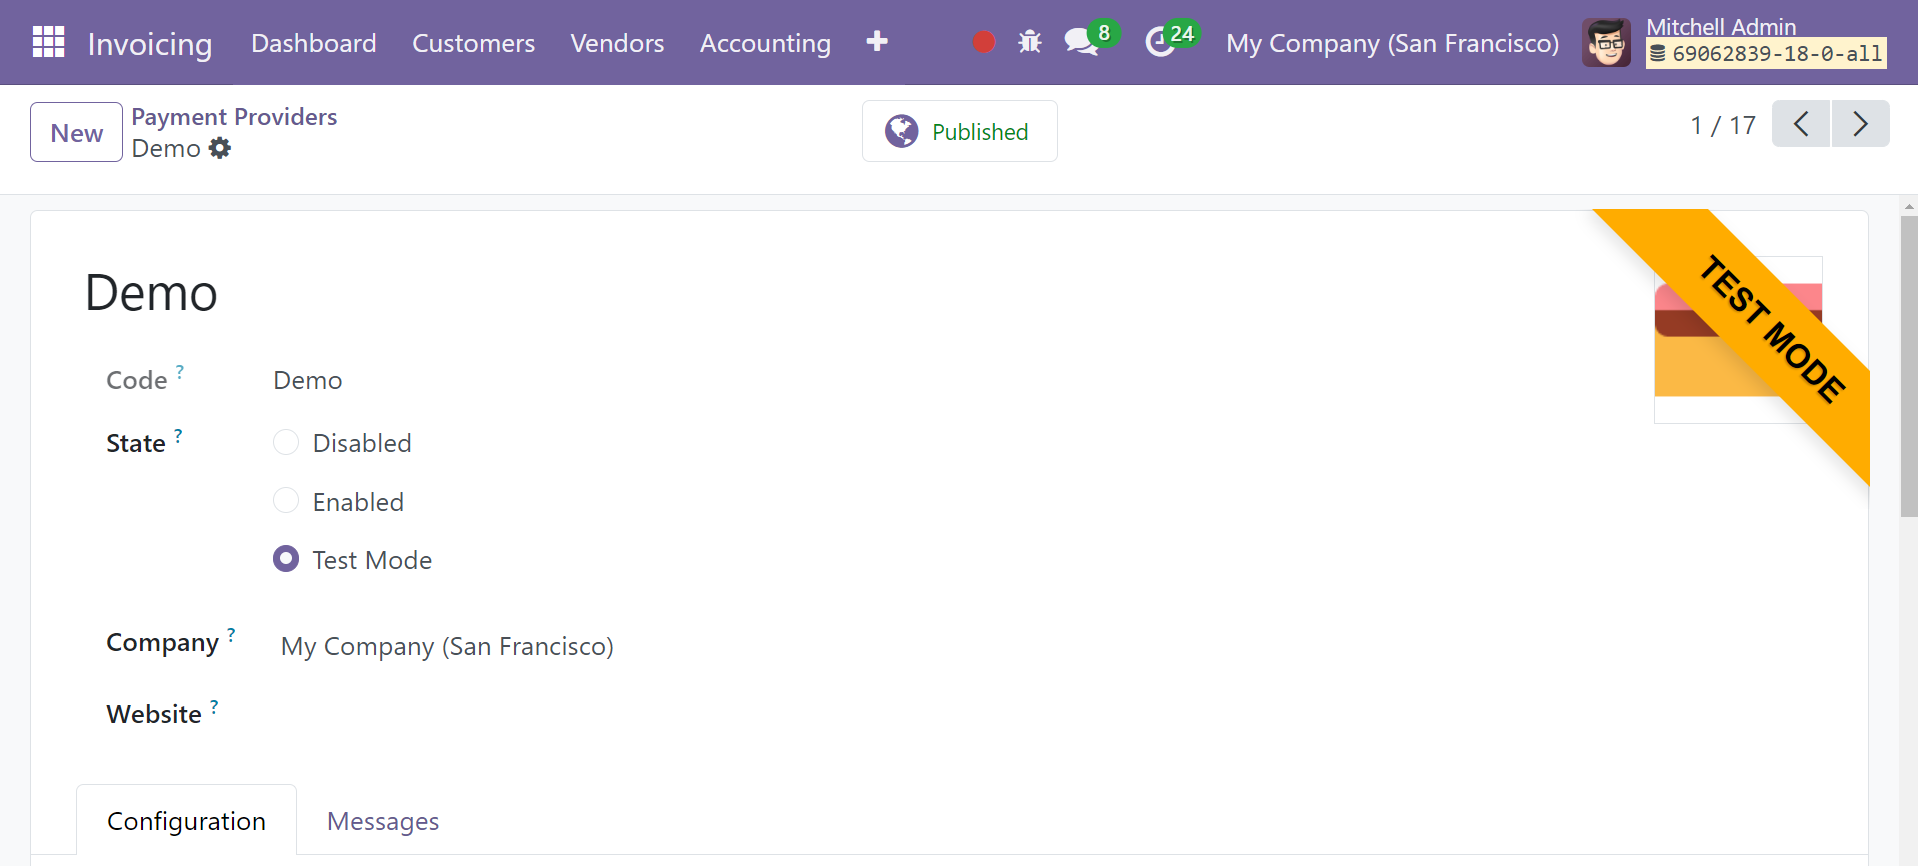
The name of the payment source will appear in the form view. The technical code for this particular payment provider could be located in the Code box. The payment provider's state can be changed to Test Mode, Enabled, or Disabled based on the objective. The matching fields contain the names of the website and the company.
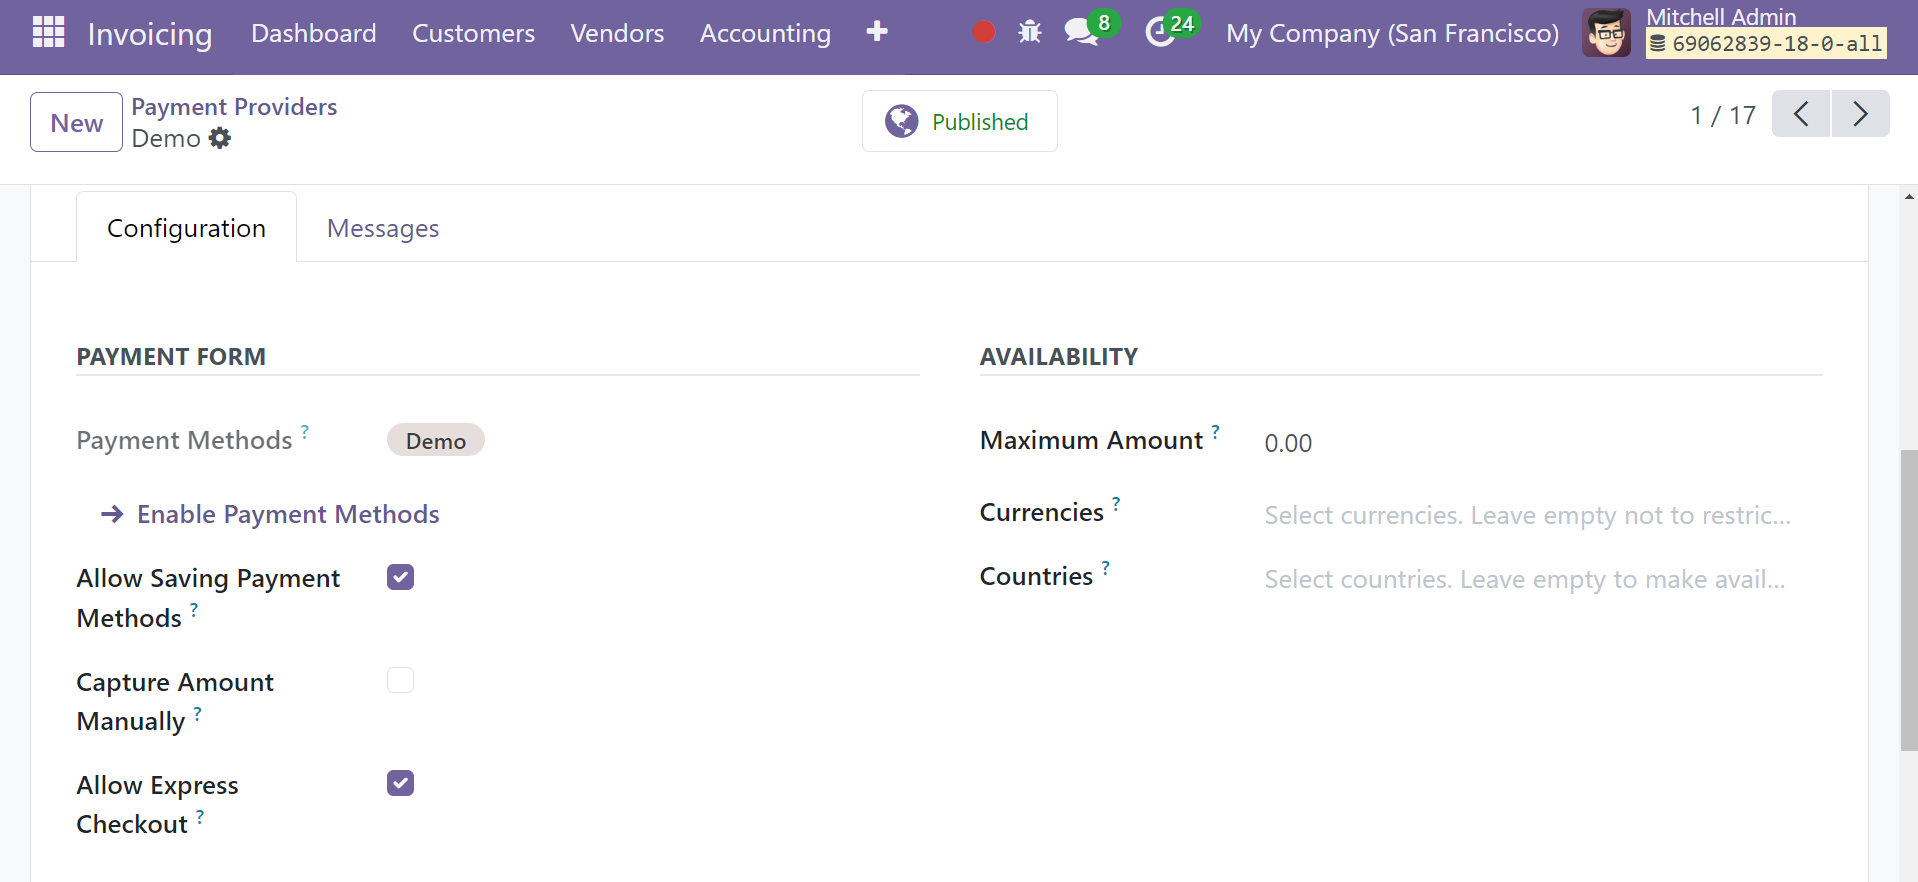
The Displayed as box in the Configuration tab allows you to give the consumers a description of the supplier. Turn on the Enable QR Codes option if you want to utilize QR Codes to make payments with this payment provider. Customers can save their payment methods as payment tokens by selecting the option to "Allow Saving Payment Methods." Manually Capture money: After the delivery is finished, manually capture the money from Odoo. If you would like to charge your customers' cards only when you are certain that you can deliver the products to them, do this. Next, the ability of clients to employ expedited payment methods is controlled by the Allow Express Checkout option. Customers can pay with Google Pay and Apple Pay through express checkout, and when they make a payment, address information is gathered.
You can enter the maximum payment amount that can be sent with this payment provider in the Maximum Amount area. You can choose which countries accept this payment provider in the Countries section.
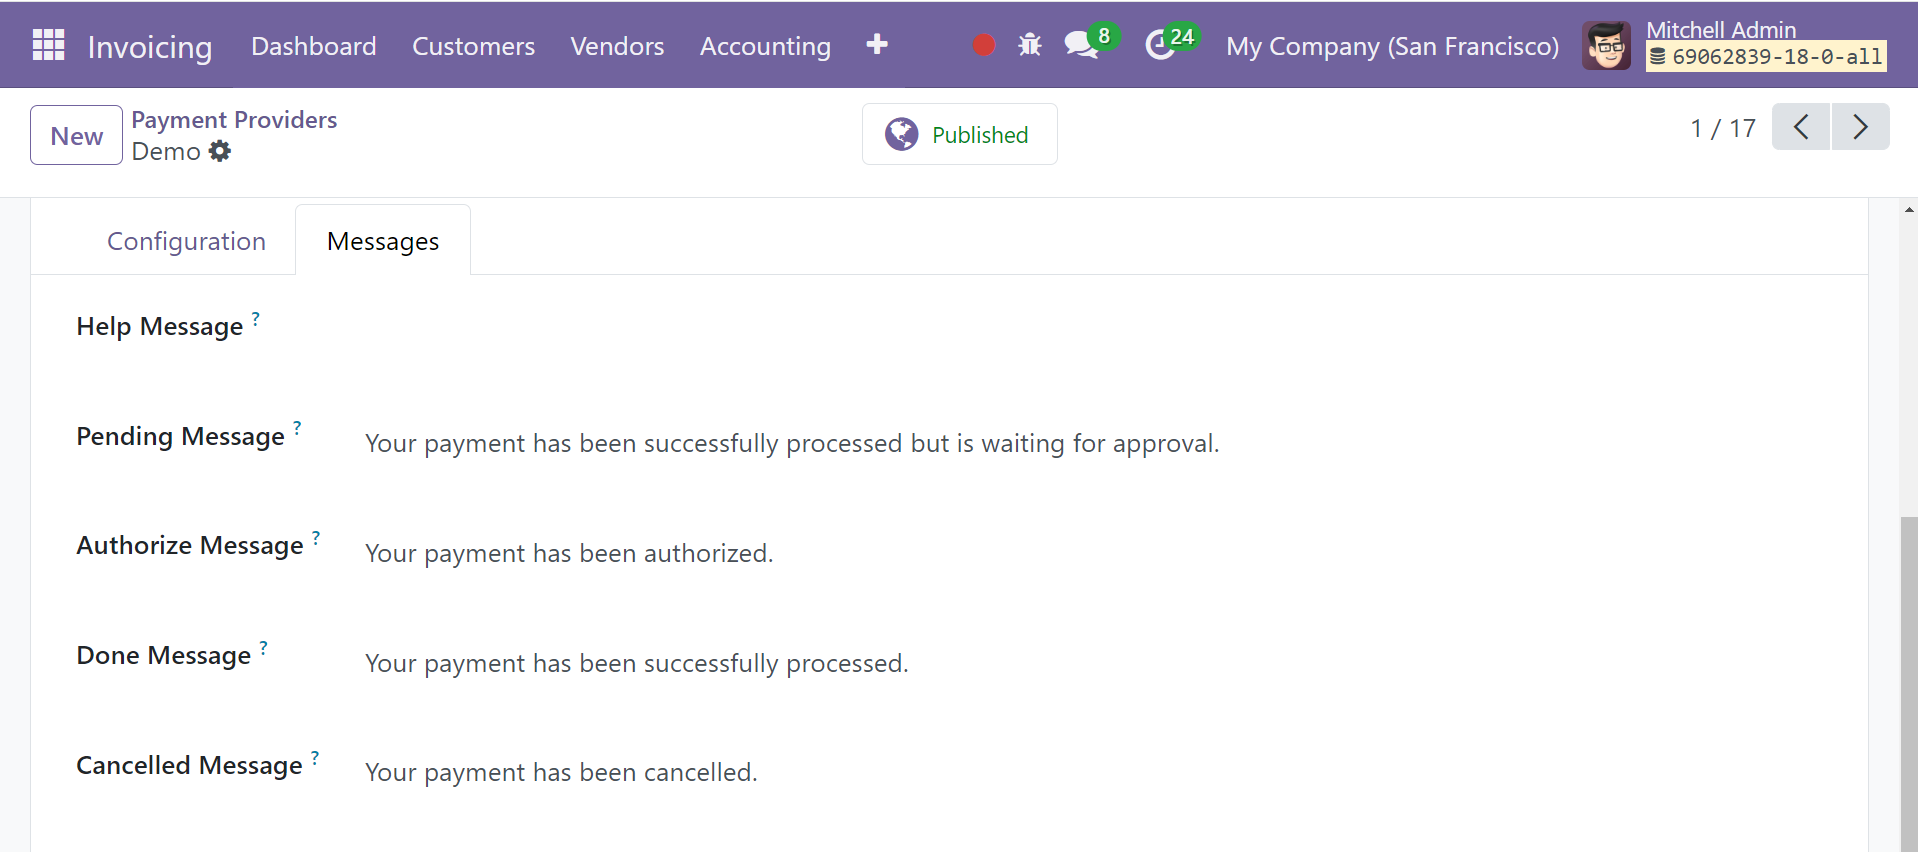
If the order is still waiting after the payment process, the client will see the message you select in the waiting Message area. This allows you to modify the available payment providers in the Invoicing module as needed.
Payment Methods
To make online payments easier, you can utilize Odoo 18's Payment Icons as identifiers. When you configure payment icons in Odoo 18, the consumer will understand exactly which online payment method or payment gateway your company's eCommerce platform accepts. Use the Payment Methods option from the Configuration menu in the Invoicing module to manage and generate payment icons.
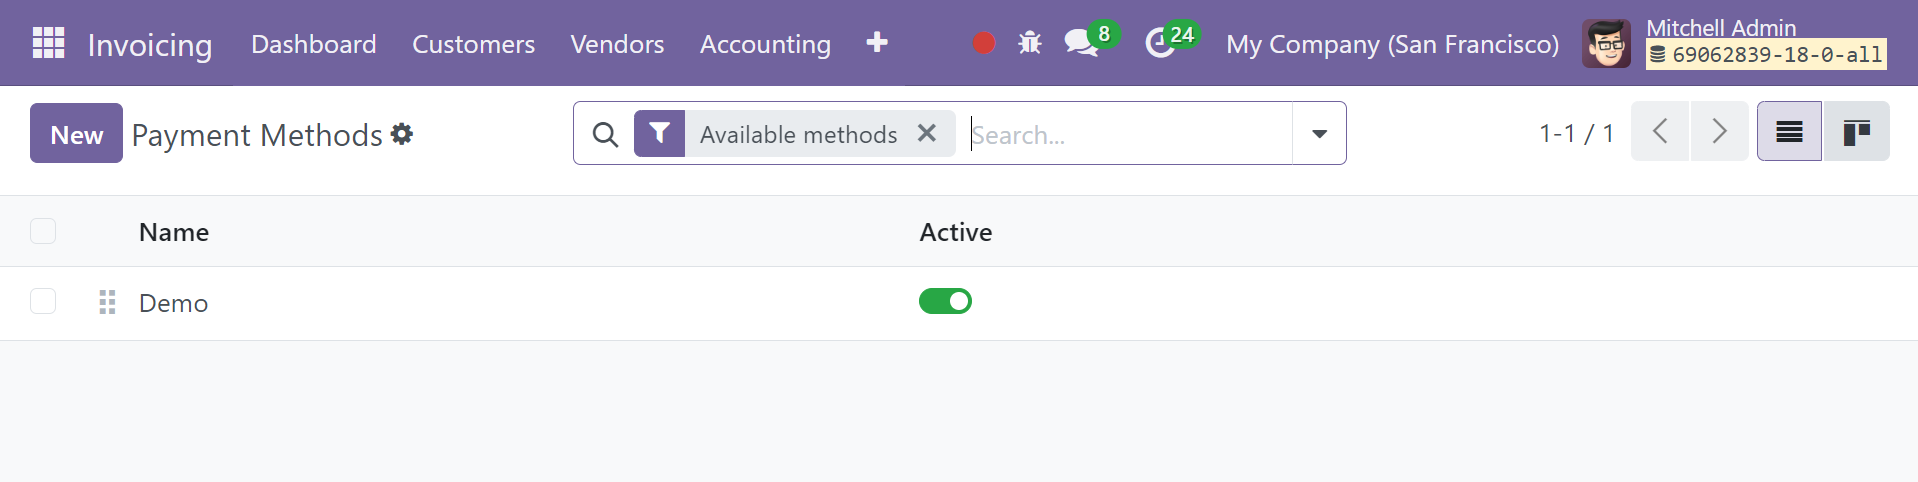
This window displays the pre-configured list of payment icons. To make a new payment icon, click the New button.
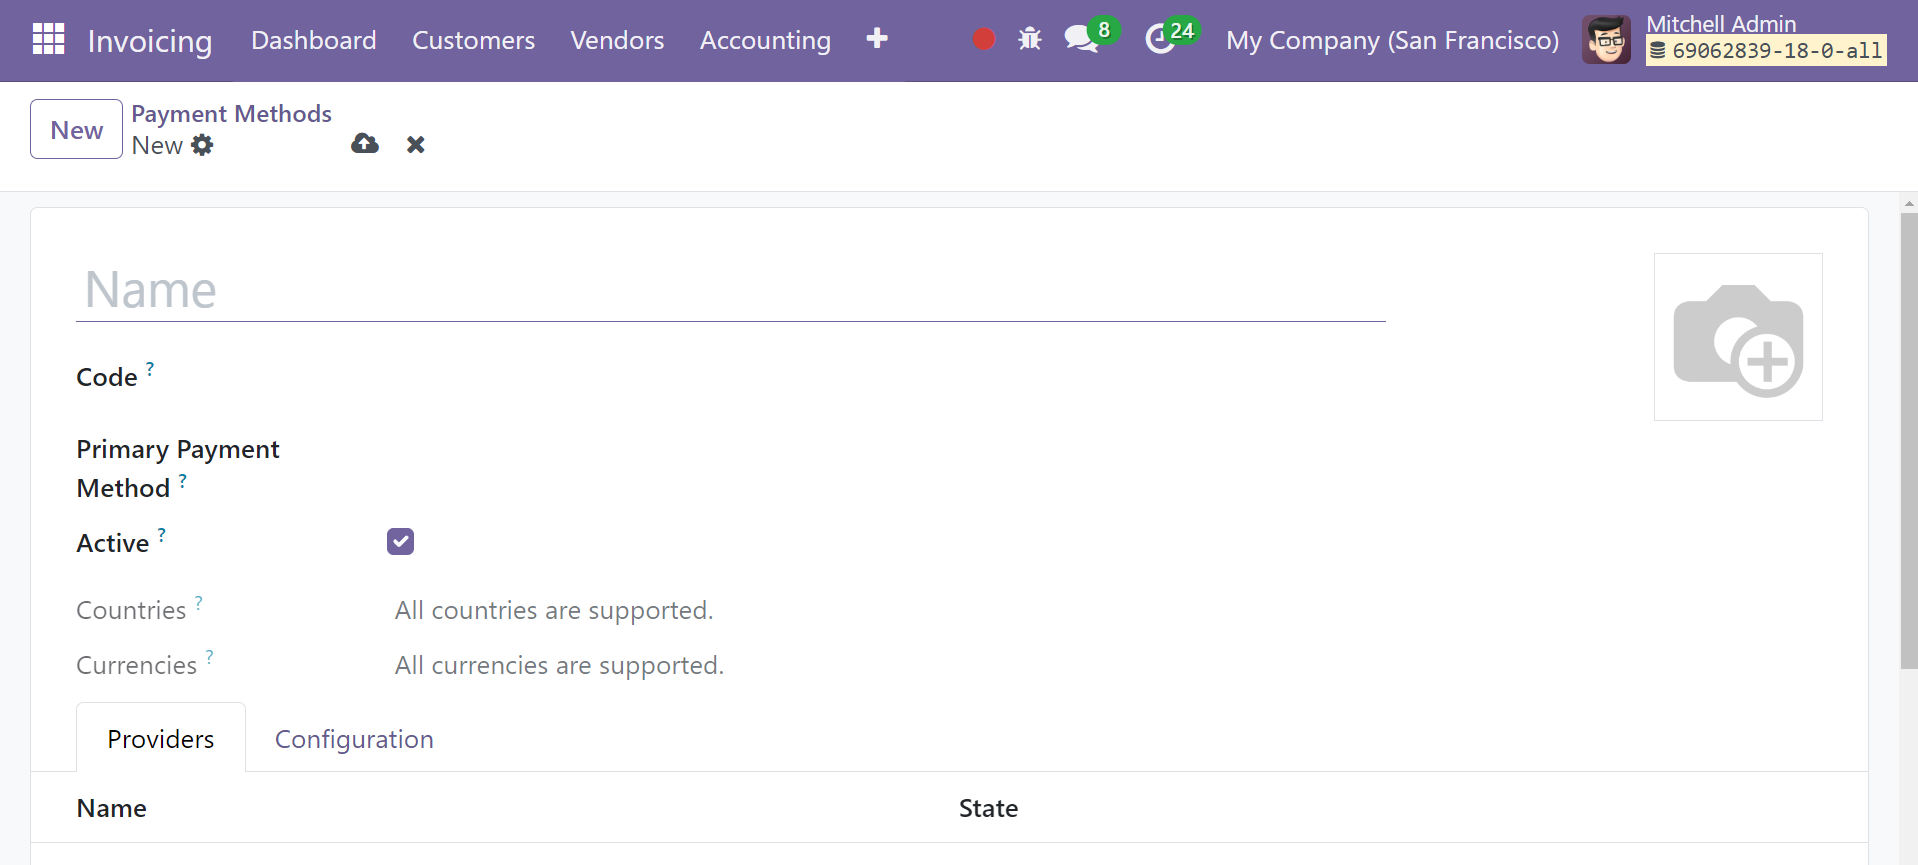
Here, you may fill in the appropriate fields with the name of the payment icon and an appropriate image for it. You can add payment providers to this payment symbol by mentioning them in the Providers List page.
Payment Tokens
Depending on the payment providers that are configured in your system, you can keep the payment details when a customer makes their first purchase as tokens. Using the previously recorded payment details, you can use automated payment of the amount the following time. The eCommerce page will have the option to save card details when a consumer wishes to pay with a convenient payment provider. If this option is used, the payment details will be stored as payment tokens in the Odoo Invoicing module. Customers can use this option for regular payments.
You may view such saved cards in the backend by choosing the Payment Tokens option from the Configuration menu of the Invoicing module. To examine the token's details, click on it.
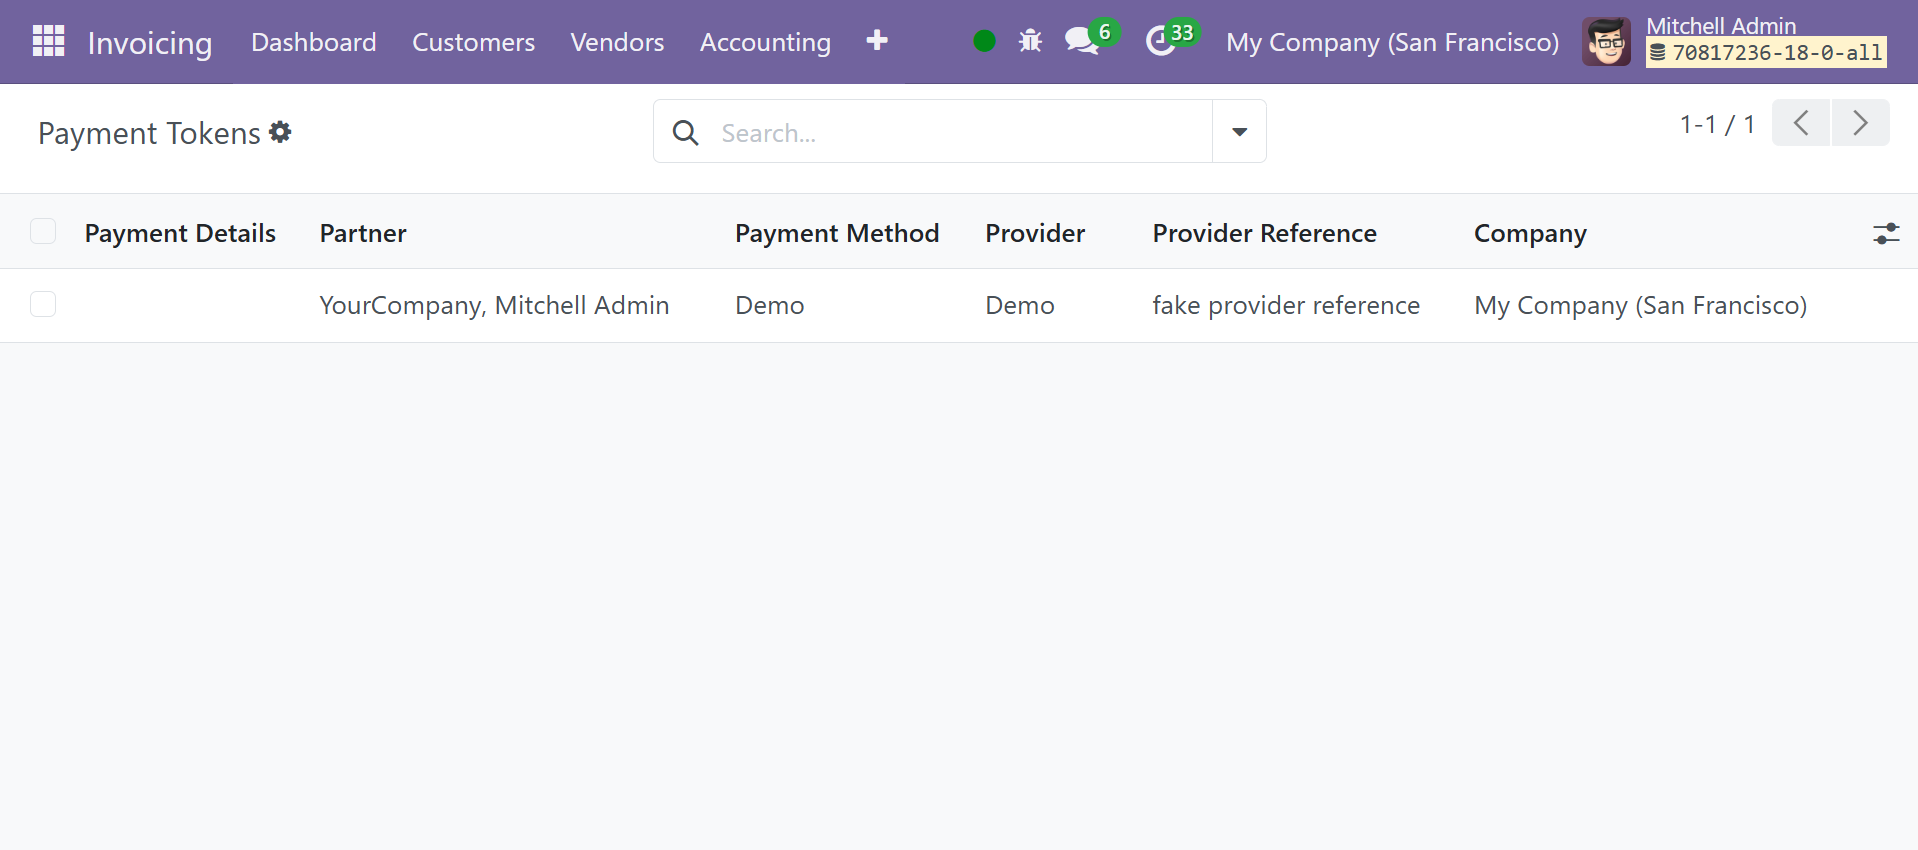
As seen in the picture, the payment token will show the Partner, Provider, Provider Reference, and Company. For simple payment processing, the user's saved card information will be shown on the screen when they return to the e-commerce page to complete a transaction.
Payment Transactions
A history of all your online transactions may be viewed by selecting the Payment Transactions option from the Configuration menu. This platform will display the records of several transactions made in the Odoo 18 Invoicing module using different payment methods.
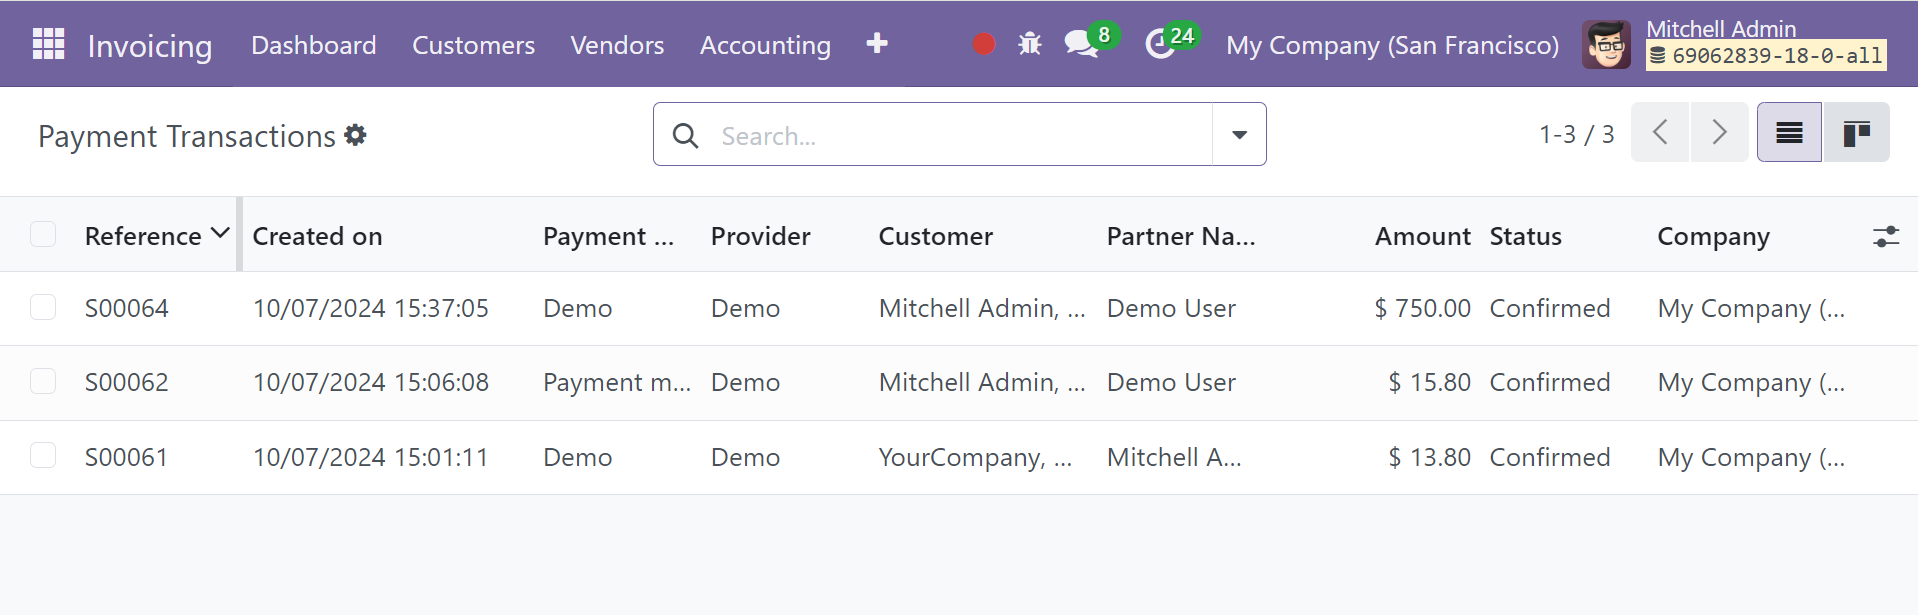
In the transaction history box, you will find the following details: Reference, Created On, Payment Method, Provider, Customer, Partner Name, Amount, Status, and Company.
Settings
The Settings option allows for more customizations. It falls under the Configuration menu.
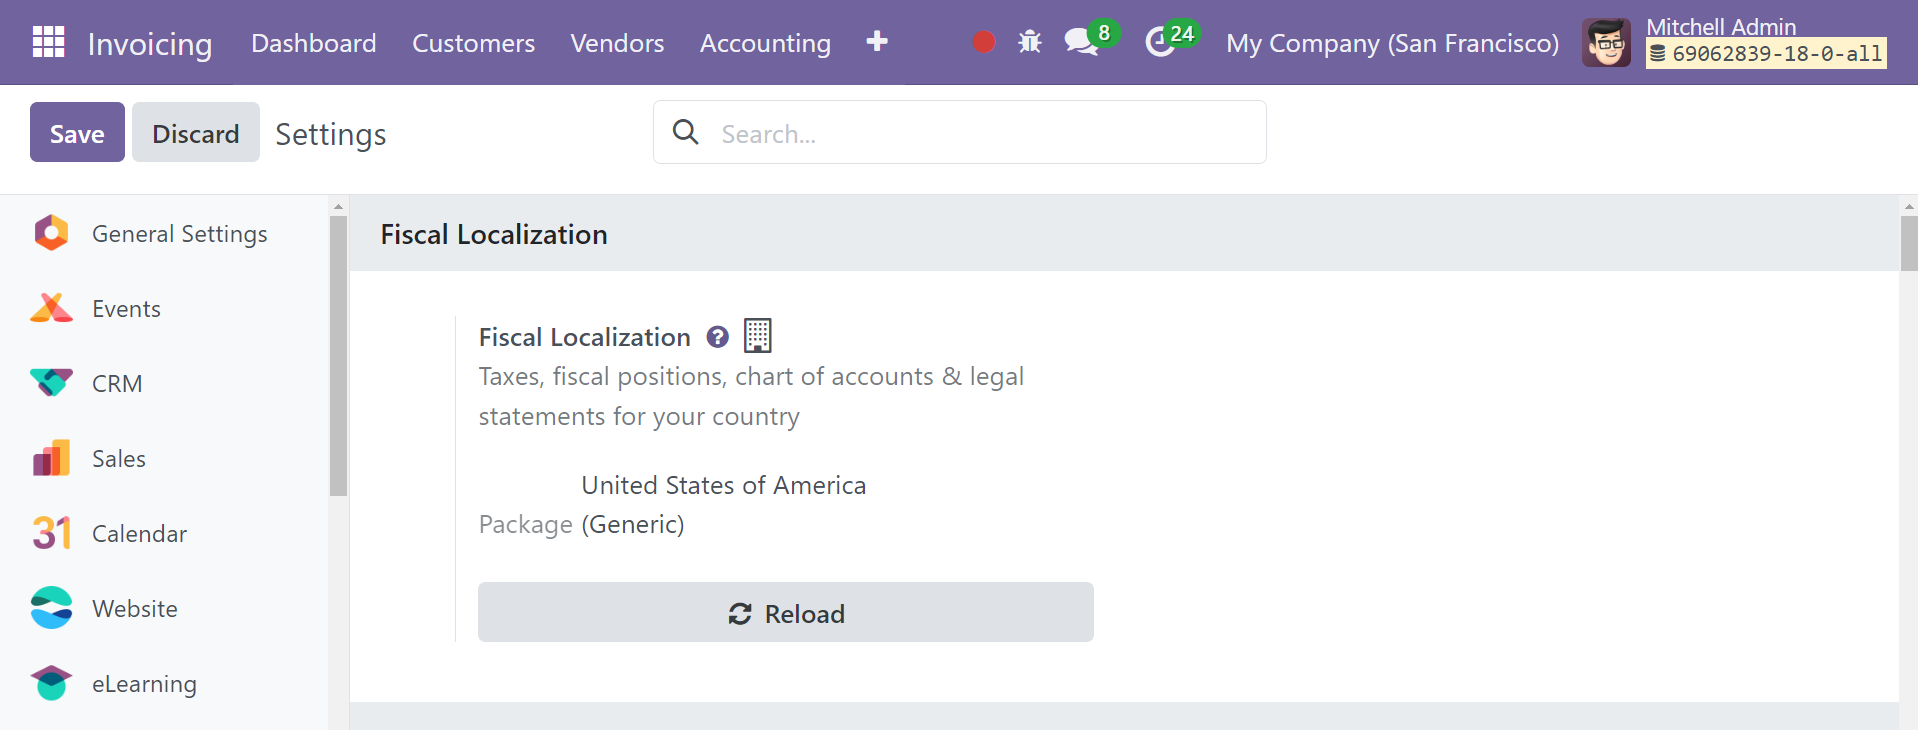
Fiscal Localisation
The fiscal localization package is a country-specific module in Odoo that allows companies to configure country statements and enable taxes. Package includes taxes, fiscal positions, chart of accounts, and legal statements for your nation.
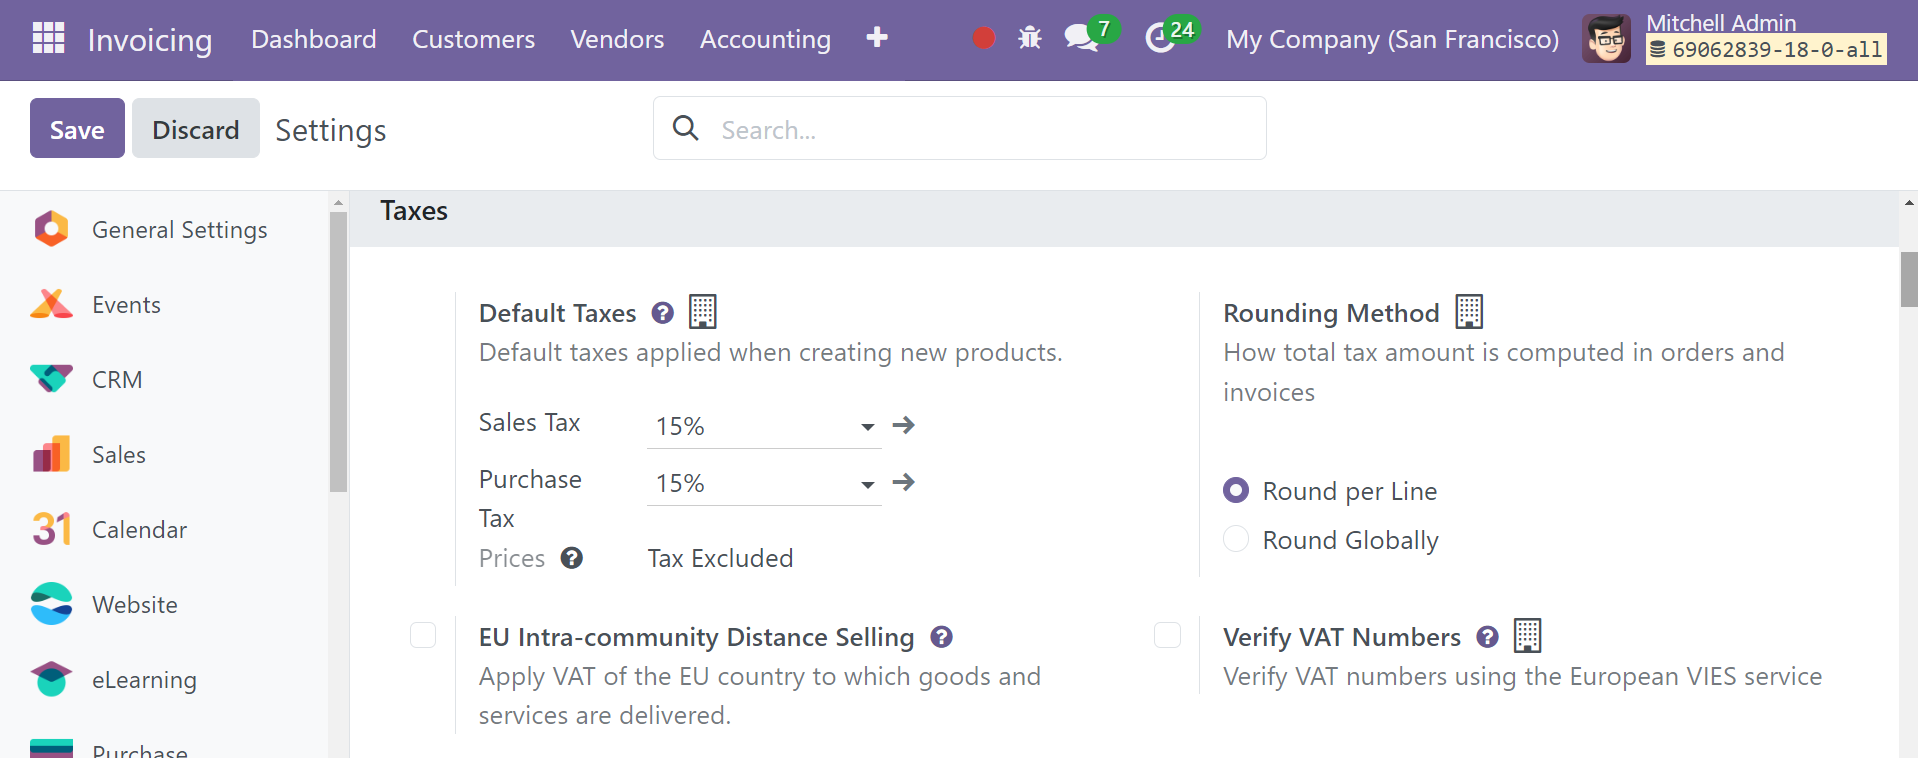
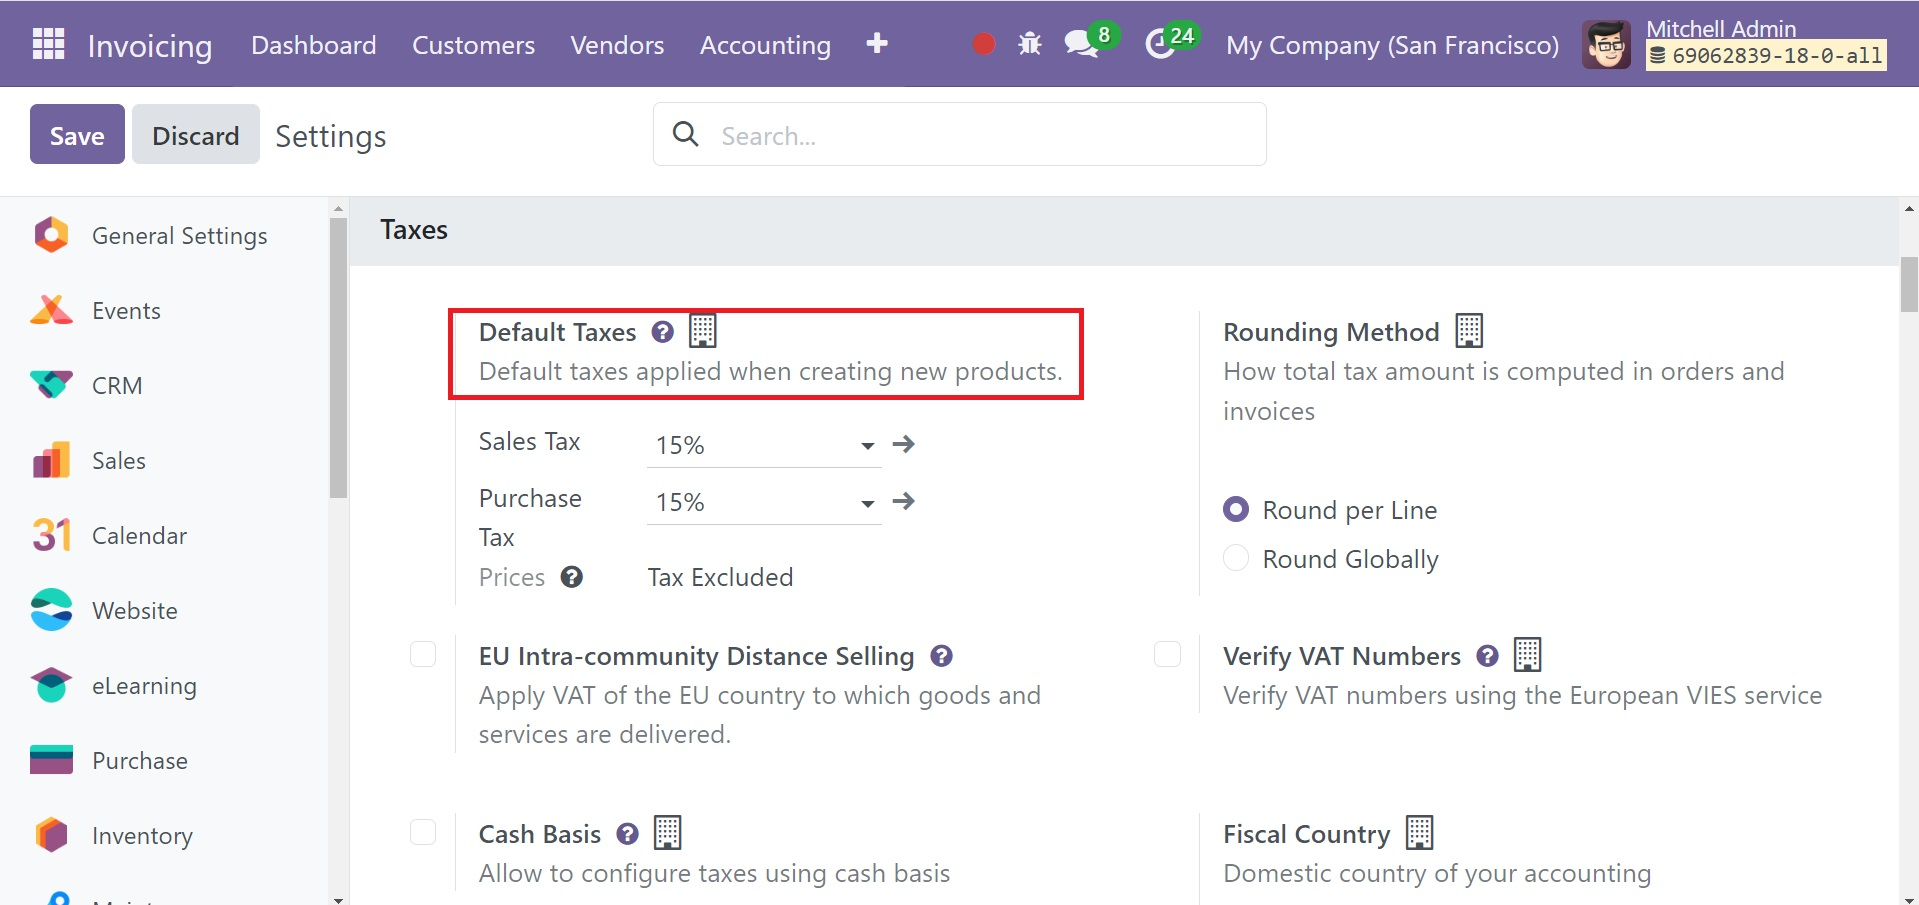
Default Tax
Default taxes applied when creating new products. Specifies the default tax type that will be applied to invoices in the event that a tax category is not included in the invoice. You must specify a tax type name that is present on your website. Export your tax type mappings to obtain the unique names.
Rounding Method
The Rounding Method option will specify how orders and invoices' total tax amount will be calculated. You can choose to use the Round per Line or Round Globally strategy for tax rounding. It is advised that you use a rounding per line if taxes are included in your prices. The sum of the line subtotals equals the total with taxes in this way.

EU Intra Community Distance Selling
In the event that a foreign EU customer buys goods and services from you, you may choose to apply VAT according to the delivery address. The EU Intra-community Distance Selling tool, available under the Settings menu of the Invoicing module, can help you with this task.
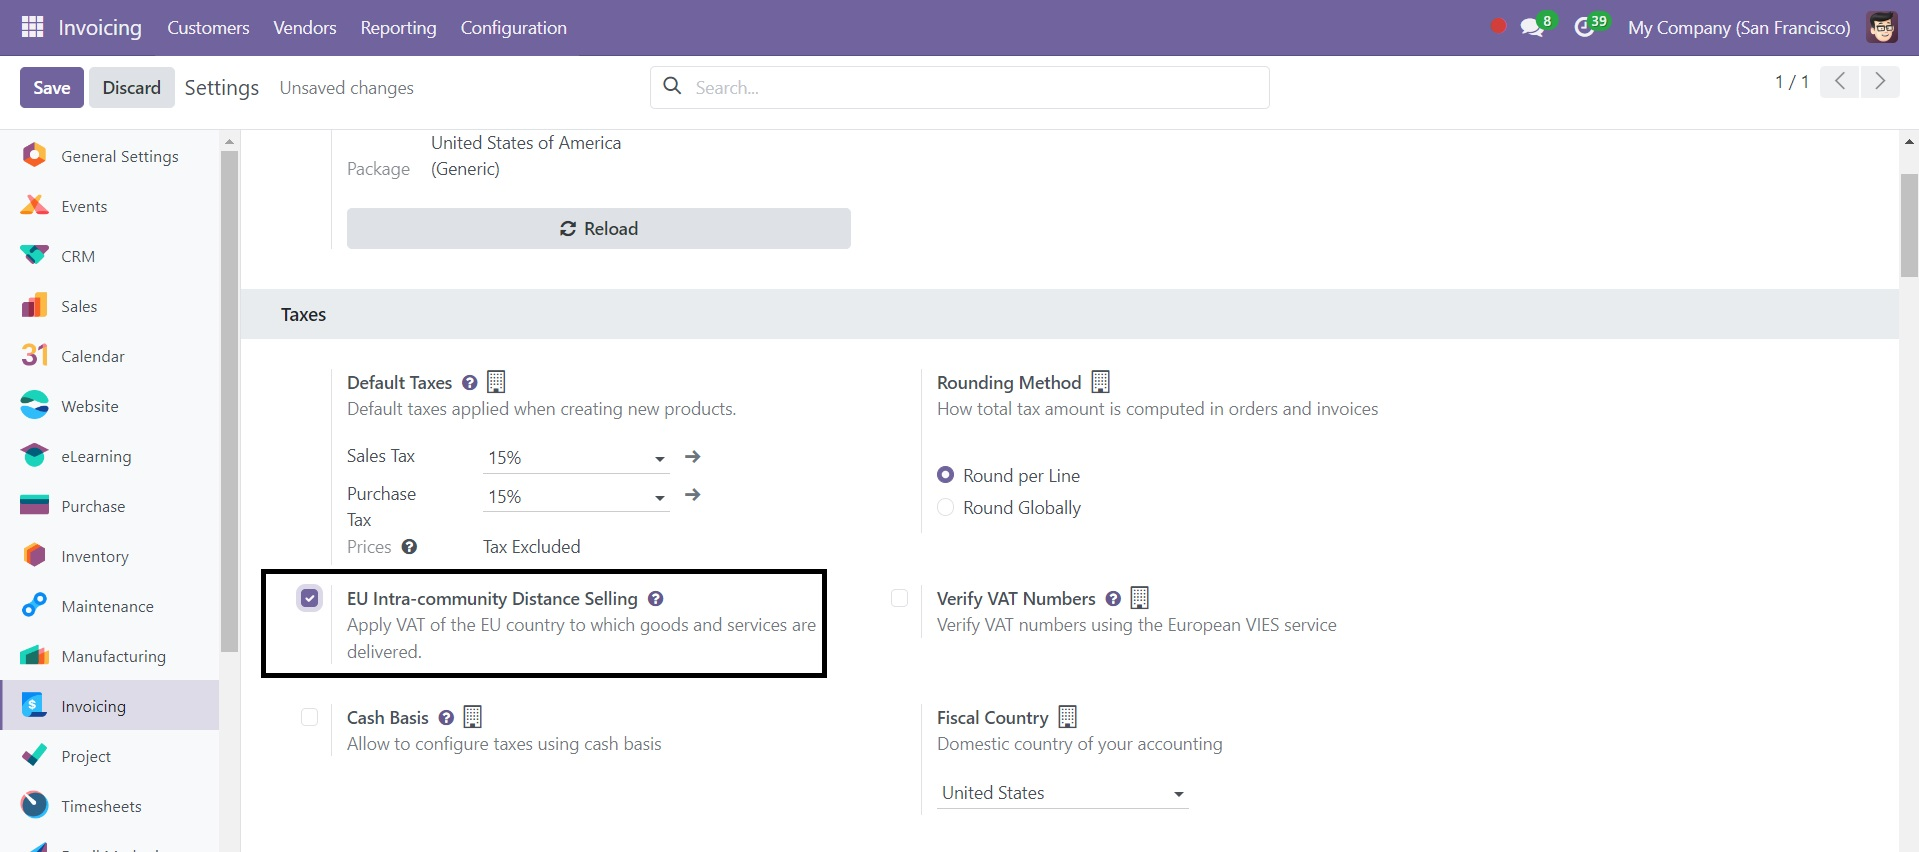
This regulation is enforceable throughout the European Union. Based on the customer's country, Odoo 18 will automatically apply the appropriate fiscal positions and taxes for each EU member state. The Verify VAT Number function through the European VIES service allows you to verify VAT. By activating this function, the contact will only be retained once its VAT number has been verified by the European VIES service.
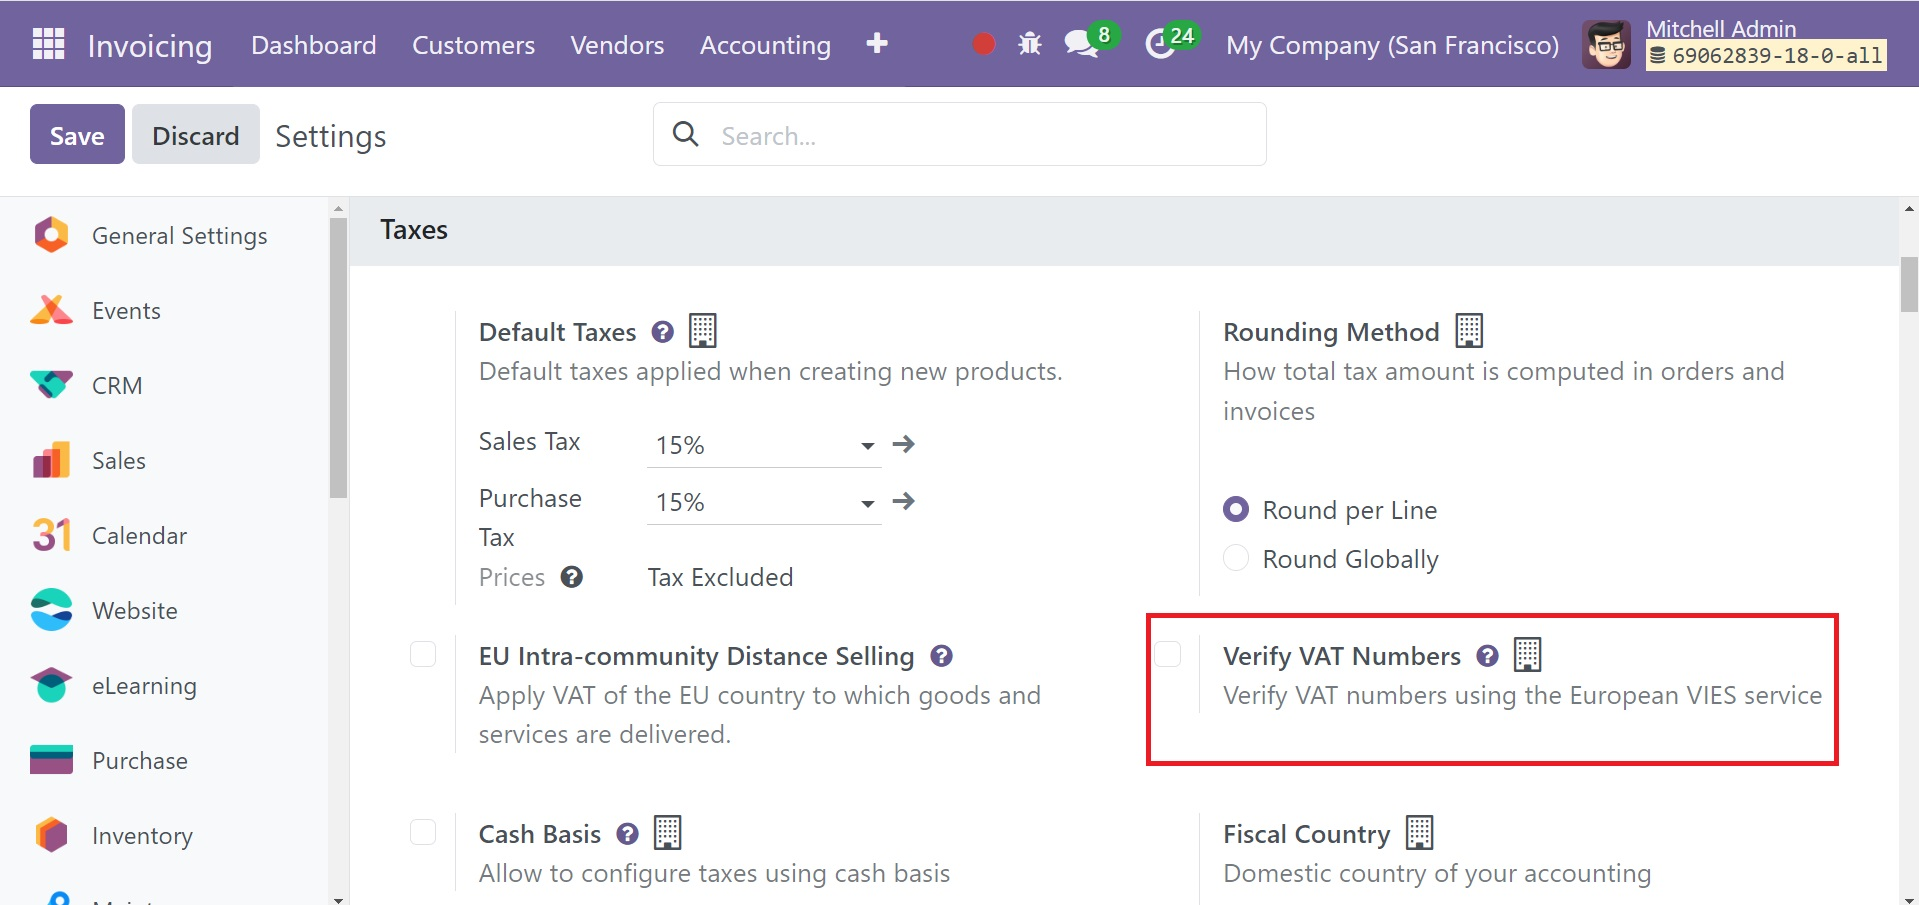
Verify VAT Numbers
Verify VAT numbers using the European VIES service, as shown in the screenshot below, which is available under the settings.
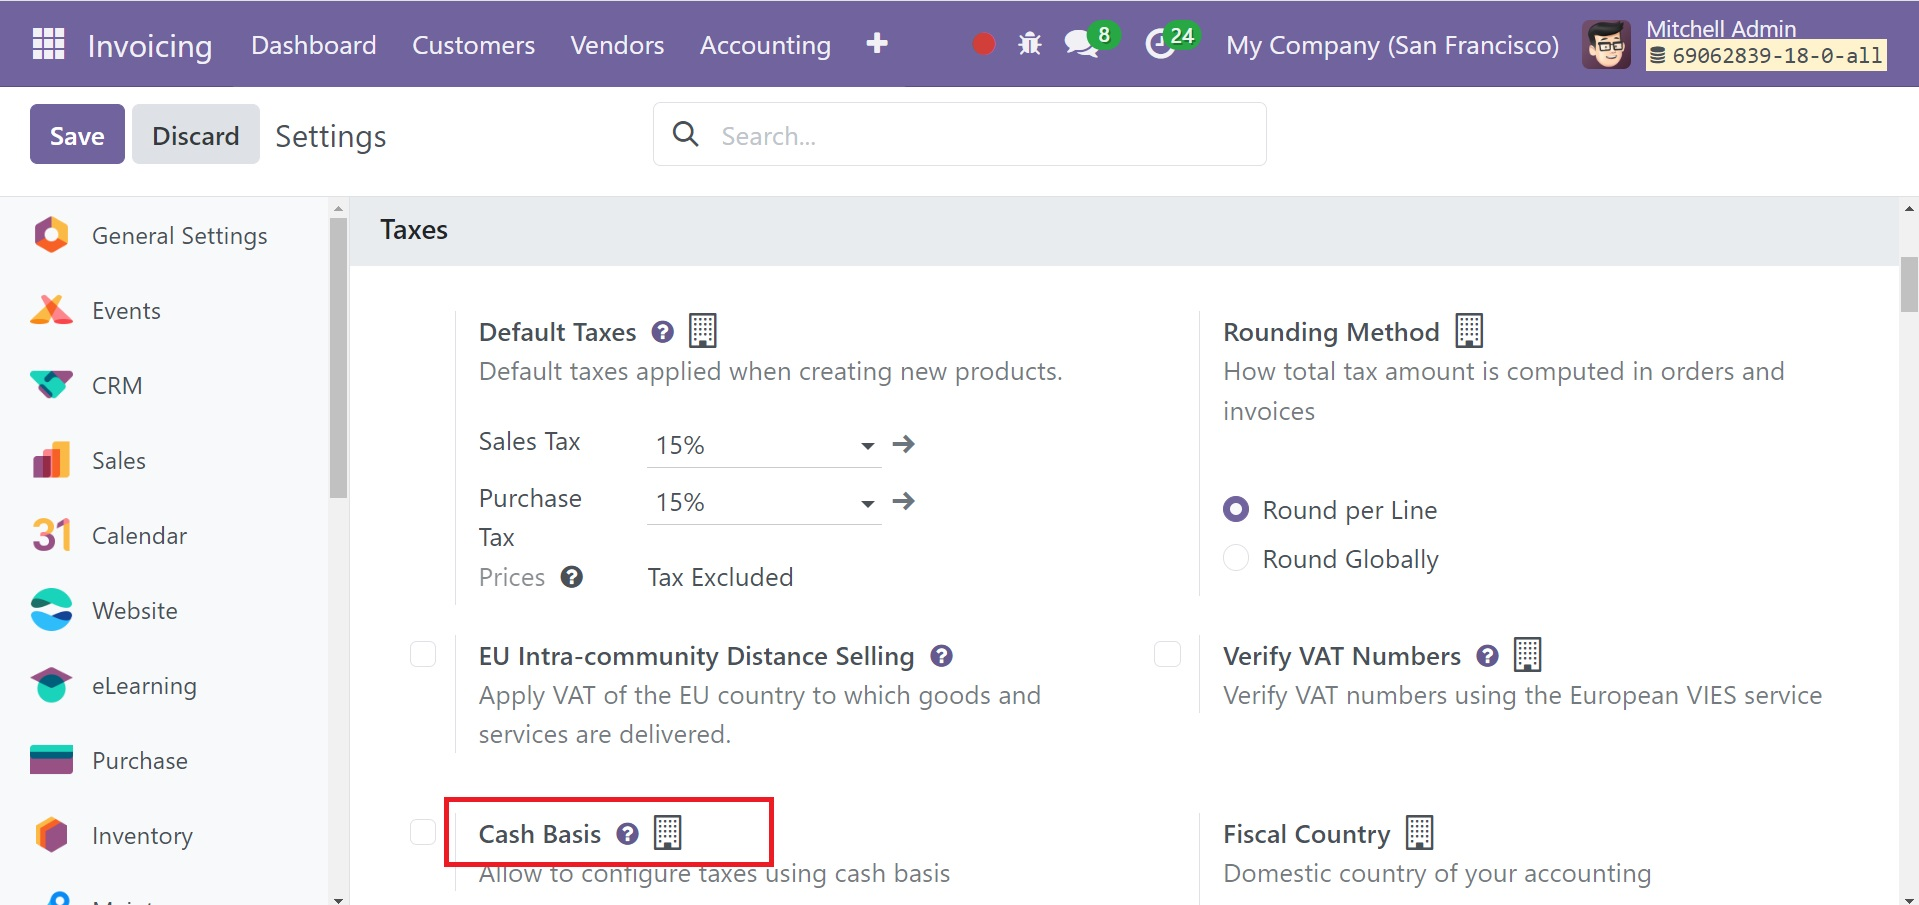
Cash Basis
This option allows you to configure taxes using a cash basis. Income and expenses are recorded under cash basis accounting at the time of money transfer, not earlier. Consequently, bills are not seen as expenses until payment has been received, and invoices are not regarded as income.
Fiscal Country
This is the domestic country of your accounting. A "fiscal country" is a nation that has implemented focalization as a strategy to manage taxpayers, typically in the retail and hotel industries.

Currency
The country's currencies can be found by selecting the currency option in the settings.
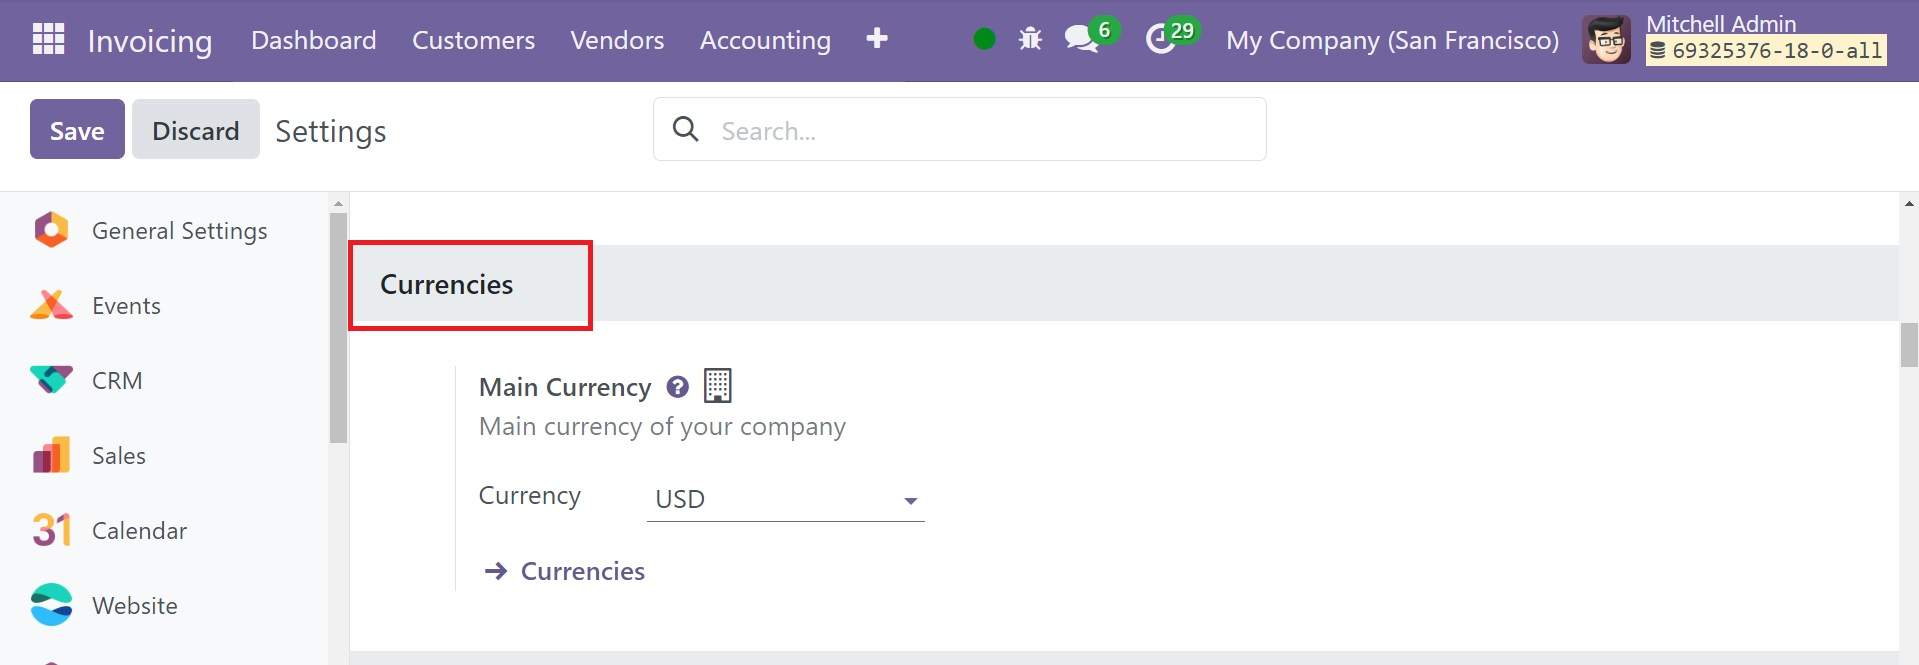
As seen in the image below, choosing the currency option will take you to a page that displays the currencies of the various nations along with their symbols, the most recent update, the unit in US dollars, and an Active button.

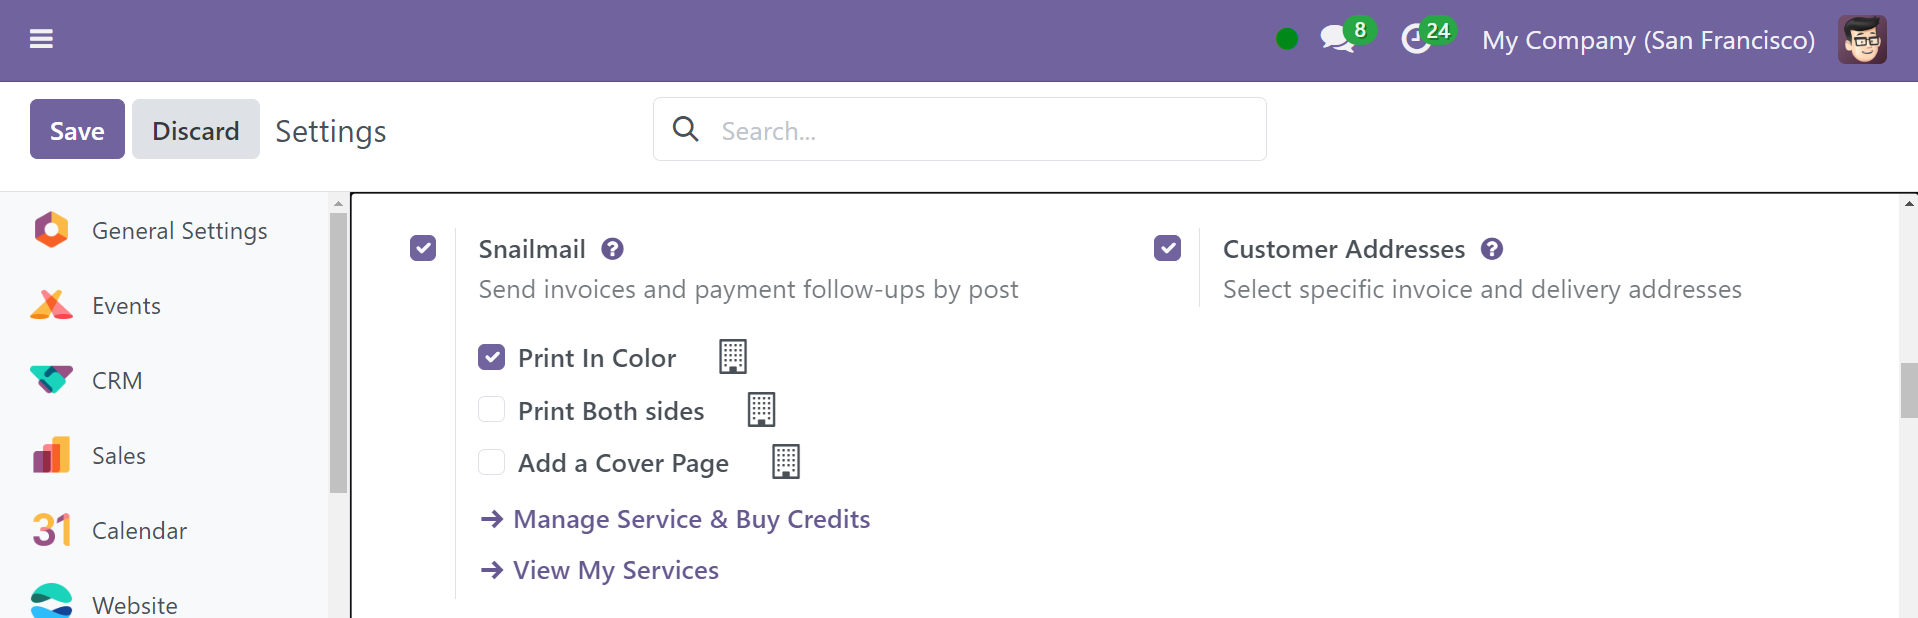
Snail Mail
The option helps you to send invoices and payment follow-ups by post. Here, you have the options like print in color, print both sides, and add a cover page.
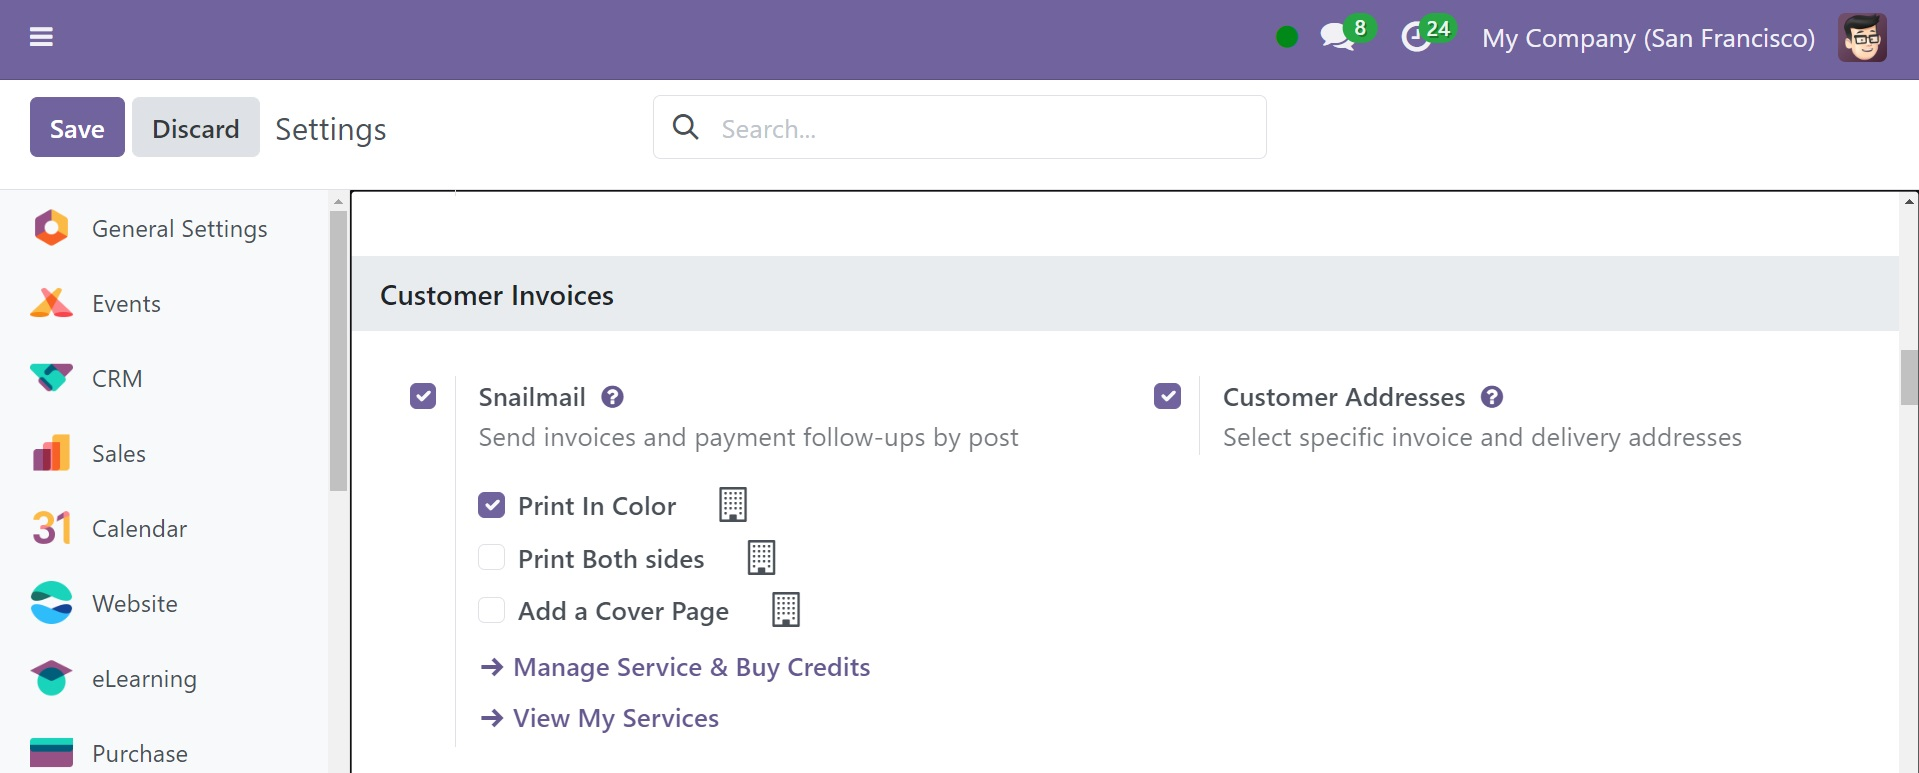
Customer Address
The option helps you to select specific invoice and delivery addresses. The customer address on an invoice is the legal address of the buyer or the address where they receive correspondence. It's different from the shipping address, which is the address where the goods or services are delivered.
Warnings
The option helps you get warnings when invoicing specific customers. Odoo 18 provides an effective platform for handling sales documentation and billing. Setting warnings and blocking messages for particular customers during the invoicing process is one of its most notable capabilities. We shall receive the product and consumer warning features as we put purchase or sale orders. The Warning and Alert are especially useful for setting up alerts and warning messages about buyers, sellers, or items.
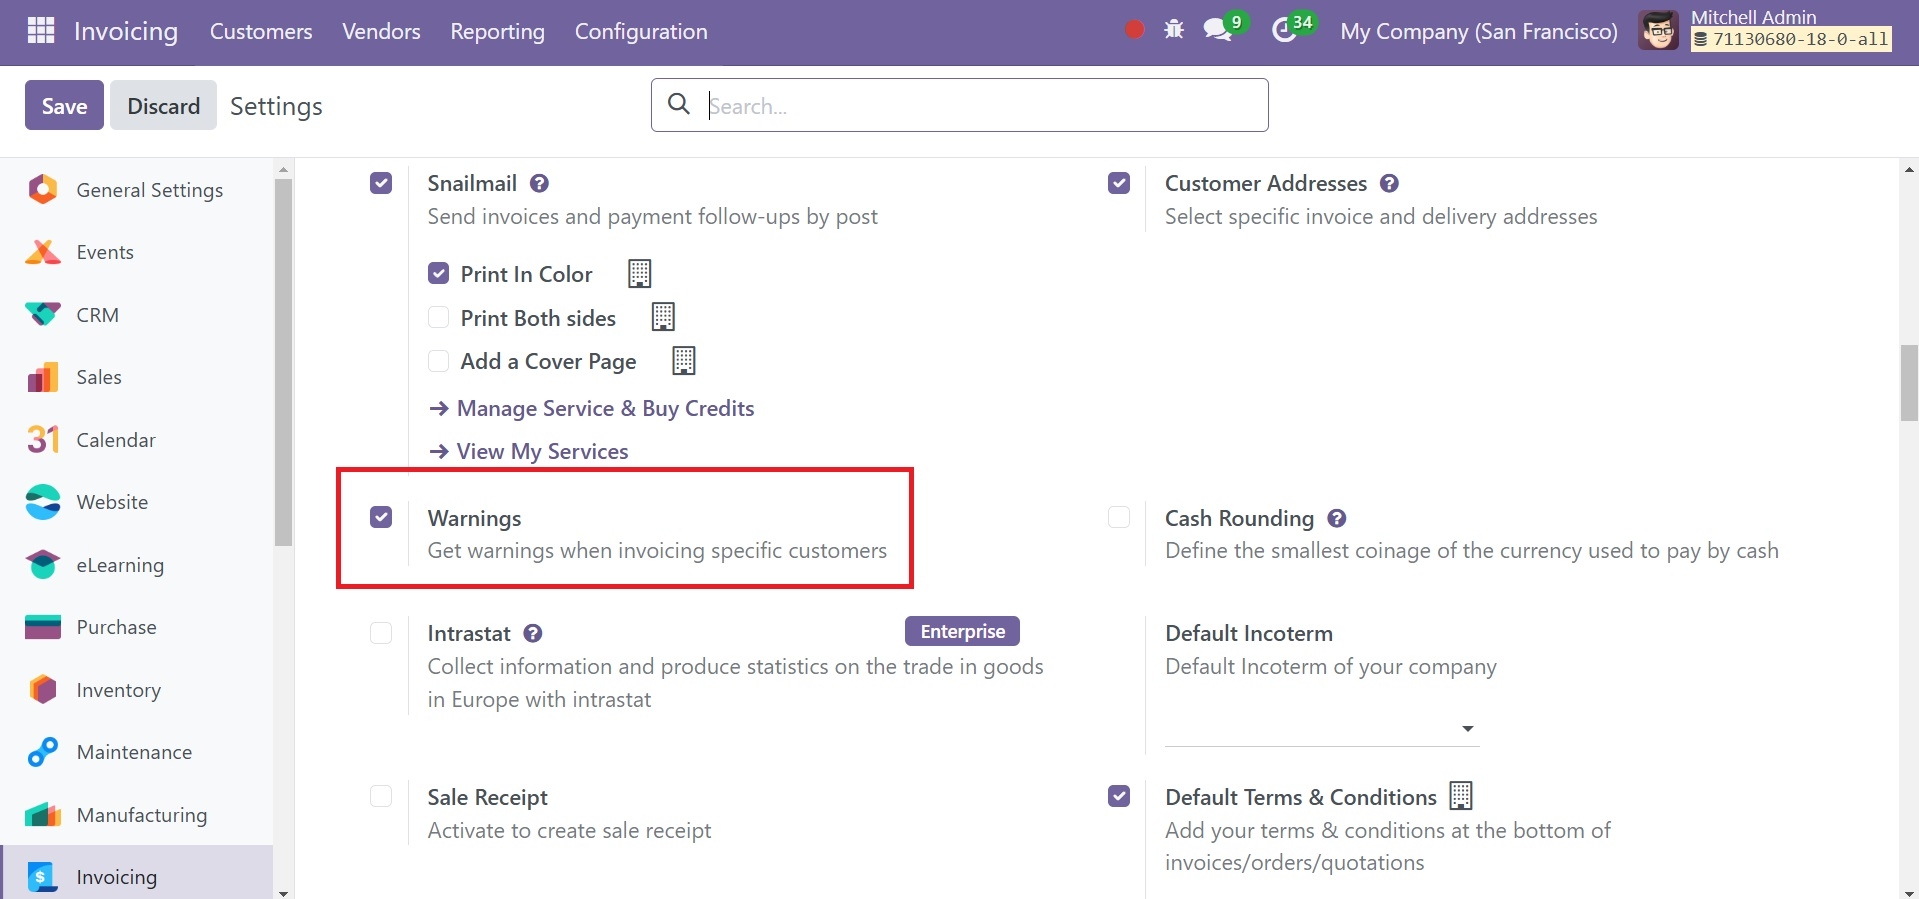
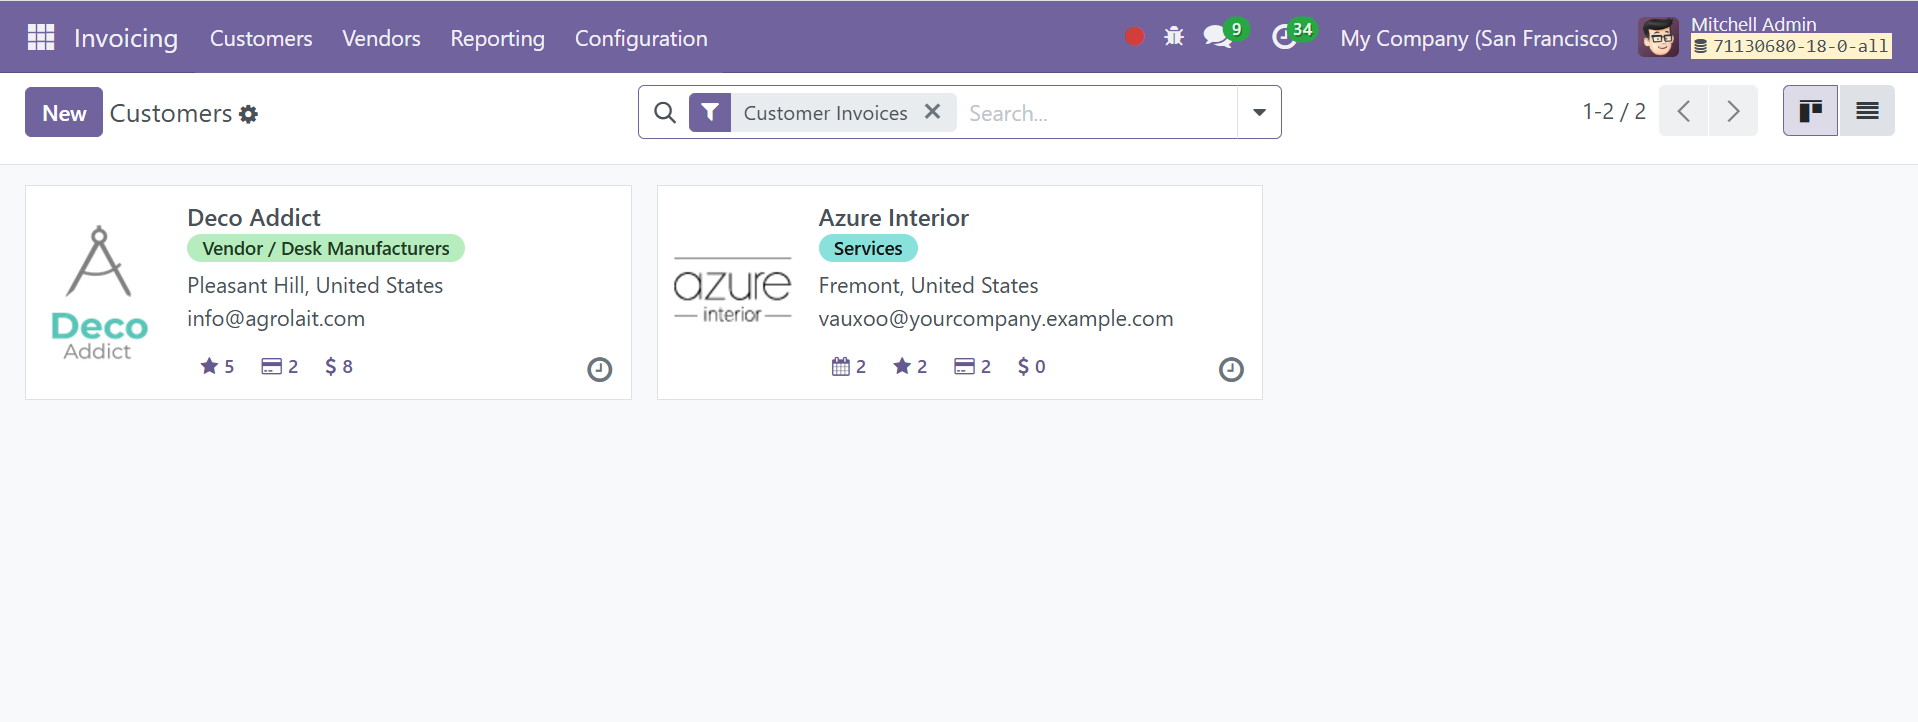
Next, select the "Warnings" option under the "Customer Invoices" tab. Check the box that corresponds to the Warning option to make sure it is enabled. Remember to click "Save" to preserve the modifications. Go to the "Customers" menu to see that the warning option is active. Here, you may use the "New" option to add new client records or examine those that already exist.
The creation form has several fields that you can fill out with all of your customer information. You can see the Partner Assignment, Internal Notes, Sale & Purchase, Accounting, Contact & Addresses, and Membership tabs in addition to the form view, as in the image below.
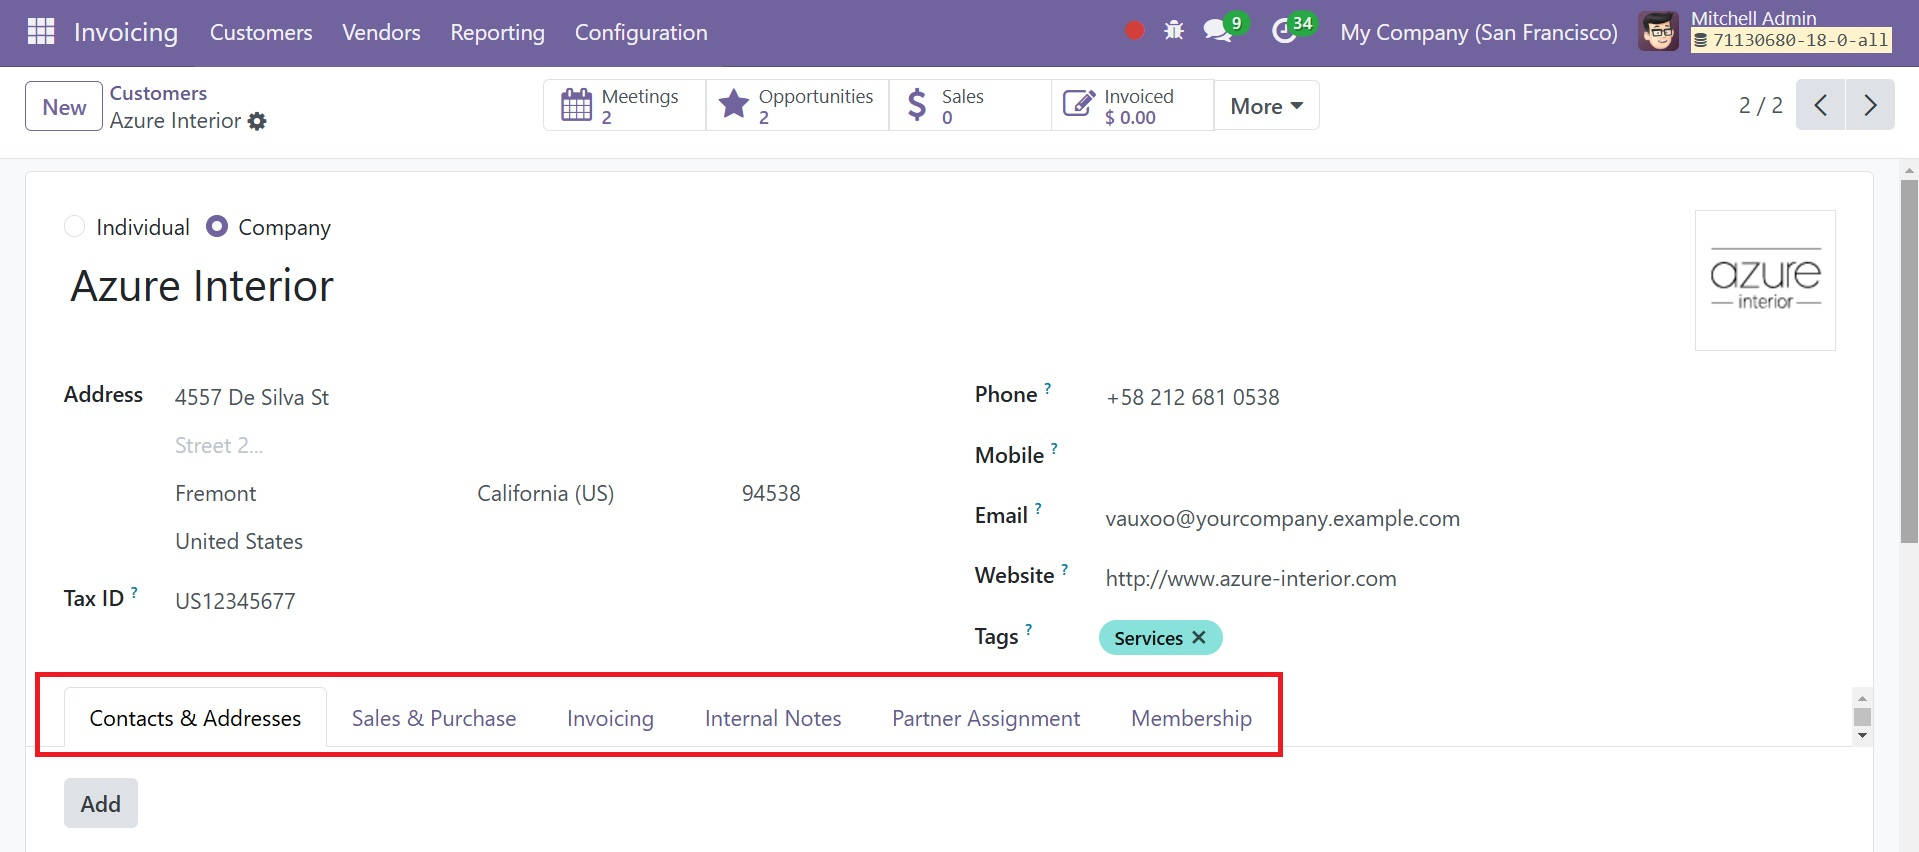
You can choose to set warnings when adding a new customer by going to the Internal Notes tab.
WARNING ON THE INVOICE is one of the warning choices that users can observe under the Internal Notes tab. The WARNING ON THE INVOICE feature allows users to ban or set warnings for specific consumers. 'No Message, Warning, and Blocking Message' are among the warning options that are visible within the 'Warning' field, as illustrated below.
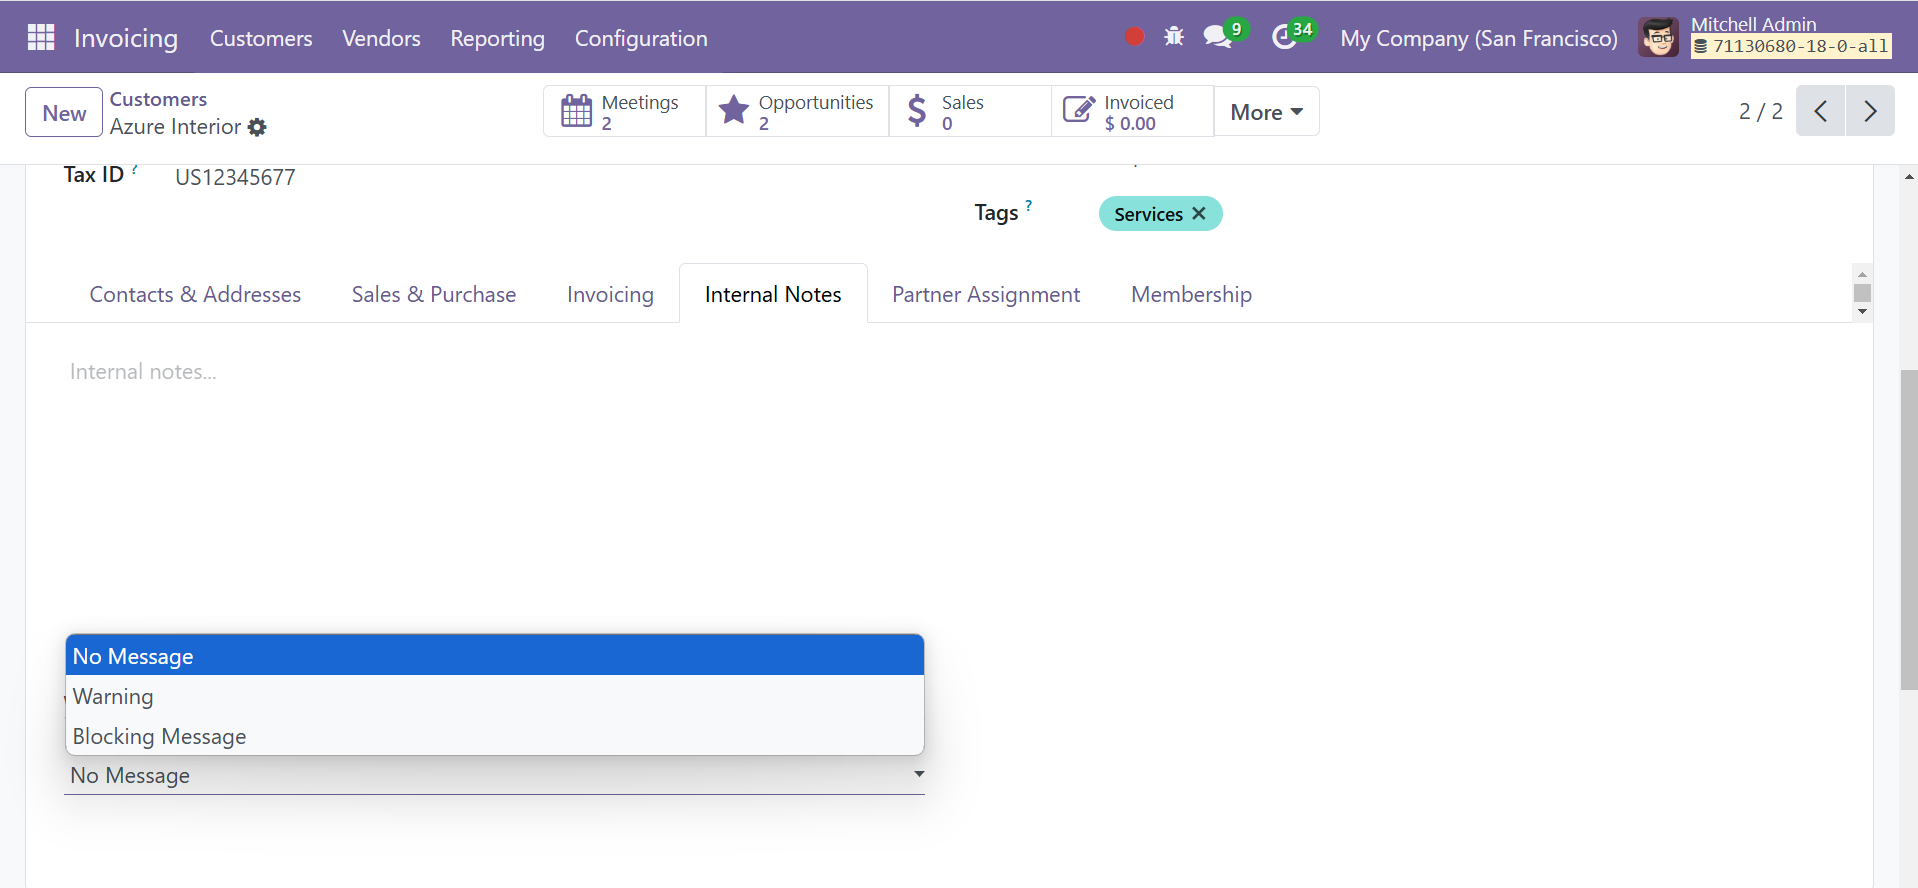
Choose the client and enter a warning message in the designated field to generate an invoice with warnings for Brenda. As shown in the screenshot above, I have just supplied an example message that reads, "Sample Warning."
After completing the form fields, save the data. Then proceed to the following step.
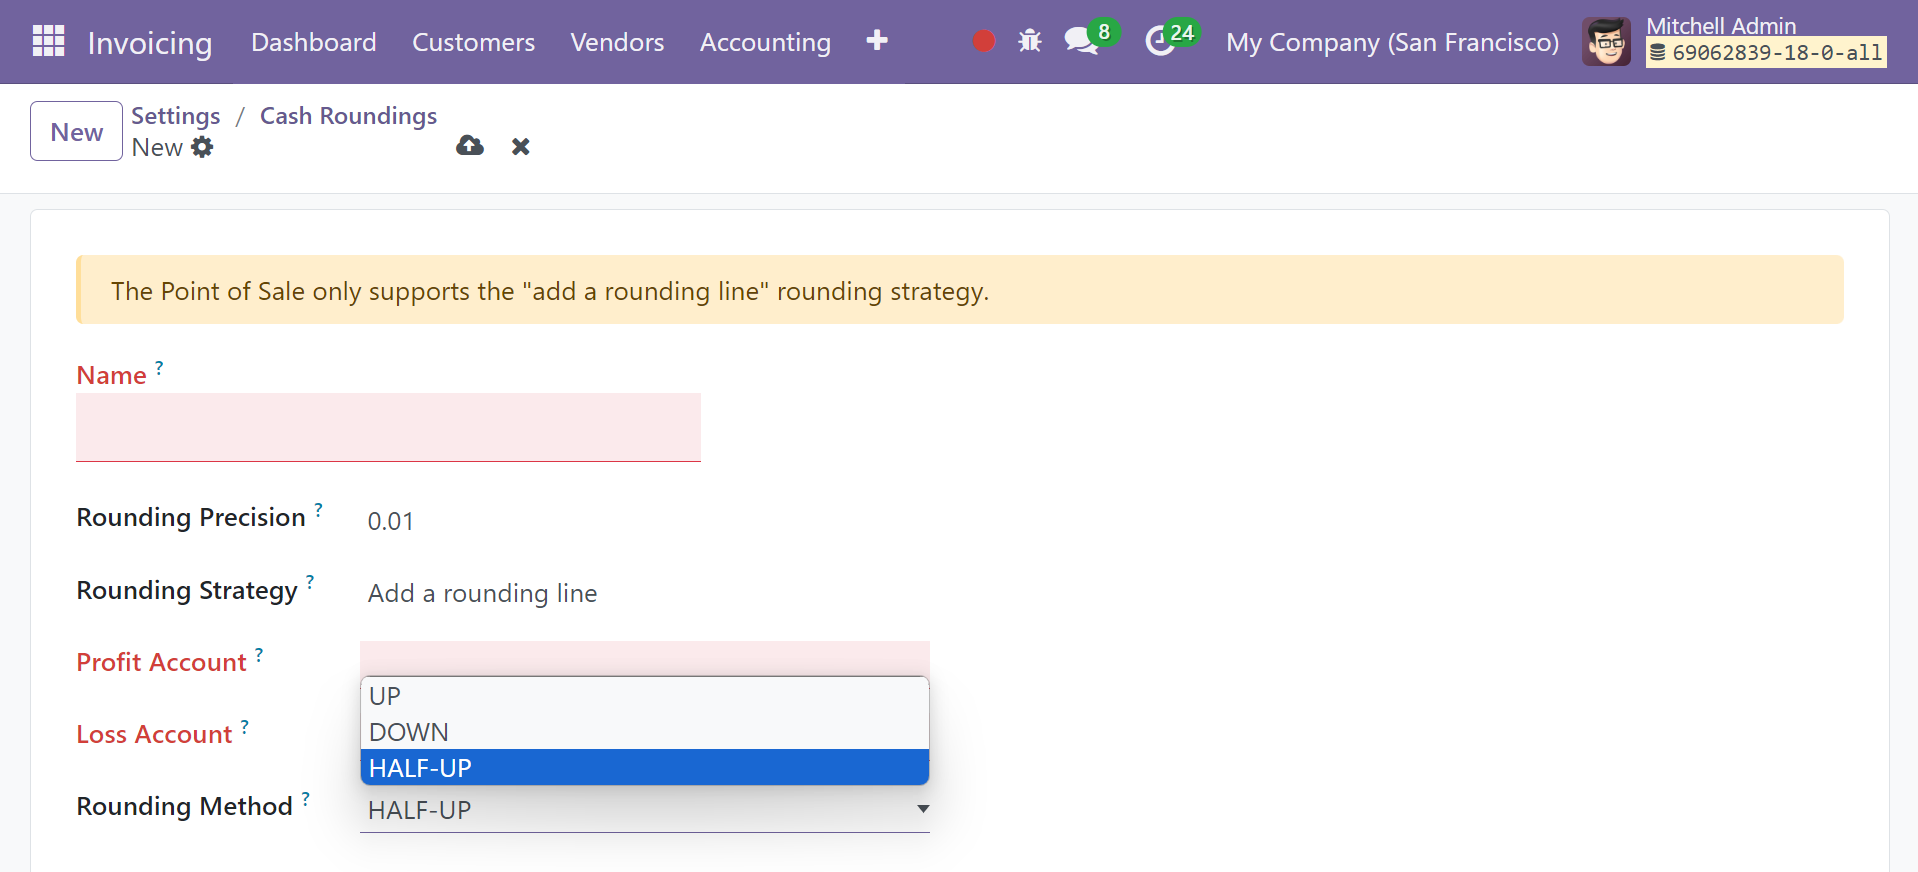
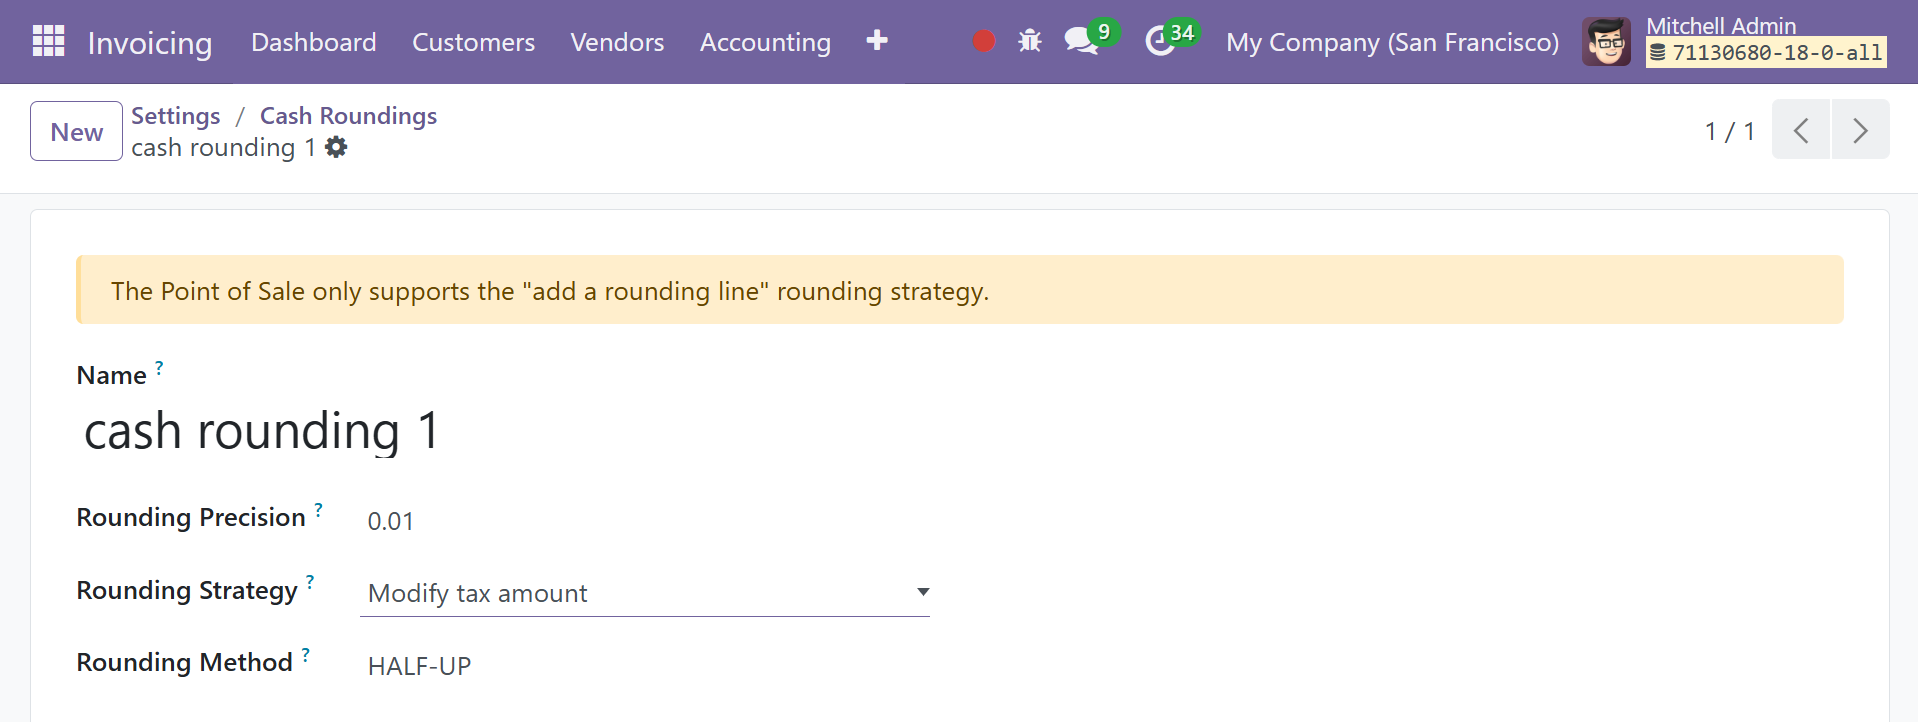
Cash Rounding Method
The Odoo 18 Invoicing module's Cash Rounding feature allows you to round the total amount of the bill to the nearest whole number. This feature will make it simpler to have bills with rounded total amounts. To use this feature, you have to go to the Settings menu in the Invoicing module. As the example below shows, you can find the Cash Rounding option under the Customer Invoices tab.
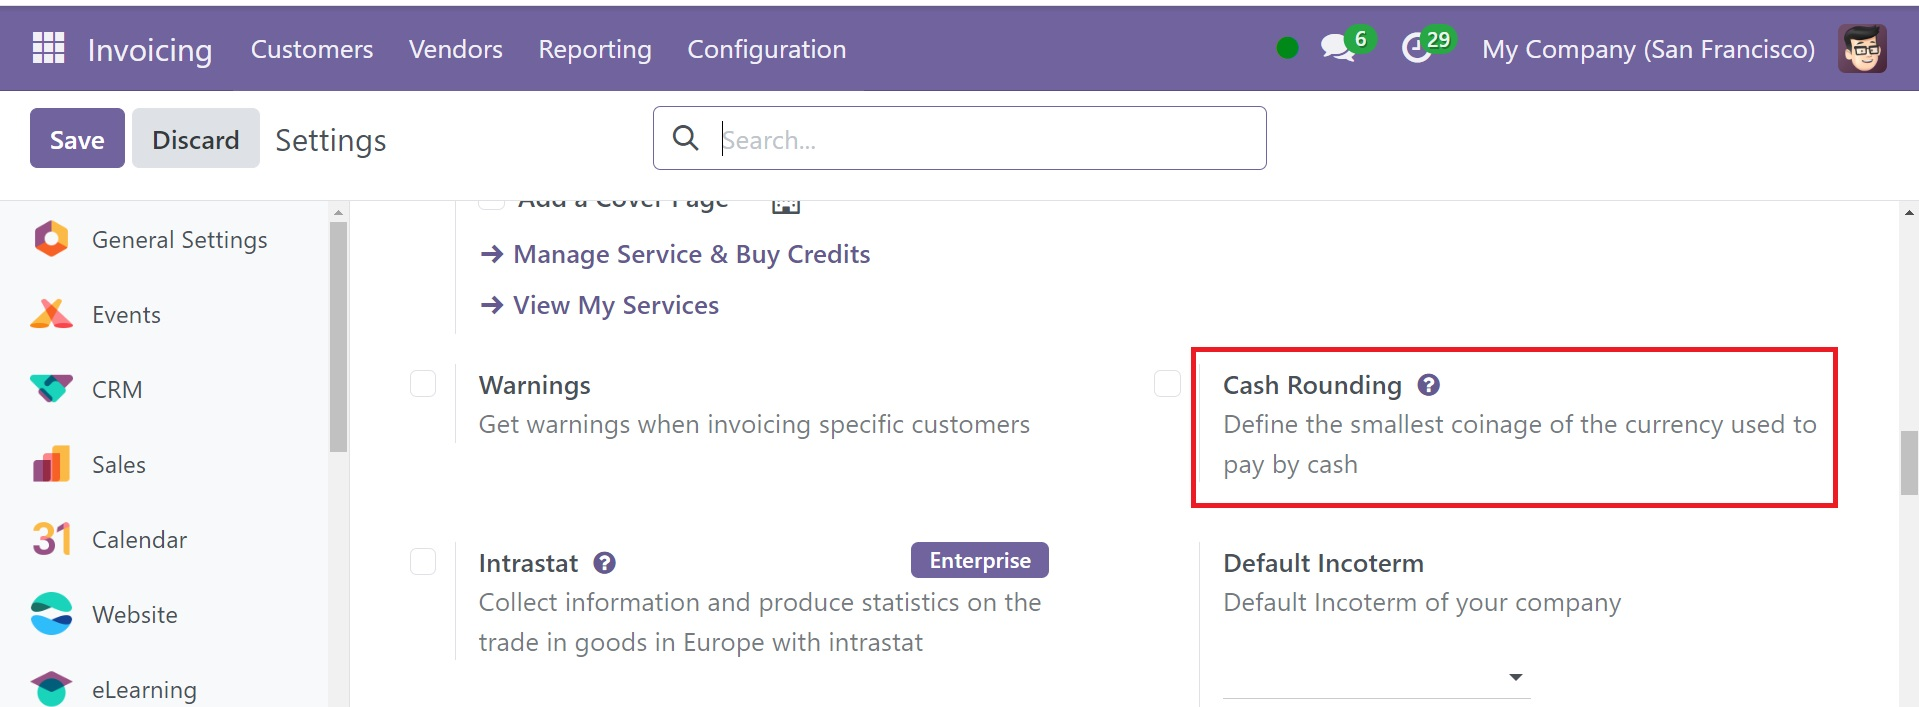
If you enable this field, the Cash Rounding option will show up under the Configuration menu. Using the New button in this module, you can start a new cash rounding.
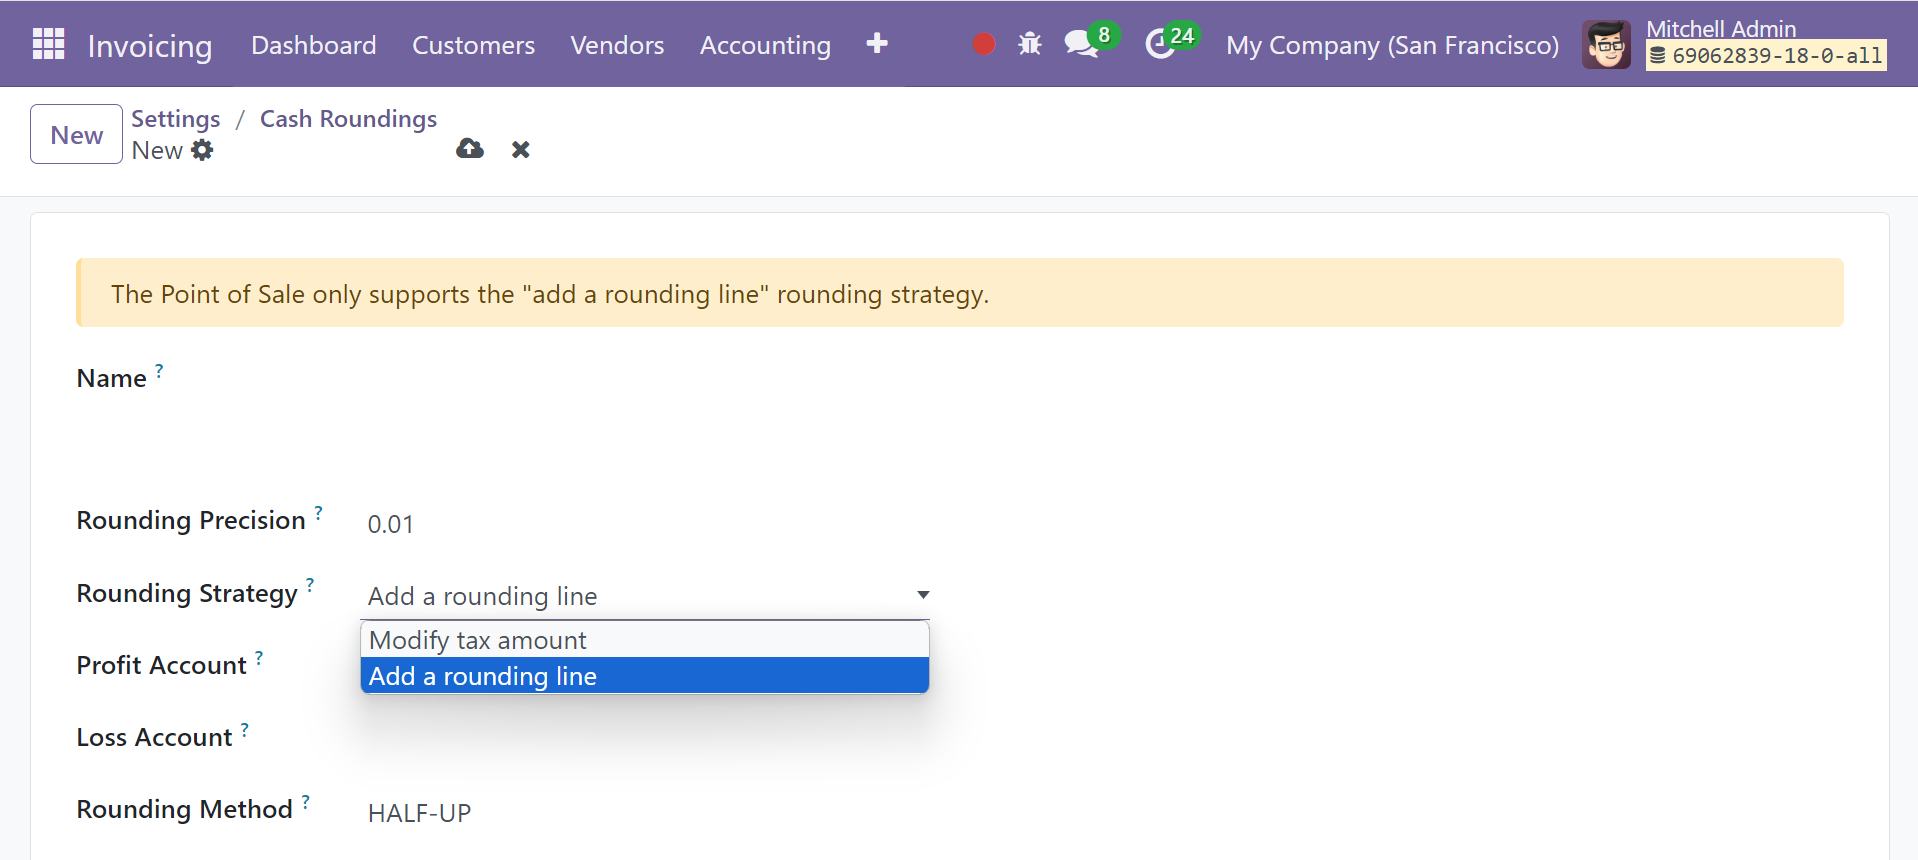
Give the cash rounding a name in the allotted area. The Rounding Precision and Rounding Strategy are available in the corresponding fields. The rounding approach will specify how the invoice amount is rounded to the given rounding accuracy. The choices will be to either Adjust Tax Amount or Add a Rounding Line. In the spaces provided, enter the profit and loss accounts.
Add a rounding line: The invoice now has a rounding line. The account that keeps track of the cash roundings must be specified.
Modify tax amount: the rounding is applied in the taxes section.
Include the "Profit account" and "Loss account" in the appropriate areas when adding a rounding line. Regarding the "Rounding Method," you have three choices.
UP: The outcome will be rounded to positive infinity using the rounding method if the Up approach is used.
Down: Depending on the rounding precision, the result is rounded off in the direction of negative
infinity when the down method is applied.
HALF-UP: The third choice is the half-up approach. This approach is effective when dealing with fractions. If the fractional component of a value is less than 0.5, it will be rounded to the negative; if not, it will be rounded to the positive.
You can also set the rounding strategy as modify tax amount.
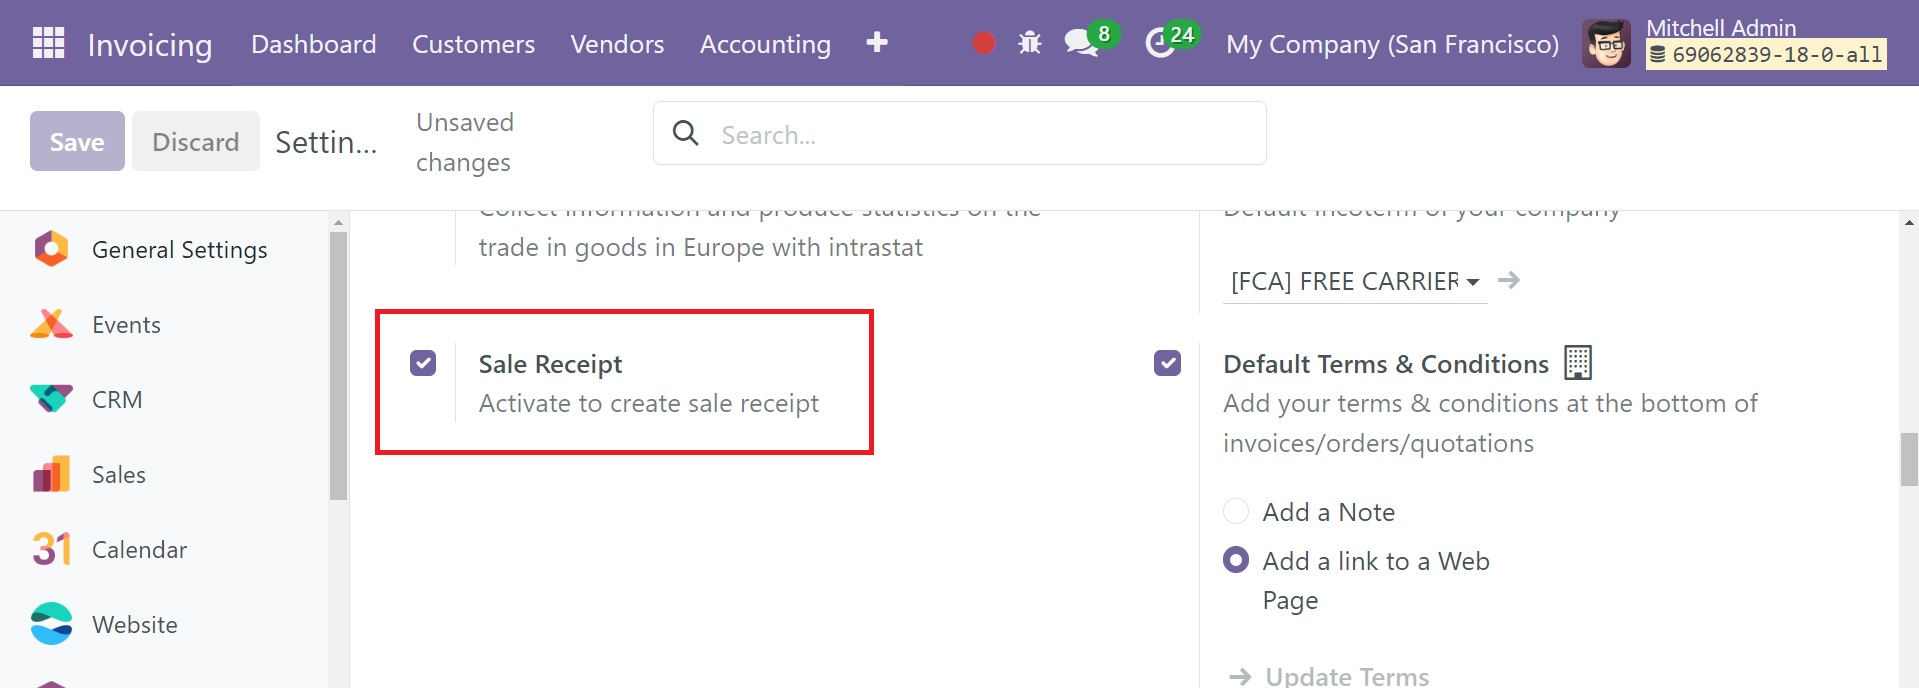
Sale Receipt
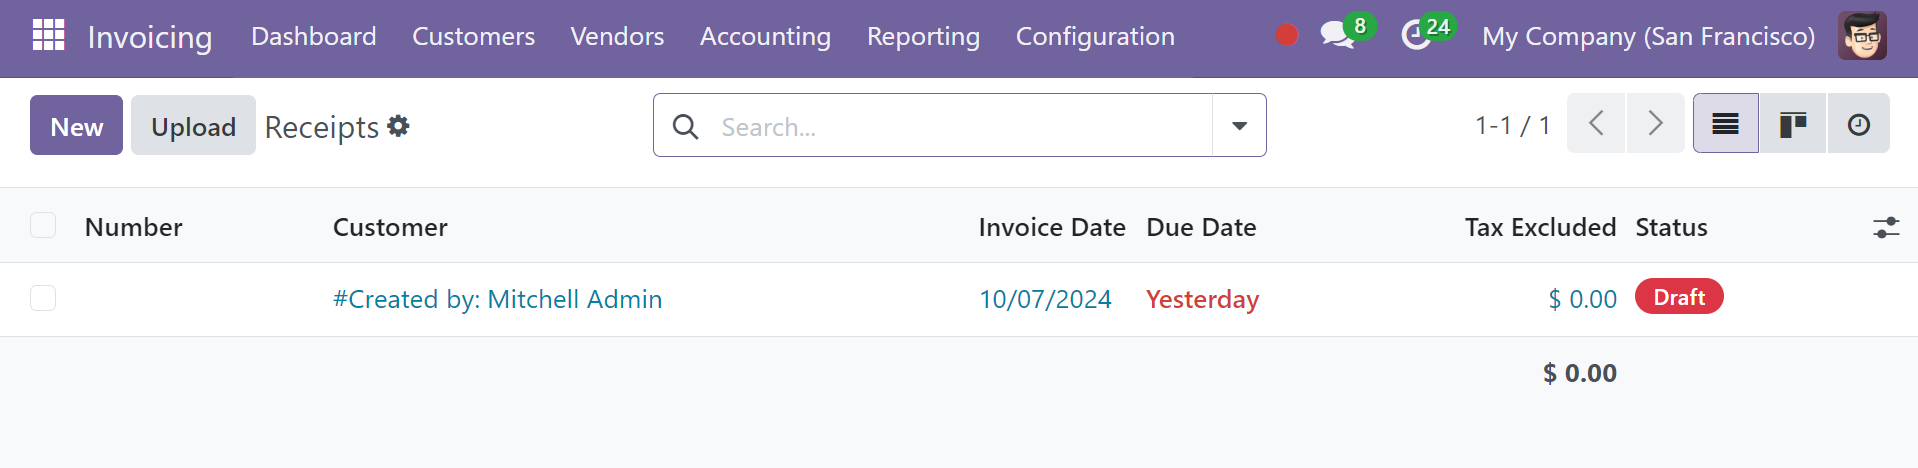
Users can choose to get sales receipts from the Customers menu. Consequently, the user must first enable the Sales Receipt option from Settings, which is found under the Customer Invoices section. It facilitates the process of creating a sales receipt.
Next, an additional Receipt option appears under the Customers menu for the user to select. The receipts contain the sales receipts.
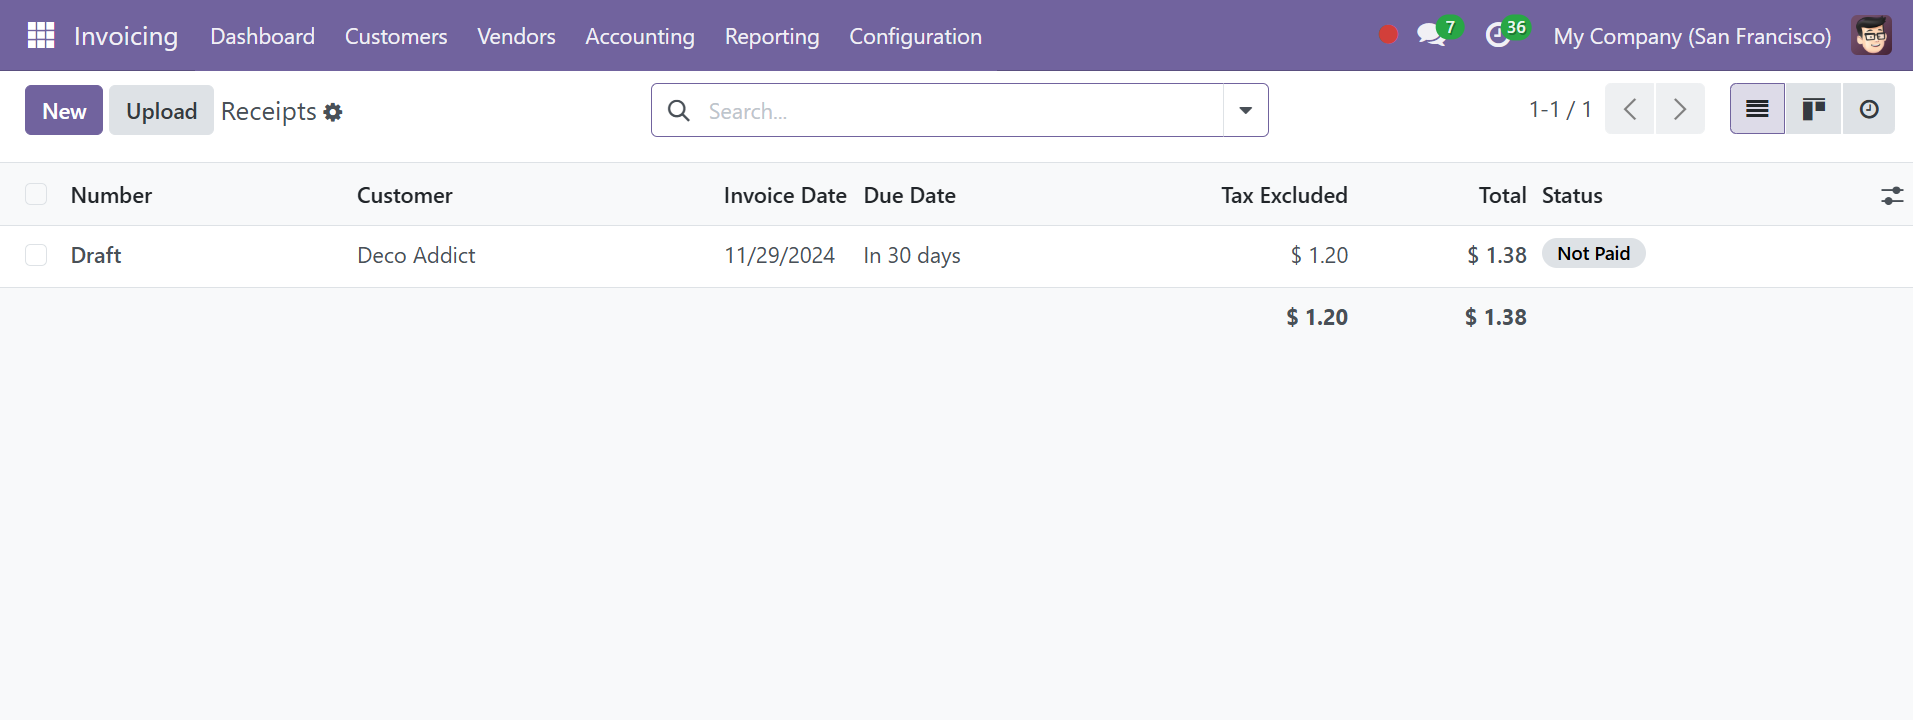
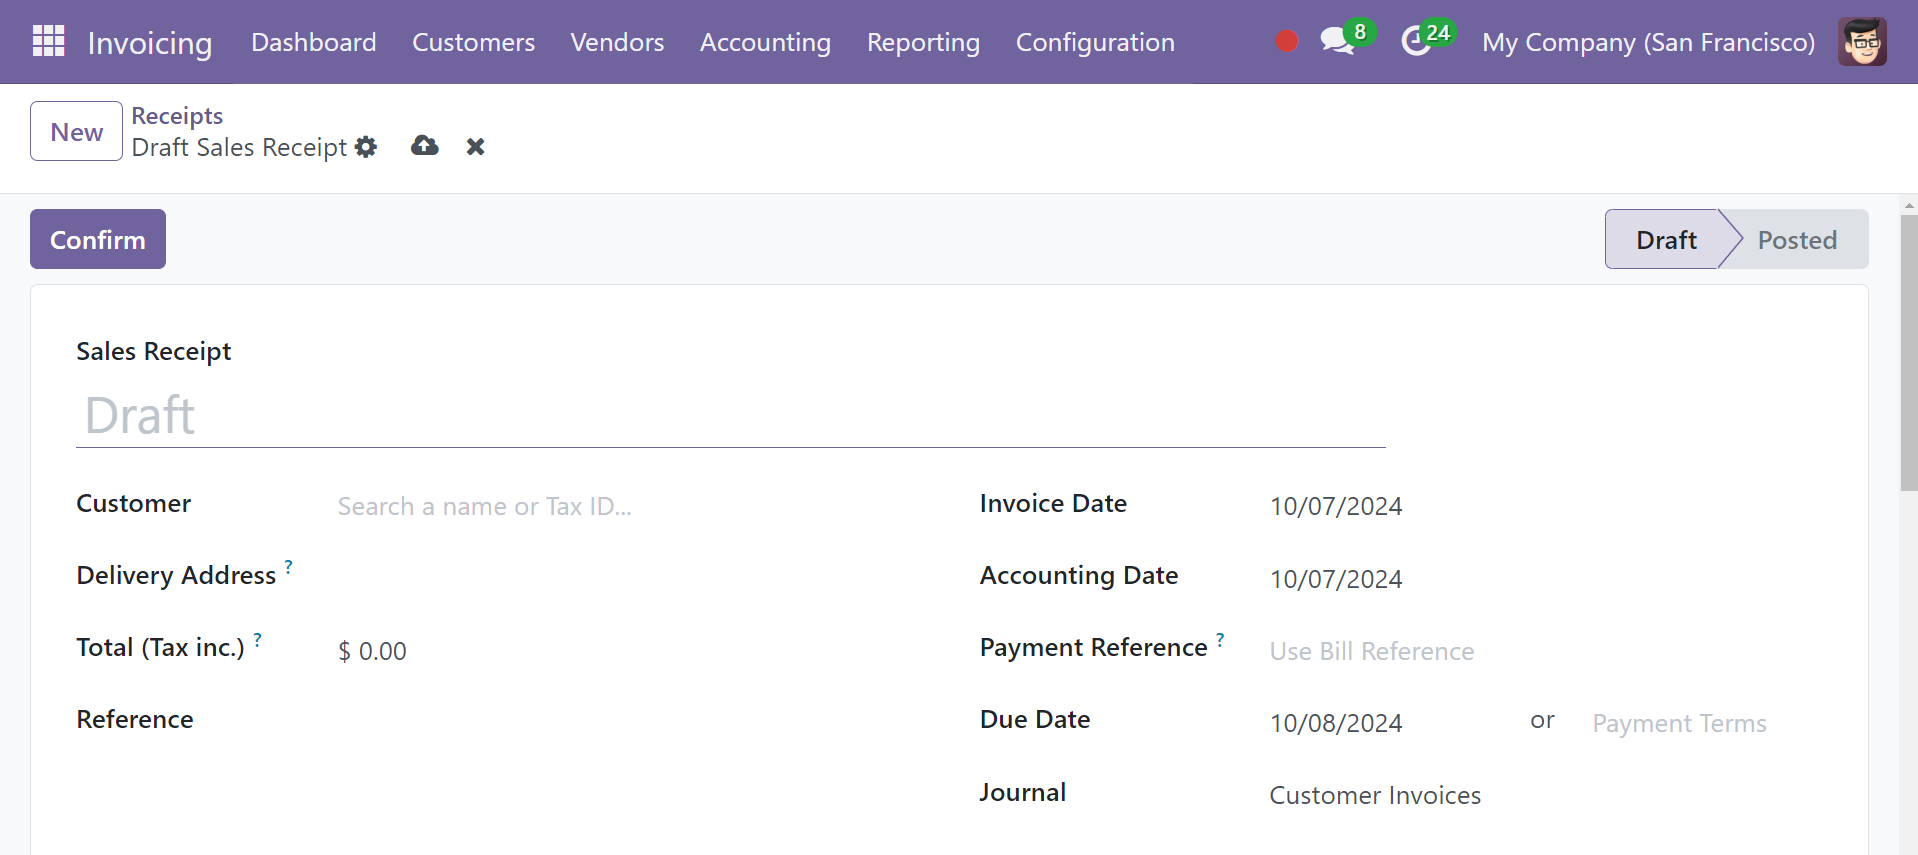
Click the New button to add a new sales receipt. The creation form and an invoice are similar
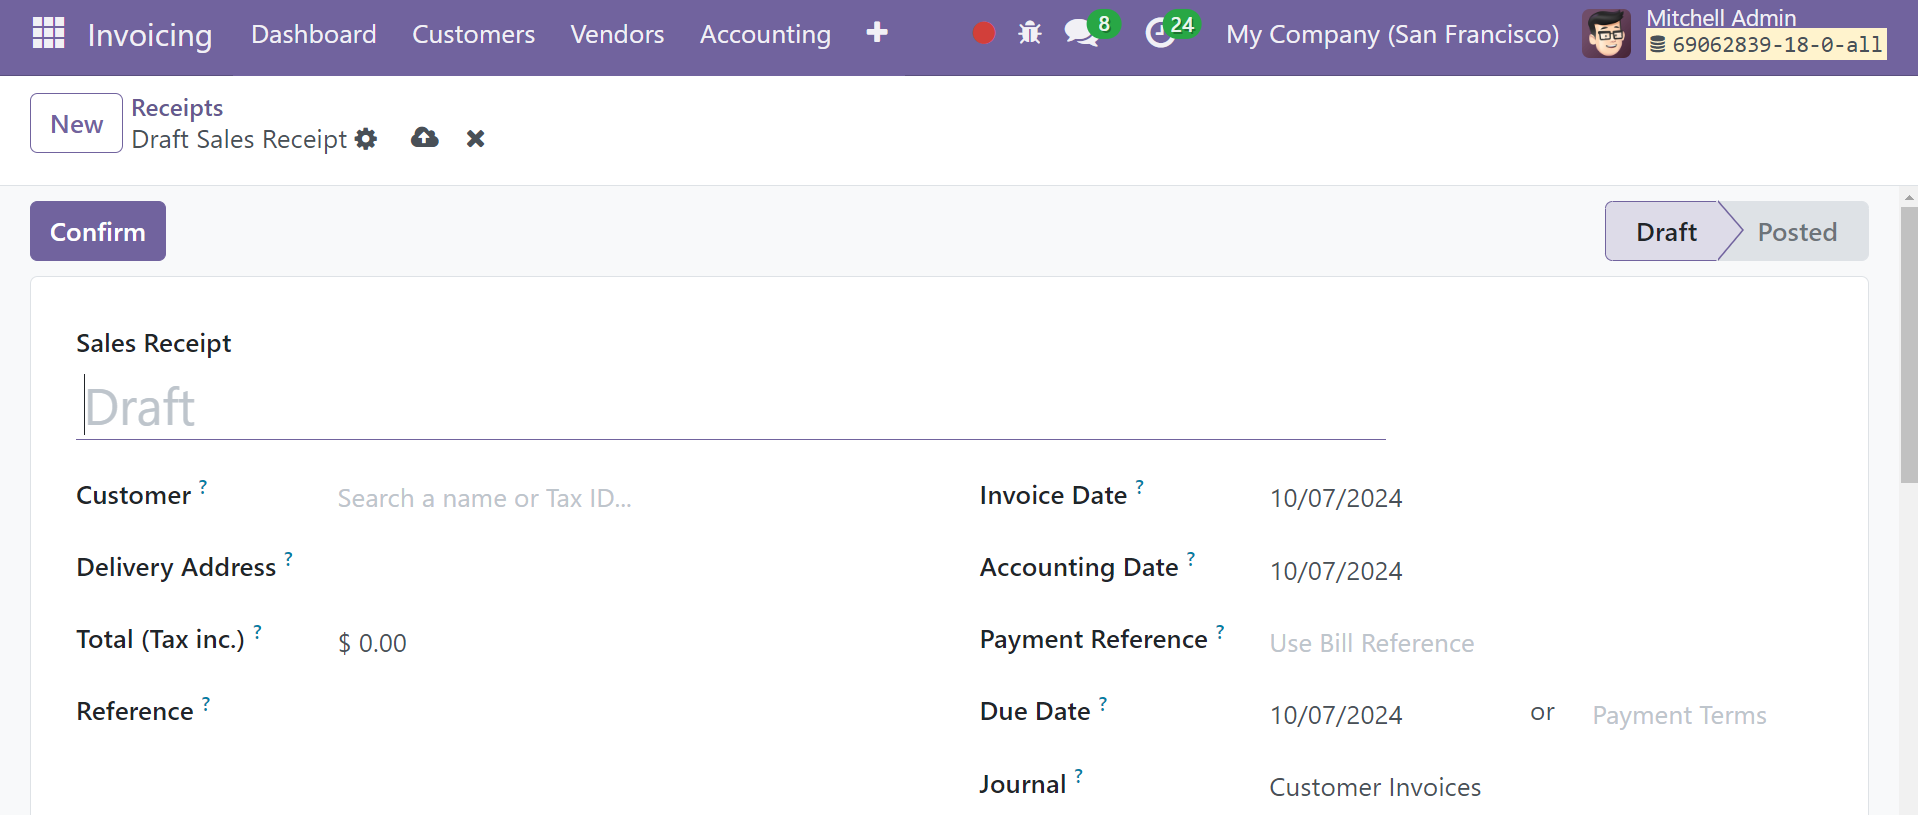
But, because the Register Payment button is absent from the document, the user is unable to complete the payment after confirming the receipt.
Default Terms and Conditions
Default Terms & Conditions is one of the customization options offered by Odoo18 for the billing process of the Invoicing module. The terms and conditions added by the user or the company may be included in the invoice by default. You can refer to the normal terms and conditions in the settings.
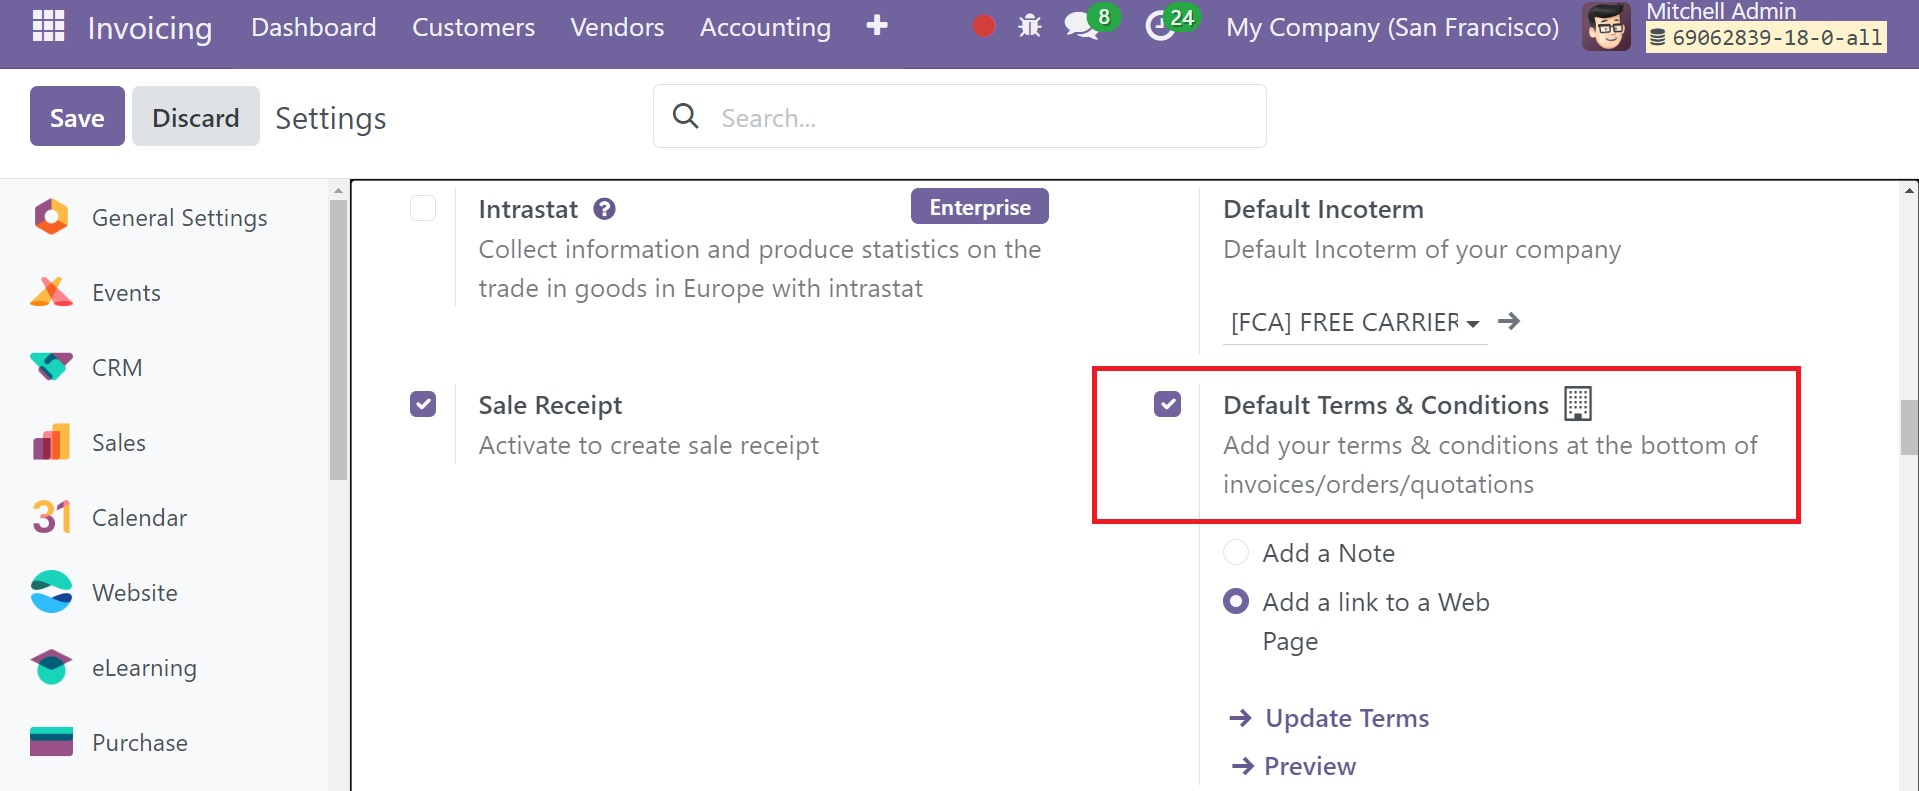
The section titled "Customer Invoice" contains the typical terms and conditions. It could be used as a comment or as a hyperlink to a web page.
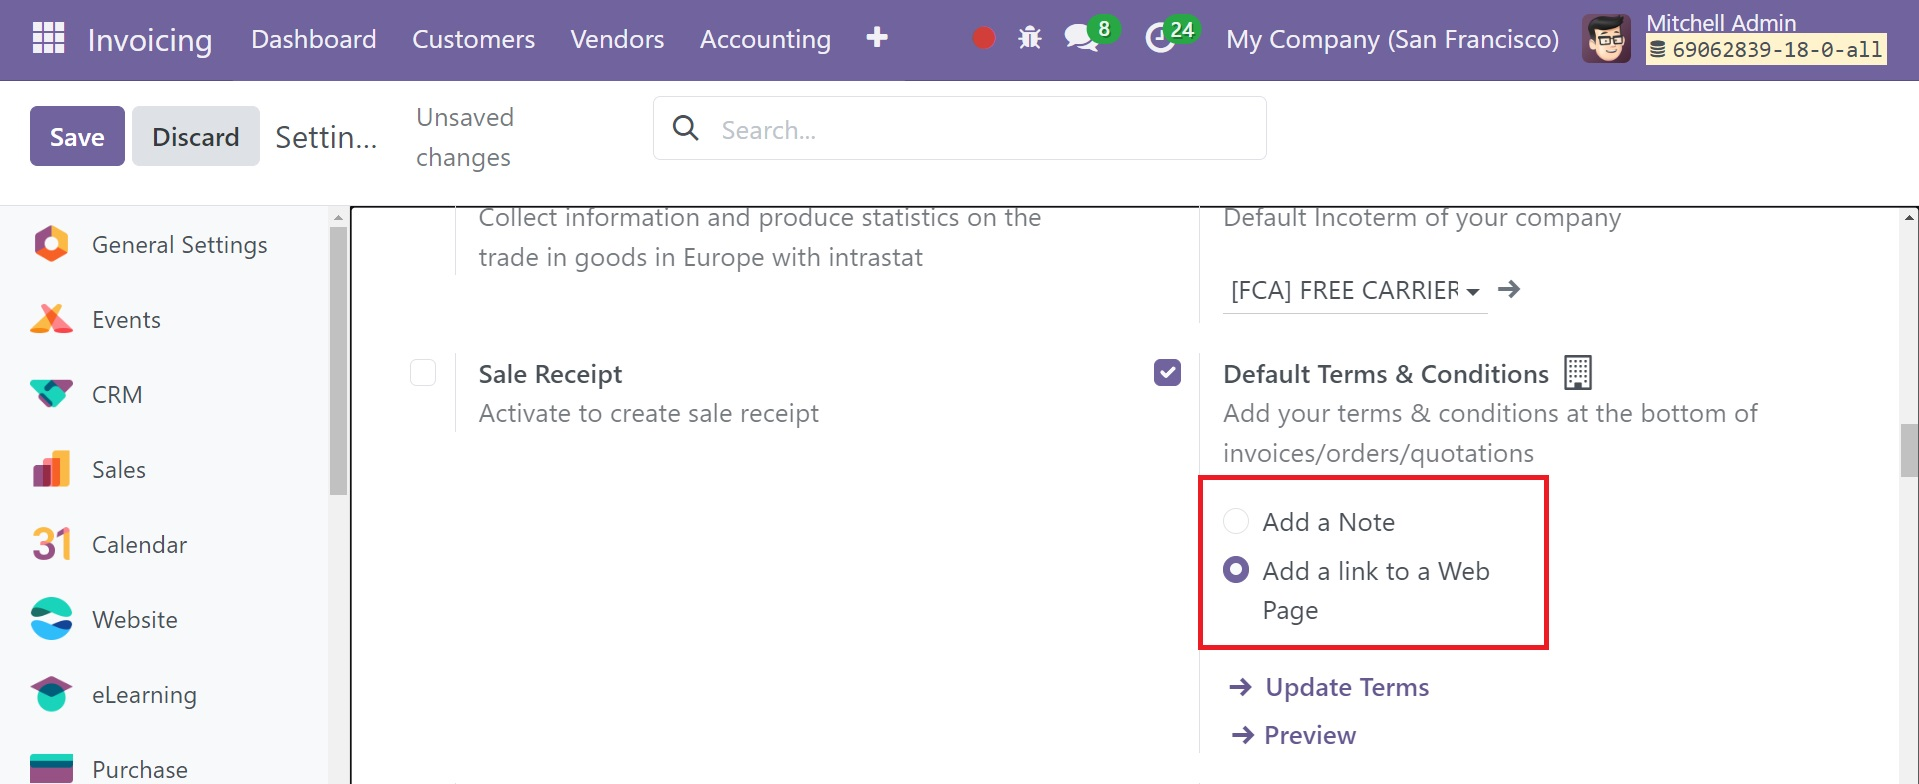
And the two types are named as Add a Note and Add a link to a web page, as shown in the screenshot above.
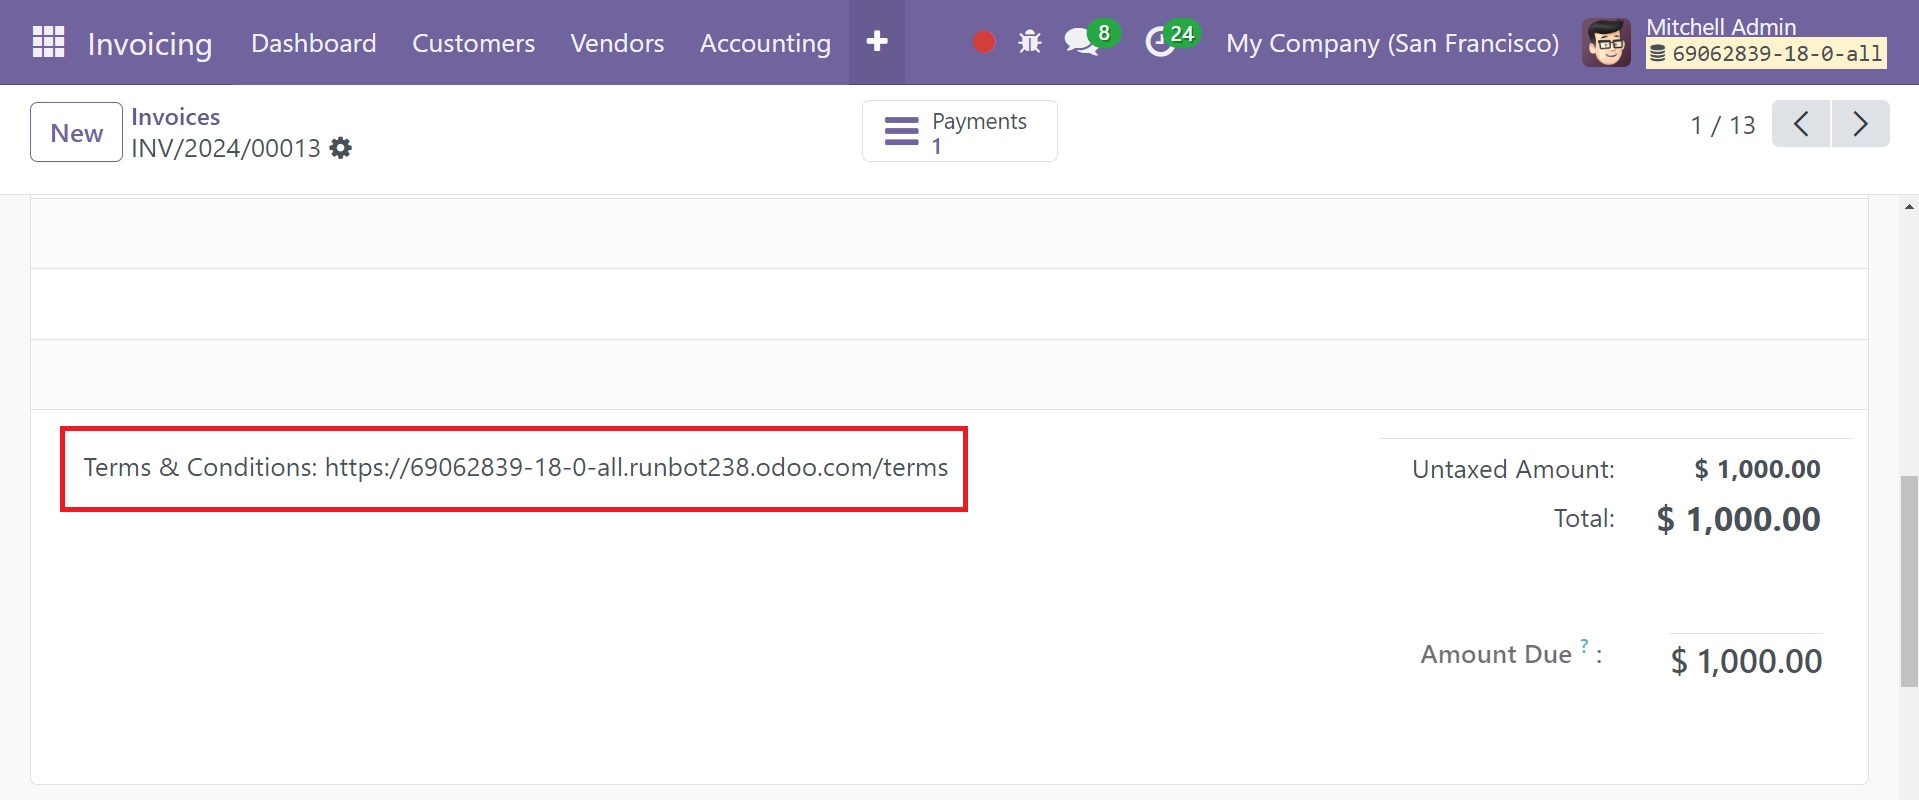
The usual terms and conditions will be displayed at the bottom of all orders, bids, and bills.
Sales Credit Limit
The Sales Credit Limit feature in the Odoo 18 Invoicing module can be used to put up an alert when issuing sales orders and invoices for partners whose total amount receivable exceeds a specific limit. From the Settings menu, you may turn on this feature, as shown in the picture below.
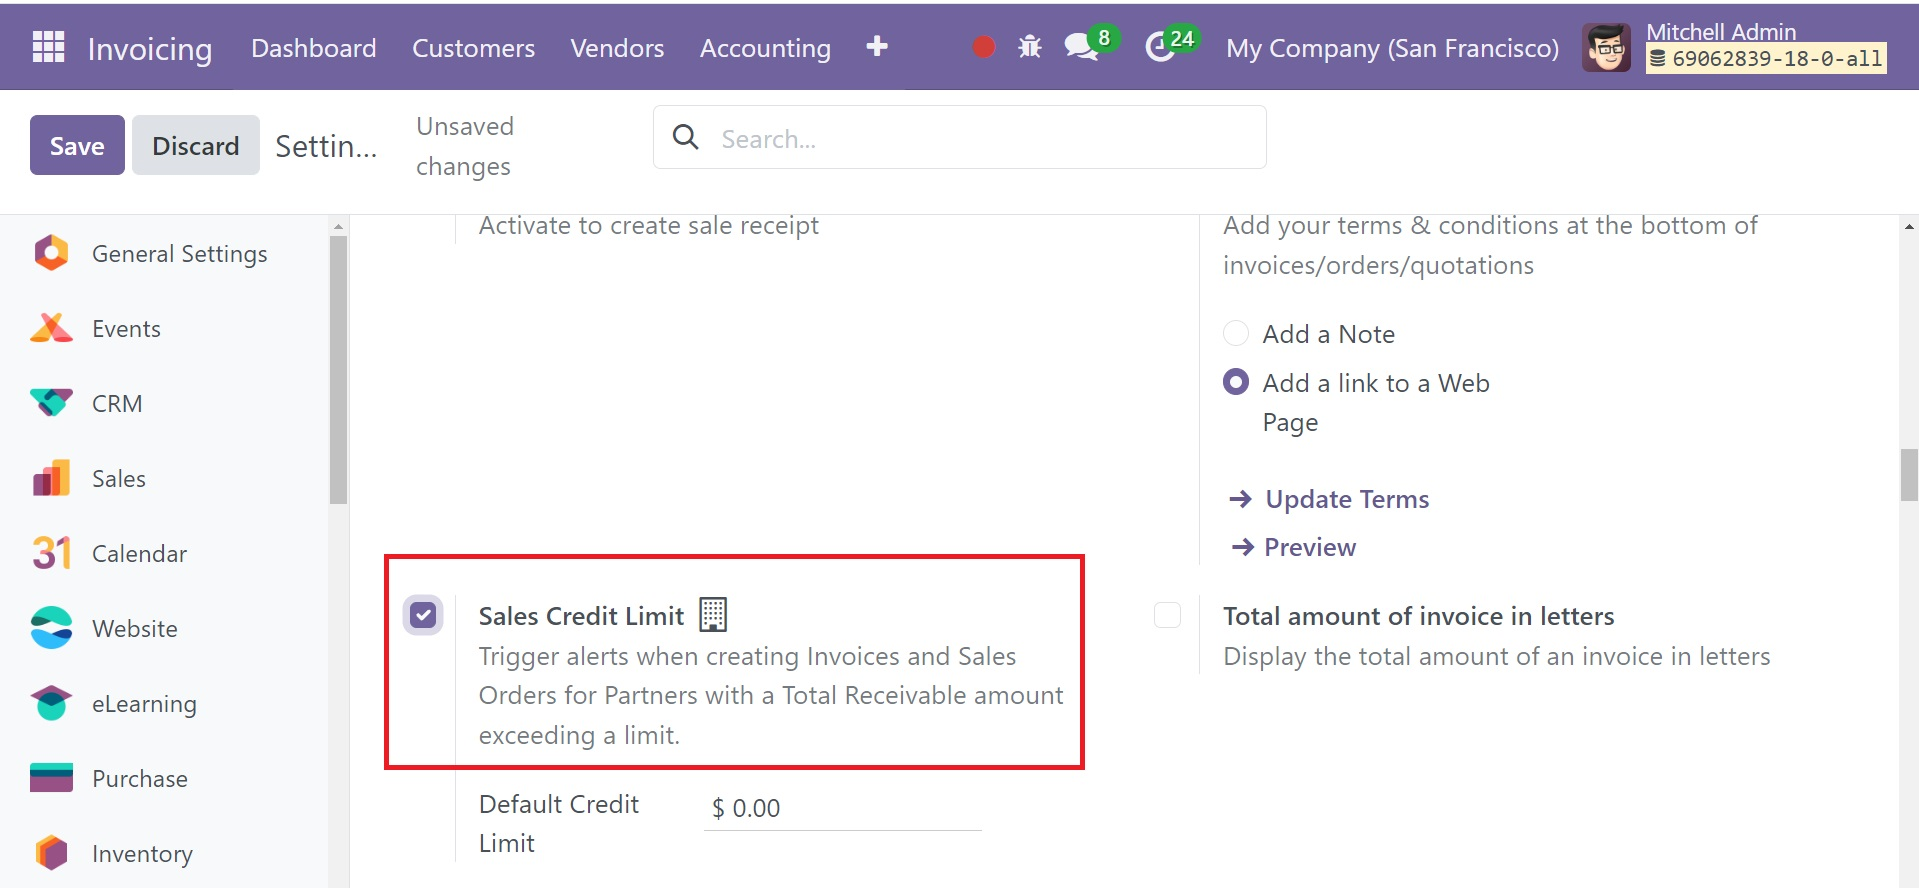
In the Default Credit Limit box, you may choose the credit limit that partners are allowed to use. For example, we may set the Sales Credit Limit at $500. We're going to look at what happens if you create an invoice or sales order for a partner whose credit limit is already higher than $500.
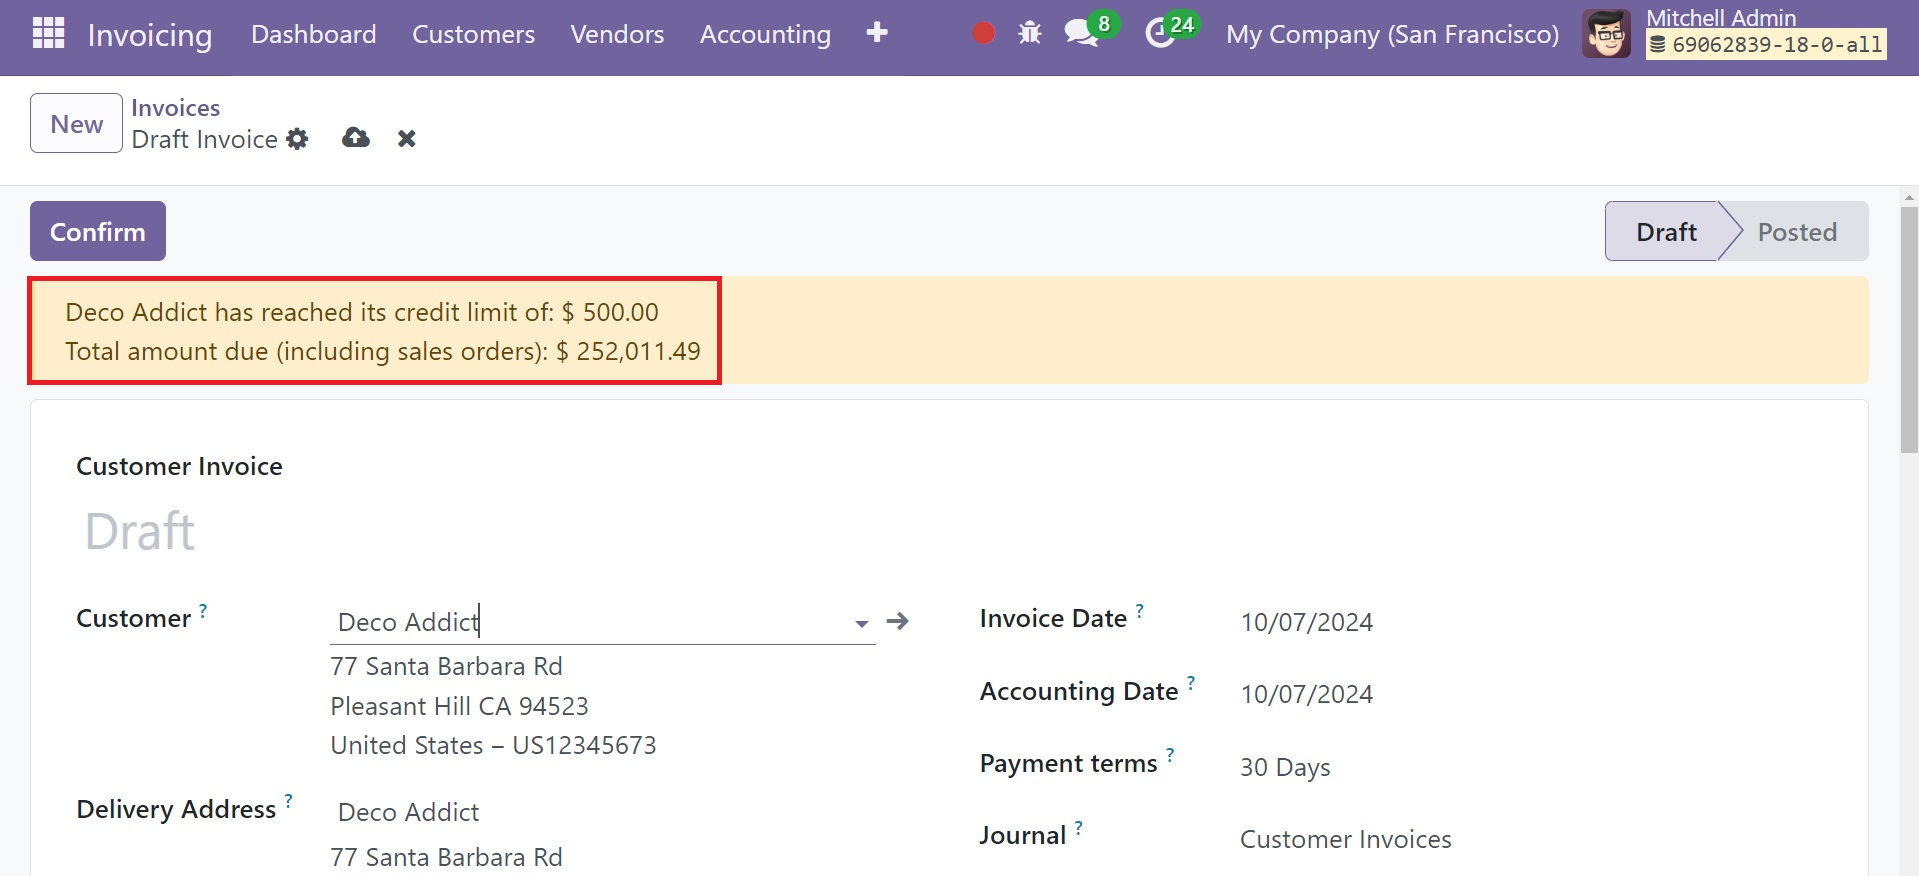
The consumer has already reached the limit, as you can see, and a warning message is shown on the window. You may view the total sum owed to the partner from this message.
You can utilize the Customers option in the Invoicing module to set a credit limit for a specific customer. Using the Credit Limits options located under the Invoicing page, you may set the Partner Limit.
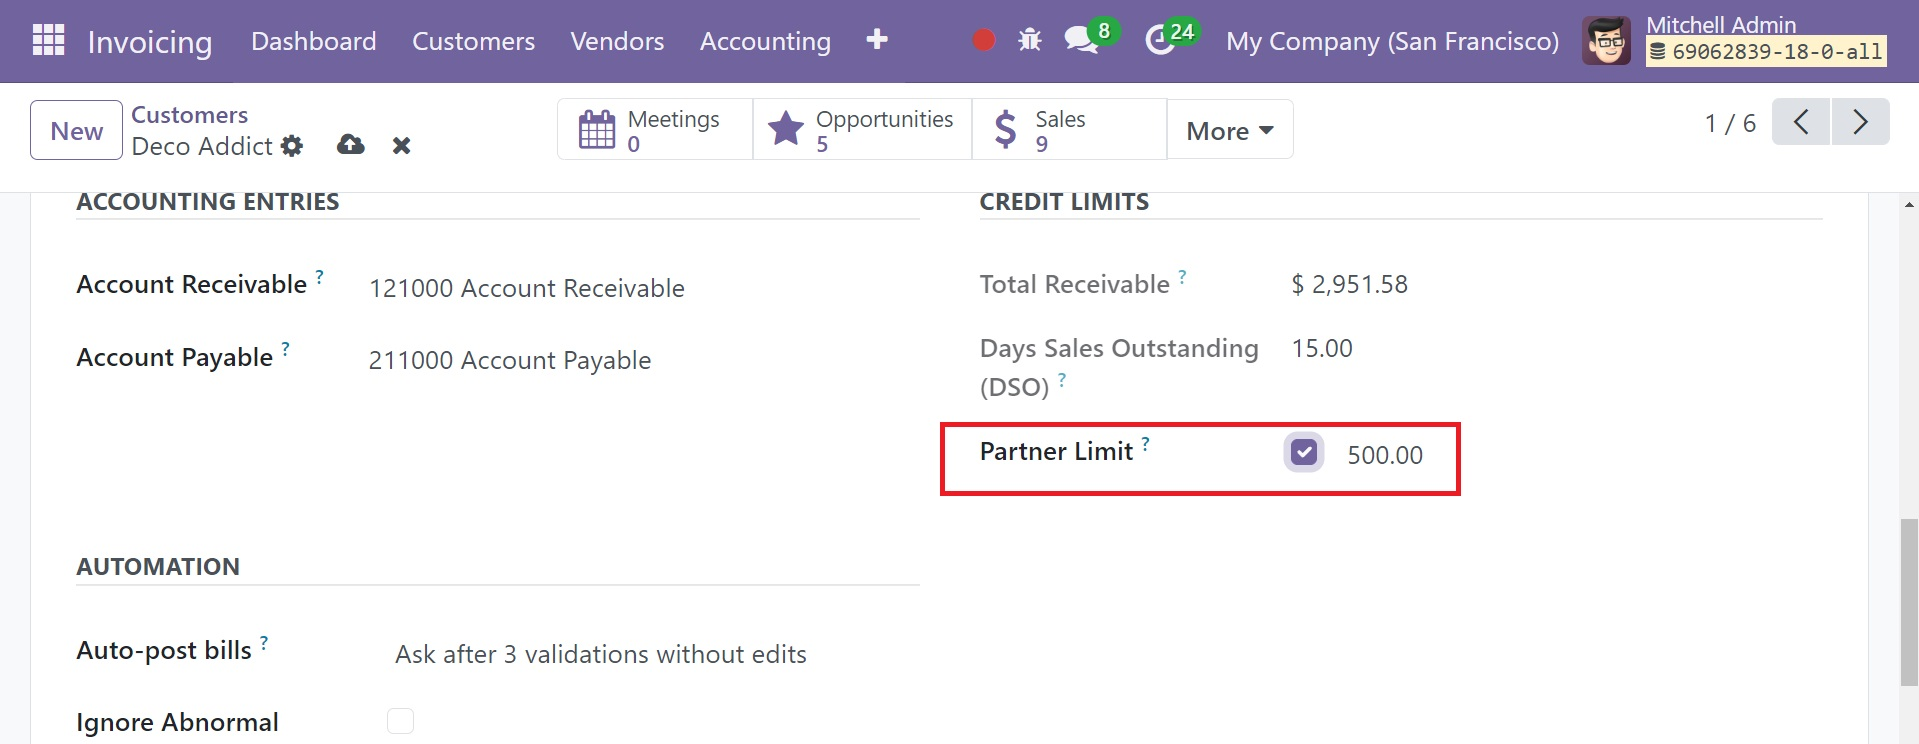
Turn on this function and enter the credit limit in the designated area. The whole amount this customer owes you will be shown in the whole Receivable field. You can set sales credit limits in your system for every customer by using this method.
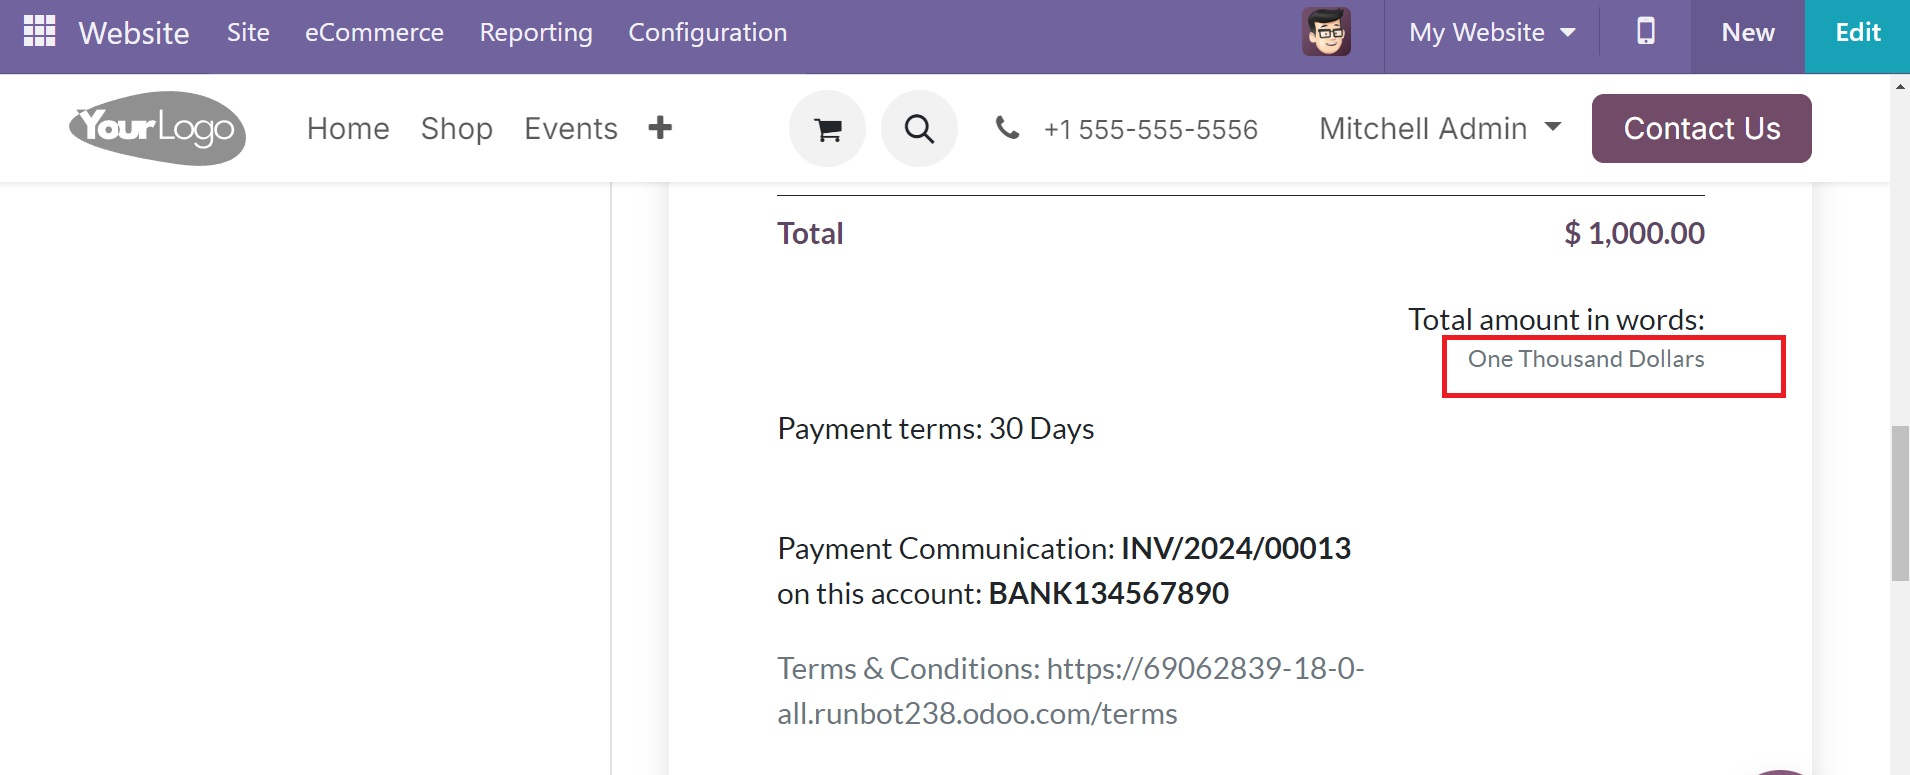
Total amount of invoice in letters
One of the new features that Odoo 18 offers is the total amount of the invoice in letters. This may be found under the Customer Invoice action in the Settings.
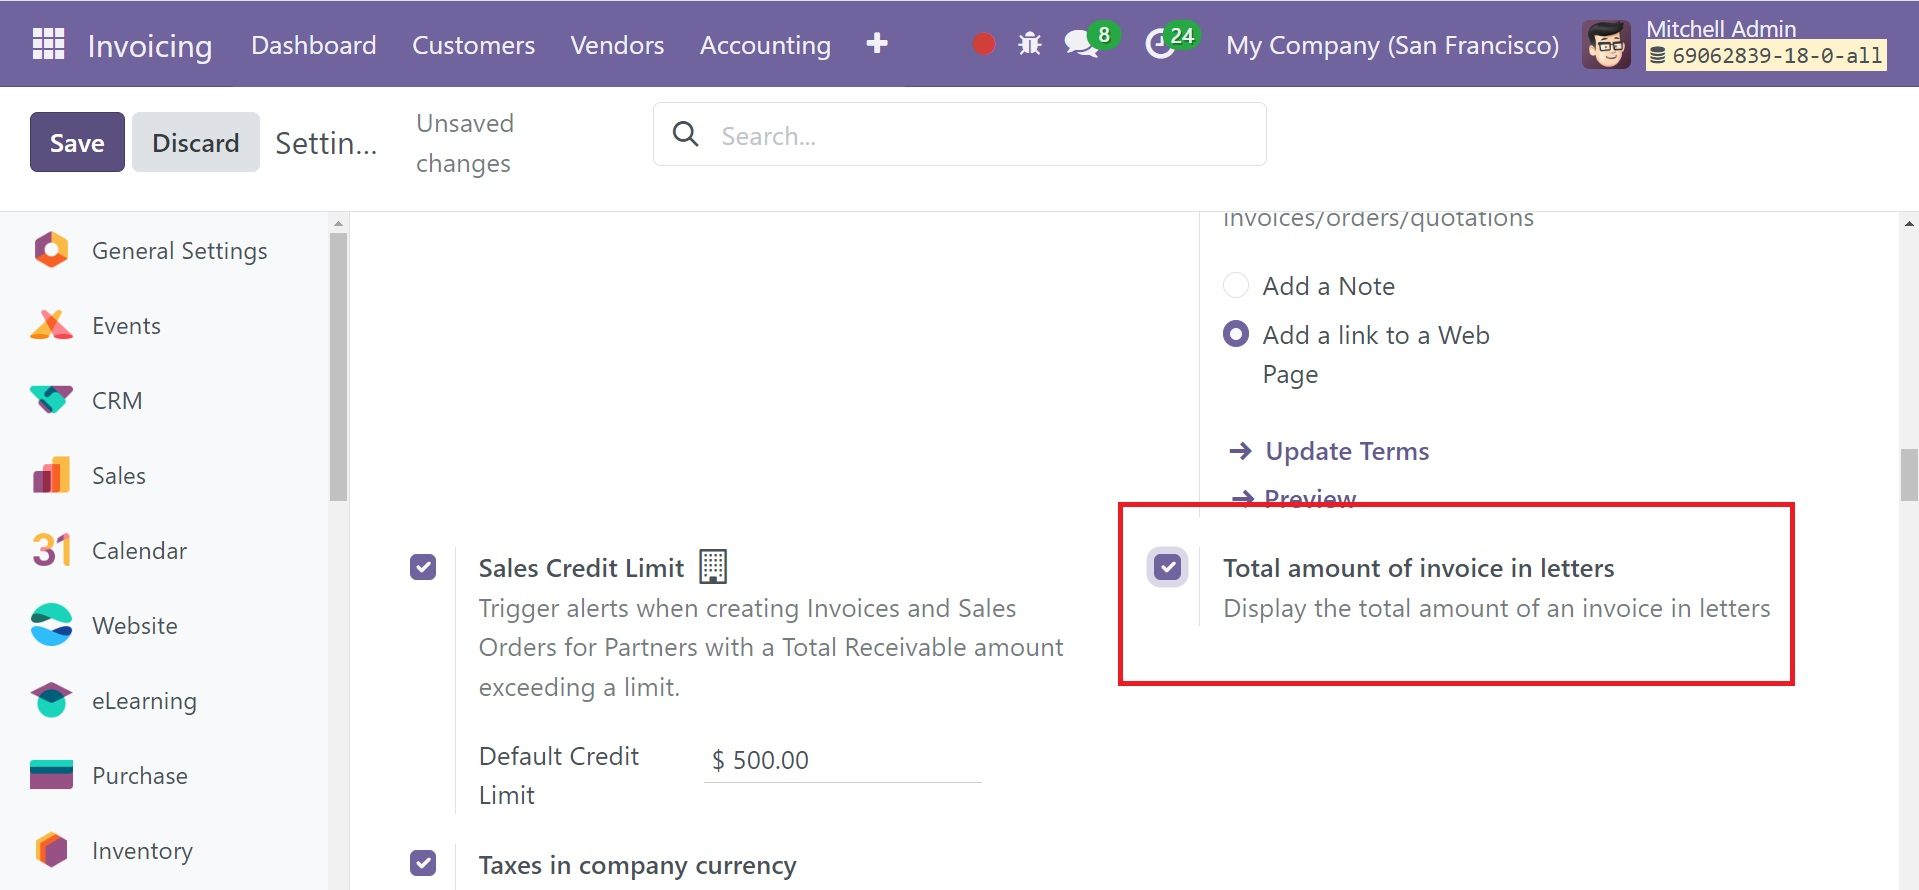
The entire amount of an invoice will also be displayed in letters if you enable this.
Taxes in company currency
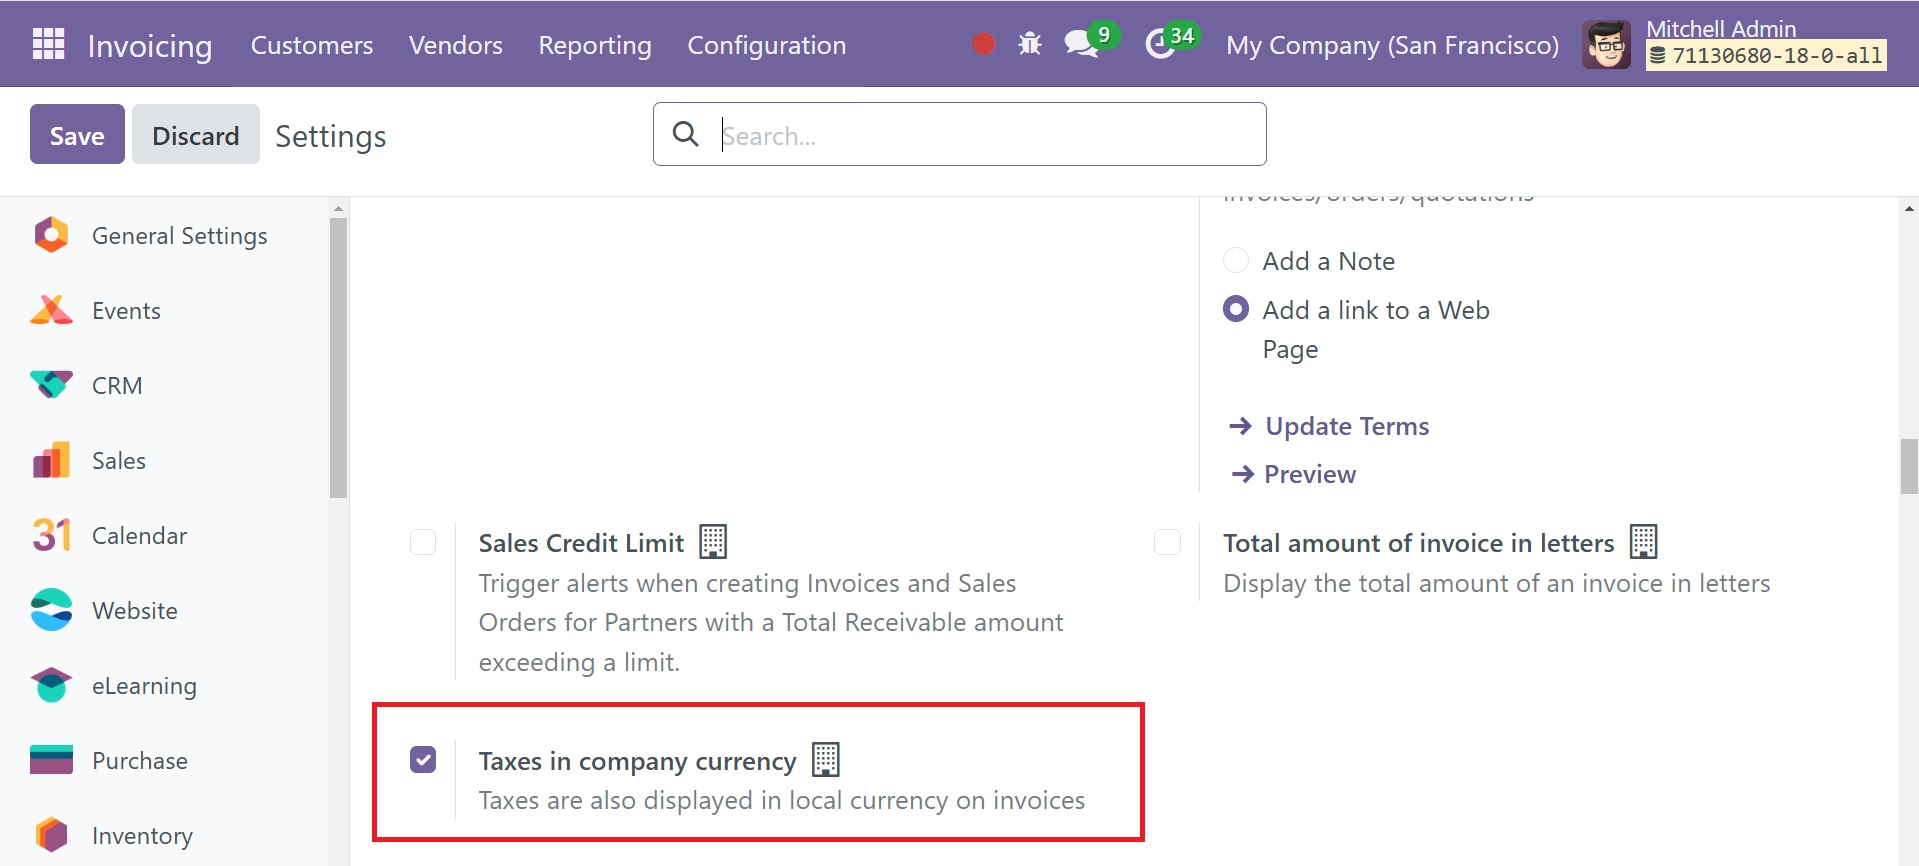
All taxes will appear on invoices in the local currency when this functionality is activated.The amounts will show up on the printed invoice if the invoicing currency differs from the company's currency.
Units of Measure
The option helps you to sell and purchase products in different units of measure.
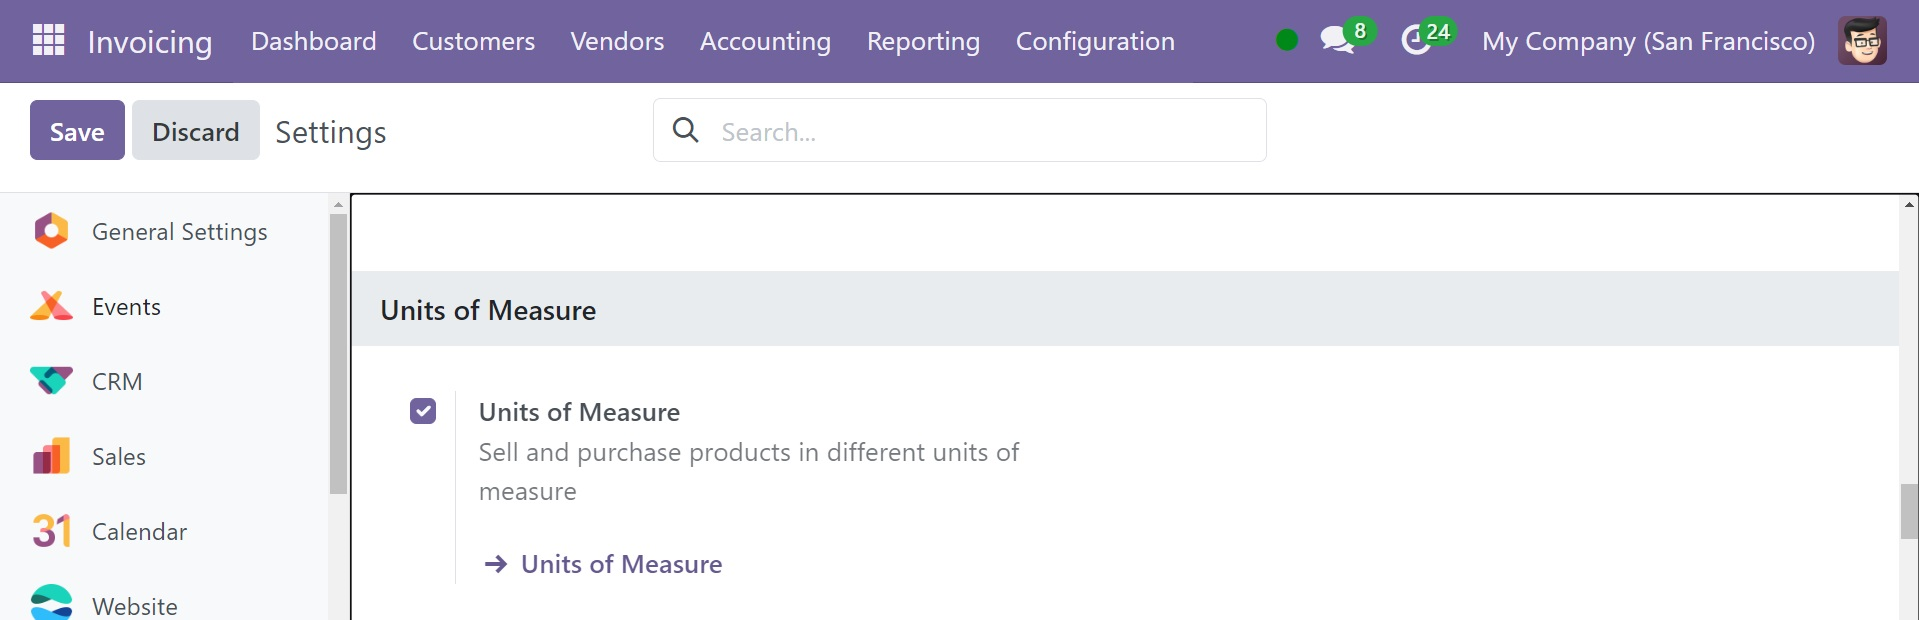
The option of units of measure will direct you to a page, as shown in the screenshot below.
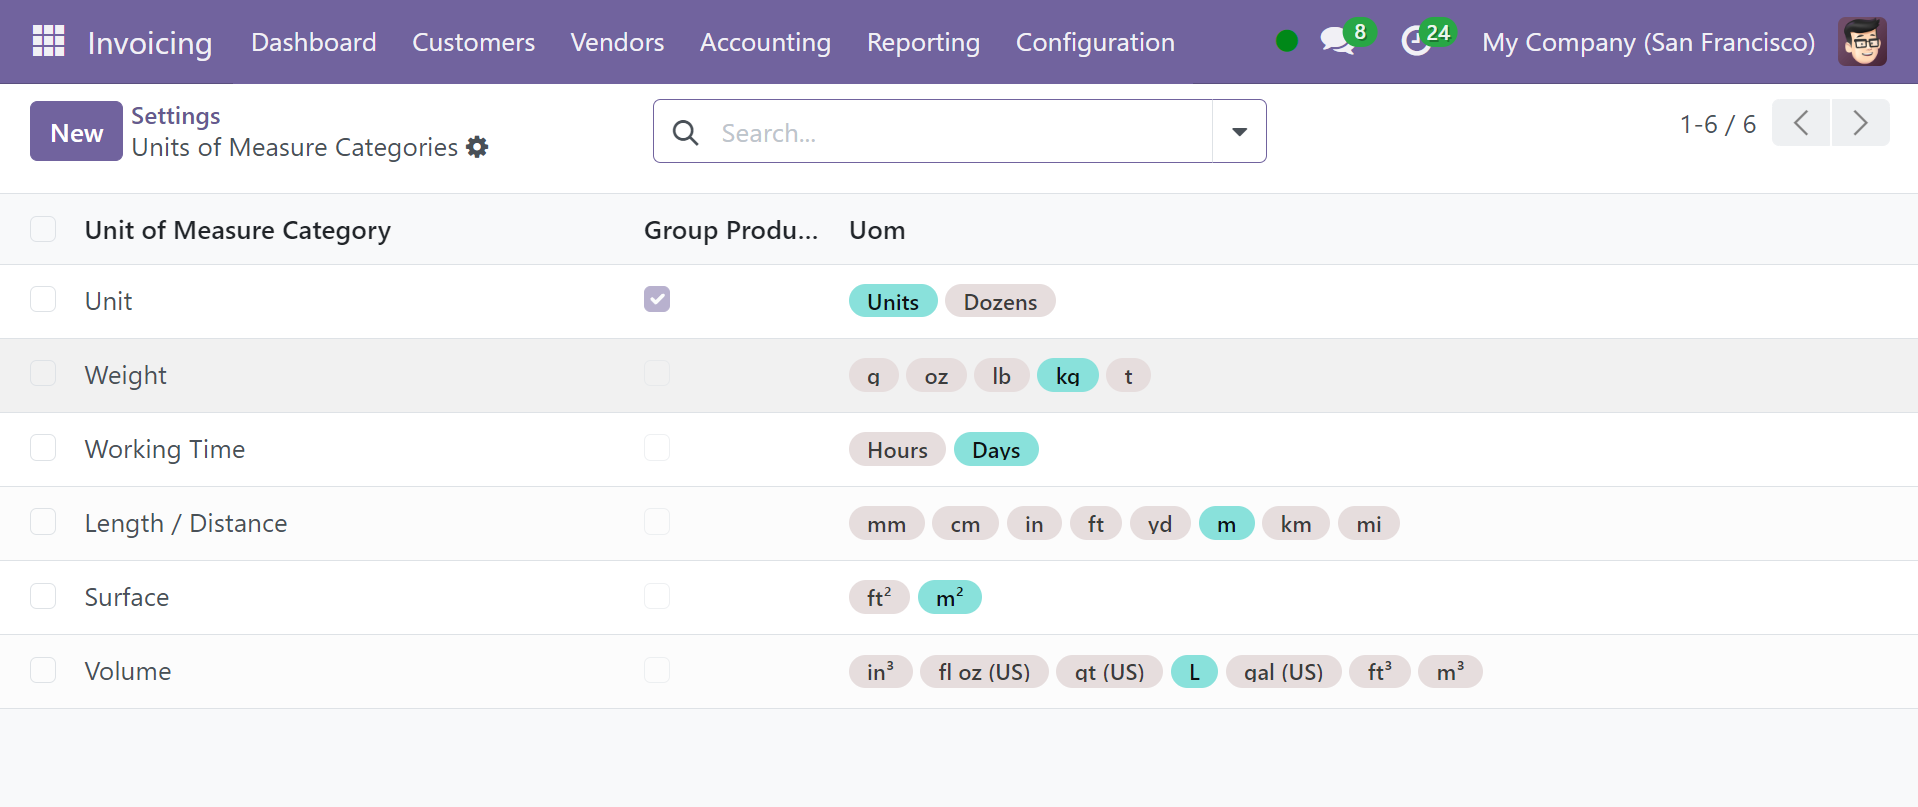
Here, you can see all the units of measure.
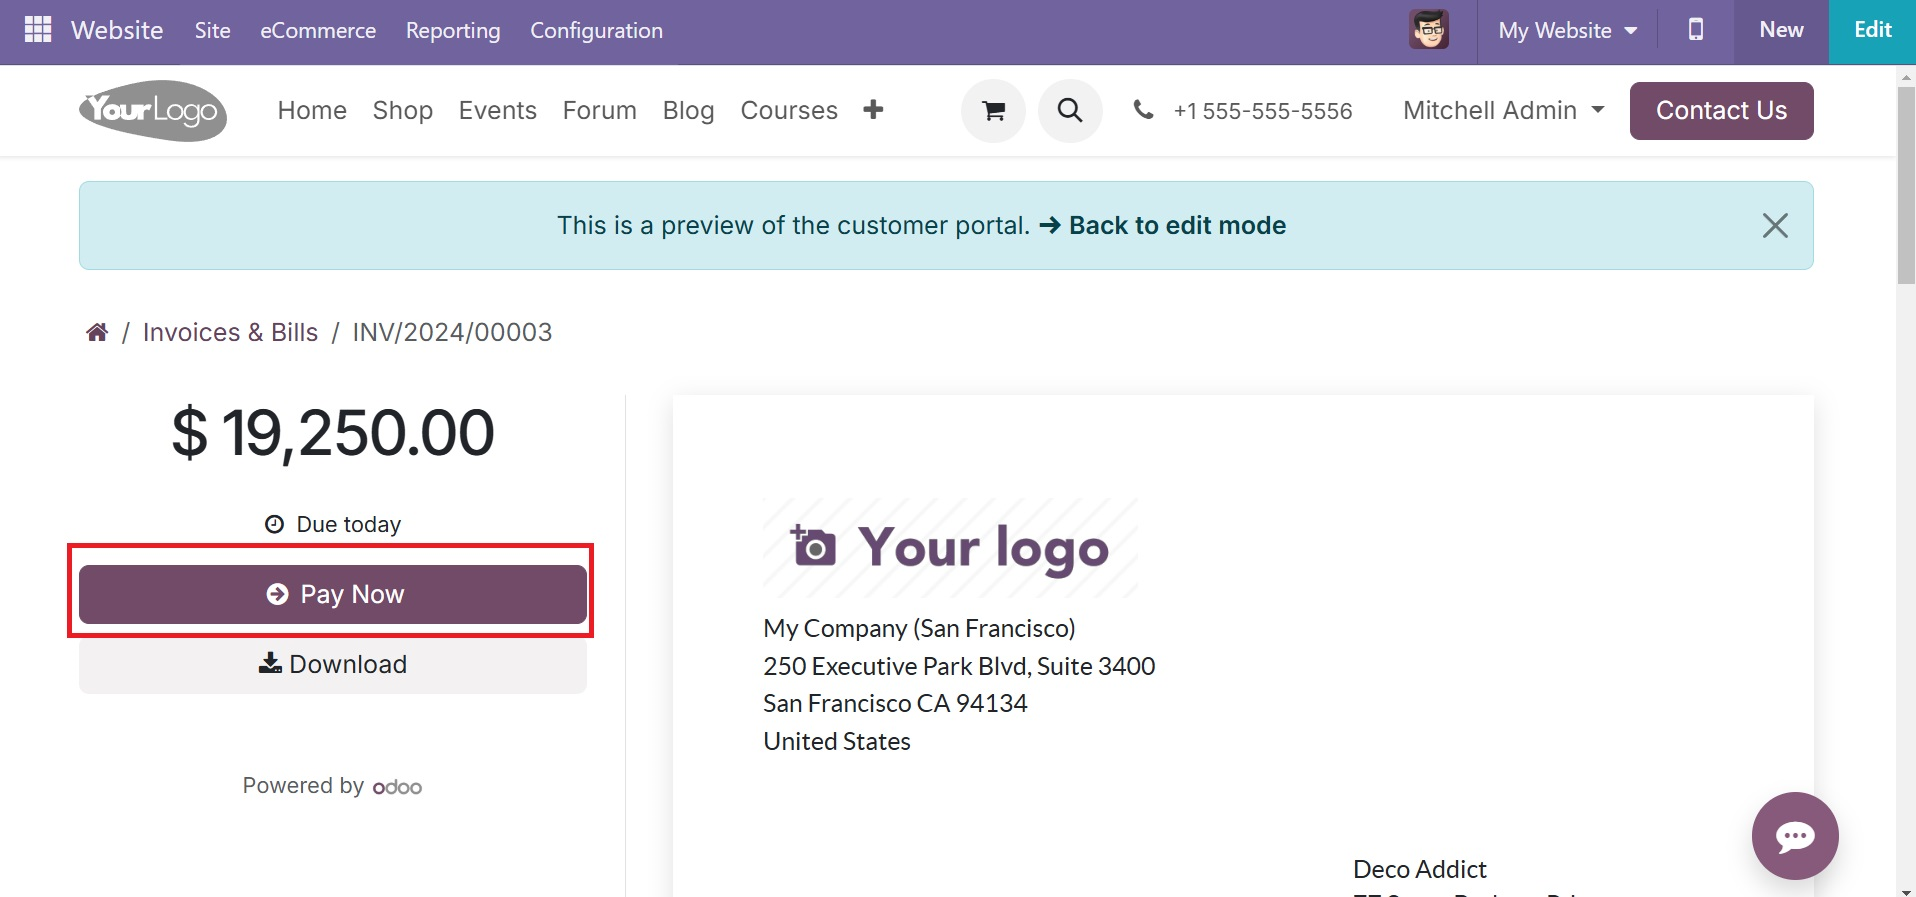
Invoice online payment
Online invoice payment is available in the client payment area which will enable customers to make payments using their portal.
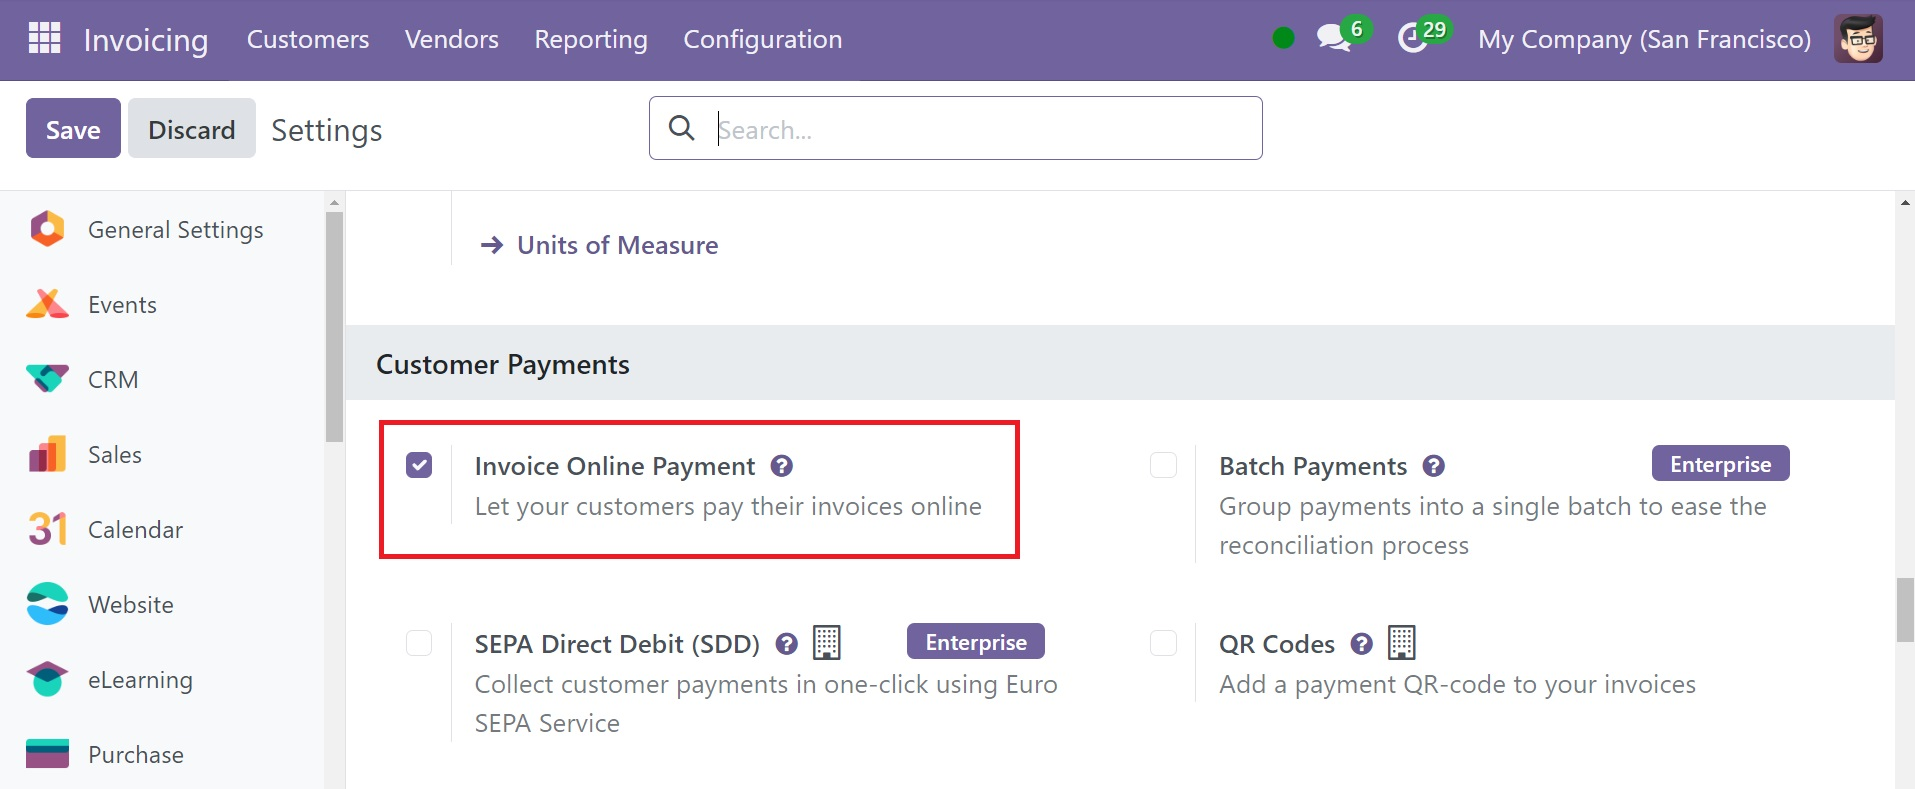
The Pay Now option will appear on the portal for the customer, if user has enabled online invoicing.
QR Codes
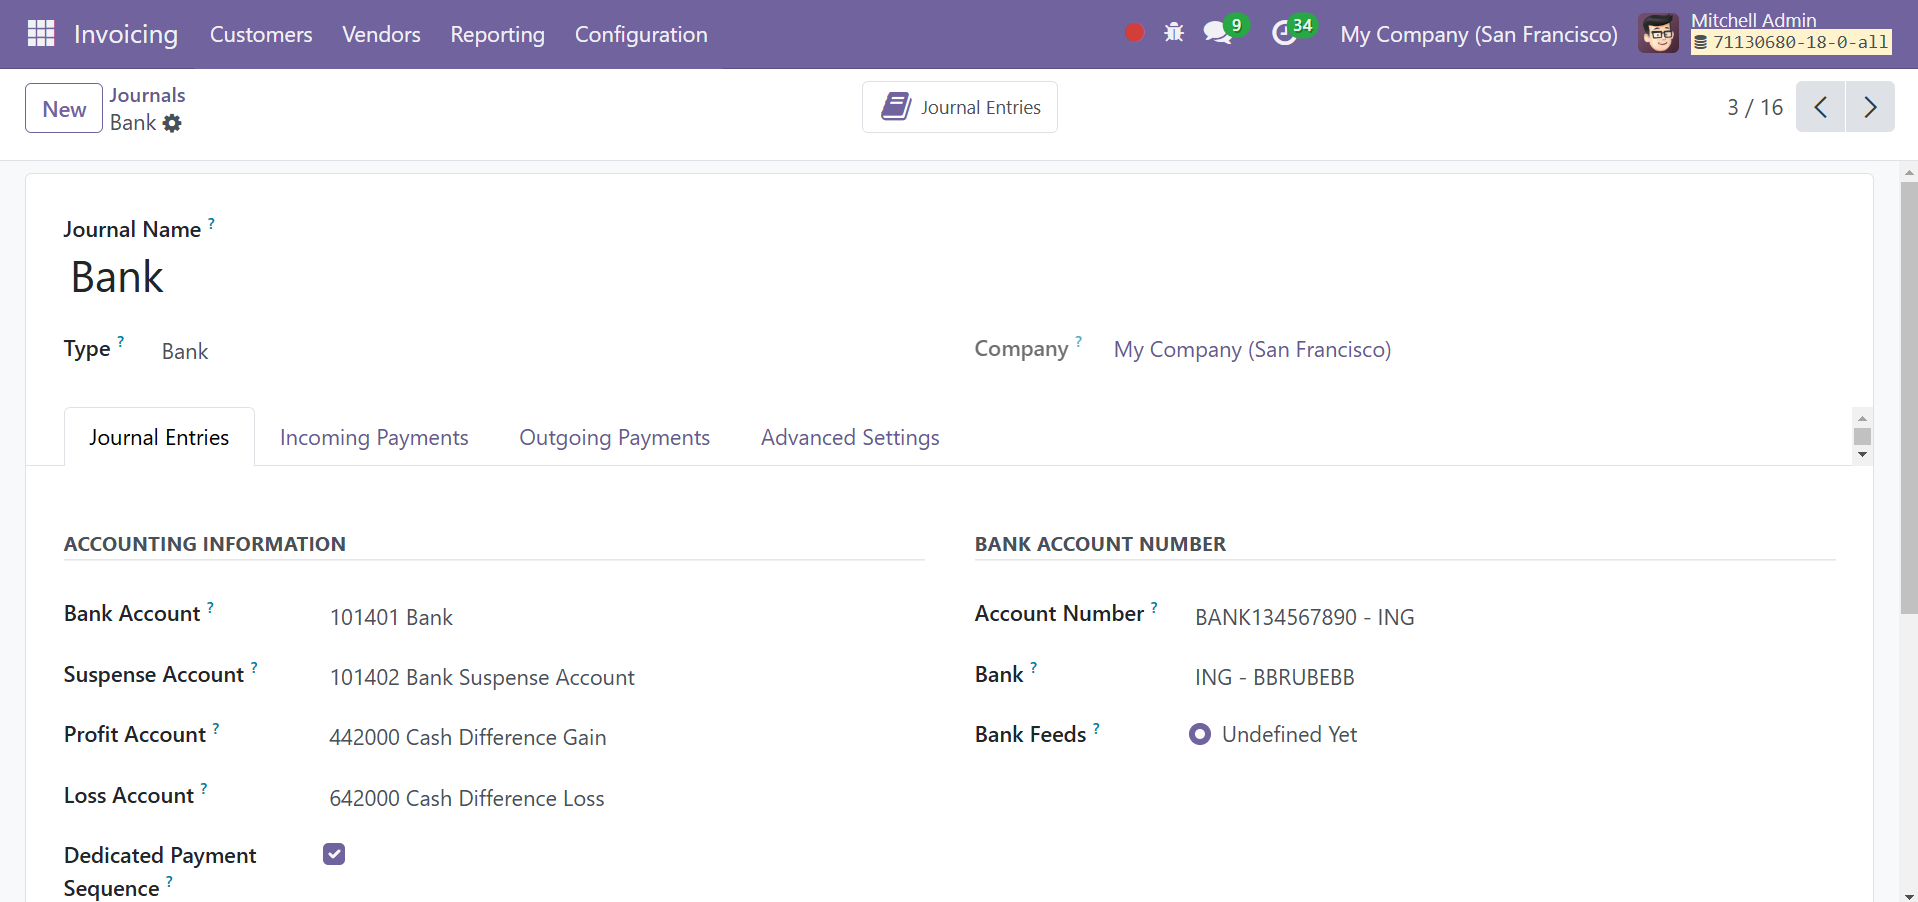
To configure QR Codes, select the Settings option from the Configuration menu. Click the Save button after activating QR Codes under the Customer Payments tab.

Make sure your bank account details are set up correctly before adding payment QR Codes to invoices for clients in other nations. Make sure you enter the "Bank" and "Account Numbers" in the designated fields on your bank journal form, as indicated below.
From the Customers menu, select the Invoice option to create a new invoice.
To select the type of QR Code that will be used to pay the invoice, select the "Payment QR-Code"
To select the type of QR Code that will be used to pay the invoice, select the "Payment QR-Code" section on the "Other Info" page. For the first available approach, leave this field empty.
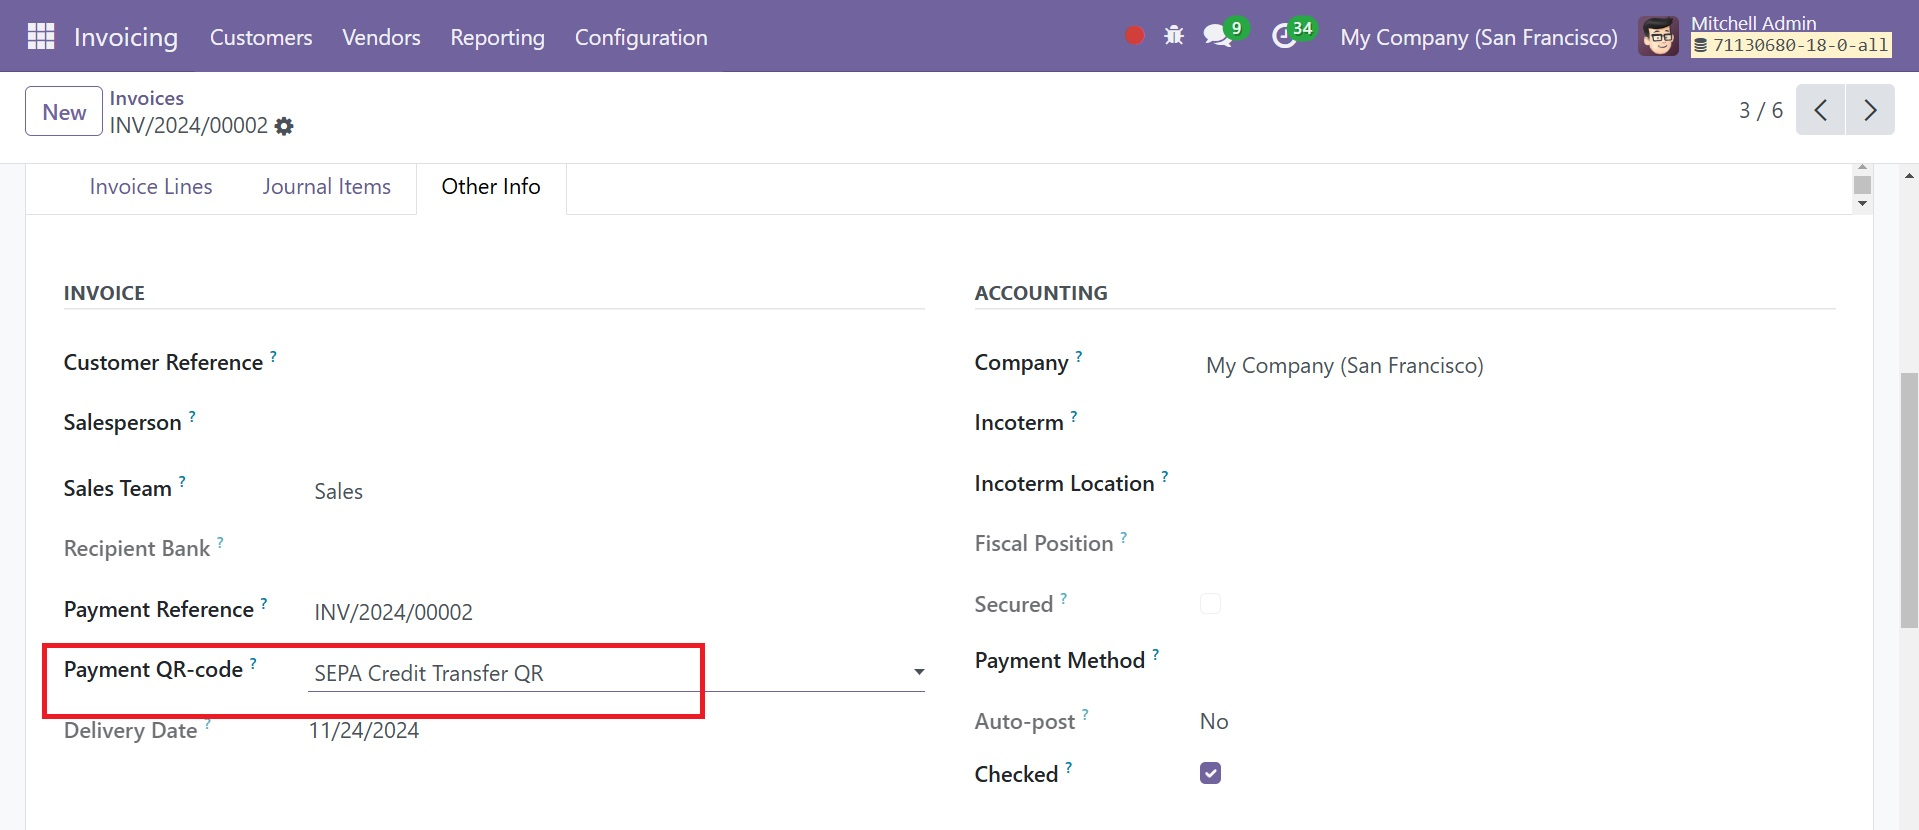
After inputting information, click the "Confirm" button to verify the revised invoice. A "Preview" button will now appear, bringing the QR Code to the customer's invoice.
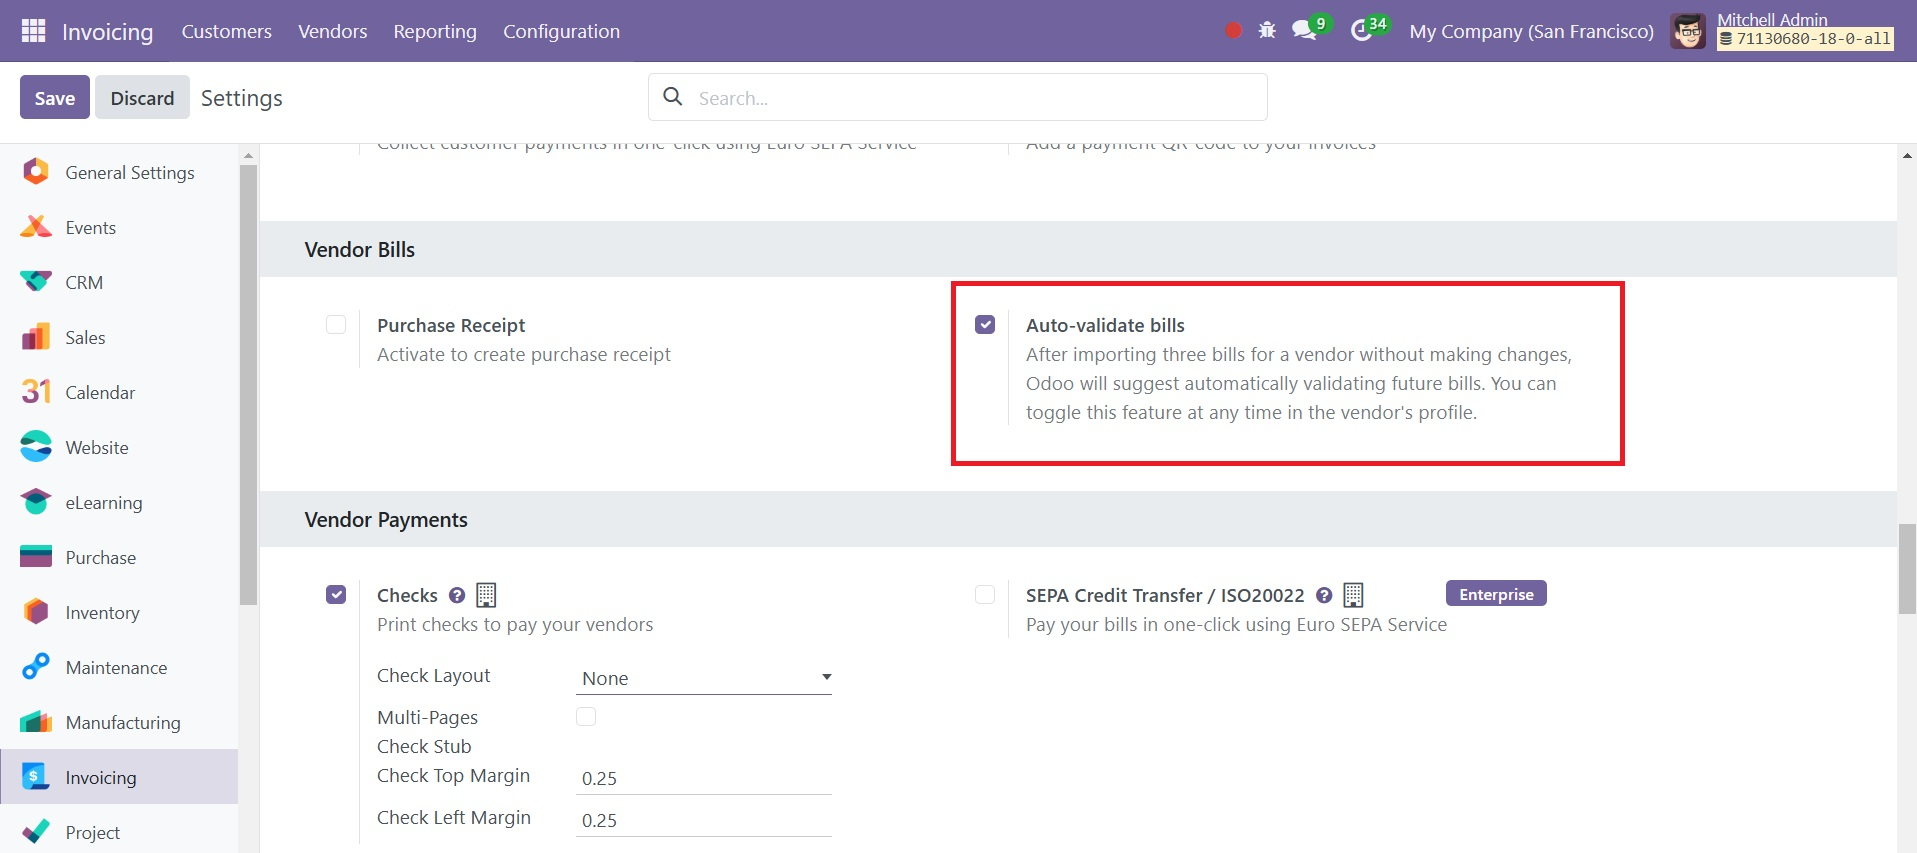
Purchase Receipt
Comparable to a sales receipt Users can select the Purchase receipt option from the Vendors menu. Consequently, the user must first enable the Purchase Receipt option from Settings, which is found under the Vendor Bills section. It helps to ensure that a purchase receipt is produced.
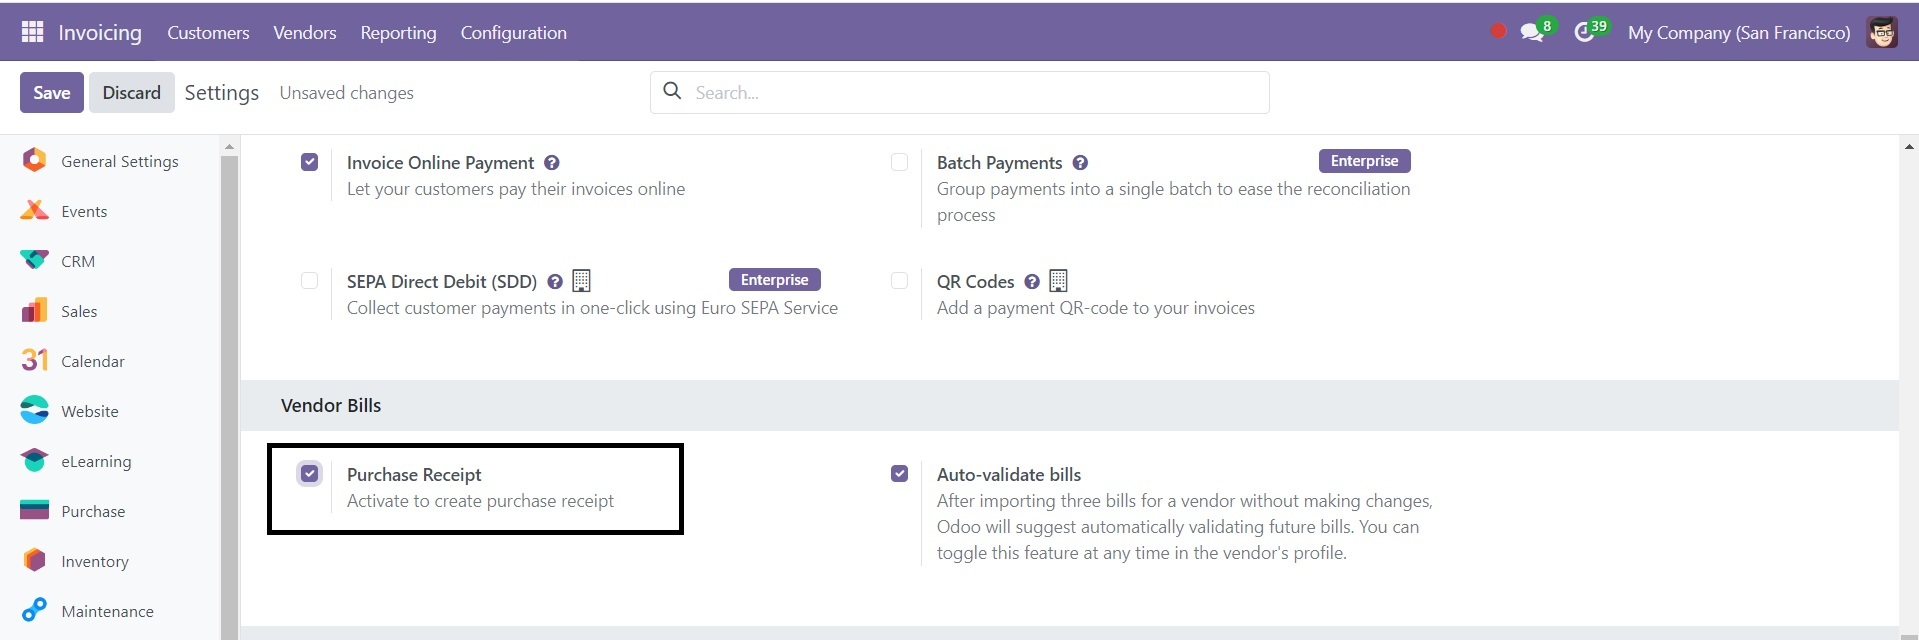
Next, under the Vendors menu, the user is presented with an extra Receipt option. The purchase receipts are part of the receipts.
To add a new receipt, click the New button. A bill and a creation form are comparable.
Nevertheless, the user cannot finish the payment after verifying the receipt because the Register Payment button is missing from the document.
Auto-validate bills
Odoo will recommend automatically verifying subsequent bills after importing three bills for a vendor without making any modifications. In the vendor's profile, you can turn this feature on and off at any moment.
Checks
Cheques for sizable vendor payments are periodically sent to the vendors. Thus, Odoo 18 makes it possible to pay these checks. Therefore, the user must first enable the Checks option from Settings in order to use the Check payment method.
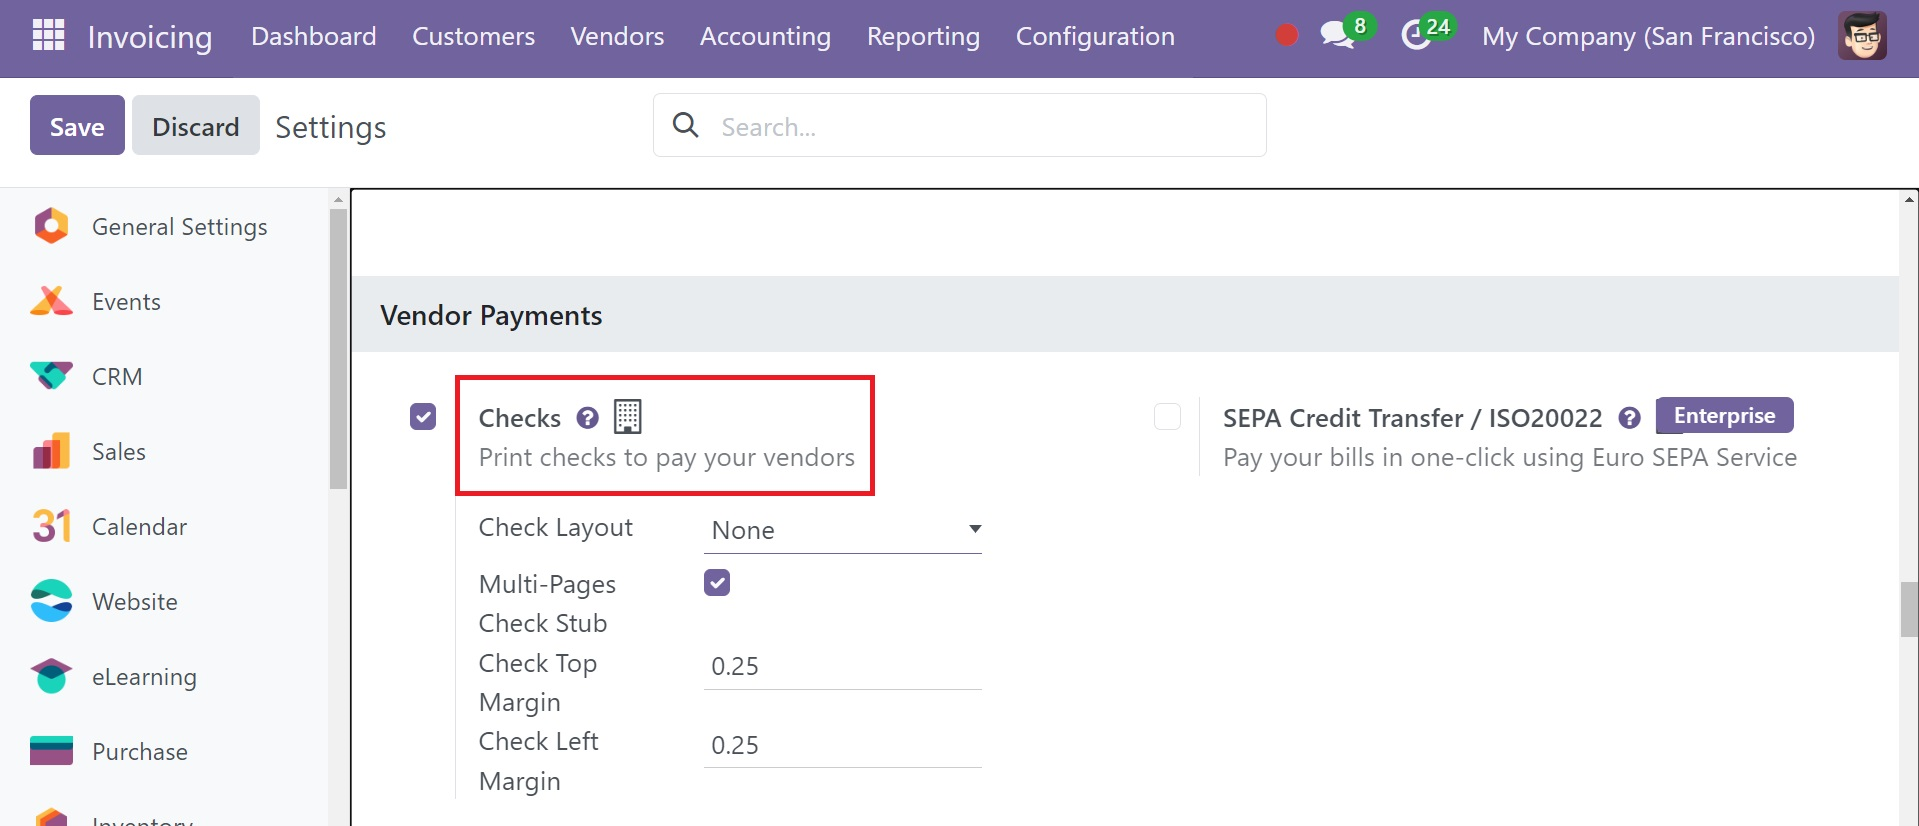
You can print checks with this option in order to pay your merchants. Thus, it is possible to list items like Check Layout, Check Left Margin, and Check Top Margin there. To use the vendor payment as a check, save the settings.
Users can then add payment methods on the Bank Journal's Outgoing Payment tab. Make checks available there as a means of payment as a result.
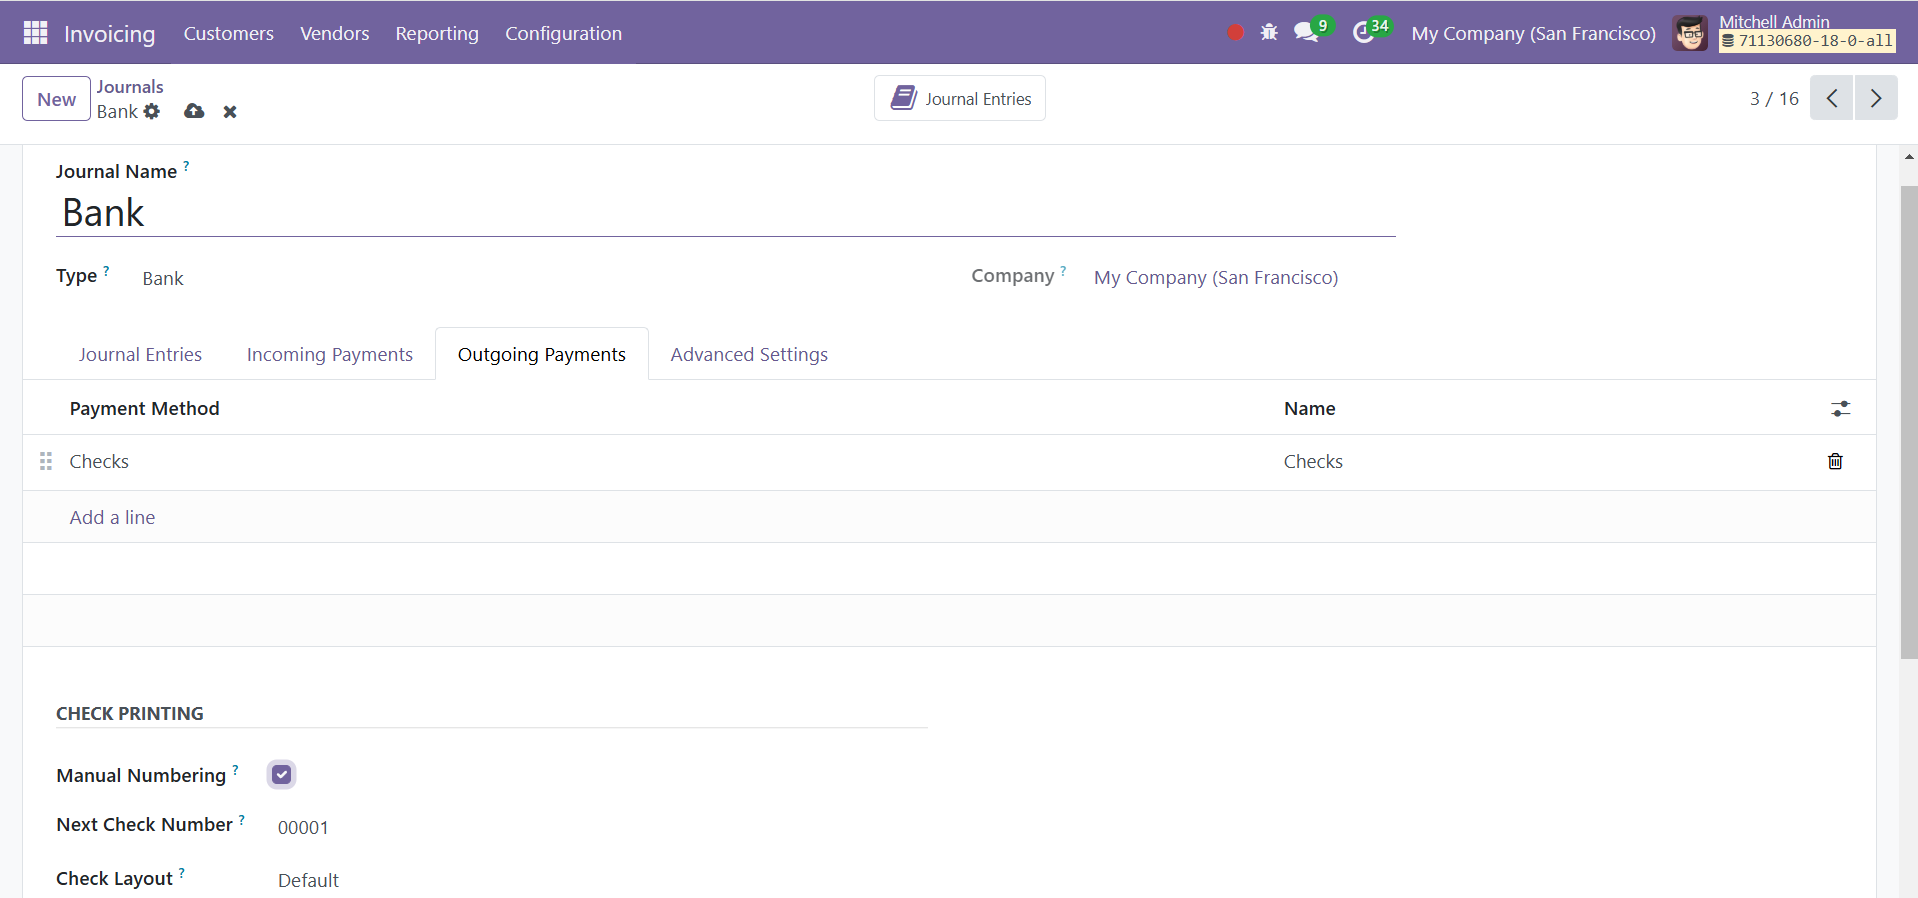
Then a section labeled "CHECK PRINTING" will appear in the bottom left corner. Add the Next Check Number there after turning on Manual Numbering. There will be an automated update to the Next Check Number.
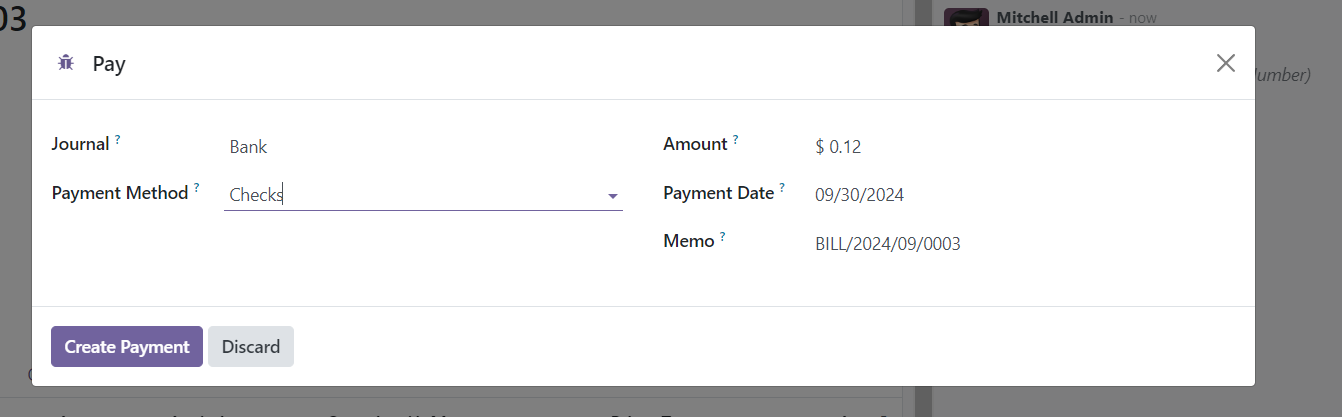
The Journal and Payment method Checks can be chosen from the Register Payment popup box when a vendor payment is added.
Default Account
Under the Default Accounts area of the settings, you can add default accounts that are used for transactions. The default accounts that are used to post payments and bank transactions are configured in this section. There are new accounts for bank suspense, outstanding payments, outstanding receipts, and internal transfers. Cash Discount Gain and Cash Discount Loss are the accounts that are supposed to post the discounts.
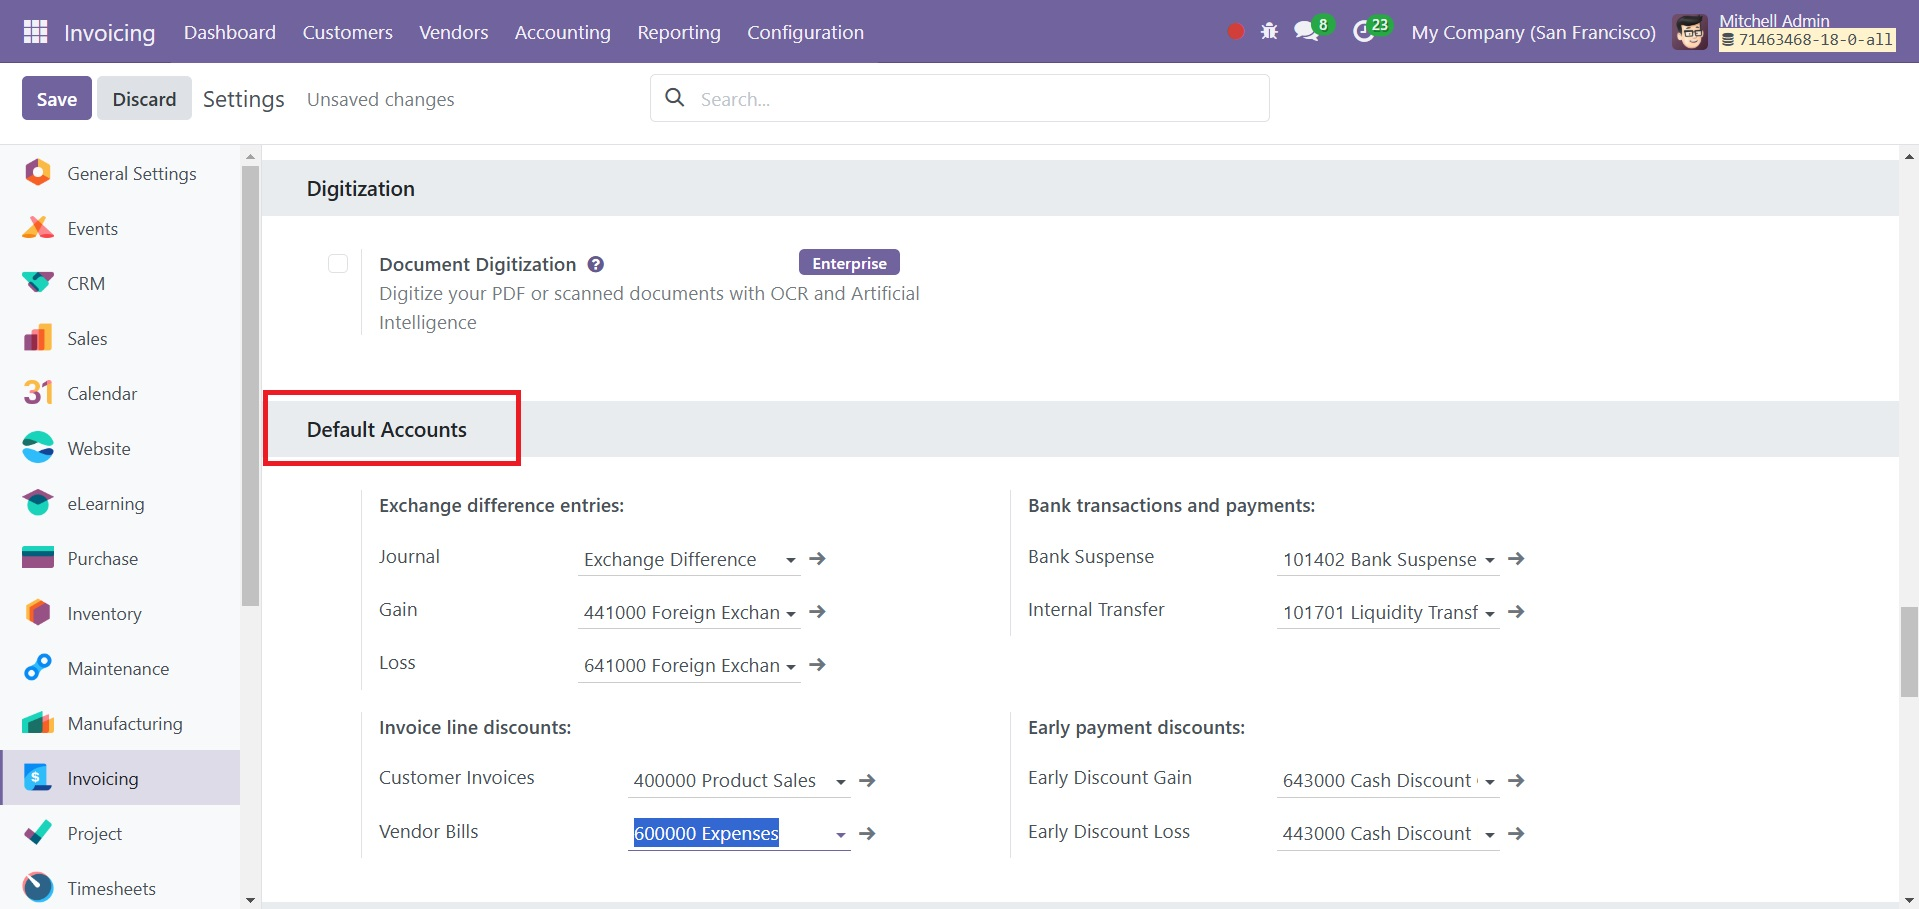
Under the defaults tab, you have got many options, such as exchange difference entries, bank transaction and payments, invoice line discounts, and early payment discounts, respectively.
Odoo automatically records exchange differences entries on dedicated accounts, in a dedicated journal. Below the exchange difference entries, you have journal, gain, and loss accounts that let you specify the default accounts that are used to submit entries for exchange differences, respectively. The exchange rate has probably changed if you get paid for a client invoice a month after it was sent. Consequently, this variation suggests a profit or loss as a result of the exchange difference, which Odoo automatically logs in the Exchange Difference journal by default.
Below the bank transaction and payments, there are bank suspense and internal transfer.
Bank suspense option: The suspense account is used to temporarily hold transactions when it is unclear which account should be used to record a given transaction, when bank statement is added.
Internal transfer option, Internal financial transfers will be tracked via the business's internal transfer account like bank-to-bank transfers.
Below the invoice line discount option, you have the option to add discount accounts of customer invoices and vendor bill as well. By default, only invoice and bill lines are eligible for a percentage discount. The discount provided at the time of billing and invoicing procedures are managed using vendor bills discount account and customer invoices discount account respectively.
Now, under the early payment discounts, you can add the early discount gain and early discount loss. The gain and loss from the cash discounts will be recorded in the default cash discount accounts. The profit and loss from the cash discounts will be recorded in the default cash discount accounts. With a cash discount, the amount you earn depends on whether the customer benefits from the cash discount or not. This inevitably leads to gains and losses, which are recorded on default accounts.
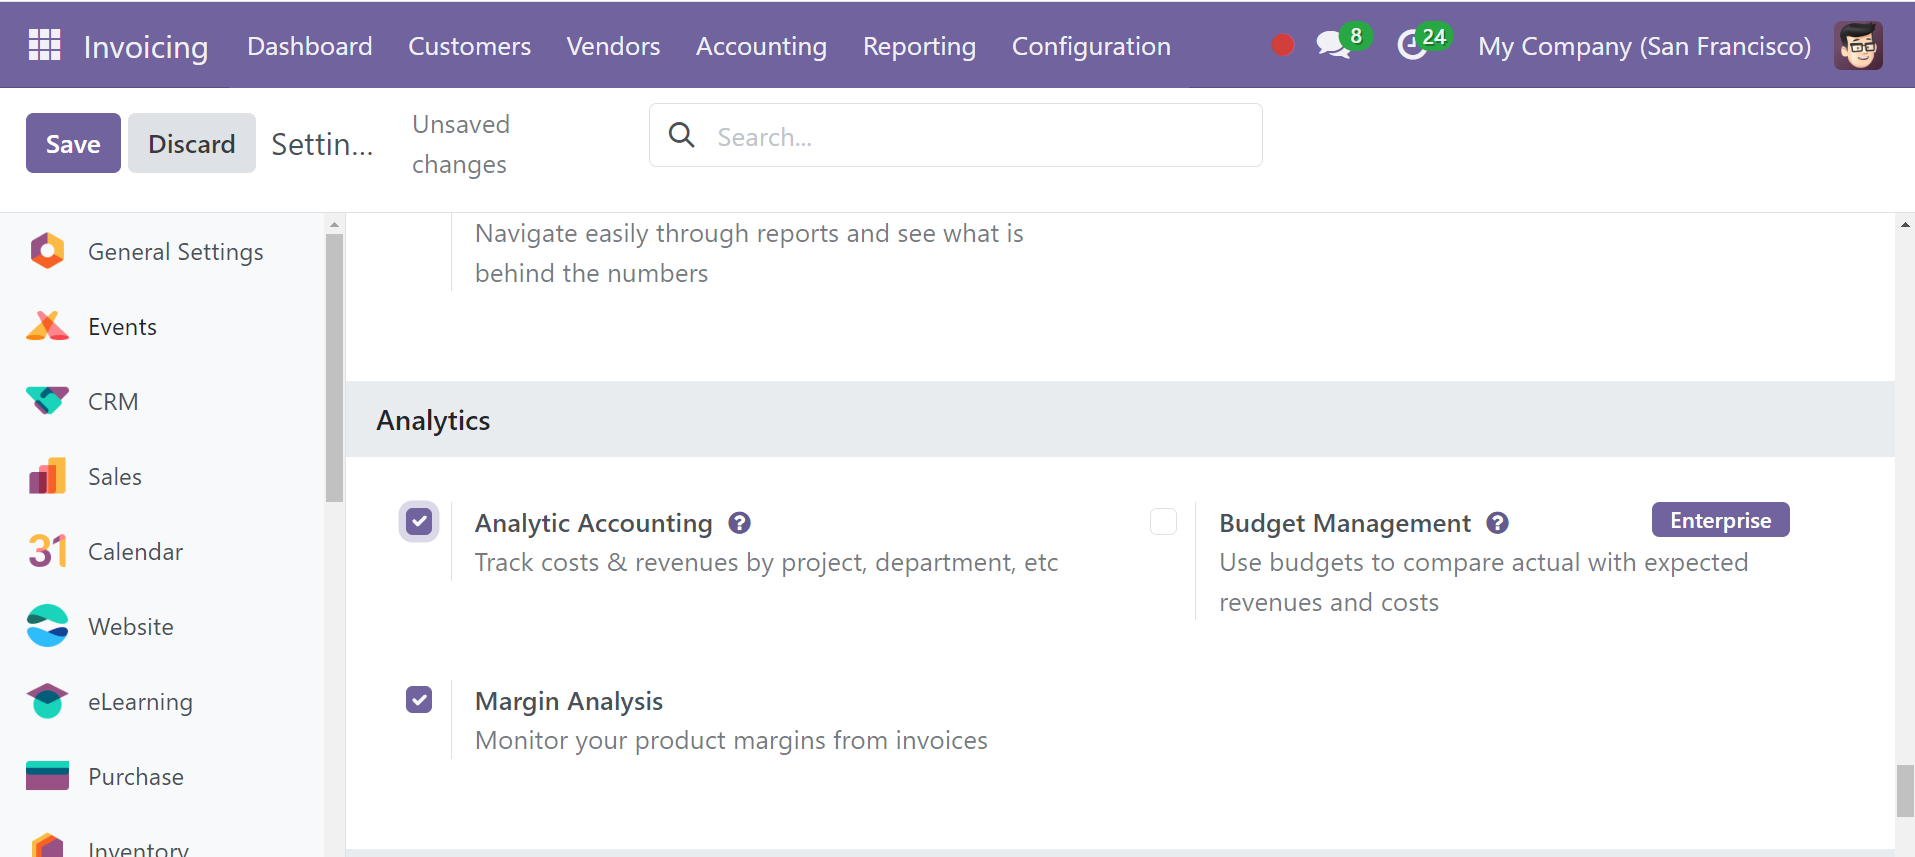
Analytics Accounting
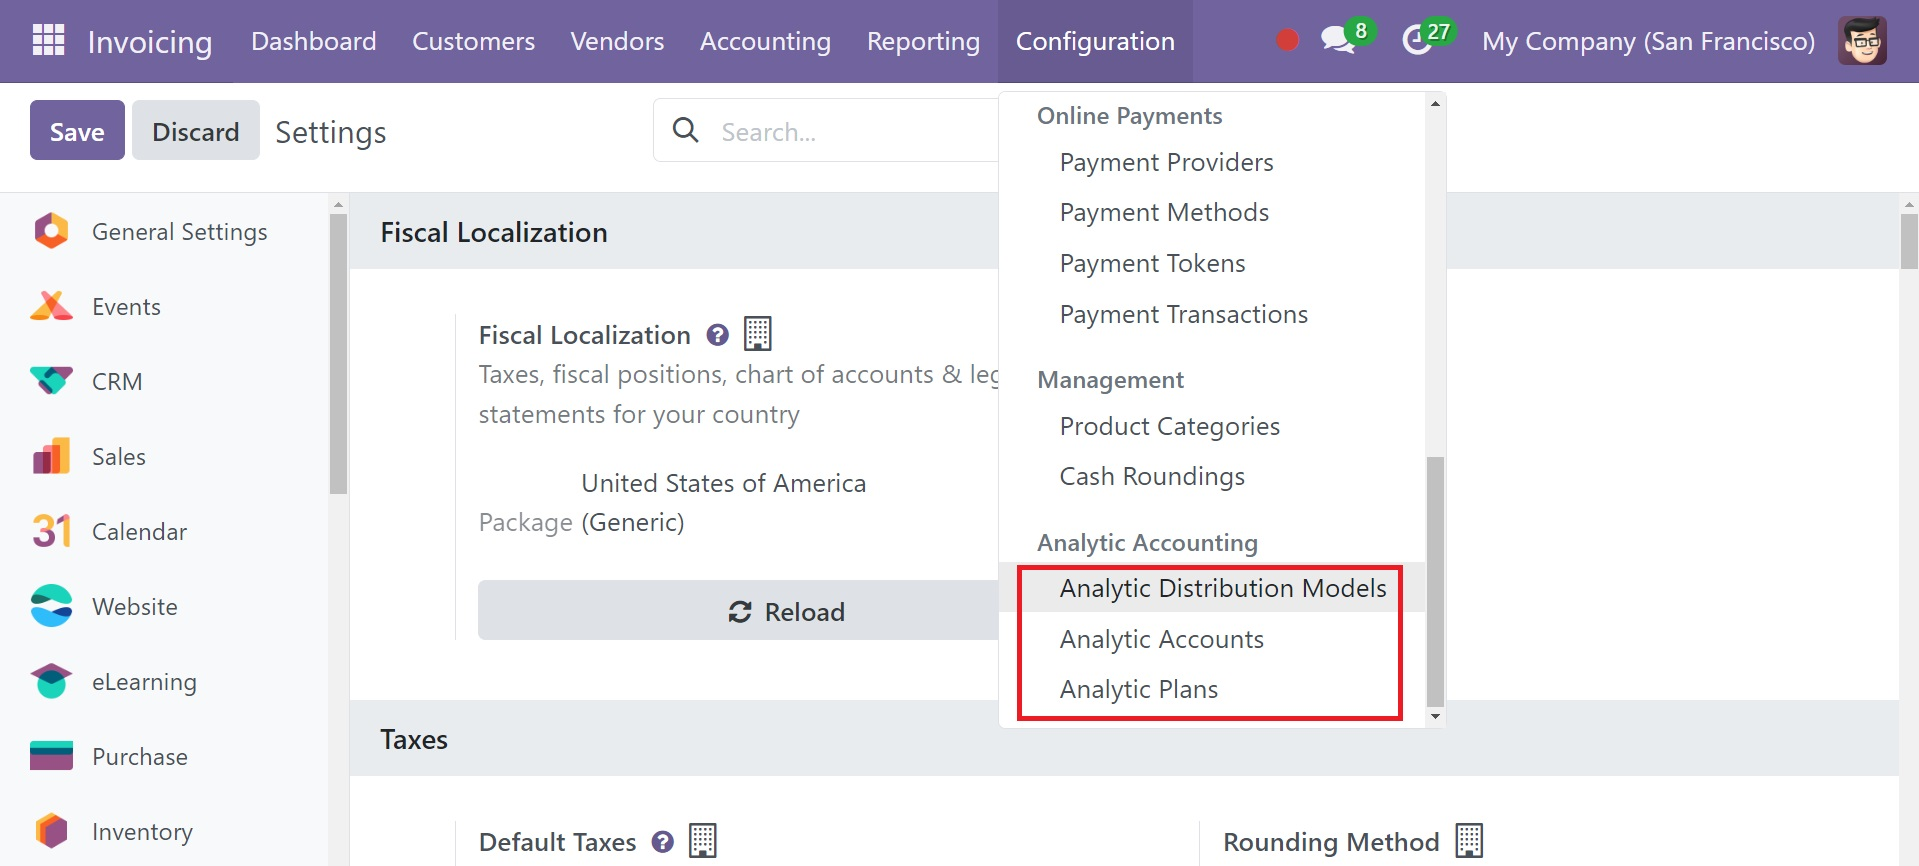
Use the Odoo18 Accounting module's Analytic Accounts feature to keep an eye on particular expenses and revenue. Depending on the needs of your company, you can configure a chart of analytical accounts in your system to record specific analytical entries. Even though they are connected to the general accounts in Odoo18, these accounts are managed separately. To activate this feature, select the Analytic Accounting option from the Accounting module's Settings menu.
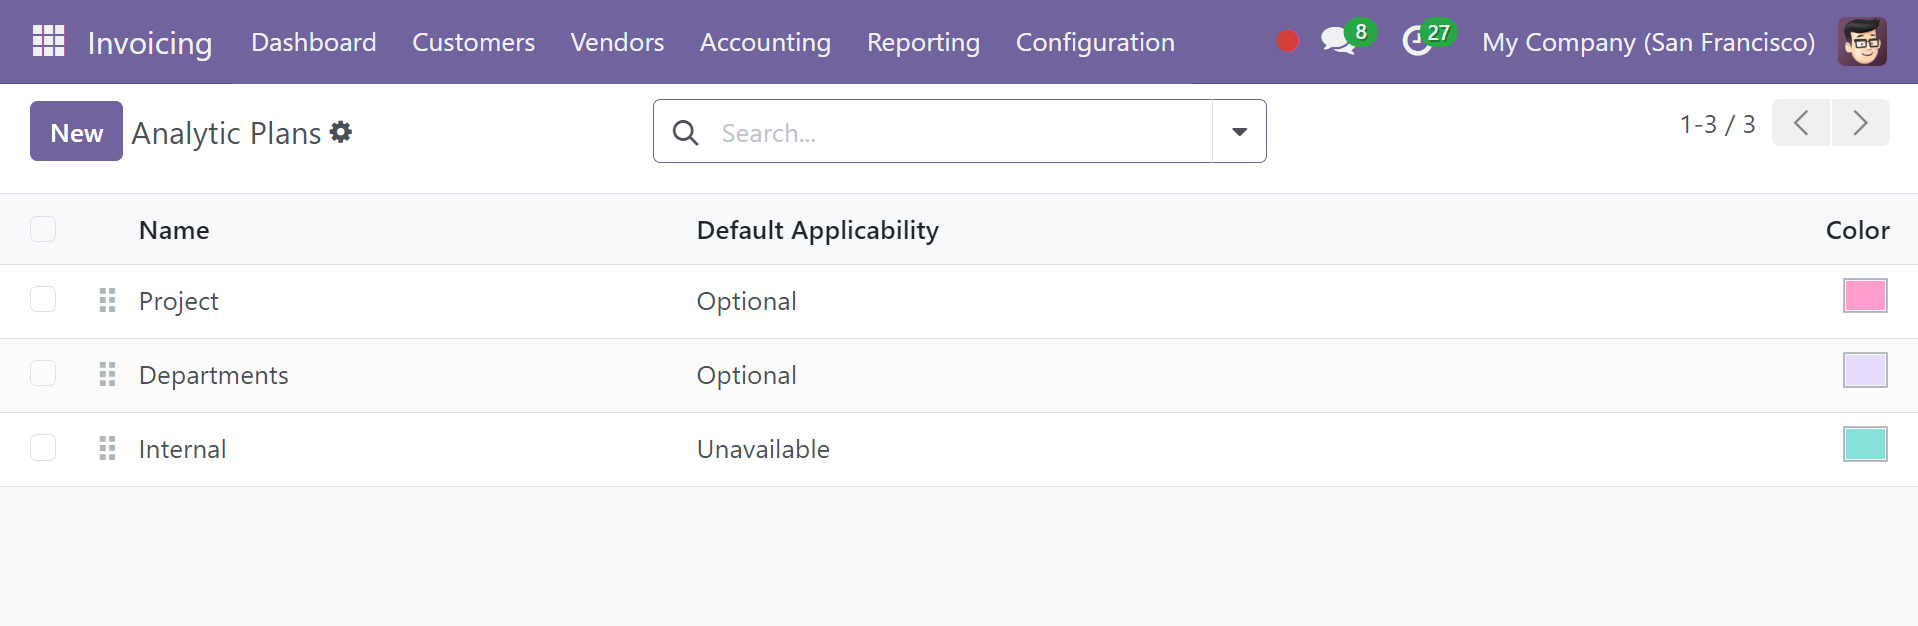
The Analytic Accounting choices will show up in the module's Configuration menu as soon as you enable this feature.
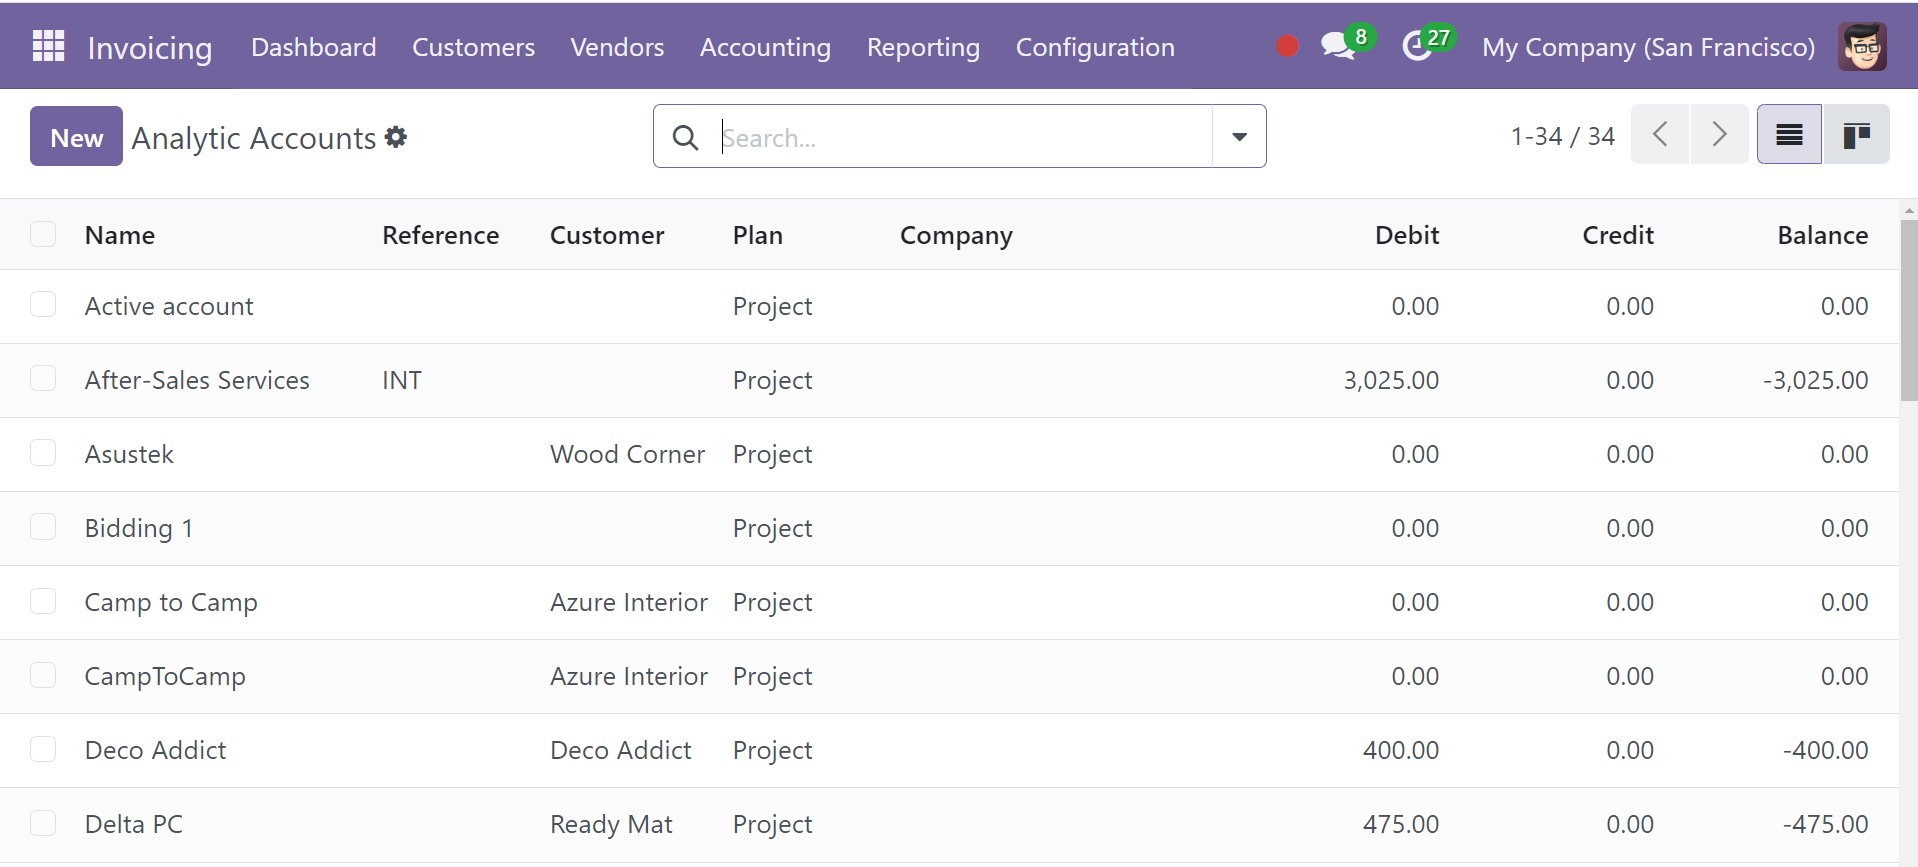
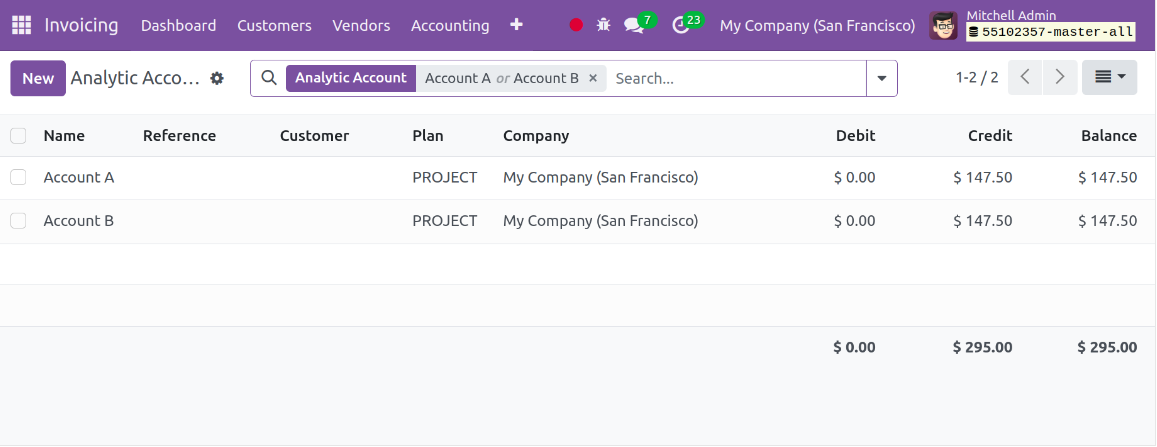
You can acquire a list of all the system's accessible analytic accounts by selecting the Analytic Accounts option. Each analytic account's Name, Reference, Customer, Plans, Company, Debit, Credit, and Balance are displayed in the list view.
In the Accounting module, creating a new analytical account is simple. A new setup window will appear when you click the New button, as shown below.
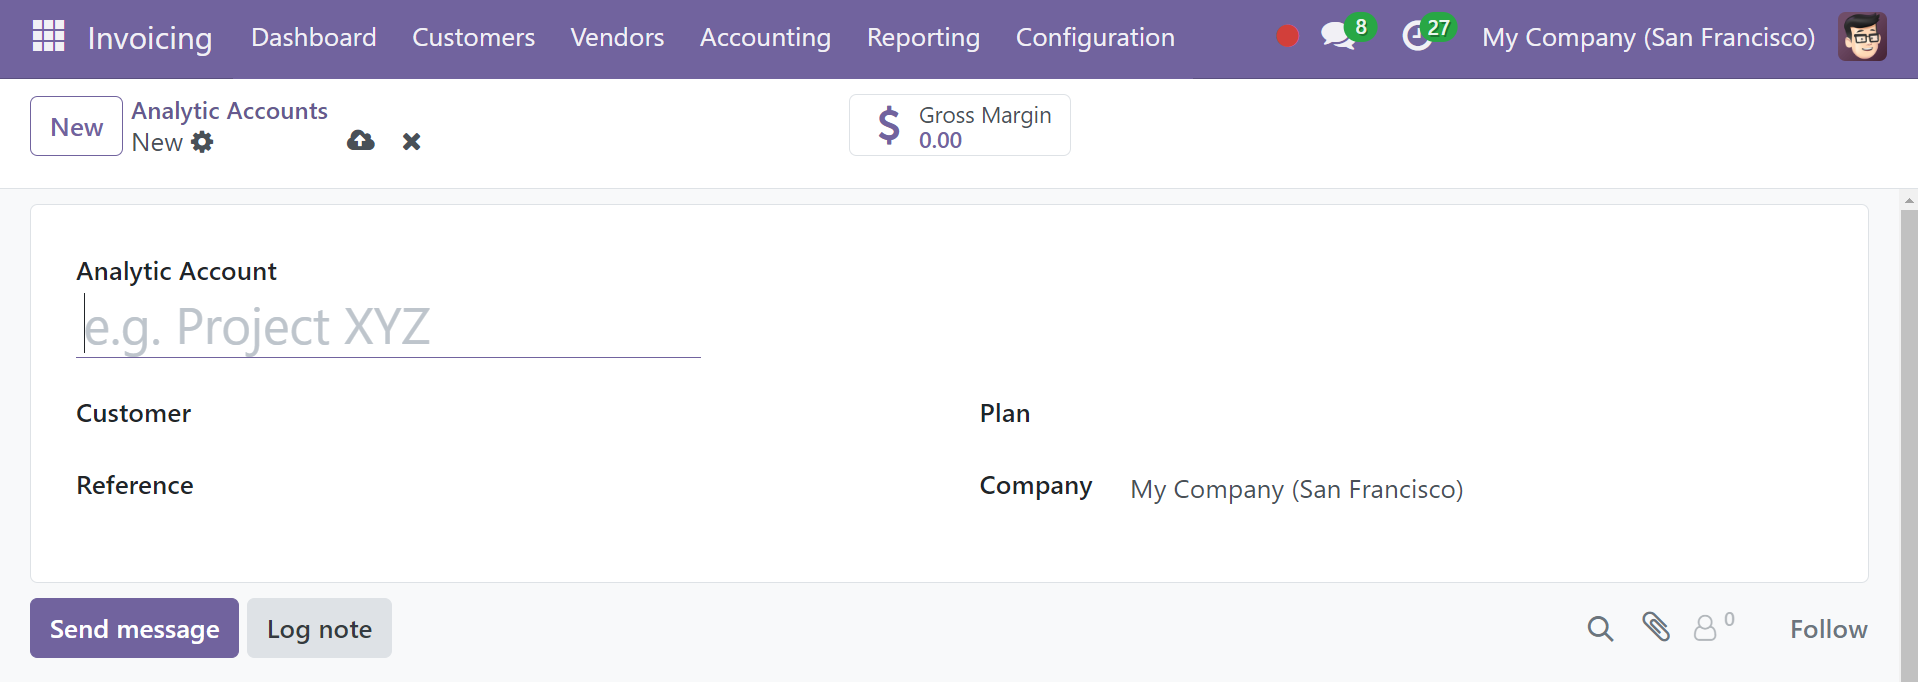
In the "Analytical Account" column, type the account name. If you know which specific customer this account impacts, you can enter their ID in the Customer box. In the relevant field, mention the Reference, Company, and Currency that were utilized to record the analytical entries.
Analytic Plan
In the new Plan field in Odoo 18, you can choose the optimal analytic plan for this account. As an alternative, a new Analytic Plan can be made via the Configuration menu of the module.
In the new Plan field in Odoo 18, you can choose the optimal analytic plan for this account. As an alternative, a new Analytic Plan can be made via the Configuration menu of the module. The list of potential analytical plans is located in this box, as can be seen in the screenshot below.
You can make a new plan by clicking the New button.
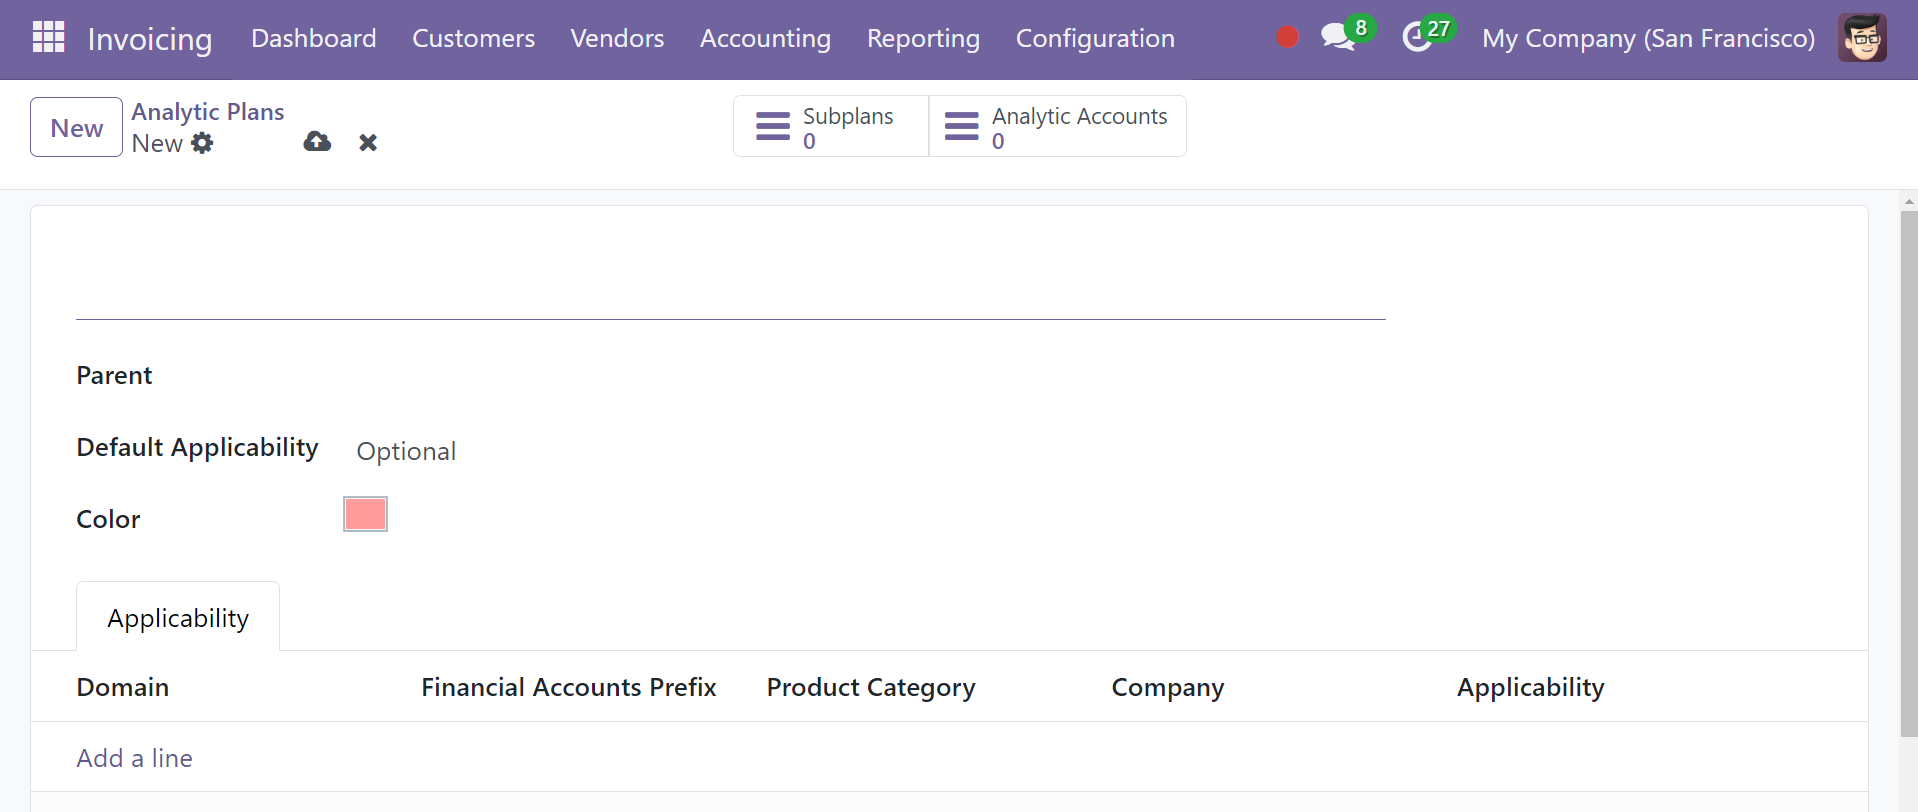
After giving the plan a name, you may complete the required fields to determine its Parent plan and Default Applicability. Use a complementary hue to help explain your strategy to others. Your company's name will show up right away in the appropriate field. Using the Add a Line button found under the Applicability tab, you can specify whether or not this plan is appropriate. An expenditure report, purchase order, vendor bill, invoice, or another domain are among the options available to you. Which accounts from the financial accounting should be covered by this applicability is specified by the prefix provided in the Financial Accounts Prefix. Utilize this analytical method while bearing in mind the Product Categories.
For the Applicability setting, there are three options available: Required, Optional, and Unavailable.
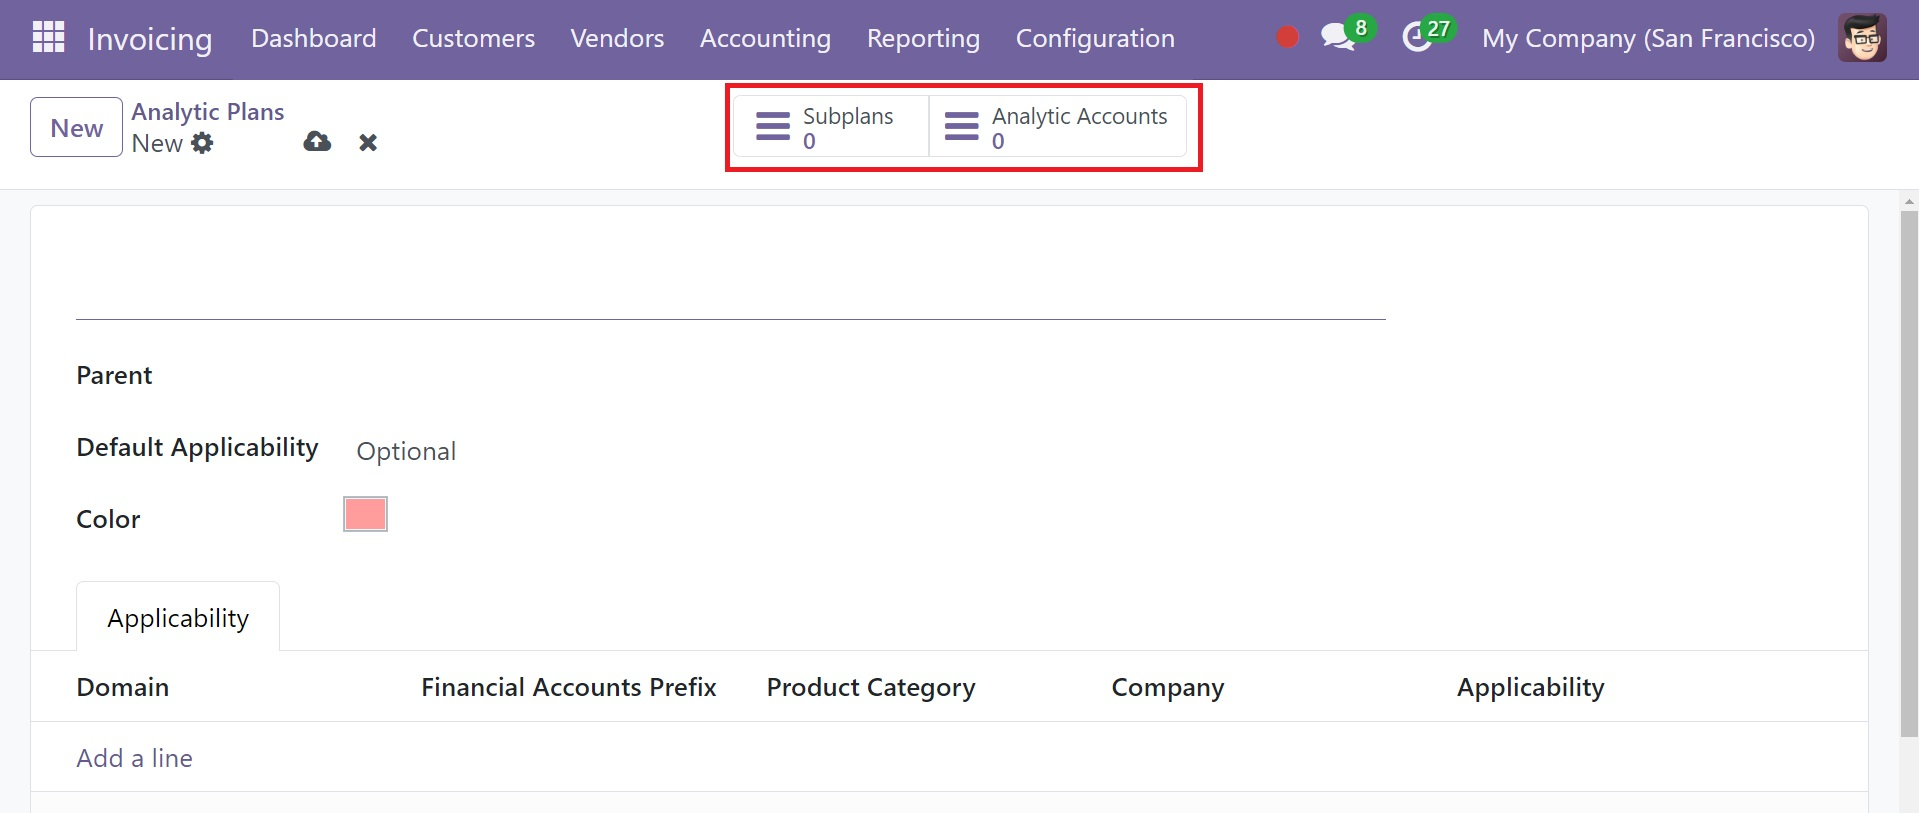
Use the available sub plan smart button in the center top of the window to add Sub Plans to a Parent Plan. In the same window, you will also see another analytic account smart button that you can use to access the Analytical Accounts included with this package, as shown in the screenshot above.
Analytic Distribution Model
Every journal item can have an analytic distribution established by turning on Odoo18's Analytic Accounting feature. You can split the whole amount among several analytics accounts. A manage and create option for creating new Analytic Distribution Models is available in the module's Configuration menu. The details of each Analytic Distribution Model's Accounts Prefix, Partner, Product, Company, and Analytic are displayed in the list preview. By selecting the NEW option, a new distribution model can be established.
You can adjust the conditions of the distribution model using this window. By choosing them in the designated sections, you can apply the analytic distribution for a Partner, Partner Category, Product, Product Category, and Company. Provide the Accounts Prefix to specify which financial accounting accounts this model should be applied to. You can choose which Analytic Accounts will share the journal item's amount among themselves under the Analytic Distribution to Apply section.
After the distribution model has been constructed, and you create an invoice for the partner that is listed in the model, the cash will be moved to the appropriate accounts. The following example follows.
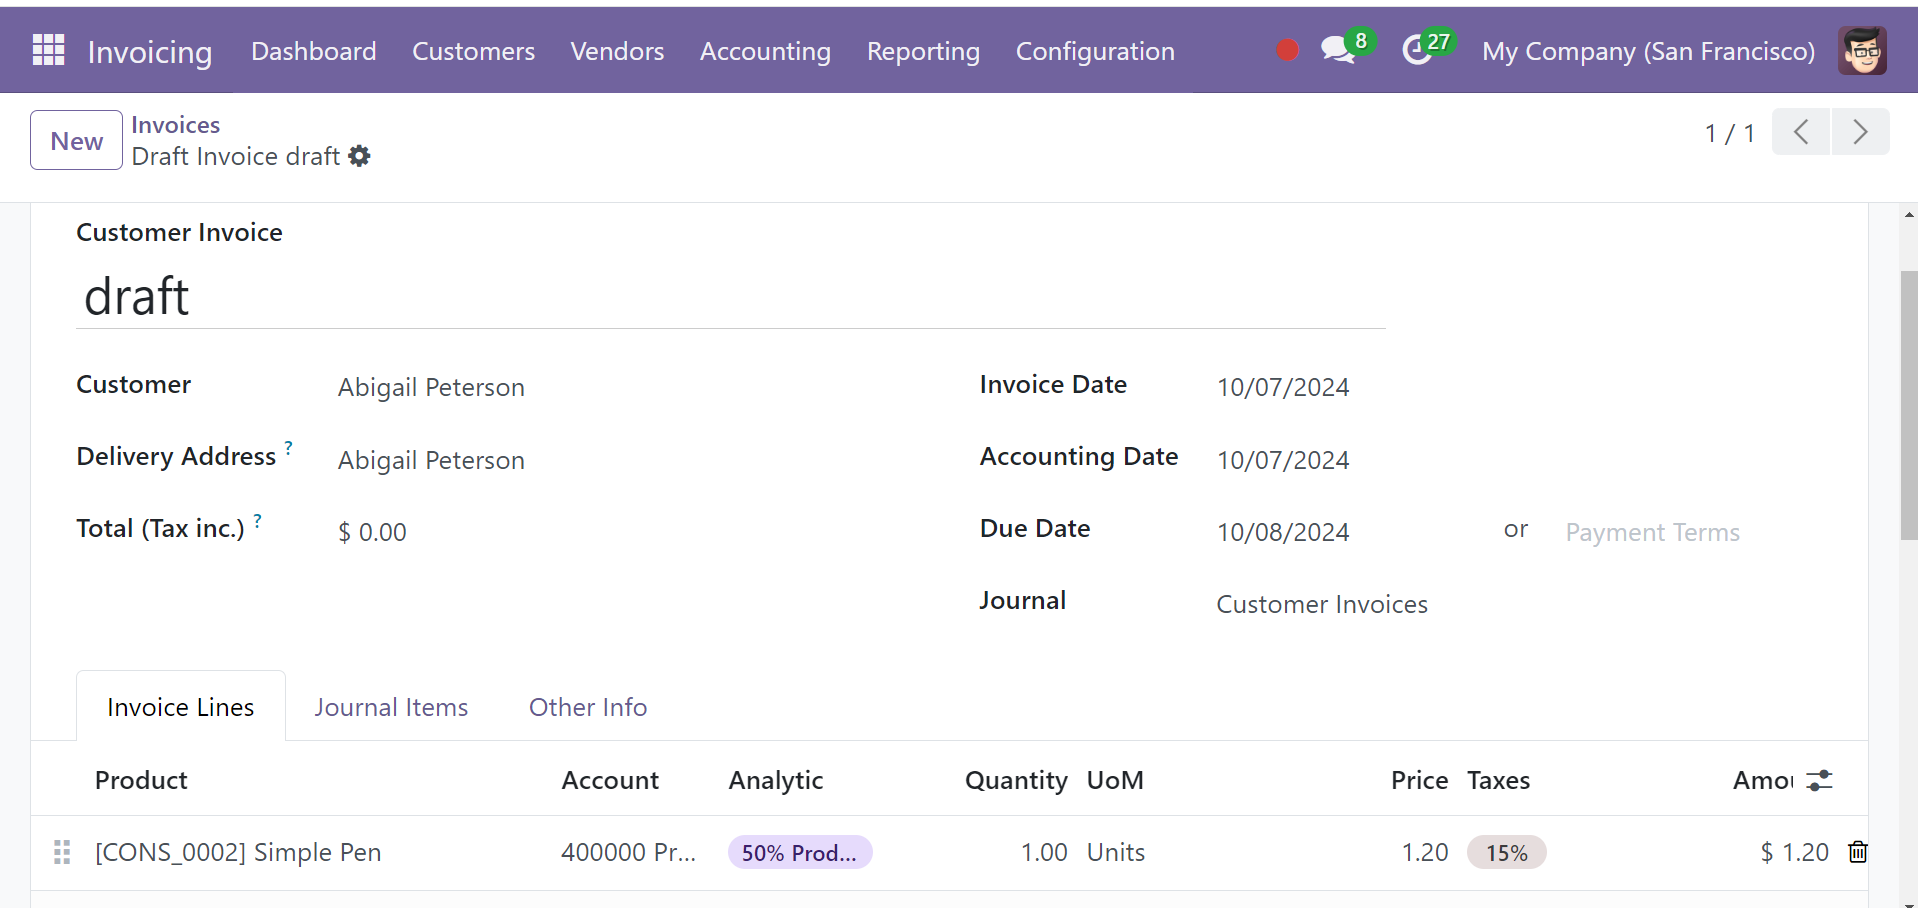
The pertinent analytic accounts will immediately show up under the Journal Items when you create a new invoice. Let's verify the payment before looking at the activity in these analytical accounts.
The screenshots display the distribution of the new analytical entry to the analytical accounts that may be found in the distribution models.
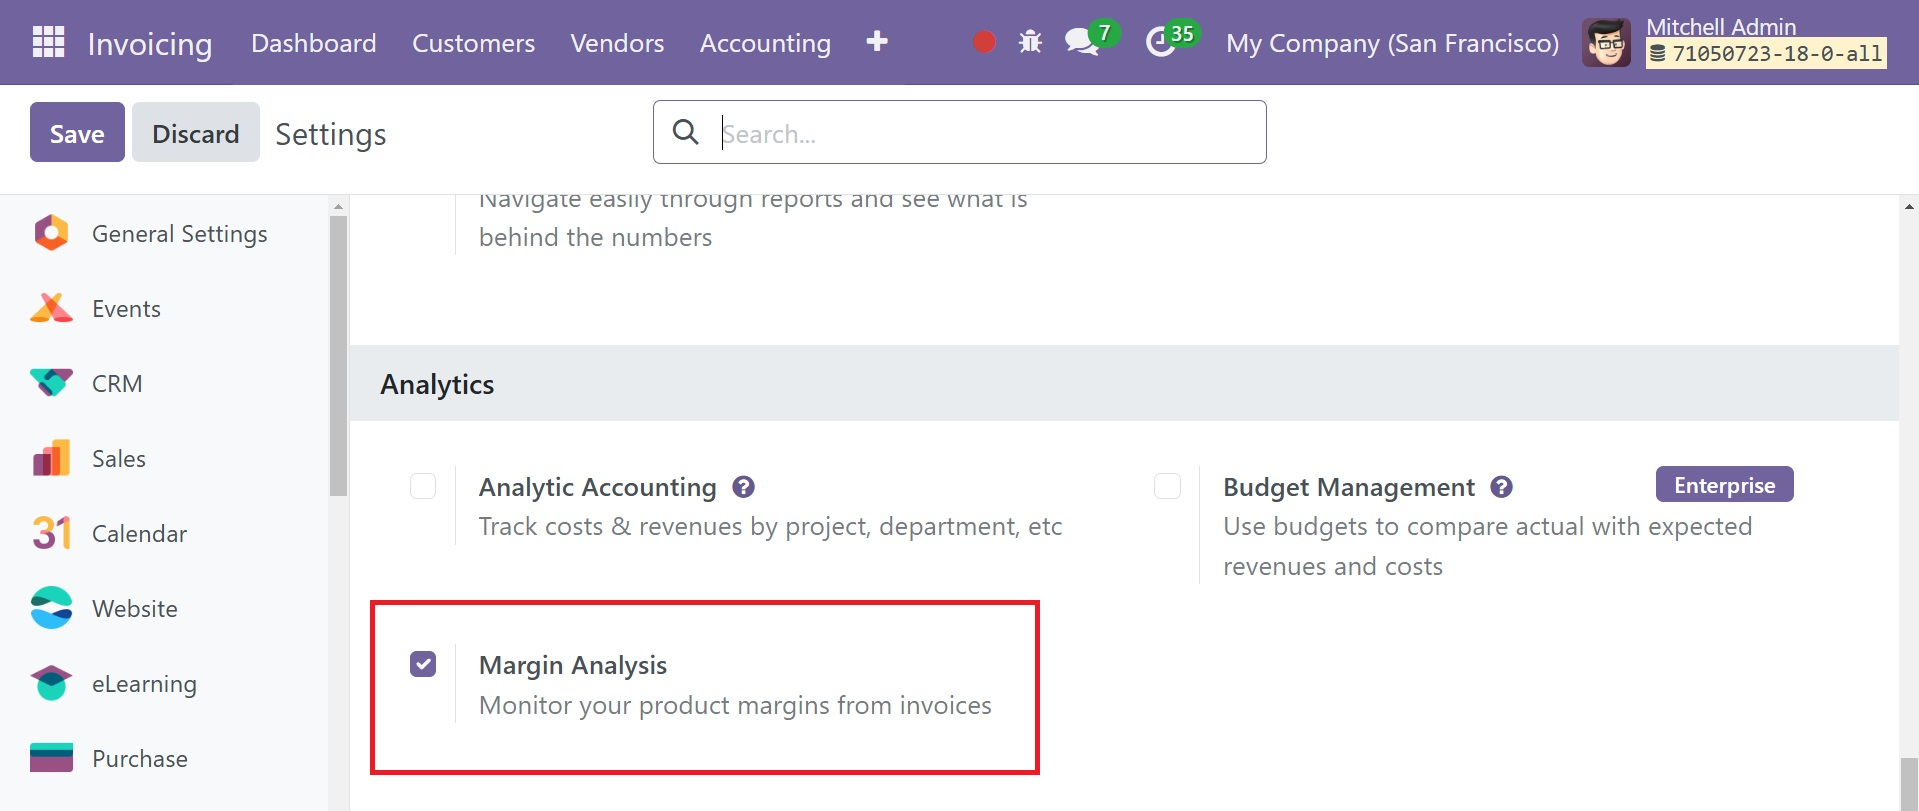
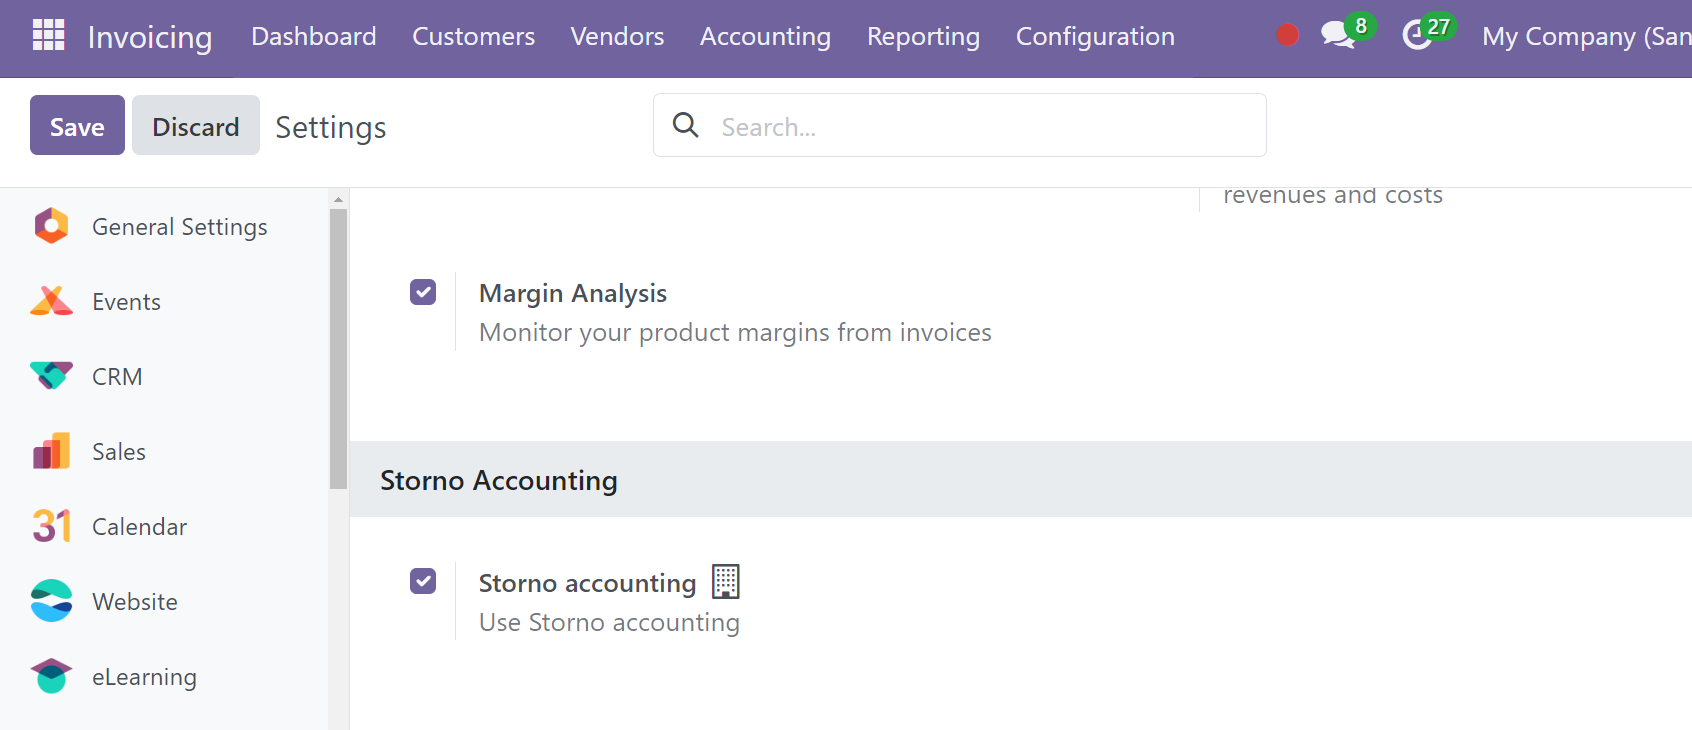
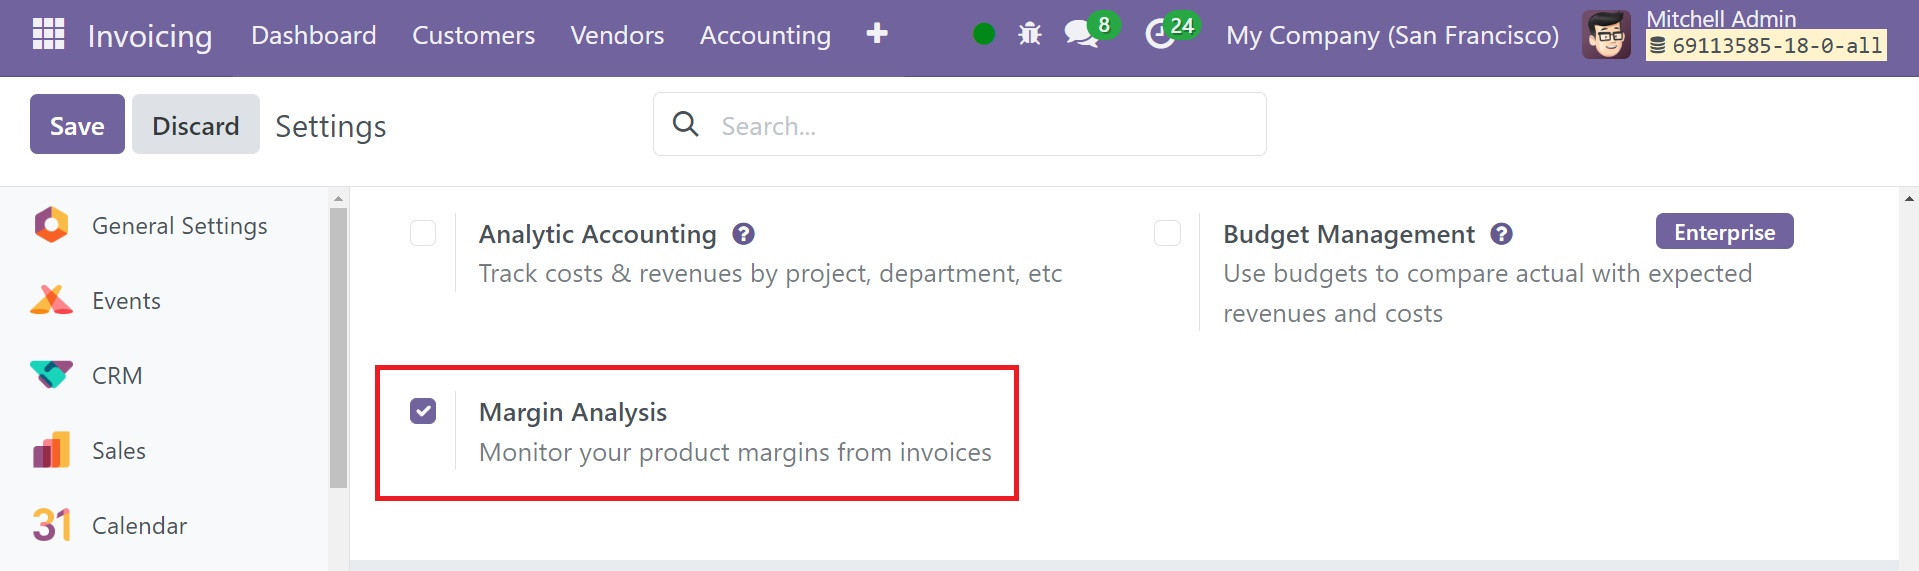
Margin Analysis
After it is enabled, you may see the margin for every product line and sale order. The cost price is deducted from the sale price to determine the margin. Additionally, you may see the margin % for every order line.
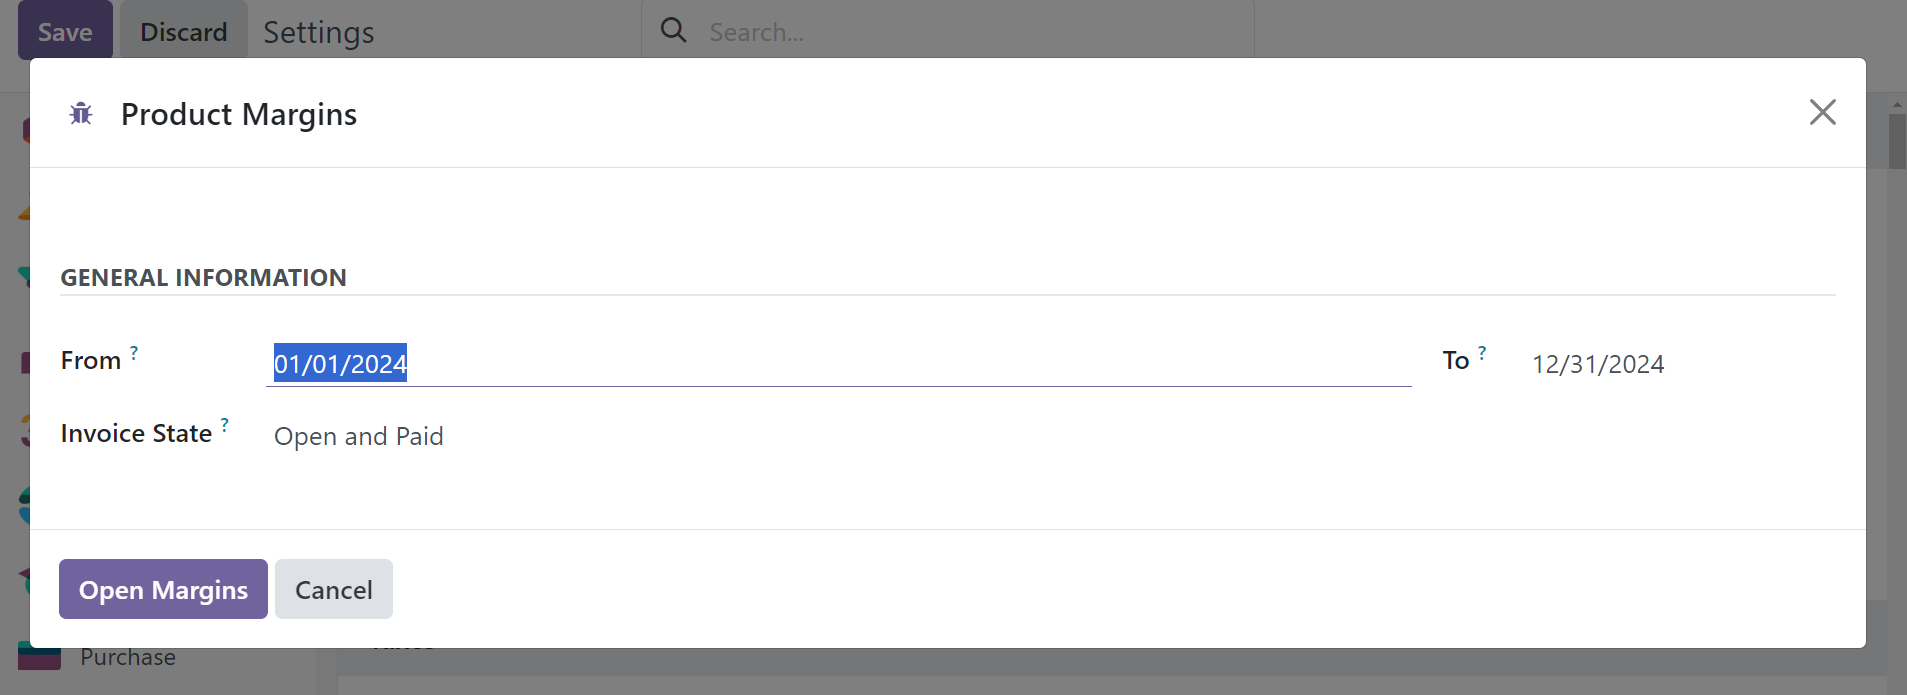
Choose 'Reporting' and then 'Product Margin'.

Enter the necessary Product Margin information in the designated "From," "To," and "Invoice State" fields.
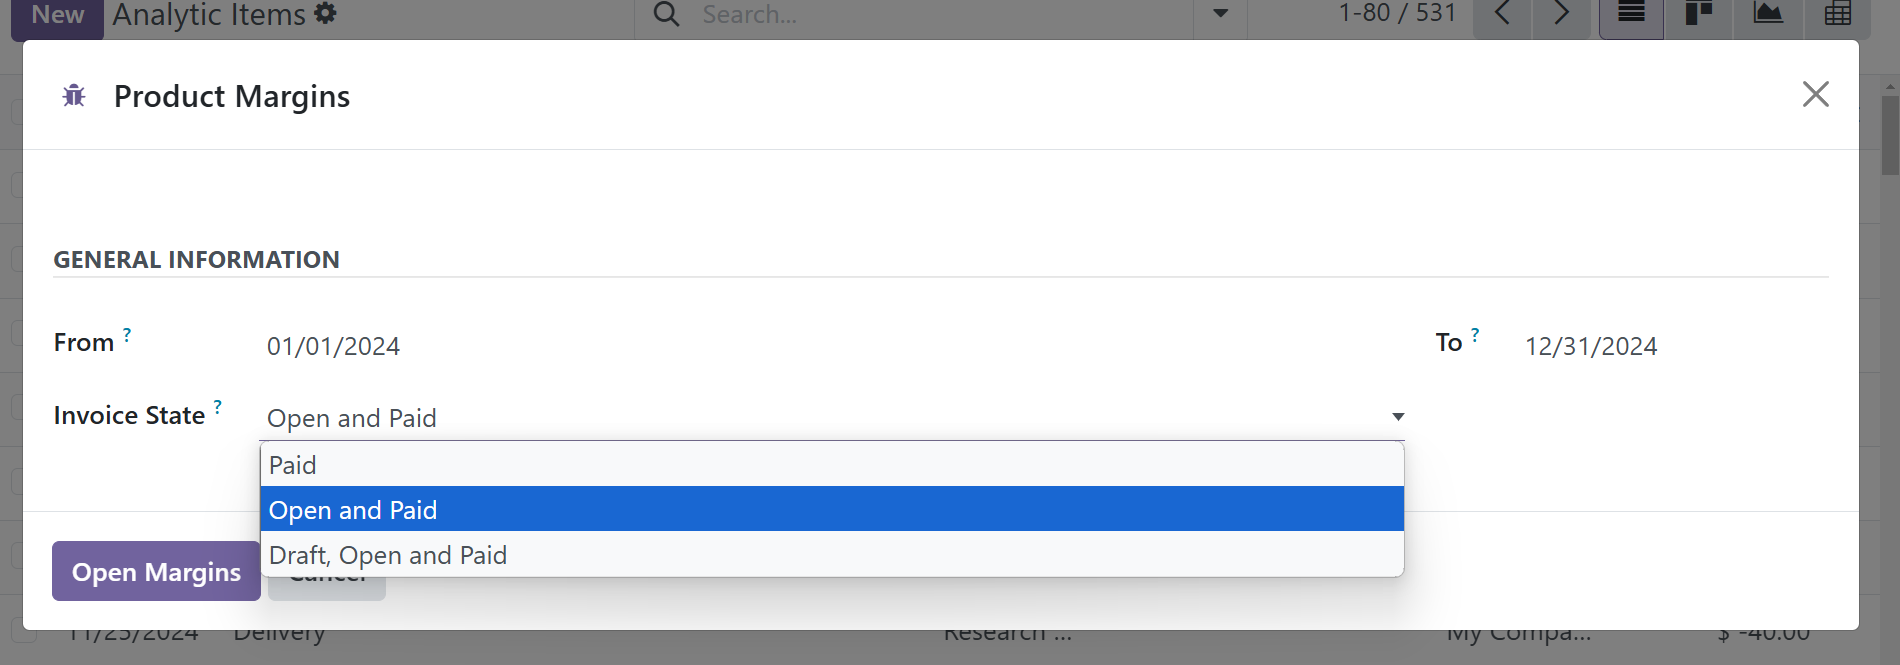
To easily choose an appropriate invoice state, such as Paid, Open and Paid, or Draft, Open and Paid, use the dropdown menu. To create a thorough product margin report based on the selected date range, select the "Open Margins" option. Customization is easy with the user-friendly interface, which refines the analysis based on invoice statuses and dates.
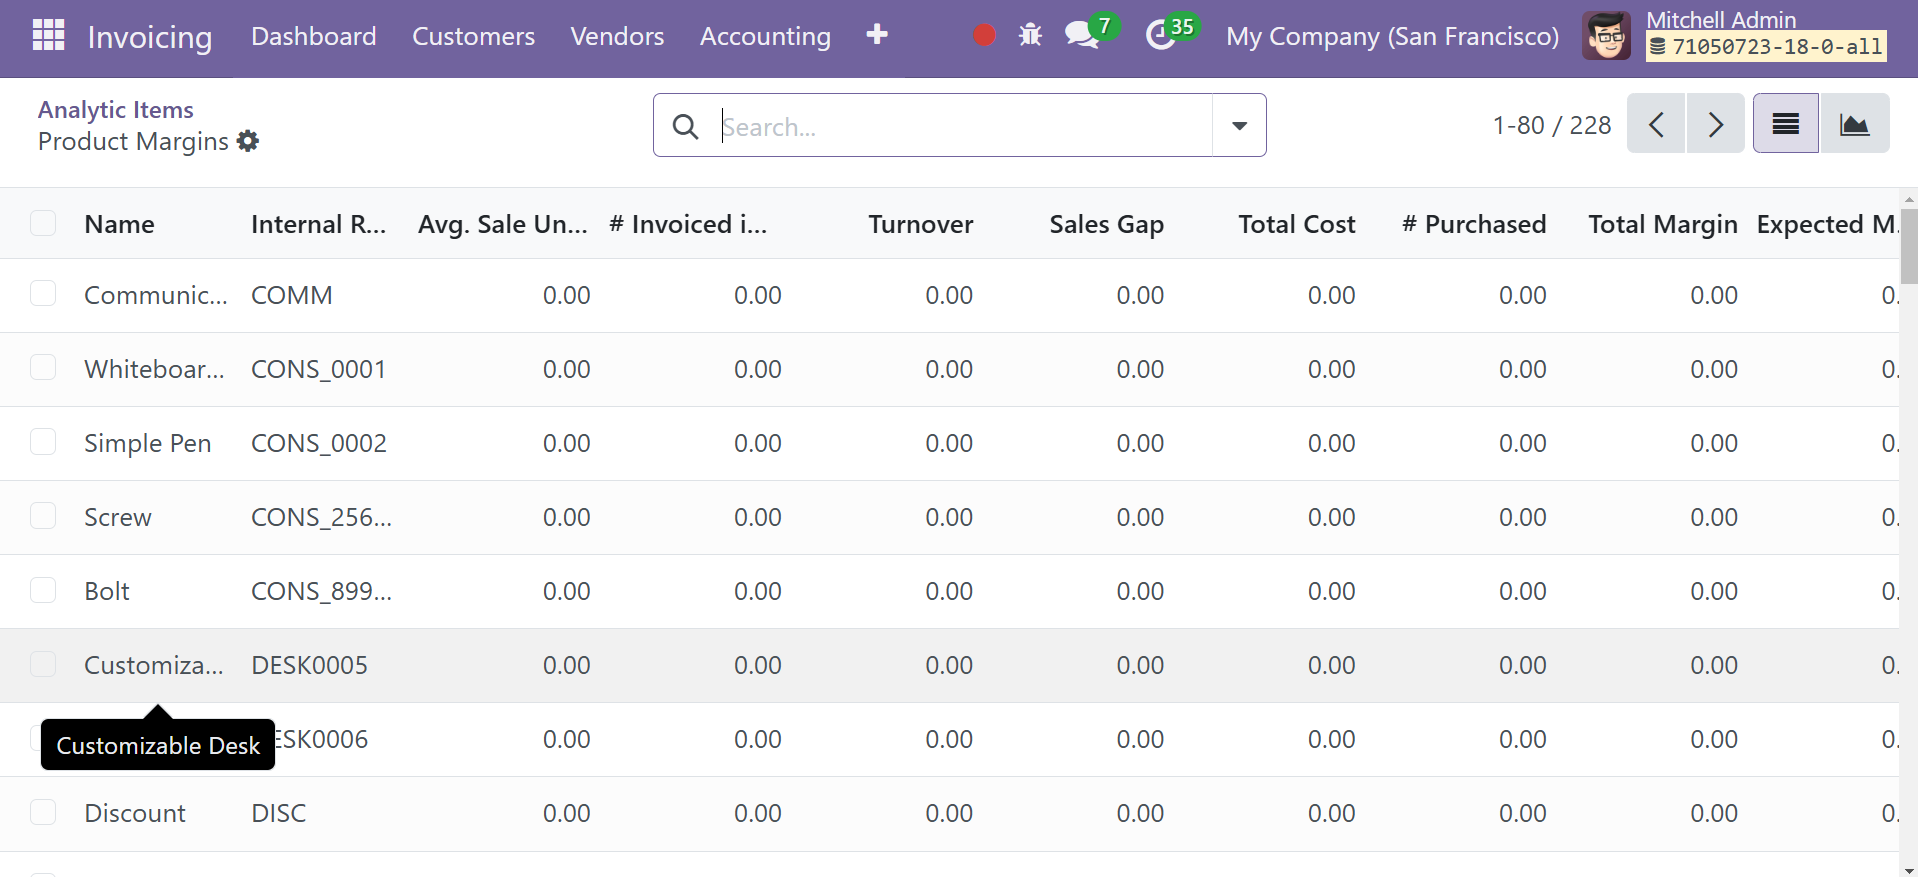
The report includes the following information about the product: Product Name, Internal Reference, Average Sale Unit Price (average price in customer invoices), Quantity Invoiced in Sales (sum of quantity in customer invoices), Turnover (sum of the multiplication of invoice price and quantity in customer invoices), Sale Gap (expected sale minus turnover), Total Cost (sum of the multiplication of invoice price and quantity in vendor bills), Quantity Purchased (sum of quantity in vendor bills), Total Margin (turnover minus standard price), Expected Margin, Total Margin Rate, and Expected Margin Rate.
Storno Accounting
One of the recently added accounting capabilities to the Odoo Invoicing module is Storno Accounting. This accounting technique will reverse the initial journal entries using the negative credit or debit amounts that are tracked in your account. You can delete files that contain inaccurate accounting data related to the recorded amount with the aid of this new feature. After the inaccurate accounting data has been canceled, you must confirm that the proper data has been entered.
In this mode, the amount indicated in the reverse item appears as a negative sign. We'll illustrate this ability with an example. While processing a customer invoice, you saw that the amount had been entered erroneously. Here is where you can make Storno for the original entry. Once you've completed undoing the initial input, Odoo will help you create a accurate invoice.
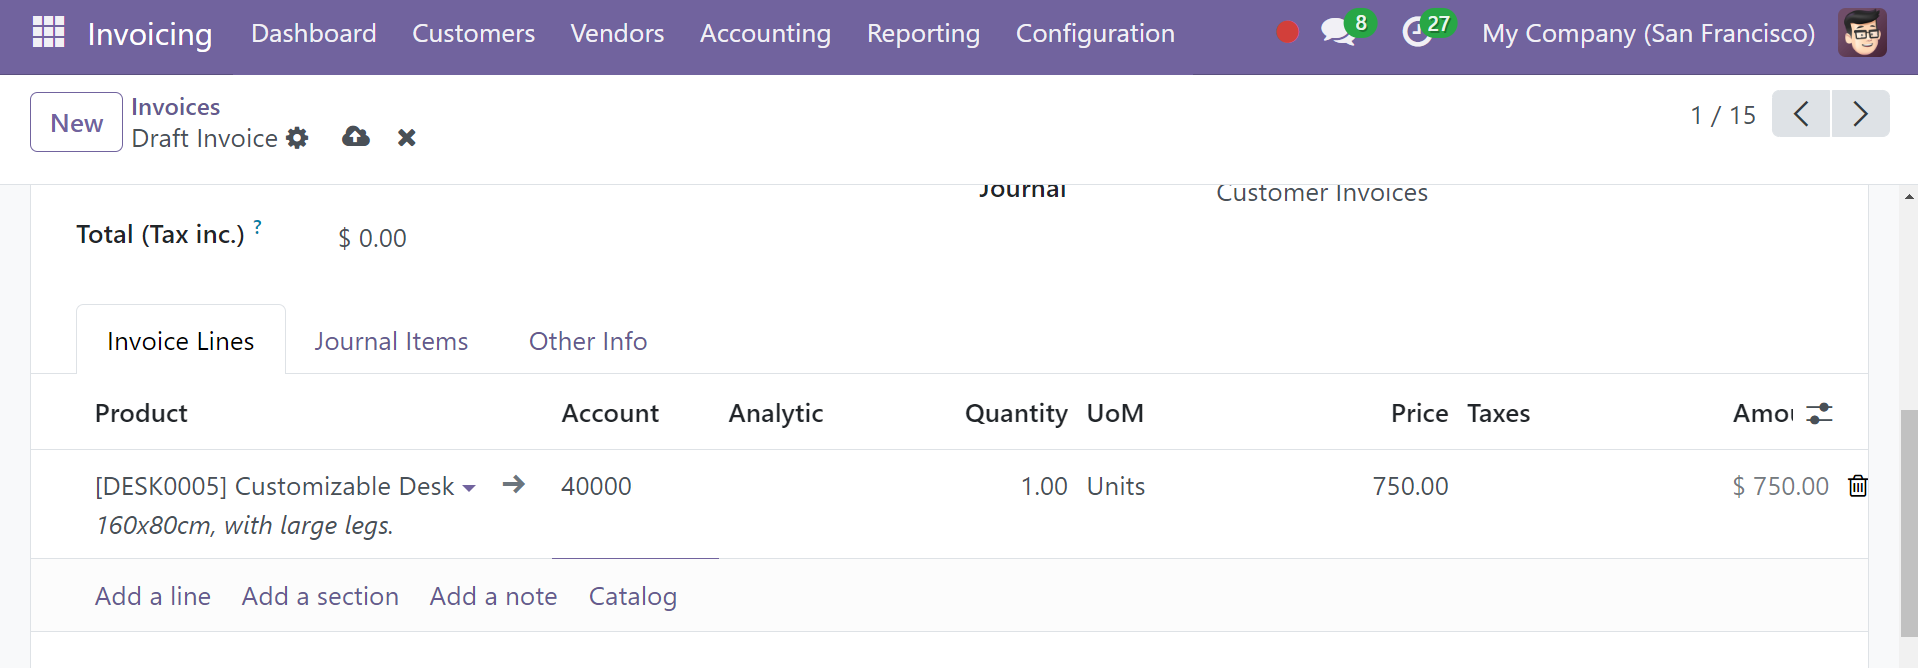
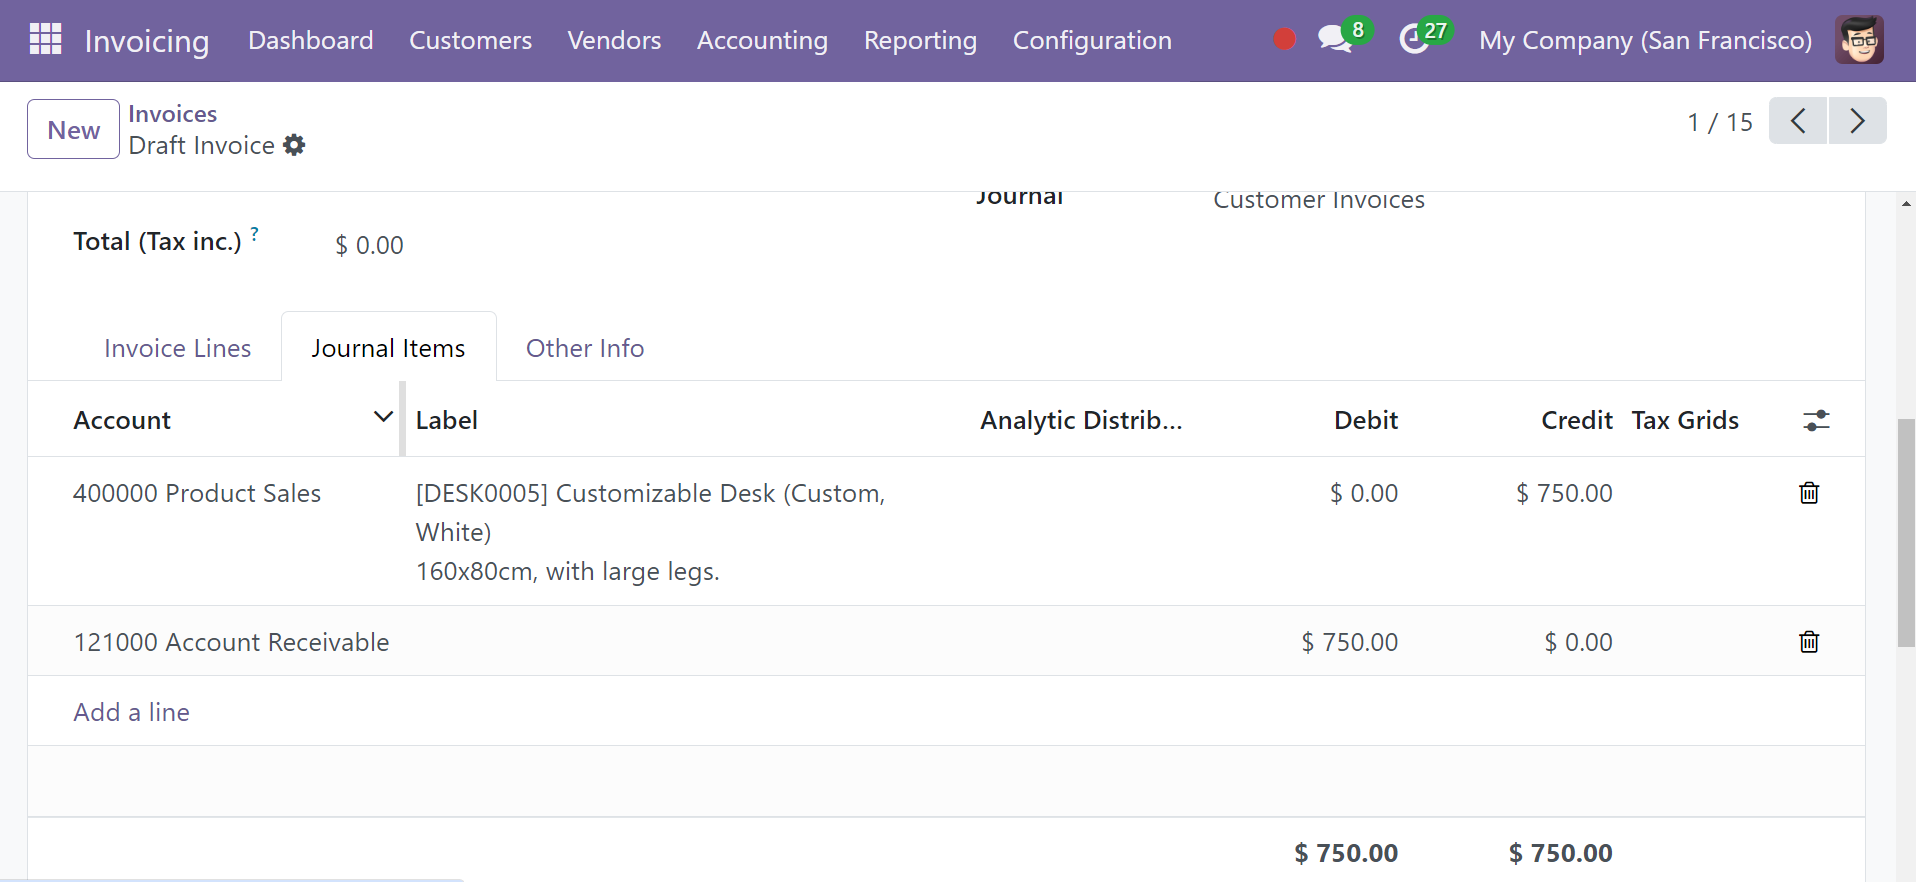
The client invoice is shown here. The items generated for this invoice are visible under the
Journal Items
Select Journal Items from the Accounting menu. This is the location of the journal item that was posted, as shown in the image below.
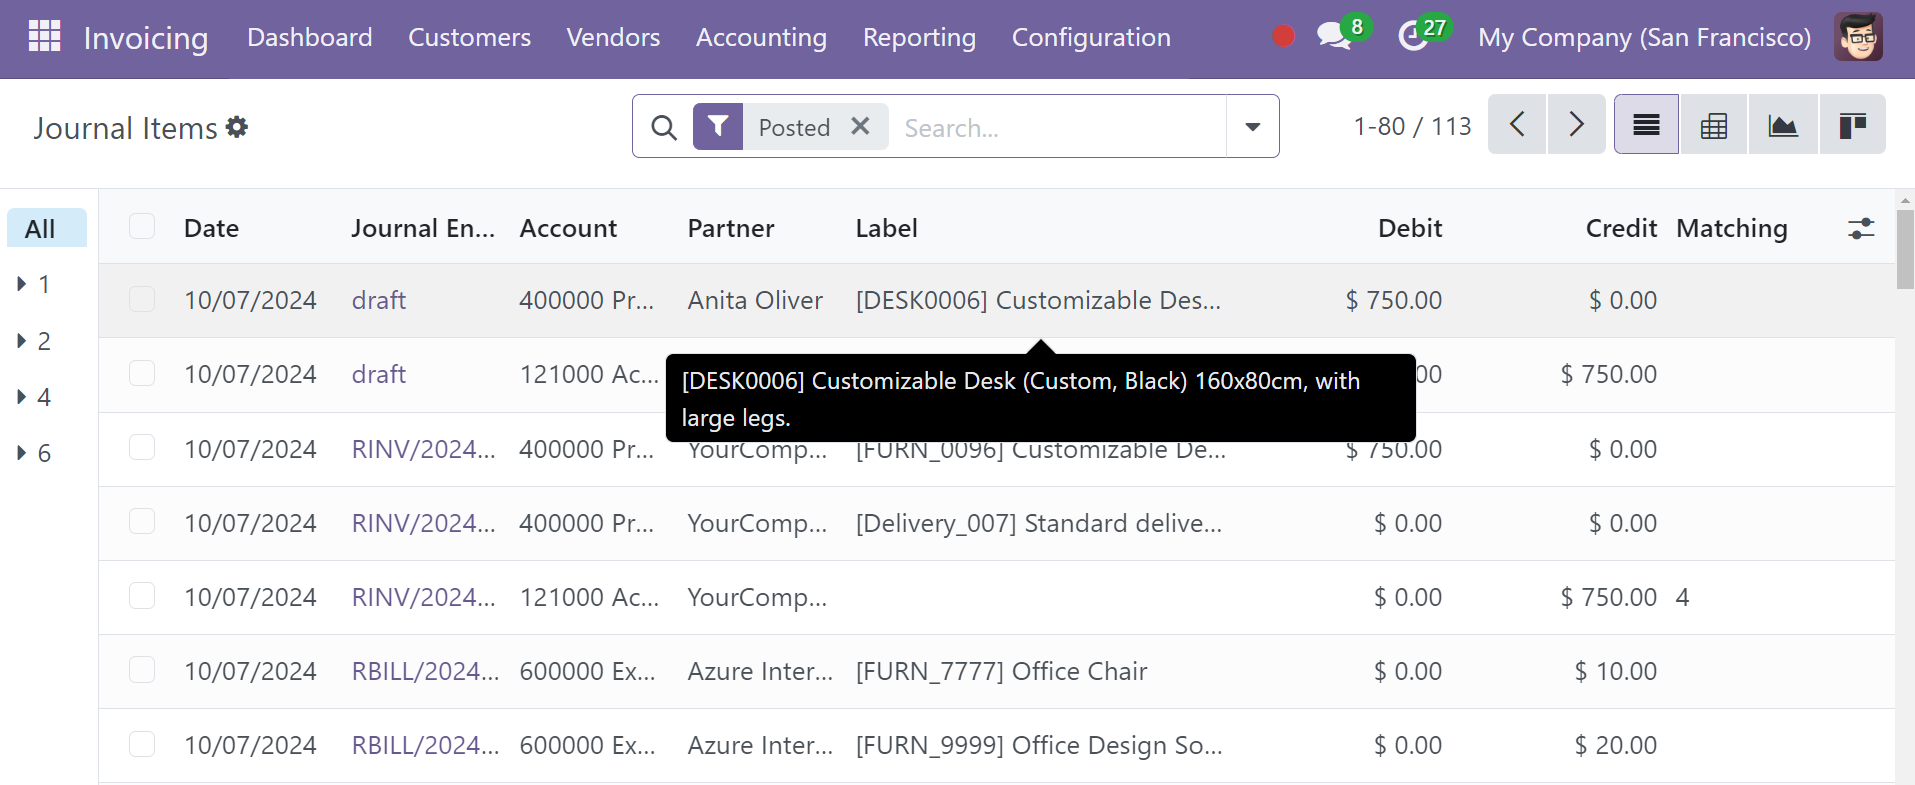
Since that isn't the actual amount, you can reverse the journal entry. You can use the add Credit Note option to make a reversal entry for the desired amount.
The uploaded entry will be reversed as soon as you click the Reverse button and validate the customer credit note. When you check the amount in the journal item pane, it shows a negative sign.
We have now reversed the incorrect entry, so you can create a new one with the correct amount.
The journal items of the incorrect invoice, Storno, and correct invoice are displayed in the Accounting menu's Journal Items option, as can be seen in the screenshot above.
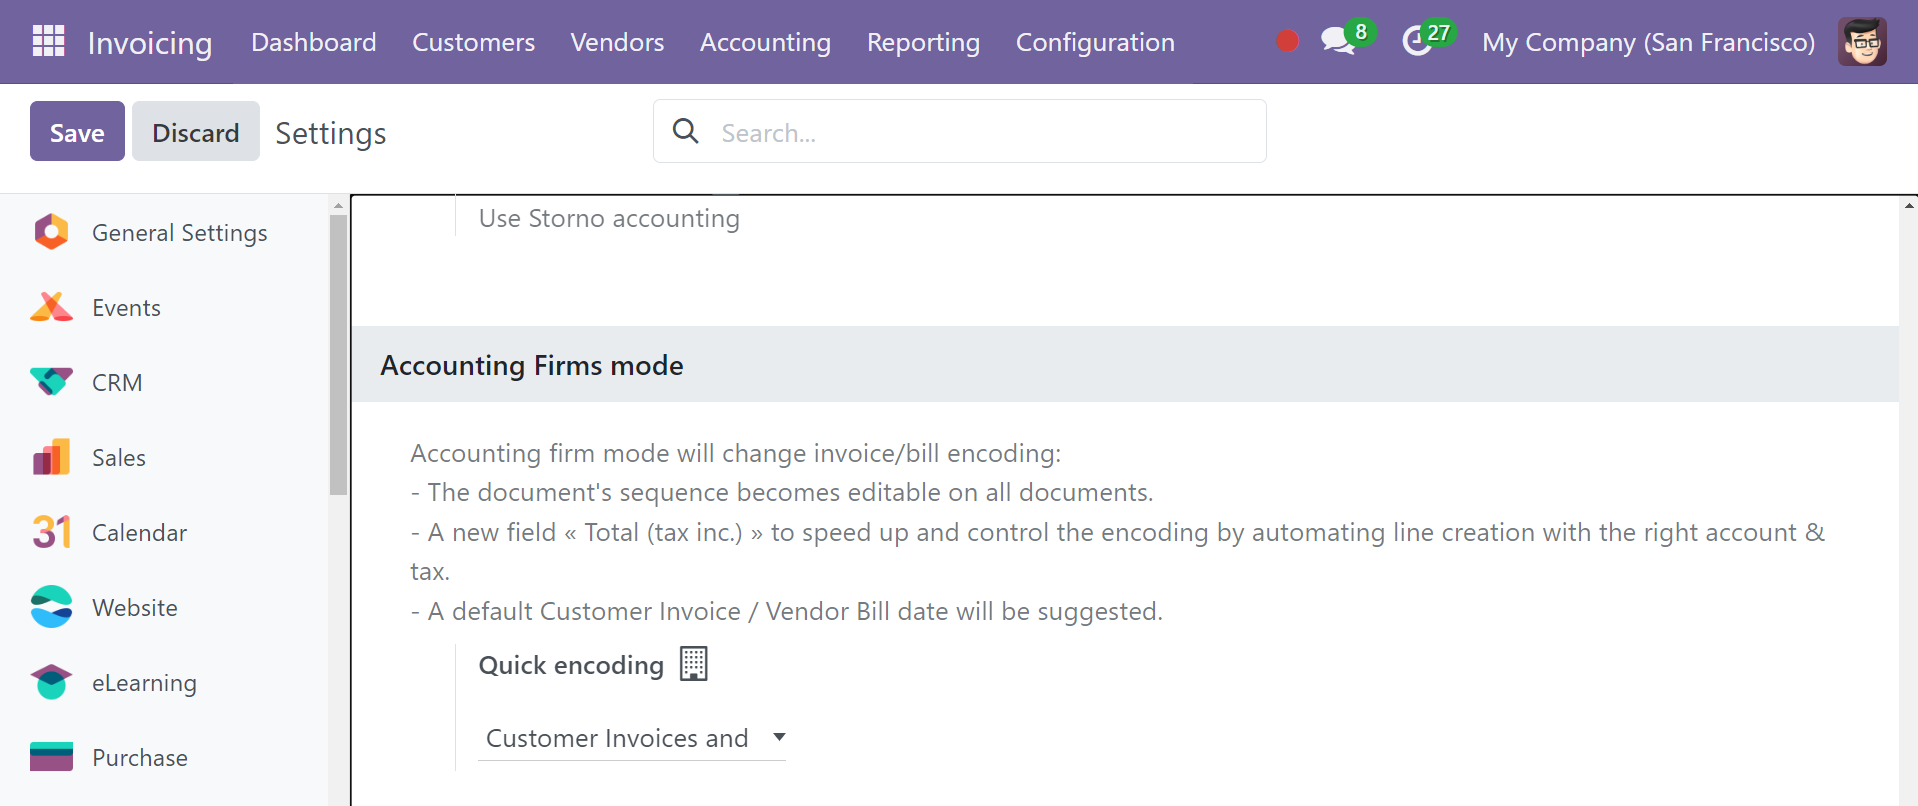
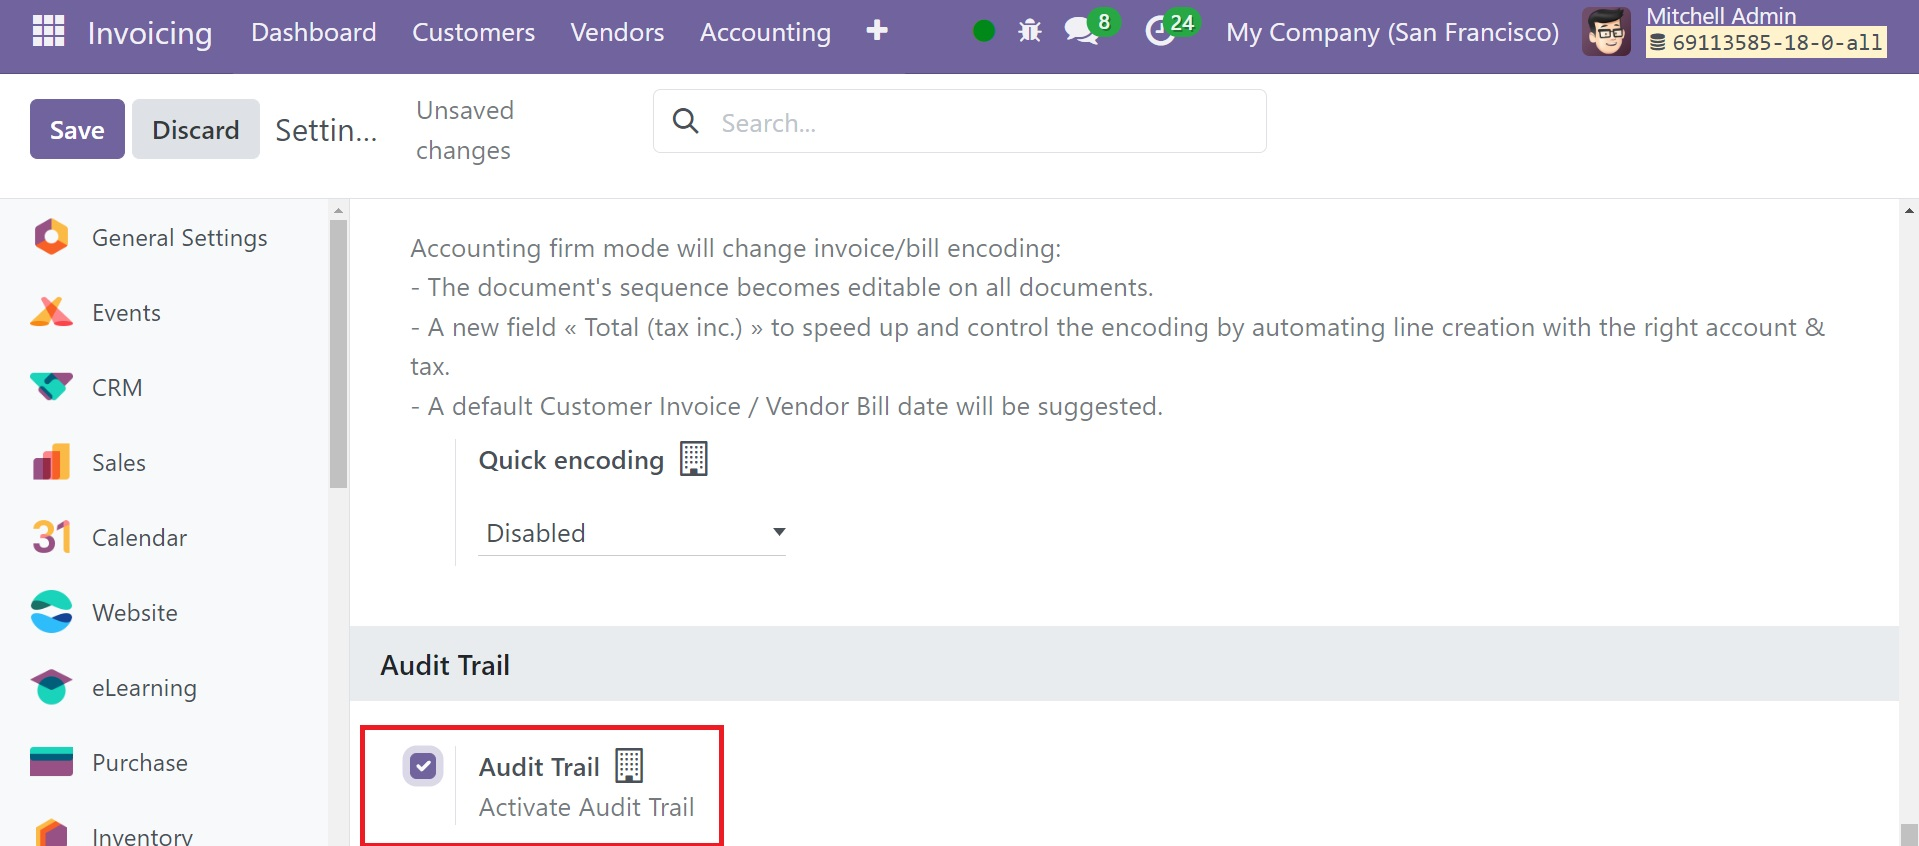
Accounting Firms Mode
Odoo 18 introduces a new feature called Accounting Firm mode. The Accounting firm mode allows users to modify the encoding of invoices or bills by turning this on.
Whether to use the invoice or the encoding contained in the bill is up to the user. Those who take advantage of this are able to do the following:
On the bill or invoice, change the sequence number.
Then, a field to add a new invoice sequence number can be added when creating a new invoice. There, bring up the personalized order.
The automatic addition of the invoice date or billing date upon the creation of a new invoice or bill is the second modification that arises from utilizing this Accounting Firms Mode feature. As a result, the invoice date did not need to be specified by the user. The bill date and the accounting date are automatically appended to the bill. Users are able to modify the dates if needed.
A new feature named "Total (tax inc.)" will be added to enhance and regulate the encoding process by automating the production of lines with the correct account and tax. The third modification is that before adding items to the invoice line, the user can now specify the total price, including tax.
As a result, Odoo 18 will determine the price based on that specified.
Audit trial
Admins can monitor user activity on a system's objects using Odoo's Audit Trail
In order to maintain transparency and accountability in financial operations, audit trails are a crucial tool. They enable auditors to follow and verify the accuracy of entries by providing them with a comprehensive, chronological record of all financial transactions. By spotting errors, fraud, or discrepancies, this promotes financial integrity and regulatory compliance. Additionally, audit trails increase the accuracy of financial statements by providing a comprehensive record of all operations that can be reviewed and modified as necessary. Ultimately, use of audit trails ensures a strong foundation that encourages stakeholders' confidence and facilitates effective financial management.
The Audit Trail option appears in Odoo 17's Settings. Try the option to activate the audit trail.
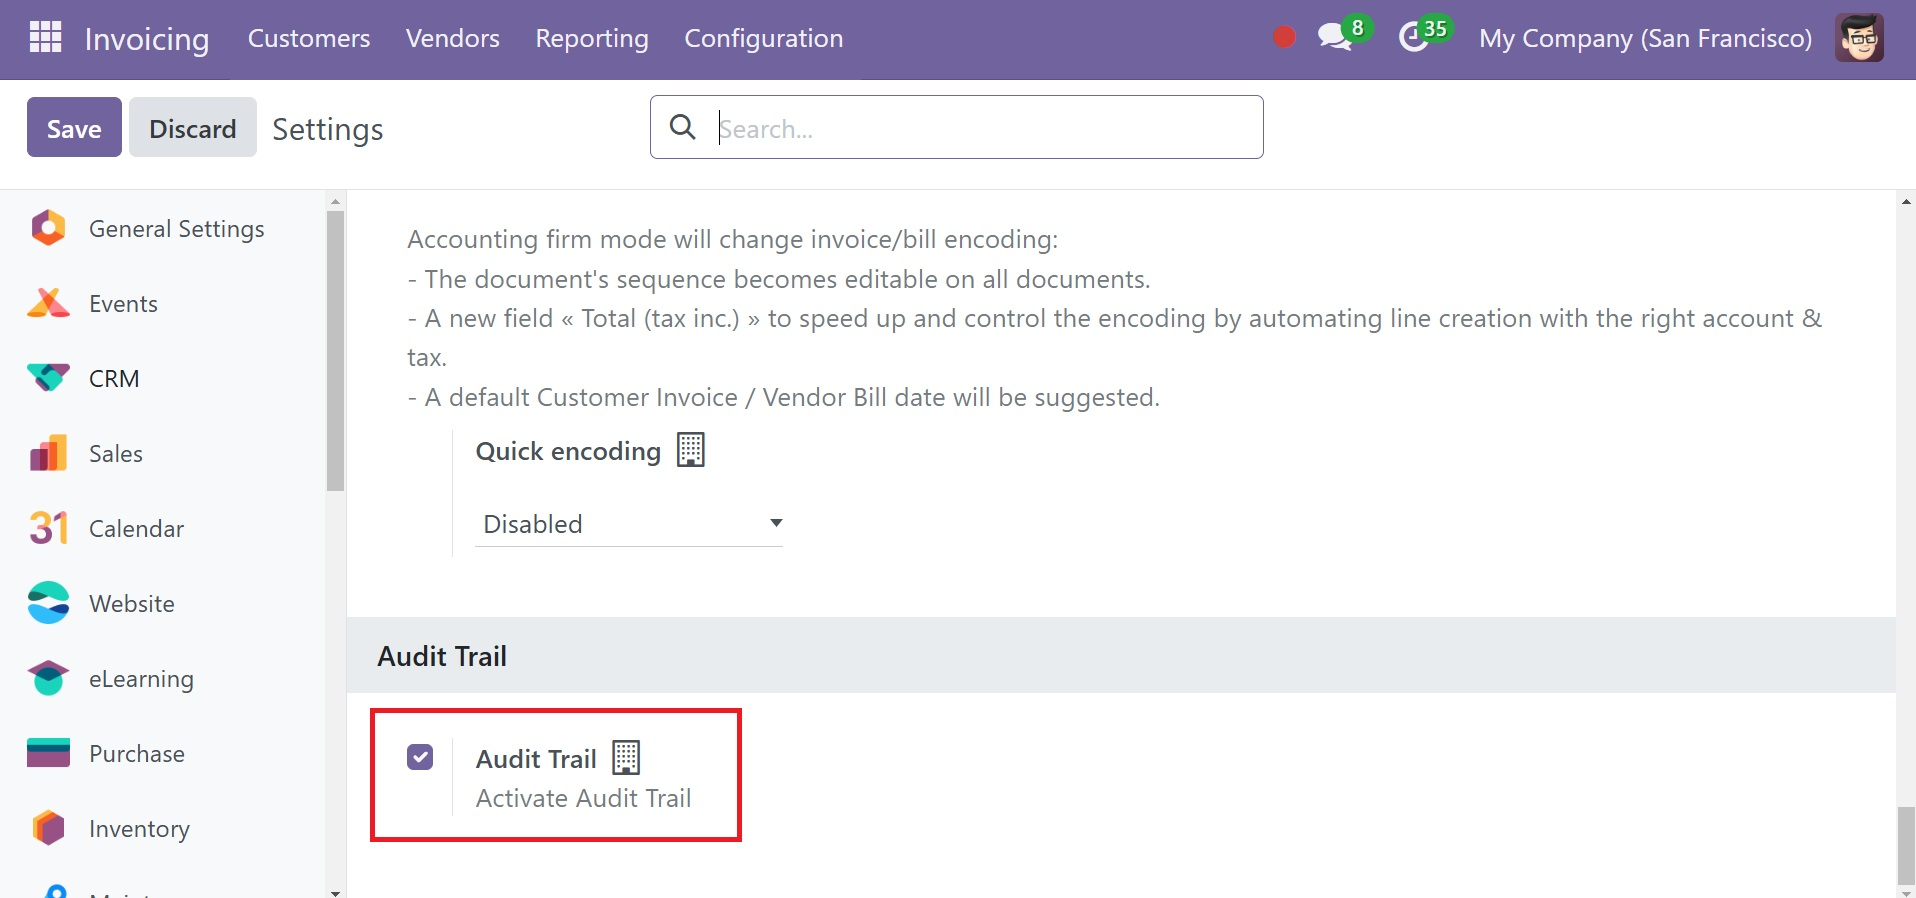
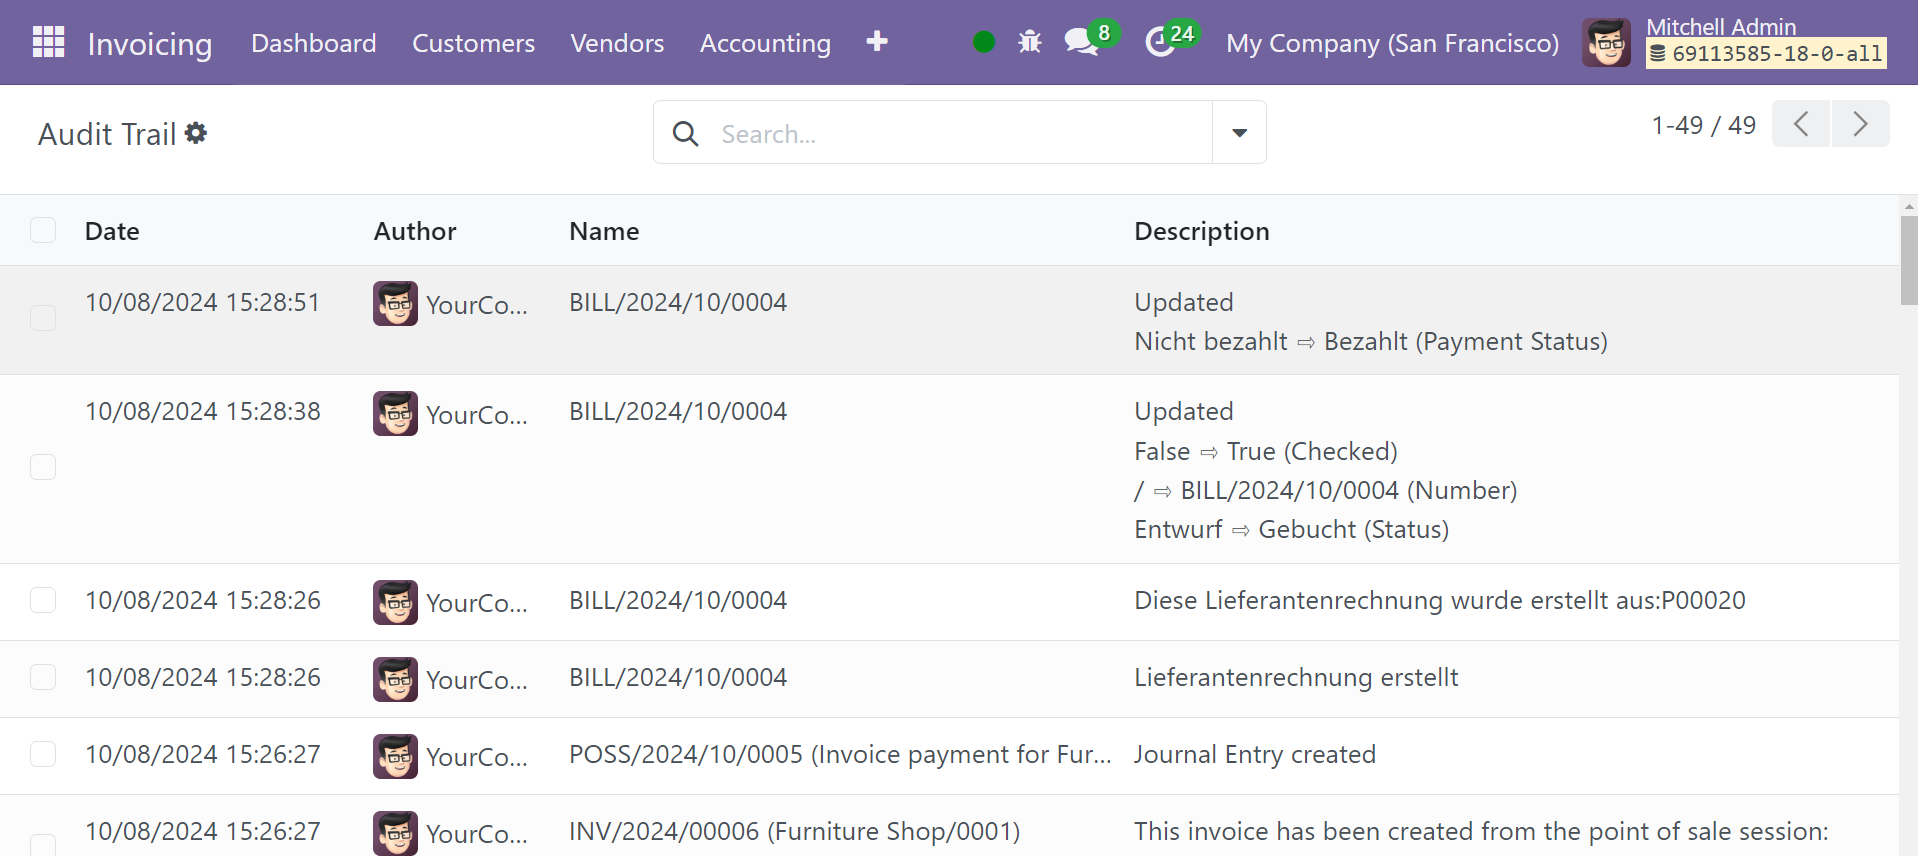
This audit trail will document any changes made by users to an invoice. so that each invoice's changes and amendments are simple for the auditor to understand.
The date, author, journal entry, and description are available here, as may be seen in the above image.
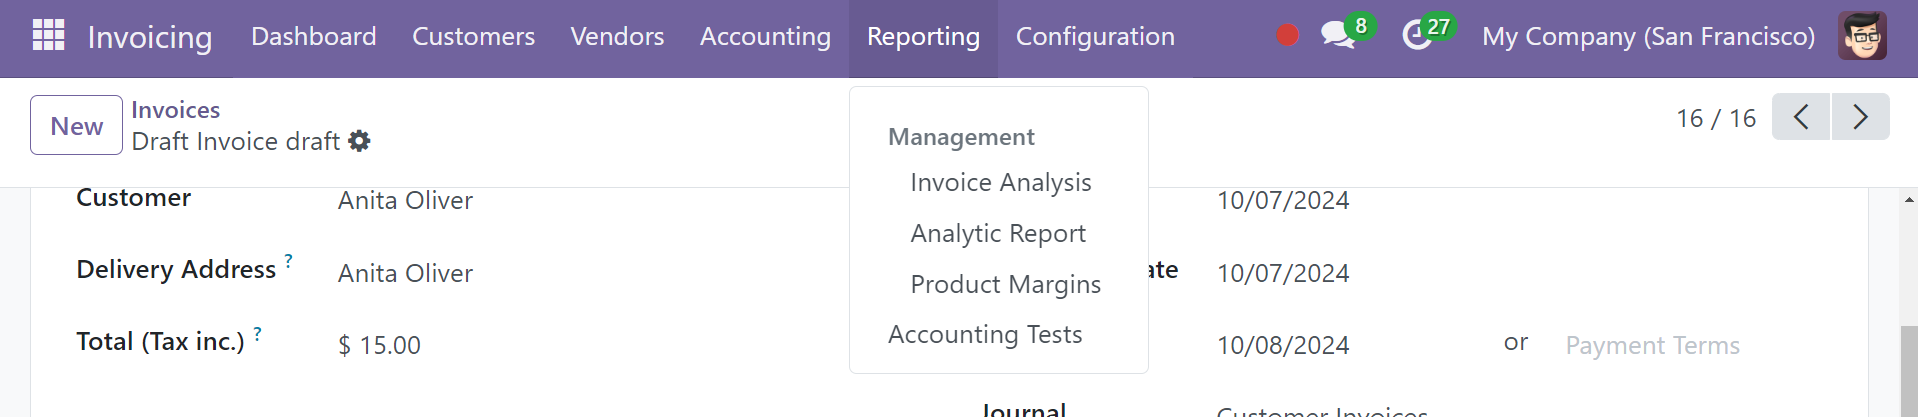
Reporting
To gain a comprehensive overview of the invoicing tasks accomplished in the Odoo 18 Invoicing module, make use of the Reporting feature of the module. With the help of this program, the user can get accurate reports of accounting-related procedures.
Invoice analysis
From the invoice reports, you may create pivot tables and graphs in one place. You can select the Reports option in the module to perform efficient invoice analysis.
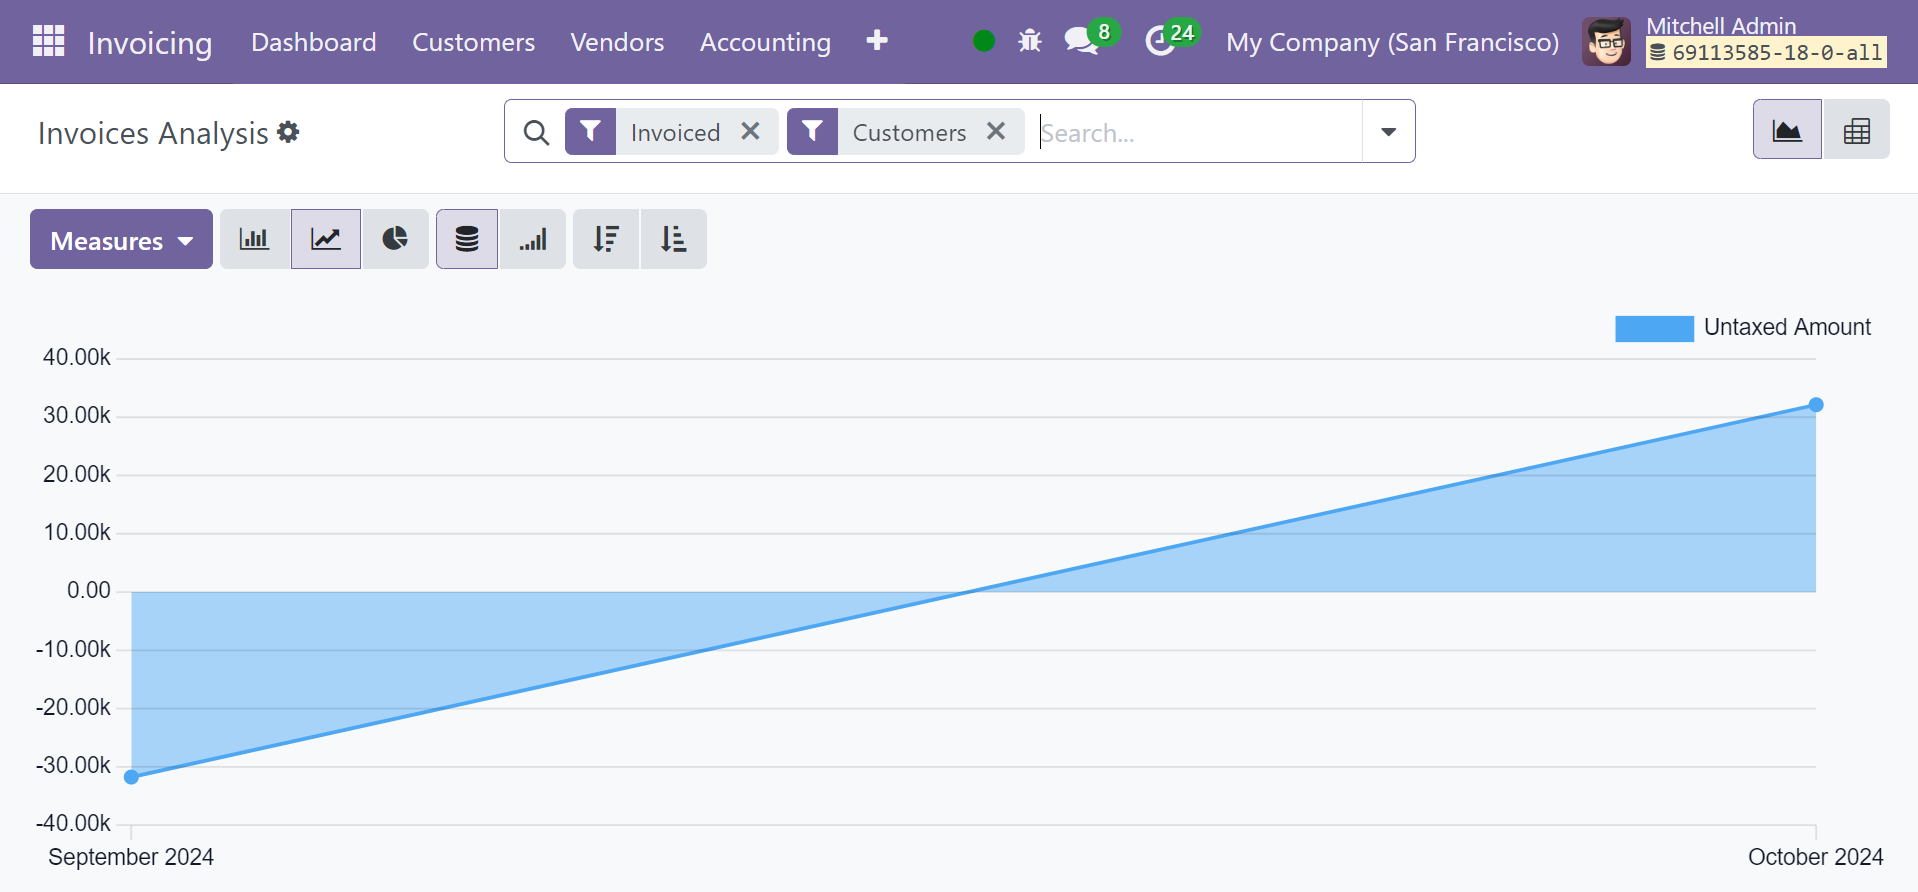
Depending on what you require, you can flip between the report's Graph and Pivot views. An illustration of the invoice analysis is shown above. You will be able to select the icons to change the graphs into Line, Bar, and Pie charts.
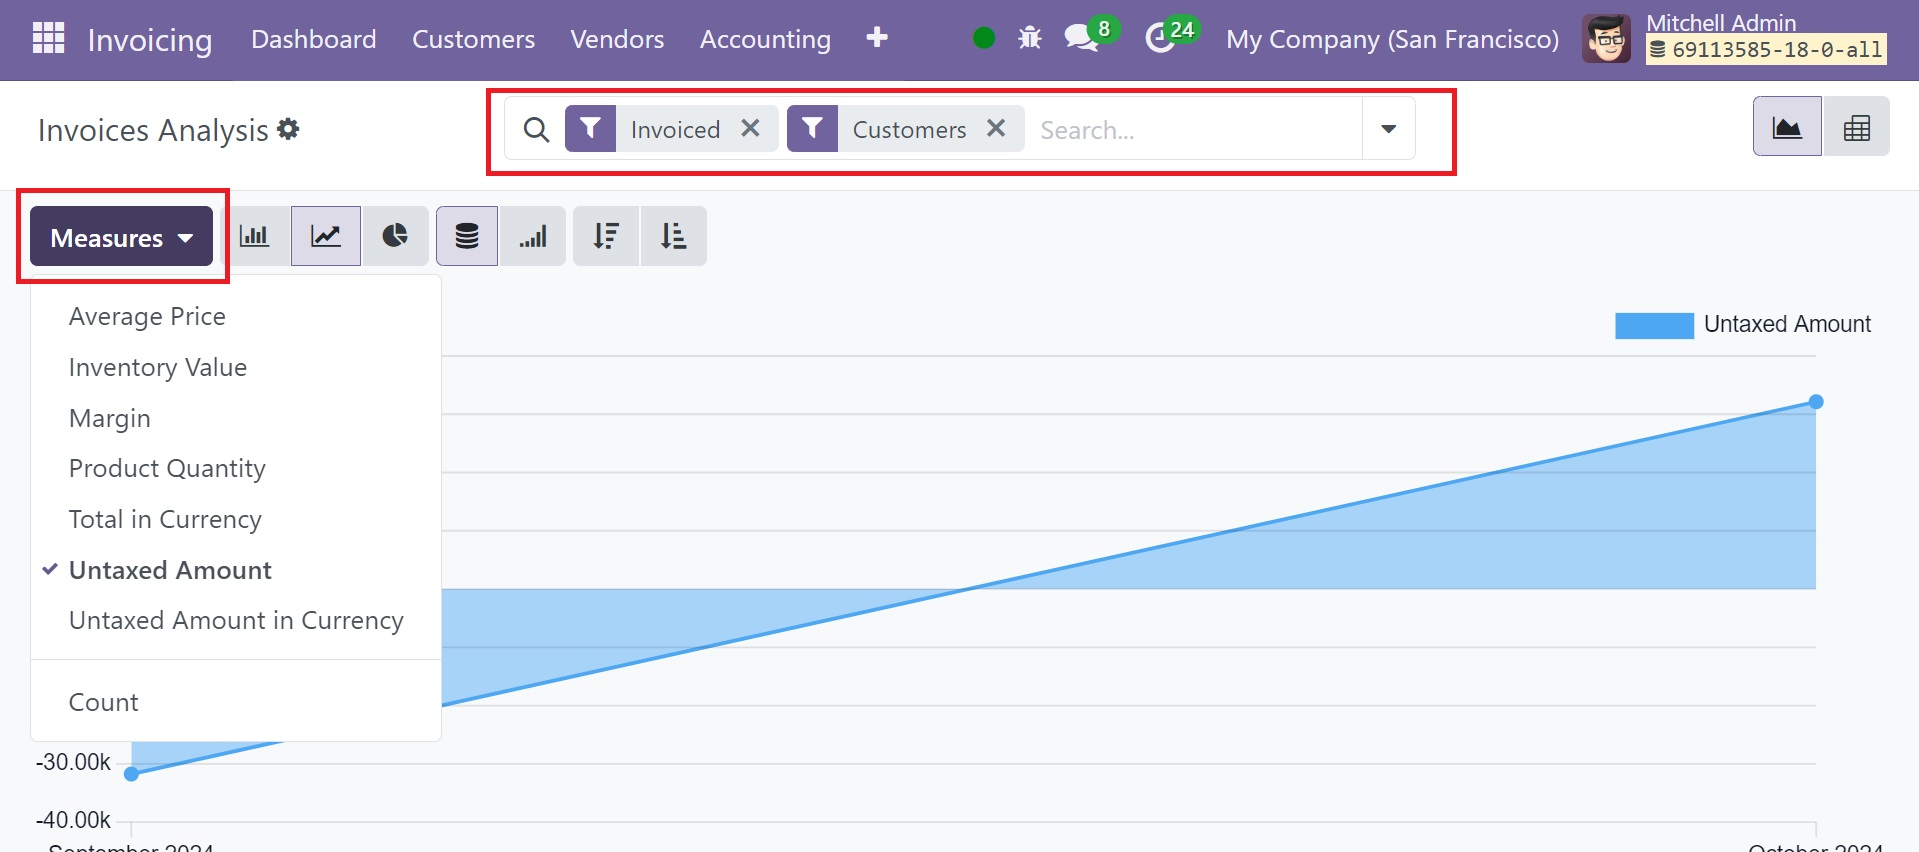
The Average Price, Product Quantity, Total, Untaxed Total, and Count are among the report's metrics. To get reports that are customized to your requirements, make use of the custom options found under the Filters and Group By options.
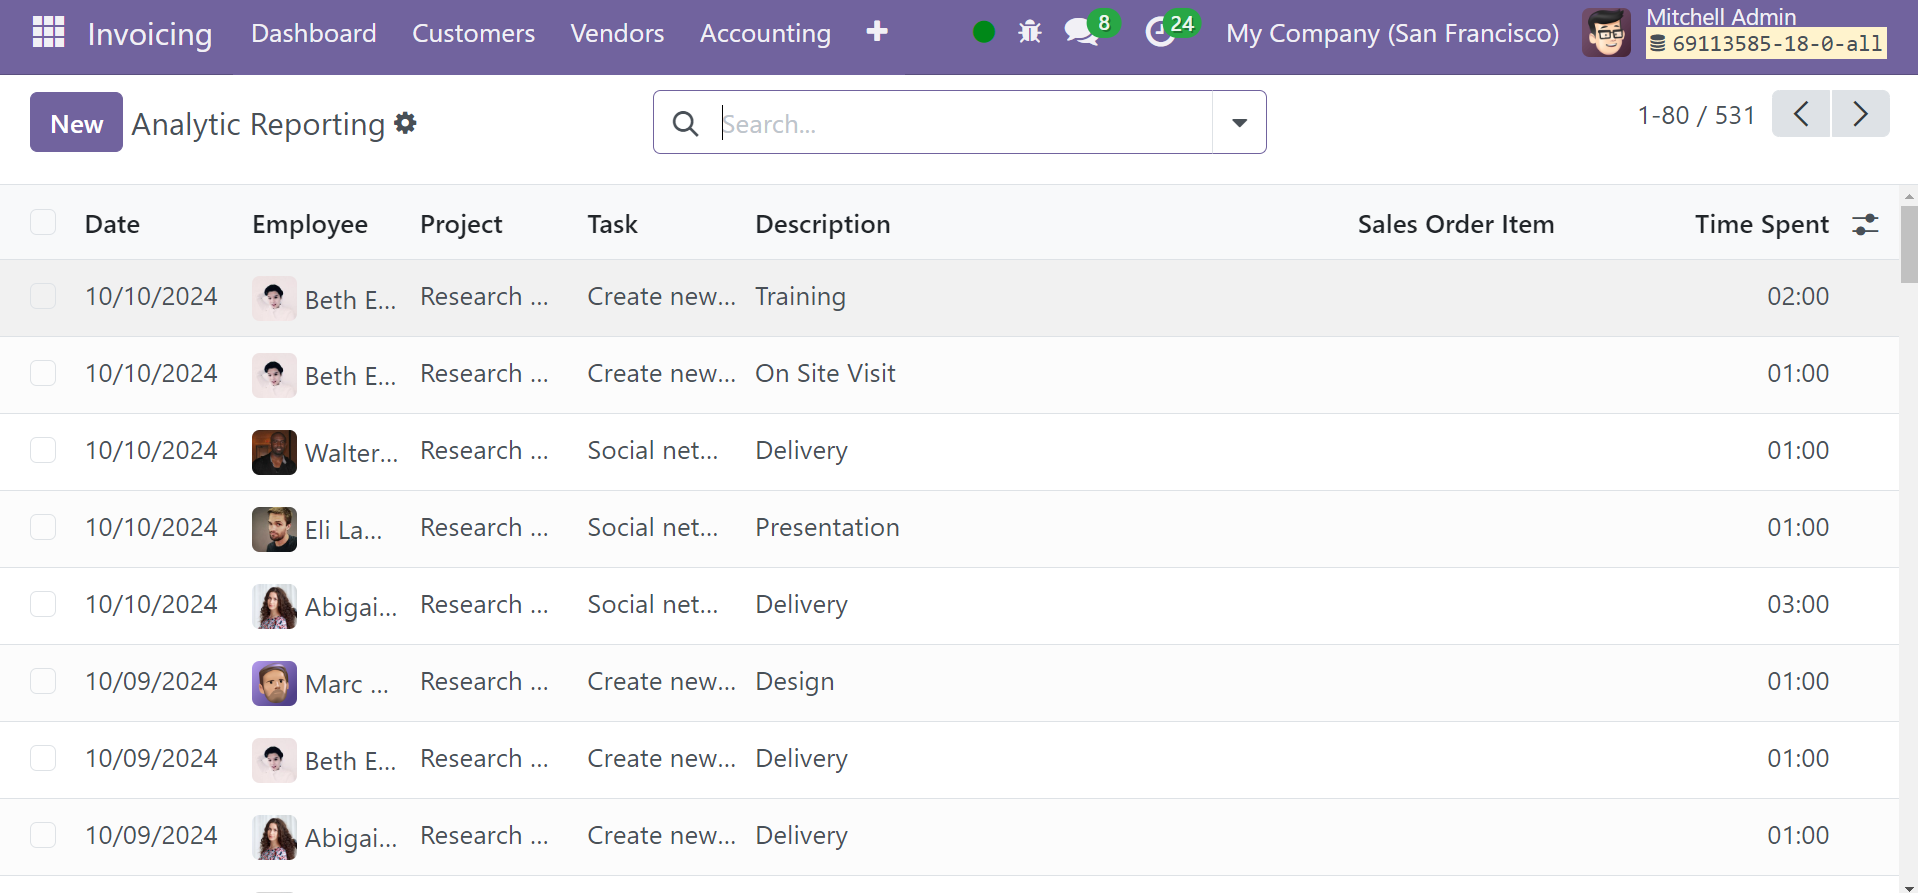
analytic Report
An analytical accounting report makes it easier to analyze, comprehend, and produce reports for the company's accounting documentation. Assistance with cost control and support for reinvoicing will be provided for all tasks pertaining to the creation of analyses and reports utilizing the chart of accounts.
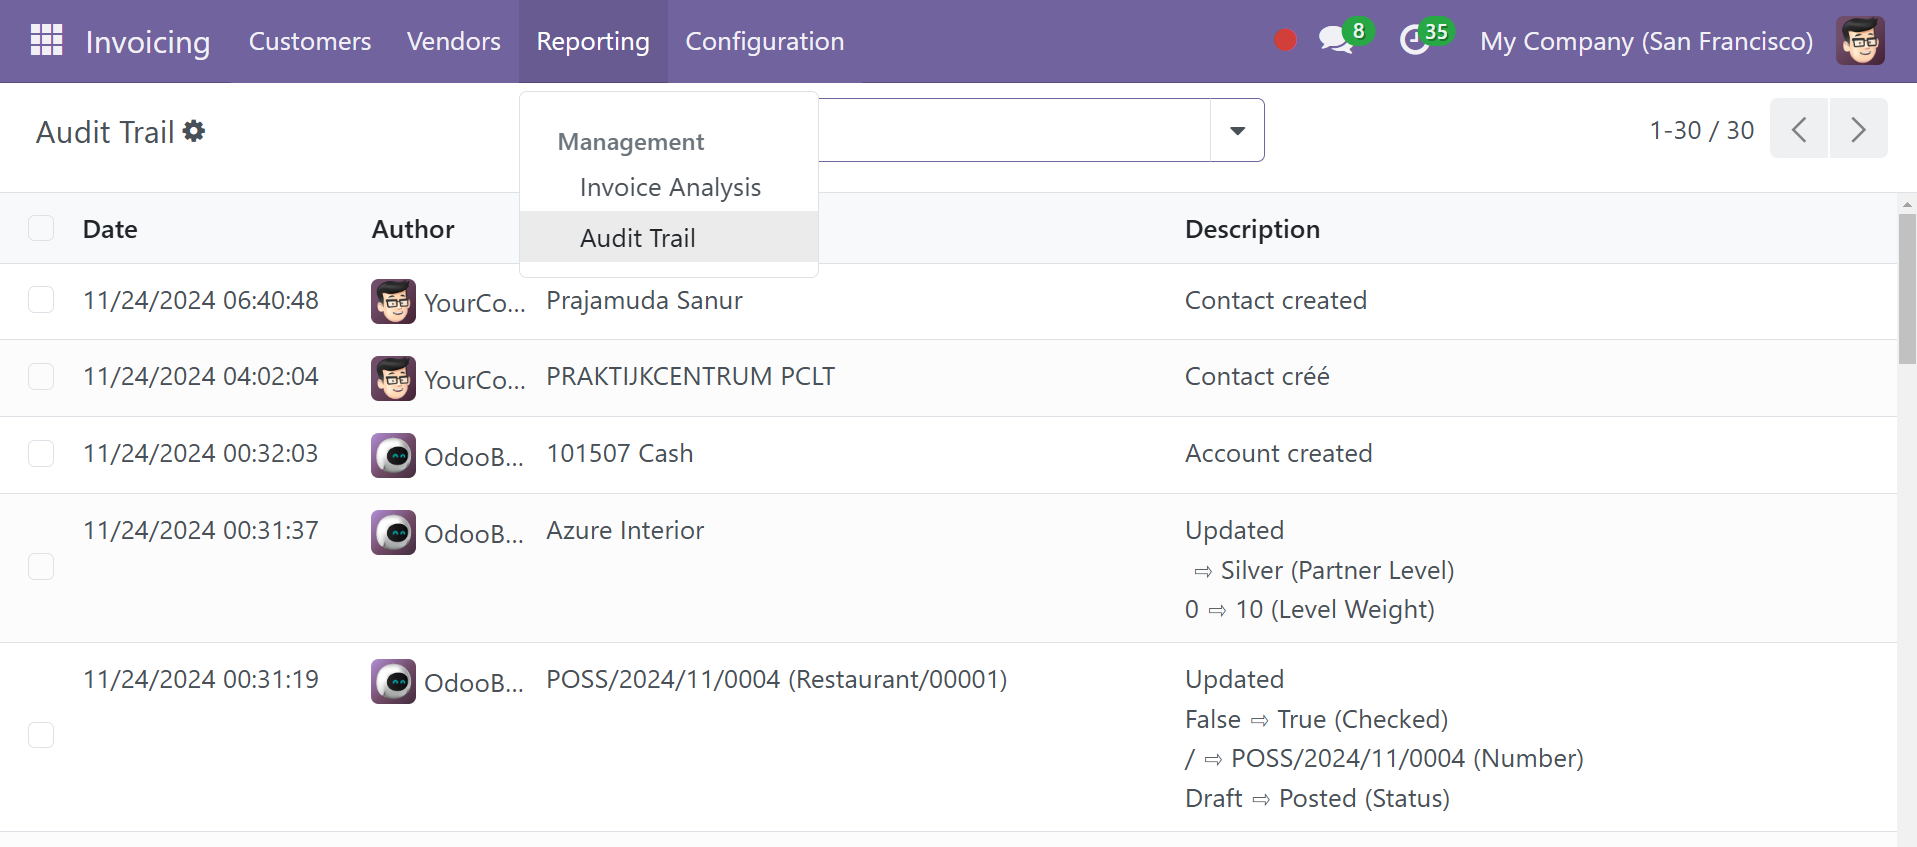
Audit Trail
Audit trails are an essential instrument for preserving accountability and openness in financial operations. They give auditors a thorough, chronological record of all financial transactions, making it possible for them to follow and confirm the accuracy of entries.
The page of audit trial will be as shown in the screenshot below. The page includes information such as date, author, name, and short description.
Product Margin
With the use of the Product Margin report, the user can examine the sales product details. To get this report, the user first needs to enable the Margin Analysis from the Settings.
As you can see below, a popup window with the Product Margin report from Reports will open. In order for reports to be generated, add the from and to dates. Next, the user can choose his bills' invoice status. Next, select the Open Margin option.
The required report will then start to be worked on.
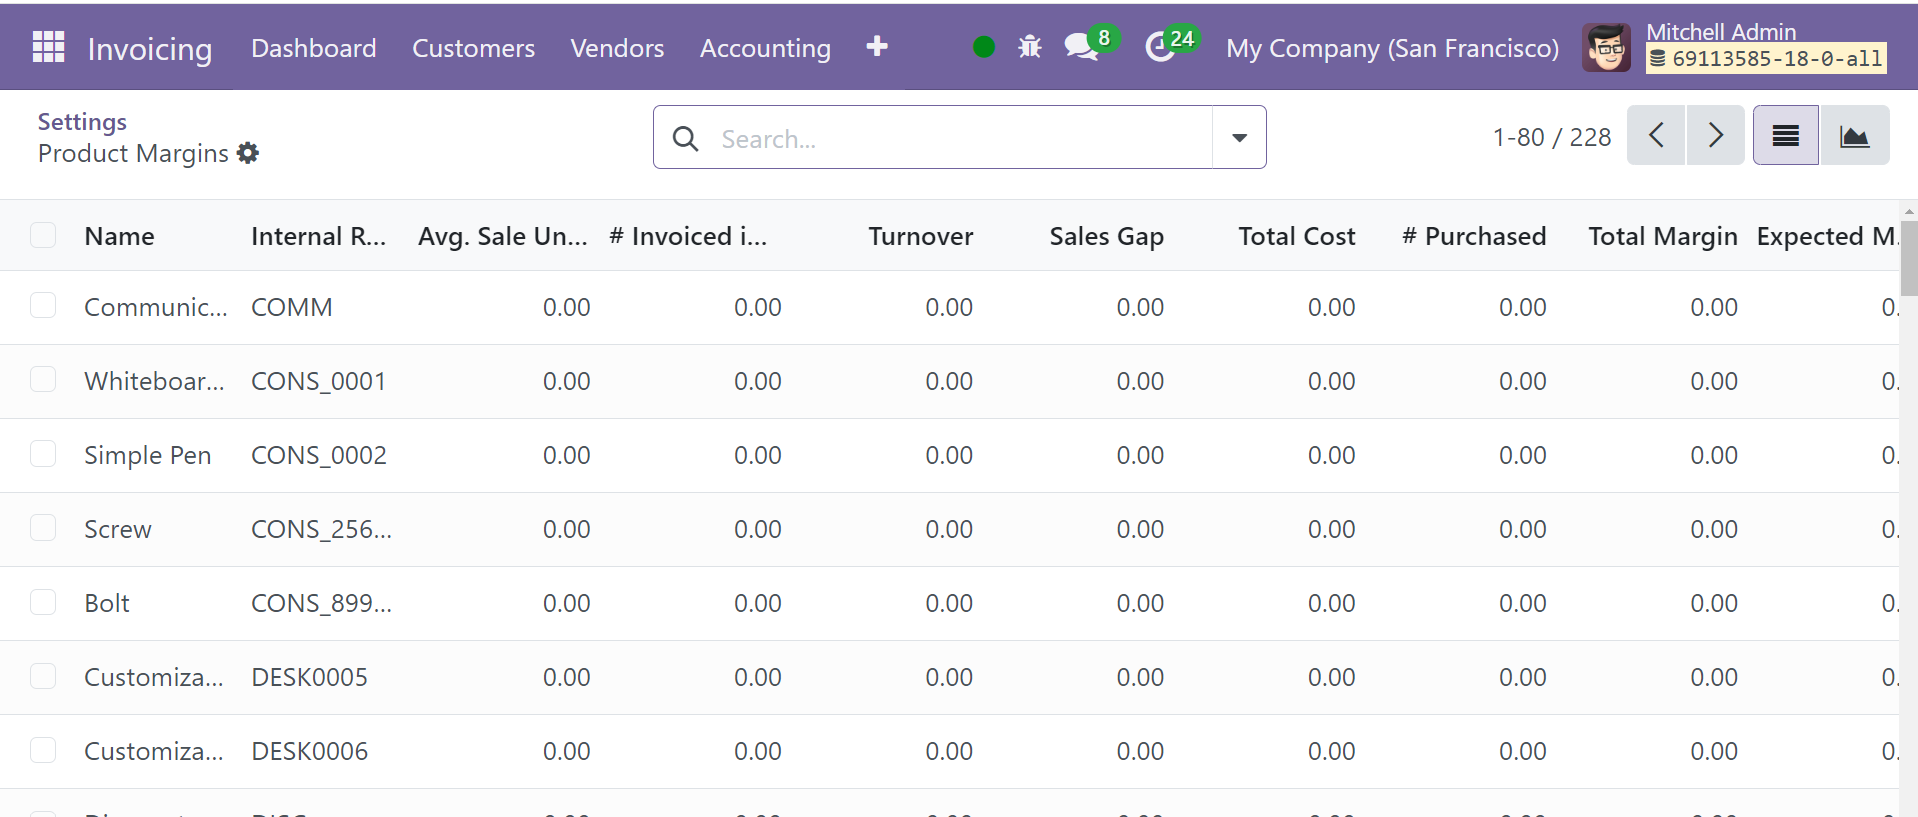
The product's name, internal reference, average sales, invoiced amount, turnover, sales gap, total cost, quantity bought, total margin, expected margin, total margin rate, and the expected margin percentage.
You may enhance your accounting operation with the help of the sophisticated features and effective tools available in the Odoo 18 Invoicing module. You can handle invoices with ease while using this module.