Transfers
If your company has multiple warehouses for product storage or distinct branches at different locations, it is imperative that you pay close attention to the management of product transfer from one site to another. The Transfers function in the Odoo 18 Inventory module makes managing product transfers simple. In inventory management, there are a number of transfer types that require oversight. Product transfers within the company, as well as outside and between warehouses, are covered. You will first acquire the warehouse management capabilities of the Odoo 18 Inventory module, and then we will explain how to configure each of your company's warehouses. You can define various product transfers between these defined warehouses and locations with the use of the Transfers option once you have completed configuring the warehouse and product location.
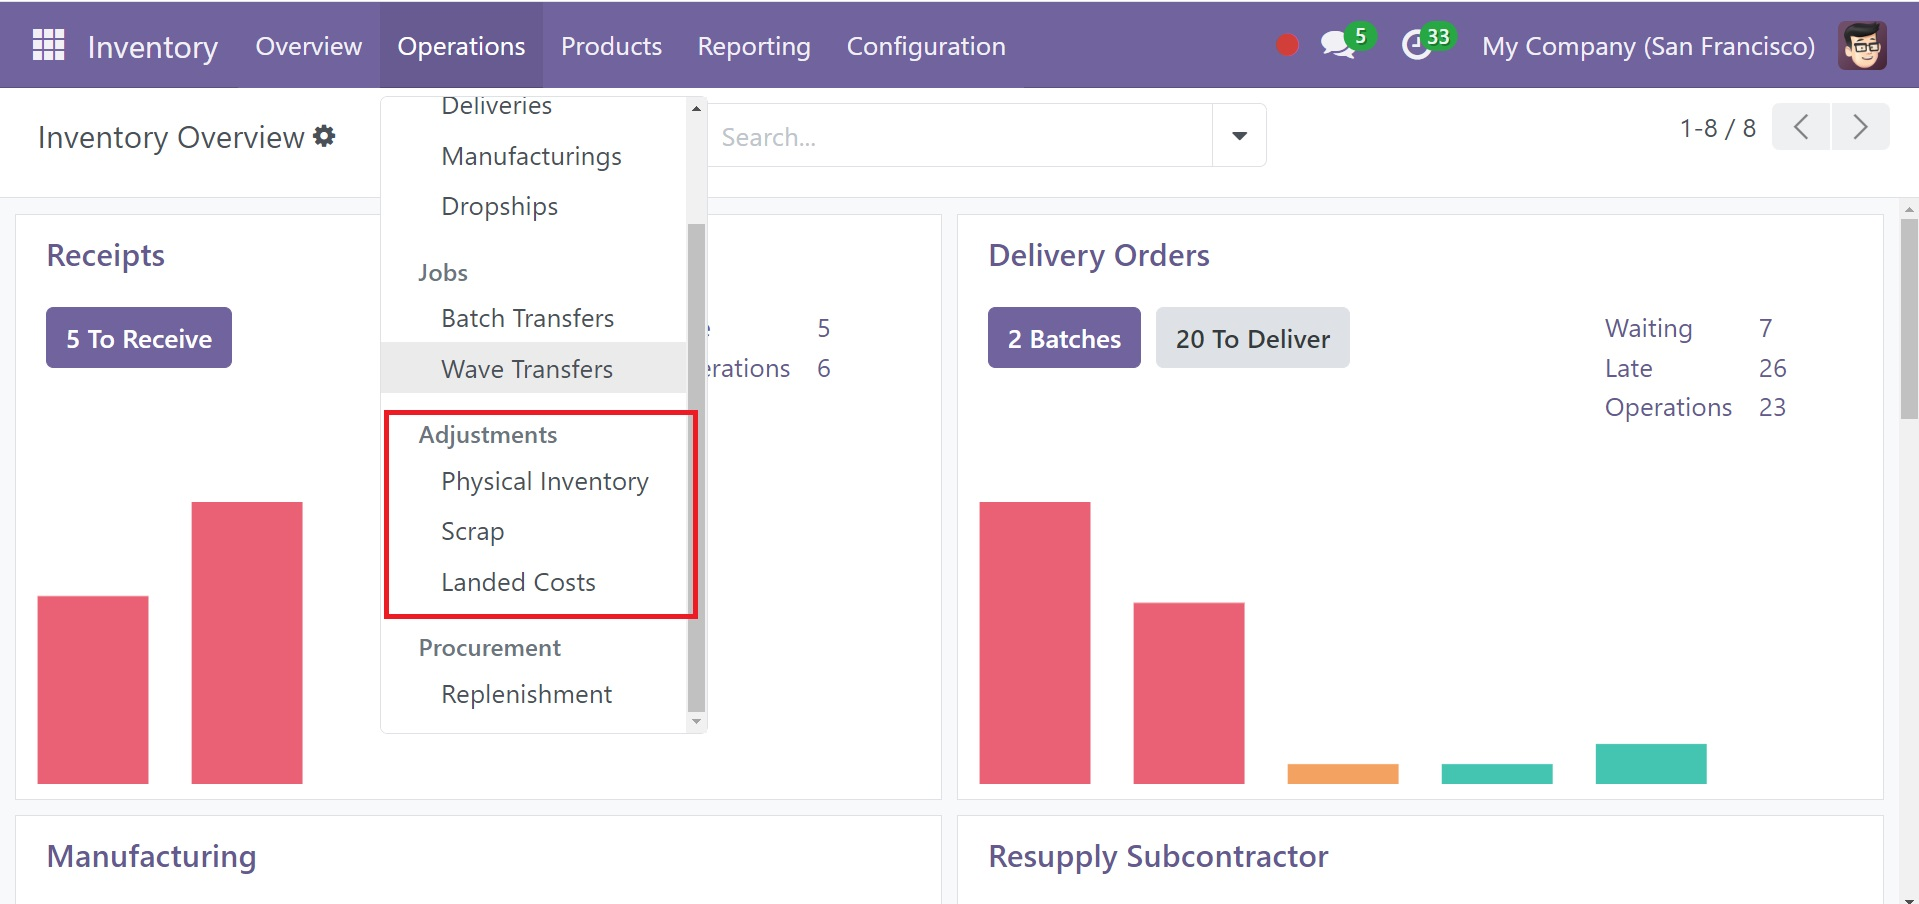
The Transfers pane allows you to track and assess the movement of goods from one place to another. To access this window, select "Transfers" from the Operations menu.
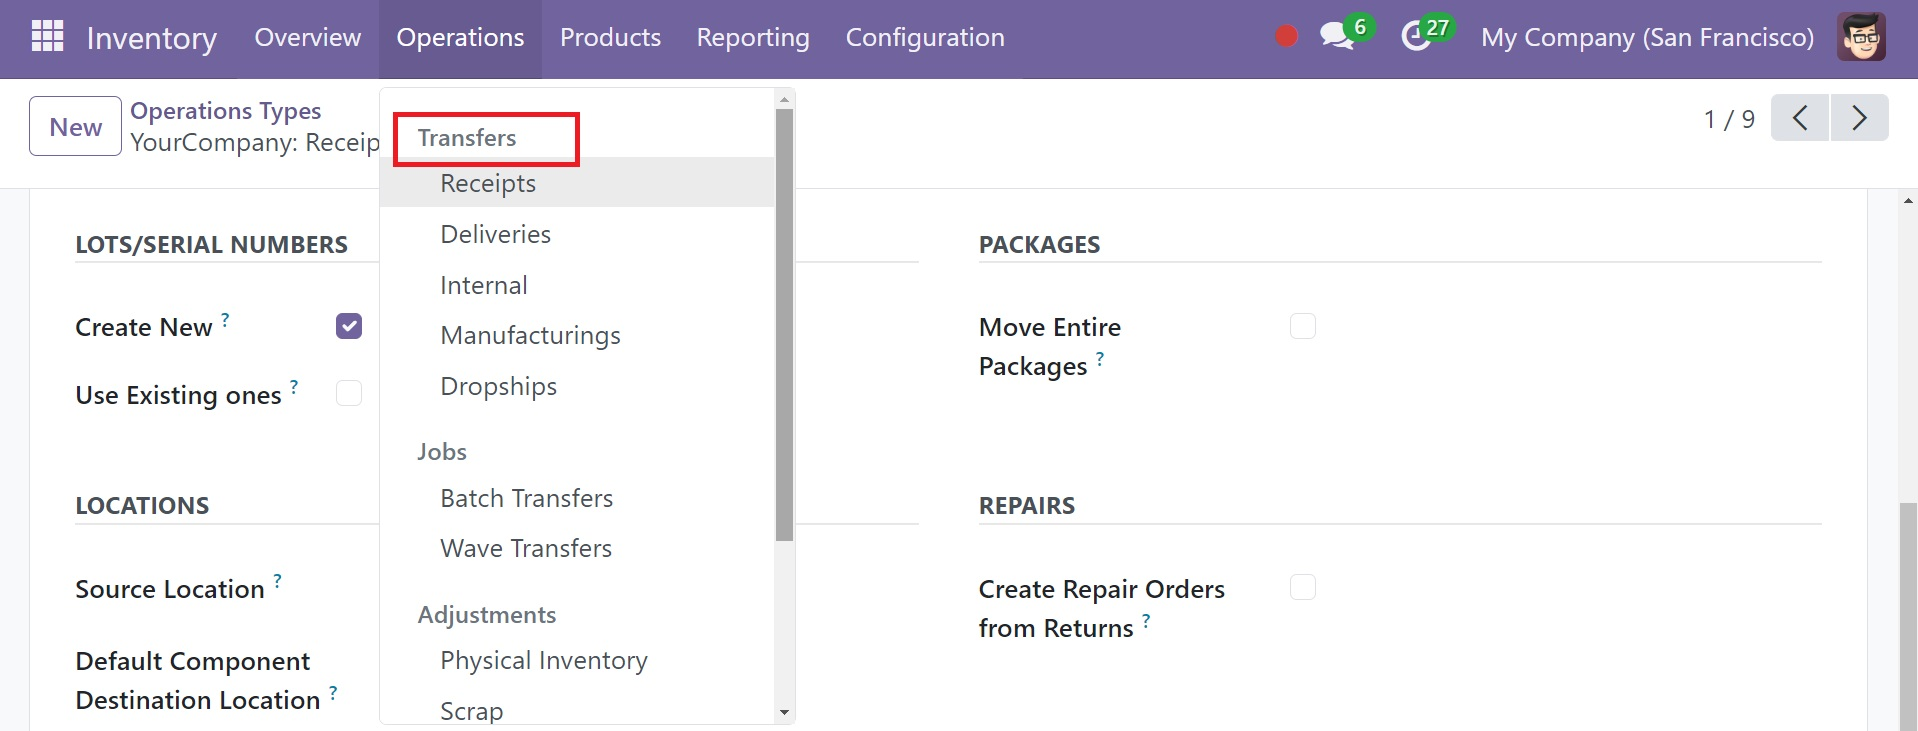
Below the transfer menu, you have the options such as receipt, deliveries, internal, manufacturing, and dropships, respectively.
Receipt
This is a thorough rundown of the product transfers your business has made. The window will display this information in a List view by default under the receipt option.
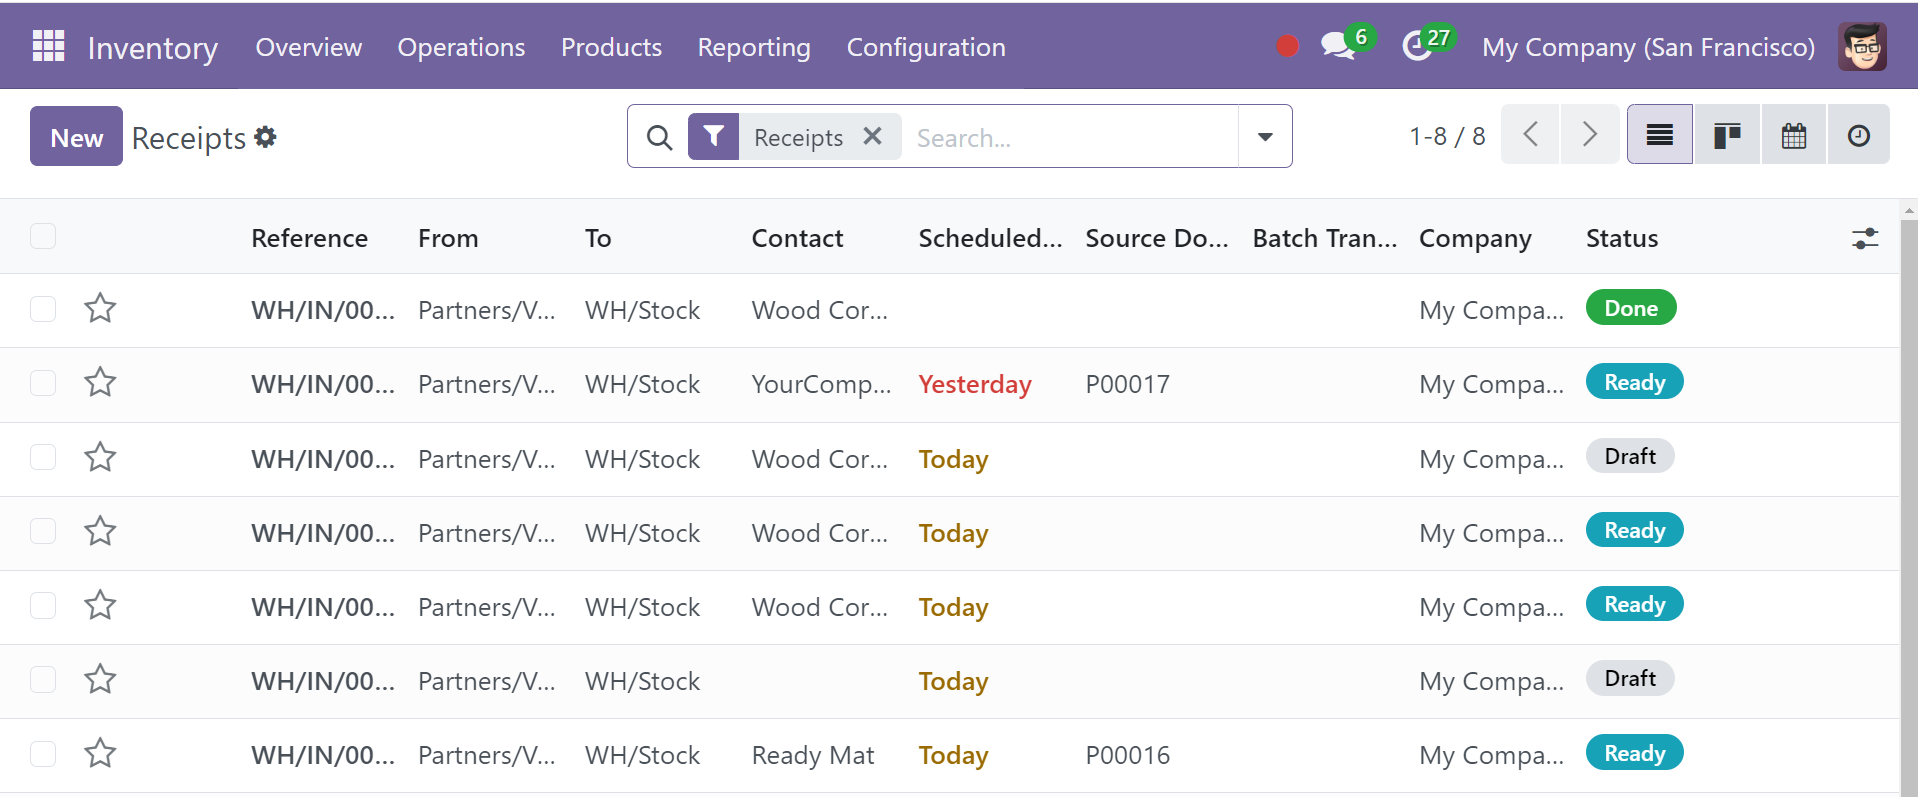
In this mode, you can navigate between the Calendar and Kanban displays by clicking on the corresponding icons.
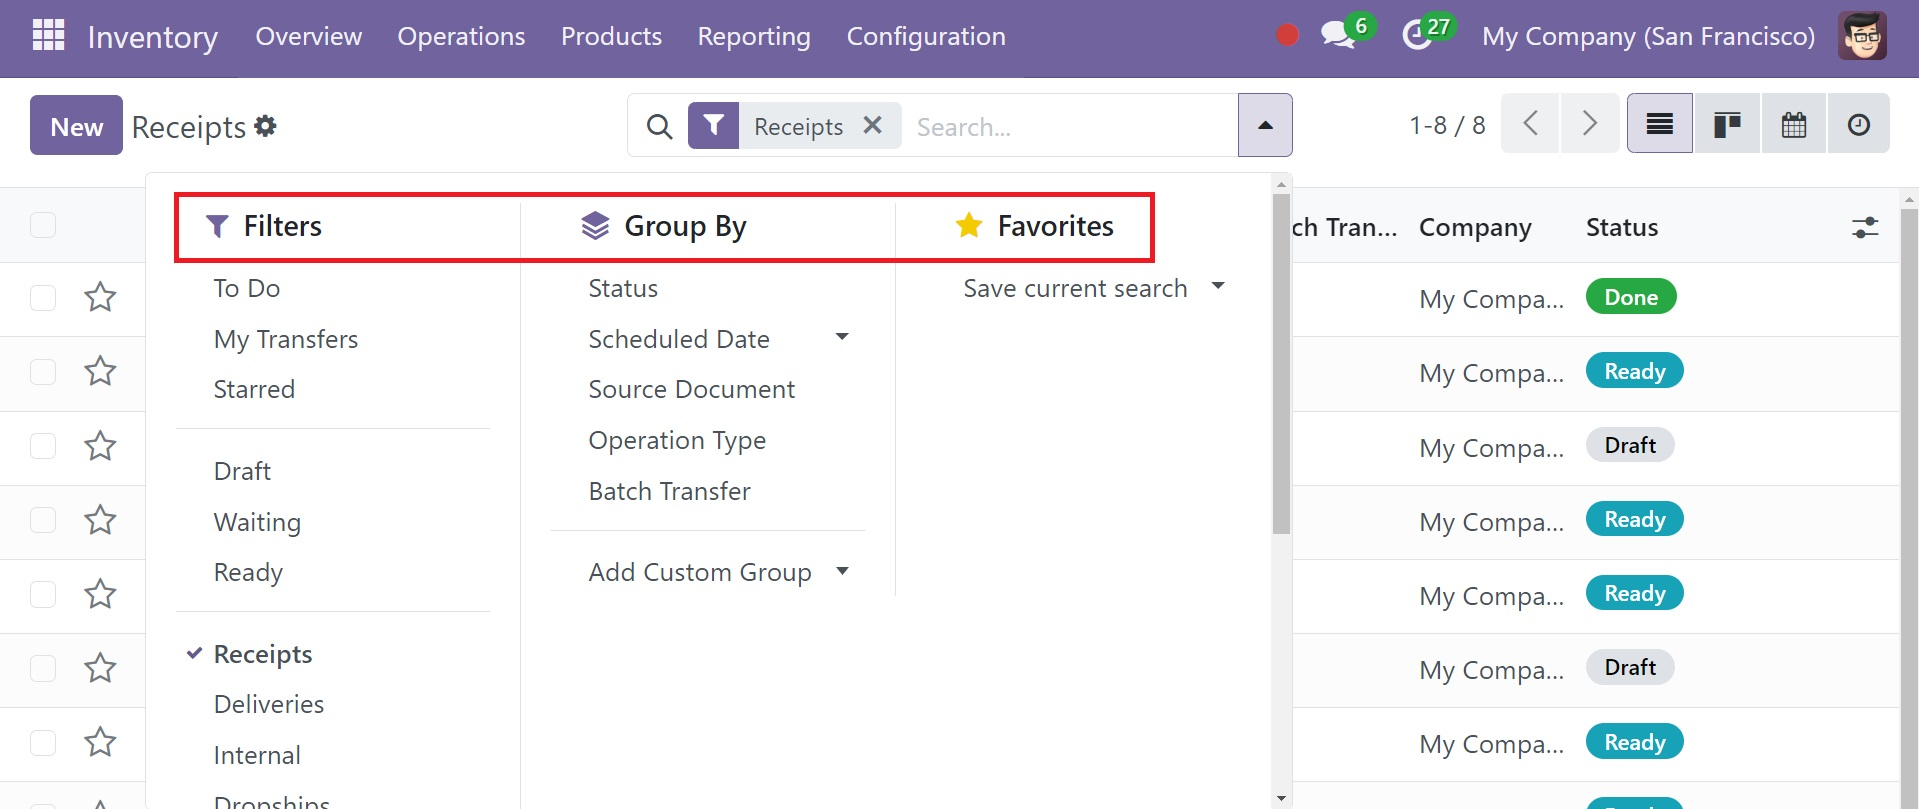
The Filters and Group By capabilities will help you find and identify certain records based on a number of criteria, making your transfer tracking process more structured. You can set these filters as the default or store them using the Favorites function.

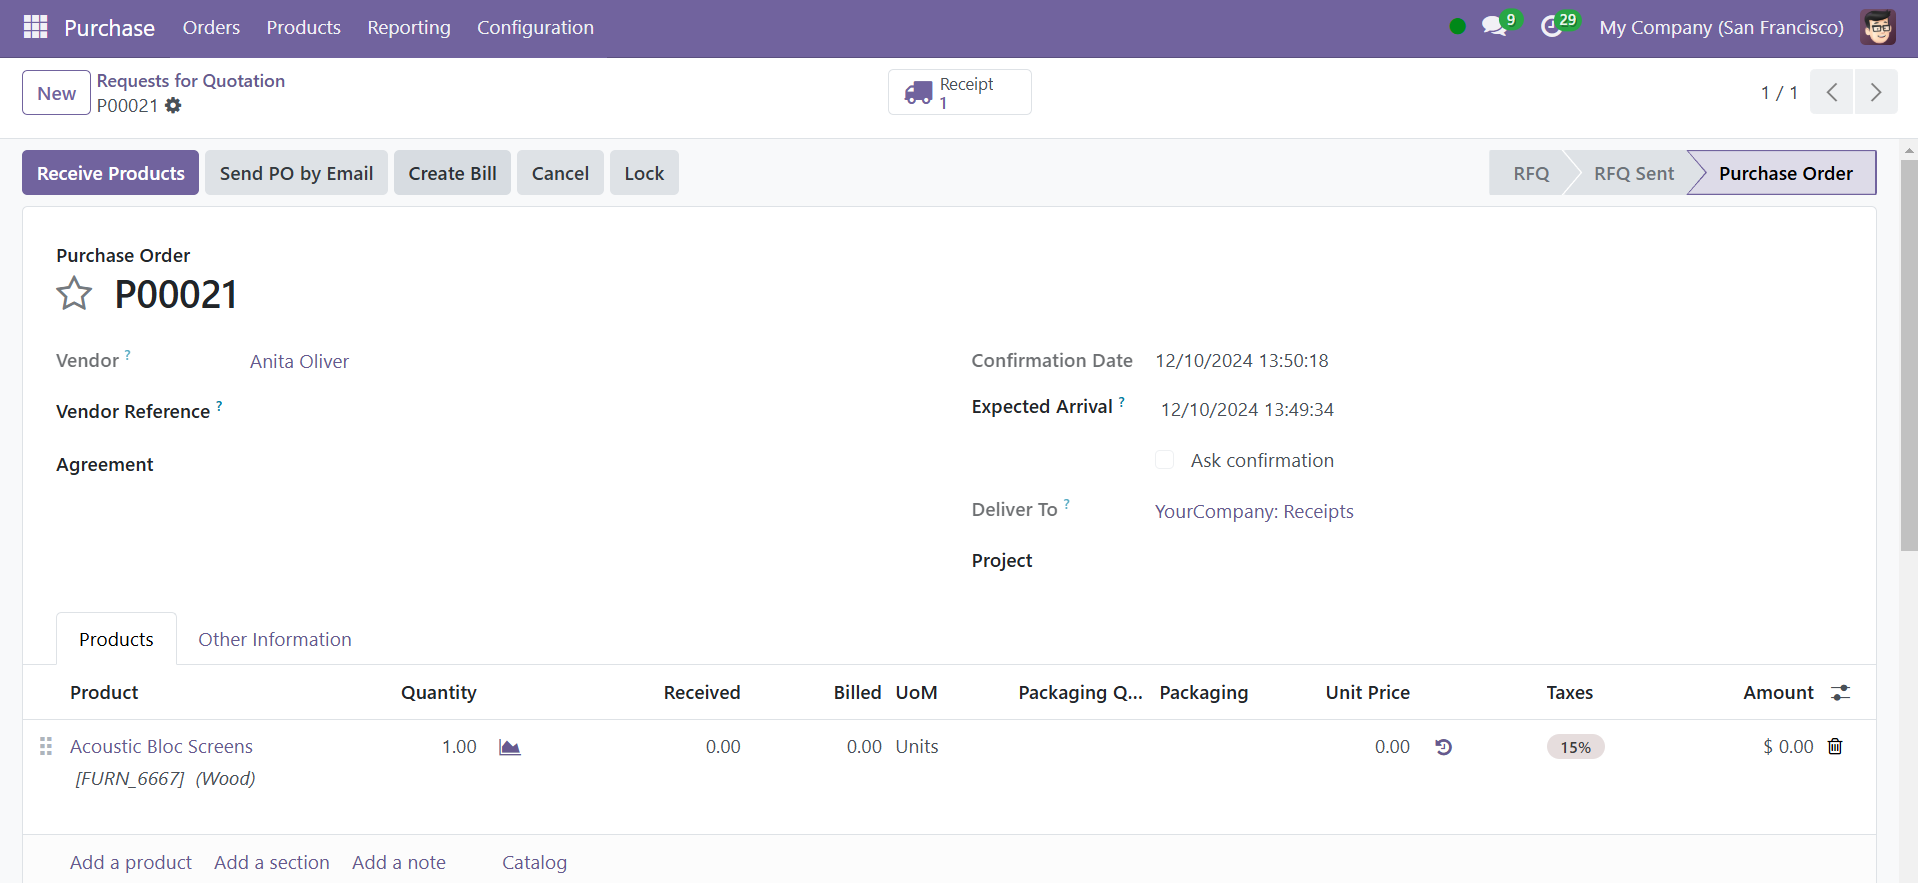
Click the "New" button to add a new transfer ‘Reciept’. Receipt represents the receipt of goods from a supplier or another source into your warehouse. Typically linked to a Purchase Order.
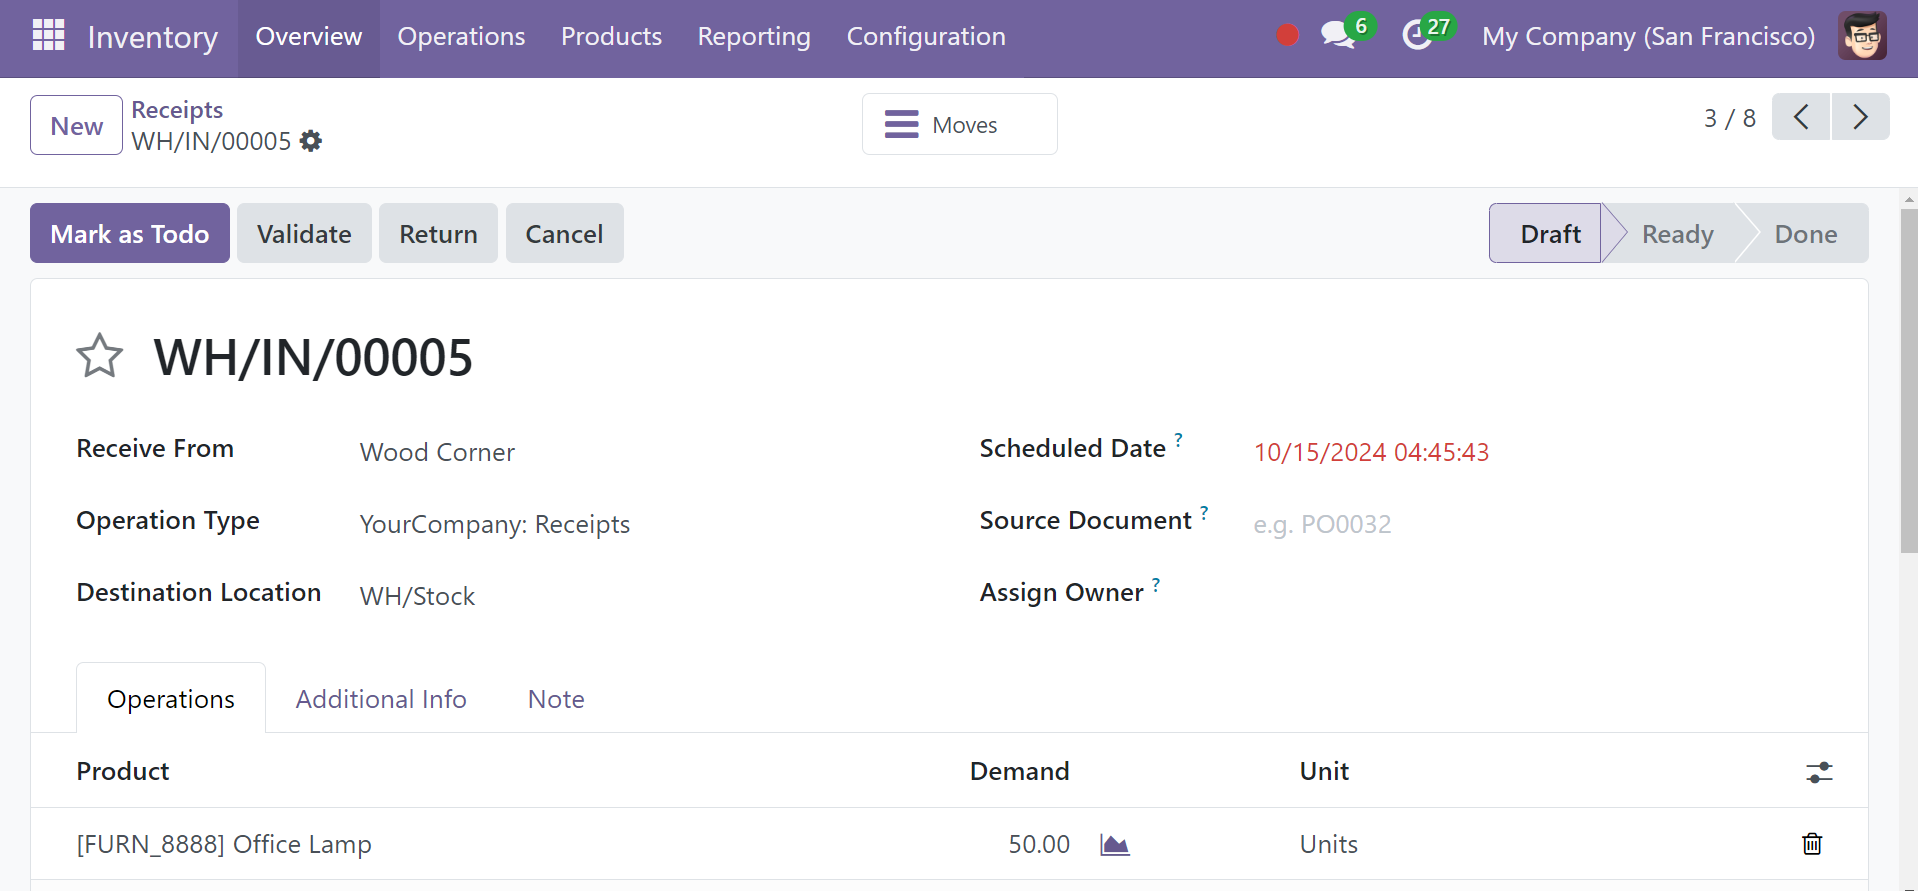
Fill out the Contact, Operation Type, Source Document, and First Shipment Scheduled Date columns. Choose 'Add a line' from the Operations menu to specify which products need to be moved.
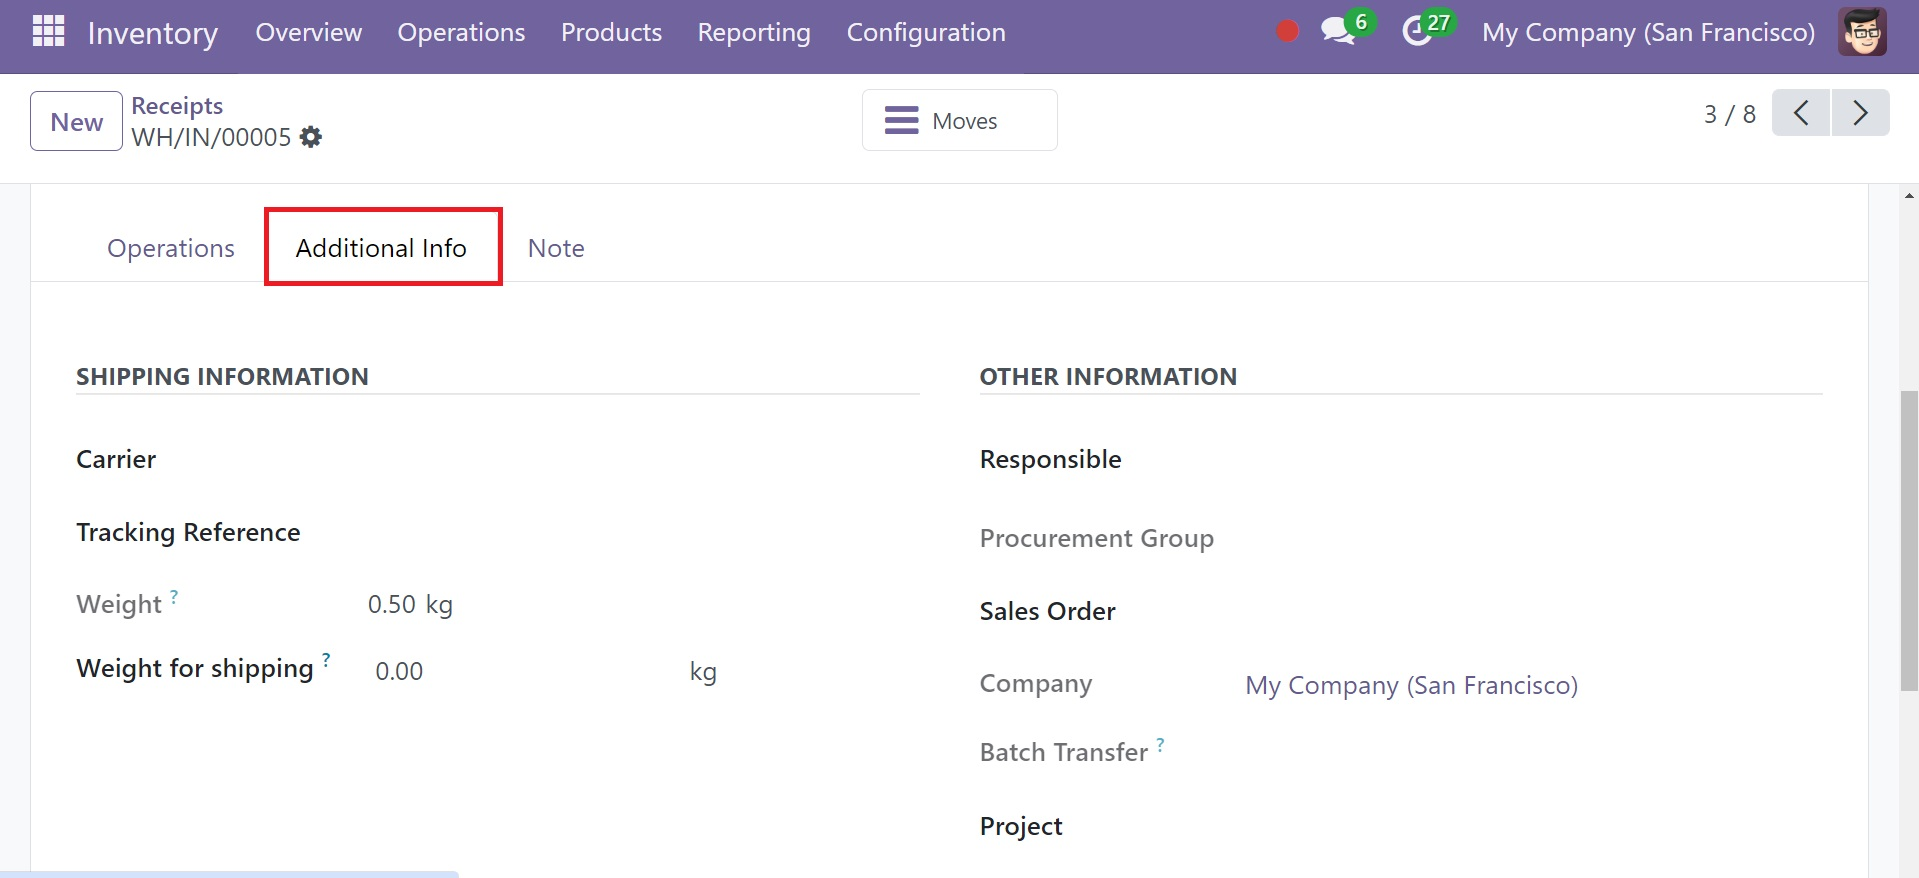
You can include the shipment information under the Additional Info tab. In the Shipping Information area, you can enter data for fields such as Carrier, Tracking Reference, Weight, and Weight for Shipping. Include information about the company, responsible officer, procurement group, and shipping policy under "Other Information."
The action menu button in Odoo can be used to modify or update a record or group of records. Under the action button, you have got some options, such as in the screenshot below.
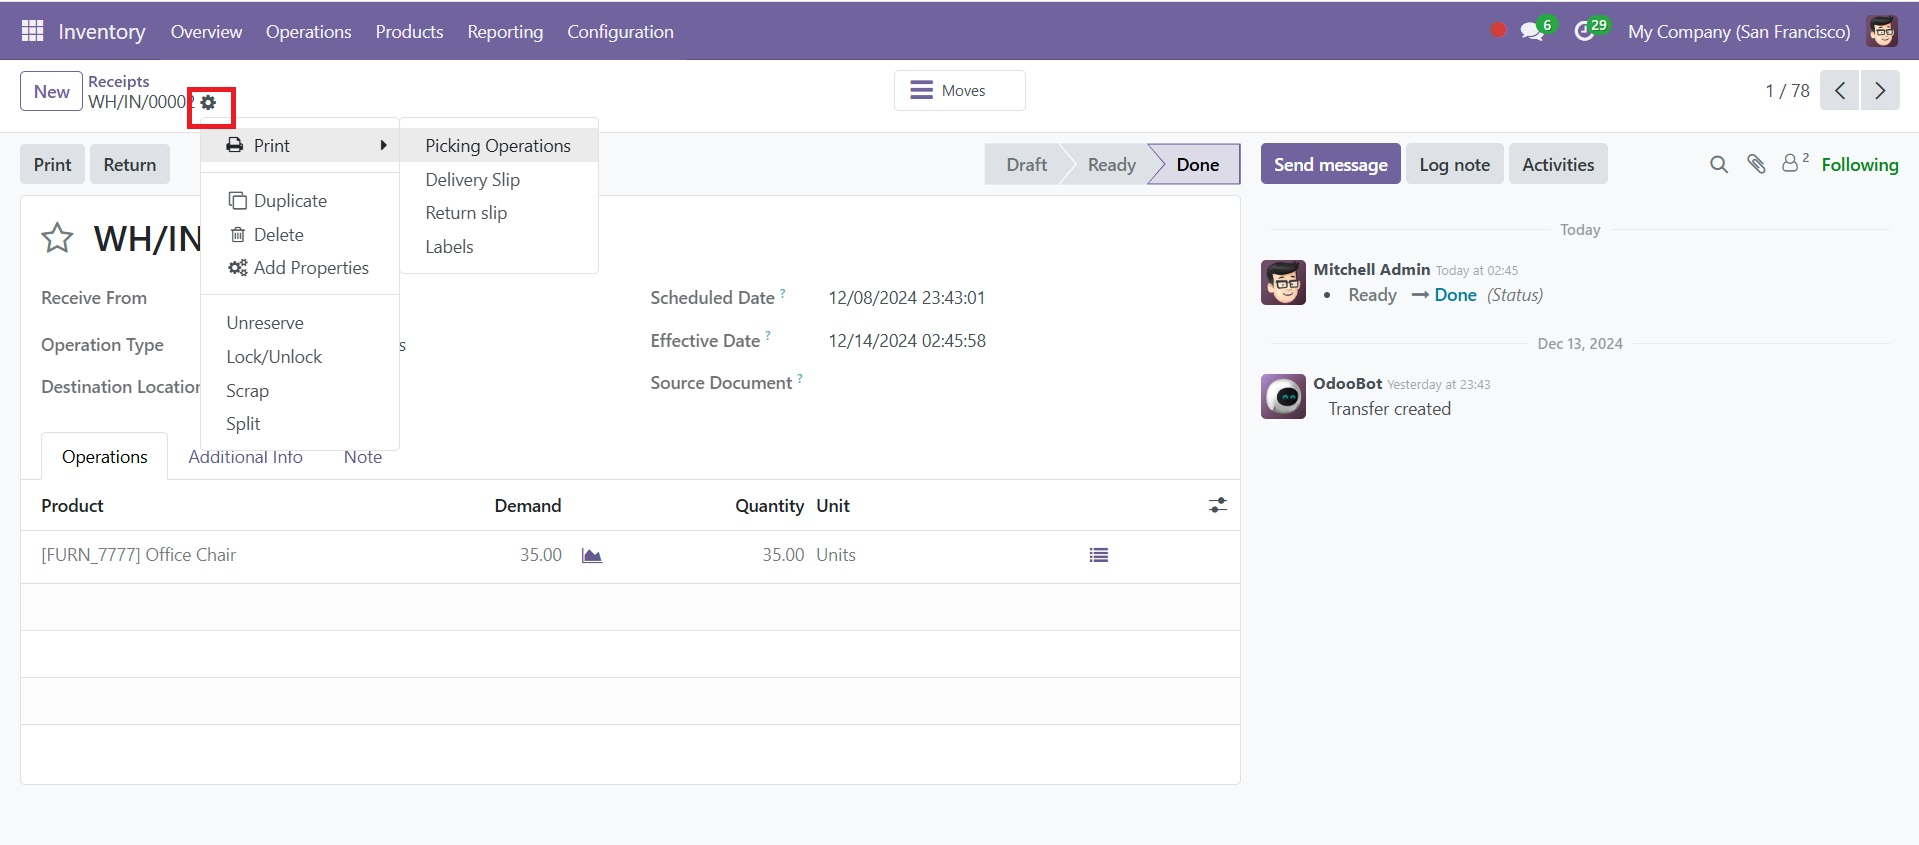
The options include print, duplicate, delete, add property, unreserve, lock/unlock, srap, and split, respectively. The Split option can split the transfer into multiple transfers.
Below the print, you have picking operations, delivery slip, label and one more new option which is ability to print the return slip at the time of a return process..
Deliveries
Deliveries are the transfers where stock is send from the warehouse to customers, for which source location is WH/STOCK to destination location Partners/Customers.
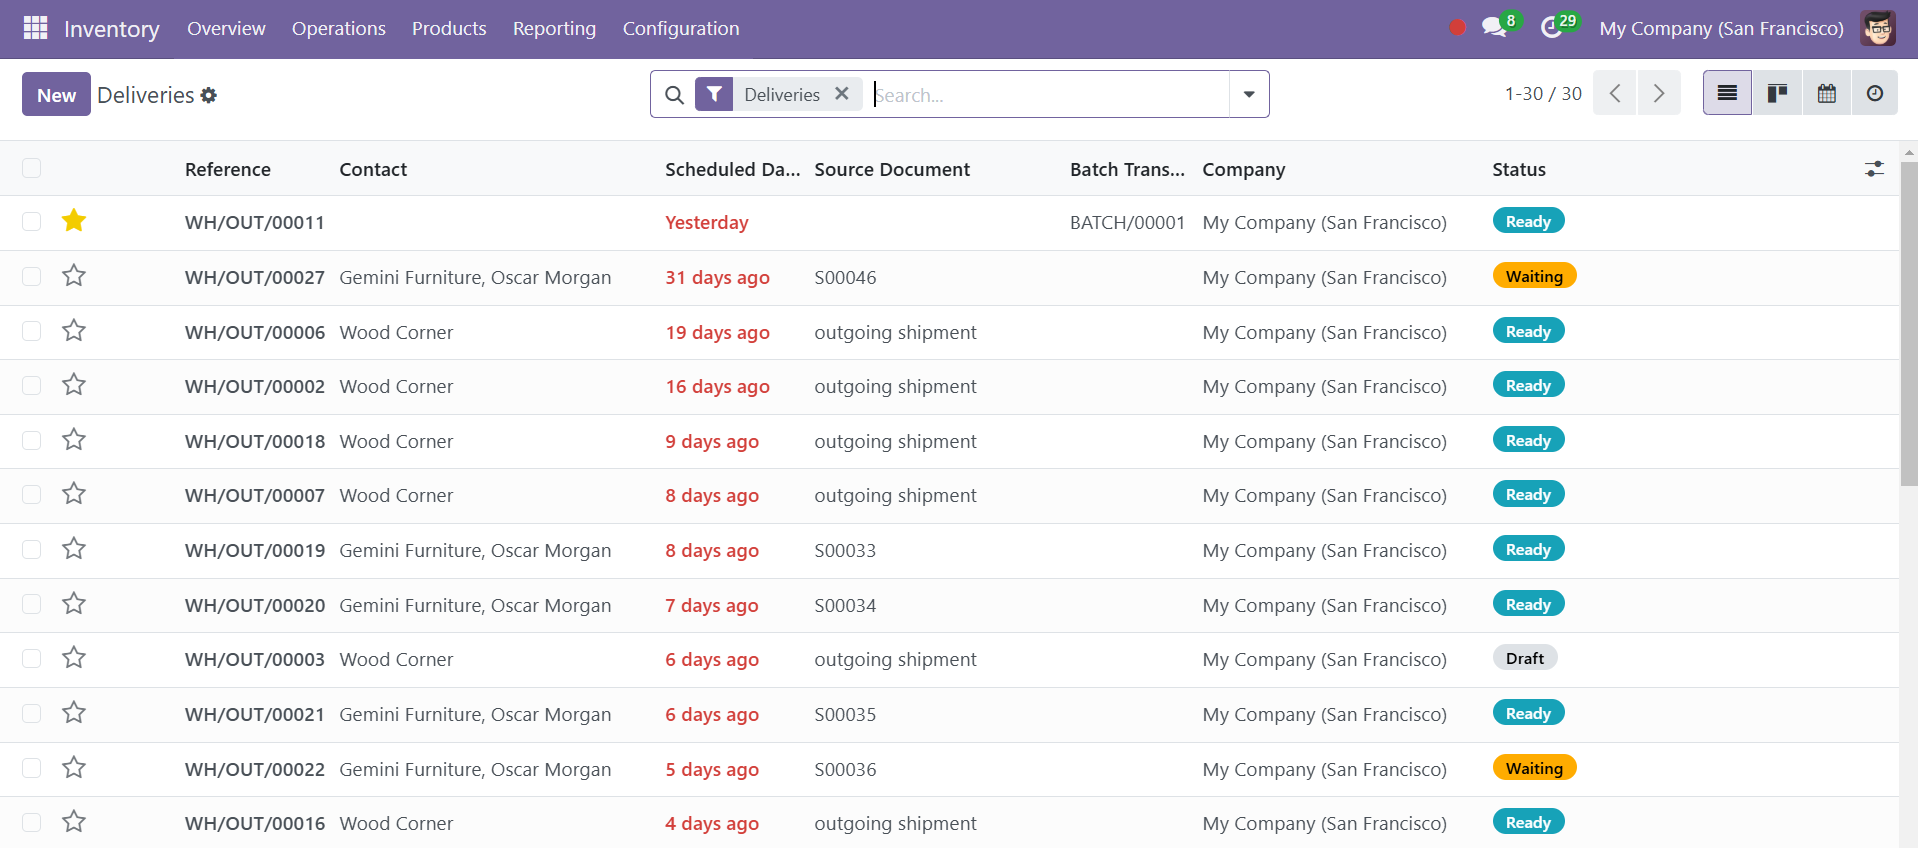
Under the deliveries option,in the list view you can have the reference, contact details, scheduled date, source document, batch transfer, company, and the status, respectively.
On selecting the New icon, you can have the creation window, as in the image below.
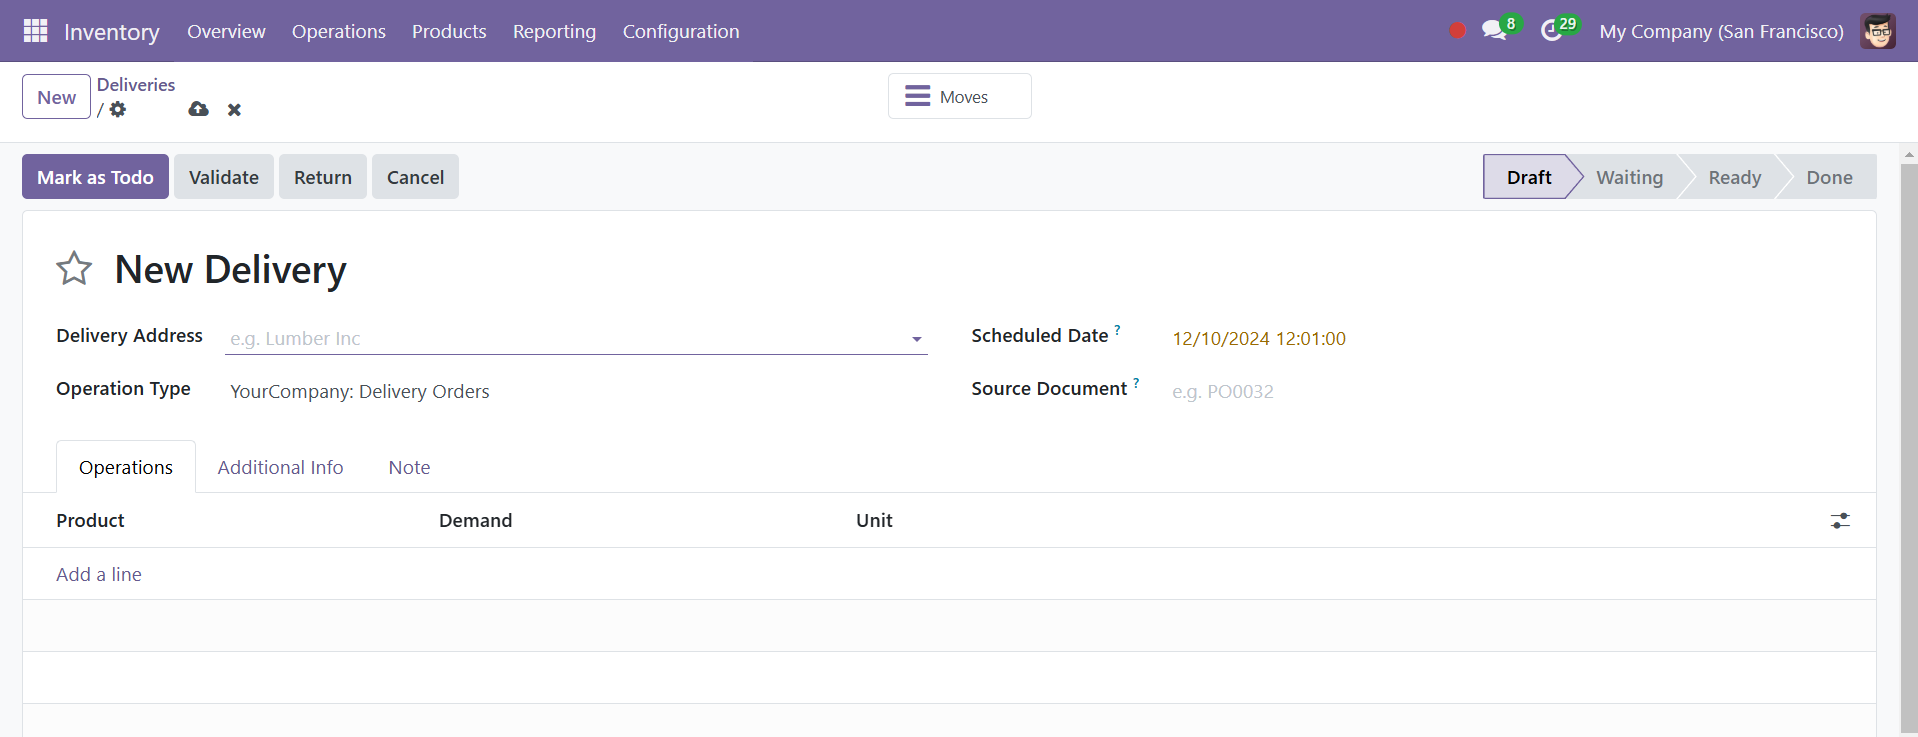
Here, you can add the delivery address, operation type, scheduled date, and source document.
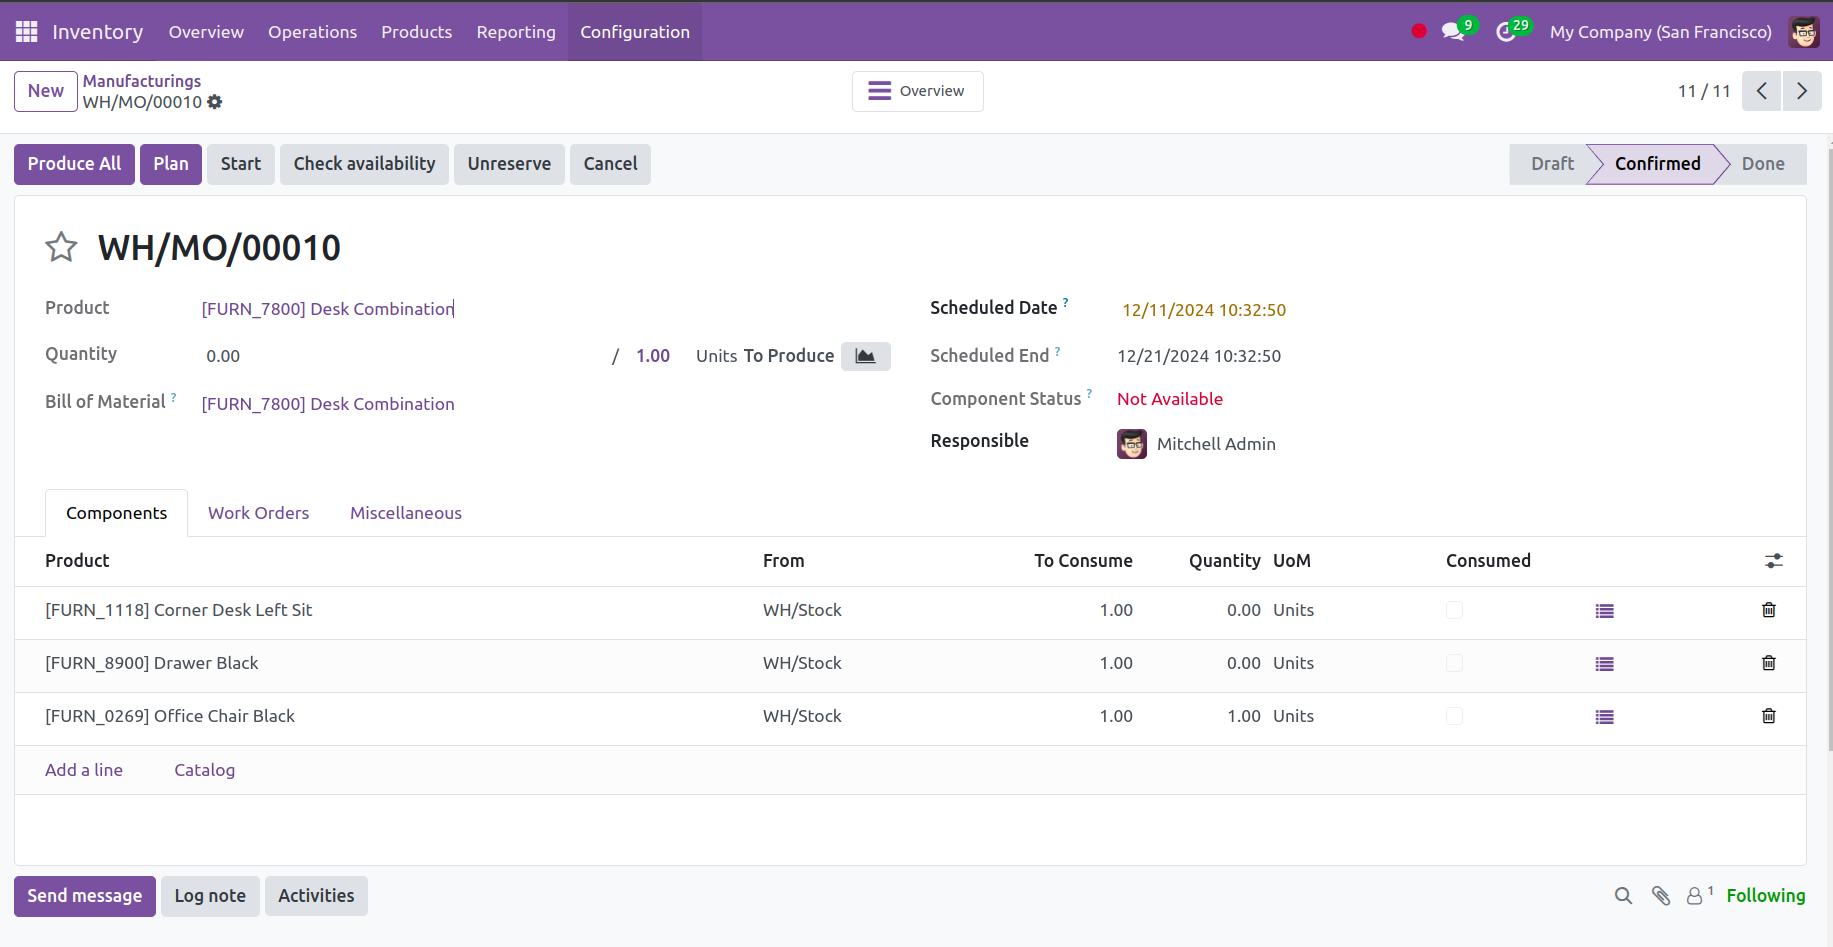
Manufacturing
Tracks raw materials consumed and finished products created during the manufacturing process. This can be linked to Manufacturing Orders (MOs) in Odoo Manufacturing.
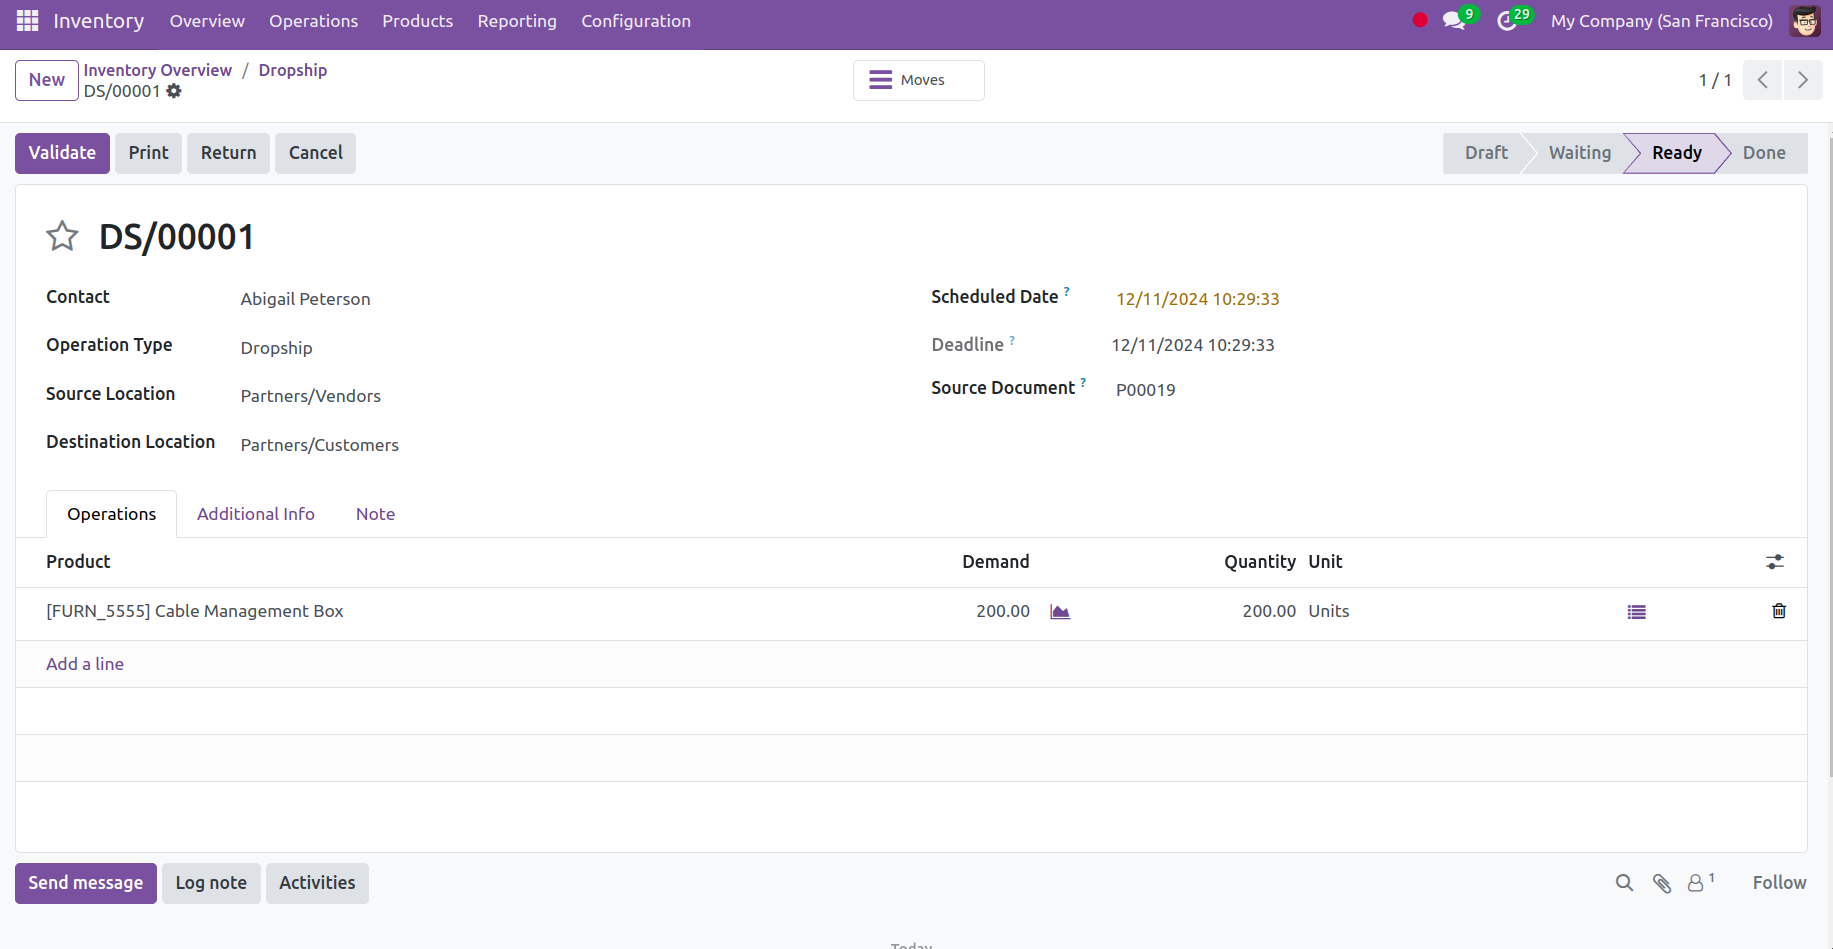
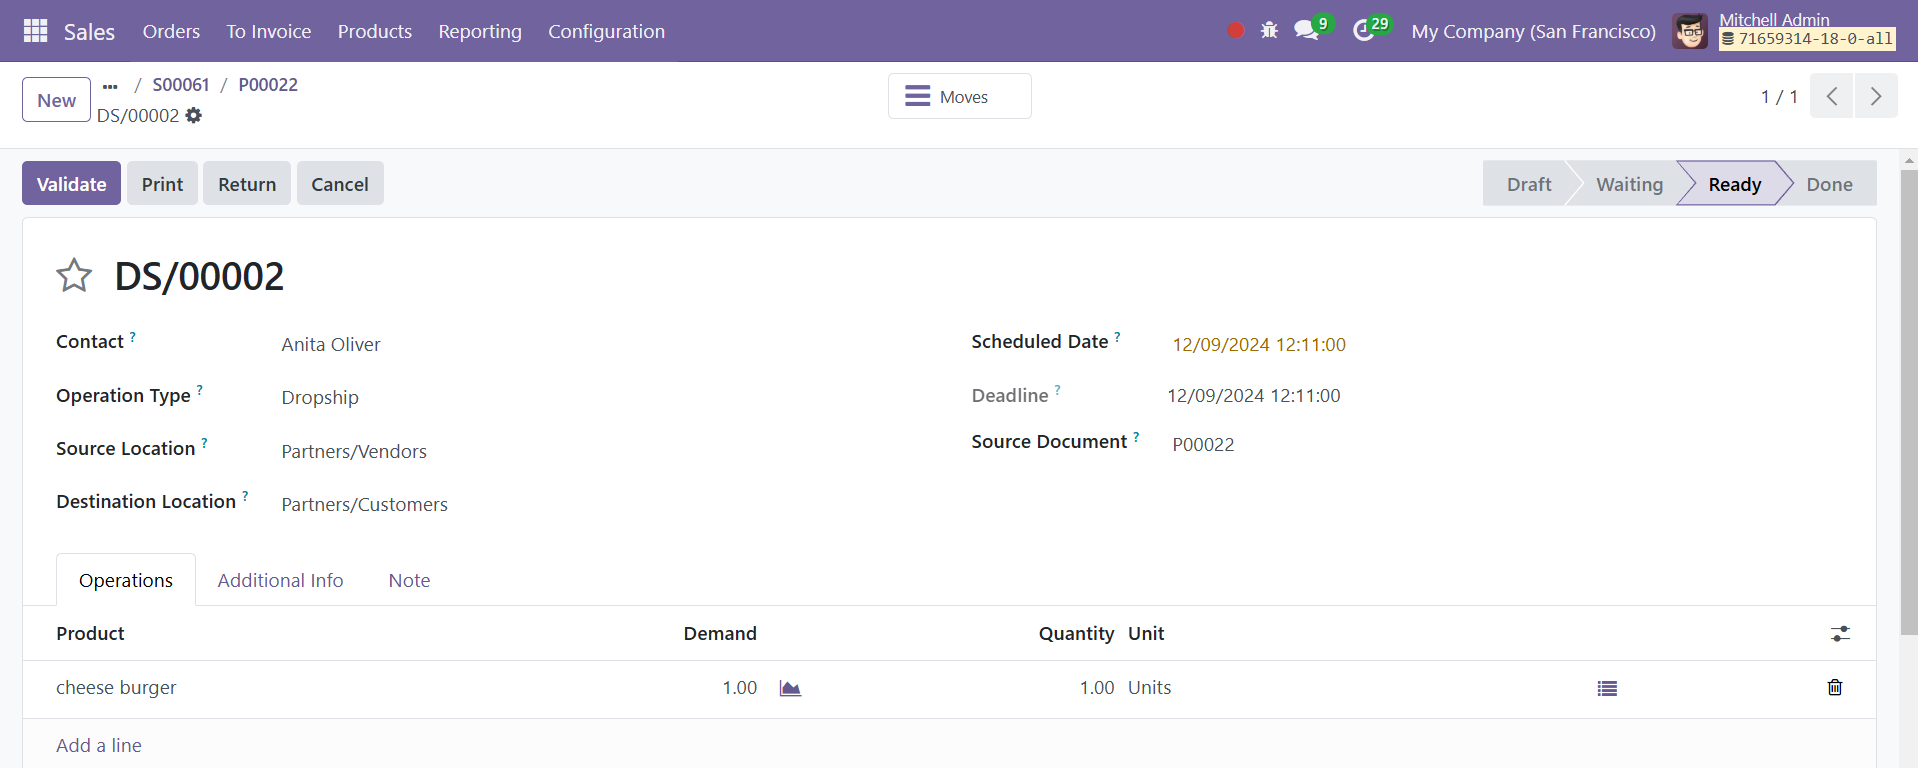
Dropships
Used when products are shipped directly from the supplier to the customer without passing through the company’s warehouse. The Stock is not recorded in inventory as the goods don’t physically arrive at the warehouse.
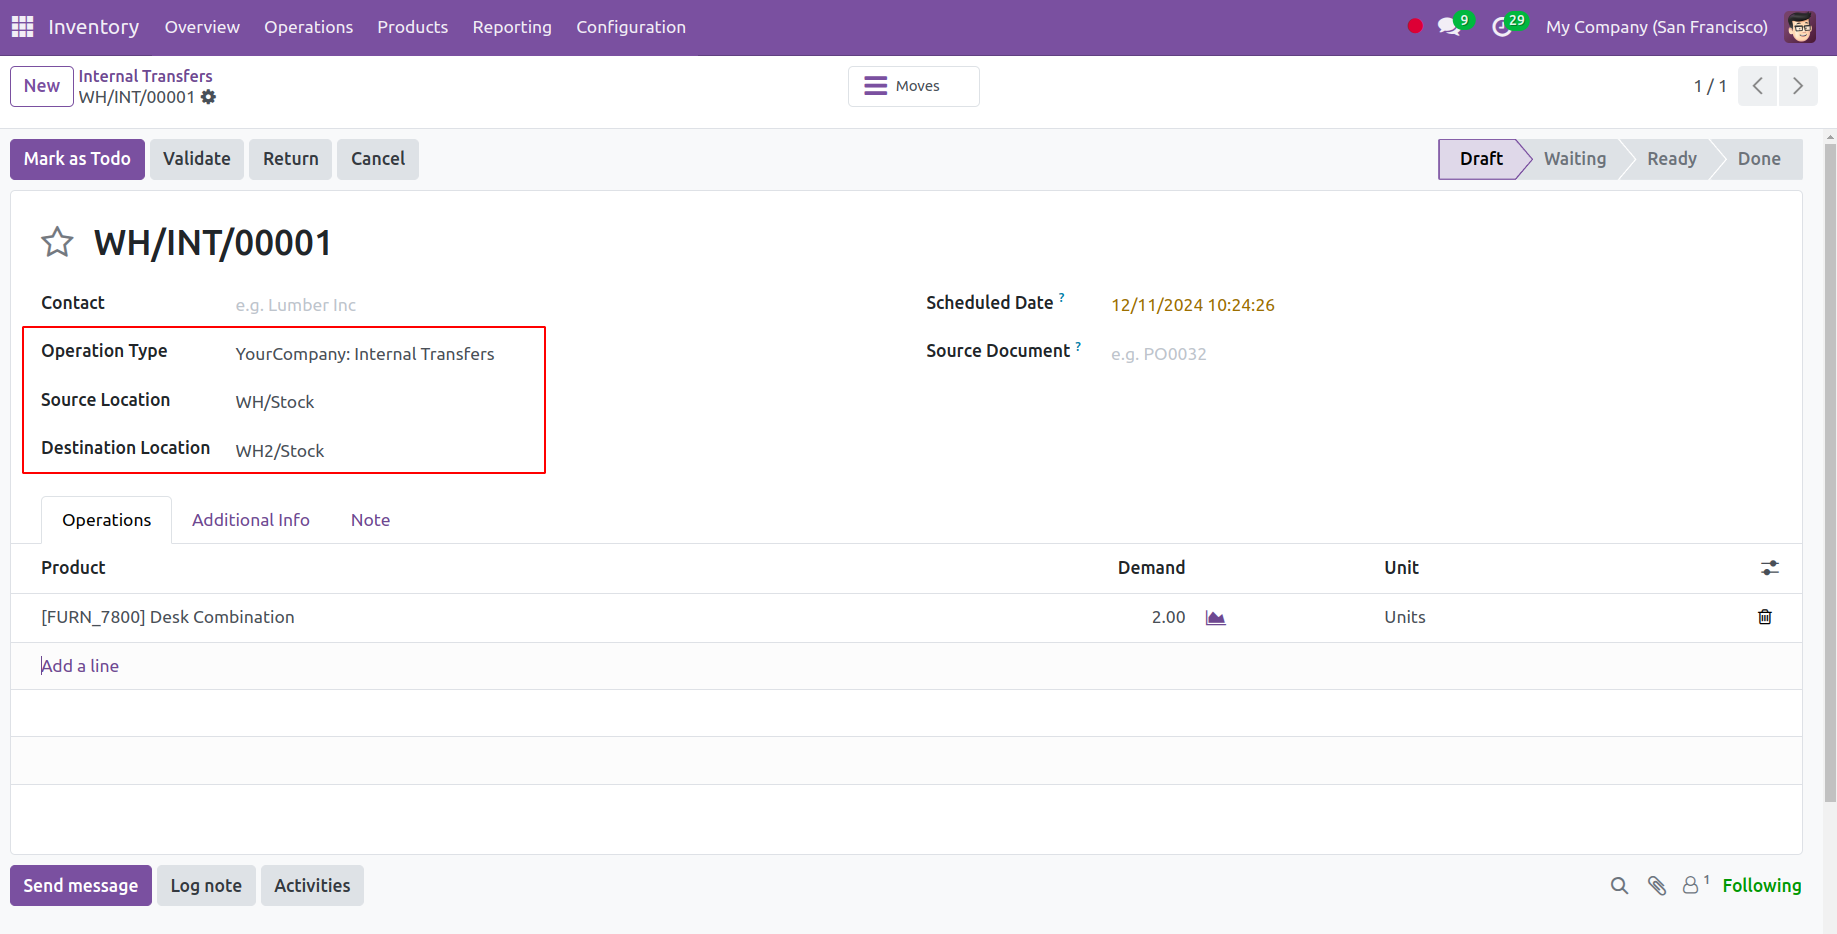
Internal Transfers
Internal transfer is an operation for which products are transported internally, it can be with in a warehouse or between two warehouses within a company. In the internal transfer, we don’t have to mention the contact as the transfer is made within the warehouse or between warehouses. We can choose a Source document here based on the requirement for the transfer. Most of the time the internal transfer may be made to meet the requirement of a product or raw material.
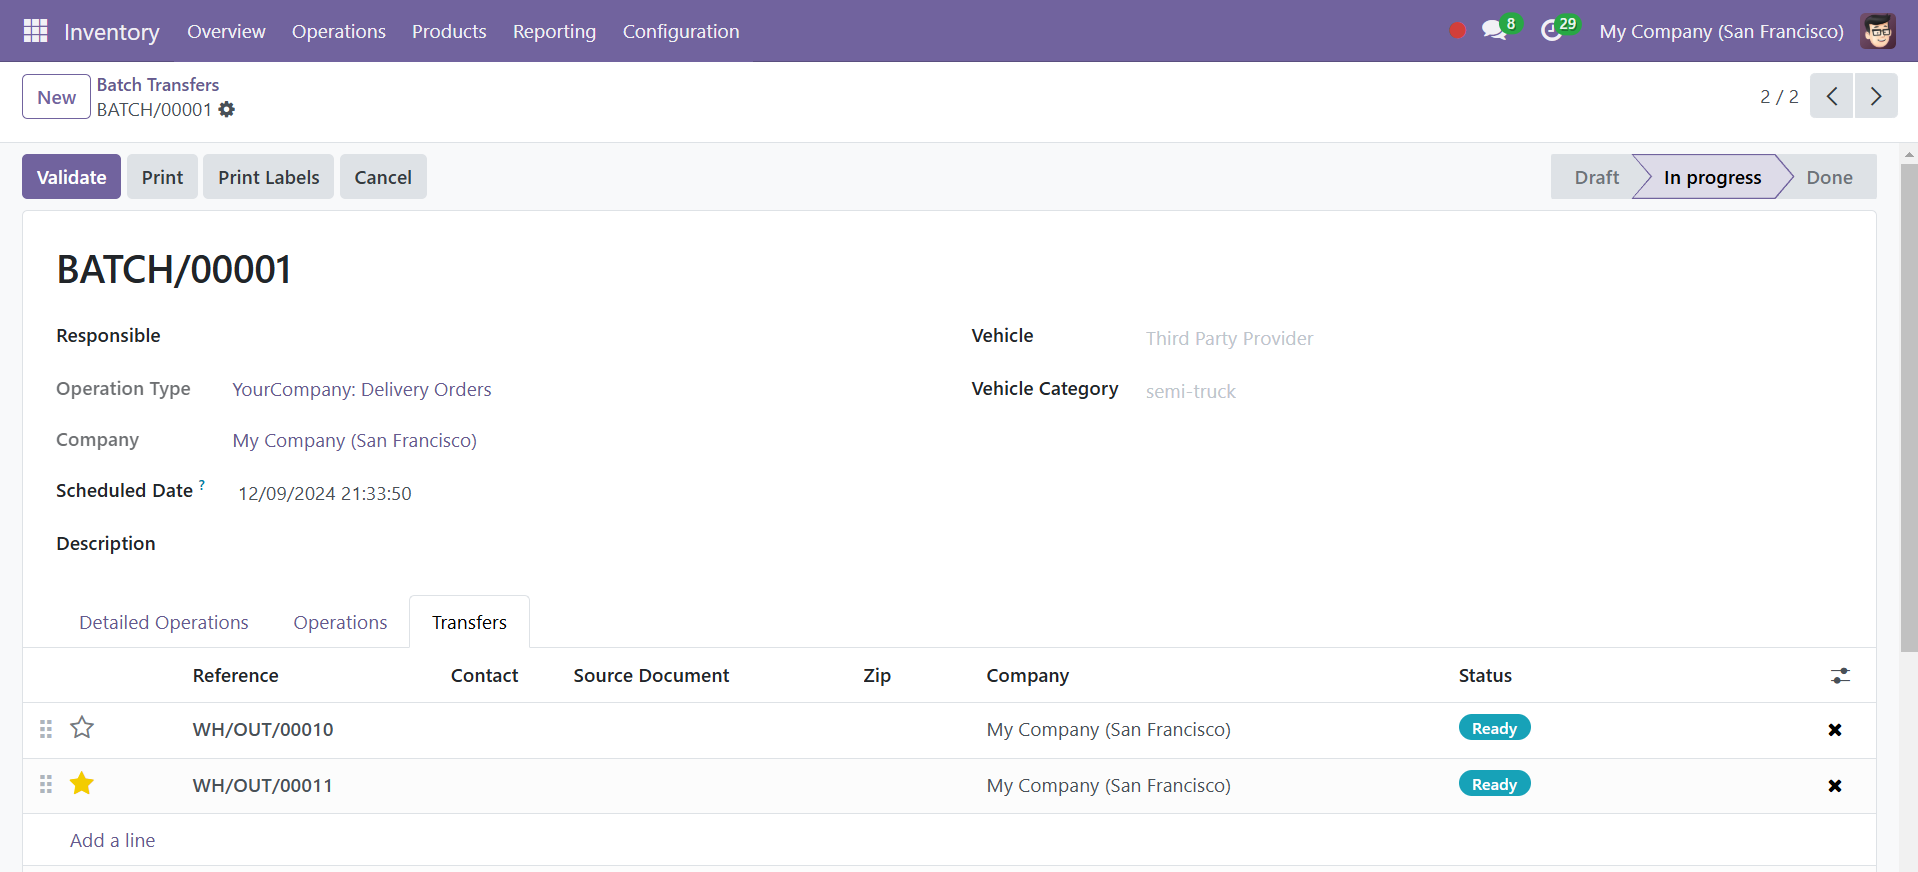
Batch Transfer
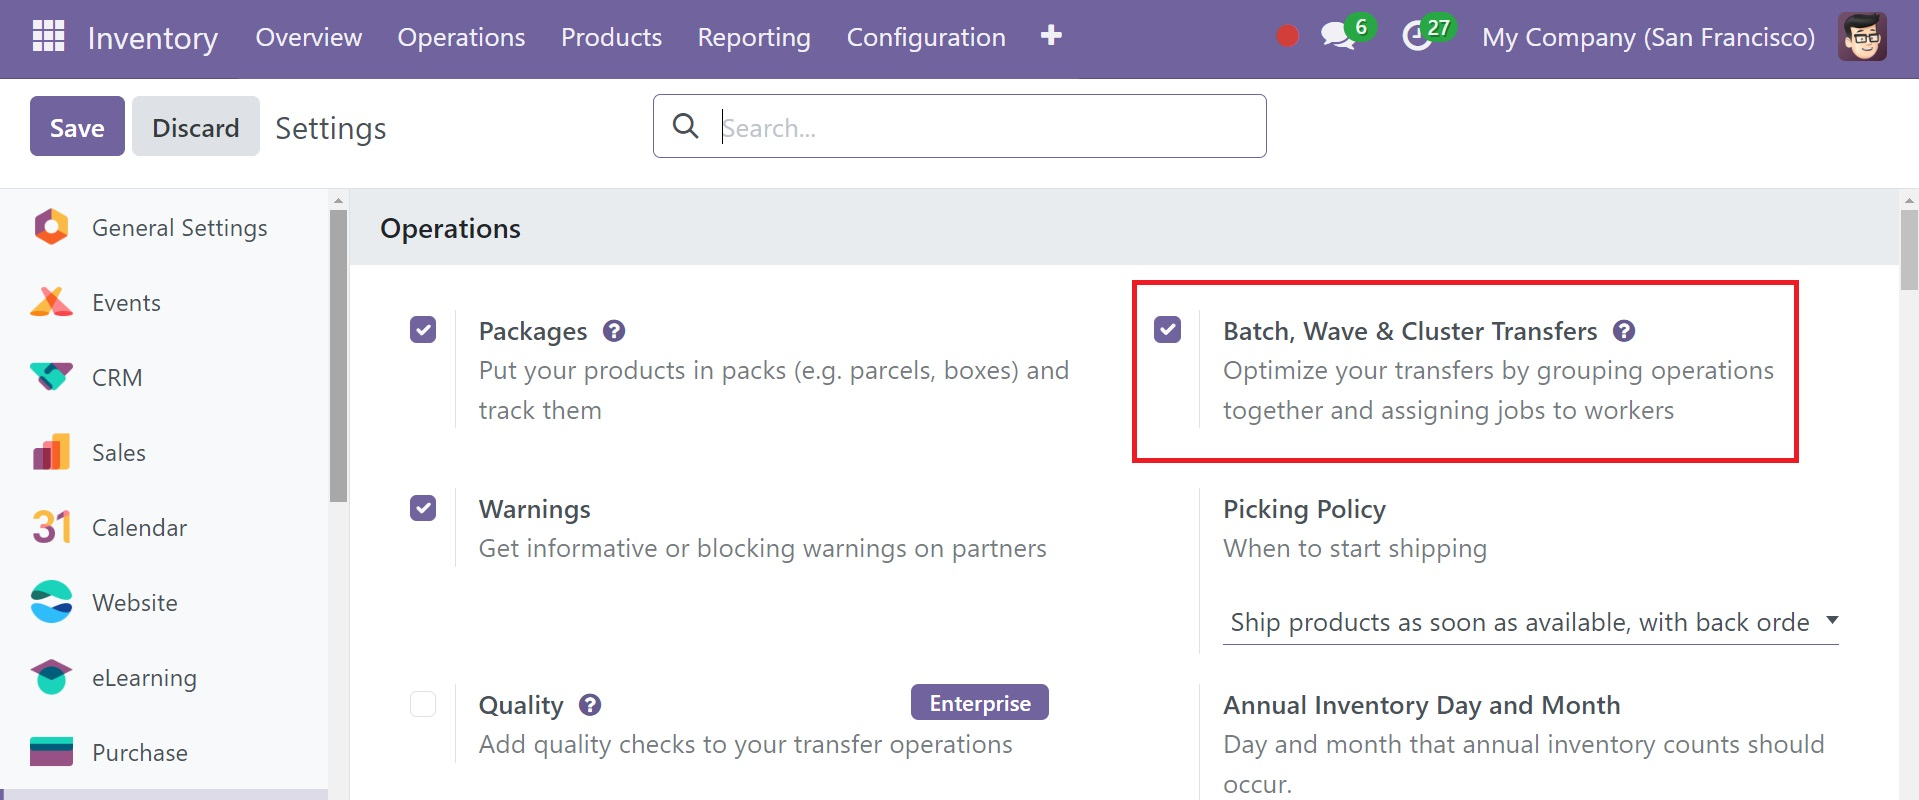
Odoo 18 allows you to move several orders at once, which maximizes efficiency and lowers transportation expenses. To activate this feature, select "Settings" under the Configuration tab. Select "Operations," then "Batch Transfers." This feature allows you to add transfers to it and process them in a batch.
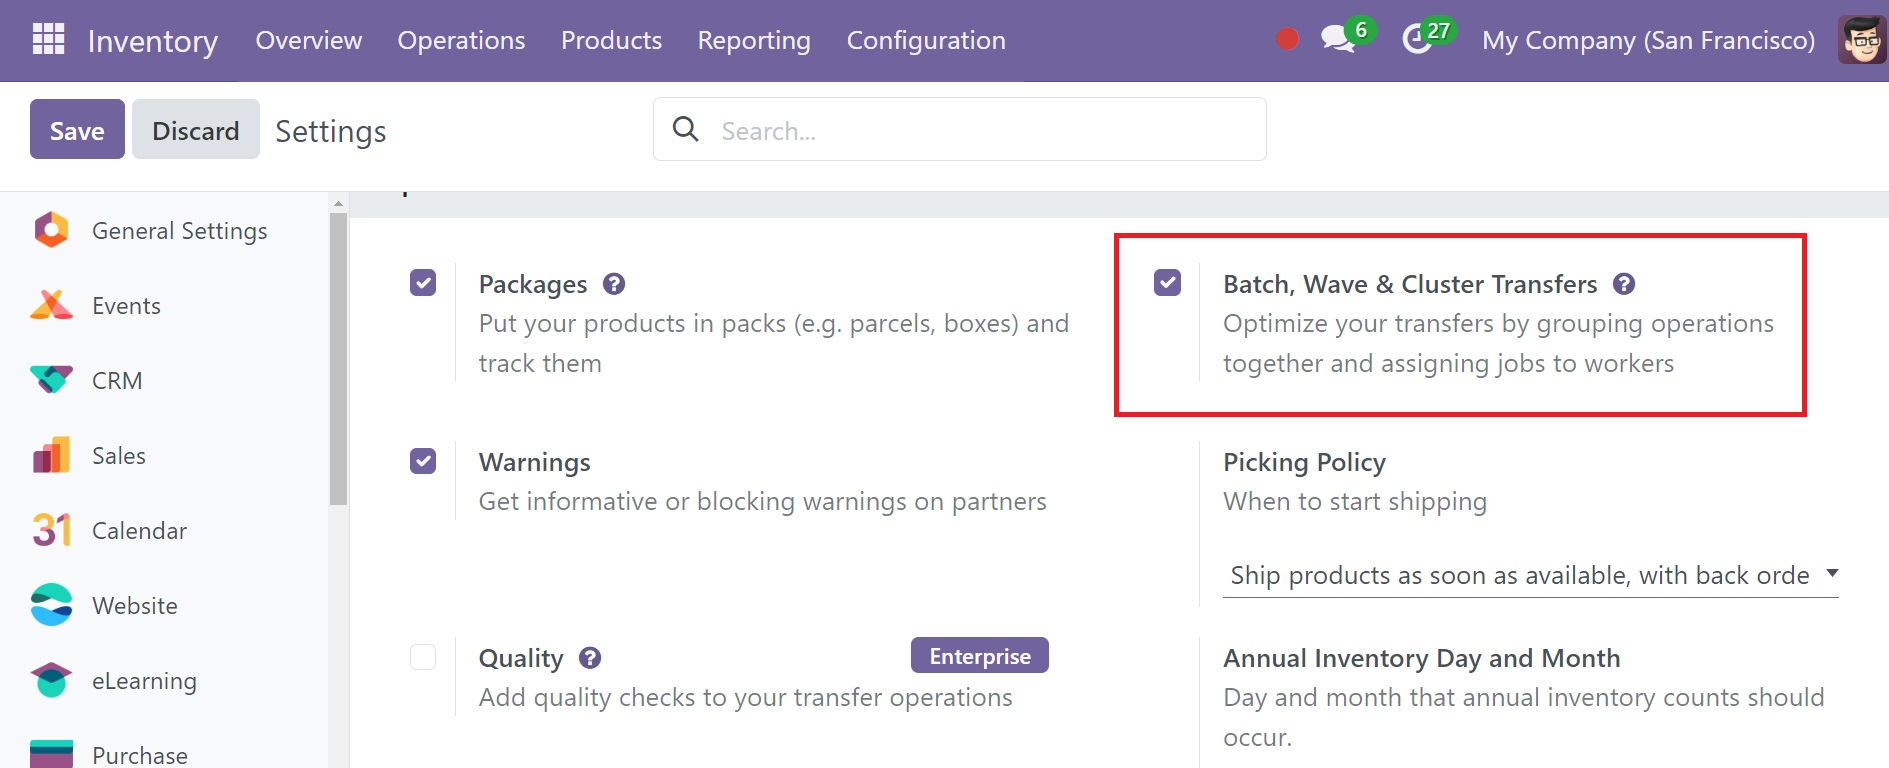
Click the Operations tab now, and select "Batch, Wave, and Cluster Transfers" from the list of options. Then choose the Batch Transfer from the Operation menu.
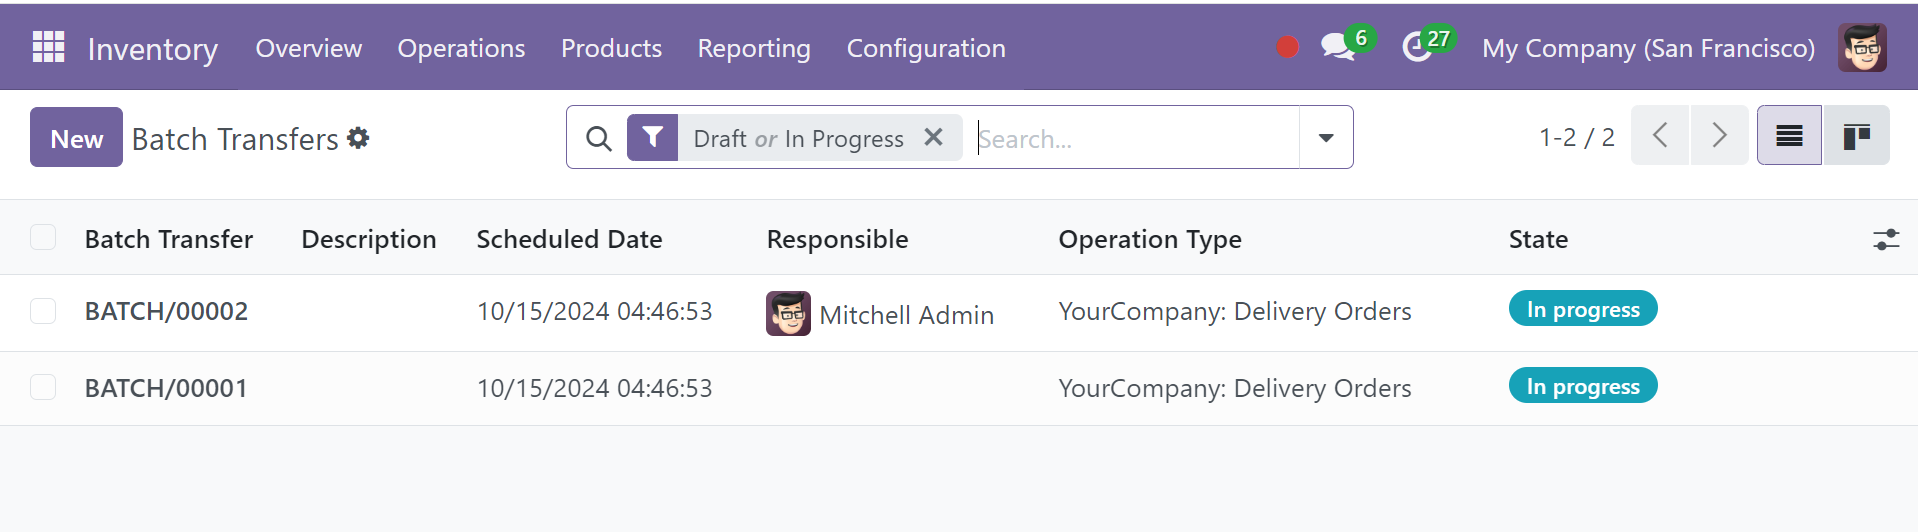
In the Batch Transfers pane, you can see details such as the Batch Transfer (reference number), Scheduled Date, Responsible, Operation Type, Company, and Status. Click the New button to add a new batch transfer.

In the "Responsible" field, type the name of the person assigned to the assignment. Indicate the business, type of operation and planned date. Click 'Provide a line' under the Transfers tab to add further information about the transfer. The pop-up window that follows will appear.
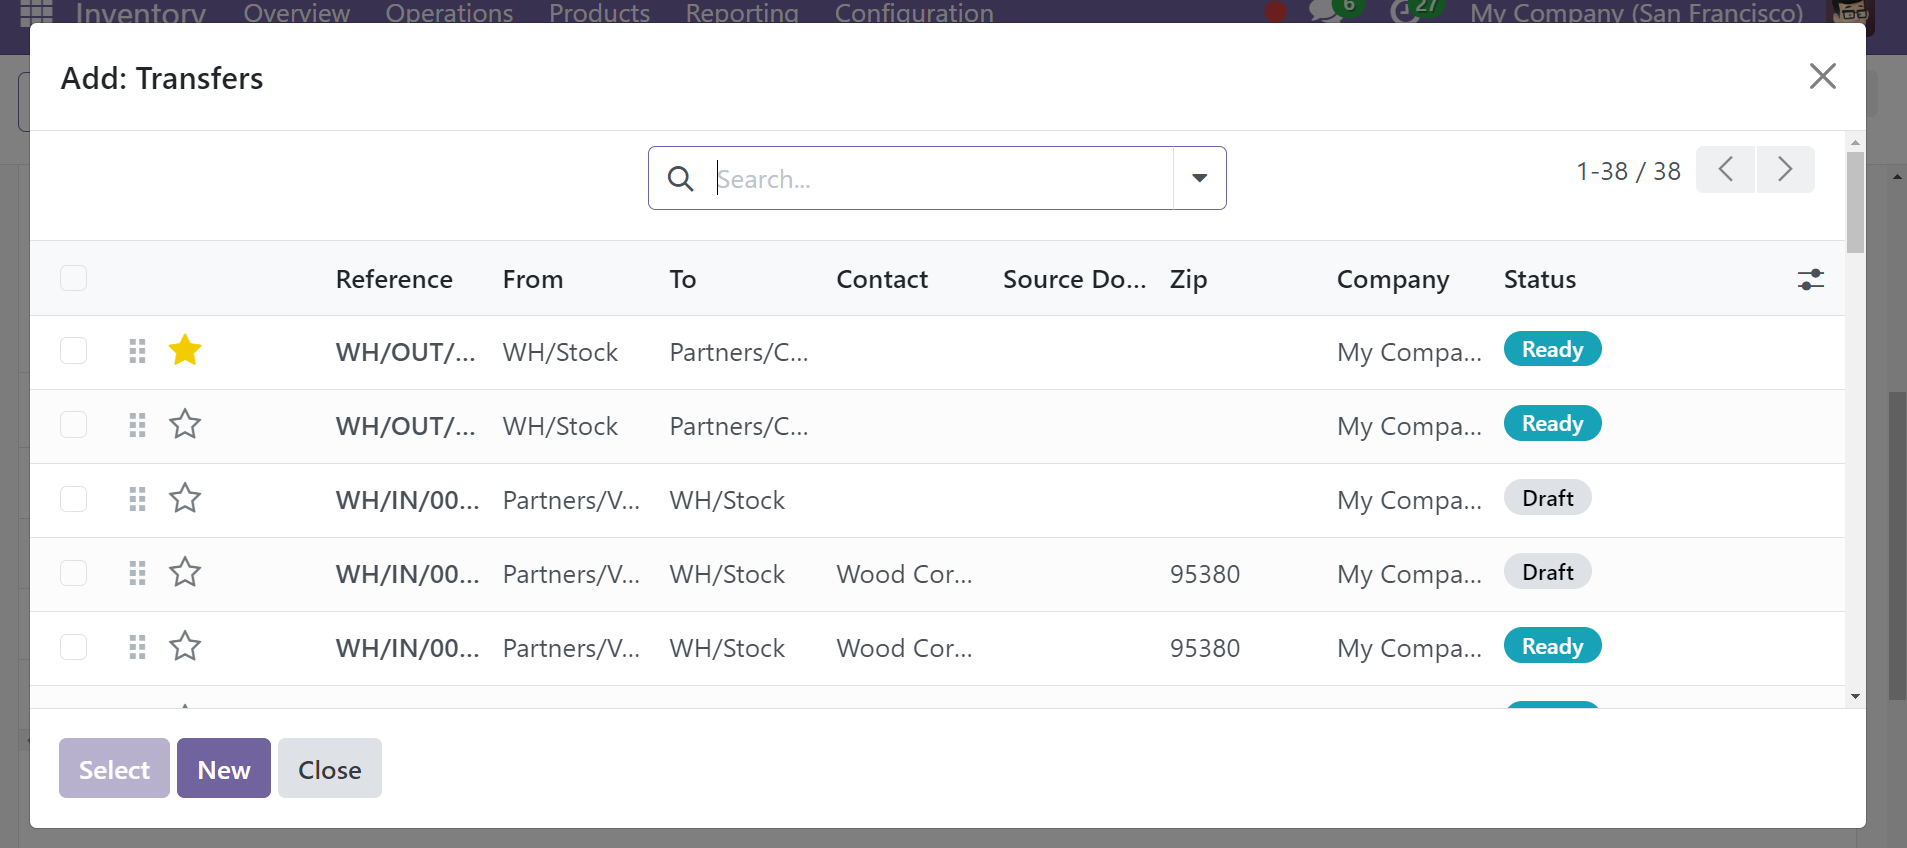
Select only those records that include the labels as "Ready." Since they don't verify the procedures to complete the action, transfers in the "Draft" status are not an alternative. As a result, it will be possible to verify whether products in the operation type are available at the time of transfer. The products can be shifted to a ready condition if they are available. If not, the transfer can be taken out of the batch and processing can resume.
From this window, click "New" to start the creation of a new transfer.
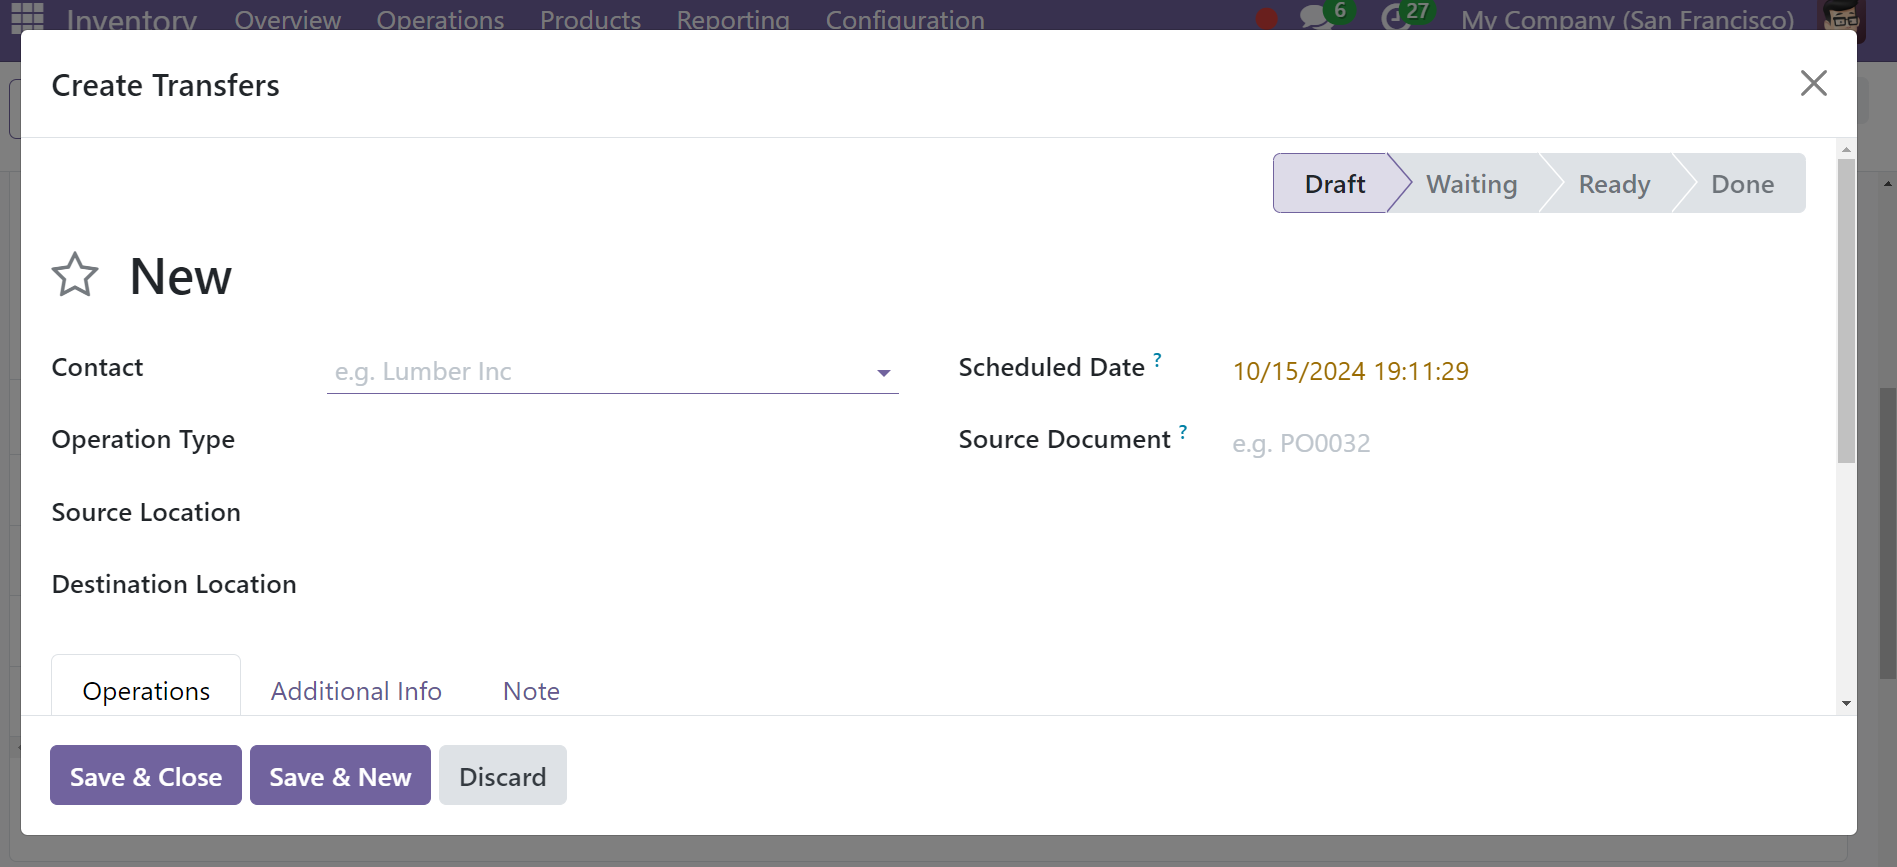
This window resembles the one that appears when you add a new transfer (see the topic above). Once all the data has been entered, click "Save and Close."
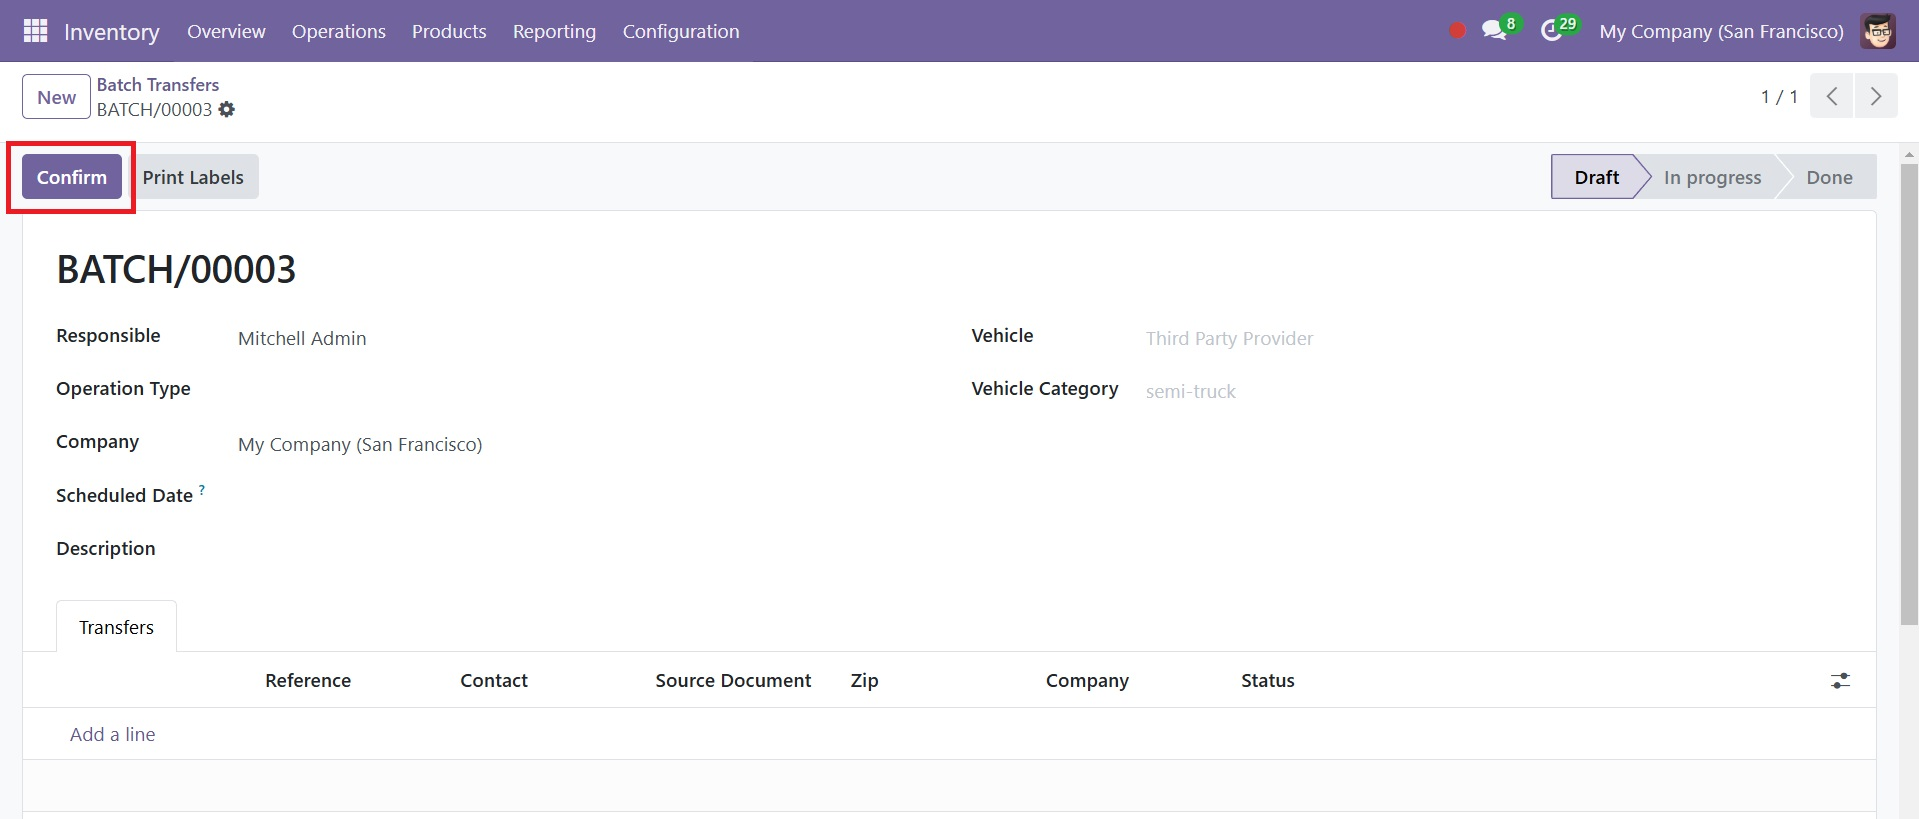
Press "Confirm" right now. "Draft" is now replaced with "In Progress". Click the Validate button to show that the state is "Done,", as in the screenshot below. This will complete the process of batch transfer.
The Transfers window can also be used for batch transfers. To do this, choose the transfers you want to include in a batch transfer from the Transfers menu, as shown in the example below. After selecting transfers from the list, click the Actions button.
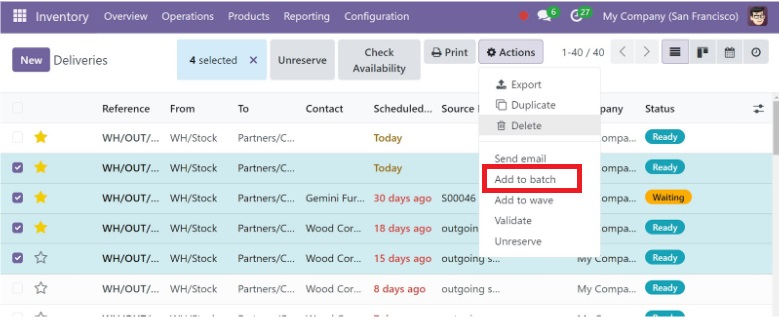
The Add to Batch option will then be displayed. This button will launch a new pop-up when clicked.
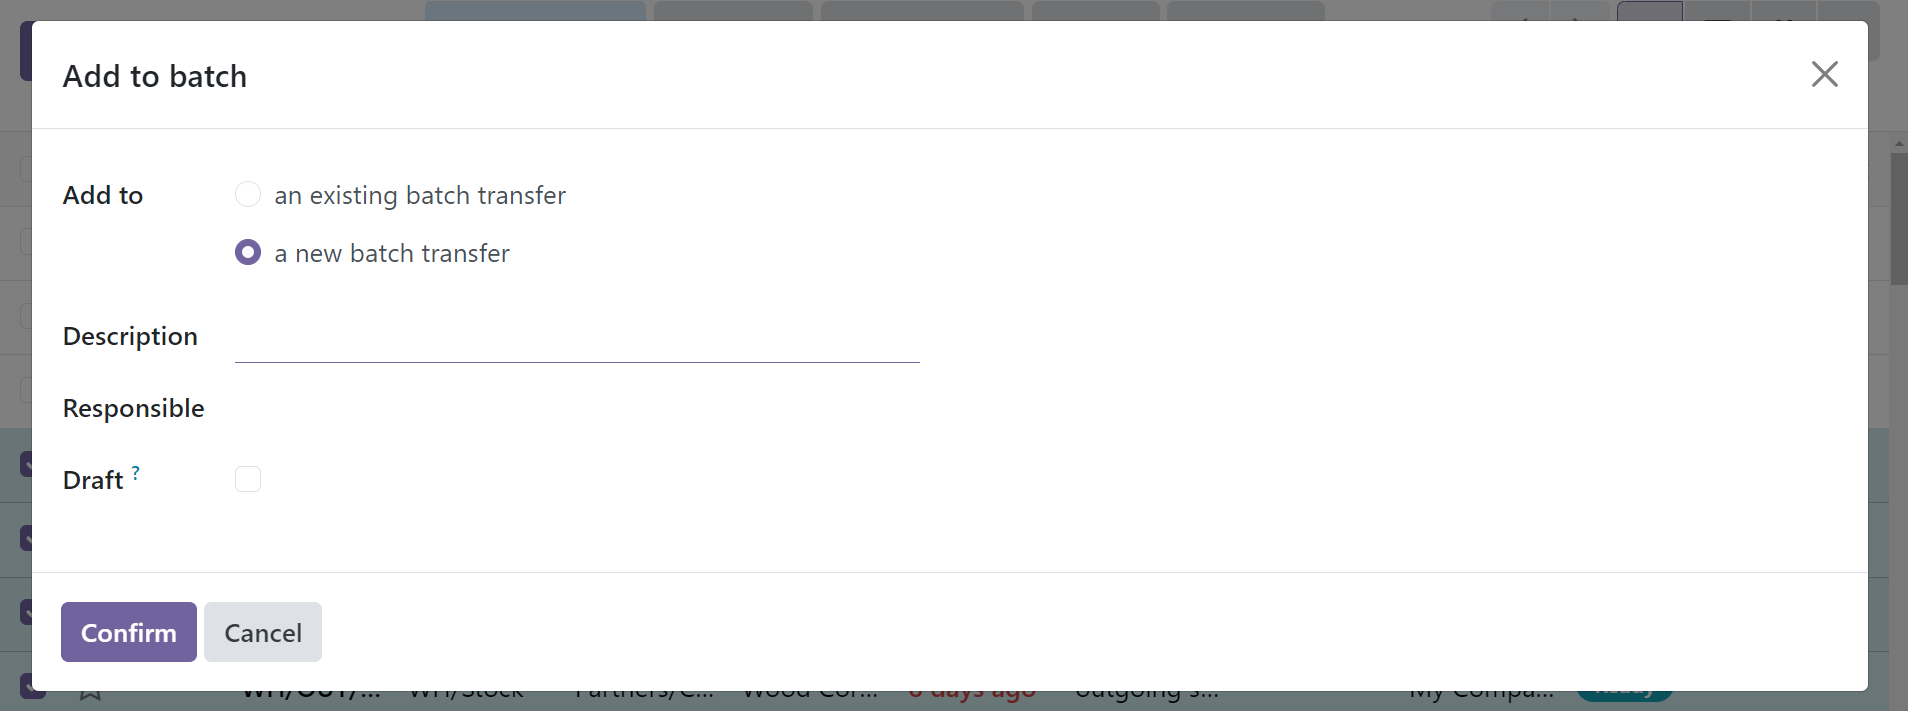
From this option, you can select where to add the selected transfers. It can be a part of an existing batch transfer or a new one. In the Responsible section, you can choose an employee. Once you've selected the right option, click the Confirm button. This will confirm the batch transfer of the selected transactions.
Wave Transfer
Wave Transfer facilitates the bundling of a number of product-related tasks, allowing you to process them all simultaneously and boost efficiency. To use this feature, select "Settings" from the drop-down menu on the Configuration tab. Next, enable "Batch, Wave and Cluster Transfers" in the Operations area as shown below.
The Wave Transfer feature helps you move a number of products from one place to another. A transfer cannot be removed from a wave after it has been introduced. It is thought to be more advanced than batch transfers. After enabling this feature from the Settings menu, you may access the Transfers menu.
Select the transfers you want to use from this window in a wave transfer. Verify the status and type of operation of the transfers you select.
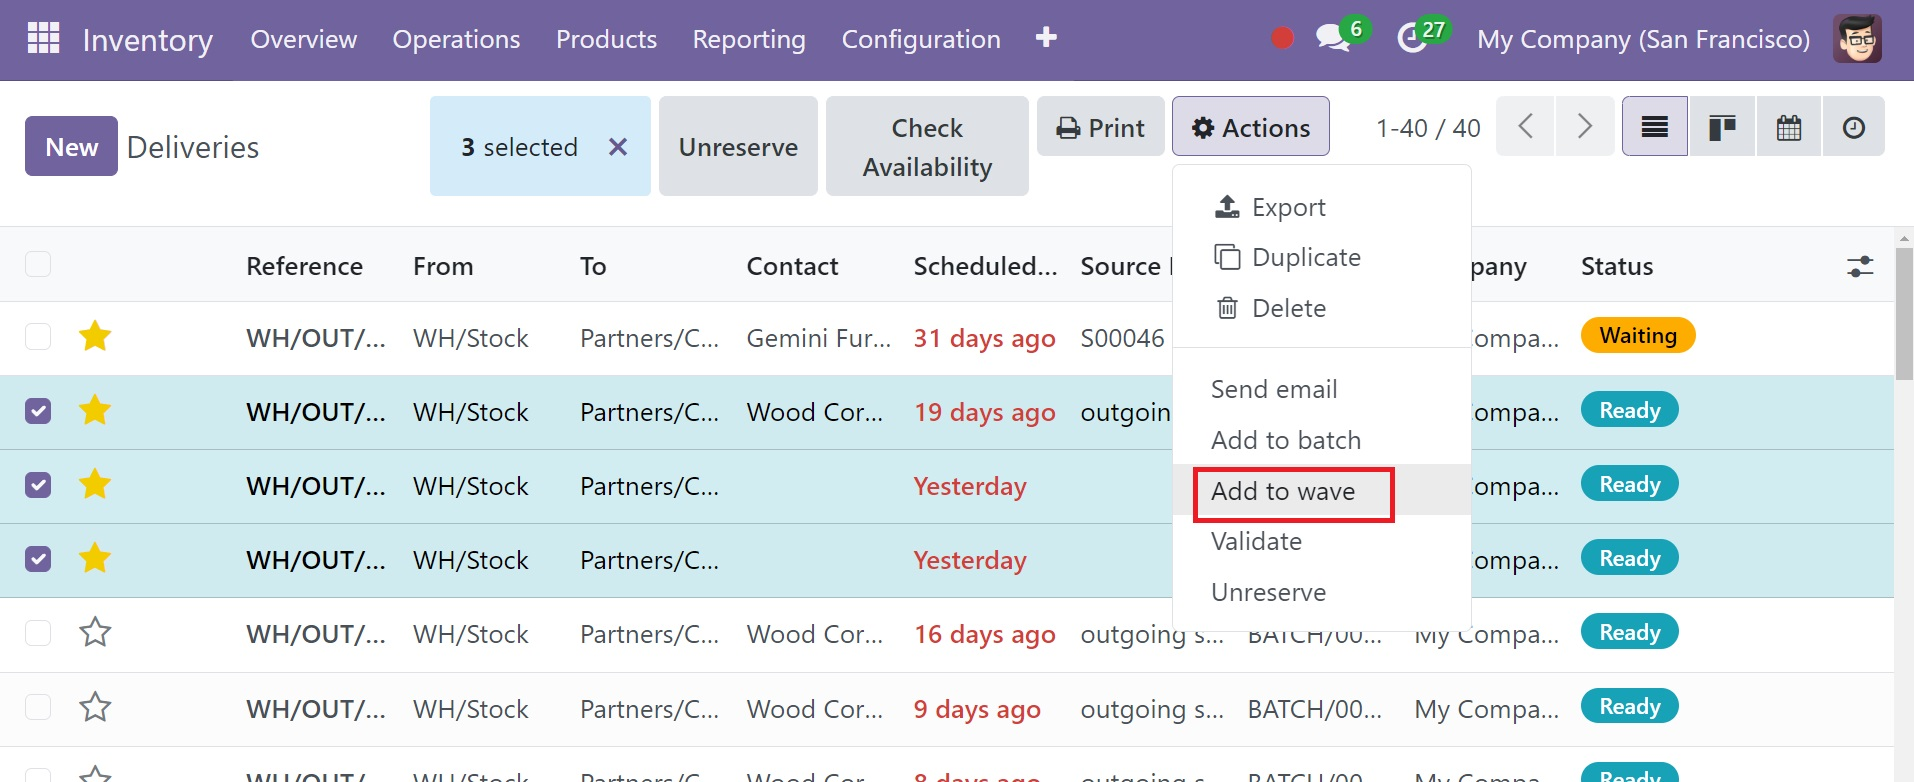
To access the Add to Wave option after selecting the transfers, click the Action button. When you choose this option, a new pop-up window will emerge.
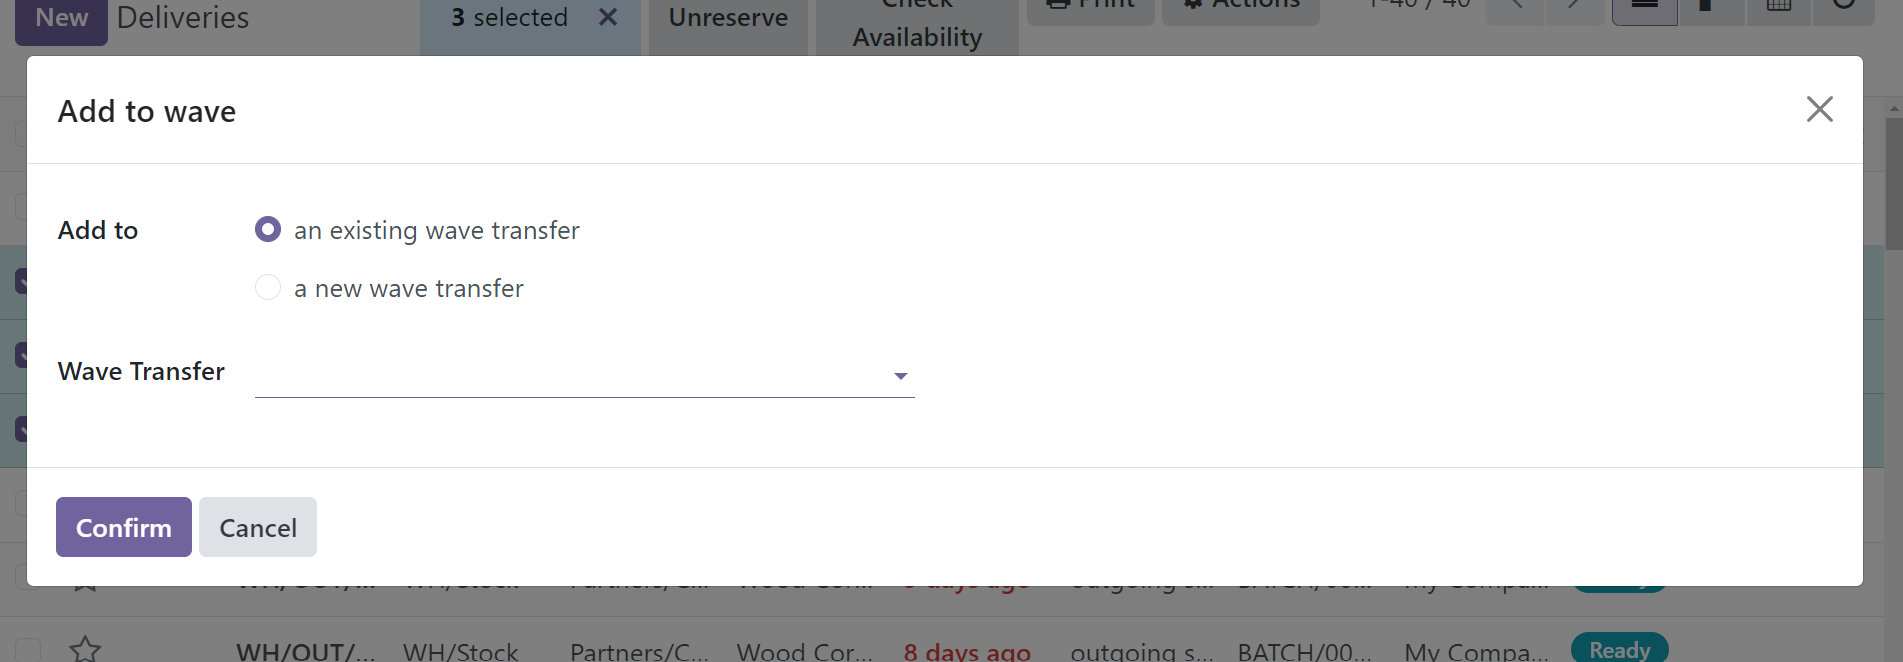
You can either add the selected transfers to an existing wave transfer or create a new one. In this instance, the 'a new wave transfer' option in the Add to field is selected. You can assign an officer to supervise this transfer in the Responsible field. After that, click the Confirm button. This will result in a new pop-up window showing the list of selected transfers with status.
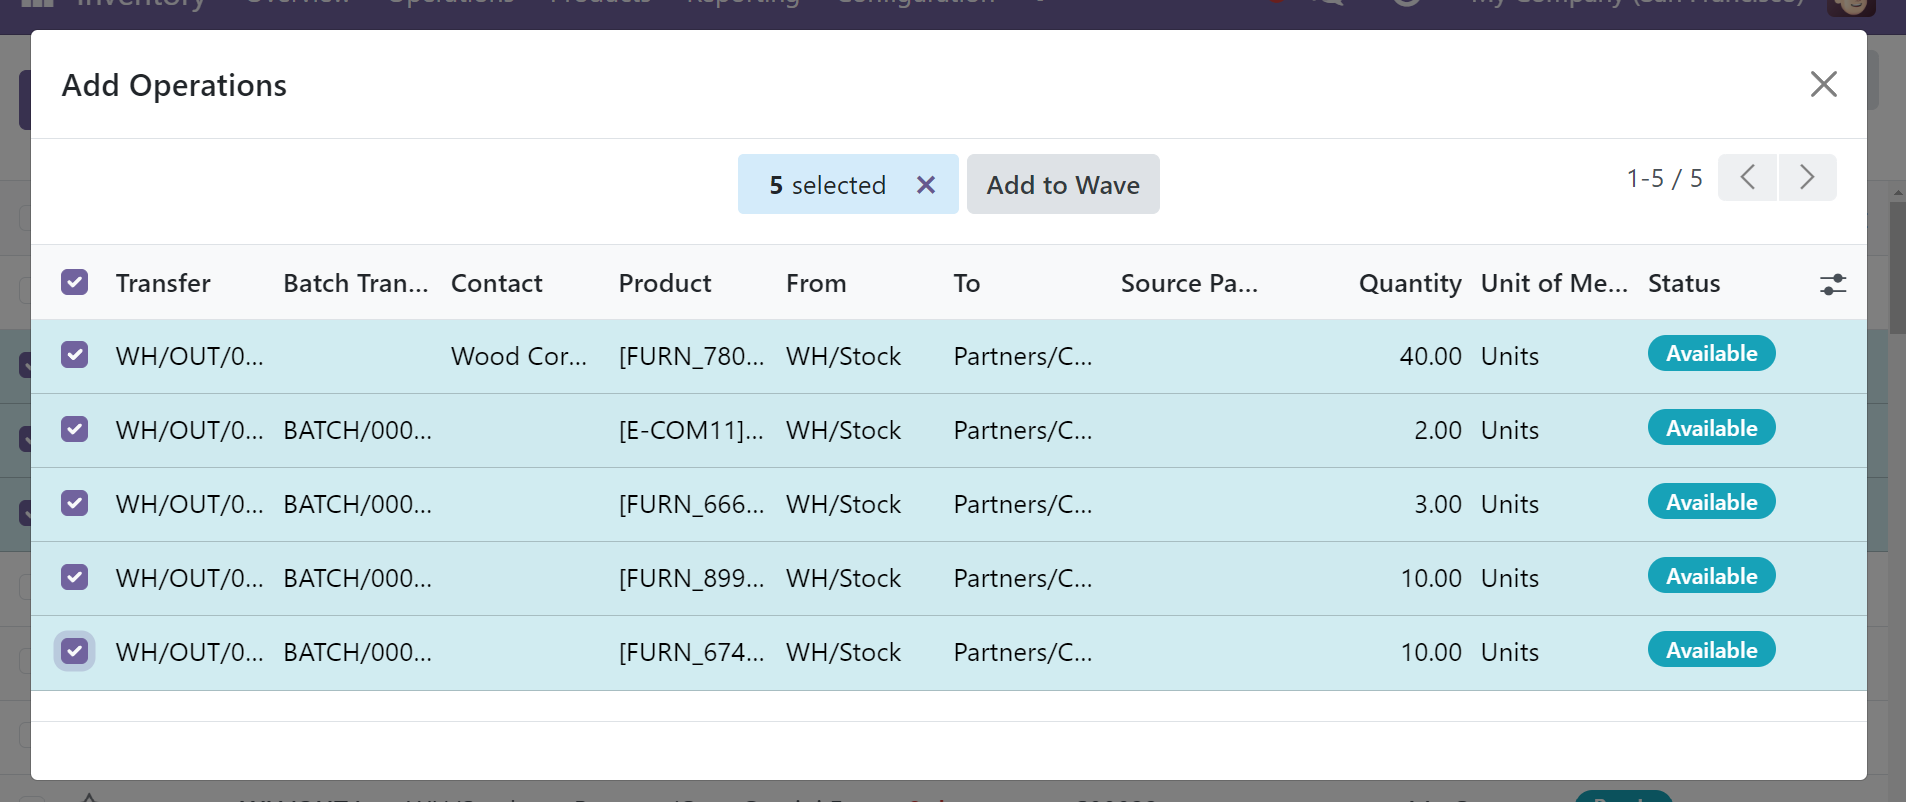
You can click the Add to Wave button after choosing the necessary transfers from this window for the wave transfer. Thus, a new wave transfer will be produced. To control it, navigate to the relevant sub-menu under the Operations menu on the Wave Transfer platform.
As seen in the screenshot above, the list includes the details of the Wave Transfer, Scheduled Date, Responsible, Operation Type, Company, and State. You can click on the newly created wave transfer from this window.
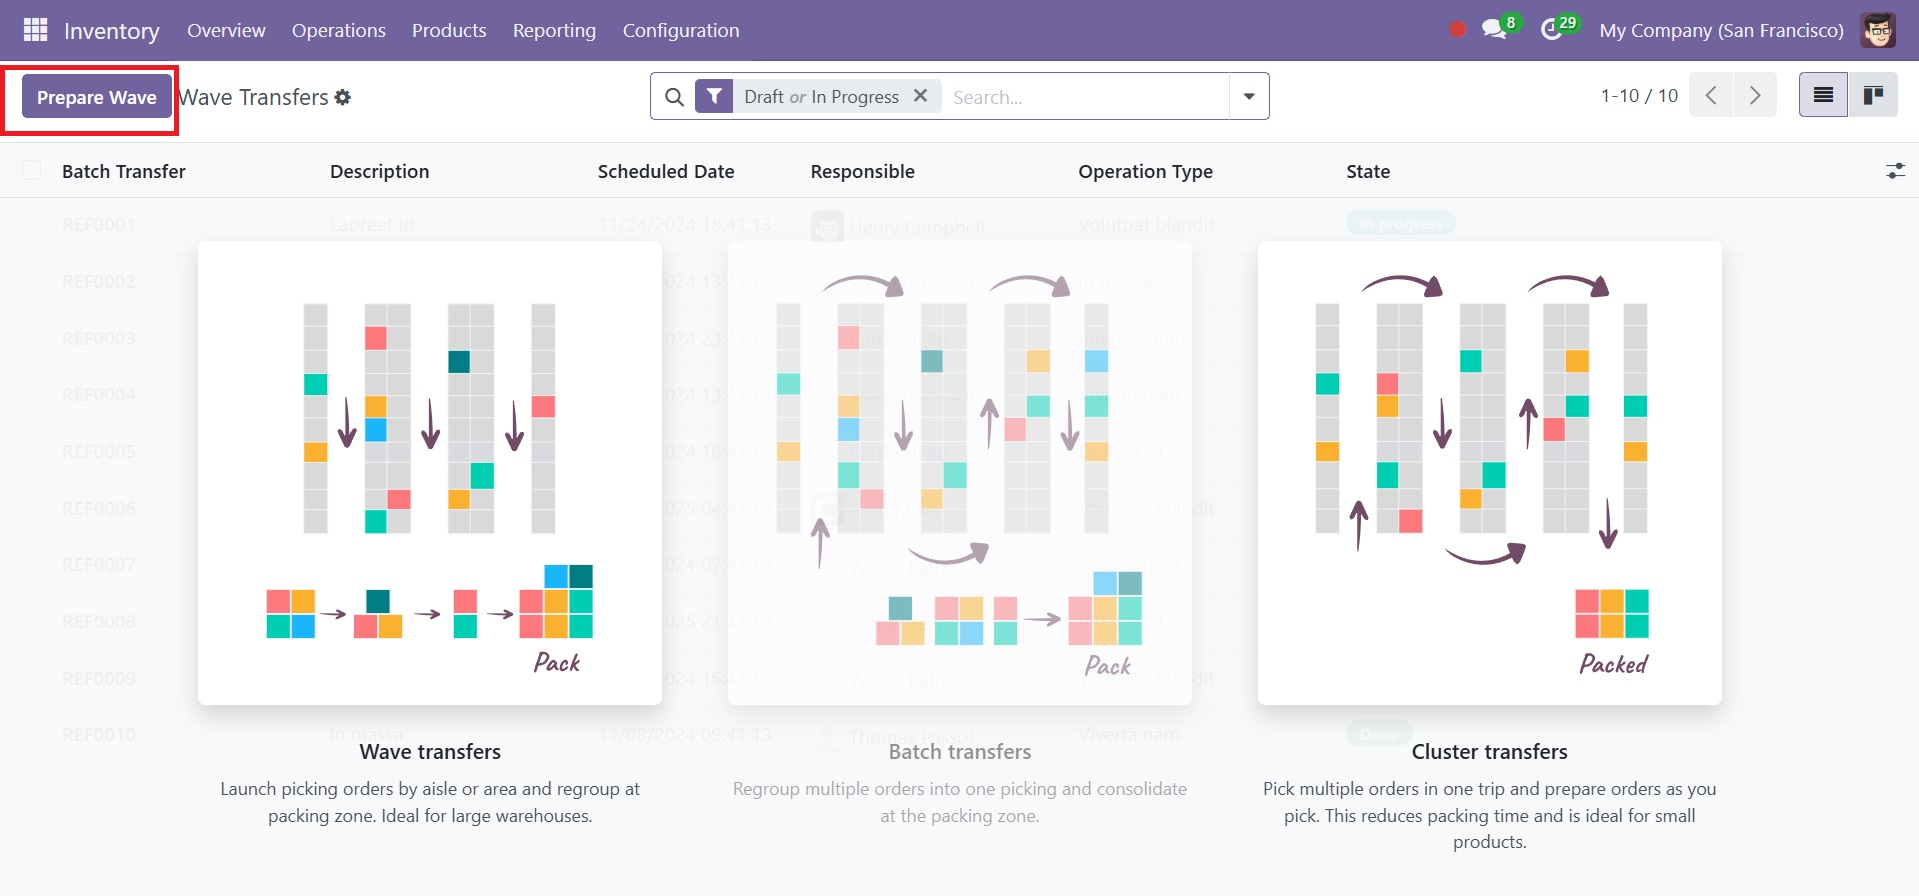
Click the Prepare Wave option after adding the pickings. Let's examine the process of creating a wave transfer. To do a wave transfer, we must first select the transfers as a batch. To choose a transfer, select Transfer from the drop-down box under the Operations tab. The same operation should be used for all requested transfers.
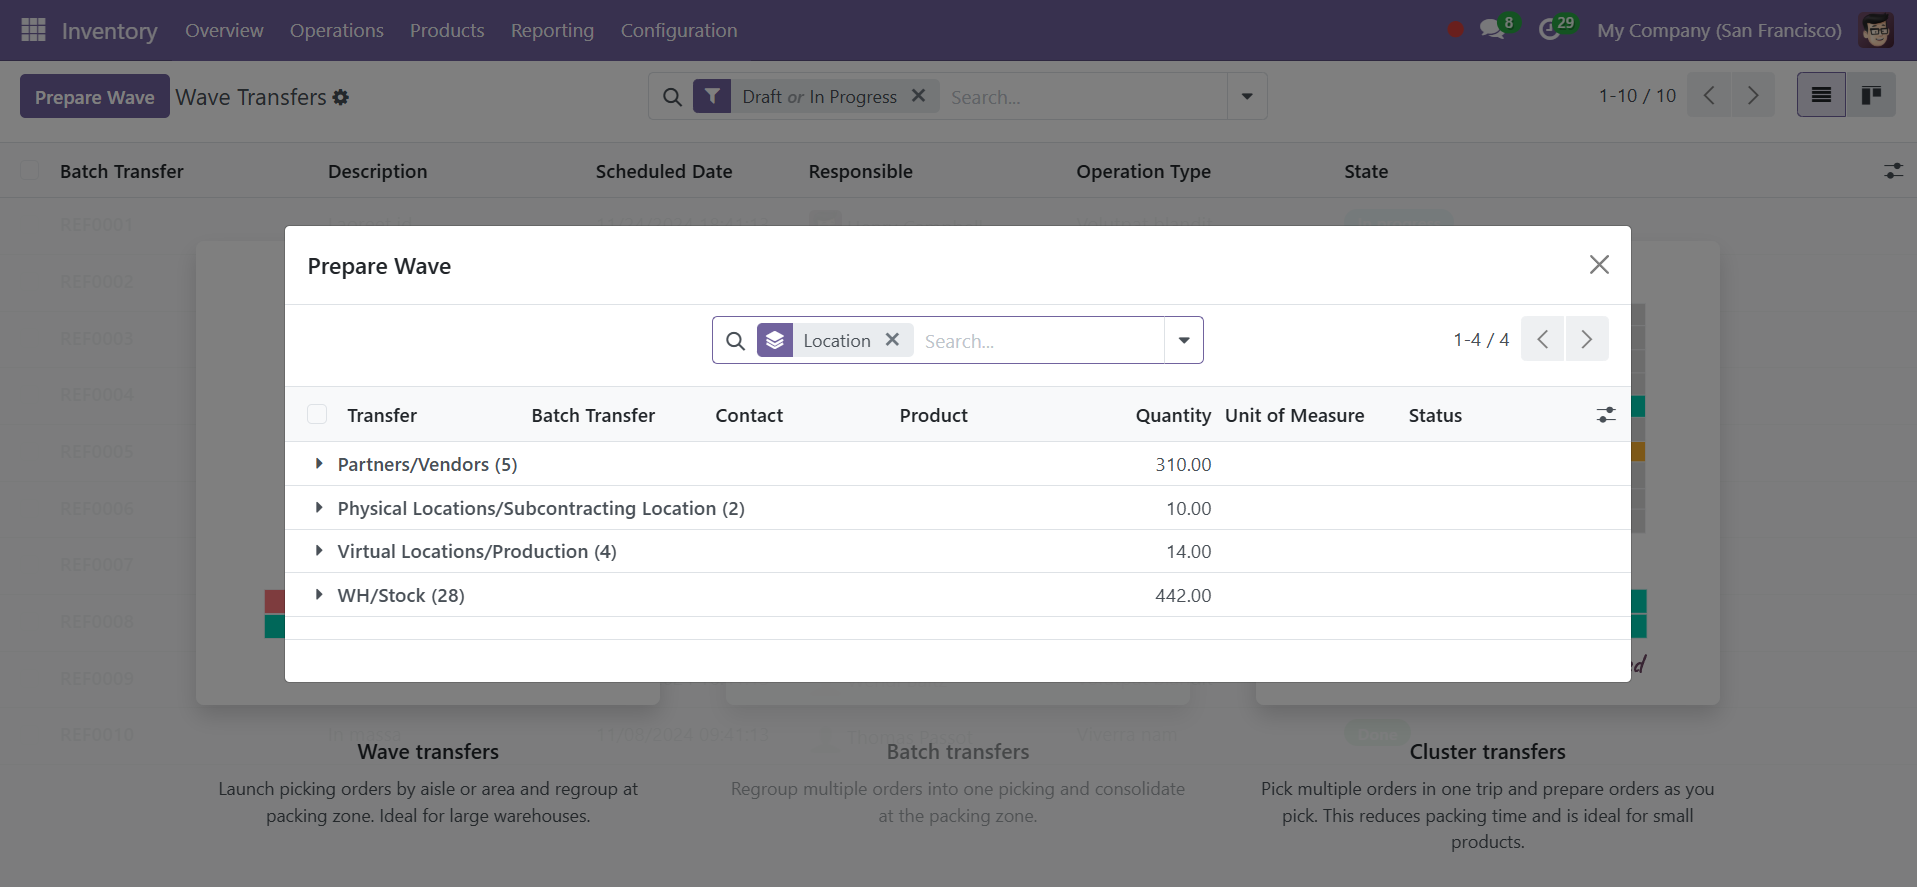
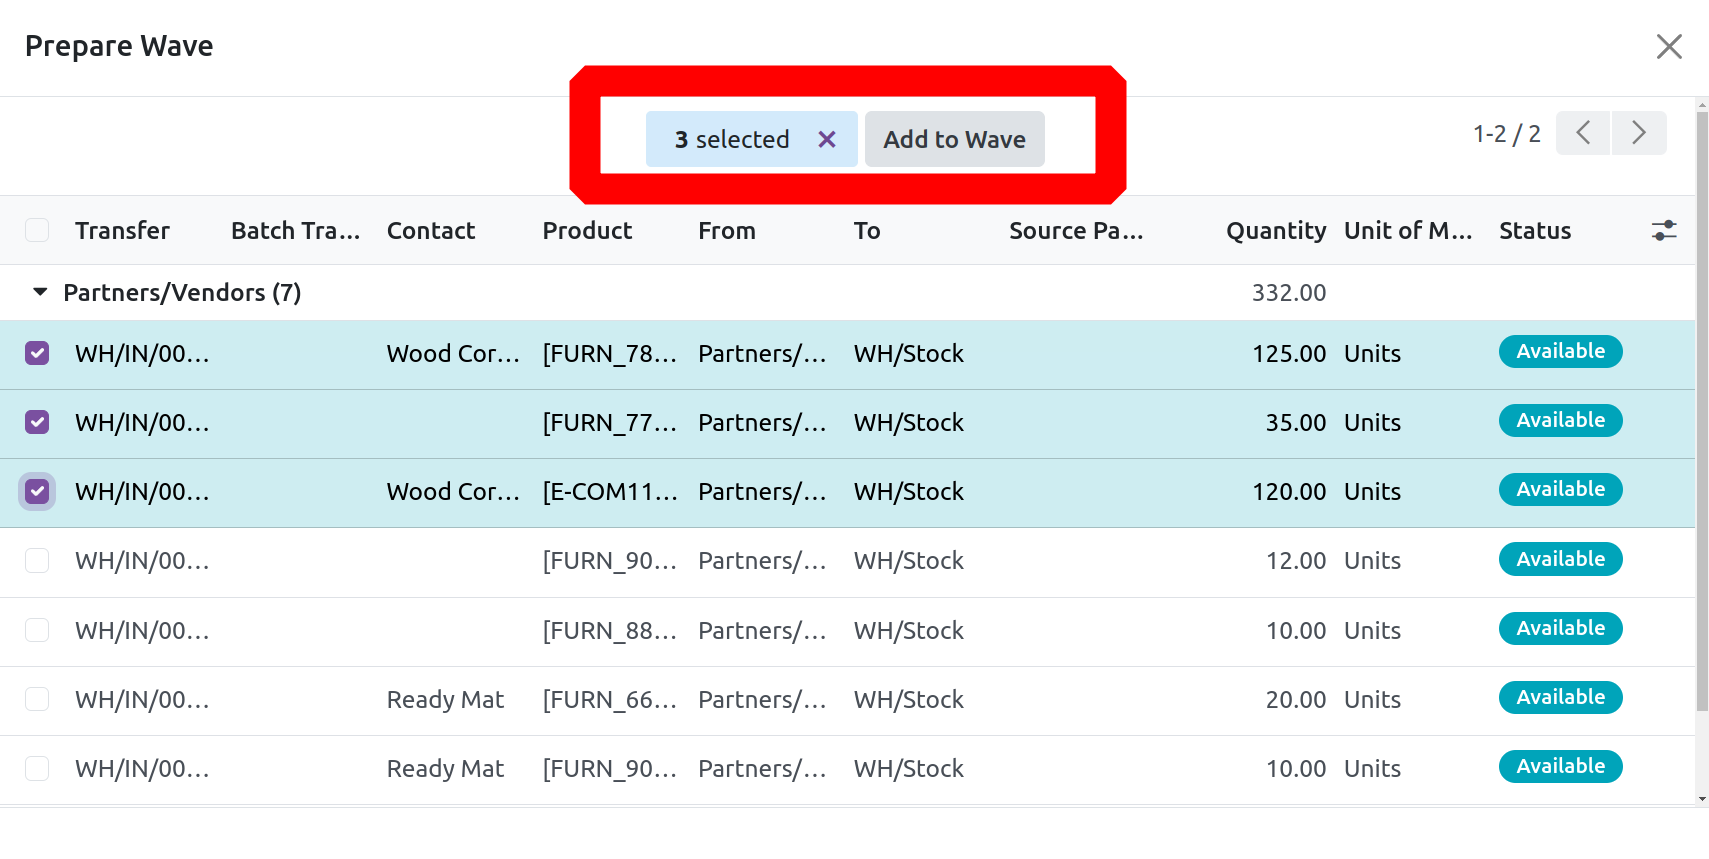
While clicking on the Prepare Wave button another window opens as shown in the above image. Here are the transfers which are filtered on the basis of Location. From the list choose the necessary transfers and click on the Add to Wave button as specified earlier.
Click on the created wave transfer to open. It is possible to set an employee in the optional Responsible box when generating a new wave transfer. To add the product lines to a wave, click Validate after choosing the desired settings.
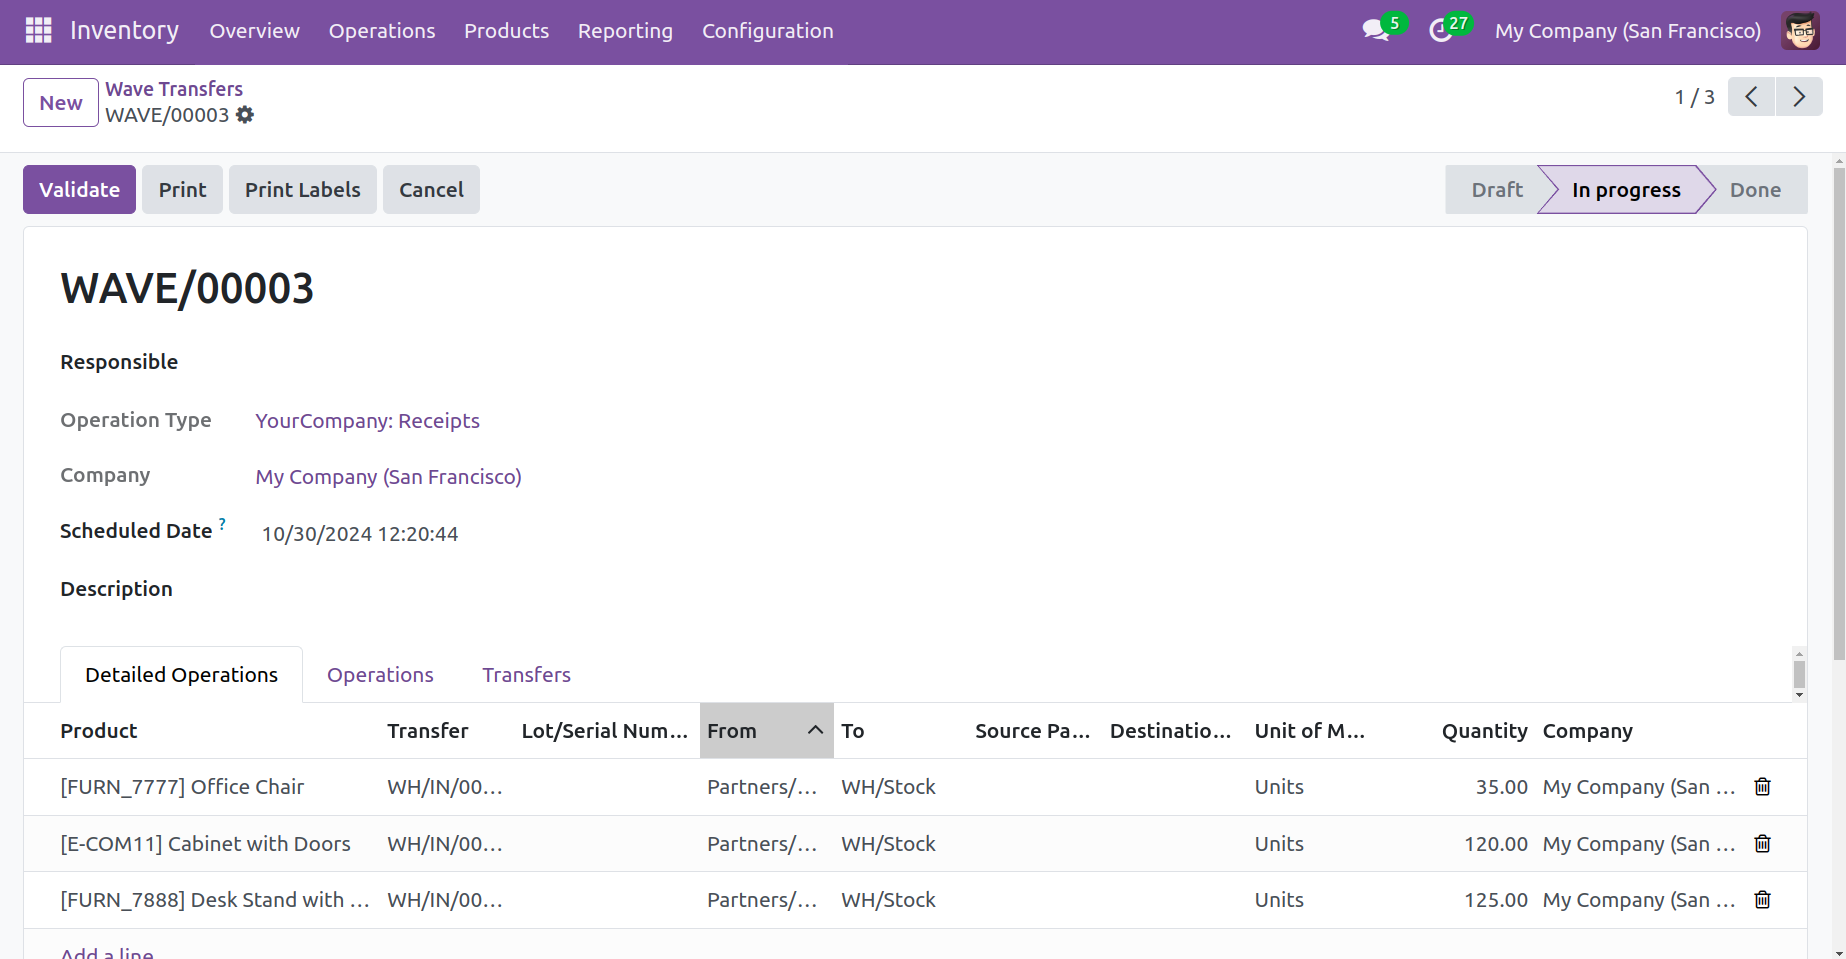
Assign a picker or employee responsible for completing the wave. As the employee progresses, they can validate each picking as done within the wave, reducing the need for multiple validations. Complete and Validate the Wave. Once all pickings in the wave are completed, validate the wave to mark it as done. This will automatically update the status of each pick included in the wave.
Inventory Adjustment
You have a unique tool to keep an eye on the company's inventory and promptly change its quantity with the Inventory Adjustments feature. With this function, you can ensure that you have enough products to finish the required inventory operations. This window opens when you select "Inventory Adjustments" from the dropdown list on the Operations tab.
Physical Inventory
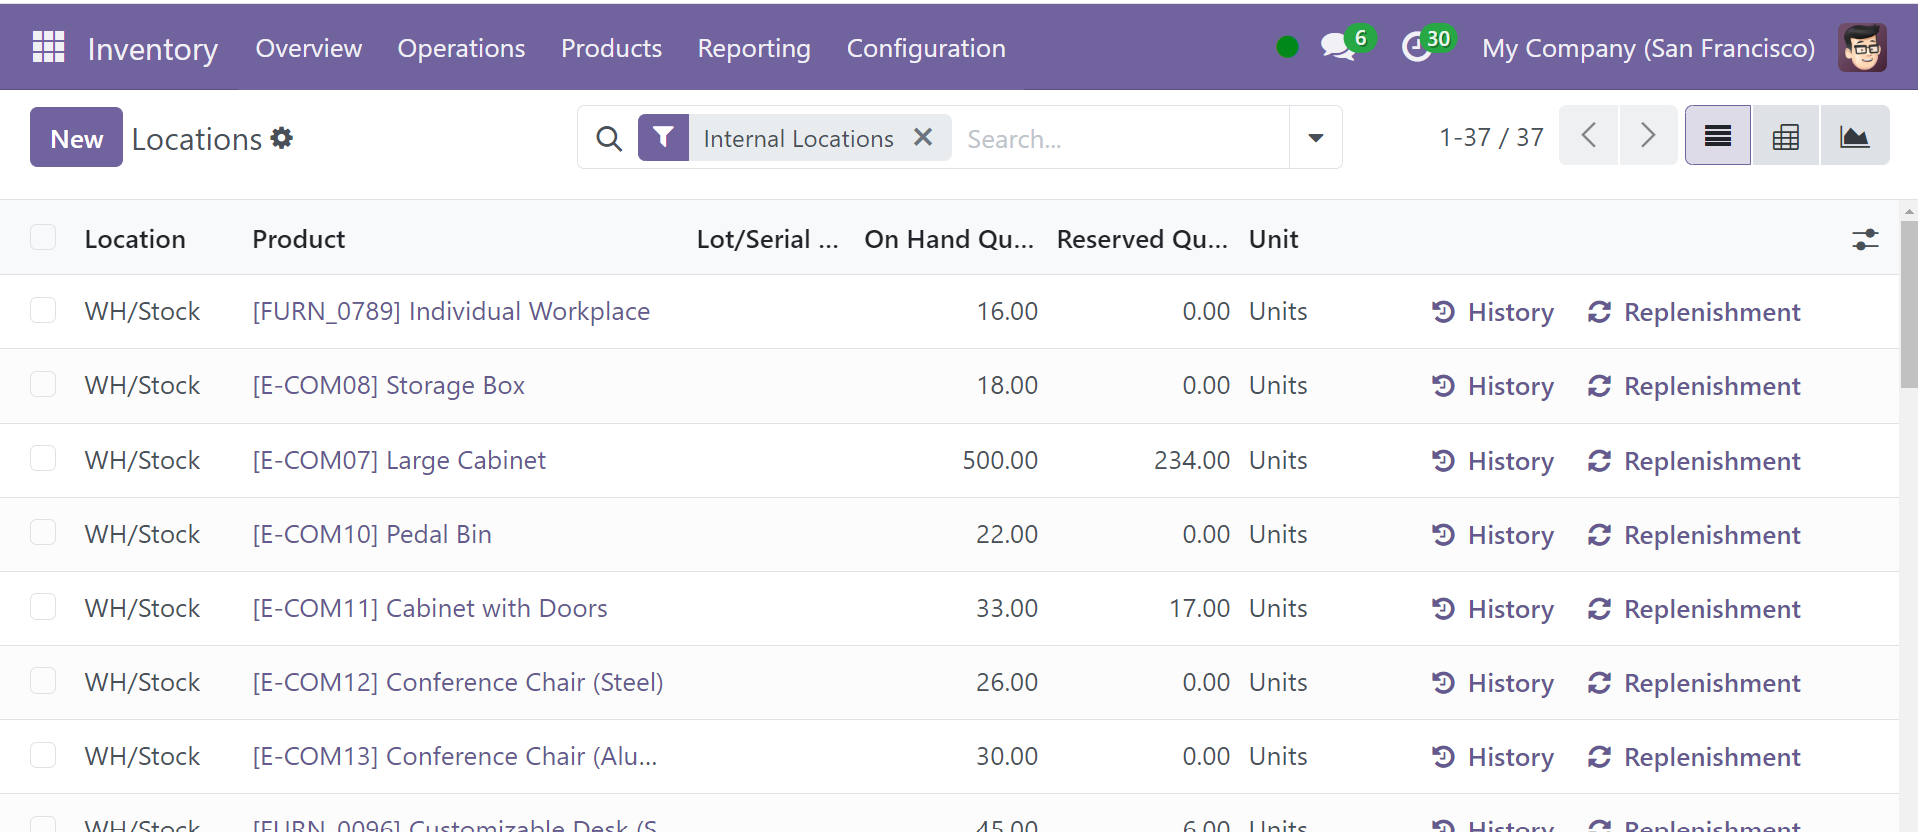
This window shows the product name along with its data, including Lot/Serial Number, Package, On-Hand Quantity, UoM, Counted Quantity, Difference, Scheduled Date, and User. "Difference" in this instance refers to the difference between the product's theoretical and counted quantity in Stock. The "Scheduled Date" indicates when the quantity on hand will be measured next.
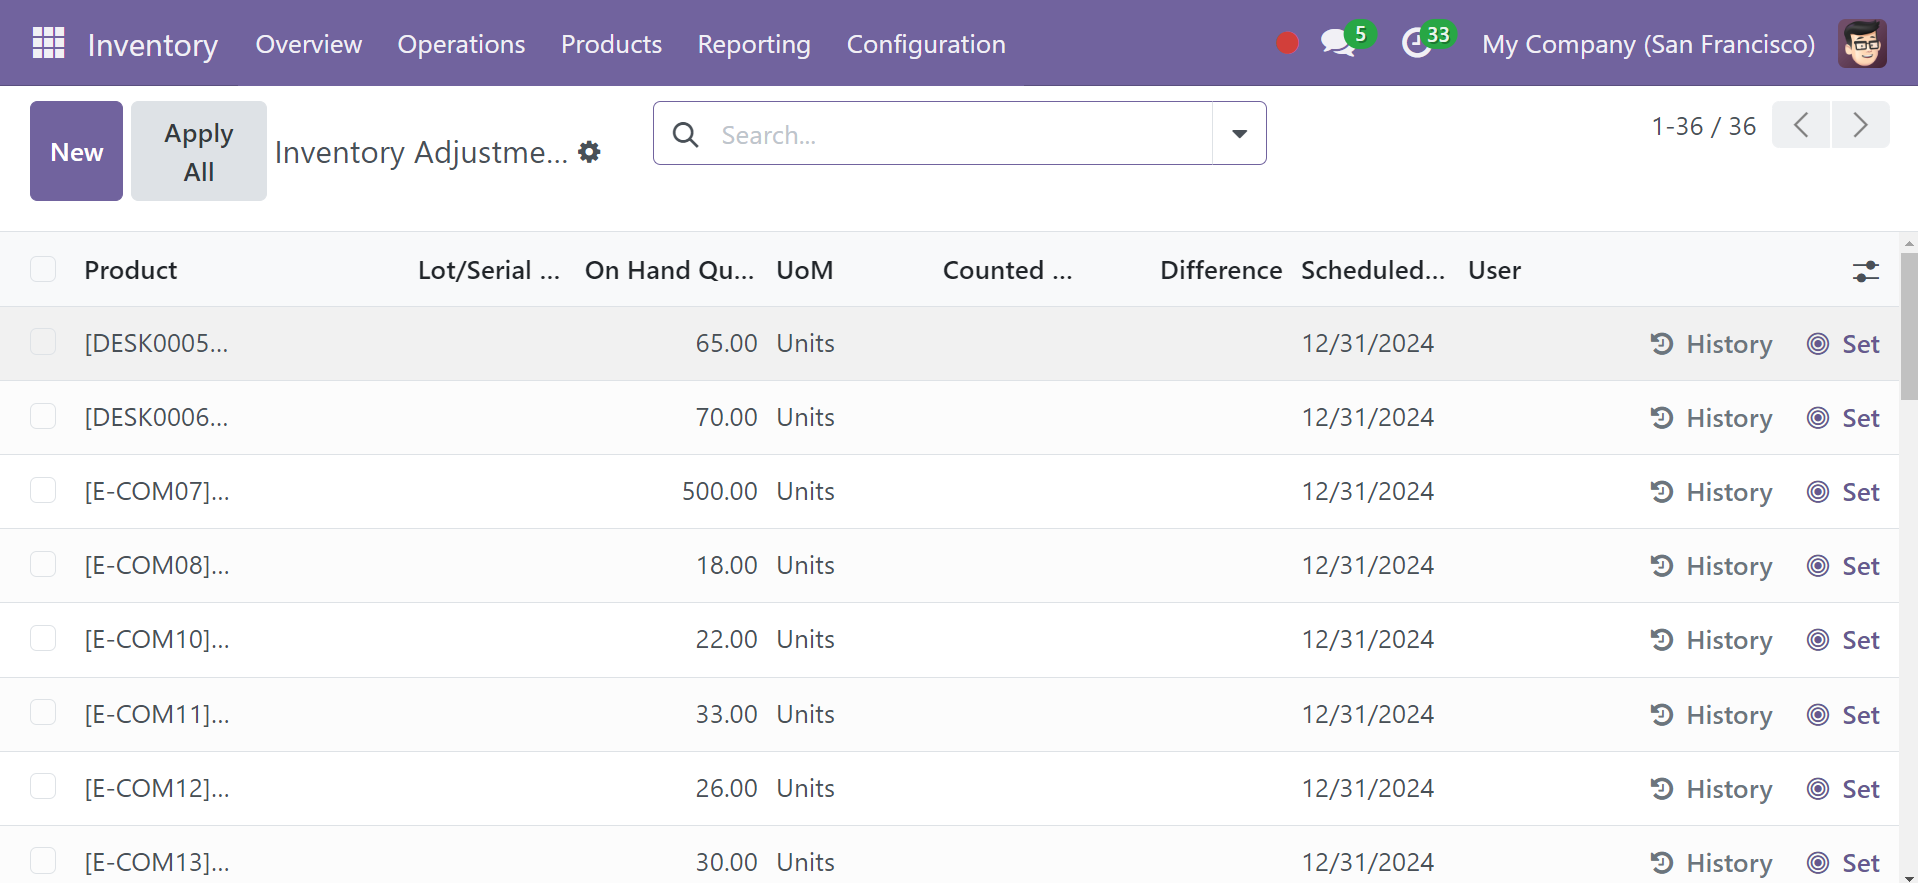
Click the New button to add a new Inventory Adjustment procedure. A line that appears beneath the current list will provide the necessary information. Upon choosing "Counted Quantity," the corresponding "Difference" field will be automatically filled in. Click "Apply," as shown below, to apply this modified adjustment.
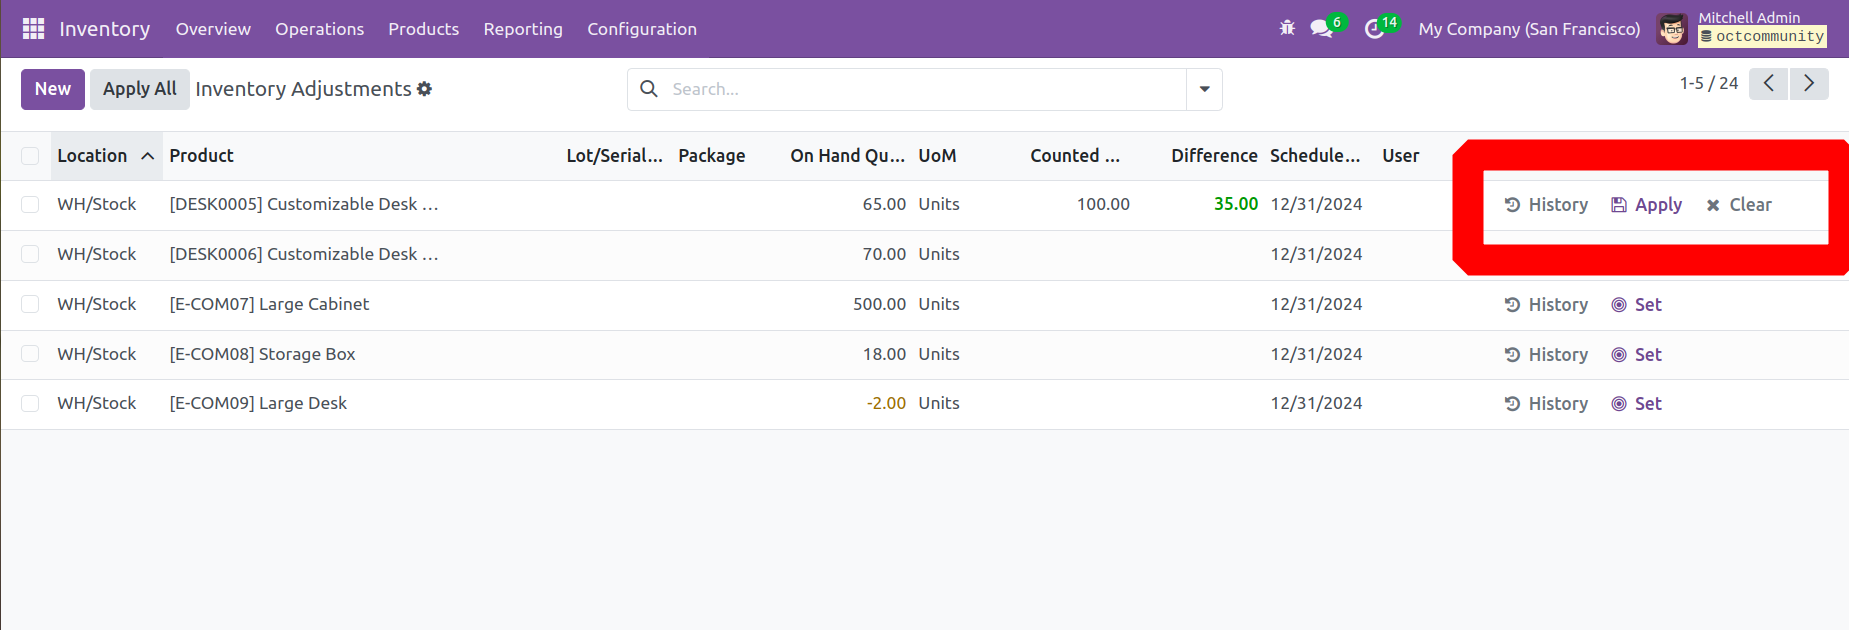
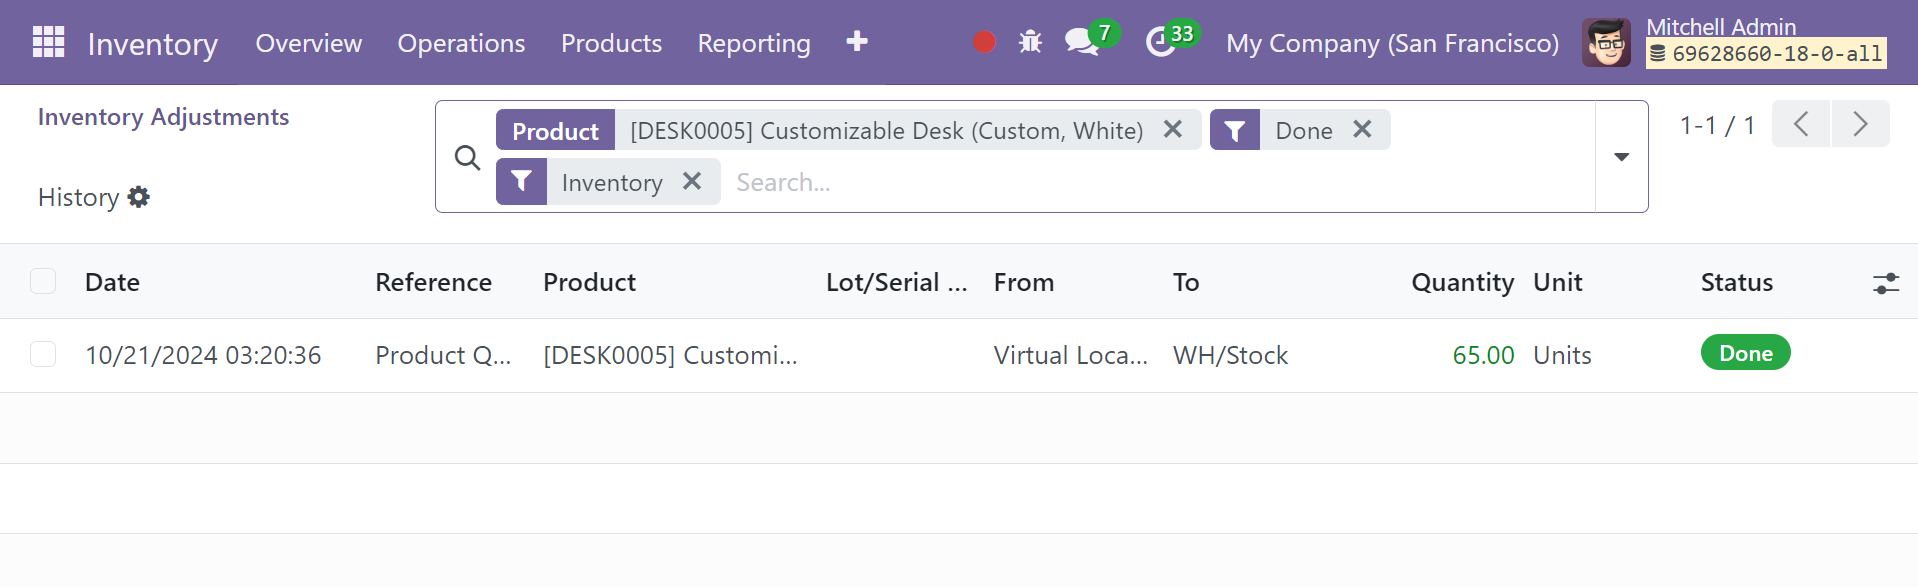
To see the details of the inventory modifications made to a given item, click the History icon next to it. An example of the Inventory Adjustments History pane may be found below.
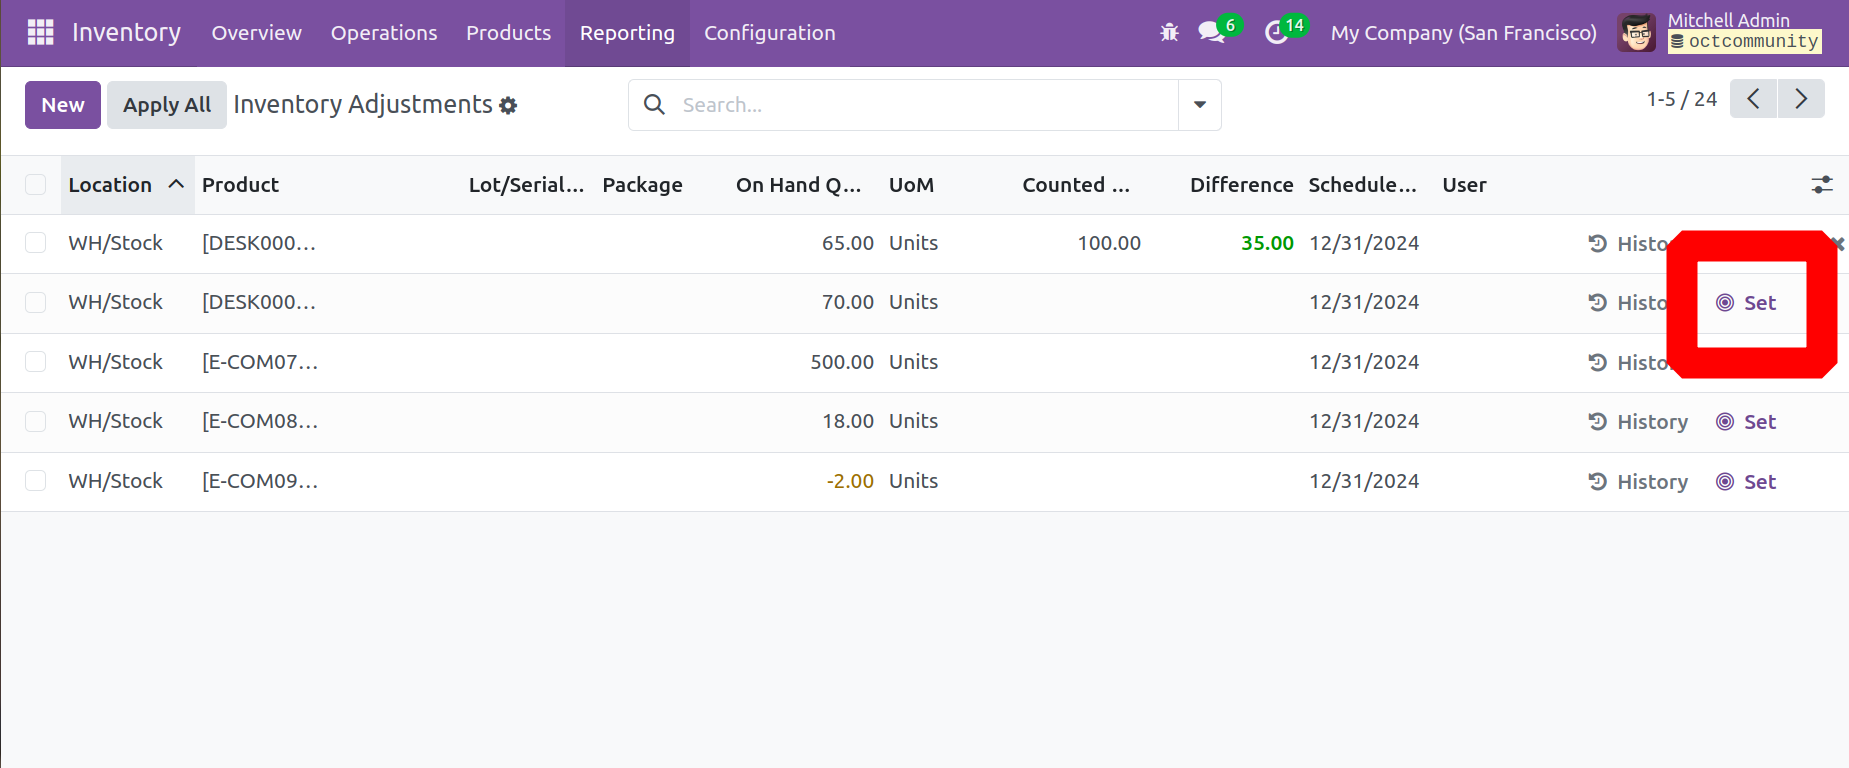
To reset a product's most recent stock update, click the Set icon next to it.
Click the Apply button, as shown in the image, to apply the revised inventory revisions to the pertinent products.
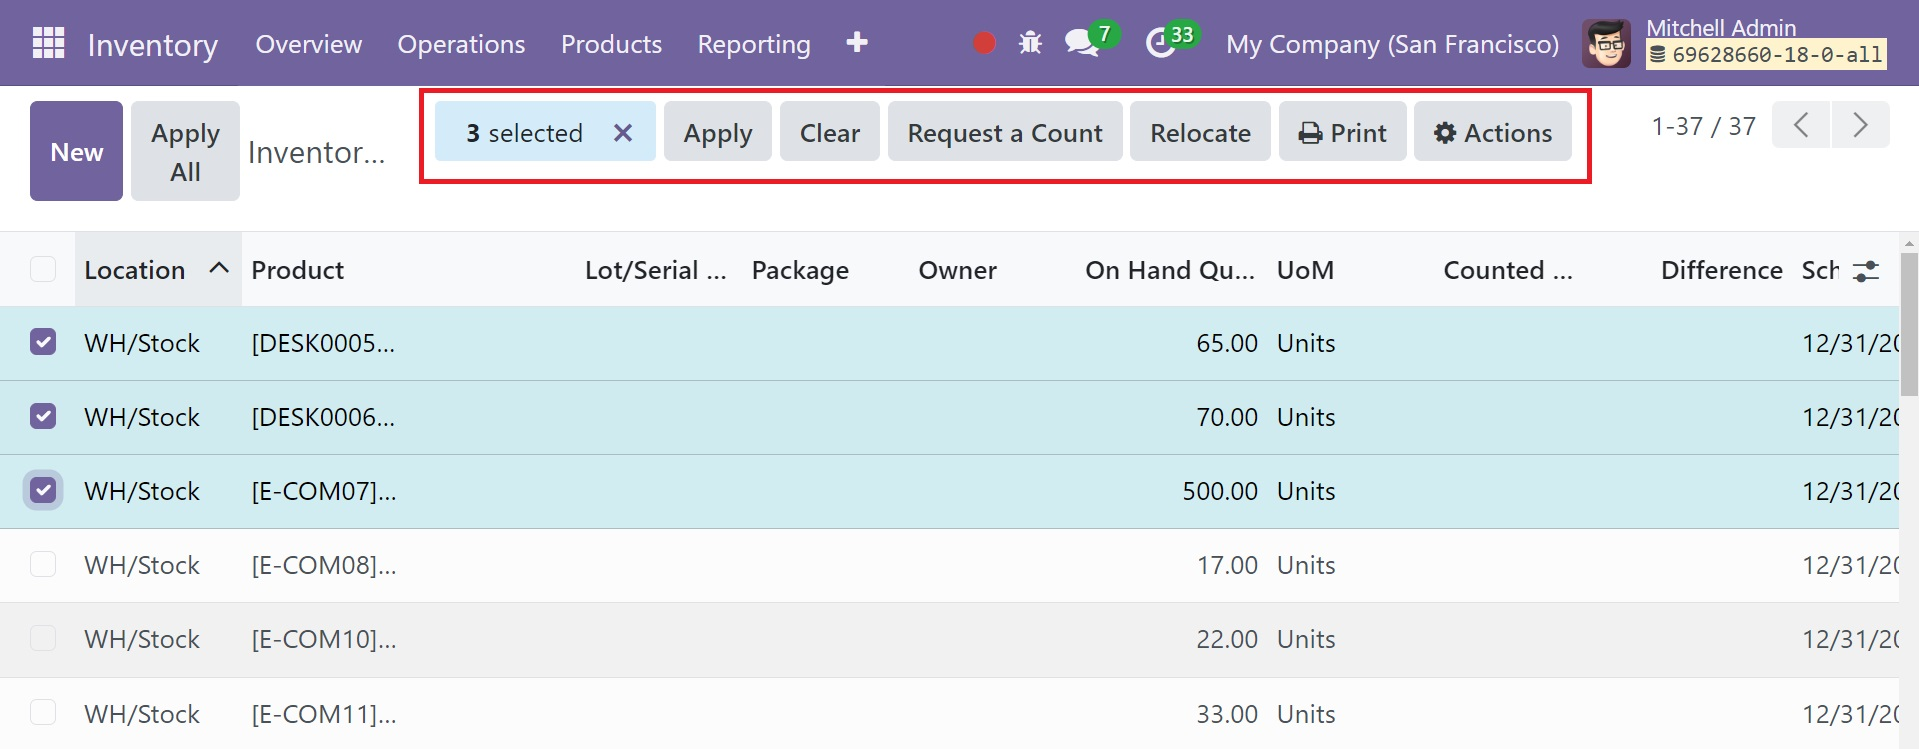
Clicking the Request a Count option will allow you to request a count for the selected inventory updates. Choose a date in a pop-up window to receive the inventory on that day. The Count box's current value can be changed to suit your needs, or it can be left empty. On the menu, look for "Confirm". In Odoo17, we manage inventory updates in a similar manner.
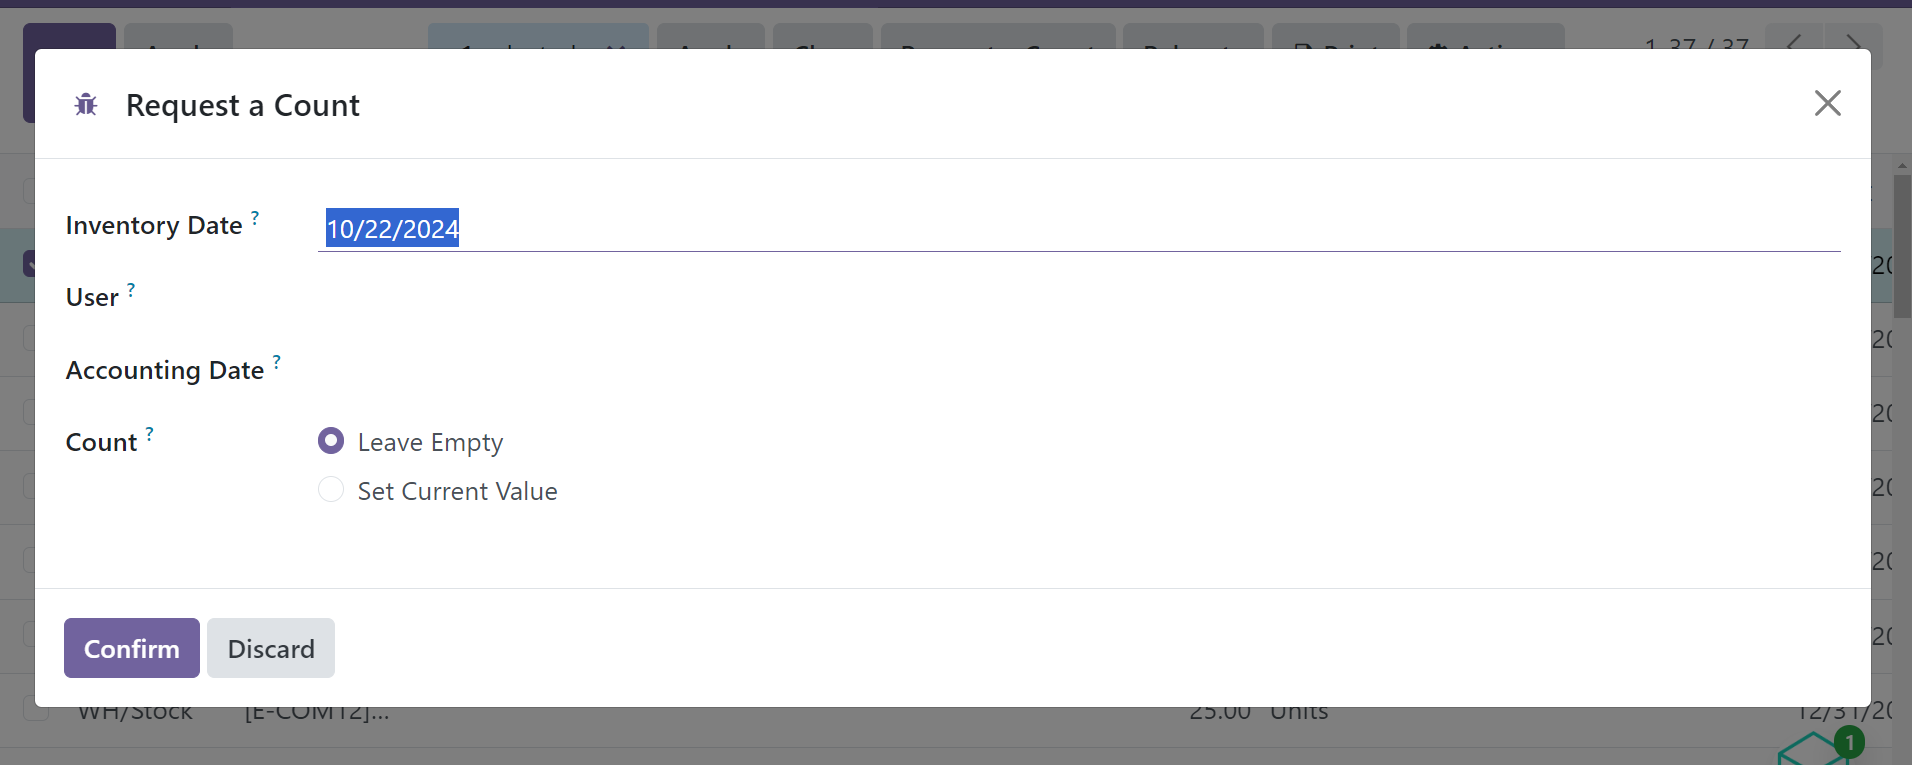
The "Relocate" function in Odoo 18 has made it easier to relocate products between locations. You can include To Location, To Package, and a justification for the relocation in the popup box. Then, Confirm.
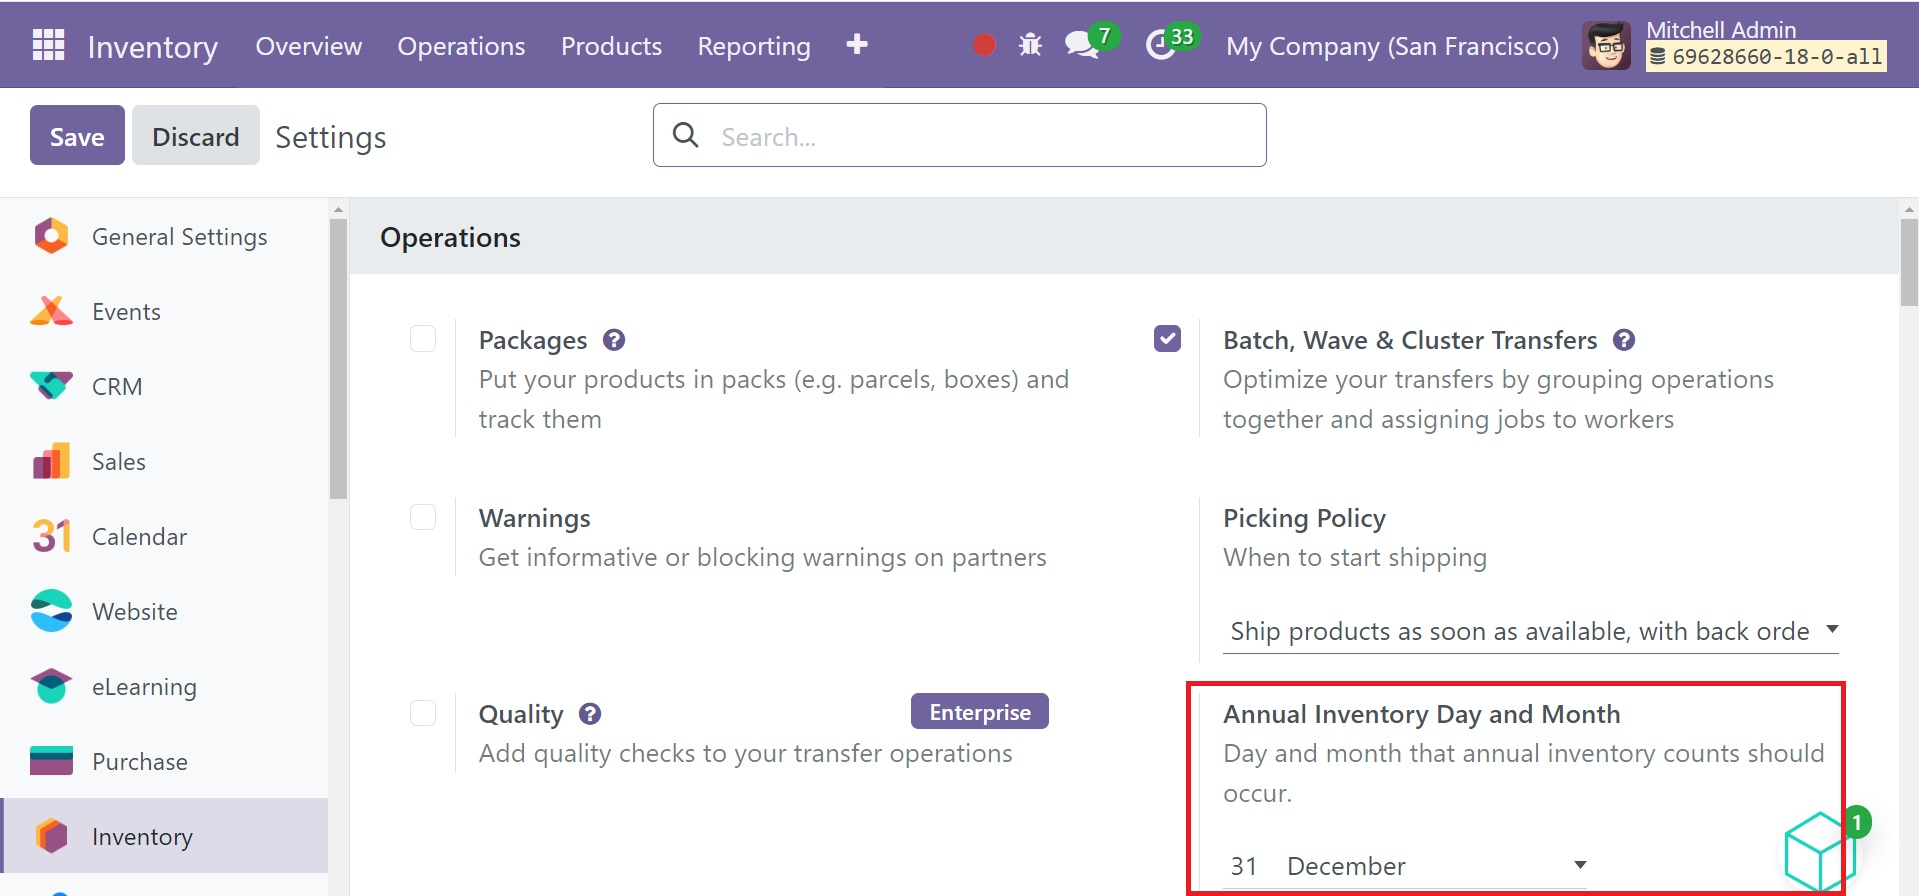
The Odoo 18 Inventory module allows you to plan the day and month of the annual inventory counts. In order to modify this timing, choose the Configuration tab and then "Settings." The "Annual Inventory Day and Month" appears in the Operations section.
You can input the amount of the product that is available in the warehouse in the window that appears when you click the Update amount button.
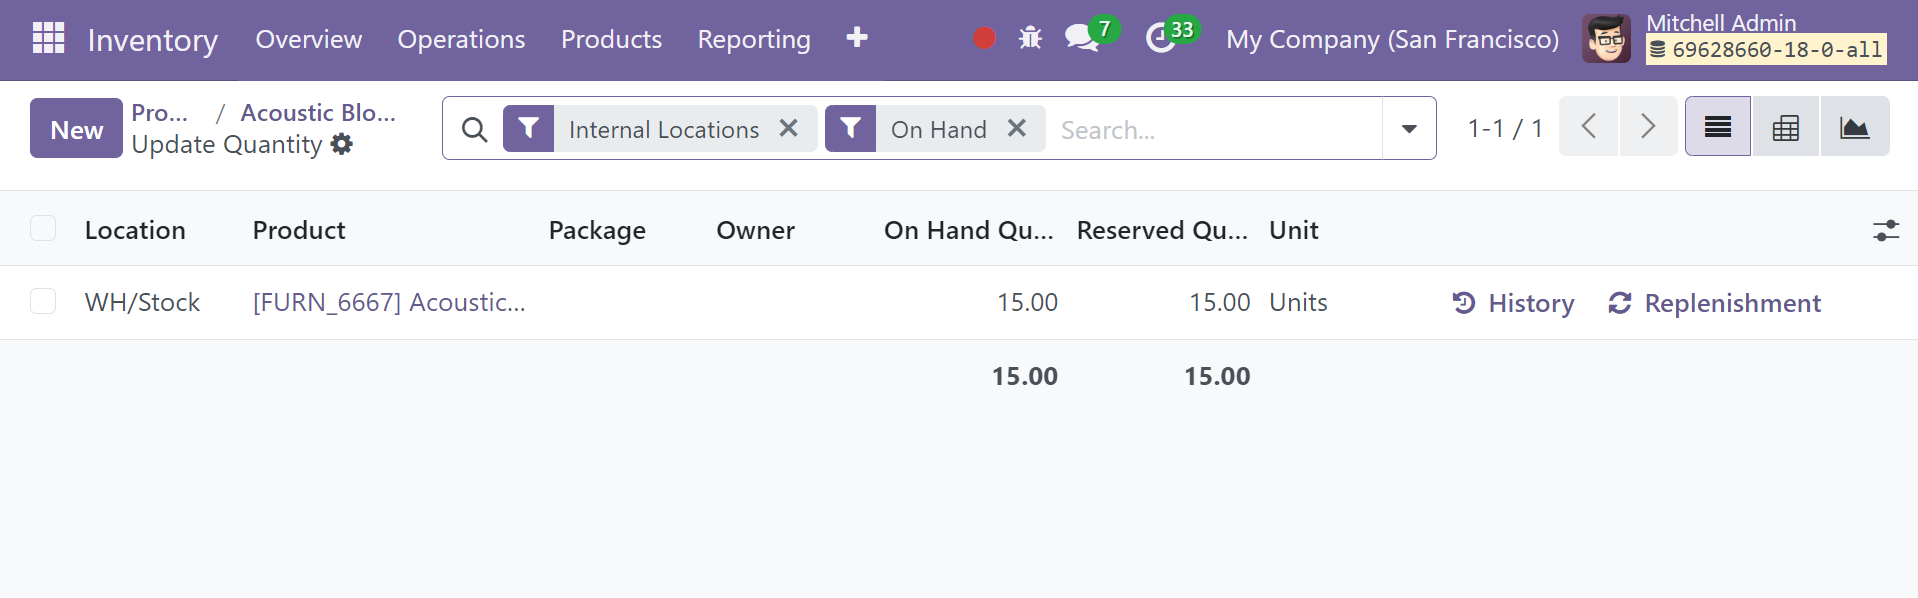
The difference between the counted and on-hand numbers will be shown in the Difference field when you choose "Counted Quantity" in this box. After adding the required info, save. Because it is used to plan the physical inventory for all materials that need to be counted, the yearly inventory day or month may have an impact on the physical inventory's scheduled date.
Scrap Management
Every company undoubtedly produces scrap, which is trash with little to no economic value. A well-facilitated scrap management platform is provided by Odoo 18. A product that is placed in the scrap bin will be removed from the business's inventory. As soon as possible, damaged or expired products must be removed from stock. Future recycling initiatives can make advantage of the scrap's reusable components. There may be a specific scrap area where the scrap is stored. In Odoo's storage area, you can set aside a space for scrap.
In order to ensure effective scrap management, let's look at how to set up a scrap location in Odoo 18. With Odoo's help, you can manage the scrap locations in your storage. We have already discussed configuring storage locations in the Odoo 18 Inventory module. Setting up a scrap site can be done in a similar manner. Go to the Locations menu in the Configuration menu.
Click the New button to create a new scrap location.
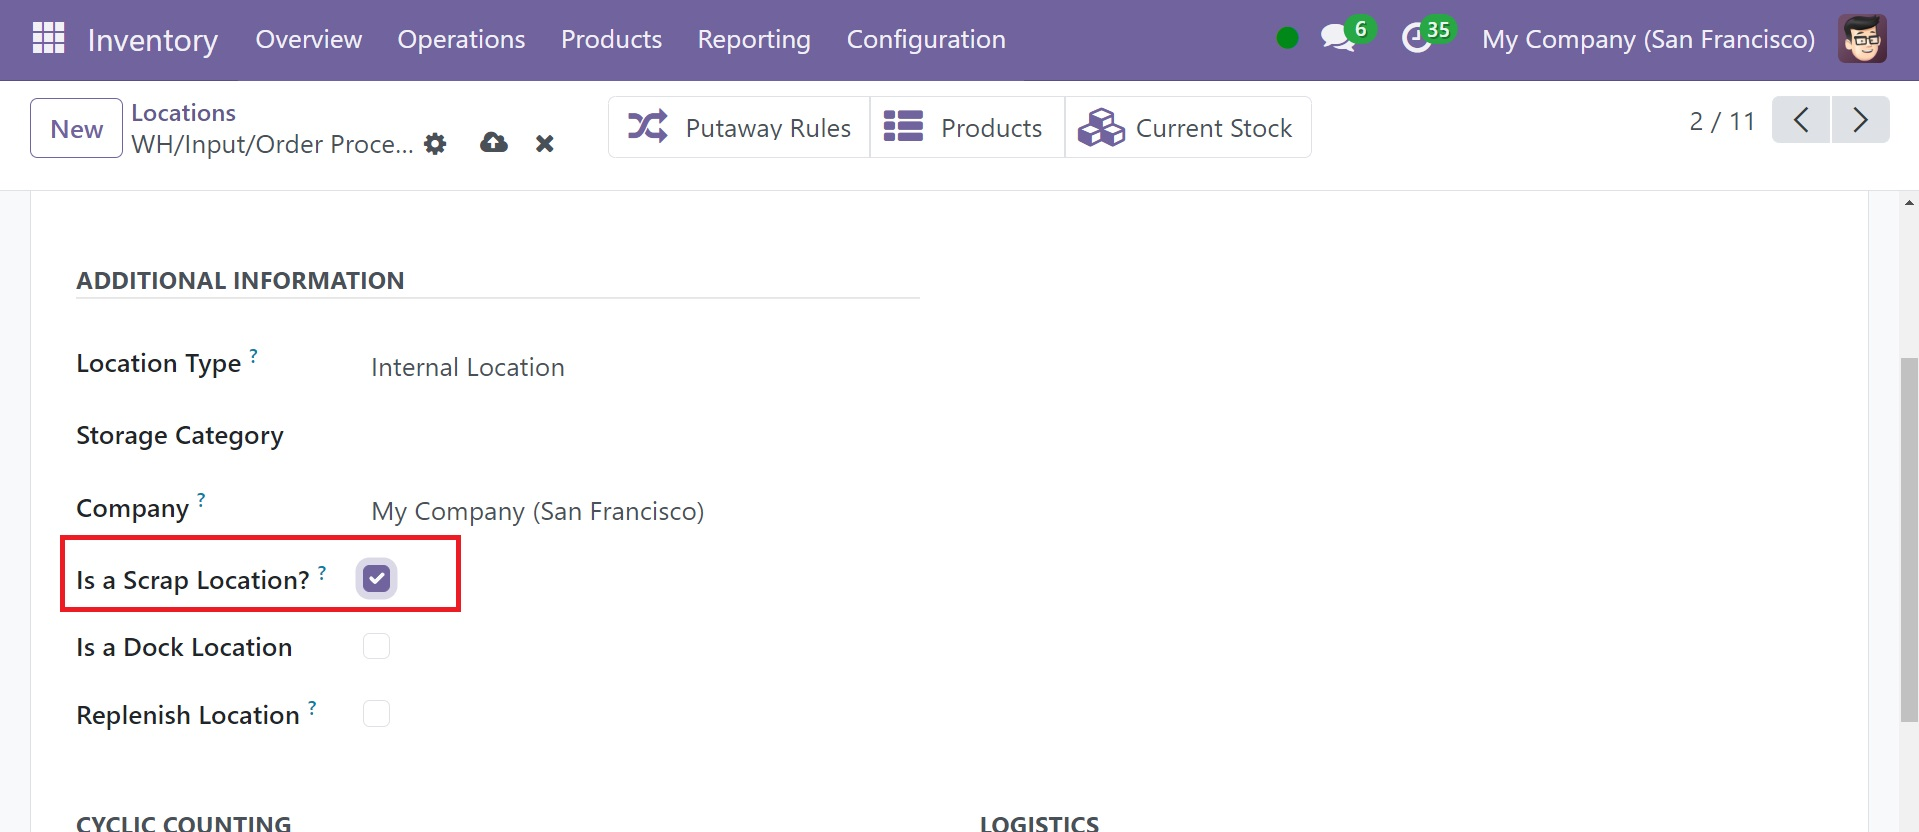
Listed In the required field, enter the name of the location, "scrap place." You can perform the same steps that we outlined in the Location setting section. Check the box for "Is a Scarp Location" to treat this site as a scrap location. This will officially designate the location as a scrap spot. You may create more scrap web pages like this one by employing the same method.
Now let's look at how to handle scrap in Odoo 18 and add products to the scrap location. Click on the Operations menu and choose "Scrap". The window for Scrap Orders will open. This pane displays the scrap order's Reference, Date, Product (name), Quantity, Unit of Measure, Company, and Status. Choose "New option.
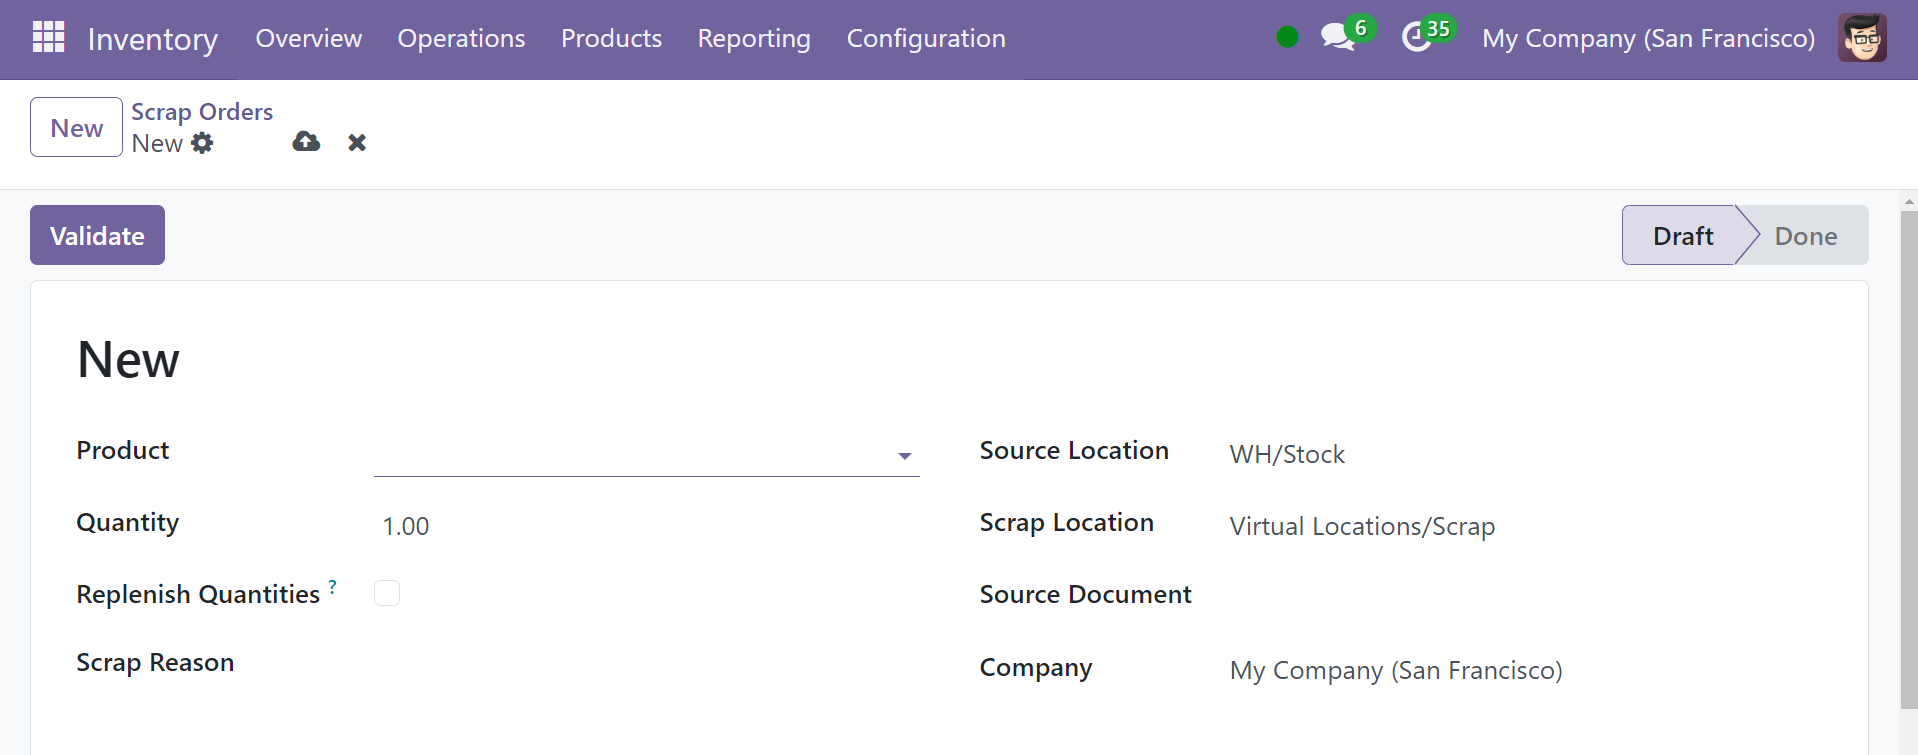
From the "Product" option list, pick the product name. Provide definitions for the following fields: Package, Quantity, Source Document, and Company. Click "Validate" once this data has been entered.
Odoo 18 helps you create scrap orders using inventory's many functions, including internal transfers, manufacturing, receipts, etc. An example of a validated receipt is shown below.

Click the Scrap button to transfer this item from the company's stock to the scrap area.
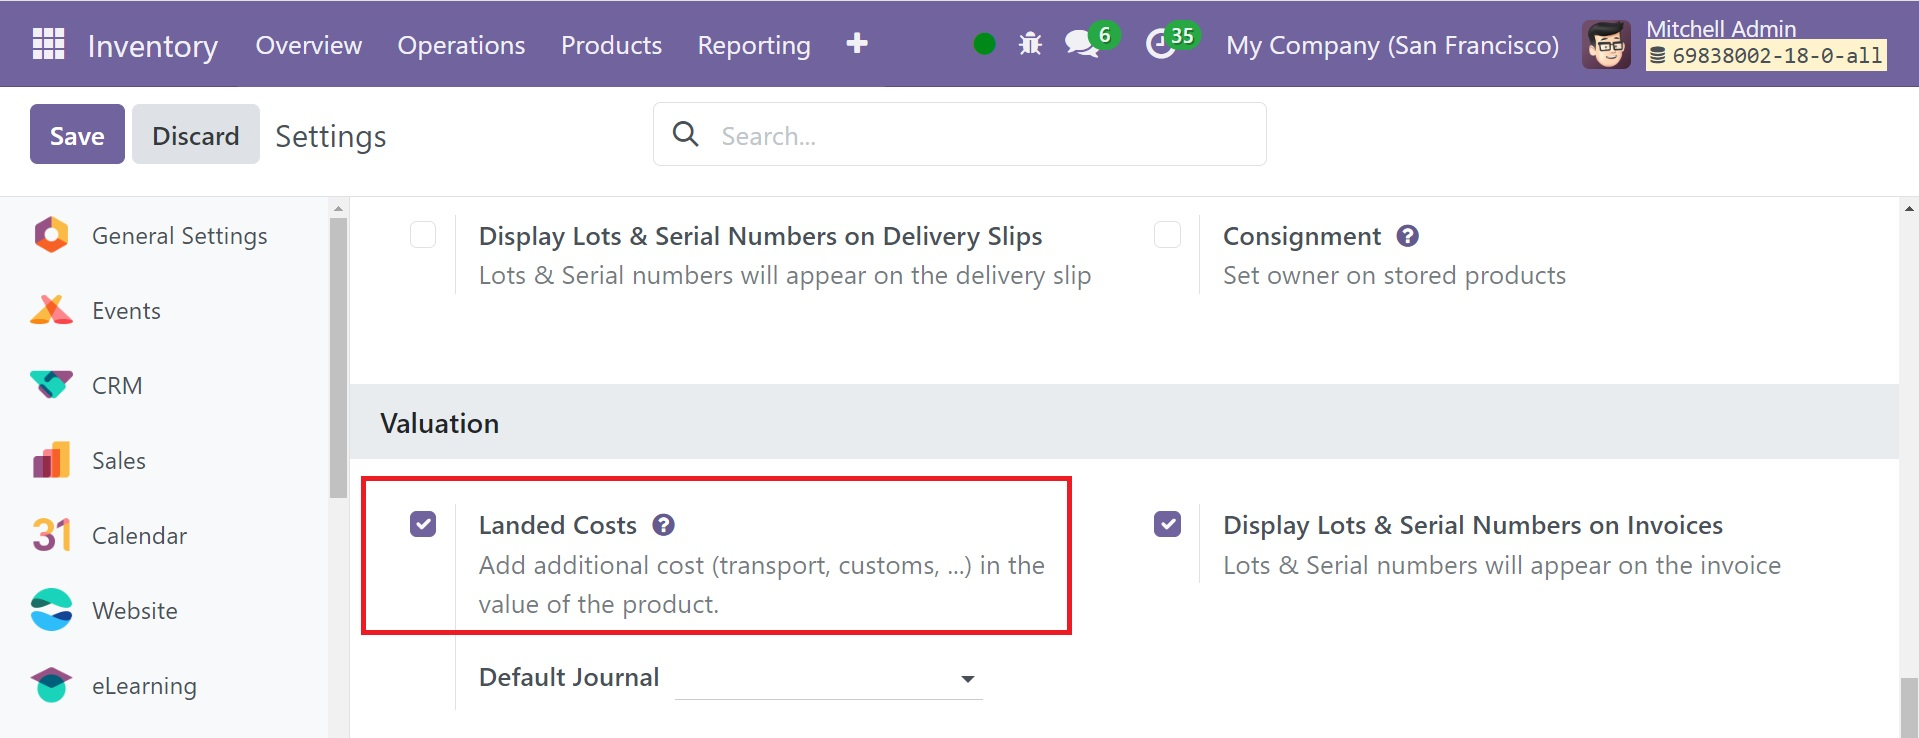
Landed Costs
After subtracting all applicable expenses, including the product's price, shipping and delivery charges, etc., the total amount you charge the consumer is referred to as the "landed cost." This cost determines the product's initial selling price. Because a product's cost changes depending on the organization's policies and procedures, two businesses may have different landed costs for the same product.
The Valuation area of the Settings box is where you may activate "Landed Costs."
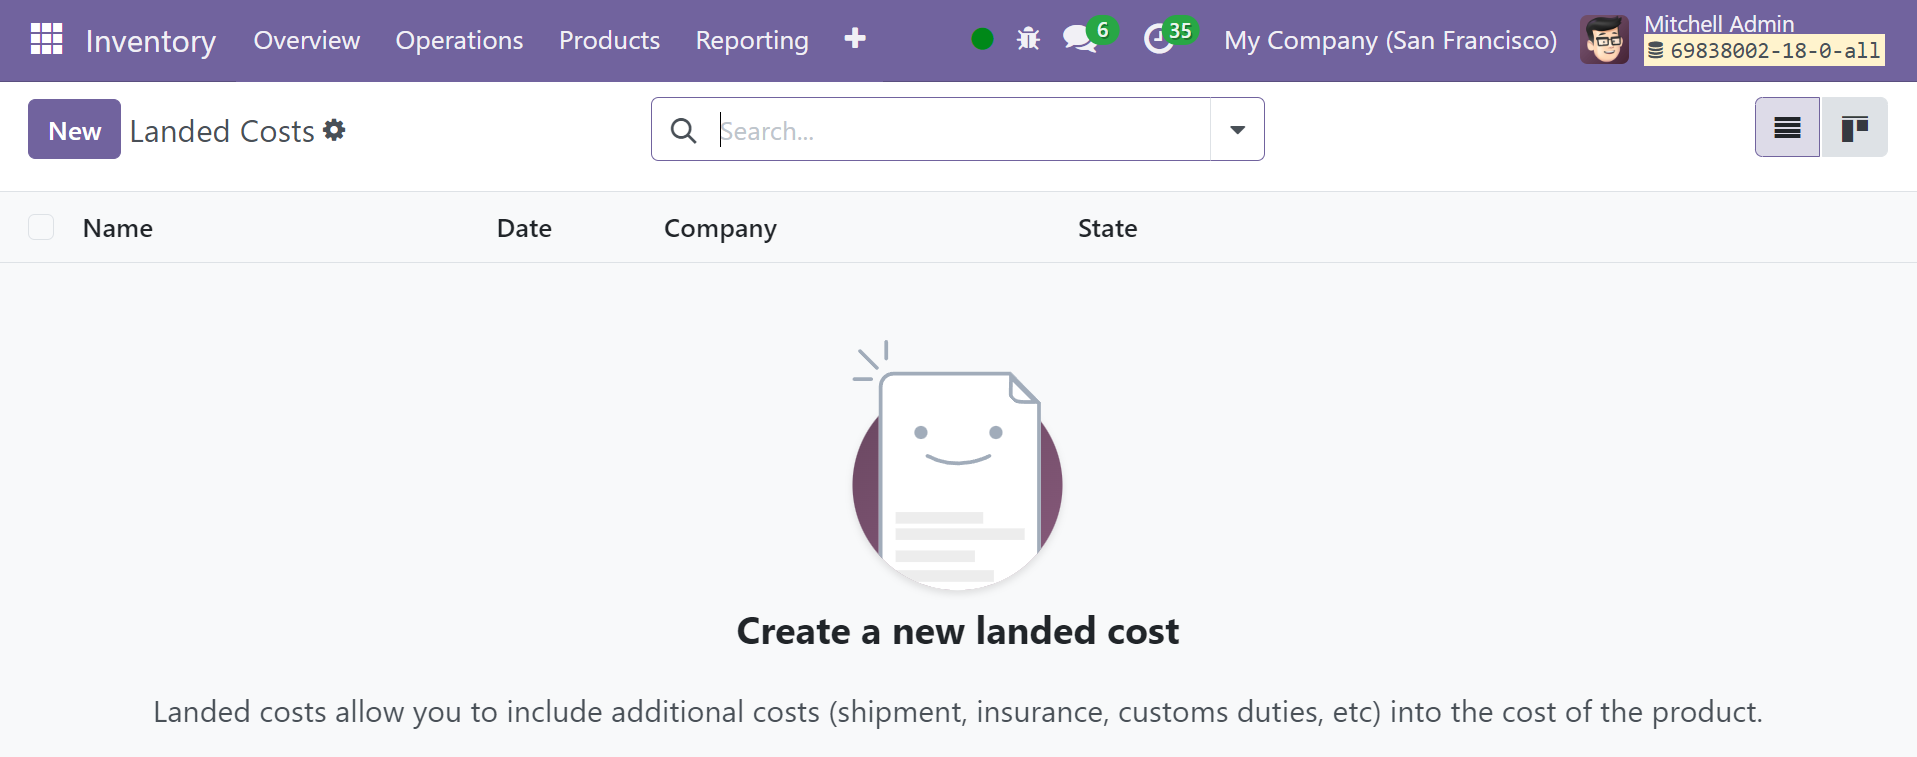
The dropdown list on the Operations tab will now display the Landed Costs menu. Click to bring up the Landed Costs pane.
Every Landed Cost that has been added to the module is shown here. The window displays every detail in a List view by default. However, by selecting the corresponding icons in the window's top right corner, you can change to a Kanban view. The Filters and Group By options allow you to quickly find, filter, and classify the records. Include the filter or criterion that you use the most in your "Favorites."
Prior to adding a new Landed Cost, click the Configuration tab and choose 'Product Categories'. Select any category from the list that is presented.
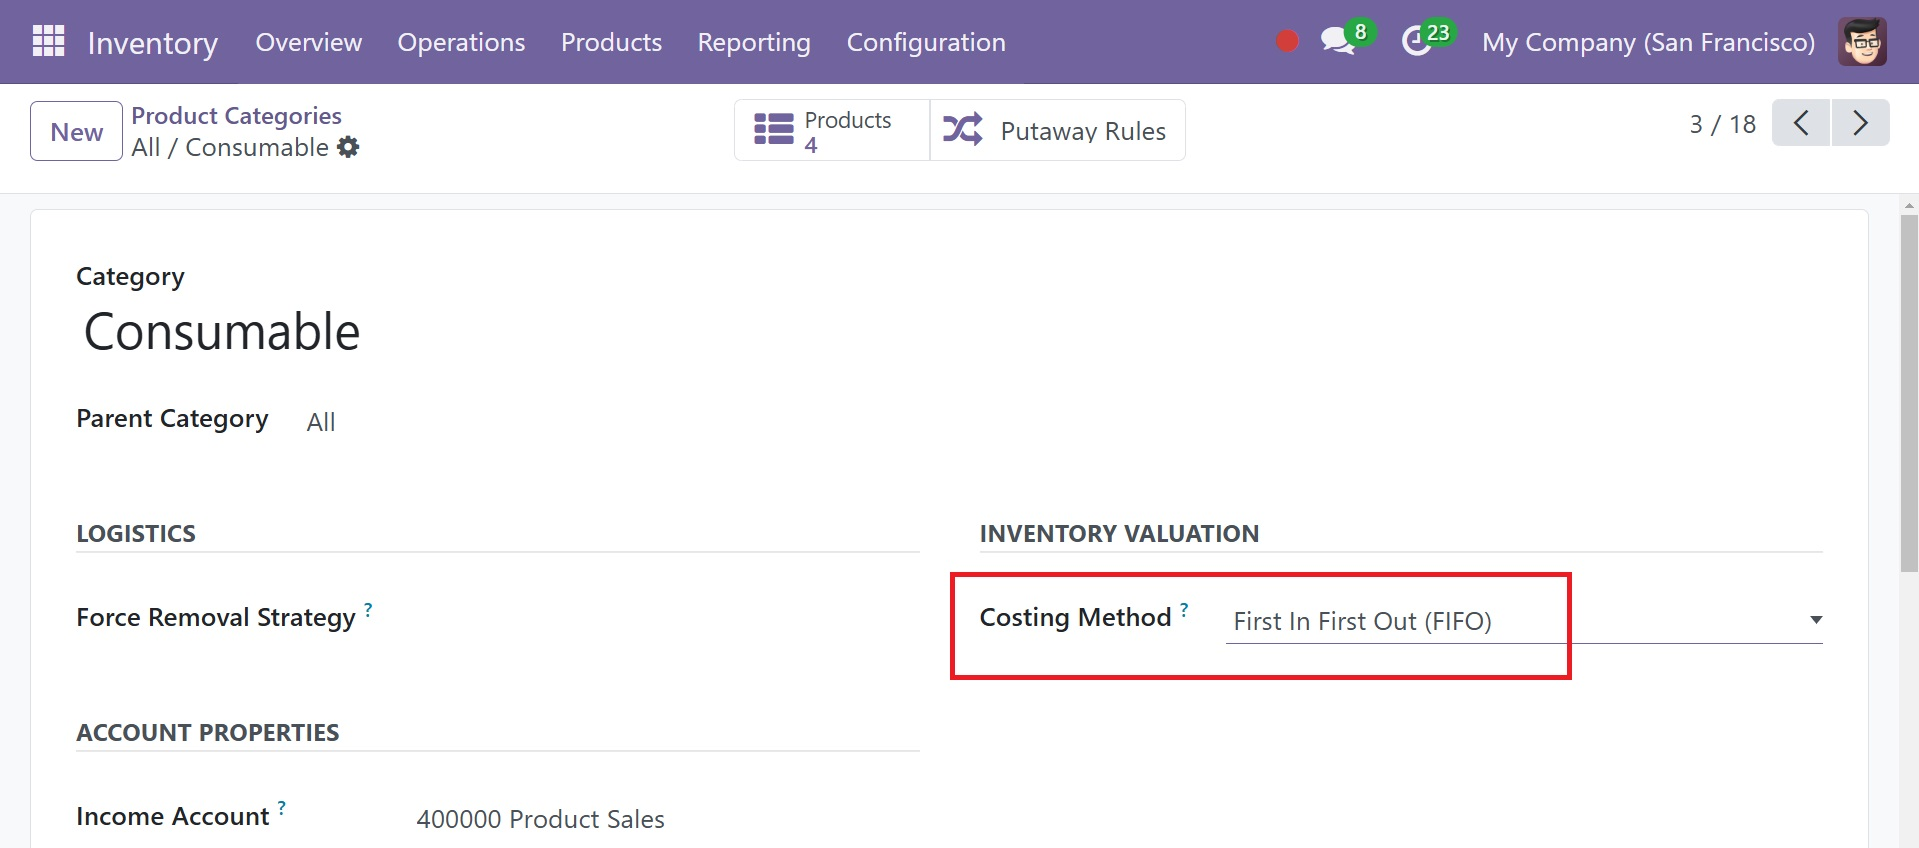
Select "First In First Out (FIFO)," or "Average Cost (AVCO)" for the "Costing Method." Since it is difficult for manufacturers to predict exact costs in advance, Standard Price allows you to select an approximate cost. If the products that are manufactured first are also the ones that are sold first, use FIFO as the costing method. The cost of all necessary supplies is divided by the total number of items when average costing is used, and the cost is then assigned to the goods.
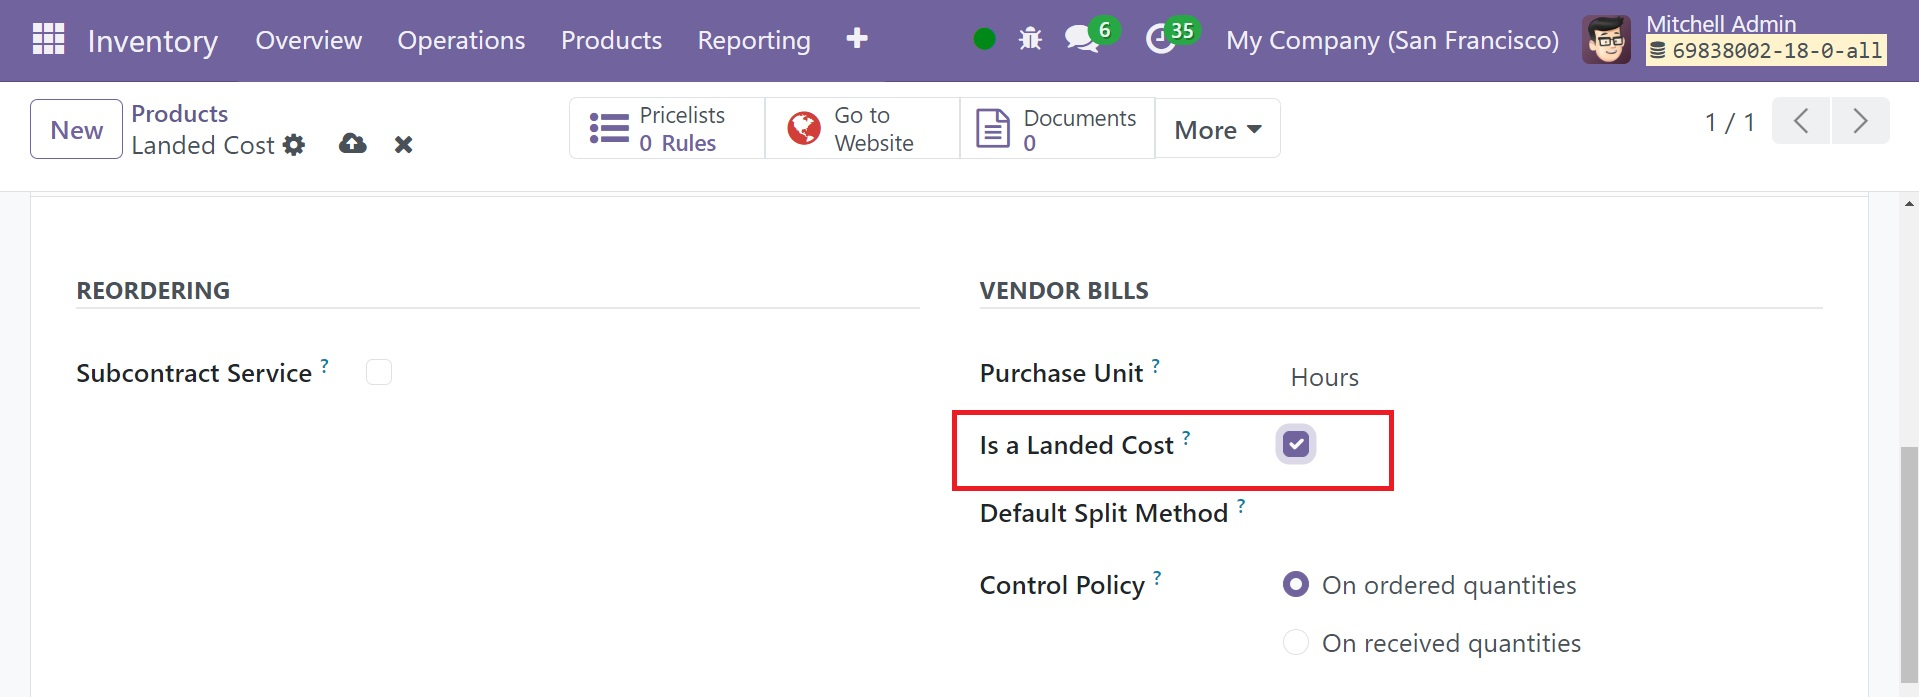
To view the form immediately, click "New" in the Products box. A service that specifies landing expenses can be configured by setting the "Product Type" to "Service."
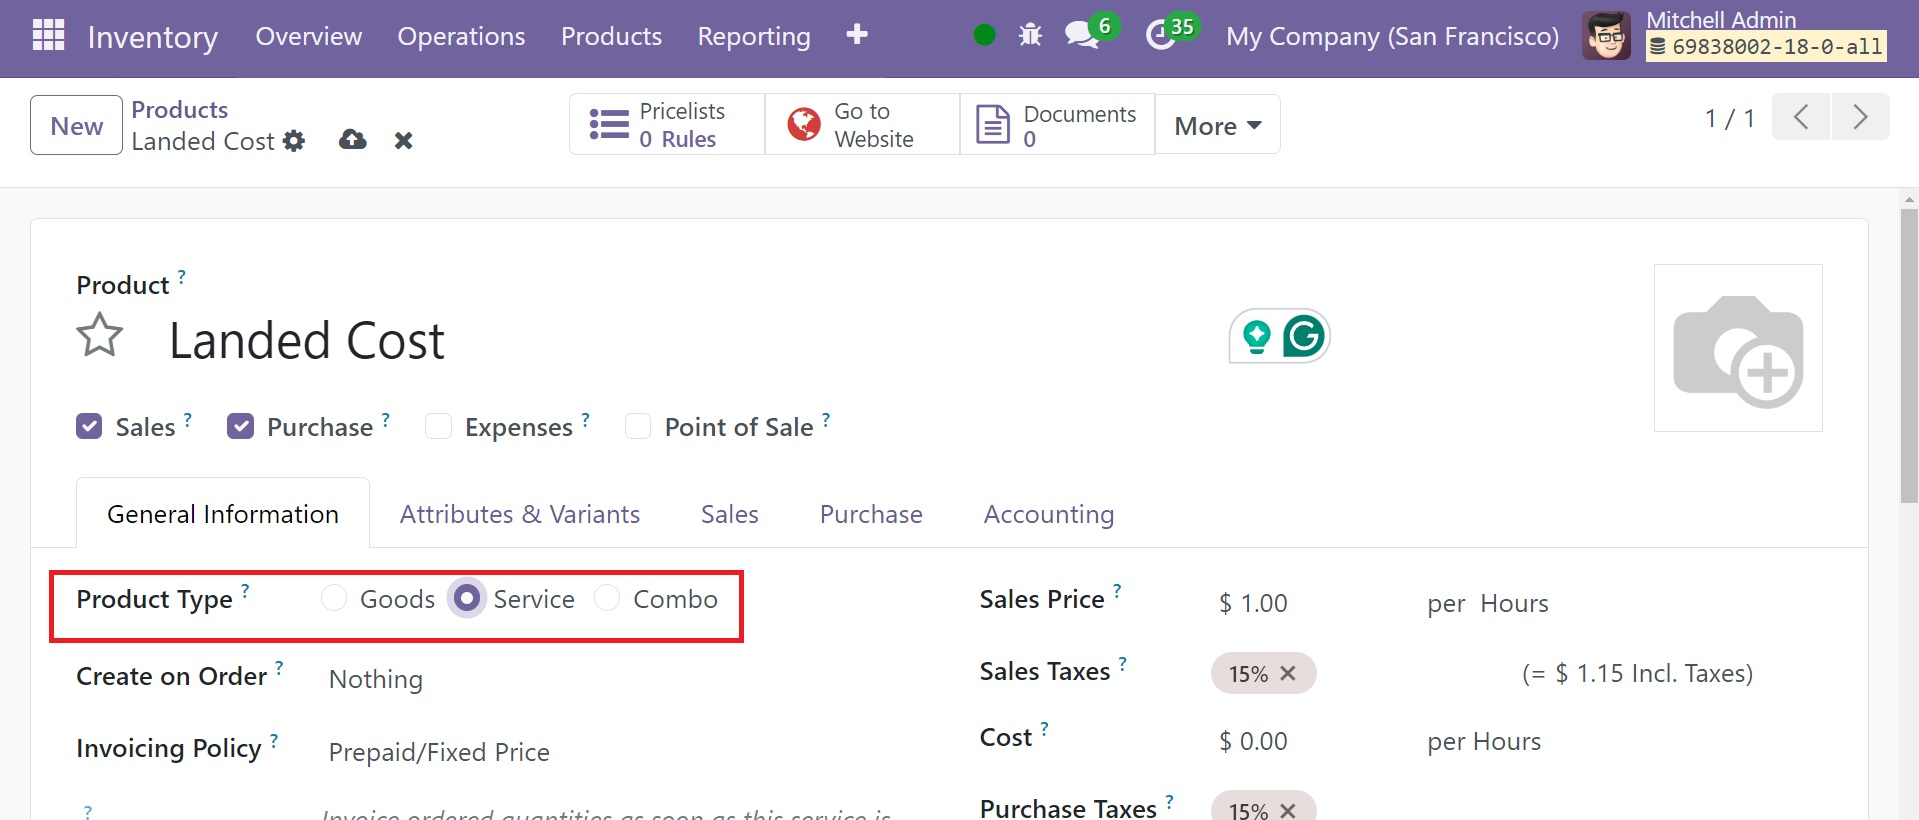
Turn on the "Is a Landed Cost" option under the Purchase page to attach pricing methodology to this service. In the Default Split Method area, you can choose how you want to split the cost.
To add a new Landed Cost, click the New button in the Landed Costs window. Indicate fields like Date, Journal, Transfers, Company, and Vendor Bill. The two options for the "Apply On" feature are transfers and manufacturing orders. It determines which domains should be subject to landed costs.
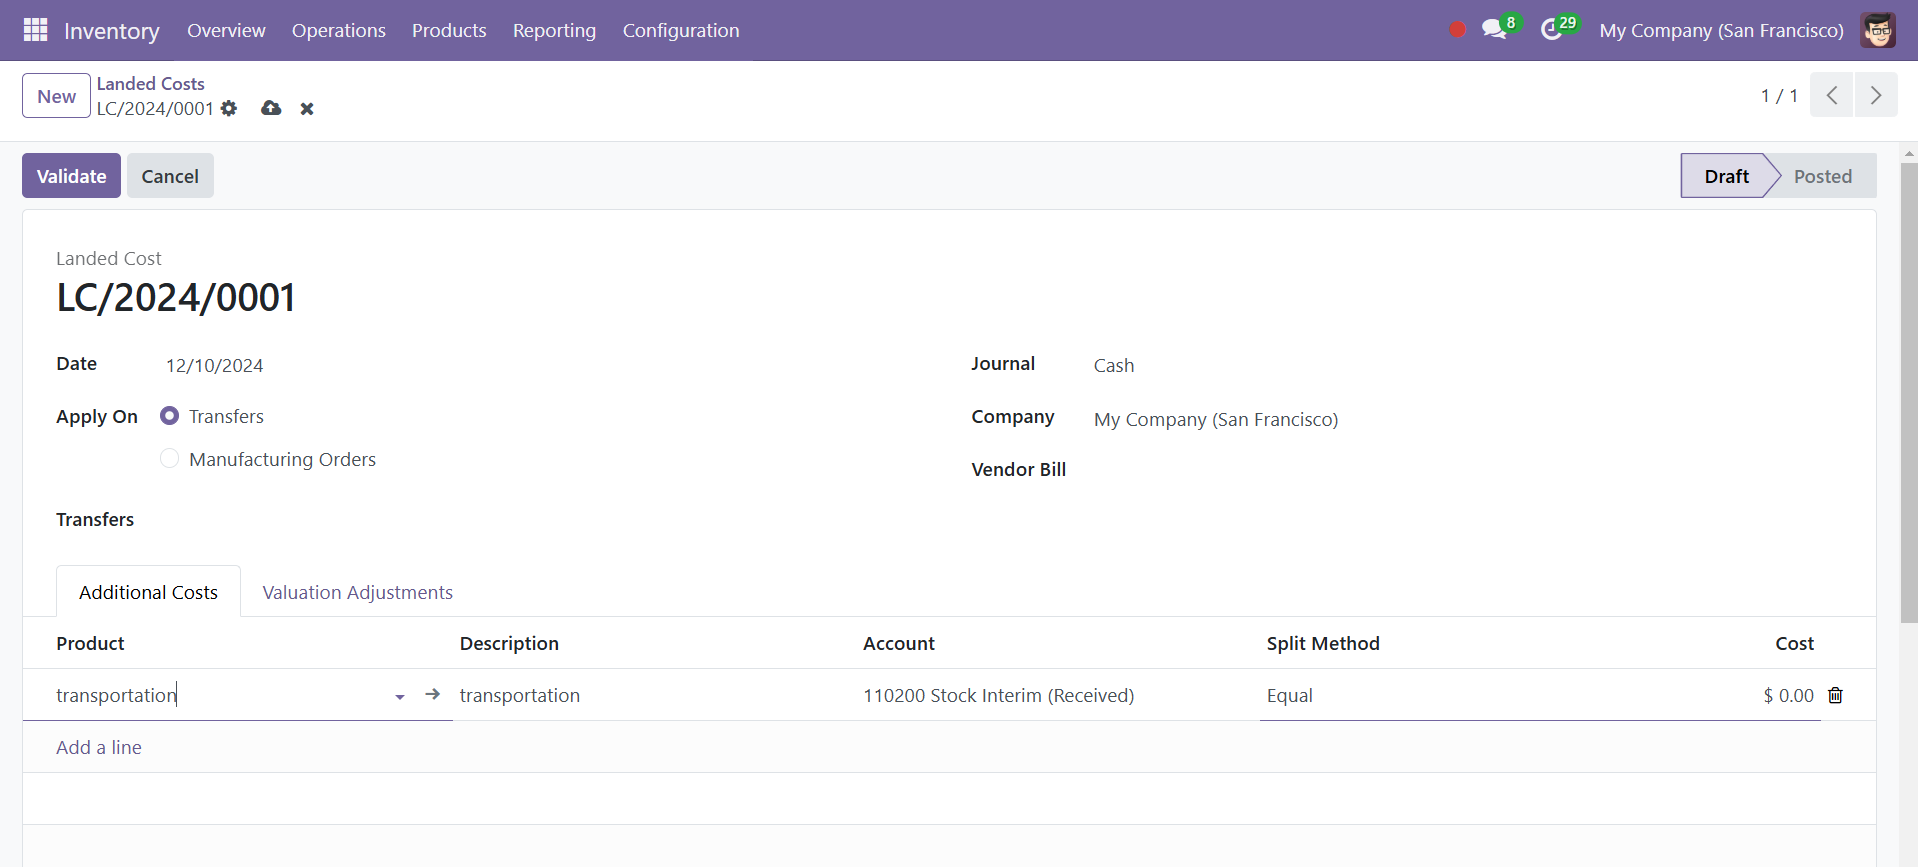
You may find the Add a Line button under "Additional Costs." You can pick the product from the dropdown list in the Product section. Provide details about the account, cost, split mechanism (the way landed costs are allocated), and description.
You can choose the appropriate Split Method once you've mentioned the Product, Description, and Account information.
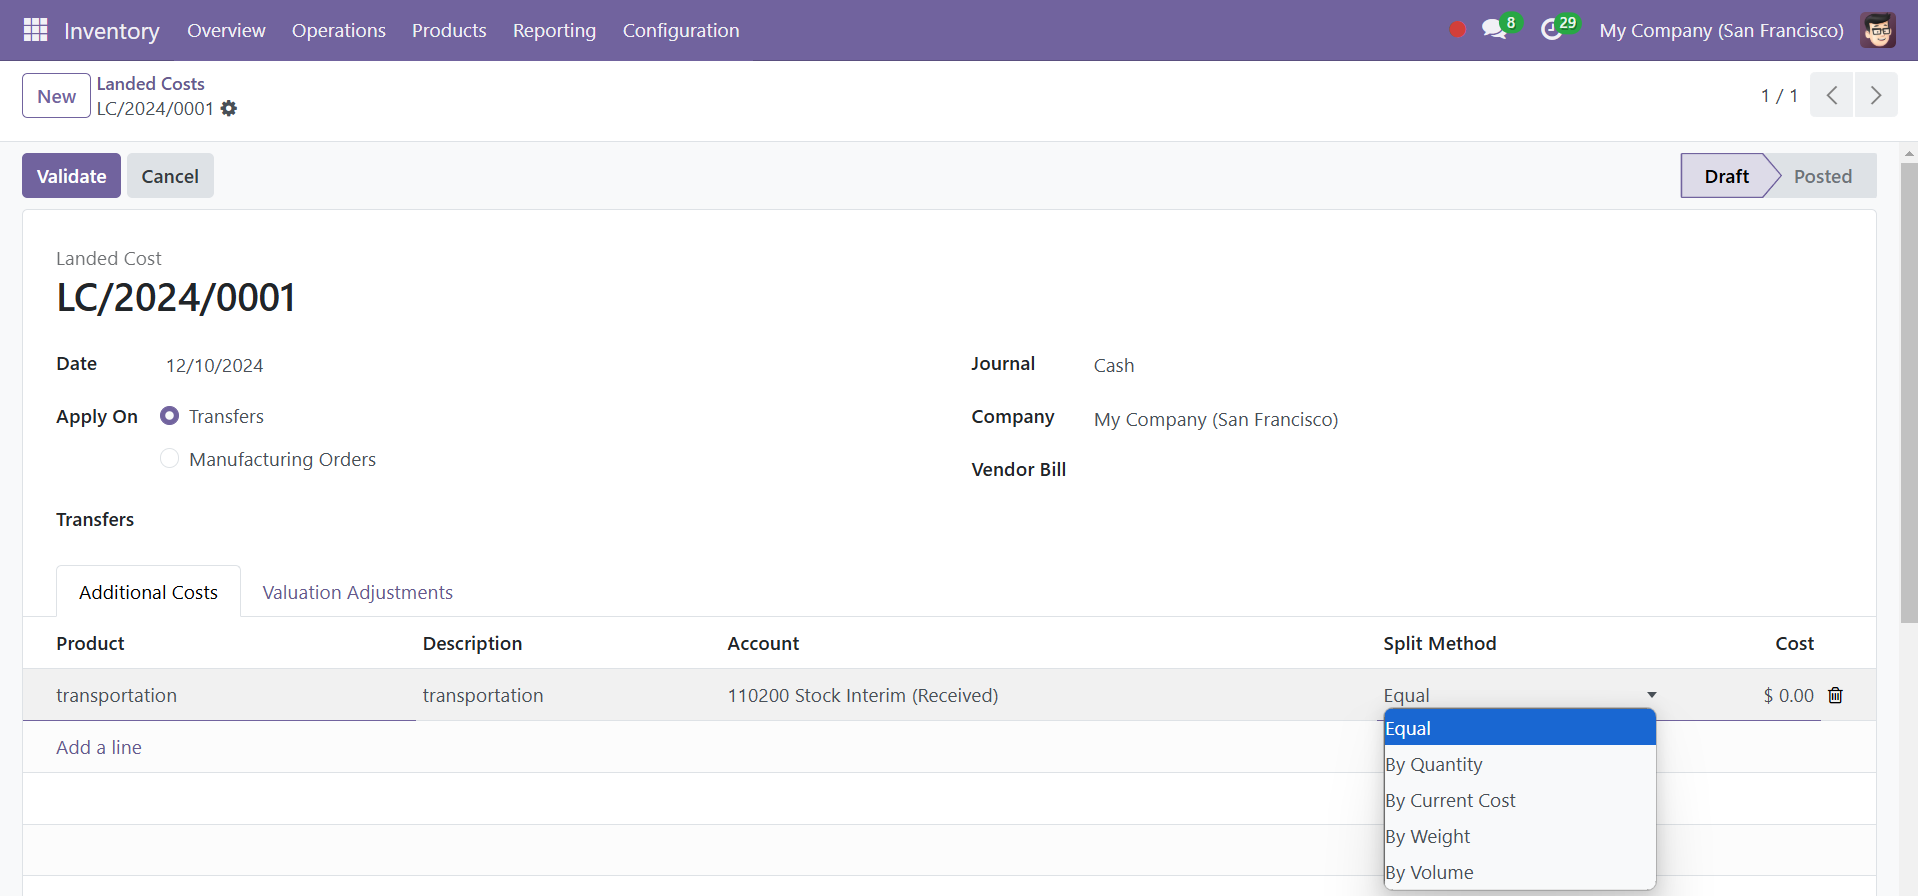
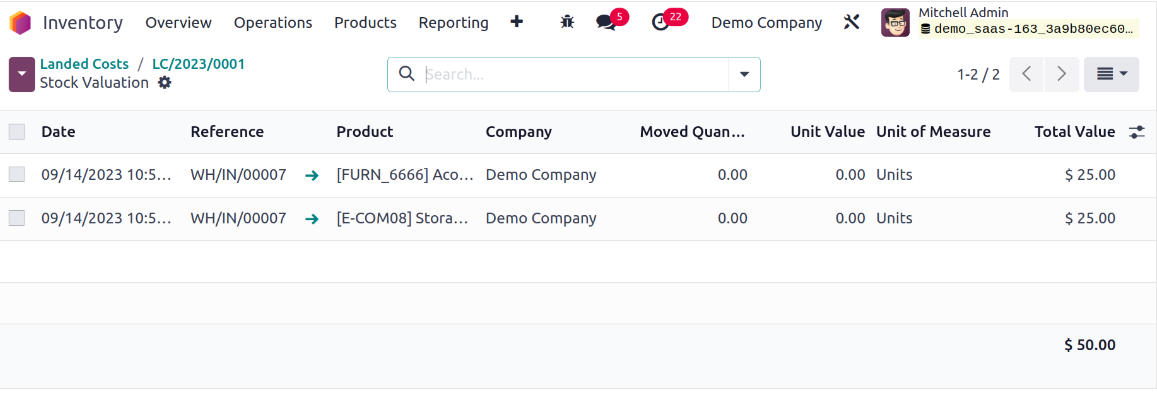
The Split Method will decide how this landing cost is distributed among the goods specified in the transfer receipt. It can be set up as Equal, By Quantity, By Current Cost, By Weight, and By Volume, depending on your company's policy. We may decide to use the Equal Split strategy in this case. To calculate the landed cost, click the Compute button.
You may now check the landing cost by clicking the Validate button.
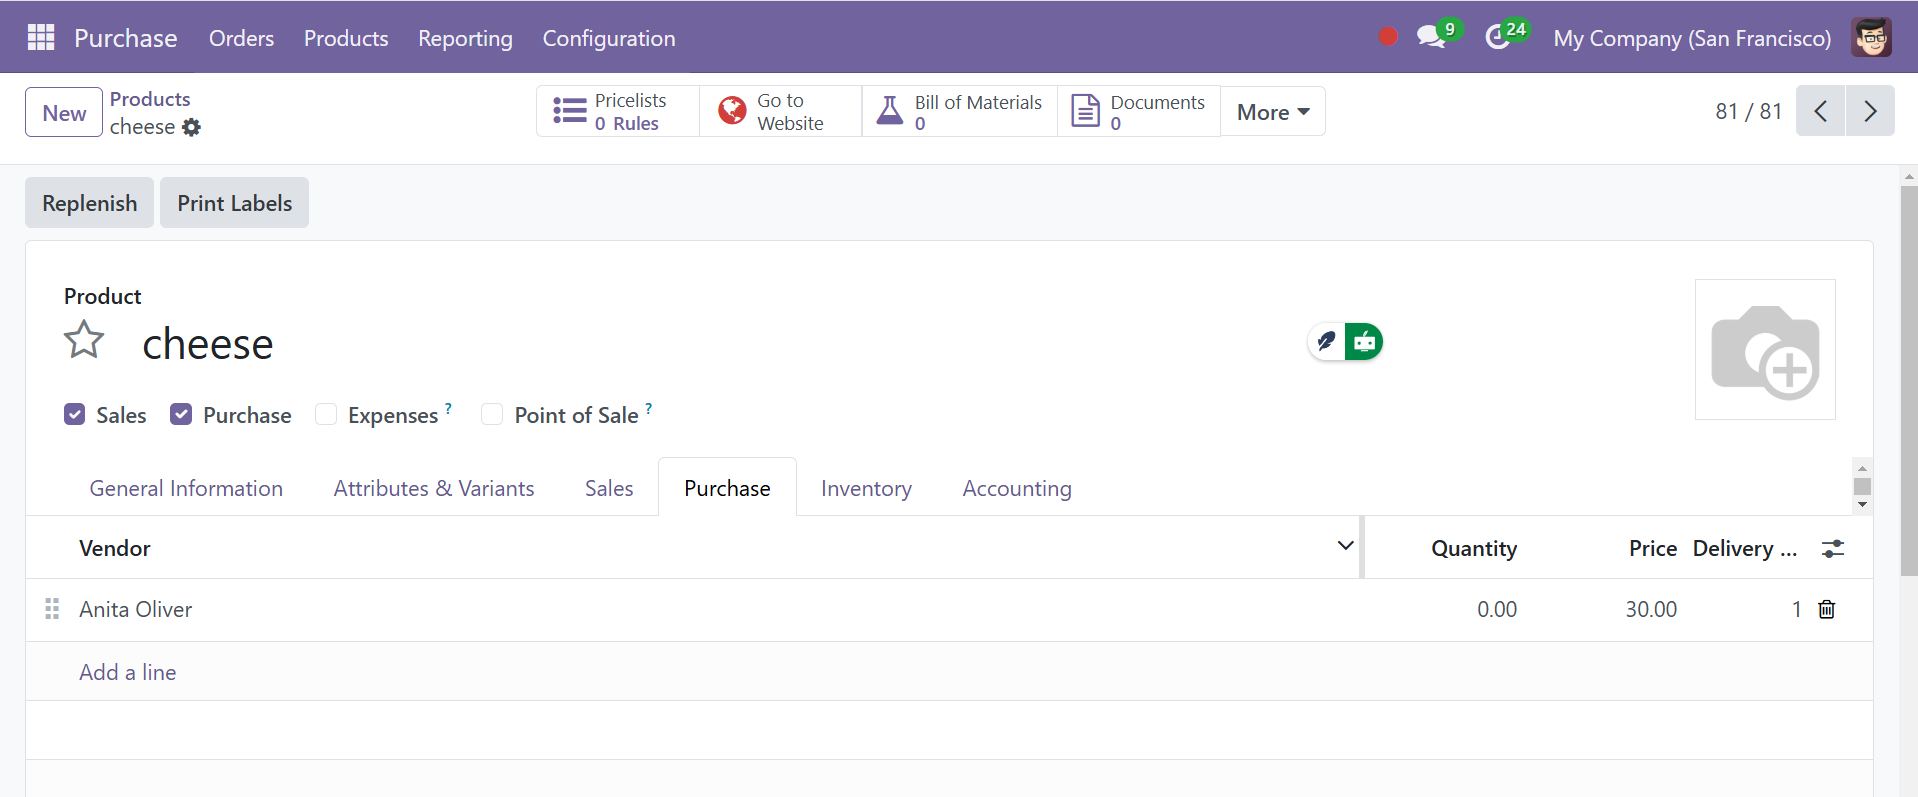
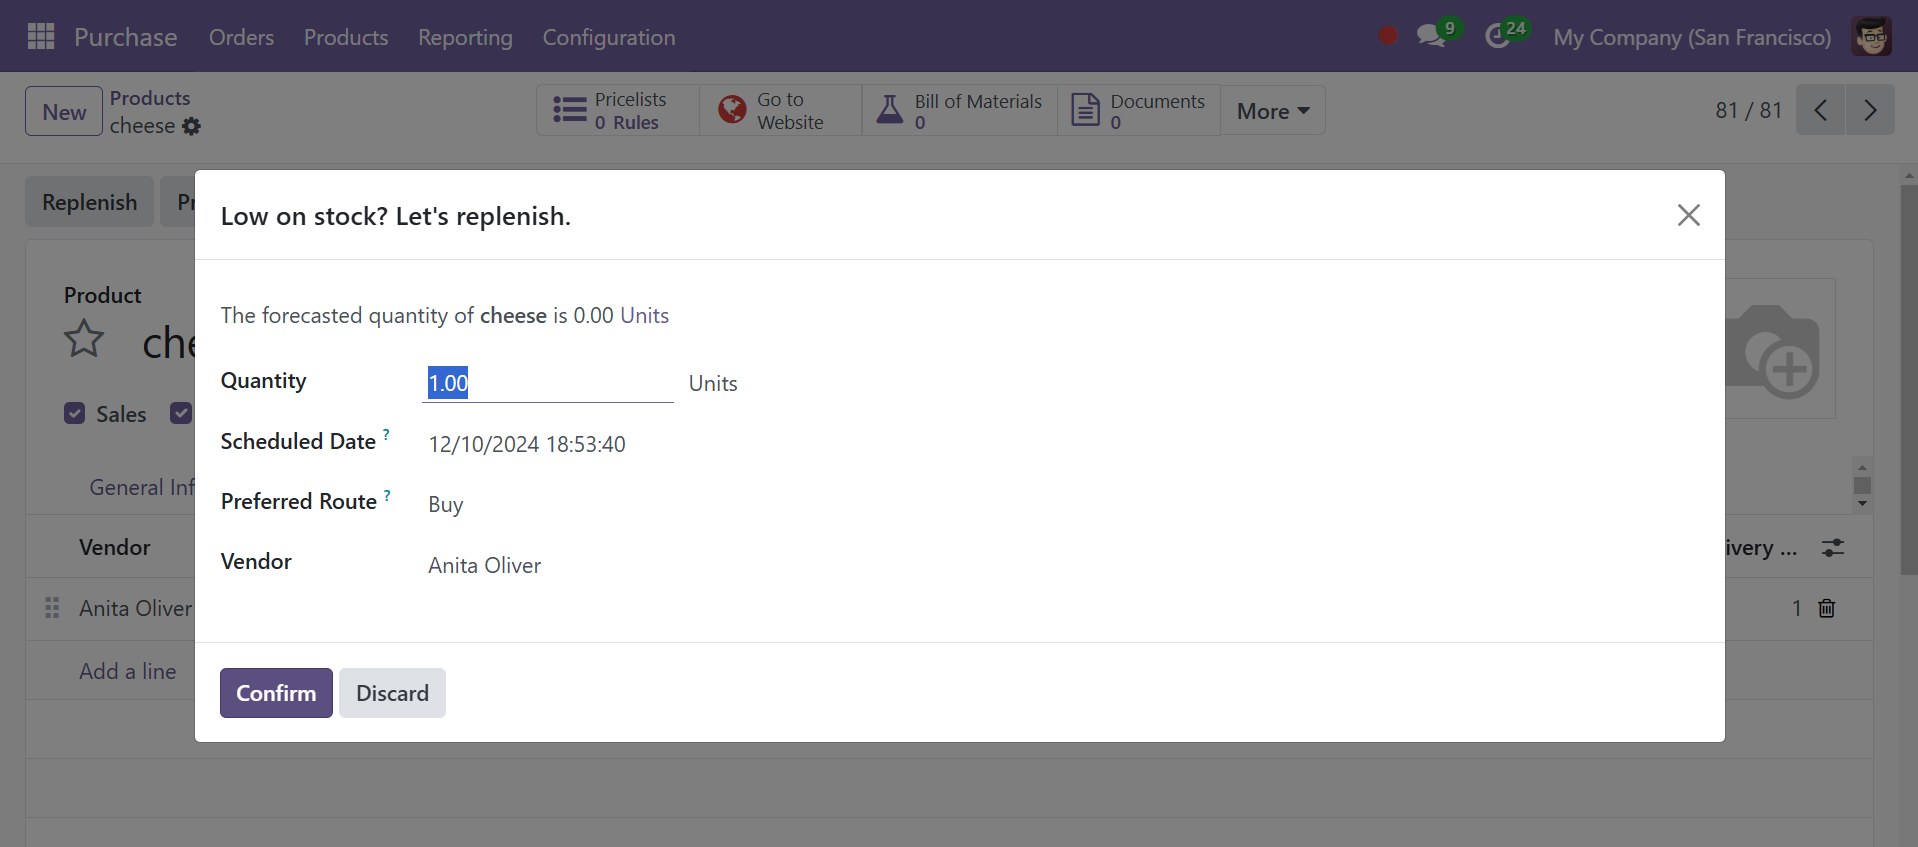
Replenishment
Using their vendors and the Replenishment function, you can restock your exhausted inventory. You must set up that particular vendor's stock when you replenish. To utilize this feature, select "Replenishment" from the Operation menu. This module allows for a detailed analysis and management of the replenishment orders that were placed.
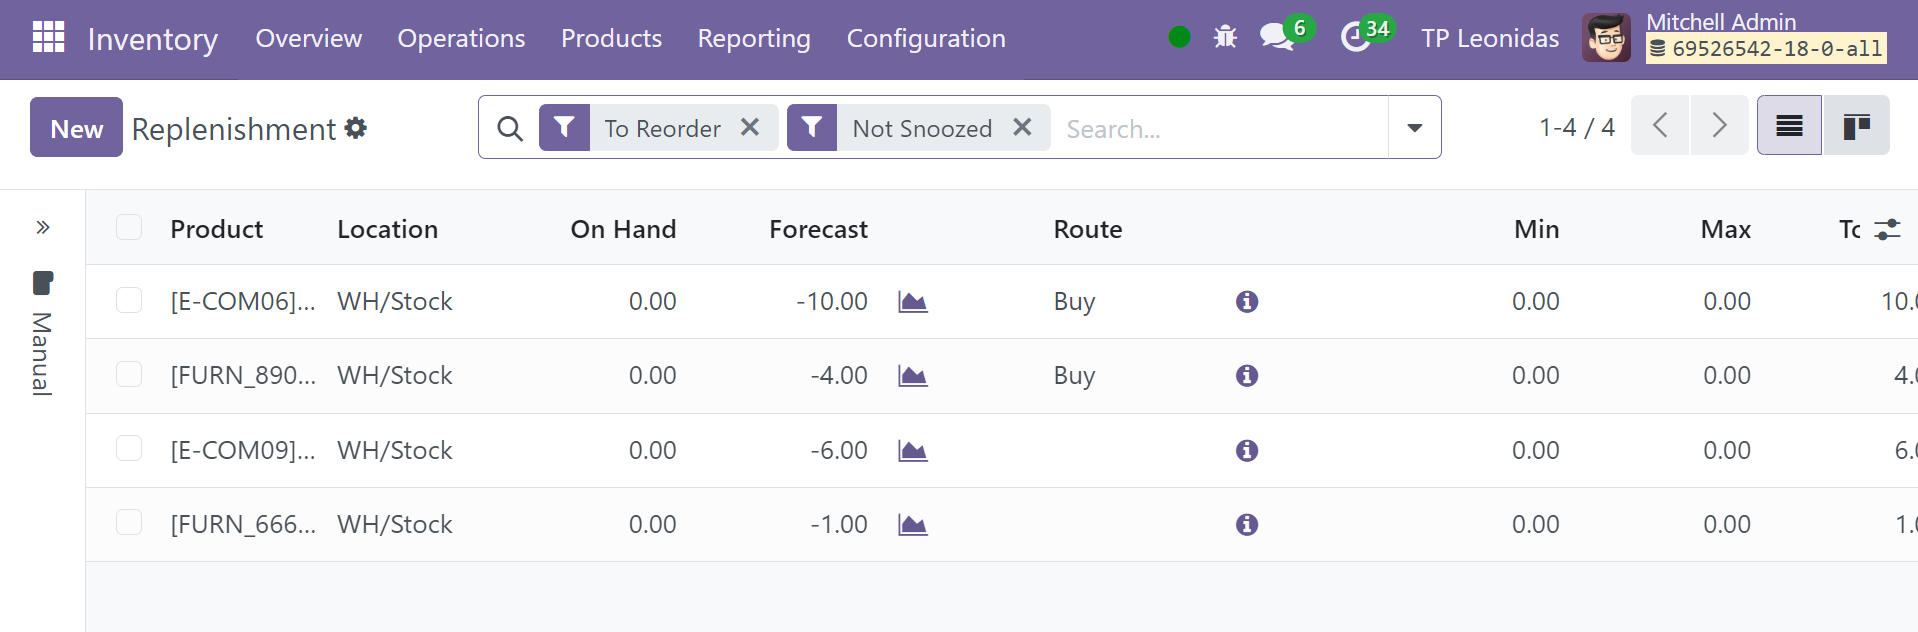
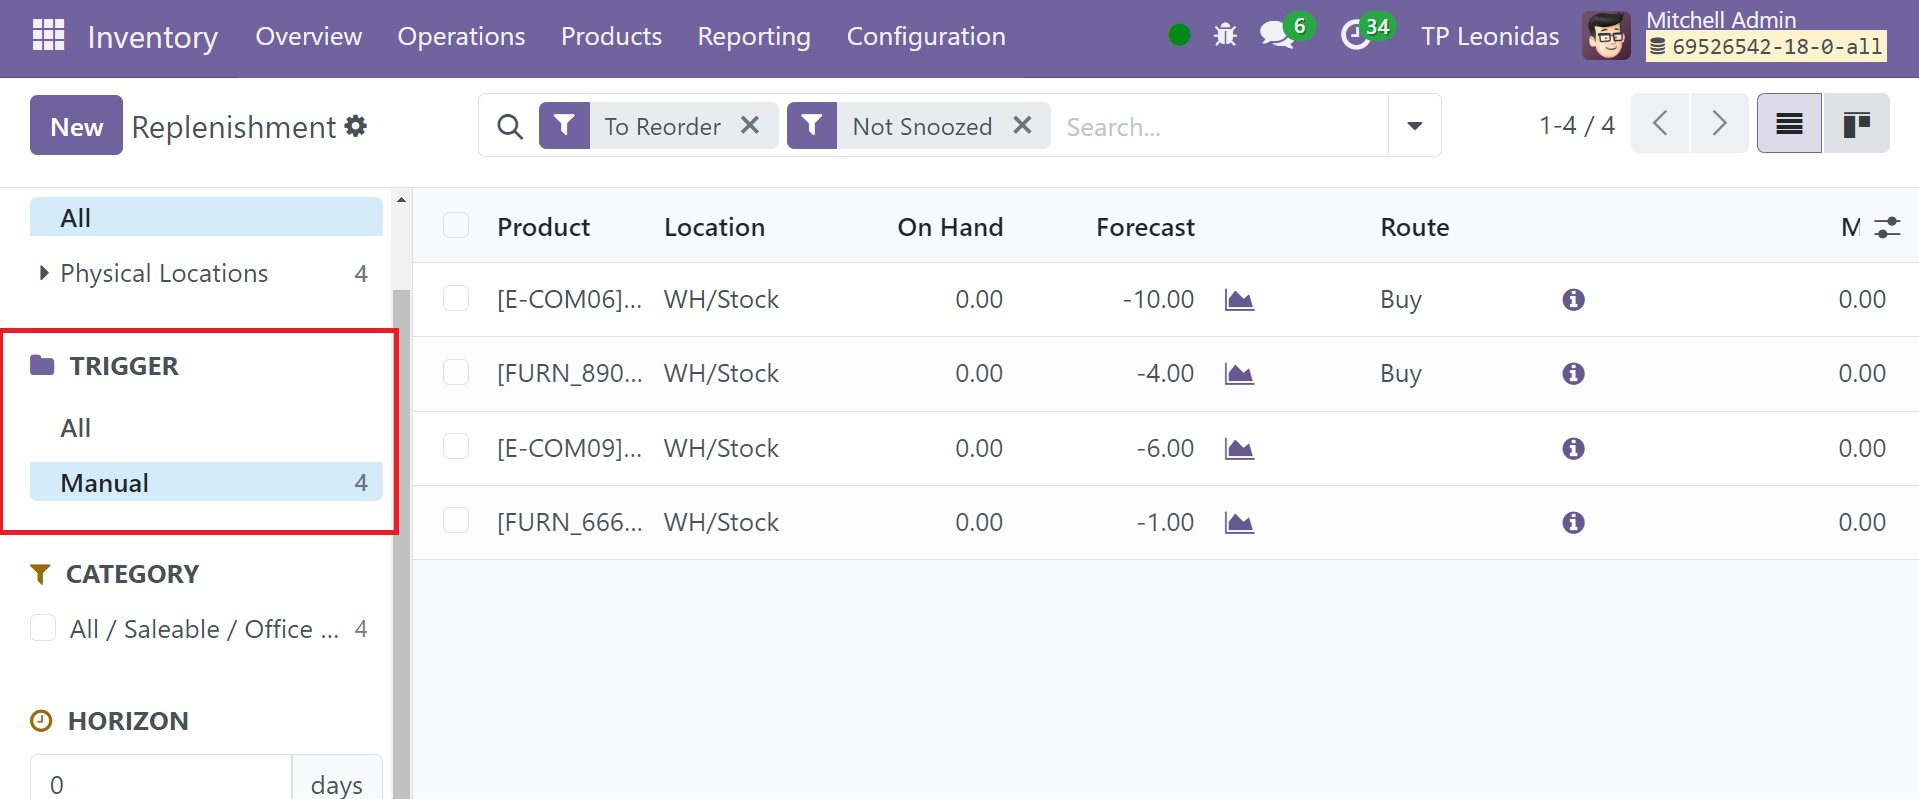
As seen in the above image, there is a filter on the left side of the window named "Trigger." This filter area is a new feature of the Odoo 18 Inventory module. There are three categories for filtering replenishment triggers: "All" (including manual and automatic), "Auto," and "Manual." Click the New button to create a new replenishment order.
Below the current list, a new line will appear for you to input the product name, preferred route, vendor, minimum and maximum quantities, and to order.
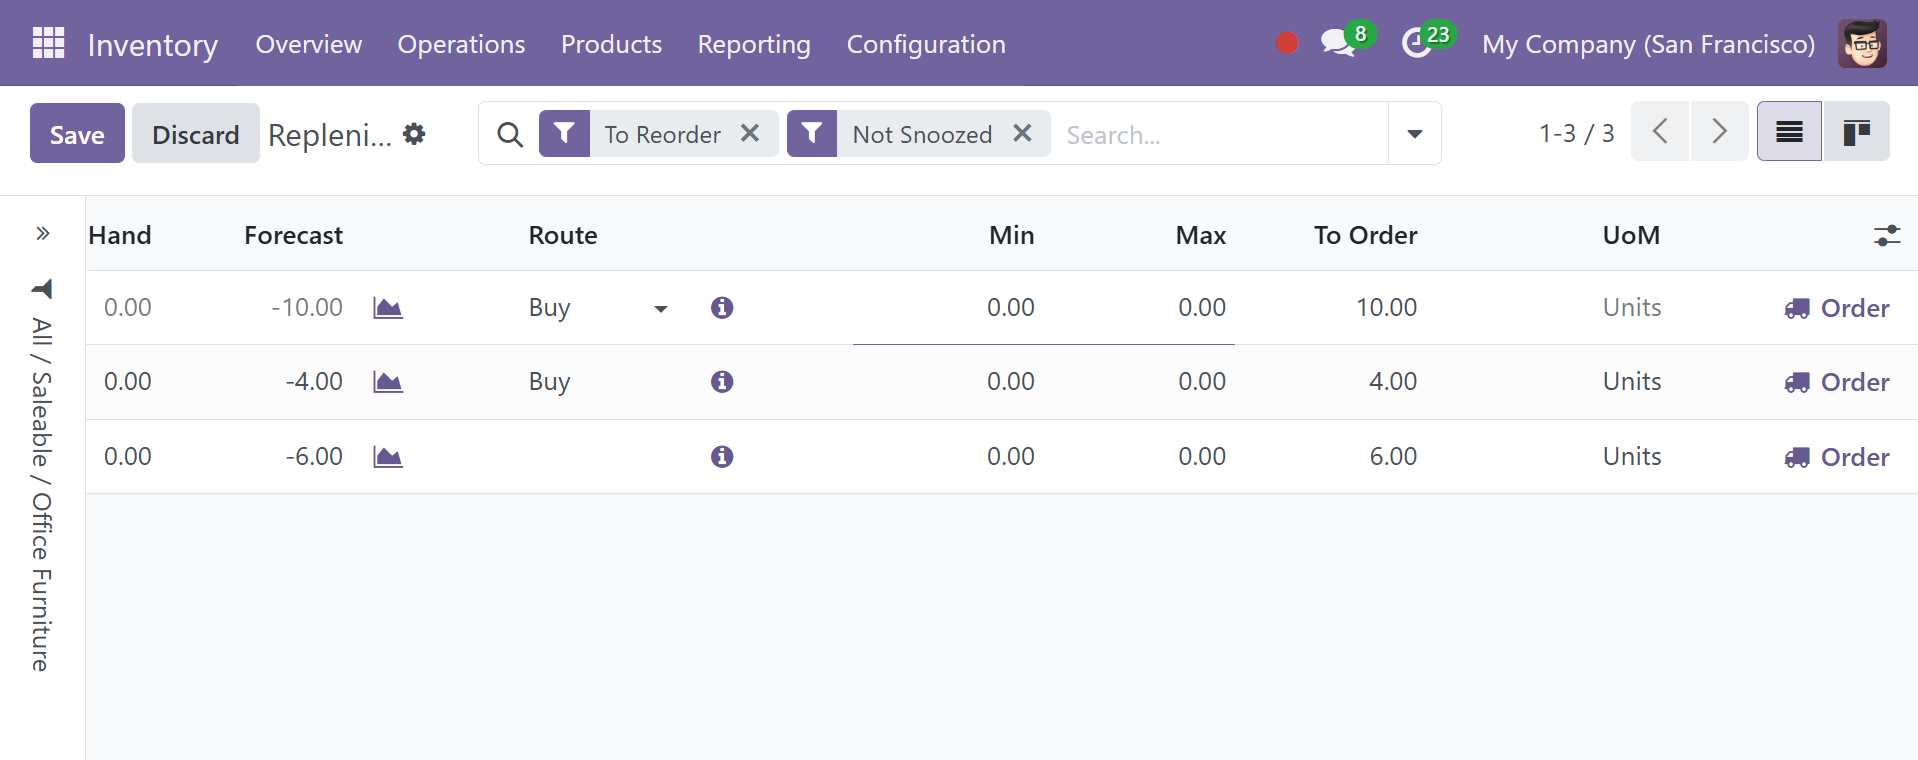
Depending on the product chosen, the fields like "On Hand," "Forecast," and "UoM" will automatically change.
The dashboard for the replenishment report by default displays all of the products that require human reordering. Odoo considers that if a product has no specified rules, on the Replenishment report page, you may also set a Min Quantity and a Max Quantity in the appropriate columns if needed.

The underlined "i" icon below shows the refill details. Click the 'i' icon next to a product to see its replenishment details. Use the Order Once icon to quickly make an order for replenishment. By pressing this button, the relevant product will be manually restocked. Clicking the Automate Orders button will start the refilling process automatically. To disable alerts for a specified period of time, select "Snooze." The window below will appear when you press the Snooze button.
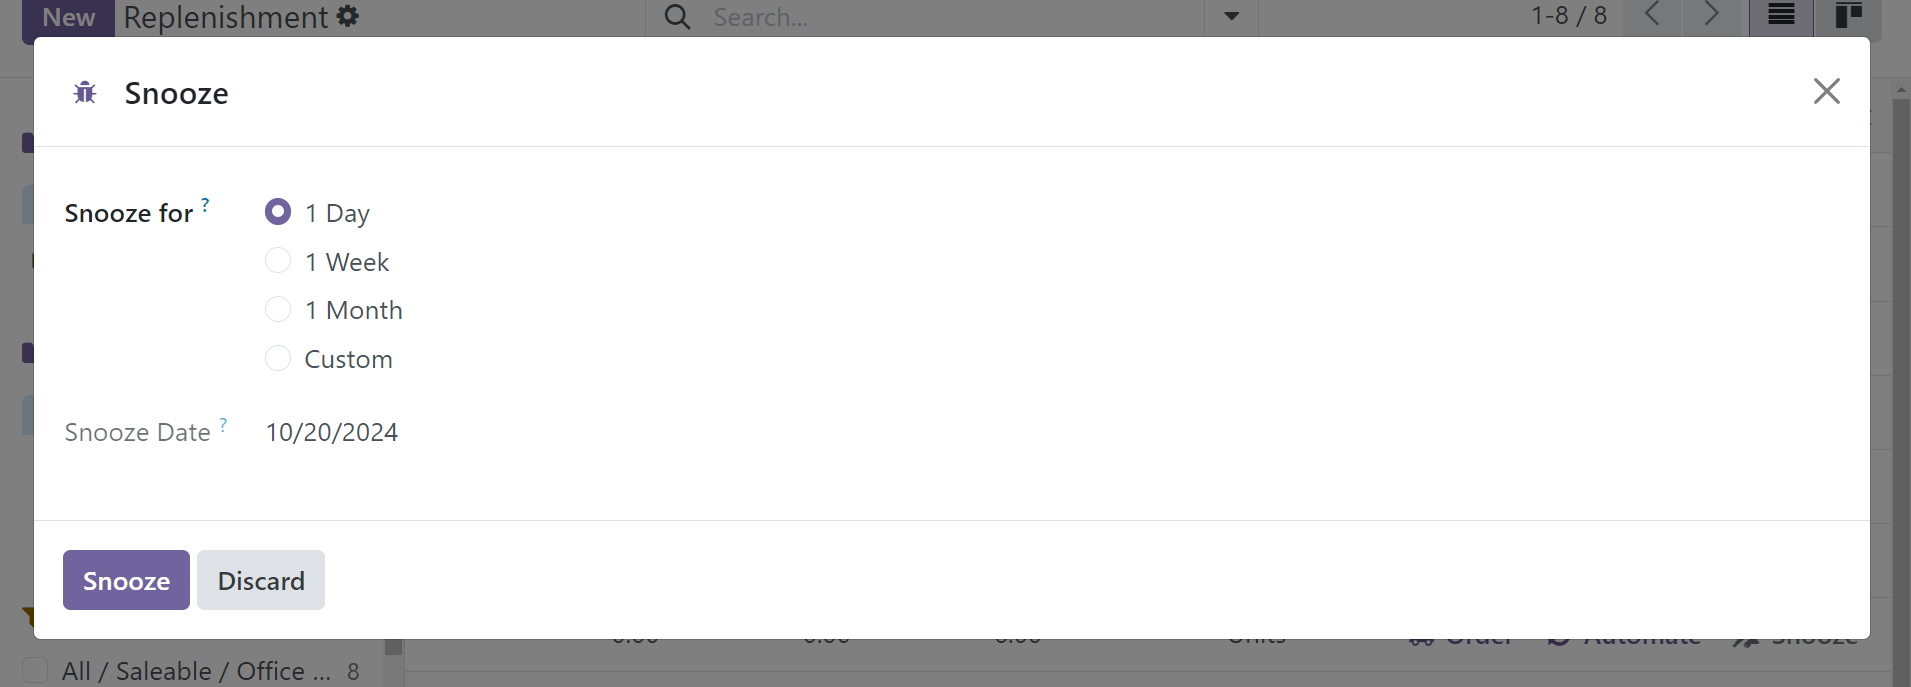
Choose your nap time and day, then click "Snooze."
Reordering Rules
For some products, it is essential to guarantee that a minimum quantity is kept on hand at all times. A purchase order can be automatically generated if the quantity on hand drops below a predetermined threshold by incorporating a reordering rule into a product. Before adding a reordering rule to a product, it must be configured in a certain way.
To create a new product, select Products ‣ Products from the Inventory and then click New. As an alternative, click into the product form of an existing product that is listed in the database.
After properly configuring a product, a reordering rule can be added to it by selecting the now visible Reordering Rules smart button at the top of that product’s form, and then clicking New on the Reordering Rules dashboard.

Once created, the reordering rule can be configured to generate purchase orders automatically by defining the following fields, as in the below image.
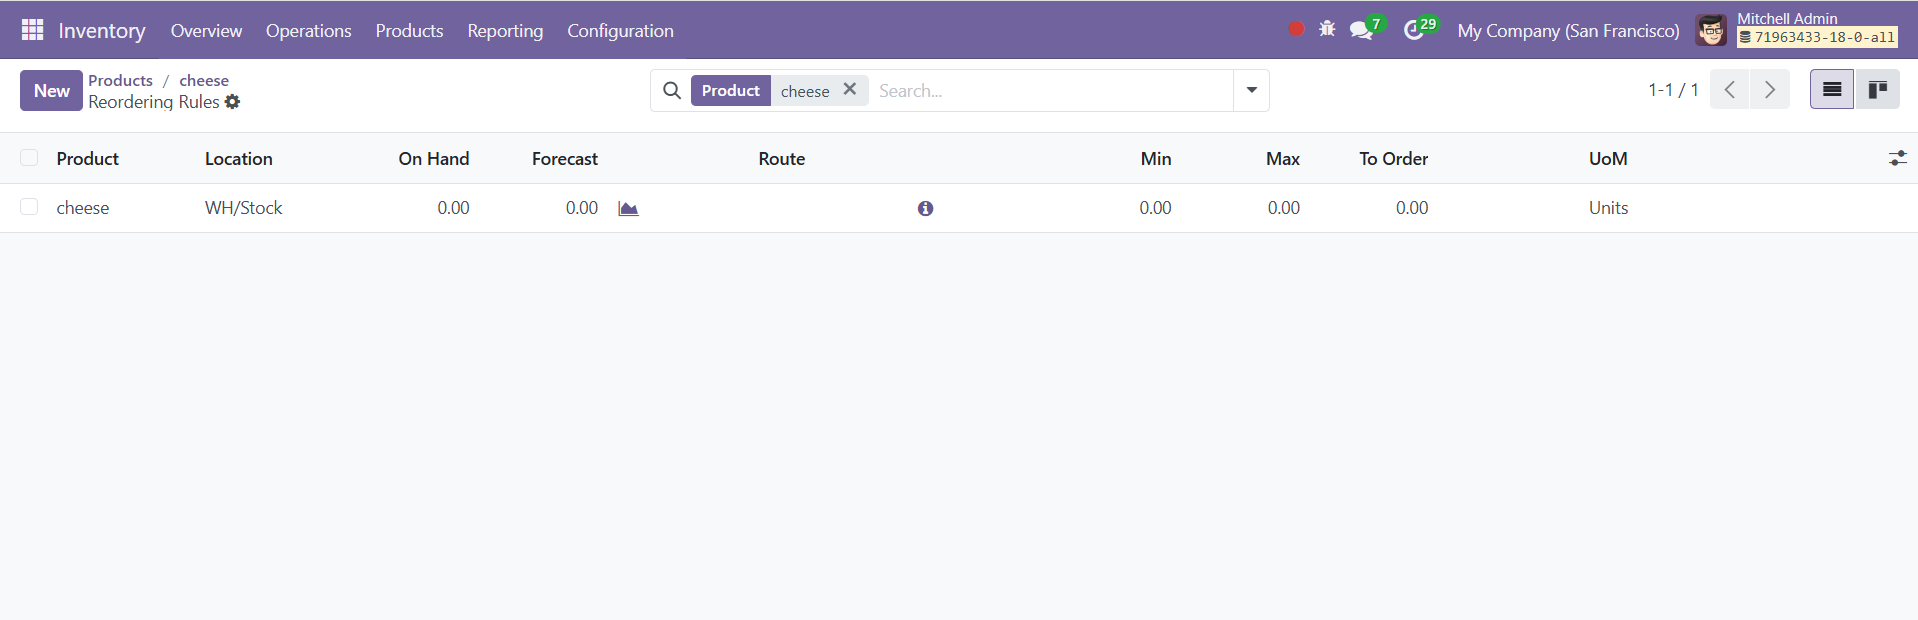
The options include,
● Location specifies the location at which the minimum stock rule is setup for the product.
● Min Quantity sets the lower threshold for the reordering rule while Max Quantity sets the upper threshold. If the stock on hand falls below the minimum quantity, a new purchase order will be created to replenish it up to the maximum quantity.
● Multiple Quantity can be configured so that products are only ordered in batches of a certain quantity. Depending on the number entered, this can result in the creation of a purchase order that would put the resulting stock on hand above what is specified in the Max Quantity field.
● UoM specifies the unit of measurement by which the quantity will be ordered. For discrete products, this should be set to Units. However, it can also be set to units of measurement like volume or weight for non-discrete products like water or bricks.
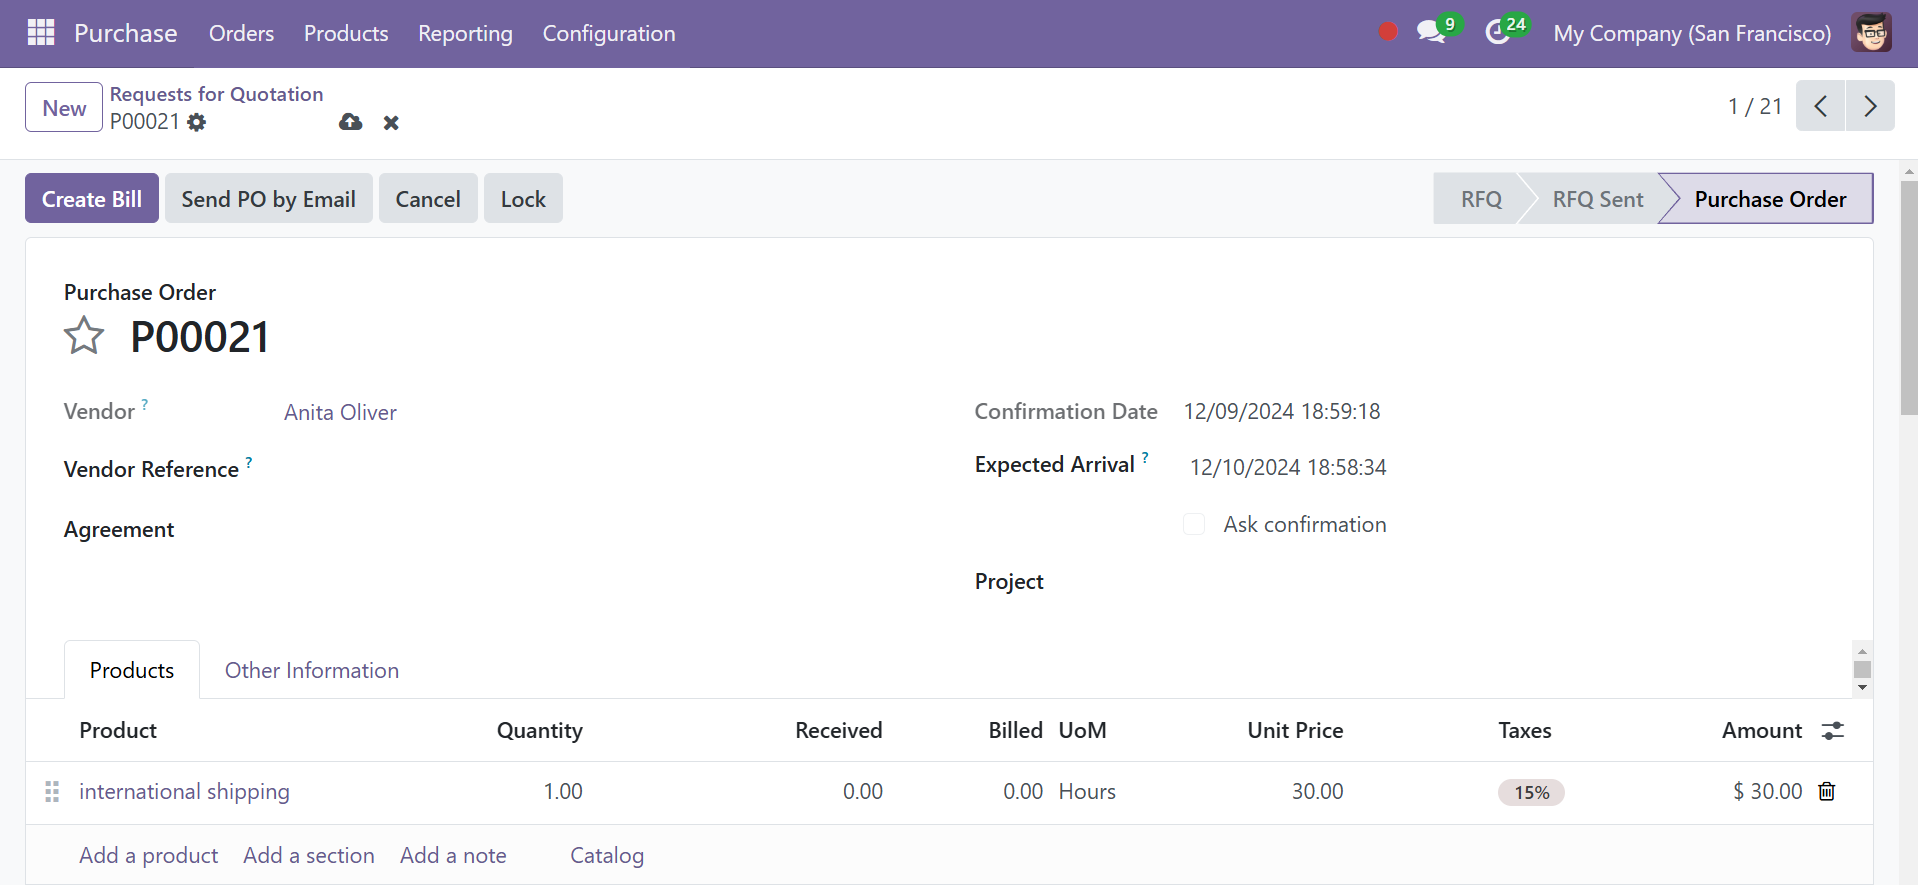
The other options include on hand, forecast, route, and to order. So whenever the onhand quantity go below the minimum quantity a replenishment request will be send to vendor based on the route has been set. If route is added as ‘Buy’ an RFQ will be send to vendor and if route is ‘manufacture’, a manufacturing order will be created to replenish the required quantity. The quantity of replenishment never exceed the maximum quantity defined in the reordering rule.
Run Scheduler
Odoo 18 schedulers are a useful tool for automating your company's manufacturing and purchasing processes. You can set up specific intervals in the scheduler to initiate replenishment tasks either manually or automatically. Click "Run Scheduler" from the Operations menu to activate this replenishment. The pop-up window that follows will appear.
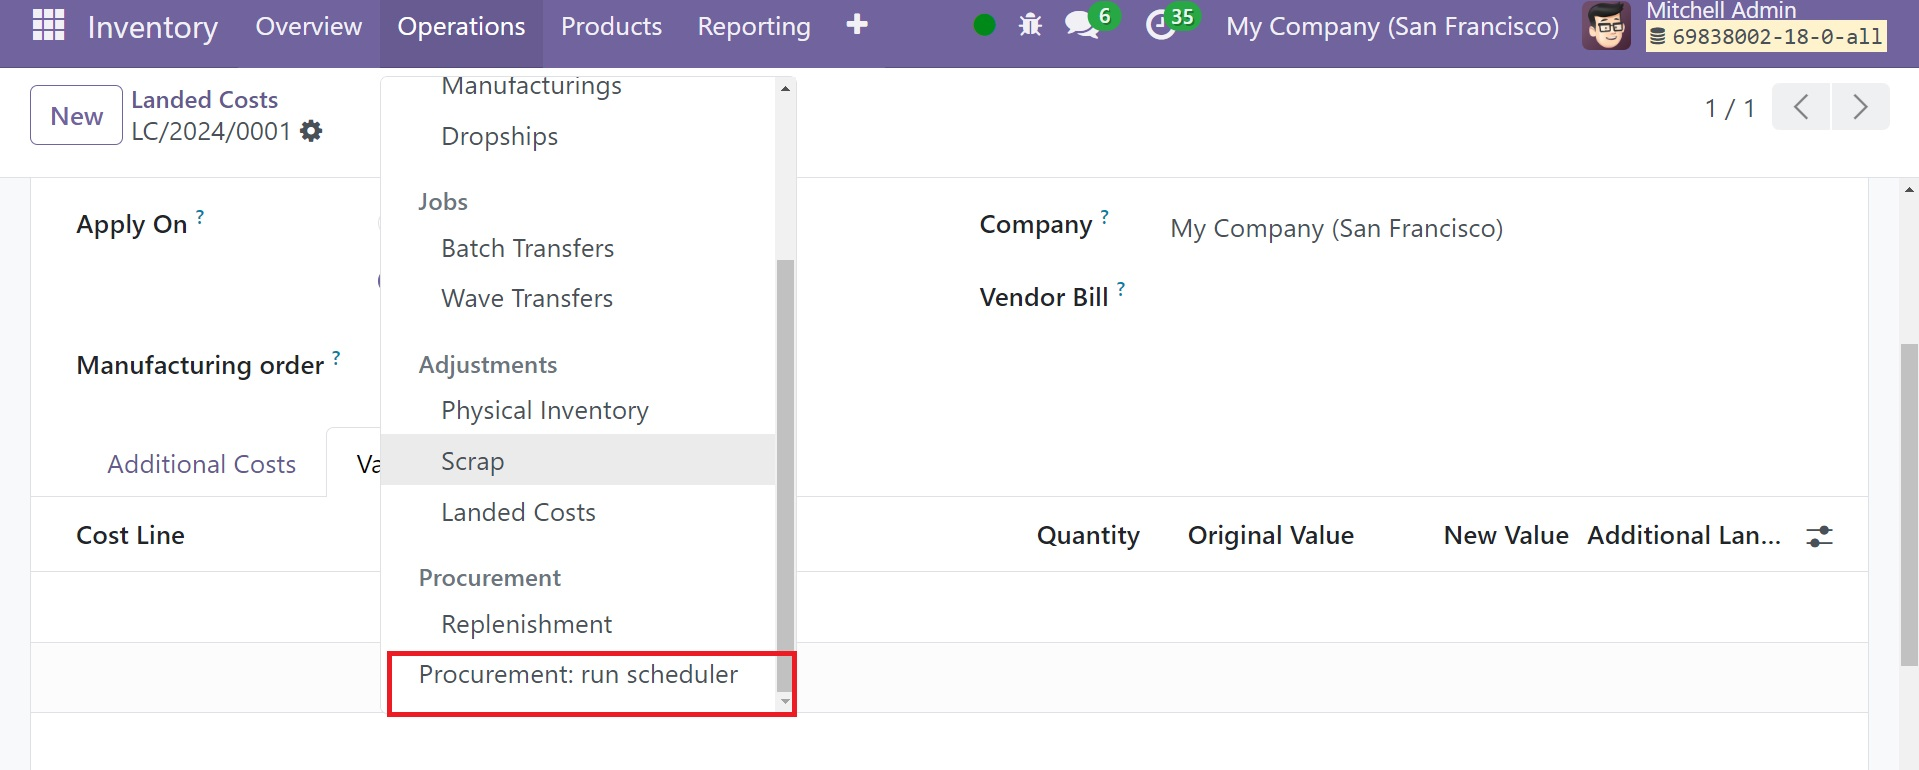
Click the Run Scheduler button to begin this process.
Settings
On the settings option, you have the following options, as explained below.
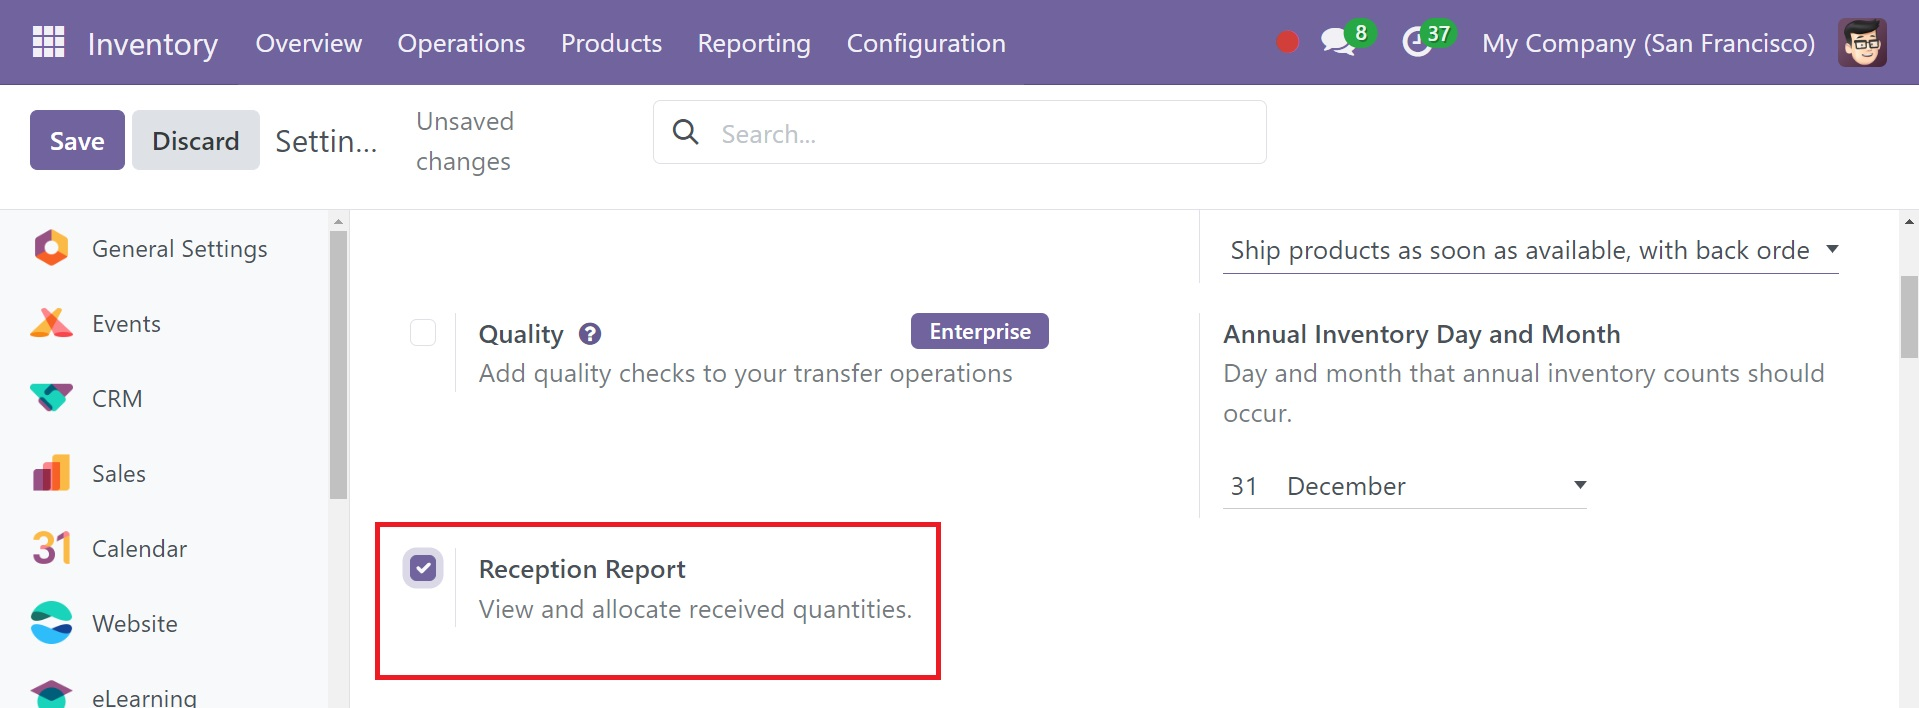
Reception Report
Odoo's Reception Report functionality allows you to view and allocate received quantities to the delivery directly from the purchase/Manufacturing order. To activate this feature, select the Reception Report option from the Operations tab in the Settings menu.
Save your changes, then go to the Purchase module to create a new purchase order. The Confirm button can be used to confirm the purchase order. This product can now be added to your inventory by clicking the Receive Product button.
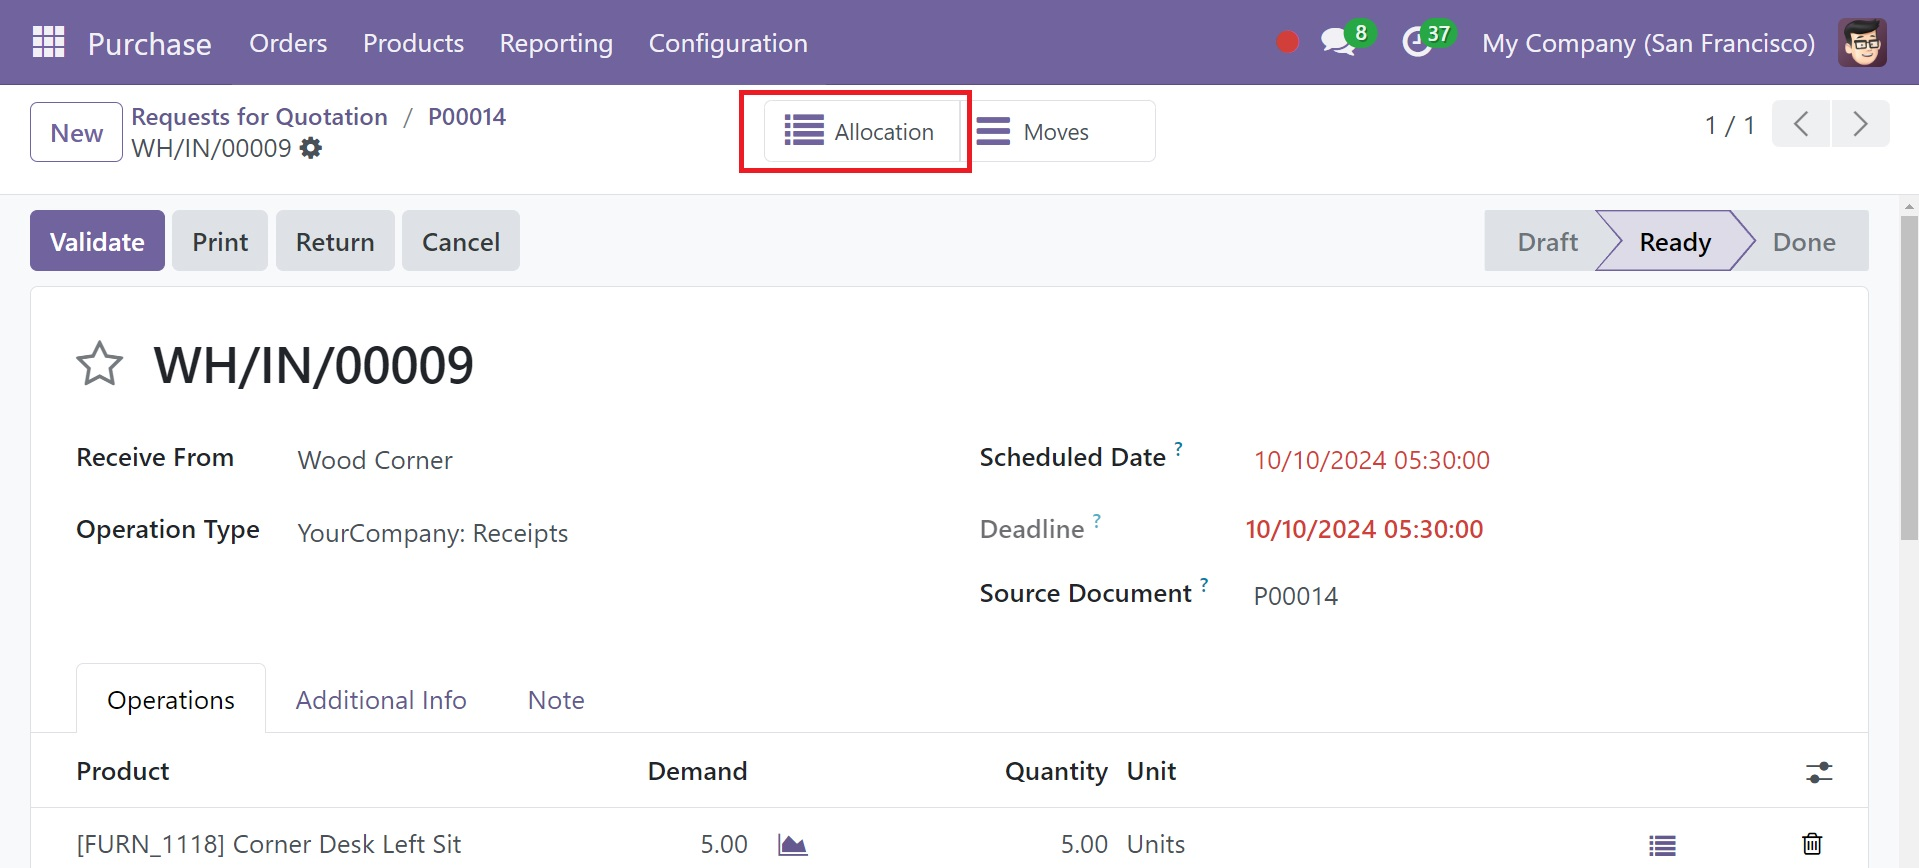
You can check the purchase receipt in a new window by clicking this button, which will bring up the Allocation smart button, which is shown below. Click the Allocation button.
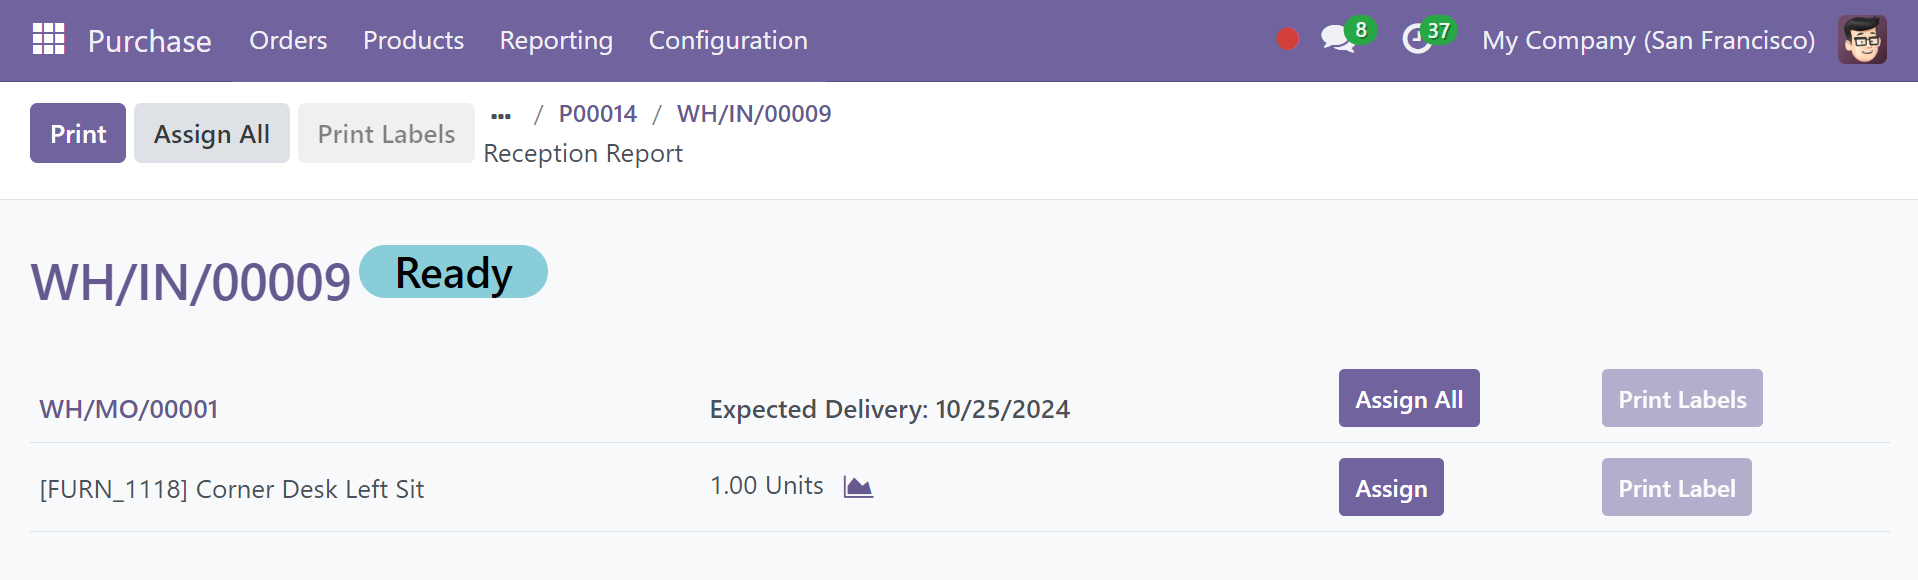
Clicking this option will send you the order's reception report right away. The product allocation and the expected delivery date are displayed in this window. Click the allocate button to allocate the product. By selecting the Unassign button, you can undo the allocation. The Print Label button will help you print labels for the specified quantity.
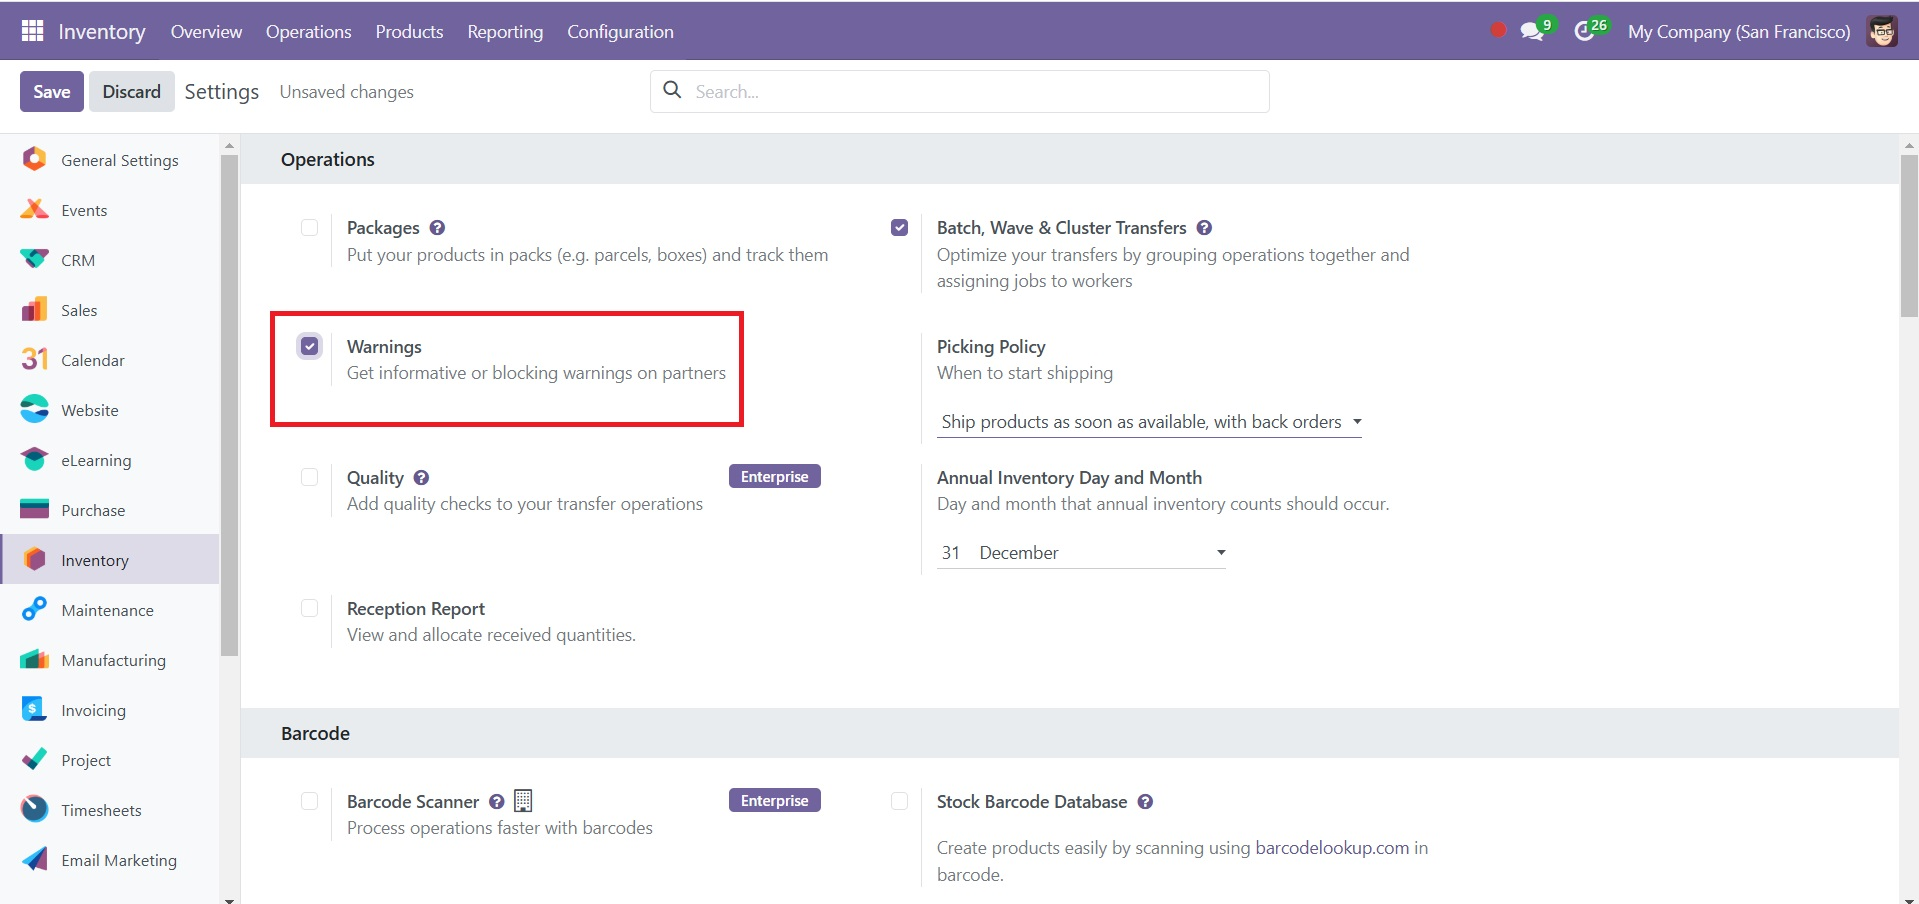
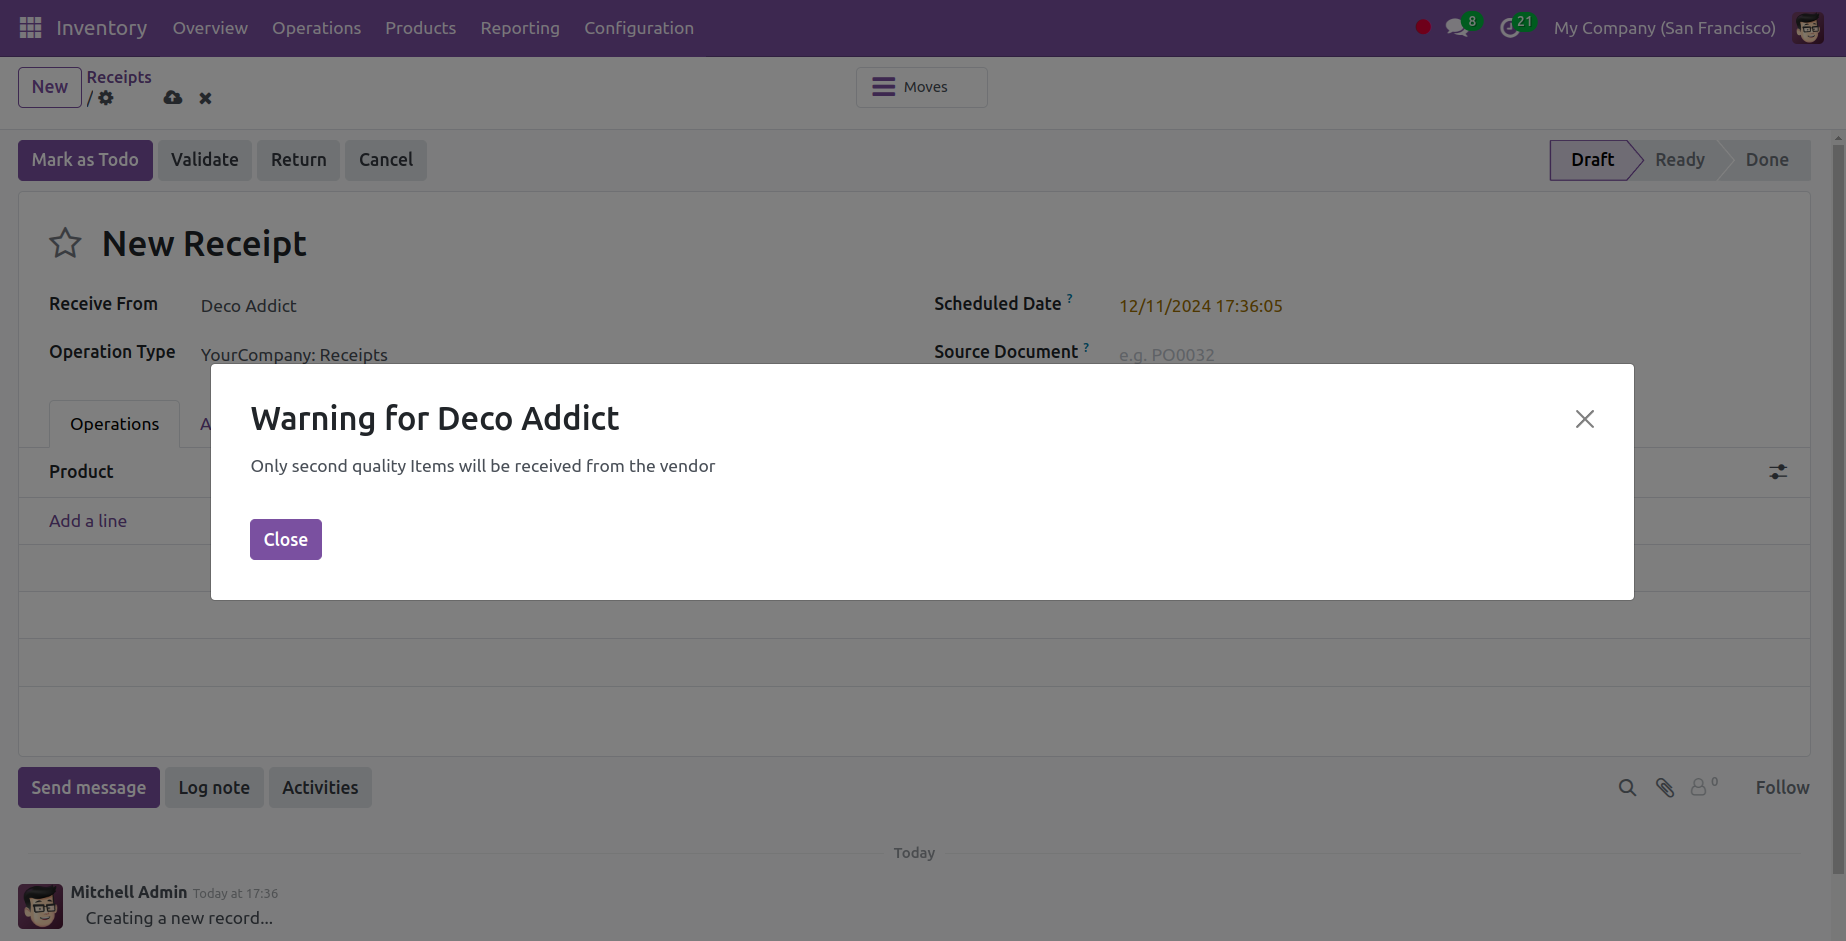
Warning
You can raise automated warning signals in the Inventory module in a variety of operating scenarios with the most advanced Odoo Inventory module. Only when you select the Warnings option from the Inventory Settings will the warning messages appear. As shown in the figure below, you may examine and access the option under the Inventory settings' Operations tab.
You can also set up warning or instructional messages on each product, vendor, and customer using the Odoo system. You can personalize a series of alerts about partners, goods, and clients by turning on these features in Sales, Purchase, and Inventory. In addition to creating custom notifications for sales, purchases, or goods, you may select from any of the other alert types. The warning types that are available are listed below.
No Message: There won't be any alerts, cautions, or messages displayed.
Warnings: When performing the specified operation, this option will display an alarm message.
Blocking Message: This message will block the work process and throw an exception along with it.
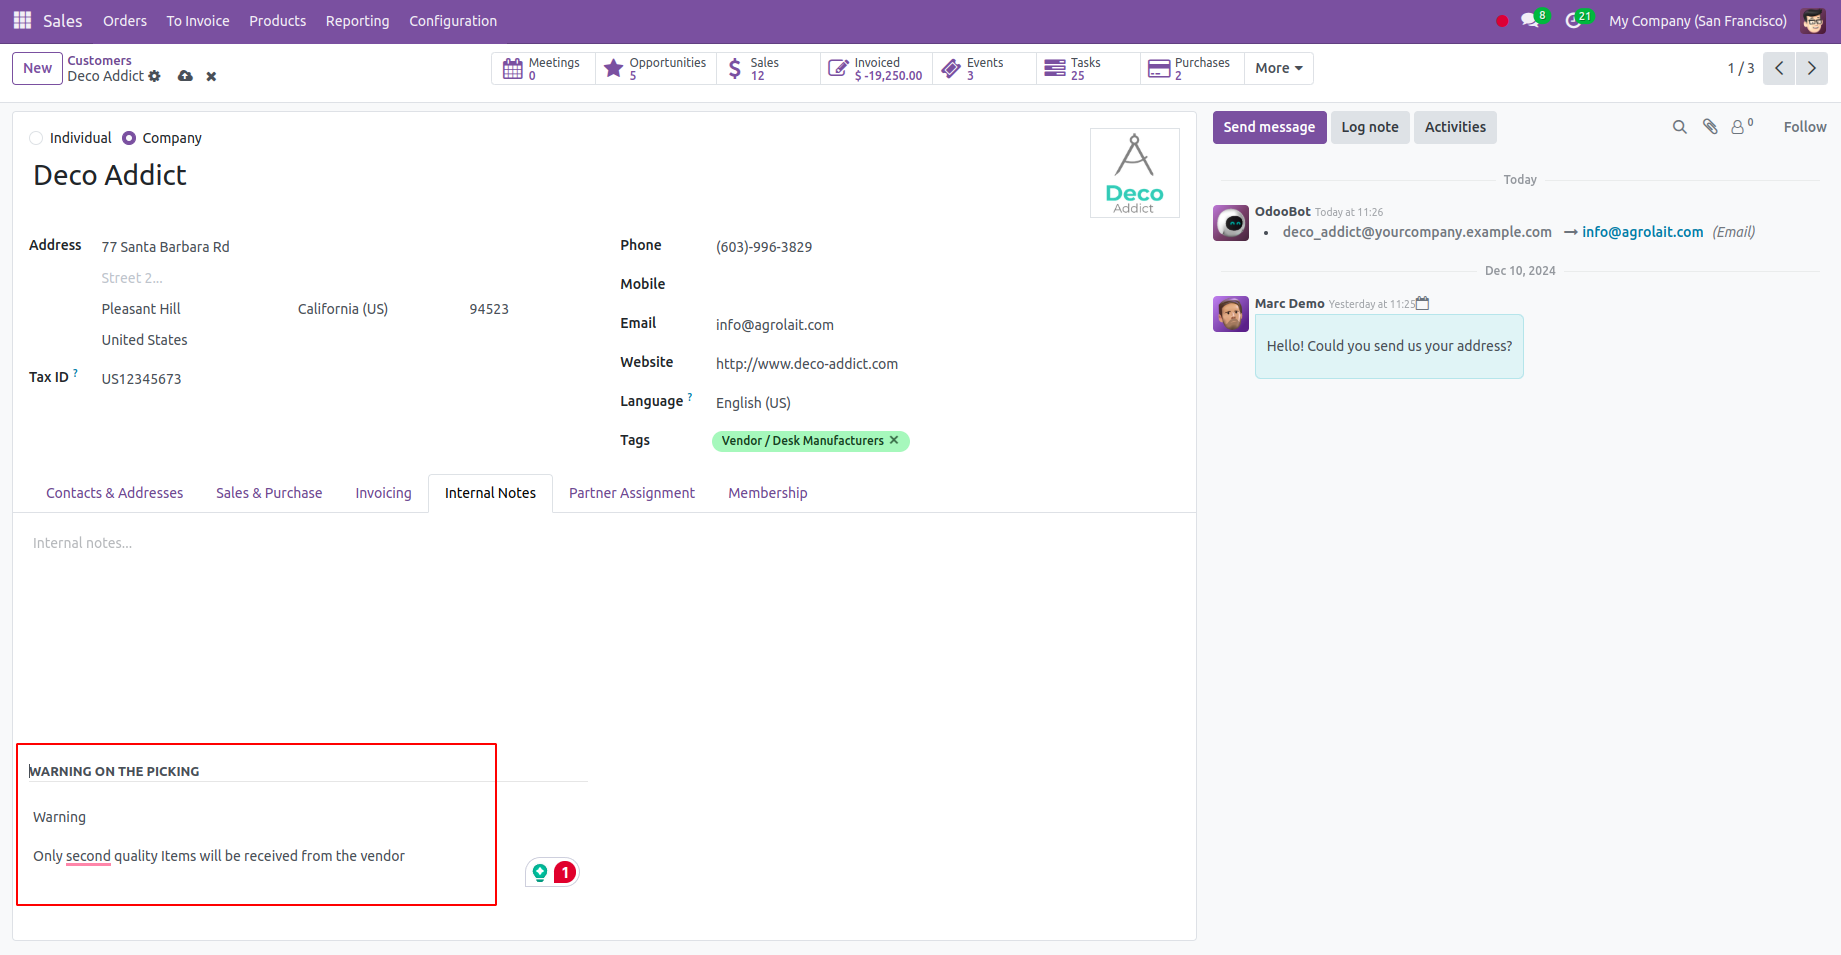
So on creating a picking for this partner will raise the warning or blocking message whatever added.
Picking Policies
For configuring the picking policy in Odoo 18, we can navigate to Inventory and to Configuration and to Settings. There we have the Picking Policy option available with two options, Ship products as soon as available with back orders and Ship all products at once.
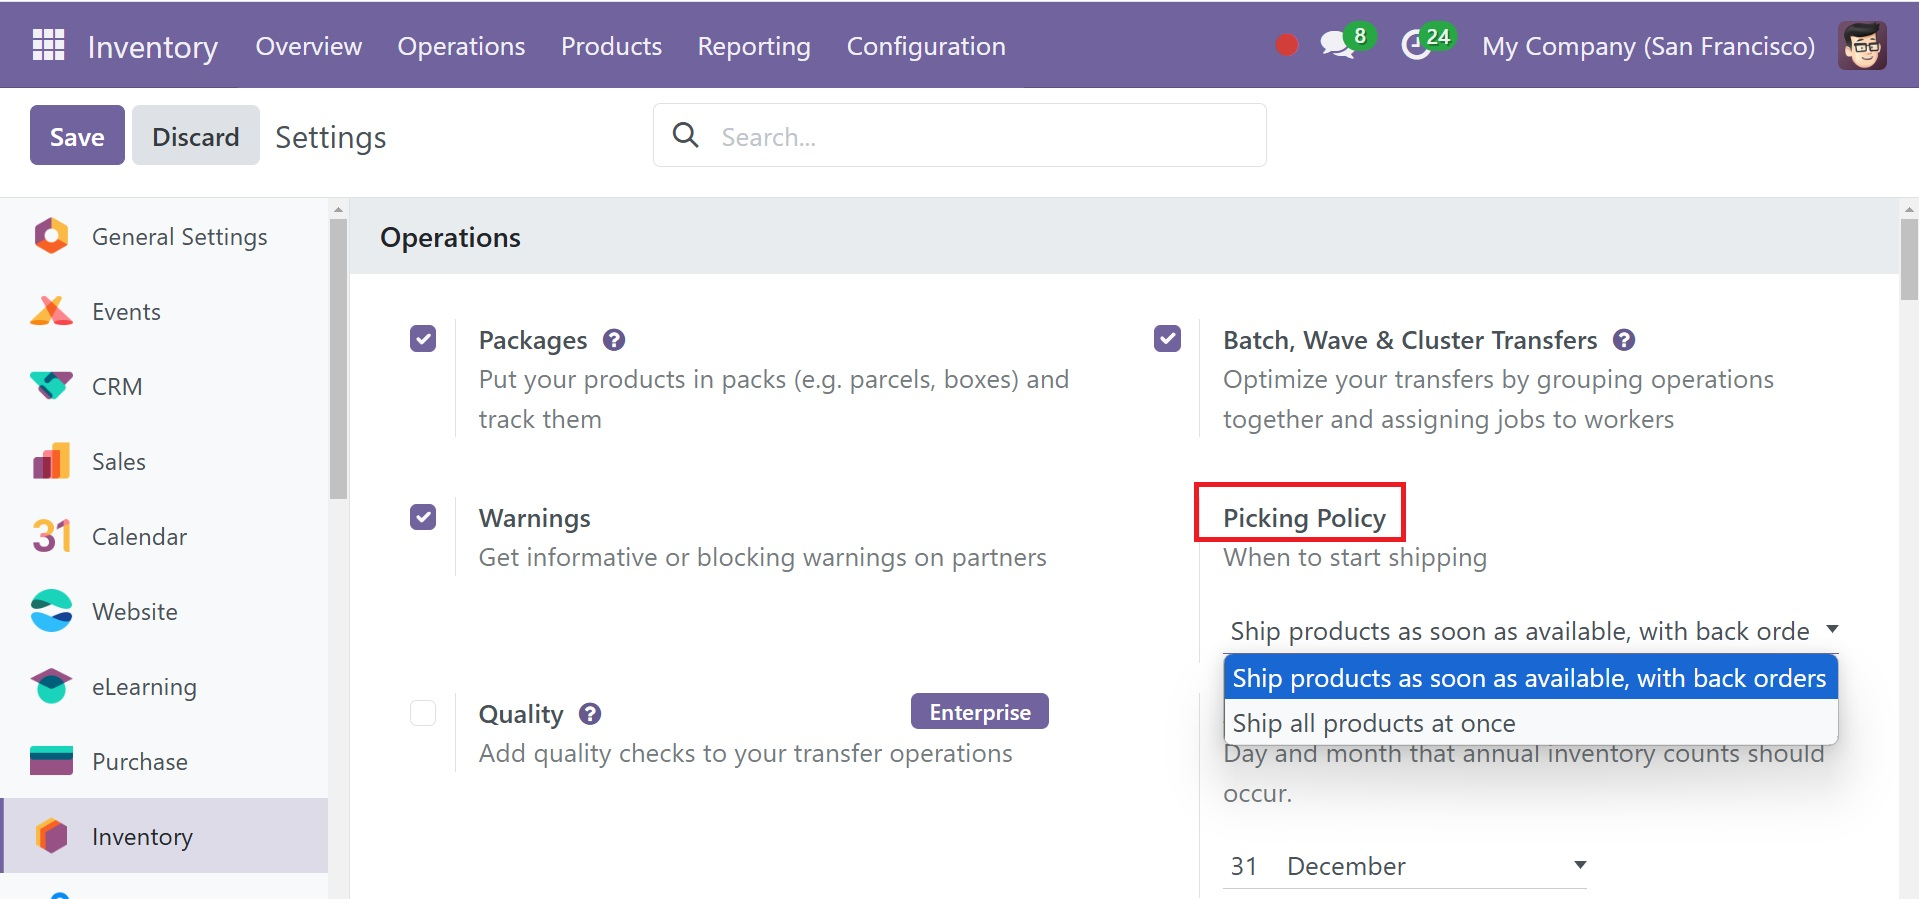
When this picking policy is selected the products will be shipped as soon as it is available. That is, if we receive an order for a product with a quantity of 10 and the on-hand quantity of the product is 7, then according to this shipping policy, the quantity that is currently available will be shipped and the remaining quantity will be created as a backorder. To configure this option, navigate to Inventory --> Configuration --> Settings and select the Picking Policy as Ship products as soon as available with backorders.
After that, the order cannot be processed until the stock is refilled and we have the full quantity of the product in stock for which we have received the order, in accordance with the picking policy, which ships all products at once. To configure this, go to Inventory --> Configuration --> Settings in the inventory module. There are two choices for the Picking Policy option: Ship all products at once or ship products with backorders as soon as they become available. Choose to ship every product at once.
Product Traceability
Tracking and documenting the whereabouts of every product component at different stages of the inventory process is a crucial part of inventory management. This process needs to be performed with extreme caution in order to ensure easy movement across the inventory. The product traceability capabilities of Odoo 18 will streamline the tracking procedures. These features will provide complete control over all inventory activities through advanced tracking.
Inventory movement may be efficiently tracked with the use of lots and serial numbers. They can be used to track the development of a product from manufacturing to delivery. This will also improve the effectiveness of your company's stock management. Using the lots and serial numbers, it is easy to locate the missing parts, which helps to reduce the risk factors associated with stock movement. A traceability report describing the stock movement of each component that goes into a product will be kept up to date by Odoo 18.
You can trace your products in Odoo 18 by using lots and serial numbers. These two traceability characteristics serve somewhat distinct reasons. Lots are usually used as a unique identifying number to identify a group of products that are all of the same kind. It is possible to bundle the products into a single pack and give the pack a lot number. Since the items are little, it is difficult to count them individually. The products in the inventory will be selected in batches. The serial numbers can be utilized for any item that is stocked. These numbers will all function as distinct product identifiers.
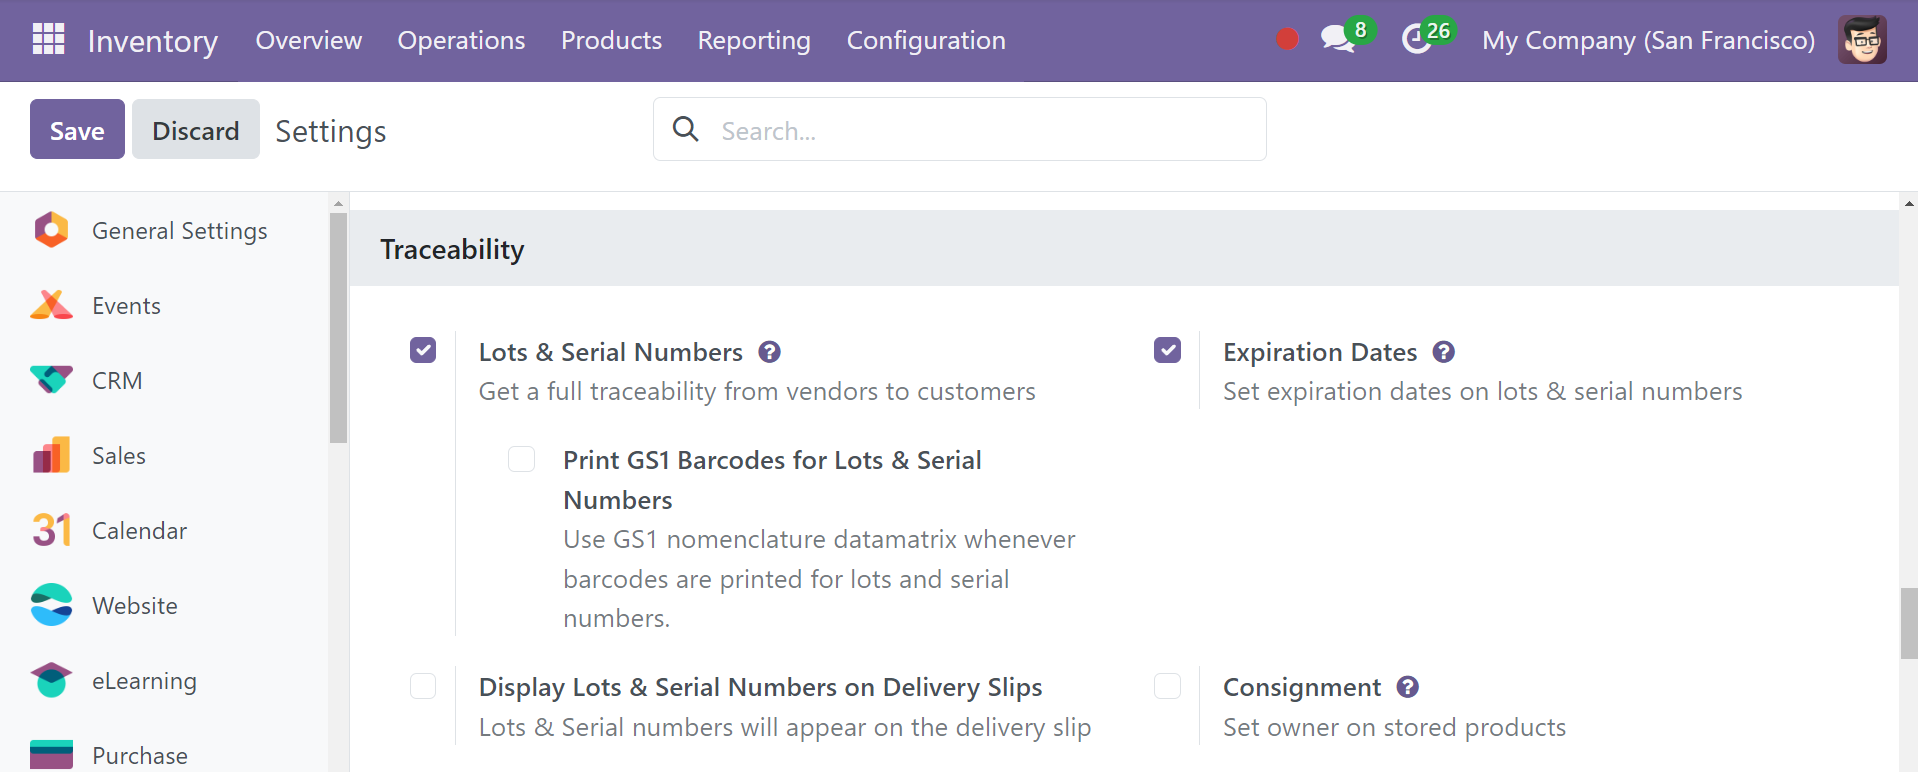
When maintaining a product's inventory, lots and serial numbers can be assigned to it. The advanced inventory management capabilities in the Odoo 18 Inventory module support these traceability features, which will boost tracking effectiveness. Let's go to the Settings menu and turn on every traceability feature in the Inventory module. This is where you enable the Lots & Serial Numbers option under the Traceability tab.
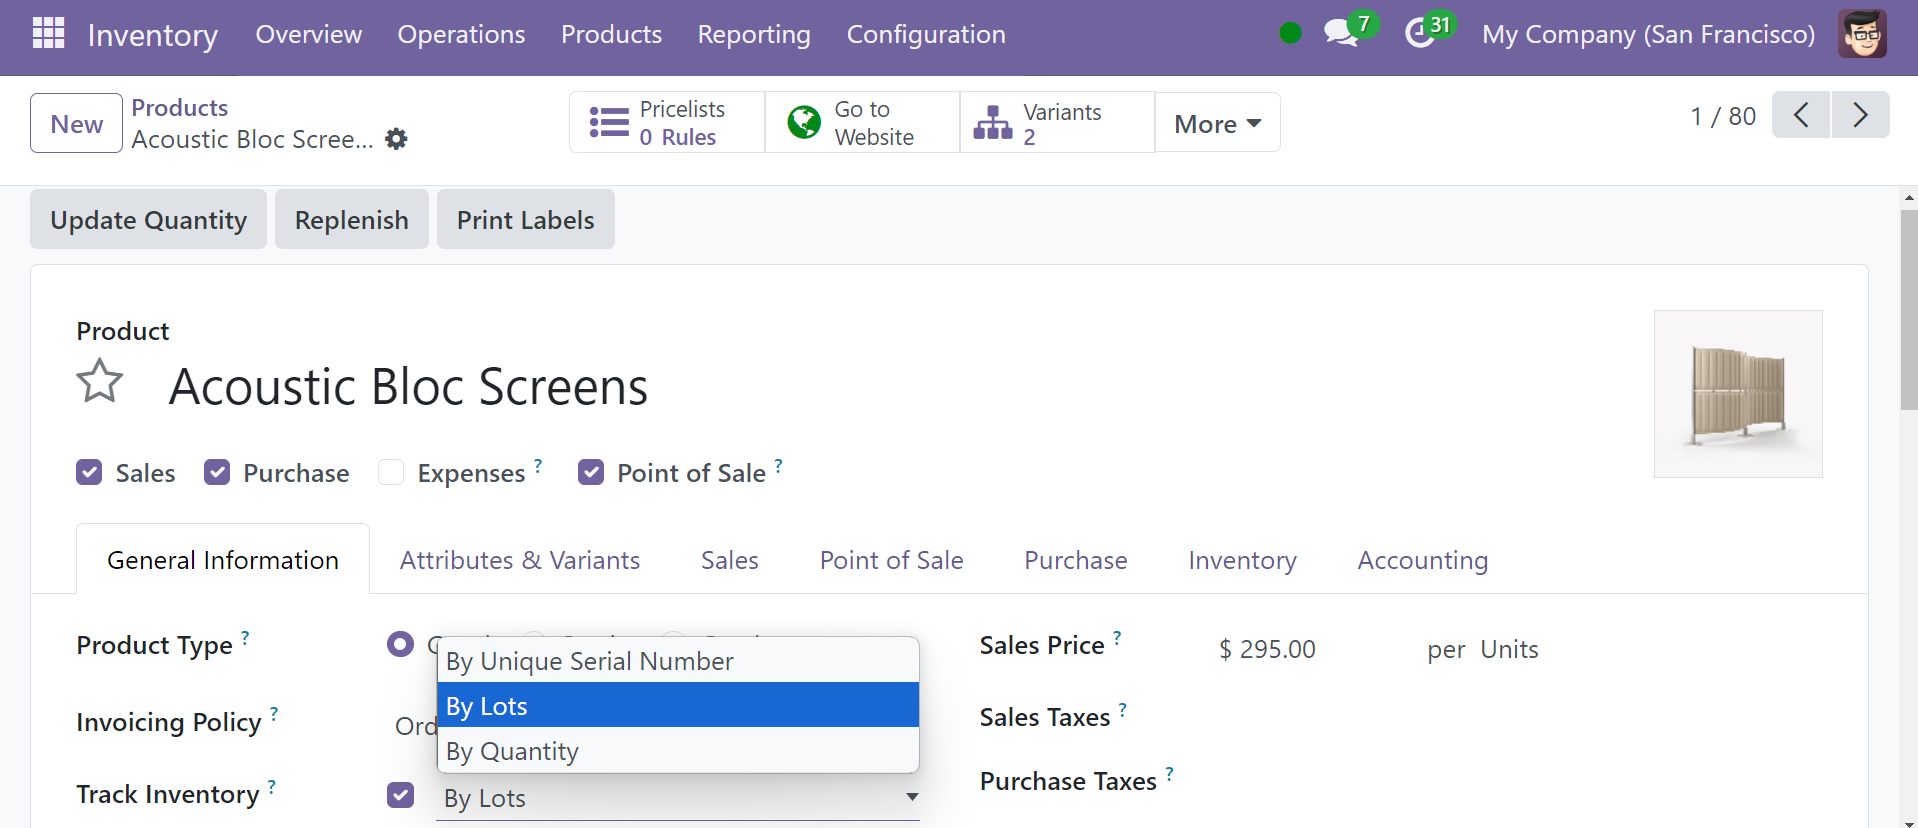
You can find out a product's traceability from the product configuration page in the Inventory module. For this, you can select the general information tab in the product form view. There, you have the option of Track Inventory, which provides the sub-options, such as by unique serial number, by lots, and by quantity, as shown in the screenshot below.
Activate the product to be tracked by lots or serial numbers by ticking the Track Inventory checkbox. Then, click the adjacent field that appears, and choose either By Lots or By Unique Serial Number from the resulting drop-down menu.
If you do not wish to enable any tracking on the product, you can disable the Track Inventory.
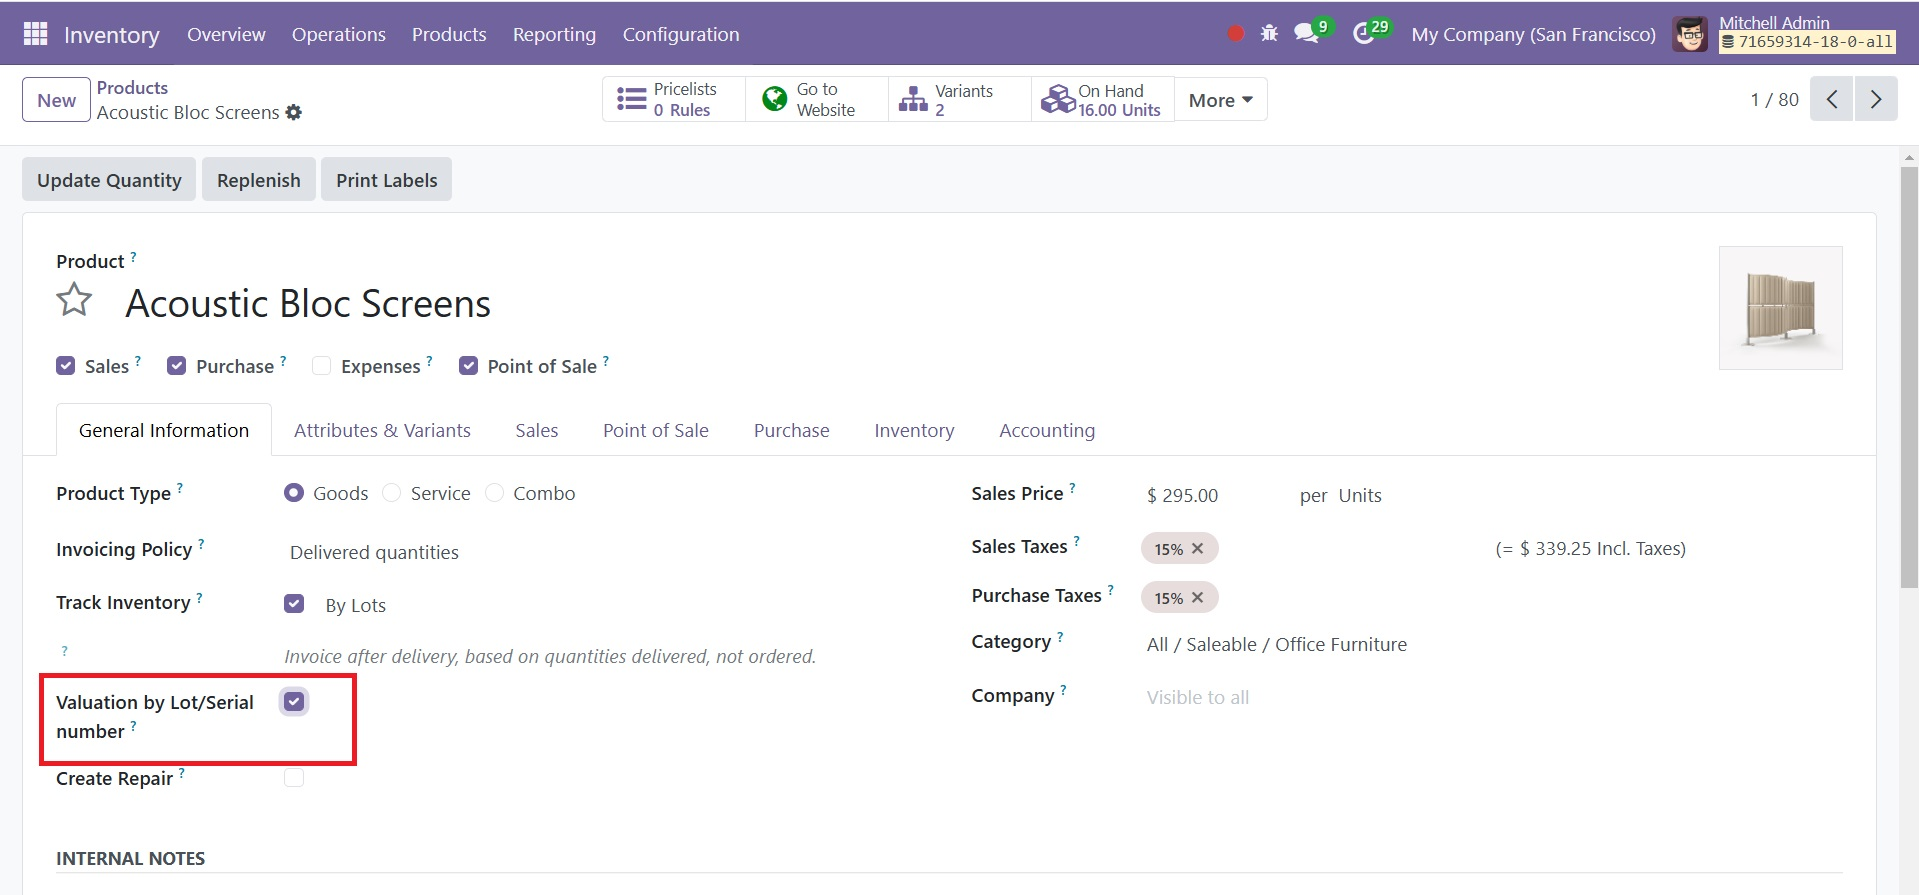
Below to that option, you have got a new option of Valuation by Lot/Serial number to activate.
Doing so makes the Valuation by Lot/Serial Number checkbox appear below it. Tick that checkbox, and the configuration to track valuation by lot or serial numbers is complete.
Doing so makes the Valuation by Lot/Serial Number checkbox appear below it. Tick that checkbox, and the configuration to track valuation by lot or serial numbers is complete. "Valuation by Lot/Serial Number" option is used in the context of inventory valuation and product tracking. This feature allows you to manage and calculate the value of your inventory at the level of individual lots or serial numbers.
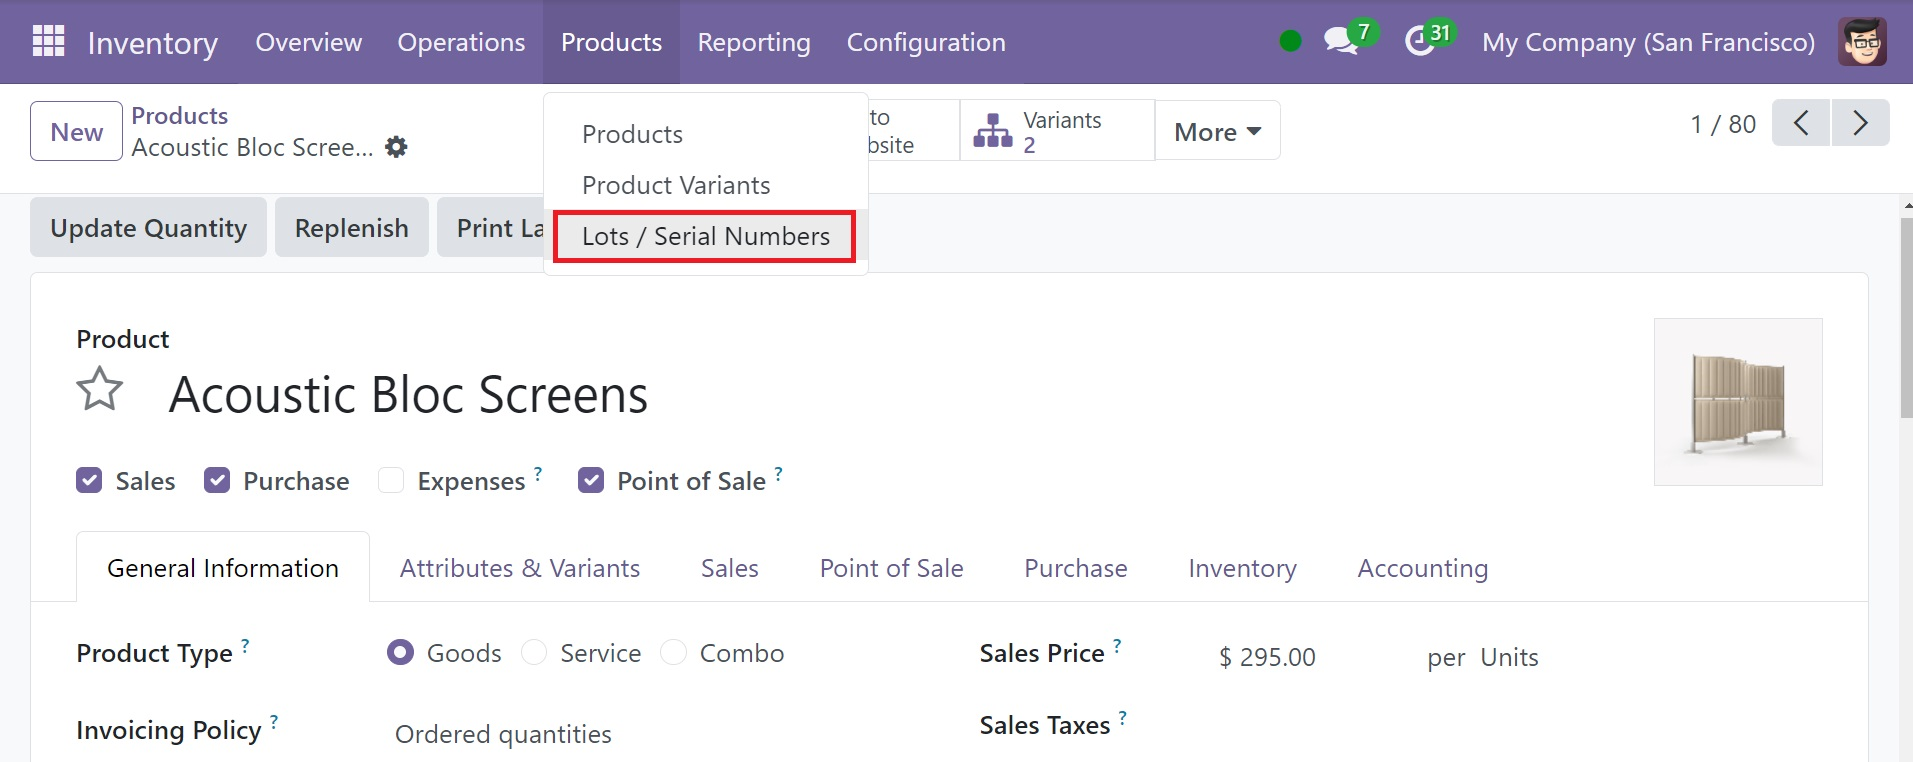
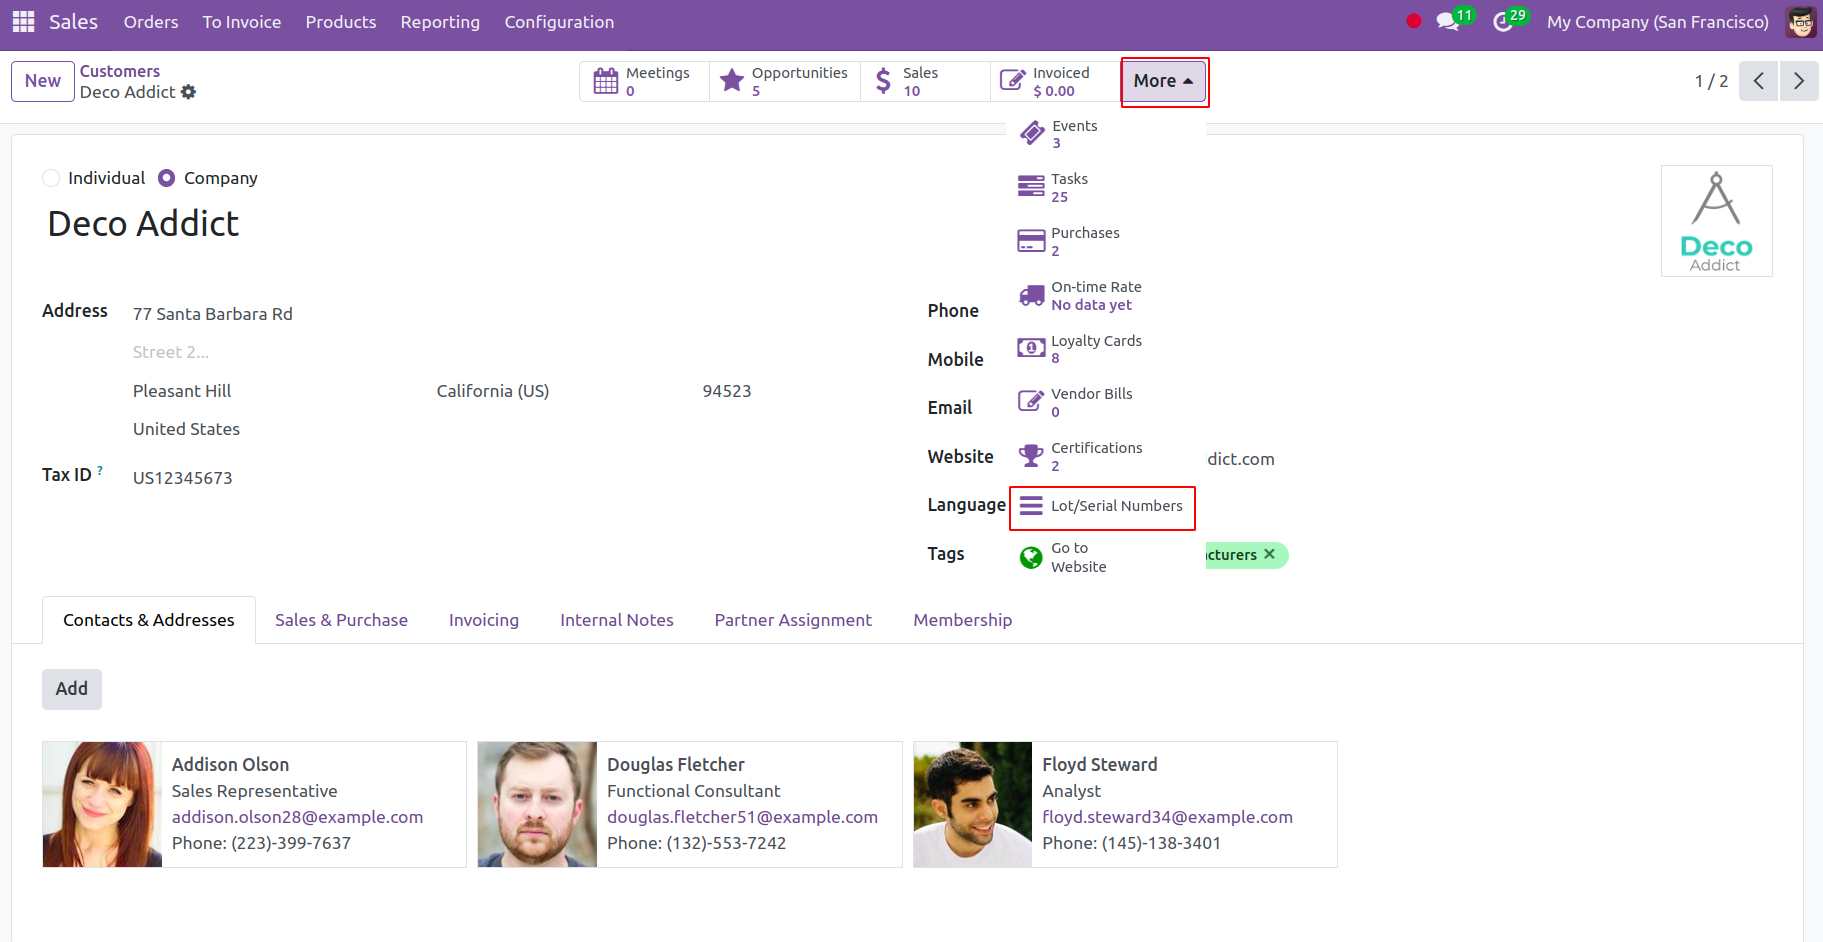
Also after enabling ‘Lot & Serial Number’ from configuration settings, you may access the pertinent sub-menu from the Inventory Module’s Products menu, as shown in the picture below.
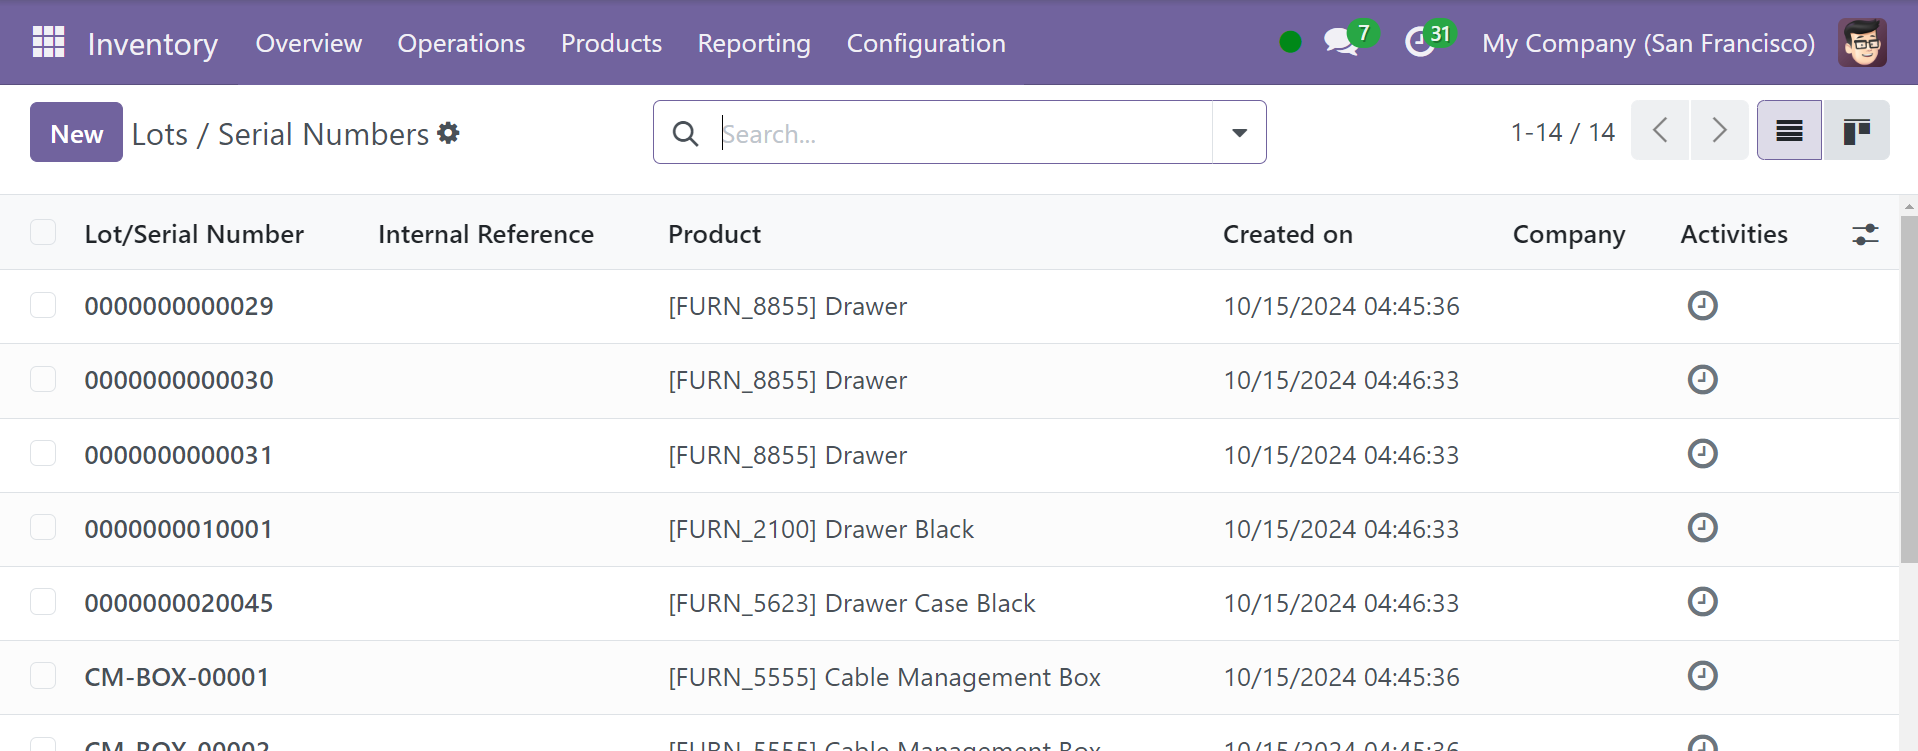
This is the serial number and lot list that has already been set up. The list view will provide information about the product, lots/serial number, internal reference number, company, creation date, and product.
To generate fresh lots or serial numbers, click the fresh button. As shown below, this will bring up a form window where you can set up a new lot or serial number.
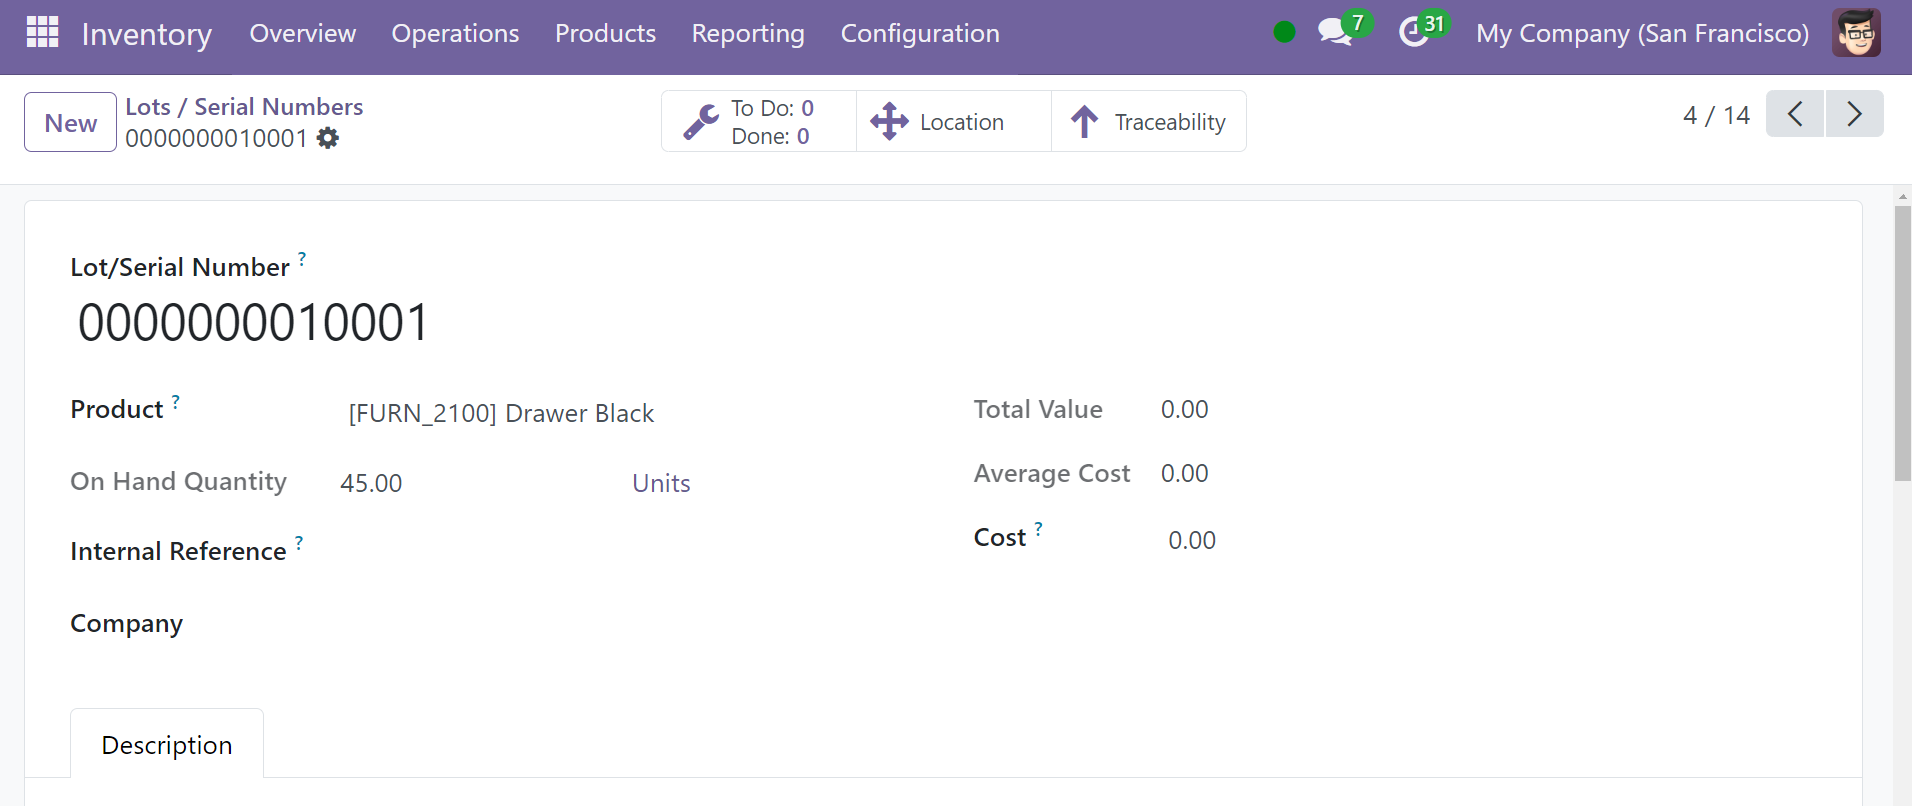
You can include a product's unique lot or serial number in the designated space. The Product field allows you to specify the matching product. Once you mention the product, the quantity that is currently in stock for that product will show up automatically in the relevant field. If the internal reference differs from the lot/serial number provided by the manufacturer, you can include it in the form.
You can enter a description pertaining to this lot/serial number in the Description area after stating the Company.
After entering the new lot or serial number, the Location smart button will appear on the screen. You may use this to view the product's inventory location.
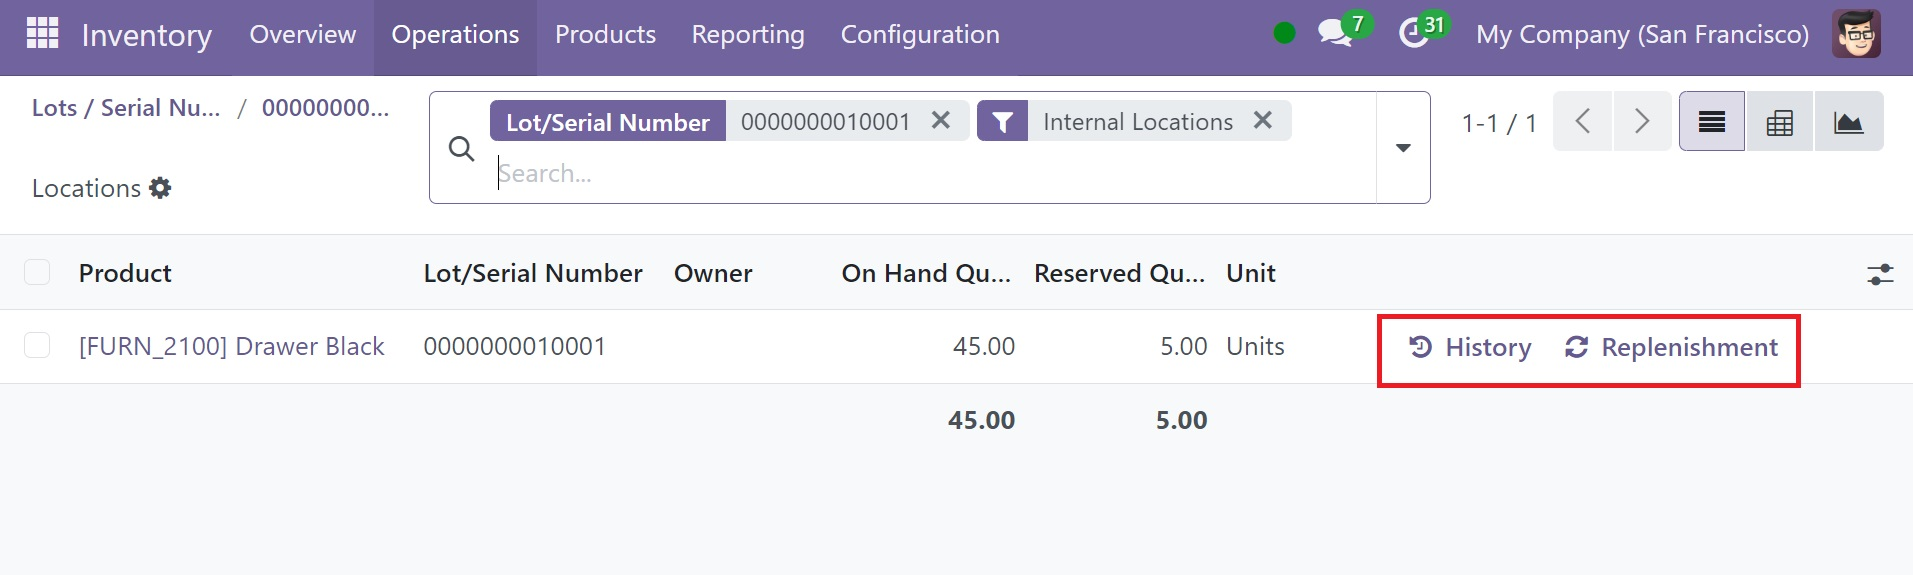
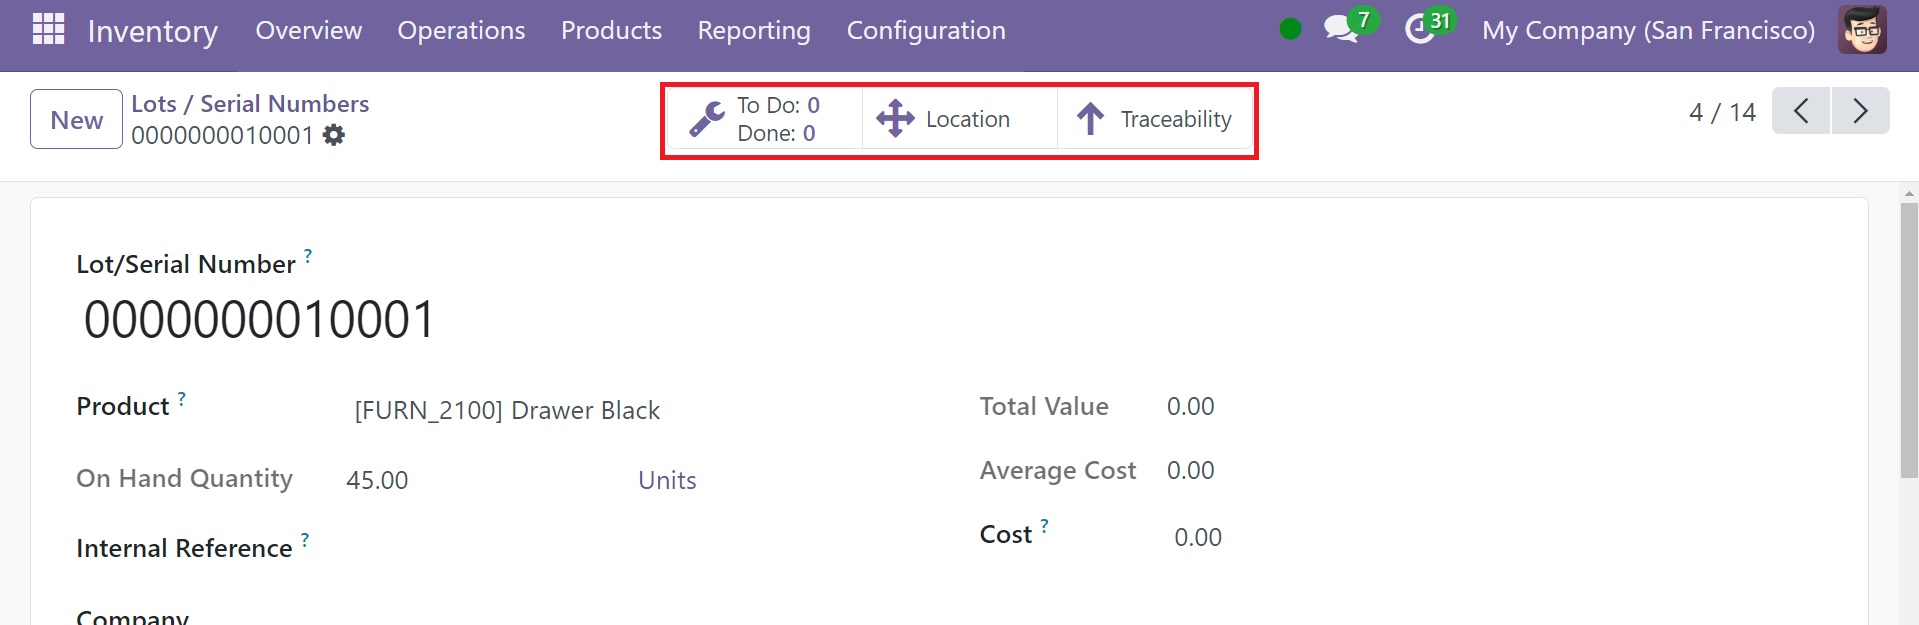
The information is shown for Location, Product, Package, Lot/Serial Number, Owner, Received Quantity, On Hand Quantity, and Unit. Here, you may access the movement history of this specific product by using the History button. From this window, you can replenish the product by clicking the Replenishment button. Traceability is another helpful button on the lot/serial number window. The tracking report for the product will appear when you click this button, as shown in the screenshot below.
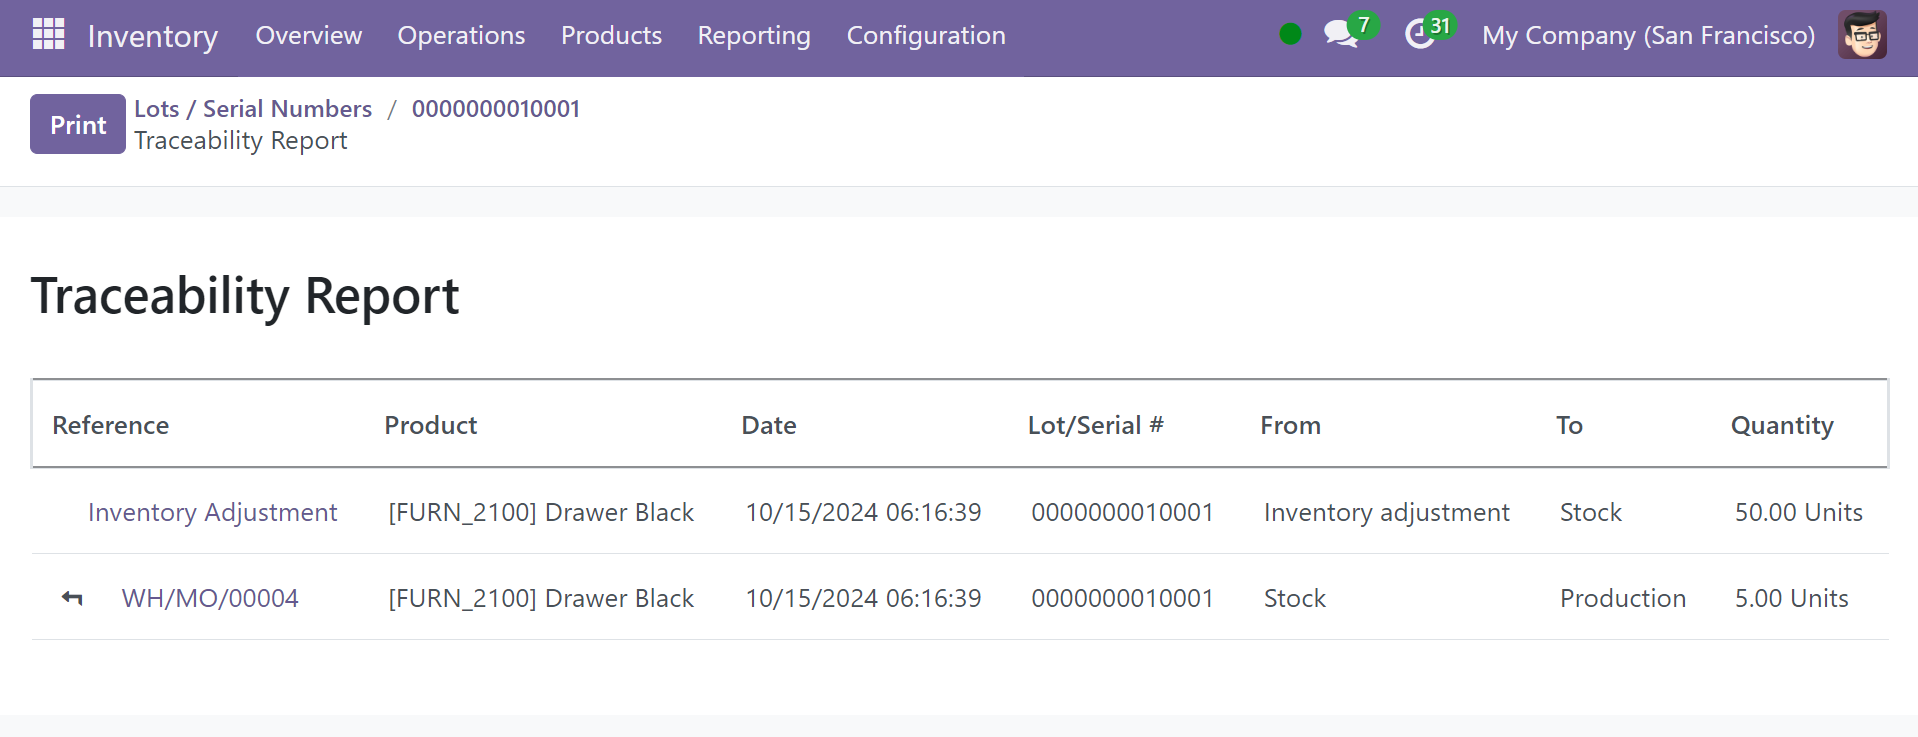
This report shows the Reference, Product, Date, Lot/Serial Number, From, To, and Quantity.
As soon as a product is added to your inventory, Odoo 18 will allow you to assign it a new lot or serial number. This is feasible for an order that has a confirmed receipt. By the provided estimated arrival date, the product will reach your place of business.
On the product’s detail form, click the Lot/Serial Numbers smart button to view the new serial number. The serial number helps you to identify the item uniquely even after a sale.

The Lot/Serial Numbers smart button in the customer form in Odoo allows you to access a product's lot or serial number.
Serial numbers are useful for warranty claims or after-sales services like identifying lots of customers for after sales purposes.
This window will display the product's serial number or new lot exactly as it appears in the picture.
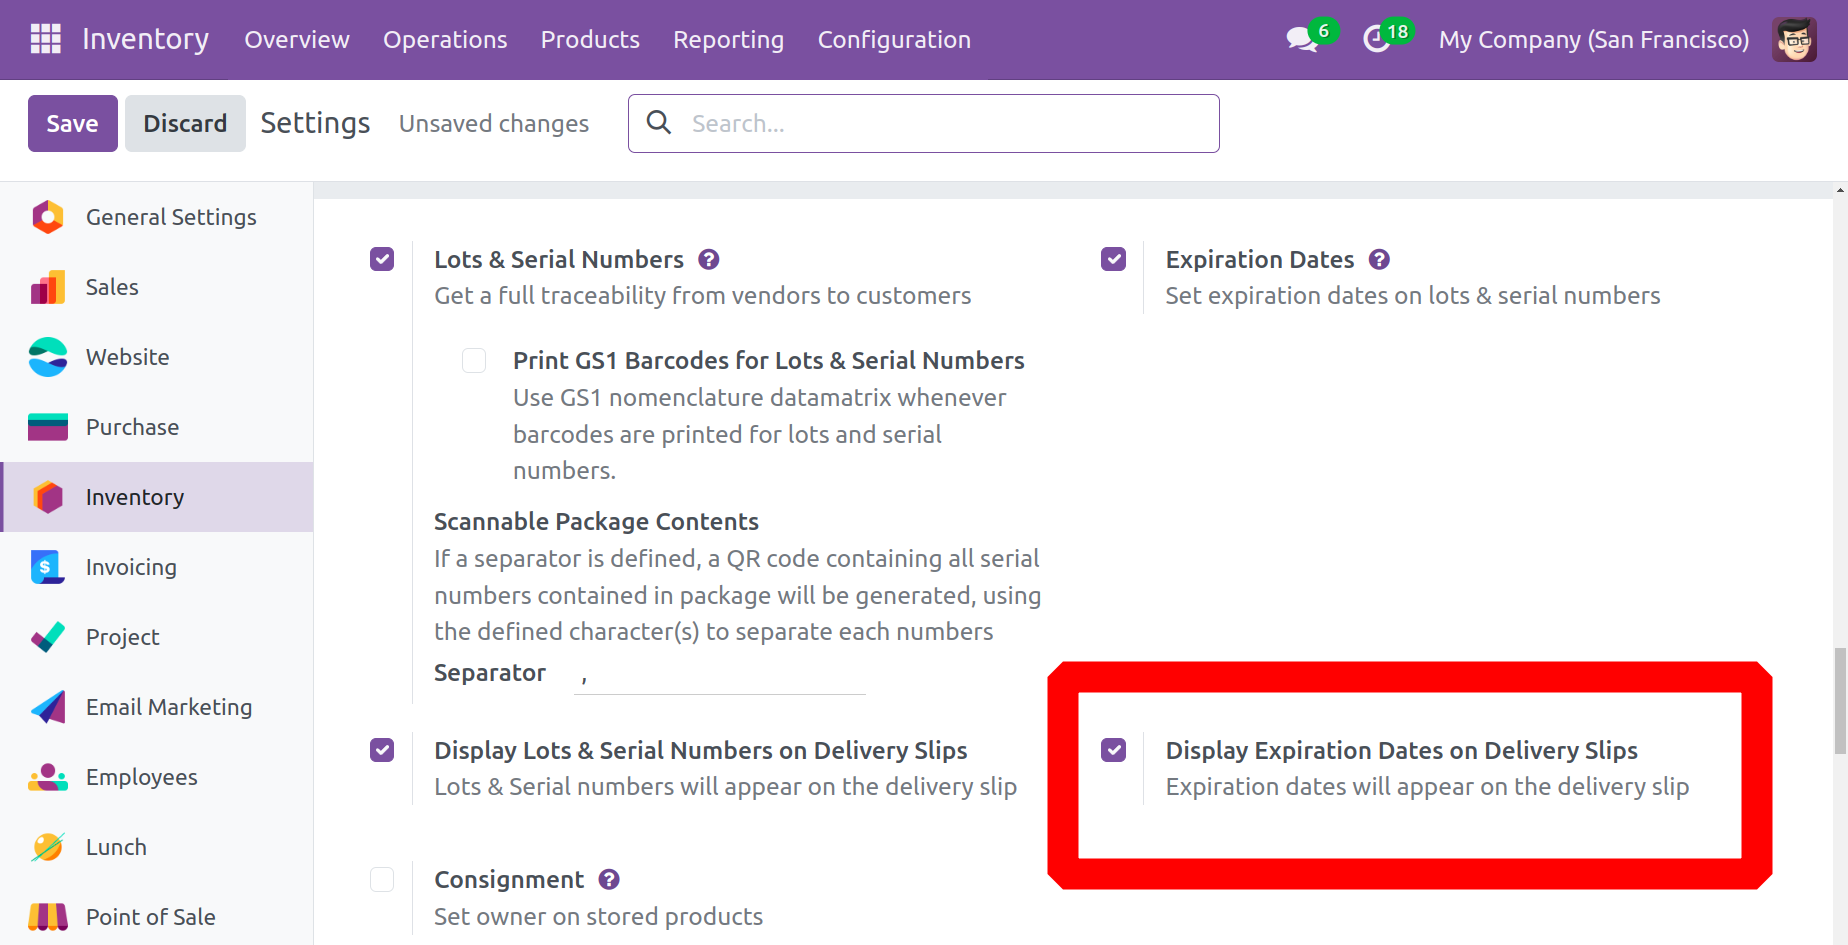
To show lots and serial numbers on the delivery slips, select the ‘Display Lots & Serial Numbers on Delivery Slips’ option from the Traceability tab in the Settings menu.
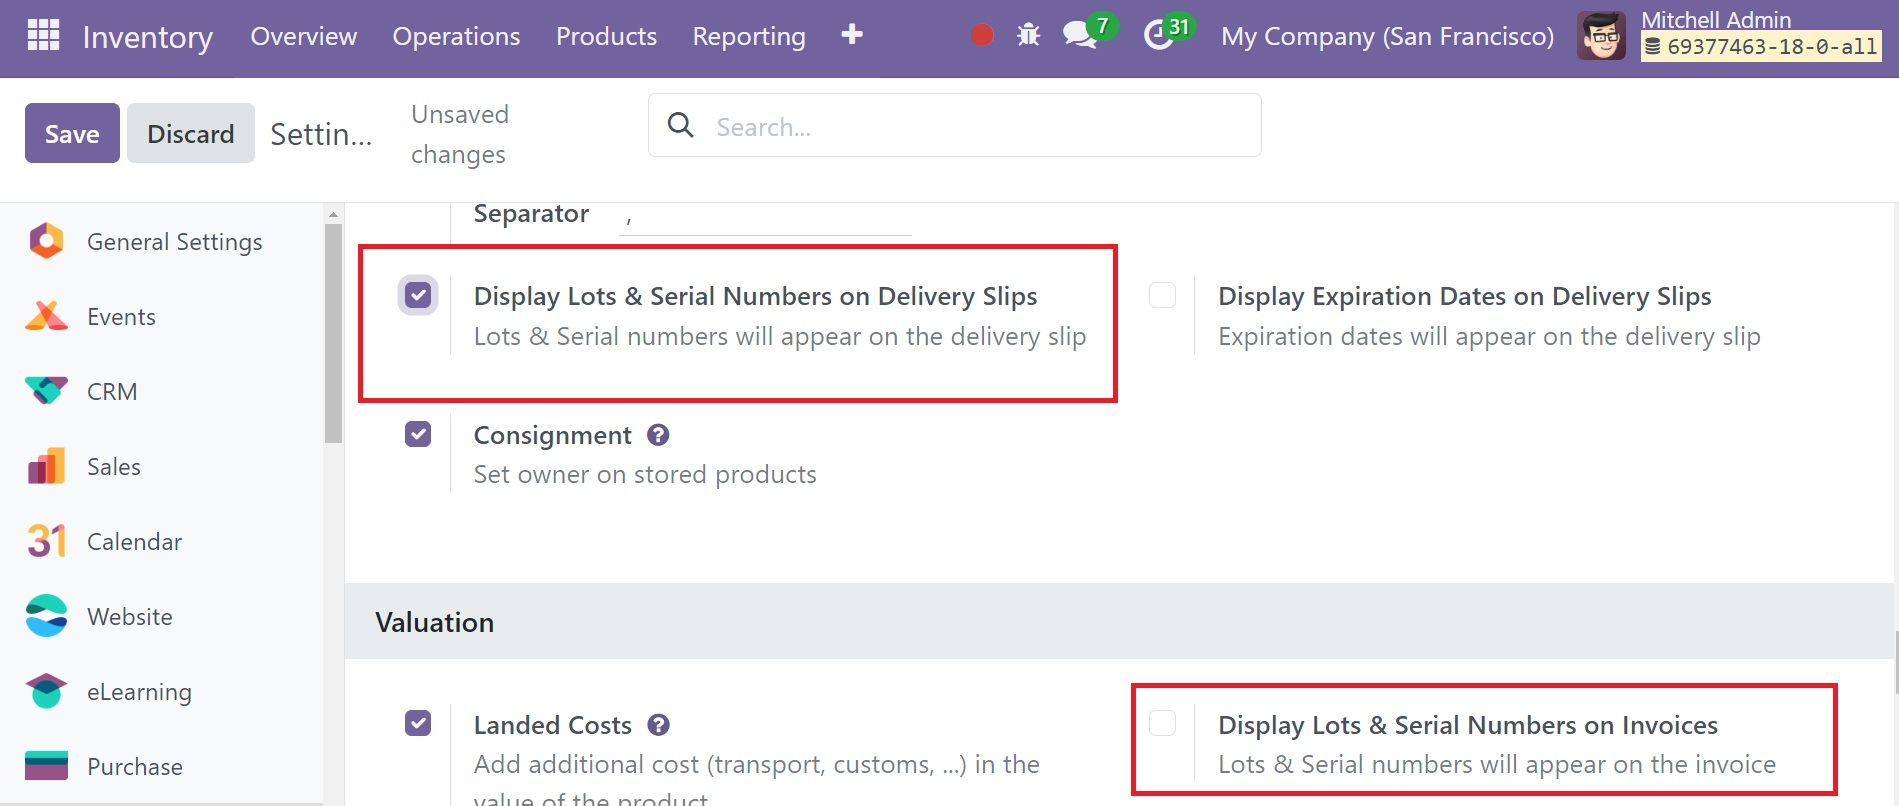
Lots and serial numbers can be seen on invoices by turning on the ‘Display Lots & Serial Numbers on Invoices’ feature from the Valuation tab.
Expiration Date
Enabling the latter brings up the "Display Expiration Dates on Delivery Slips" option. Check the box next to it to make it active.
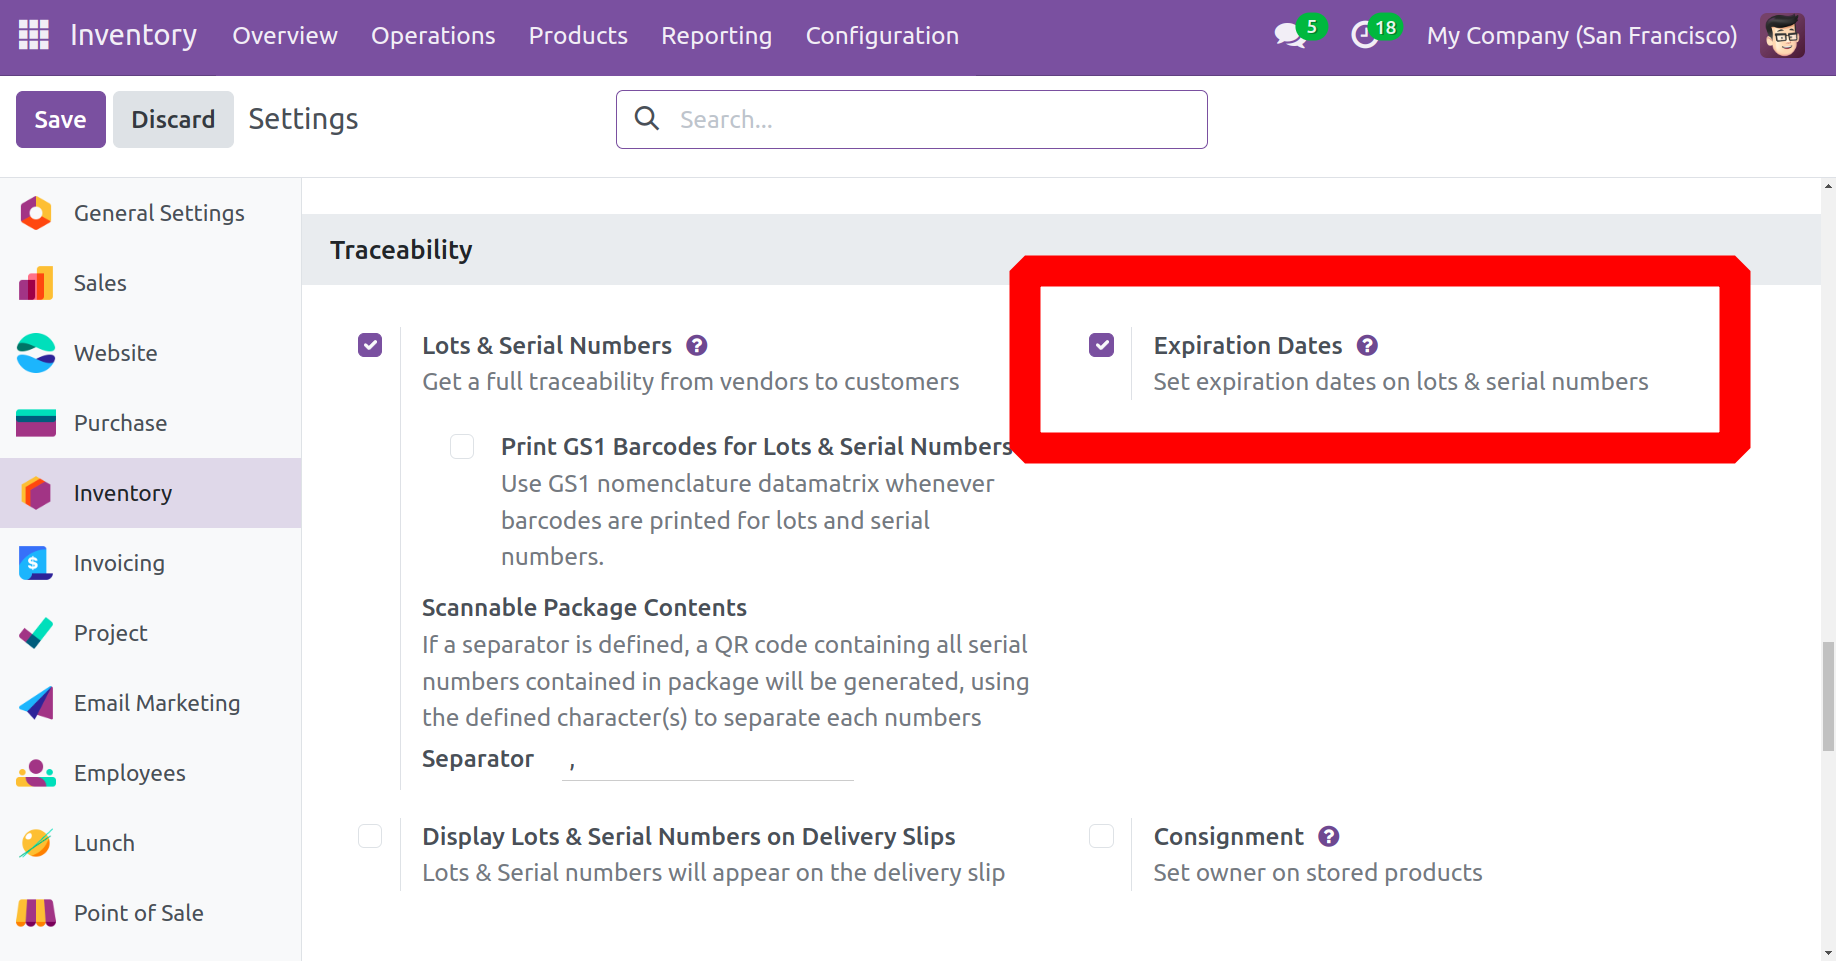
If you want your business to flourish and your connections with your customers to stay pleasant, make sure you don't send them expired products. As a result, before you sell your items, you must ensure that they are current. Allow delivery slips to show lots and serial numbers by turning on "Expiration Dates." Enabling the latter brings up the "Display Expiration Dates on Delivery Slips" option. Check the box next to it to make it active.
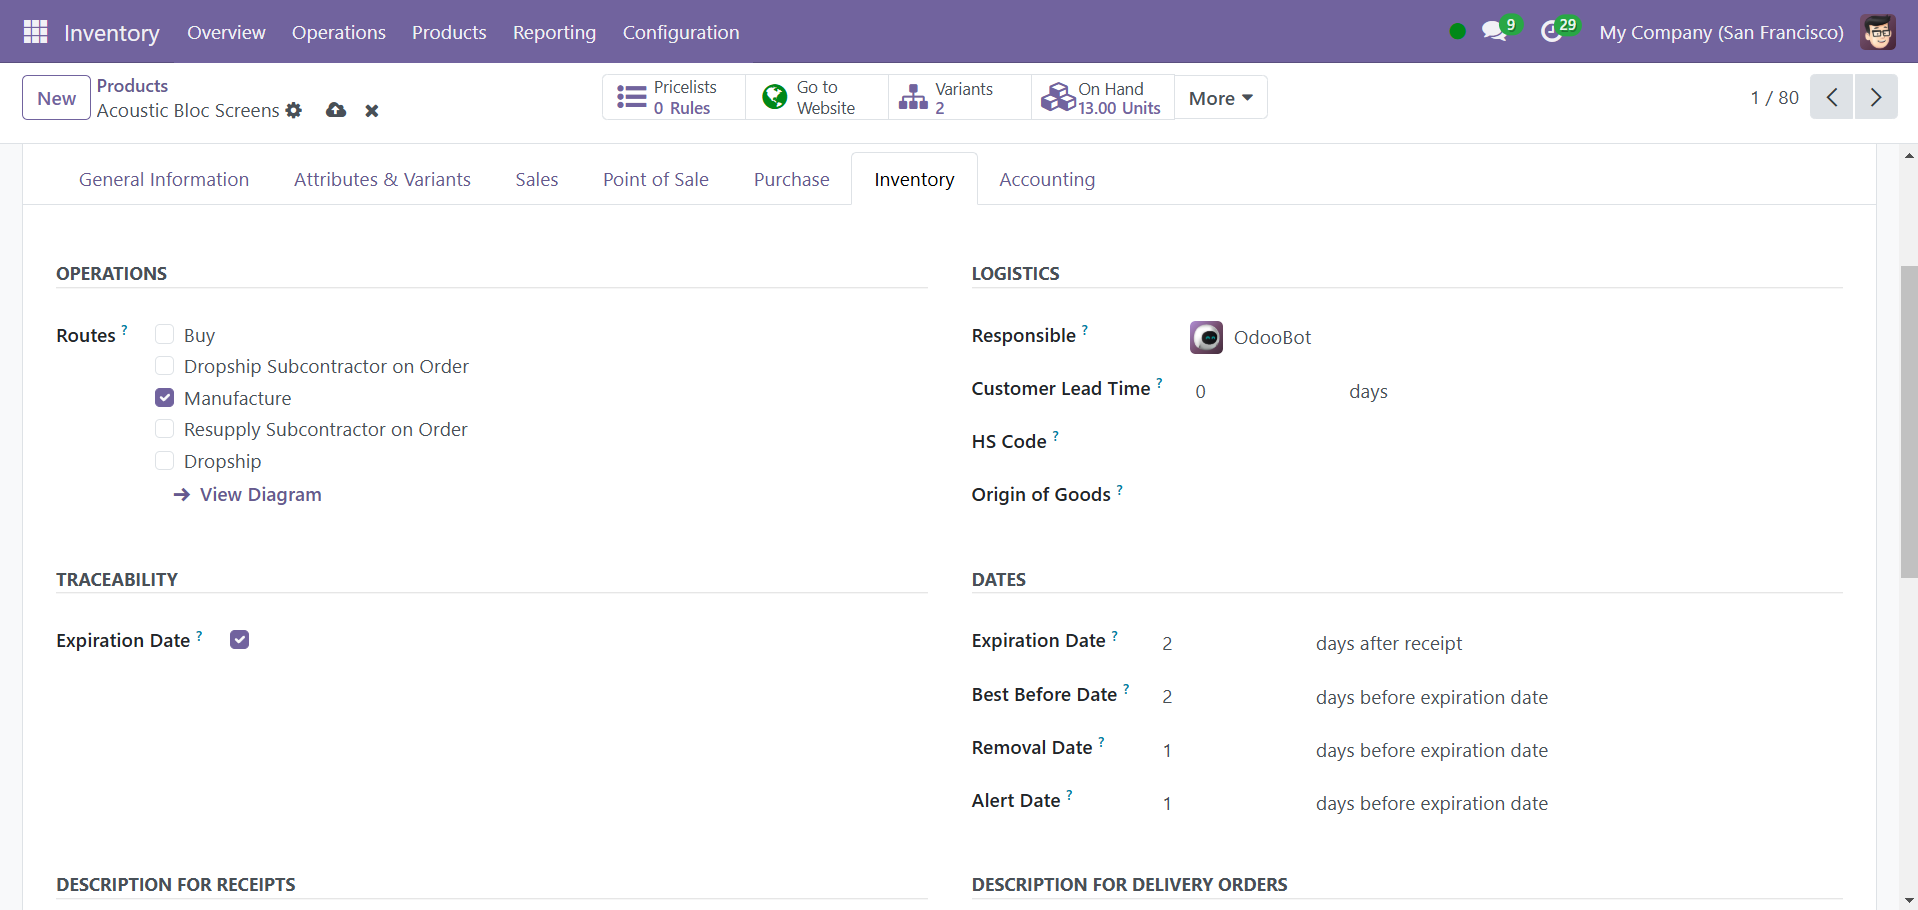
To set a product's expiration date, go to the Inventory tab's form view and select the Expiration Date option. New fields where you can enter expiration details will appear after it.
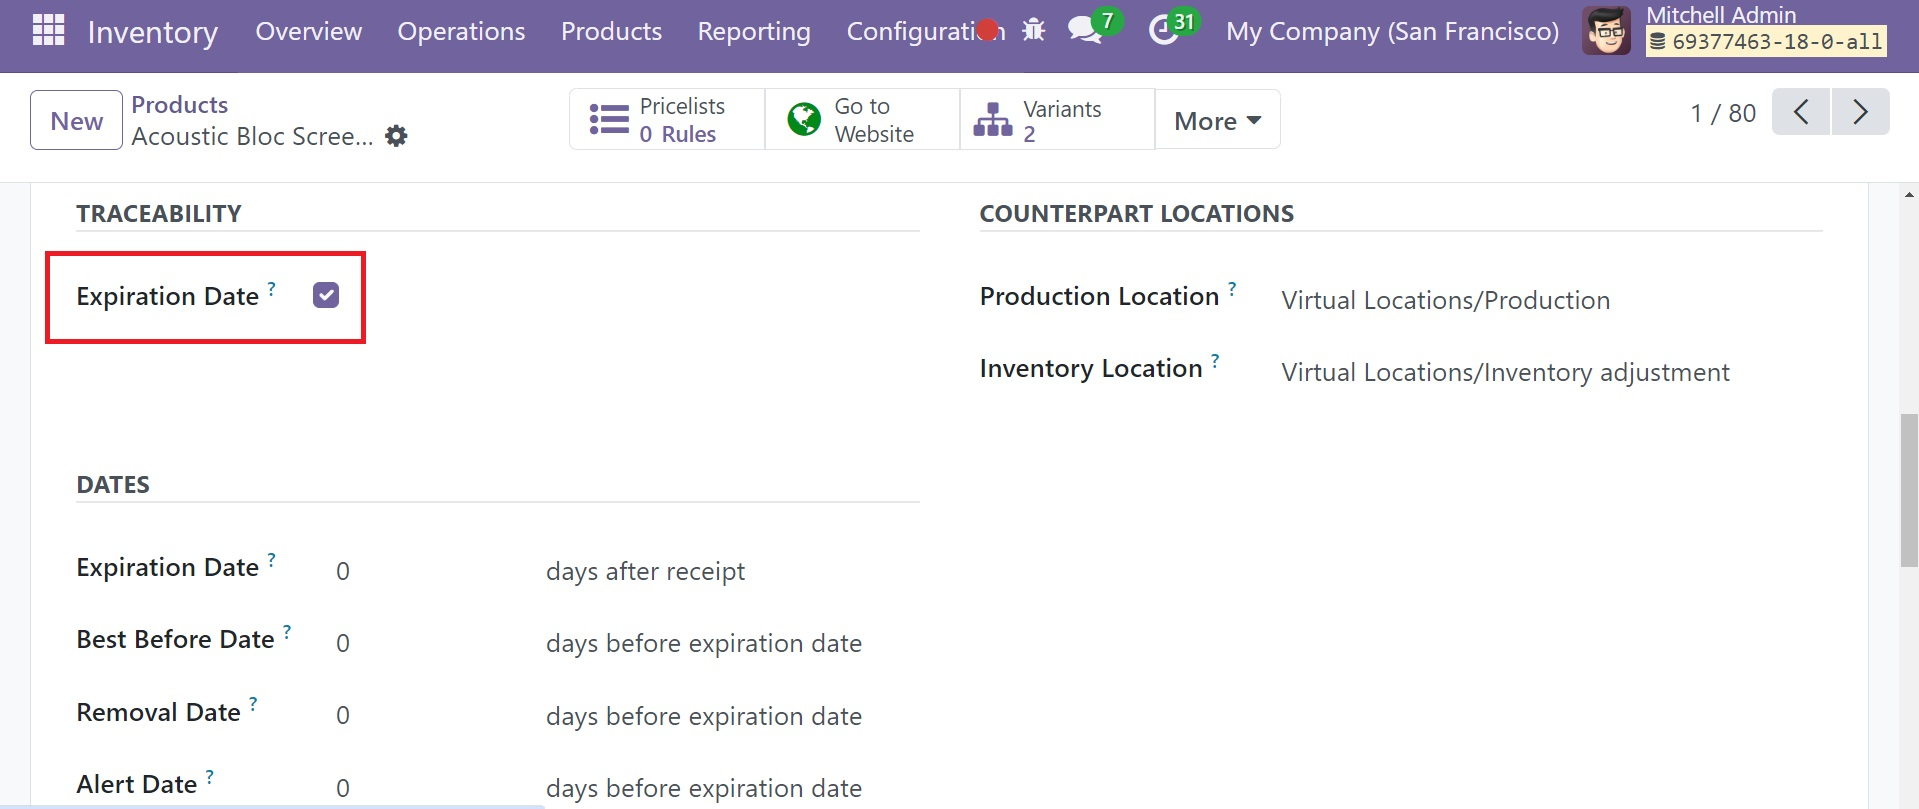
Four types of expiration information can be configured for the product under the Dates field:
Expiration Date: number of days after a product is received (from a vendor or in stock following production) that it may become harmful and should not be used or consumed is known as the expiration time.
Best Before Time: the period of time before the product's expiration date when it begins to deteriorate but isn't yet unsafe.
Removal Time: the number of days leading up to the product's expiration date when it should be taken out of stock.
Alert Time: the number of days prior to the expiration date when a product in a specific lot or with a specific serial number should trigger an alert.
The screenshot below shows the expiration dates that provided for this product.
After providing the Dates, save the data, and we can quickly create a new purchase order for this product. So, go to the “Requests for Purchase” section of the Purchase “Order” menu.
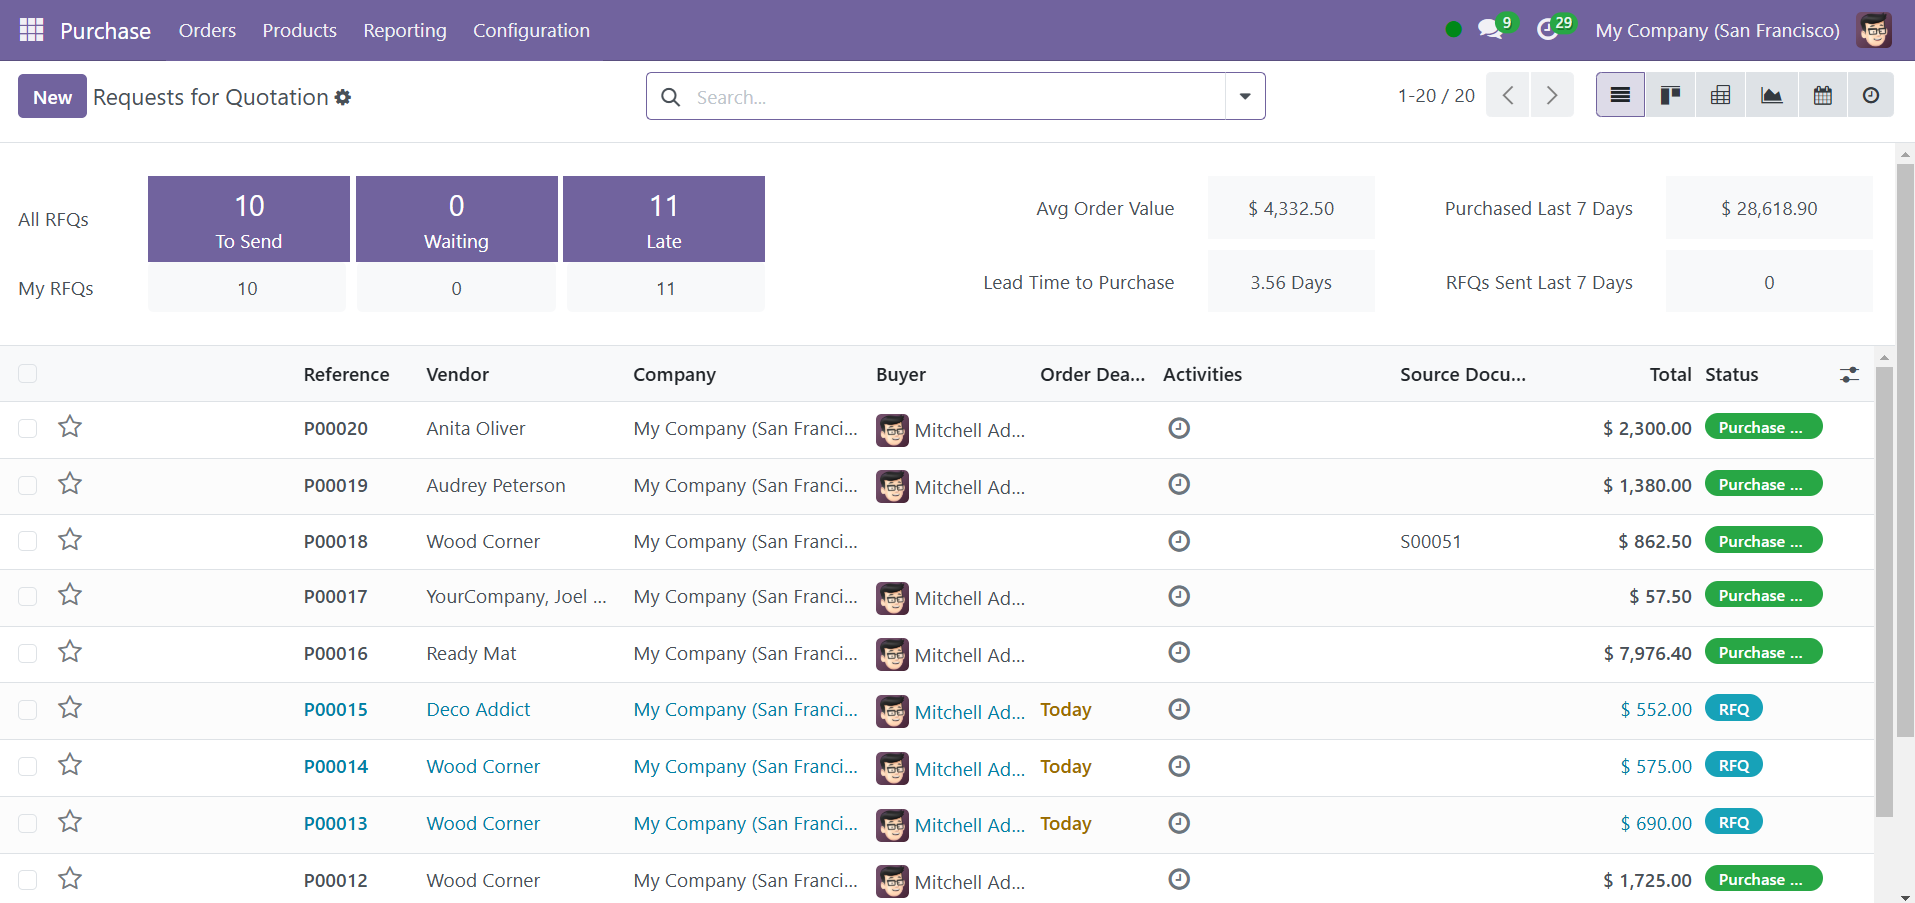
You have to edit the order details in the displayed form view, save, and confirm the order.
Inside the “Receipts” smart button page, you will get the detailed reciept operations details. Click on the menu provided inside the product column of the “Operation” tab.
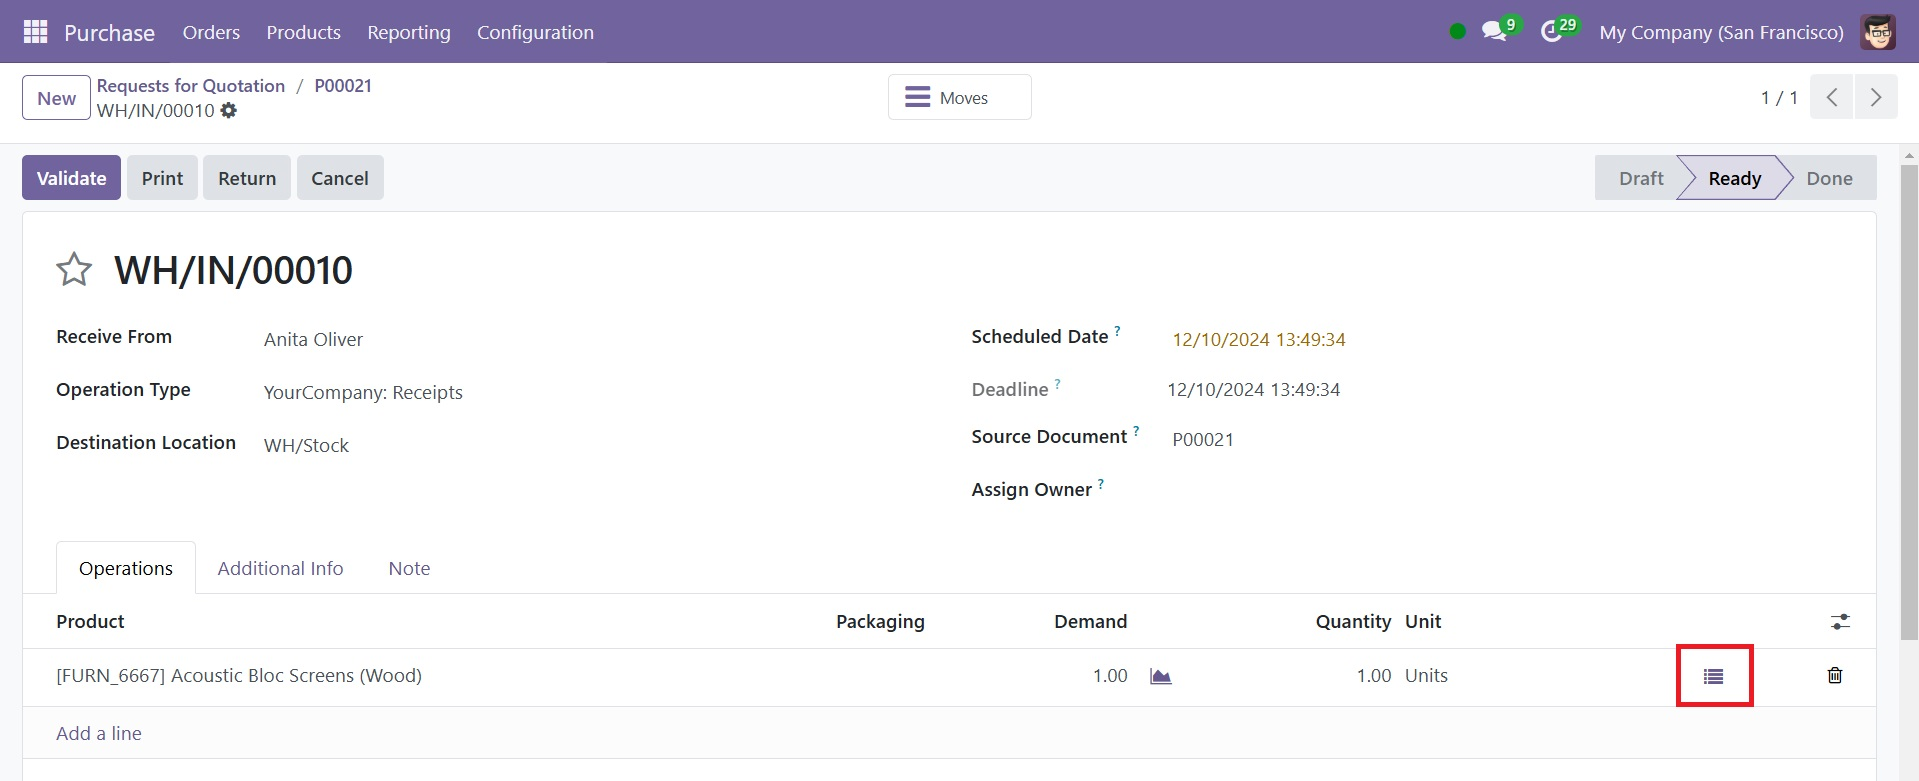
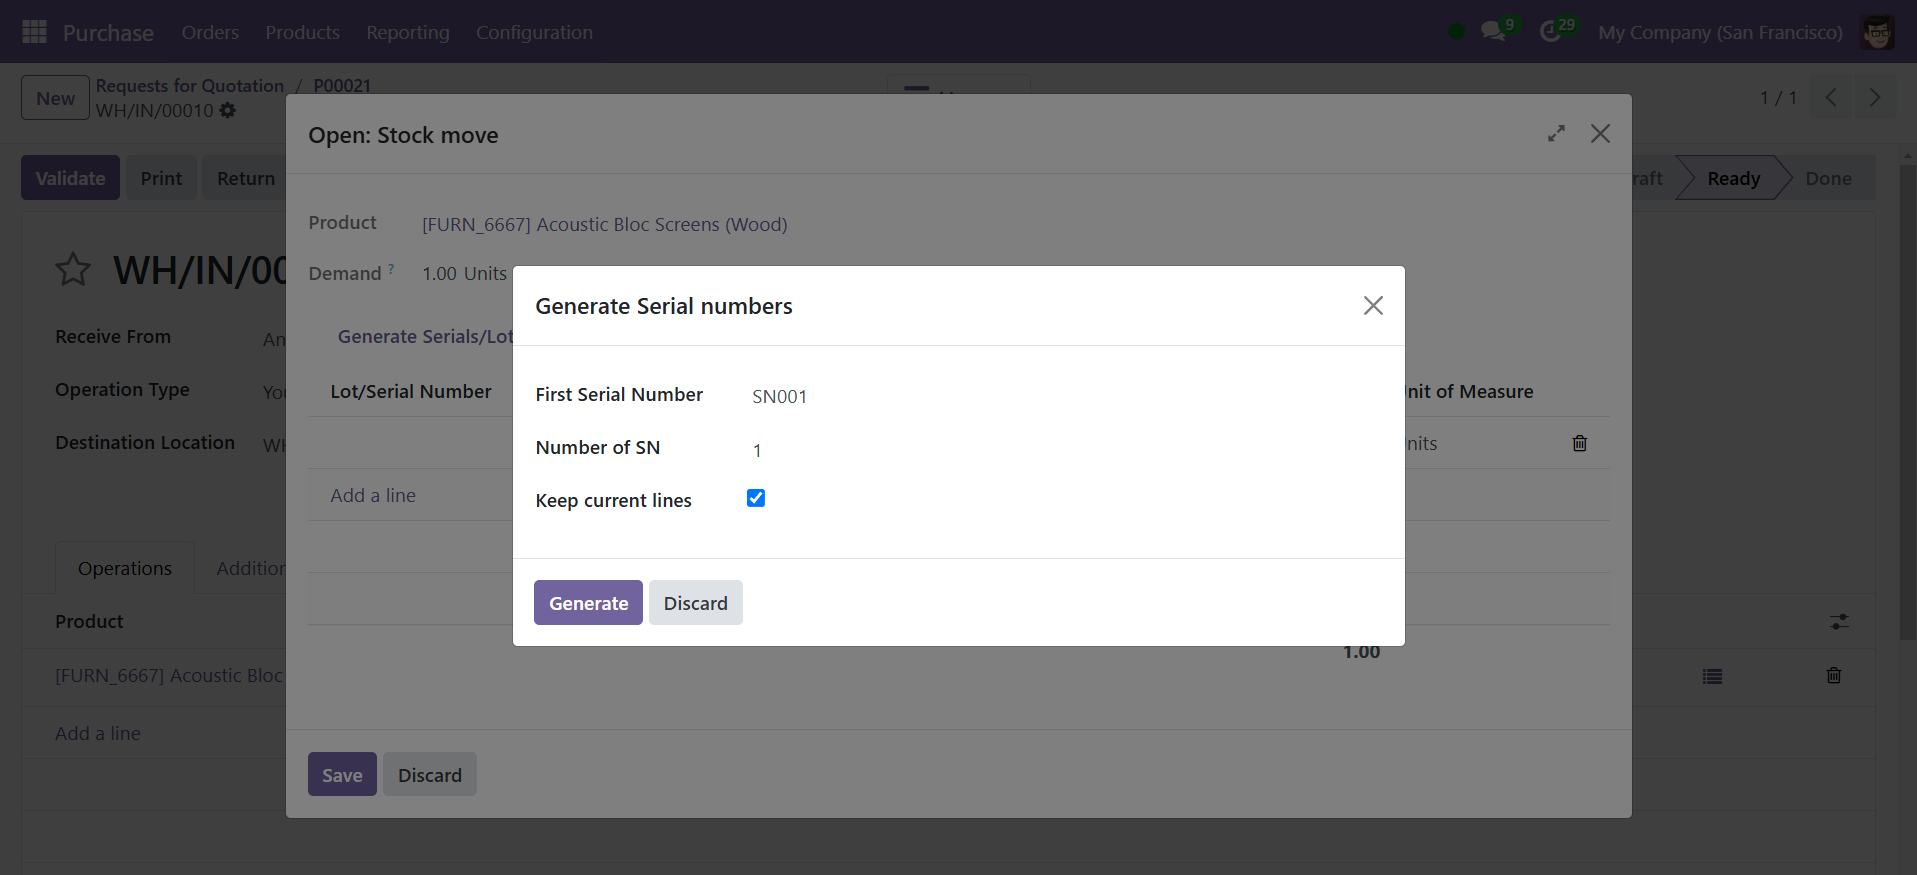
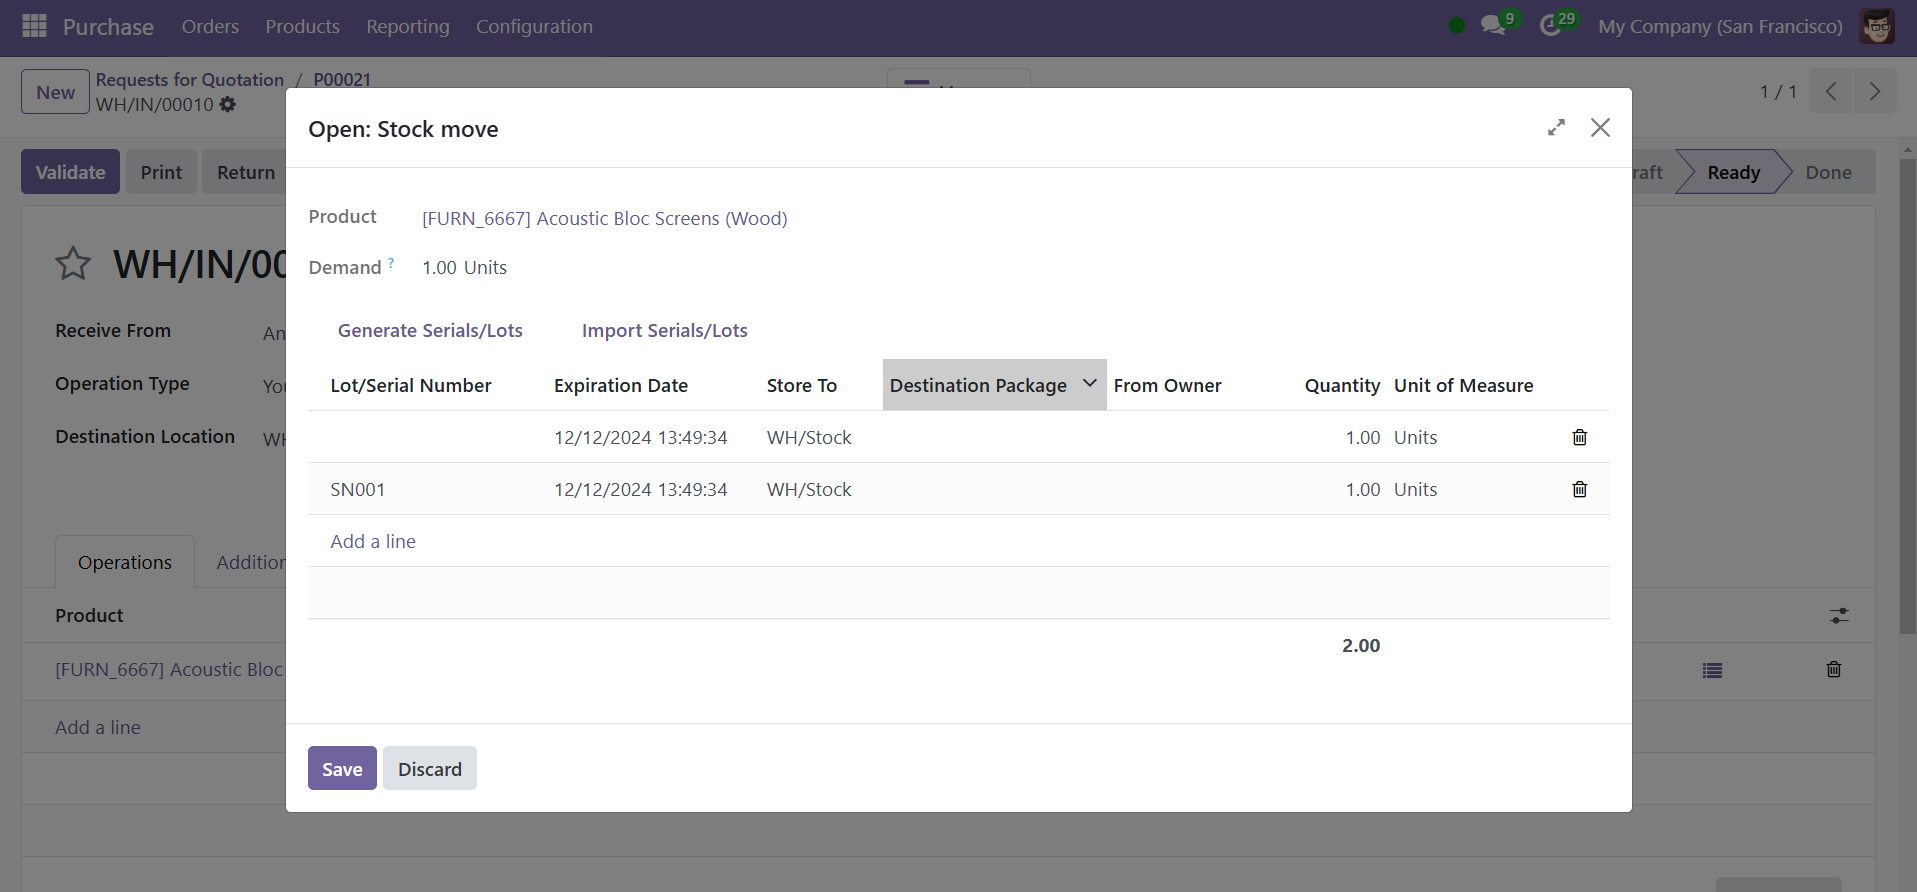
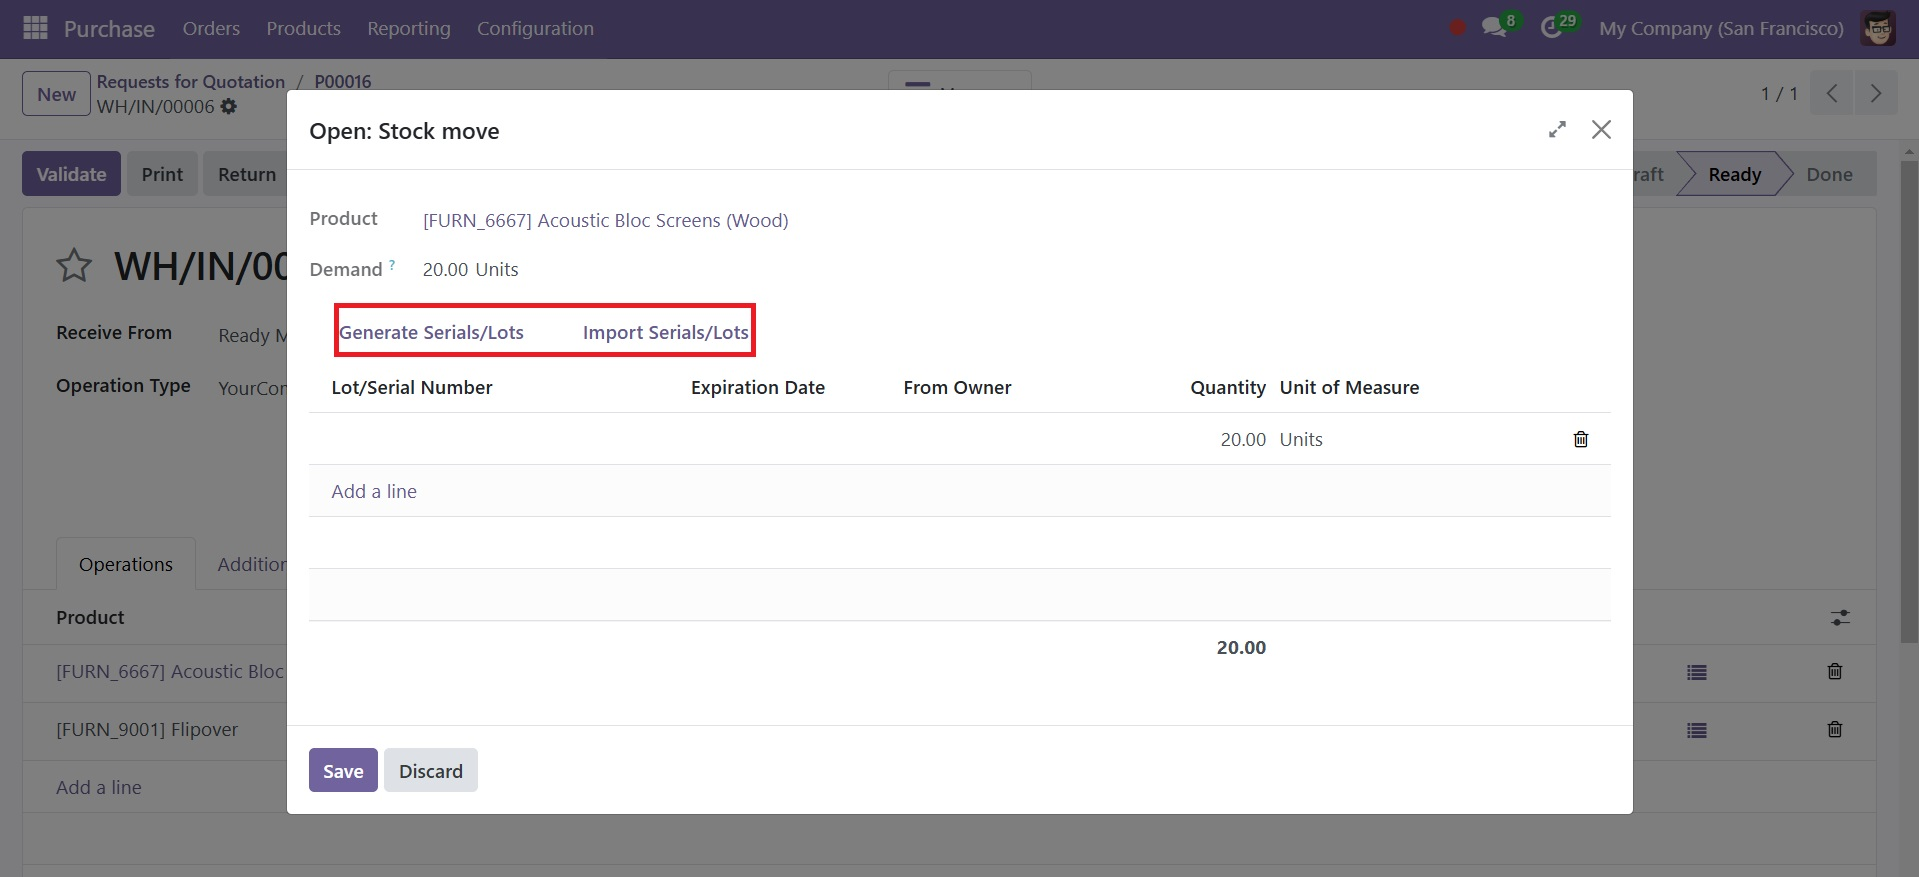
Then, it will open a new popup window with a dashboard containing fields including Lot/Serial Numbers, Expiration Date, To, Destination Package, Quantity, and Unit of Measure. Also, you can configure new product serial or Lot numbers using the “Generate Serials’ and “Import Lots” buttons, and go to the generate serial number, and the page will be as depicted in the screenshot below.
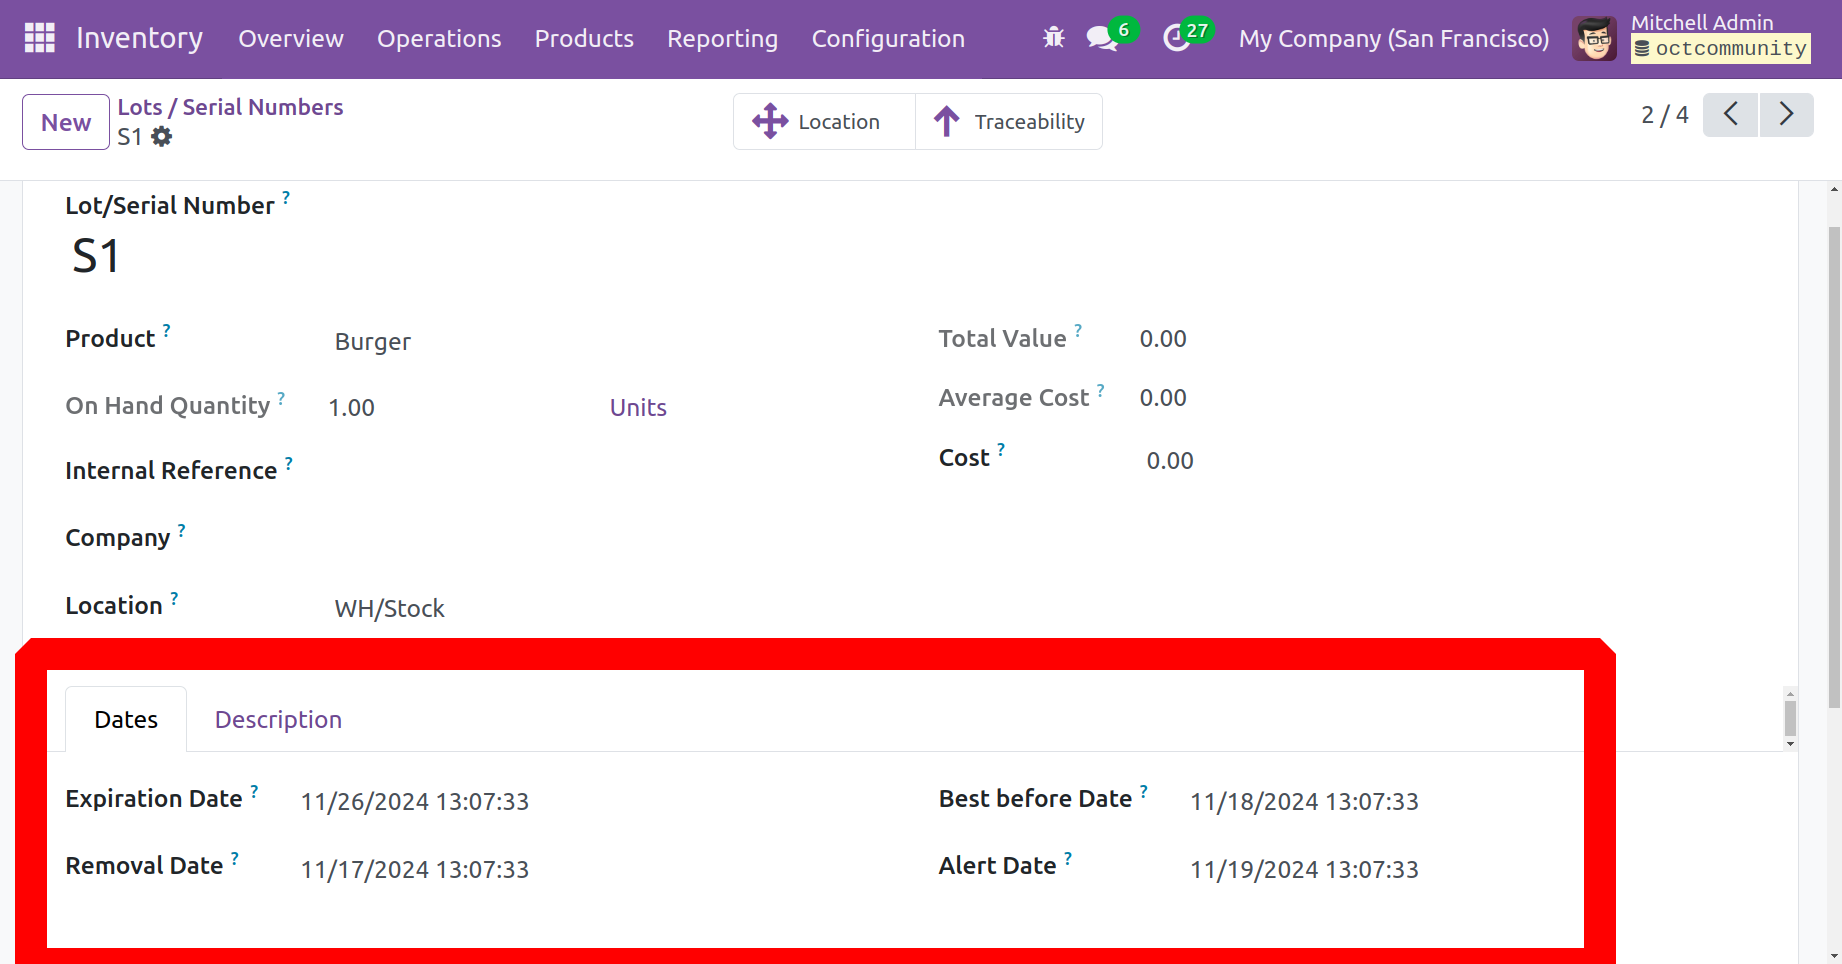
You can view a "Detailed Operations" smart tab that displays a dashboard of products with lot/serial numbers and expiration dates. The two-day expiration date set on the product form is also displayed in the "Expiration Date" section. Here, we have provided the same expiration dates for this package of products, you can also provide different expiration dates for specific lot numbers using the "Lot/Serial Numbers" configuration form in the "Products" menu.
After validating the transfer to view the expiration dates click the Lots / Serial number under the products. There added a new tab named Dates as shown in the below image.
Also, you can configure new product serial or Lot numbers using the “Generate Serials/Lots’ and “Import Serials/Lots” buttons, as depicted in the screenshot below.
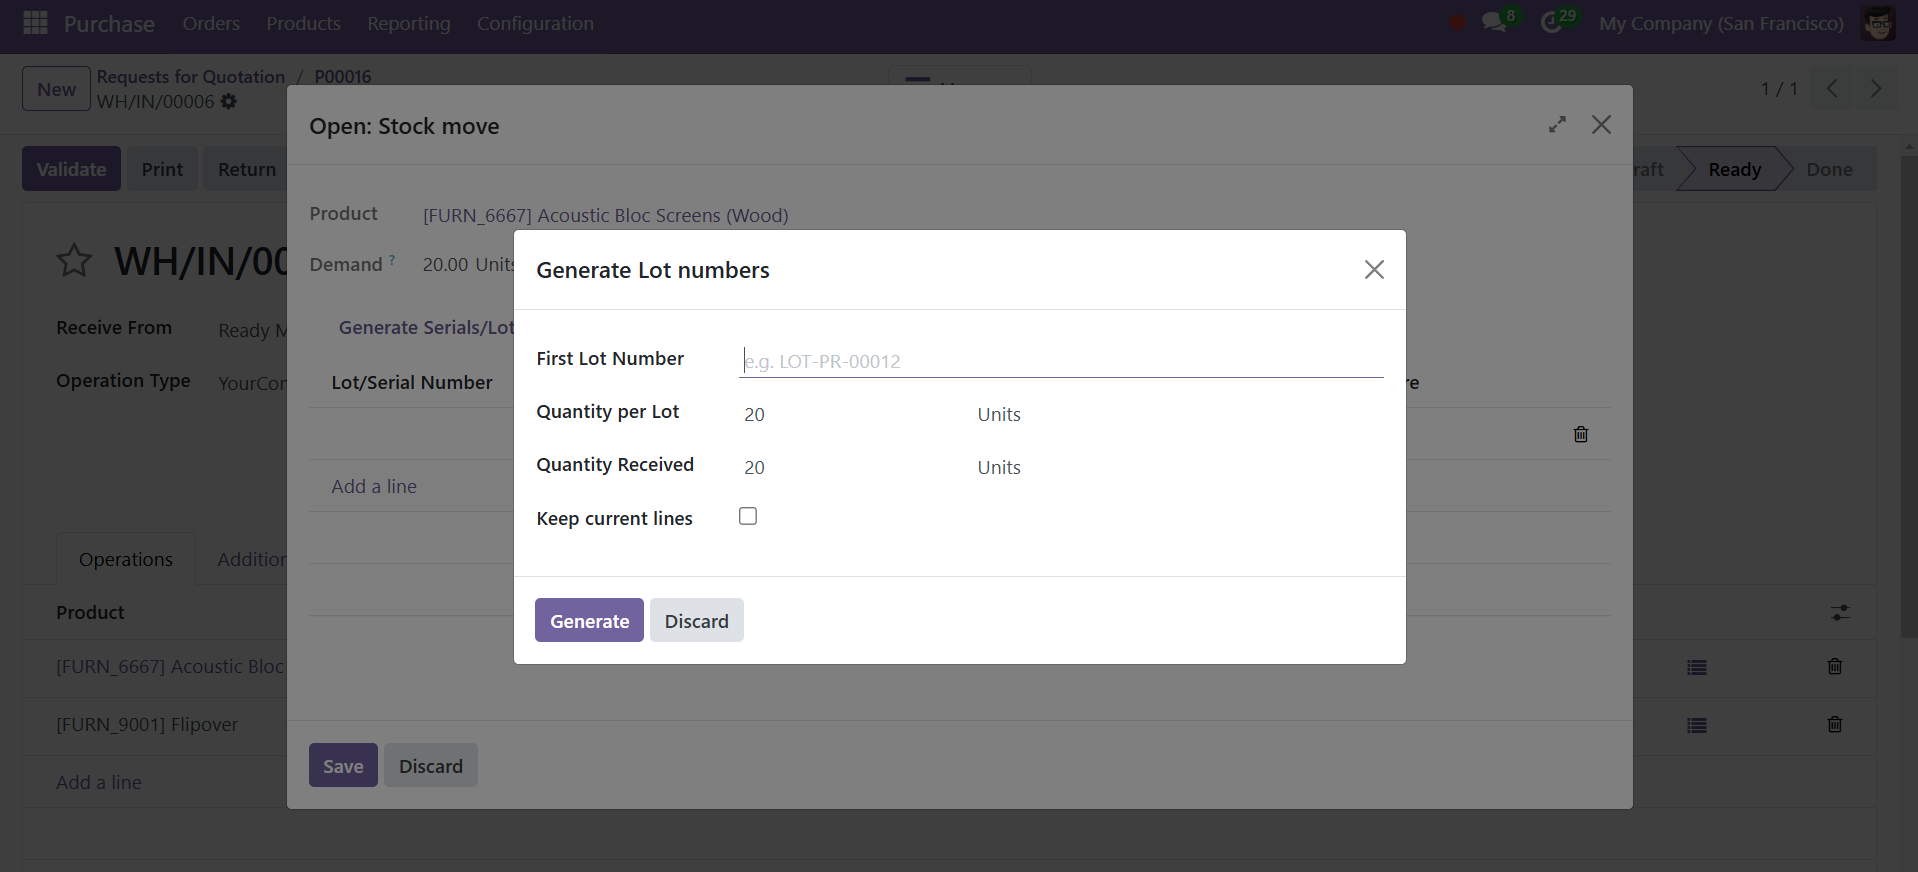
By selecting the "Generate Serials" button, we may generate new serial numbers. This will launch an additional wizard to assist you in creating serial/lot numbers. An automated method for allocating serial numbers to several goods is offered by Odoo. The "Generate Serials" button allows users to personalize serial numbers, while the "Number of SN" section allows users to choose the total amount of serial numbers needed. Before selecting the "Generate" option to get the required serial numbers, we can also alter the product's First Serial Number (SN).
Another option for assigning multiple serial numbers at once is to click the Import Serials/Lots button in the Open: Stock move pop-up window.
Doing so opens the Import Serials pop-up window. Enter each serial number on a separate line in the Lots/Serial numbers text field.
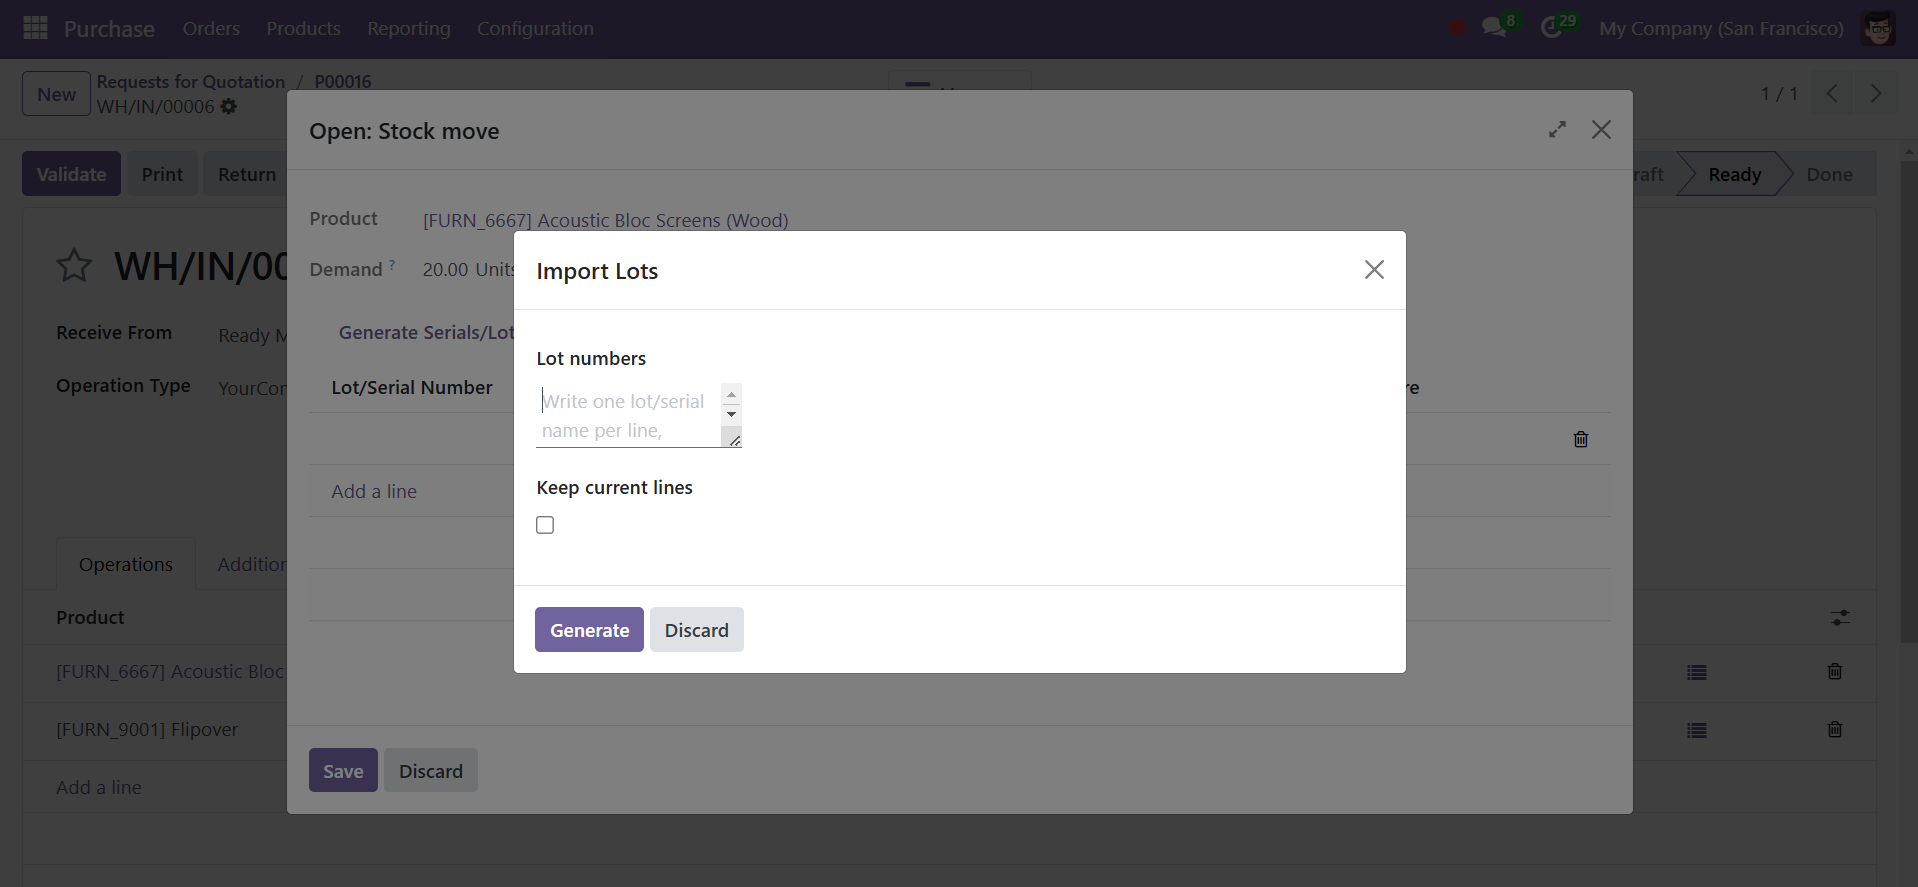
As when generating serials, check the Keep current lines box to keep existing serial numbers, or leave it unchecked to overwrite them. Finally go to the Generate option.
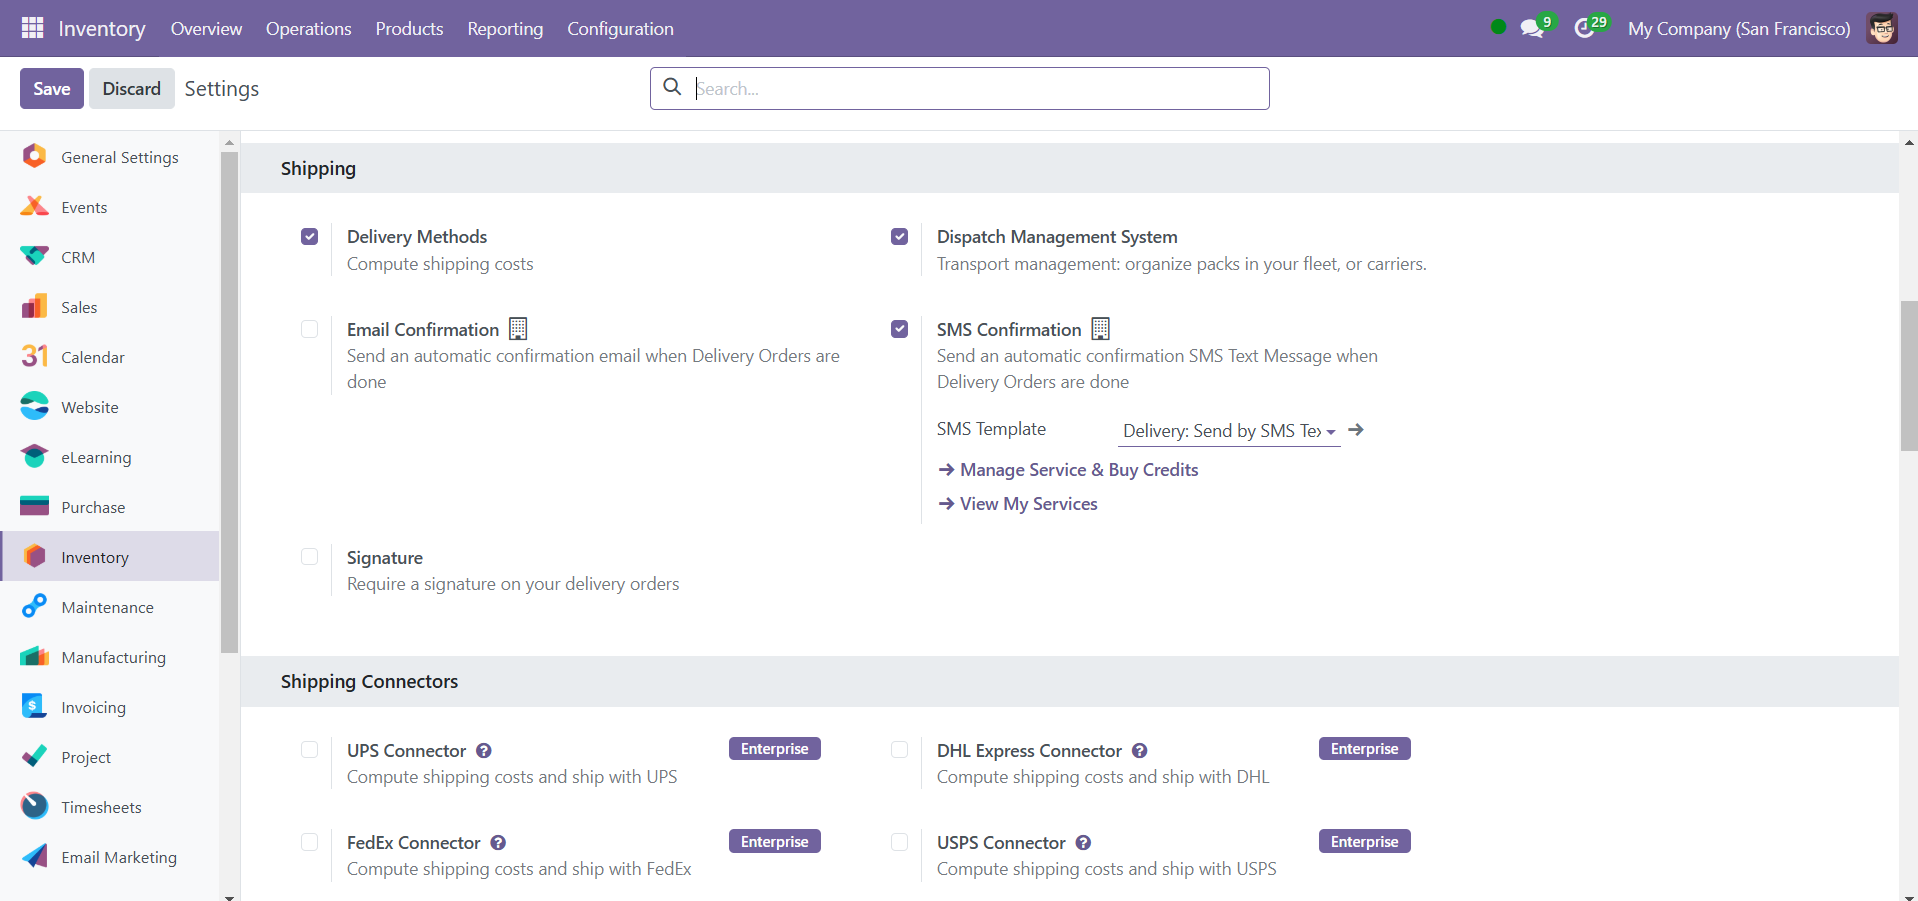
Shipping
Shipping Methods
The Shipping Method feature in the Odoo Inventory module can be used similarly to how we discussed it in the Sales module. A company may decide to distribute products directly to customers or use the help of third-party delivery companies. To use this feature in the Odoo 18 Inventory module, you must first enable the Delivery Methods option in the Settings menu.
The delivering Methods tool can be used to calculate the cost of delivering shipment. To get outside assistance for delivery operations, you can activate Shipping Connectors from the Settings menu, as shown in the screenshot. Shipping connectors from FedEx, UPS, bpost, Sendcloud, DHL Express, USPS, and Easypost are among the options only available in Odoo 18's Enterprise edition.
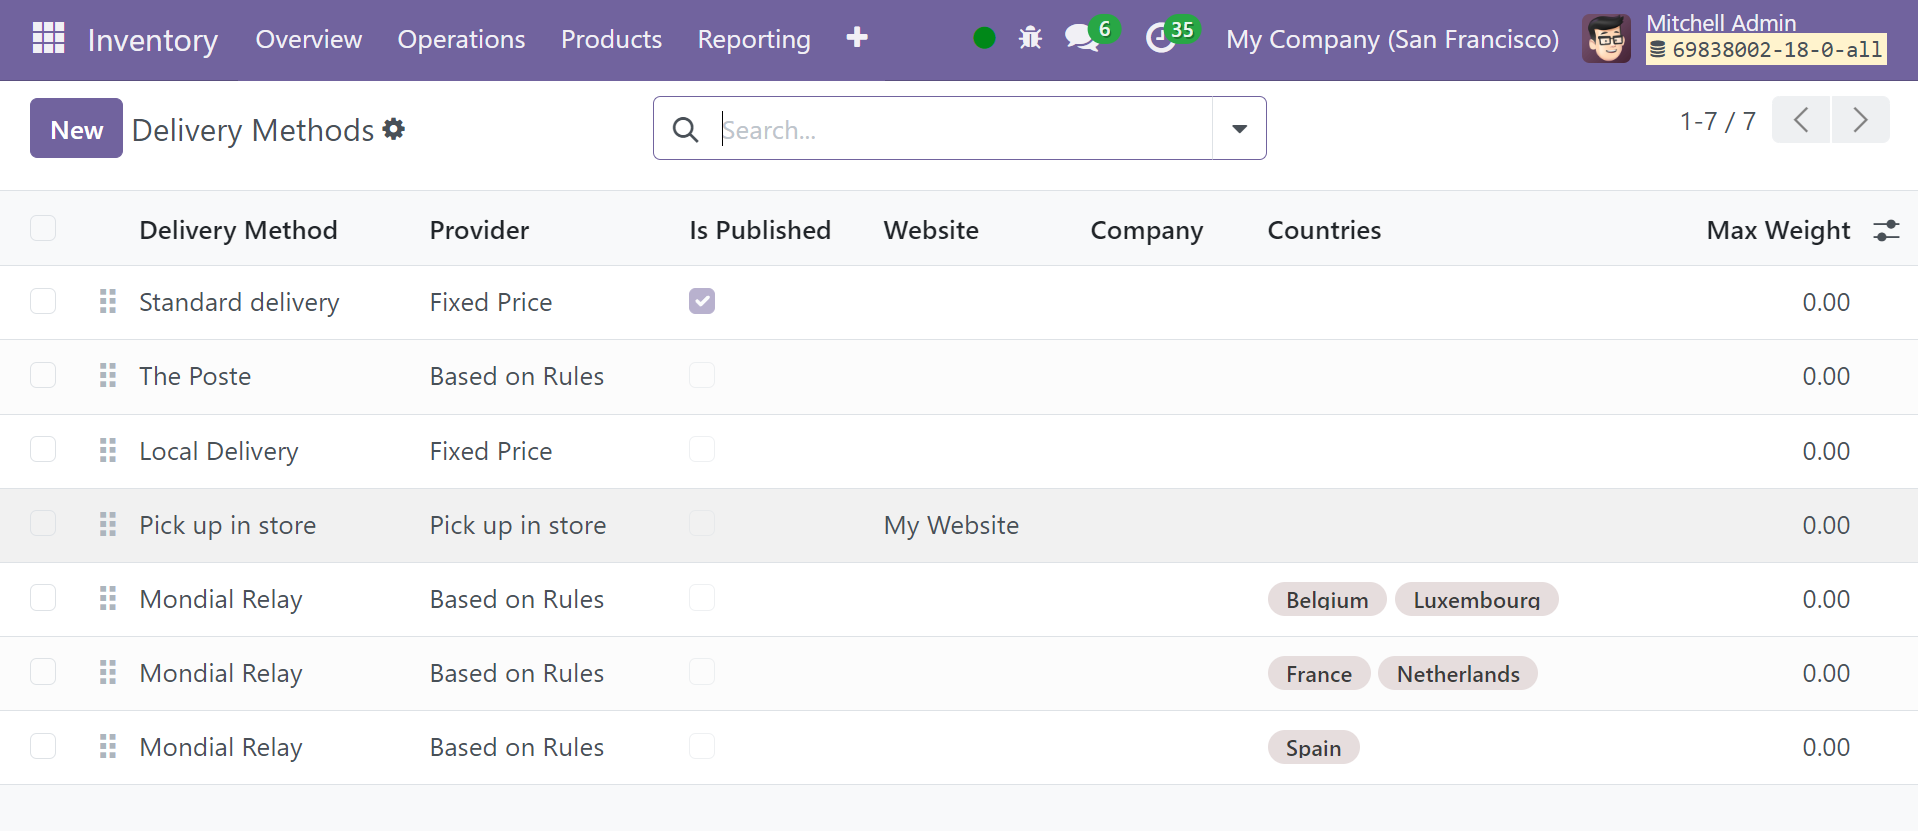
Choose the Shipping Methods option from the Configuration menu to add additional delivery options. Along with details on the delivery method, supplier, company, and countries, the list will show the shipping options that have already been established.
To establish a new delivery method, click the New button.
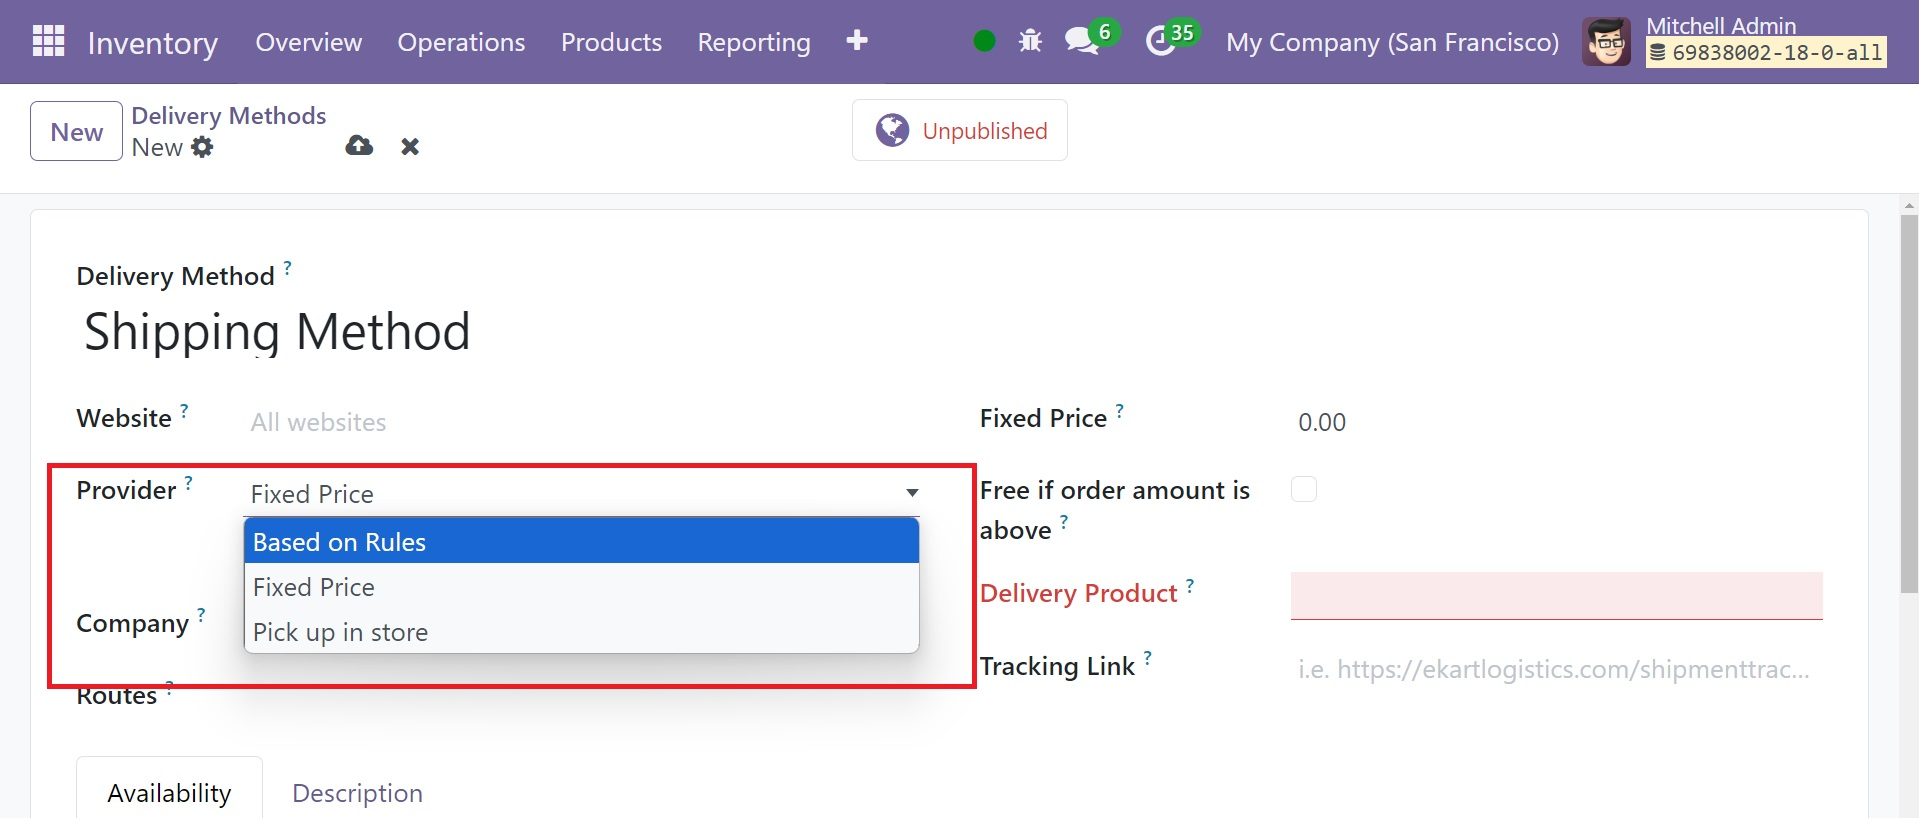
In the field provided, you can include the name of the shipping method. The provider can be set up for in-store pickup, fixed pricing, or rules-based pricing. The names of the delivery product and the business can be entered in the appropriate fields. Delivery product is a service product used for the shipping process.

The percentage you designate in the Margin on Rate will be applied to the shipping fee. The shipping charge will be increased by the percentage you specify in the Margin on Rate. To calculate the price of shipping based on pricing rules, set the Provider field to the Based on Rules option. Optionally, adjust Additional margin to include additional shipping costs. You can also include the delivery product and the tracking link in the appropriate fields.
You can choose to provide free delivery for orders that total more than or equal to the amount indicated in the Amount section. The Pricing tab will change based on your selections in the Provider section.
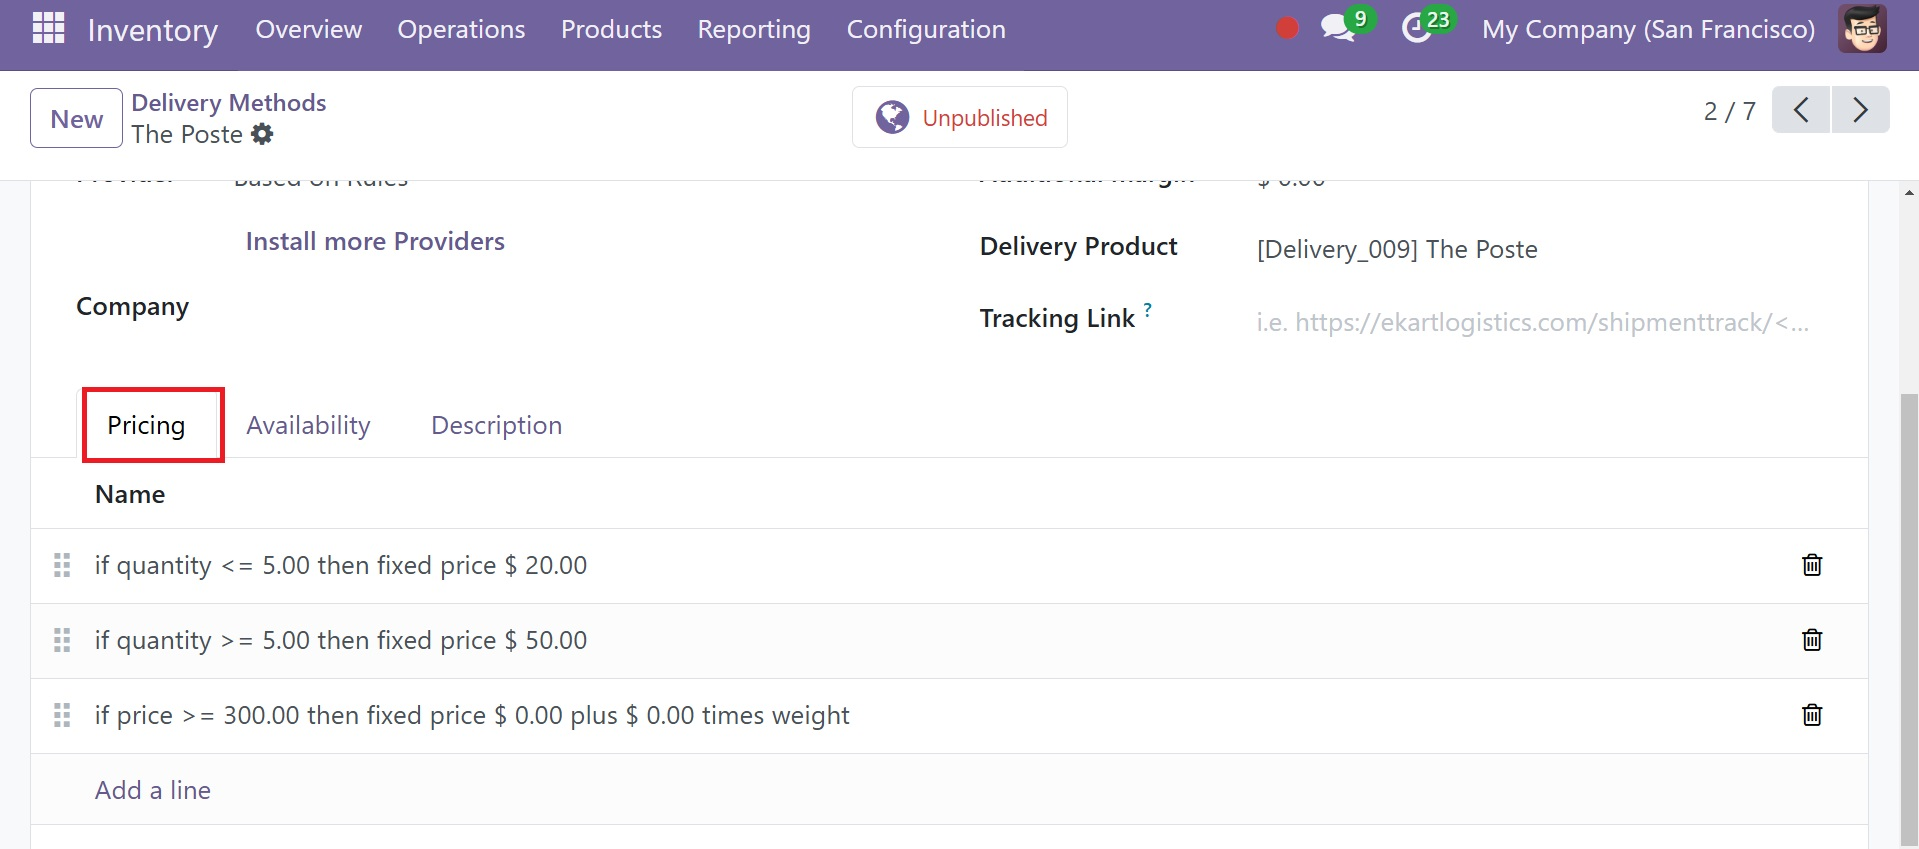
We chose the Fixed Price option in this instance. Under the Pricing tab, you can include the shipping fee as a fixed cost. On the Pricing tab, select "Add a line." By doing this, the Create Pricing Rules window is opened, where the Delivery Cost is determined by comparing the Condition pertaining to the product's weight, volume, price, or quantity to a predetermined amount.
When you're done, select Save & Close or Save & New to add another rule.
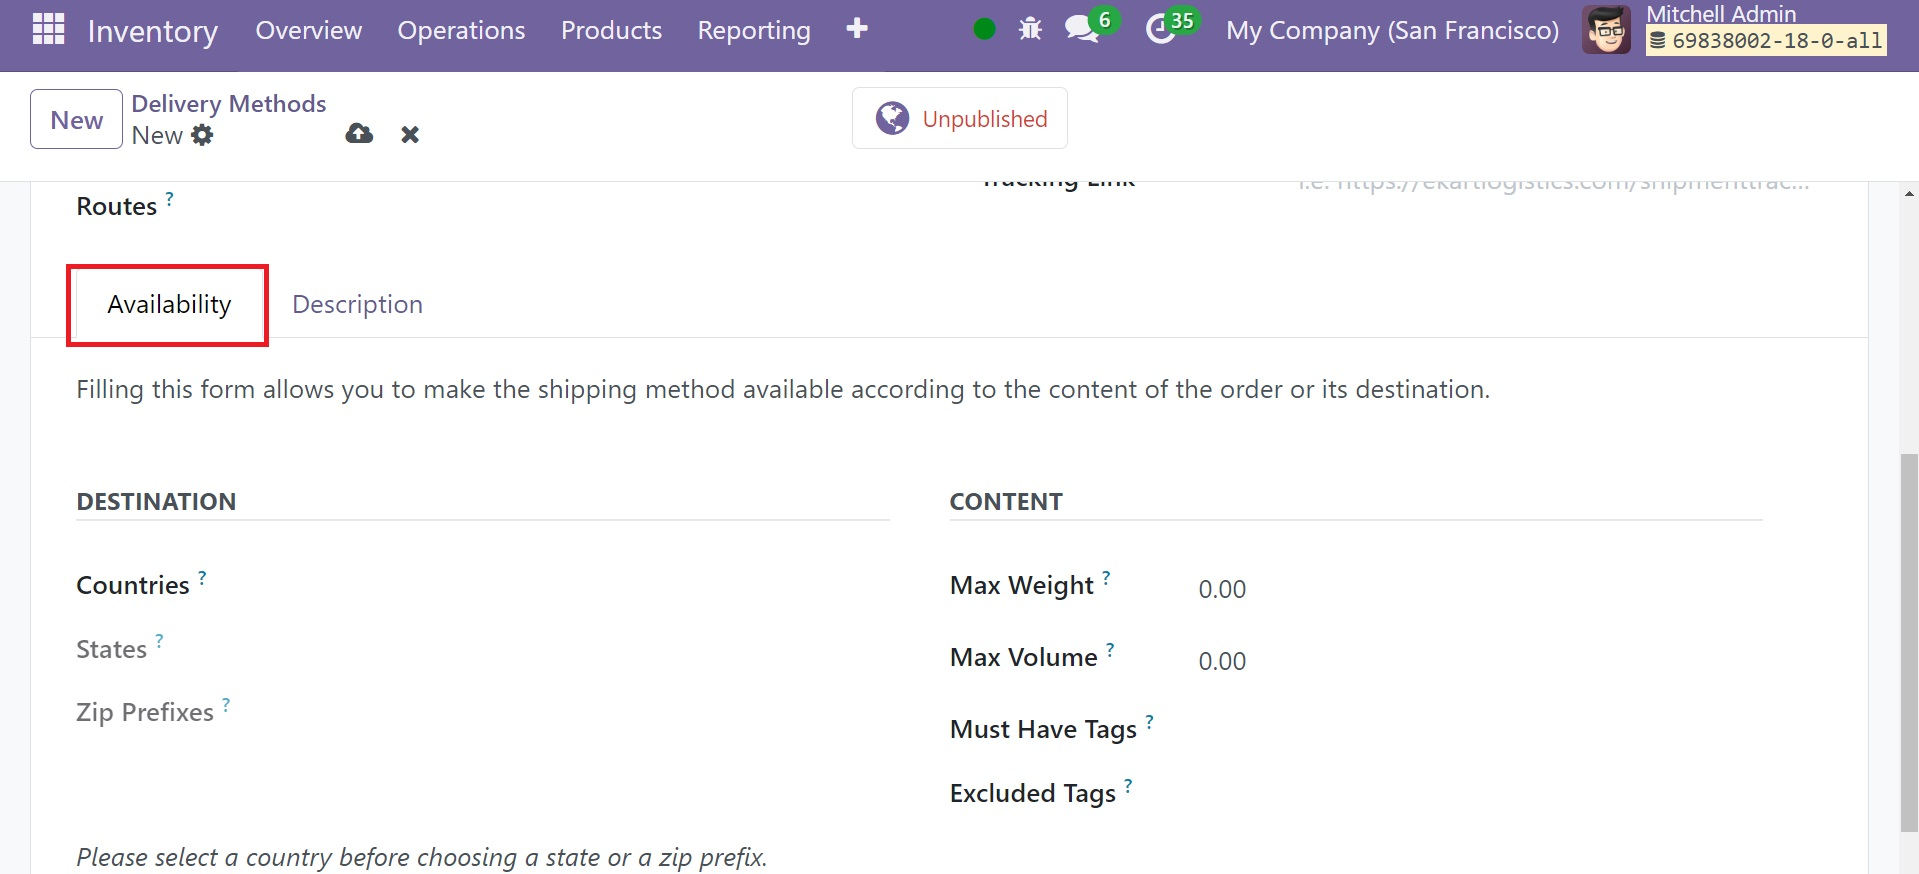
Mention the States, Countries, and Zip Prefixes in the appropriate fields. In the Destination Availability area, you can write any additional information you want to include with the delivery option. Once you have completed setting a sales order, you can use the delivery method while confirming it. Now, under the Content option, you can have sub options, such as Max weight, Max volume, Must have tags, and Excluded tags options respectively.
Max weight: If the total weight of the order is over the weight, the method won't be available.
Max volume: If the total Volume of the order is over the volume, the method won't be available.
Must have tags: The method is available only if at least one product of the order has one of these tags
Excluded tags: The method is not available if at least one product of the order has one of these tags
Click the Add Shipping button on the Order Lines tab of a sales order to add a delivery method to the associated order.
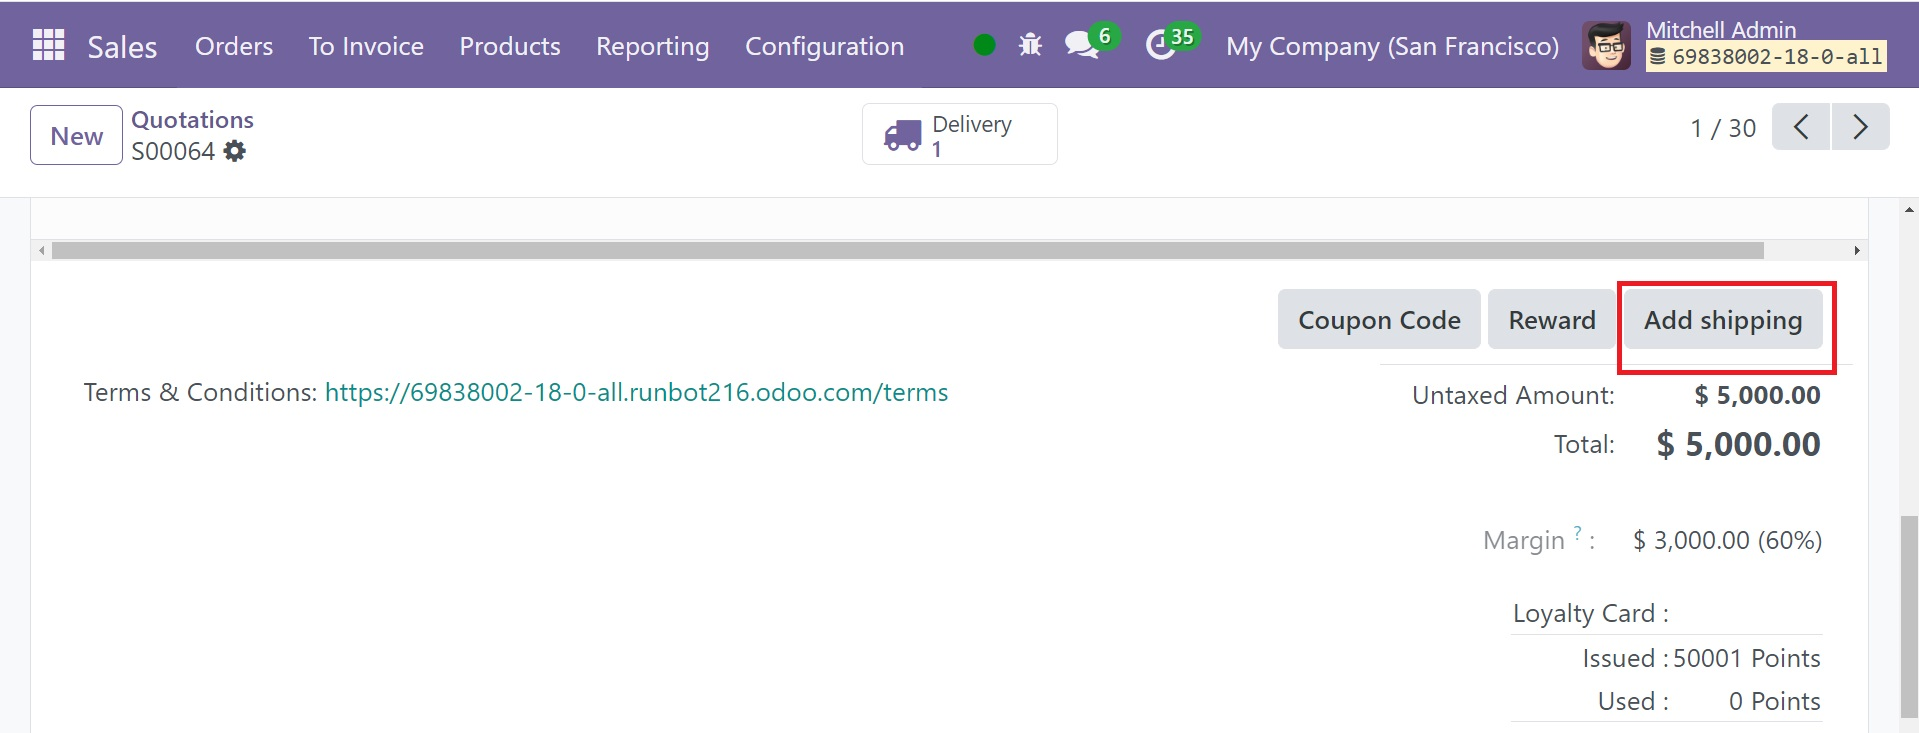
You can select the best delivery option for the items in this particular sales order by doing this, which will cause a new pop-up to appear.
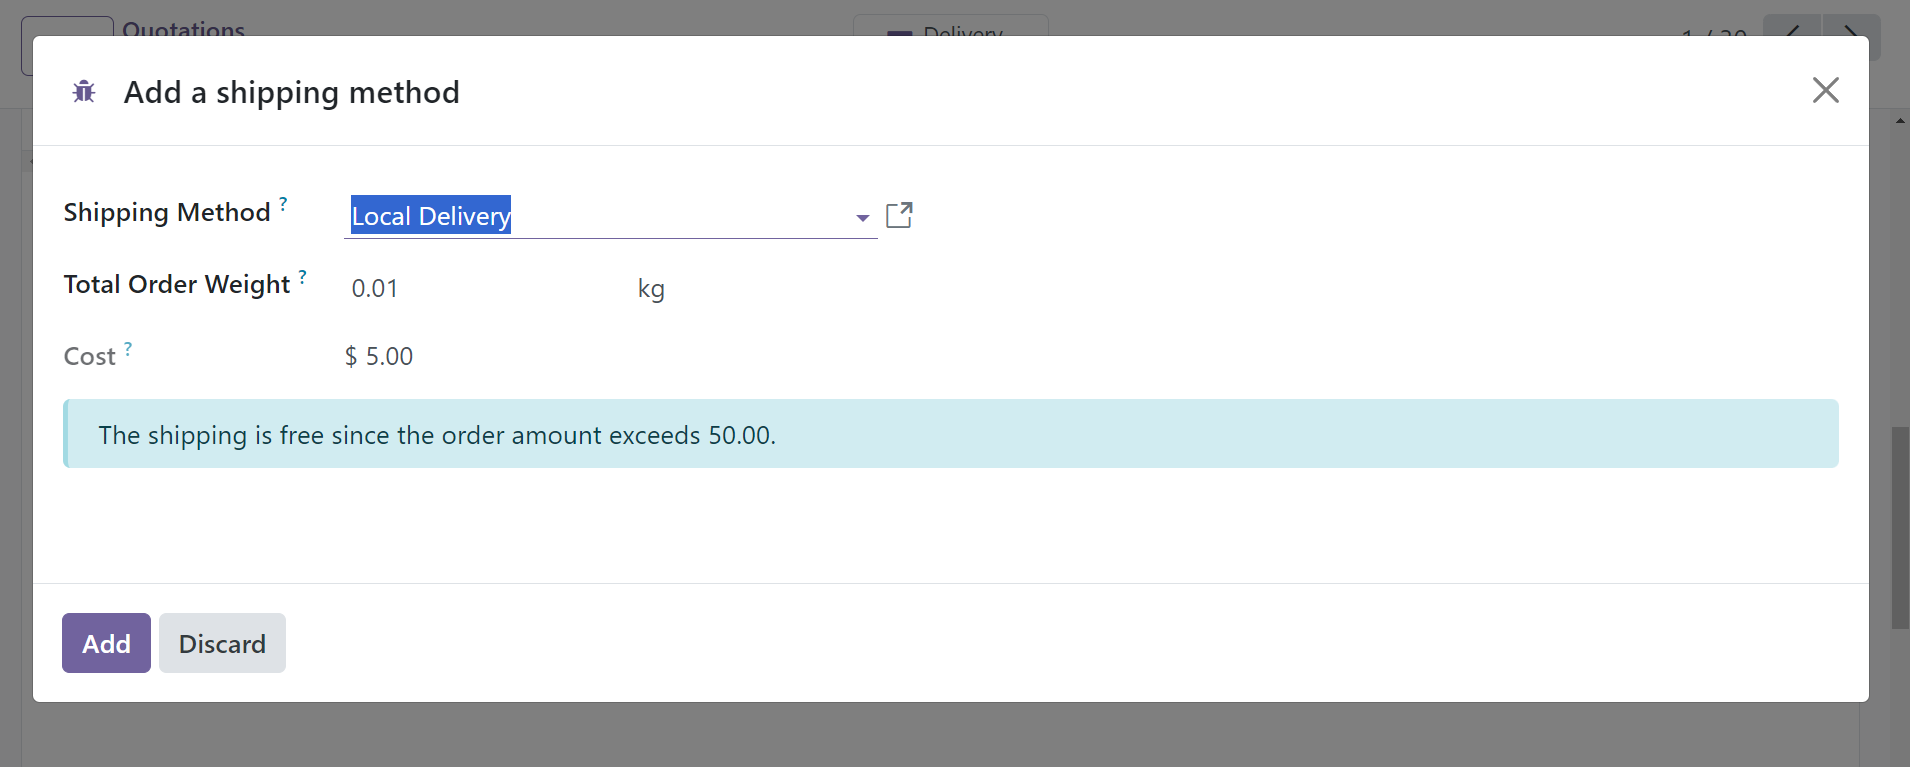
The shipping cost will be shown as soon as you select the shipping option.
Now, under the shipping option, you have the dispatch management system option, as in the screenshot below.
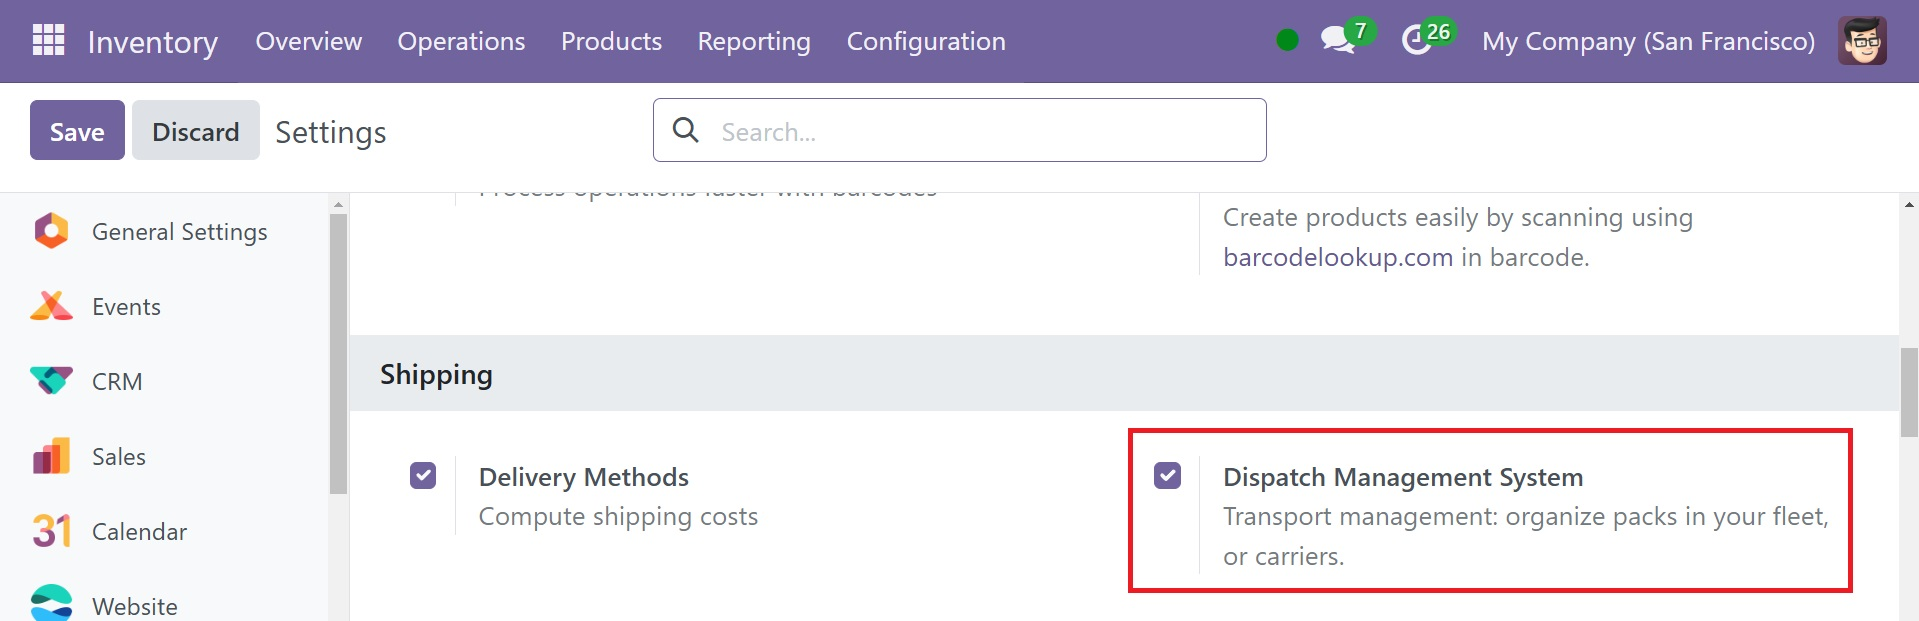
Tick the Delivery Methods and Dispatch Management System checkboxes. Doing so allows specific vehicles to be set as carriers. The feature in Odoo is used to plan and build shipments.
Key features include:
● Load building: Group products for specific carriers, assign those batches to loading docks, and manage vehicle assignments based on fleet capacity. This ensures the right products are packed into the appropriate trucks for delivery.
● Fleet management: Track and manage the capacity of in-house delivery vehicles.
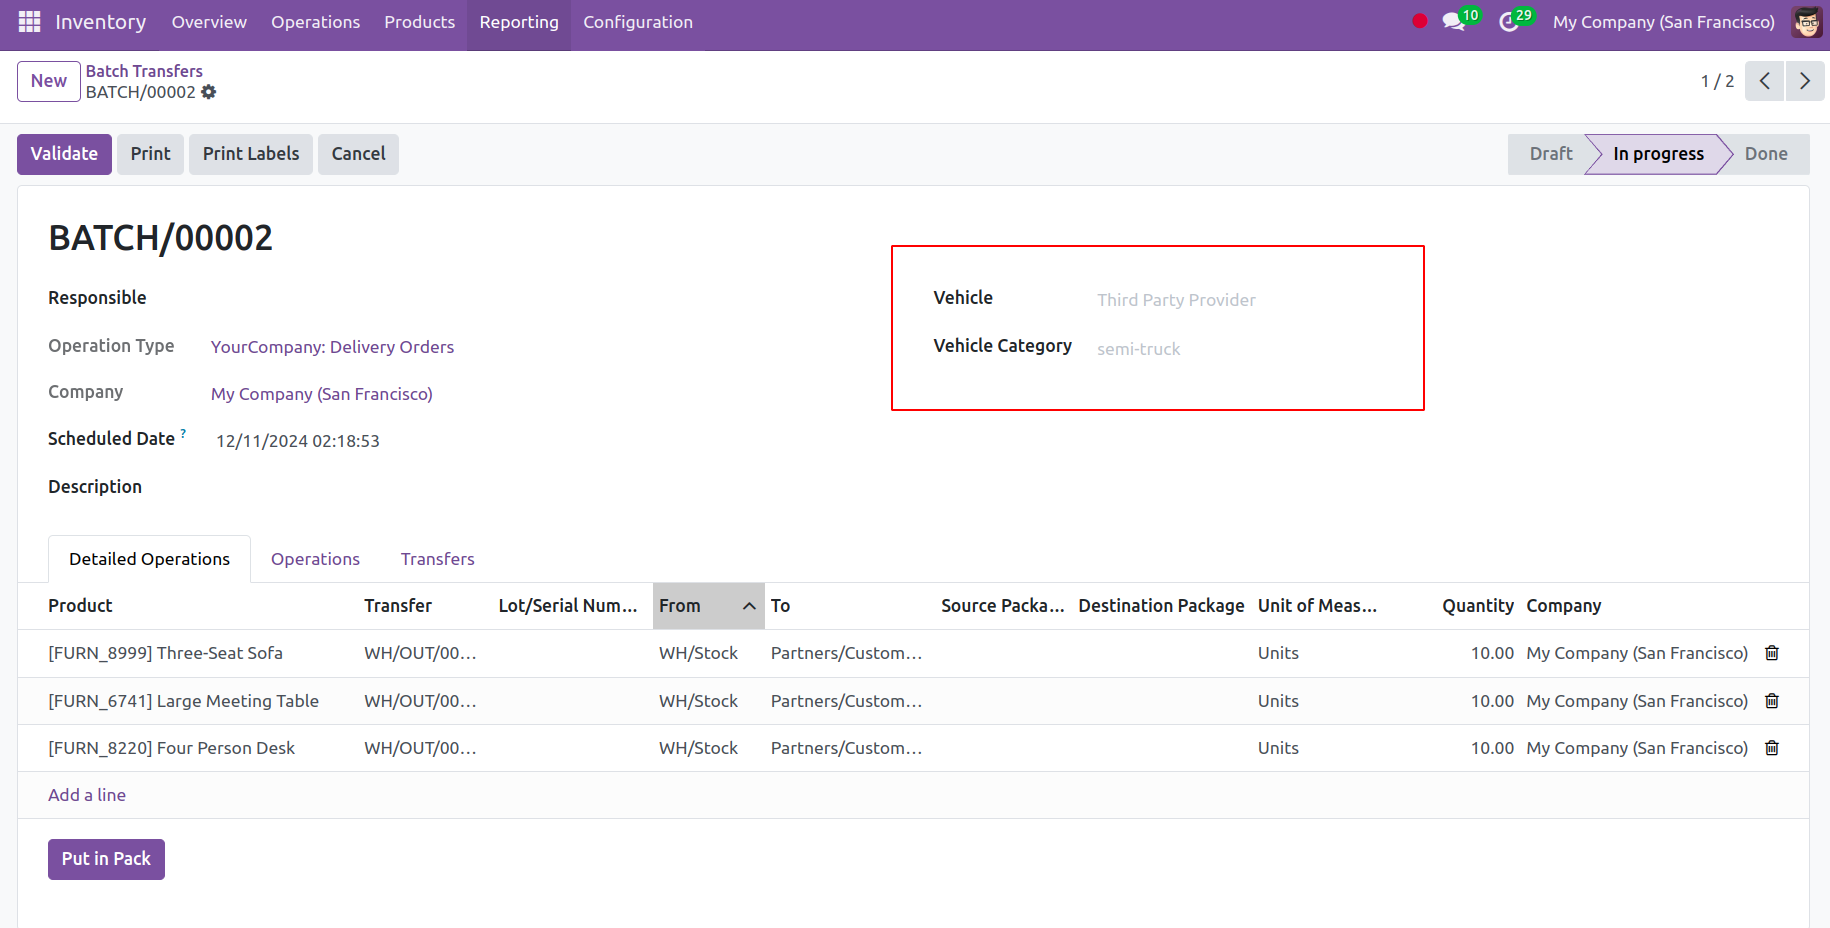
Dispatch management system allows to add the vehicle and vehicle category information in the batch to deliver items in though the vehicle.
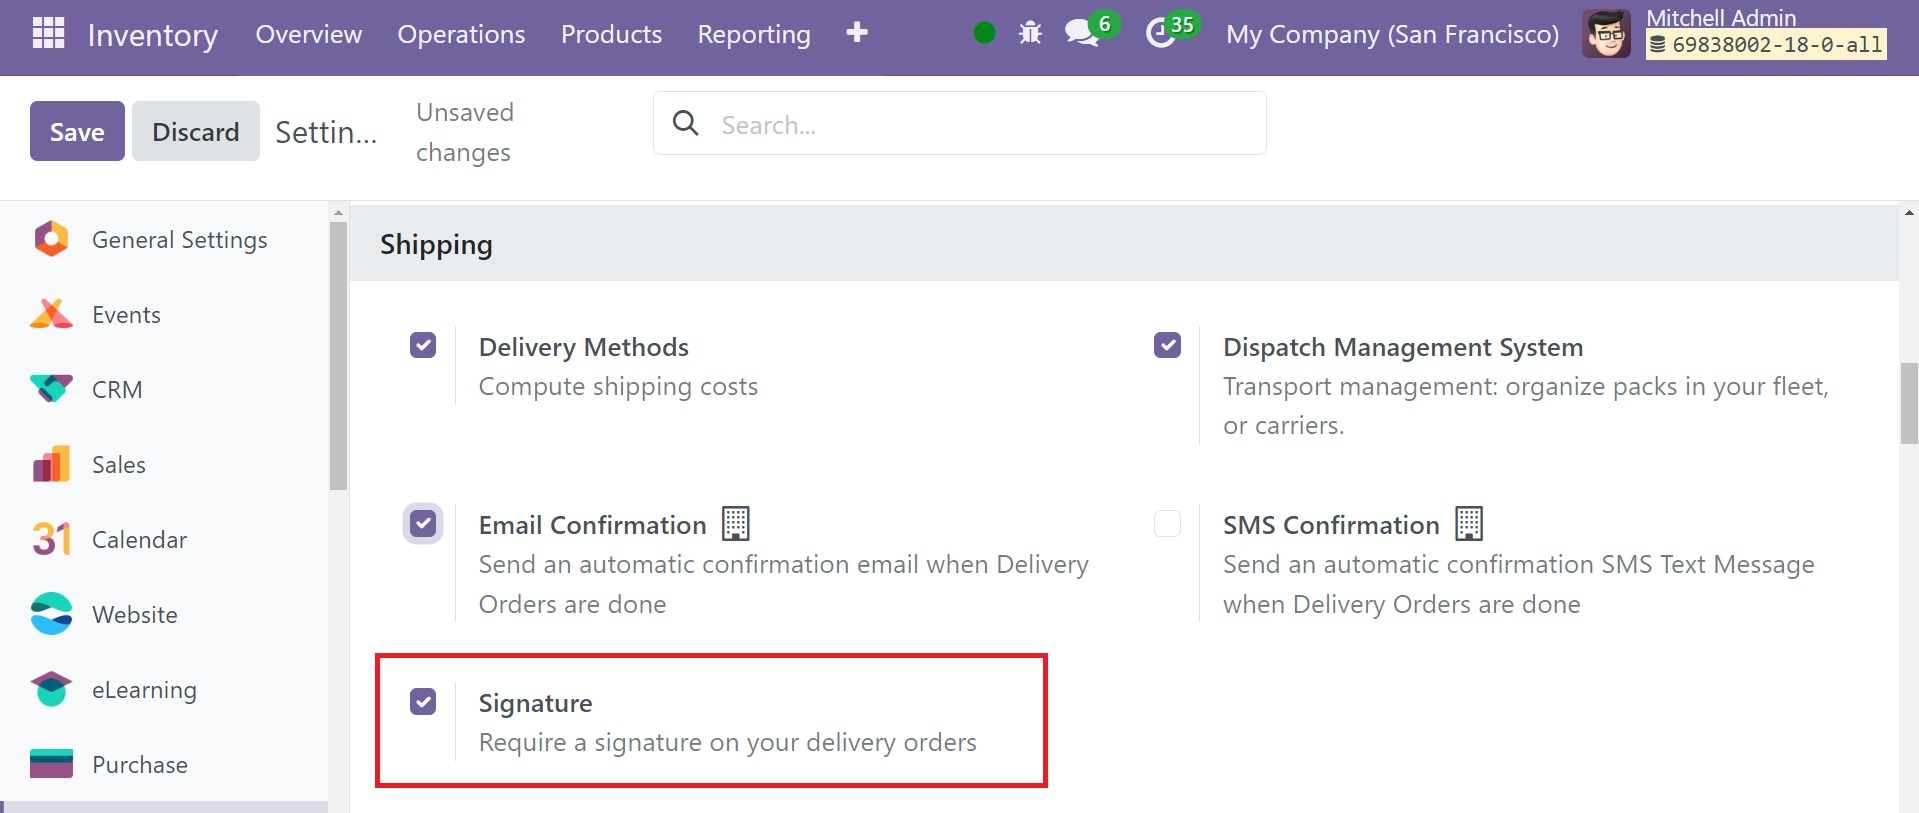
Signature
After the consumer receives the goods, you can use the Signature option to get their signature. With this approach, you can efficiently confirm the goods delivery. To enable this feature, choose "Settings" from the Configuration menu. In the "Shipping" menu, activate the Signature option.
When confirming a delivery order, the Sign button will show up, as shown below.
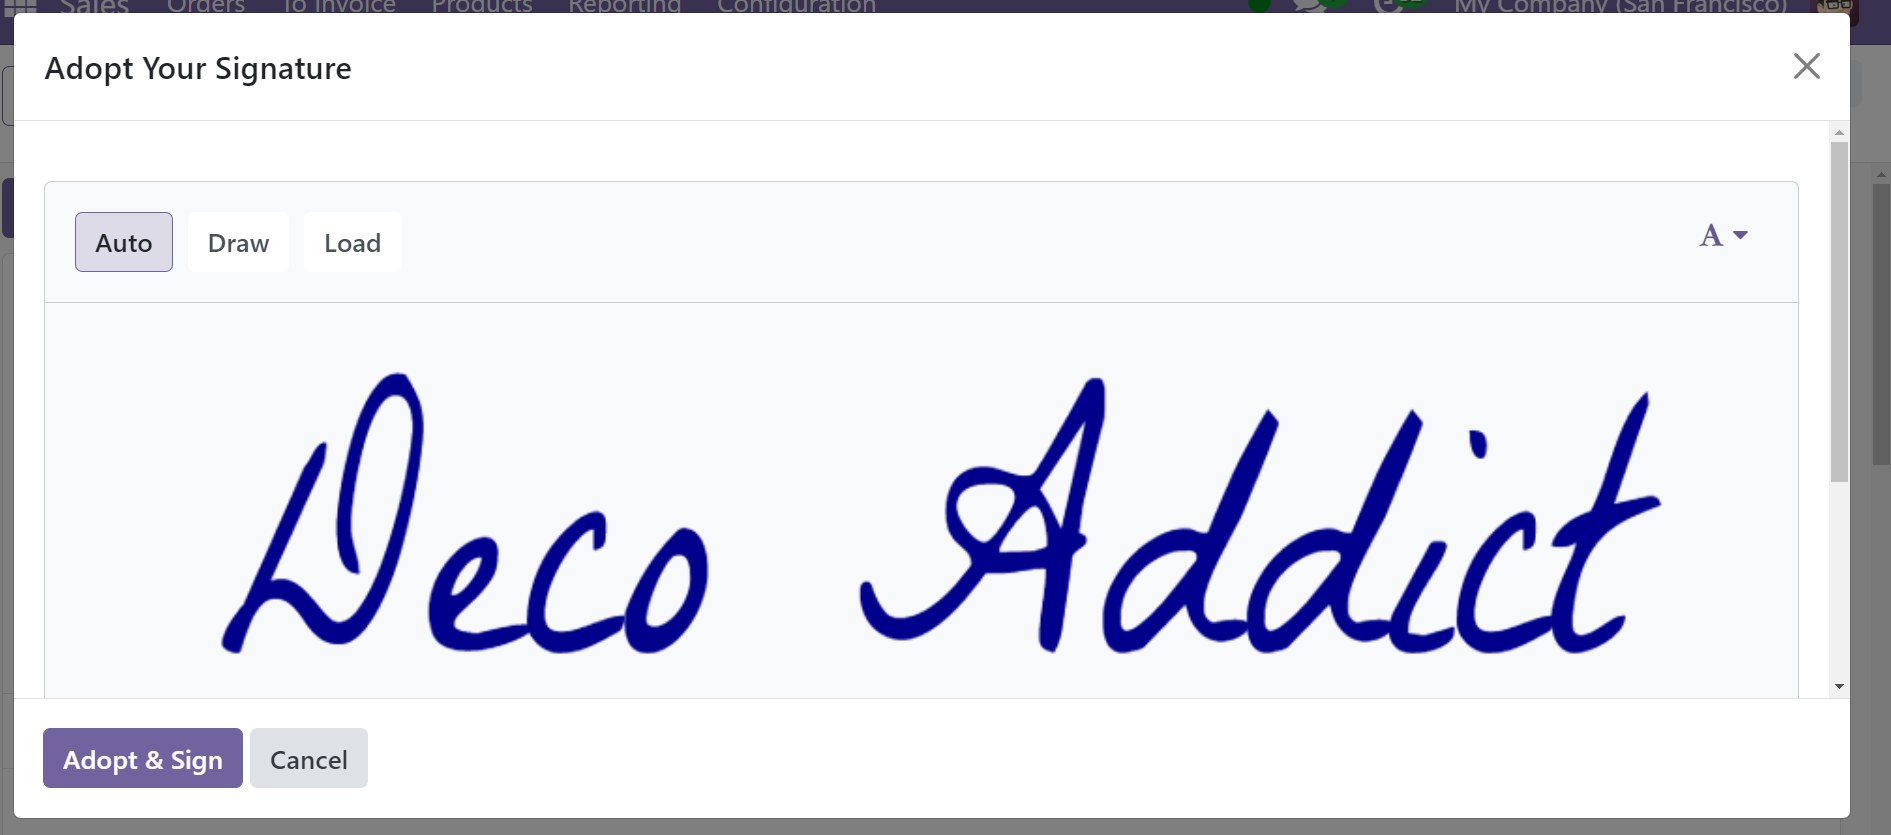
After adding the signature, click "Adopt & Sign".
Email Configuration
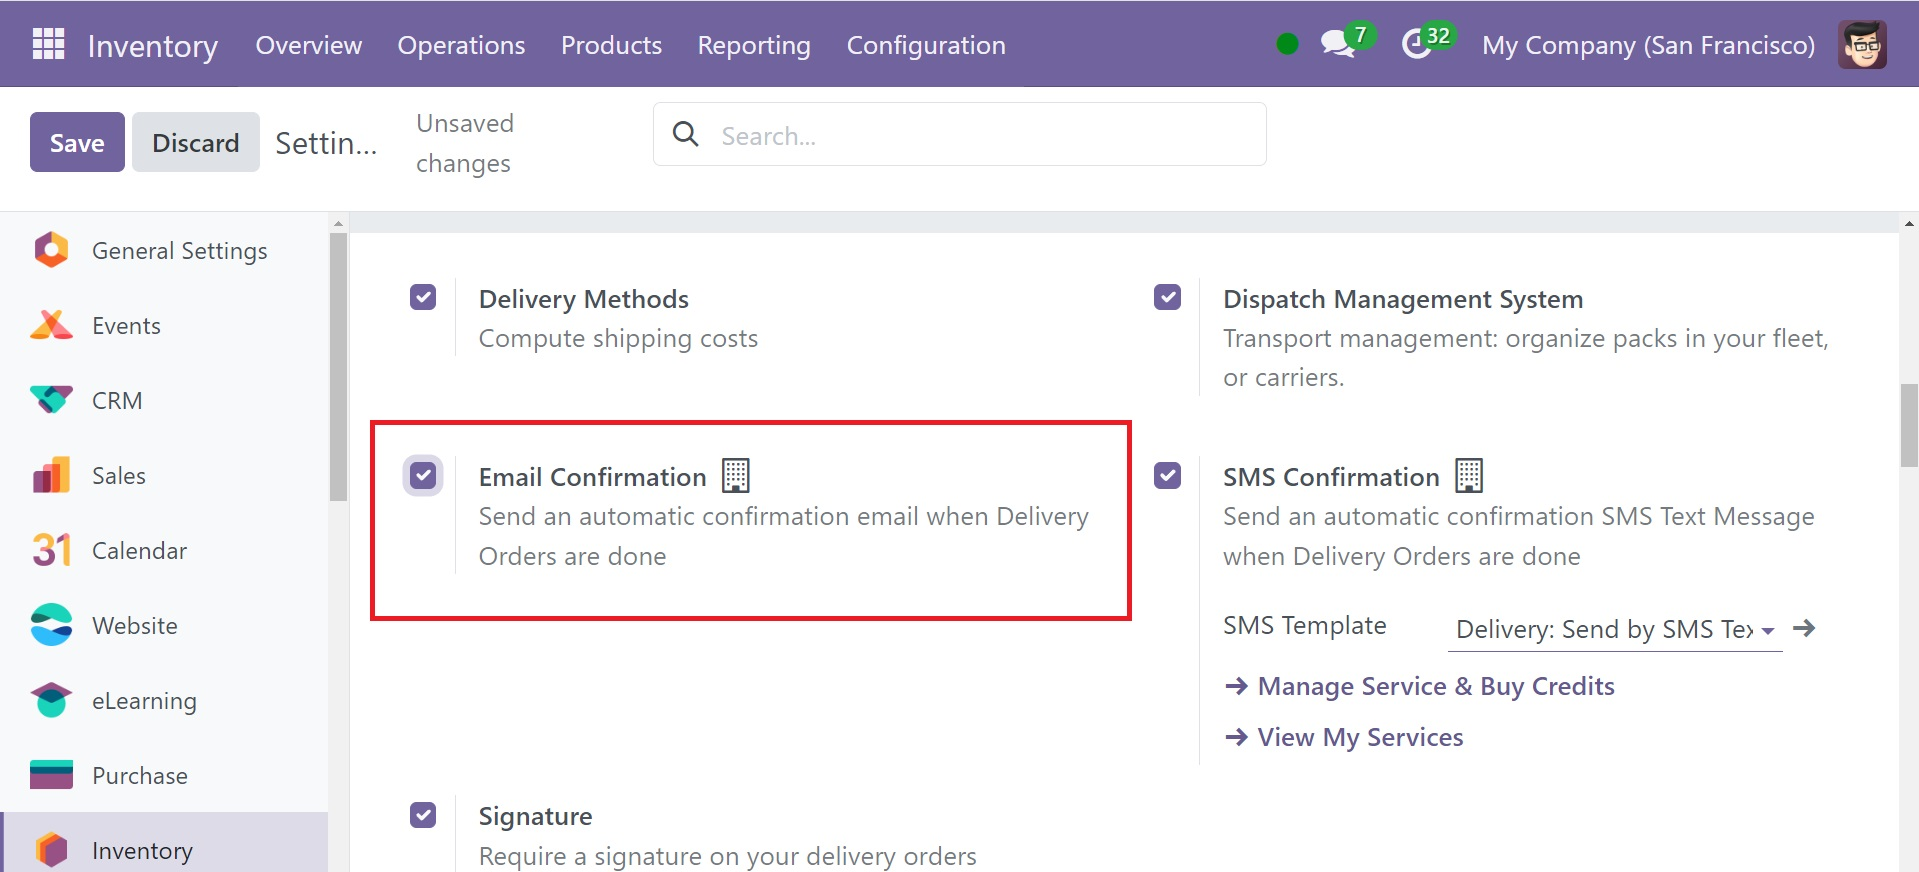
When a delivery order is confirmed, Odoo 18 will automatically send the customer a confirmation email with the delivery order attached. To use this feature, select "Settings" from the dropdown list on the Configuration tab. Then, in the Shipping section, activate "Email Confirmation."
When you check your delivery orders, Odoo will send confirmation emails to the appropriate clients.
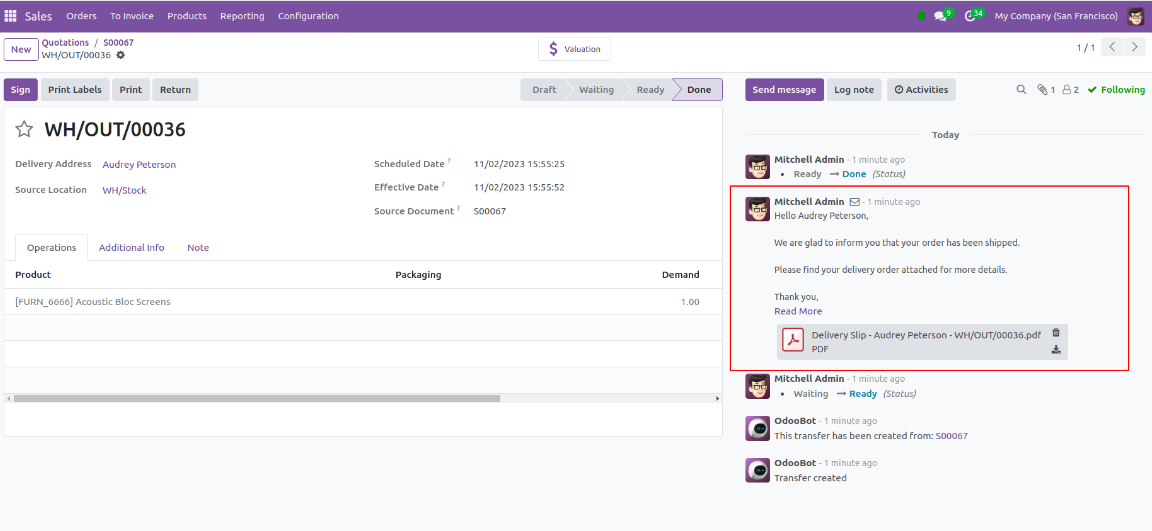
The Log note tab displays this email in its form view.
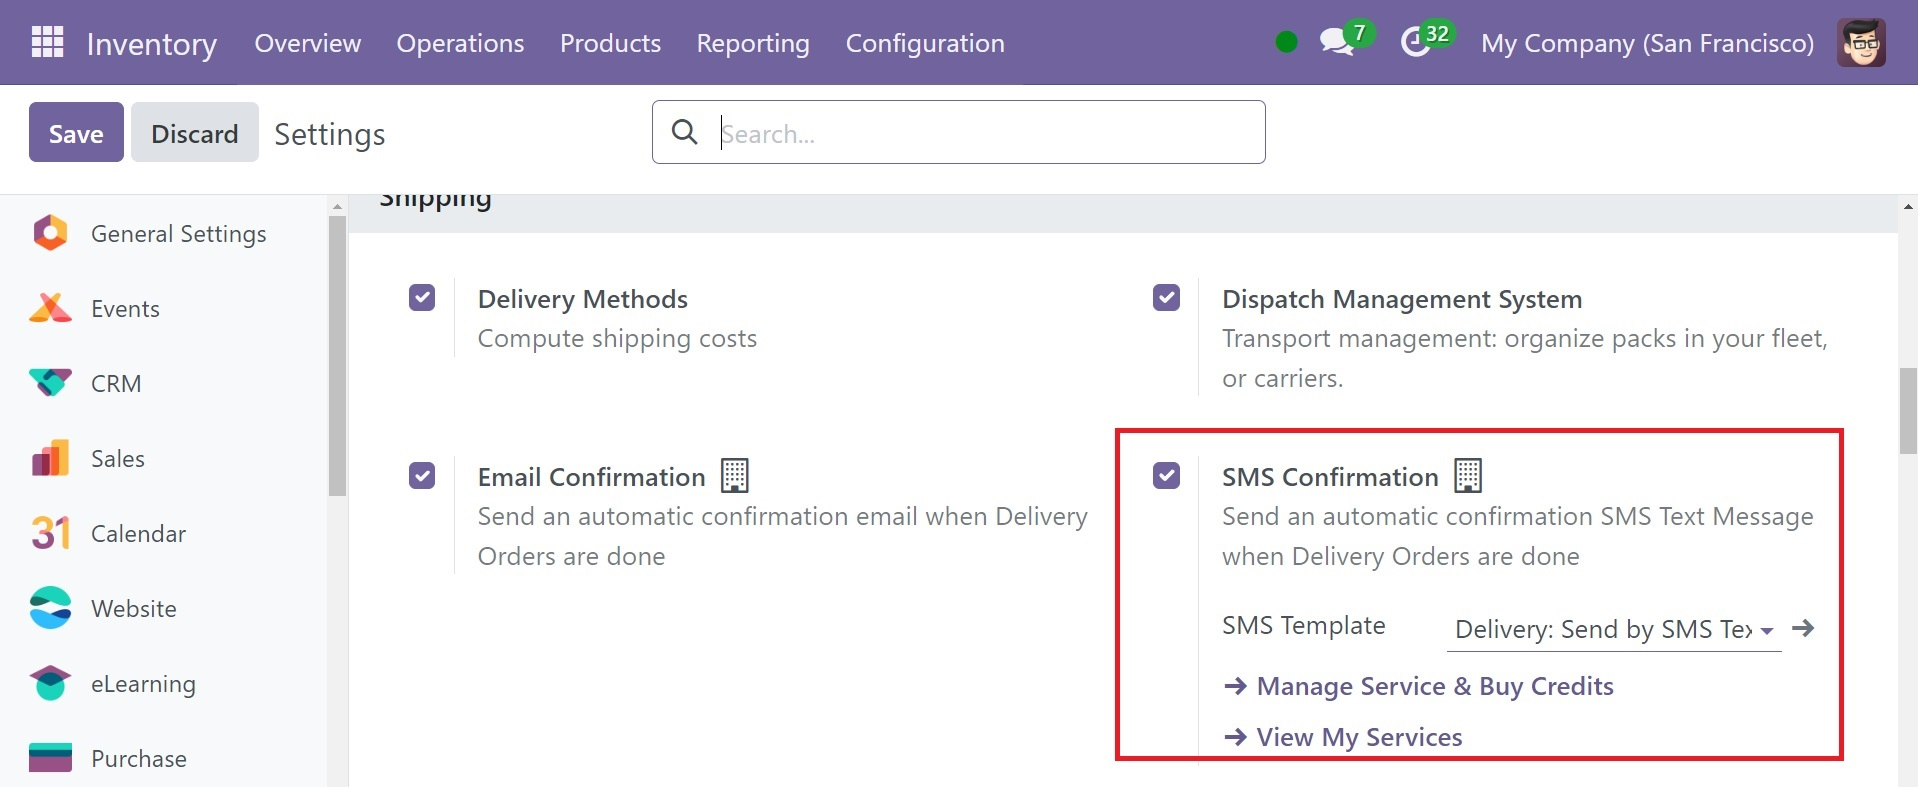
SMS Configuration
With this In-App-Purchase (IAP) service, you can only send SMS to your customers if you buy enough credits. Choose 'Settings' from the Configuration menu to make this function active. With this In-App-Purchase (IAP) service, you can only send SMS to your customers if you buy enough credits. Choose 'Settings' from the Configuration menu to make this function active. The Settings box will appear, and you may choose the Shipping option and enable "SMS Confirmation."
This window allows you to modify the existing template and create a new one. Once a delivery order has been verified, Odoo will send the customer a system-generated SMS.
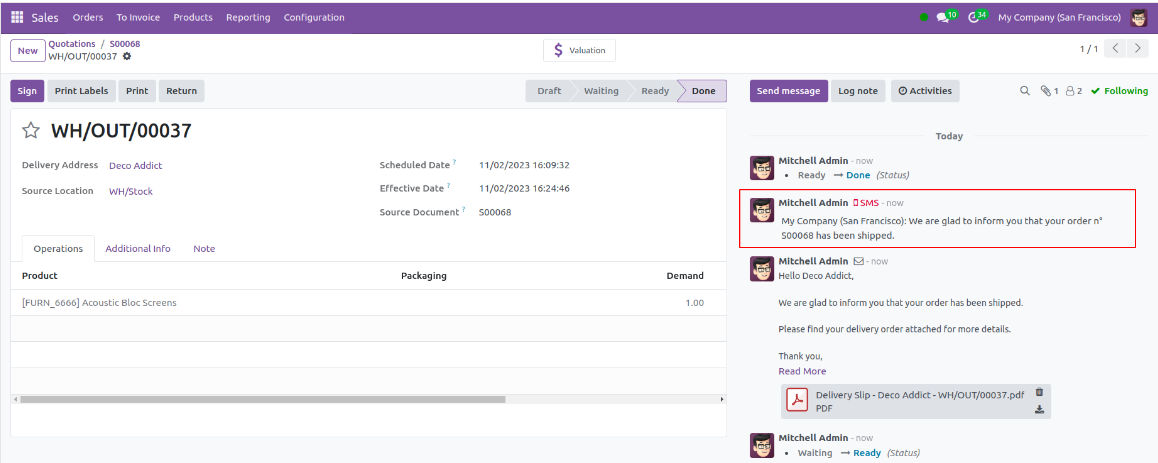
Following verification, these SMS messages appear under the Log remark tab in the delivery order form view.
Advanced Scheduling
Odoo 18's Advanced scheduliging functionality helps you save time by efficiently arranging the processes associated with sales and purchases. To utilize this feature, choose the Settings menu from the dropdown list on the Configuration tab.
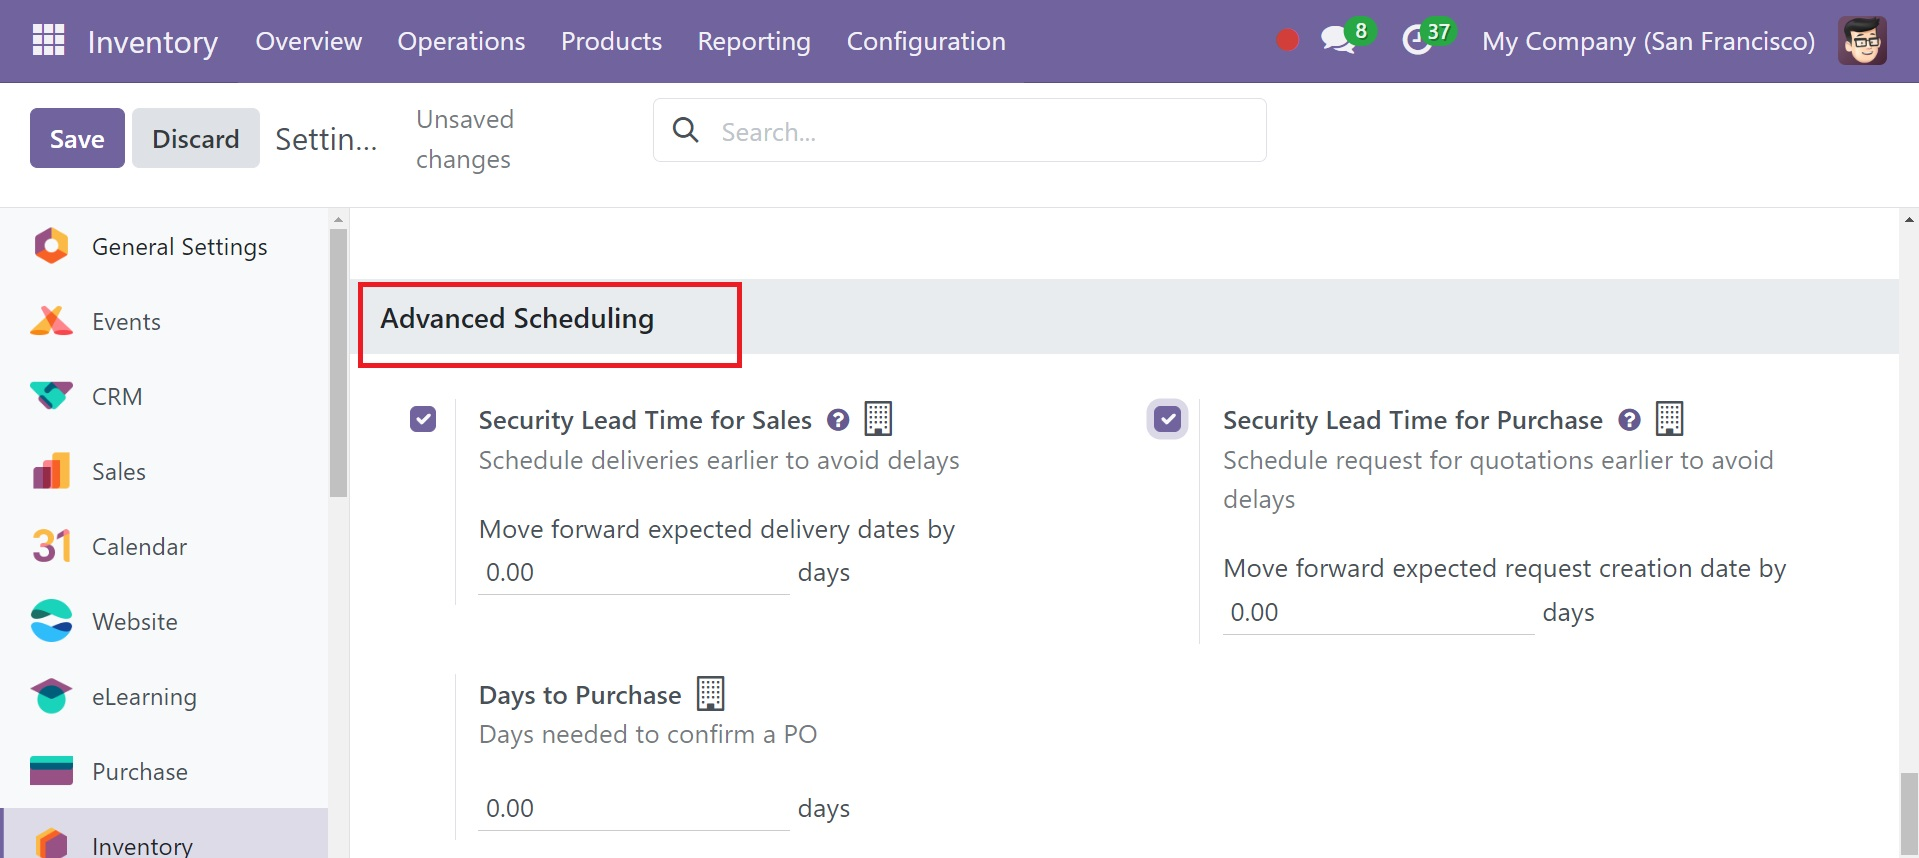
Check the Security Lead Time for Sales option to expedite the delivery. You can specify how many days you want the scheduled date to be moved earlier. Use the "Security Lead Time for Purchase" function to schedule request for quotations to move forward the deadline. You can also select the number of days needed to complete this task under the same option. Enter the number of days required for a purchase order to be confirmed under "Days to Purchase."
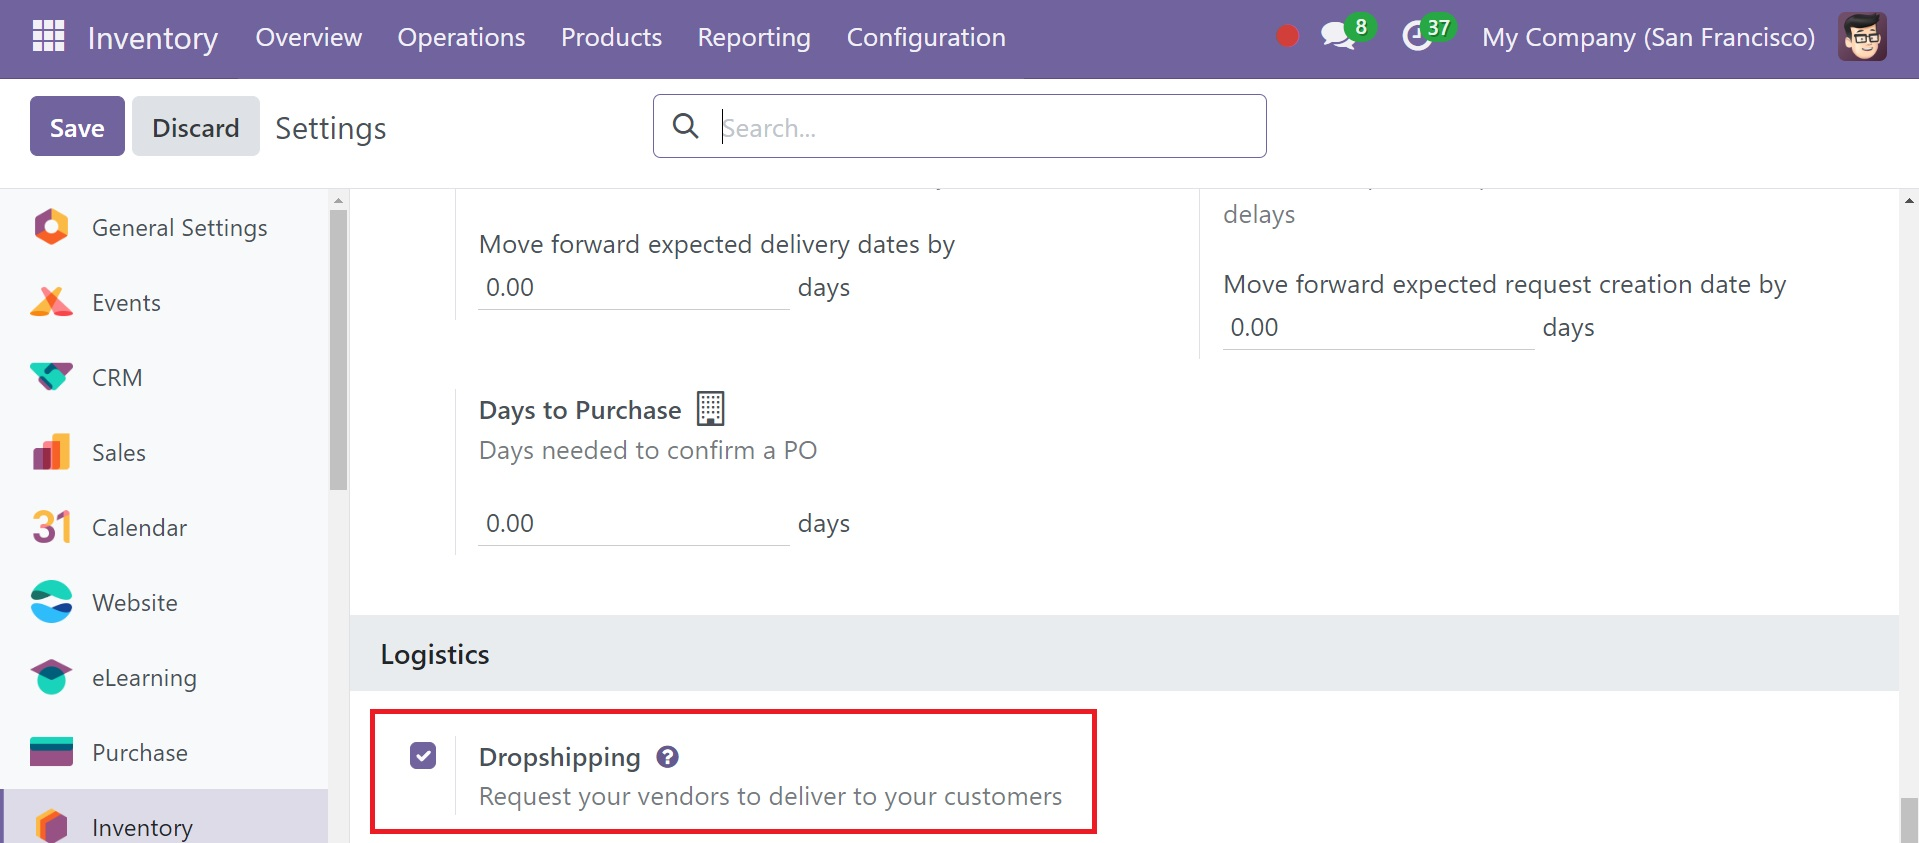
Dropshipping
Dropshipping, which enables things to be delivered directly from the seller to the client, is among the most affordable shipping choices. Dropshipping allows you to ship goods directly from suppliers or manufacturers to customers, doing away with the requirement for inventory control.
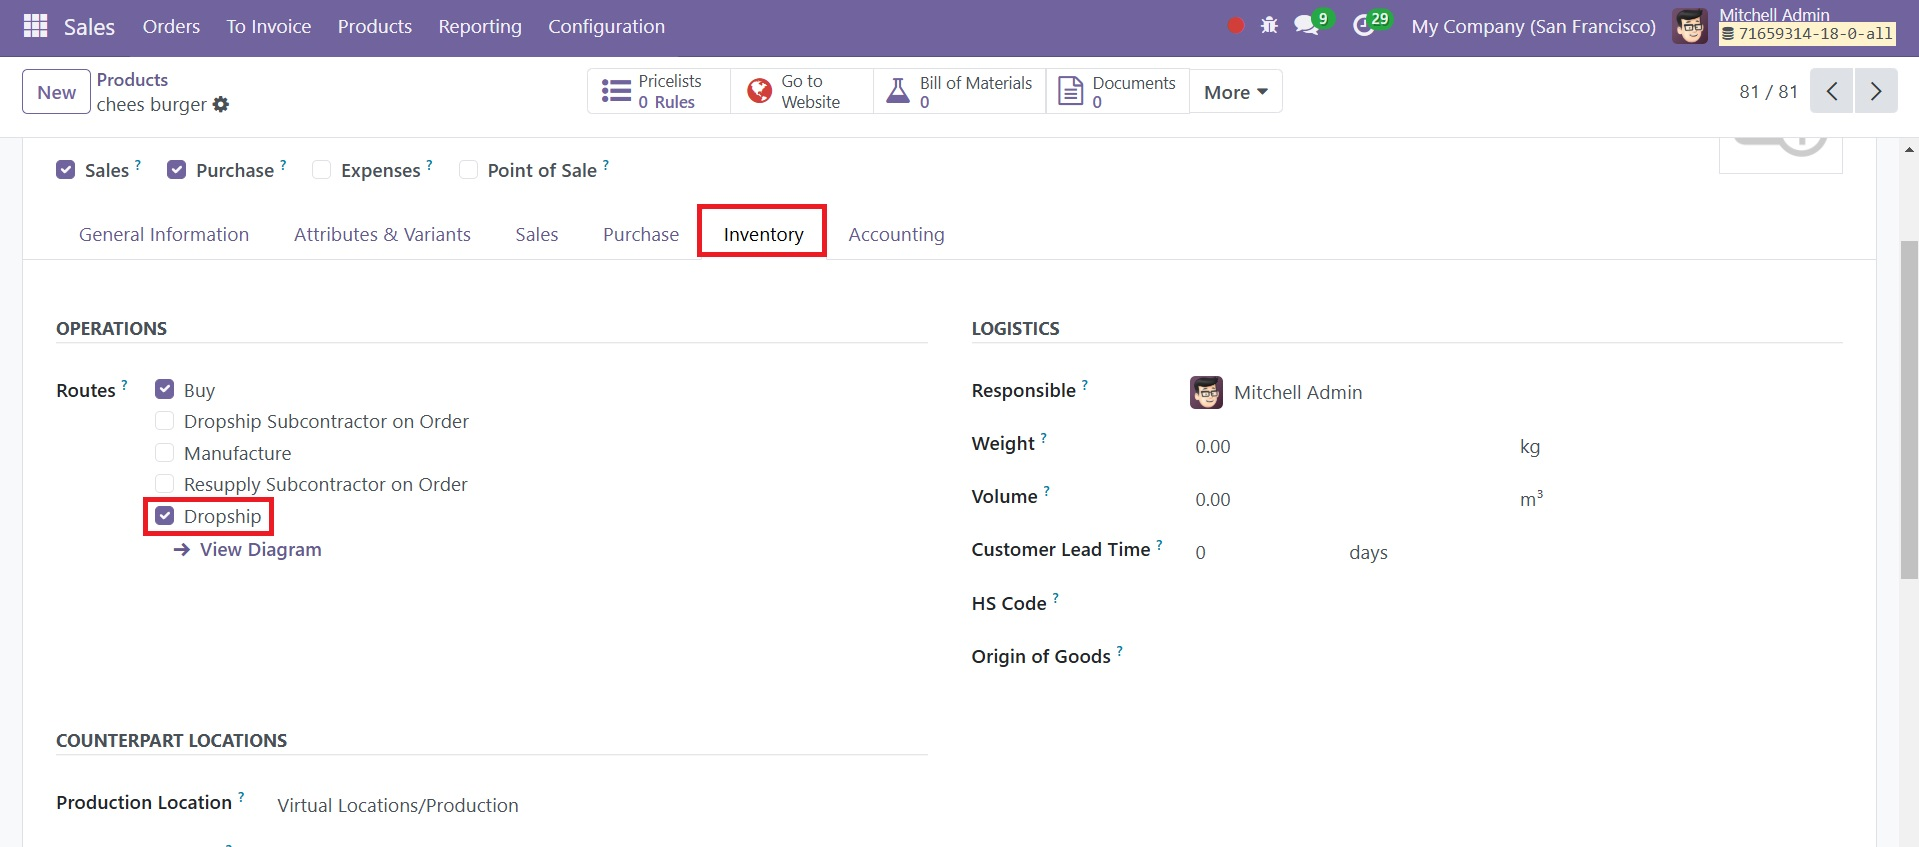
To enable Dropshipping in Odoo 18, navigate to the Settings menu in the Inventory module. As seen in the graphic below, the option is found under the Logistics tab.
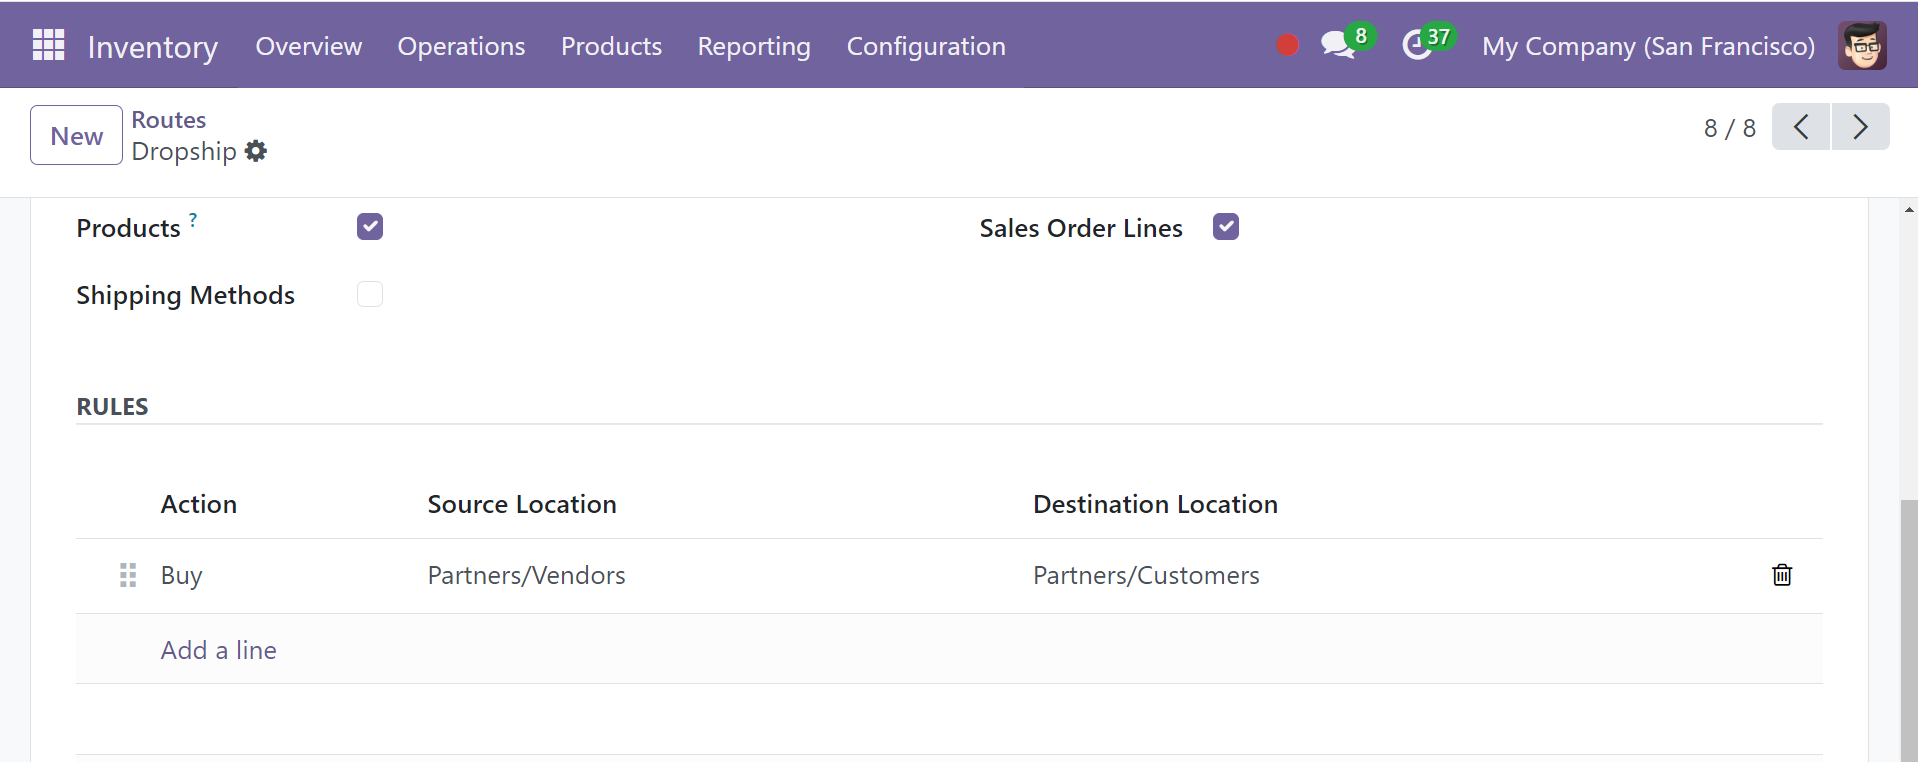
A new route called Dropshipping will now appear in the Routes. The rule inside the routes is configured using the Buy rule. The customer's location is the destination, and the vendor's location is the source.
Now, you can change the product you wish to dropship and set up the dropship routes, as shown in the screenshot below. On the Inventory tab of the product detail form, the option is displayed.

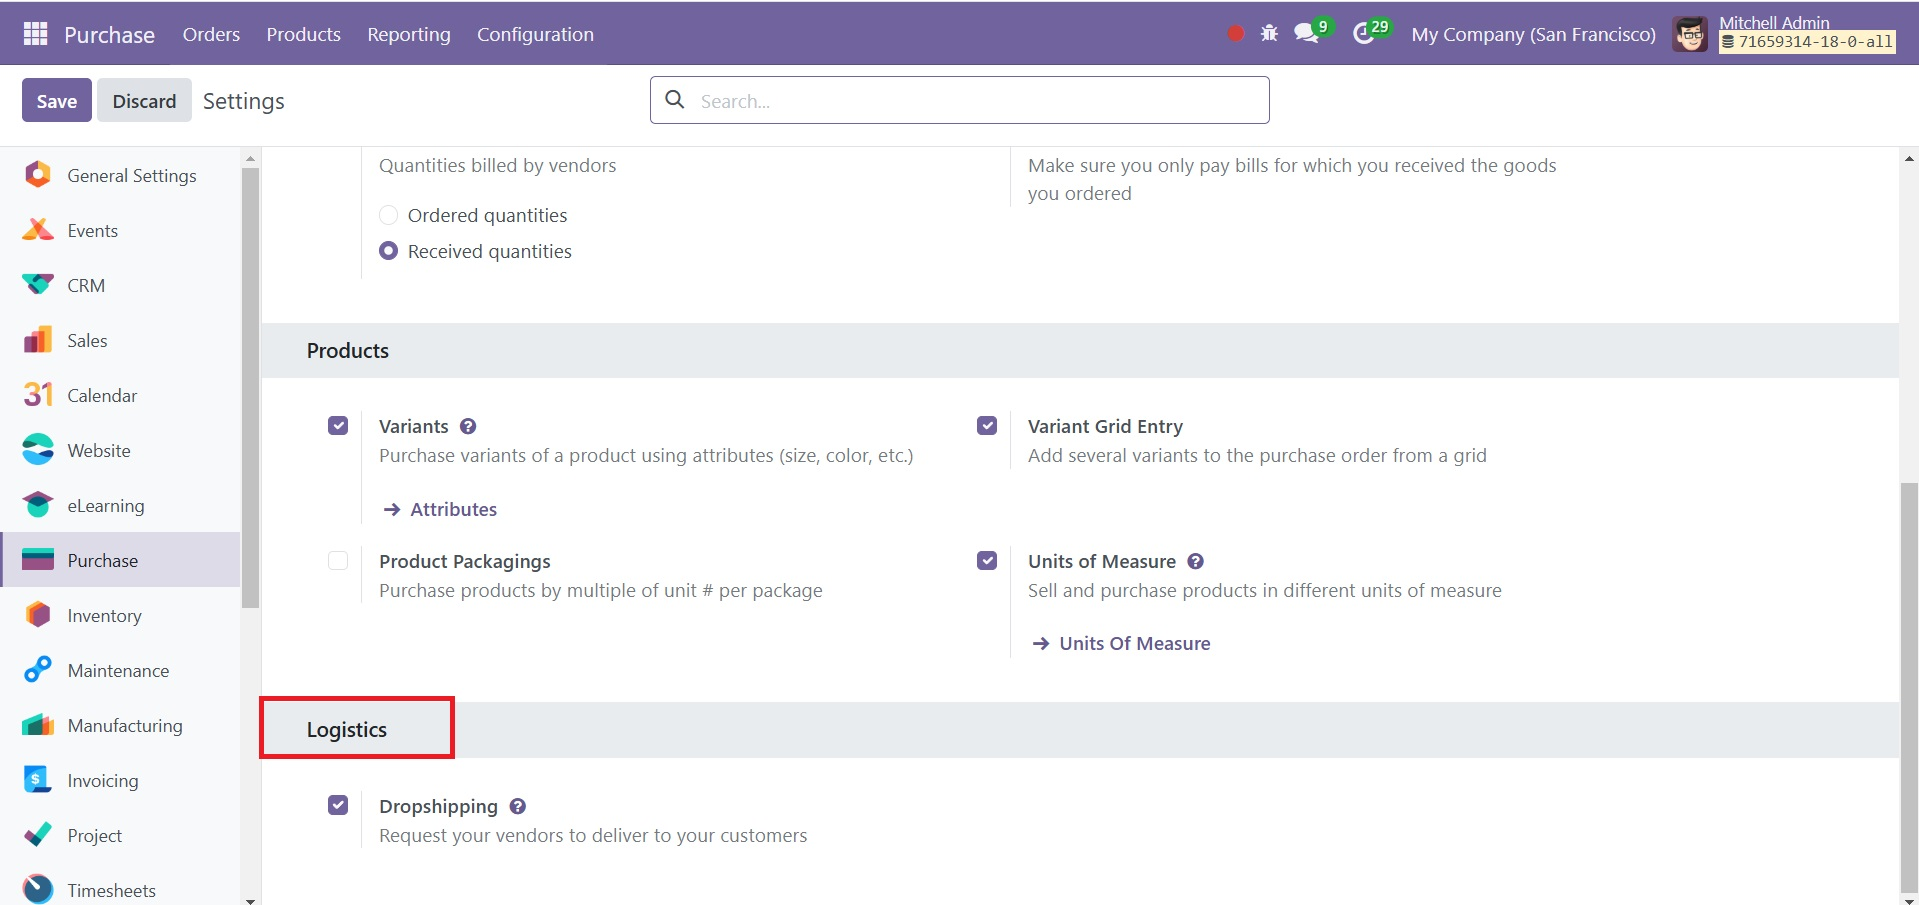
Go to the Purchase app and choose Configuration ‣ Settings to employ dropshipping as a fulfillment tactic. Click the Dropshipping checkbox under the Logistics header, then click Save to complete the process.
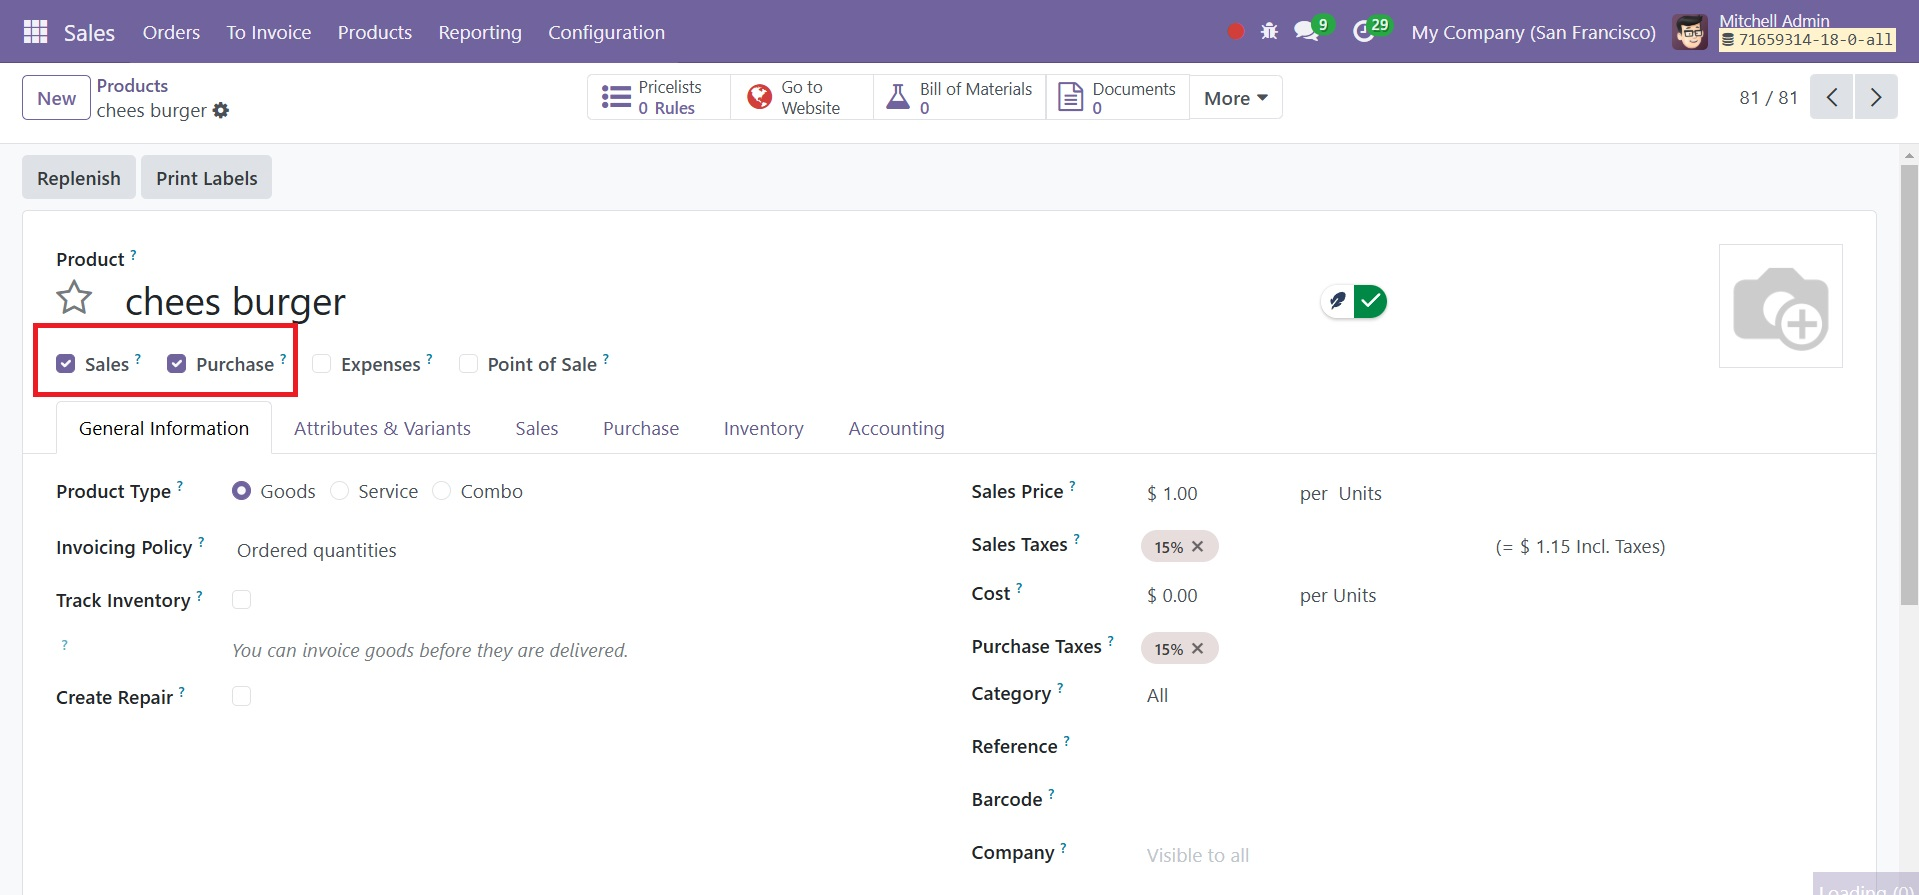
Next, open the Sales app, click Products ‣ Products, and either select Create to configure a new product or choose an existing one. Verify that the Can be Sold and Can be Purchased checkboxes are checked on the Product page.
Select a vendor and the price they charge for the product by clicking on the Purchase tab. Although you can add more than one vendor, the seller at the top of the list will be chosen for purchase orders automatically.
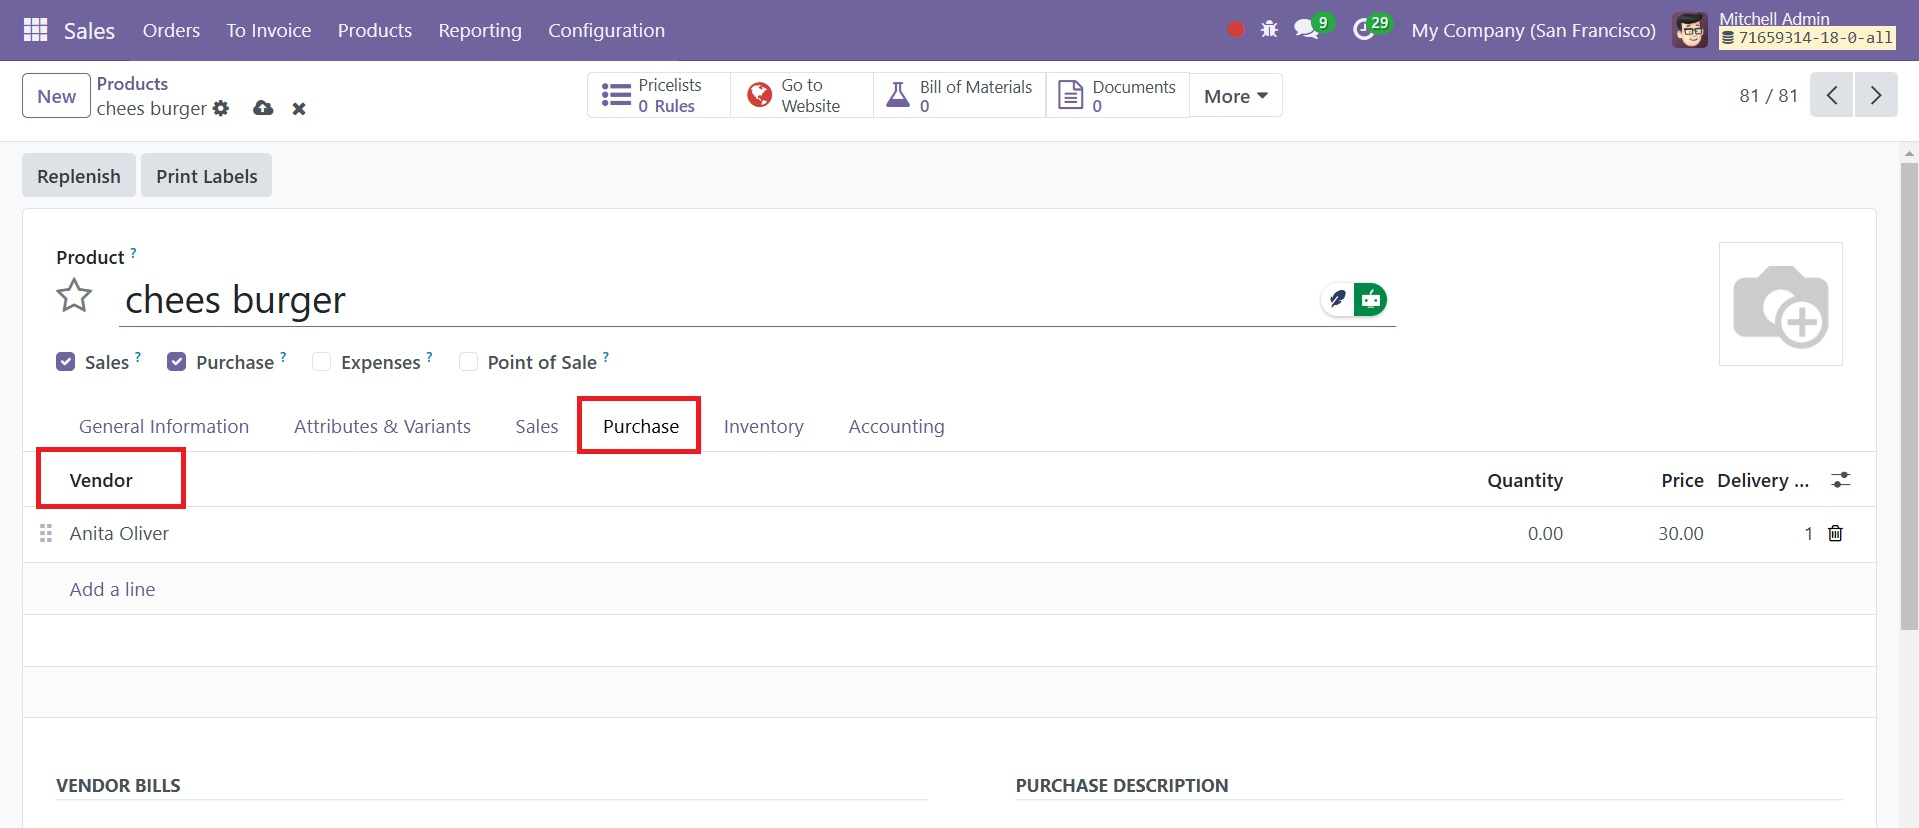
Lastly, in the Routes section, pick the Inventory tab and turn on the Dropship checkbox.
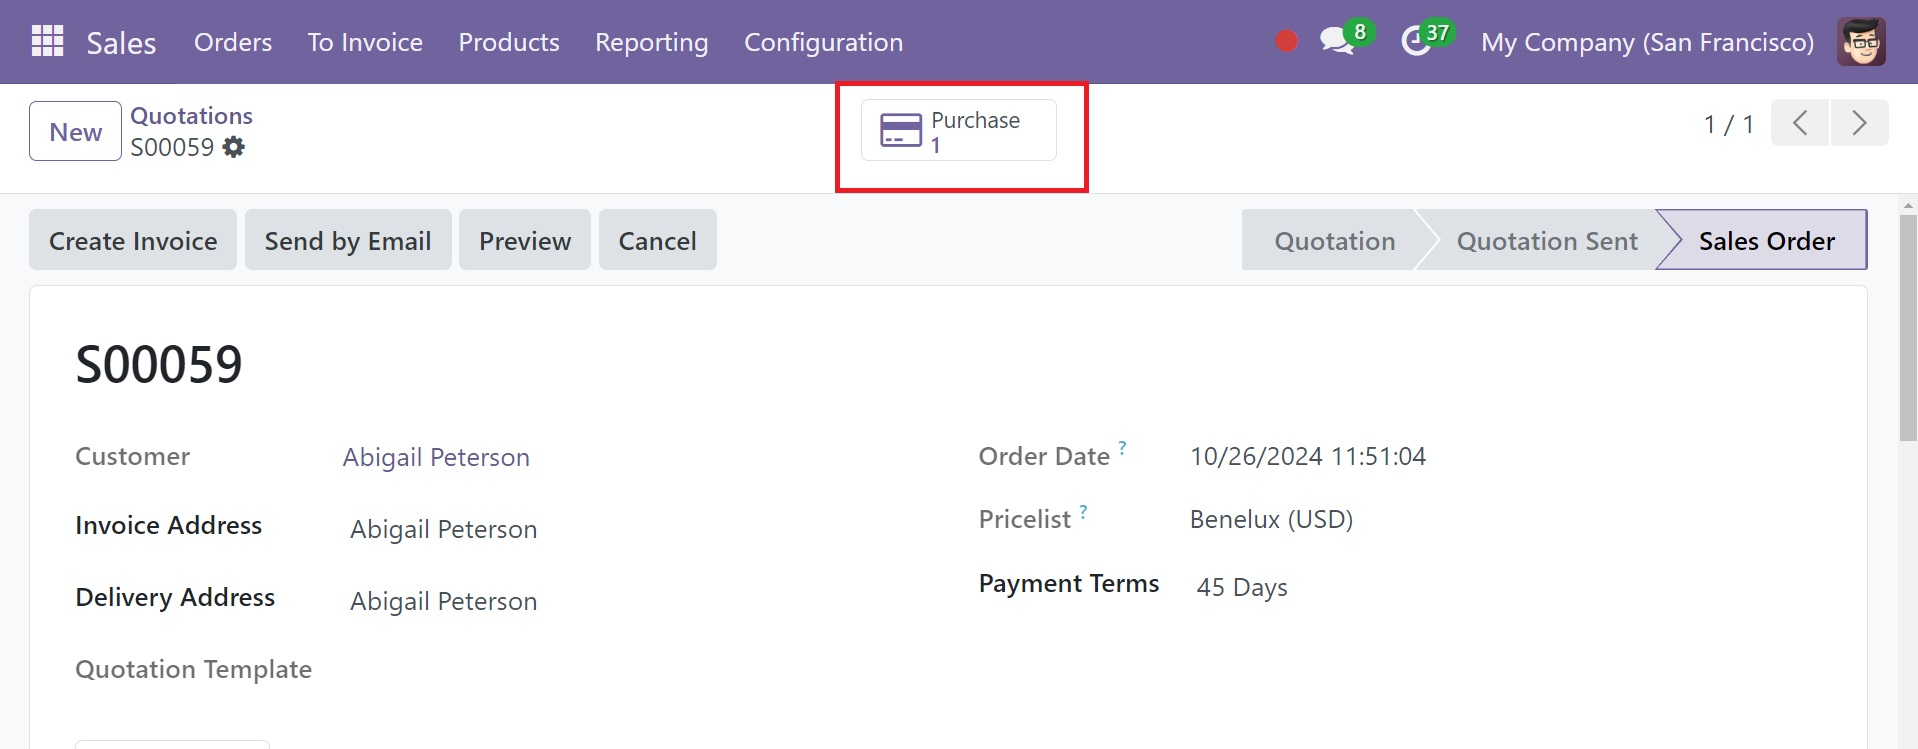
When a sales order is created for a dropshipped product, an associated request for quotation (RFQ) is automatically generated to purchase the product from the vendor. Sales orders can be viewed in the Sales app by selecting Orders ‣ Orders. Click the Purchase smart button at the top right of a sales order to view the associated RFQ, as in the image below.
After that, the Dropship tab can be obtained by verifying the purchase order. The vendor's dropshipping to the consumer can then be verified.
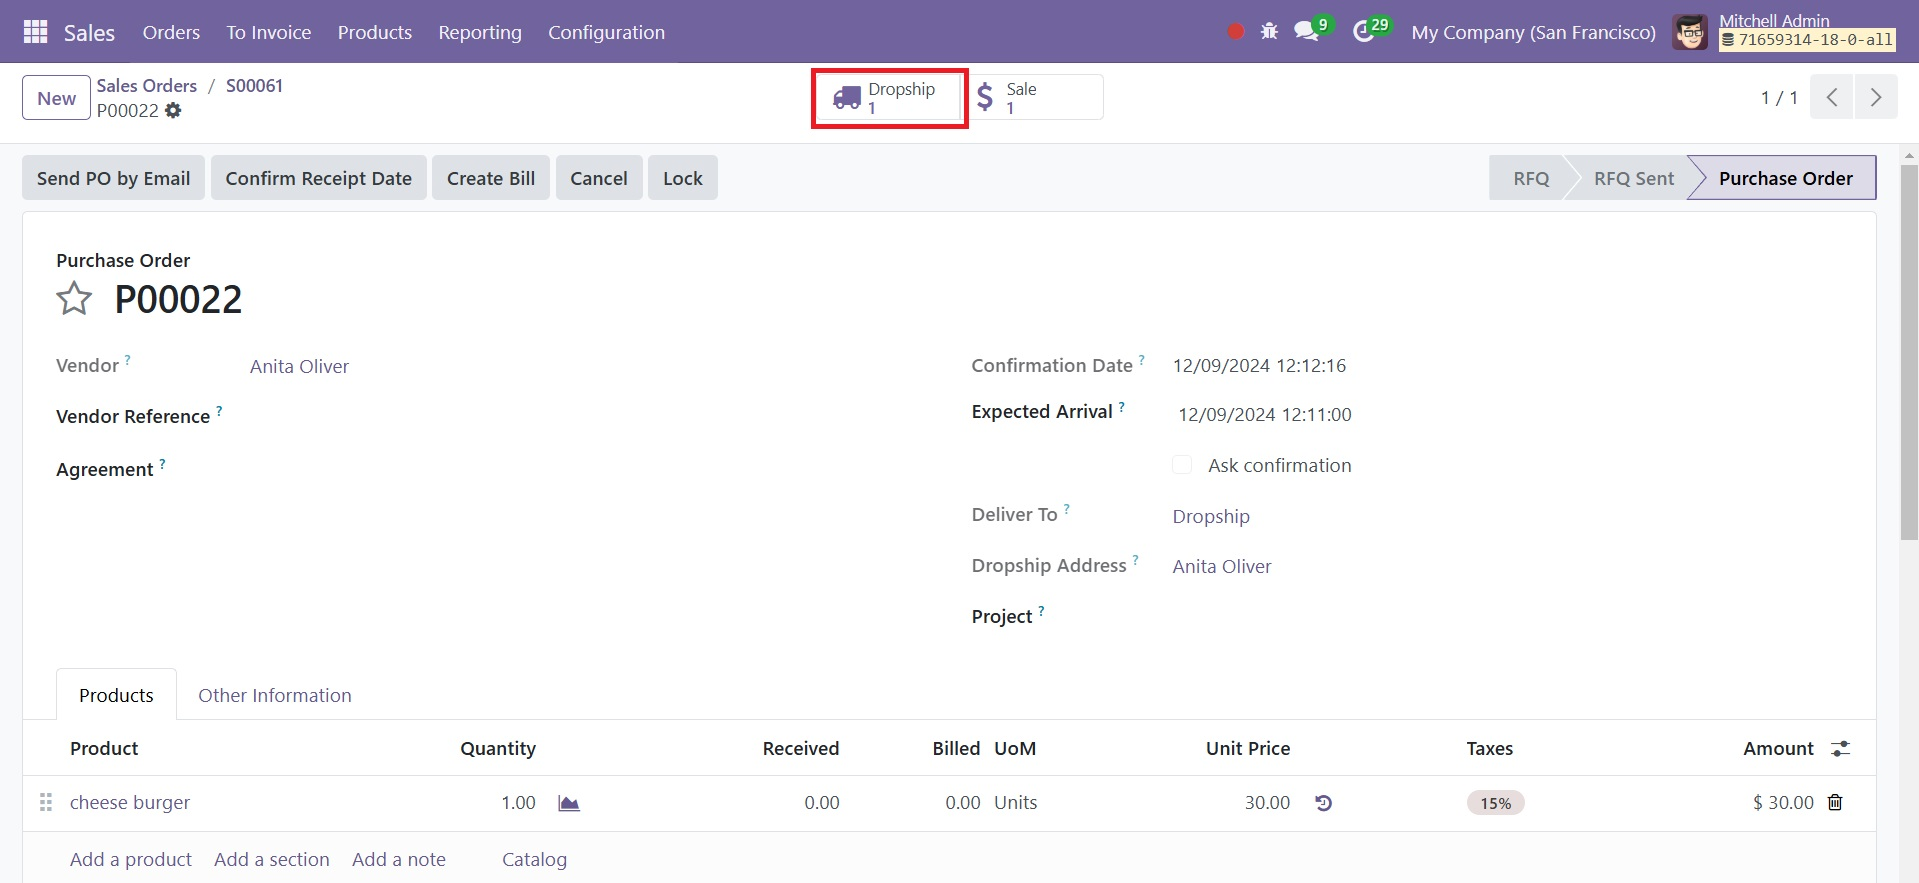
The dropship receipt displays Partners/Vendors in the Source Location field, and Partners/Customers in the Destination Location field. Upon delivery of the product to the customer, click on the Validate button at the top-left of the dropship receipt to confirm the delivered quantity.
As a result, the vendor ships the item directly to the customer.
Landed Cost
The whole cost of a product or cargo, including all shipping charges, is known as the "landed cost" when it comes to recieving goods from suppliers.
When determining a product's value in Odoo, extra expenses are taken into consideration using the Landed Costs function. This covers the price of shipping, insurance, taxes, customs charges, and other charges.
The Landed cost feature needs to be enabled before landed costs may be added to items. Go to Inventory app ‣ Configuration ‣ Settings, then scroll to the Valuation section to activate this option.
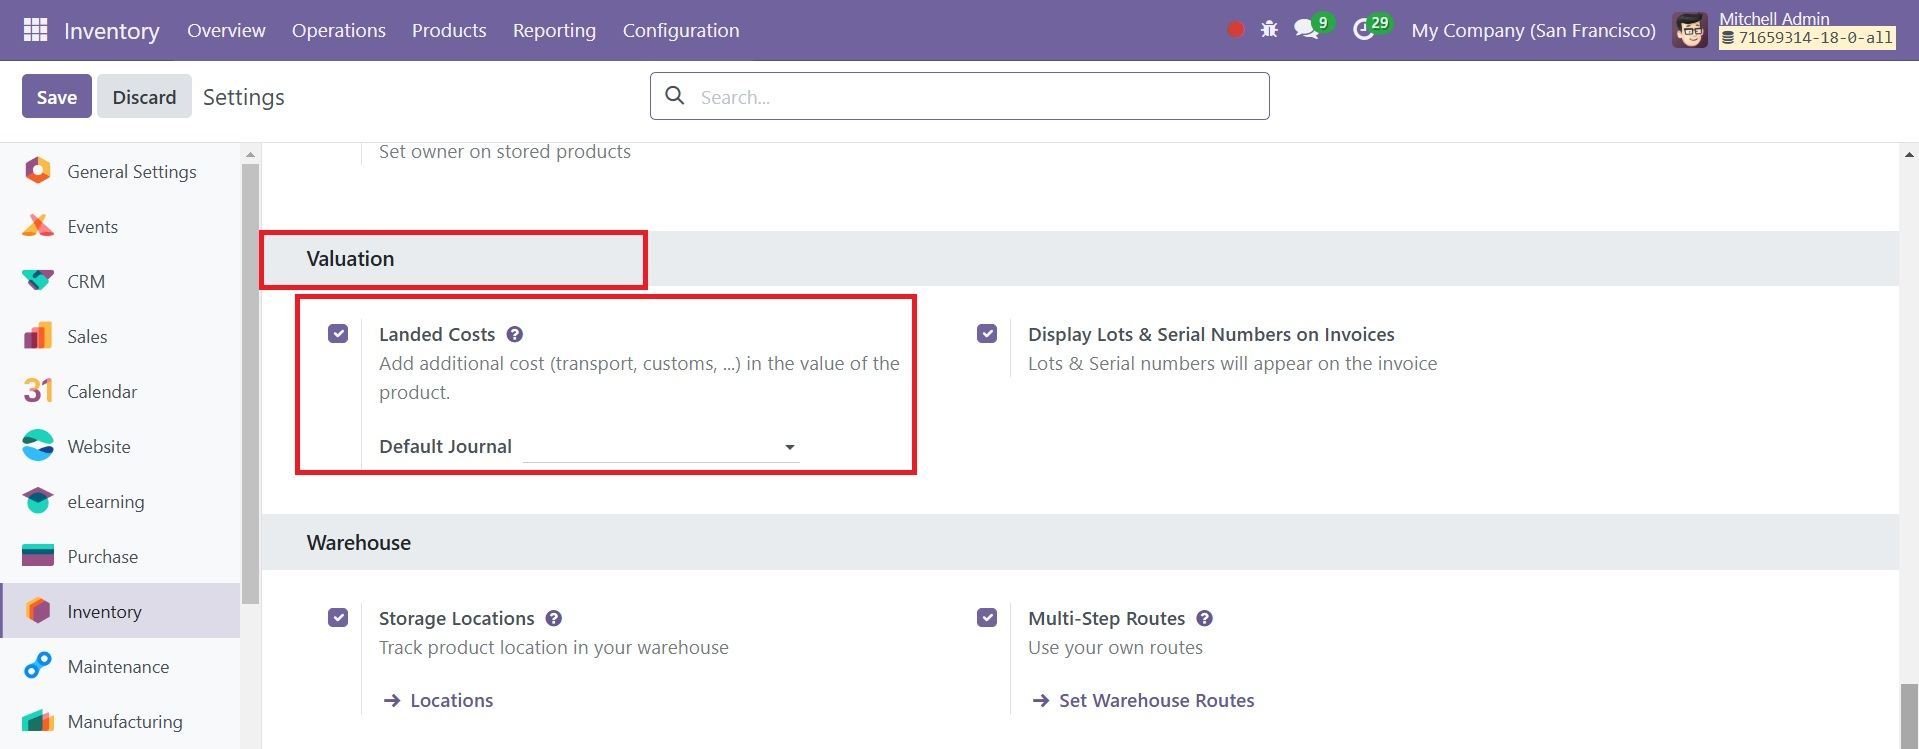
To save changes, click Save after checking the box next to the Landed Costs option.
In Odoo, a landed cost product may be made for charges that are regularly added as landing costs. Instead of needing to be manually input each time a new vendor bill is prepared, a landed cost product can be swiftly added to a vendor bill as an invoice line.
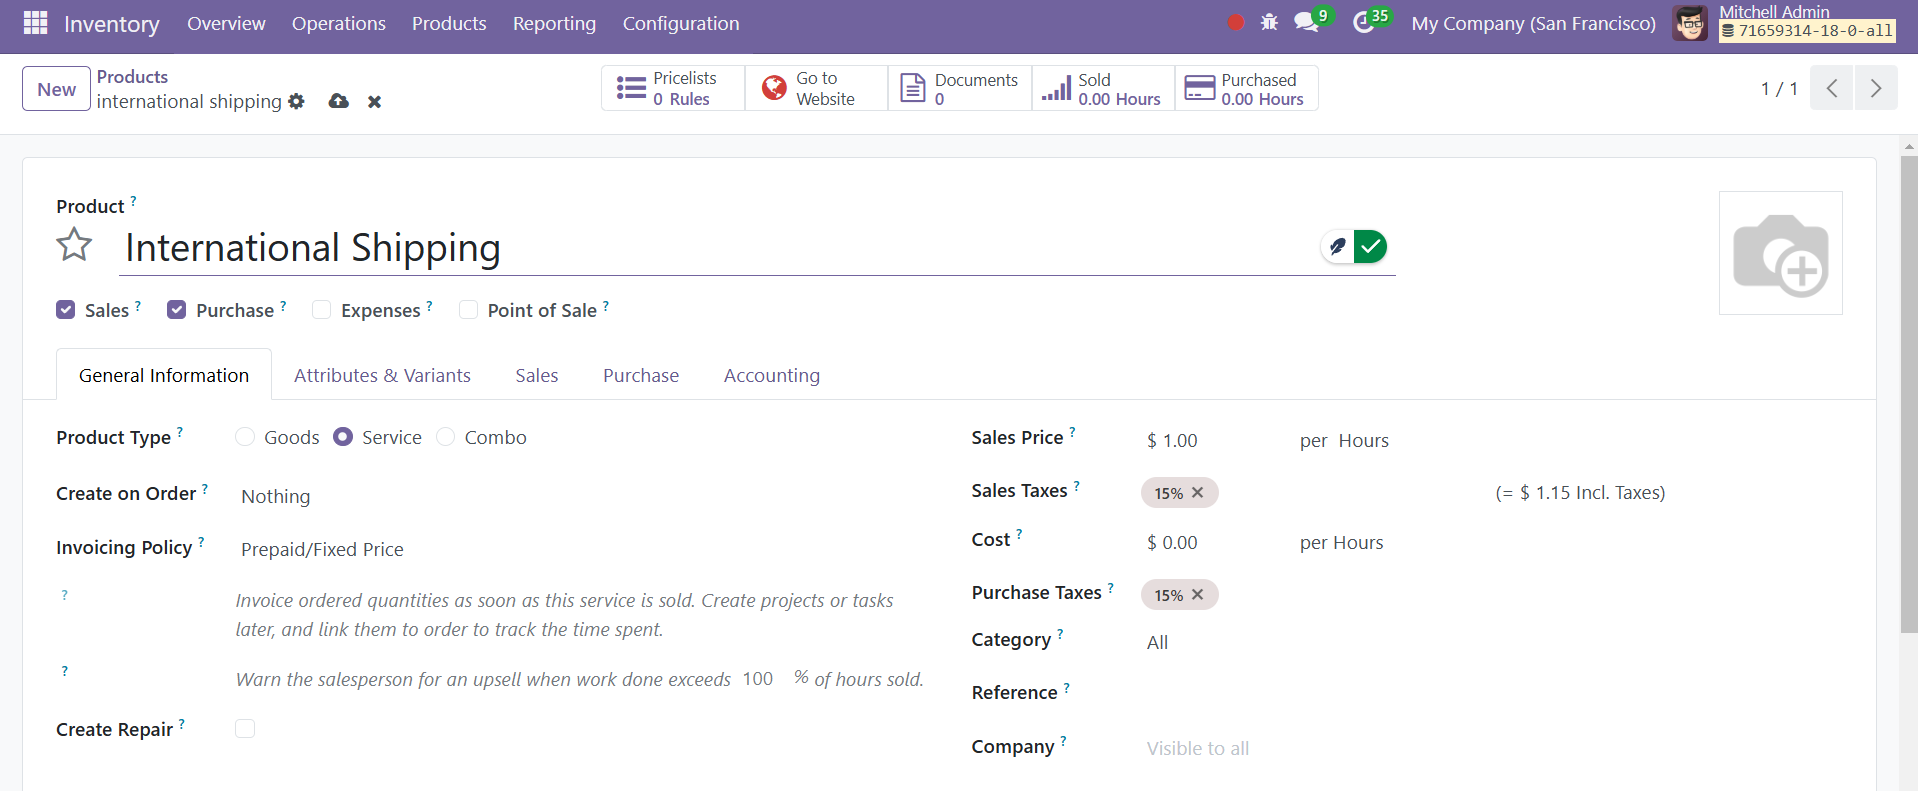
Go to Inventory app ‣ Products ‣ Products and click New to create a new product.
In the Product Name column, give the landed cost product a name (for example, International Shipping). Click the drop-down menu in the Product Type column and choose Service as the Product Type.
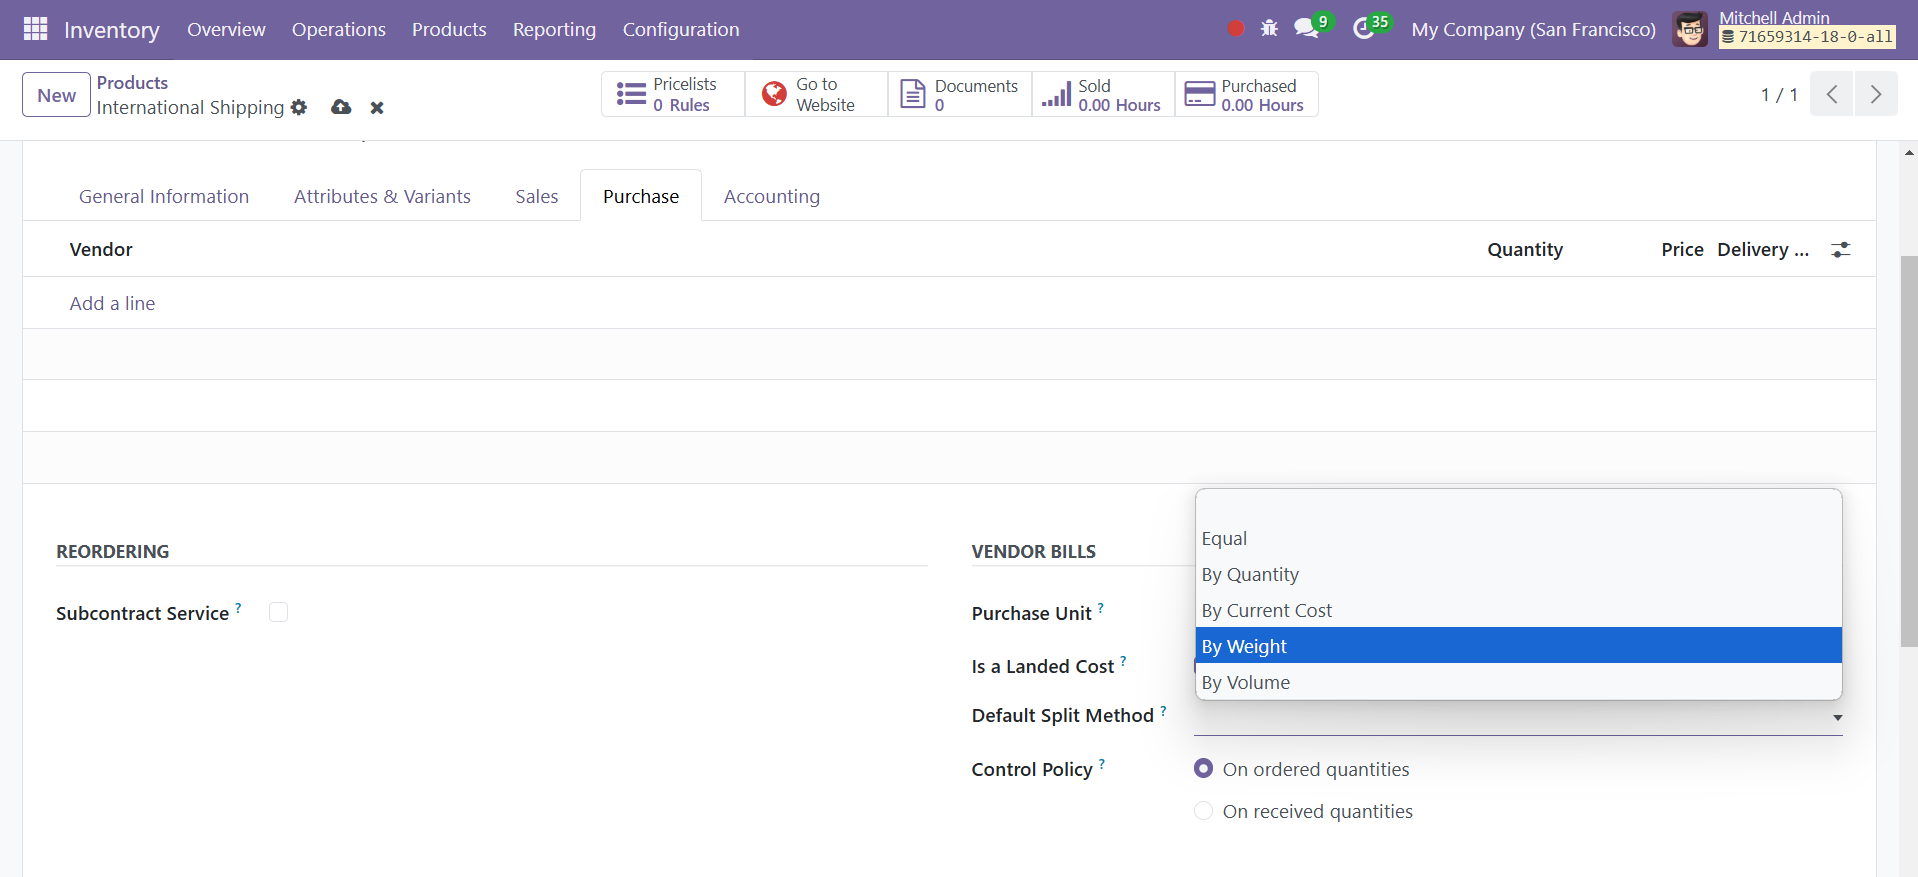
Click the Purchase tab, and tick the checkbox next to Is a Landed Cost in the Vendor Bills section. Once ticked, a new Default Split Method field appears below it, prompting a selection. Clicking that drop-down menu reveals the following options:
● Equal: splits the cost equally across each product included in the receipt, regardless of the quantity of each.
● By Quantity: splits the cost across each unit of all products in the receipt.
● By Current Cost: splits the cost according to the cost of each product unit, so a product with a higher cost receives a greater share of the landed cost.
● By Weight: splits the cost, according to the weight of the products in the receipt.
● By Volume: splits the cost, according to the volume of the products in the receipt
Set default split method as equal. When creating new vendor bills, this product can be added as an invoice line as a landed cost.
Now, navigate to Purchase app and select the New to create a new request for quotation (RfQ). In the Vendor field, add a vendor to order products from. Then, click Add a product, under the Products tab, to add products to the RfQ.
Once ready, click Confirm Order to confirm the order. Then, click Receive Products once the products have been received, followed by Validate.
Once the vendor fulfills the PO and sends a bill, a vendor bill can be created from the PO in Odoo.
Navigate to the Purchase app, and click into the PO for which a vendor bill should be created. Then, click Create Bill. This opens a new Vendor Bill in the Draft stage.
In the Bill Date field, click the line to open a calendar popover menu, and select the date on which this draft bill should be billed. Then, under the Invoice Lines tab, click Add a line, and click the drop-down menu in the Product column to select the previously-created landed cost product. Save and update the draft bill.
At the top of the form, a Create Landed Costs button appears.
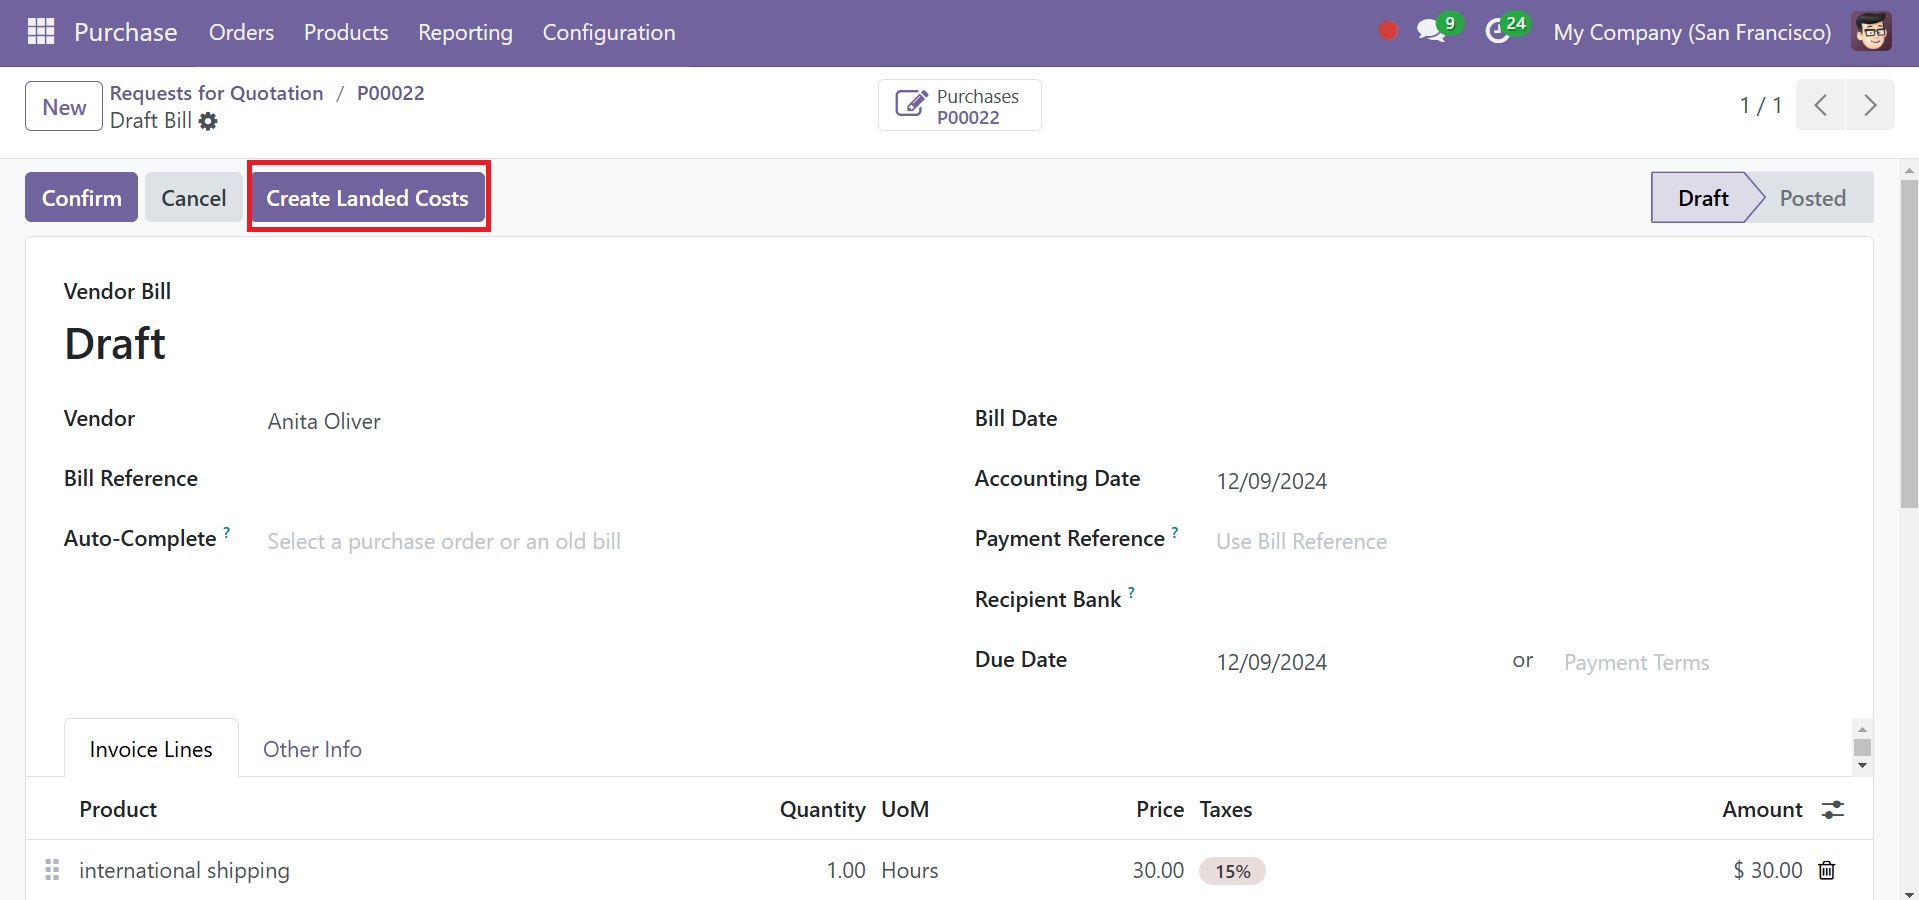
Once a landed cost is added to the vendor bill, click Create Landed Costs at the top of the vendor bill. Doing so automatically creates a landed cost record, with a set landed cost pre-filled in the product line in the Additional Costs tab.
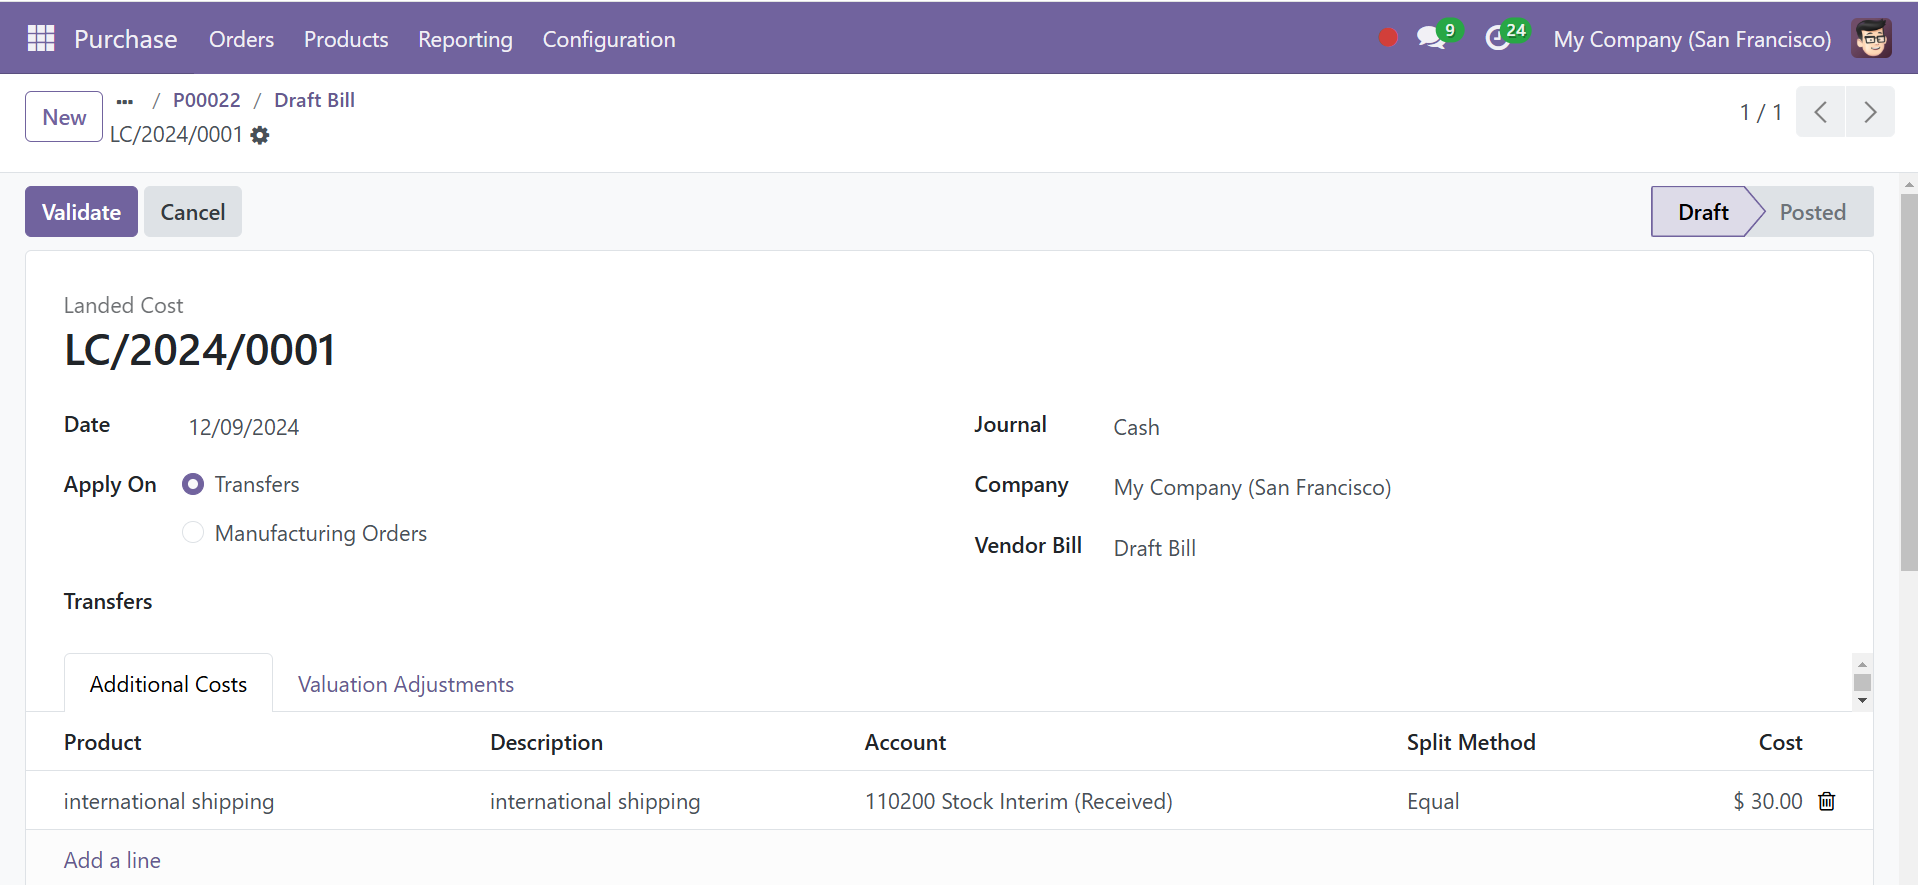
From the Landed Cost form, click the Transfers drop-down menu, and select which transfer the landed cost belongs to.

After setting the picking from the Transfers drop-down menu, click Validate.
Consignment
Consignment is a practical way for suppliers to introduce new goods and make delivery to clients simple. It's also a fantastic way for the consignee, the business that stores the goods, to get paid for their labor. For the ease of keeping goods they don't really own, consignees may even charge a fee. The consignment principle is used by online businesses and eCommerce. The stores are exempt from keeping a permanent inventory when it comes to consignment.
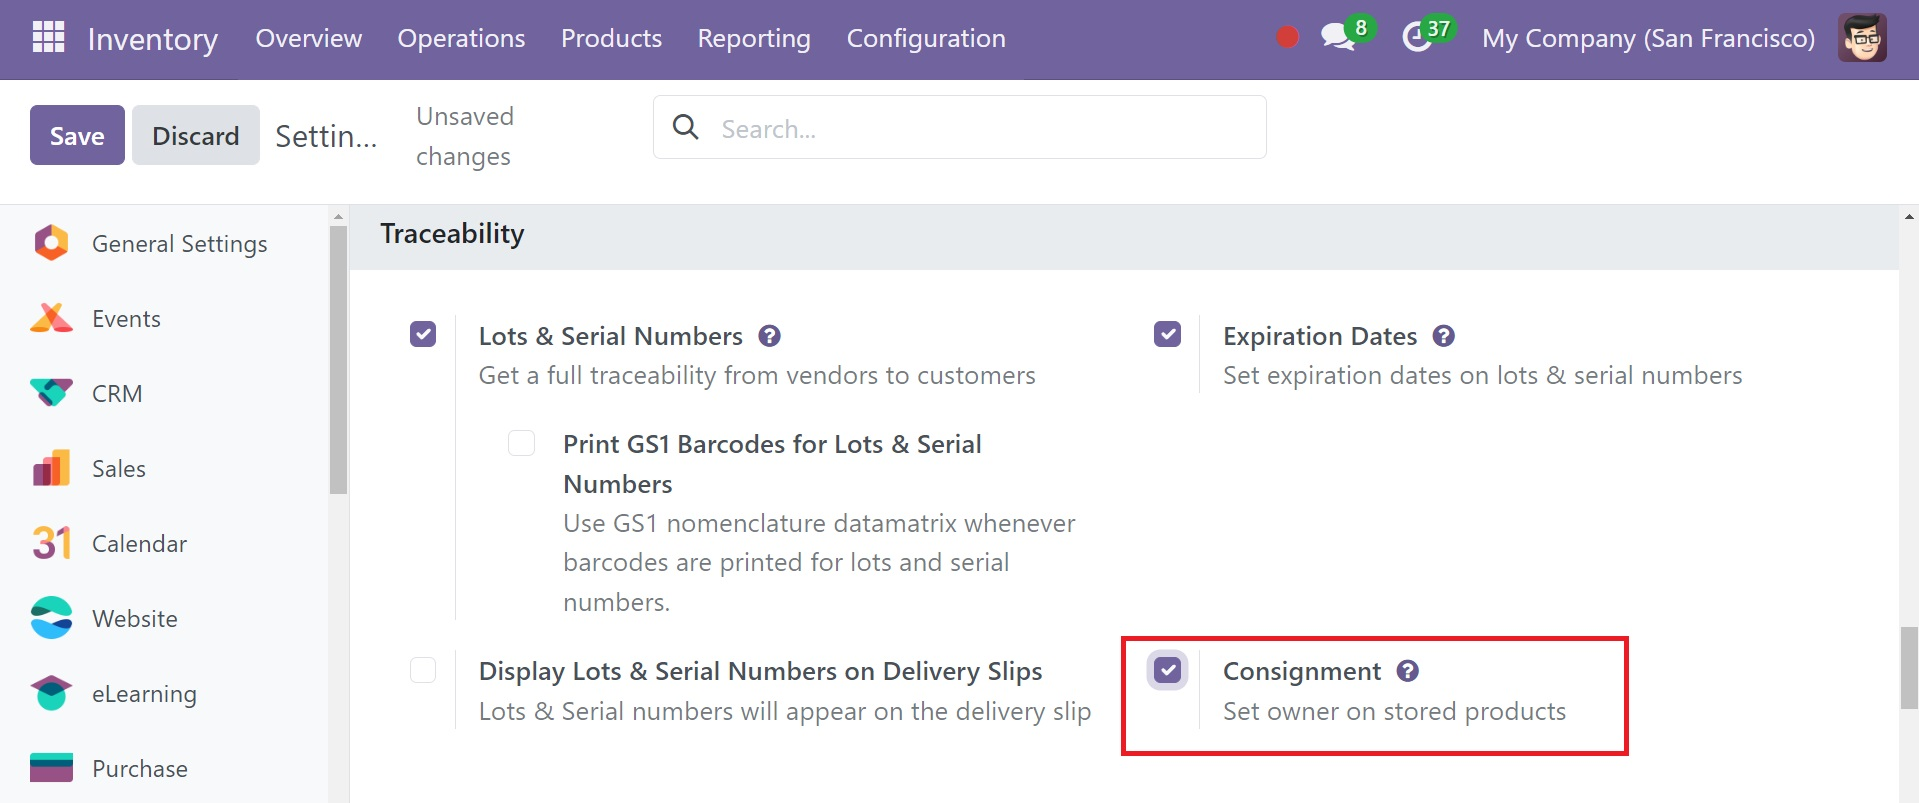
To access the Settings menu, select the Configuration tab. To enable traceability, select the "Consignment" option.
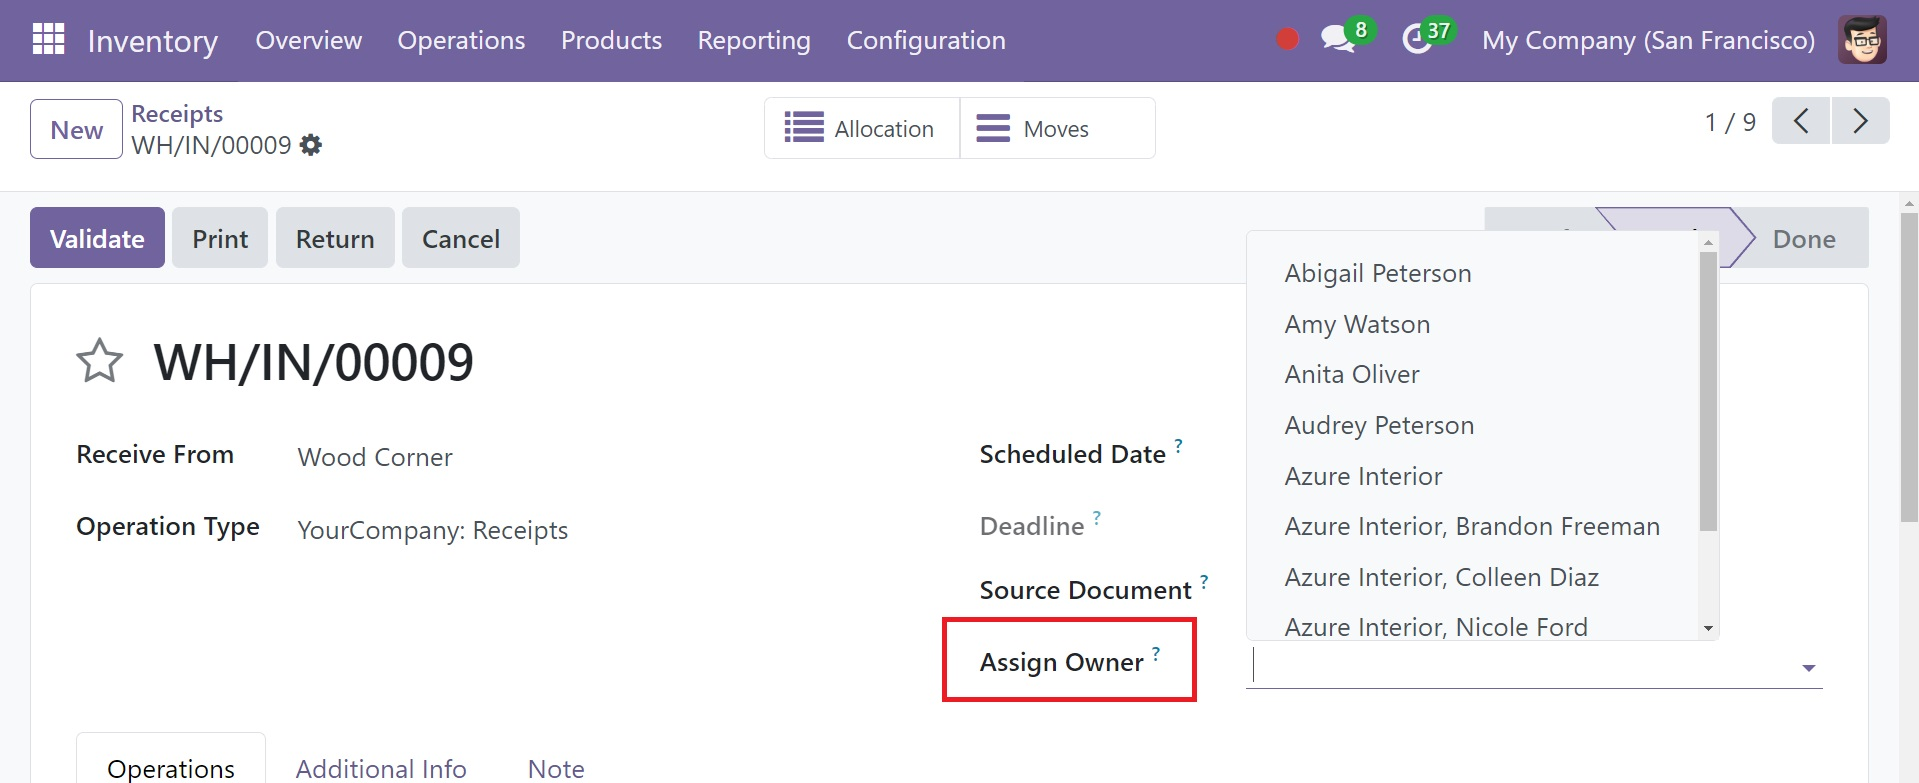
This option allows you to assign an owner to the products and consignees when creating receipts. The system will assign the products to the proper consignees once you approve these receipts. Enter the name of the consignee in the Assign Owner field, then click "Validate."
Now let's examine the Reporting features.