Subscriptions
One of the best and most effective marketing strategies for helping your company maintain a positive rapport with
clients is subscription. If you're curious, here is a description of how subscriptions might enhance customer
relationship management. Subscriptions can be used to maintain a client relationship for a longer time with the finest tactics.
Customers are more inclined to purchase goods and services from a supplier or business to which they are subscribed.
It encourages customers to buy additional products from the same company.
You can methodically create new subscription plans and change renewal programs with the aid of an ERP system.
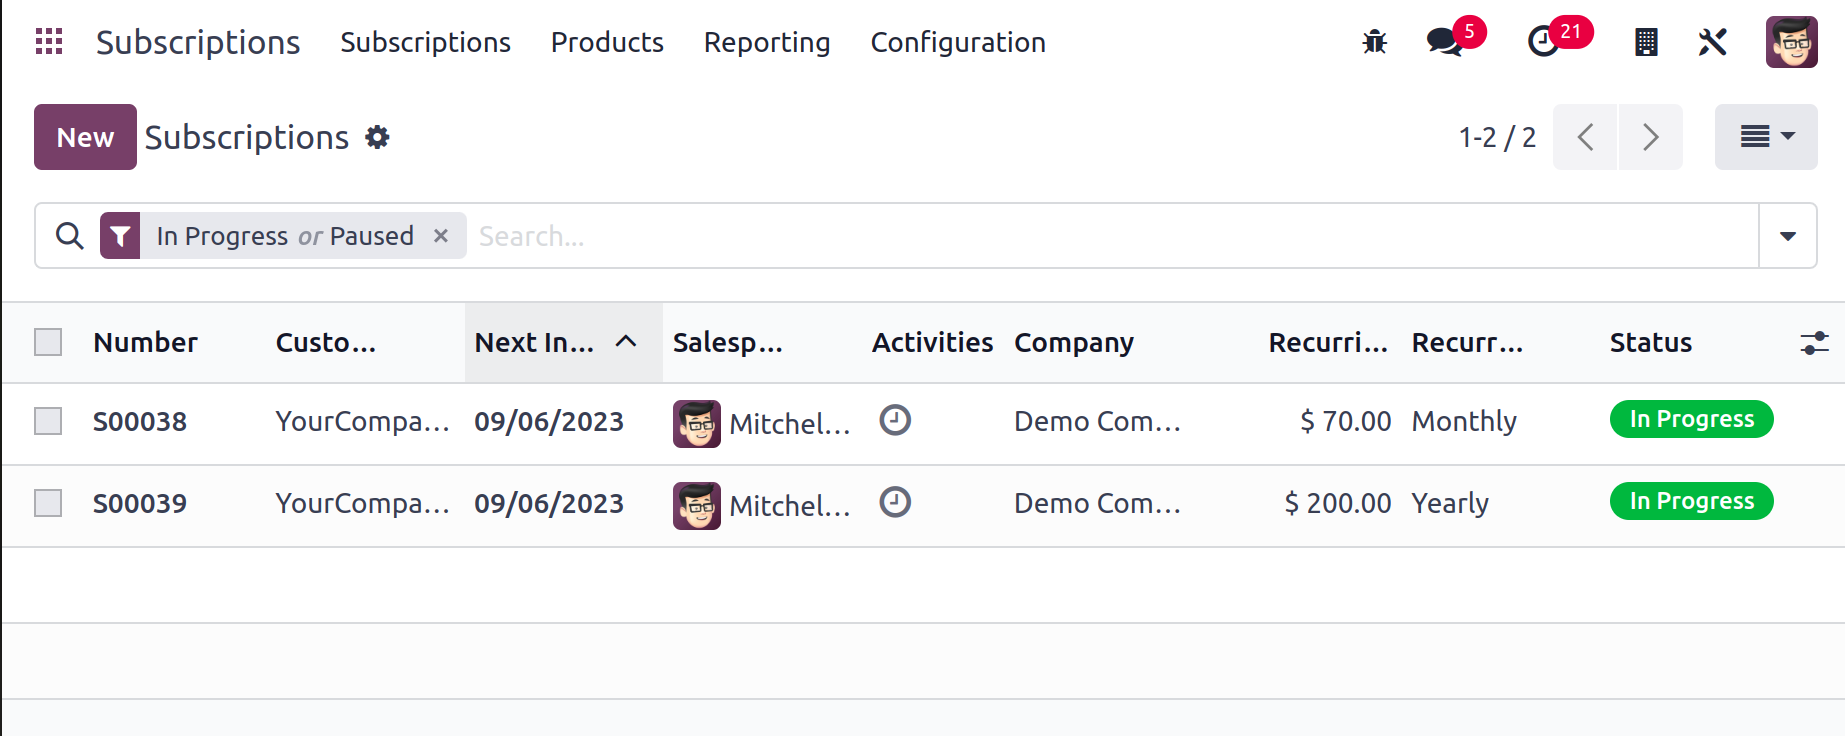
Users of the open-source Odoo17 software can manage subscriptions and services associated with them using a special module. Everything pertaining to subscribers of the many programs the organization offers will be managed through the subscription module. Each customer's subscription status will be displayed on the advanced dashboard of this module. The Subscription module icon will appear on the main dashboard of Odoo 17 as soon as you install it
from the Odoo 17 App Store. You can access the module's main dashboard by clicking the Subscription icon, as shown below.
Using this platform's Kanban view, you can examine various clients' subscriptions at various levels. To add new stages, use the +Stage button shown on the screen.
If you want to create a new subscription under a particular stage, use the plus icon found next to each stage's title.
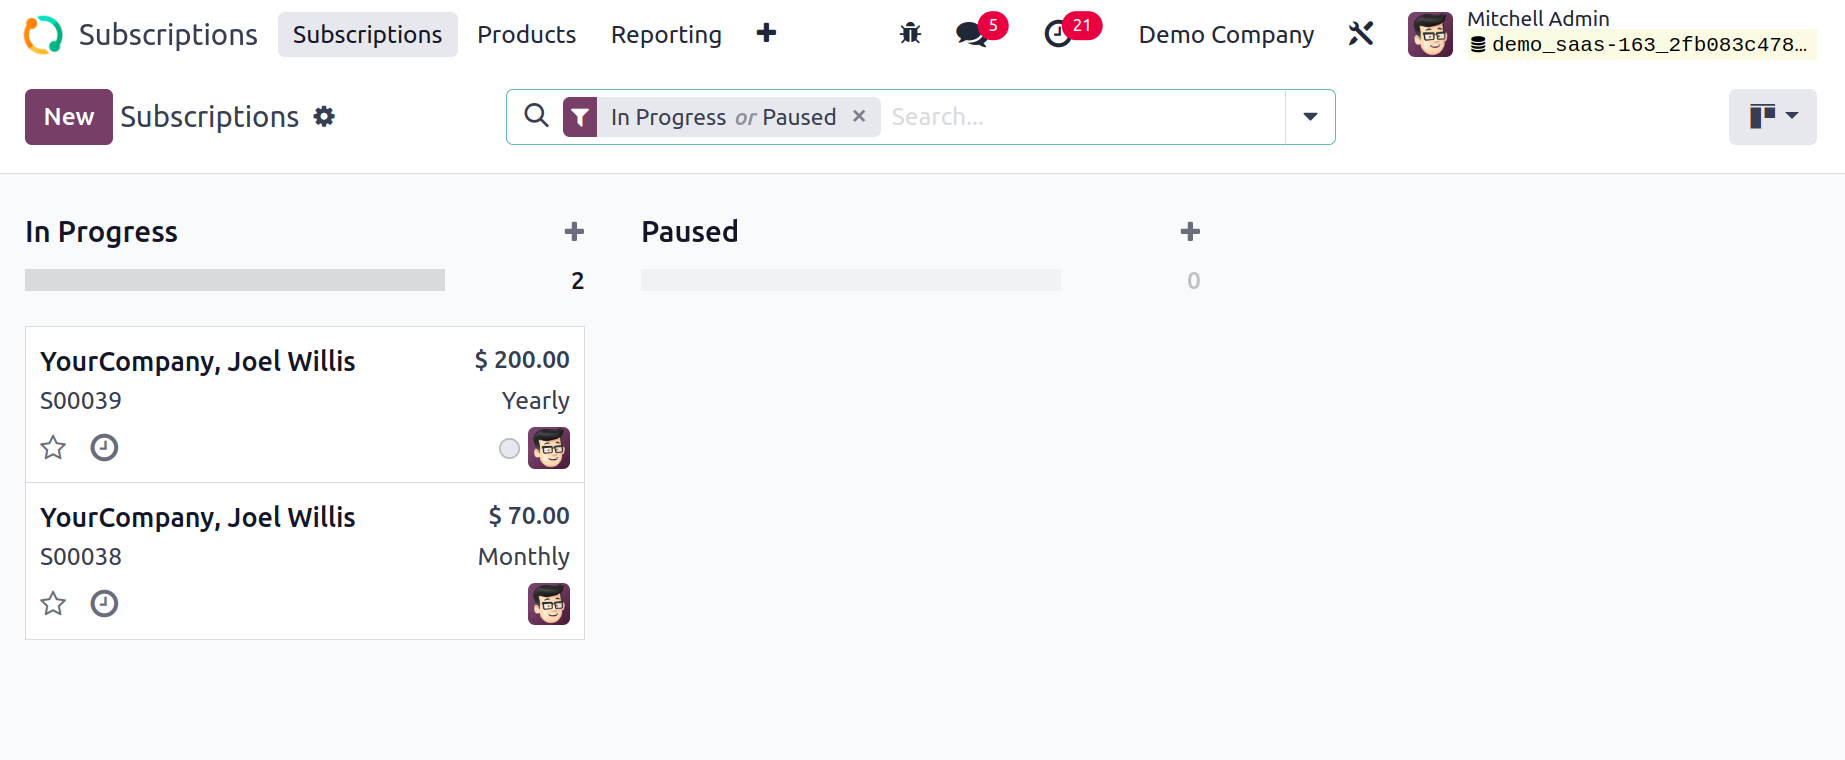
You can use the clock icon provided on each subscription to schedule various tasks for the subscriber.
My Orders, Unassigned, Subscriptions, Alive, To Renew, Failed Payment, Closed, Not Started Yet, Good Health,
Bad Health, Order Date, and Date of Next Invoice are among the available Filters. You can group the available subscriptions
using the Group By option, which includes options
for Salesperson, Sales Team, Customer, Template, Stage, End Date, Next Invoice Date, Recurrence, Pricelist, and Referrer.
You can change the view into a List, Pivot, Graph, Cohort, and Activity in addition to the Kanban view. Let's now use the New button to start a new subscription.
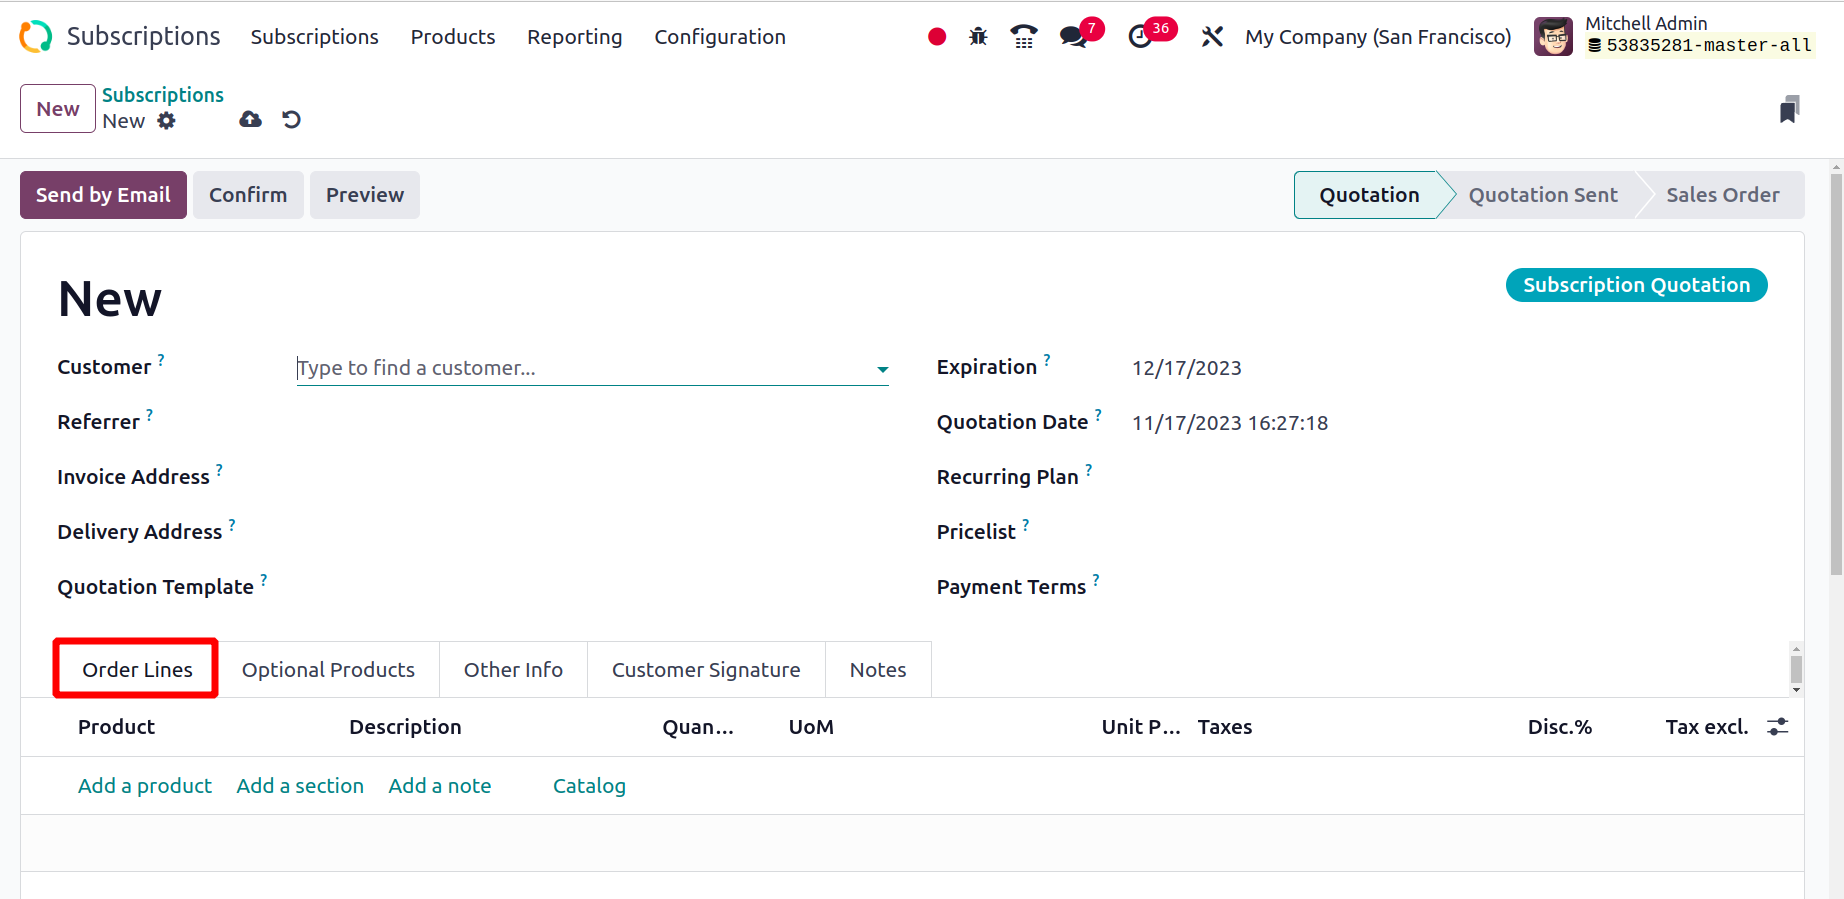
After selecting the New button, the subscription form view will show up. You can establish a new subscription plan and corresponding product in the module before generating a new subscription for customers. The plan and product can then be configured for the new subscription. In addition, quotations can be made utilizing the subscription product from the sales module.
Odoo17 will immediately record the corresponding subscription in the Subscription module after confirming the sales order.
In the space provided, you might mention the customer's name here. The relevant field can be used to mention the Referrer whose
recommendation led the consumer to purchase this subscription. You can enter the Invoice Address,
Delivery Address, and Quotation Template information in the corresponding areas.
Quotation Template is the subscription template that will include information about the billing procedure and the terms
of payment of the subscription.
On the day specified in the Expiration column, the subscription will expire.
You can mention the Recurrence plan if the consumer wants to repeat the subscription at regular intervals. In the appropriate spaces,
you can add the pricelist, payment terms, and new multiline text connected to the subscription.
The Order Lines tab can be used to list each subscription product individually. Use the Add a Line button to add a line for this. The Product Details, Description,
Quantity, UoM, Unit Price, Taxes, discount, and Subtotal are displayed in this tab.
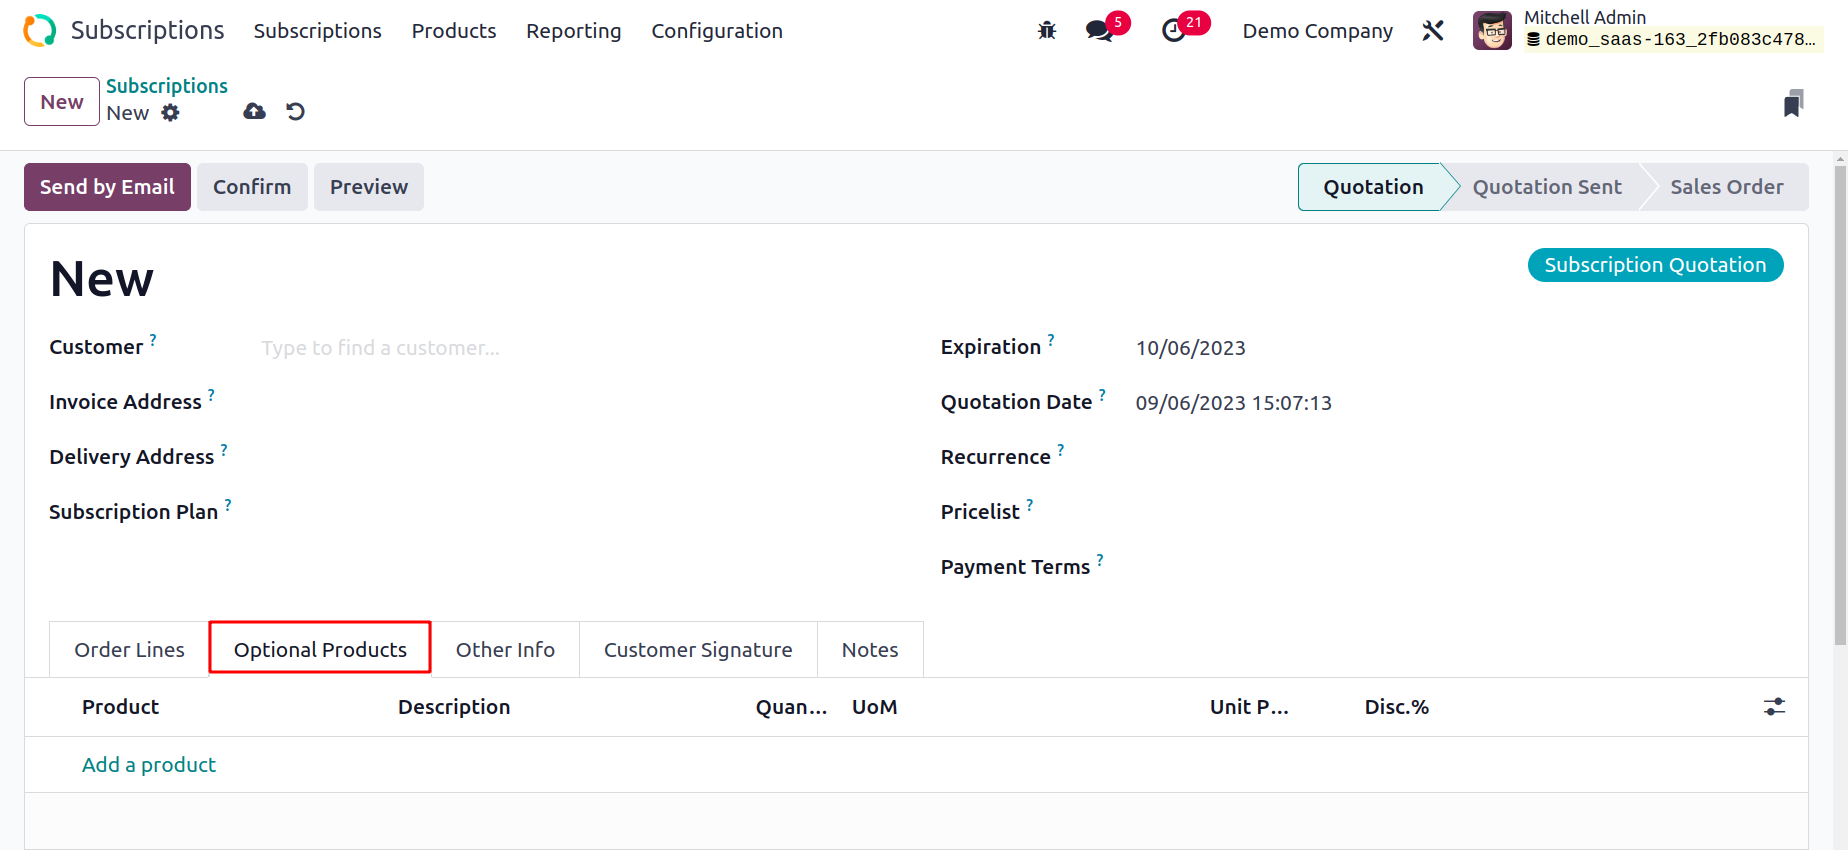
The optional items that come with the subscription plan can be added using the Optional items tab.
You can enter information about Sales, Delivery, Tracking, Invoicing, and Payments in the Other Info tab. You can designate a Salesperson
and Sales Team to administer this subscription under the Sales session. The relevant field will include the name of the Company.
You can activate the Signature and Payment option from the Online Confirmation box if you wish to allow the customer to sign and finish payment online. In the Tags section, you can specify the tags that would be appropriate for this specific subscription.
The subscription period will start on the day that you choose in the Start Day section.
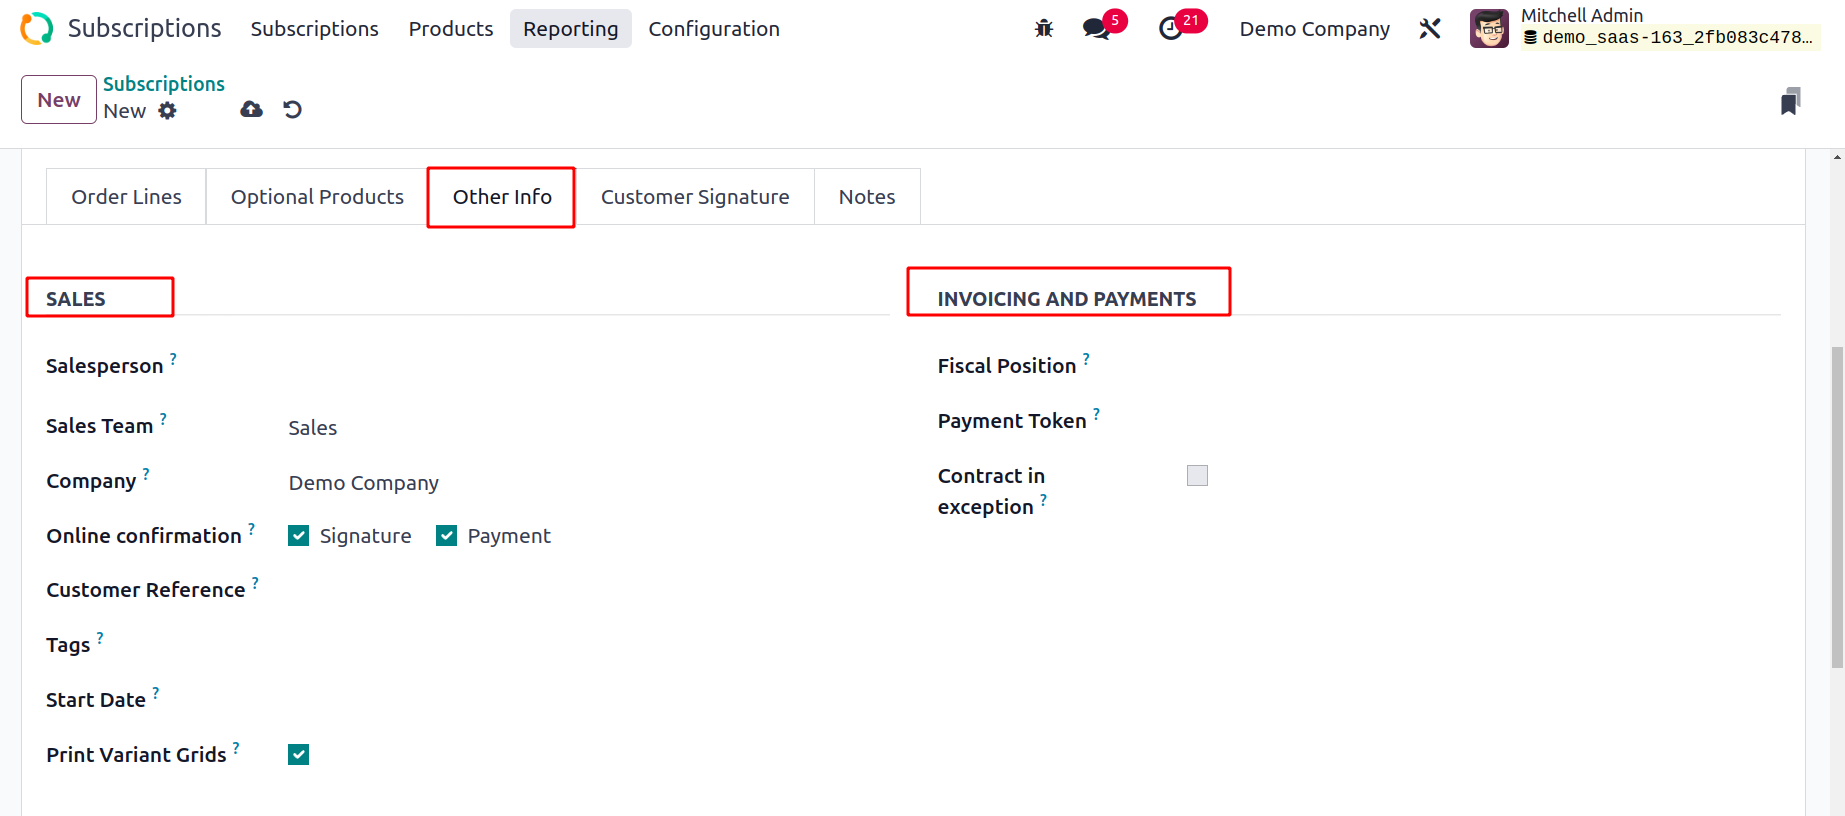
You can turn on the ‘To Renew’ boolean if you're creating this subscription as part of a renewal plan.
For the purpose of managing the billing
and payments for this subscription, the Fiscal Position and Analytic Account can be entered in the appropriate box.
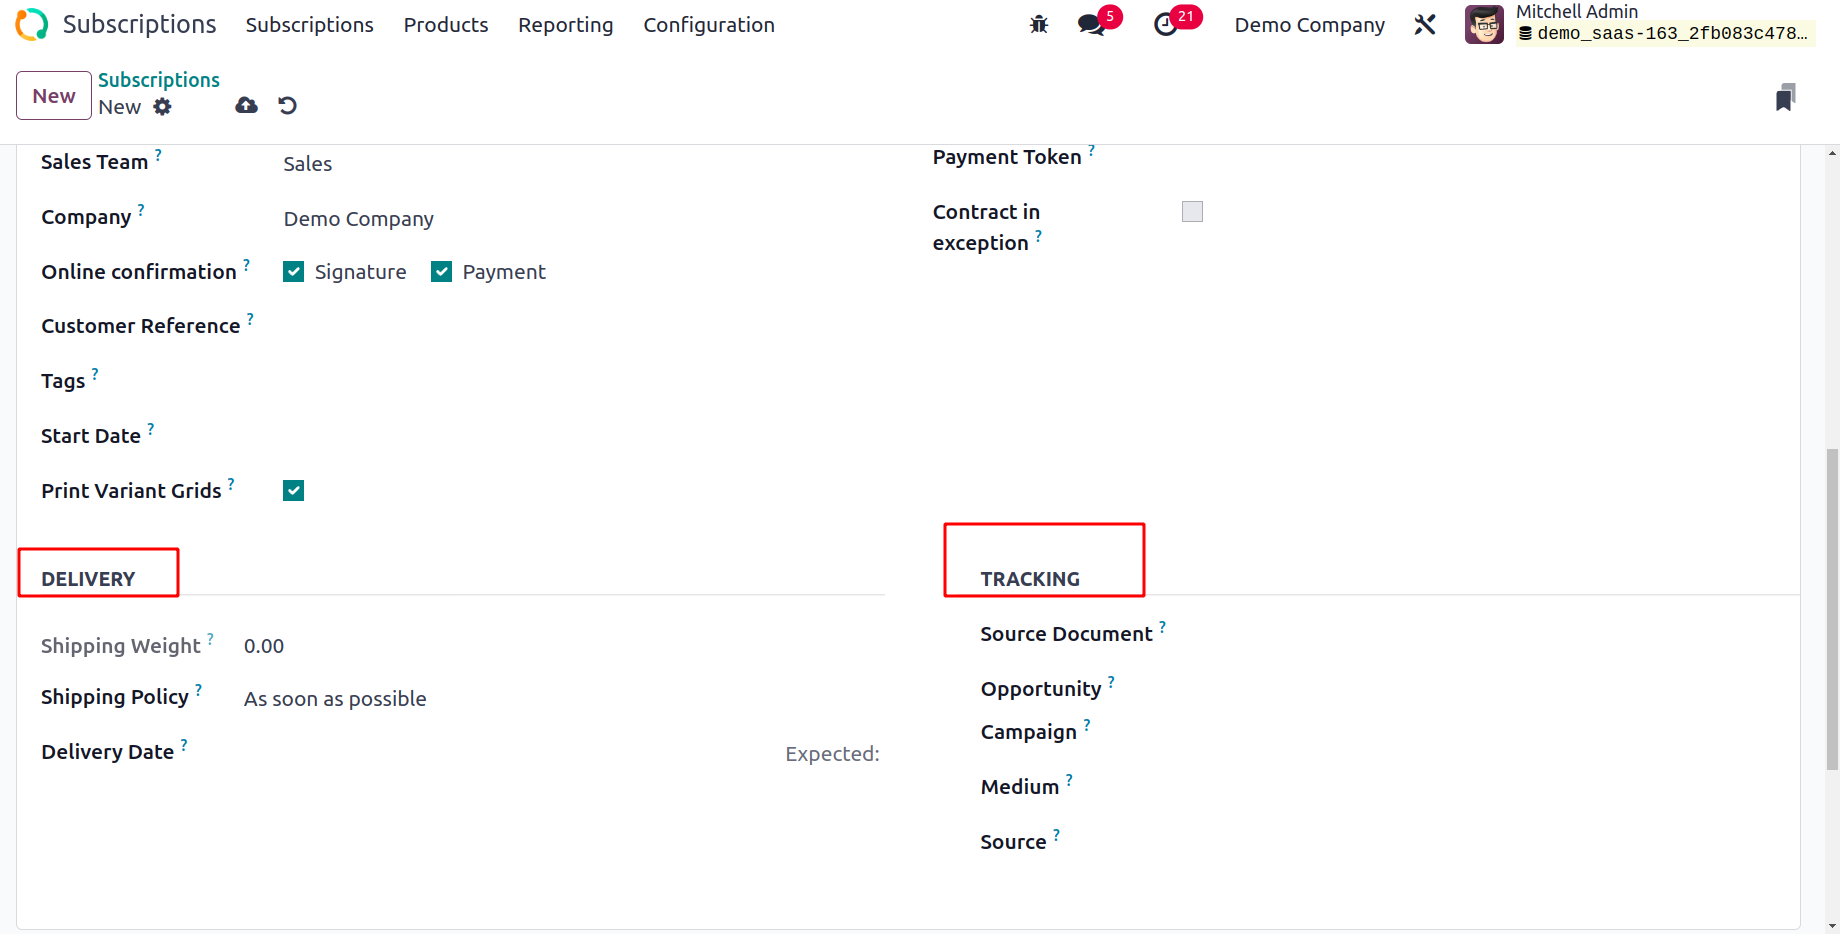
The Shipping Policy for this subscription can be modified in the Delivery session to as soon as possible or when all products are ready, depending on the needs of the customer. Additionally, during this session, you can choose a Delivery Date for the subscription.
You can enter the appropriate information in the Source Document, Campaign, Medium, and Source sections for tracking purposes.
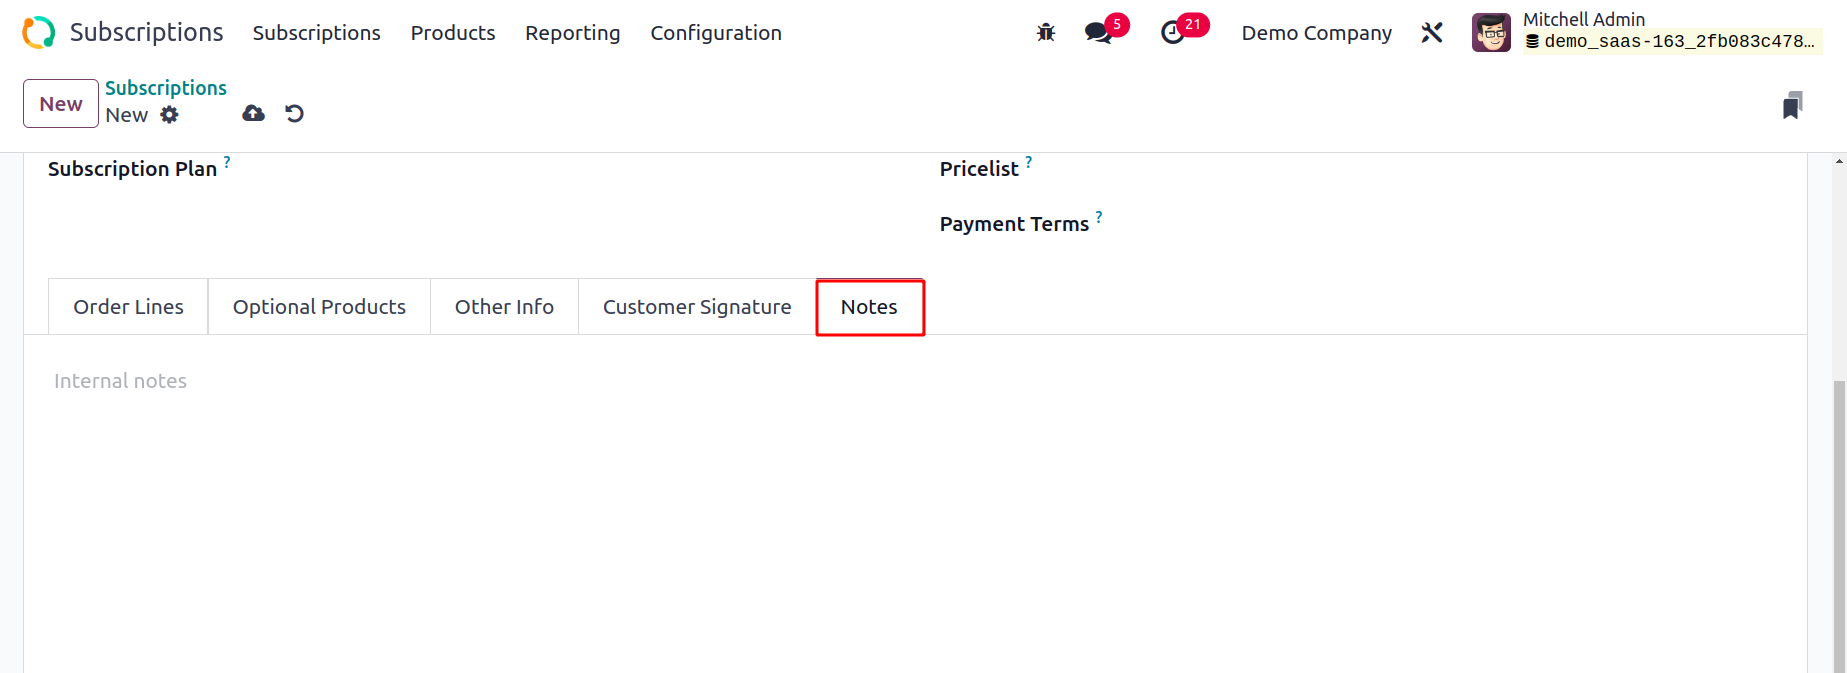
The remarks area can be used to enter any internal remarks regarding the subscription.
You can confirm the subscription quote by clicking the Confirm button after entering all the necessary information.
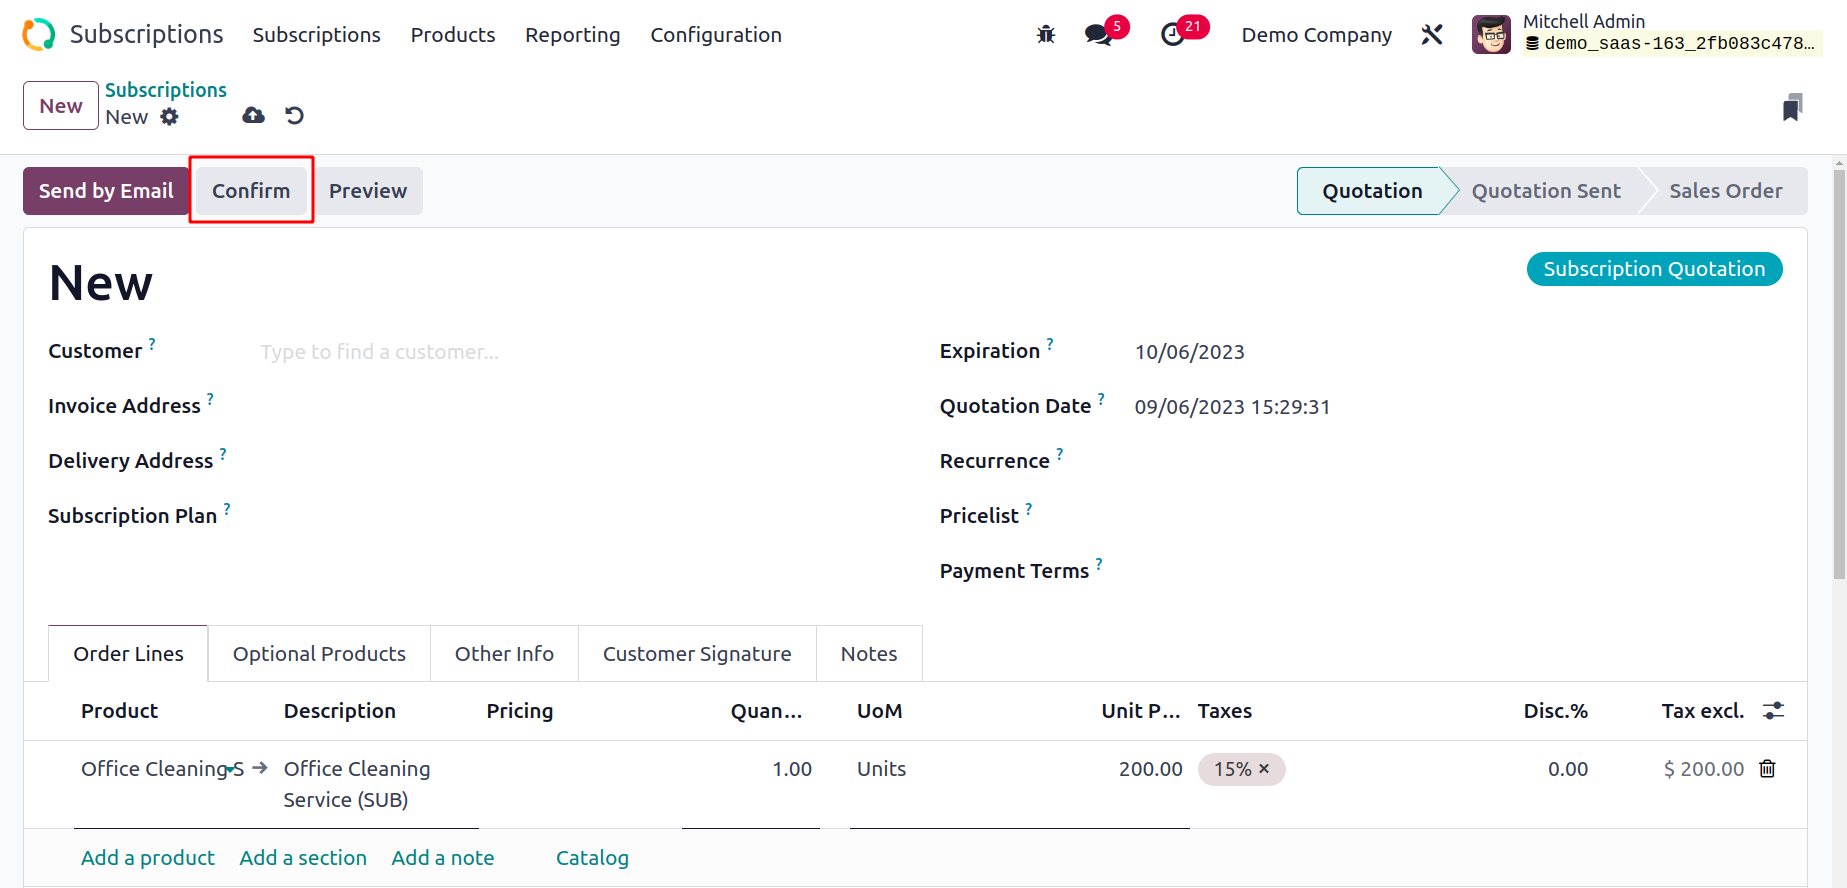
By selecting the appropriate customer, the Send By Email button will mail this quotation to them. To view a customer's preview of the quotation, click the Customer Preview smart button. If the customer is happy with the quotation,
they can use the customer preview window to sign the quotation and finish the payment process online.
The Sales Order will be confirmed when you click the Confirm button.
Using the Create Invoice button, you can now create an invoice for the sales order.
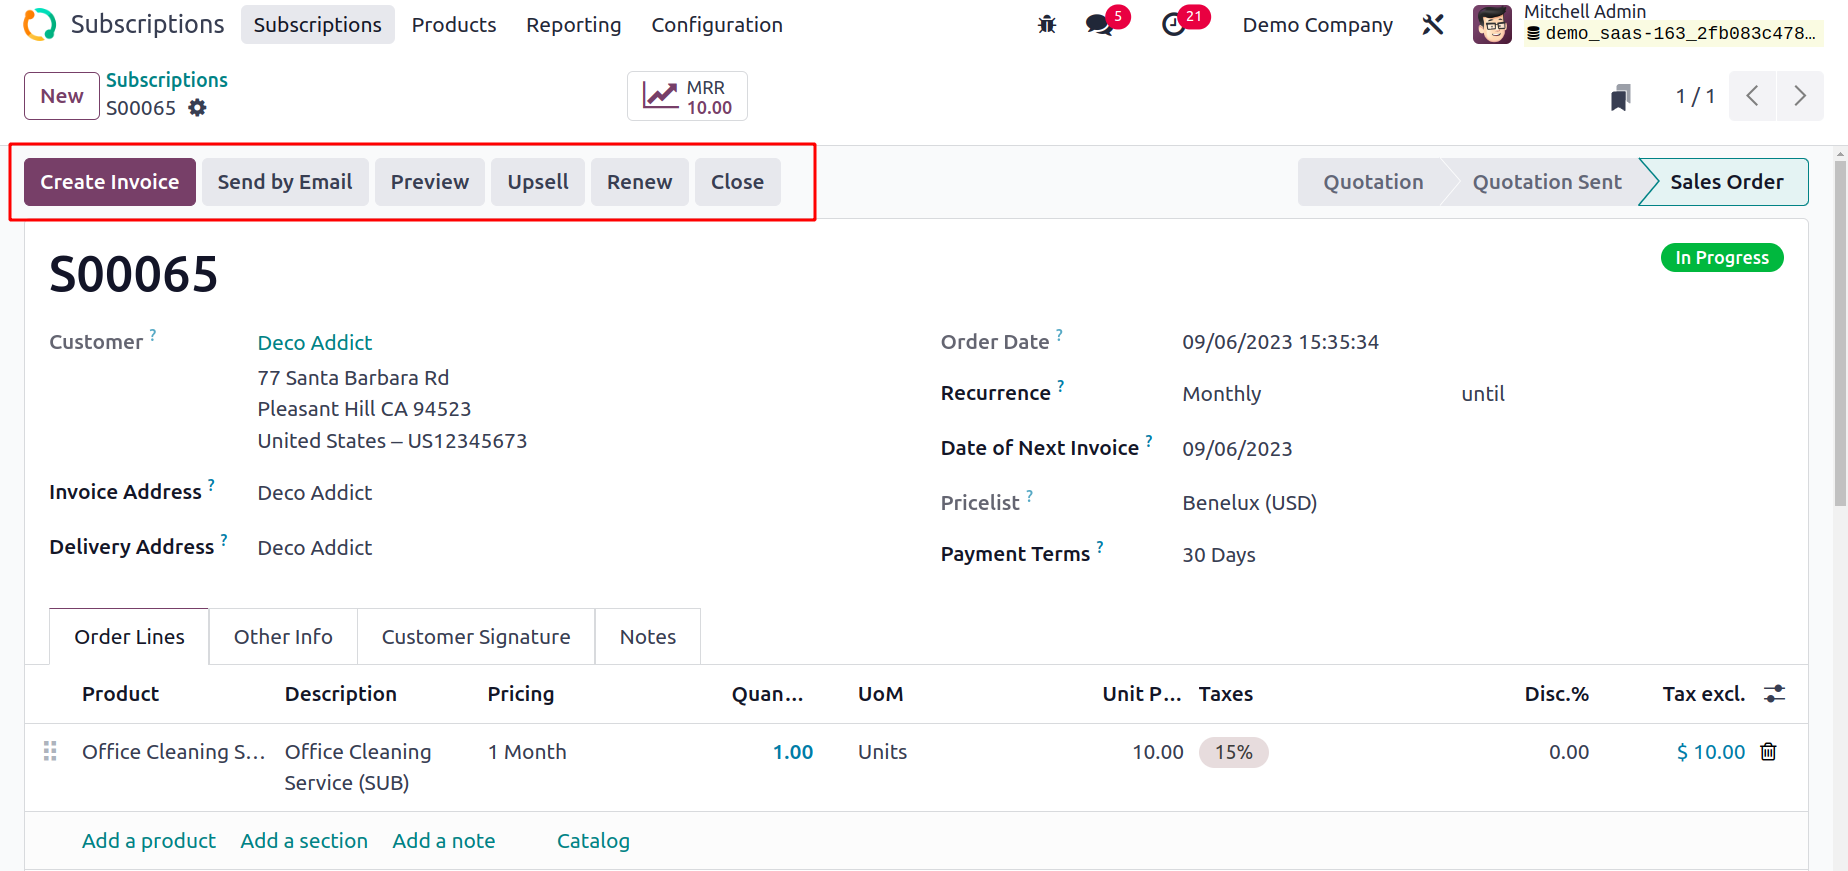
You may renew your subscription by clicking the
Renew button. Use the Upsell button to provide the consumer with more features when they begin their membership.
Subscriptions to Renew
The customer can extend their subscription in the Odoo17 Subscription module at the end of its term. To continue receiving the advantages after the expiration date, renew your subscription. Odoo17 gives a distinct platform in the module to manage subscription
renewals. The option for subscriptions To Renew can be found in the module's Subscription menu.

This platform will display all expired subscriptions. The number, order date, website, customer, salesperson, activities, company, total, invoice, and status are all displayed in the list view.
You can choose a subscription from the window to handle the renewal of that subscription.

The renewal window's form view will appear, as seen in the screenshot. The status of the subscription is as you can see here. You can utilize the Renew button to carry out the renewal transaction.
This will produce the subscription renewal sales order that is displayed below.
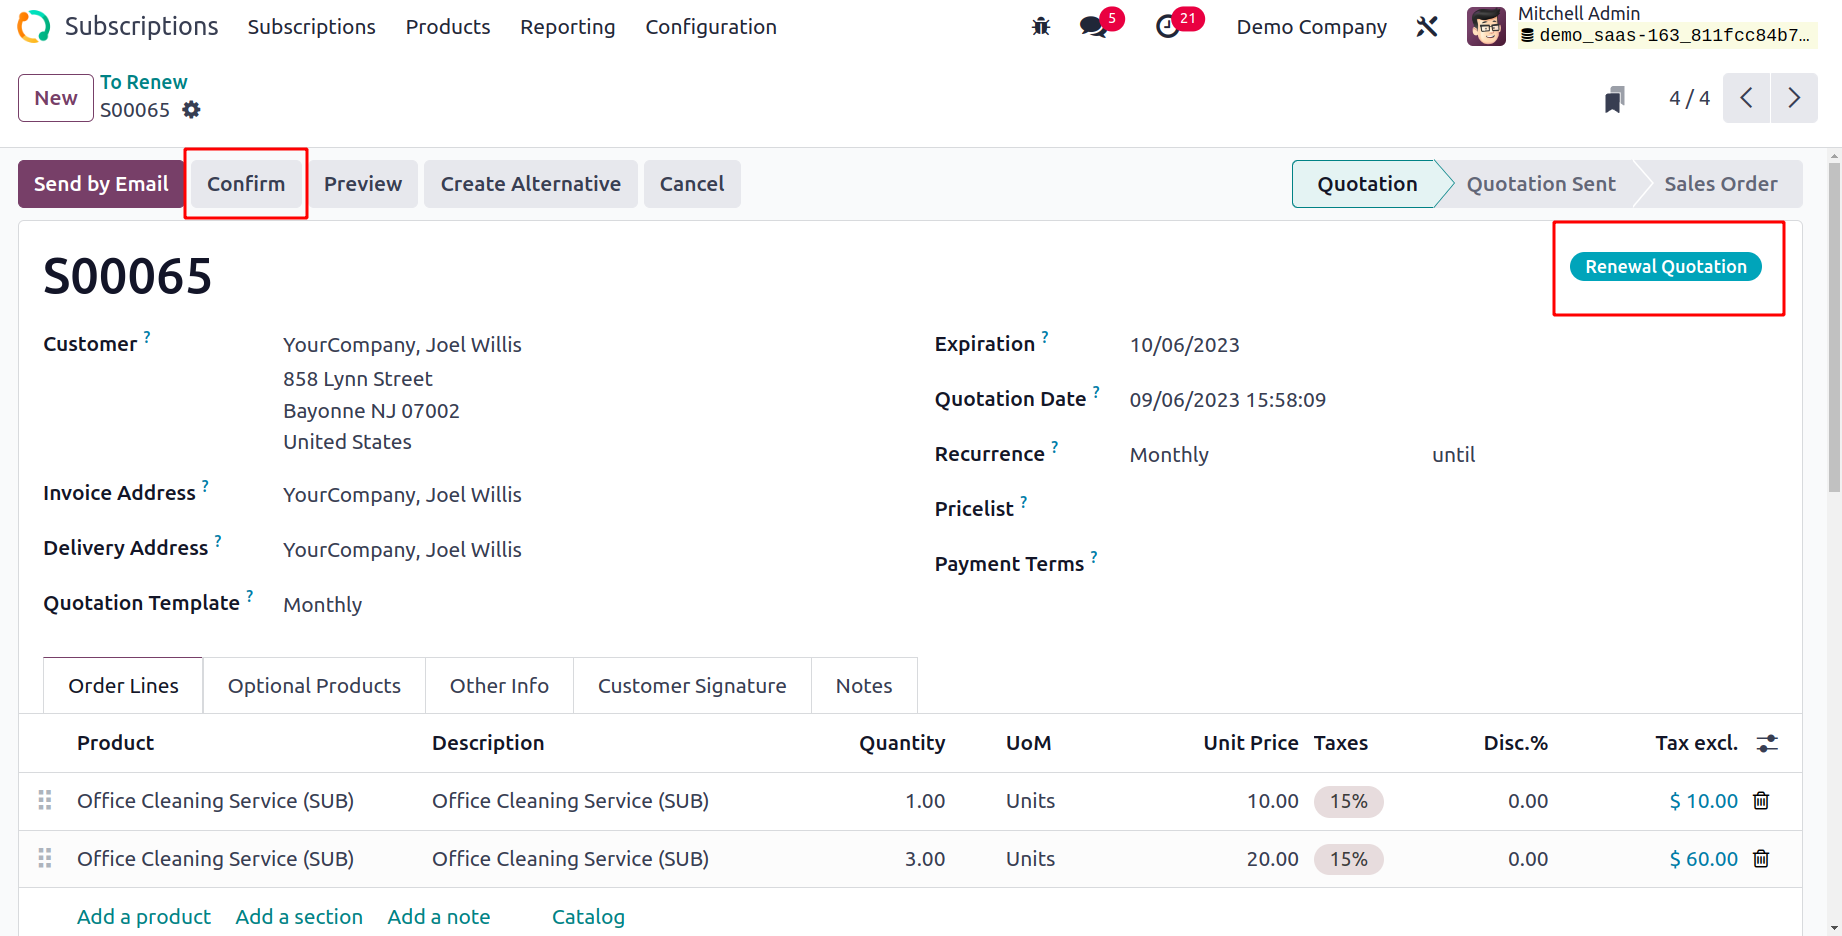
This is the subscription's renewal sales order. To complete the order and create an invoice, click the Confirm button.
Your subscription will be renewed once you submit your order confirmation.
The Create Alternative button, which facilitates creating other quotations, is a new feature added to Odoo 17.
The previous subscription's status is Renewed. This process will allow you to renew your subscription.
Upsells
An upsell is a powerful marketing technique used to sell more of a company's goods.
By integrating extra offers and subscription products, you can upgrade existing subscriptions
to new subscriptions through upselling. This can be utilized to give your customers more practical and useful offerings. The Upsells option is located in the module's Subscription menu. The list of sales orders created for upselling
products will be displayed on this platform.

The number, order date, website, client, salesperson, activities, business, sum, invoice, and status are all displayed in the window.
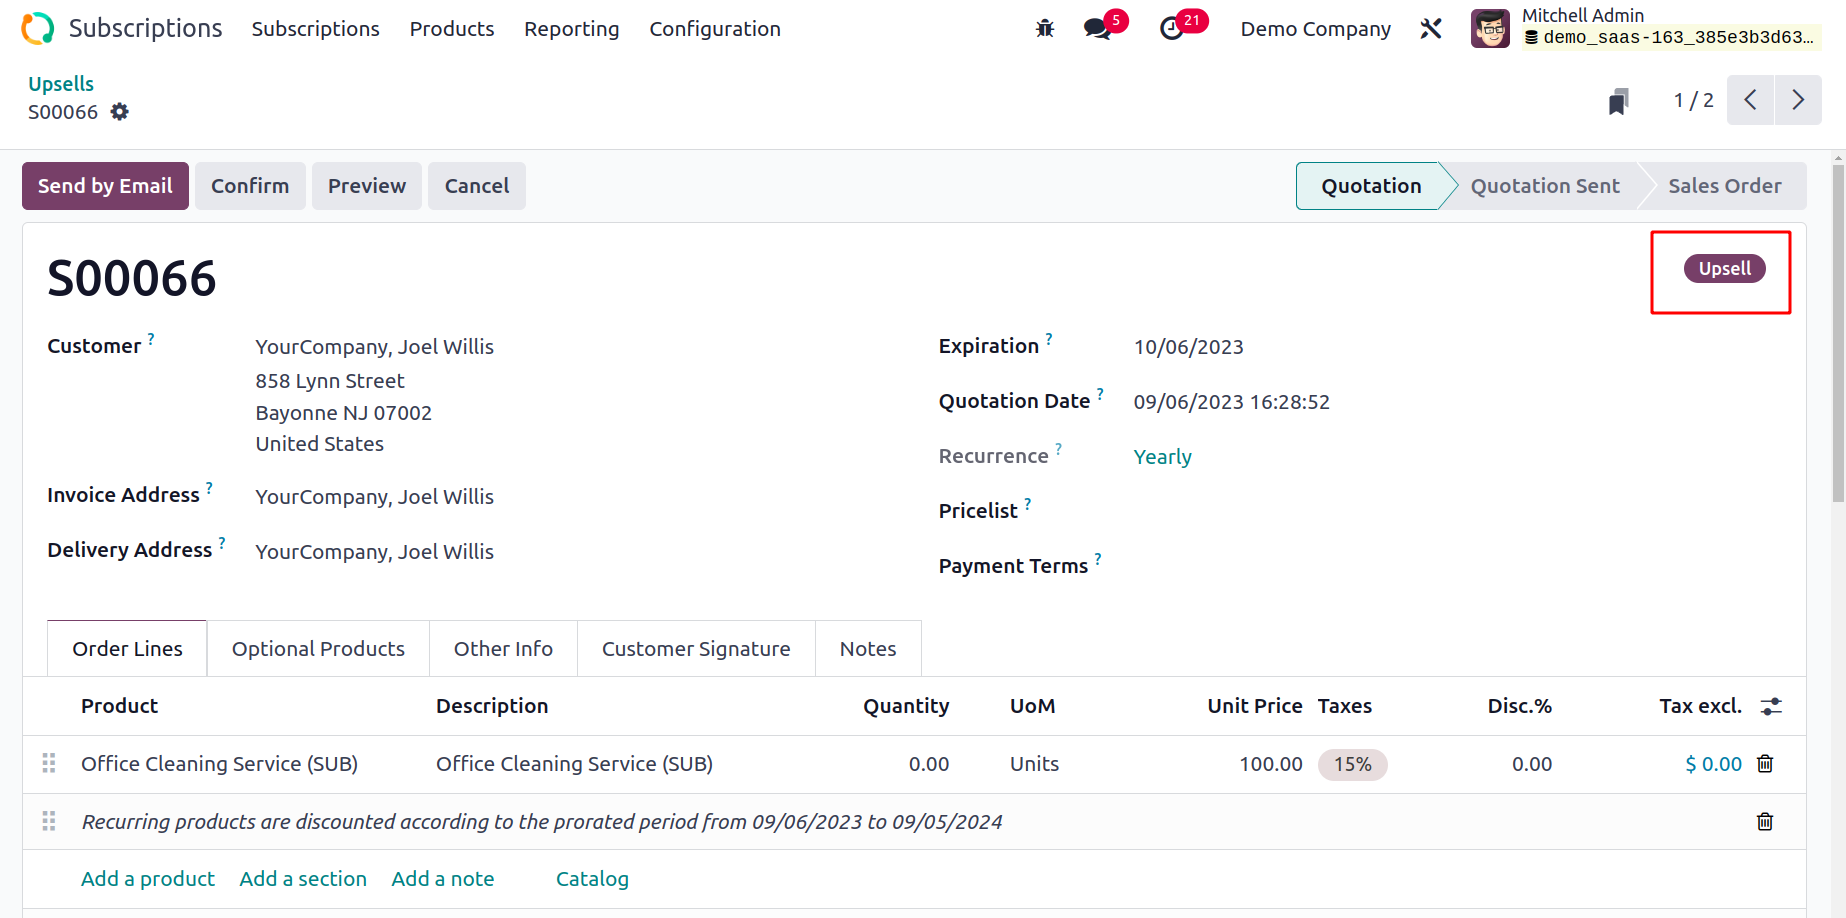
As seen in the above screenshot, the Upsell status may be found on the sales orders.
You can now choose a subscription from the module's main dashboard in order to add upsell products to an existing subscription.
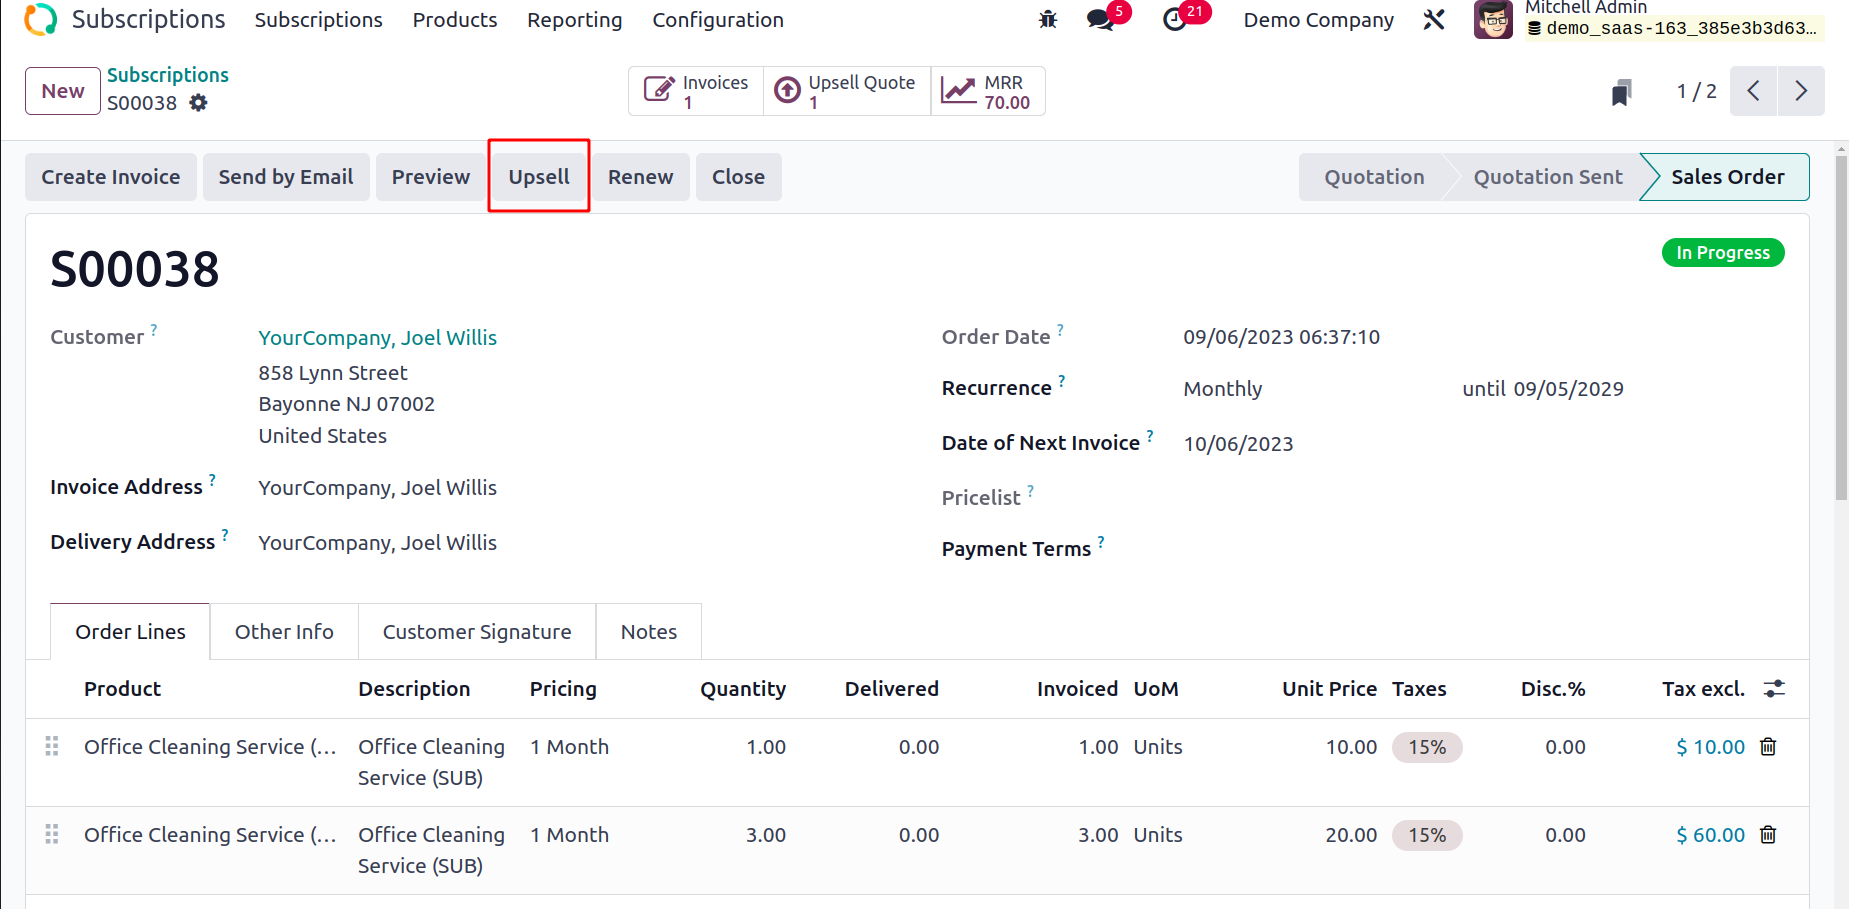
The Upsell button, as seen in the above image, is located in the form view. Clicking this button will provide an upsell product quotation. To this quotation, new products may be added.
The relevant customer can be asked to approve the quotation for the new products.
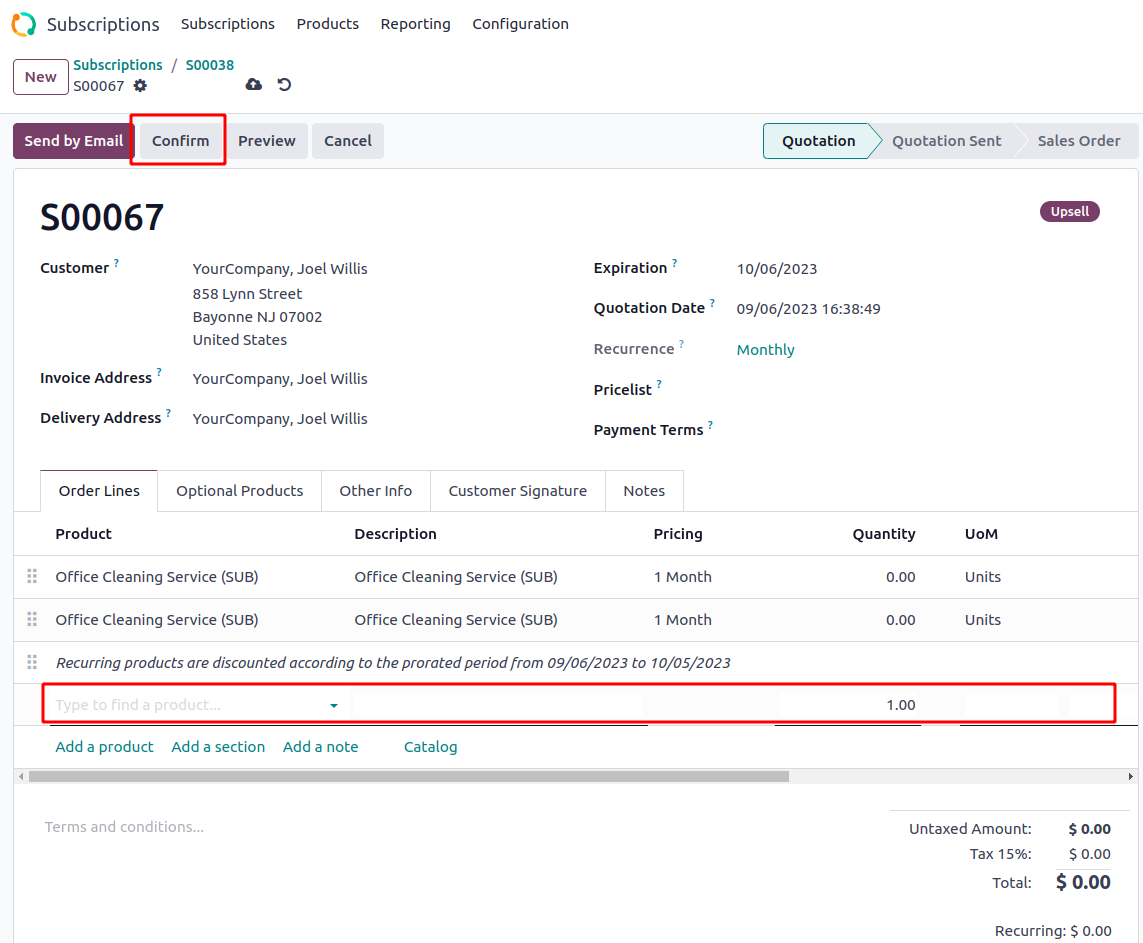
After receiving the client's approval, you can use the Confirm button to turn the quotation into a sales order. Once you confirm the order,
the new upsell items will be added to the subscription.
Subscription Products
The subscription product configuration is the same as the product configuration that we
described in modules like Sales and Inventory. Under the items menu in the Subscription module,
you can configure items. You can use the Filter Can Be Recurring on this platform to receive a list of
the subscription products.

This filter will provide you with information about the recurring products on your screen.
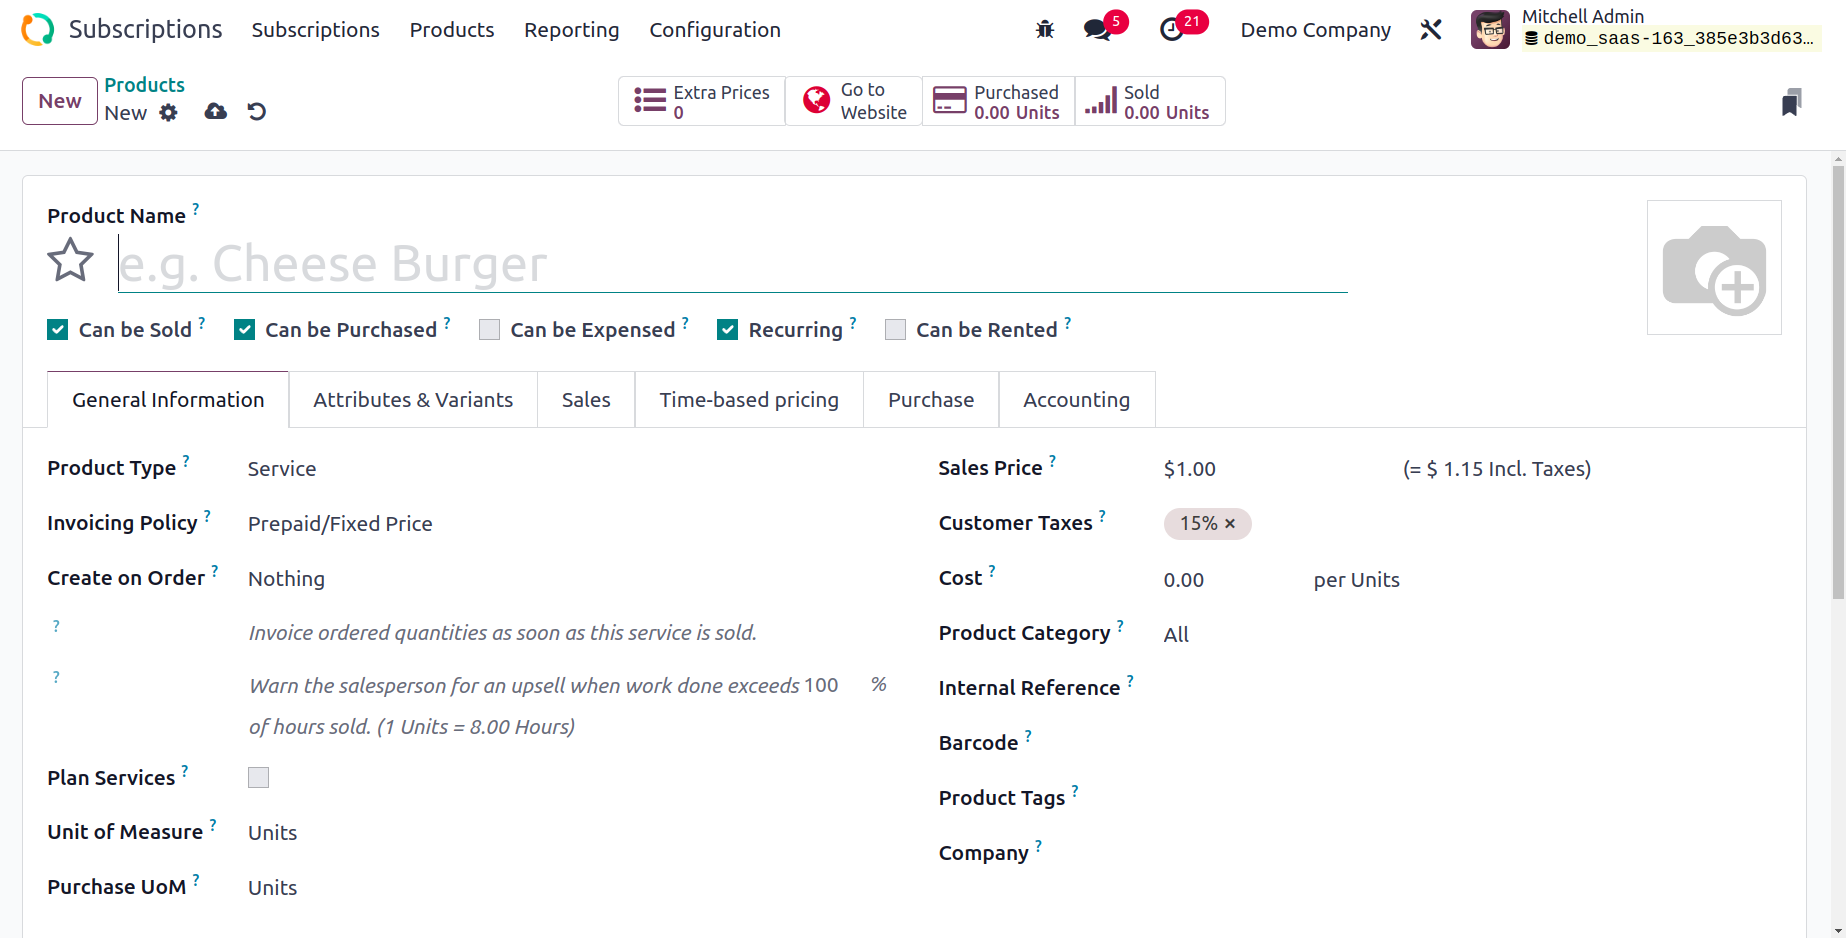
Don't forget to select the Recurring option from the form view when setting up a subscription product. By doing this, each time you confirm a sales
order using this product, Odoo will automatically generate a subscription for it.
Odoo 17 added an enormous amount of new functionality. One of them is that storable products may now also be created as subscriptions.
Quotation Template
You can build appropriate quotation templates for your consumers in the Subscription module before generating a new subscription. The subscription plans in Odoo 17 serve as a template for new subscriptions. These plans make it simple for clients to add new subscriptions. You can choose the Quotation Template option from the Configuration menu in order to create templates for subscriptions.
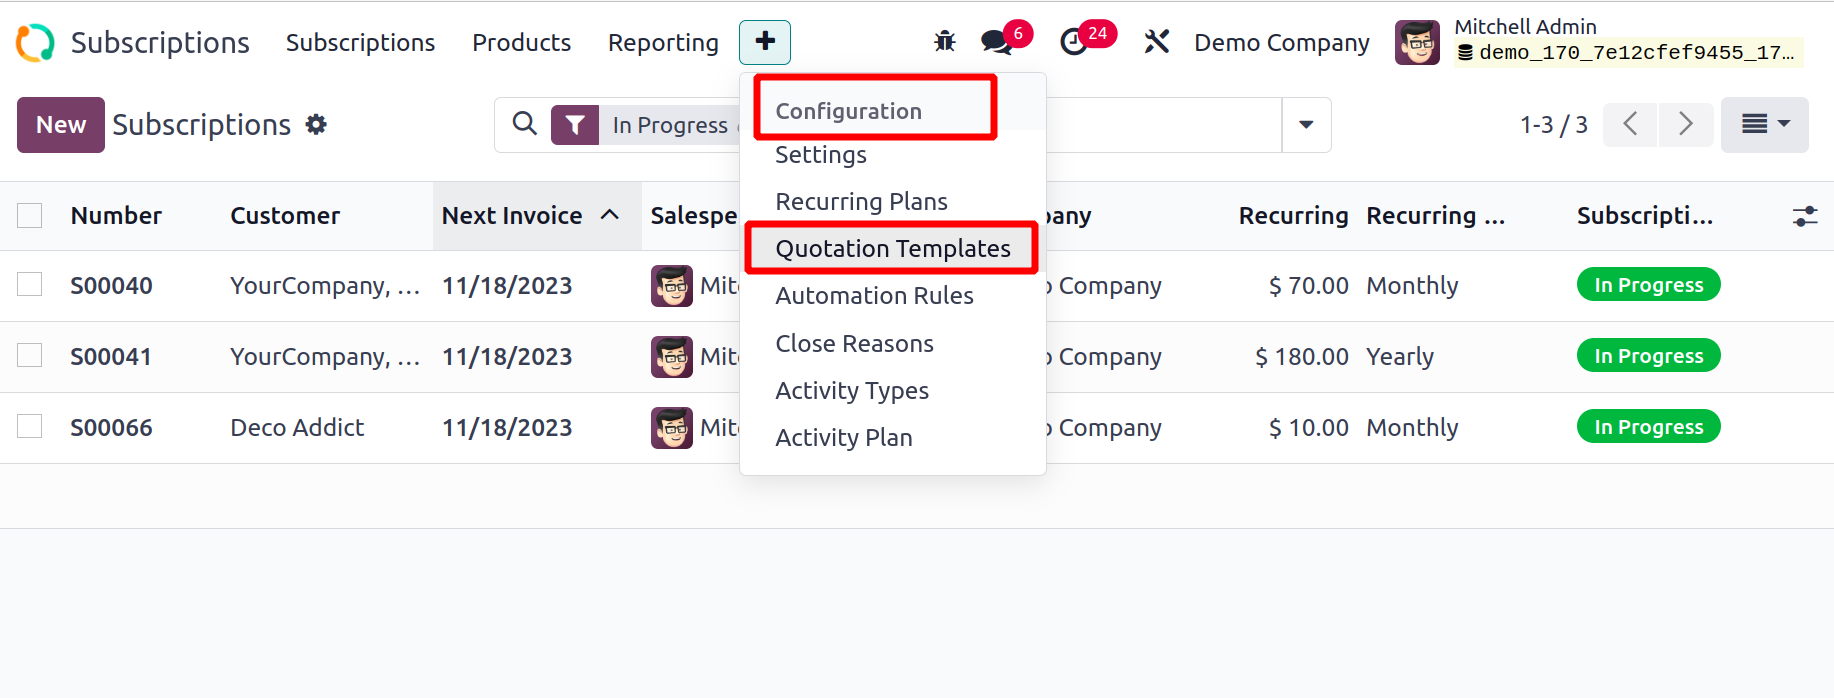
A few preconfigured templates will be displayed on the platform, as seen below. The Quotation Template, Recurrence, and Company are
all included in the list view. To establish a new quotation template, click the New button.

You can enter a suitable title for the Quotation Template in the provided field. The Quotation Expires After field allows the user to specify the number of days to use when calculating the quotation's validity date. The expiration of the quotations made with this plan will be automatically set by Odoo17 as a result.
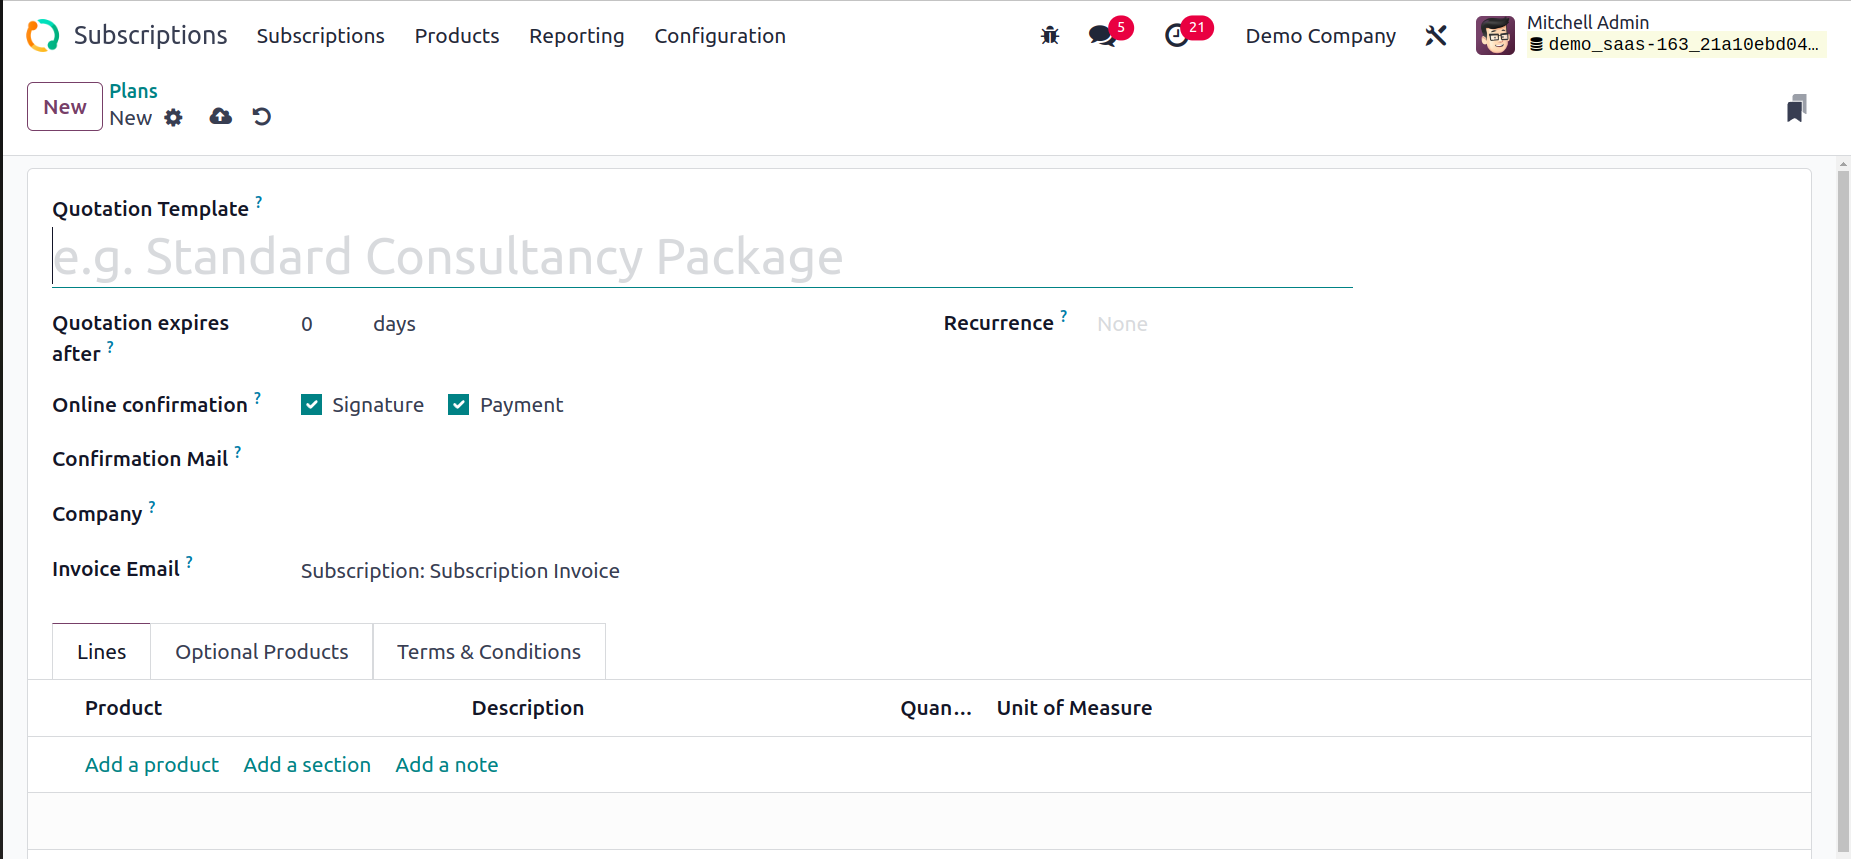
Odoo enables you to request an online signature and payment from the customer in order to automatically confirm the order by activating the Signature and Payment options from the Online Confirmation field. In the Confirmation Mail area, you can insert an email template. When the customer's order is confirmed, they will receive this mail. The percentage of the total that must be paid to validate the quotation is known
as the Prepayment Amount. In the appropriate field, you can enter the name of the company.
Choose the appropriate choice for the recurrence plans. Following your selection of the Recurring Plan, you will receive some extra fields. Last Forever is the option for the plan's duration setting, which means the plan is unlimited.
Using the Add a Products button located under the Lines tab, you can individually discuss each subscription package. When you choose this subscription plan in a quotation, these items will be added to the Order Line.
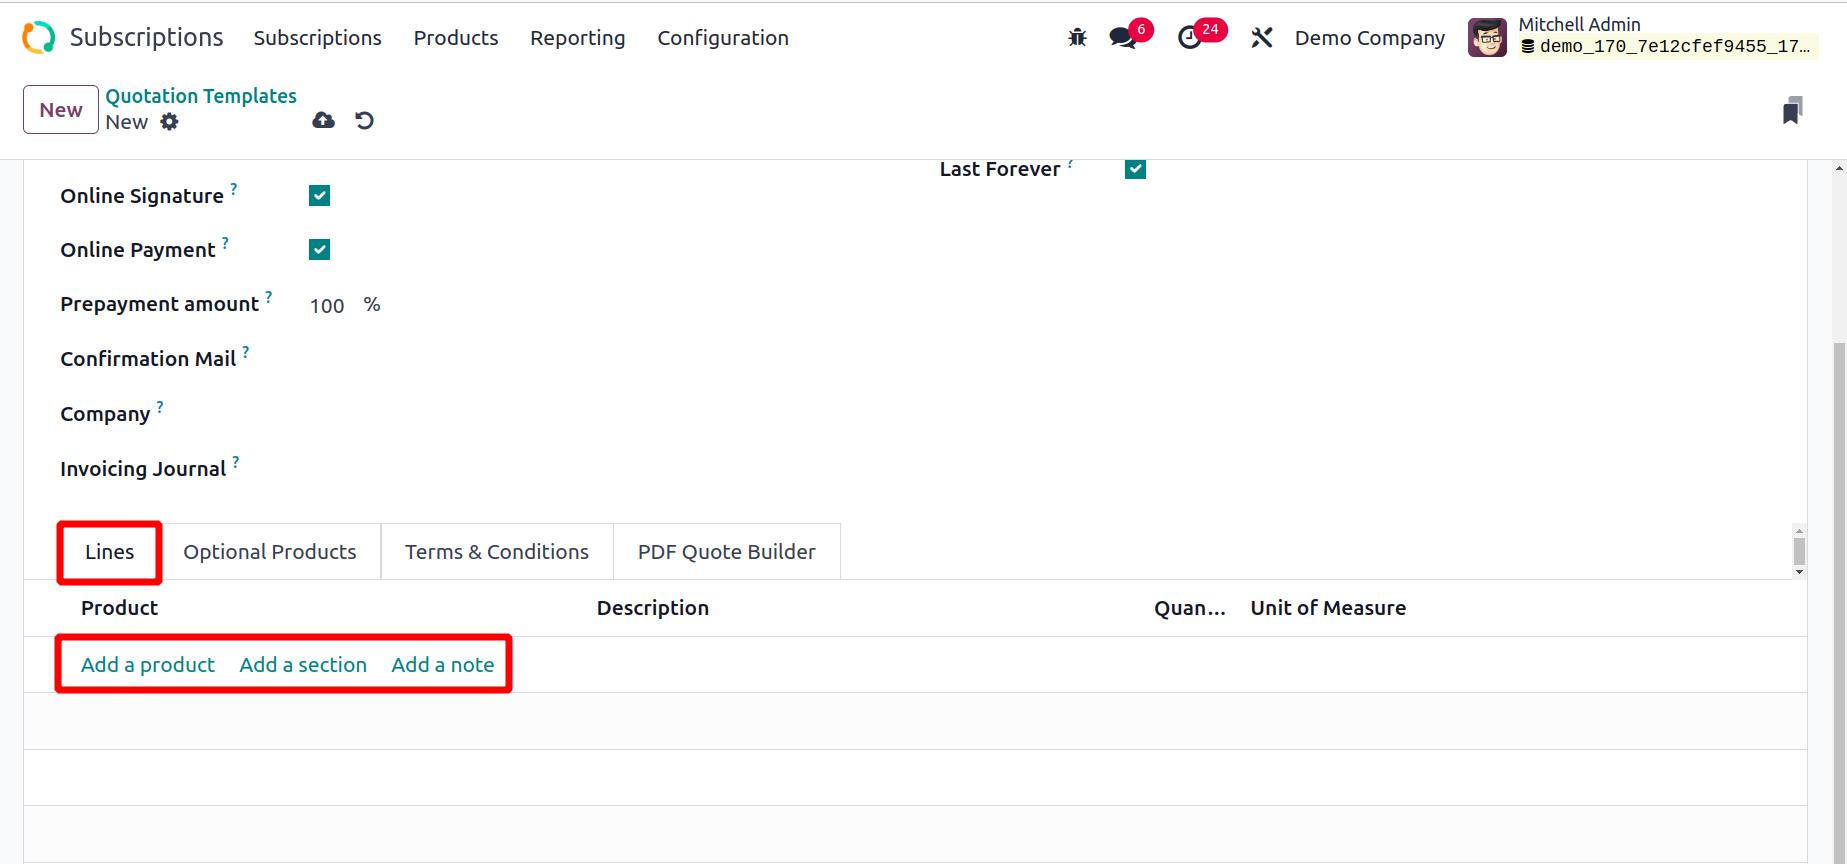
It is possible to identify the products as distinct sections by adding a section using Add Section.
You can then add more notes by using the Add Notes feature.
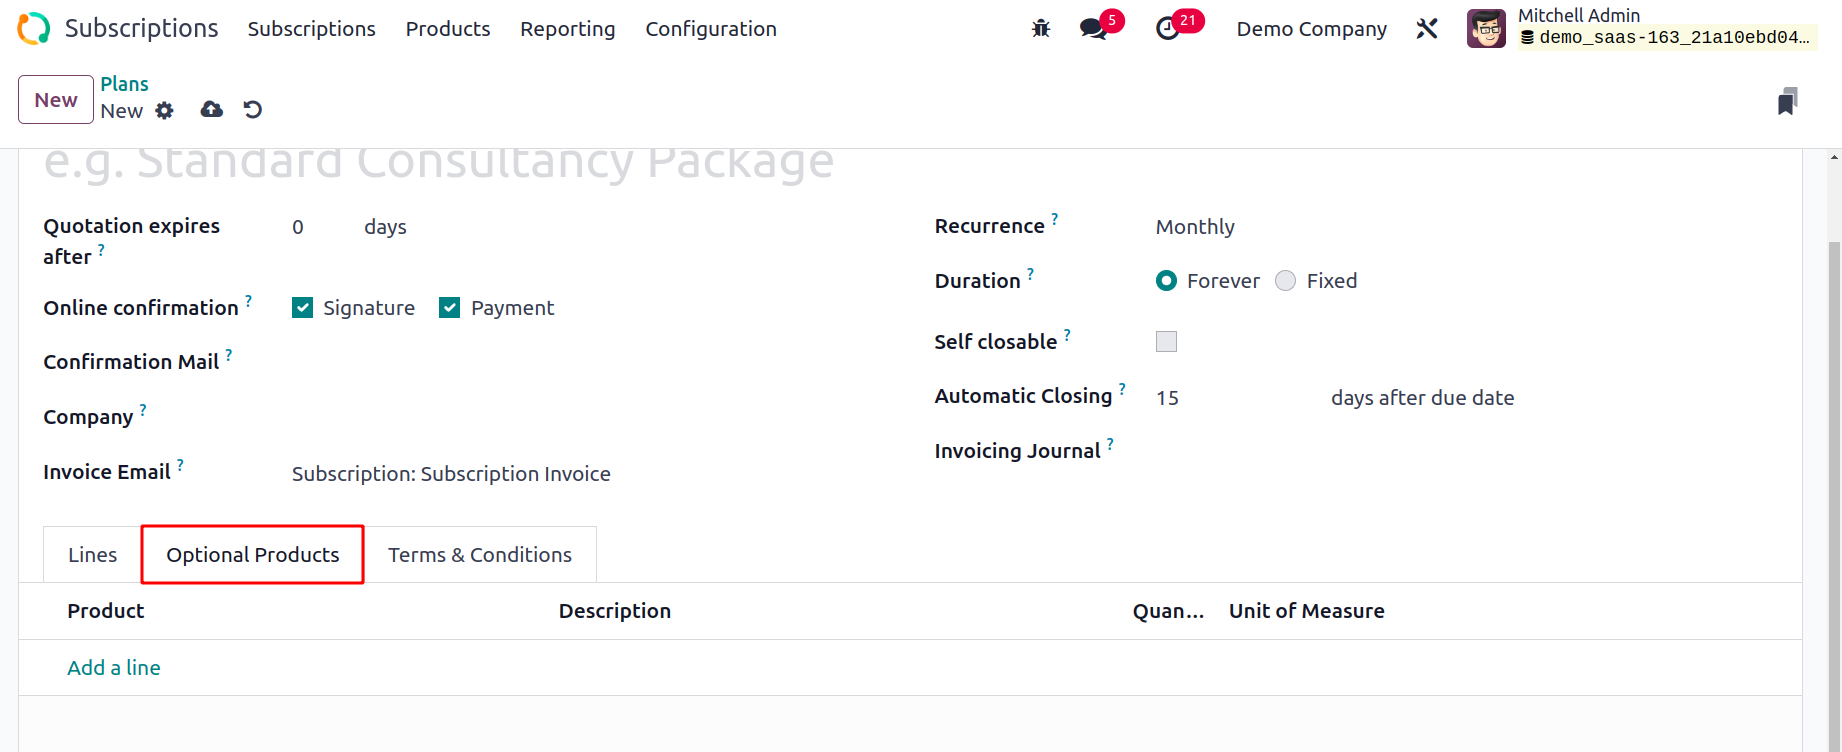
You can add extra products that are part of the subscription plan using the Optional Products page.
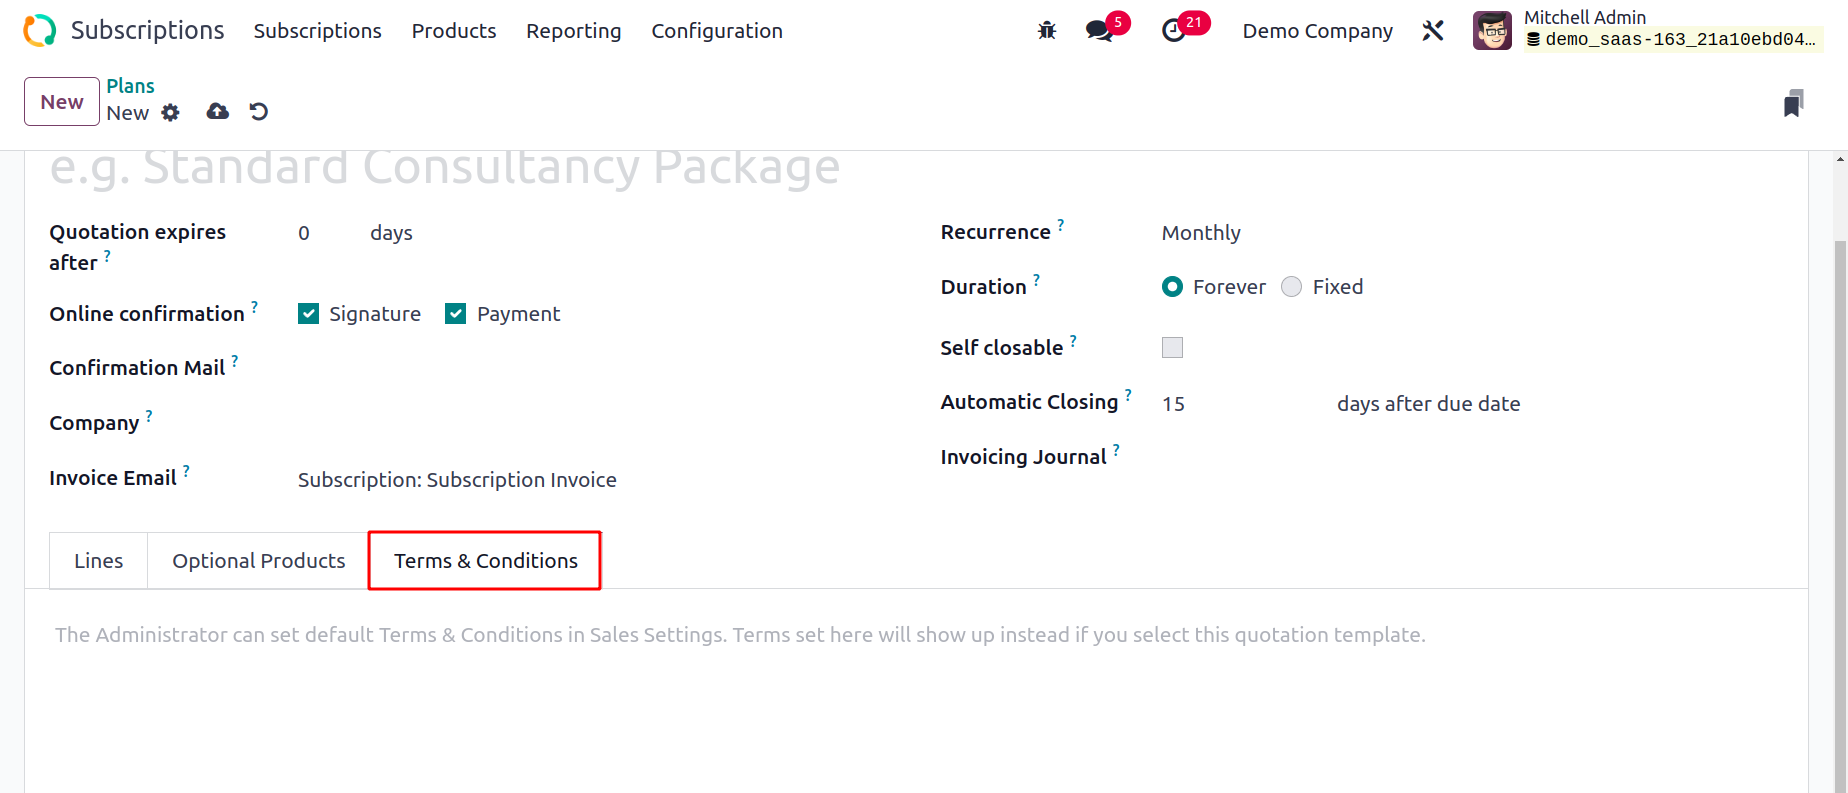
The tab depicted in the screenshot above allows you to choose the Terms & Conditions for the subscription plan.
Recurring plan
From the Configuration menu of the module, you can set the Recurrence Plans of the subscription.
When the Recurrence Periods option is selected, a popup similar to the one below appears.

The database's list of available recurrence periods looks like this.
By selecting the New button, a new recurrence period can be created.
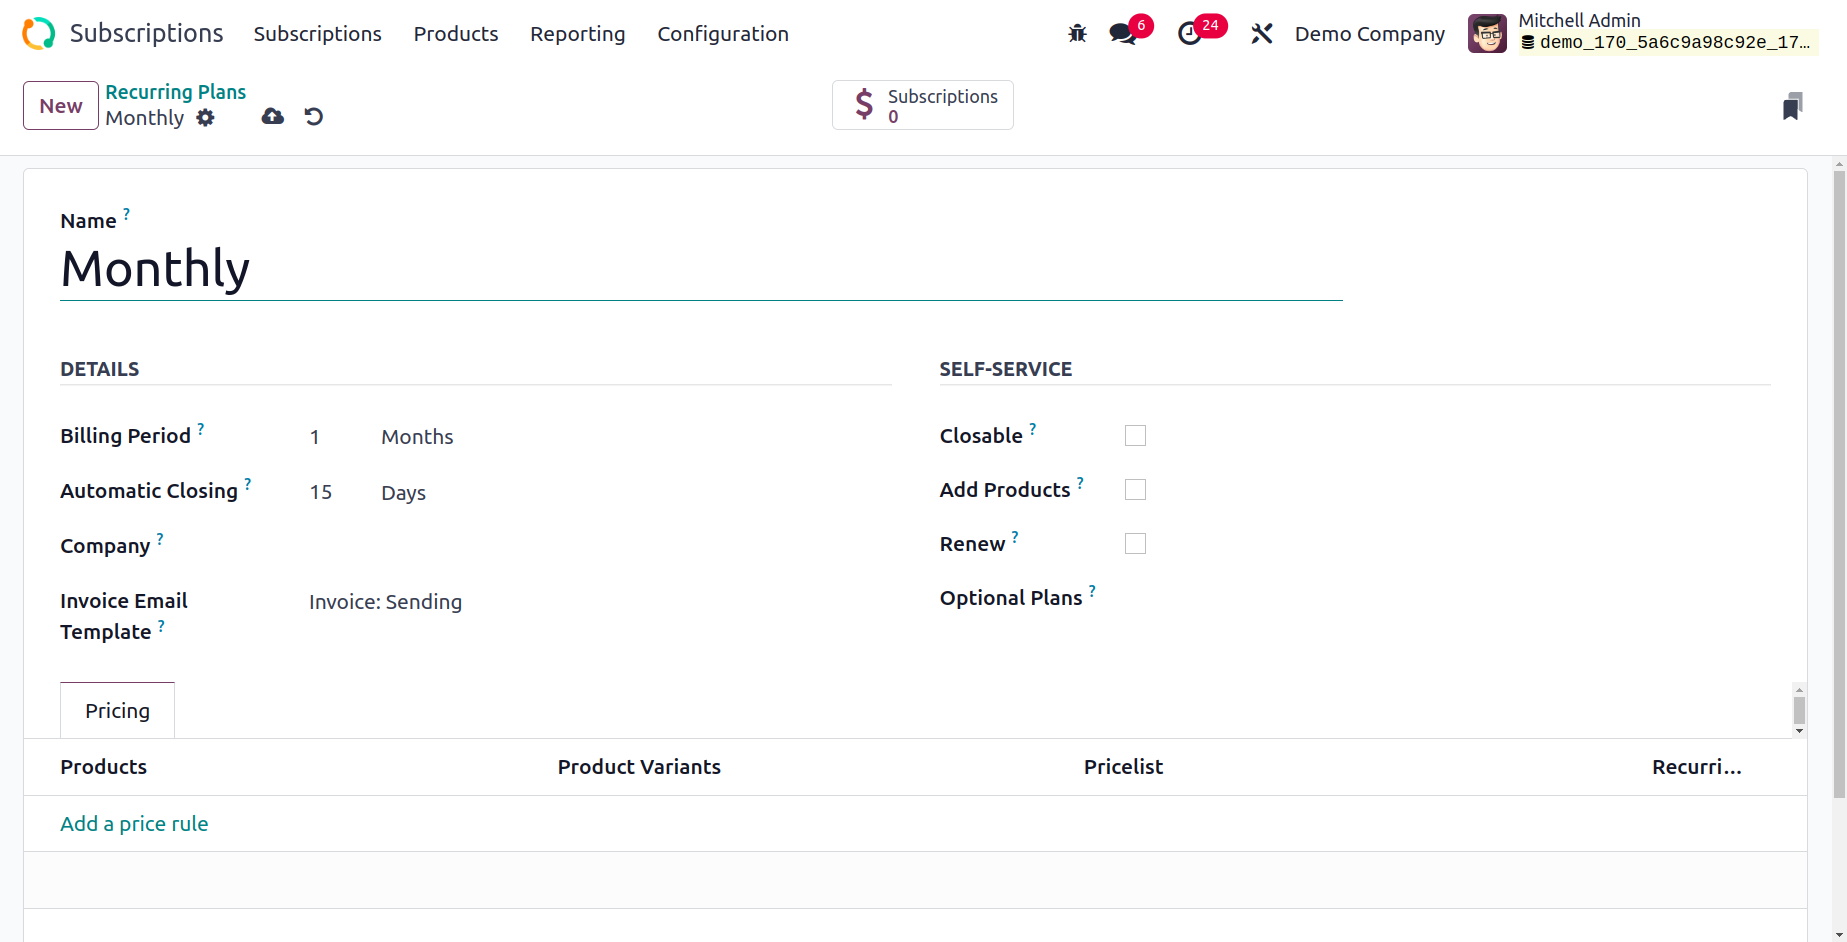
In the space provided, you can see the DETAILS like Billing Period, Automatic Closing, Company, Invoice Email Template.
The Billing Period is the bare minimum of time before this regulation takes effect. A fixed temporal price is represented by a set of zero. Add Automatic Closing days to your subscription. The subscription expiration scheduled action will automatically close any unpaid subscriptions after the due date by the specified number of days. The subscription is immediately terminated if the selected payment method is unable to renew it after this period. To send invoice emails automatically, utilize the Invoice Email Template.
Turn on Closable if the customer wishes to cancel the subscription.
Customers can customize an upsell quotation with Add Products to change the number of products included in their subscription. You can change the quotes by using the goods that are marked as Optional products.
Customers can generate a renewal quotation for their membership using the Renew option.
Customers can choose between different plans when requesting a new subscription or renewal through Optional Plans.
Adding price rules is possible via the Price tab. The pricing tab displays the product, product variants, pricelist, and recurring prices.
Automated Rules
You may remind your clients to buy from you using the Automated Rules feature in Odoo 17. You can use this function in the Subscription module to notify customers when their subscriptions are about to expire or when a payment is past due. Select the Automated Rules option under the Configuration menu.
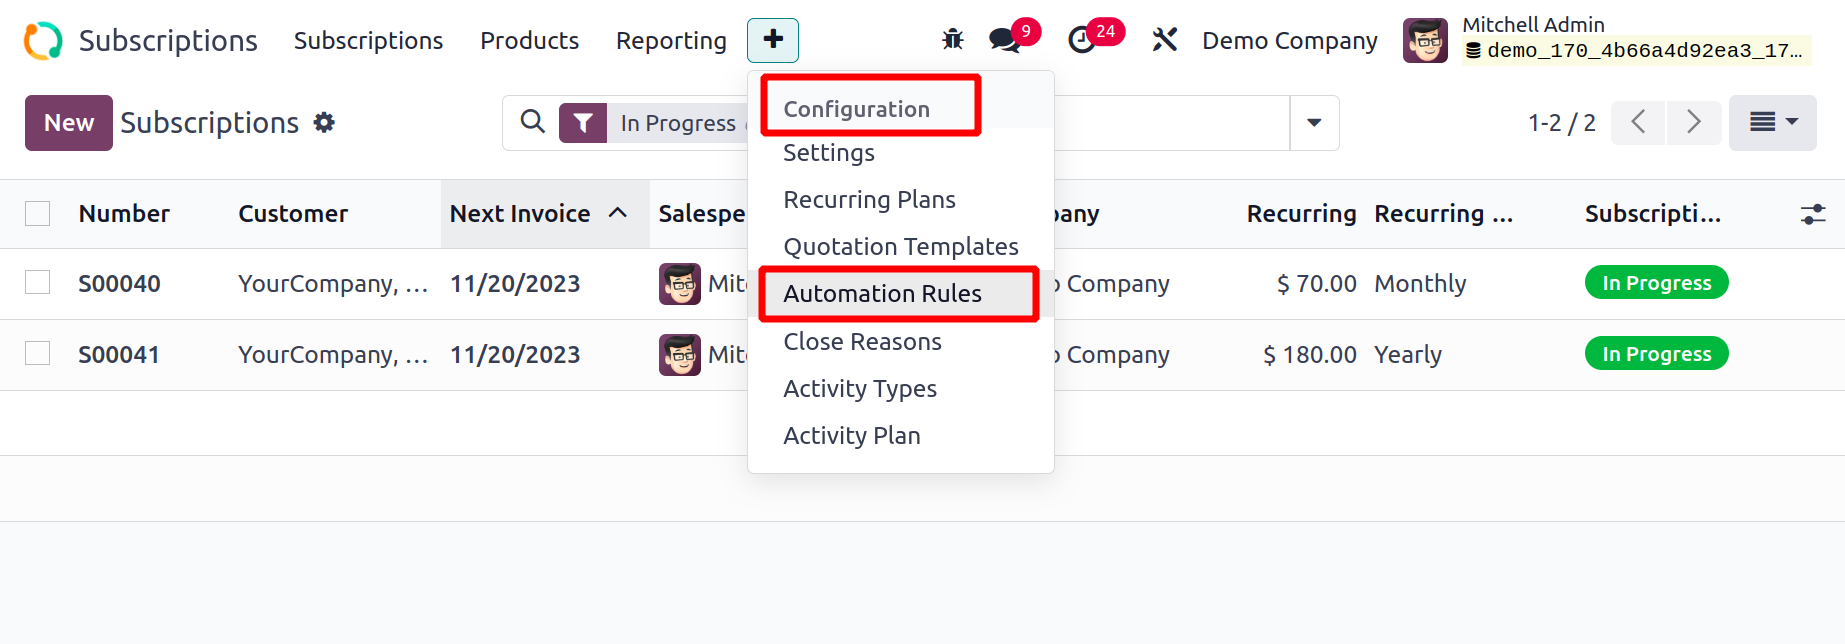
Odoo17 will launch a new window, as displayed below, where you can view the list of Automated Rules that have already been configured. The Name, Action To Do, Trigger on and Company are included in the preview of the list.
Now, make a new alert by pressing the New button.
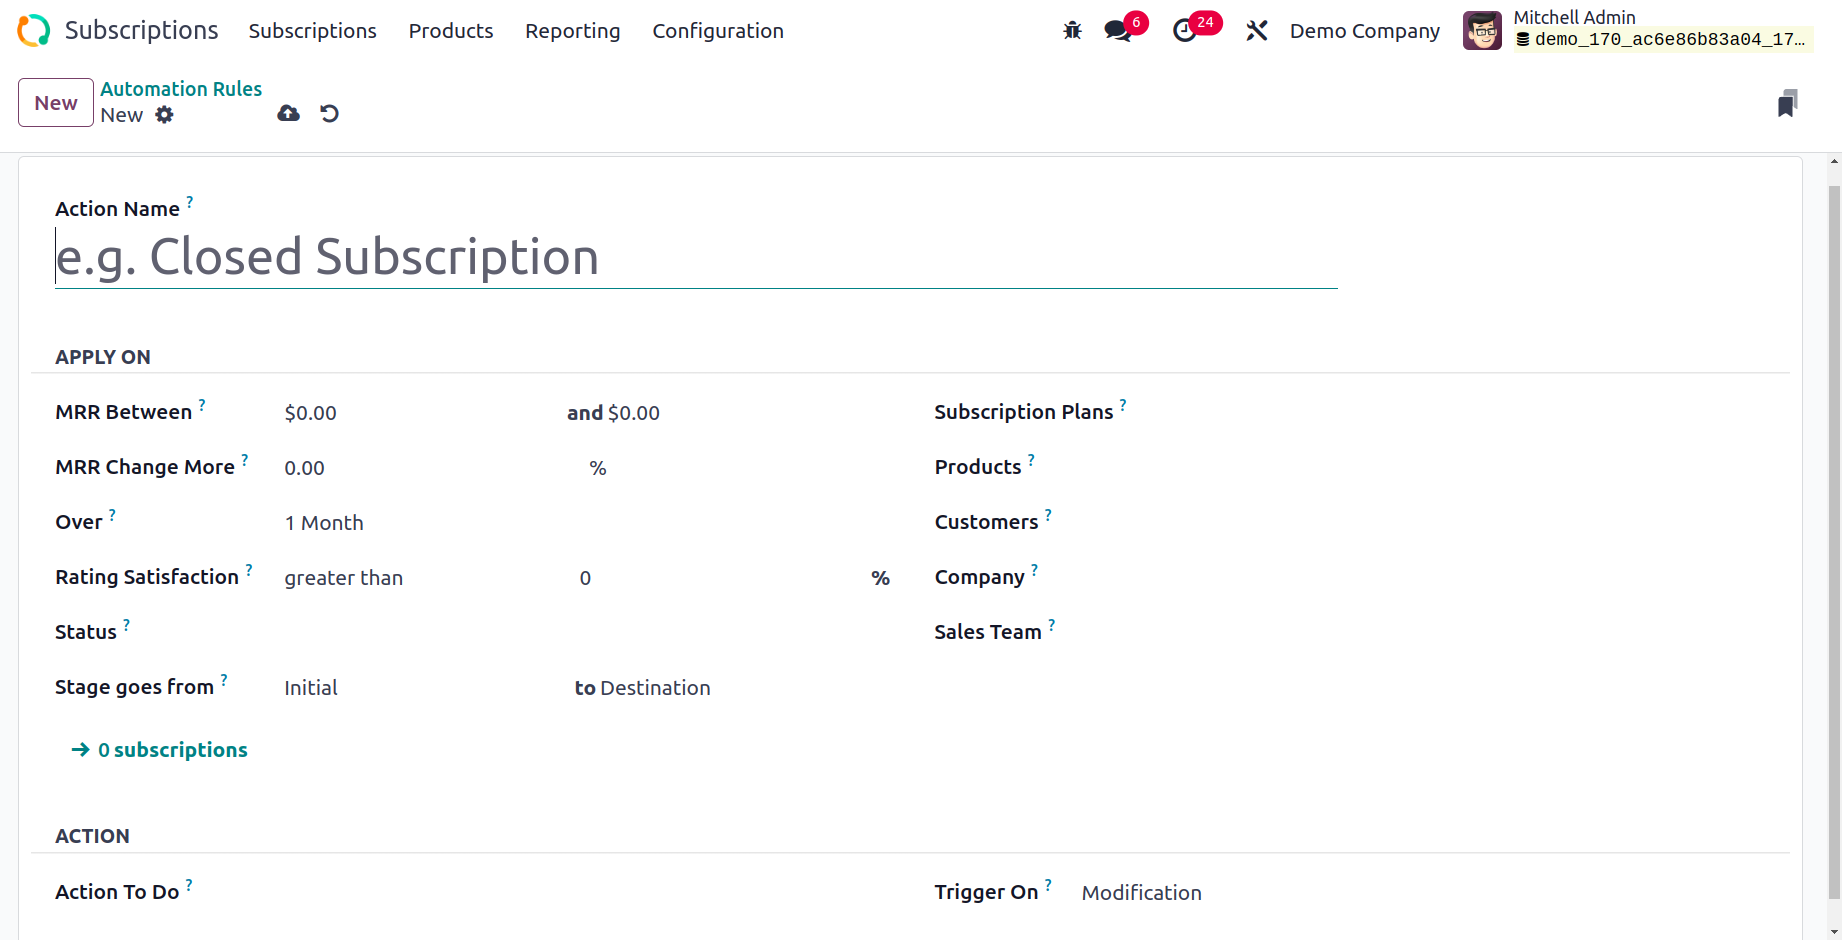
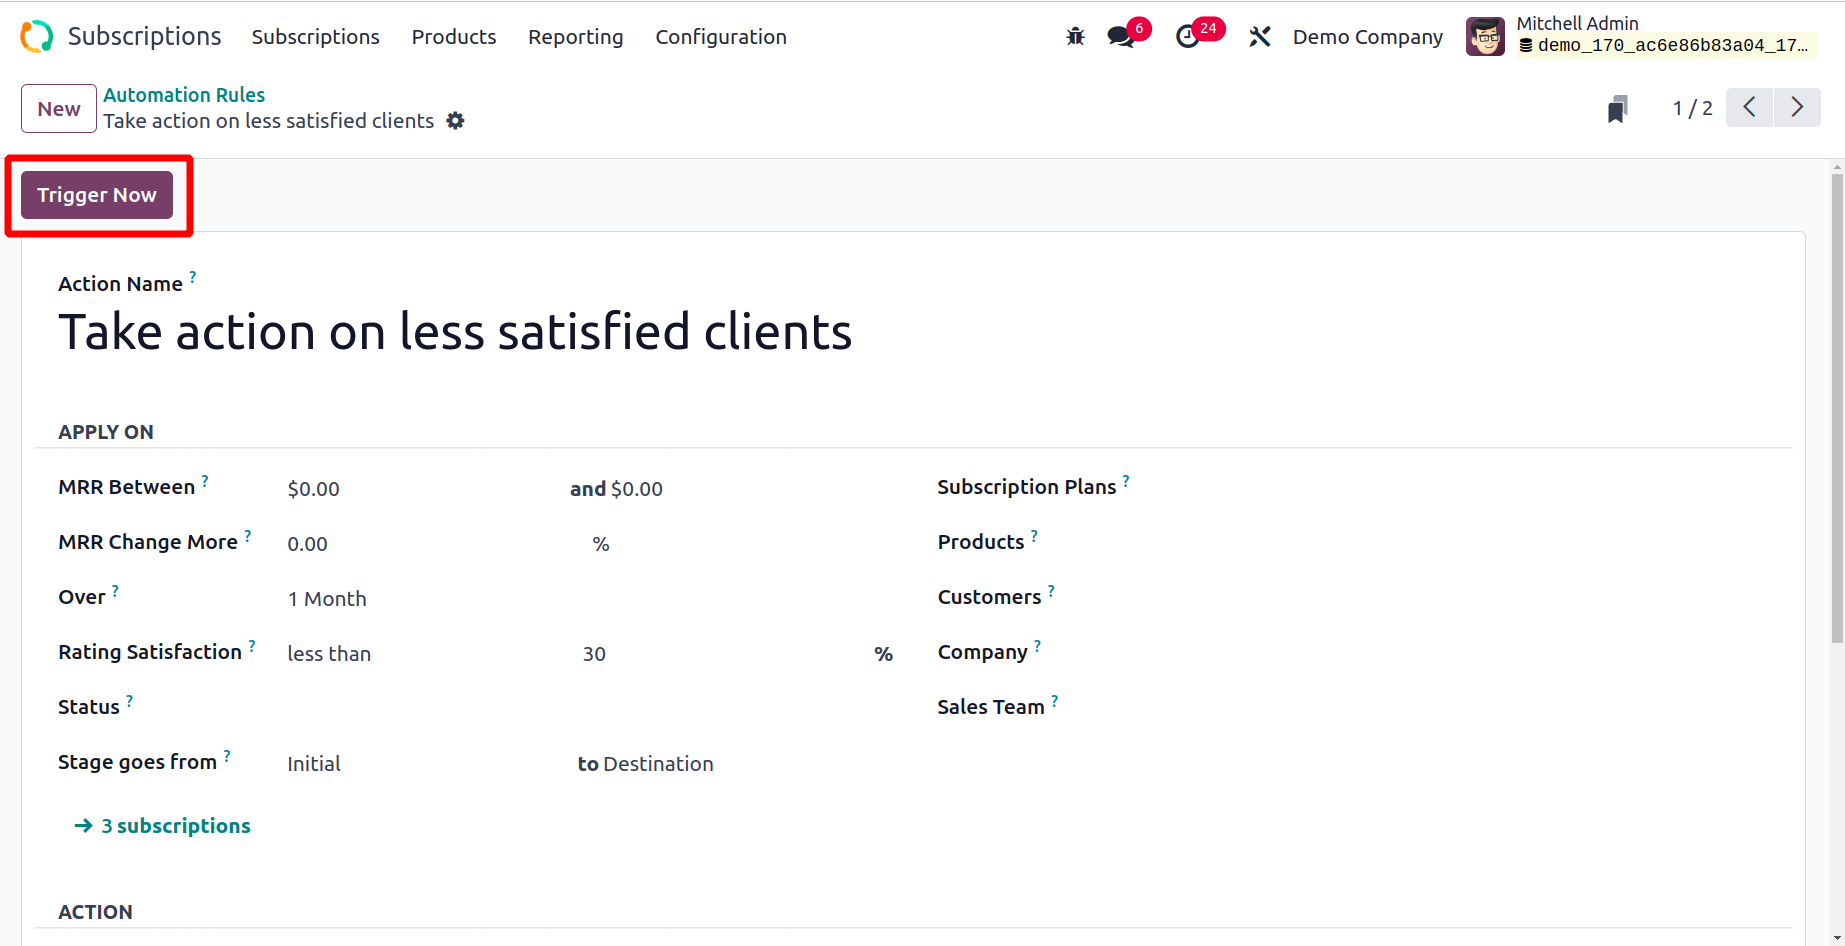
You can give the action a name in the Action Name field in the form view. You can specify action conditions under the Apply On tab. On the MRR Between, MRR Change More, and Period Over which the KPI is calculated, conditions can be set. The Rating Satisfaction can be used to set off alarms. Rules may be greater than or less than the specified percentage. Similar to that, notifications can be set off when a stage changes. The Stages from the field allow the
appropriate stages to be selected.
You can provide information in the relevant boxes if you wish to establish an alert for a certain Subscription Plan,
Product, Customer, Company, or Sales Team.
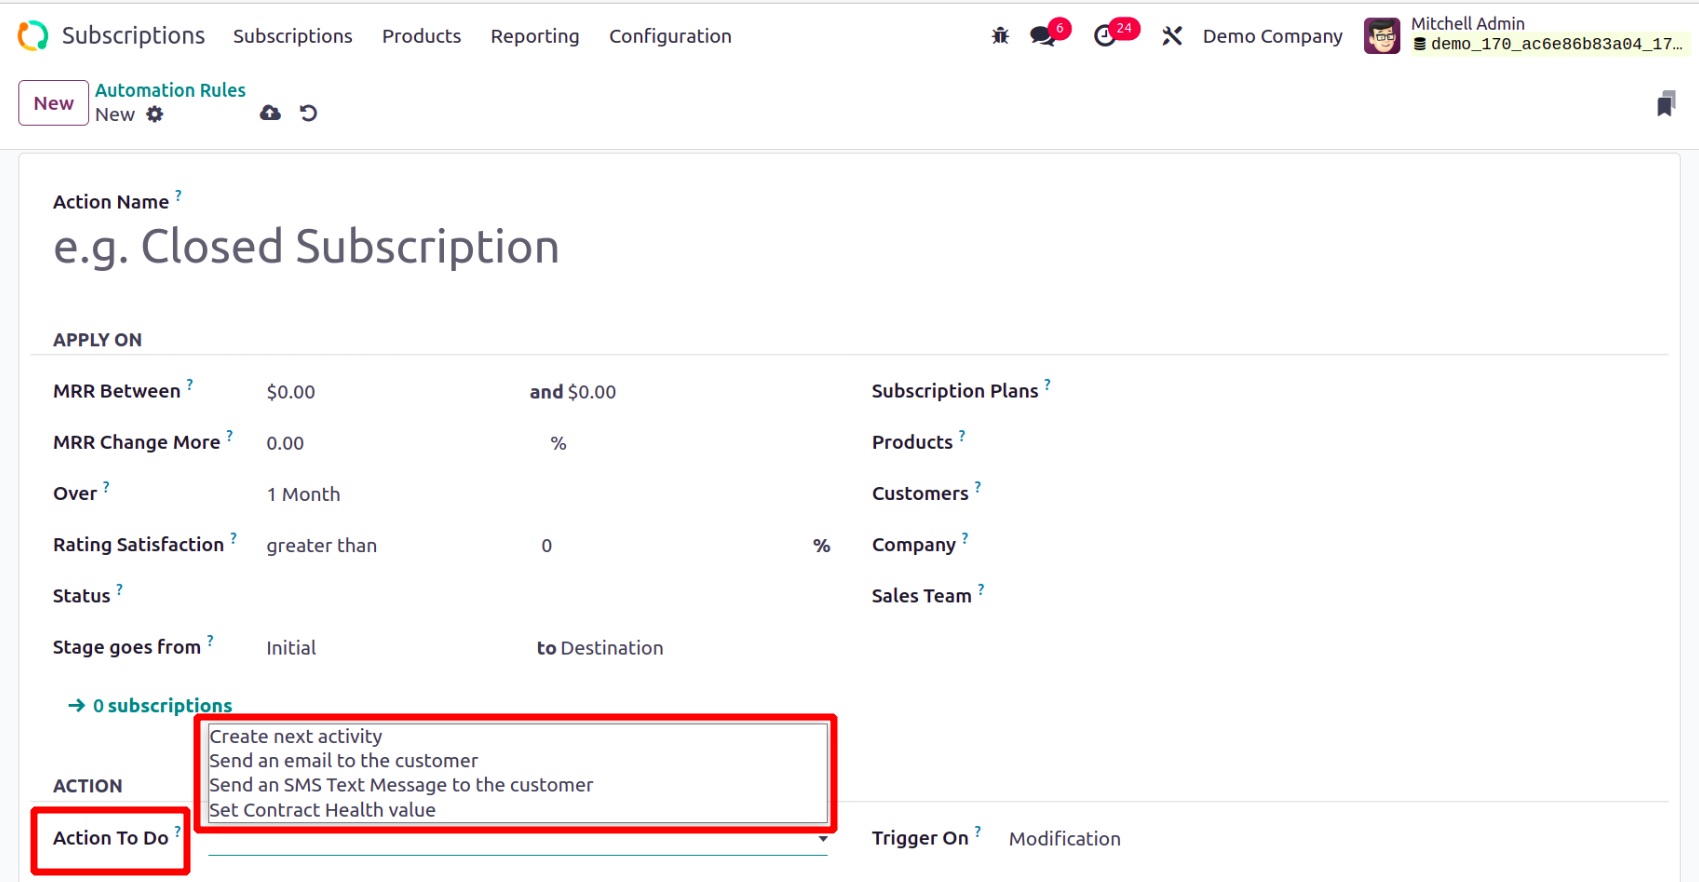
You may now specify an action for this alert using the Actions tab. A stage on the subscription, Create next activity, and other options are available as the action. Identify as to renew, Send the consumer either an SMS text message or an email.
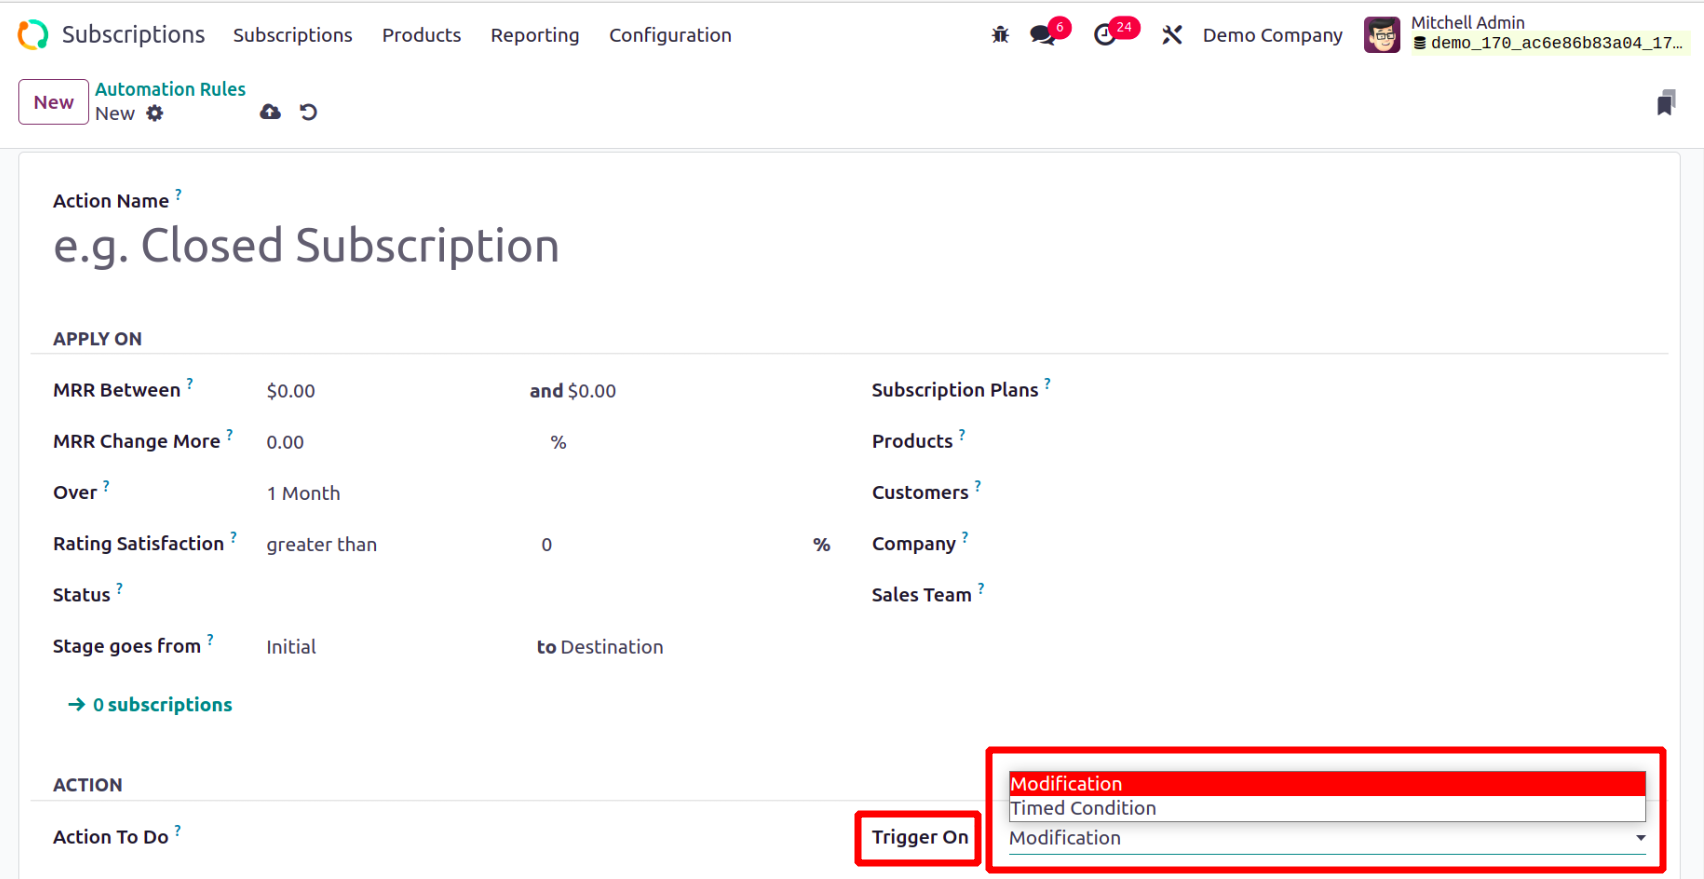
This action can be started by a modified condition or a timed condition. You can add internal remarks about this alert in the Note field.
The alert in Odoo can also be triggered using the Trigger Now button.
Close Reasons
In some cases, it may be necessary to cancel the subscription before the expiration date. In these situations, it's crucial to explain the situation before canceling the membership. The Close button,
which may be used to cancel a subscription, can be found on the subscription's form view.
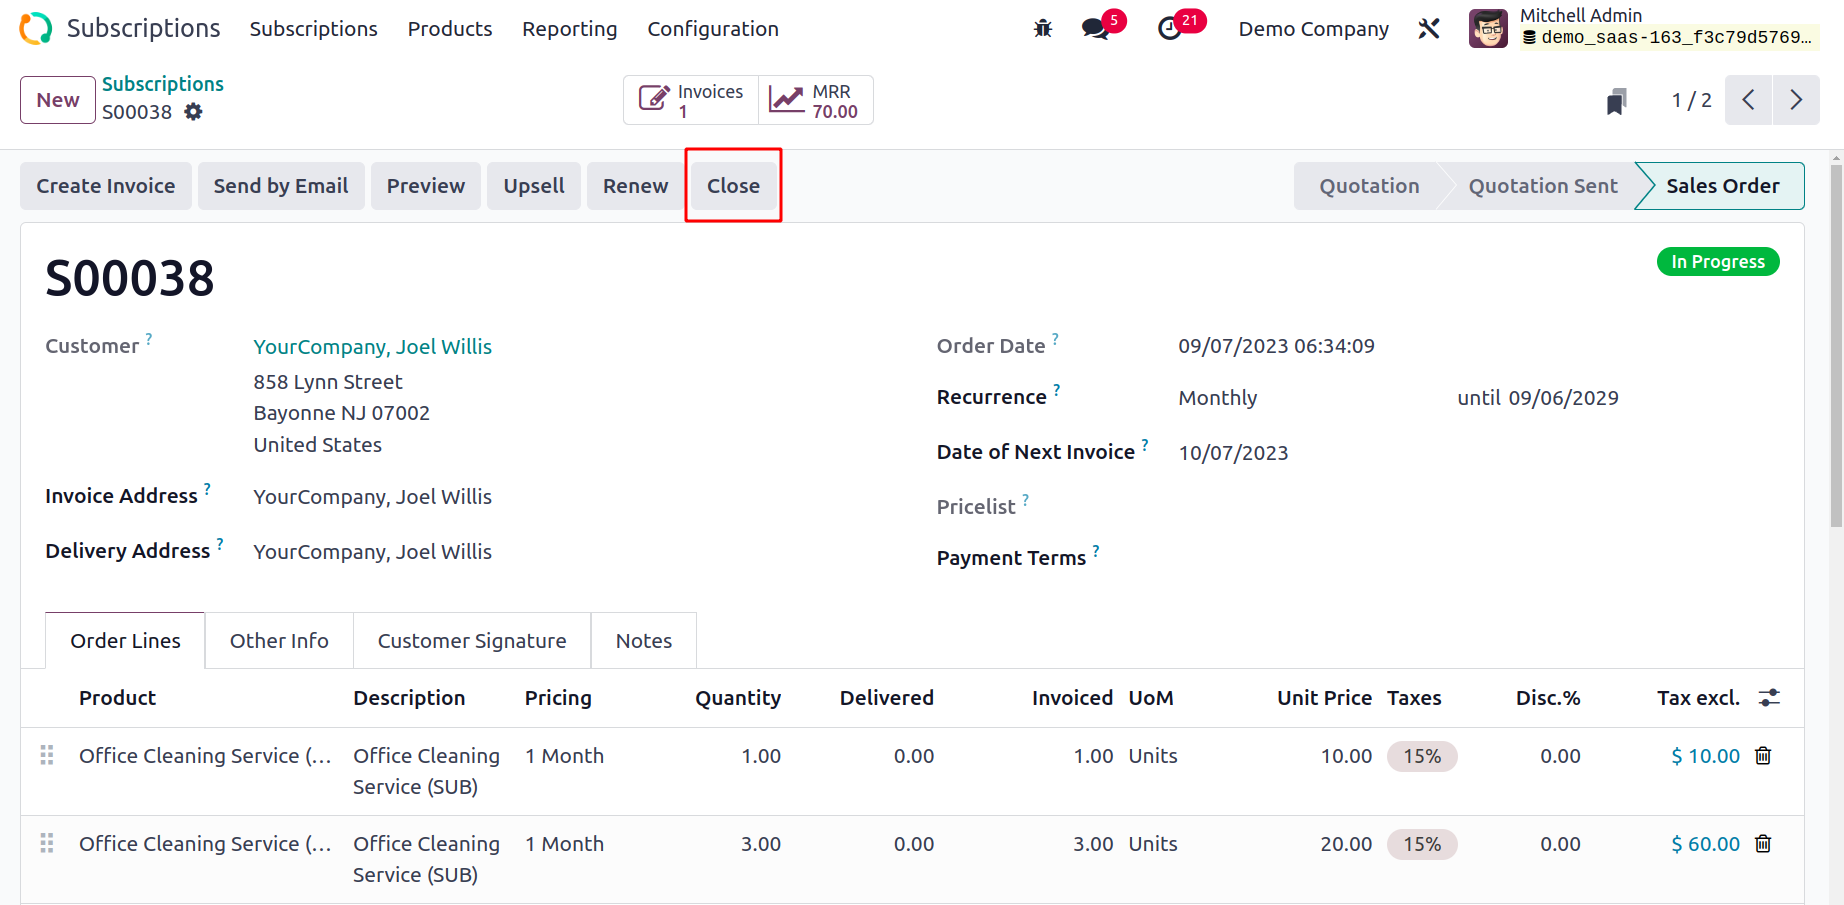
When you click on this button, a new pop-up window will appear, as seen in the screenshot below.

Here, you can choose the most fitting justification for canceling the membership from the list provided.
After that, you can click the Submit button to end the subscription.
For these reasons, the Odoo17 Subscription module allows you to create a list. You can do this by
using the Close Reasons option under the Configuration menu.
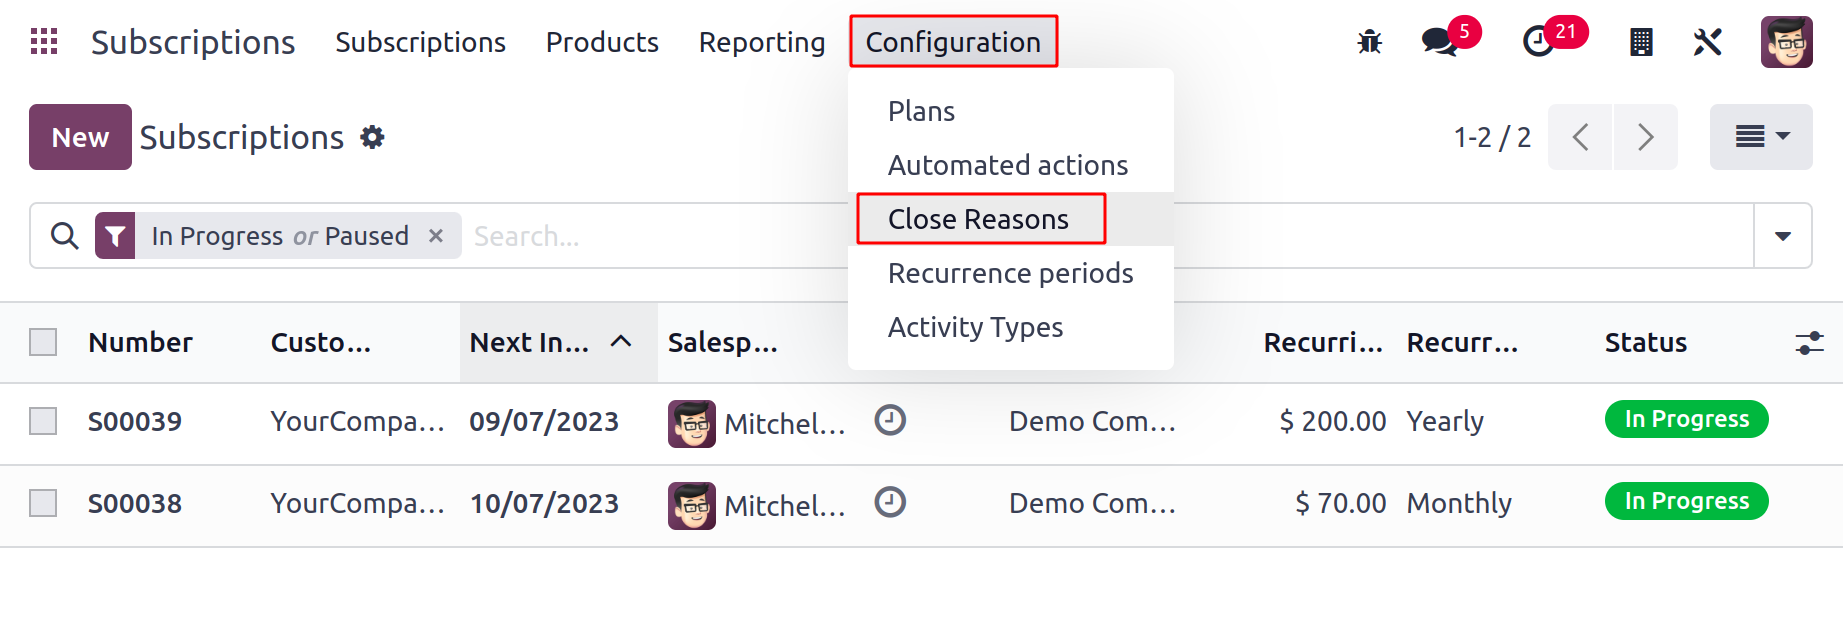
Here, it is possible to see the previously created close reasons. Using the New button, you can start a new one.
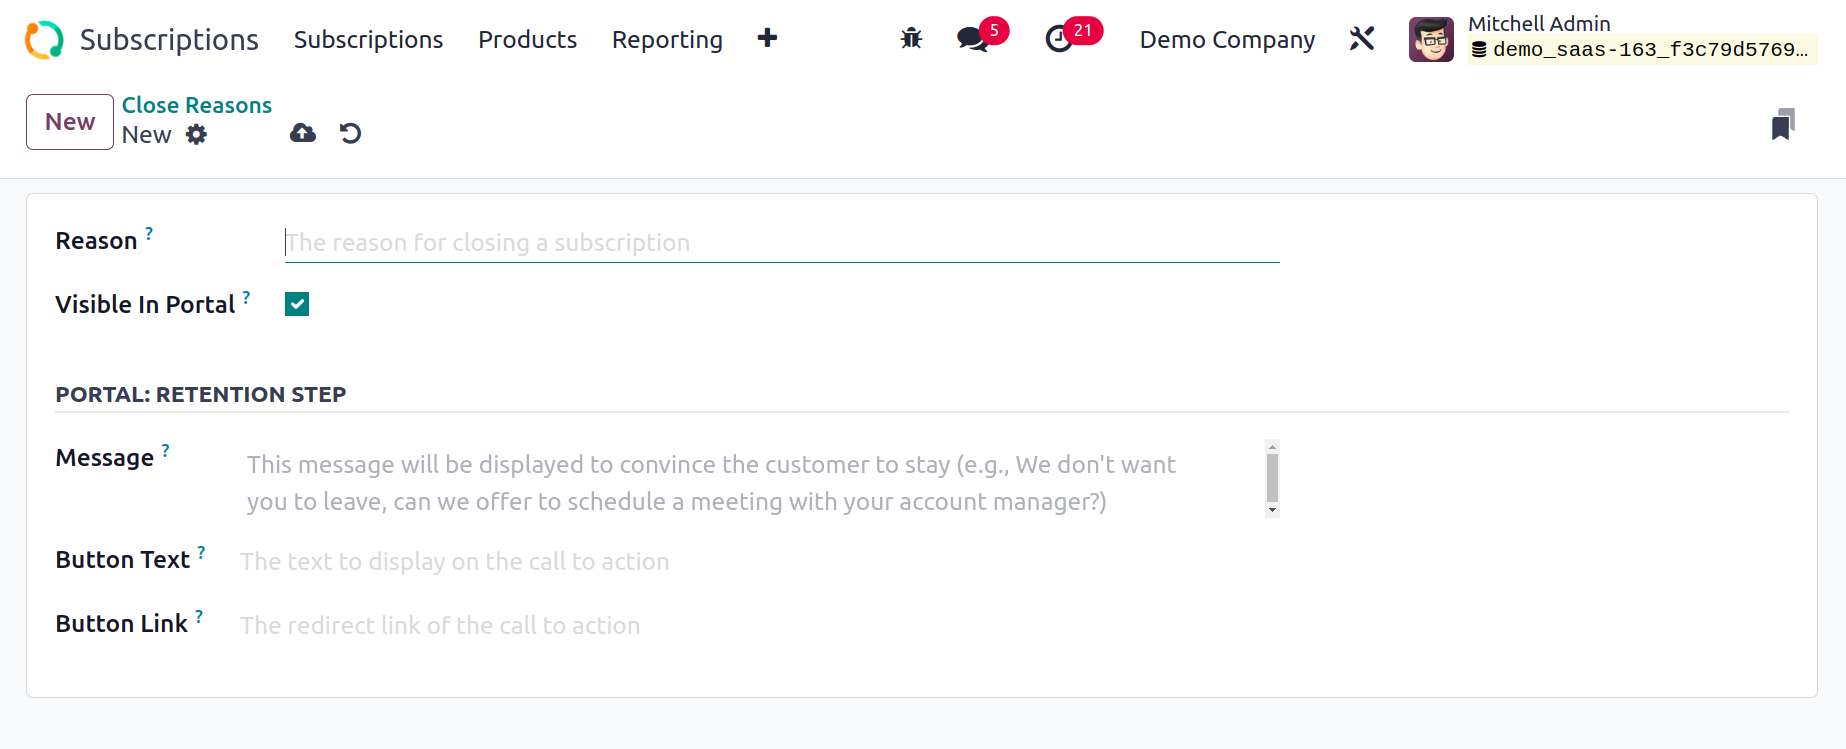
A new line will be created under the current list for you to add your reason. To use this justification the next time you want to cancel a subscription, click the Save option.
Activity Types
In the Odoo 17 Subscription module, new activity kinds can be added. To do that, use the Configuration menu's Activity Types option. All of the current activity types are displayed in the list view along with their data, including Name, Default Summary, Planned in, Type,
Model, and Icon.
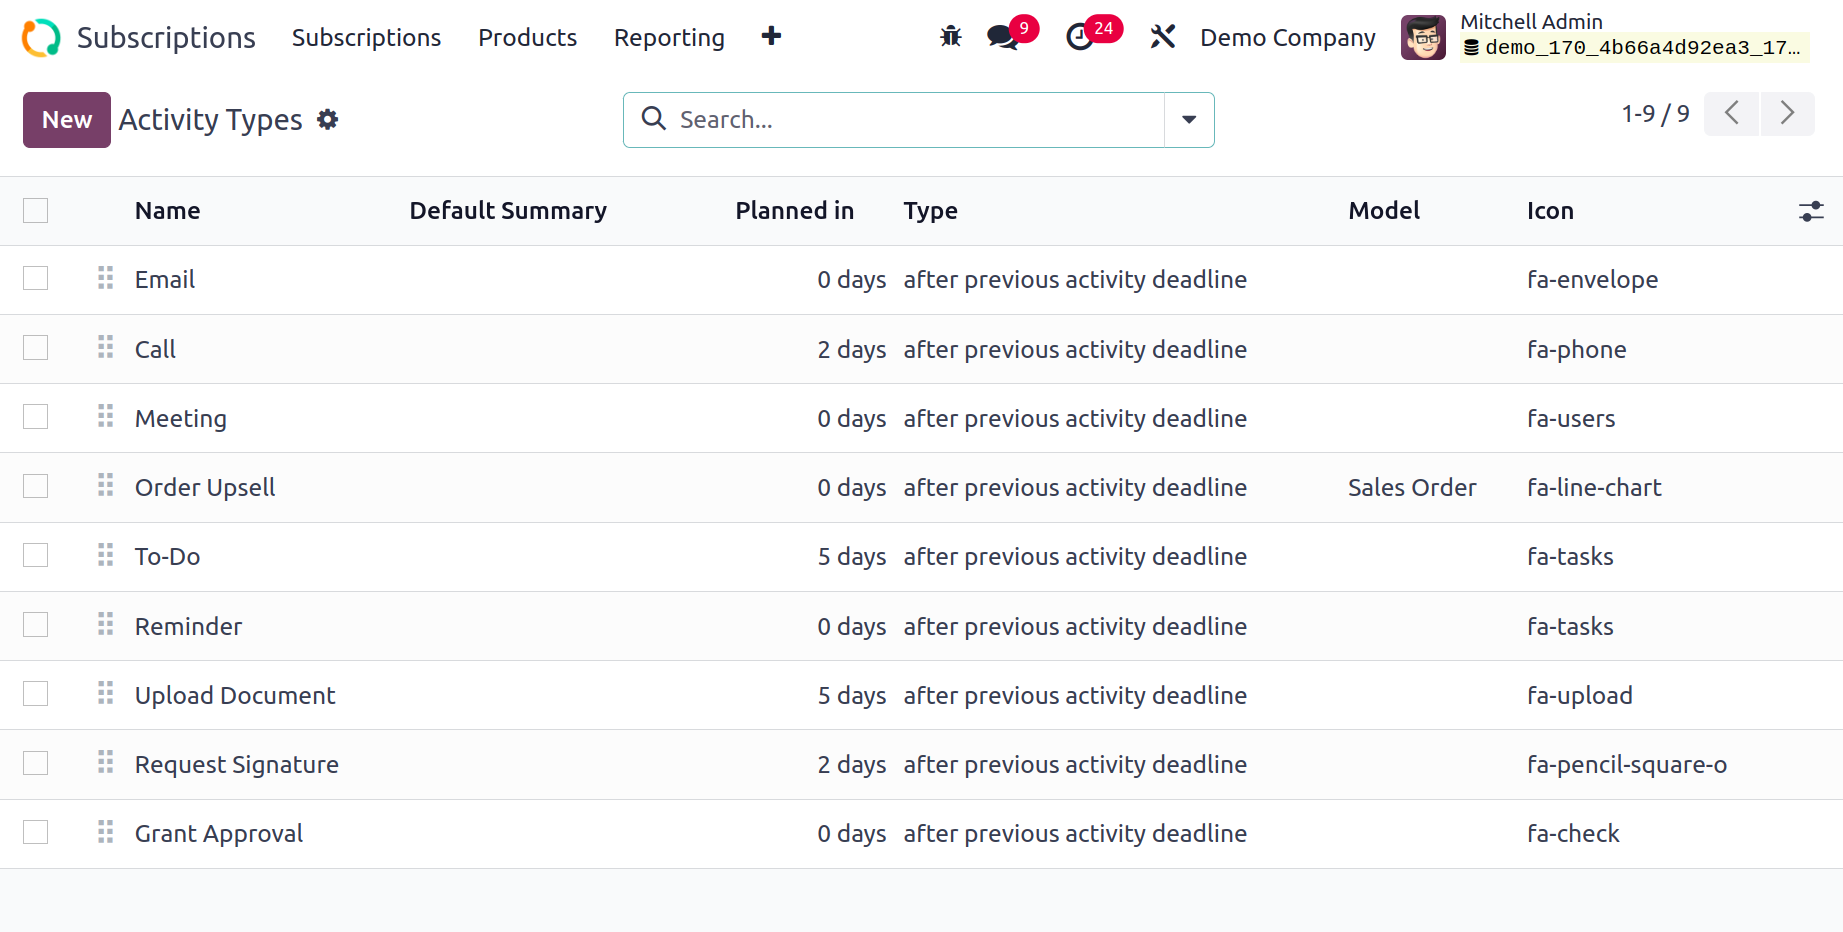
To add another, click the New button. The activity Type form view will appear. In the field, enter the name of the activity. Next, select the model and the action to be performed from the ACTIVITY SETTINGS. Talk about the Icon, Default Summary, and Default User. Can alter the related activities of this type's backdrop color, as Decoration Type. Enable the Keep Done option if you want the activity to remain marked as completed in the activity view. If needed, add any Default Notes.
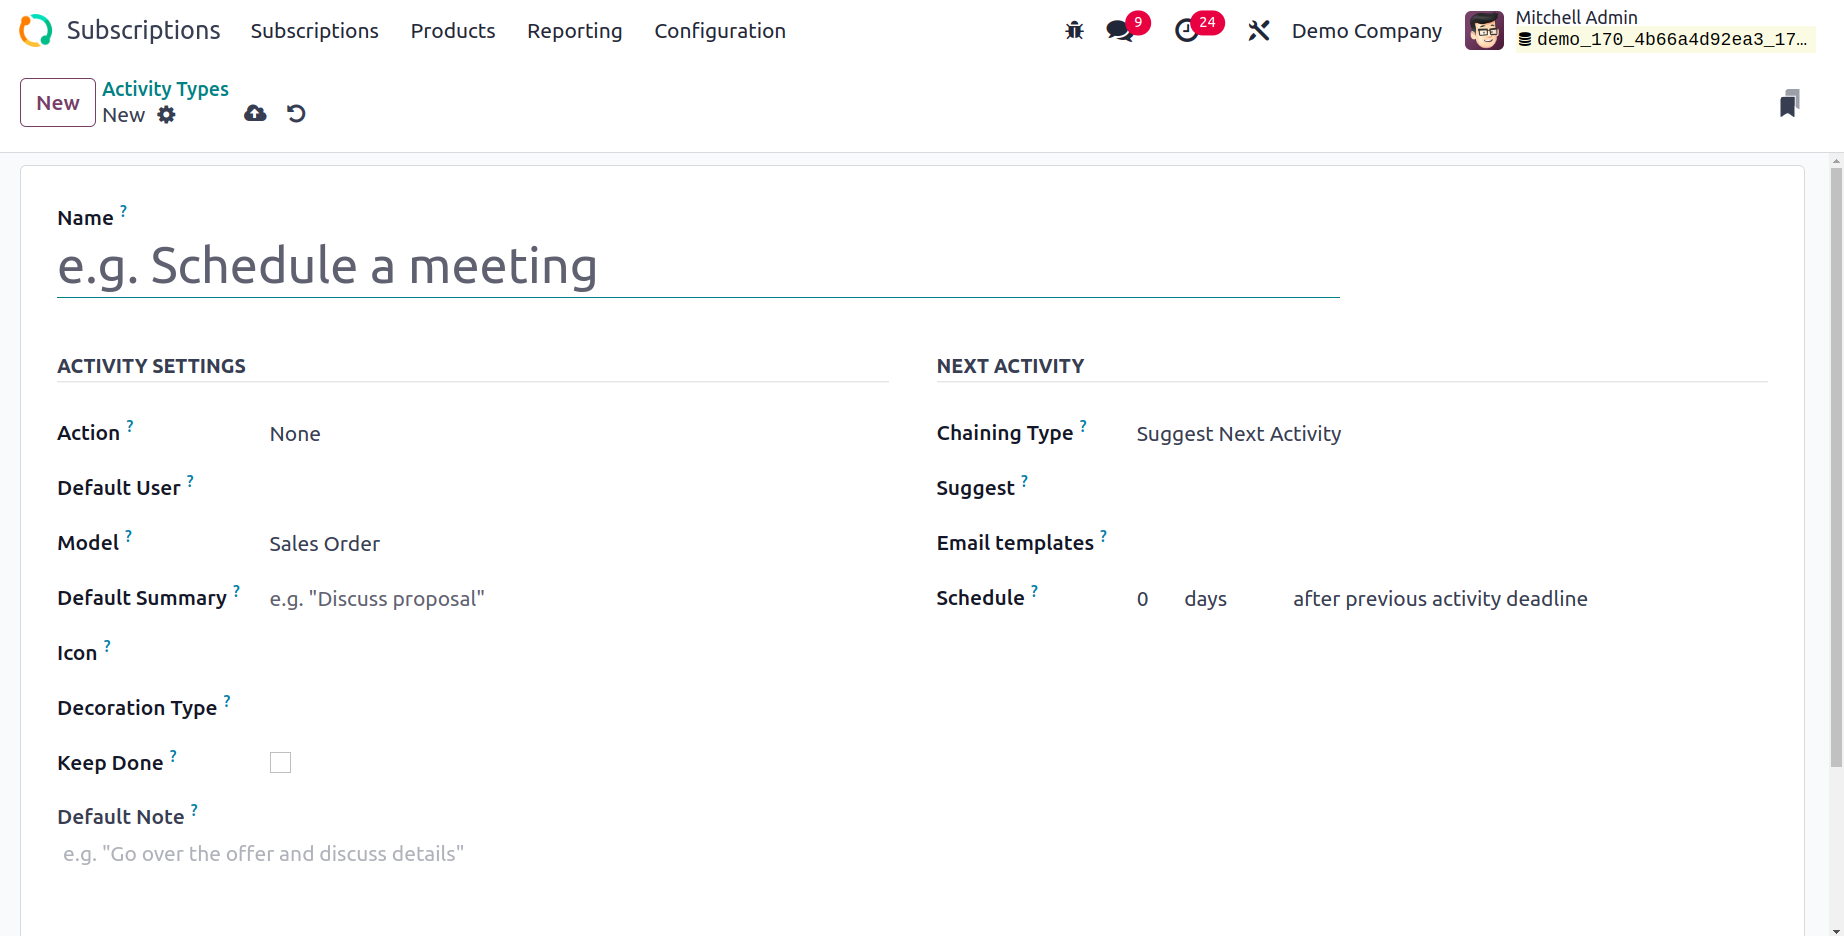
Users can add Chaining kinds from the NEXT ACTIVITY section. Select the Chaining type: Suggest Next Activity or Trigger Next Activity. Put an Email Template in. We can plan the action deadline by using the Schedule option.
Then save the created Activity Type.
Activity Plan
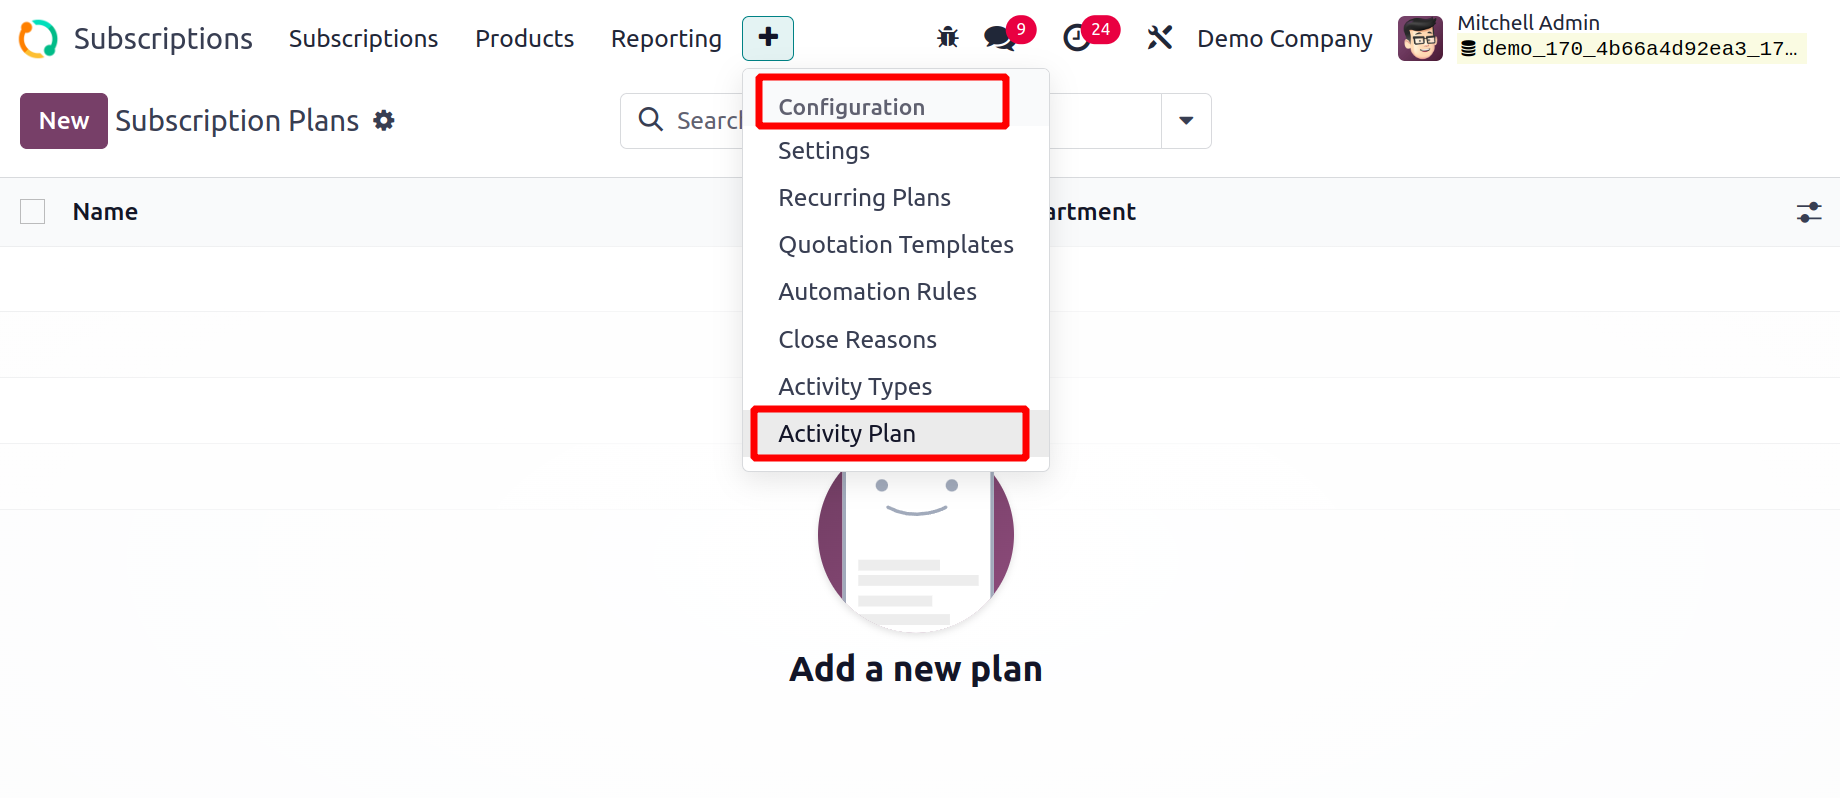
Activity Plan is the last option under the configuration menu. Click on the Activity Plan from the Configuration. The New button allows you to add new Activity Plan.
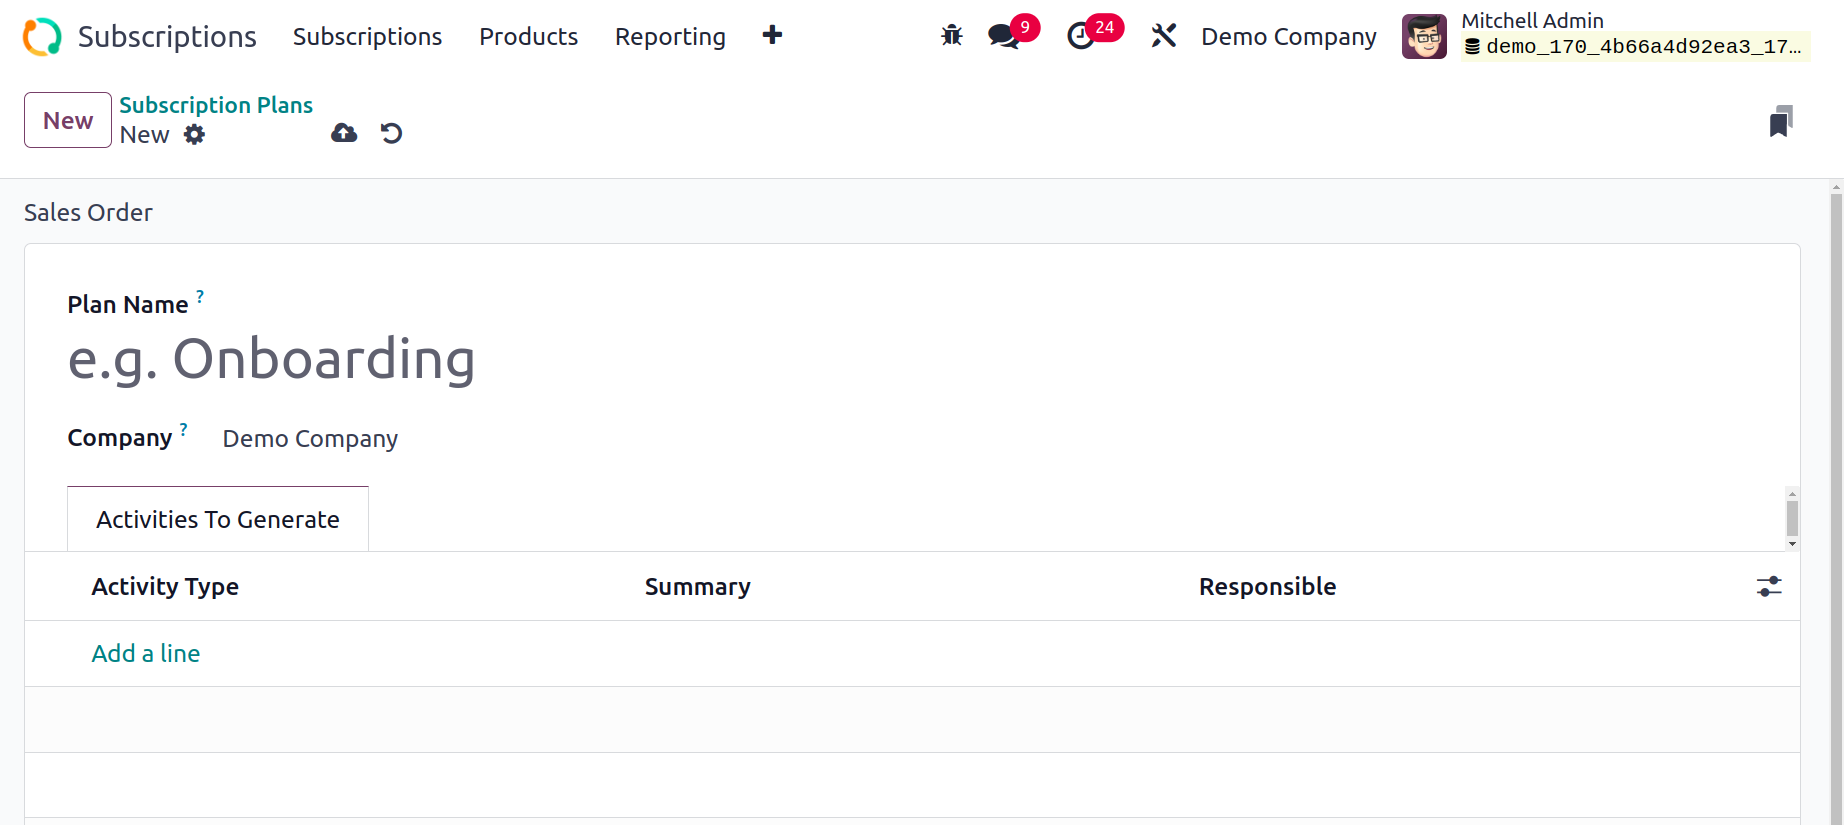
Put the Company and Plan Name in front. Next, you can set up new Activities utilizing the Add a line feature on the Activities To Generate tab.
Reporting
It is vital to have a suitable platform that provides correct reports to comprehend a corporation's operational process. These tools will enable the user to see clearly all of the activities carried out during a specific time period. You can perform numerous analysis tasks connected to the module by using the Reporting function in the Odoo17 Subscription module. The user will find reporting tools for salesperson dashboards, subscriptions, retention, and revenue KPIs here.
Below is a screenshot of the Subscriptions Analysis pane. This is the report's pivot table.
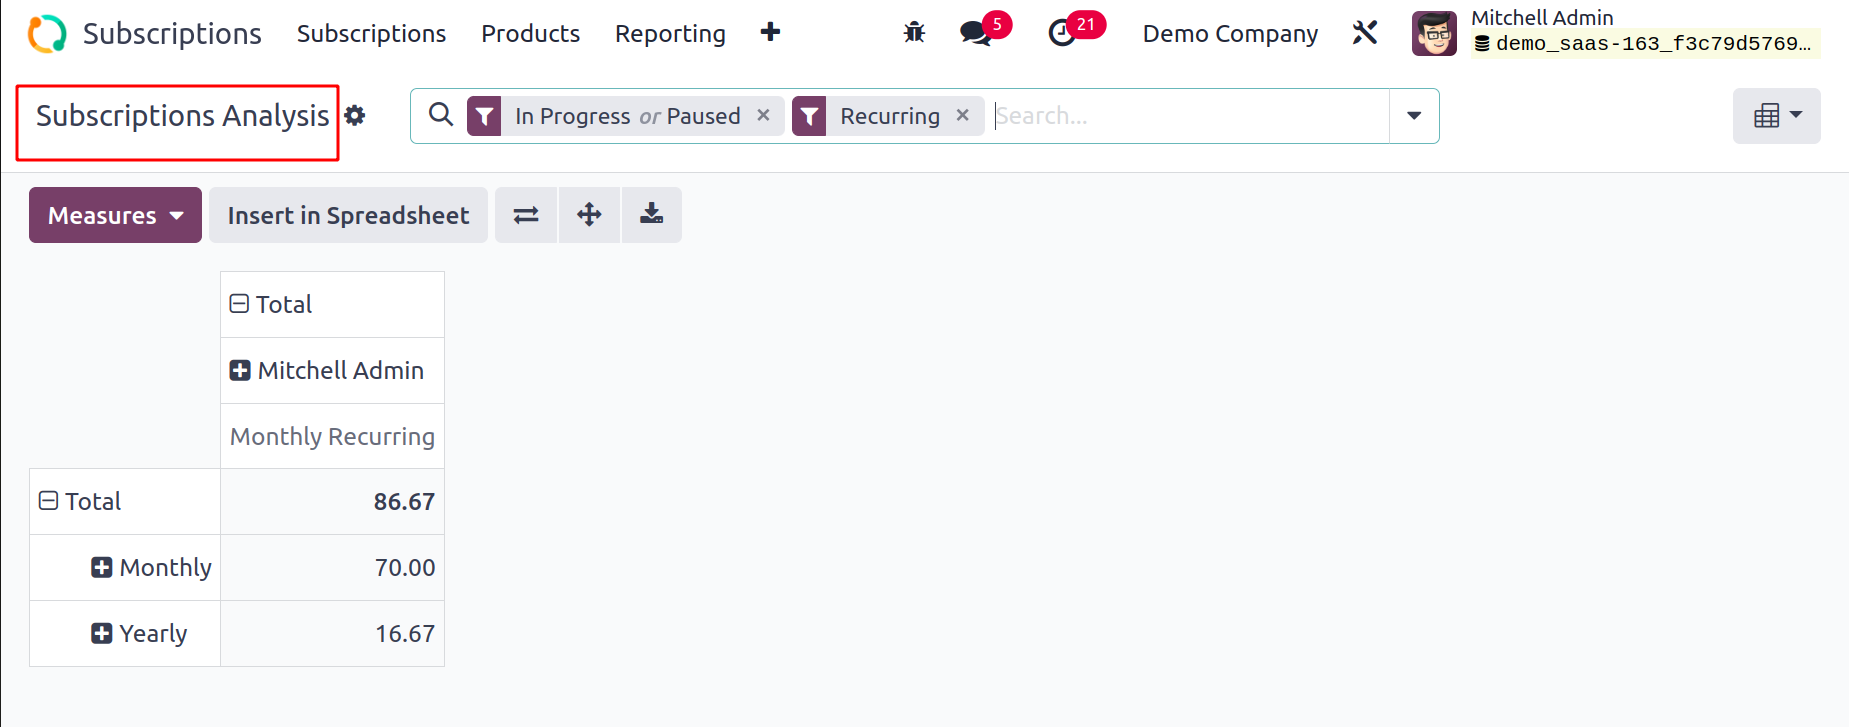
As the Measures for the report, you can choose from Monthly Recurring Revenue, Quantity, Recurring Amount, Yearly Recurring Revenue, and Count. My Subscriptions, Running, To Renew, Expired, Good Health, Bad Health, Order Date, and End Date are available as filters. You can group the report using the options in the Group By section, including Stage, Salesperson, Customer, Country, Industry, Template, Order Date, and End Date.
Selecting the Retention option from the Reporting menu will open the Retention Analysis window.
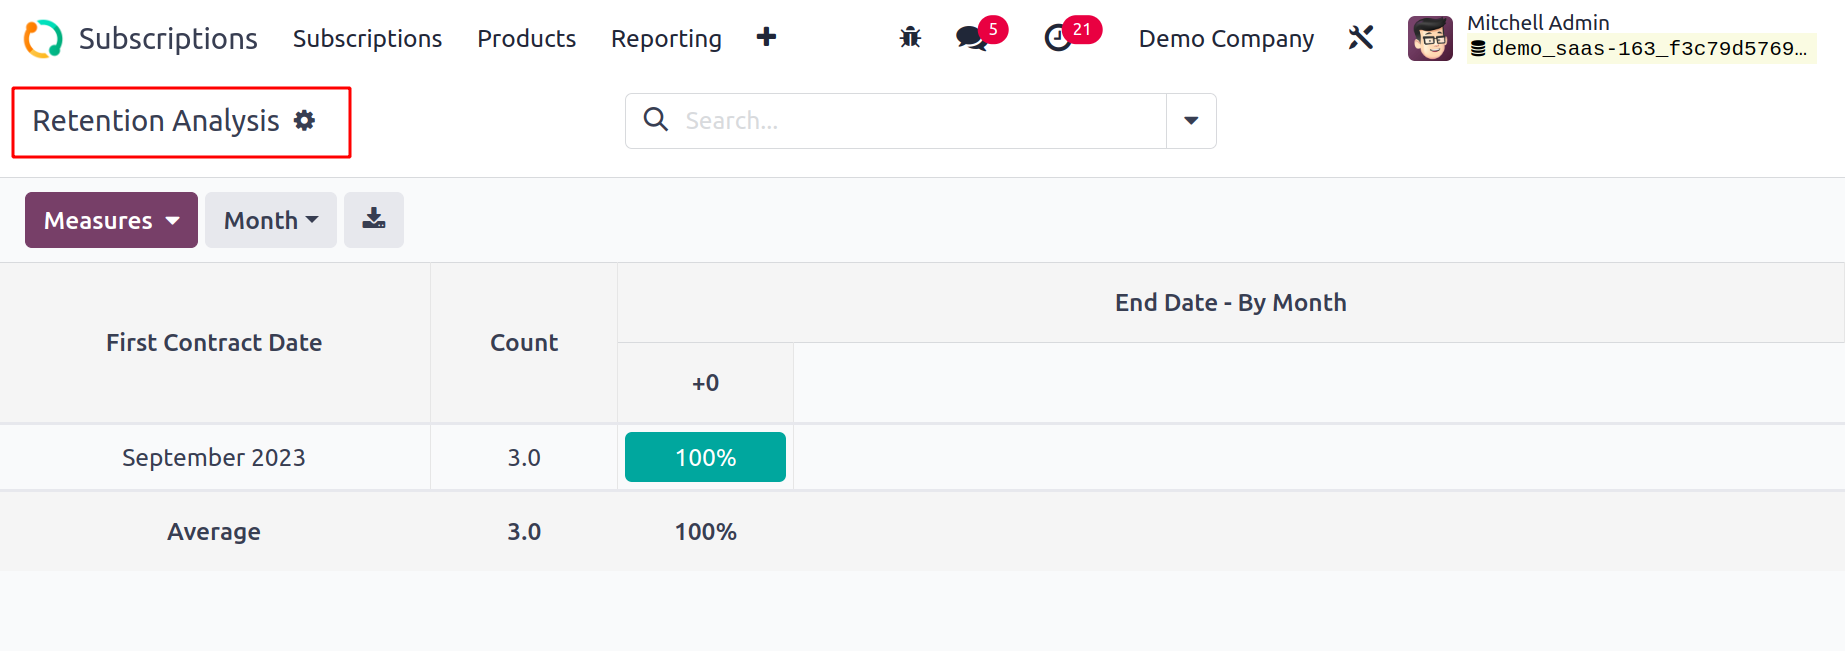
The same Measures, Filters, and Group By options that we stated in the Subscription Analysis box are available here for the user. The report is available in Cohort, Pivot, and Graphical modes.
The MRR Growth' reporting window is provided below. By changing the date and year in the provided field, you can produce MRR Breakdown KPI reports for a specific time frame. The report can be altered in accordance with the subscription plans, businesses, and sales staff.
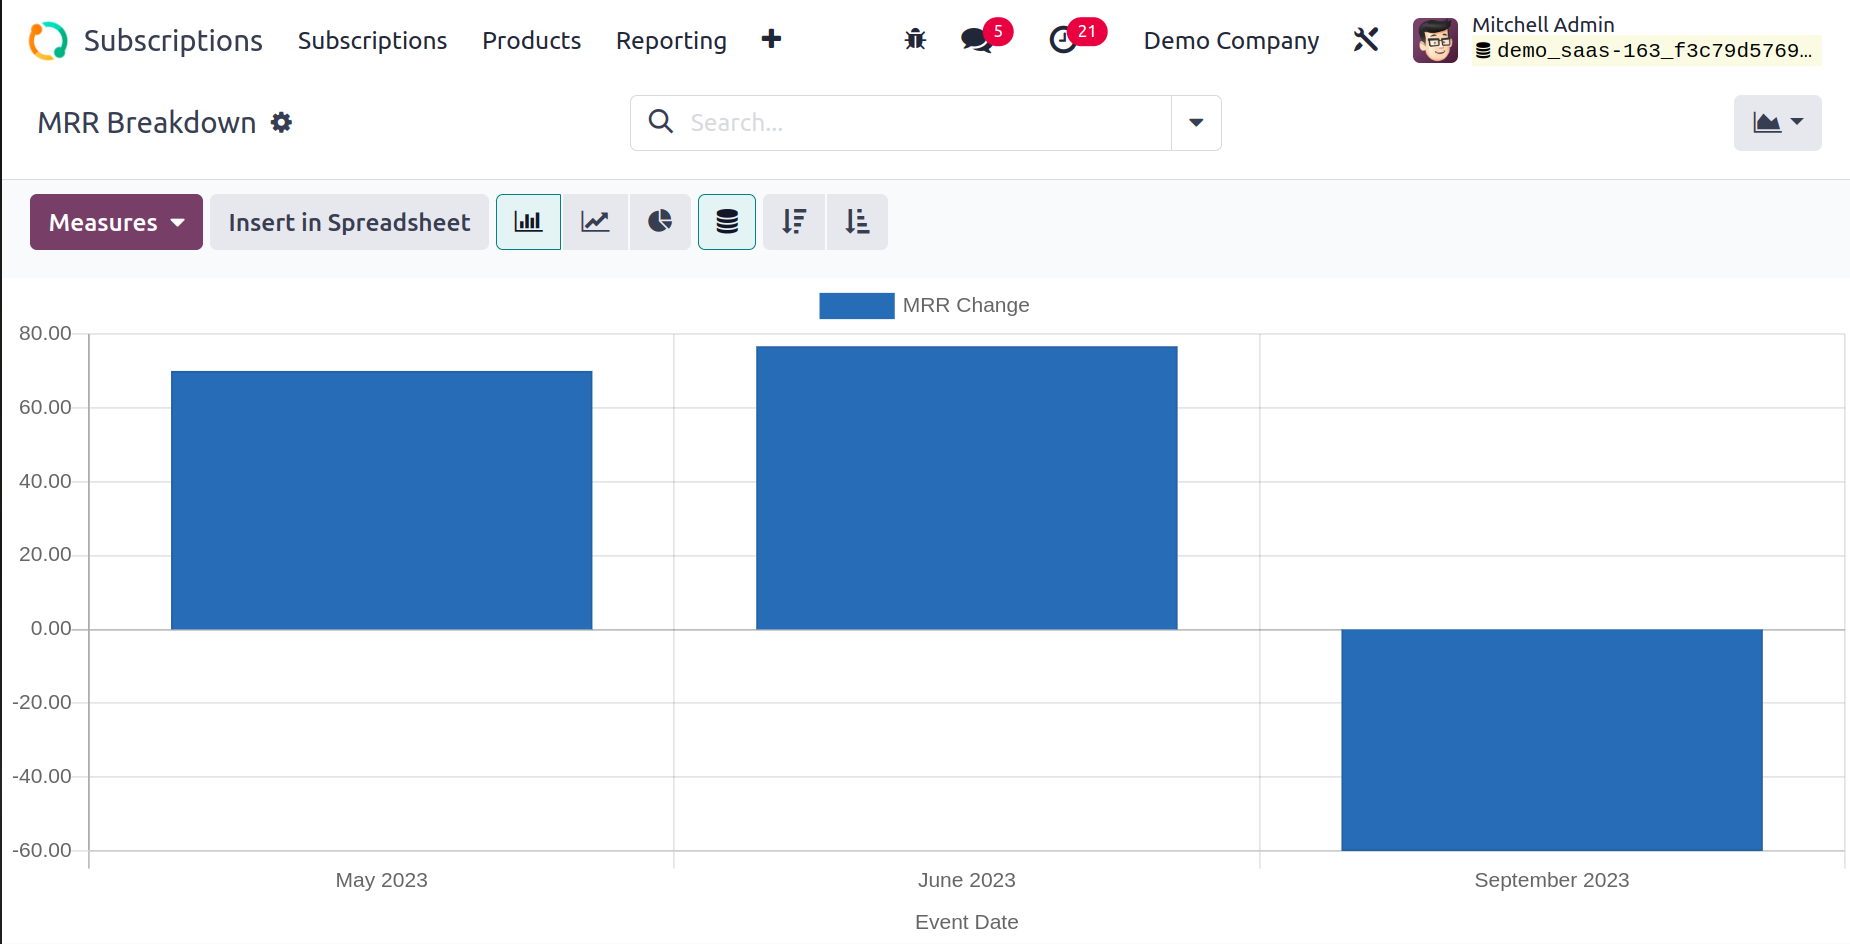
MRR Analysis Report shows the MRR Timeline.
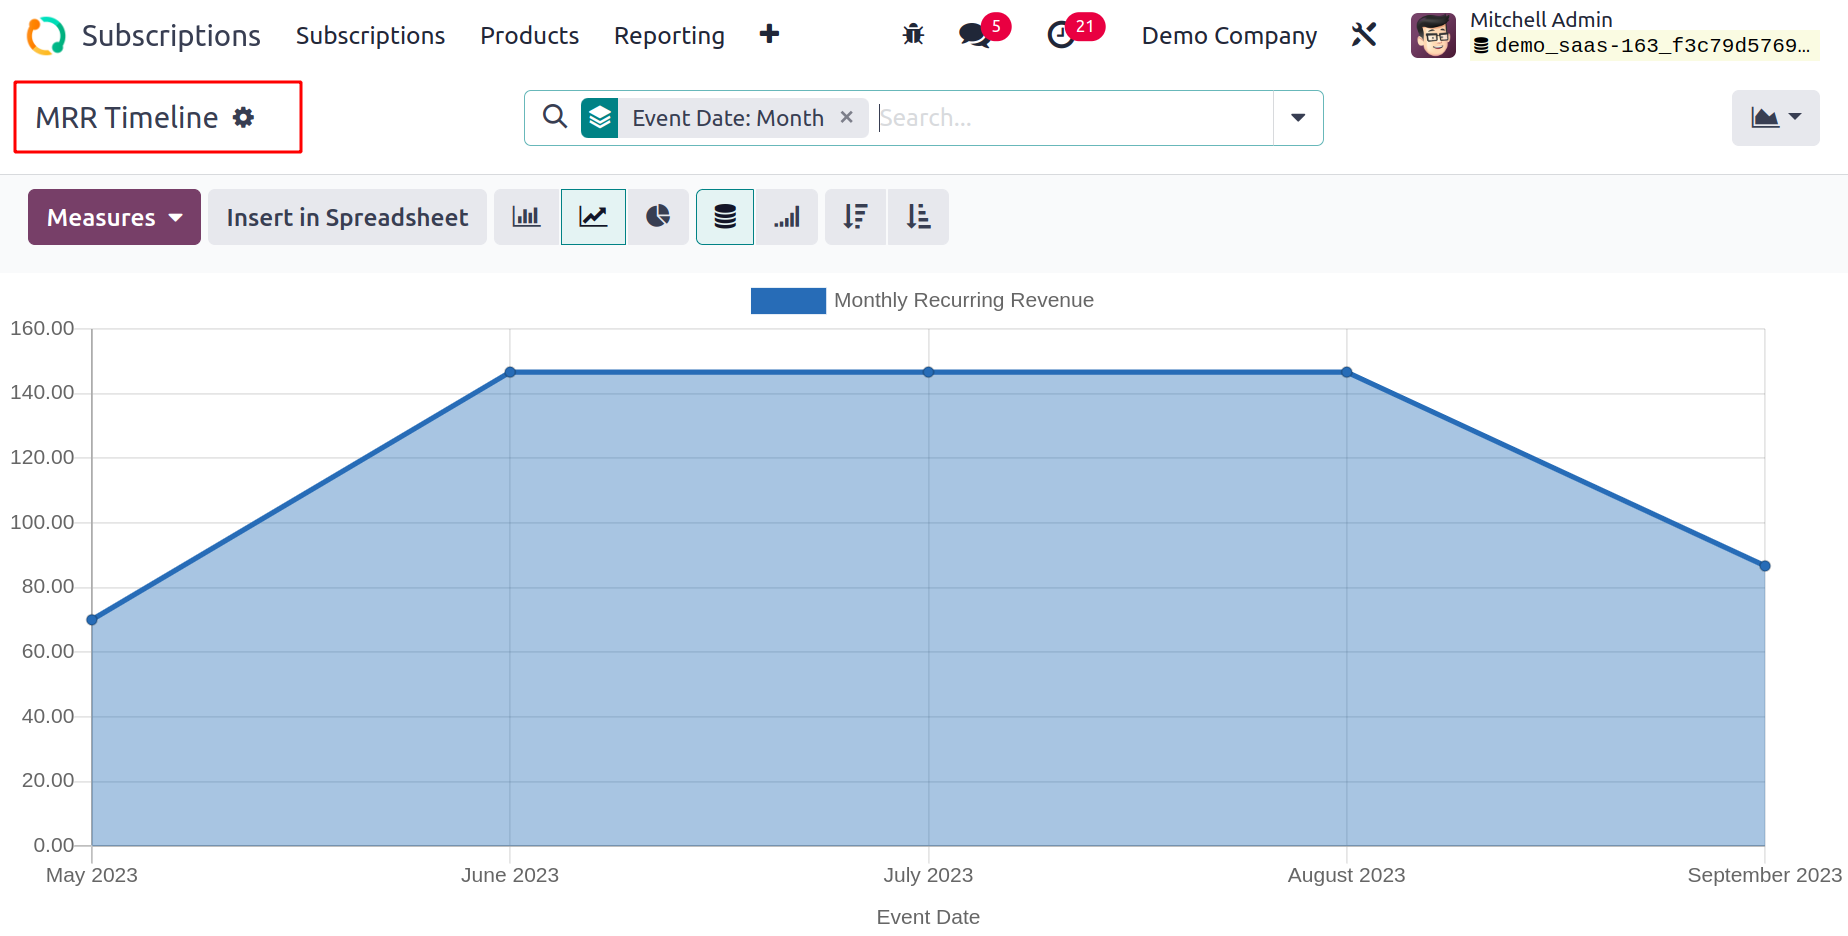
On this platform, the salesperson can view monthly recurring revenue, non-recurring revenue, subscription modification activity, and non-recurring invoices. The user may easily handle all subscription-related tasks in a professional manner with the sophisticated Odoo 17 Subscription module.