Odoo 17 SMS Marketing
SMS marketing, an immediate marketing technique, has a
significant impact on the marketing environment. It is
essential for promoting a company, event, product, service,
promotions, get-togethers, and many other things.
We might not have much time in our hectic daily lives to read
advertising, emails, or other forms of marketing or
communication. However, due to their convenience, SMSs have a
very high possibility of being read. Personal, concise, and
easily available are three characteristics of SMSs that
increase their acceptability among users.
The Odoo17 system includes a powerful SMS marketing tool, and
it regularly updates the module. Let's examine the Odoo 15 SMS
Marketing module in this chapter. All of your contacts will be
aware of your flash deals, discounts, and time-limited
promotions thanks to Odoo17's SMS Marketing module. You
should, however, make sure that the SMS is delivered at the
appropriate moment to the appropriate audience when you use
SMS marketing tactics. You'll need to enlist the aid of
increasingly automated and efficient methods to do this.
Your SMS marketing can only be automated with the Odoo17 SMS
Marketing system. By applying filters to your recipient list,
the platform will help you deliver different SMSs to different
client segments and ensure that no one is missed. Your
marketing will be automated by the Odoo17 system; all you need
to do is write and schedule your texts. Your Odoo 17 system
will be efficiently handled by all other operations and
procedures. This implies that all concerns and challenges will
be totally handled by the system. It will expertly handle all
the sending and tracking processes and assist you in producing
comprehensive reports.
By integrating the Odoo17 SMS Marketing module into your
company, you can concentrate and make the most of your
precious time and energy by planning and strategizing how to
grow your market and increase your conversion rate. There is
no need to spend a lot of time sending texts.
Installing the SMS Marketing module from Odoo17 applications
is necessary to launch Odoo SMS Marketing campaigns for your
company.
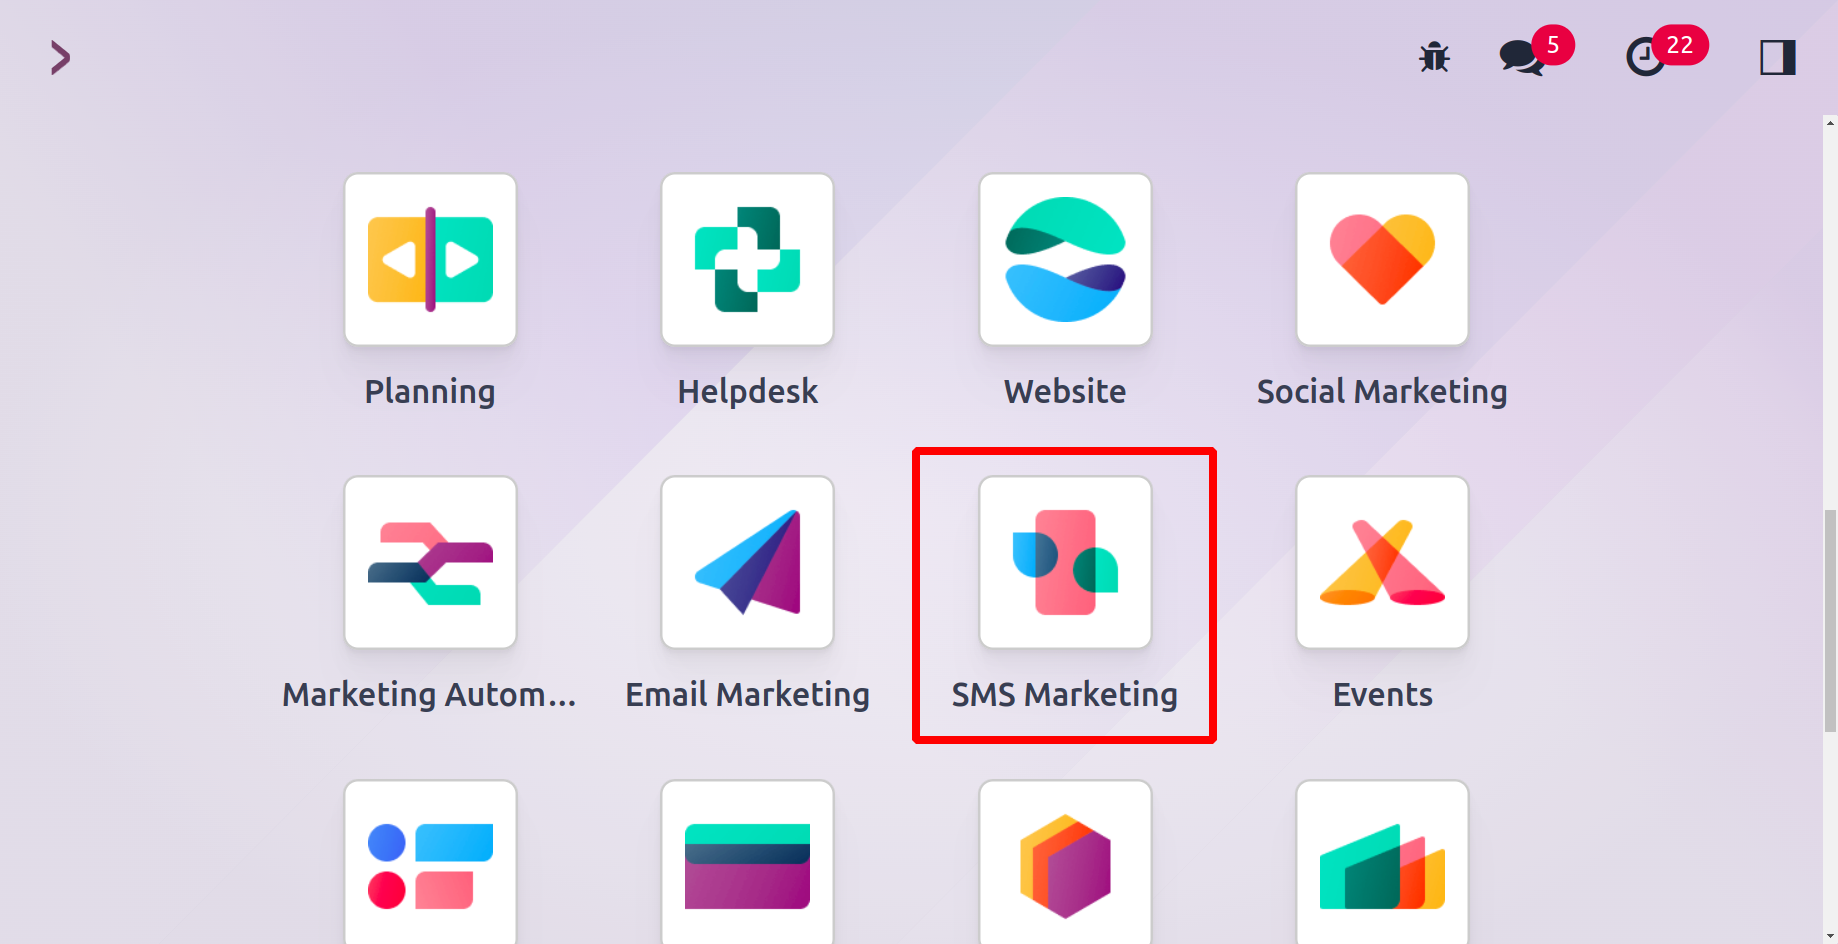
You may search the SMS Marketing module in the Apps area of
your database while it is open. The SMS Marketing icon will be
displayed once the module has been added to your database, as
illustrated in the figure below.
To access the module, simply click on them. You will now be
taken to the module for SMS marketing.
All of the records in the window will be displayed in a list
format as demonstrated in the image below.
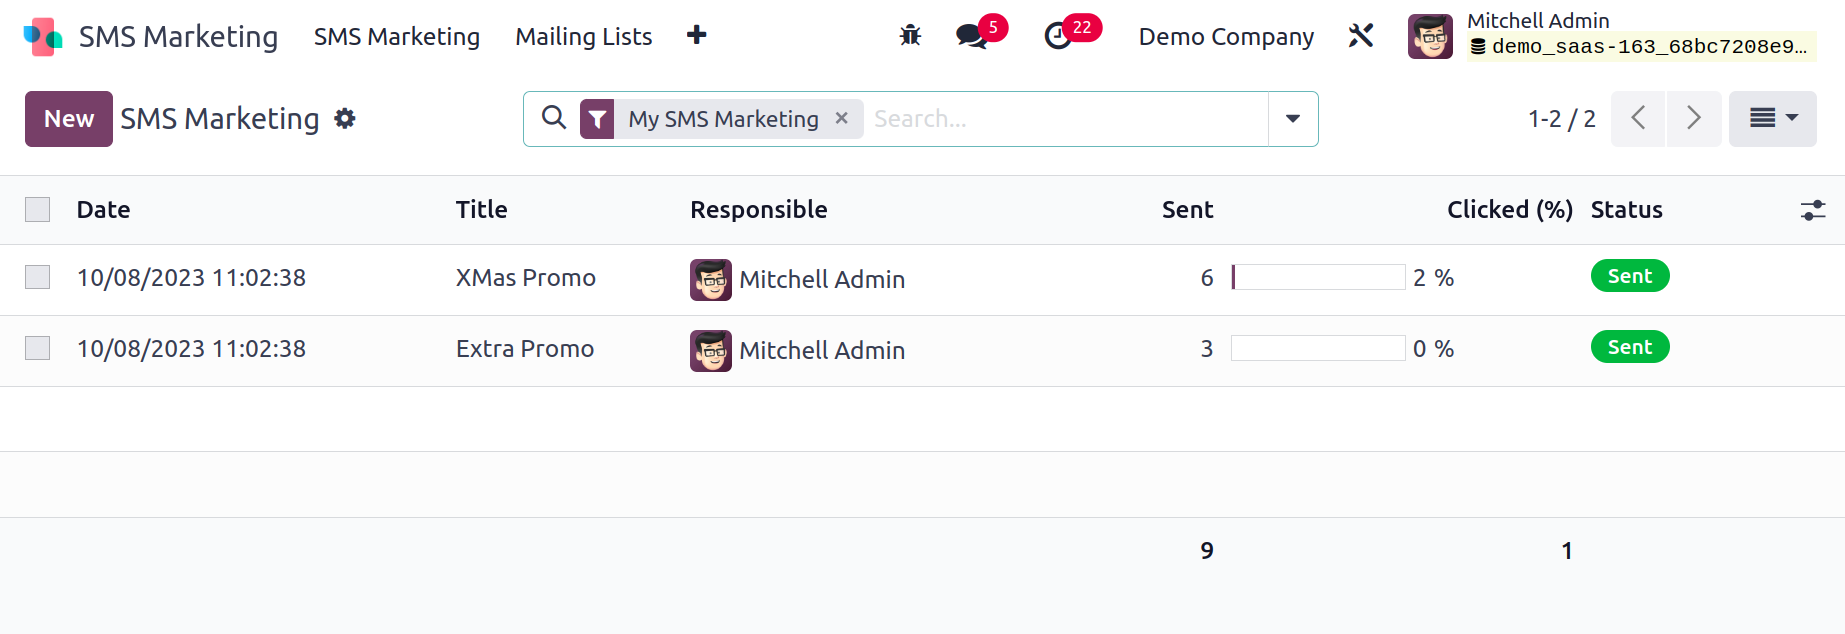
Each defined SMS's preview will be listed in this window
together with its specifics, including the Subject,
Recipients, Responsible, Scheduled, Sent Date, Status,
Campaign, Sent, Clicked, and Bounced. Along with the name, the
Responsible employee's picture is also displayed. This image
serves as a quick way to chat with that specific employee. As
seen in the screenshot below, a pop-up will display if you
click on this image.
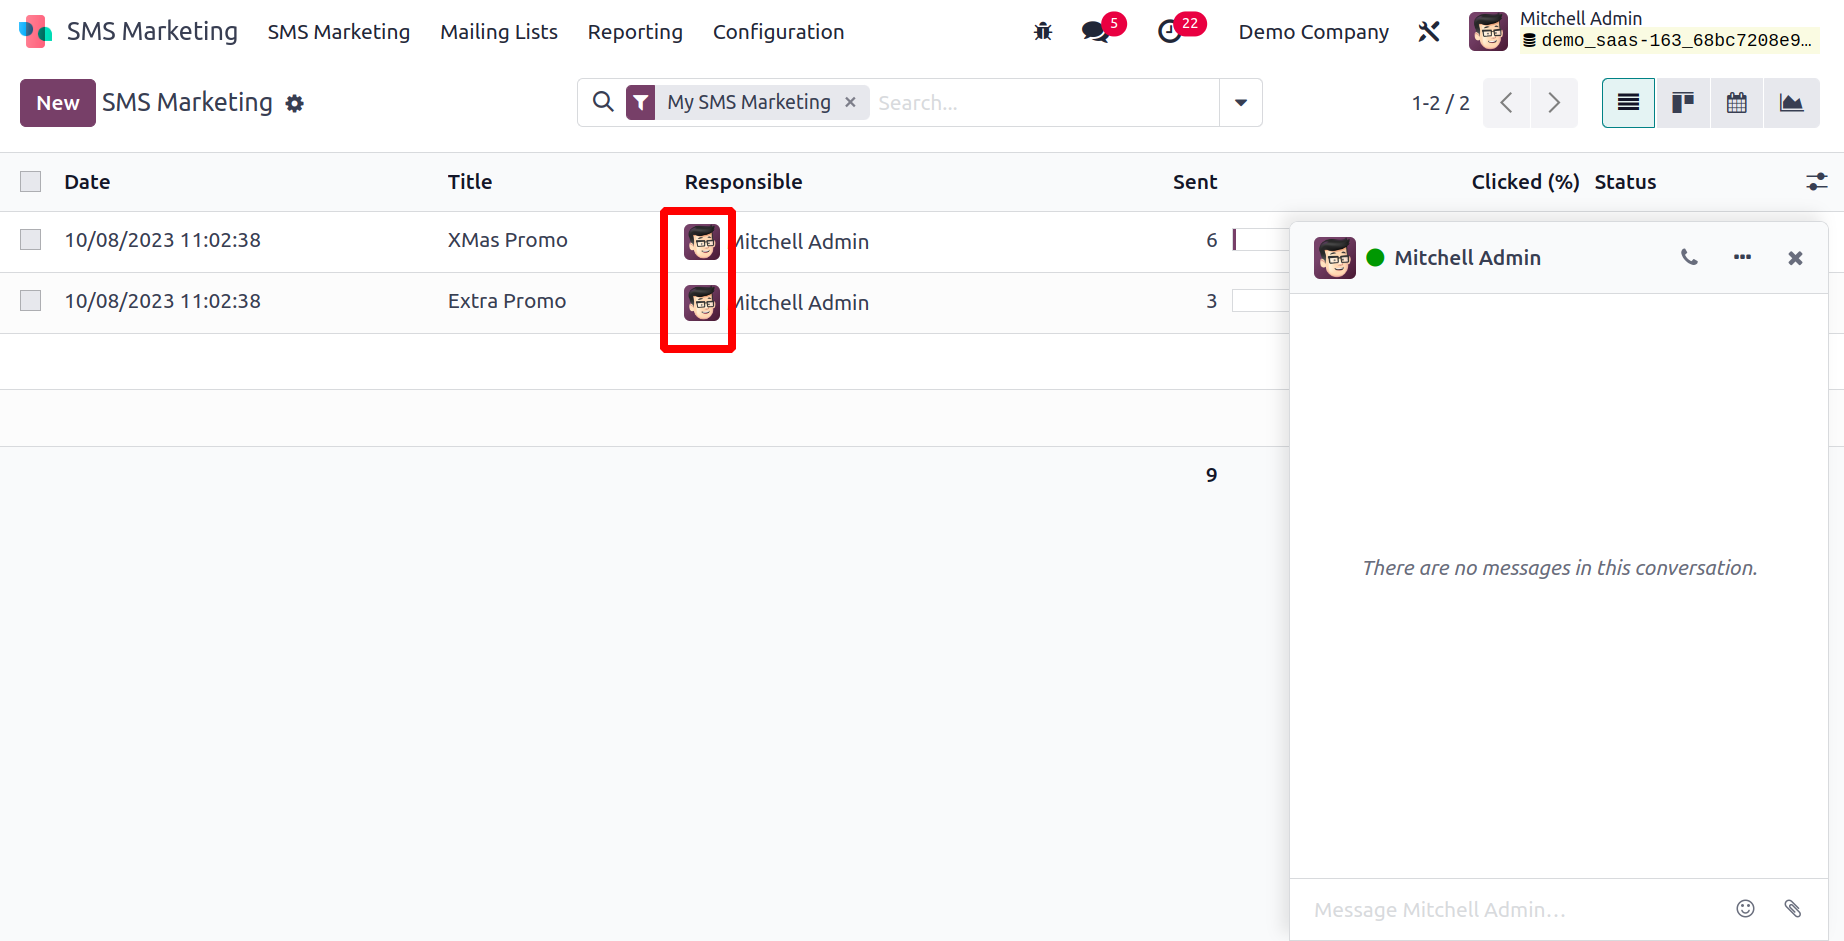
You can have a conversation with that person using this pop-up
chatbox. In order to improve the efficacy of your discussion,
you are also permitted to attach files or documents and
utilize smilies.
An SMS Marketing window, similar to the one in the above
image, will be visible on the module's home dashboard window.
You can see the reports in a variety of formats in the SMS
Marketing window, including Kanban view, List view, Calendar
view, and Graph view.
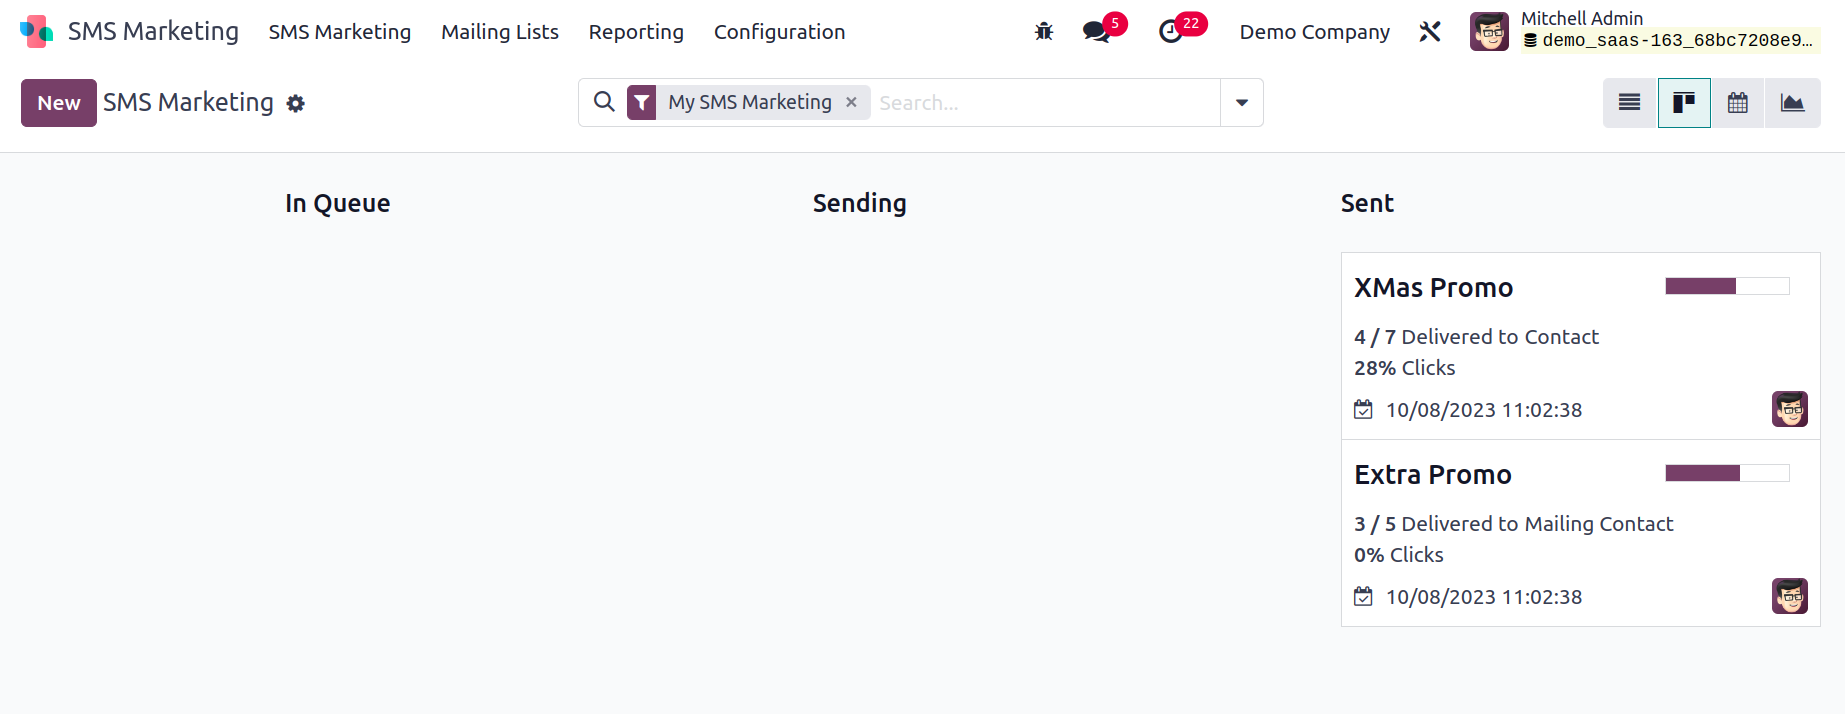
In the Kanban view, reports are shown in the image above.
According to the reports' operational stages, the window
manages them in different stages in the Kanban view. You may
see the Draft, In Queue, Sending, and Send stages in this
window, as seen in the highlighted areas of the below image.
In the screenshot below, the menu symbols for opening various
perspectives are also underlined. The Fold, Archive All, and
Unarchive All menus are included in the Settings icon, which
is located in the upper right corner of each stage and is
shown in the image below.
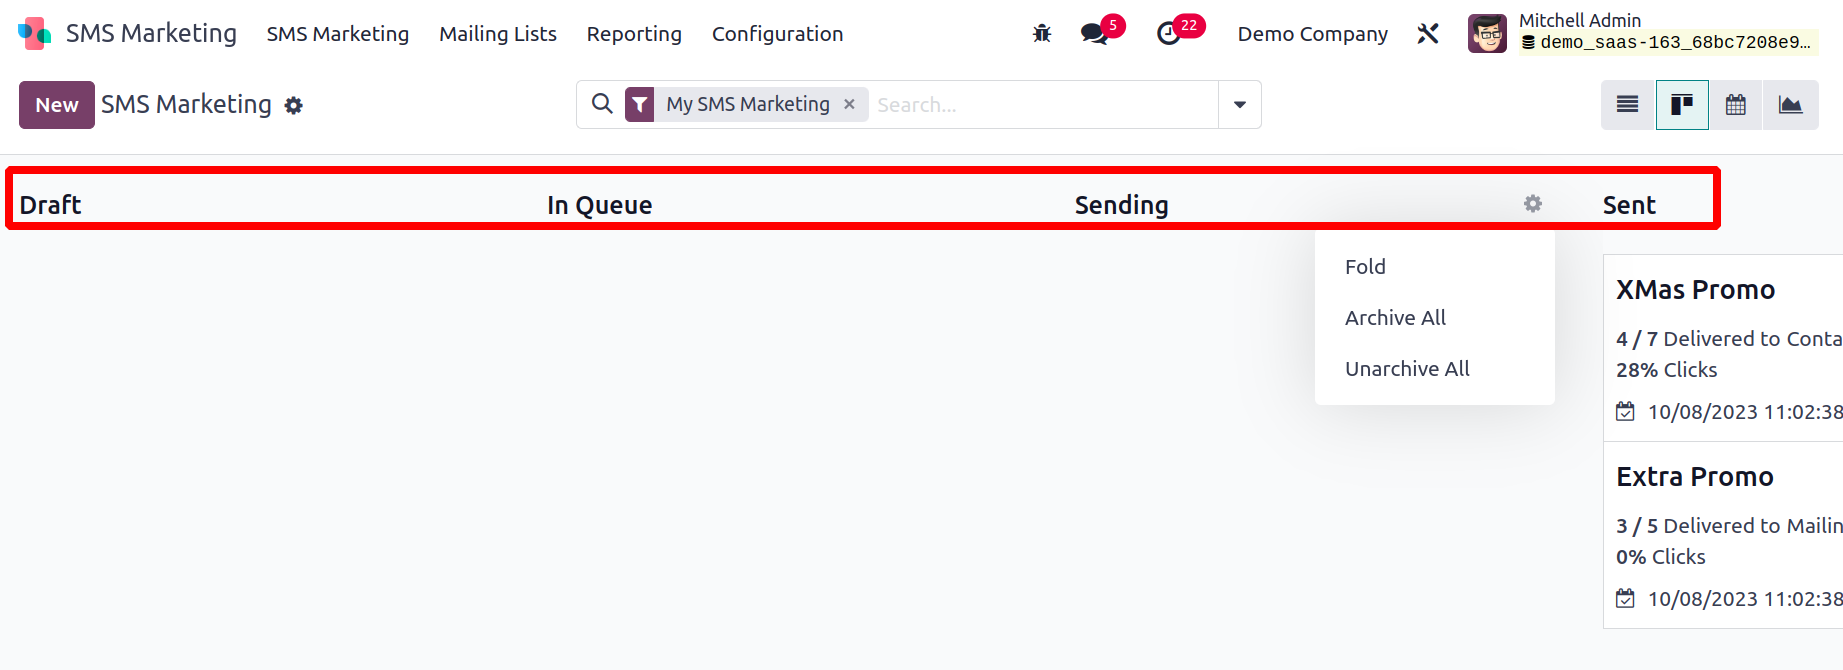
You can fold the relevant stage from the Kanban view by using the Fold option. Additionally, you have
the option to archive or unarchive the SMS records that are listed under each step. Additionally,
you may rapidly organize your data using the default and customizable filters included in the window's
Filters and Group By options.
Clicking the New button will allow you to start a new SMS marketing campaign. Below is a representation
of the creation window.
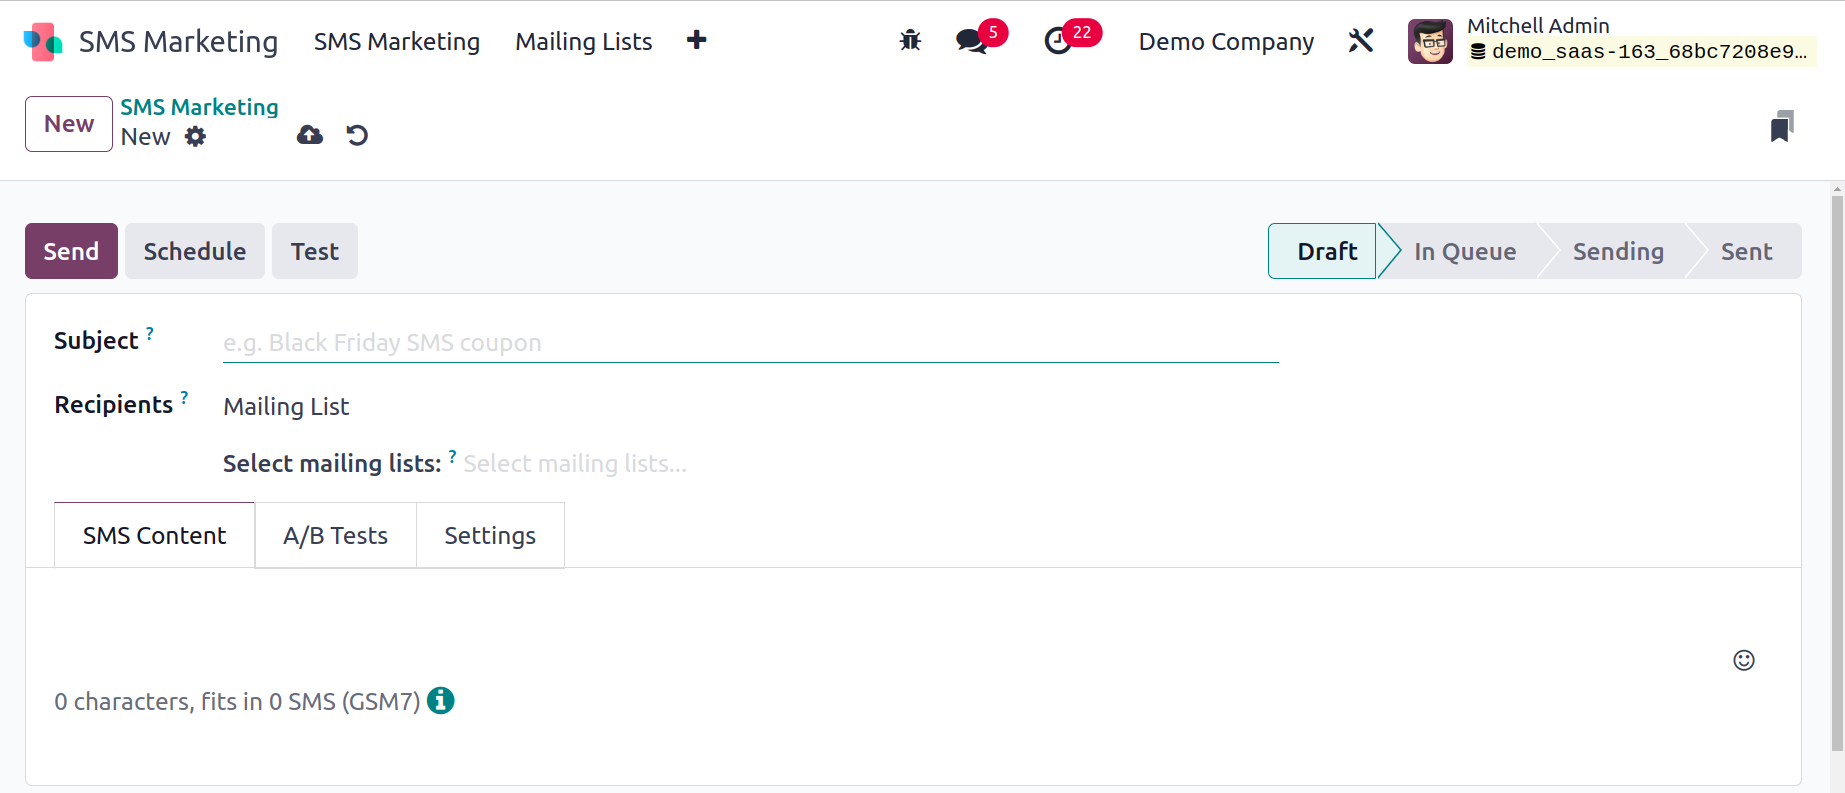
You must fill up some fields here. The internal title of the SMS can first be specified by providing
the Title of the SMS. The Recipients can then be added to this message. Fill out this form using the
drop-down menu. You can select your chosen receiver from a drop-down list of all the receiver models. If
this message isn't being sent to a large group of people, the Odoo17 system aids you in choosing the
right recipients. You can use a variety of filters on the platform to narrow your list. You need to
choose the recipients from the list in order to see the filters. You can select Applicant as the
Recipient, for instance,
if you want to send the message to the Applicants. As seen in the screenshot below, the system will now
show a +Add Filter option.
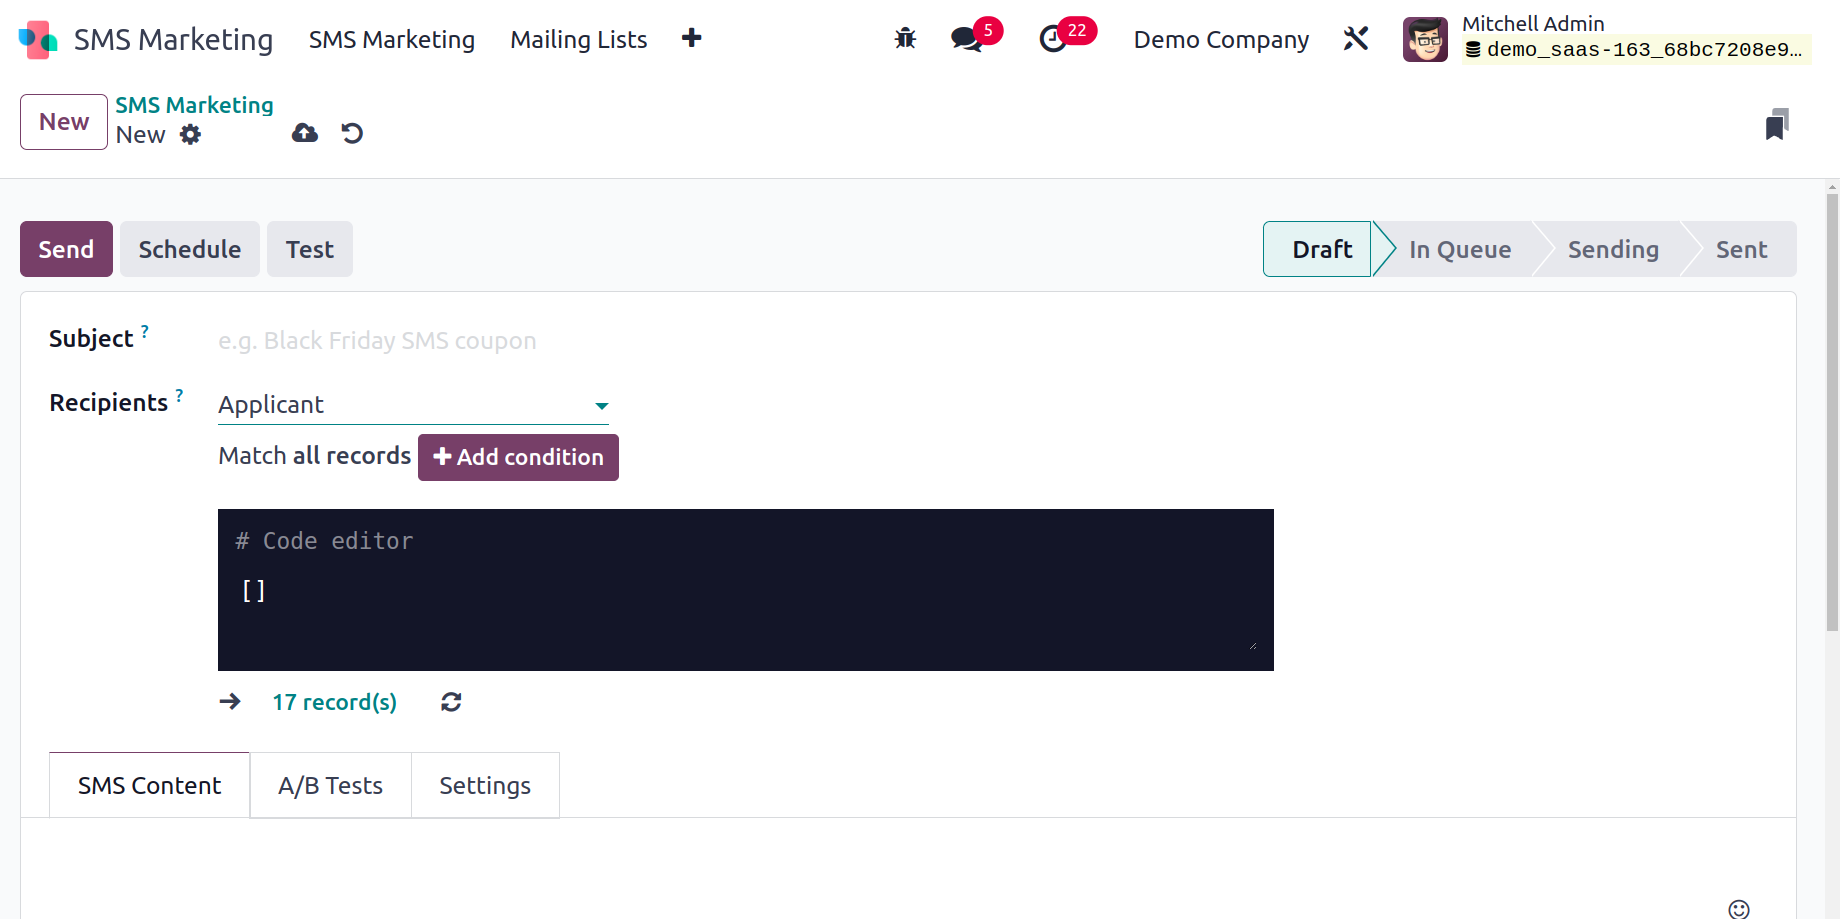
You can choose a certain applicant category by using the Add Filter option. You can now choose the
appropriate filter from the list.
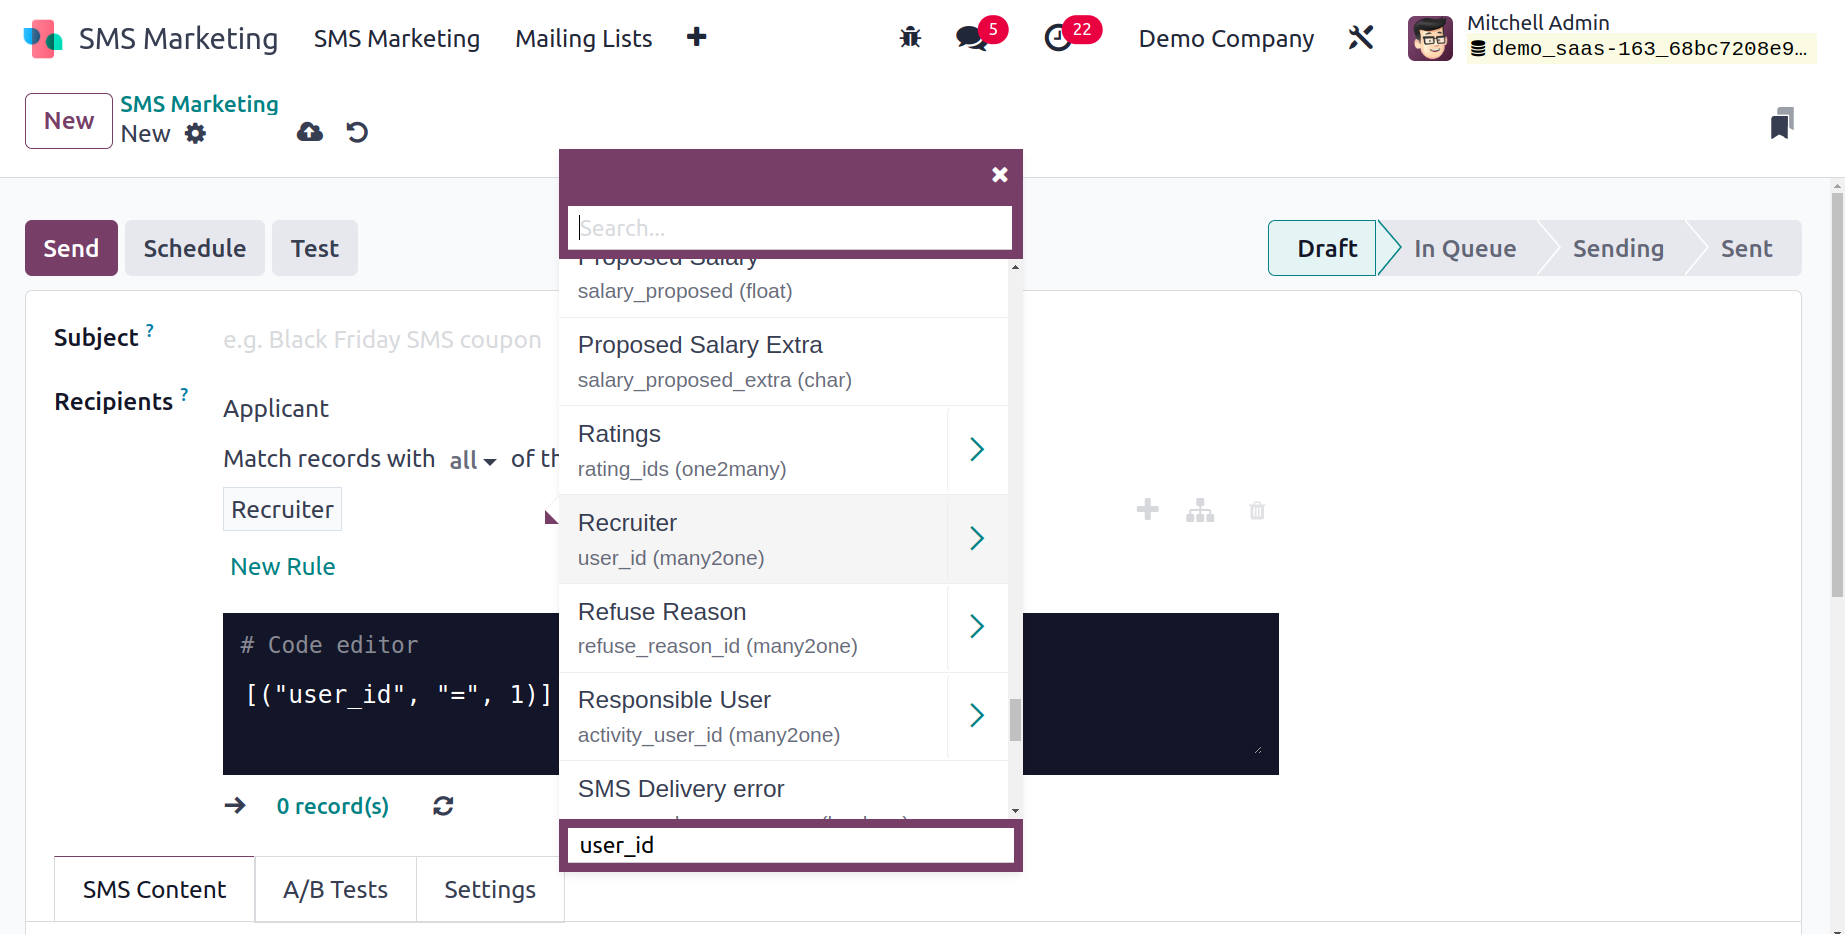
Selecting a certain applicant type is possible by using the Add Condition option. You can now choose the
appropriate filter from the list.
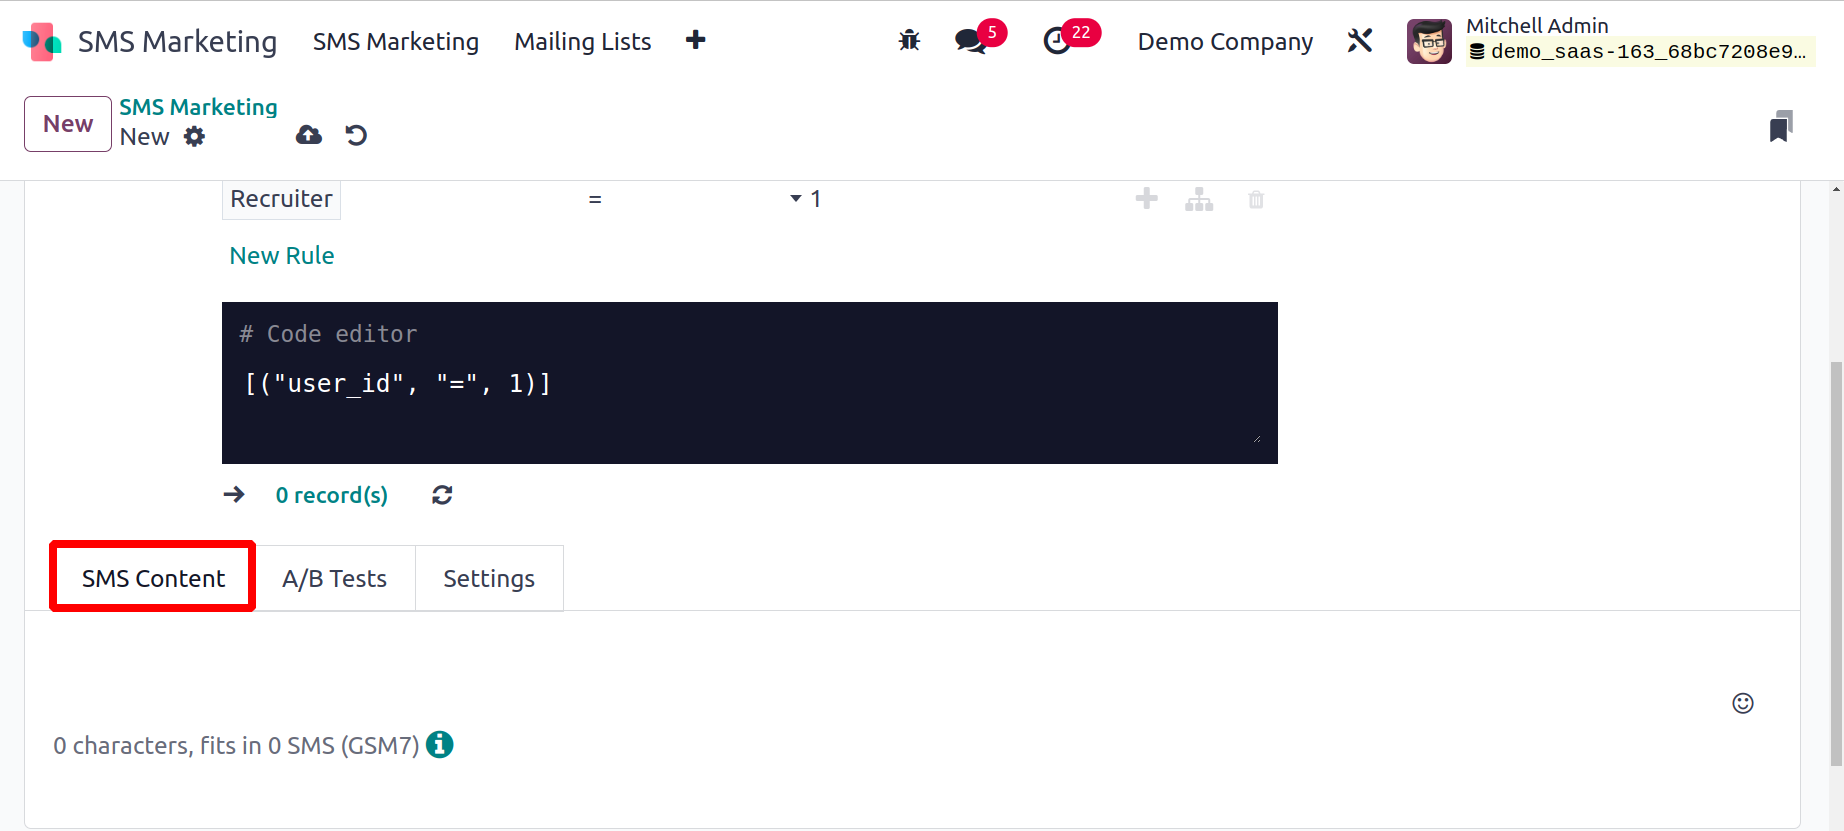
You can type the message's content in the SMS Content tab. You have the option to utilize a variety of
smileys here as well.
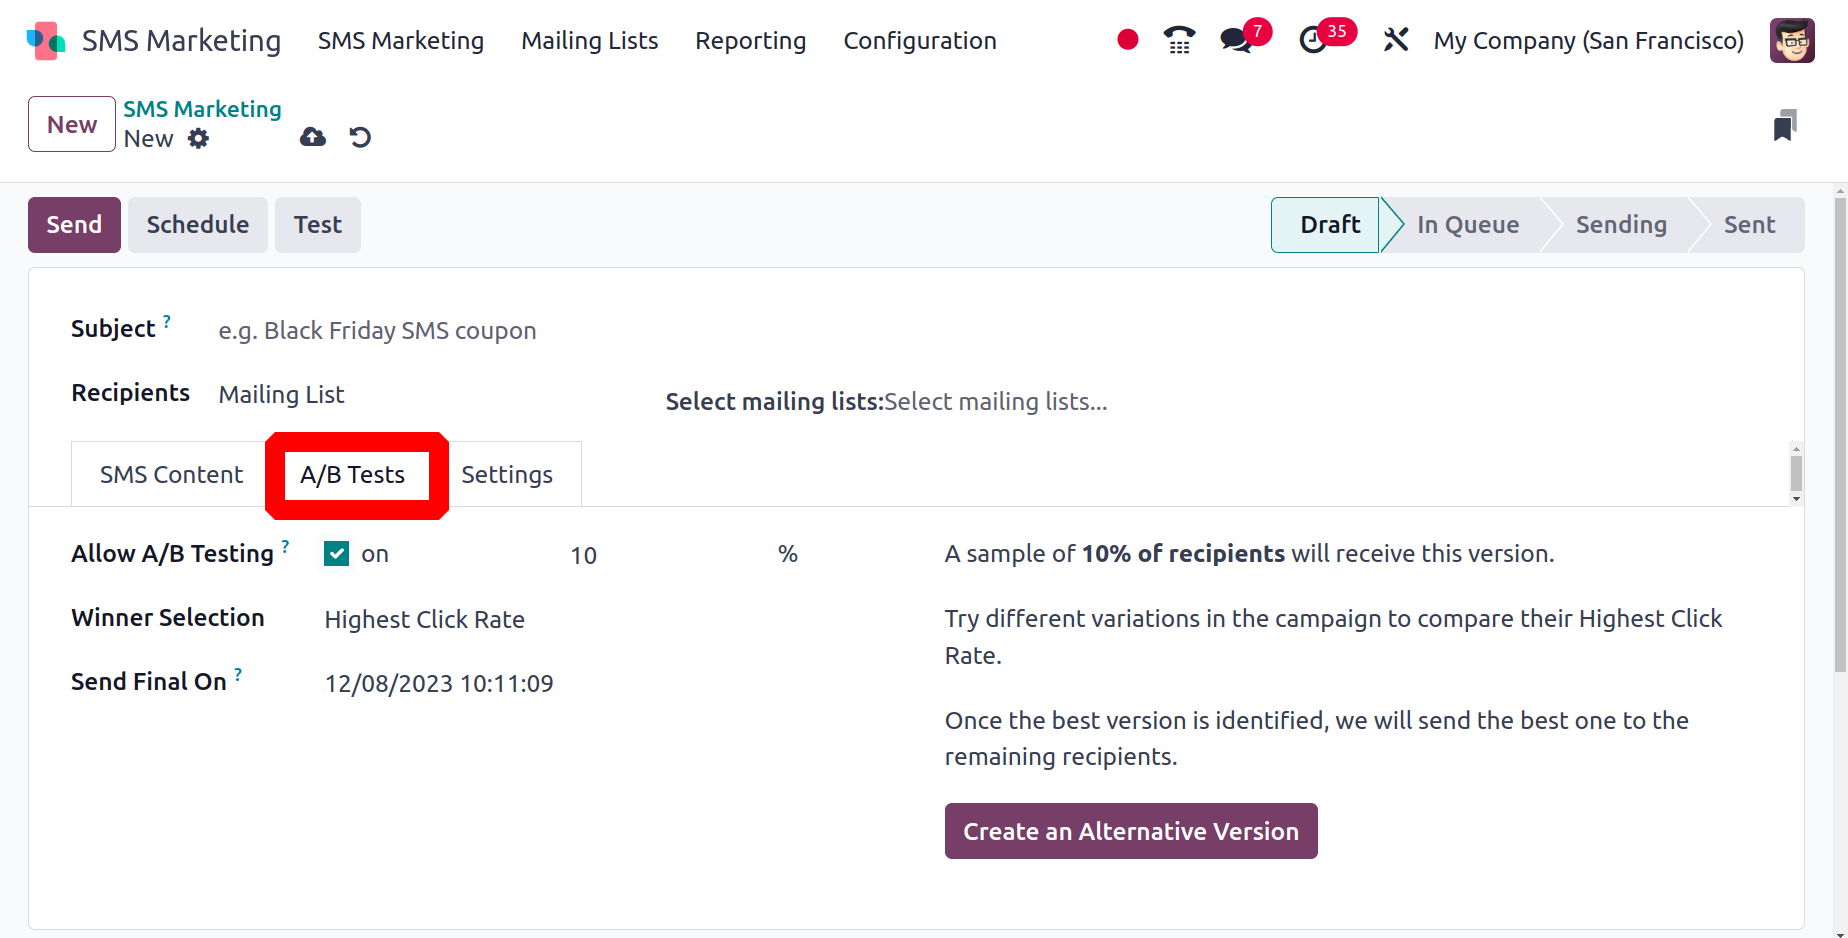
A/B Tests is the next tab. A/B testing is an approach that compares two versions to see which will
produce better results. Allow A/B Testing, for instance, has a value of 10%, meaning that 10% of the
total receivers will receive one SMS version. Click the Create Alternative Version button to start
creating the alternate version, which can be sent to another 10% of recipients. Choose the appropriate
winner selection criteria, it can be the Highest Click Rate. Thus the SMS template that wins will be
determined by the criteria entered. Since the Highest Click Rate is used to select the winner in this
case, many campaign variants are compared based on this metric. The best version will then be sent to
the remaining recipients when the best version has been determined.
The Send Final On field might then contain the date of the final transmission to the remaining
recipients.
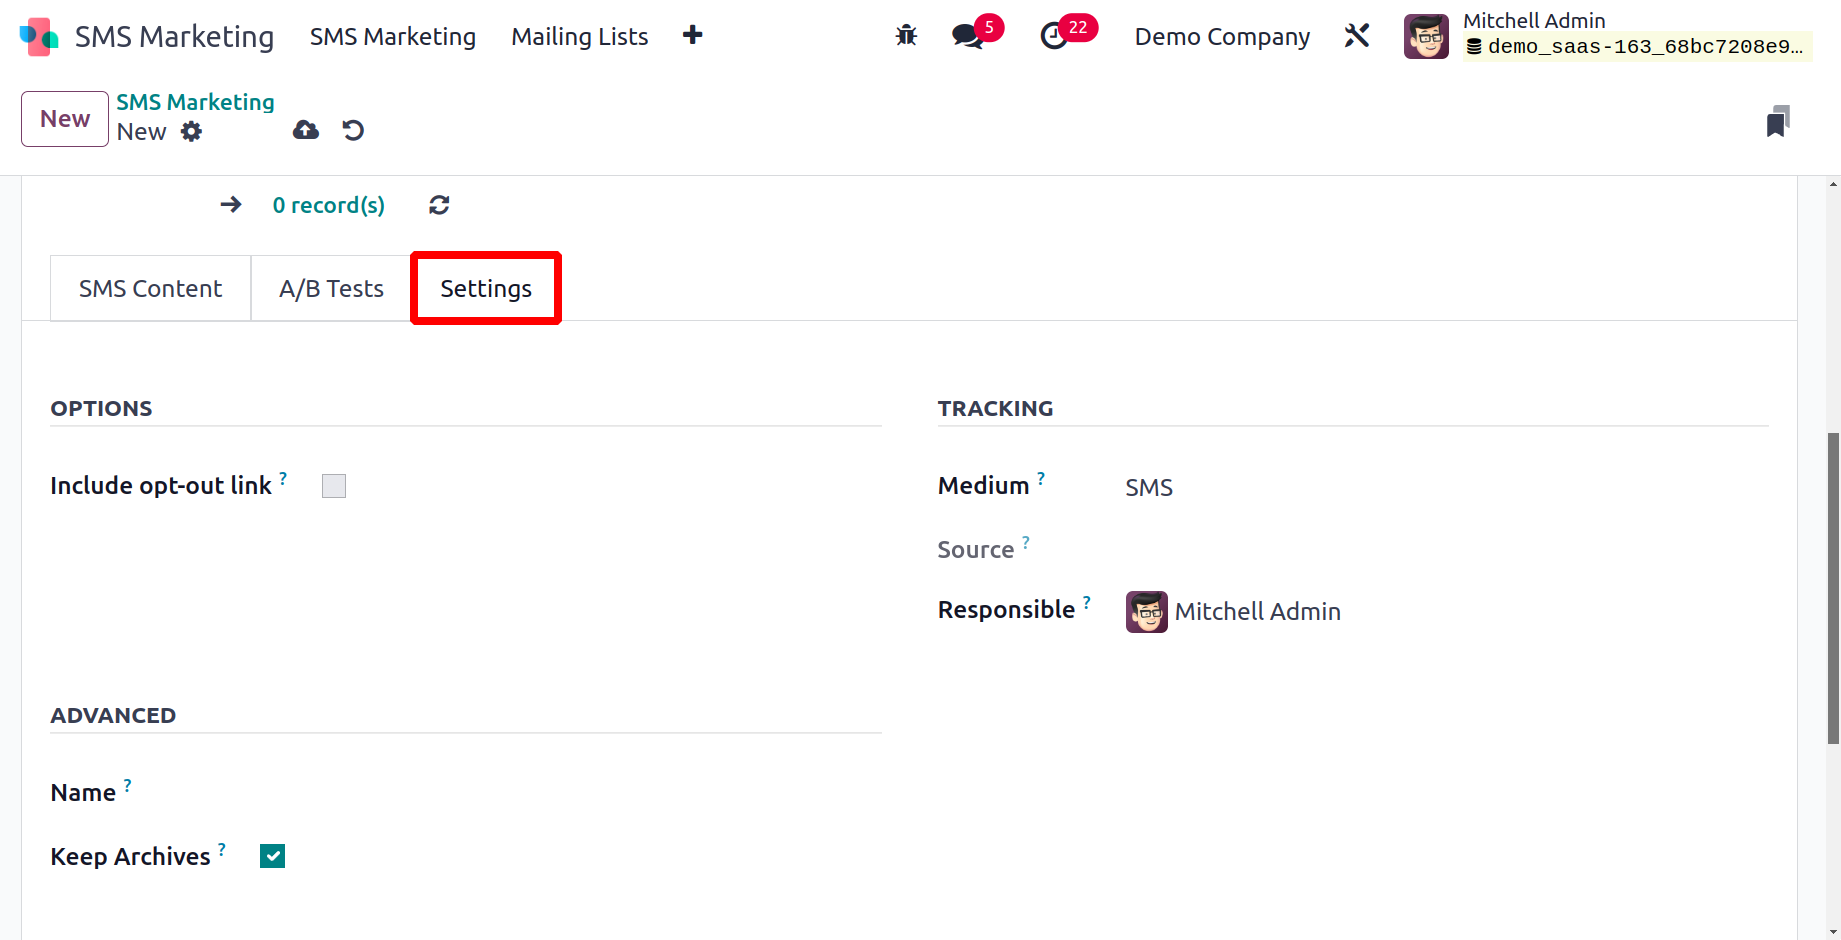
You can enter the name of the Responsible person in the Settings tab of the SMS creation window. The
Include opt-out link option is also available.
You can save the information after providing all the necessary information by selecting the SAVE option.
The Send, Schedule, and Test buttons may be seen on the upper left side of the window when you look up
at it. A pop-up window will appear when you click the Send button asking for confirmation to send SMSs.
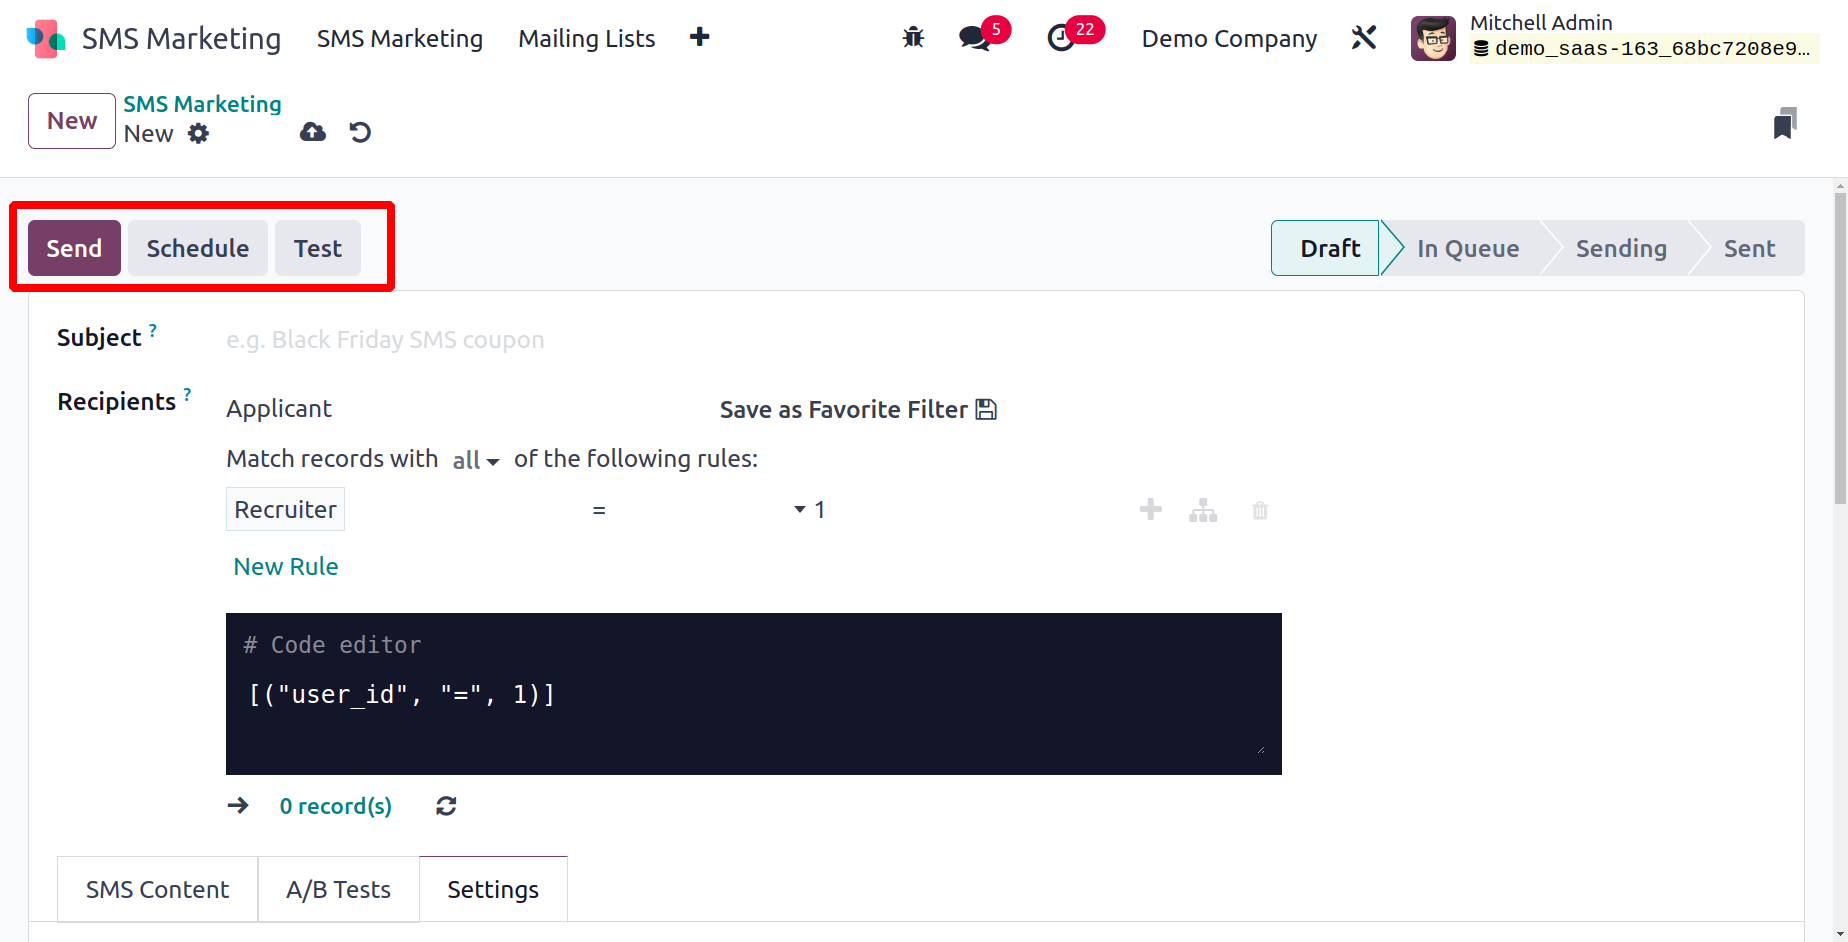
Selecting the Send button will confirm the list. Now that the SMS has been sent, its status will change
from Draft to Sent.

By selecting the Schedule button, you can plan the SMS for a future time. The date on which you wish to
send your SMS to the recipients
can then be set in a pop-up box that appears. You can select a date using the calendar popup and then
click on the Schedule button.

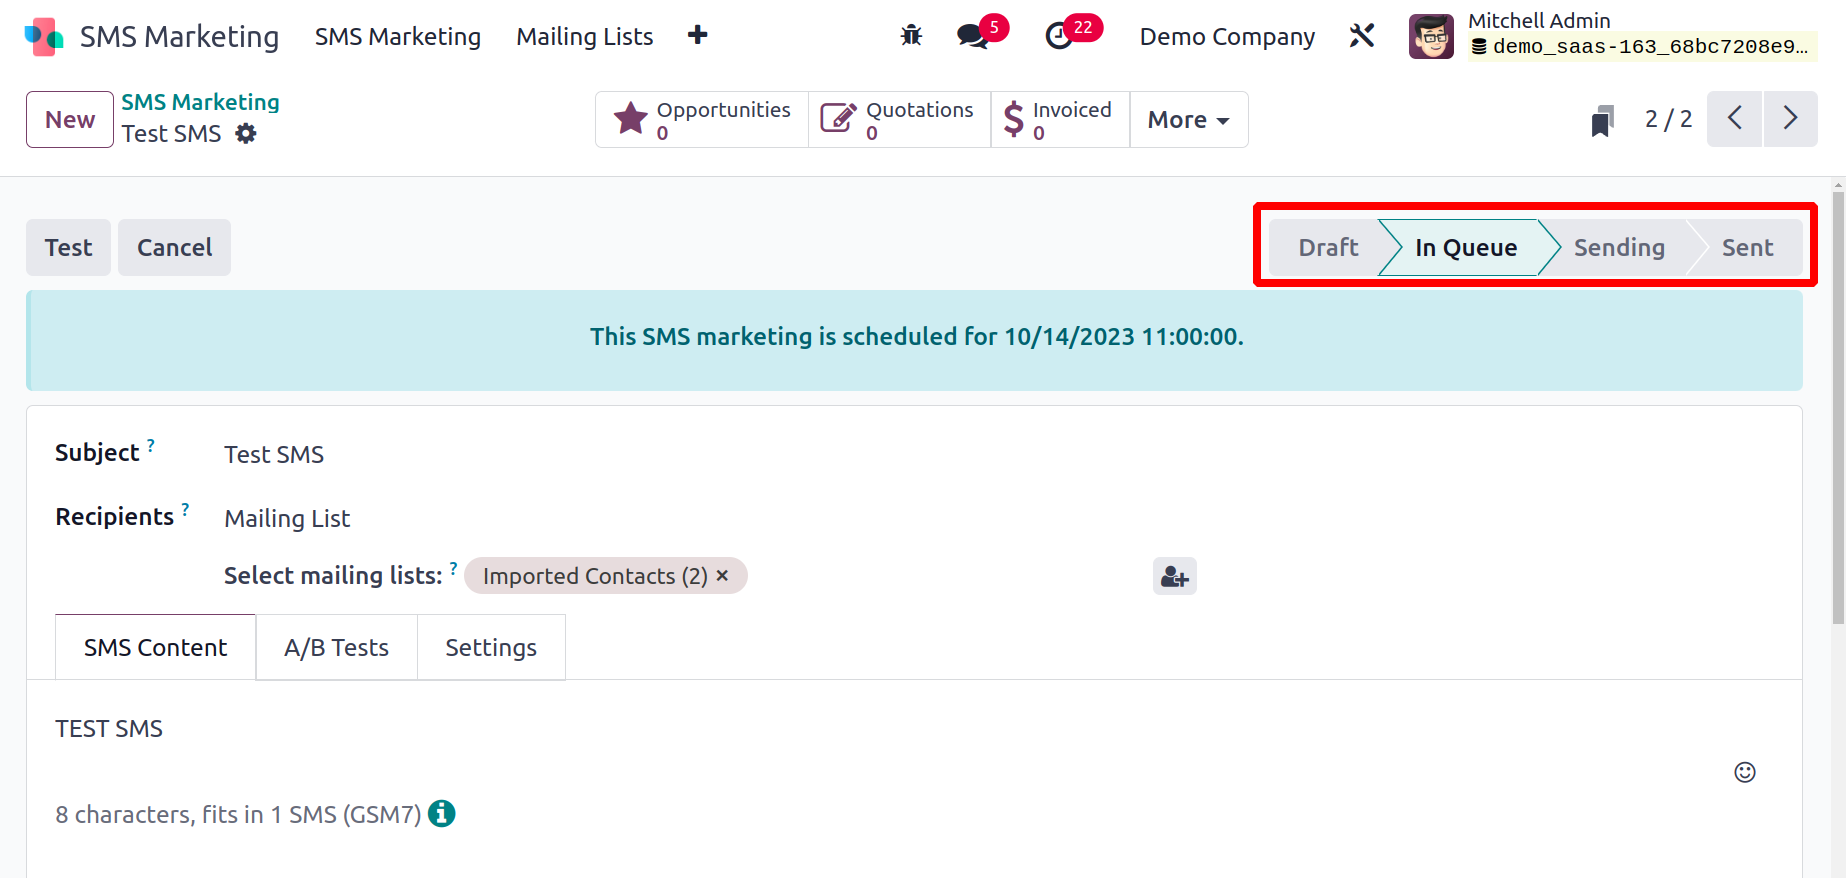
The scheduled date, associated information, and the associated SMS Marketing status will all be
displayed in the window as In Queue.
Click the Test button to test out the SMS-sending procedure. Then, as seen below, you will depict a
pop-up window.

You can enter the phone numbers for sending this test SMS message in this pop-up window. After providing
the numbers, press the Send button.
Mailing Lists
There are two sub-menus available under the Mailing Lists tab in the Odoo17 SMS Marketing module:
Mailing Lists and Mailing List Contacts. The Mailing Lists feature was specifically created by Odoo17 to
allow users to compile a list of contacts for SMS distribution. Sending a large number of SMSs with only
one click will be incredibly practical. You will be able to save more time and effort as a result. The
Mailing Lists window will display a list of every Mailing List created on the platform. You may browse
and locate the numerous mailing lists built into the platform for marketing programs by looking at the
Mailing Lists window.
Both a Kanban and a List format are used by Odoo17 to display the Mailing Lists window. The image below
shows the Kanban perspective.
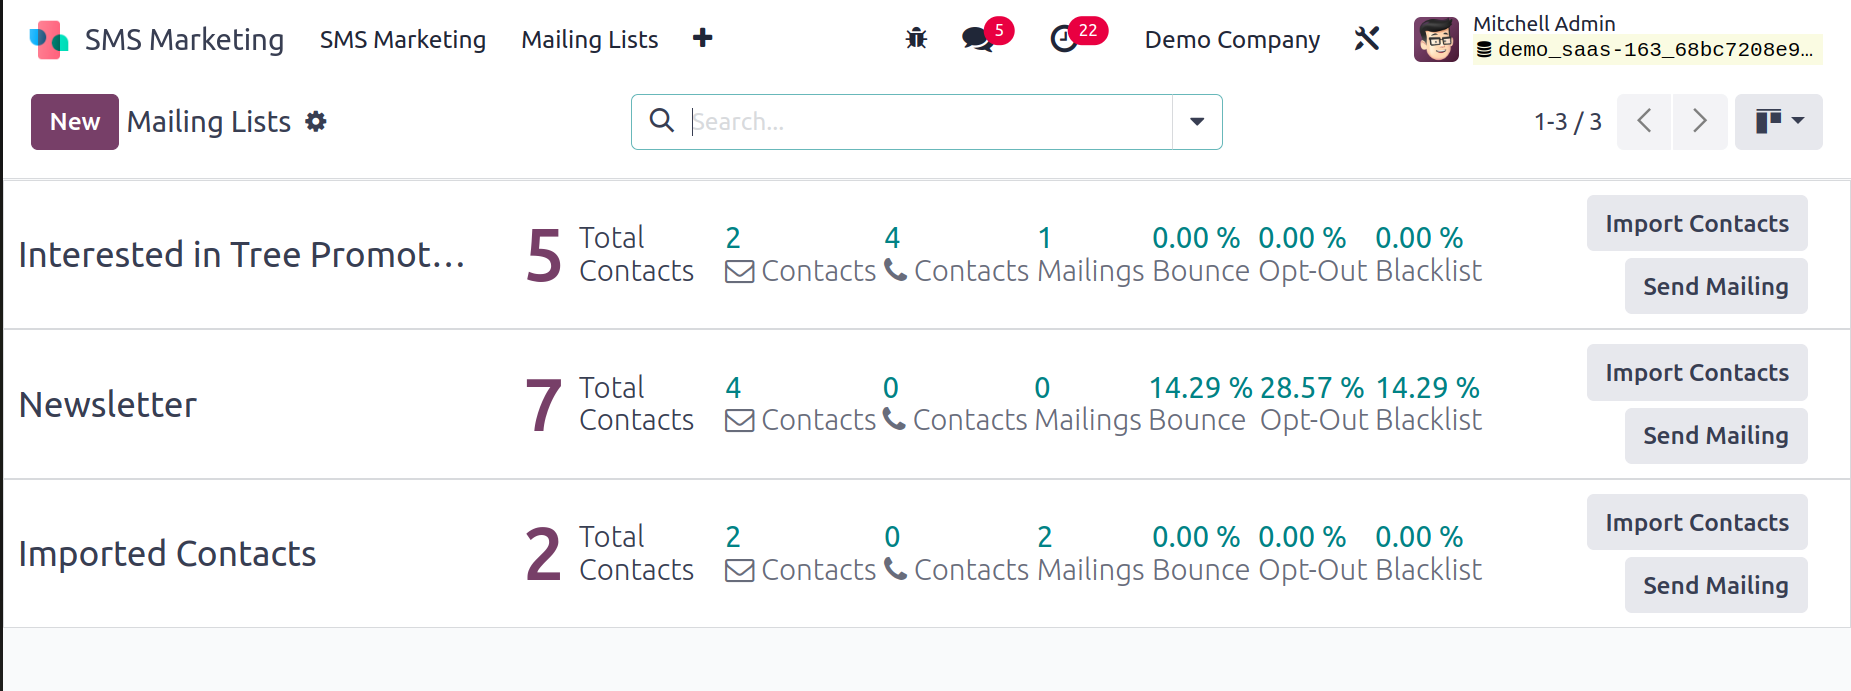
You can get a preview of the email lists that we already described in the window. It contains
information like the mailing list's name, the number of contacts on each mailing list, and other
specifics. You can click on the List view menu icon located in the top right corner to open the list in
the List view. The List view is shown in the illustration below.
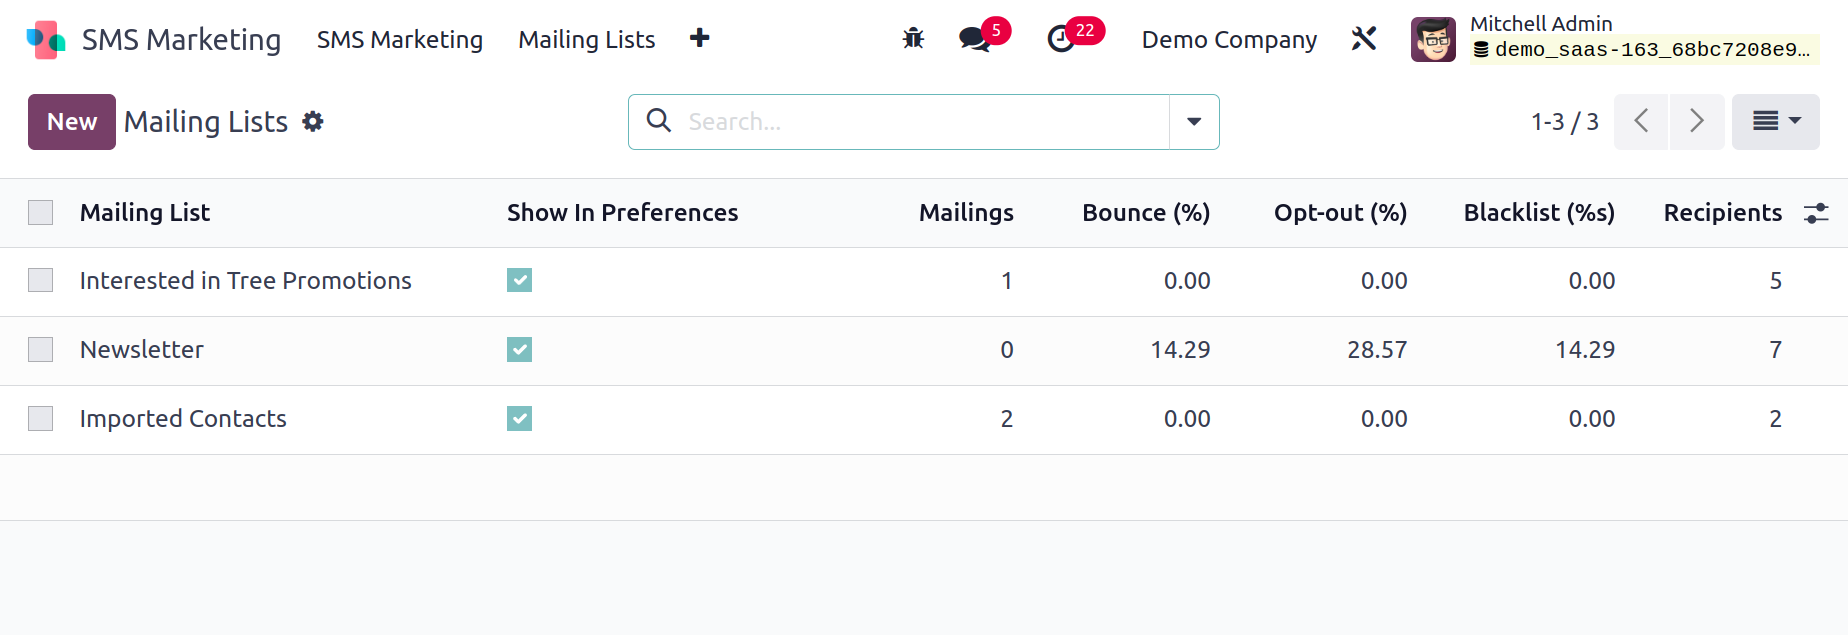
You may see a preview of the previously discussed SMSs right here as well. Click on the New button to
start a fresh mailing list.

In the field provided, you can enter the Name of the Mailing List. After entering the recipient's name,
you can turn on the Is Public checkbox to make this mailing list visible to him on the unsubscription
page so he can change his subscription settings.
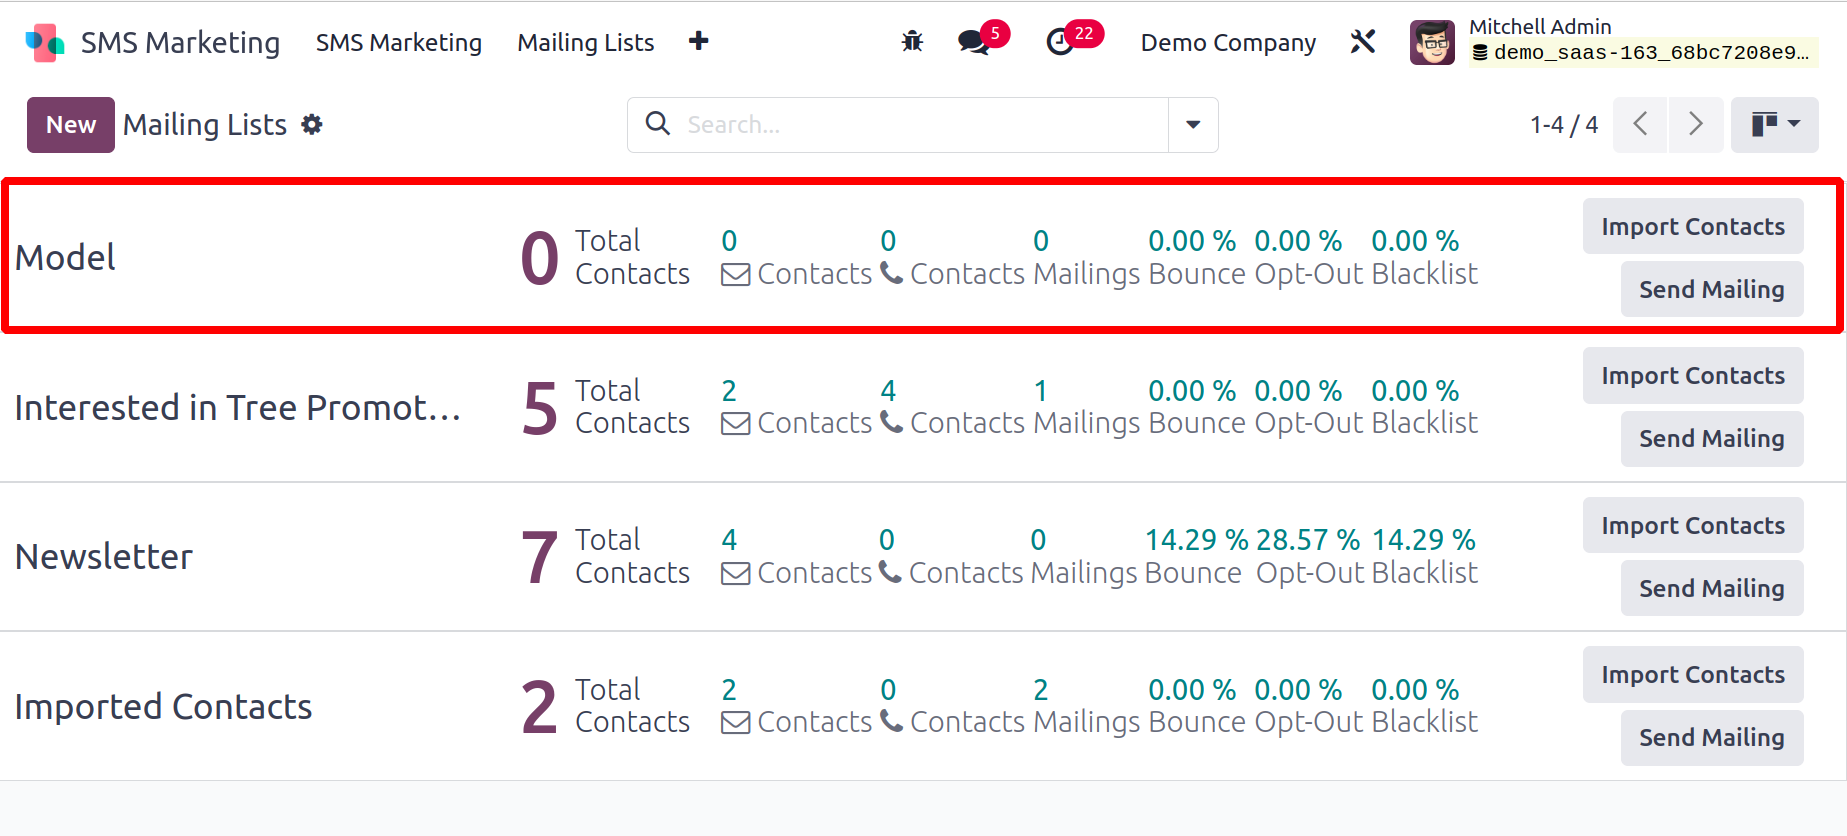
As seen in the image below, the newly formed Mailing List will now be stored in the Mailing Lists
window.
Let's launch the window for mailing list contacts. To open this window, select the Mailing Lists
Contacts option from the Mailing Lists tab. Check out the Mailing List Contacts window first.
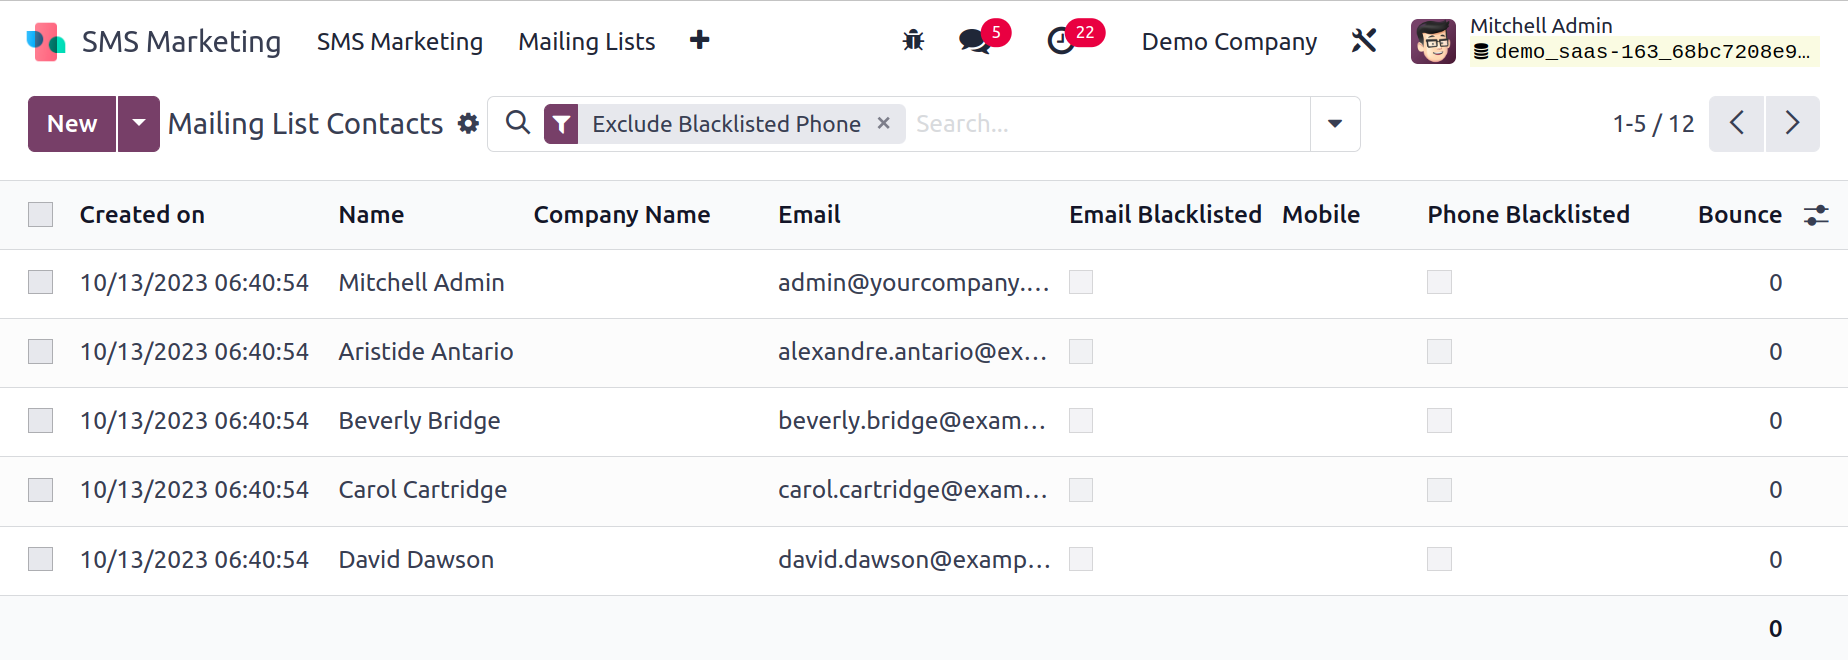
A list of contacts in the system that have already been configured will be shown in the Mailing Lists
Contacts pane. The Created On box allows you to access other crucial contact information, including the
date and time of creation, Name, Company Name, Email, Email Blacklisted, Phone, Phone Blacklisted, and
Number of Bounce. By clicking on each record, you may examine and update it. You can deactivate the mass
SMS delivery to the specified contact by activating the Phone Blacklisted box. The pane offers a variety
of categorizing choices, preset and custom Filters, and other options for carrying out different
activities. The Filters, Group By, Favourites, and Search options provide access to these choices.
Additionally, all the information in the window can be exported to an Excel file. You can accomplish
this by selecting the Export All button. You can click the New link to add new mailing list contacts.
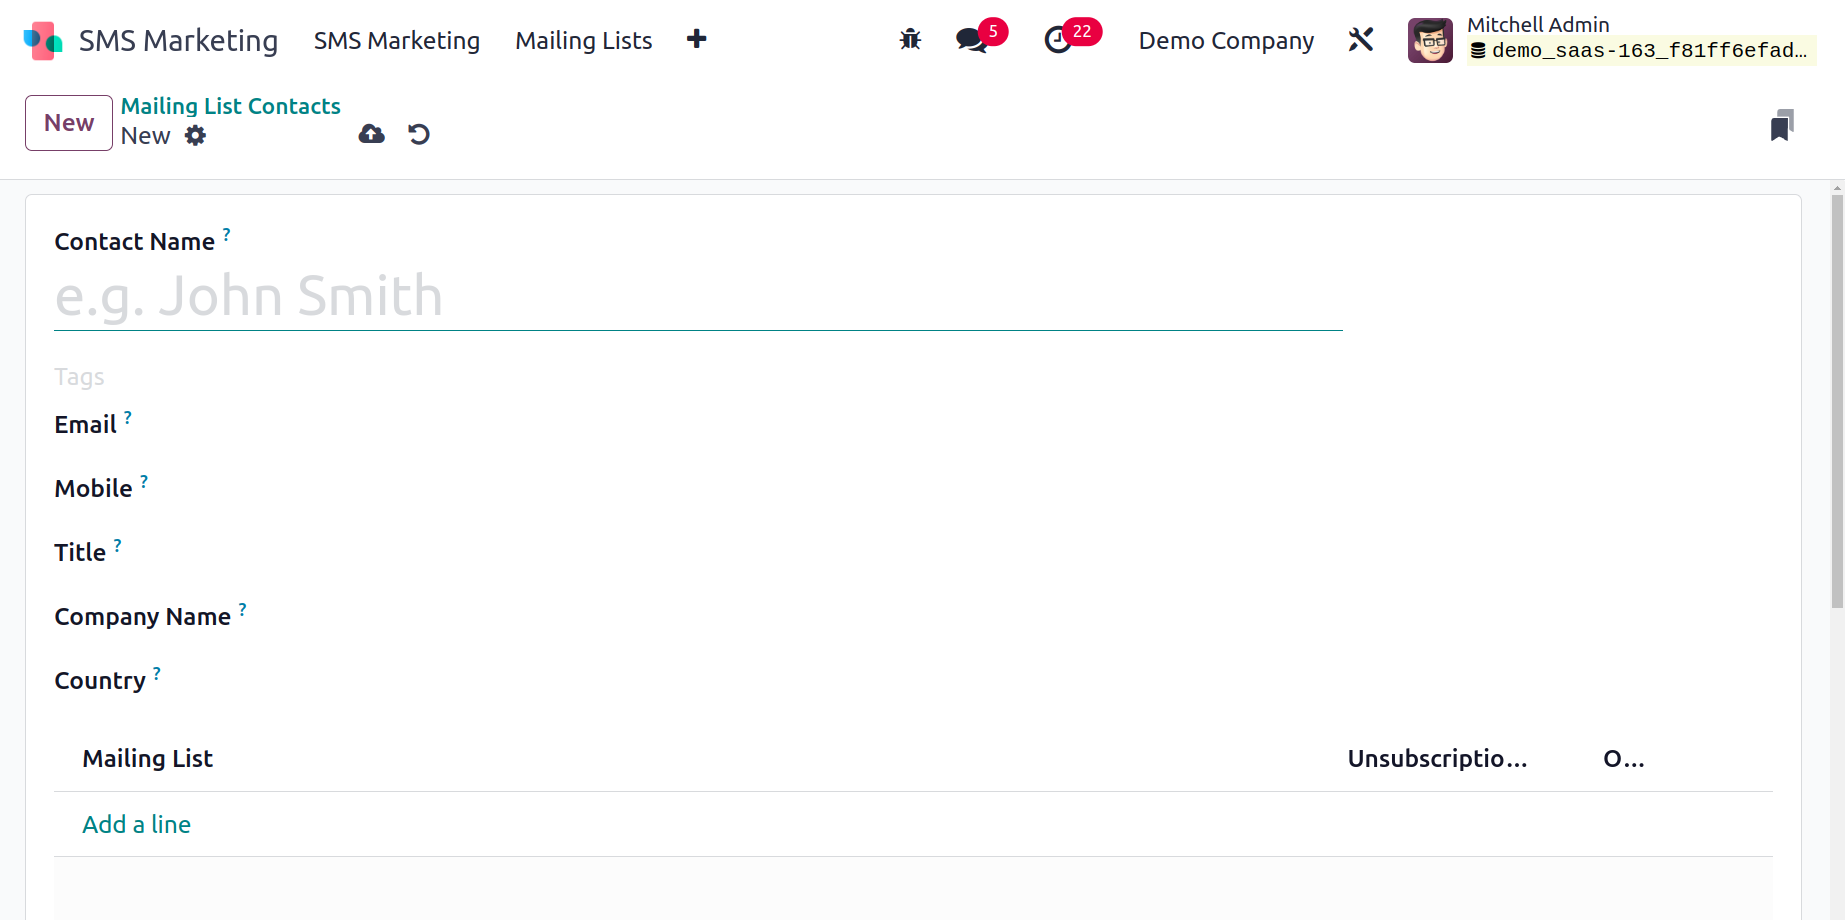
You can include the Contact Name, Tags related to this contact, Email, Mobile, Title, Company Name, and
Country in the creation window. Under the Mailing Lists tab, you can also add the appropriate mailing
lists and the Unsubscription Date. Additionally, you can turn on the Opt Out field. By selecting
the Add a Line button, you can complete all of these. Once you've entered all the necessary information,
preserve the contact information.
Blacklisted Phone Numbers
You can eliminate undesired contacts from your SMS list to blacklisted phone numbers using the Odoo17
SMS Marketing module. For avoiding sending undesired messages frequently, this feature is quite helpful.
You can do this by going to the Configuration tab and selecting the Blacklisted Phone Numbers menu. You
can add the necessary phone numbers to the blacklist using this menu. Therefore, SMS Mailings won't be
sent
to phone numbers on the blacklist any longer. Below is a picture of the Blacklisted Phone Numbers popup.
The Blacklist Date and a list of all the banned phone numbers are displayed in this window.
Clicking the New button will allow you to add new blacklisted phone numbers to the list.

The creation window will now be displayed to you, where you can enter the Phone Number. It is necessary
to provide the phone number
in the E164 format. You can store the information by clicking the store button after providing the phone
number.
Link Tracker
The quickest marketing method and one with the highest open rates is SMS. The recipient will open and
read the SMS sooner because it is delivered directly to their pockets. The SMS Marketing module comes
pre-configured with the Link tracker option. To track click-through rates and comprehend the revenue
generated by your SMS campaign, use this Link tracker tool.
The Configuration tab of the Odoo17 SMS Marketing module provides access to the Link Tracker menu. Below
is a picture of the window.

The Link Tracker box will show a preview of the previously created records together with information on
the date and time of creation, the title of the page, the label of the button, the target URL, and the
number of clicks. Additionally, you may view the buttons for visiting a page and view click-through
data. Additionally, you have access to a number of Filters, Group By, Favorite, and Search options.
Graph view is another option for viewing the Link Tracker window. You can get the graphical analysis by
selecting the Graph view menu icon.
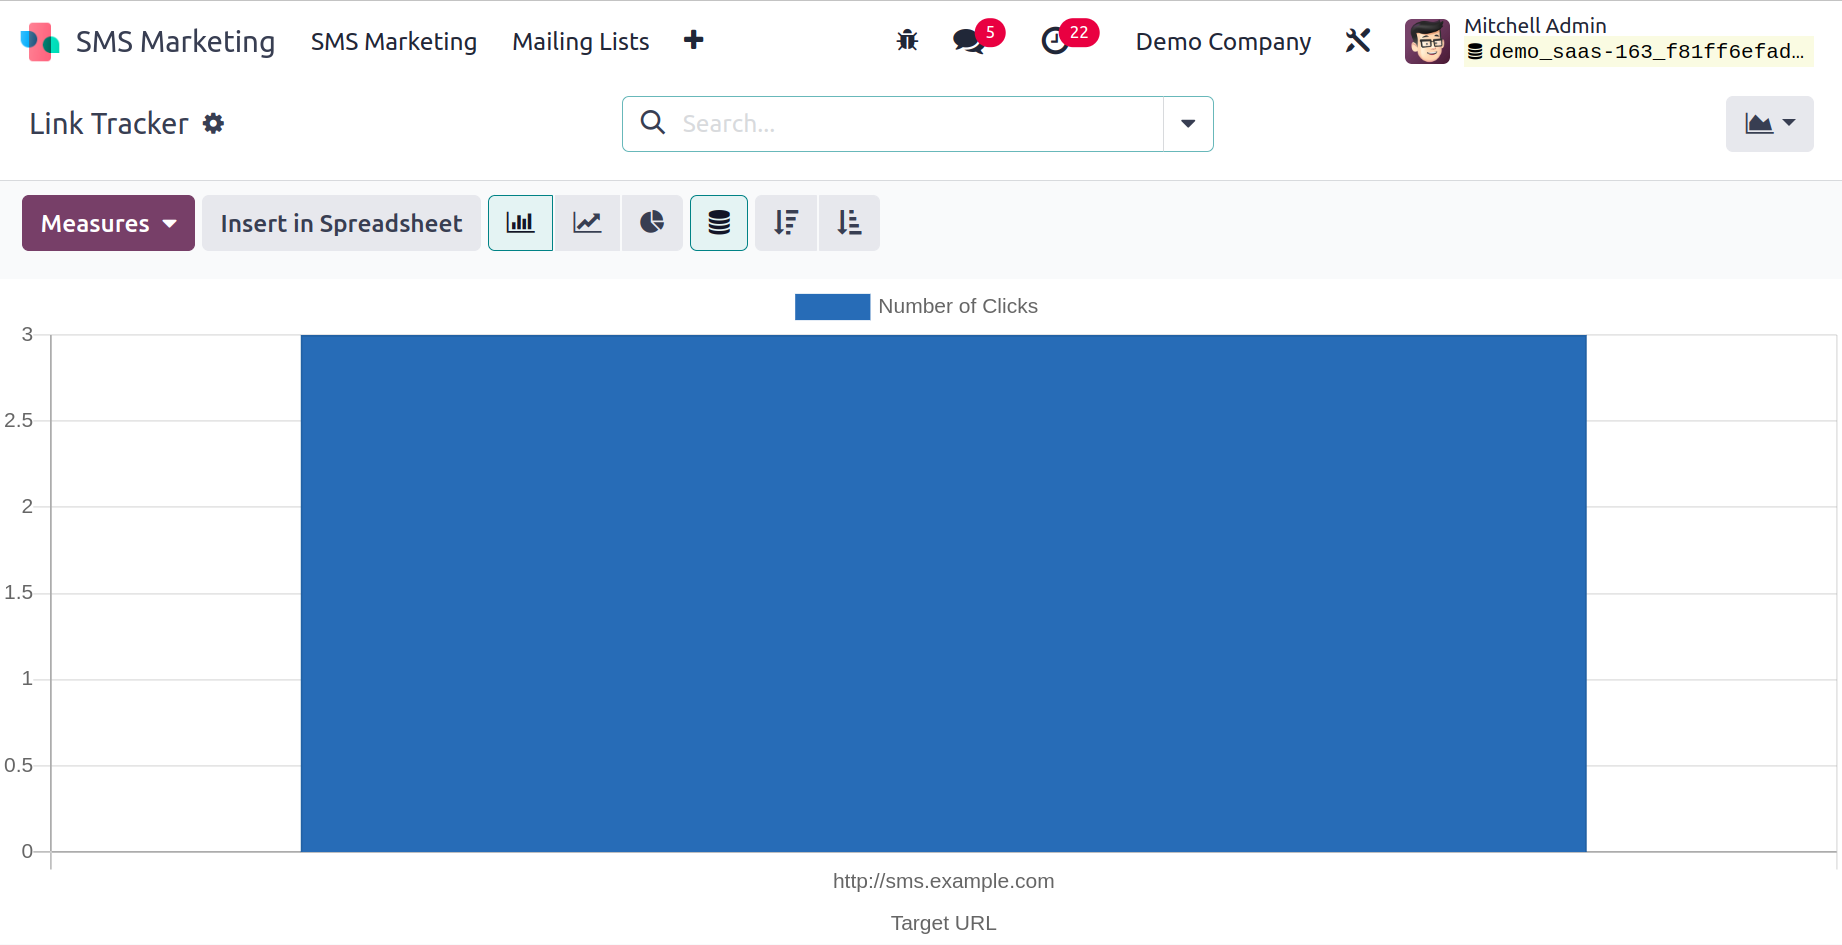
You can create reports in bar charts, pie charts, and line charts using the Graph view.
Let's have a look at the window's Reporting area.
Reporting
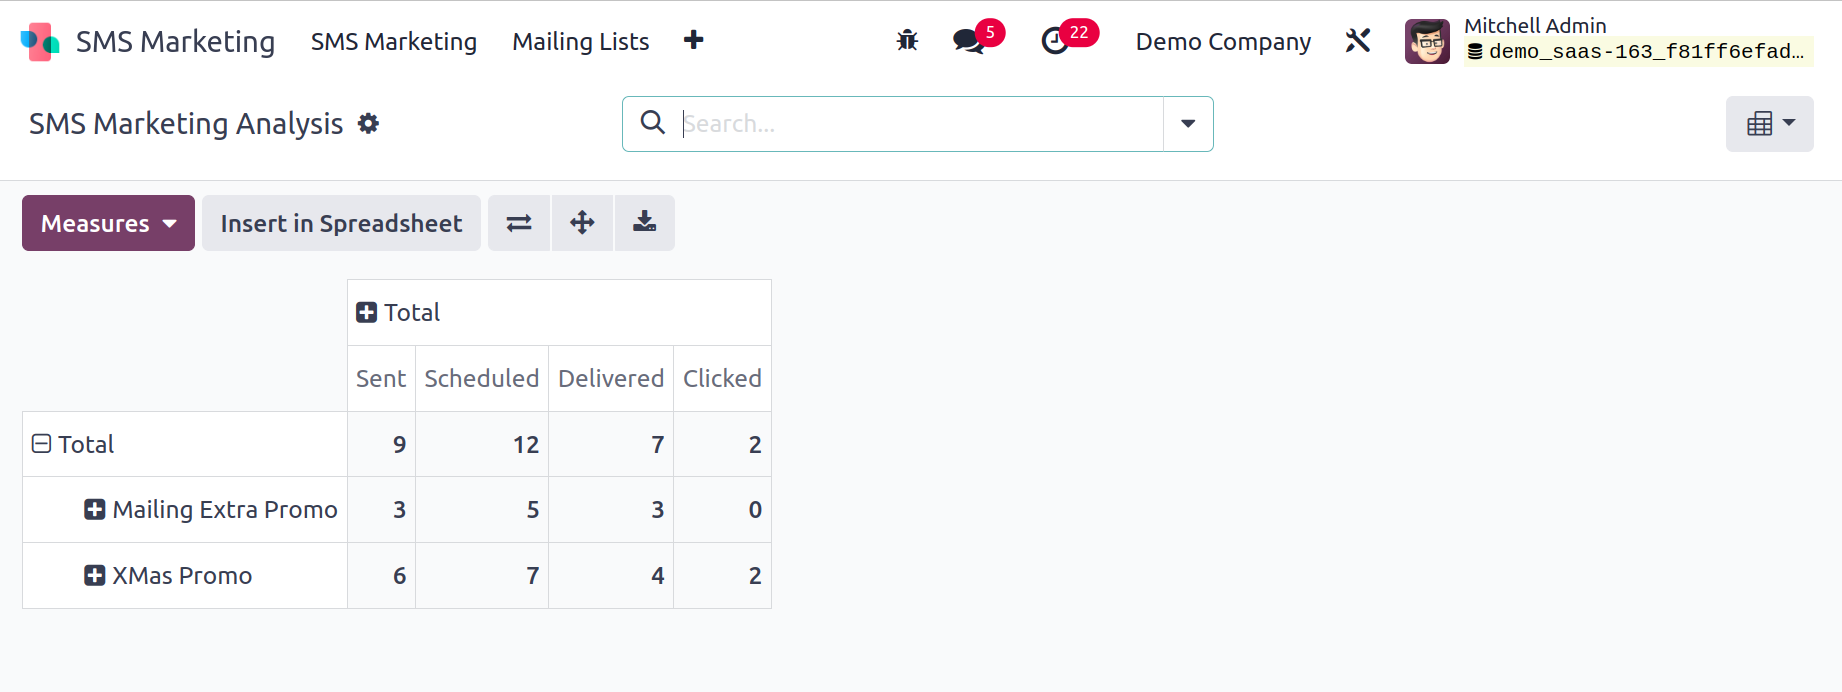
It will be quite helpful to have access to accurate and current reports on SMS Marketing in the
Reporting section of the Odoo SMS Marketing module. With the help of the Odoo17 SMS Marketing module,
you may analyze the many components of SMS marketing that have been done. The Odoo17 SMS Marketing
module's Measures page offers a number of metrics, including Bounced, Canceled, Clicked, Delivered,
Error, Opened, Scheduled, and Sent. Each of these
choices can be seen by clicking the Measures tab. To view the report analysis, choose the necessary
metrics from the list.
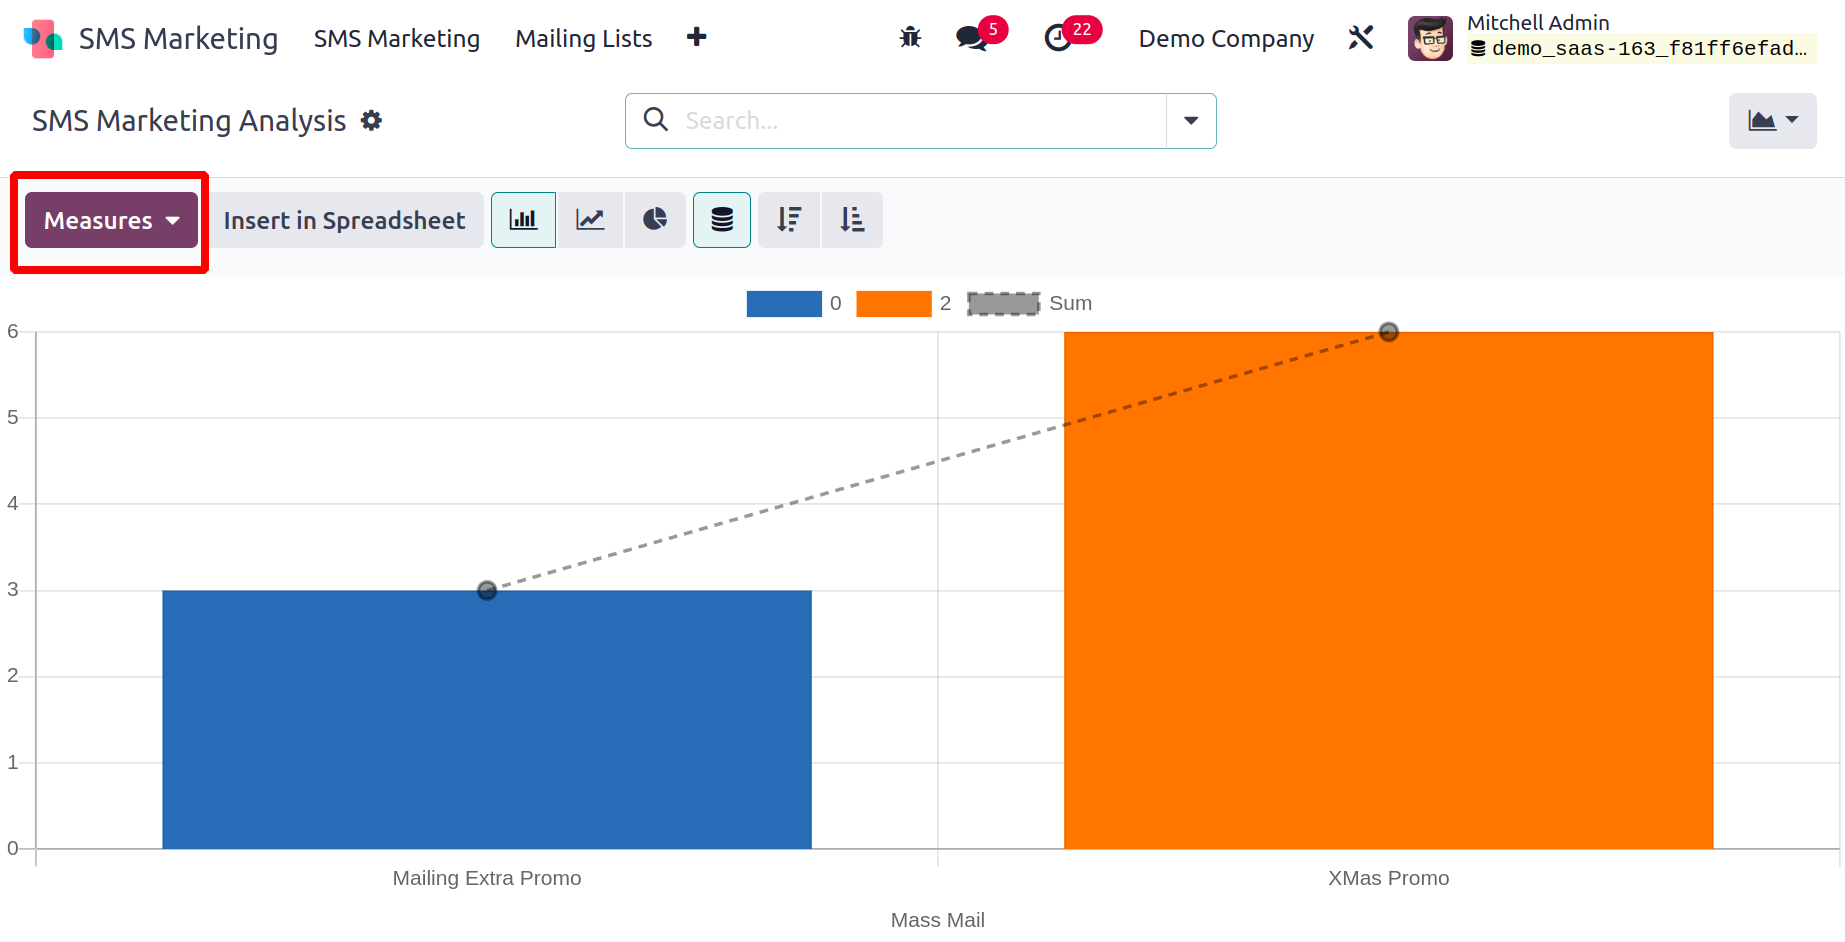
The window also provides a variety of sorting options,
both by default and by customization. These choices are accessible via the Filters, Group By,
Favourites, and Search tabs.
The Pivot view may also have access to the window.
The greatest strategy to increase your company's sales is with the Odoo17 SMS Marketing module.
You may efficiently plan, organize, and schedule marketing campaigns with the aid of this automated
system.