All business organizations operate mostly according to pre-planned operations. A
flawless workplace at a firm is always guaranteed by pre-planned procedures. Plans
created by the offices will mostly influence the actions planned in an organization.
Since these actions are planned by taking into account the examination of numerous
operational regulations, company procedures, and the organization's primary areas
of concentration throughout a financial term, the success rate of execution will
be high. Planning should constantly be closely related to an organization's operations.
If not, the actual justification for contemplating planning in an organization loses
all significance.
Odoo 17 provides an automated method for planning out and managing a company organization's
daily operations. The most cutting-edge technology can be used to handle every aspect
of your business operations with this specialized resource planning business management
software. To organize their operations based on the calendar outline, users of the
Odoo 17 ERP system will receive the Planning module. By confirming the available
day and time, you can easily arrange tasks connected to business operations. By
combining the module with additional Odoo 17 modules, such as Employee, Payroll,
Attendance, Project, Manufacturing, and many others, you may increase its functionality.
Scheduling
You will be taken to the module's scheduling platform when you choose the Planning
module from the main dashboard of the module. This platform is made to seem like
a calendar, making it simple for you to plan your activities around the available
dates.
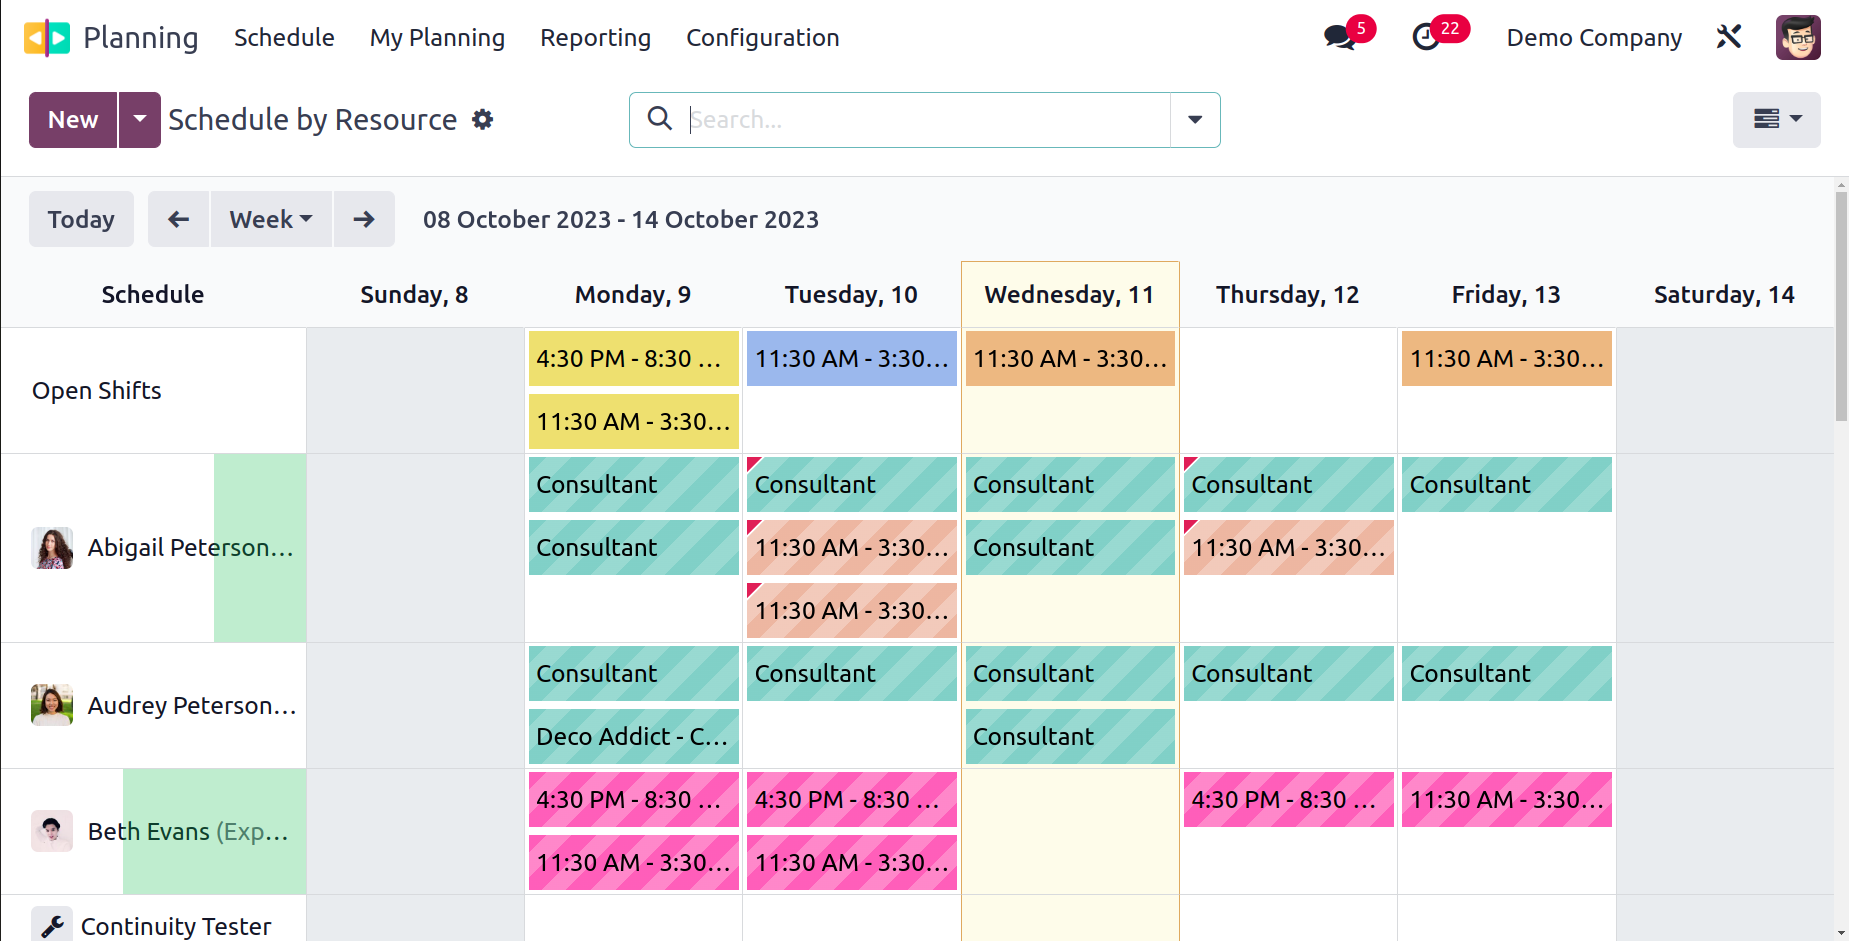
Activities can be planned based on resources, roles, projects, and sales orders.
The timetable by resource is displayed in the screenshot. The plans can be seen
by day, week, month, or year. You can choose a convenient perspective based on your
needs. Here, you may see each resource person's schedule.
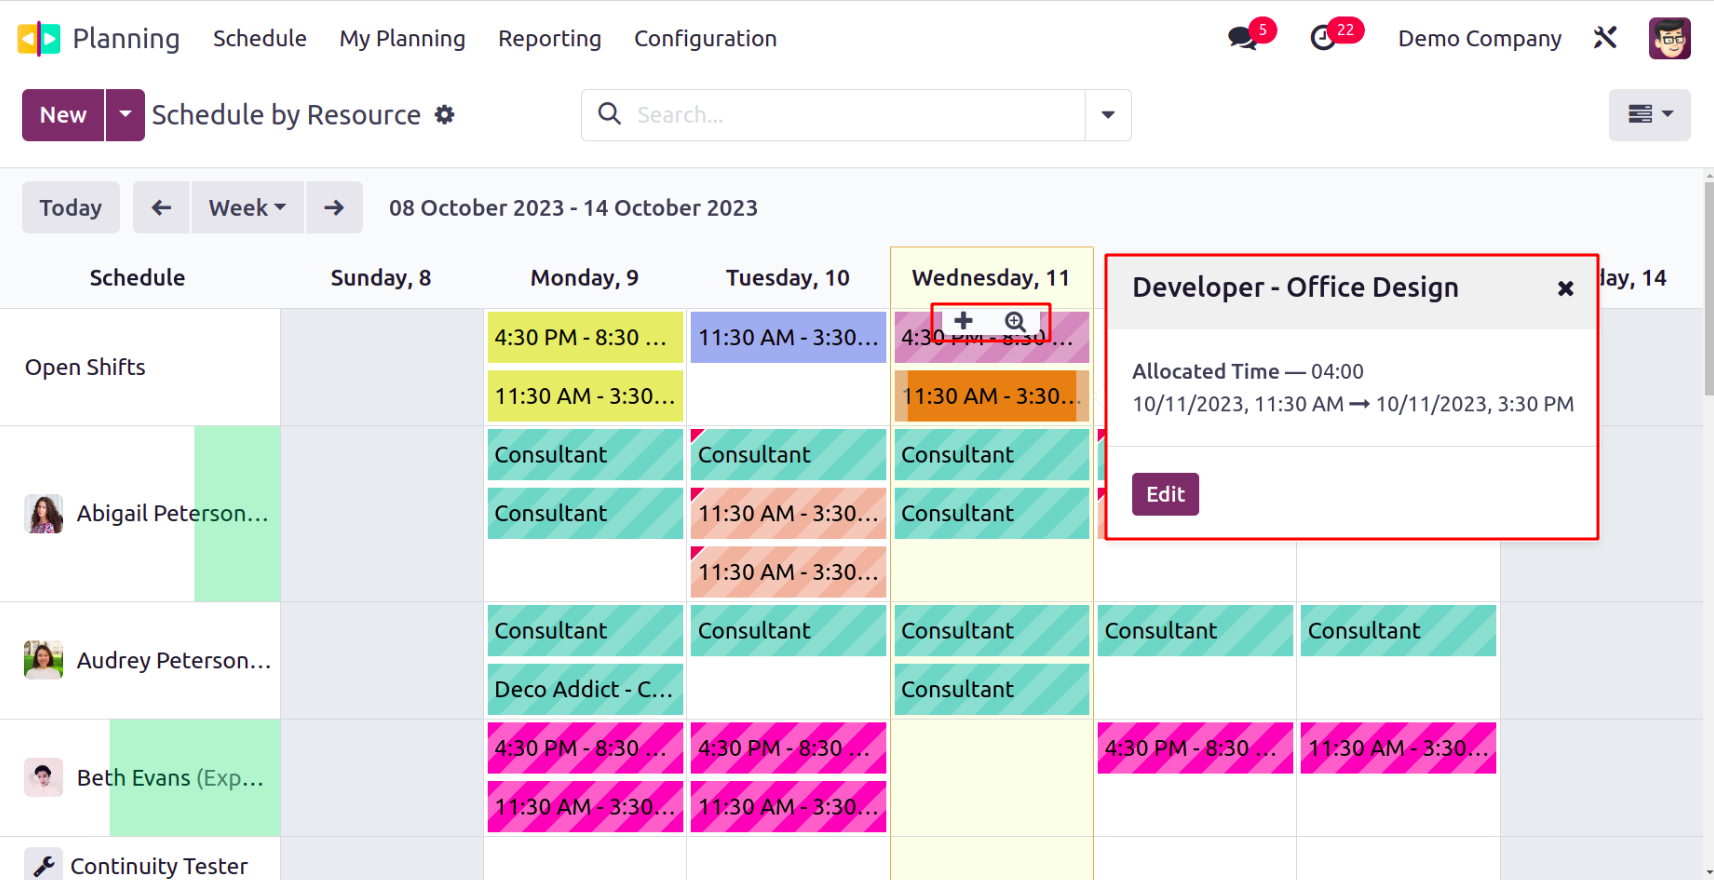
You can hover the pointer over a certain timetable to see a preview of the schedule.
The schedule's specifics will be displayed in the preview, as seen in the screenshot
above. If an employee is scheduled for more than one shift at once, a small red
label will appear on the schedule.
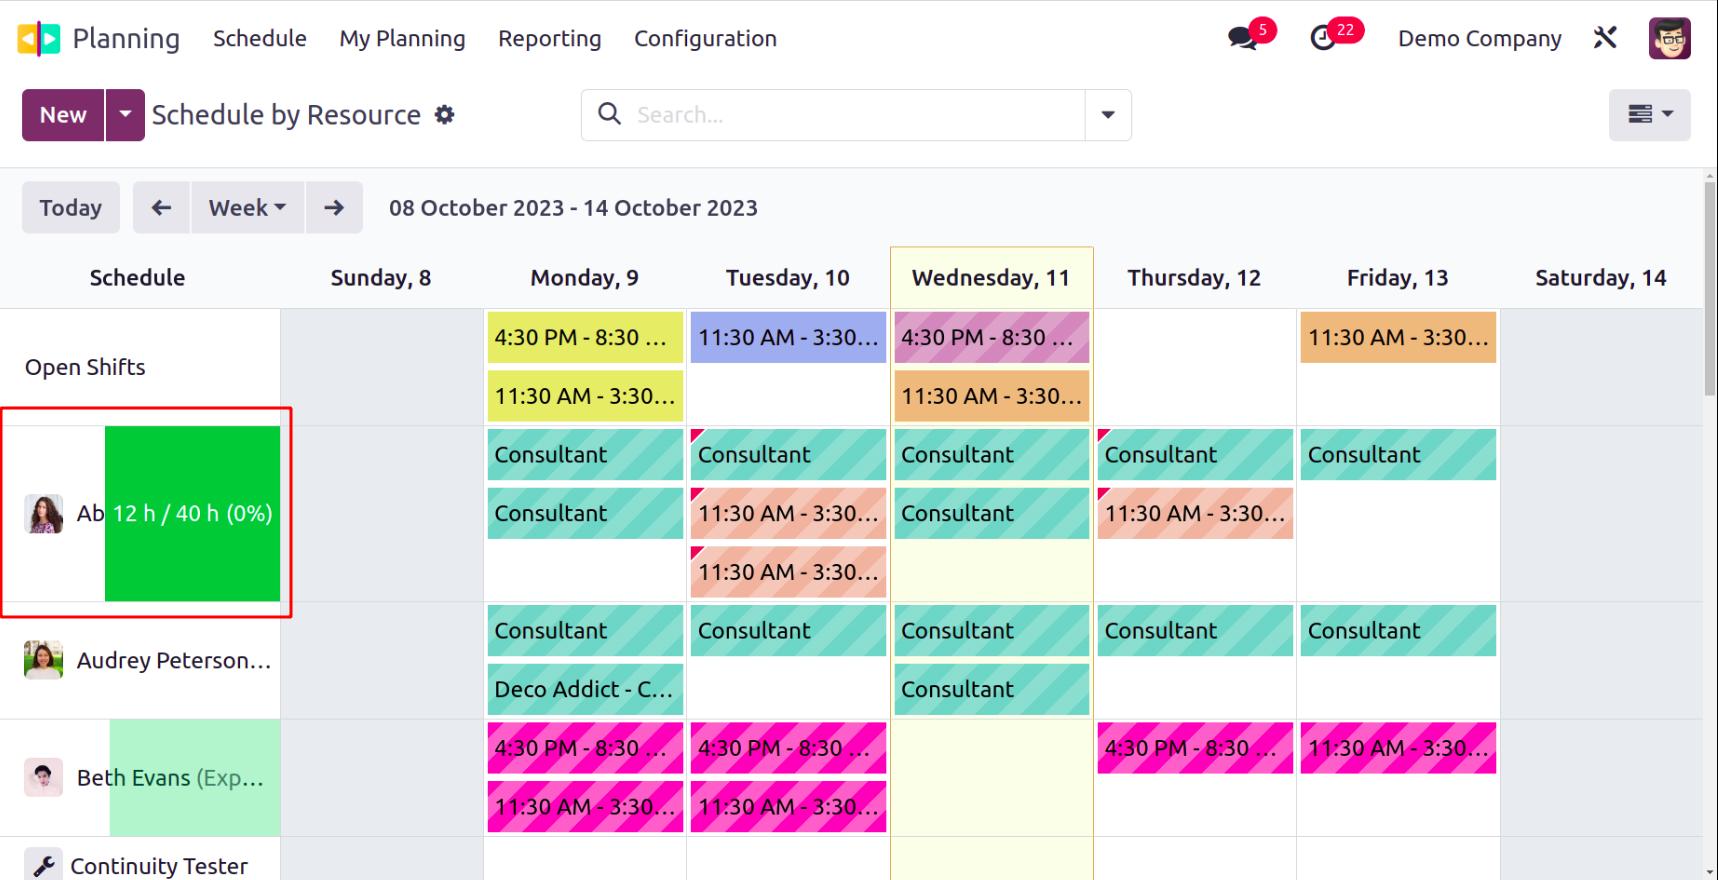
You can view the employee's total hours worked throughout the course of the chosen
day, week, month, or year next to the resource person's field.
Unassigned sales orders can be distributed among available personnel by clicking
the Plan Orders button. Use the Copy Previous Week option to duplicate the shift
from the previous year.
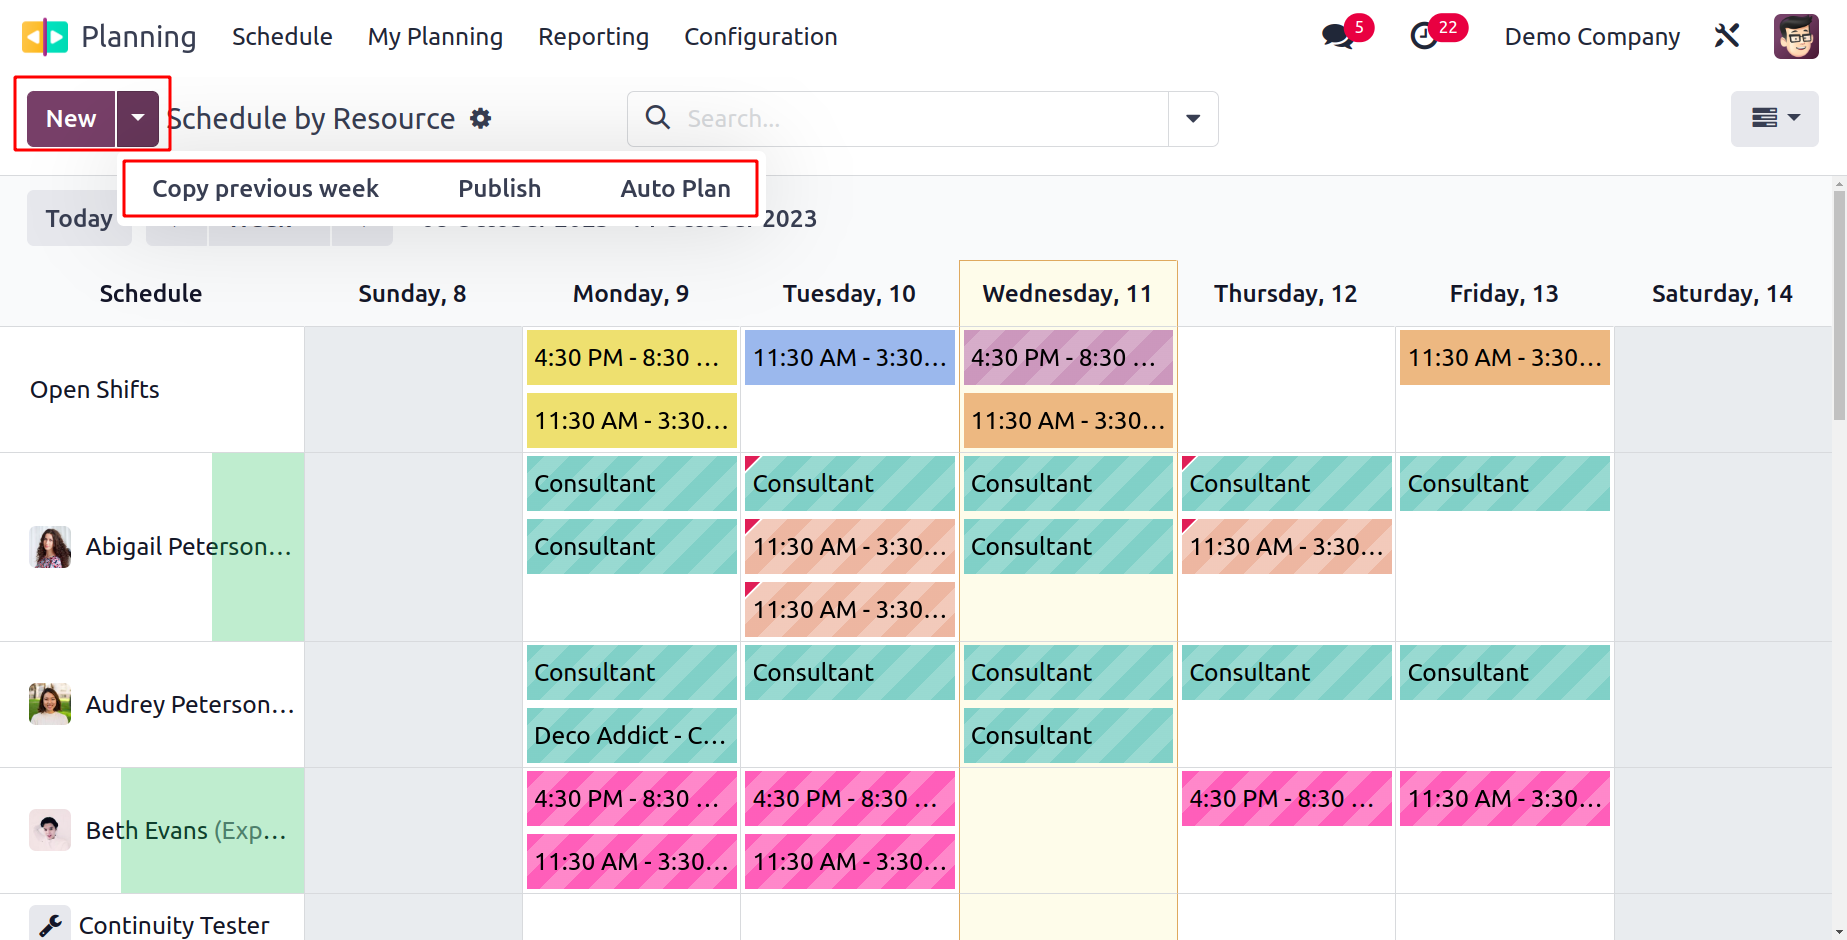
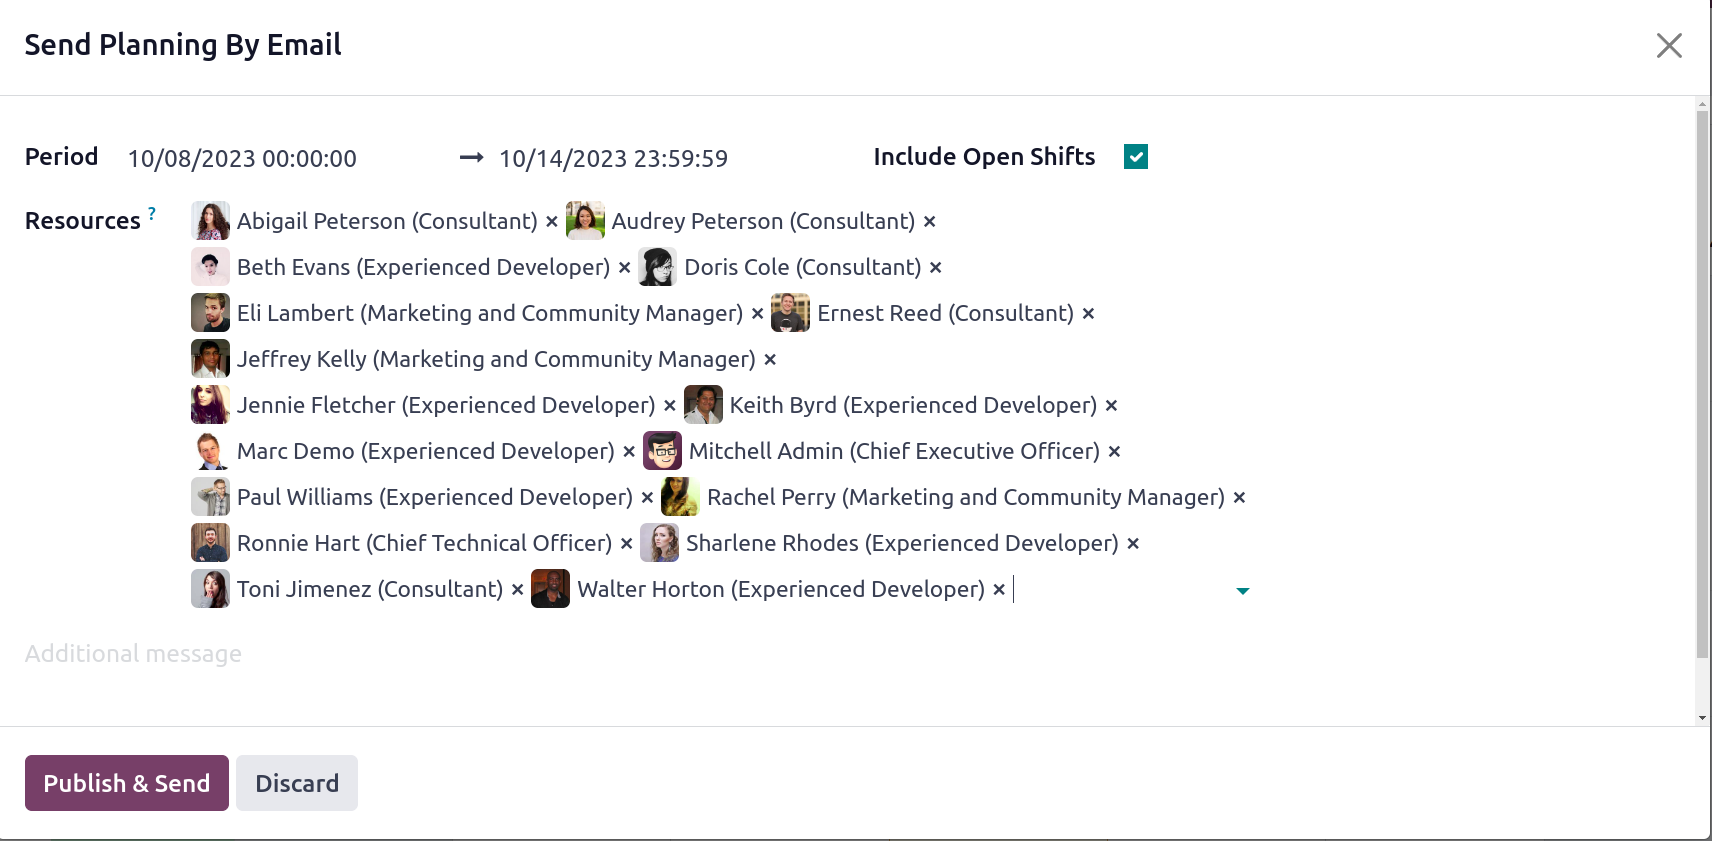
When you click the Publish button, a pop-up window appears. Planning can be emailed
to the resources listed in this box.
To create a new activity, click the New button. Additionally, you can use the plus
icon that shows on the screen when the pointer is over a specific date. As seen
below, a pop-up window will appear as a result.
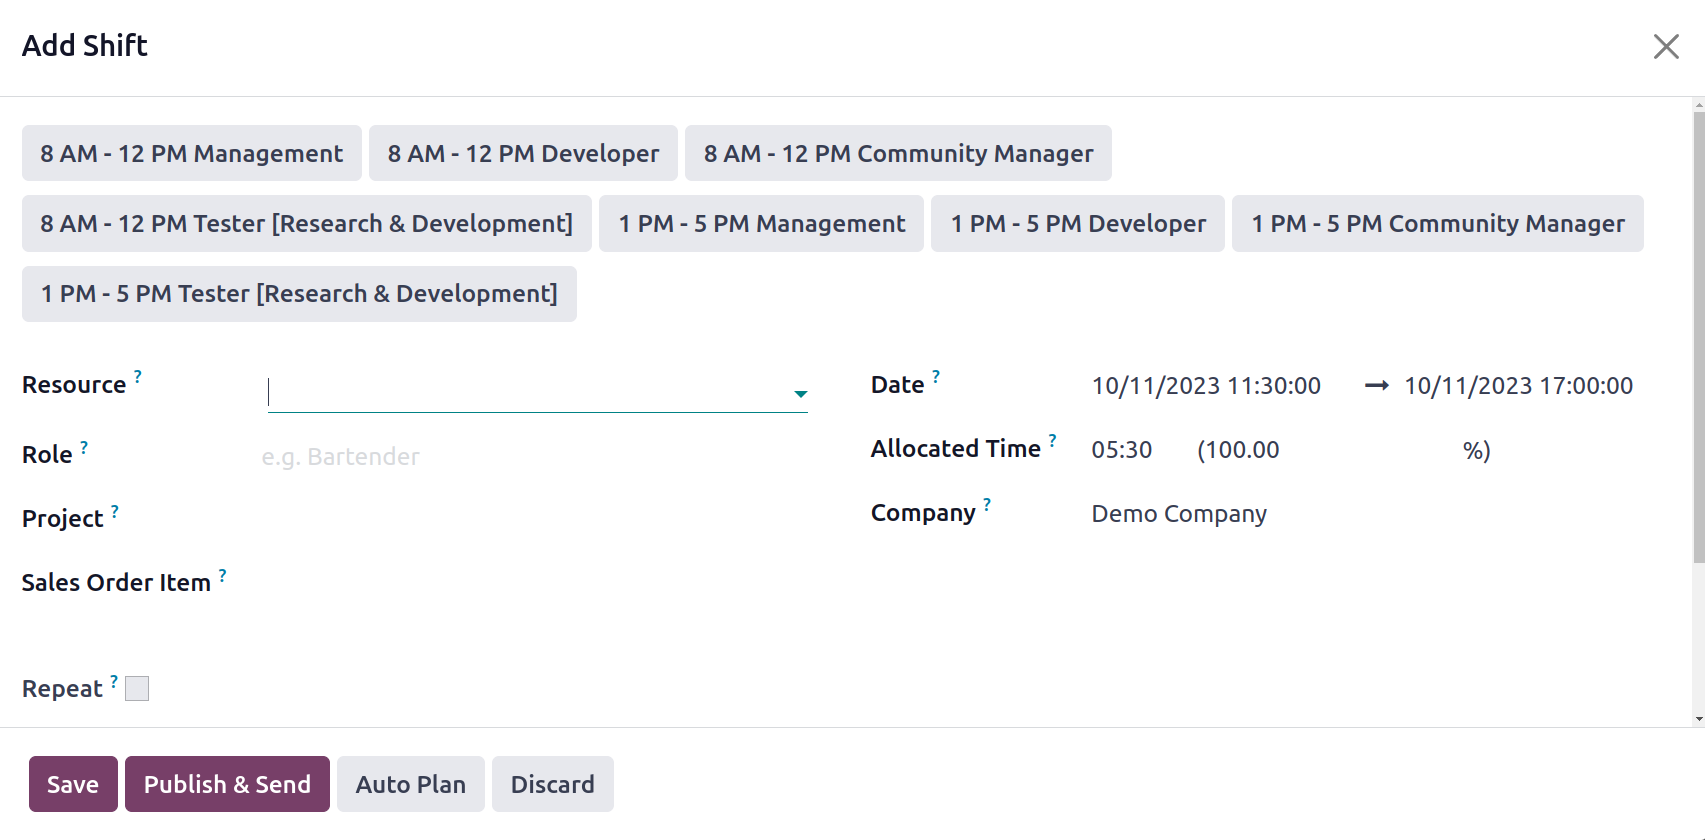
The resource's and role's names will be displayed in the window. If not, you can
refer to the information in the relevant fields. The project and sales order item
for which this activity will be planned should be specified. You can turn on the
Repeat field to repeat the schedule. Changes to a shift solely affect the current
shift; they have no effect on the other shifts that are a part of the repetition.
The same holds true for removing a repeating shift. This option can be turned off
to prevent future occurrences. Activate the Save as Template option to save the
shift as a template. The fields for the Date, Allotted Time, and Company will all
be available. Any other notes that you include in the space provided will be emailed
to the employee along with the schedule information. You can complete the necessary
actions by pressing the Publish & Send button and the Save button, respectively,
to save the shift.
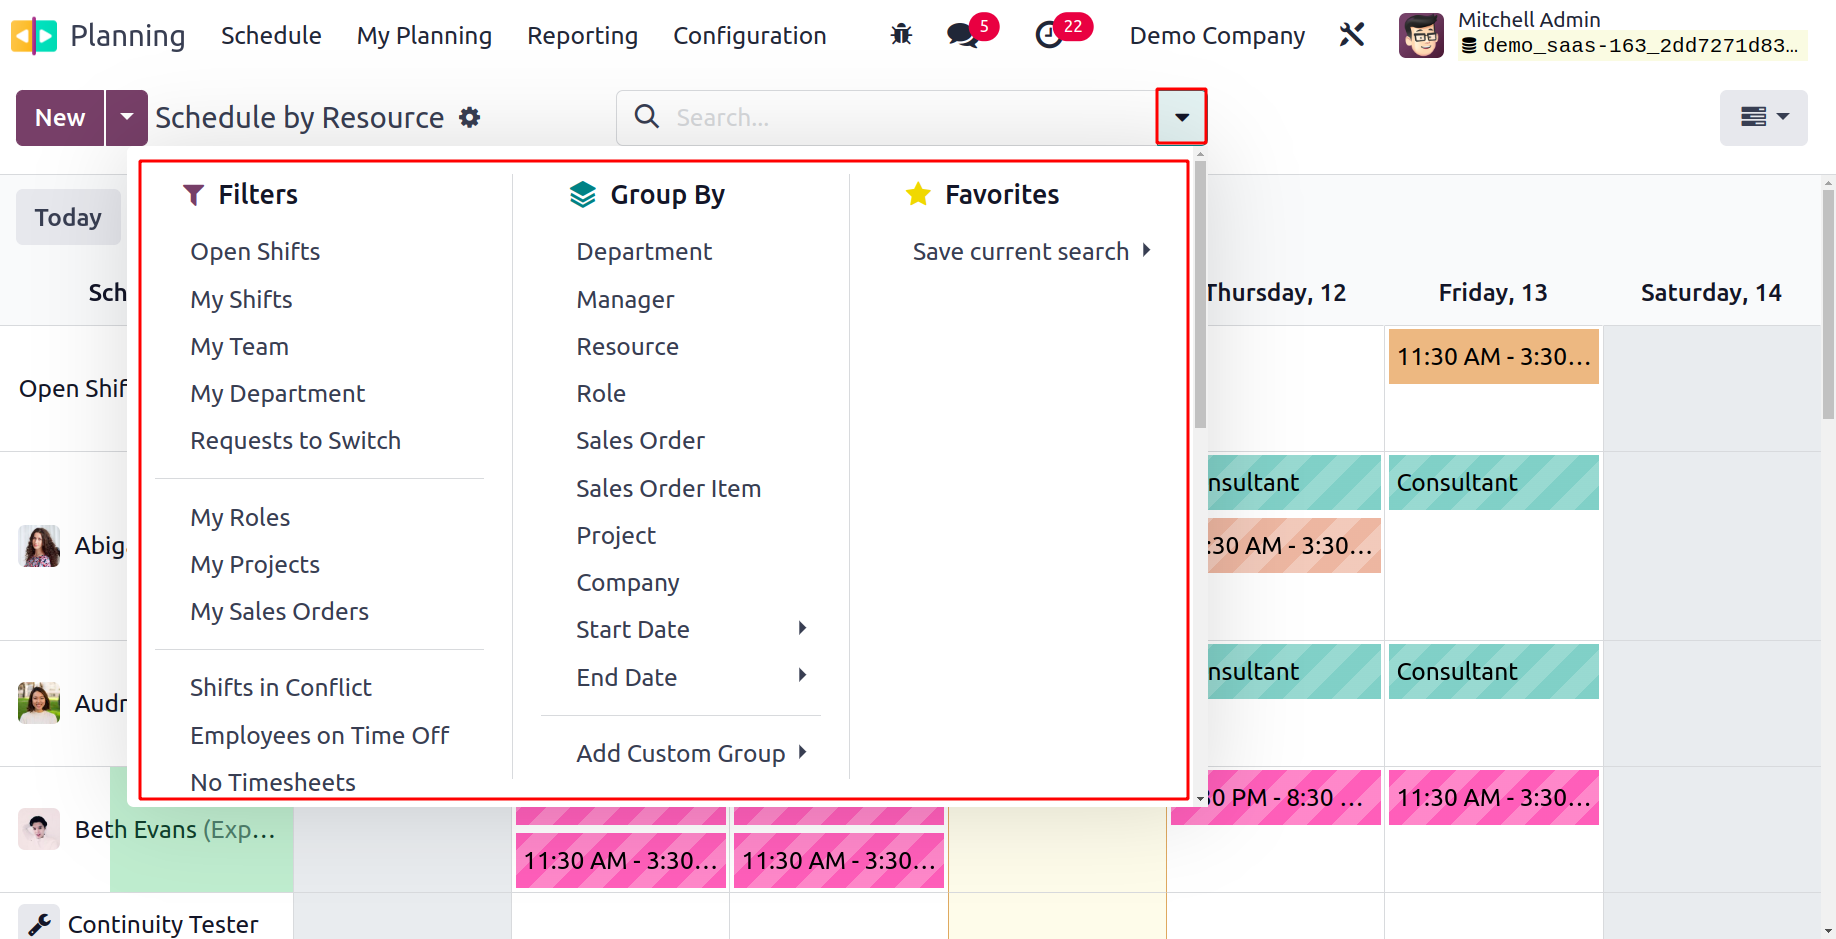
Open Shifts, My Shifts, My Team, My Department, My Role, My Project, My Sales Orders,
Conflicting Shifts, Time Off for Employees, No Timesheets, Human, Material, Billable,
Non-Billable, Draught, Published, To Send, Future, Next Week, This Week, Tomorrow,
Today, Yesterday, Last Week, and Past are all available to you here as default filters
in this platform. The Department, Manager, Resource, Role, Sales Order, Sales Order
Item, Project, Company, Start Date, and End Date options may be found under the
Group By option.
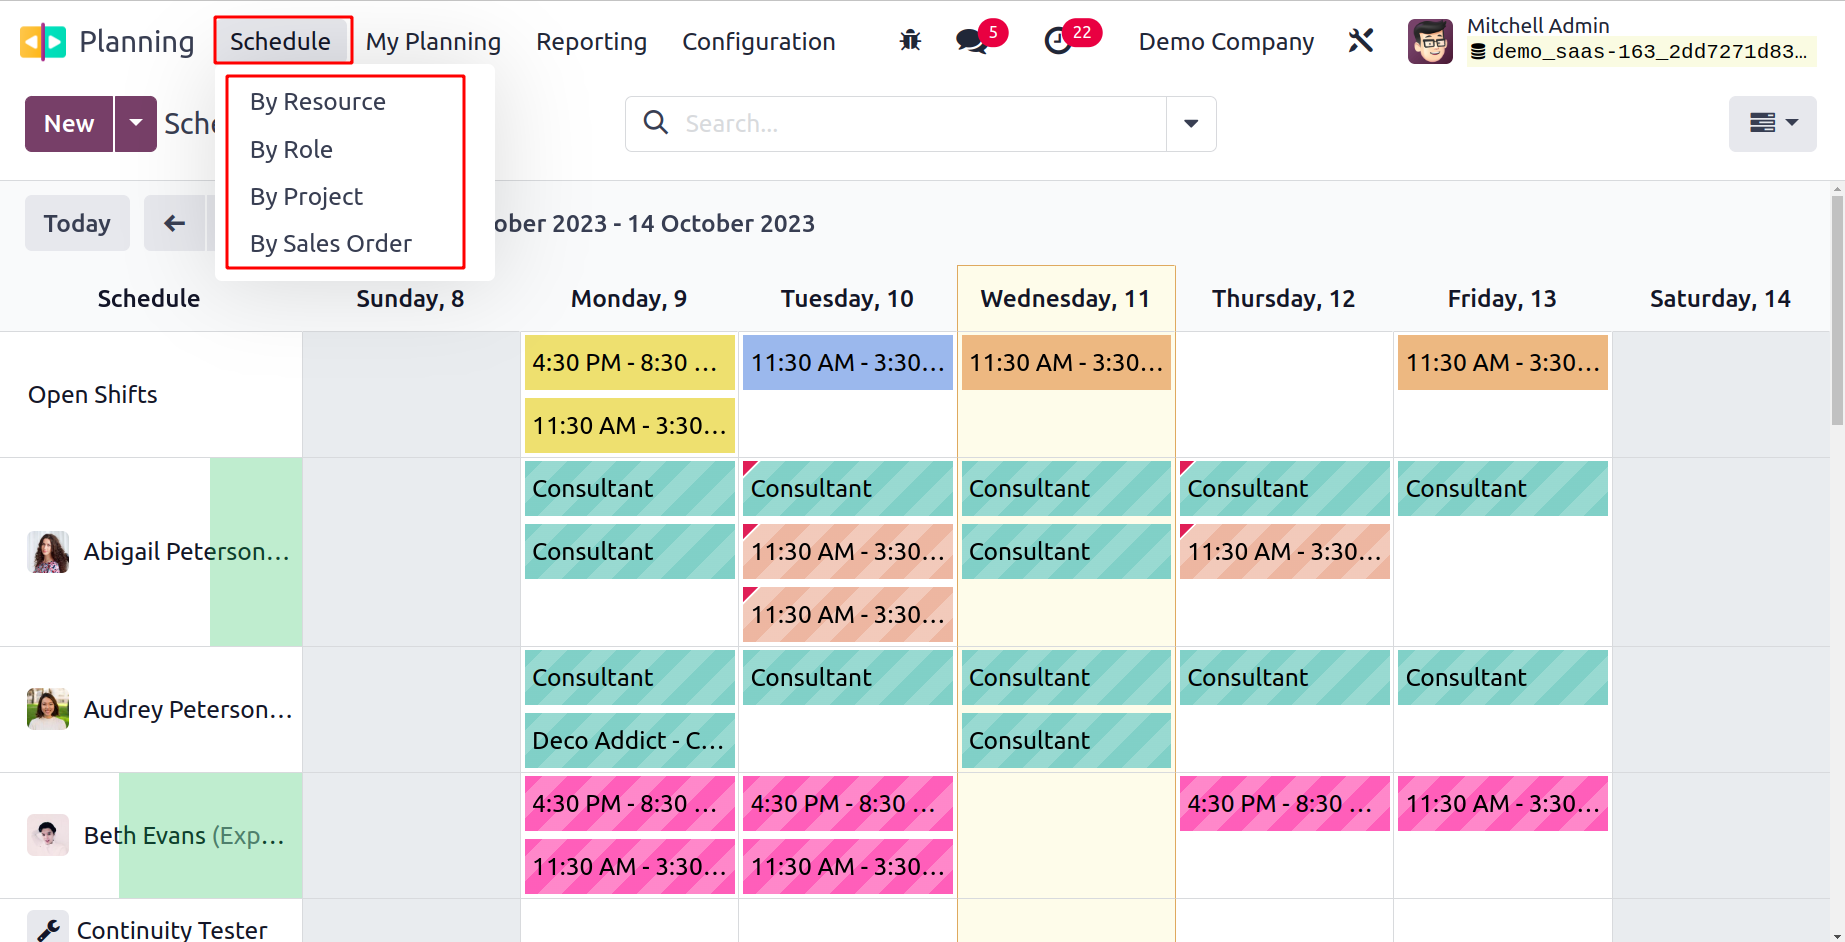
The same scheduling pattern will be accessible based on Role, Project, and Sales
Order via the corresponding menus for By Role, By Project, and By Sales Order, as
we previously said.
My Planning
The user will receive a special menu named My Planning in the Planning module where
they can view their schedules. This platform lets you quickly see your entire schedule.
This will enable you to plan your schedule so that there are no conflicts.
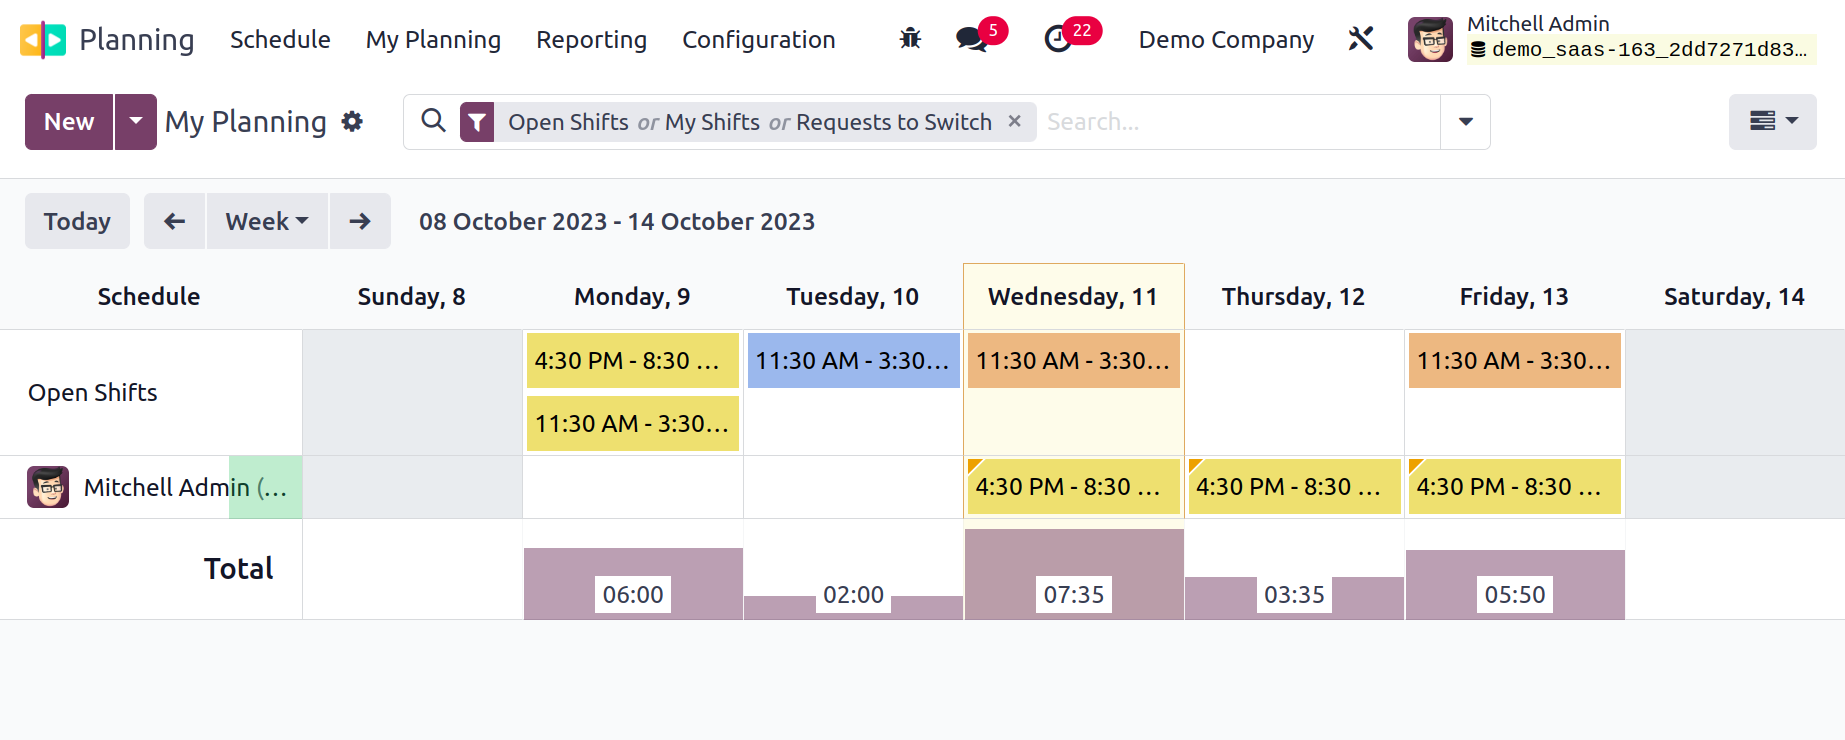
This window will provide you with the relevant information about your shifts. In
this window, the schedules will be arranged in accordance with the scheduled day
and time. Here, the user will learn about the published shifts. The employee will
find it easy to identify overlapping shifts thanks to the schedule's organized,
systematic structure.
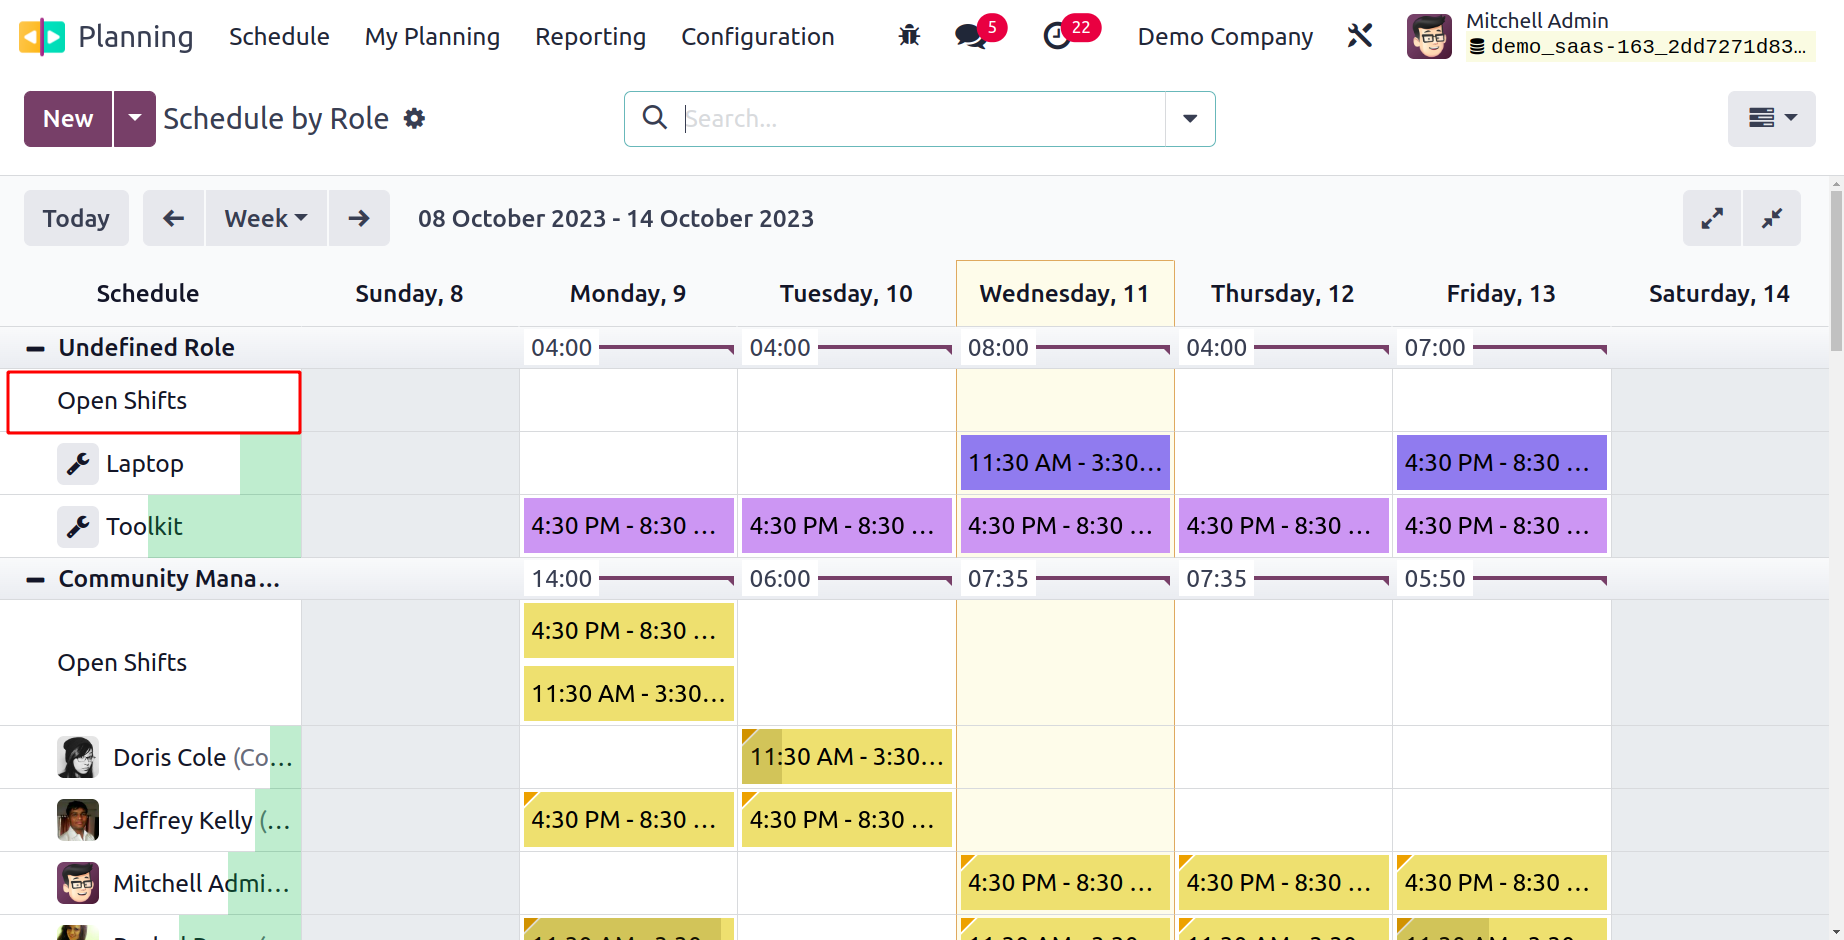
Open Shifts
There can be instances where the employee was unable to complete the allocated work
within the allotted time owing to certain personal or technical difficulties. Whatever
the circumstances, it is crucial to finish the planned action in order to accomplish
the company's goal. In these situations, Odoo17 provides the option to schedule
the pending tasks in Open Shifts.
If the designated worker is unable to finish the task by the deadline, other people
can step in and finish the task. The Open Shifts feature is included in the Odoo17
Planning module.
In the Odoo17 Planning module, it is possible to provide employees the option to
withdraw from the allocated activities.
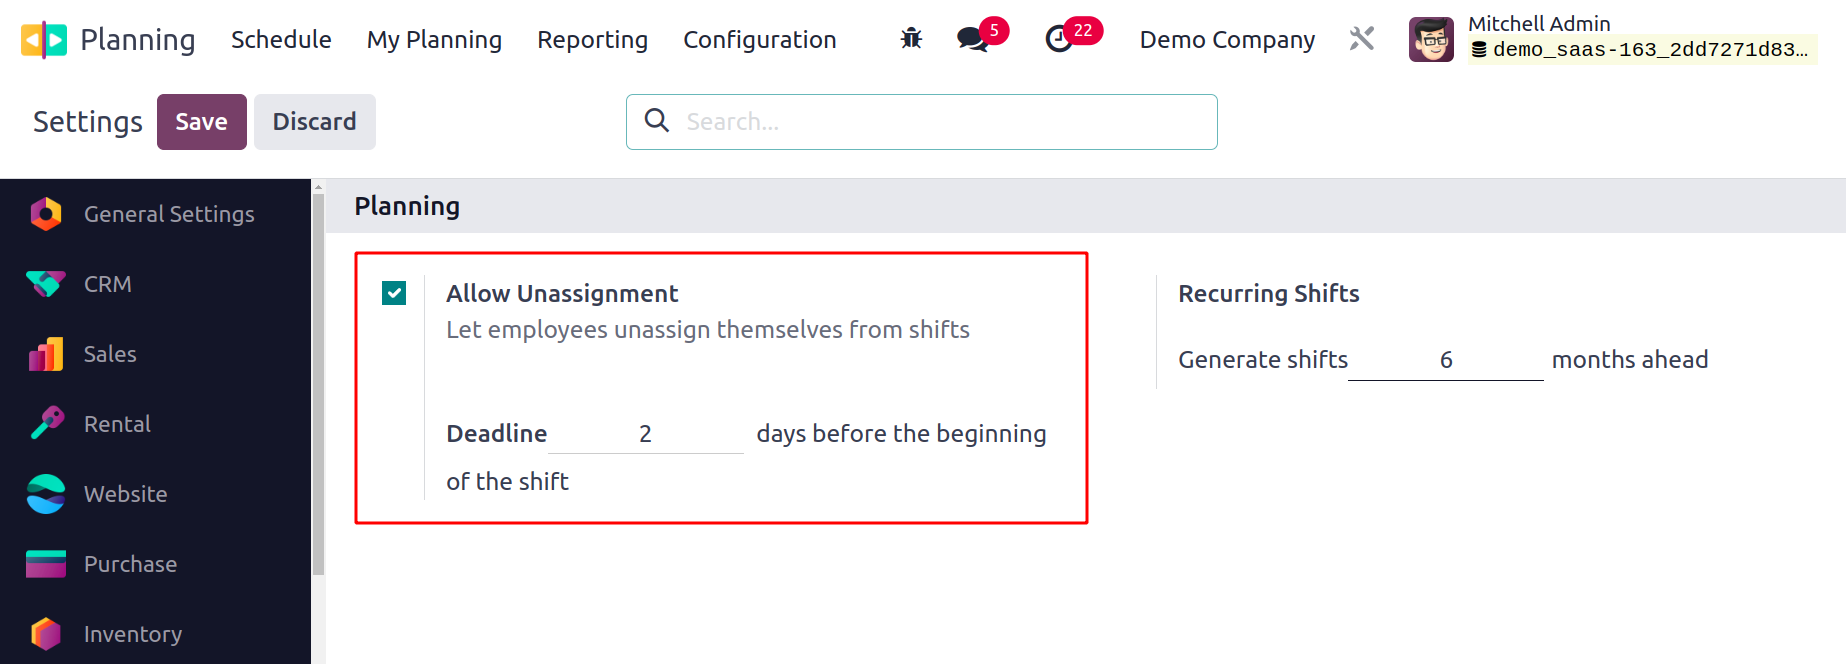
You can do this by turning on the option to Allow Unassignment. The employees can
release themselves from the shift assignments by selecting this option. Here, the
admin may provide a deadline. Thus, the unassignment can be completed up until the
due date.
Roles
Employees will benefit from having a clear grasp of the duties and obligations that
go along with each function by having different roles assigned to them. By doing
this, the administrator can quickly allocate tasks to each employee in accordance
with their responsibilities. It will provide them with a perspective on the task
they should complete while playing the part. These roles can be set up using the
module's Configuration menu. The user can find the Roles option under the Configuration
menu, as seen in the figure below.
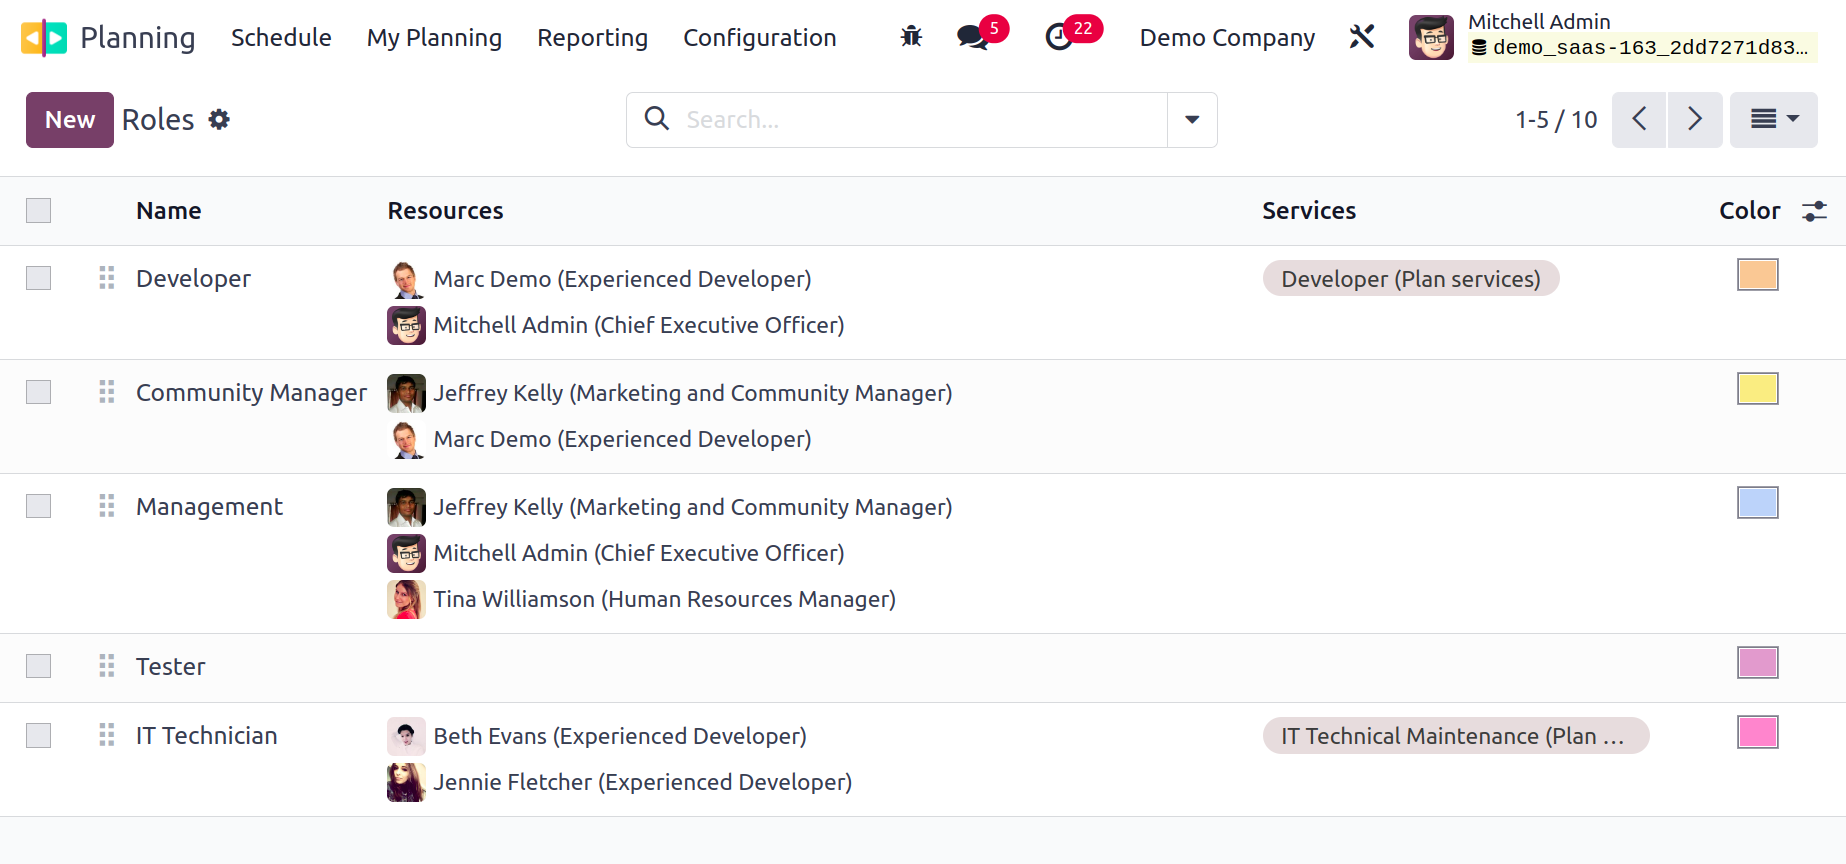
The Name, Resource, and Services of the roles are displayed in the list view. By
pressing the New button, you can create a new role. The available list will be updated
with a new line when you click the New button. You can provide the name of the role
in the box provided here. It is possible to assign employees to this function in
the Resources field. The relevant field can be used to specify the Services that
the Resources offer in this position. For easier identification, you can assign
different colors to certain jobs.
Materials
You will find a new option under the Configuration menu in the Odoo 17 Planning
module that can be used to configure the materials needed or utilized during a scheduled
activity. You can navigate to the Configuration menu and use the Materials option
to configure such materials.
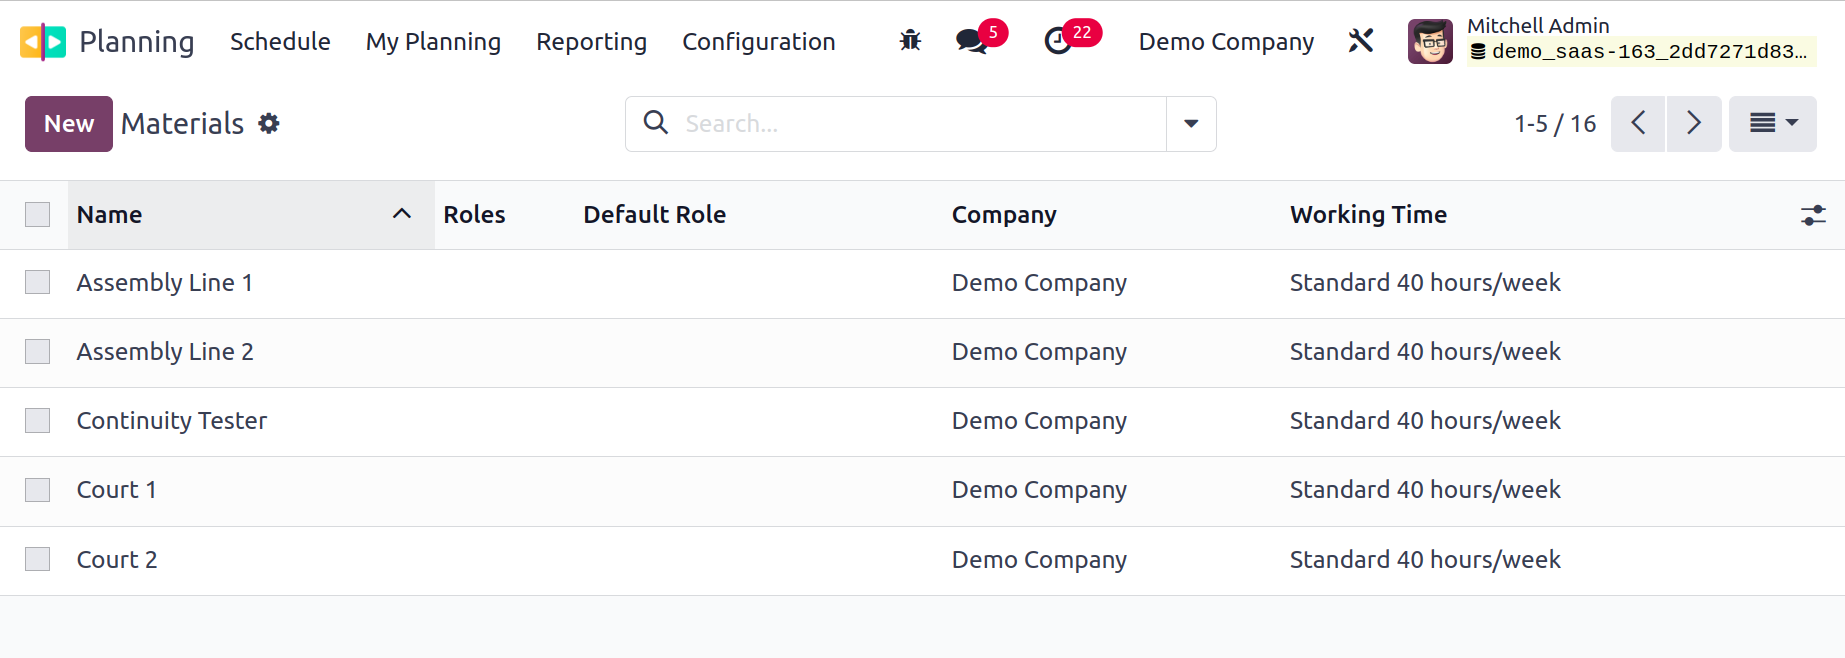
You may see the list of already-created items here, together with information on
each item's Name, Roles, Company, Flexible Hours, and Working Time. Selecting the
New button will allow you to contribute new content. This will add a new line below
the list of options. Give the content in the designated field a name. You can mention
the Roles, Company, Flexible Hours, and Working Time in the relevant fields.
Shift Templates
In the Odoo17 Planning module, shift templates can be added when new schedules are
being created. By doing this, the template's pre-configured data will be immediately
incorporated into the new schedule. By doing so, you will avoid having to manually
mention the details. When configuring Odoo17, you will have the opportunity to save
a new schedule as a template. From the Configuration menu of the module, you can
also make a new shift template. For this, choose the Shift Template option from
the Configuration menu.
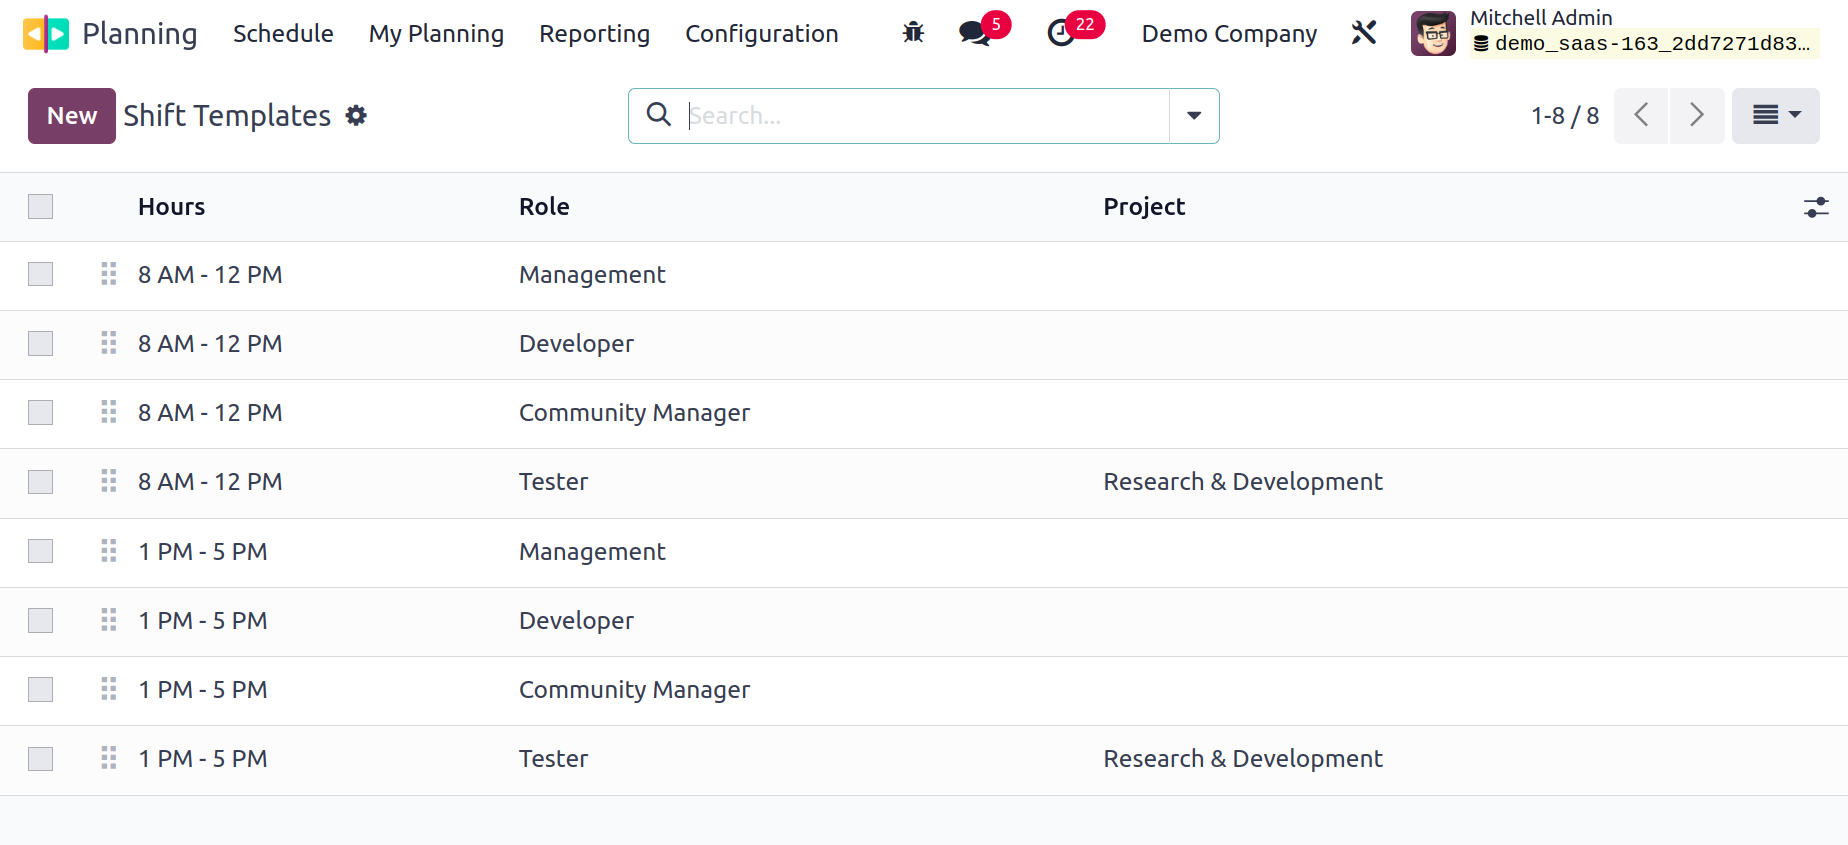
Here, you can see the shift templates that are already set up with Hours, Rule,
and Project. To create a new shift template, click the New button.
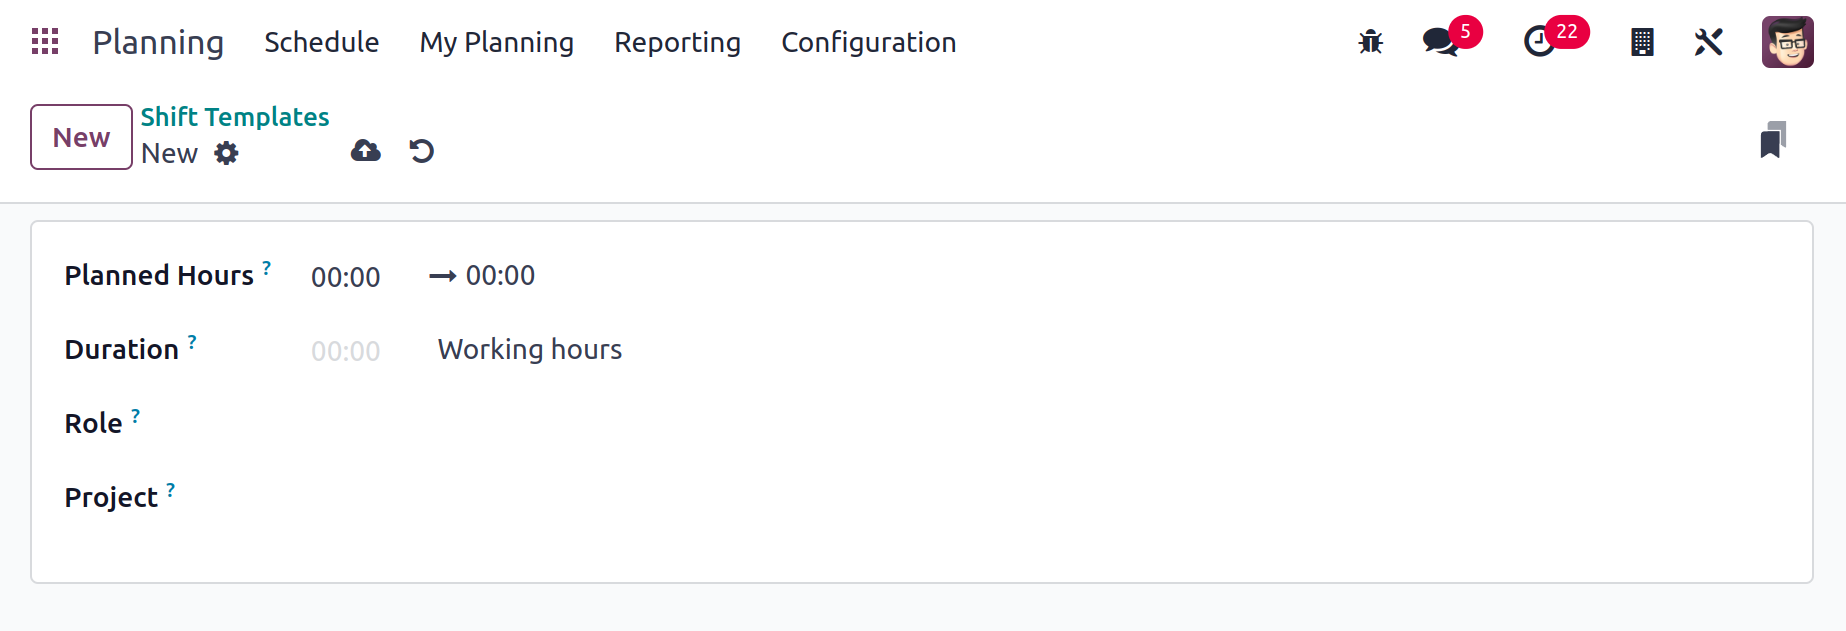
As seen in the picture, a new form of perspective will emerge. The fields for the
Planned Hours, Duration, Role, and Project can all be filled in here.
Reporting
The actions scheduled using the Planning module can be examined using the Planning
Analysis platform, which is accessible under the Reporting menu.
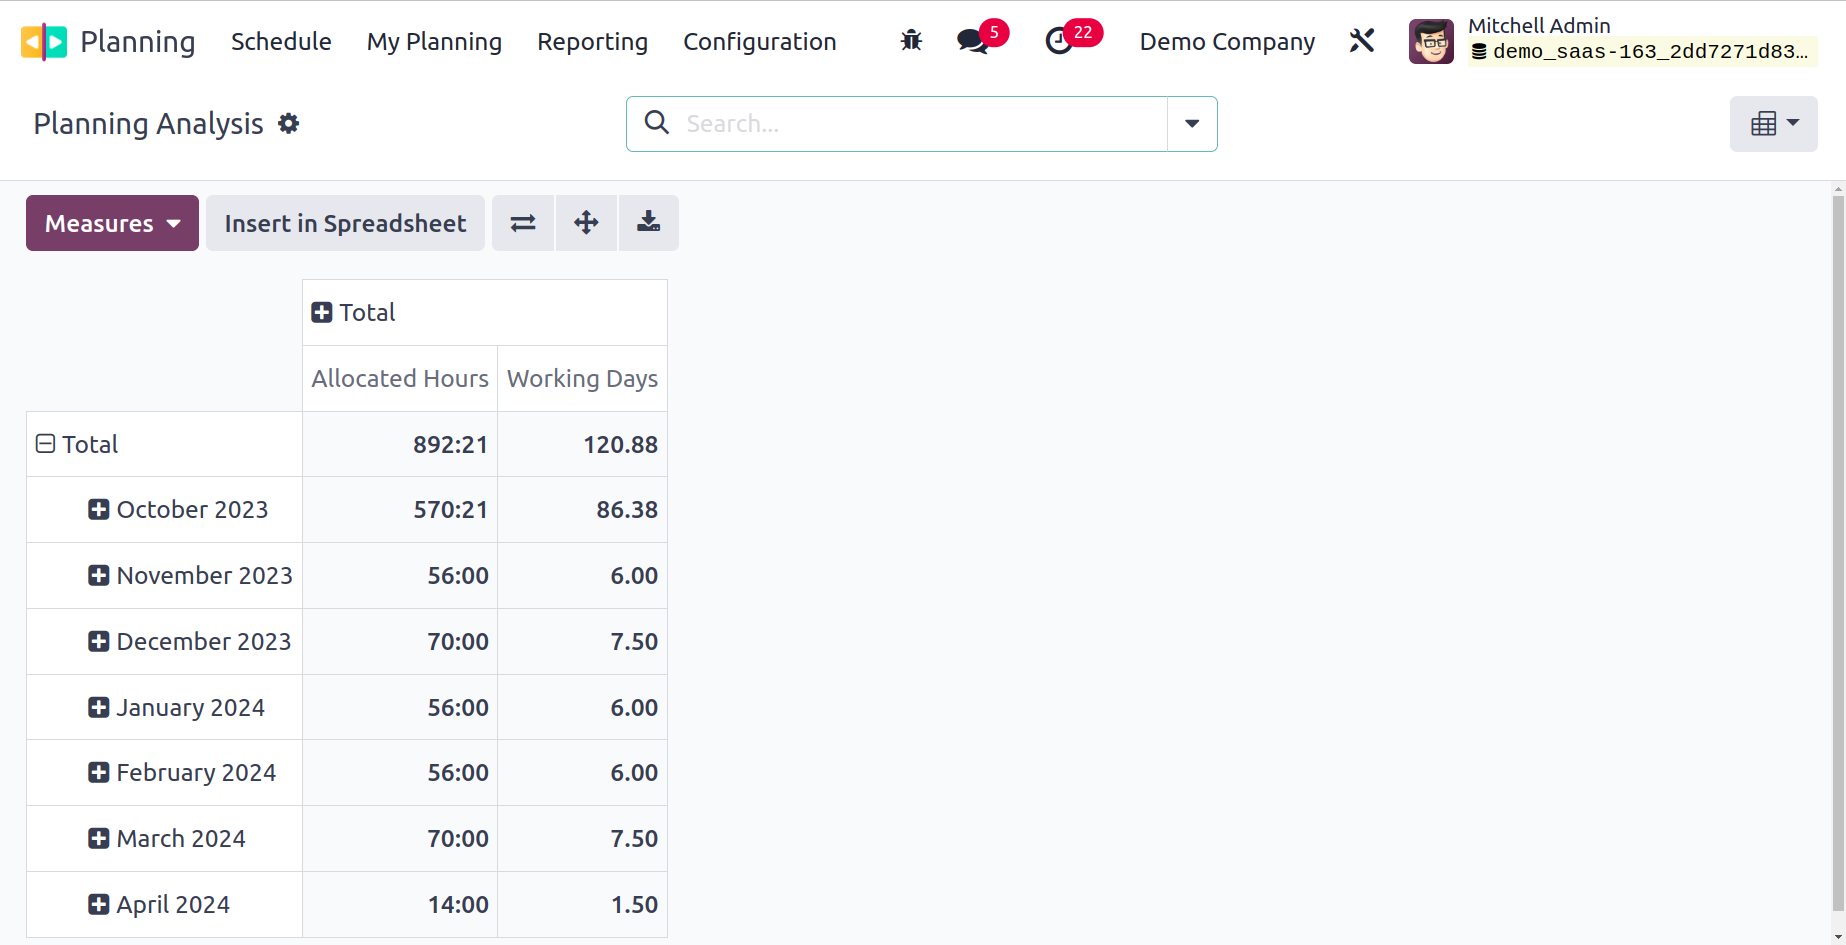
This is the report's pivot view. On this platform, you can use the appropriate filters
and group by option to receive the reports you want. Using the Measures option,
you may modify the reports' metrics.
You can efficiently streamline the company's scheduling activities with the help
of Odoo 17's planning module.