Maintenance
A manufacturing business typically uses a variety of tools and machinery. The production
process will be delayed and productivity will be lost if any of these machines or pieces
of equipment malfunction. Proper maintenance is required to extend the life of the
machines and equipment and prevent these issues. It is crucial to guarantee the quality
of the machines you employ for the manufacturing process if you want to end up with a
completely finished product. Your workload will be reduced if there is a specific module
for managing the company's maintenance requests. Any type of maintenance order within a
firm can be monitored with the help of the Odoo 17 Maintenance module.
Maintenance Team
You can designate a maintenance team in the Odoo17 Maintenance module to manage and keep
an eye on the maintenance orders. You will be prompted to mention the maintenance team
when creating a maintenance request. You can designate a team to handle maintenance;
this team will be in charge of all maintenance-related activities. You can find the
various maintenance teams of a company on the dashboard that appears when you launch the
Maintenance module, as shown below.
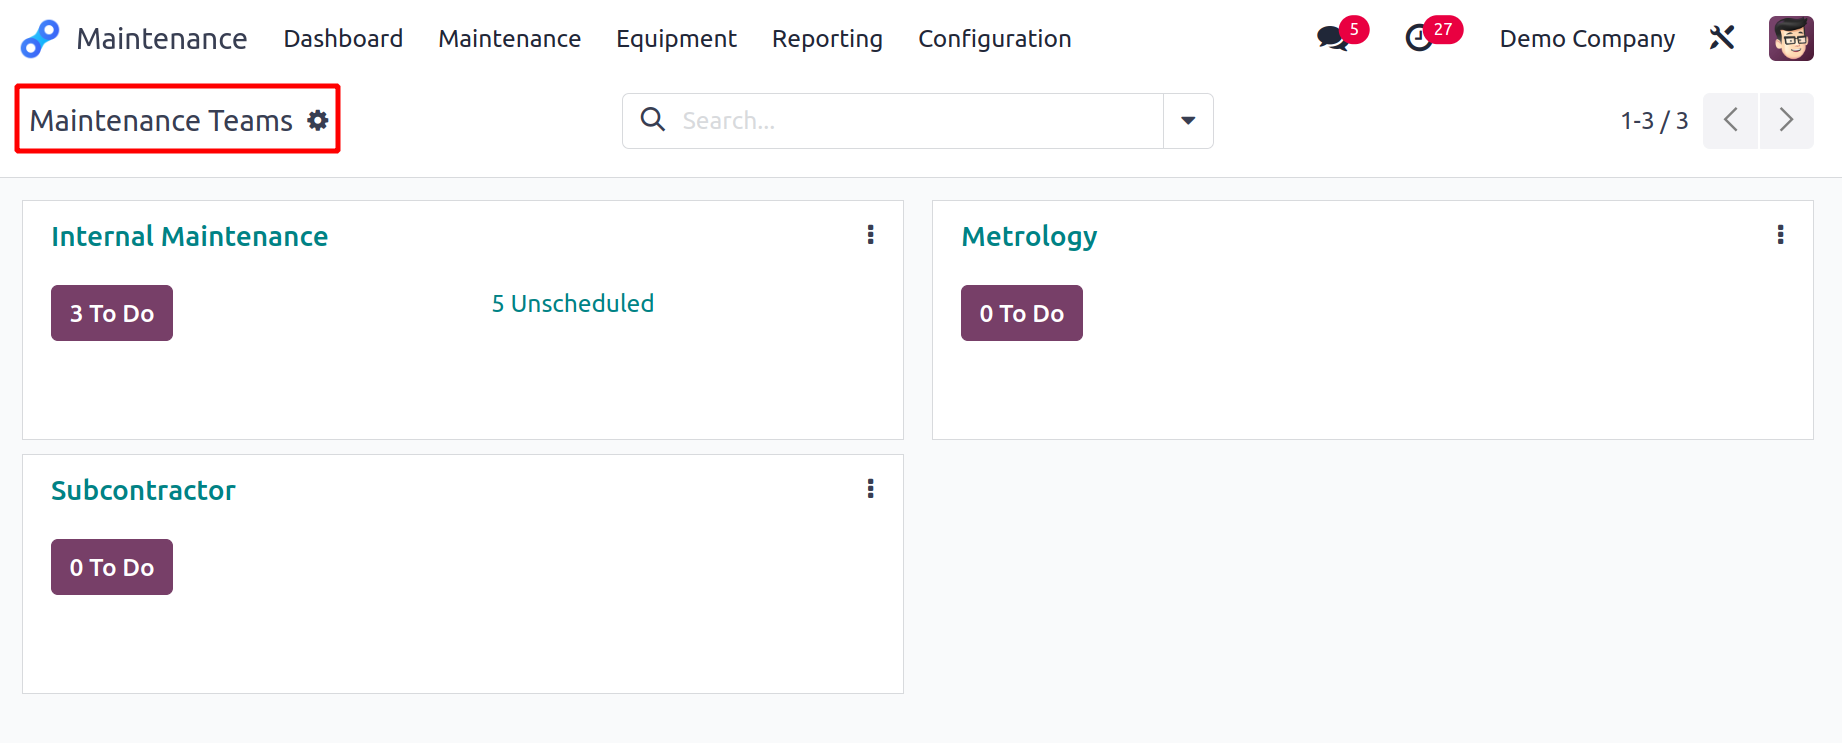
On each maintenance team, you can check how many requests there are to be completed. You
can click on the three tiny vertical dots that are located in the upper right corner of
each tab to access additional operation tools.
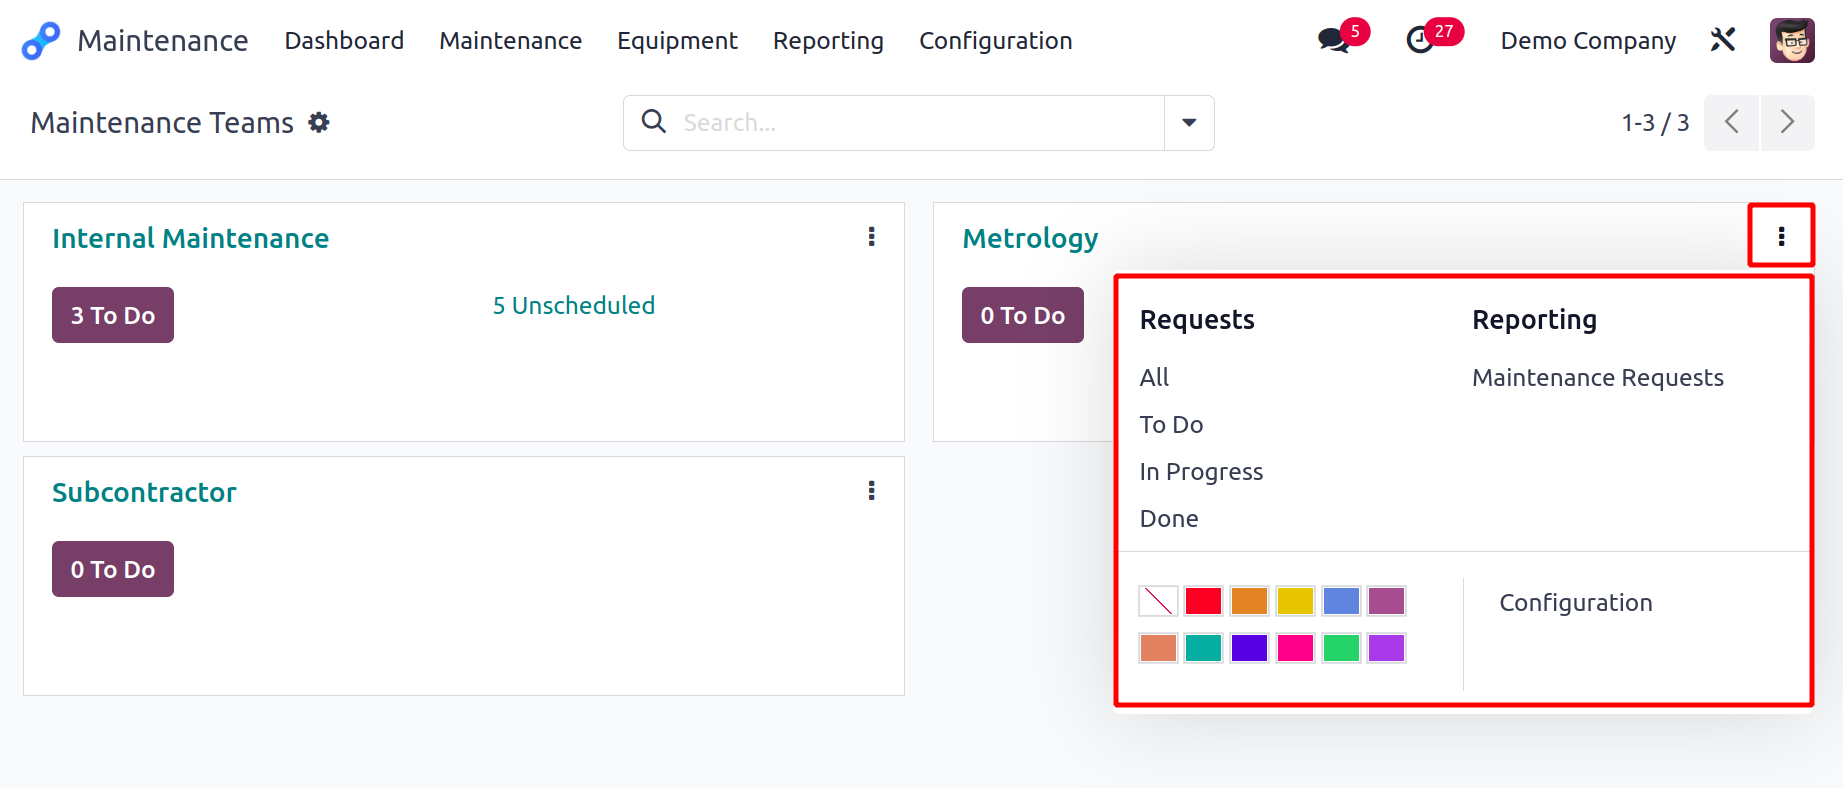
The maintenance requests can be seen using the menu bar in the following order: All, To
Do, In Progress, and Done. You can obtain the Maintenance Requests report with the help
of the reporting tool. Use the Configuration option to make any changes you wish to a
maintenance team.
You can select the Maintenance Teams option from the Configuration menu of the module to
start a new maintenance team. This will launch a new window with a list of teams that
have already been set up for maintenance.

It's simple to form a new team. A new line will be added to the existing list when you
click the New button, as illustrated below.

The Team Name, Team Members, and Company may be mentioned here. Once these fields are
filled out, your new maintenance crew is prepared to start working.
Equipment
Equipment is required for maintenance activities, and equipment records must also be
kept. You can compile a list of every piece of maintenance equipment utilized by your
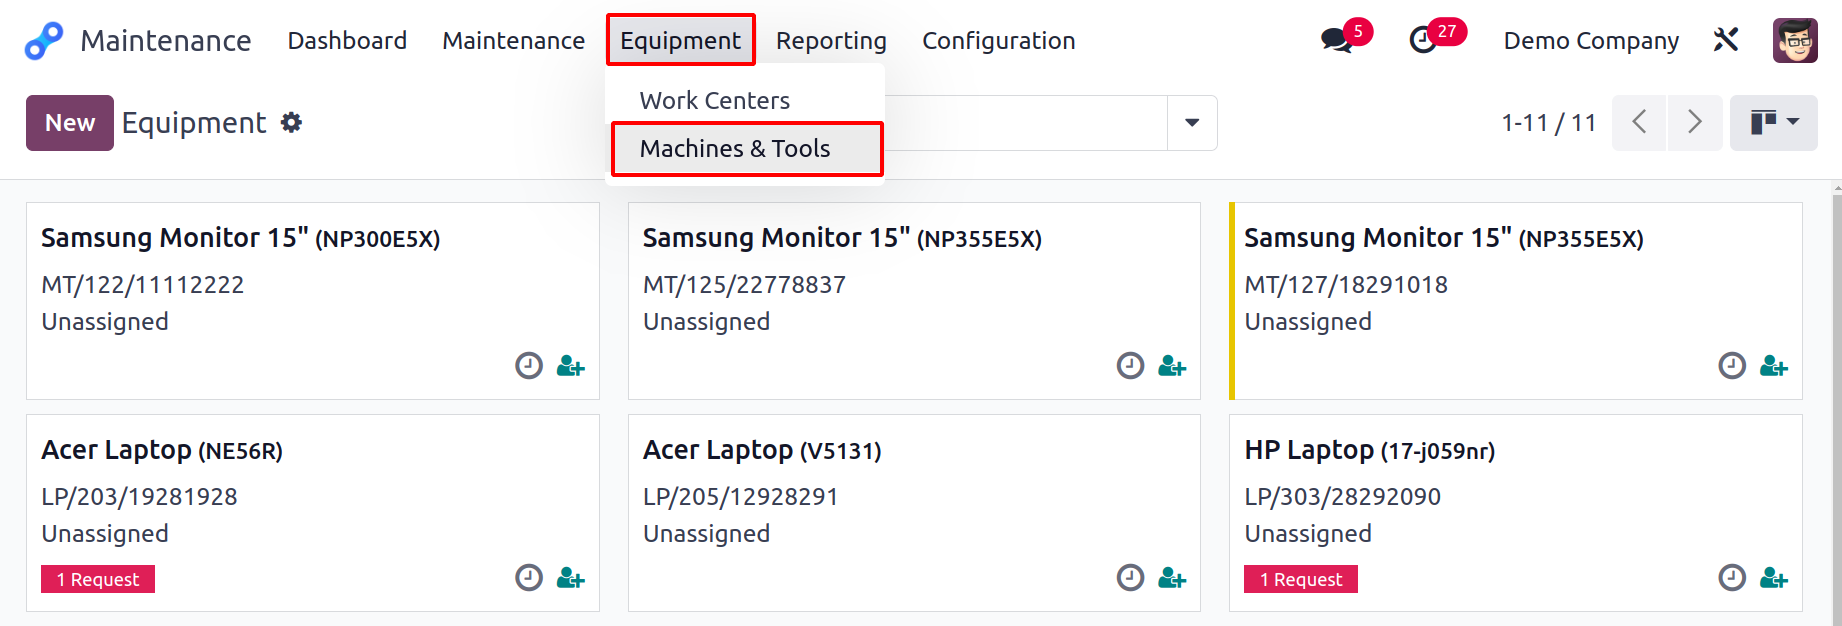
business using the Machines & Tools option found in the Maintenance module. This option
will be accessible through the module's Equipment menu.
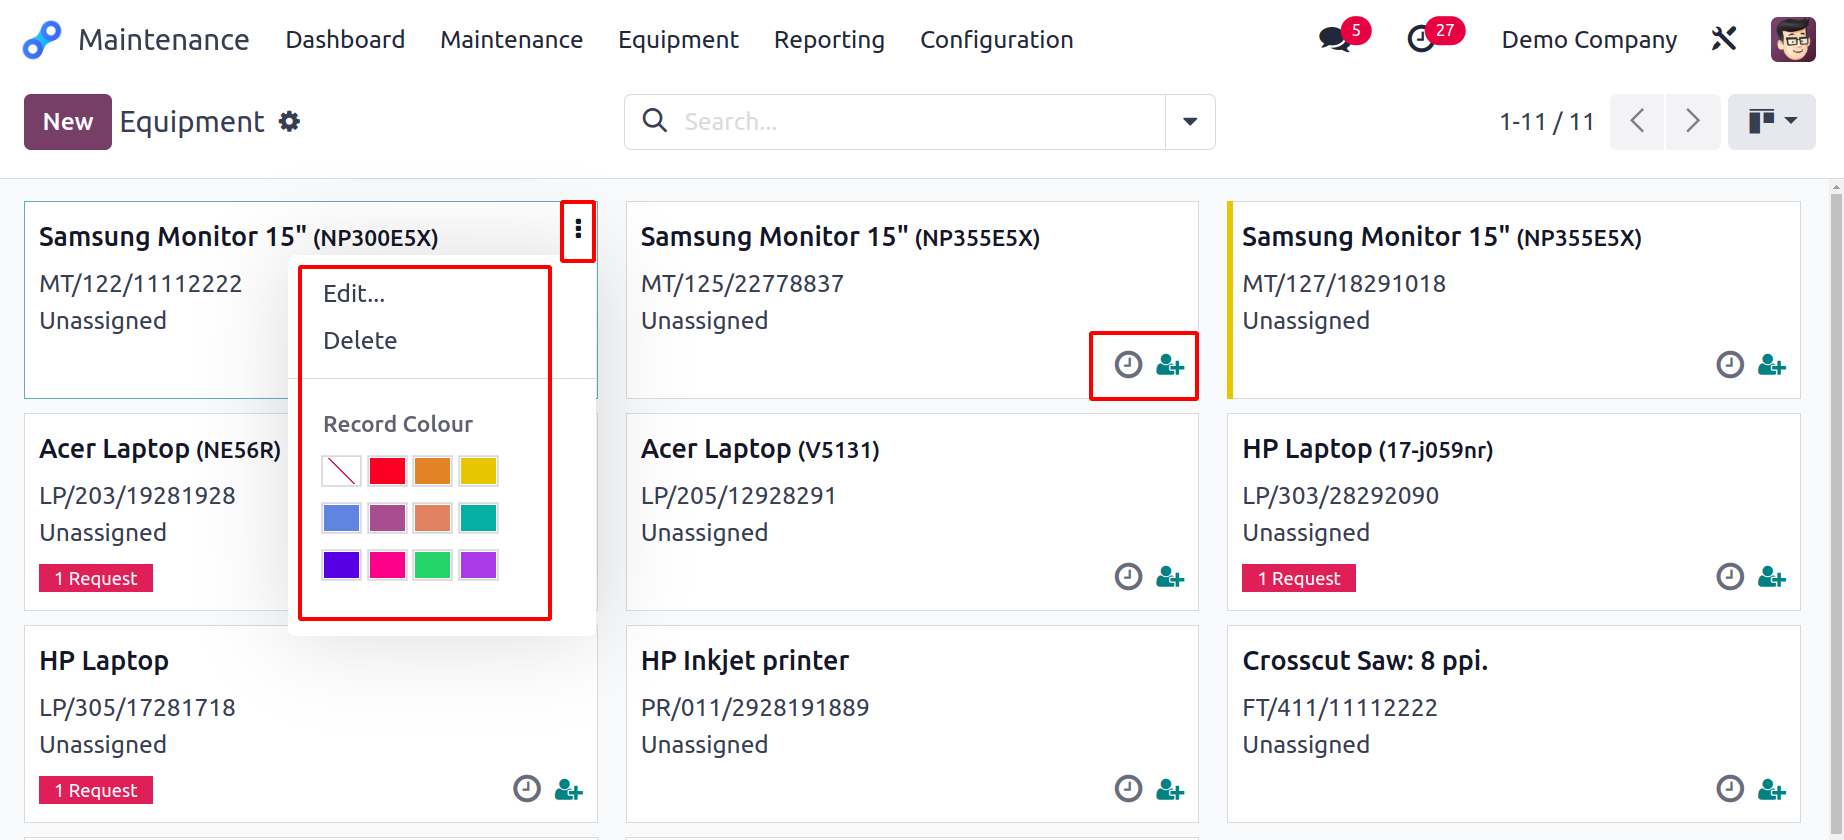
You can see every piece of configured equipment in your firm in the platform's Kanban
view. The Edit and Delete buttons for the corresponding operations are provided by the
tiny three-dot icons on each equipment tab.
Default filters like My Equipment, Assigned, Unassigned, Under Maintenance, Unread
Messages, and Archived are available. Equipment can be designated for use by specific
staff members or departments by using the Used By option found inside the form view.
This can be specified while constructing equipment in the form.
Equipment can be grouped by technicians, categories, owners, vendors, employees, and
departments using the Group By tool. You may set up several activities for the equipment
using the tiny clock icon.
You will be sent to a new settings window as seen below after clicking the New button.
You can specify the Name of the apparatus in the designated space.
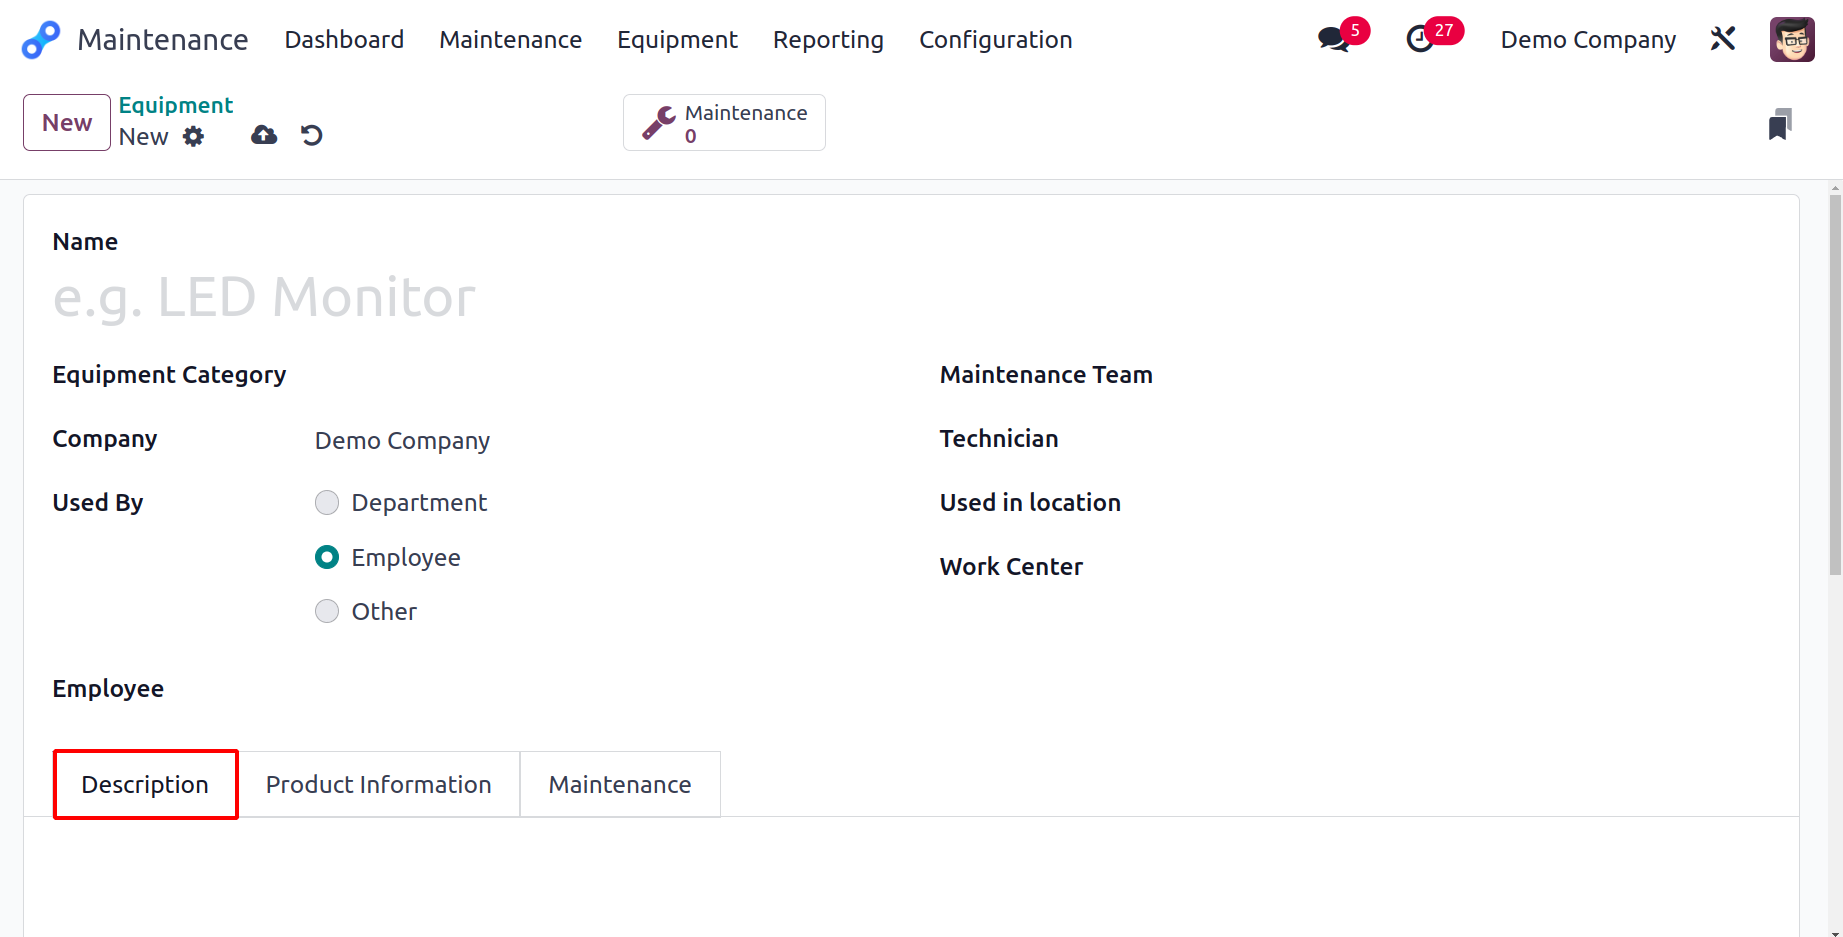
From the menu, pick the appropriate Equipment Category. The appropriate field will
automatically contain the Company name. You can identify who this equipment belongs to
in the Used By column. Department, Employee, or other are the options. You will be given
an additional space to define the Employee or Department based on the choice you choose.
By mentioning them in the provided space, you can now assign this equipment to a certain
Maintenance Team. Mention the Technician in charge of this equipment, the Assigned Date,
the Scrap Date, the Used in Location, and the Work Centre in the appropriate fields. You
may give a description of the equipment under the Description tab.
Now navigate to the Product Information tab to enter the equipment's specifics. If
another business provides the equipment, the vendor's name and vendor references may be
mentioned.
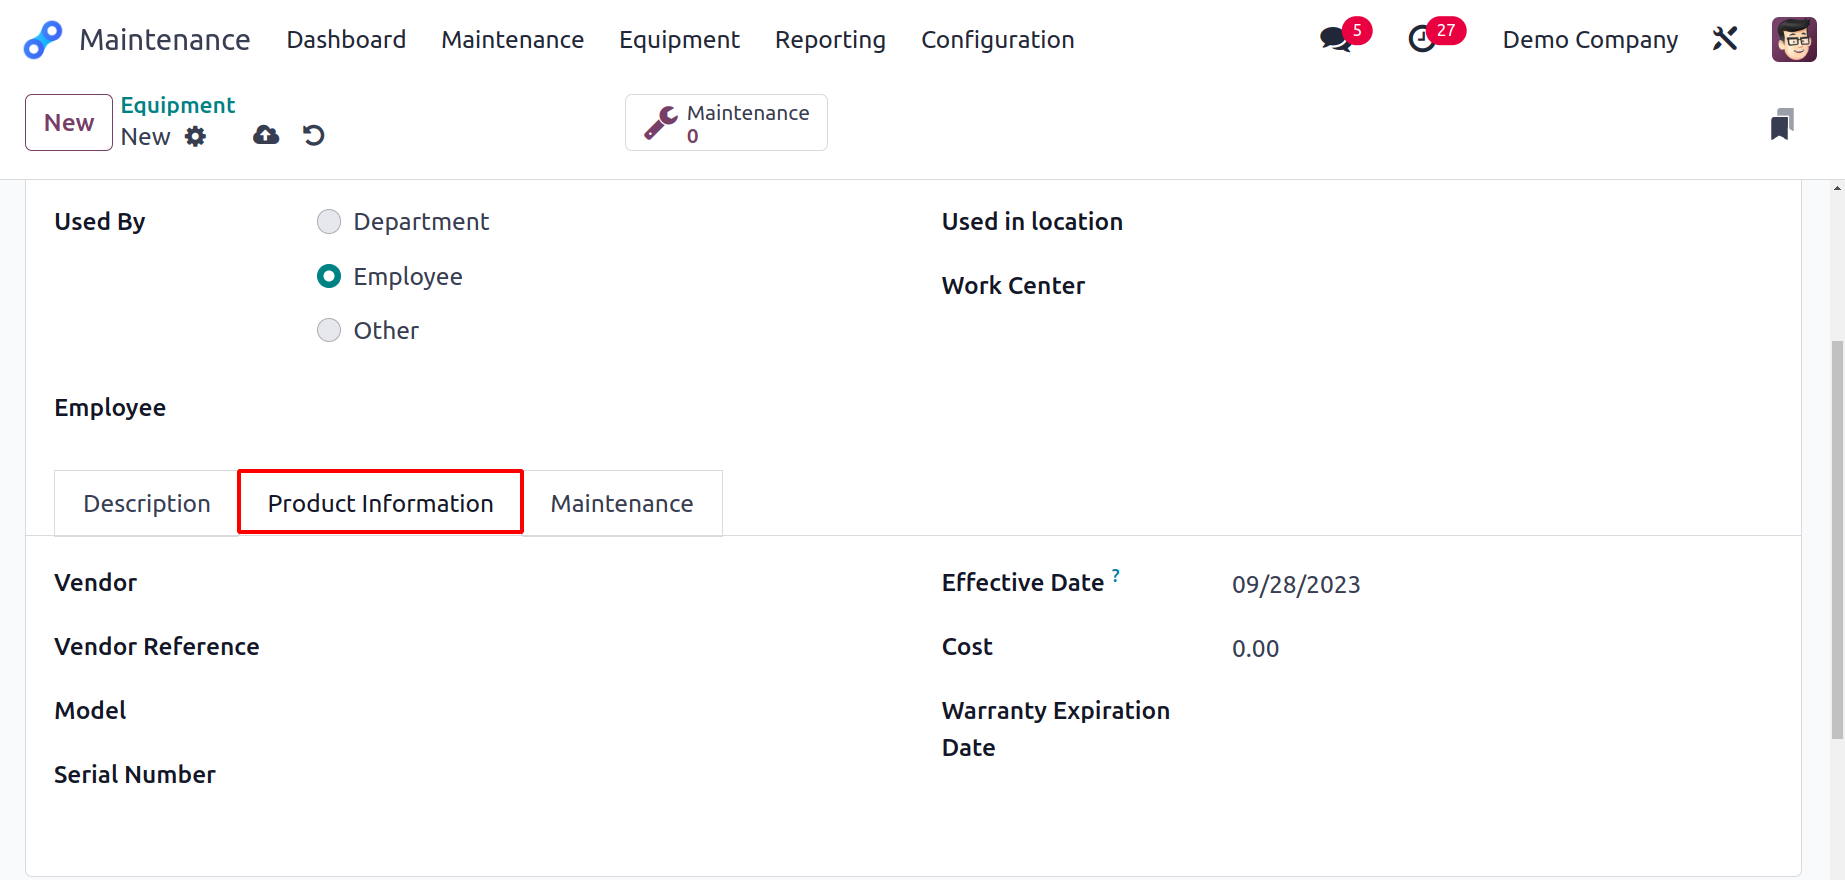
You can put the equipment's Model and Serial Number in the appropriate fields. The
equipment's effective date is indicated by the phrase Effective Date. This day can be
used to calculate the average interval between failures. In the relevant areas, enter
the cost and warranty expiration date.
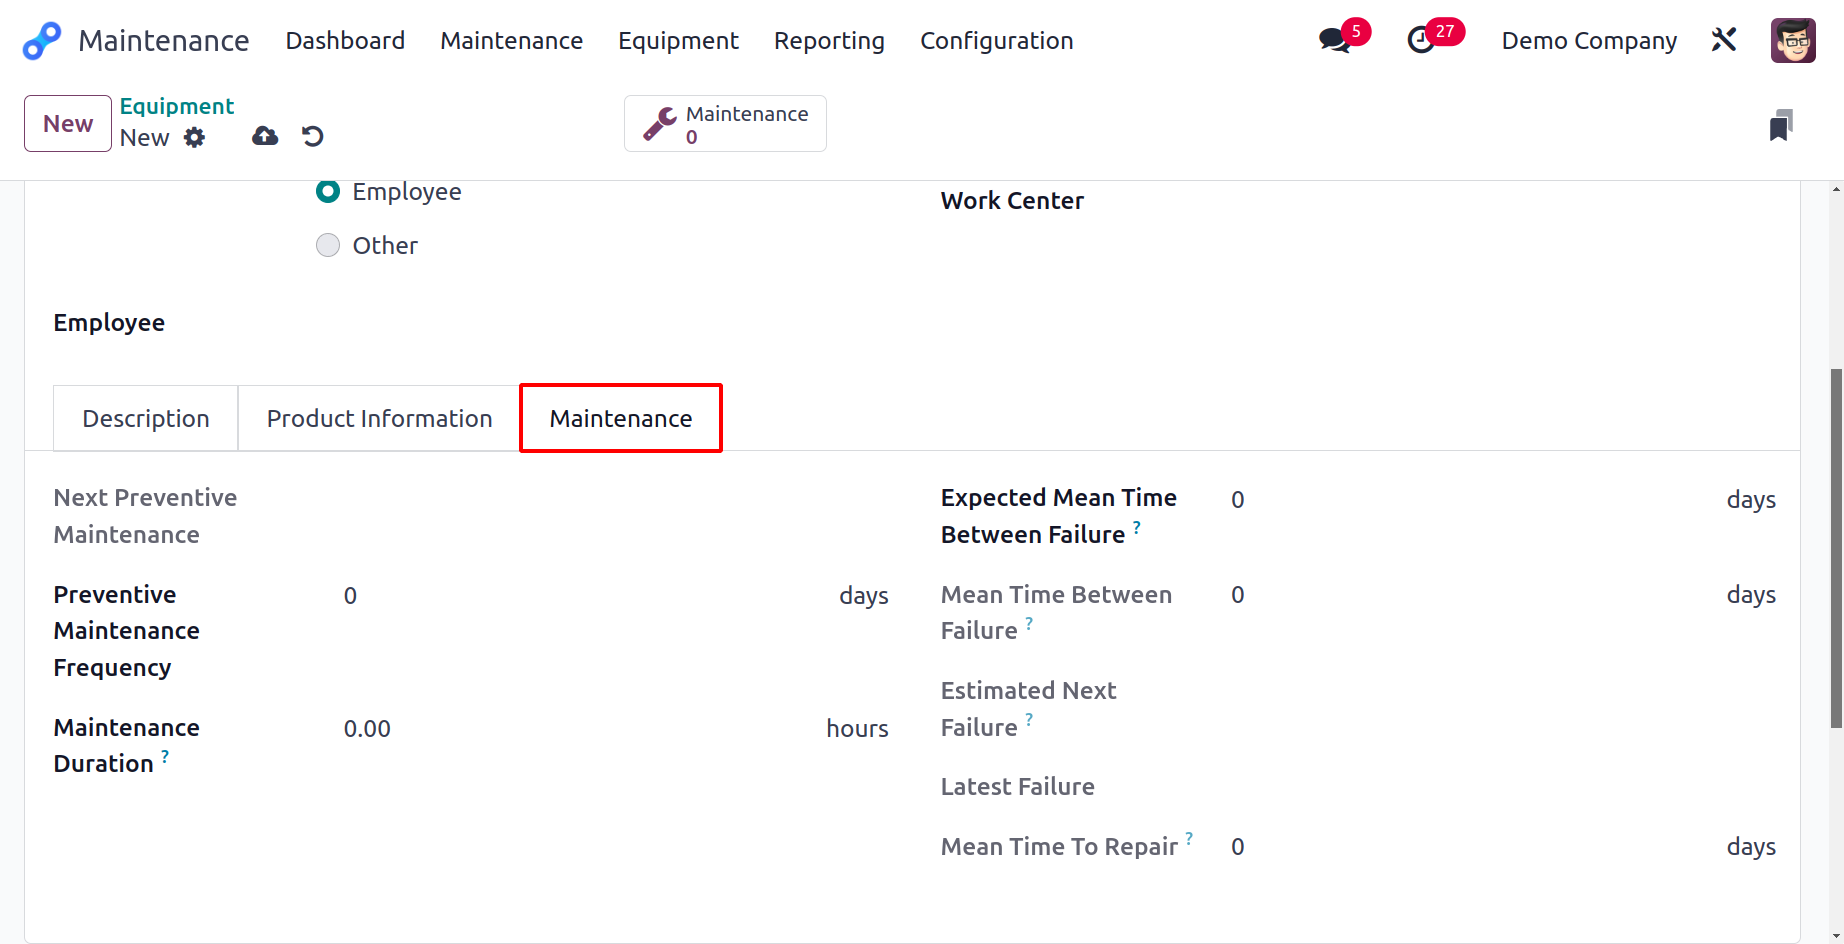
The Next Preventive Maintenance field will provide the equipment's next action date.
Based on the Preventive Maintenance Frequency you enter in the relevant area, this will
be accessible. This equipment's maintenance duration can be defined in hours. Days can
be added to the expected mean time between failures. The Mean Time Between Failures will
be calculated automatically based on the Effective Date you selected. By taking into
account the most recent failure date and the mean duration between failures, the
Estimated Next Failure will be displayed. The supplied field will display the most
recent failure date. The Mean Time to Repair field displays the typical amount of time
needed to fix the equipment. The equipment configuration will be finished once all the
required information has been specified.
Equipment Categories
You can choose the Equipment Categories option from the Configuration menu to establish
several categories for the equipment. This window contains a list of the equipment
categories that have already been configured.
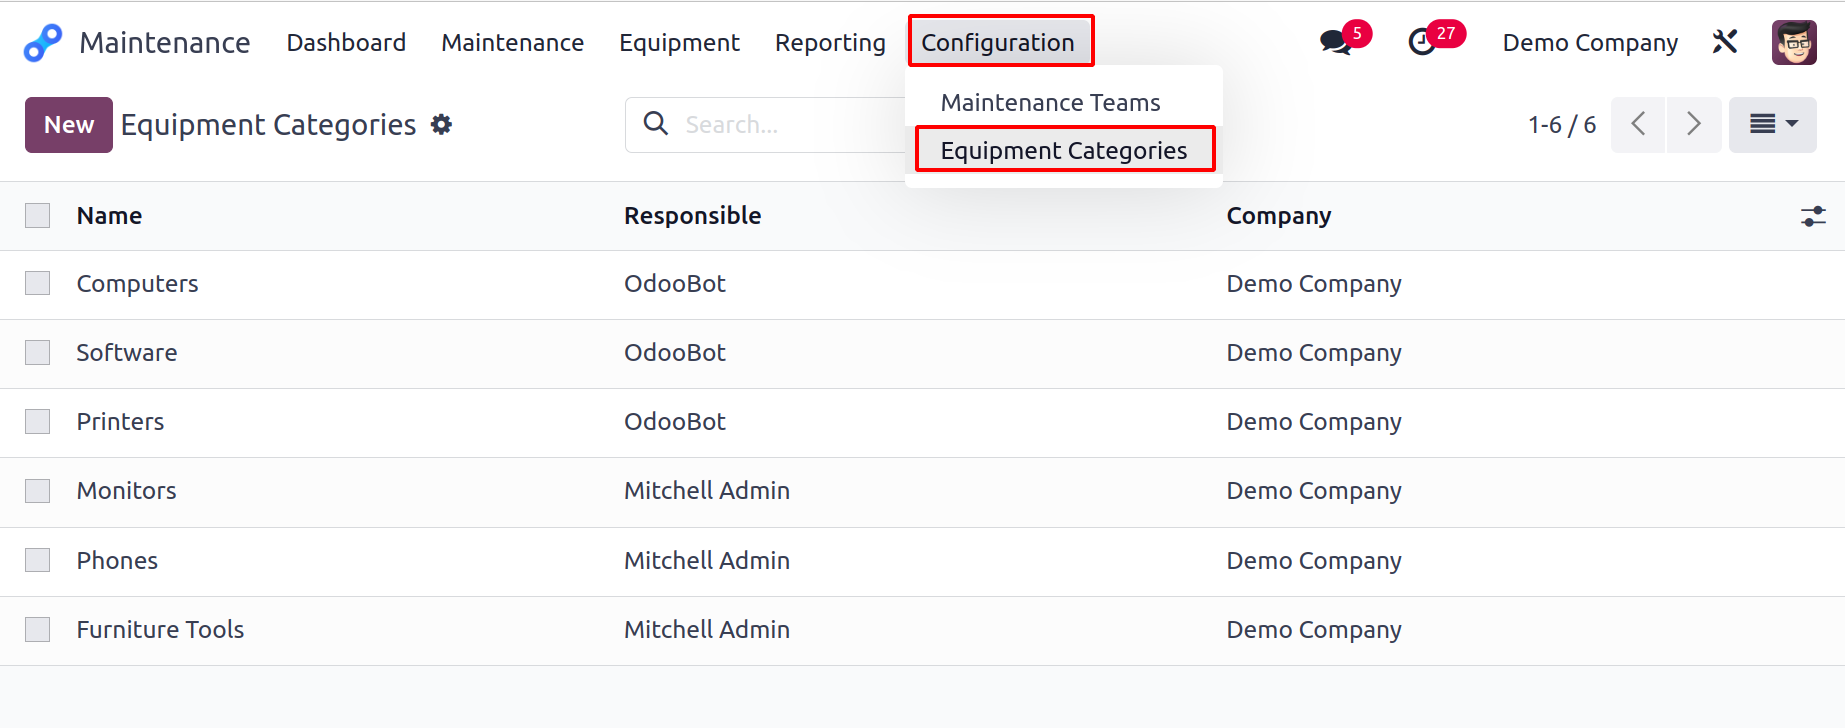
The Name, Responsible, and Company of the Equipment Category will be listed on the list.
Select "New" from the menu. This will bring up the new window you see below. In the
space provided, you can enter the Category Name.
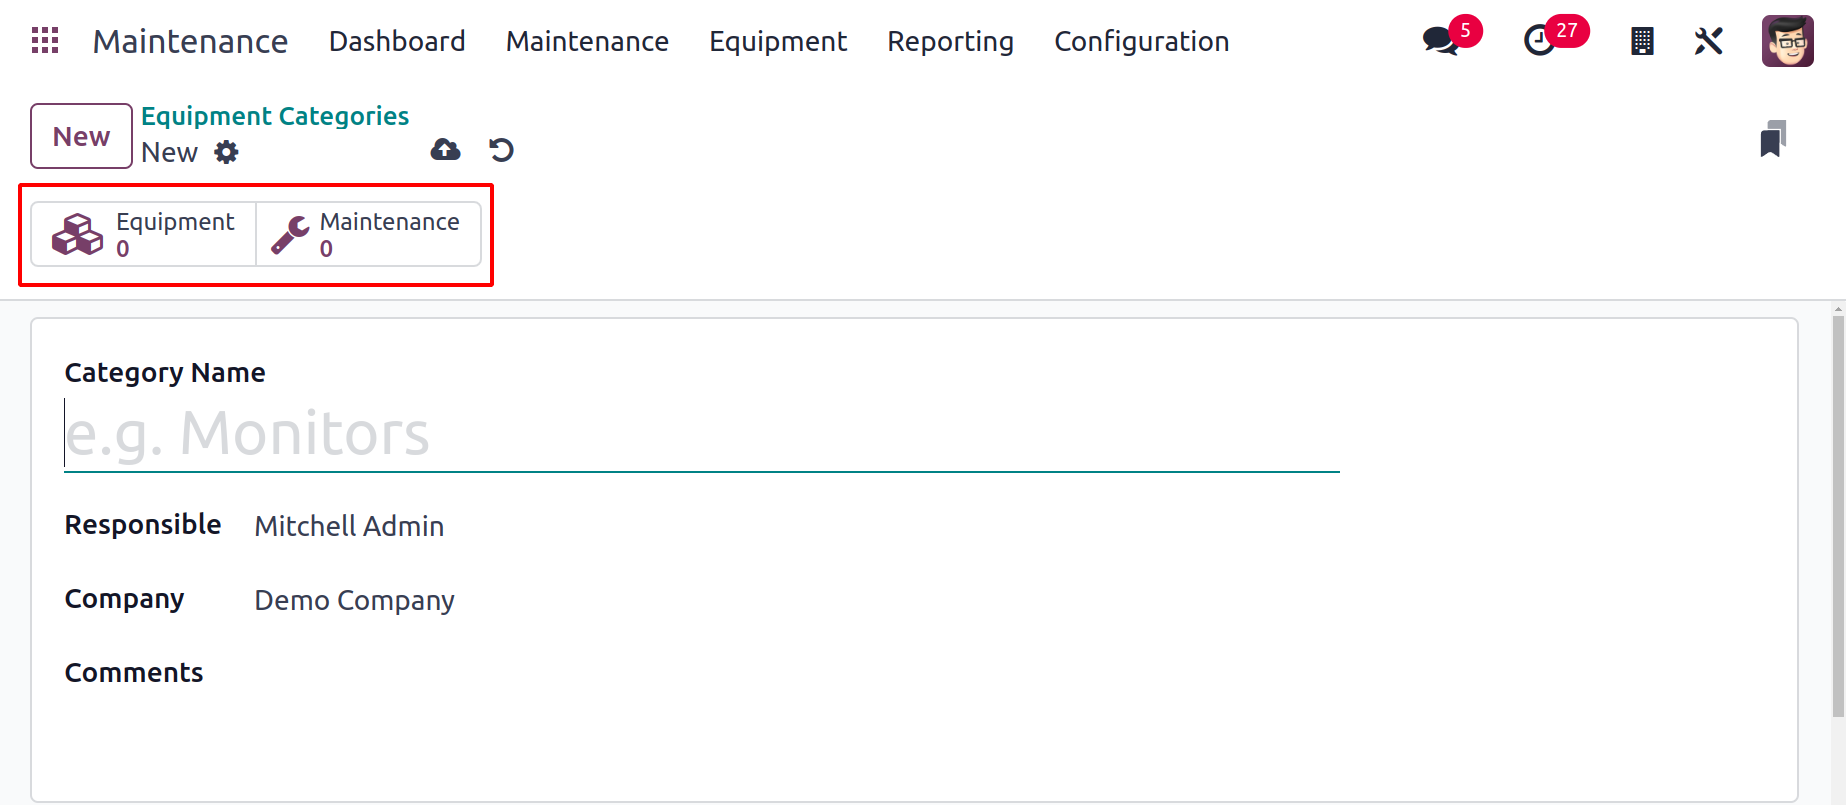
Put the name of the employee responsible for this category of equipment in the
Responsible field. The provided field will include the Company name. The Comments area
can be used to add any information pertaining to this equipment category. The Equipment
smart button can be used to obtain information about the equipment assigned to this
category after the equipment category has been configured. The list of maintenance
requests created for the equipment falling under this category will be displayed by the
Maintenance smart button.
Maintenance Requests
You can create a maintenance request for the equipment from the Maintenance Request
option when it experiences a failure. Below is a screenshot of this platform's Kanban
view.
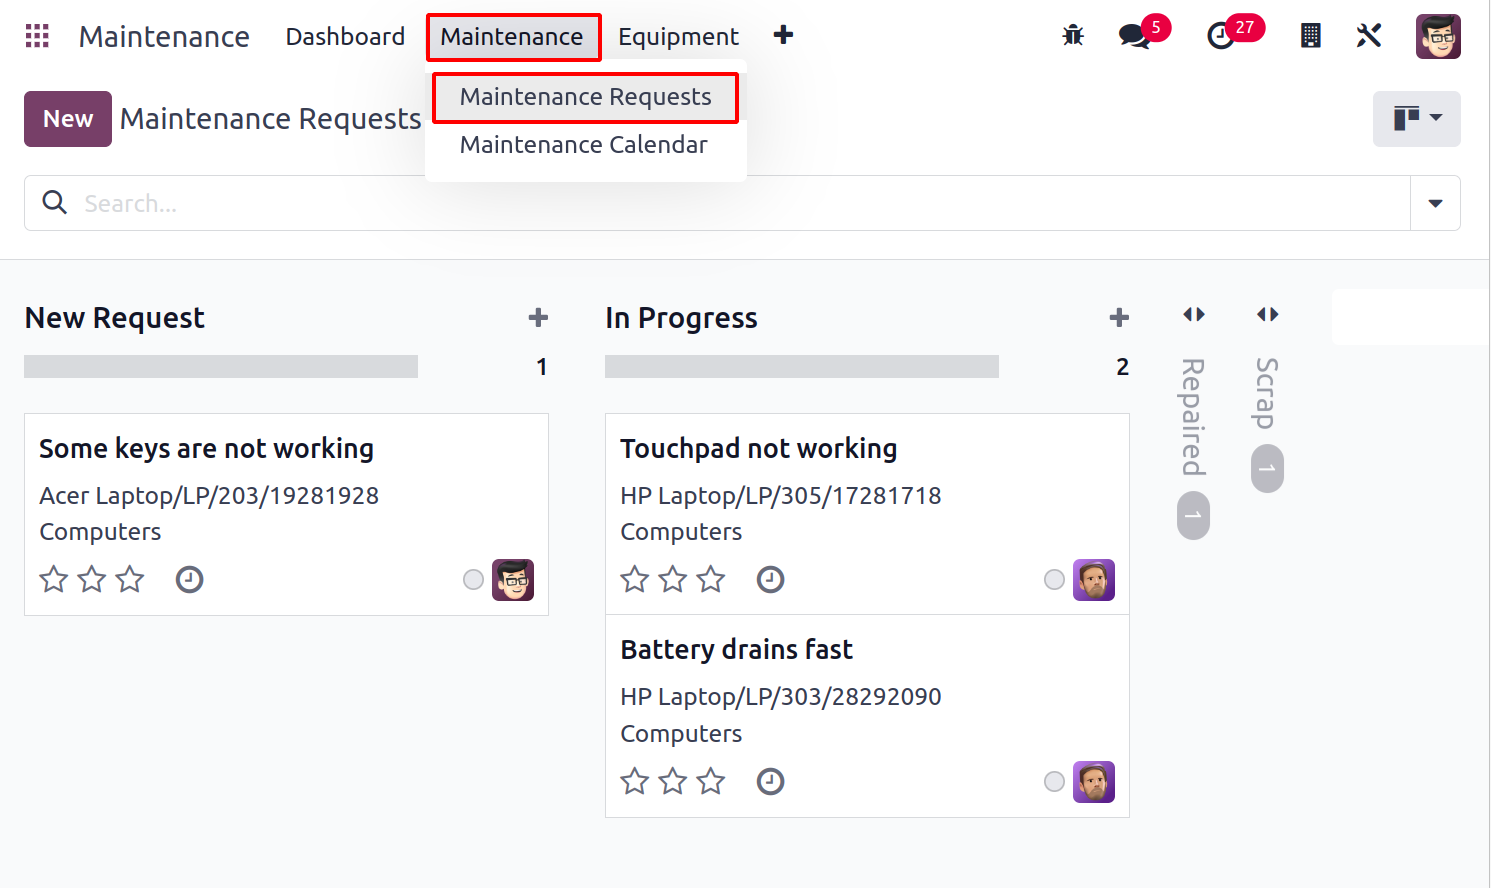
The maintenance requests allocated to various phases are seen here.
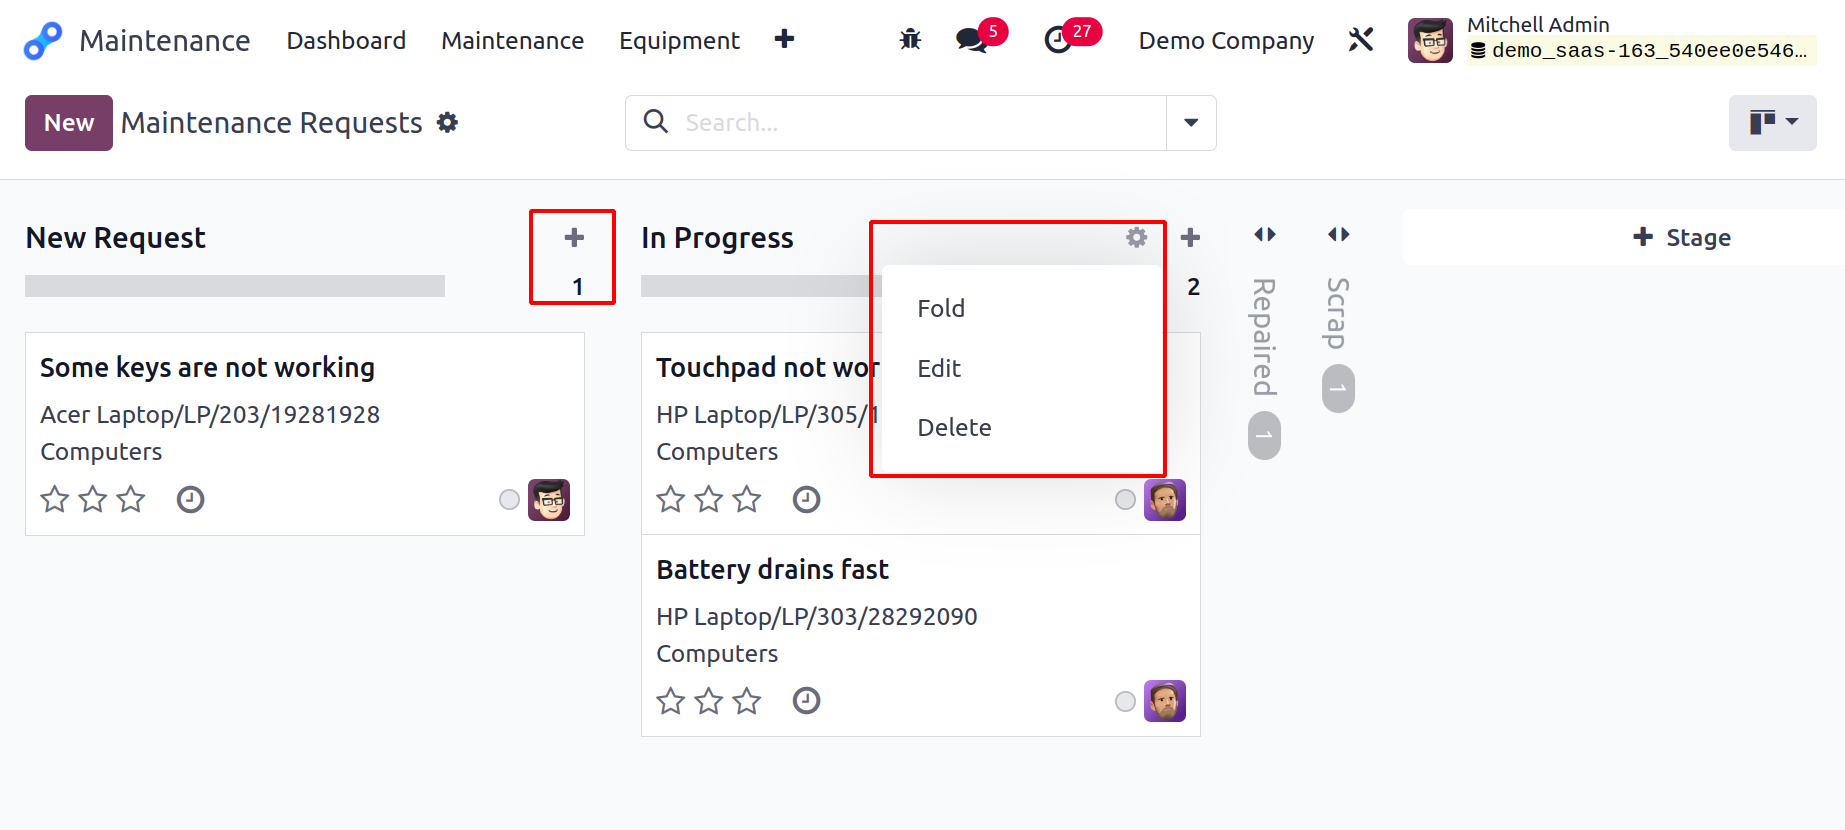
The plus icon is located to the right of each stage's title, and clicking it will allow
you to add a new request to that stage. You will be given a space to include the
request's title. You click the Add button to include a new request in that stage, and
you click the Edit button to change the request's specifics.
Each stage's title has a settings icon that offers the ability to Fold, Edit, and Delete
the specific stage.
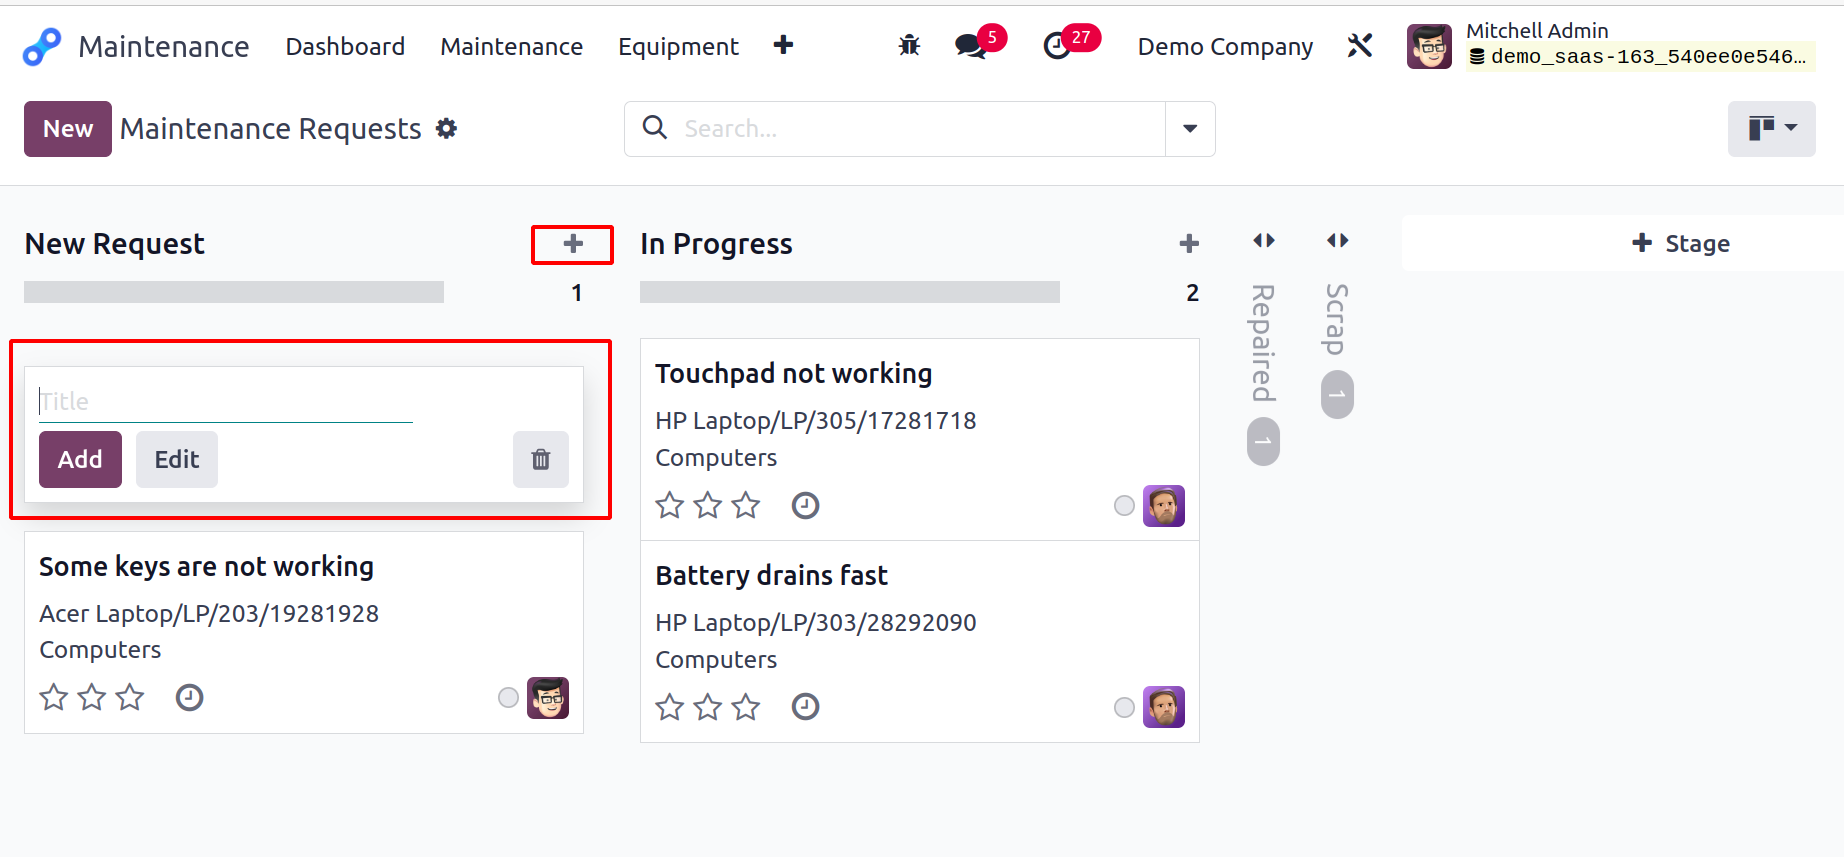
You can use the +Stage option to add a new stage to the Kanban view. This will enable you
to do so.
The request can be given a higher priority according to emergencies using the stars. You
can schedule tasks for the maintenance request using the tiny clock indicator. On the
maintenance request, you can see the allocated employee, who is marked in the picture.
When you click on it, a chat window will appear where you may start a conversation with
the corresponding employee.
Now make a new maintenance request by using the New button.
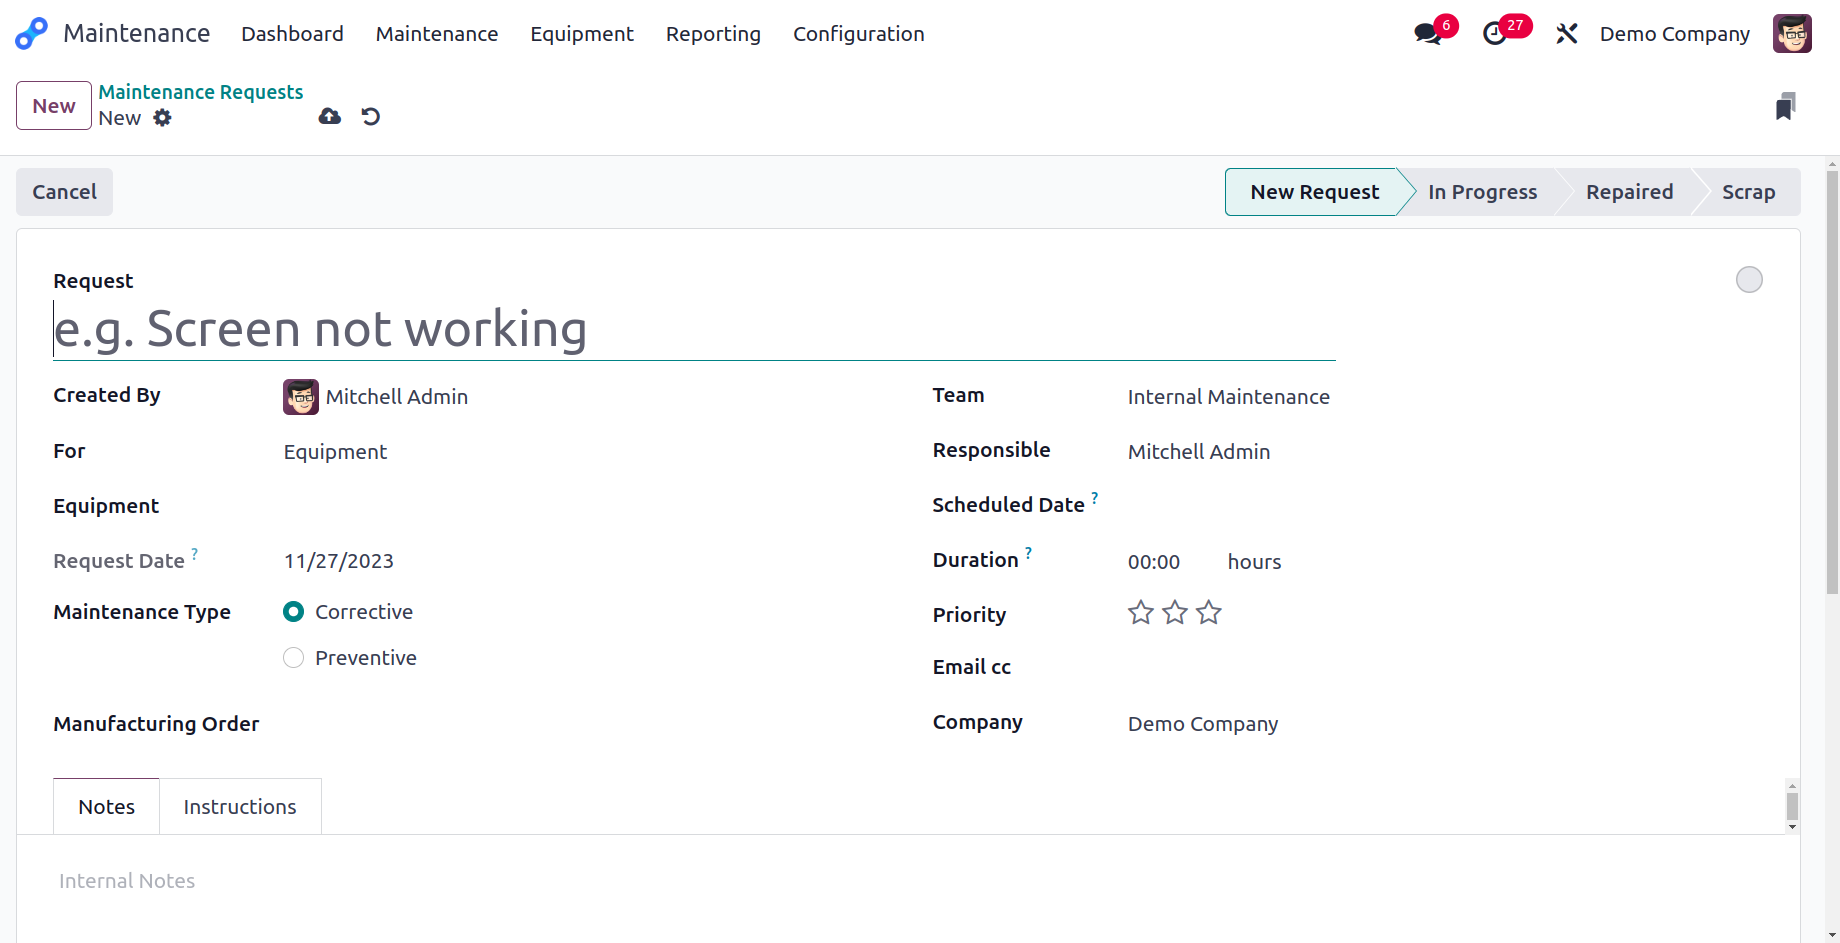
The provided space allows you to provide the title of the maintenance request. The
Created By field contains the name of the employee who is creating the request. Mention
the Equipment id that must be kept up in the appropriate field. The Request day will be
the day on which you submit the request. In general, Odoo17 offers two sorts of
maintenance requests: Corrective and Preventive. To guard against any unforeseen
failures of the equipment, preventive maintenance will be performed on a regular basis.
When an item of equipment malfunctions, corrective maintenance will be performed to fix
it.
Recurrent is a new field that will be added to the form if the Preventive Maintenance
Type is selected. It is then possible to add the Repeat frequency there.
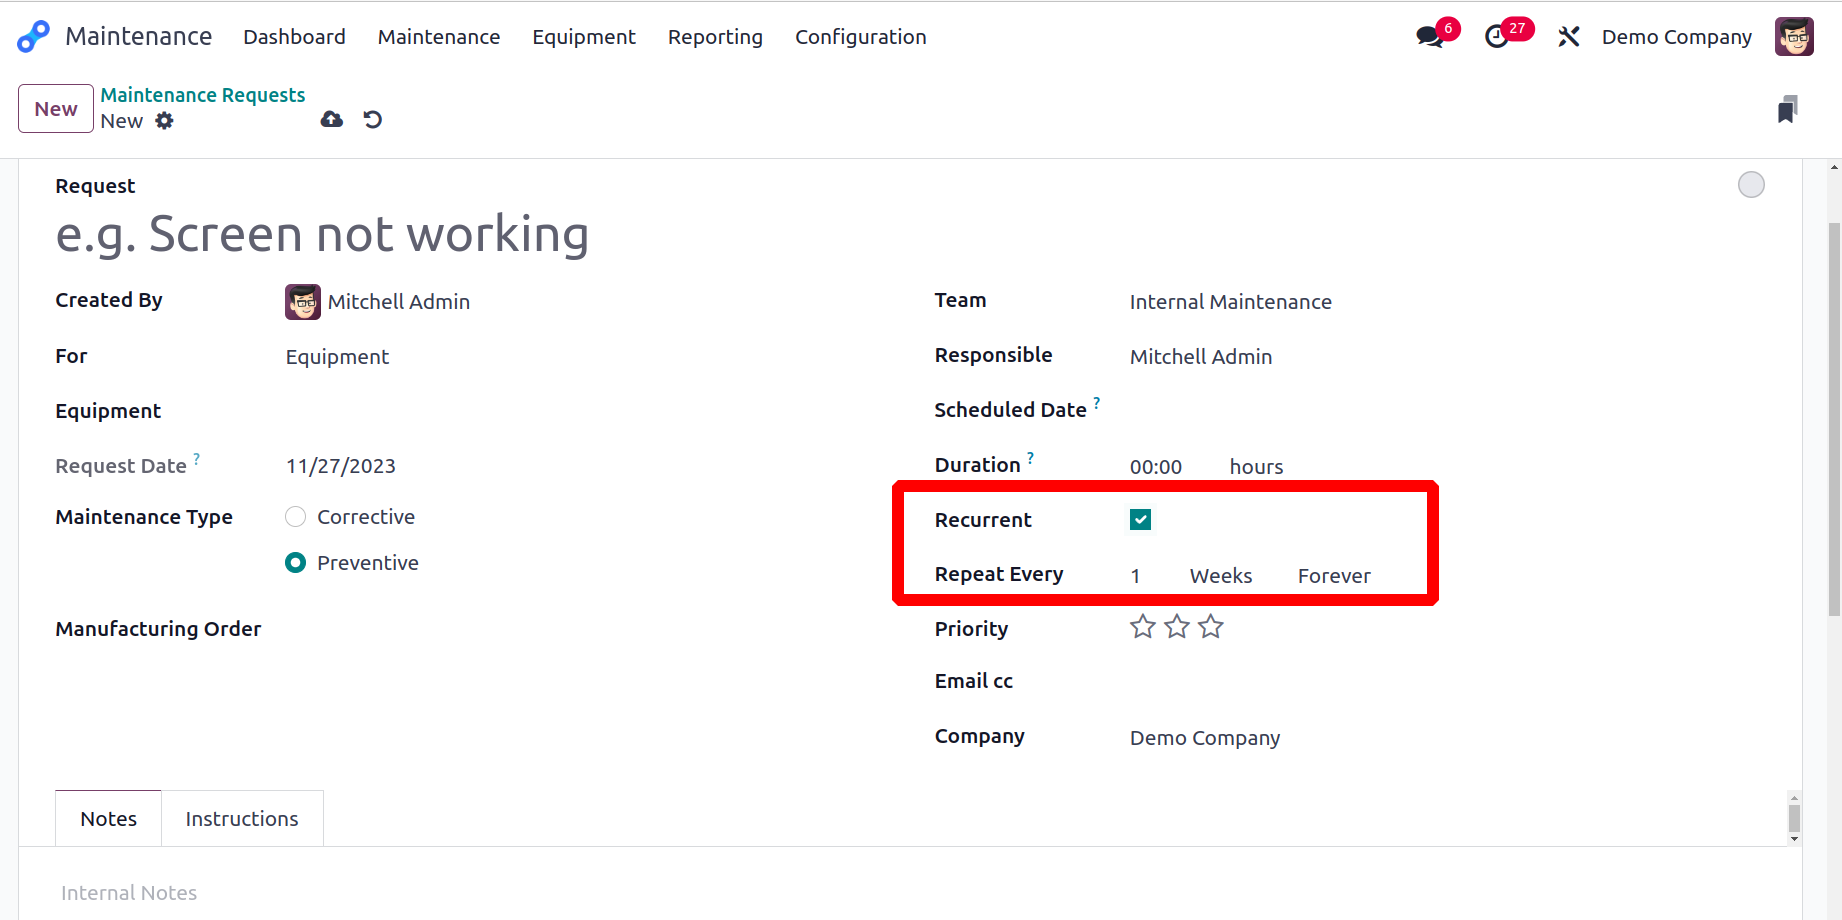
You might mention the equipment's Manufacturing Order in the request if you have it. In
order to acquire more information about the request, add a Description.
You can designate a team to take care of the equipment's upkeep in the Team field. The
Responsible in charge of this maintenance request should be mentioned. The Scheduled
Date field allows you to specify the day the team scheduled the maintenance. Hours can
be used to describe the length of the maintenance task. Use the stars to denote the
request's priority. The maintenance request is ready to be processed after adding Email
cc and Company to the appropriate fields.
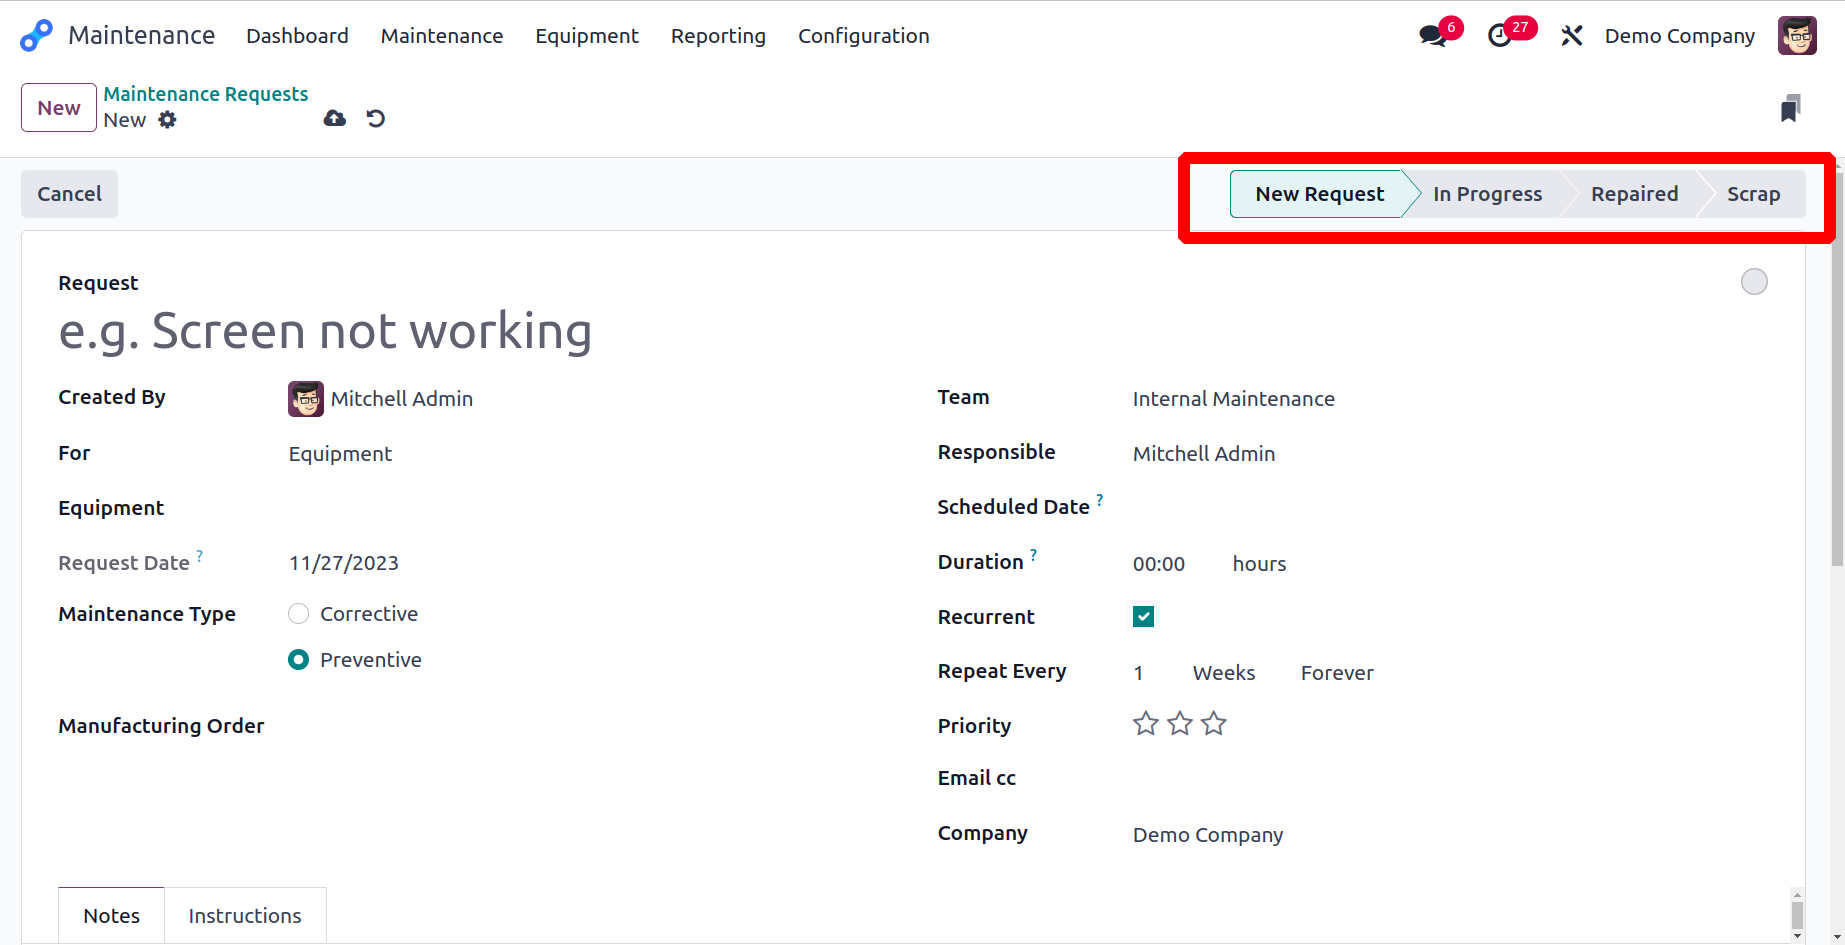
You can alter the request's stages based on how the procedure is going. The phases that
are used by default are New Request, In Progress, Repaired, and Scrap.
Maintenance Stages
You can add new phases for the maintenance requests using the Configuration menu of the
module. This will make it easier for you to organize the requests according to their
status. The platform will display the steps that have already been built, as illustrated
below.
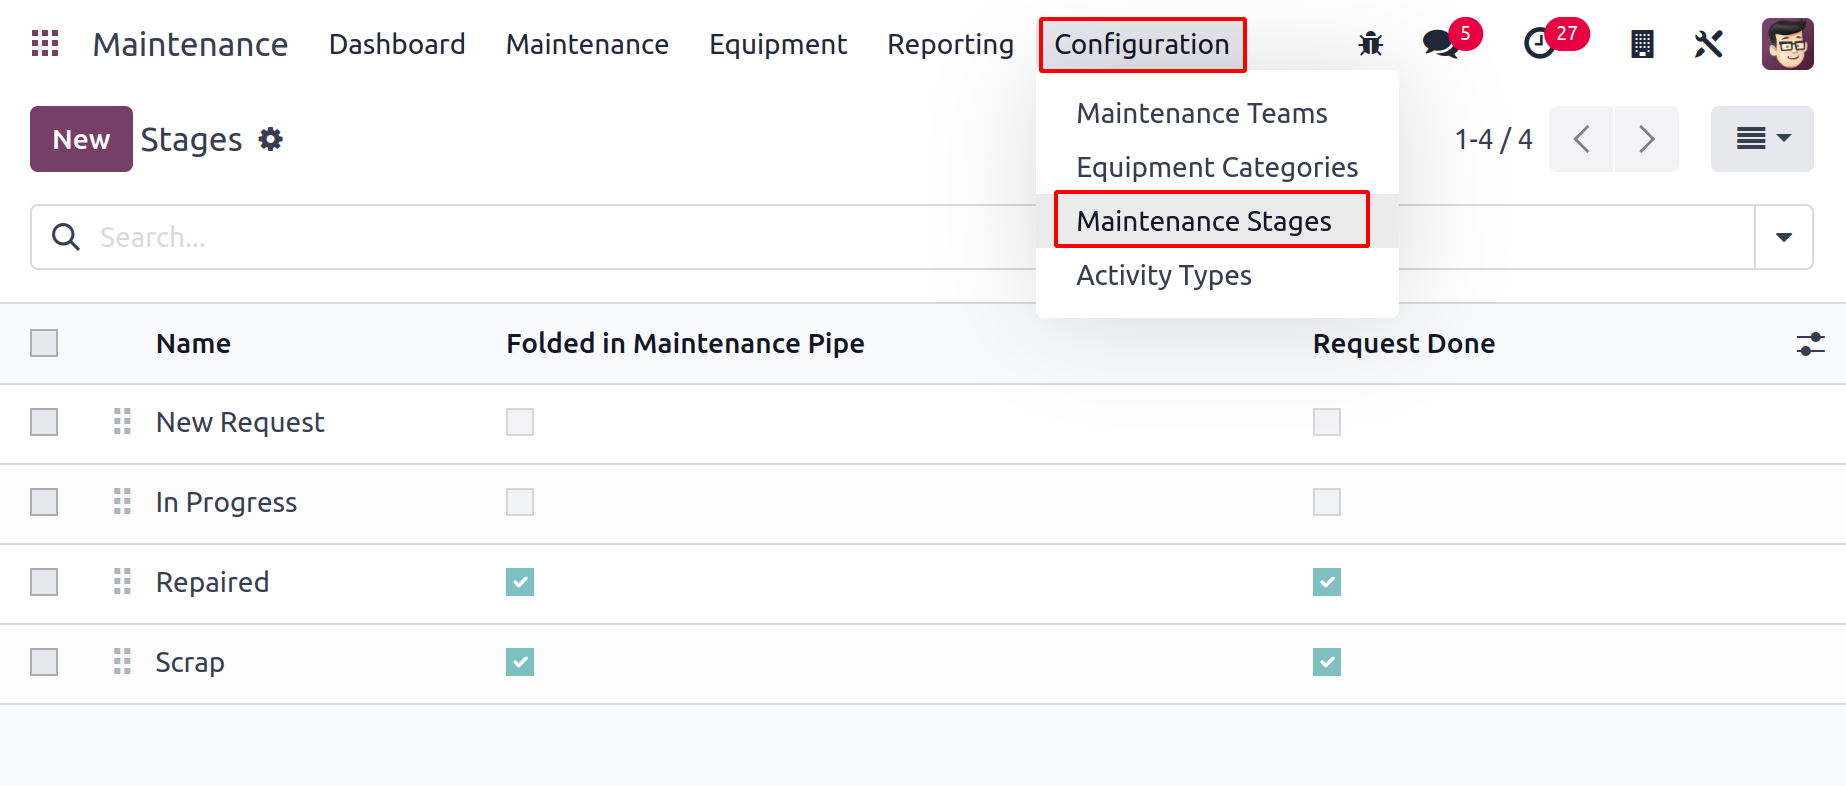
By selecting the New option, you may add a new line to which you can add the name of the
stage.
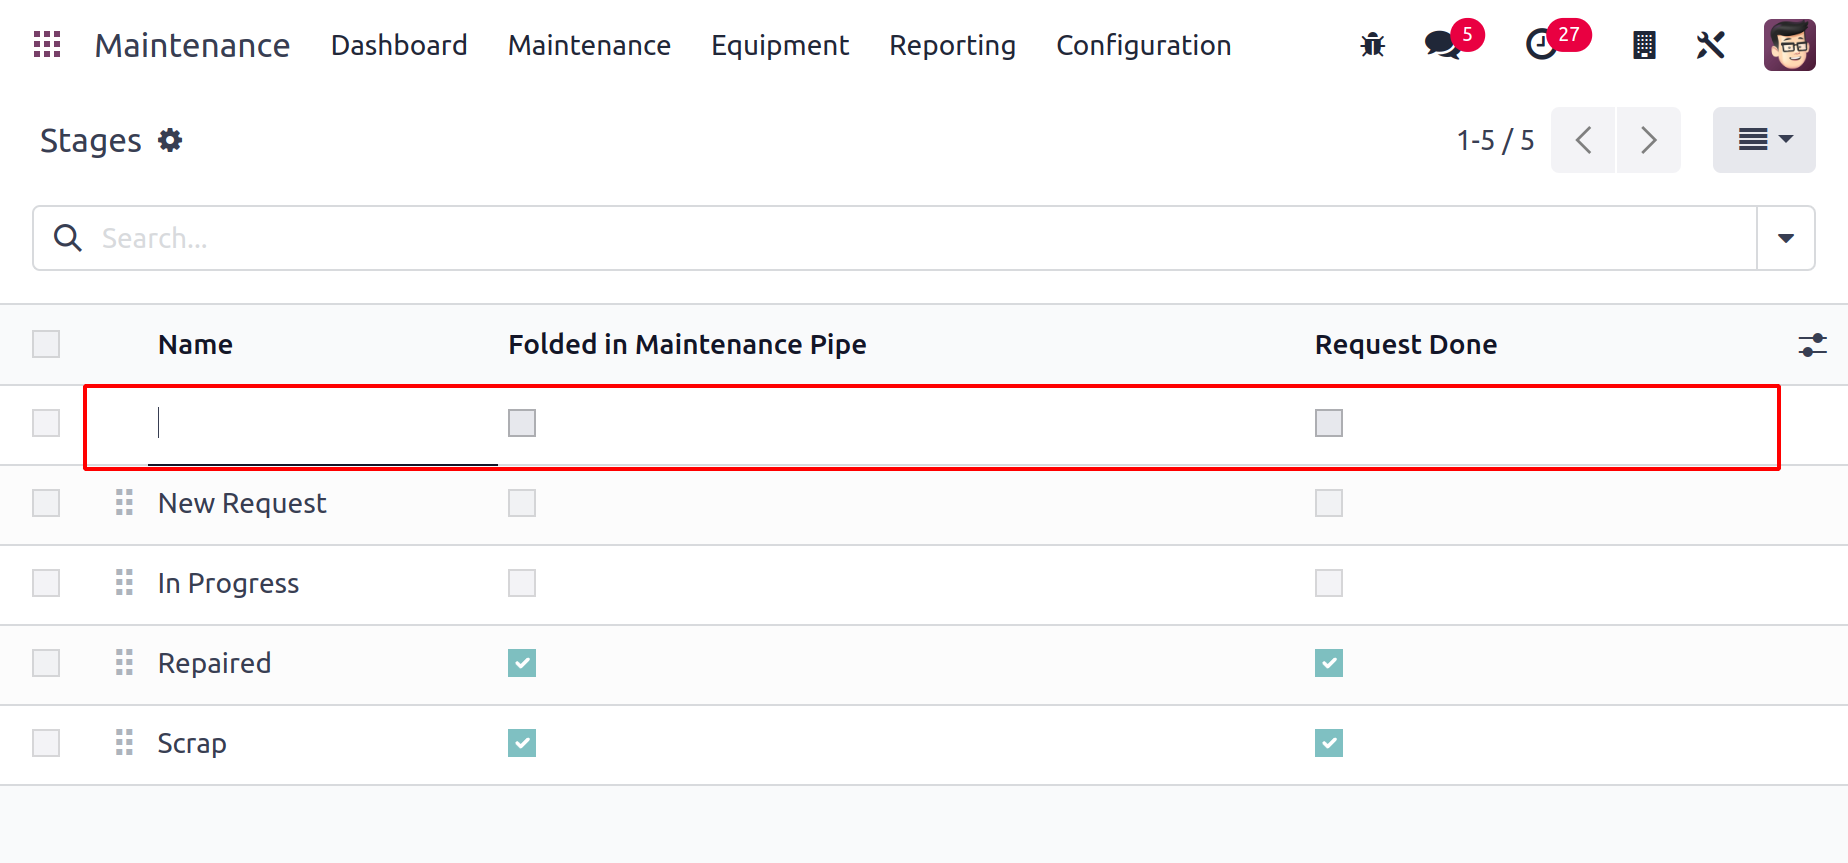
Here, you can enter the stage's name. You can turn on the Folded in Maintenance Pipe
field to fold this stage in the Kanban view of the Maintenance Requests. You can turn on
the Request Done field to mark the requests in this stage as completed.
Maintenance Calendar
All requests created in your module will be displayed in a calendar format via the
Maintenance Calendar option found under the Maintenance menu. The requests can be seen
by Day, Week, Month, and Year. Choose the appropriate calendar view for your needs. On
the calendar, which is displayed below, are the maintenance requests that are scheduled.
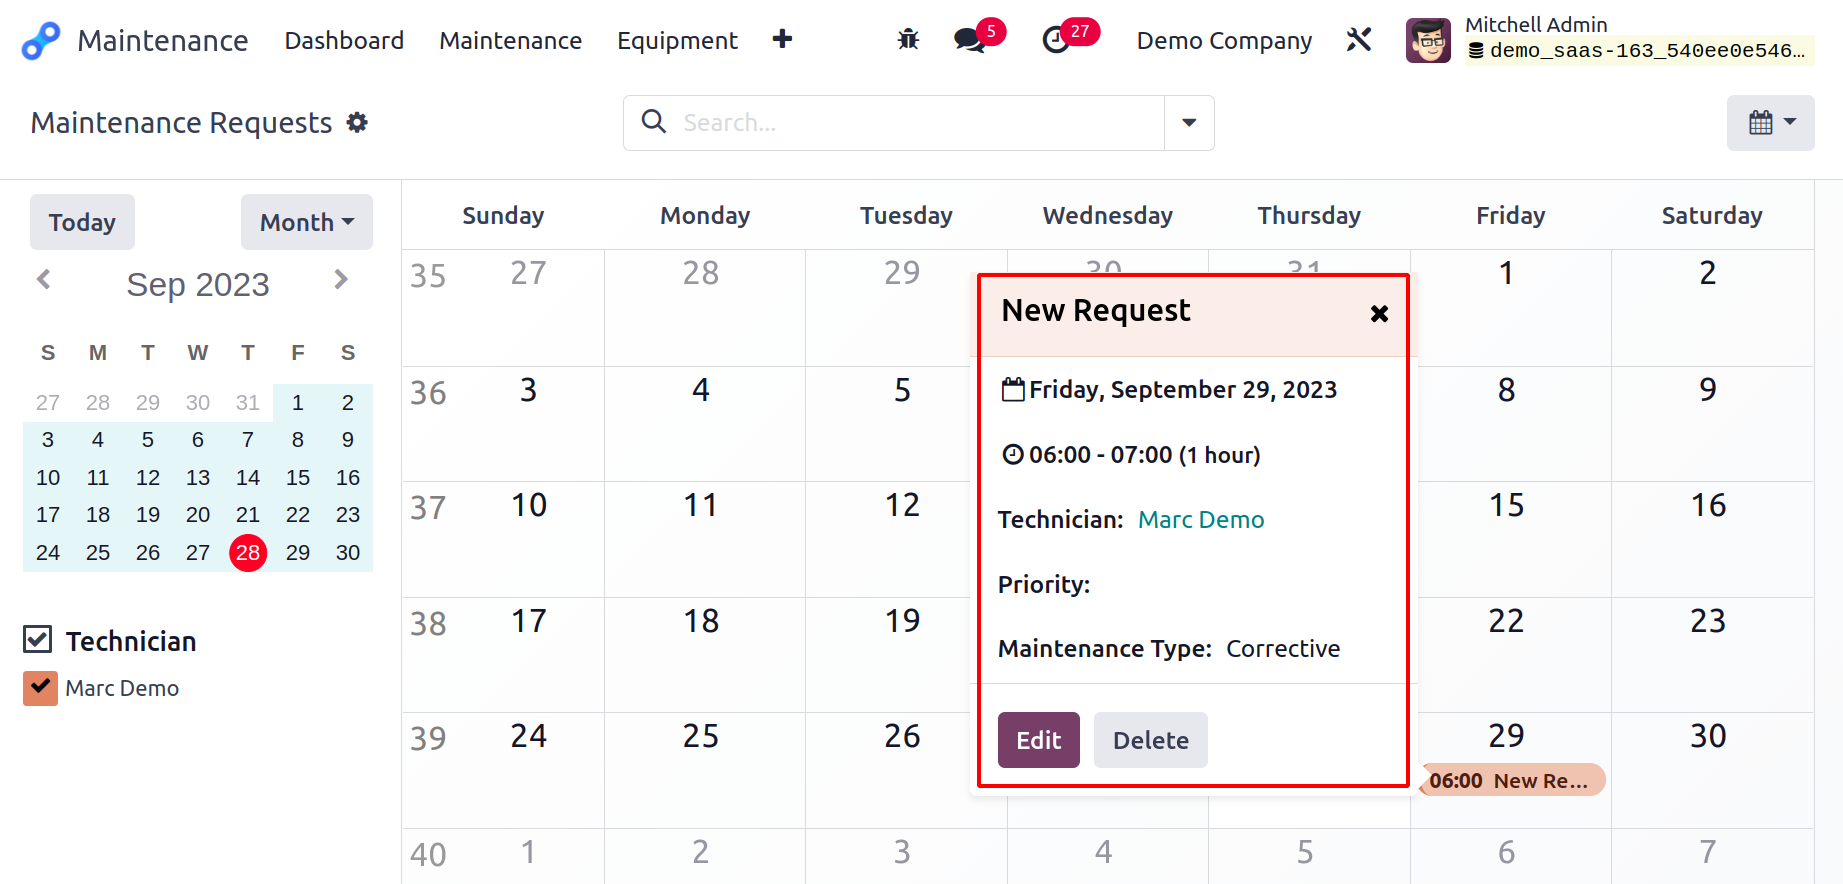
The scheduled date, time, technician, priority, and maintenance type will all be
displayed in the preview. A maintenance request can also be made via the calendar view.
You can do this by selecting the maintenance date that you want to plan. You'll see a
pop-up window similar to the one below.
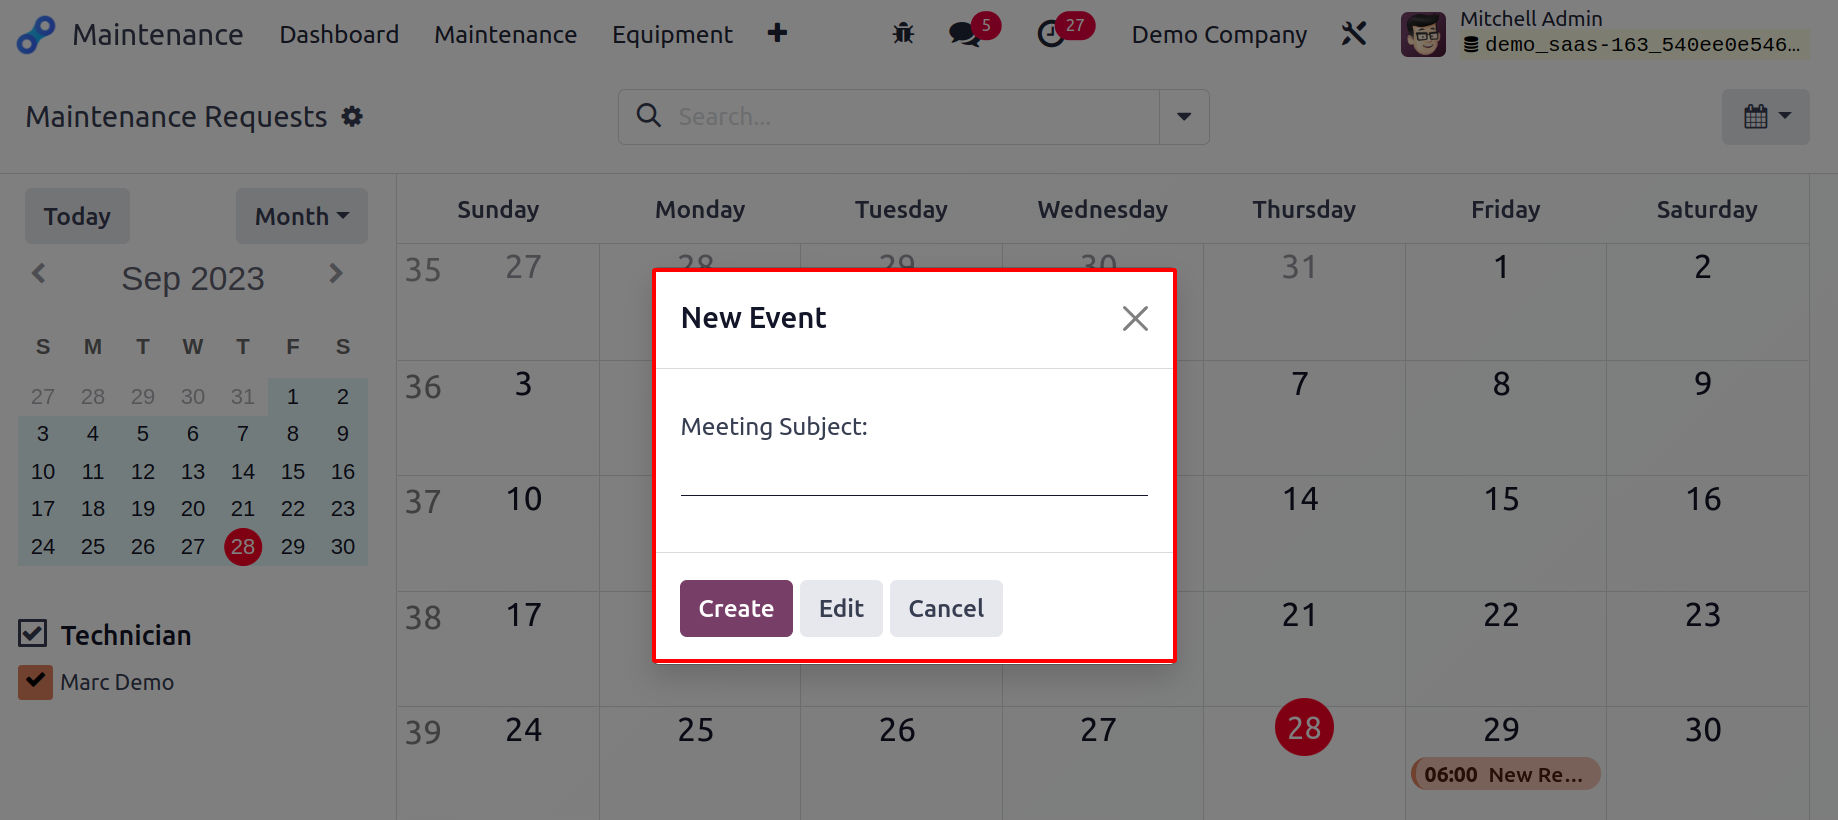
Click the Create button after adding the subject here. Use the Edit button to access the
form view of the maintenance request creation window if you need to add more details to
the request.
Reporting
You can use the Reporting option in the Odoo17 Maintenance module to get reports on every
maintenance task completed in your business. An efficient analysis of the maintenance
requests generated by the module will be provided by this platform.
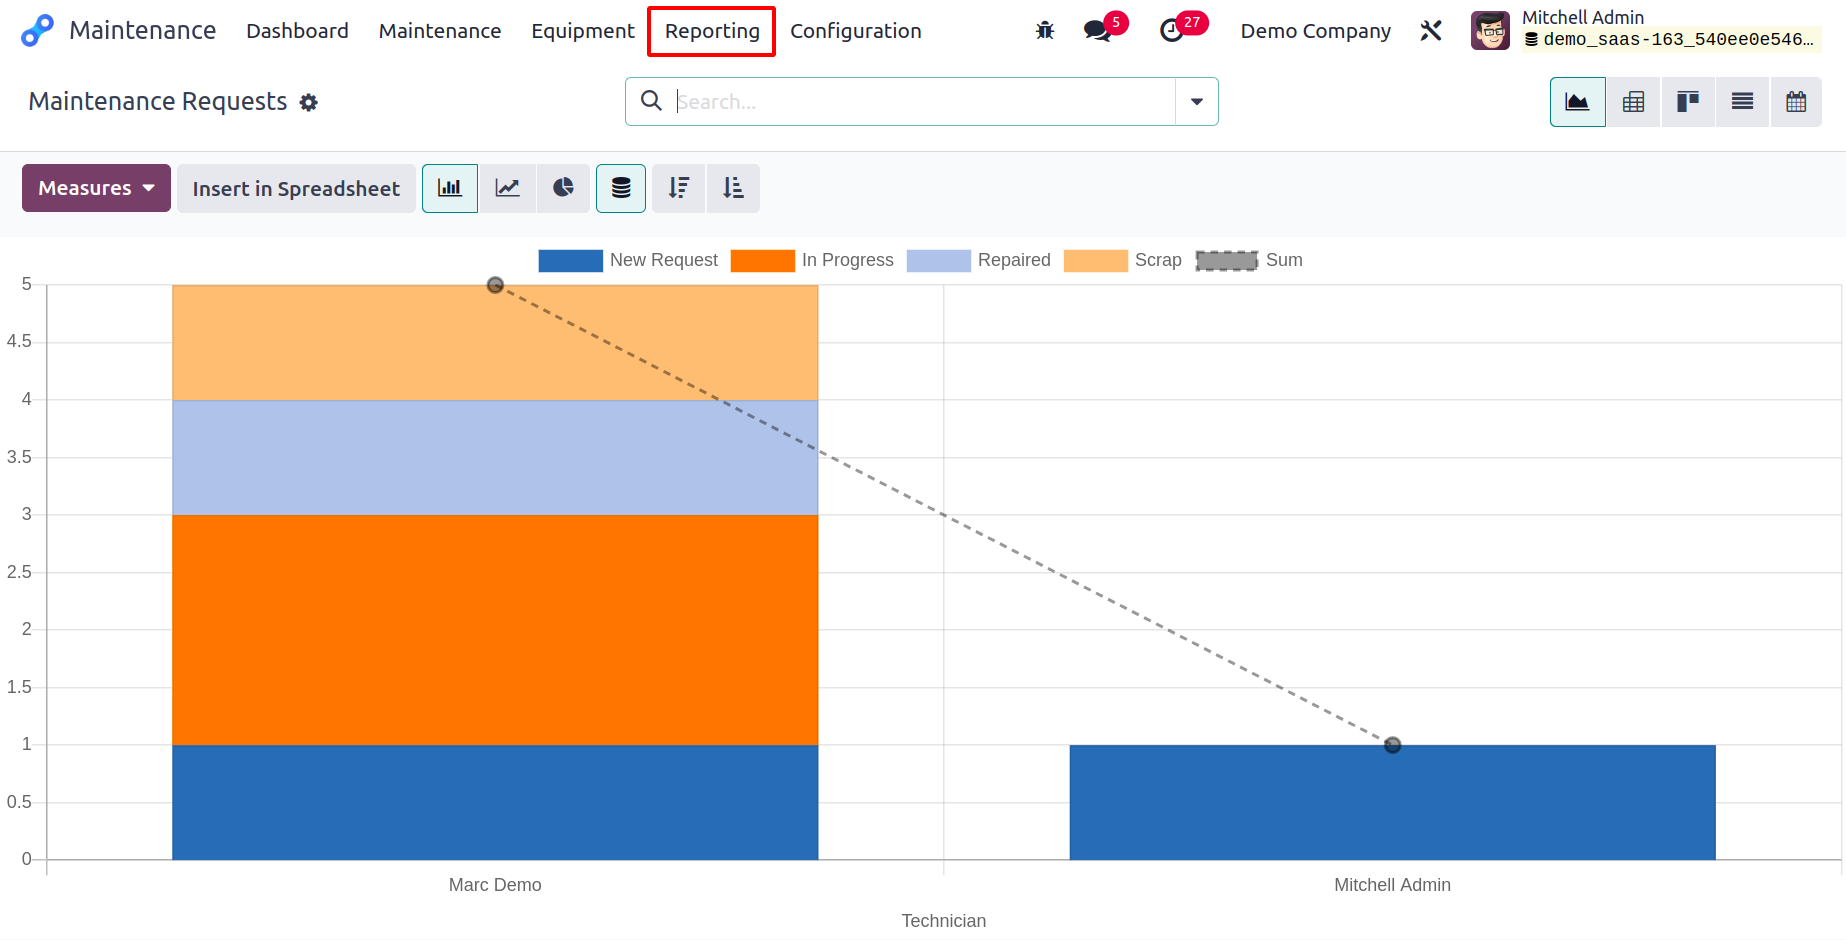
Pivot and graphical reports on the maintenance requests will be provided to you. You can
switch between Line, Bar, and Pie Charts in the graphical view. Among the filters you
can use are My Maintenance, To Do, Blocked, Ready, High-Priority, Unscheduled, Request
Date, Scheduled Date, Close Date, Unread Messages, and Archived. Using the Group By
option, you will receive reports based on Assigned To, Category, Stage, and Created By.
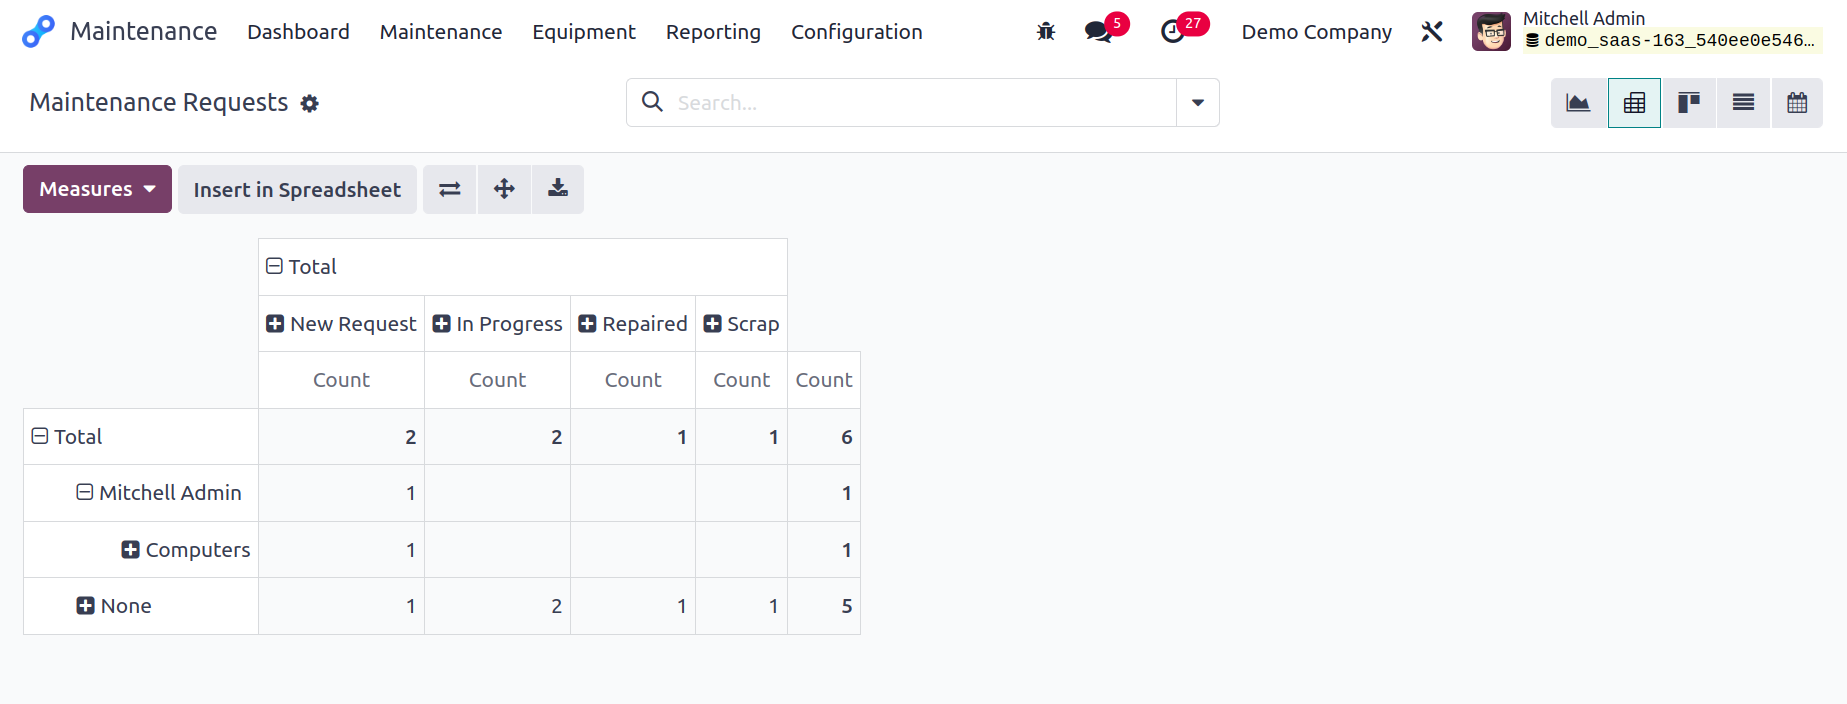
The Count and Duration of the maintenance request can be used as Measures. The Odoo 17
Maintenance module will assist in streamlining operations and enhancing workflow for
your business without squandering labor or useful time.