Product Management
For the efficient upkeep of inventory, keeping track of every facet of a
product is essential. You can set up new products in your database that
will efficiently track and monitor all actions to improve the inventory
management of the relevant products using the Odoo17 Inventory module.
The Sales and Purchase modules' and the Inventory module's processes for
configuring products are essentially identical. For successful product
management in
Odoo17, you will receive a distinct menu called Products on the main
menu bar of the Inventory.
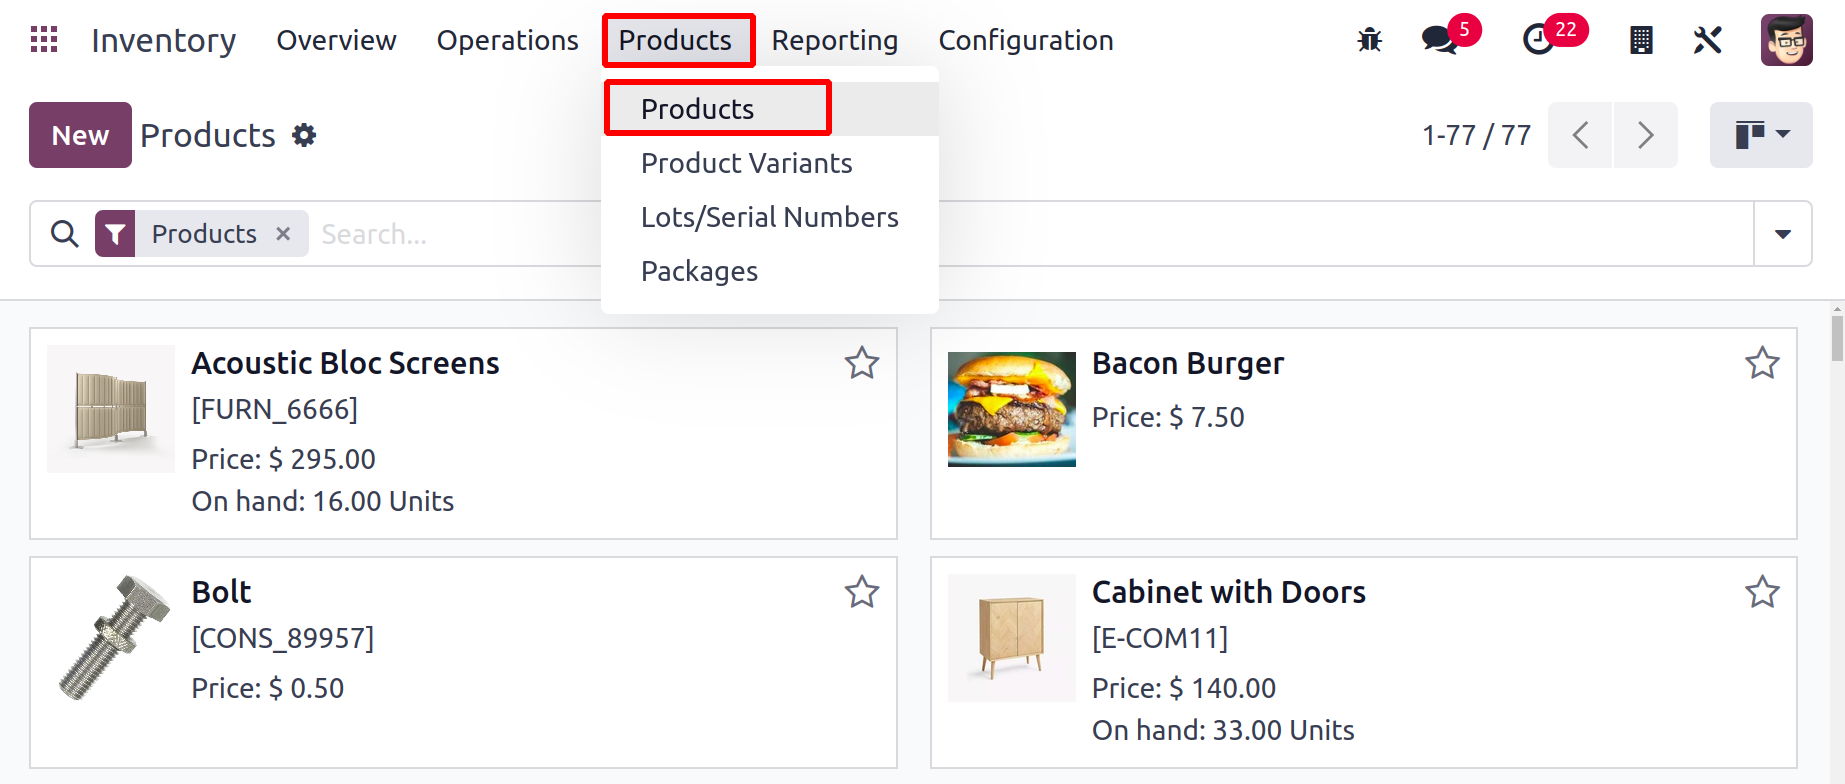
The Products menu, as seen in the above image, has options for
Products,
Product Variants,
Lots/Serial Number and Packages.
By selecting the items option, it is simple to see all configured items.
The configuration of new products via the Products menu
will be covered first.
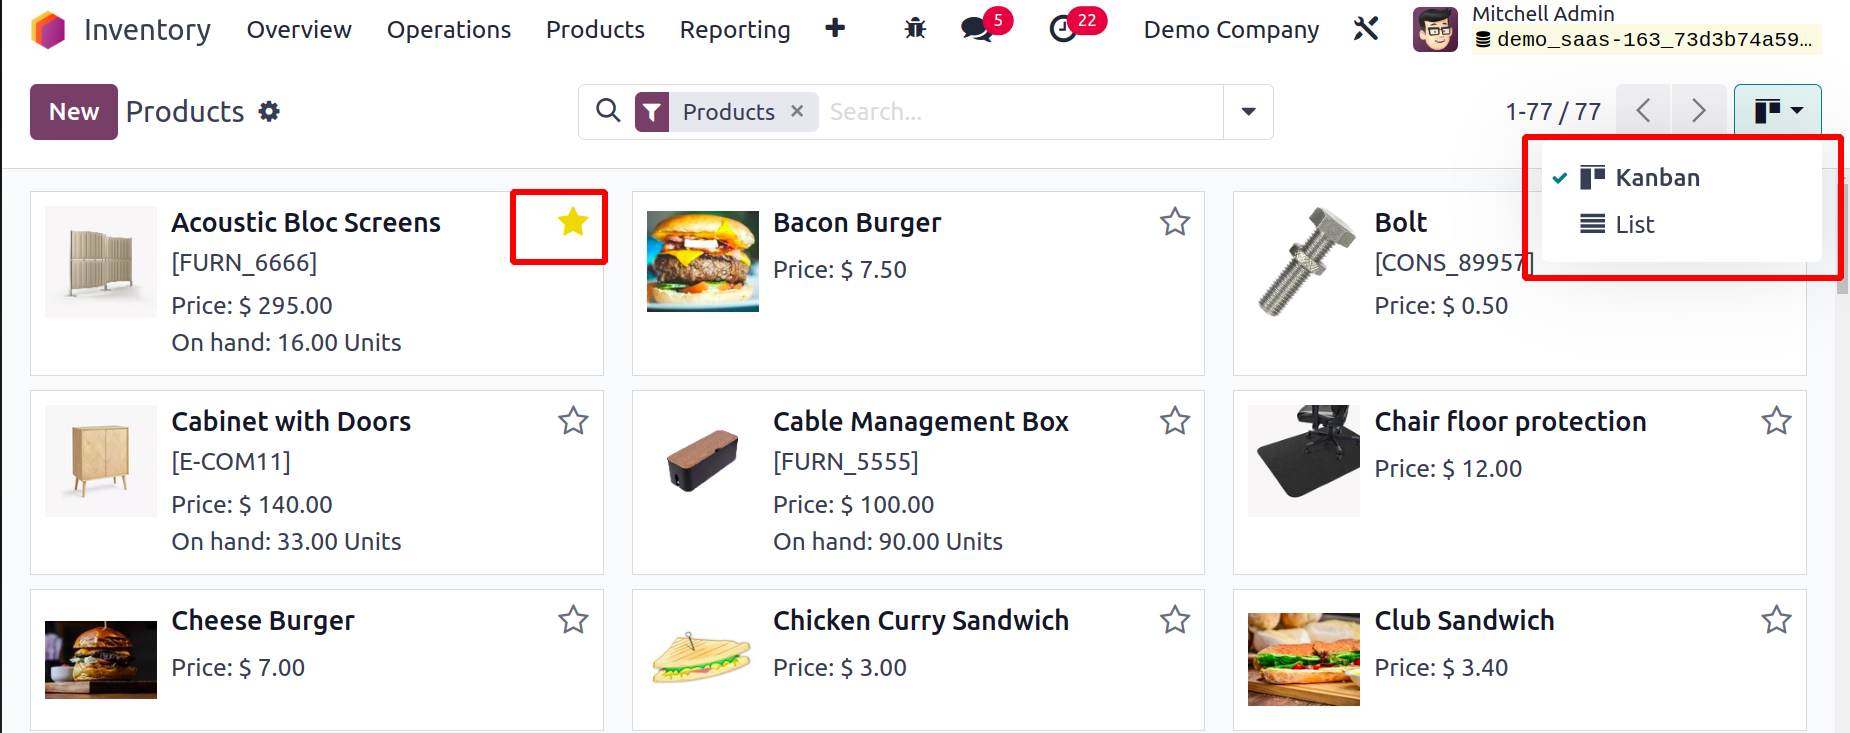
The Kanban view of the product's platform is depicted in the image. On
each product tab,
you will find the names of the items as well as crucial details like the
price, picture, quantity on hand, etc.
You can add products to your Favorite list by selecting
the star symbol.
This will enable you to quickly and easily find all of your favorite
products.
As you are aware, Odoo17 offers sophisticated sorting options across
nearly all platforms.
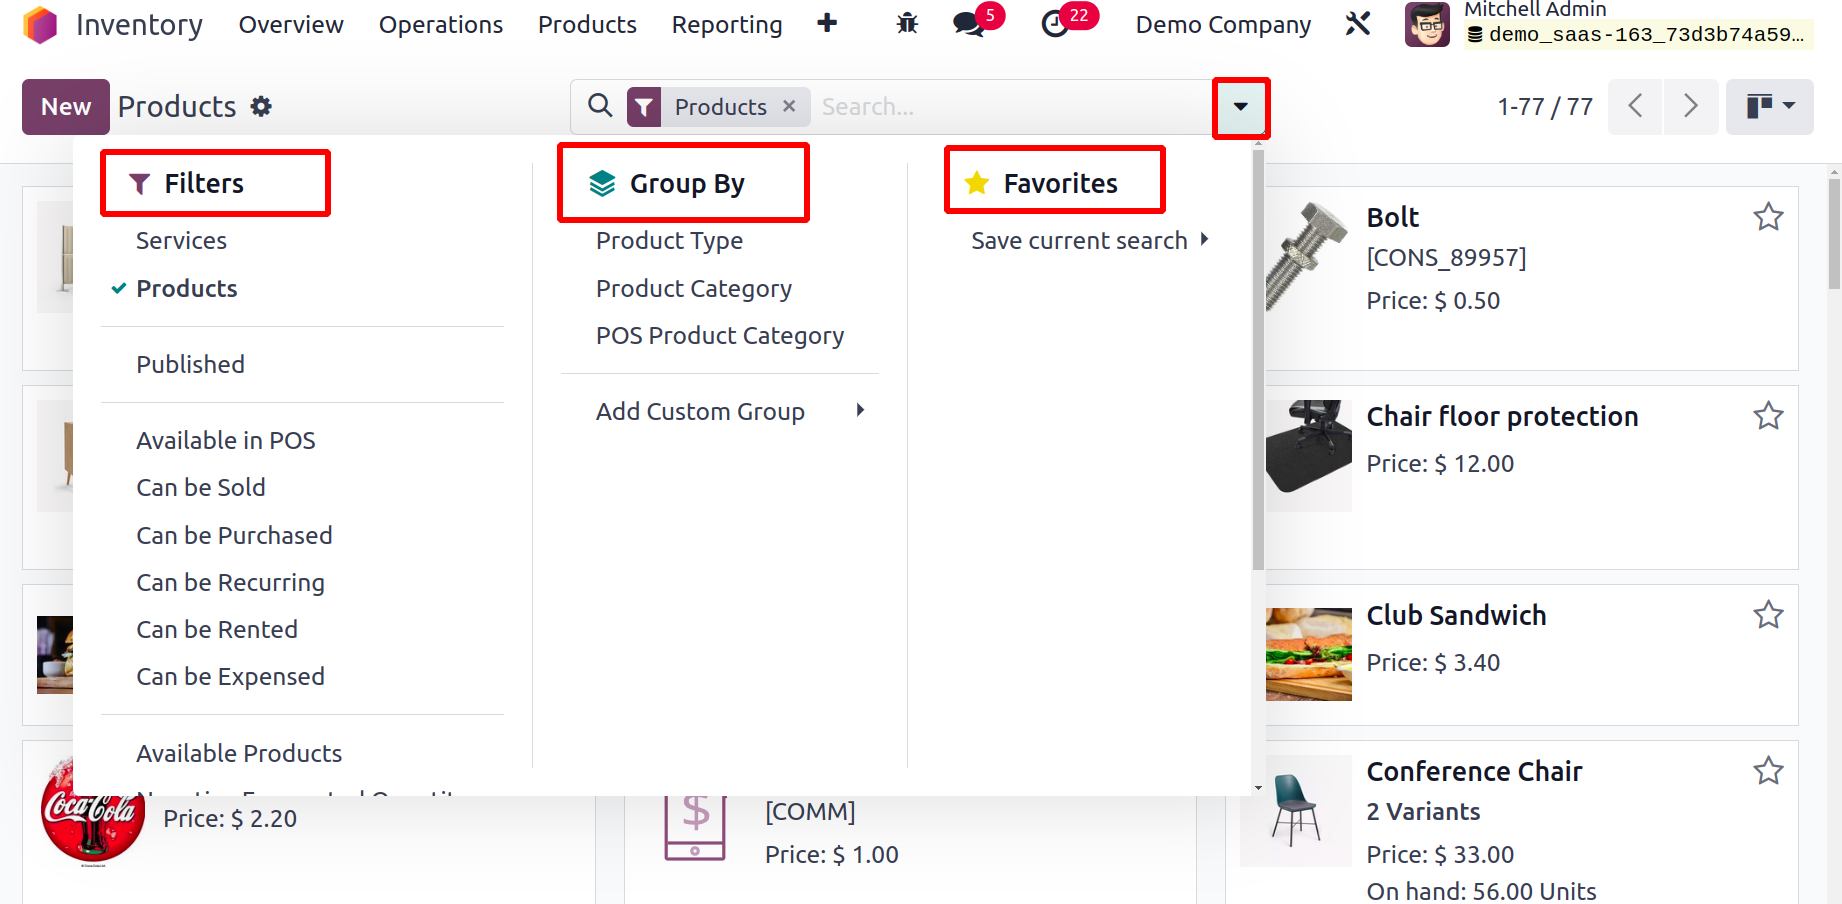
Additionally, you will find the Filters and
Group By options in this window, which will
allow you to quickly locate the necessary information regarding the
product listed in the Inventory module.
The
Filter
option offers both standard and bespoke capabilities to find the
necessary data.
The default choices allow you to filter
Products, Services, Published, Available in PoS, Can be Sold, Can be
Purchased,
Can be Rented, Can be Subcontracted, Can be Expensed, Available
Products, Negative Forecasted Quantity, Favourites, Warnings,
and Archived Products.
You can add new custom filters to the products using the Add
Custom Filter option.
Similar choices for default and custom sorting are available in the
Group By function as well. You can organize
products based on the Product Type,
Product Category,
and POS Product Category using the default selections. To build
additional grouping options that meet your needs,
use the Add Custom Group tool.
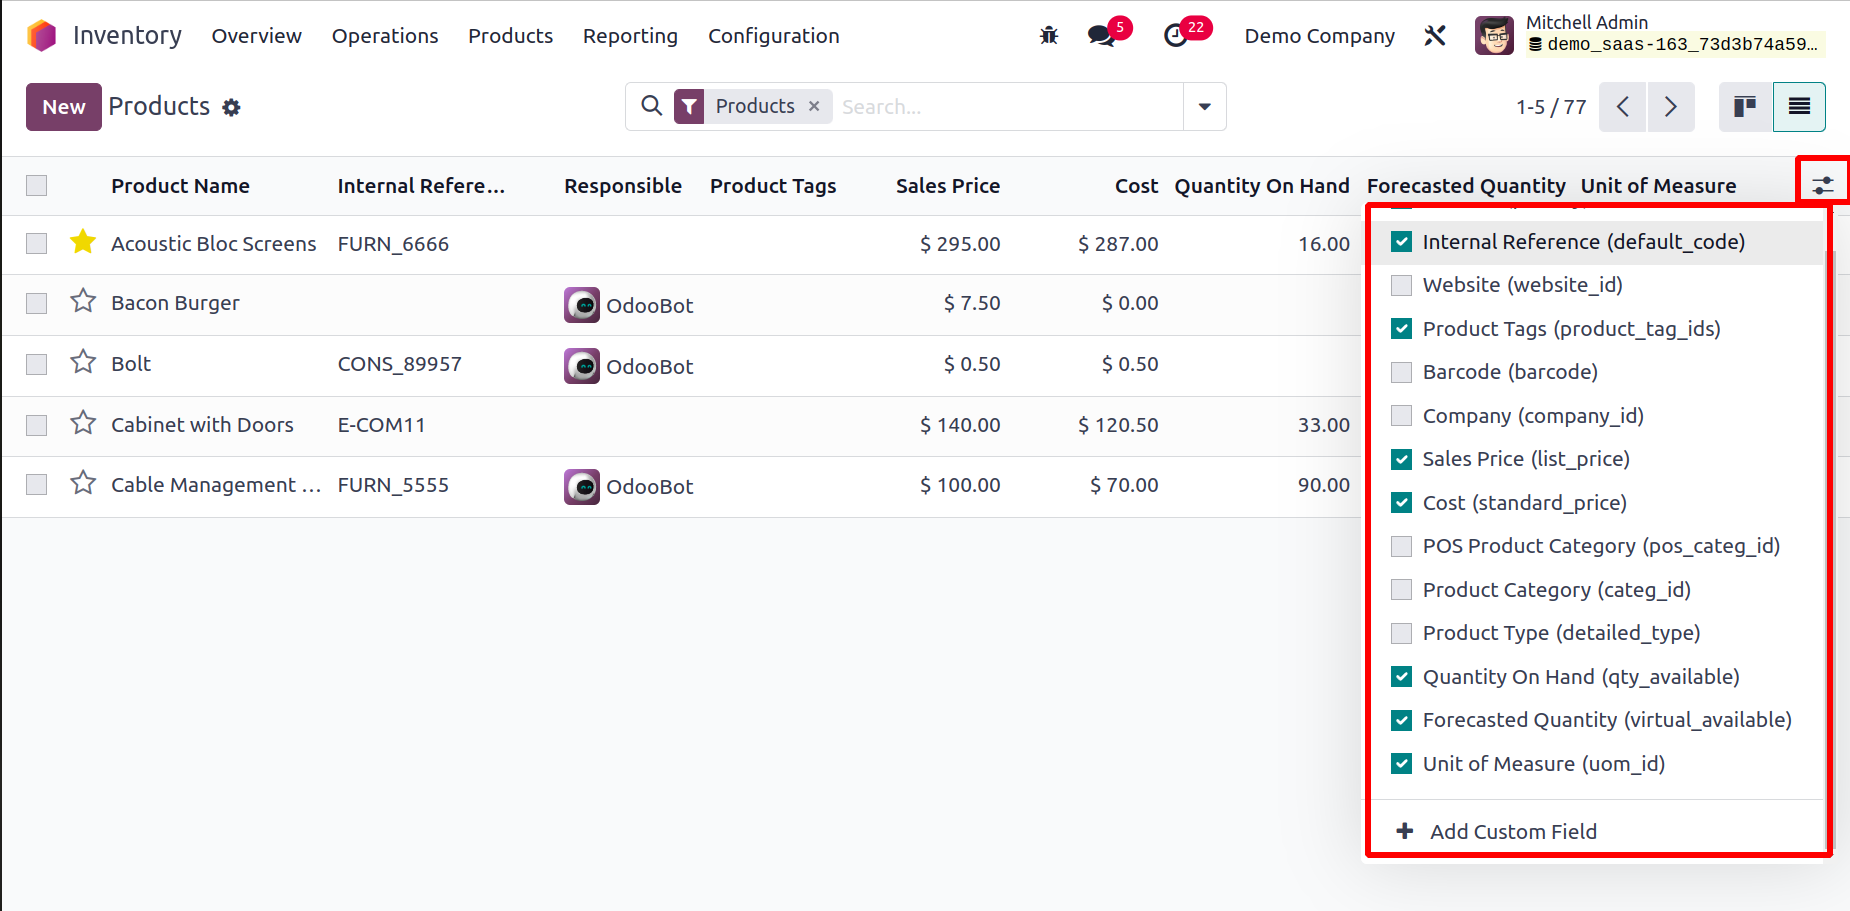
You can see a preview of the products in the list view, as shown below.
The product name, internal reference, responsible, product tags, sales
price, cost, quantity on hand, anticipated quantity, and unit of
measurement are all included in the preview. You can expand the list
view by selecting extra fields from the default selections, such as the
Website ID, Barcode, Company, POS Product Category, Product Category,
Product Type, and eBay Status. You can include custom fields in the list
view by selecting the Add Custom Field option.
By selecting the necessary goods from the list, you can manage and
change any product's
details. As seen in the illustration below, the product details window
can be seen.
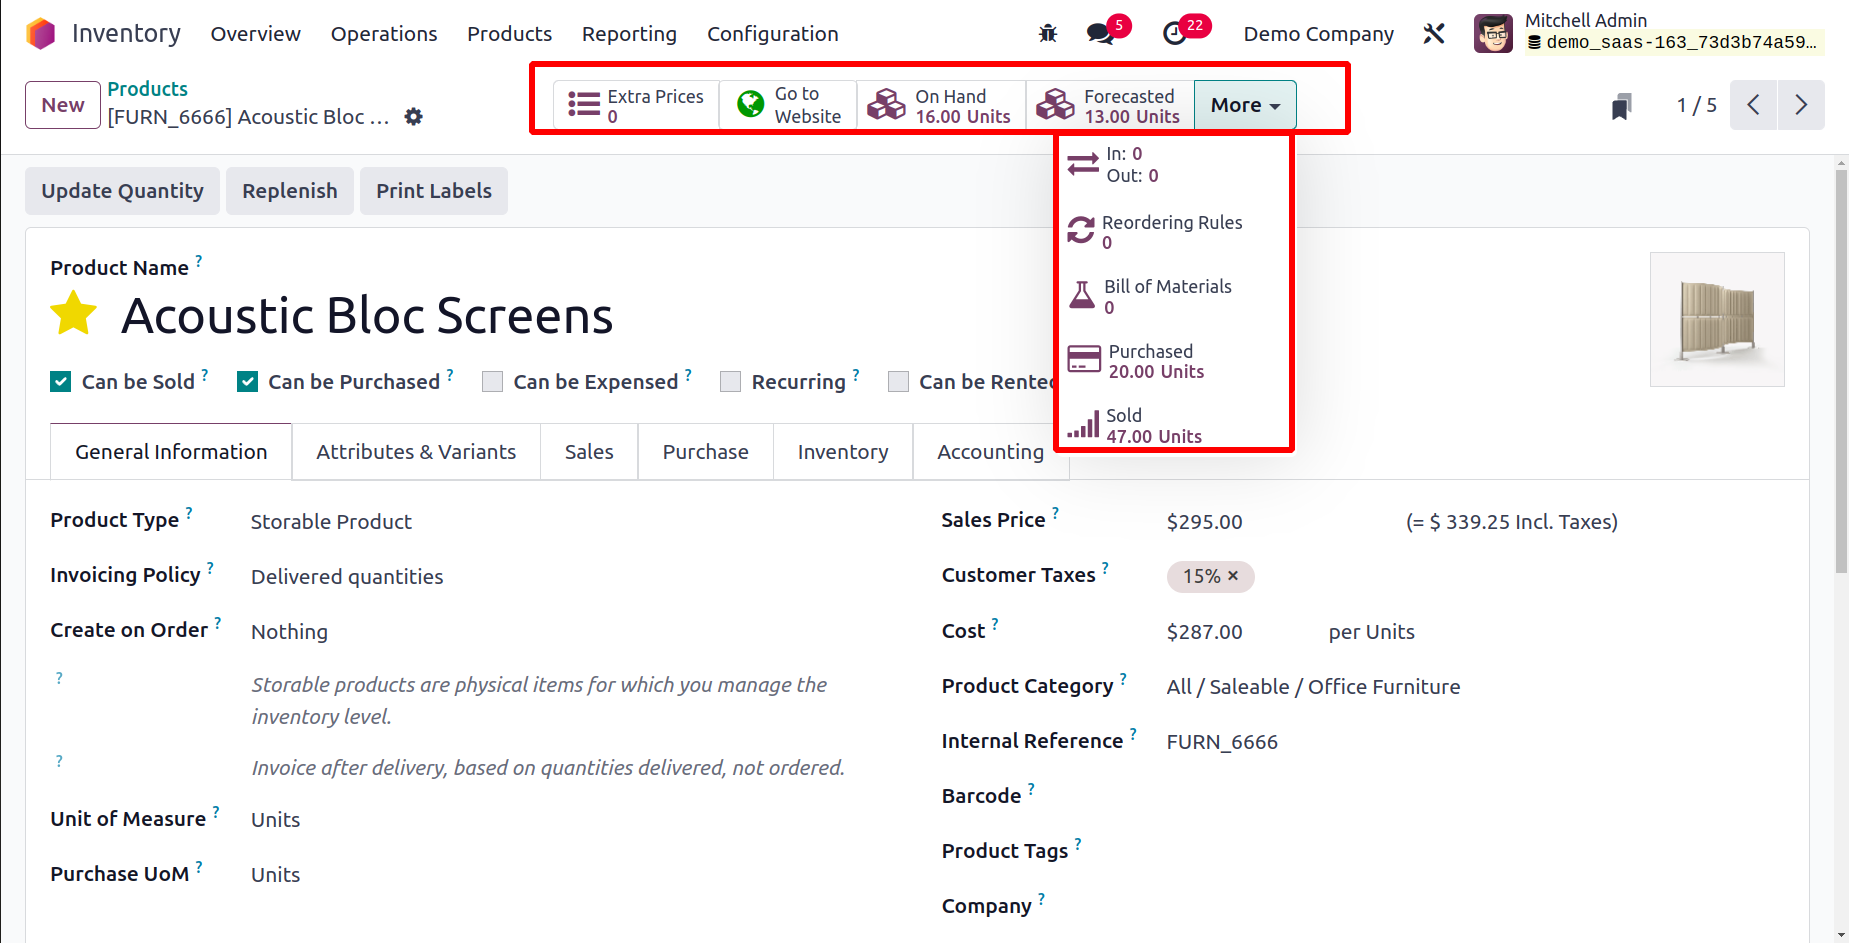
Based on the data configured on the relevant goods, the user will
receive sophisticated smart buttons in the
products window. To manage other price lists for the product, click the
Extra Prices option. With the aid of
the Go To Website, the product may be readily launched
and managed on eCommerce. The On Hand button will
display
the inventory's available amounts. Similar to this, the
Forecasted button will display information on the
numbers
that have been predicted. The movement history of the items in the
inventory is shown by the In & Out button.
The corresponding smart buttons can be used to access the configured
Reordering Rules and Lots/Serial
Numbers
for this product. When you click the More button,
you'll see more possibilities for finding information
on the product's Bill of Materials, Engineering Change Orders,
Putaway Rules,
Quality Control Points, Storage Capacities, Purchase Analysis, Sales
Analysis, and Digital Attachments.
Let's now use the New button to create a new product
and talk about the choices available in the product settings box. Odoo17
will direct you to the product setup window, as shown below, as soon as
you click the New button on the product dashboard.
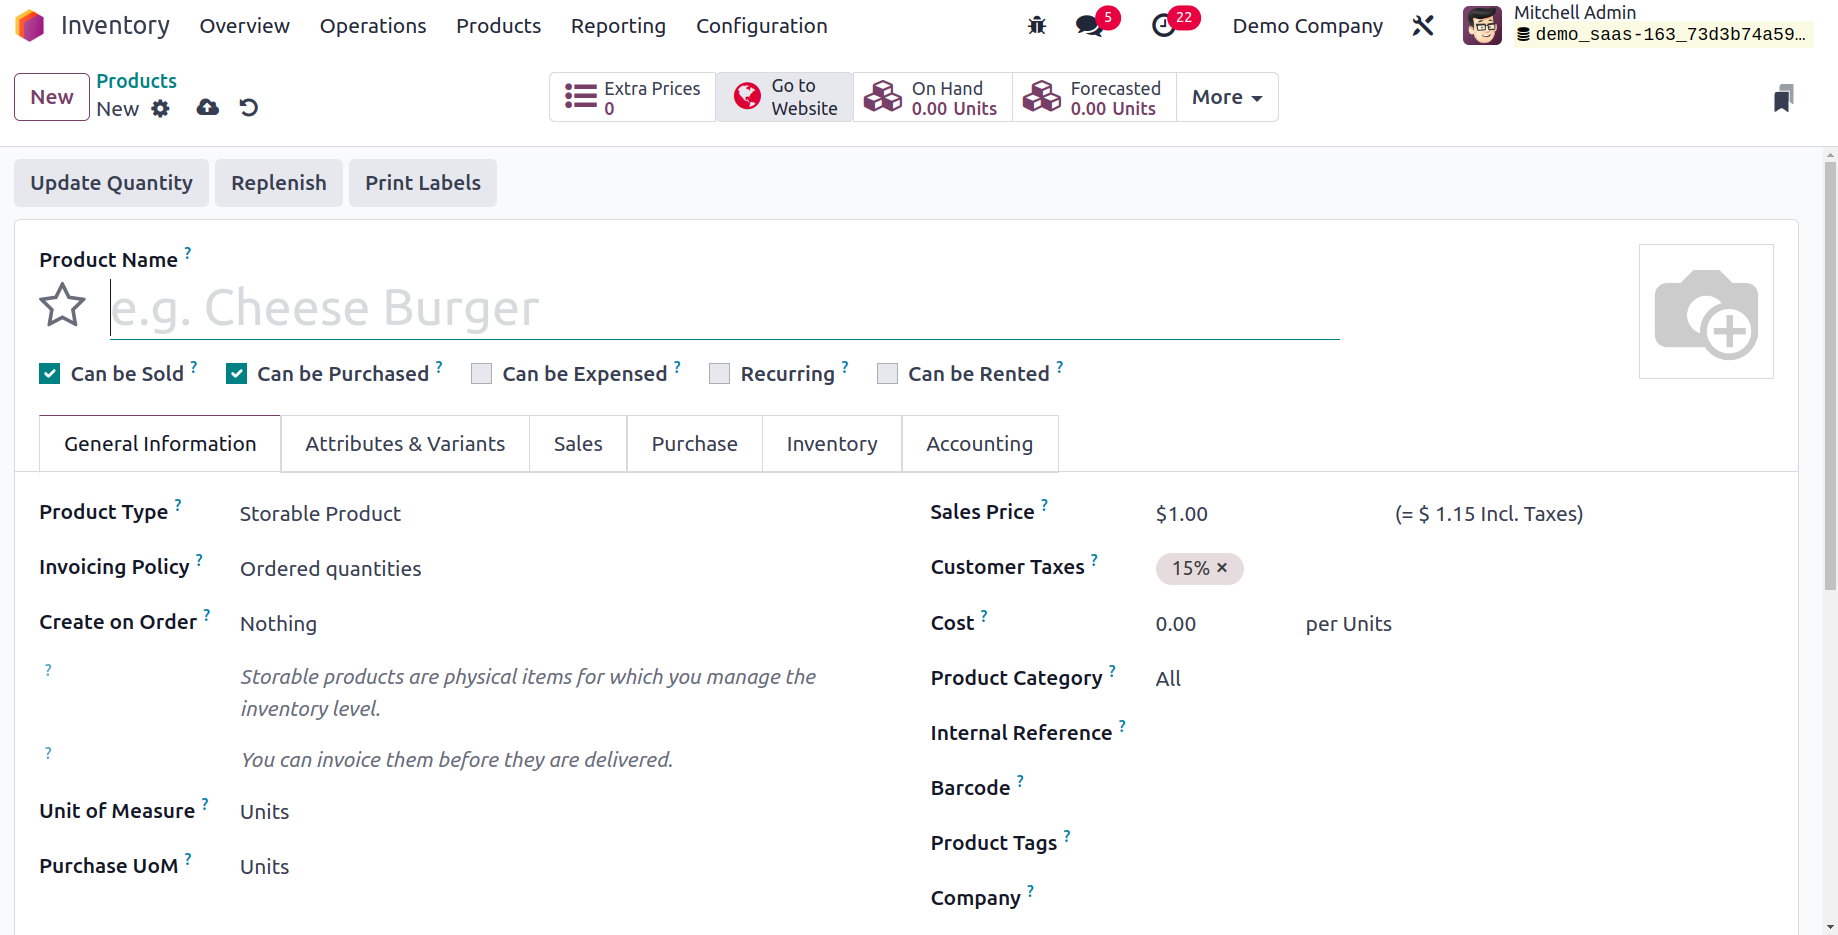
In the Product Name field, you can start by mentioning the name of the
product. You are welcome to use the Star symbol to add this
new item to your list of favorites. You can use the space provided to
add a lovely image of the product
You will be prompted to choose the product-related operation types while
configuring a new product. The choices are:
Choose the option Can be Sold, if your stuff can be
sold.
Choose this option Can be Purchased, if the product is
able to be bought.
If you want to choose this product while creating costs, use this option
Can be Expensed.
Choose the choice Can be Recurring, to start a
subscription while approving purchases of this item.
To allow rental of this product, choose this option Can be
Rented.
We have General Information, Attributes & Variants,
Sales, Purchase, Inventory, Accounting, and eBay tabs to
add more information about the product. Below is a link to the tab for
general information.
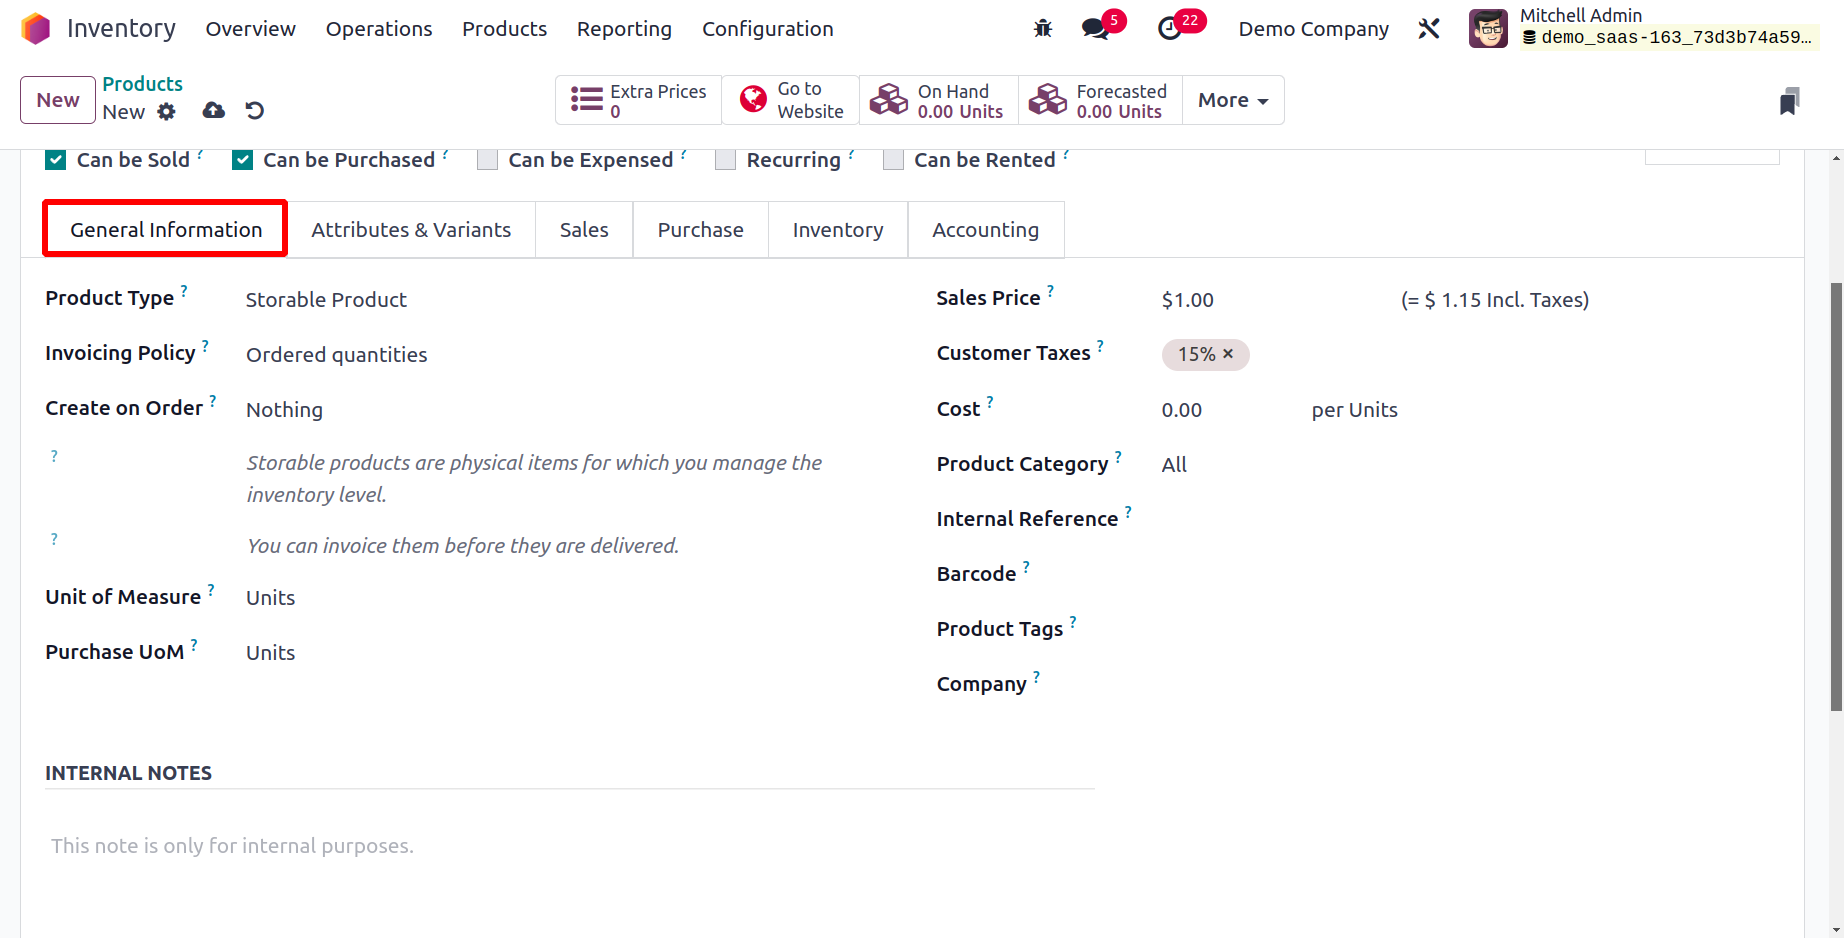
You can select the Product Type from the
available options on this page. You can view a list of the various
product kinds from the drop down menu.
Consumable goods:These are sent straight from suppliers
to the appropriate clients, so you don't need to keep inventory of them.
Service: Odoo views all services provided by an
organization as Service items. This kind
of product's inventory cannot be maintained by the user. It is a service
that a business provides that is not tangible.
Storable: Products that are storable are the ones for
which stock management is necessary. This product type cannot be
delivered until there is enough inventory on hand. Using the reordering
guidelines on the products, you can replenish the inventory.
If not, Odoo17 will produce caution messages while creating orders to
indicate that there is not enough stock.
Event Ticket: Using this product category, the tickets
for an event may be set up in Odoo17 as a product.
Event Booth: The Event Booth product type in Odoo17 can
be used to configure the booths that a business provides during an event
as products.
Course: It is a non-tangible good that a business
offers as a component of eLearning programmes.
Combo: Combinations of multiple products can be
created. And the customers can choose what they require.
Booking Fee: This type of products are usually used for
online booking.
You can specify the Invoicing Policy after indicating
the product type.
For its users, Odoo17 provides two different kinds of invoicing
policies.
Ordered Quantities: With the help of this billing
policy, you can create invoices for the quantities that a client has
ordered. By doing this,
you'll be able to bill for all of the quantities specified in the order
even before it's delivered.
Delivered Quantities: Only the delivered quantities
will be taken into account
when generating invoices under this invoicing strategy. When a customer
orders 12 quantities of a
product but only delivers 5, Odoo will use this invoicing policy to
create an invoice for the delivered 5
quantities. Only after delivery will an invoice be created for the
remaining 7 amounts.
The Unit of Measure parameter can be used to provide
the default unit of measurement for
all stock activities for this product.
The default unit of measure for purchase orders for this product is
indicated by the Purchase UoM .
In the Sales Price section,
you can provide the price at which you offer this product to your
clients. In the Customer Taxes column,
you can specify the default taxes that are applied to products when they
are set up. The taxability information
codes that are utilized to determine precise tax rates for each class of
goods are referred to as the TaxCloud Category.
In the relevant fields, you can include information about the
Avatax Category, Cost, Product Category, Current Version
of the product, Barcode, Product Tags, and Company.
The product-related notes that are intended only for internal usage
might be specified in the Internal Notes box.
The fields that are available for service-type products, such as event
tickets,
event booths, and courses, may vary in several ways.
Below are four different sorts of invoicing policies that you can find
here.
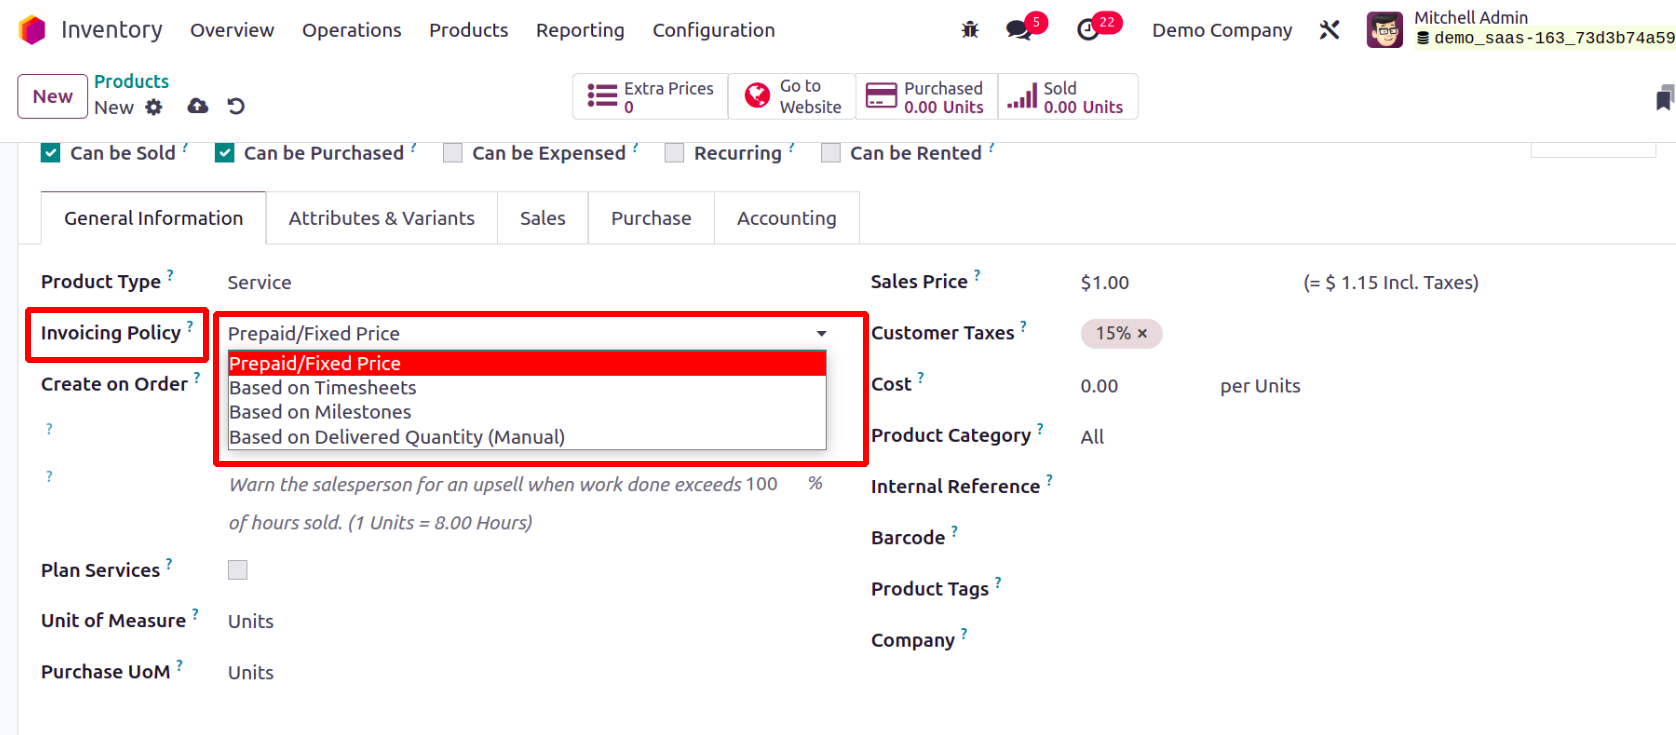
Prepaid/Fixed
: Based on the ordered quantities, invoices may be generated as
necessary.
Based on Timesheet
: Invoice tasks or projects in accordance with timesheets for the
quantities supplied.
Based on Timesheet:
Invoice tasks or projects in accordance with timesheets for the
quantities supplied.
Based on Milestones
: Invoice jobs or projects in accordance with reached
milestones.
Based on Delivered Quantity: Invoice services based on
quantities that were actually delivered.
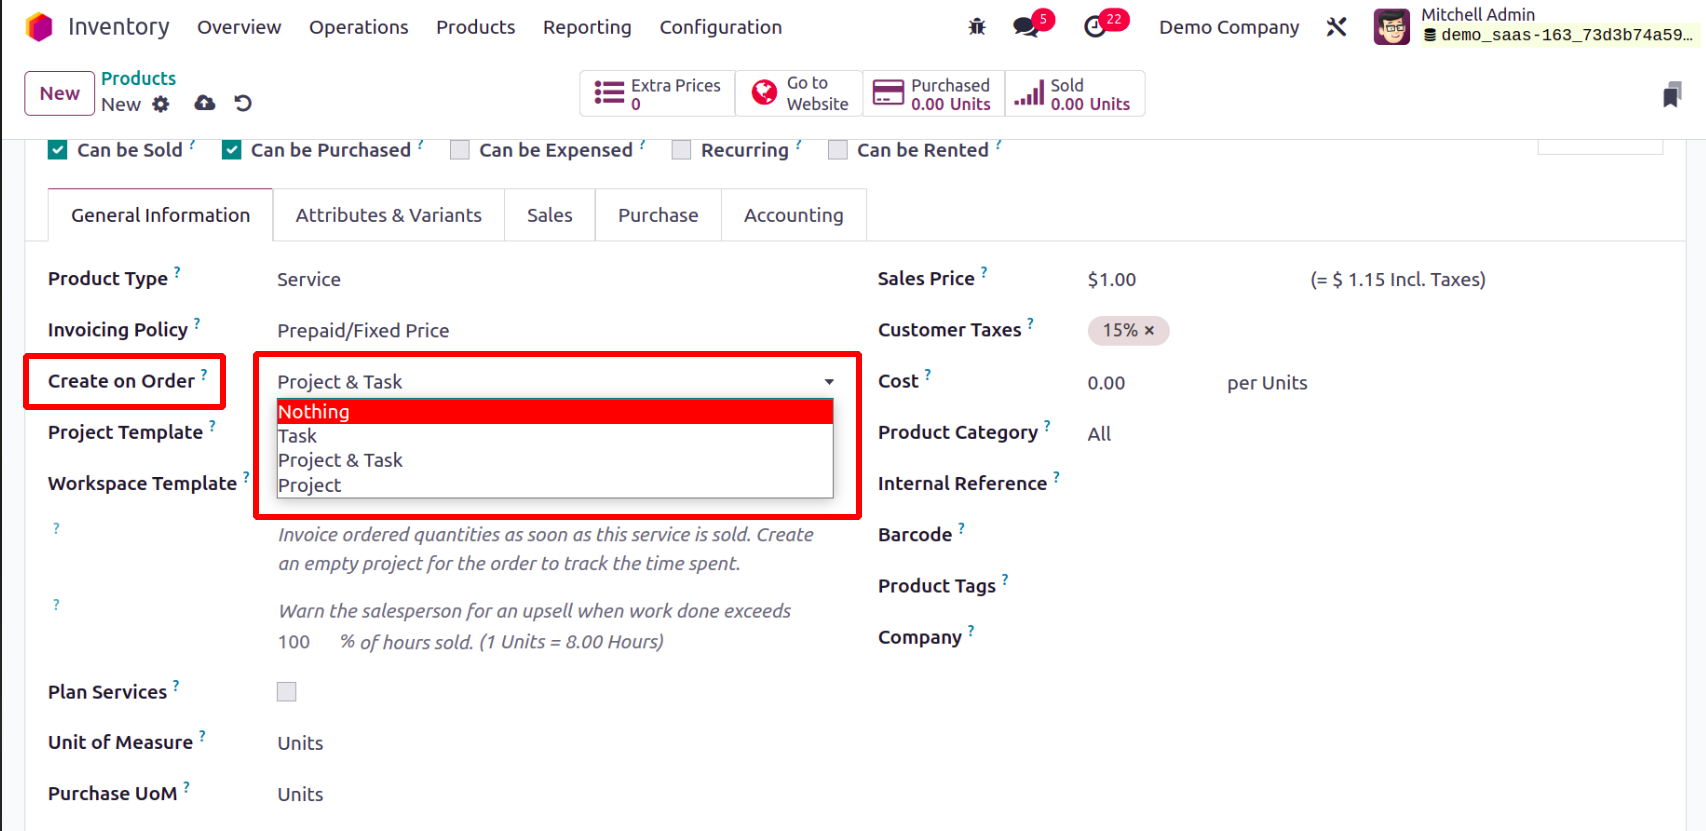
Within the Create on Order area, you can choose an
appropriate alternative. Depending on the option you choose,
this product can generate a Project, Task, or a
Project and Task combined upon sales confirmation.
You can track the service that you are selling using this project or
task. When finalizing the sales order,
a shift will be automatically generated for the chosen position if the
Plan Services option is used.
After enabling the Plan Services, an area will emerge where you may
describe the job.
In Odoo17, you may keep track of several product versions and qualities
so that the consumer
has a variety of options to choose from. You can define the variations
of a product that are
already set up in Odoo17 by using the Add a Line buttons found under the
Attributes & Variants page.
Use the Configure option if you wish to add a new variant or attribute.

The Upsell & Cross-sell, Ecommerce Shop, Helpdesk, Point of Sale, Extra
Product Media, and Sales
Description can all be defined under the Sales tab. The Upsell and
Cross-selling area offers clients
suggestions for supplemental products, accessory products, and
alternative products. Mention the Website, Website Categories,
Website Sequence, and Ribbon attached to the product in the ECOMMERCE
SHOP section.
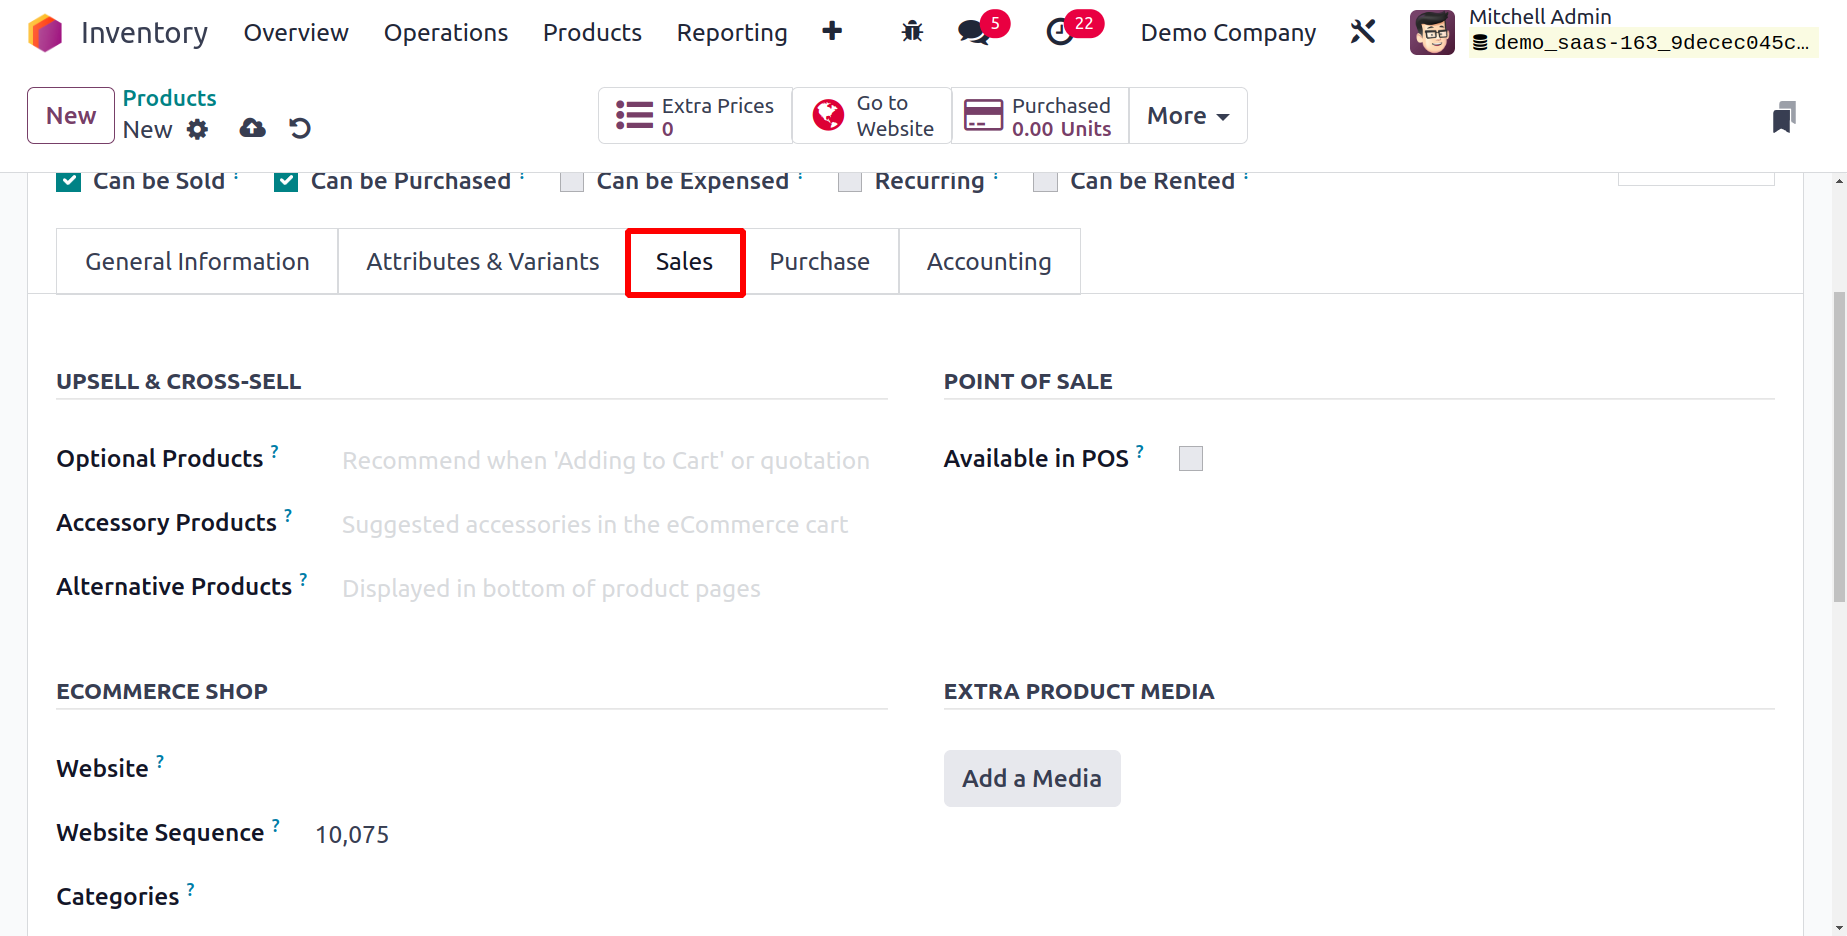
Odoo17 provides a variety of eCommerce techniques to increase online
sales. You will have the choice to specify
the upselling and cross-selling methods as a result on the Sales tab.
When users click the Add to Cart button,
products that are considered optional are presented to them. The
cross-selling approach includes this. Using this
functionality, Odoo17 will suggest complementary products that can be
purchased along with the primary item.
The cross-selling approach uses accessory products to propose additional
items to customers when they review
their shopping carts before checking out. The product you chose may have
alternatives, as suggested by Alternative Products. This is one of the
best up-selling techniques
to increase online sales and will be visible at the bottom of the
product page on the eCommerce website.
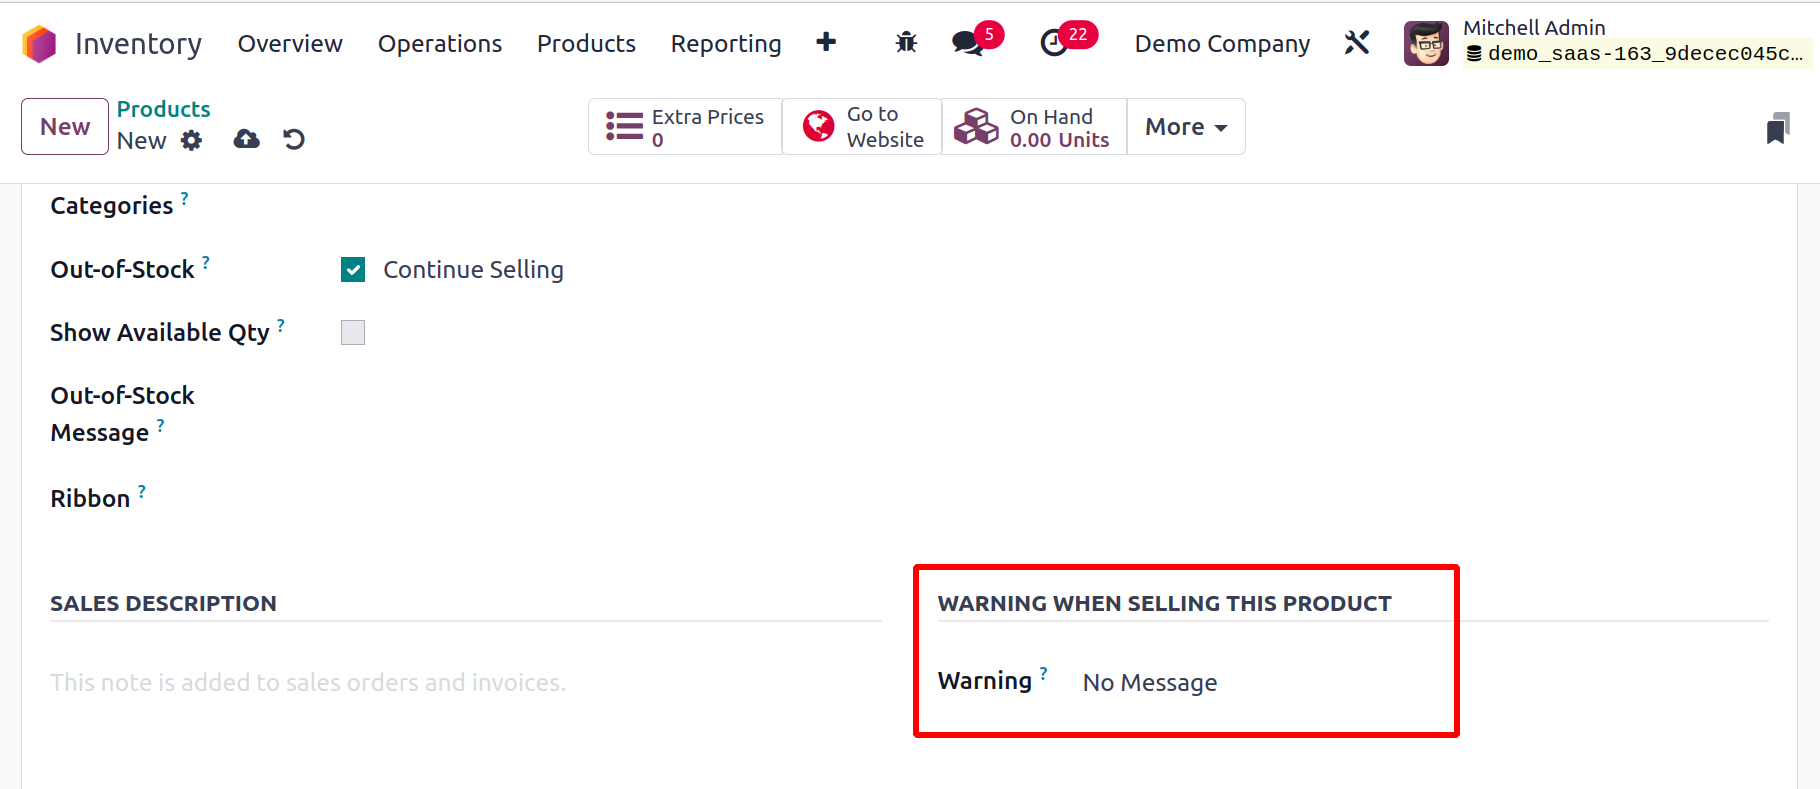
In the Warning field located under the Sales tab, as shown in the figure
below,
you can set warnings to appear while this product is being sold.
By turning on the appropriate option in the Point of Sale field, you
can make this product available in POS. You will be given the
opportunity to enable the To Weight with Scale feature after
selecting this option. If the product needs to be weighed using the
hardware
scale integration, you can turn on this option. In the Category
section, enter the product's category for usage in the POS.
You can enter the website, website sequence,
categories, and ribbons for the product's eCommerce presentation in
the Ecommerce Shop section.
The sales order and invoice for this product will include the sales
description that was written in the sales tab.
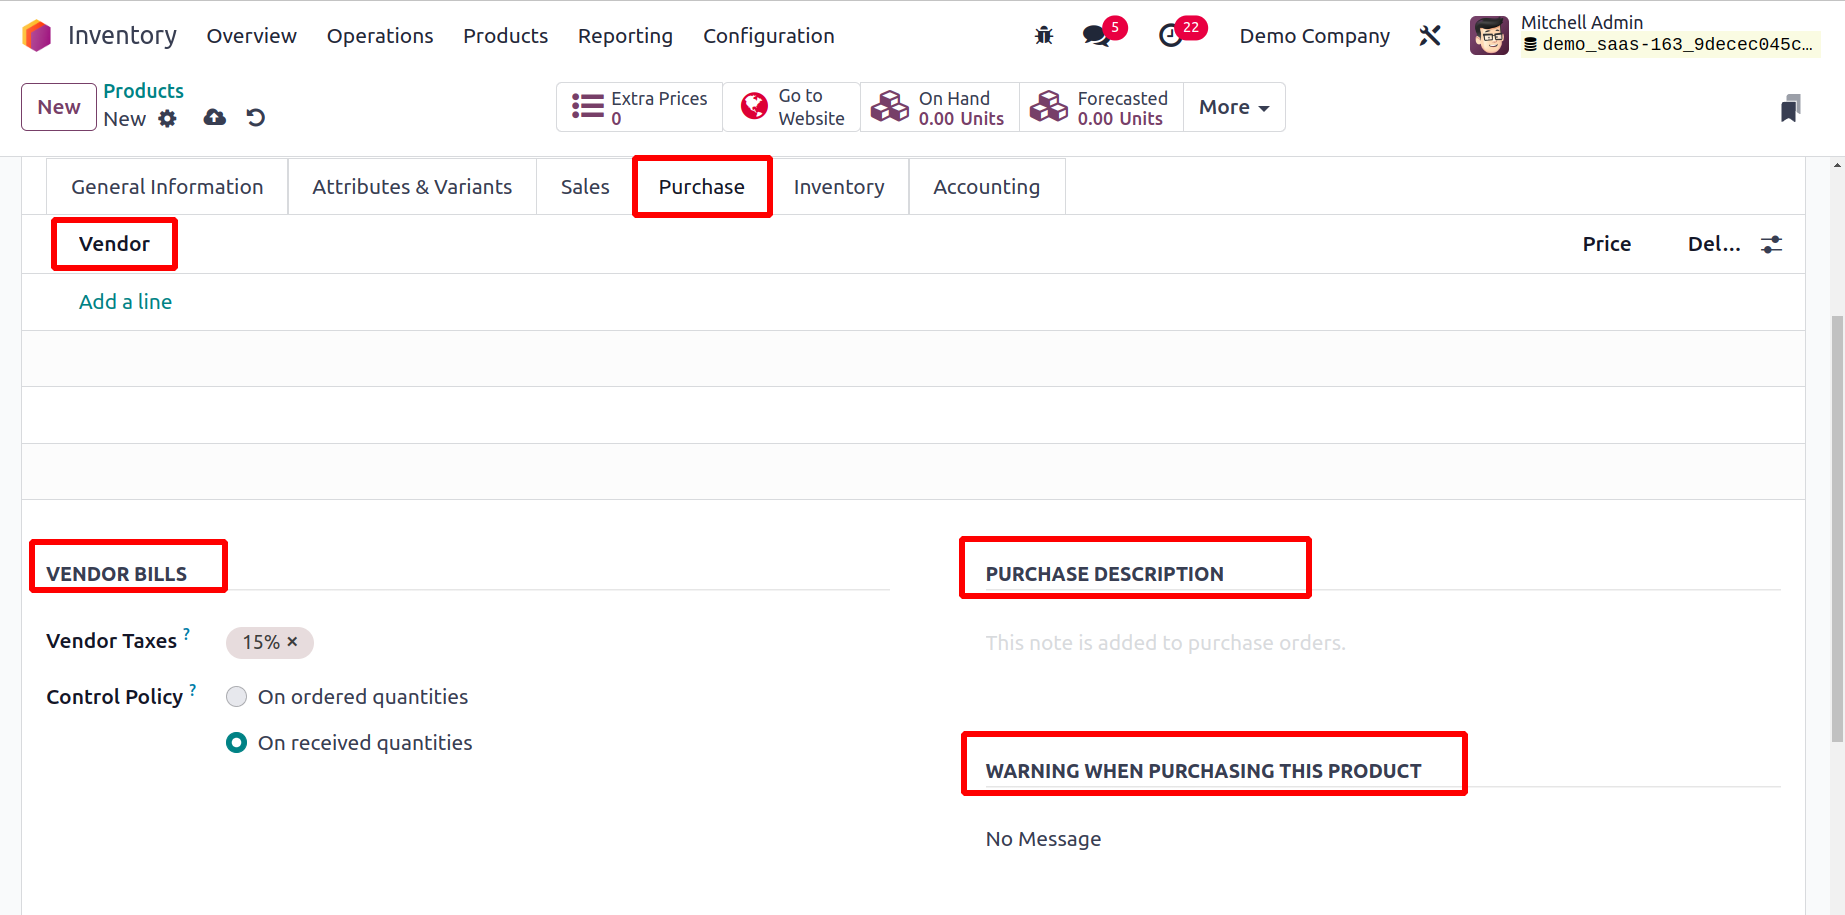
Under the Purchase tab, further information
about the product's purchase can be provided. The Add a Line
button can be used to list the suppliers of this product. You
can turn on the Subcontractor field if you plan to subcontract
this product with the chosen vendor.
Enter the appropriate Currency in the field
provided to purchase operations with the vendor.
Additionally, you can provide in the appropriate boxes the Unit
of Measure used for the
purchase orders with this vendor, the Price to buy this product
from the given vendor,
and the Lead Time for Delivery. The delivery
lead time is the number of days from the
moment the vendor confirms the purchase order and the time the
product is delivered to its final destination. In order
to compare pricing and choose the best option for a purchase,
Odoo enables you to set
numerous vendors to a single product.
You can configure the default vendor taxes used for this
product's purchase activities under the Vendor
Bills section.
How to create vendor invoices for the goods will be outlined in
the control policy.
By changing the bill control policy to Ordered amounts, the
bills can be created depending on
the amounts that the client has ordered. You can create a
control policy on Received Quantities
if the consumer wants to pay the bill only after receiving the
products.
To add internal notes on the product's buying activities, use
the buying Description tab.
Let's go to the Product Configuration Window's
Inventory tab now. This page allows you to
specify the
operations, logistics, traceability, and counterpart locations.
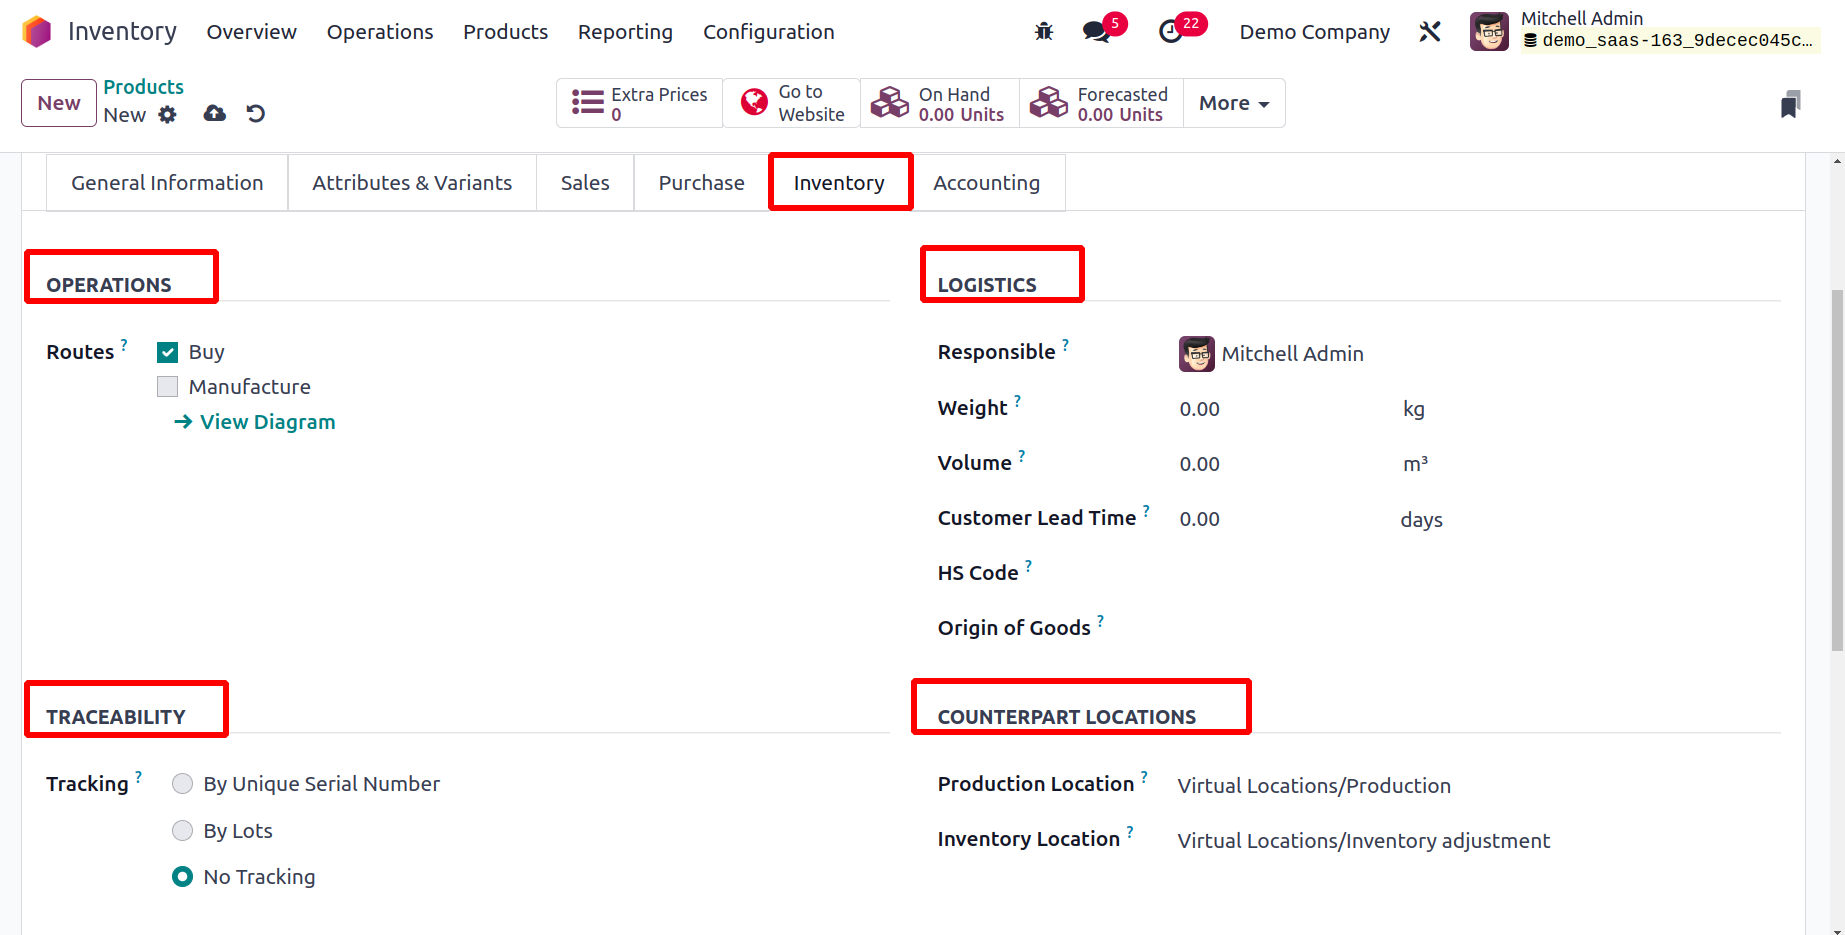
The Operations field will assist you in defining the Routes
of the product in accordance with the modules
that are installed in your Odoo17 database. Depending on
your company's regulations, you can set the
route of this product as Buy, Dropship
Subcontractor on Order, Manufacture, Resupply Subcontractor
on Order, and Dropship. For the storable goods in your
warehouses, Odoo17 provides tracking tools
that make it quick and easy to find the item in your
inventory. The distinct serial numbers or
lots assigned to each product can be used to track products.
You can configure the Tracking
based on Unique Serial Number or Lots in the
Traceability box.
You can choose the No Tracking option if you don't want to
permit tracking for this product.
Designate a Responsible employee to be in charge of the
impending logistics-related tasks
for this product in the Logistics area.
This product's Weight and Volume can be specified
in the corresponding fields.
The number of days given to the customer for delivery
following the confirmation
of the sales order is known as the customer lead time. In
the space provided, enter
the HS Code that is used for international shipment and
product declaration.
You can also identify the country
of origin of the goods, which indicates how and where they
were made.
You can define the Product Location under
Counterpart Locations, which serves as the
source location
for stock moves brought on by manufacturing orders. When you
perform an inventory, the provided
Inventory Location will be taken into account as the
originating location for the stock moves created.
You will find a new option under the
Inventory tab where you may describe the
packaging of the products you have on hand. You must enable
the Product Packaging
feature from the module's
Settings menu, as shown below, in order to
access this option.

The product packaging function will be accessible after
you turn on this
feature under the Inventory tab of the product setup
window, as shown
in the illustration below. Product packaging
allows for the creation of product packets in
predetermined quantities.
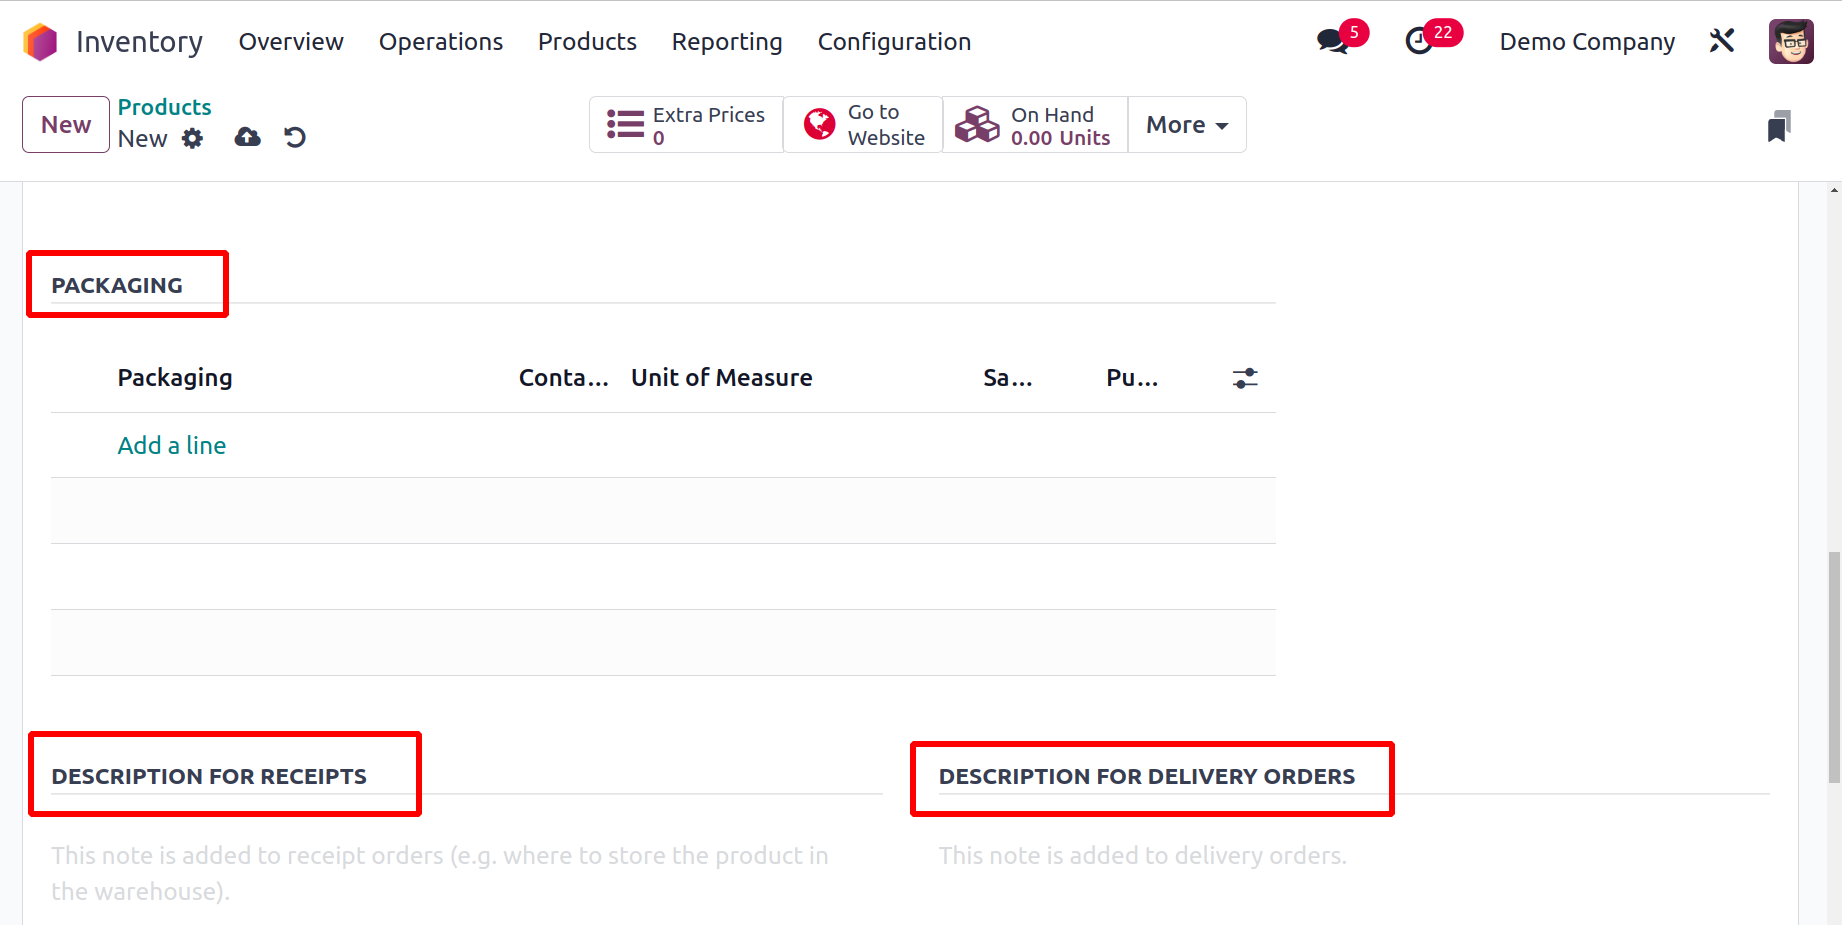
The packing, package type, amount of the product
contained in the packaging, and unit
of measurement can all be entered using the Add a
Line button. You can choose the appropriate
fields if you wish to use the package approach for
sales and purchase orders.
Additional notes for receipts and delivery orders
can be added using
the Description
for Receipts and Description
for Delivery Orders, respectively.
You can specify the necessary information for the
product's accounting
activities under the Accounting tab
of the Product Configuration window.
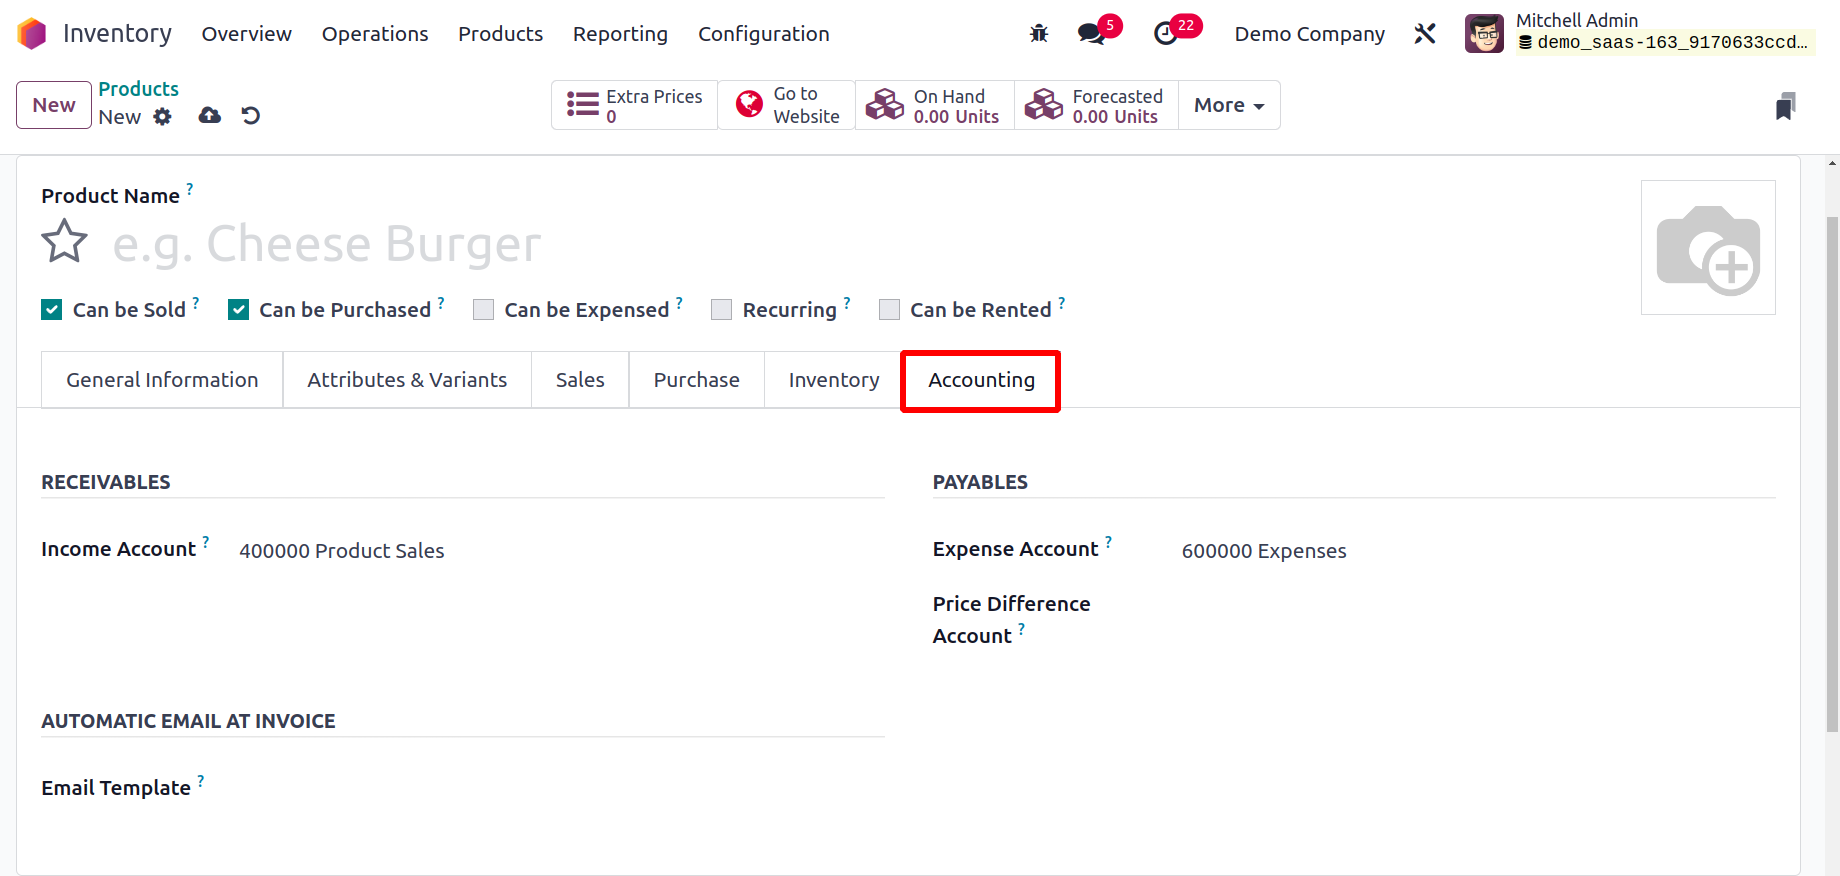
The Receivables area allows you
to enter the Income Account,
while the Payables field allows
you to enter the Expense Account and
Price difference account.
When confirming vendor bills, this Price
difference account is employed in
automated inventory
valuation to record the price difference between
a cost and its associated vendor bill.
Enter the Country of Origin and Commodity Code
in the Intrastat field. If an Email Template is
mentioned in the Automatic Email At Invoice
field, Odoo will automatically
send a product-specific email once the invoice
has been validated.
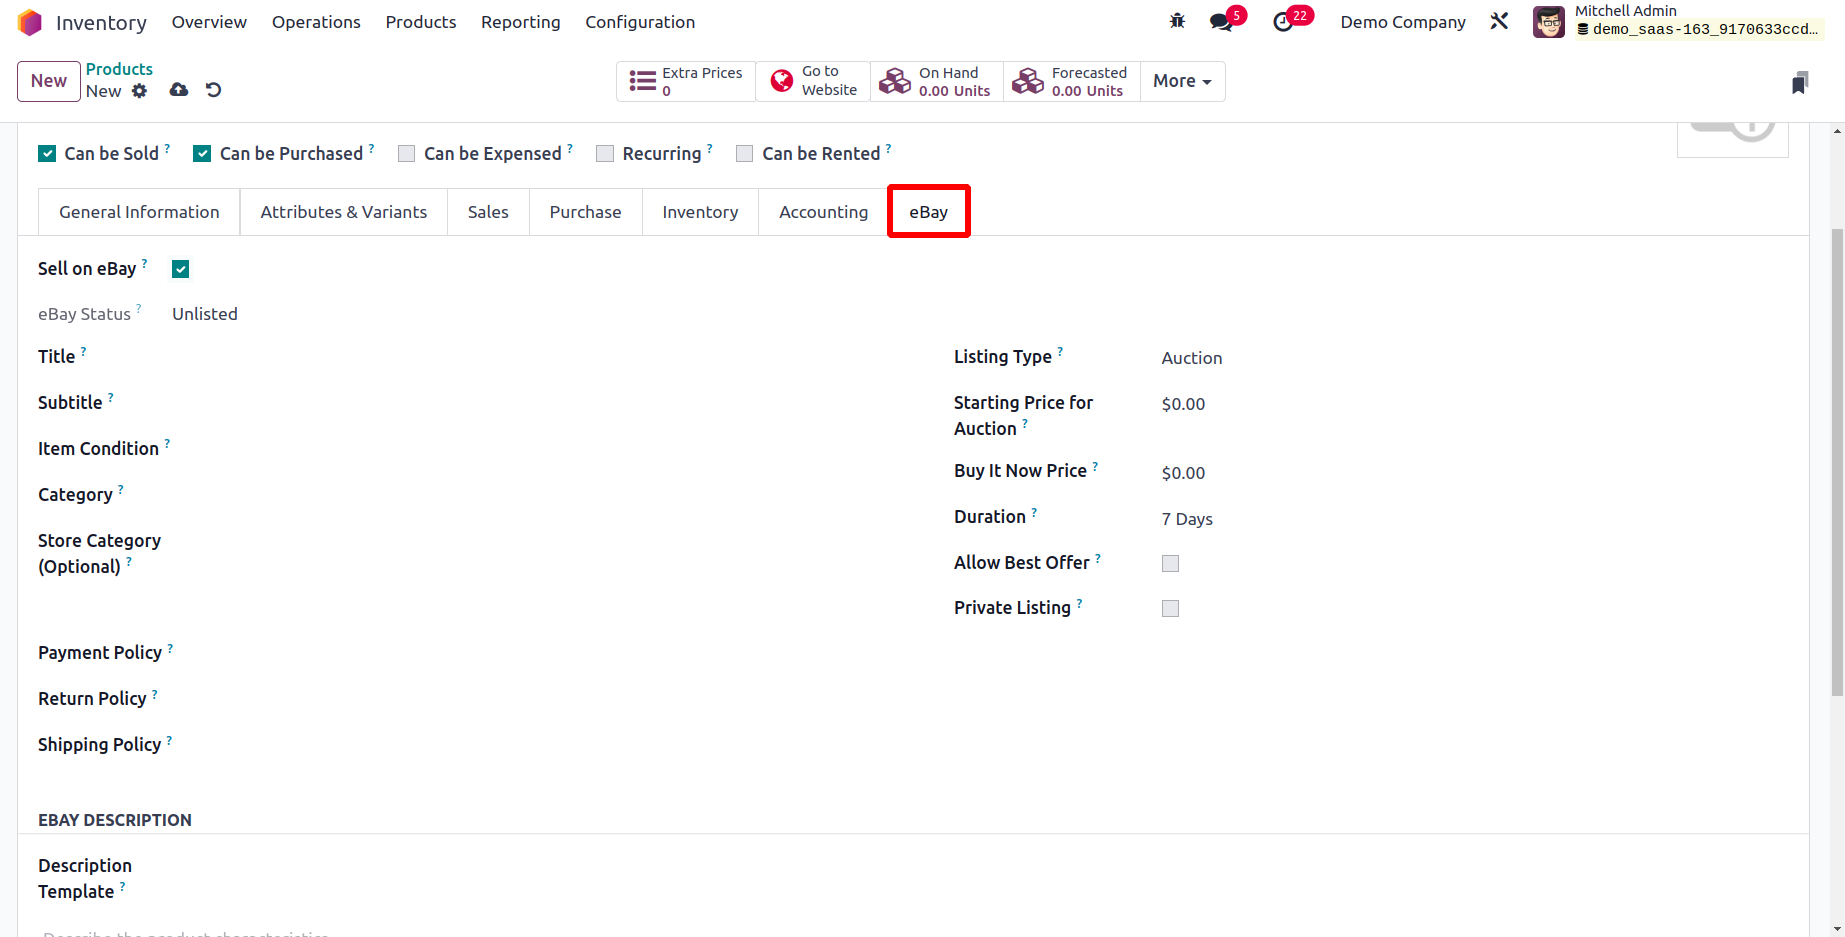
You can enable the Sell on eBay option under
the eBay tab in order to sell this item on
eBay.
You will receive more fields to set as soon
as you enable the eBay option, as indicated
in
the image above. Here, you can see the
product's eBay status. For the product on
eBay, you
can enter a suitable Title, Subtitle, Item
Condition, Category, and Store Category in
the
corresponding areas. There are two options
for the listing type: fixed price or
auction.
You will be presented with an additional
field to specify the price depending on the
option you
choose. The Duration parameter allows the
eBay listing duration to be defined. You can
make the
best offers on eBay by turning on the Allow
Best Offer setting.
To enable private listing for this product
on eBay, turn on the Private Listing option.
We went over every tab that was there in the
product configuration window.
You may use certain operational tools on the
screen after adding a new product to your
Inventory module,
including Print Labels, Update
Quantity, and
Replenish. Use the
Print Label option to
create labels for this
product that may be placed on the parcels
when they are delivered. As illustrated
below, this will
take you to a new wizard.

The fields provided here allow you to
enter the product's quantity, extra
content, and label format. Labels for
the chosen product
will be printed after clicking the
Confirm button. The example that
follows.
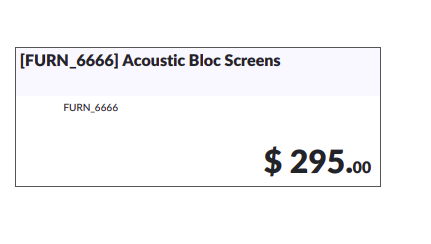
Now that we've covered the product
configuration capability,
let's talk about the configuration
of product variants in the Inventory
module.