Odoo 17 Maintenance
The manufacturing process is made as efficient as feasible via the process of managing
a company's resources and assets while controlling expenses and time. Well-maintained
resources and assets greatly reduce the likelihood of unscheduled downtime while
maintaining a stable level of productivity. Unexpected expenses for items like repairs
(overtime labor, replacement parts, etc.), delayed shipments, missed revenue, or
total machine malfunctions increase as a result of unplanned downtime. Manufacturers
can use the cutting-edge software program Odoo Maintenance. It is a comprehensive
software solution for maintenance management that provides end-to-end services for
all kinds of manufacturing enterprises. This book will provide a clear explanation
of the Odoo 17 Maintenance application, which is accessible in the community version.
By increasing the operational efficacy of plant facilities and reducing operating
expenses, maintenance management increases income while improving the quality and
output of manufactured items. In addition to cost savings, other benefits include
heightened workplace safety, heightened productivity, and fewer staff errors.
The following are some benefits of putting a maintenance plan in place:
- Safety gains are brought about by a reduction in the possibility of mishaps, fatalities,
and the ensuing responsibility resulting from defective or dysfunctional assets.
- Avoid costly downtime incidents that could impede productivity and result in financial
losses for the organization.
- Extend the life of assets and increase their value as a post-use asset.
- Reduce the cost of maintenance since repairs sometimes cost substantially more than
preventive maintenance.
- In actuality, one of the most important measures of maintenance effectiveness is
the ratio of planned to unplanned maintenance.
- Keep assets to fulfill financial and scheduling obligations.
- Lower energy use and running costs.
- By maintaining comprehensive service logs that demonstrate adherence to recommended
maintenance requirements, you can preserve warranty coverage.
A thorough maintenance management system offered by Odoo 17 will look after your
manufacturing company.
The Odoo 17 ERP platform offers a free community version of the program that you
can install. The screenshot below shows the homepage of the maintenance application,
which you will view after installing and opening it.
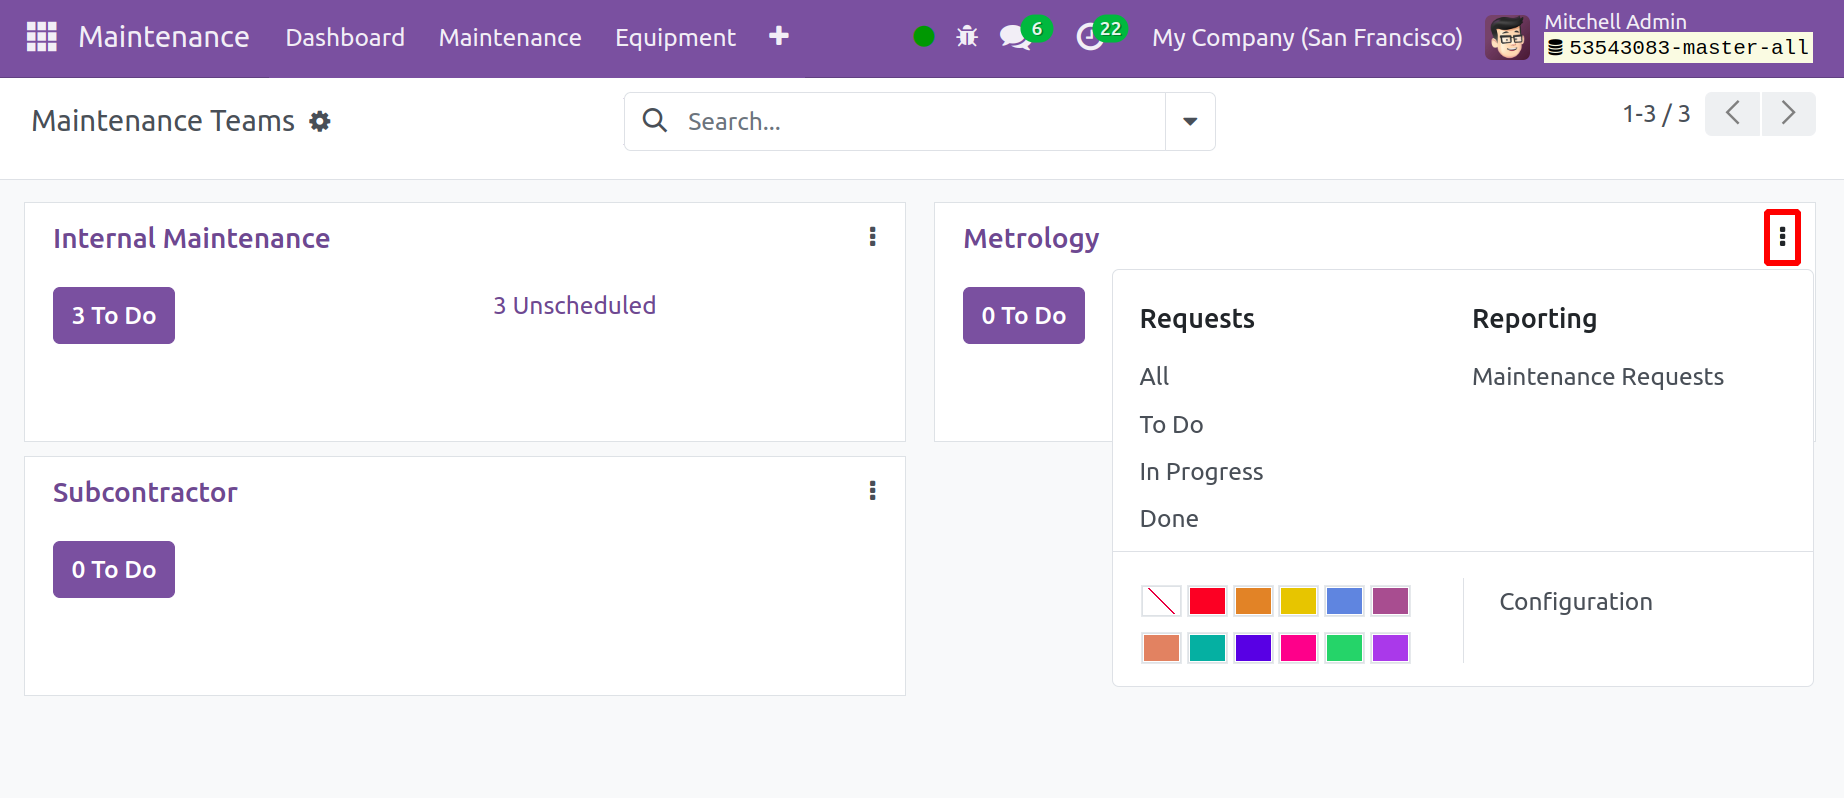
As you can see, team-based maintenance requests like Internal Maintenance, Metrology,
and Subcontractor are used to organize the maintenance homepage in a Kanban-style
dashboard. As a result, the relevant team will review and address the requests that
have been added to their assigned duties.
Internal Maintenance: Users can propose new internal maintenance
initiatives to this maintenance management team.
Metrology: Metrology is the study of measuring things. In the context
of modern manufacturing, metrology refers to quality control methods used to calibrate
production machinery and measure final goods. Users can add metrology-based maintenance
requests to the metrology maintenance team.
Subcontractor: This group arranges maintenance chores that are
dependent on subcontractors. Following the appropriate maintenance category, users
may also post their requests and duties on this home page.
The maintenance tasks of manufacturing enterprises or firms are better managed with
the aid of this kind of task organization. In the platform, you can also form new
maintenance teams—a topic that will be covered in the sections that follow.
Types of Maintenance Management
- Preventive Maintenance
- Corrective Maintenance
Preventive Maintenance
Preventive maintenance refers to routine maintenance that is carried out ahead of
time to stop heavy machinery, cars, electronic equipment, and other assets from
breaking down. Preventing or minimizing the impact of equipment failures is the
major objective of maintenance, as it guarantees the equipment's correct functioning
and reliability. Preventive maintenance is carried out on machinery that is still
in excellent operating condition, as opposed to corrective maintenance, which fixes
or restores broken or non-functioning equipment.
Corrective maintenance
"Corrective maintenance," also referred to as "non-routine maintenance," is the
most basic kind of maintenance and comprises identifying and correcting flaws or
deficiencies. Corrective maintenance fixes equipment or facility flaws that have
been identified. Resolving and fixing the problem is the primary goal of corrective
maintenance.
It is necessary to replace certain equipment pieces, which is common when computer
equipment wears out, so this maintenance, which is carried out when an equipment
failure or breakdown occurs in equipment that cannot be planned ahead of time, presents
costs for repair and spare parts that were not budgeted for.
Equipment
The fundamental component of the maintenance management system is equipment. Users
can add their organization-manufactured or maintained equipment to the Odoo 17 Maintenance
software platform after installing the module.
As seen in the screenshot below, Odoo 17 offered a distinct menu for the equipment
management procedure that is viewable from the application platform Menubar.
The homepage appears after selecting the "Equipments" menu, as seen below.
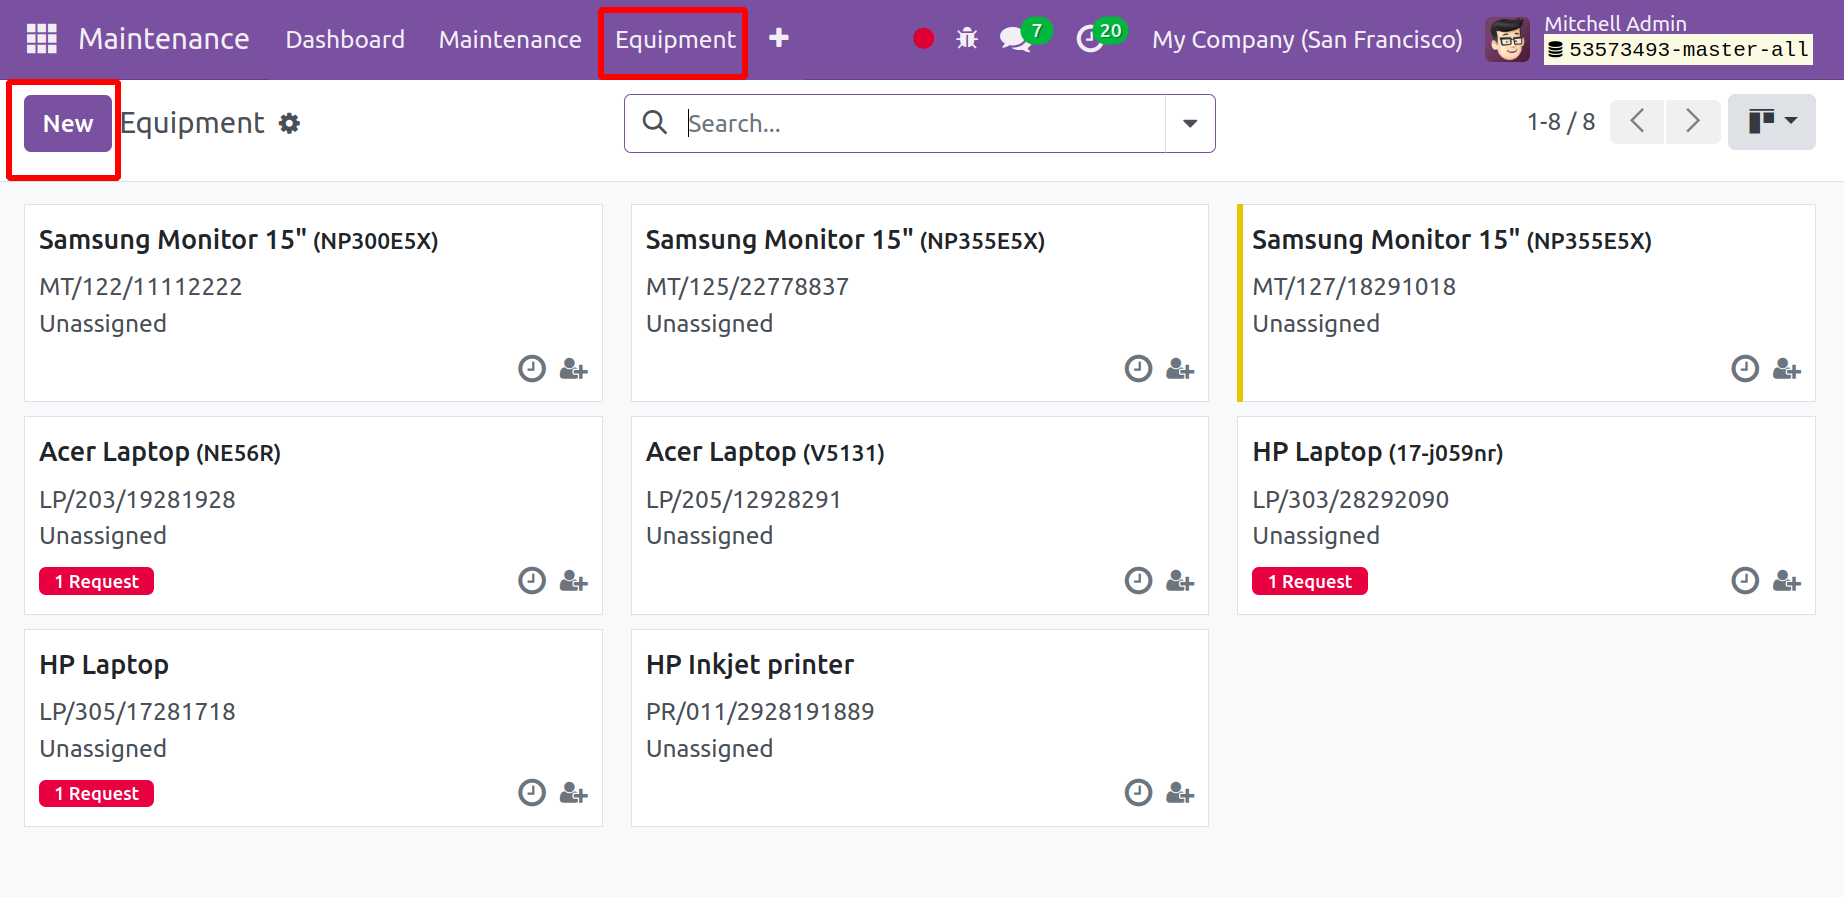
The list of previously built equipment is visible to users in a Kanban dashboard
view. By selecting the corresponding Kanban card, we may also view the specific
equipment's details. From the dashboard, you can also view product or equipment
details and the number of repair requests related to a certain piece of equipment.
The homepage view for "Equipments," as seen in the screenshot above. You will next
be taken to an equipment configuration form where we can designate new equipment
for maintenance procedures and establish how frequently those operations should
occur. The configuration form is shown as it appears in the screenshot below.
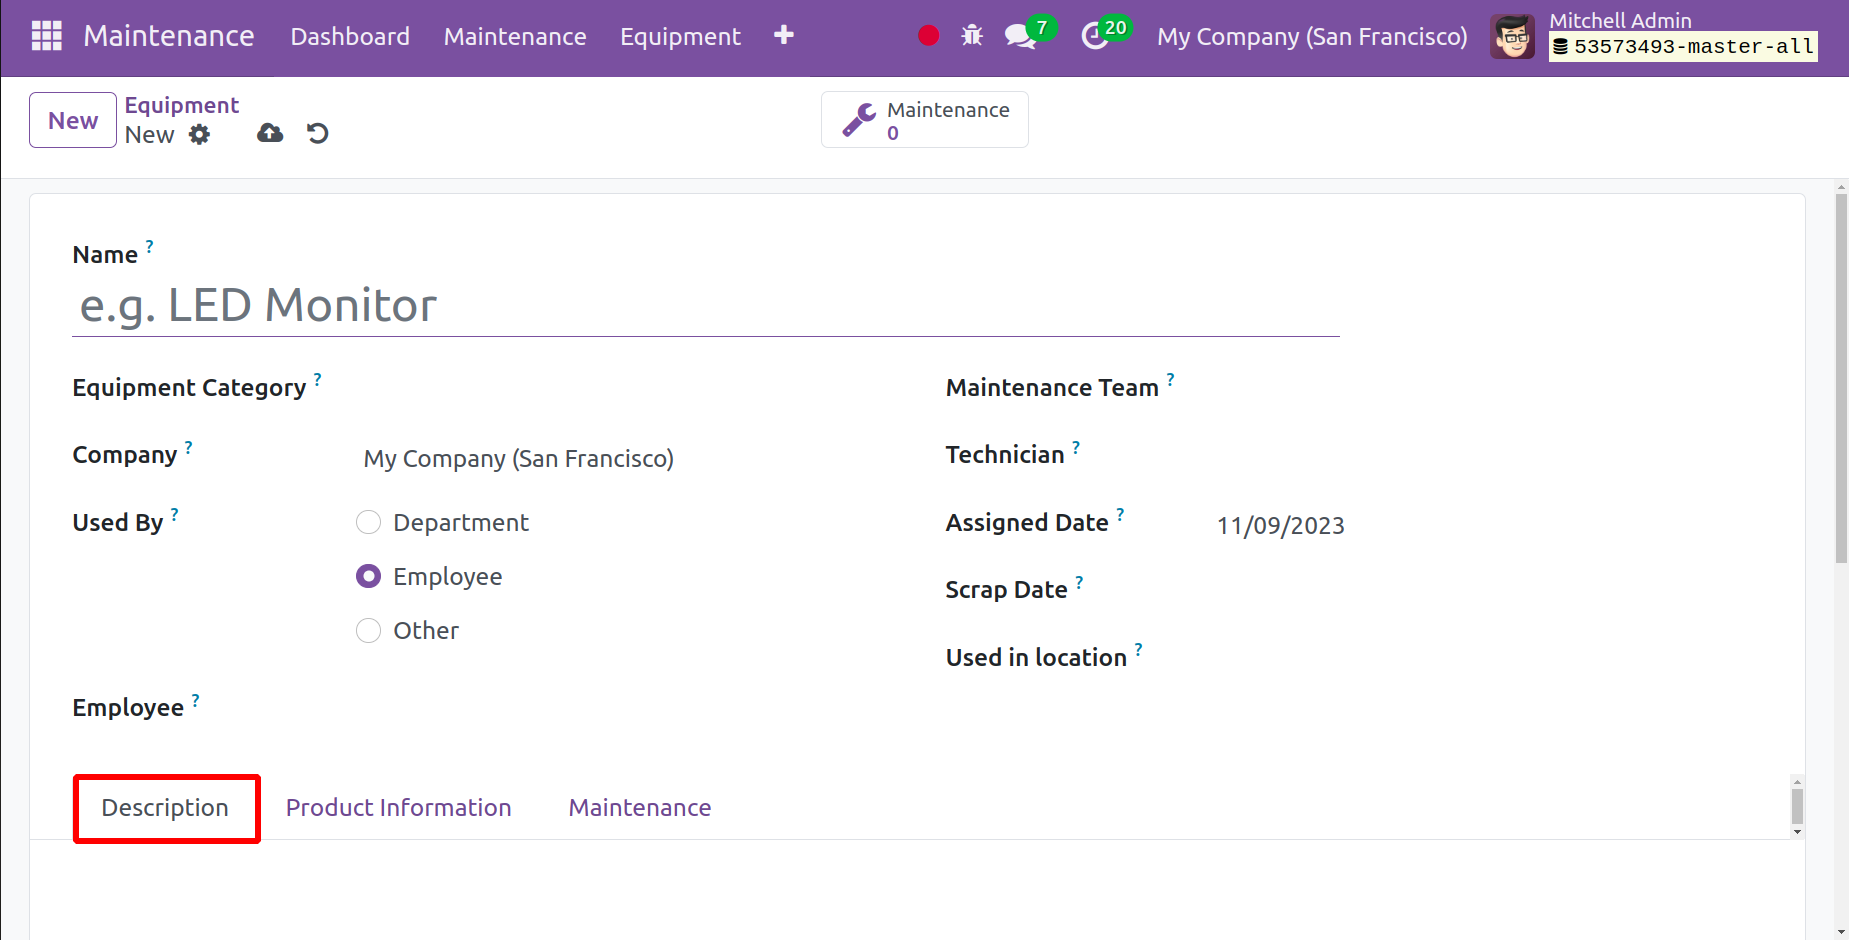
In this form, users can add their products, equipment, and components along with
a thorough description of the specific equipment. The data fields must be completed,
such as the Name of the equipment. The type of equipment, such as computers, monitors,
electronics, etc. (selectable from the drop-down menu in the category box). Name
and specifics of the business. In the section on the Maintenance Team, mention the
name of the specific team that will be assigned the task of maintaining the equipment.
The equipment maintenance technician's name. The area in your organization where
the equipment is utilized. The name of the worker in charge of the equipment. State
who is in charge of the equipment in the Used By field.
The following sections make up this form: Description, Product Information, and
Maintenance. As seen in the example above, you can provide the product description
and maintenance issue in the Description box.
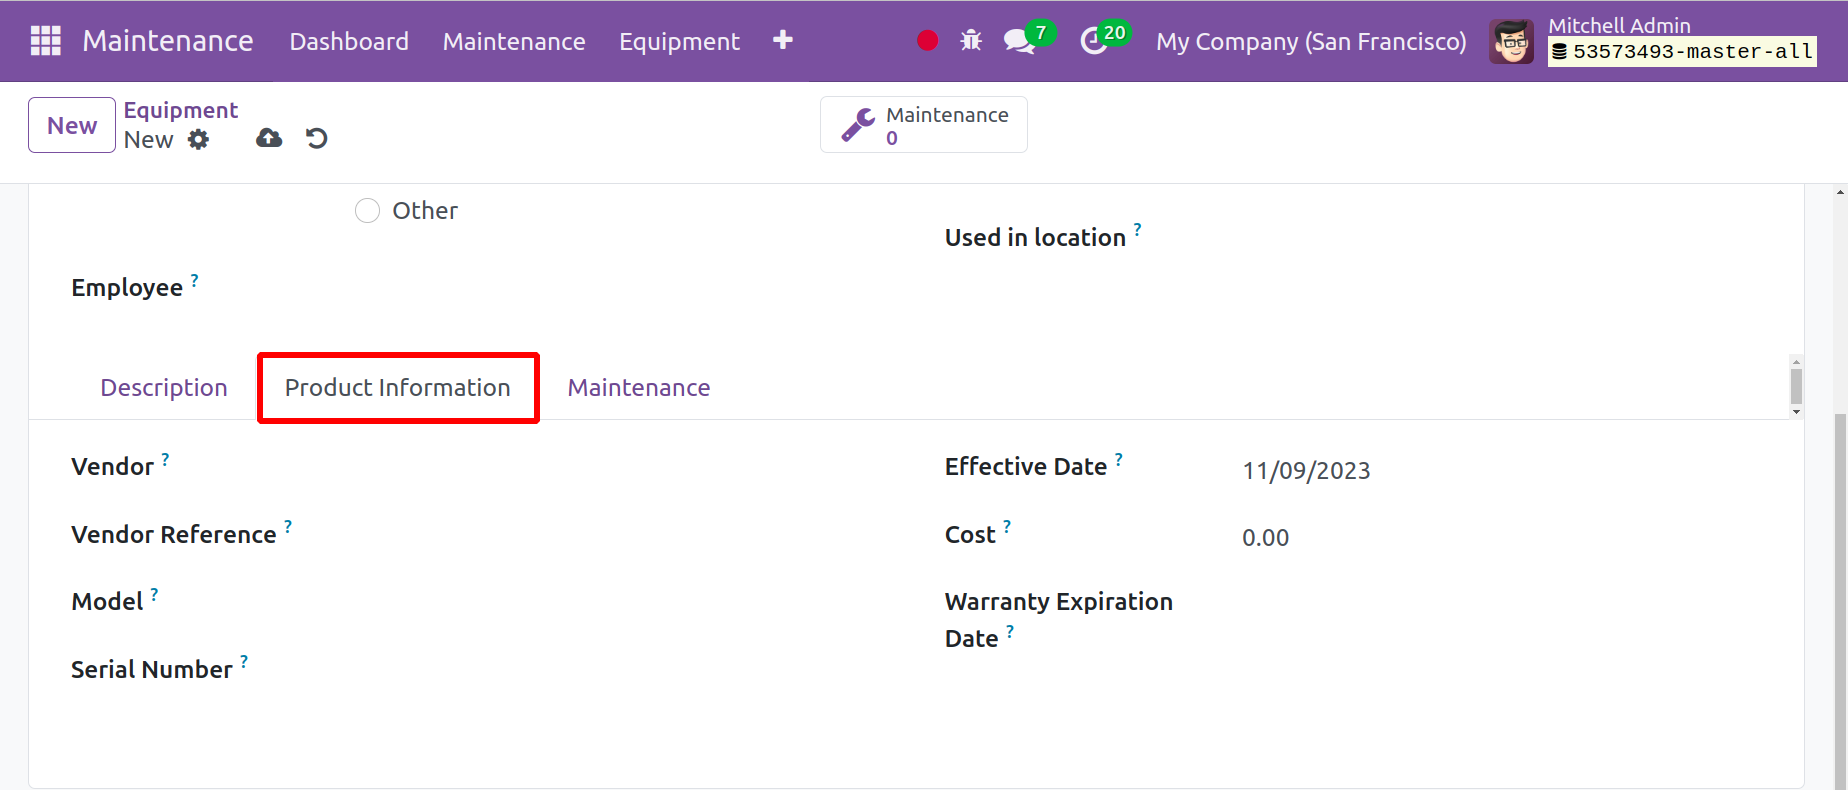
Under the Production Information tab, you can enter facts about the equipment, including
the name of the product vendor, vendor reference information, equipment model details,
product or equipment serial number, and equipment cost. The date when the equipment
was added for the first time in the Effective Date field and the equipment's warranty
period in the Warranty Expiration Date field
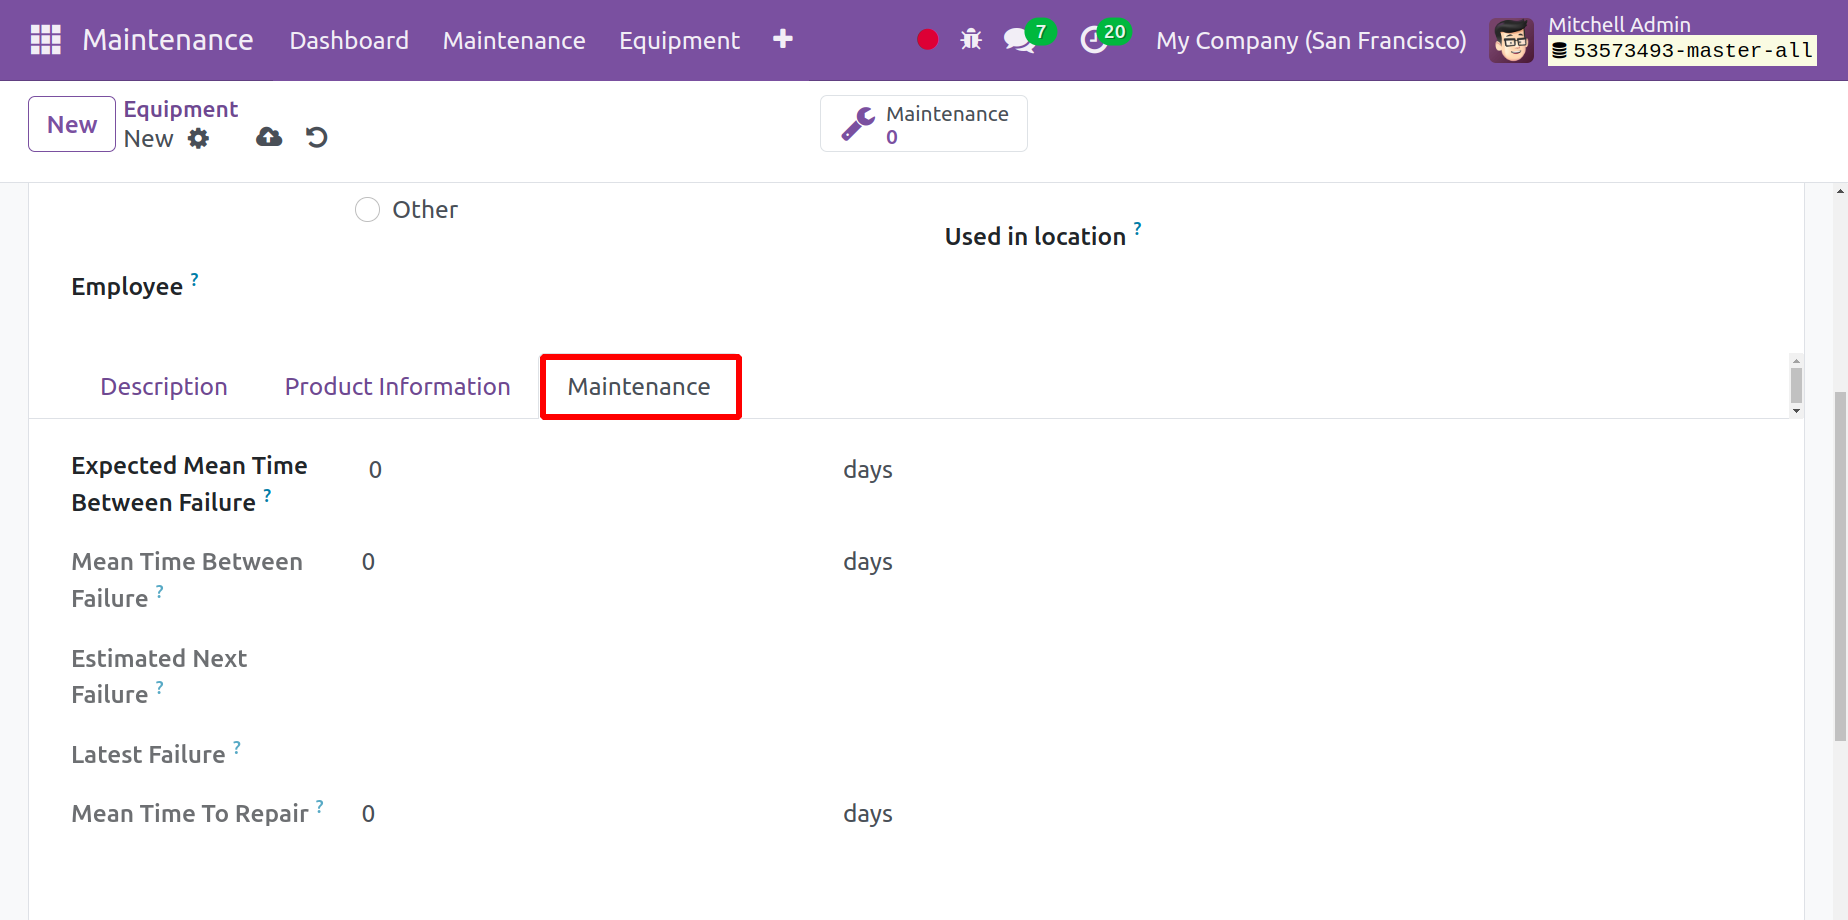
You can enter your preferred maintenance frequency in the provided data fields located
in the "Maintenance" section of the configuration form.
Preventive maintenance frequency is a technique used by businesses to arrange their
resources so that maintenance jobs are finished according to predetermined time
or usage triggers. In this data area, indicate how frequently you maintain your
equipment.
Maintenance Duration: You can state how long the maintenance process will take for
your equipment. Use the save icon to store the details of your equipment.
Then you can see that new equipment has been developed from the "Equipment" home
page.
Your equipment record is now kept on file in the Odoo 17 maintenance portal. So,
by selecting the Kanban view, you can view the maintenance history of the specific
piece of equipment.
Equipment Categories
Every piece of equipment can be divided into several categories based on its functions
and other considerations. Choose "Equipment Categories" from the "Configuration"
menu to alter these equipment categories and add new ones to the system. The personnel
in charge of each category of equipment is listed together with the categories of
equipment. You can view the equipment that falls under the chosen category by selecting
them.

The screenshot above illustrates how different equipment categories are grouped
in a dashboard list view according to the criteria of "Category Name," "Responsible,"
and "Company." The setup menu allows you to add additional categories in the manner
shown below. Select the "NEW" button that is present on the "Equipment" site. The
screenshot below illustrates how the Equipment category configuration form will
appear when it opens.
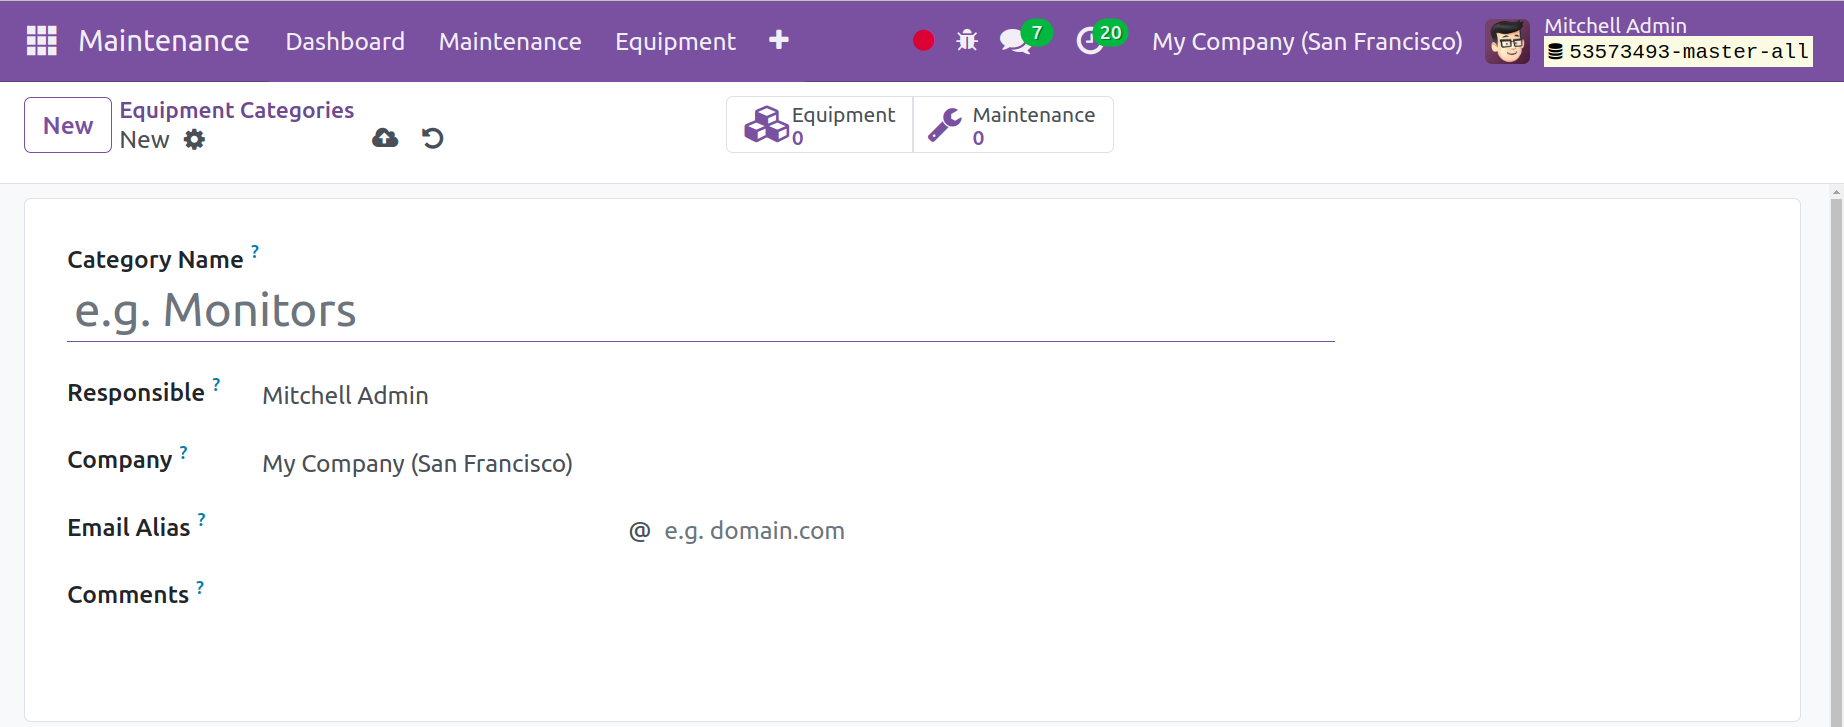
You will then be brought to a form page where you have to fill out the category
information, as seen in the screenshot below.
In this form, you can enter information such as "Category Name," "Responsible" employee
or person name, "Company" data, and "Comments" about the category. You can save
the information by clicking the save icon on the form page.
The previous section covered our discussion and creation of the fundamental specifications
for the maintenance module's constituent parts. The establishment or configuration
of "Maintenance Teams" within the Odoo 17 platform is the following step. The "Configuration"
option is another tool available for this operation.
Maintenance Teams
Users can establish new Maintenance teams for their manufacturing facility or organization
based on their needs and specifications, as we covered in the previous section.
Using the "Configuration" menu in the Odoo 17 maintenance module may be accomplished
with ease. As seen in the screenshot below, select "Maintenance Teams" from the
Configuration menu dropdown to start a new maintenance team.
From the "Maintenance Team" home page, you may view the names of the current teams.
Additionally, as seen in the screenshot below, you can form new teams by clicking
the "New" button located beneath the teams.

Forming a new "Team" is a fairly simple process. As seen below, selecting the "NEW"
button will cause a new data field to pop up, allowing us to enter new "Team Names,"
"Team Members," and "Company Details."

For illustration, we are creating a new team here called "Quality Maintenance."
Once the process is finished, use the "Save" button to save the team. Using the
above process, you can add more teams based on your needs.
We may observe the procedure for generating a "Maintenance Request" utilizing the
established teams and equipment after the fundamental data requirements for the
module have been established.
Maintenance Request
Thus far in our conversations, we have covered the topics of creating "Equipment,"
forming "Maintenance Teams," and classifying equipment. Now let's look at how to
use the teams and tools that are accessible on the platform to send or generate
a maintenance request. As seen in the screenshot below, navigate to the "Maintenance"
menu and choose the "Maintenance Request" option from the dropdown menu.
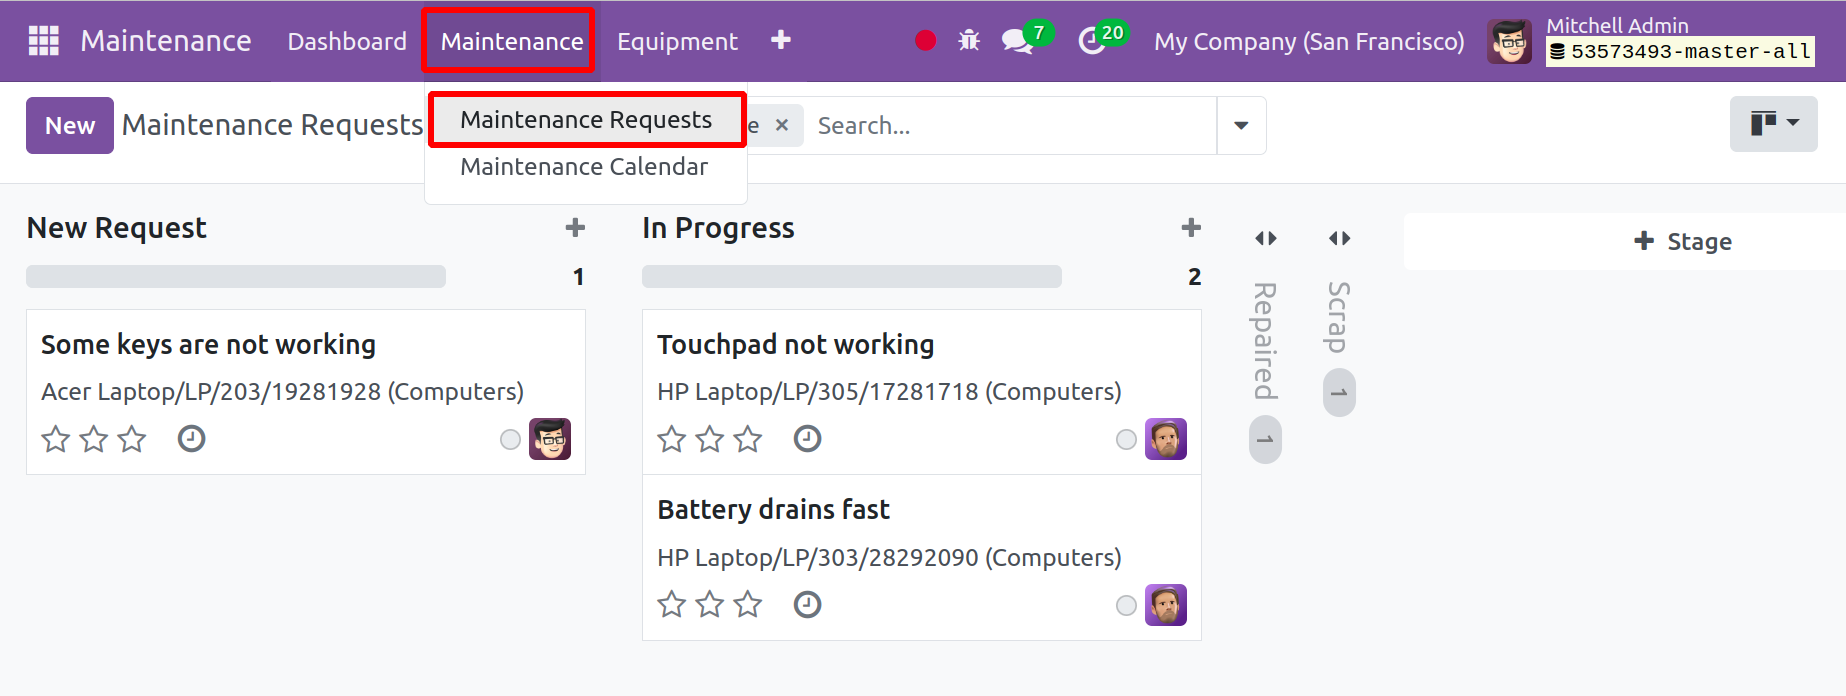
The open maintenance requests and their current status are displayed in this "Maintenance
Request" box. After accessing the "Maintenance Request" homepage, we can see the
created request dashboard view as seen in the screenshot above. In this case, the
requests are arranged according to projects. In this Maintenance Request window,
you can see the ongoing maintenance requests along with their current statuses.
This means that if the maintenance request is in the progress condition, the state
is changed to the "In Progress" stage. As soon as the equipment is fixed, its status
will automatically change to "Repaired". However, if the equipment is scrapped,
the state will change to "Scrap". You can also add new stages by selecting the "+Stage"
option on the platform, and you can fold up or unfold the stages.
Making a Corrective Maintenance Request and Scheduling as seen in the screenshot
above, click the "NEW" button located under the Maintenance request page title in
the upper left corner of the homepage to initiate a new maintenance request. You
may see the request configuration form shown in the screenshot below after selecting
the "Maintenance Request" option. Here, we must provide the necessary information.
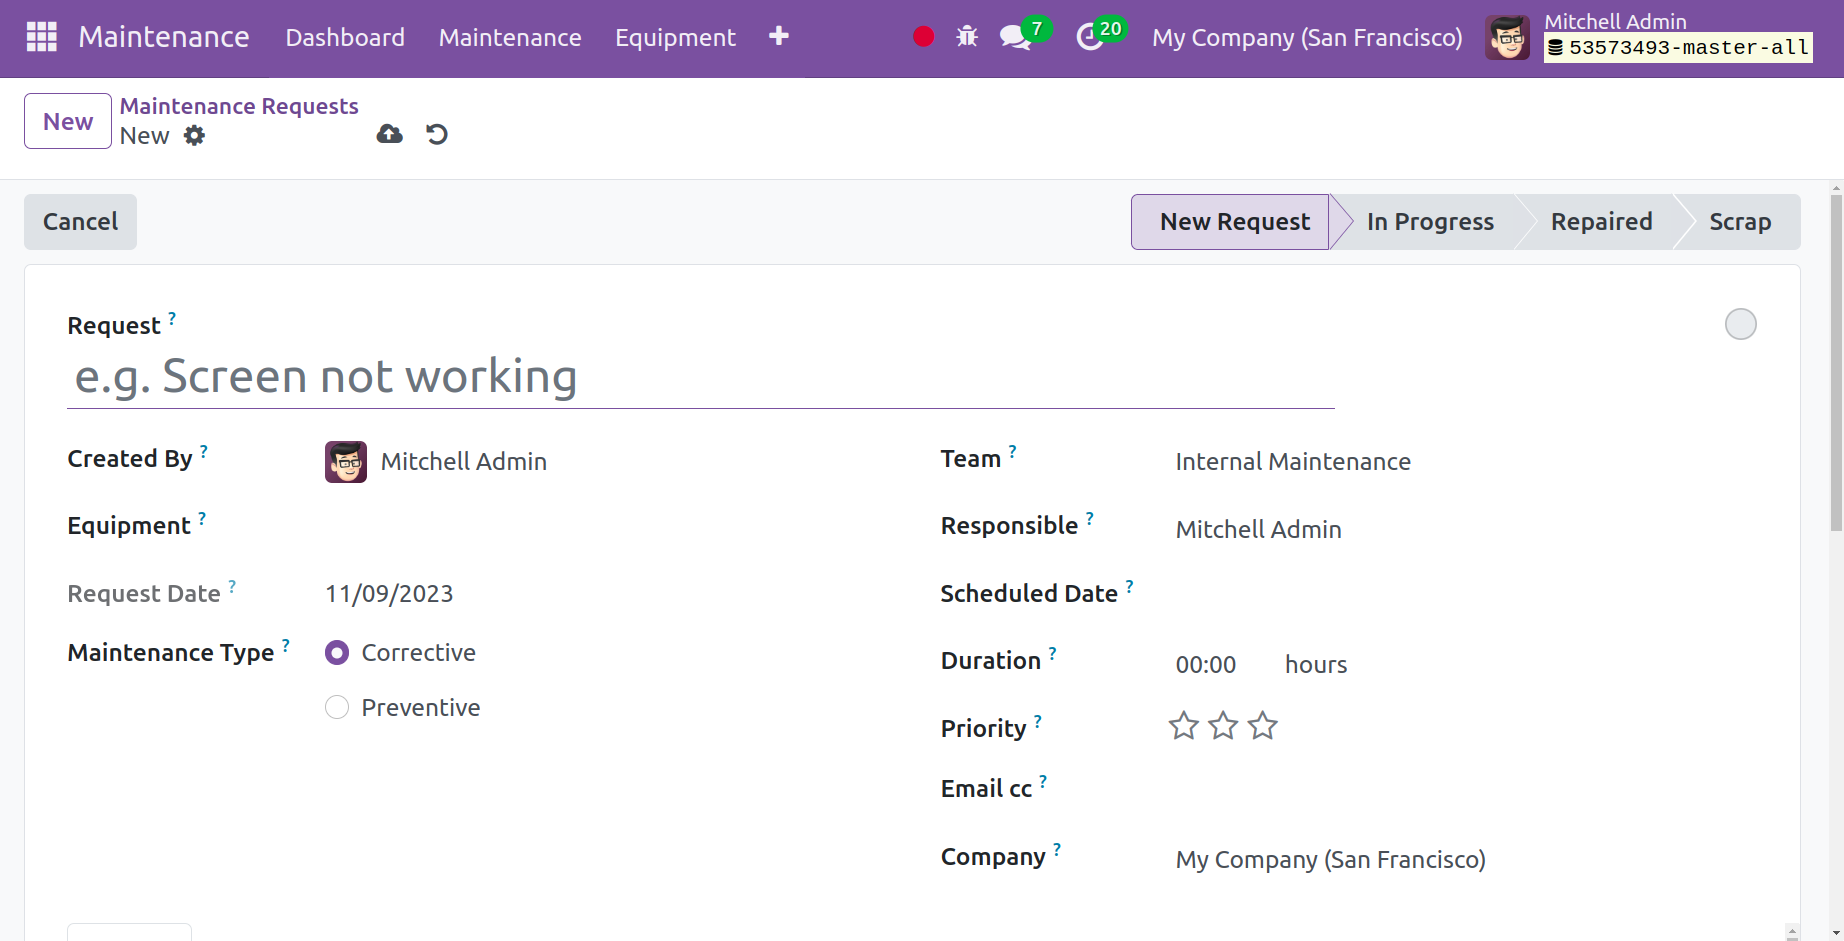
The maintenance request must be submitted using the form, which has numerous data
fields, including
Request: A description of the maintenance request must be entered
into this data area.
Equipment: The name of the equipment is selectable from the field's
dropdown list.
Date of Request: The date the request was created.
Maintenance Type: From the options next to it, choose the type
of maintenance.
Description: Please provide the maintenance crew with any information
you may have on the device.
Team: Refer to the maintenance team that is being requested based
on the kind of equipment.
Responsible: You may identify the individual in charge of this
upkeep.
Scheduled Date: The Date of Schedule.
Duration: The amount of time needed to complete the maintenance
process.
Priority: By establishing a priority, you can express your urgency.
Company: Provide specifics about your company.
After entering the necessary data, you can save the specifics of the new maintenance
request.
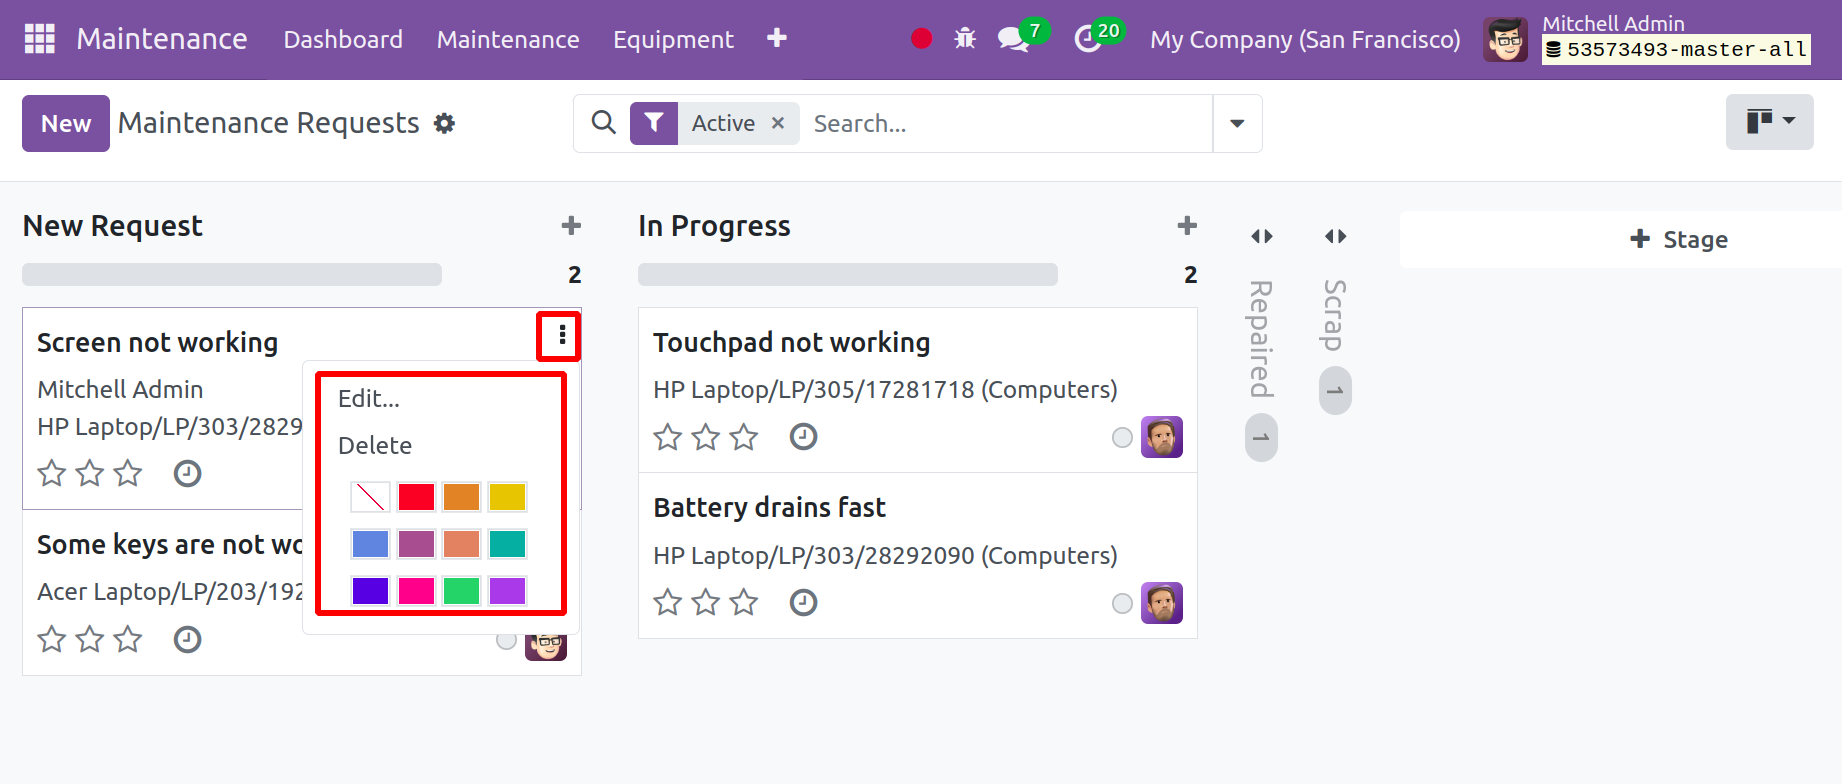
On the Kanban card, you can rapidly change the request's status and mark it as urgent
by underlining it in various colors. To fold and unfold the status as well, click
the settings button that appears next to each component of the status.
The steps needed to generate new maintenance requests from the maintenance menu
have now been covered. The event that was just described is an illustration of corrective
maintenance. We may now talk about the procedure for planning "Preventive Maintenance."
Making an Appointment for Preventive Maintenance, the process for developing, overseeing,
and planning Corrective Maintenance Management was covered in the preceding example.
Examine the example of a preventive maintenance request. Although the procedure
is nearly the same, in this case, the request is seen from a different angle. Preventive
maintenance is routine maintenance that is carried out on a regular or periodic
basis in advance to stop heavy machinery, parts, goods, and other assets from breaking
down.
Clicking the "NEW" button on the Maintenance Request homepage will open your new
maintenance request page. You will be taken to the request configuration form, which
is identical to the configuration form that was previously explained and can be
seen in the screenshot below.
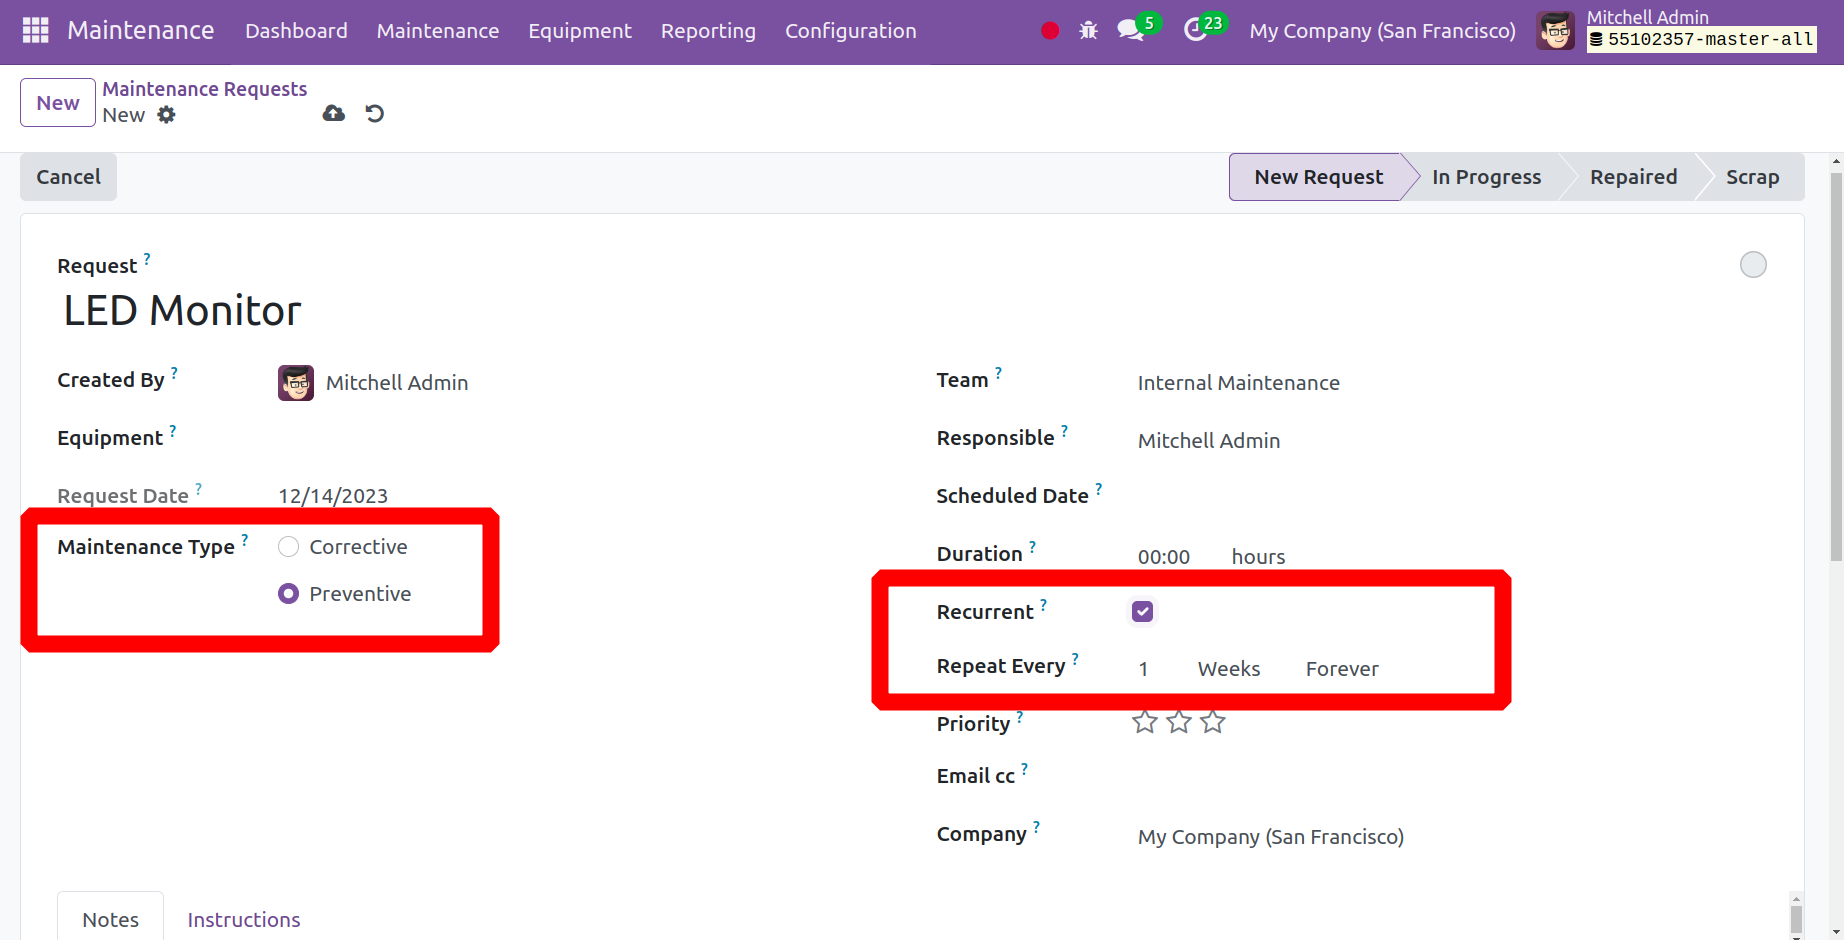
We can submit a maintenance request here to replace an LED monitor, as shown in
the screenshot below. The Maintenance Type that needs to be chosen is "preventive"
maintenance. then the request form will include a new field named Recurrent. The
frequency of recurrence might then be specified. That means that preventive maintenance
will take place.
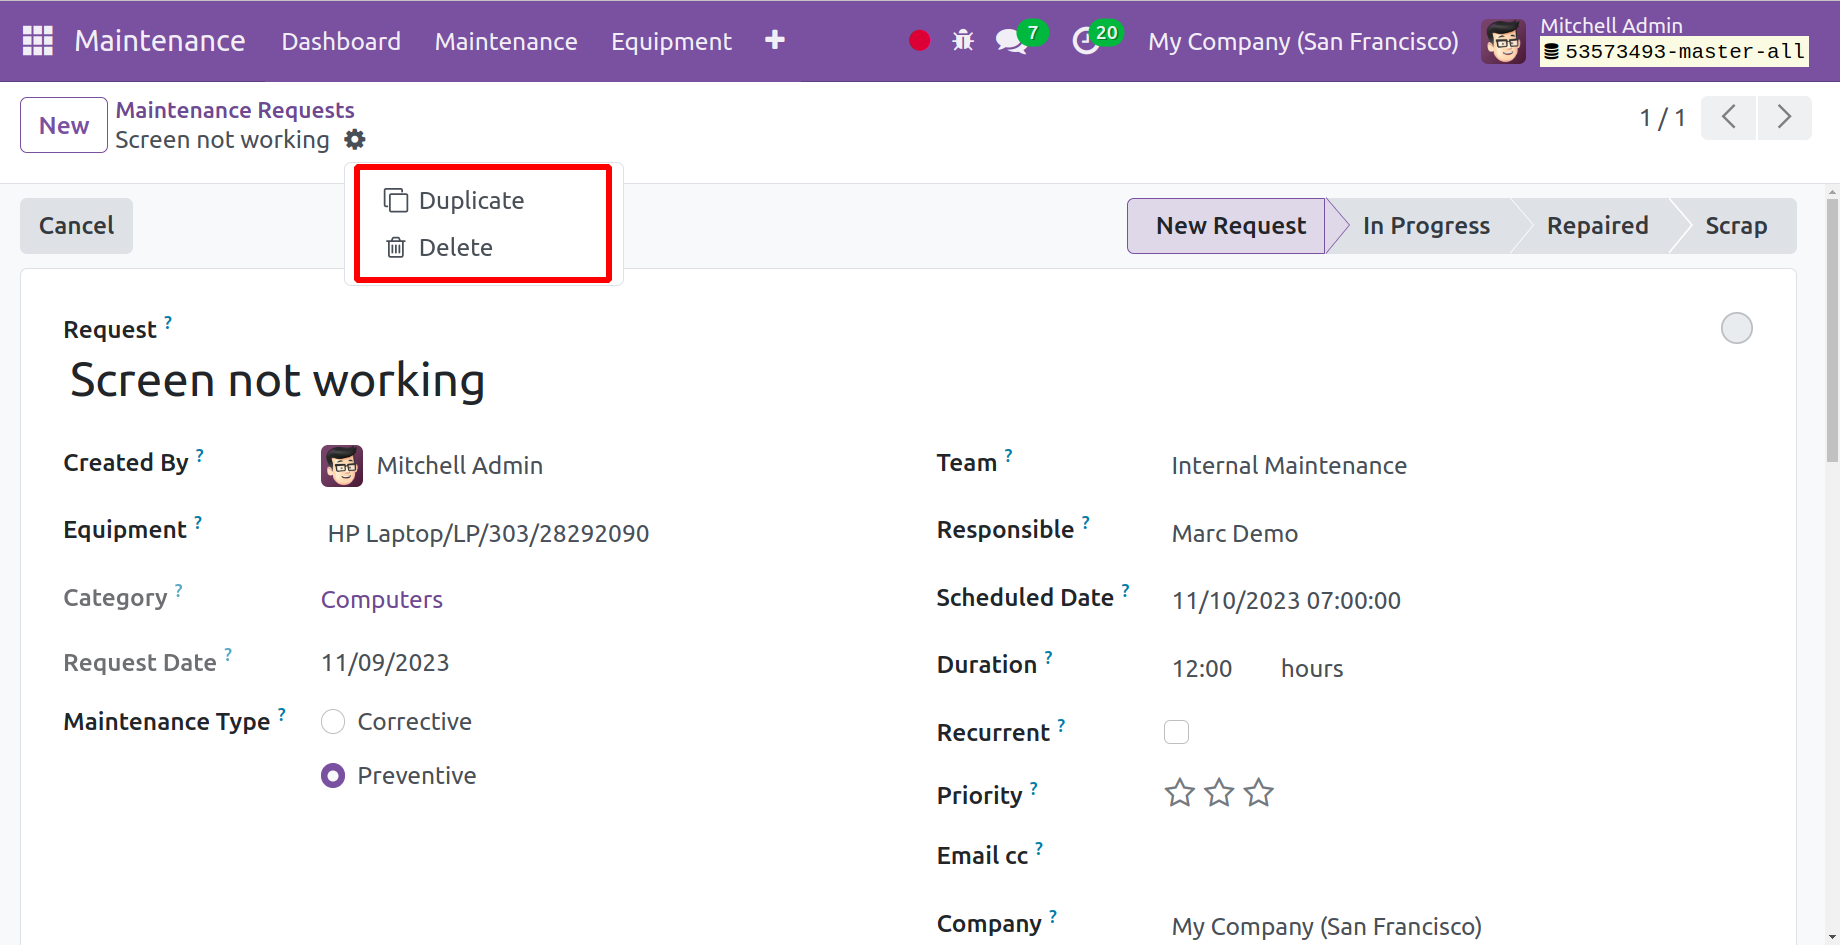
By selecting "Duplicate" from the "Action" menu, you can make numerous copies of
the same maintenance request by clicking on the action button. This approach allows
users to make numerous copies of their requests.
Once the essential info fields have been filled out, save the details. You may view
the freshly created request from the "Maintenance Request" Home page.
Through the "Maintenance Calendar" option, you may view the recently created maintenance
request.
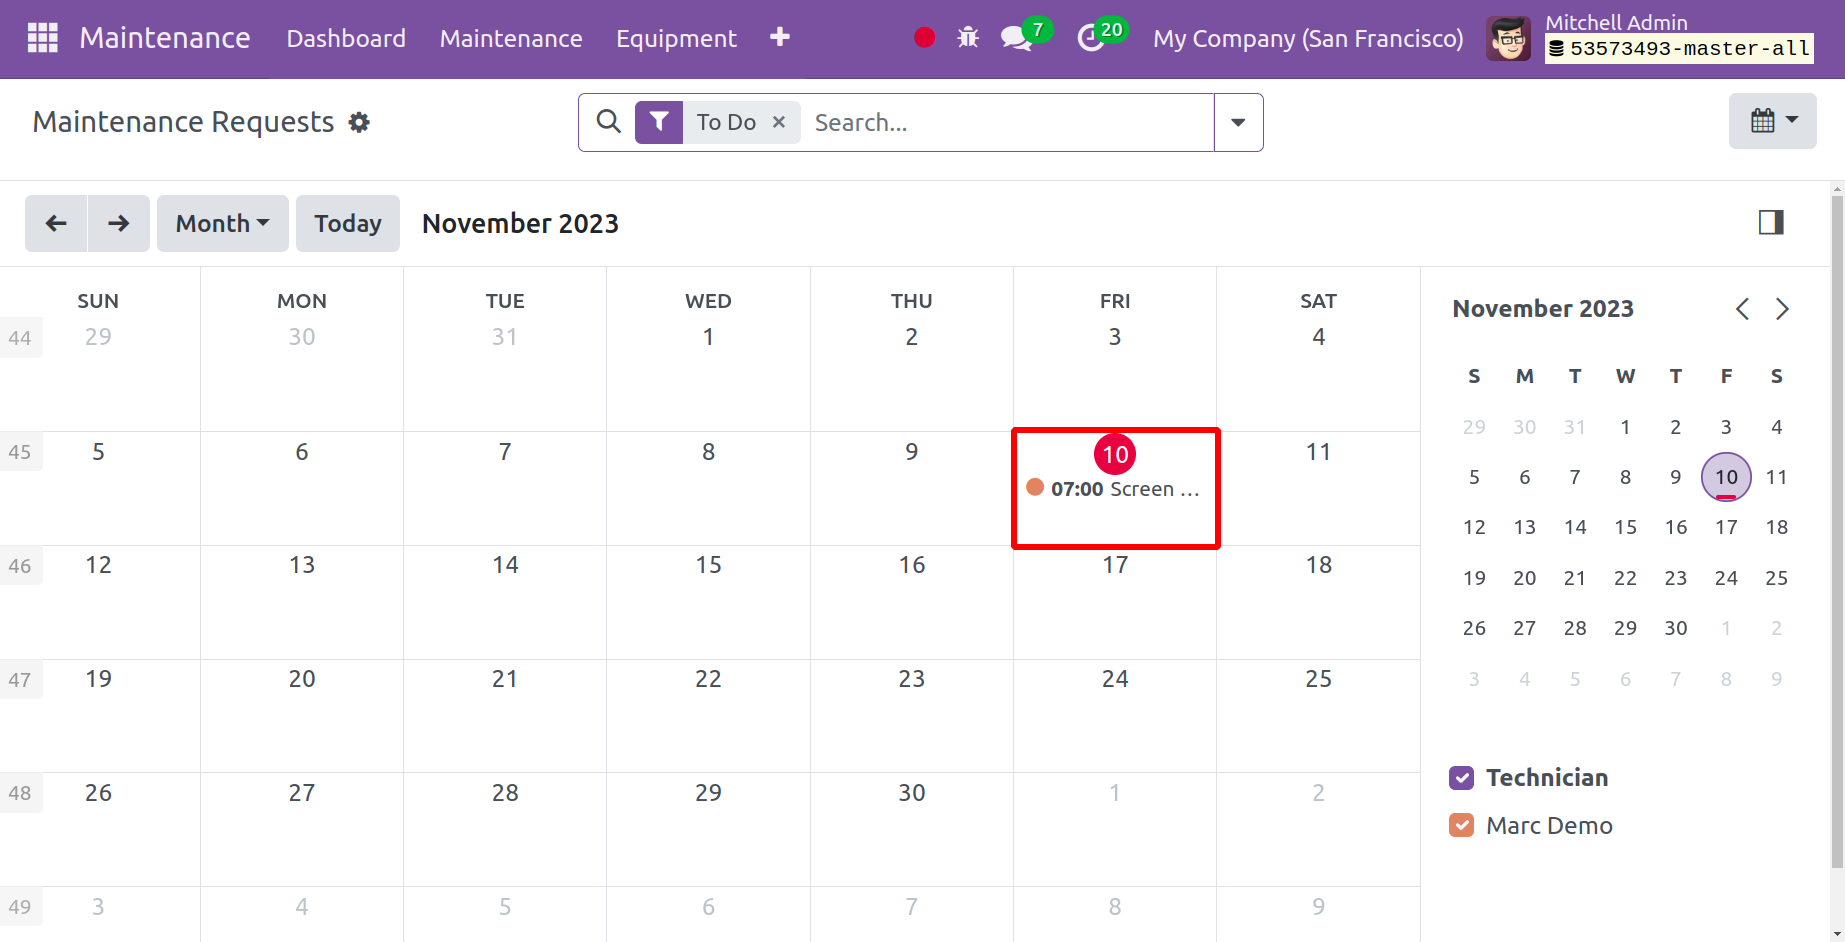
We may now talk about the "Maintenance Calendar," the second item on the maintenance
menu.
Maintenance Calendar
The Maintenance menu's Maintenance Calendar option allows you to see all of the
maintenance tasks in a calendar view. The tasks from a specific day, week, month,
or year can be viewed.
You may easily make a maintenance request based on a specific date by using the
Maintenance Calendar included in the Maintenance Module. This is a quick and easy
way to schedule maintenance jobs according to the days that are open on your working
calendar. From the Maintenance menu dropdown list, select the "Maintenance Calendar"
option, as seen in the screenshot below.
As seen in the screenshot below, you can see the webpage for the Maintenance Calendar.
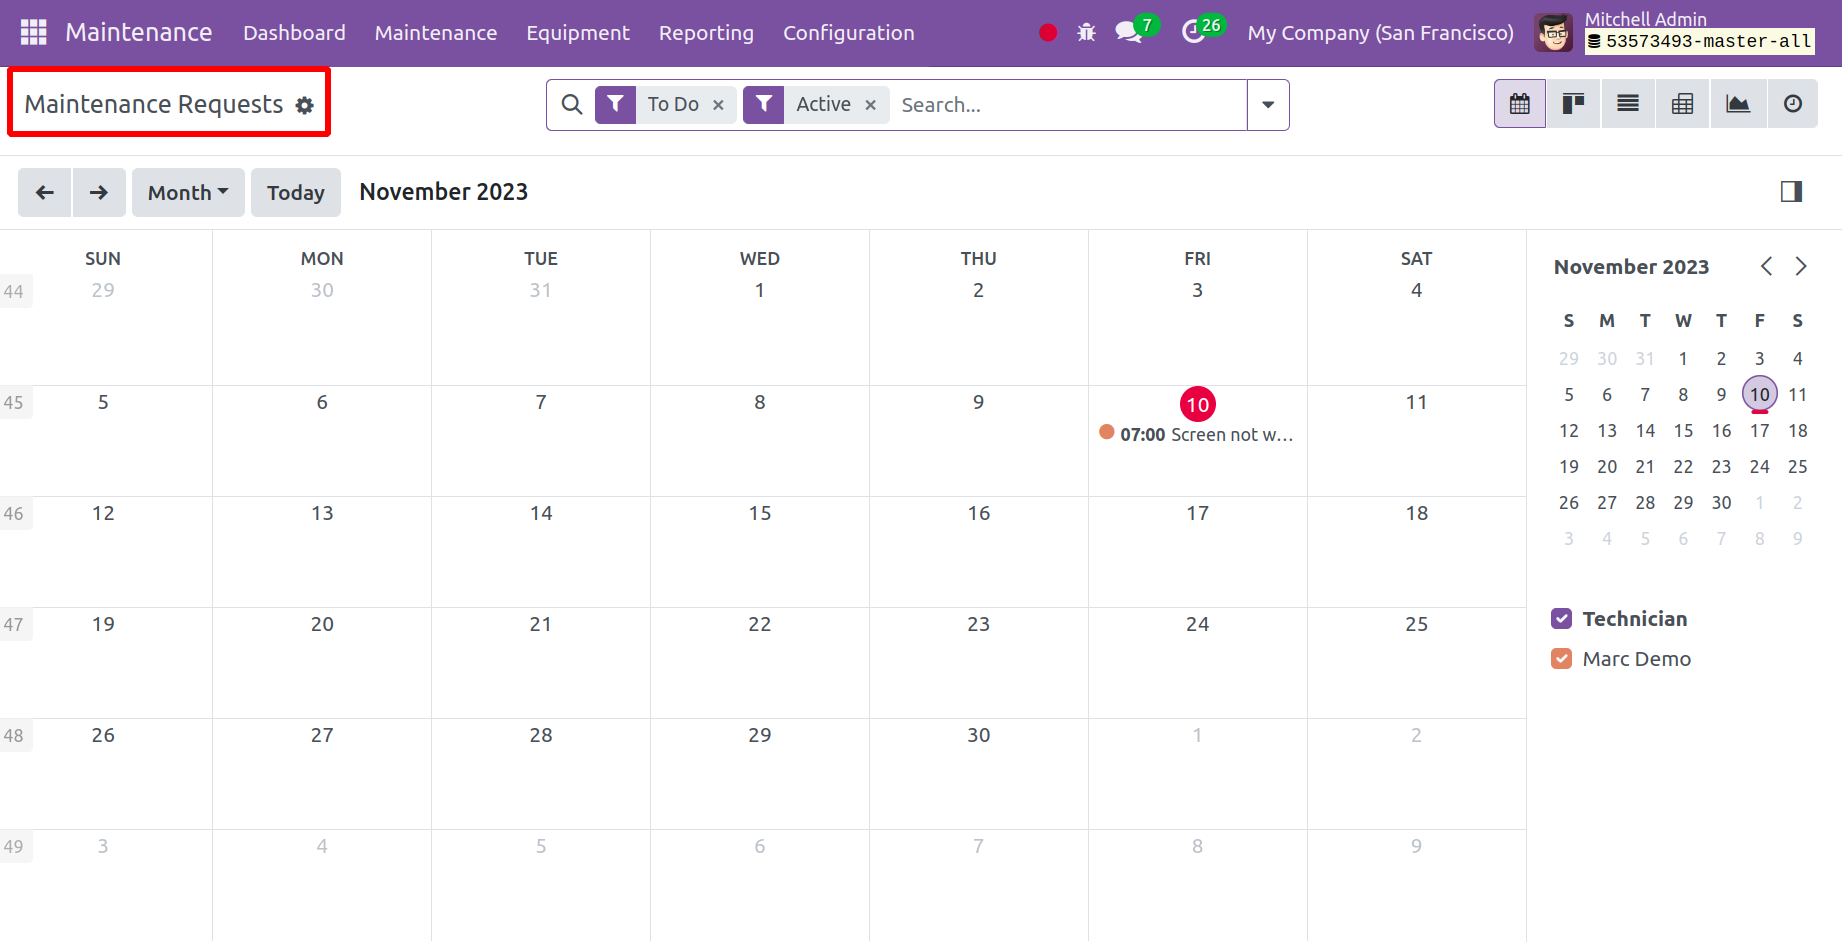
We can observe that the tasks are organized in a calendar style for simple identification
from the Maintenance Calendar page. The tasks are displayed date-based in the screenshot
above. To obtain a summary of the maintenance, we can click on the job card.
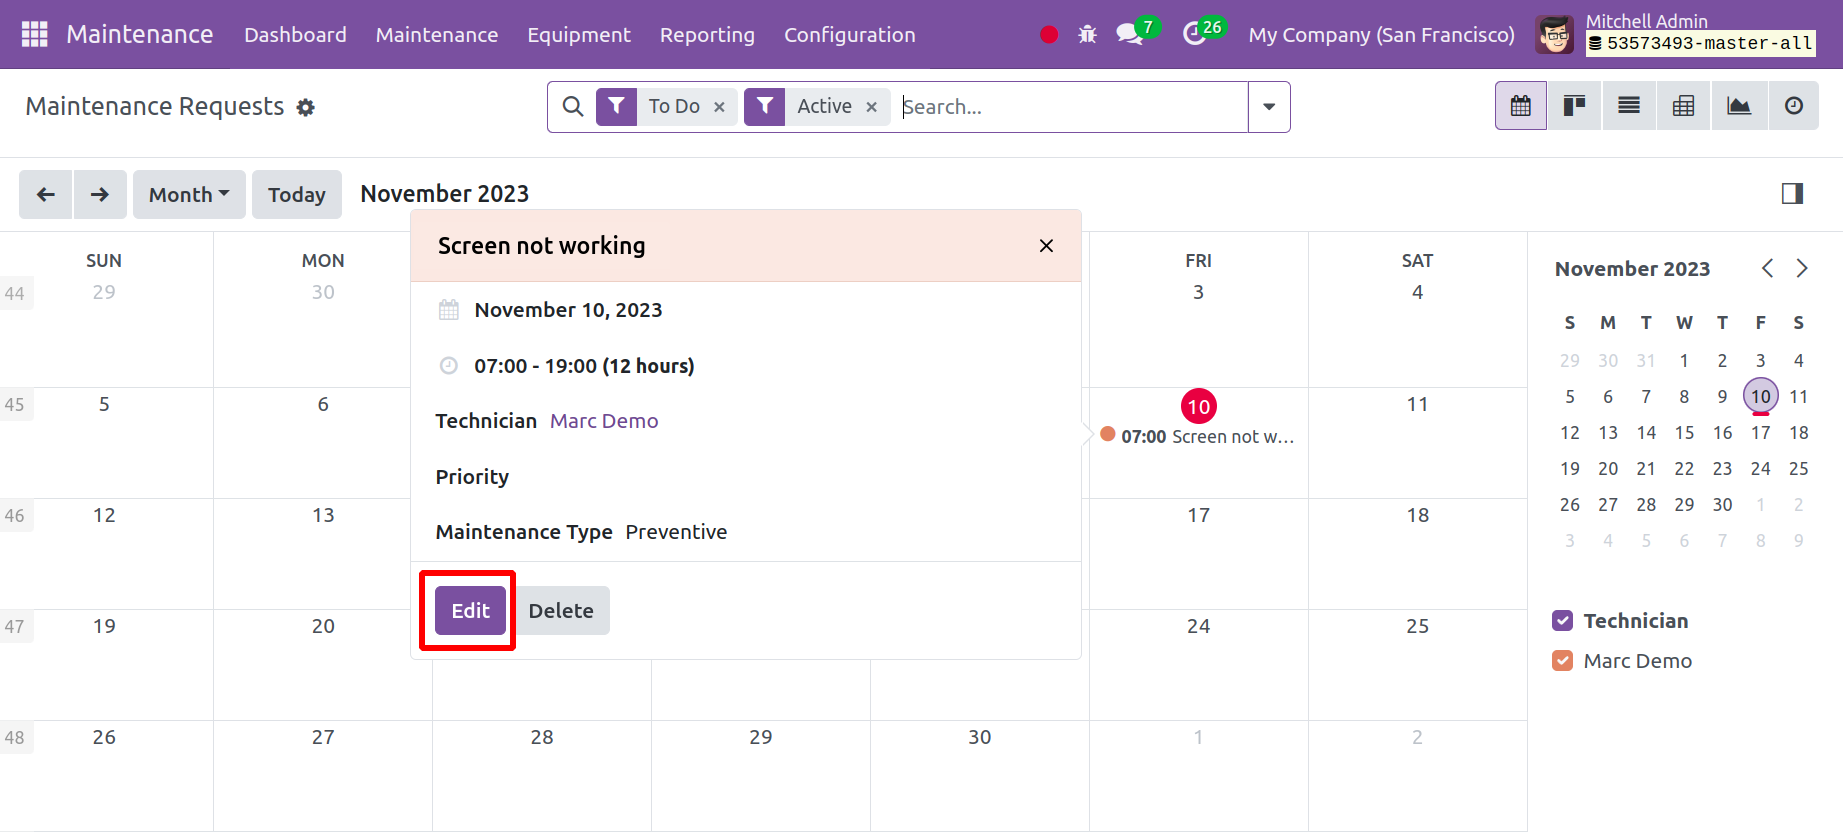
A window with the task's planned date, priority, and other details will open when
you click on the task or request card. By selecting the "EDIT" option in the job
details card seen in the screenshot above, you can easily change the maintenance
request. A specified date in the calendar can be set for adding new requests.
To add a new maintenance request for a certain date, select that date on the calendar,
as shown in the screenshot below.
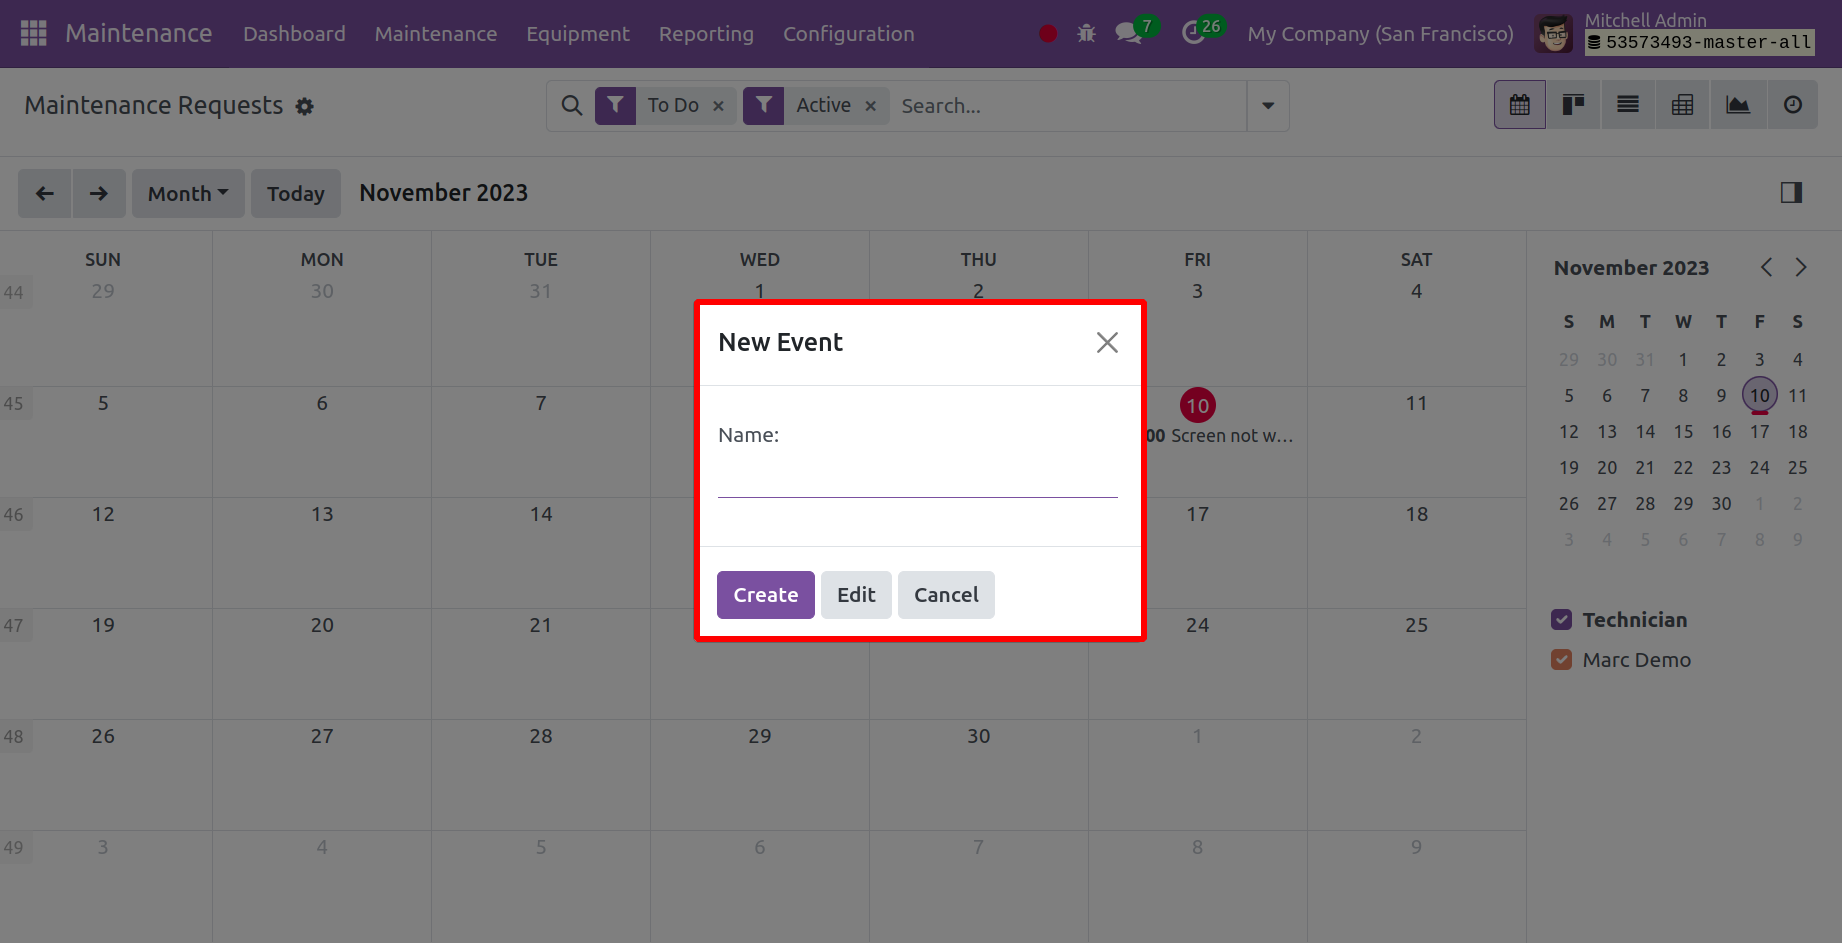
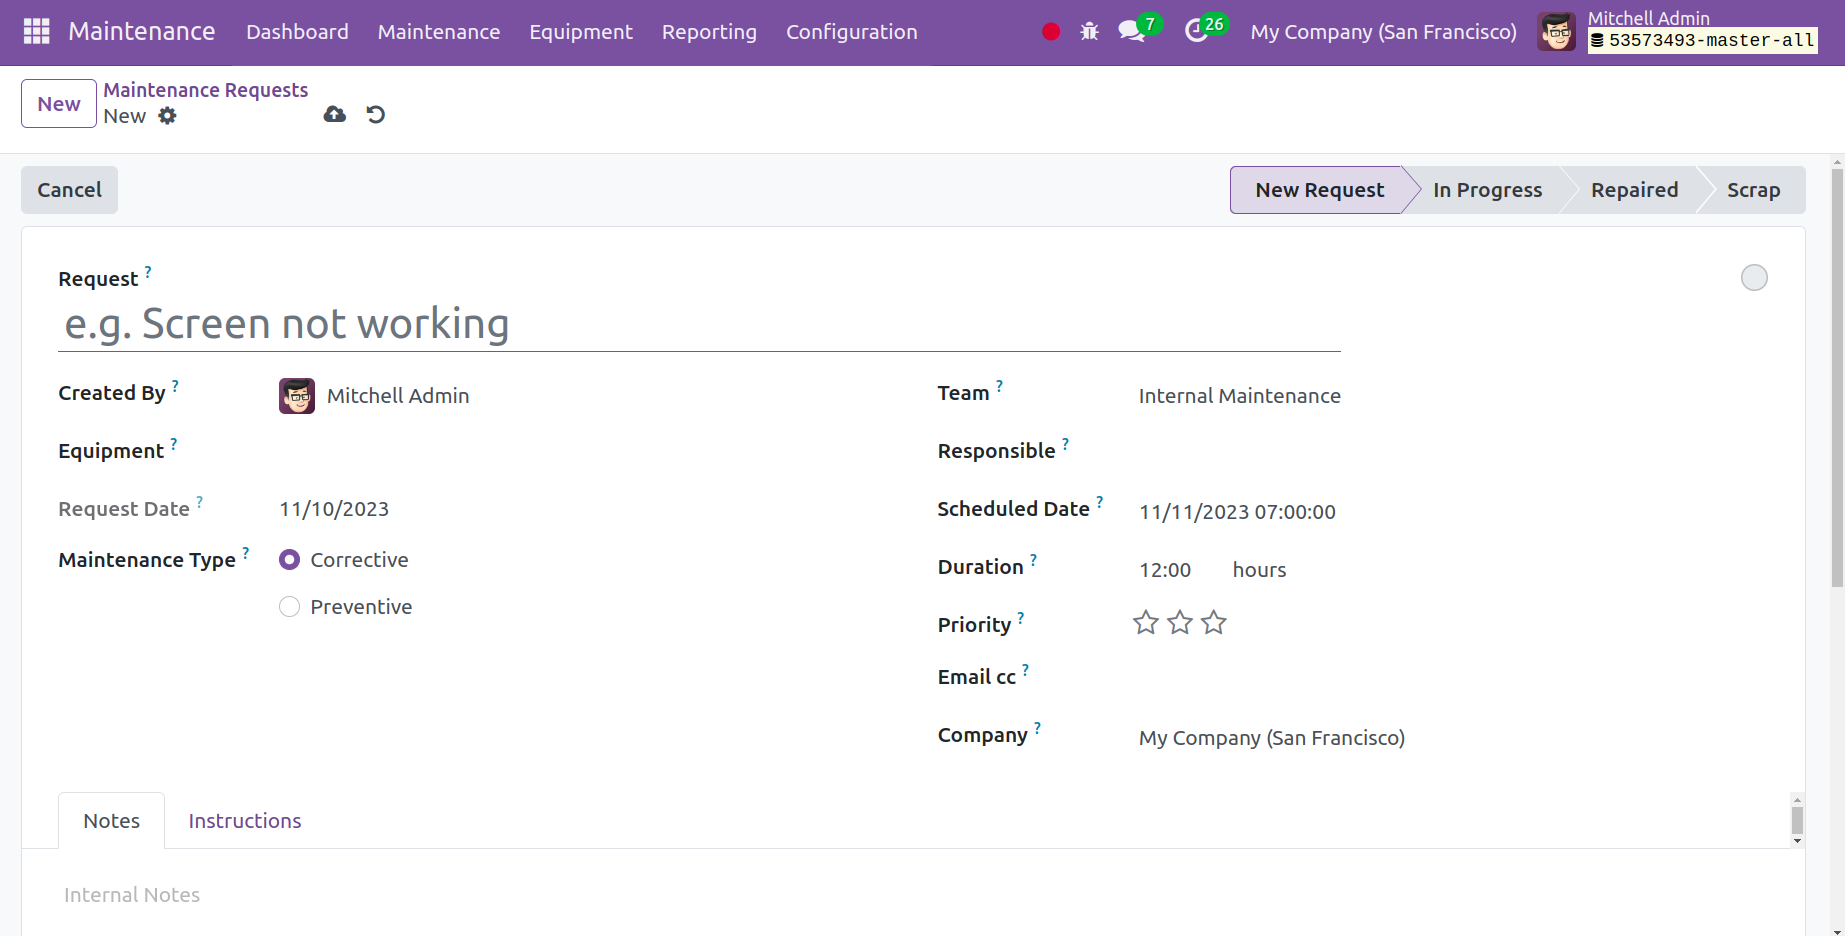
Then, click the "Create" button to return to the form that configures maintenance
requests. From there, you can create the request by entering the "Request" name,
"Created By," "Maintenance Type," "Equipment," "Request Date," "Team," "Responsible"
person's name, "Scheduled Date," "Duration," "Priority," and other details as we
covered in the previous section on creating maintenance requests.
Nearly all of the functionality of the Odoo 17 Maintenance Module platform has now
been covered. Let's now discuss "Reporting," one of the most crucial functions.
Reporting
Presenting data from multiple sources understandably and succinctly is the process
of reporting. Procedures that are meticulously established are always used to report
correct data and avoid misunderstandings. Dashboards with cutting-edge data visualization
capabilities are made possible by Odoo 17 reporting tools. As a result, the users
can produce a large number of reports, such as accounting reports, financial reports,
operational reports, and market studies. This makes it easier to see how rapidly
each function is operating.
Go to the "Reporting" menu from the Maintenance Module, as seen in the screenshot
below, to create and view your maintenance-based reports.
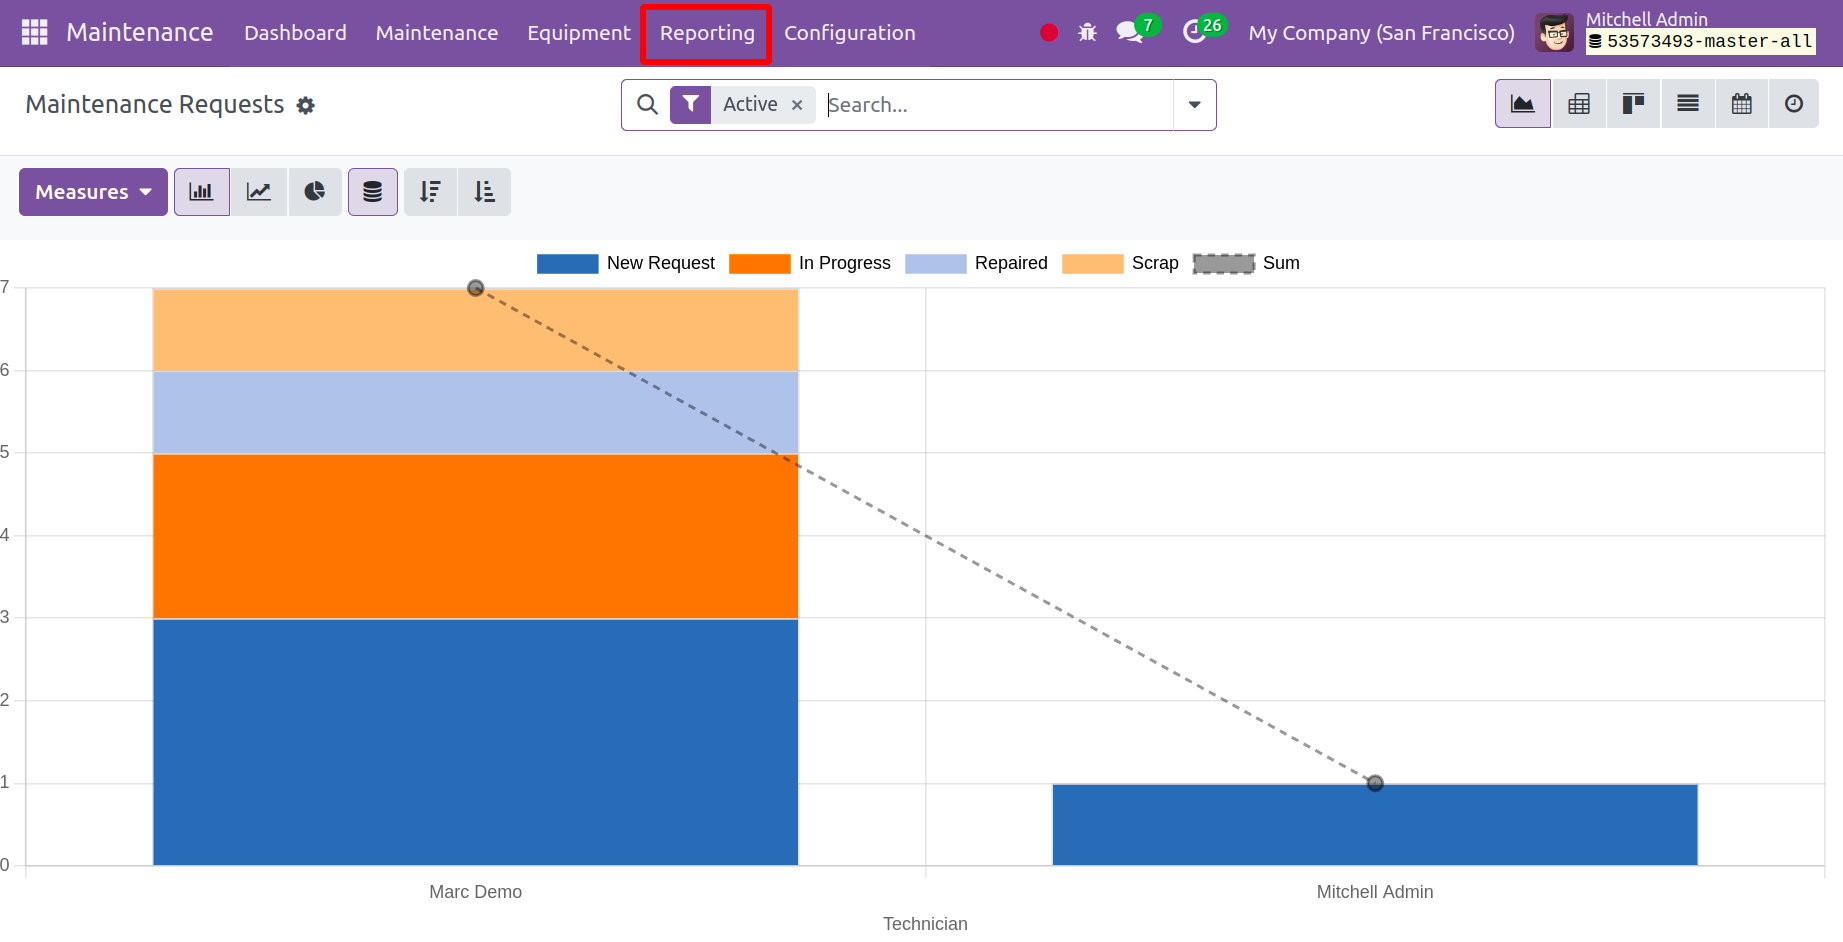
Based on the measurements mentioned in the Reporting menu of the Maintenance module,
you may build a range of reports on the maintenance requests that you create in
the module on the Reporting home page. You can swiftly analyze Odoo's maintenance
requests on a daily, weekly, or monthly basis.
As you can see, this Report view shows the Maintenance Request data in a Bar Chart
view. You may modify the report view into a line chart, stack, pie chart, descending
or ascending graph, pivot, Kanban, list, or calendar view by clicking the relevant
icons on the report page, as seen in the screenshot above. You can also look at
the pie chart depiction of the report that is provided below.
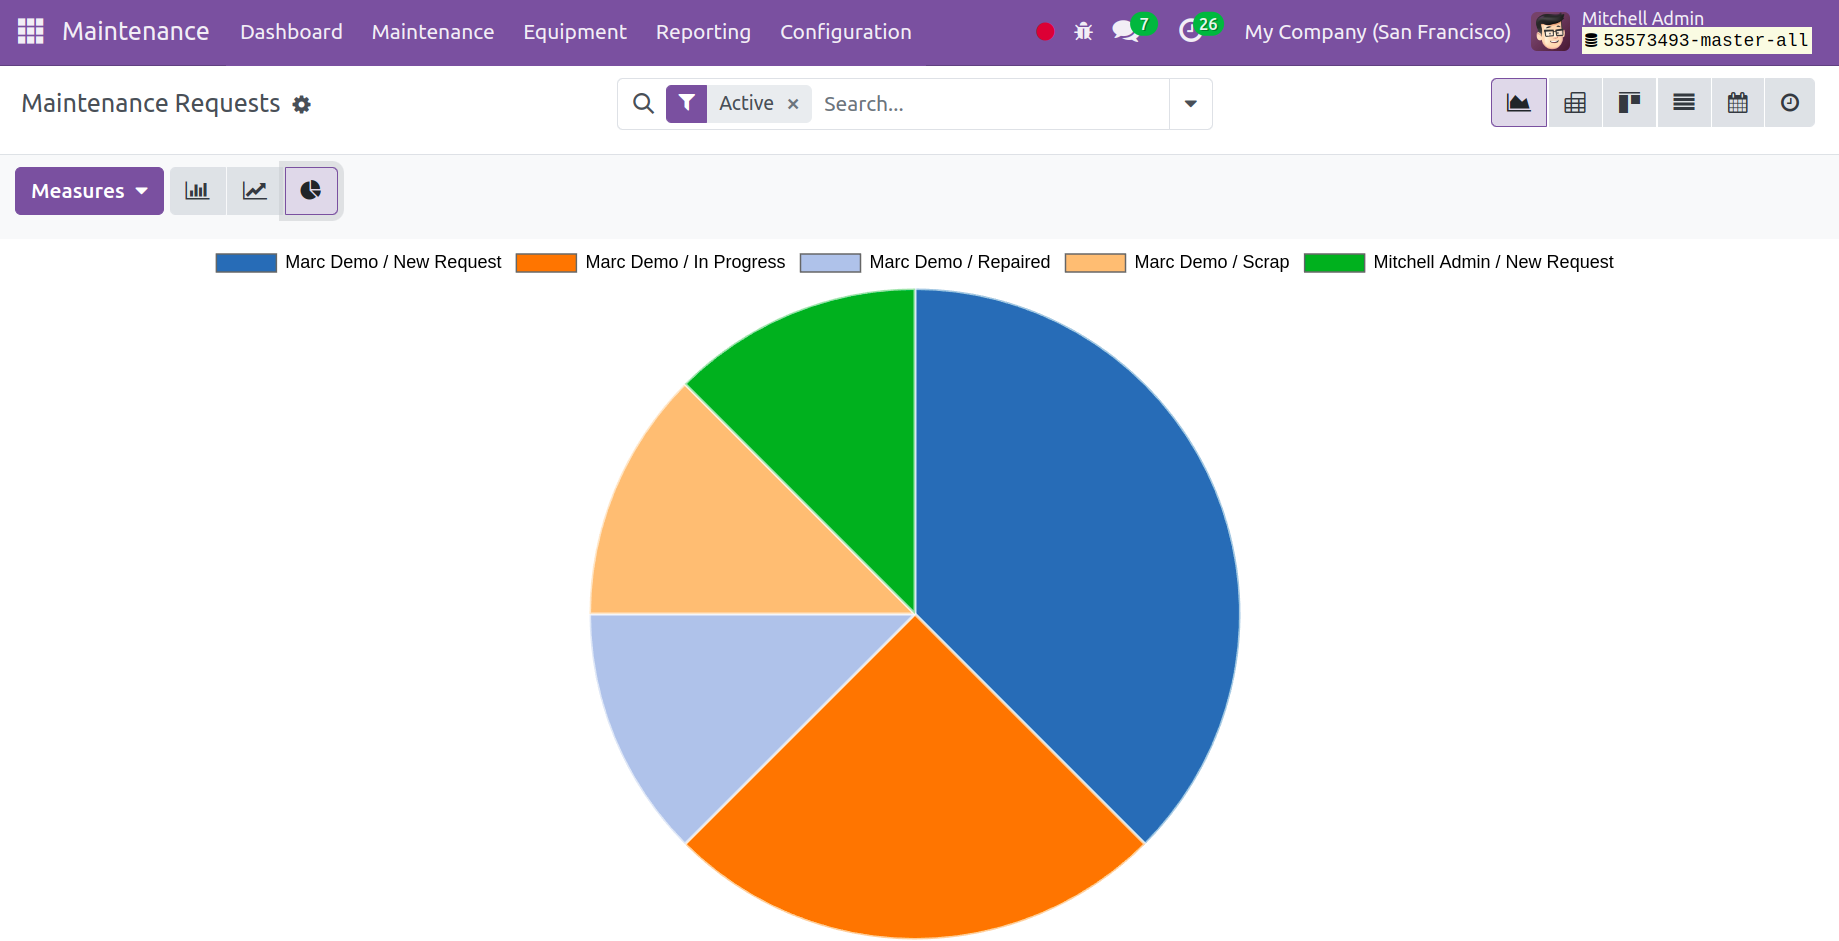
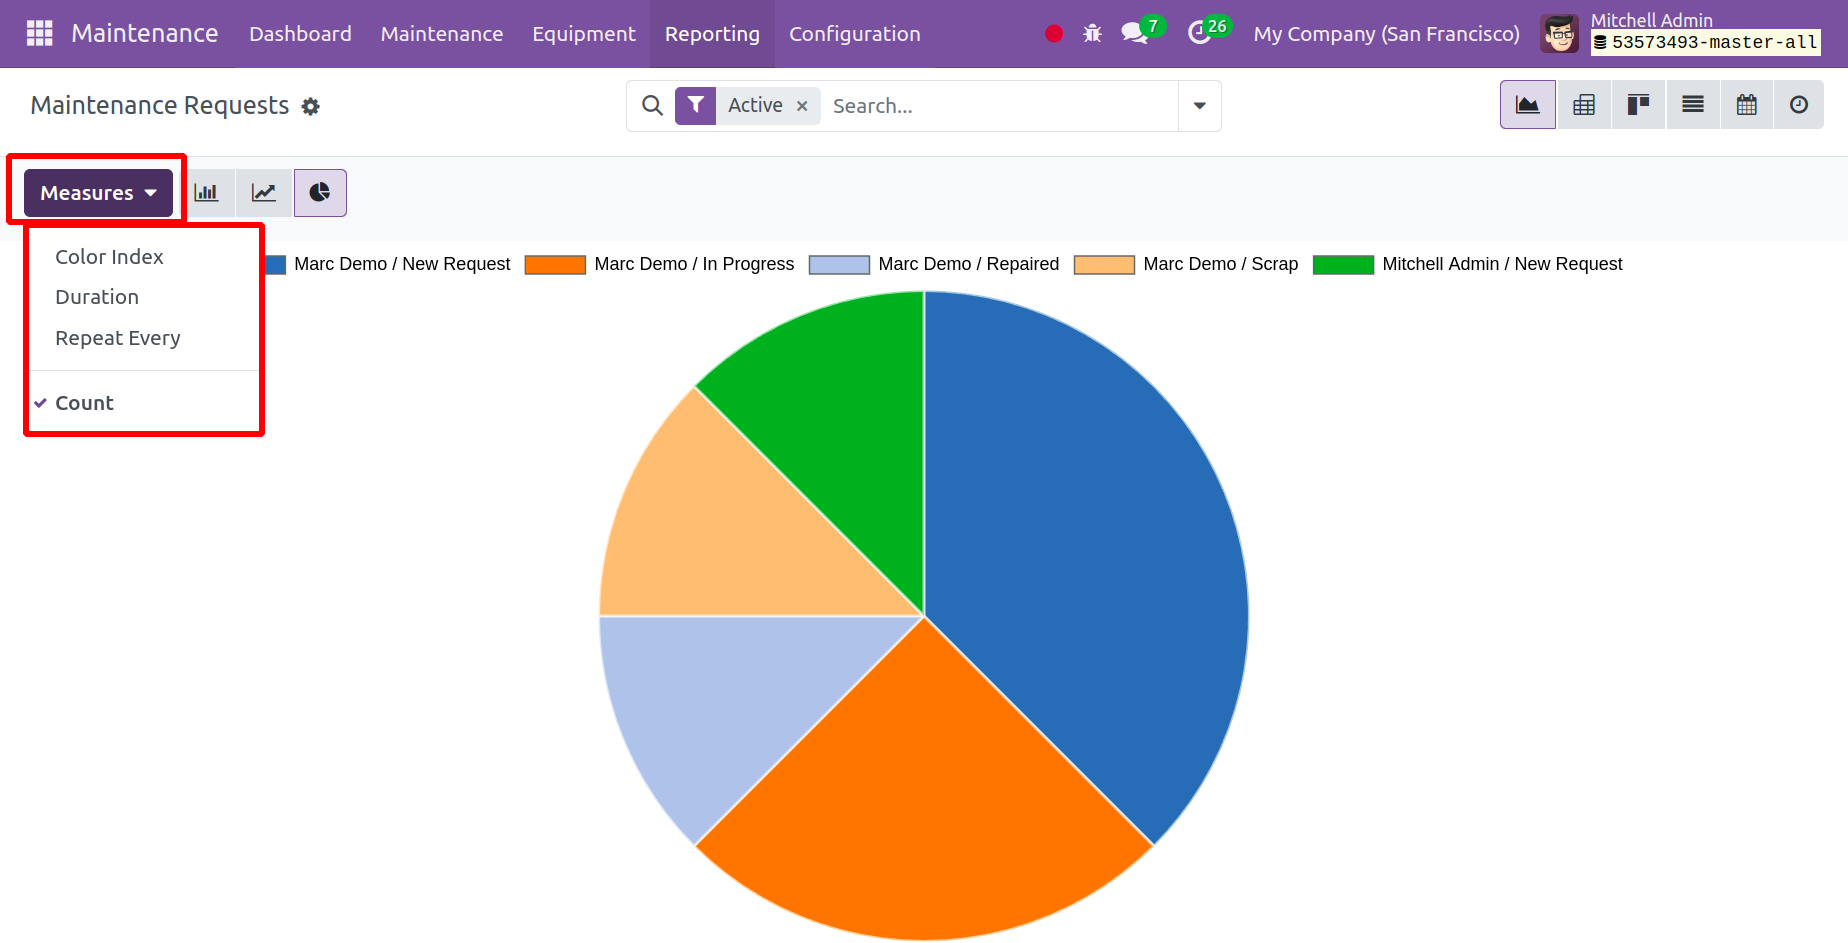
The "MEASURES" button allows you to modify the report viewer's measurements.
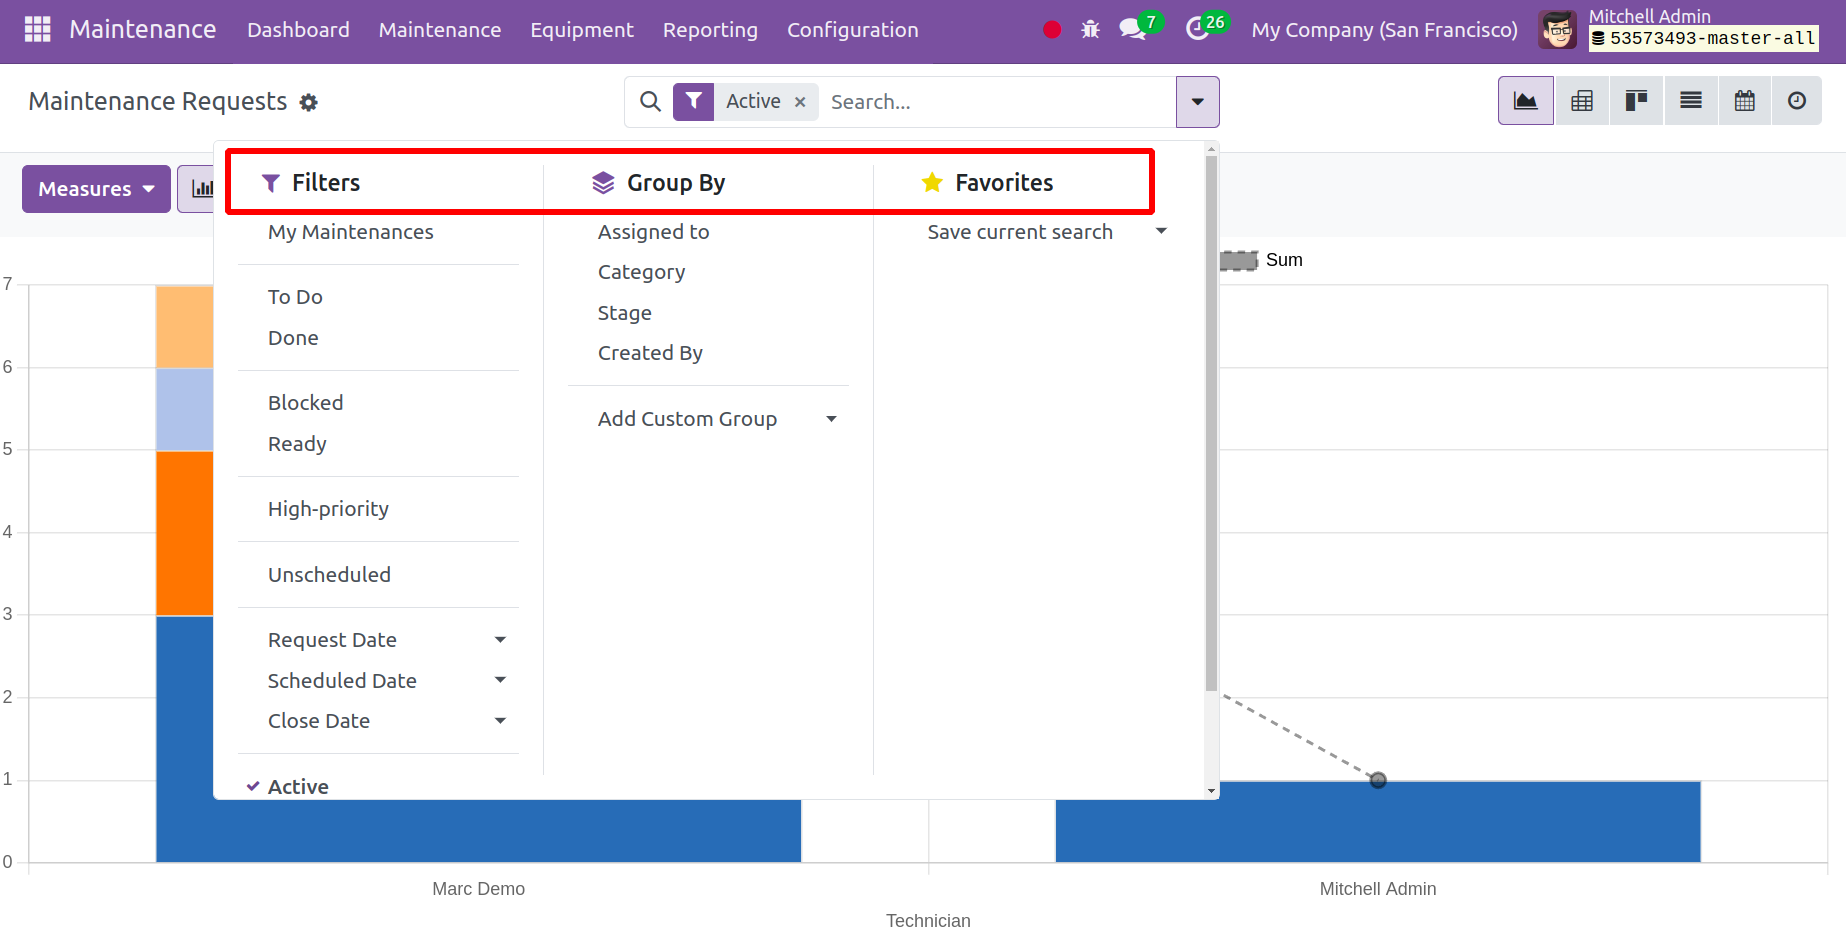
As the screenshot below illustrates, you can also use the "Filter" option to sort
and filter the data, the "Group By" option to group certain data, and the "Favourites"
option to save reports to your favorites. Additionally, you can apply custom filters
to suit your needs.
The open-source Odoo 17 maintenance module's features and choices have been covered.
This book will show you how the Maintenance Module helps with efficient maintenance
job management and how the Manufacturing Module Integration makes handling preventative
and corrective maintenance simple.