Engineering Change Orders
The Engineering Change Order (ECO) document states about the new changes or the
new design made to the existing products. They provide you with the list of changes,
new or changed components and other related information about the proposed change.
From the PLM module you can make view engineering change orders by selecting the
Changes tab. The list of existing changes is displayed along with their Bills of
Materials, Responsible and Stage. Changes can be grouped on the basis of Product,
State, Stage and Company.

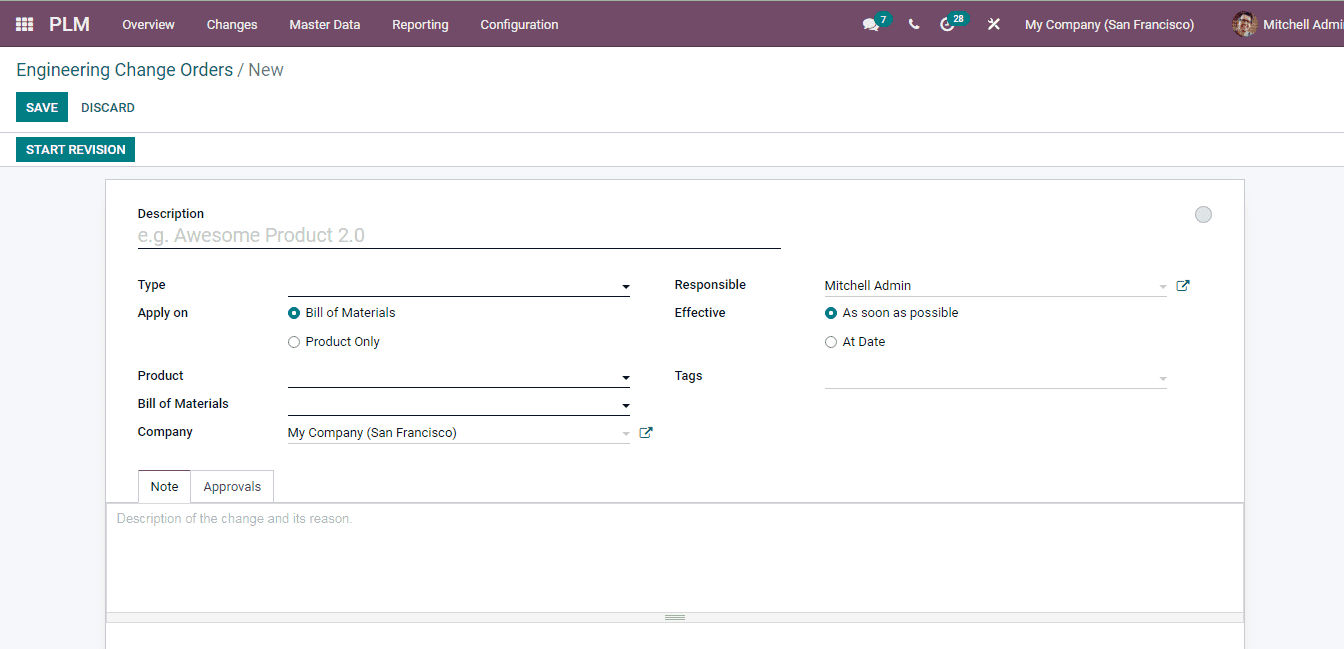
To create a new change order select the CREATE button. At the new Engineering Change
Orders, enter the details such as:
Description: The brief description of the ECO can be included here.
Type: The type of the change must be inserted at the given field.
Apply On: You can either apply the change to the Bill of Materials
or on the Product Only.
Product: Name of the product upon which the change order will be
applied.
Bill of Materials: Add the BoM to the field on which the creating
change will be applied.
Company: You can add the name of the company in this given field.
Responsible: The name of the employee who will be responsible for
the changing procedures and will be held accountable for the whole process must
be added in this field.
Effective: The date on which the changes should be applied can
be mentioned. It can be either As Soon As Possible or you can add an accurate Date.
Tags: Tags related to the changes can be inserted here.
At the Note tab, provide the detailed information of the reason for the changes
along with the changes that will take place. Under the Approvals tab, you can define
the approval roles on the ECO stages. While making changes in the existing products
you need to have proper approvals from the authorised employer. Therefore it is
necessary to fill the Approvals tab. After entering all the details you can start
revising the ECO by selecting the START REVISION button.

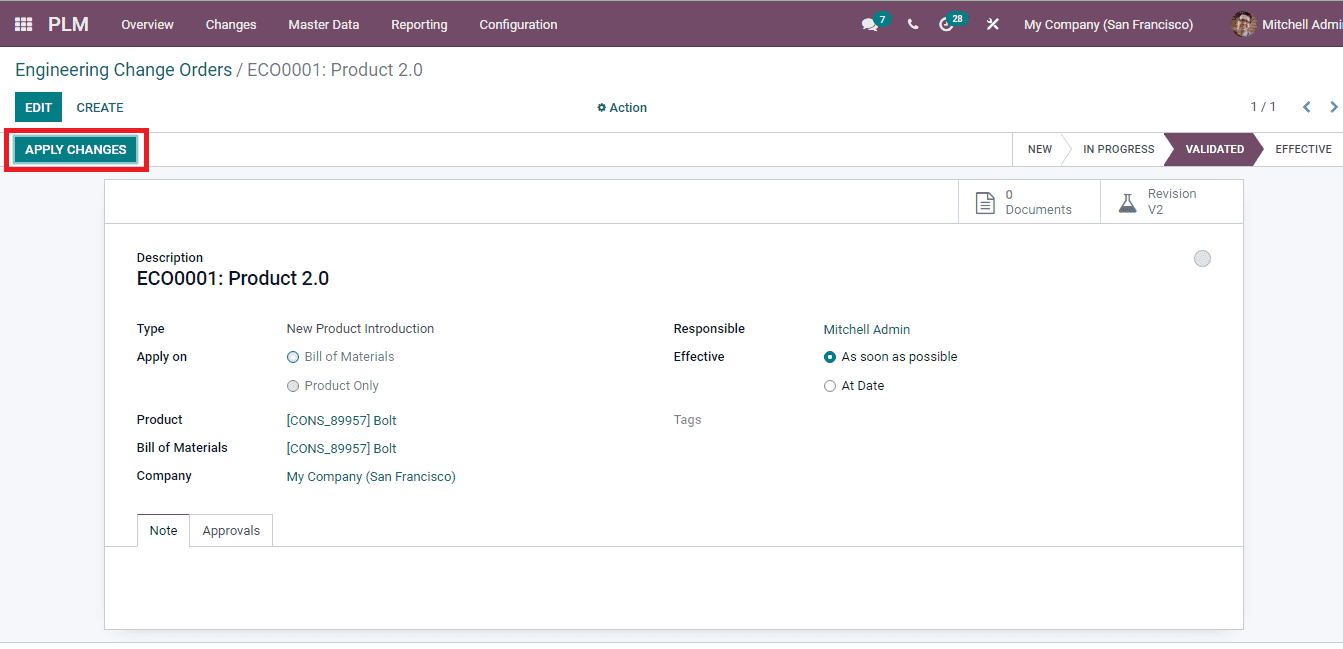
You can adjust the stages of the engineering change orders to In Progress, Validated
and Effective as per the progress. The changes can be applied on the products by
selecting the APPLY CHANGES button when the change reaches the VALIDATED stage.
The next stage of the ECO is the EFFECTIVE stage. By converting the product to this
stage the new version of the product will be updated with the stated changes.

ECO Configurations
From the PLM module you can also set up the major settings of the ECO such as the
stages, types and tags. Let us look at each of them.
ECO Stages
The ECO stages will help in configuring different stages. By looking at the stages
of ECO you can understand the position where the change has been. The processes
of the change can be identified by looking at the stage. When the changes in the
product are totally completed and new updates are made, then the stage will reach
its final stage called EFFECTIVE.
The stages of the engineering changes order can be configured by selecting the ECO
Stages option from the Configuration tab. The list of existing stages is displayed
along with their corresponding Approval Roles. Changes can be made in them by simply
clicking on the stage. By default there are 4 stages, they are New, In Progress,
Validated and Effective.

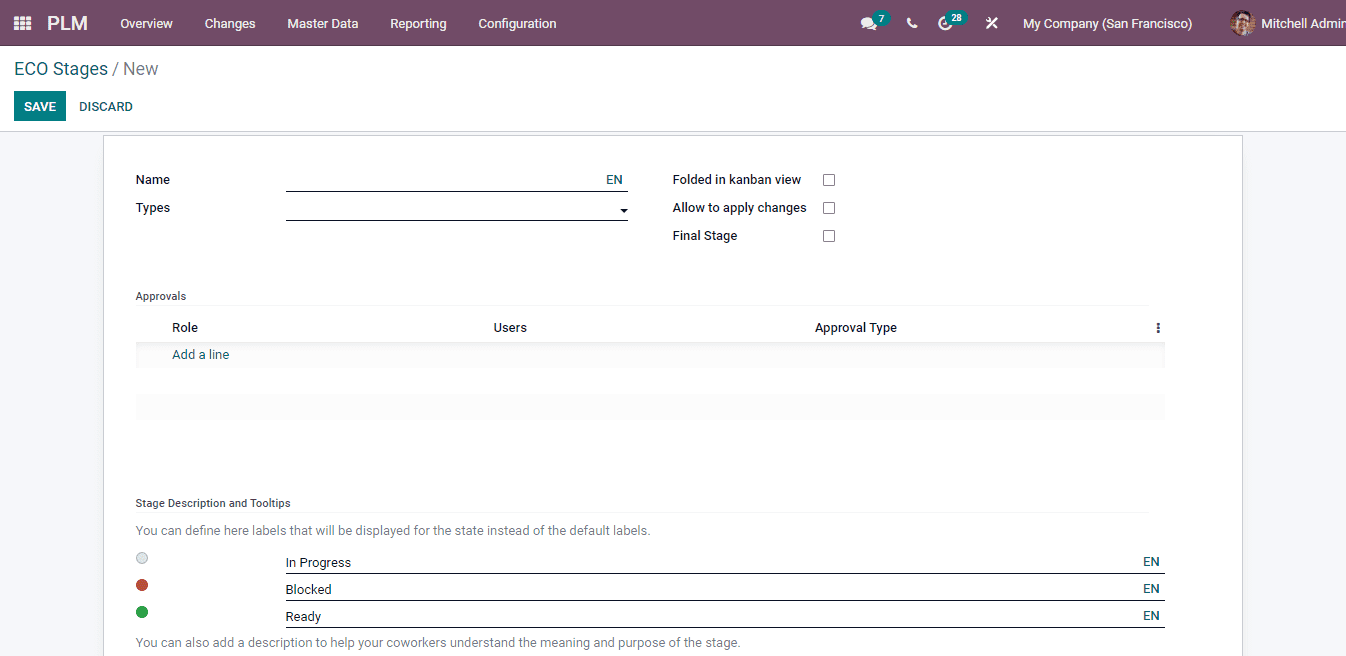
By selecting the CREATE button, you can create a new ECO Stage. At the displayed
form page enter the details such as the Name of the stage, ECO type, whether the
stage can be Folded in Kanban view, whether changes can be applied at this creating
stage and check if the current creating stage is the final stage of the process.
At the Approvals tab, set the Role, Users and Approval Type. You can also define
the labels that will be displayed instead of default labels. Descriptions can be
added so that the co-workers will understand the meaning and purpose of the stage.

ECO Types
In the same way, ECO Types can also be configured by selecting them from the Configuration
tab. New types can be added to the system by simply clicking the CREATE button.
Insert the Name of the new type and the Email Alias at the fields provided.

ECO Tags
For easy recognition tags can be attached to the ECOs. These tags can be configured
by selecting the ECO Tags option from the Configuration tab. The list of existing
tags will be displayed. To add new tags to the list select the CREATE button. A
new row will be created, enter the name of the tag and press the SAVE button to
add the newly created tag.
