Manufacturing order management
Odoo manufacturing module enables a user to manufacture a product in two different
ways.
- 1. A user can create a manufacturing order after following simple default stages
and then complete the production
- 2. The user can create a product by customizing the work order by setting up work
centre and routing mechanisms.
Manage manufacturing in single step/ without routings
Here, the user can take a simple step- generate manufacturing orders without routings.
This can be useful when the manufacturing process is limited to one place, one person
and one step.
Odoo, by default, has manufacturing process without any routing.
Create a manufacturing order
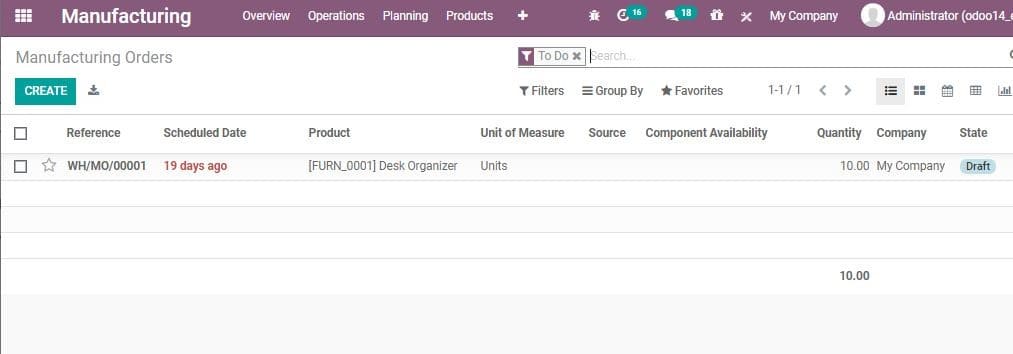
Here, you can easily create manufacturing order. For this, go to Manufacturing>
Operations> Manufacturing Order

You can either use the existing manufacturing order or create a new one by clicking
CREATE button

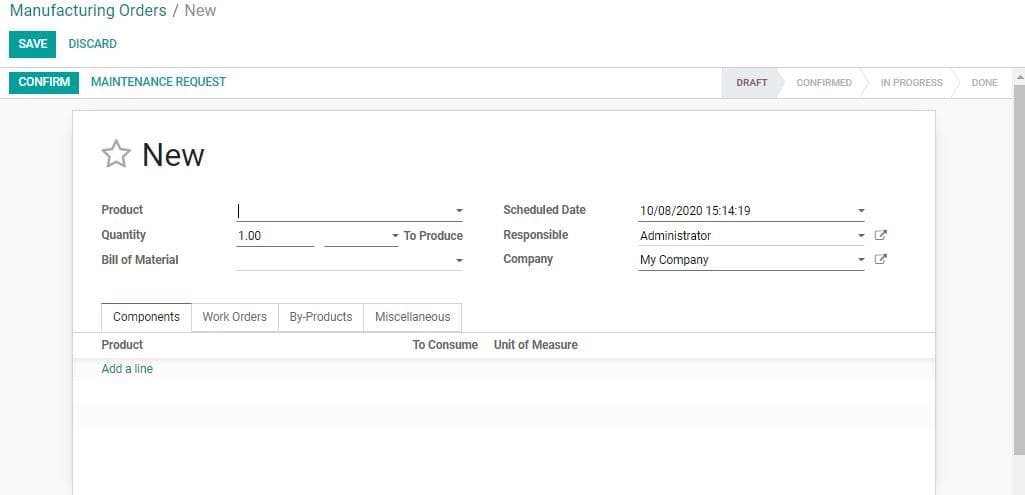
The given fields are present in the Create Form
Product: The name of the product
Quantity: Choose the Quantity to produce.
BoM: You can choose Bill of Material from the list or create a
new one.
Scheduled Date: The user can set a deadline for completing the
production.
Responsible: The persons who is responsible for this manufacturing
order.
Source: Reference of the document that generated this production
order request.
After filling all fields click CONFIRM button
Here, Components Tab show the product, unit of measure and products to consume
By Products tab will show the number of by-products.
Work Order tab gives details about operation, work centre, scheduled start date,
expected end date, real duration and status of the order
Miscellaneous Tab helps to get details about operation type, Components Location
and Finished Product Location.
Here, the user can Confirm the order by clicking Confirm.
After Confirming, a user can Click “Check availability” to see the availability
of raw materials in the inventory. The availability can be viewed at the Reserved
Tab. The availability will be shown in red if the raw material is unavailable. If
there is sufficient stock in the inventory then it will be shown in black.
AS Odoo offers negative inventory support, the user will be able to start production
even though the raw material is not available. The process can be started by Clicking
“Mark as done”.
Click “Mark as Done” to complete the production process.
Now you can see the status bar changes from Confirm to Done
Here you can also get the traceability report. This report can also be printed.
- Product Moves
- Stock Valuation
- Cost Analysis
Manage manufacturing with routings and work centers
As we mentioned earlier, Odoo also enables manufacturing with routing. Compared
to simple step method, manufacturing with routing and work centre can be considered
advanced and multi-stepped. The advanced method facilitates the configuration of
detailed manufacturing process including the setting up of Work centers, Routing
and Work Order management
A user can enable this feature. For this, go to Manufacturing ->Configuration ->
Settings and activate Work Orders feature under Operations Menu.
Then click SAVE
After this, the user can create a new manufacturing order in the following steps.
Manufacturing > Operations > Manufacturing Order > Create
Click CREATE here, you can fill the forms as did earlier.
Choose a product from the list or create a new product
Fix the Quantity to produce.
Select Bill of Material
Now, add routings to Work orders and configure the operations planned at different
work centers. The Work centers are the locations where the manufacturing process
takes place. ‘Routing’ gets auto-filled when you choose the BoM.
The user can also add the person Responsible for this manufacturing order.
Miscellaneous tab will show you the operation type, the location where the system
stocks the raw material and the location where the system will stock the finished
products.
Then Confirm the action.
Here you can see two buttons Start and Block. These buttons can be used for starting
or blocking the process. The status of the process could also be viewed here.
Now, on clicking Check availability the user can see the availability of raw materials
in inventory. If it is green, that means the inventory has reserve of raw material
for production. If it is in Red the inventory does not have raw material. Here,
a user can replenish the stock by clicking on the available stock.
There you will get a new window that will help you to get a FORECAST REPORT.
Replenish
The user can use the replenish tab to Replenish the stock
Here, you have to enter all required fields and confirm the act.