Customer management is critical to the efficient operation of a business since, without it, you risk losing control over processes such as payment collection, product transportation, and many others. The financial parts of client operations are vital, as you will want specialized operational tools to handle them. Using a specific tab of menus, you may control client financial management processes in Odoo. The Customer tabs on the Accounting module's dashboard give you various options, such as Invoices, Credit Notes, Receipts, Payments, Batch Payments, Follow-ups, Direct debit Mandates, Products, and Customers. The financial management factors related to client activities towards the firm will be added up using each of these choices. Now that we have thoroughly discussed each configuration choice, let's move on to the section that covers client finance management.
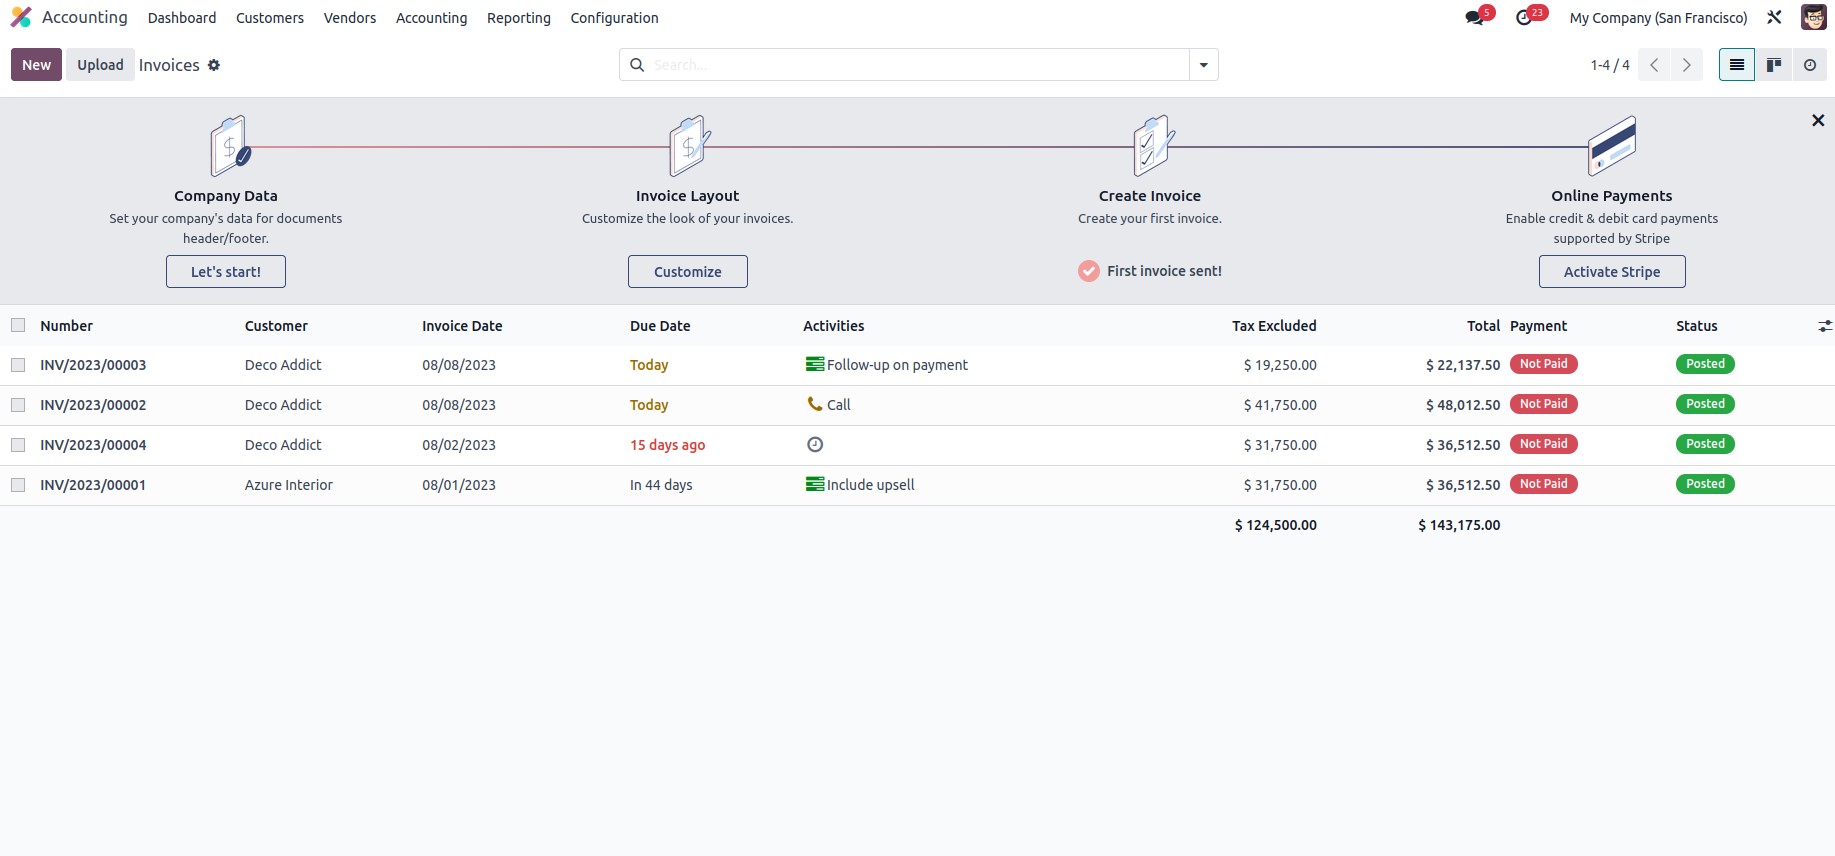
Customer invoices must be processed quickly, carefully, and very carefully. You should have special programs for this. Customers can access the invoice management menu in the Odoo accounting module by going to the Customers menu in the accounting module. The Invoices menu in the Accounting module displays all business invoices owed to customers, as shown in the screenshot below. It shows invoice number, customer details, invoice date, due date, future activity, tax information, invoice amount, invoice status, and payment status. The Due date and status correspond to the colors as shown in the following screenshots. With this complex feature of Odoo, you can identify and categorize many activities. If the deadline is today, a yellow color appears, and if it is red, it means that the date has passed or become due. The invoice status says whether it is posted or not and the Payment status defines whether the invoice is paid or not.
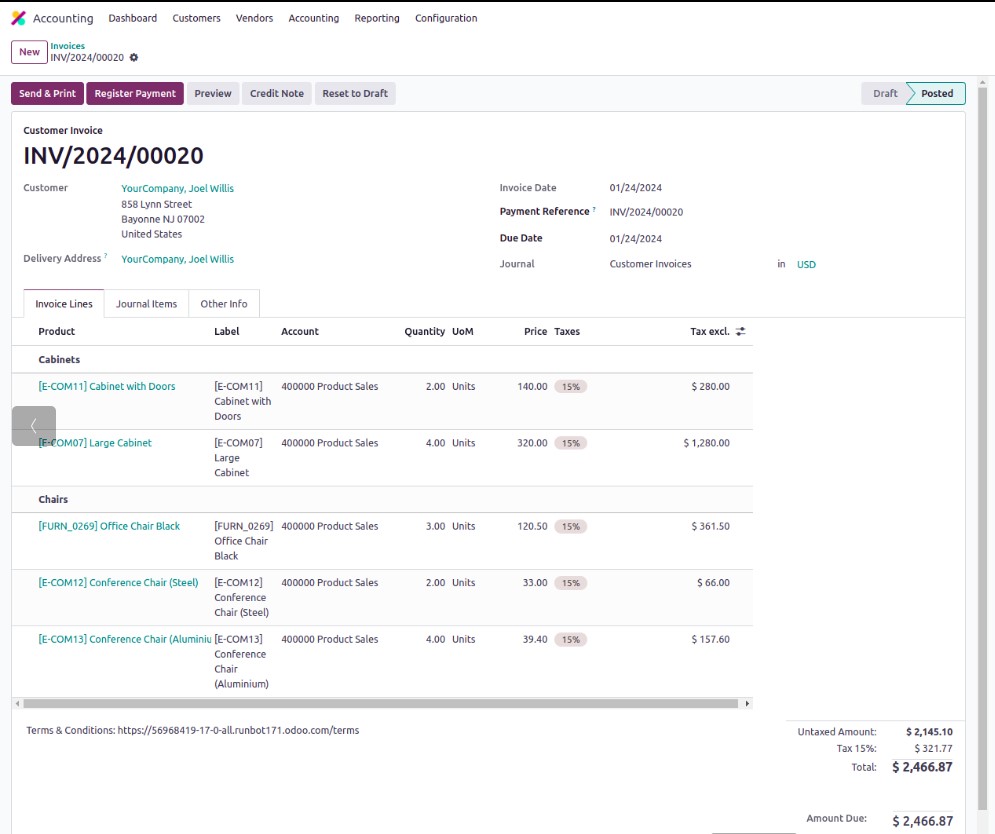
If required, you may amend the current invoice data, providing you the freedom to modify it as needed, but only by authorized persons to avoid interruption of security. You may also create new invoices by selecting the Create option from the Invoices menu. As seen in the picture below, the customer invoice number will also be displayed in the invoice production menu along with the shortcode INV, which is connected to journal activities and is changeable. INV is used as the invoice prefix. Additionally, you may select the Customer, Payment Reference, Invoice Date, Due Date, and Journal where the entries should be defined.
The Sales Product may be specified under the Invoice Lines tab. When adding items or additional sections to the invoice lines, you may do so here using the Add a line or Add a section choices. By selecting the ‘Add a note’ option, you can also include a note to the client right on the invoice. The following fields can be added: the Product, Label, Account, Analytical Account, Analytical Tag, Intrastat, Quantity, Price, Taxes, and Subtotal of the products being defined. You can also include the Terms and Conditions in connection with the particular Invoice. The Untaxed Amount will be described together with the Tax, its percentage, and the Total Amount.
The Journal Items for the appropriate Invoice will be specified by the menu based on the items and other data provided in the invoice. As soon as the products are added to the invoice, the pertinent ledgers will be added to the journal entries.
It consists of the Receivable Account, Tax Account, and Income Accounts listed under the Product/Product category. The Account information, Label, Analytical Tags, Debit, Credit, and Tax Grids will all be defined. You will also be able to observe the Cut-Off of the relevant Account, as seen in the image below.
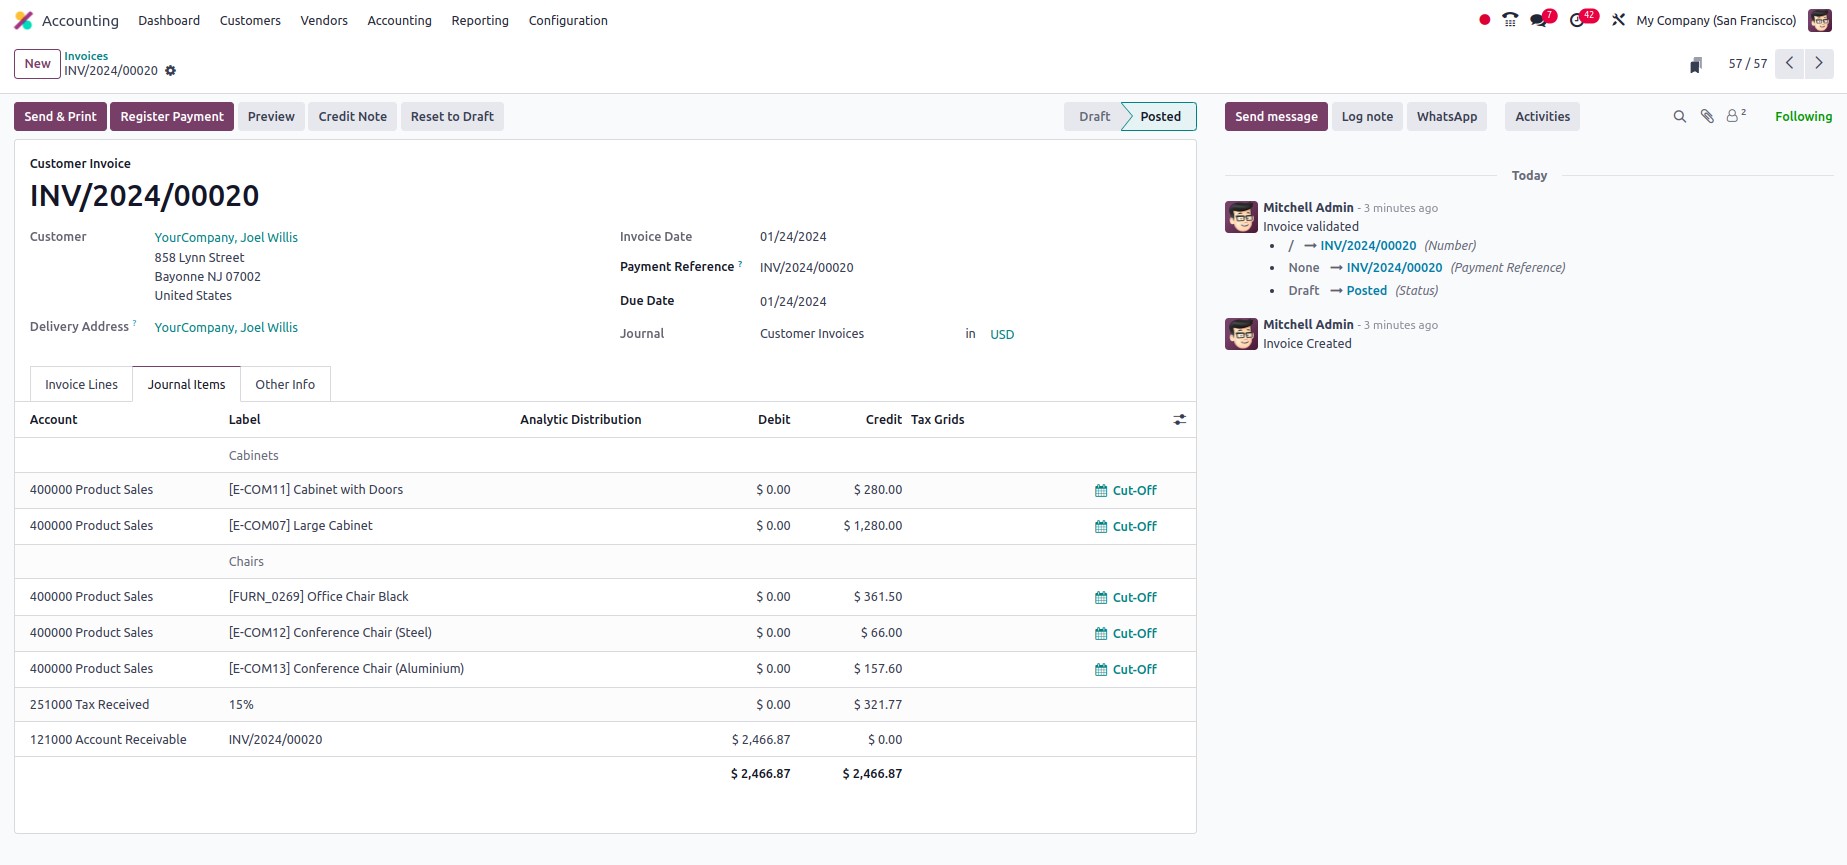
Odoo uses Continental and Anglo-Saxon accounting in its general ledger entry procedures, allowing both to be fully understood. In Continental Accounting, when an invoice is produced, the Account Receivable is debited, and the Income Account is credited. The Account Receivable is debited when the Assets' value increases because, by definition, the Account receivable is an "Asset." Similarly, the Income Account gets credited when income rises because it is of nature "Income." Since the tax account is a "Liability" by definition and is credited when liabilities increase.
On the Other Info tab, which also gives you more details, you may customize a number of the created invoice's components. In the Other Info tab of the invoice menu, you can include customer references, salespeople, sales team, receipt bank, etc. Fiscal Position, Incoterms, Intrastat Country, and Cost Rounding Method are further concepts included in the definitions of accounting other information tab. 'Auto Post' is another option that may be enabled or disabled to determine whether this item will be posted on the specified accounting date and any related recurring bills. Invoice auto-posting options include "No," "At Date," monthly, quarterly, and yearly. 'No' invoices are those that are not automatically posted but can be manually uploaded; 'At Date' invoices are those that are posted on the specified date, and Monthly, Quarterly, and Yearly defined invoices are posted every month, quarterly or yearly.
Additionally, based on the Accounting Date set, the journal entries are automatically posted when the Post Automatically option is activated. In case you or another user of the Odoo platform is unclear of how they operate, the To Check options can also be selected to indicate that the pertinent document needs to be checked.
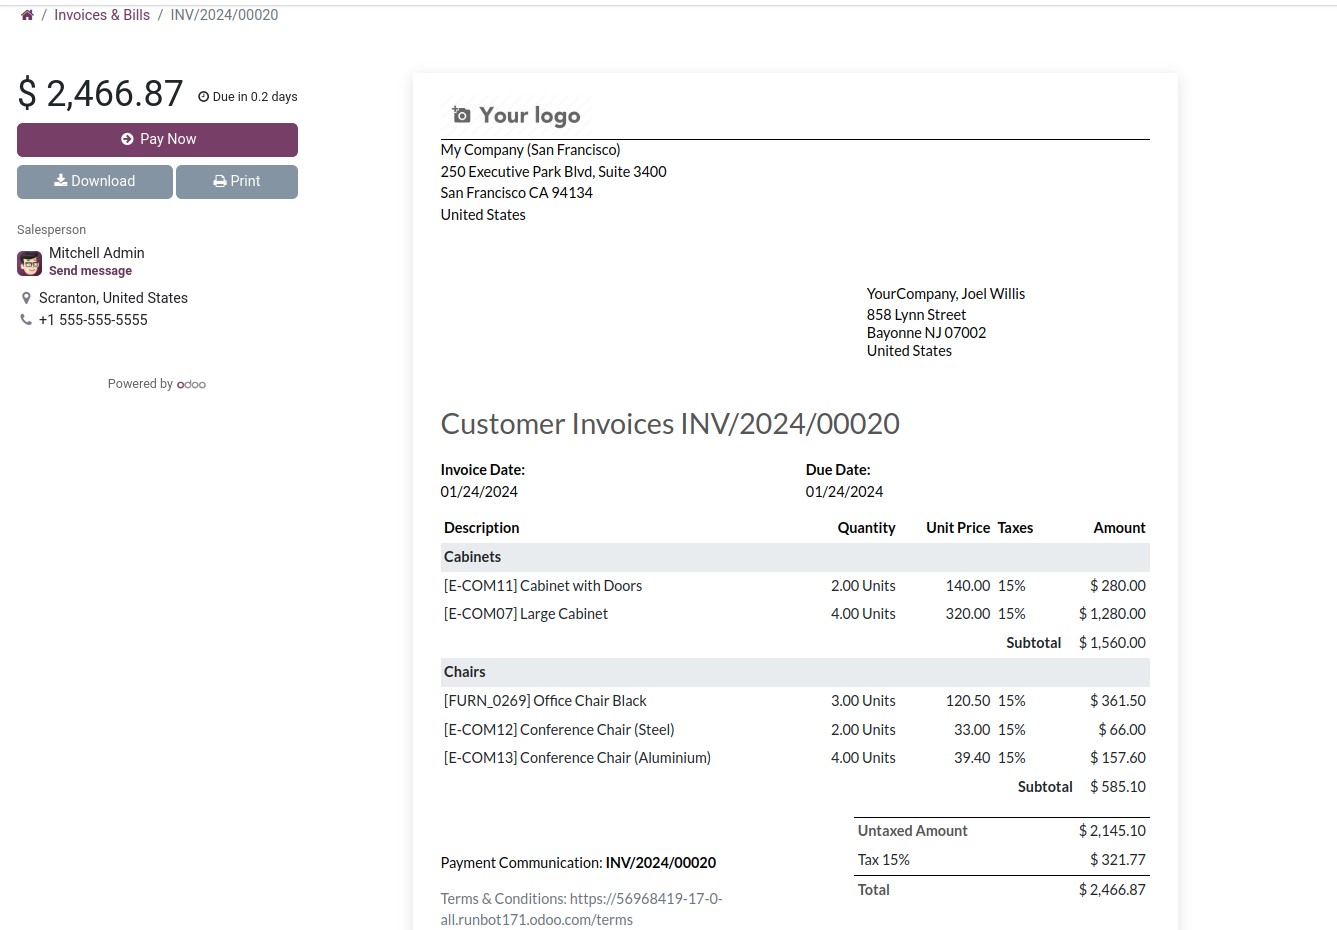
You have the option of sending invoices to the customer after they have been sent and modifying them as needed. Depending on the conditions, the buyer will get the invoice through mail or post. You may keep track of the money owing to you by using the Register Payments option in the appropriate invoice box as soon as the client makes a payment in connection to the issued invoice. After deciding to register the payments, you will see the following pop-up window, where you may choose the Journal Payment Method from Manual, Branch Deposit, or SEPA Direct Debit. You can provide the specifications of the Receipt Bank Account in addition to the Amount and Currency. The memo and the Payment Date can both be defined. Finally, to register the payment in the Odoo platform, choose the Create Payment option.

It will be feasible to manage how the company's accounting activities are handled by knowing how the payment revival methods of Continental Accounting and Anglo-Saxon Accounting vary. Let's look at the operational features of them. When a payment is received, the Continental accounting system credits the Account Receivable and debits the Outstanding Receipts Account. After bank statement reconciliation, the Bank Account is debited, and only the Outstanding Receipts Account is credited. An Outstanding Receipt Account will be utilized to store all incoming payment entries brought on by invoices and refunds. During reconciliation, they are compared to the pertinent transaction rather than Account Receivable and shown in blue in the widget. On the invoice, the ribbon PAID will take the place of IN PAYMENT. The Expense Account in Anglo-Saxon accounting also modifies upon the posting of the invoice. The Anglo-Saxon accounting expenses are affected after the Sales process has been validated.
As a result, the stock output account is credited, and the expense account is debited.
As seen in the example below, the associated invoice menu will show an In Payment label after the payment has been received. If the payment has been made in full, the status of the related invoice will be shown as Paid.

Once the payments have been received and you need to repay part or all of the money for internal reasons, you may attach a credit note to the relevant invoice by selecting the credit note smart invoice option. The following menu will display, where you may define the credit note's parameters, such as the credit method, the cause for the refund, and the reverse date (which can be a journal entry date or a particular day). Additionally, you may customize the Refund Date and Use Specific Journal details to suit your needs. Select Reverse if you want to change the amount that will be returned to the customer; otherwise, select Cancel.
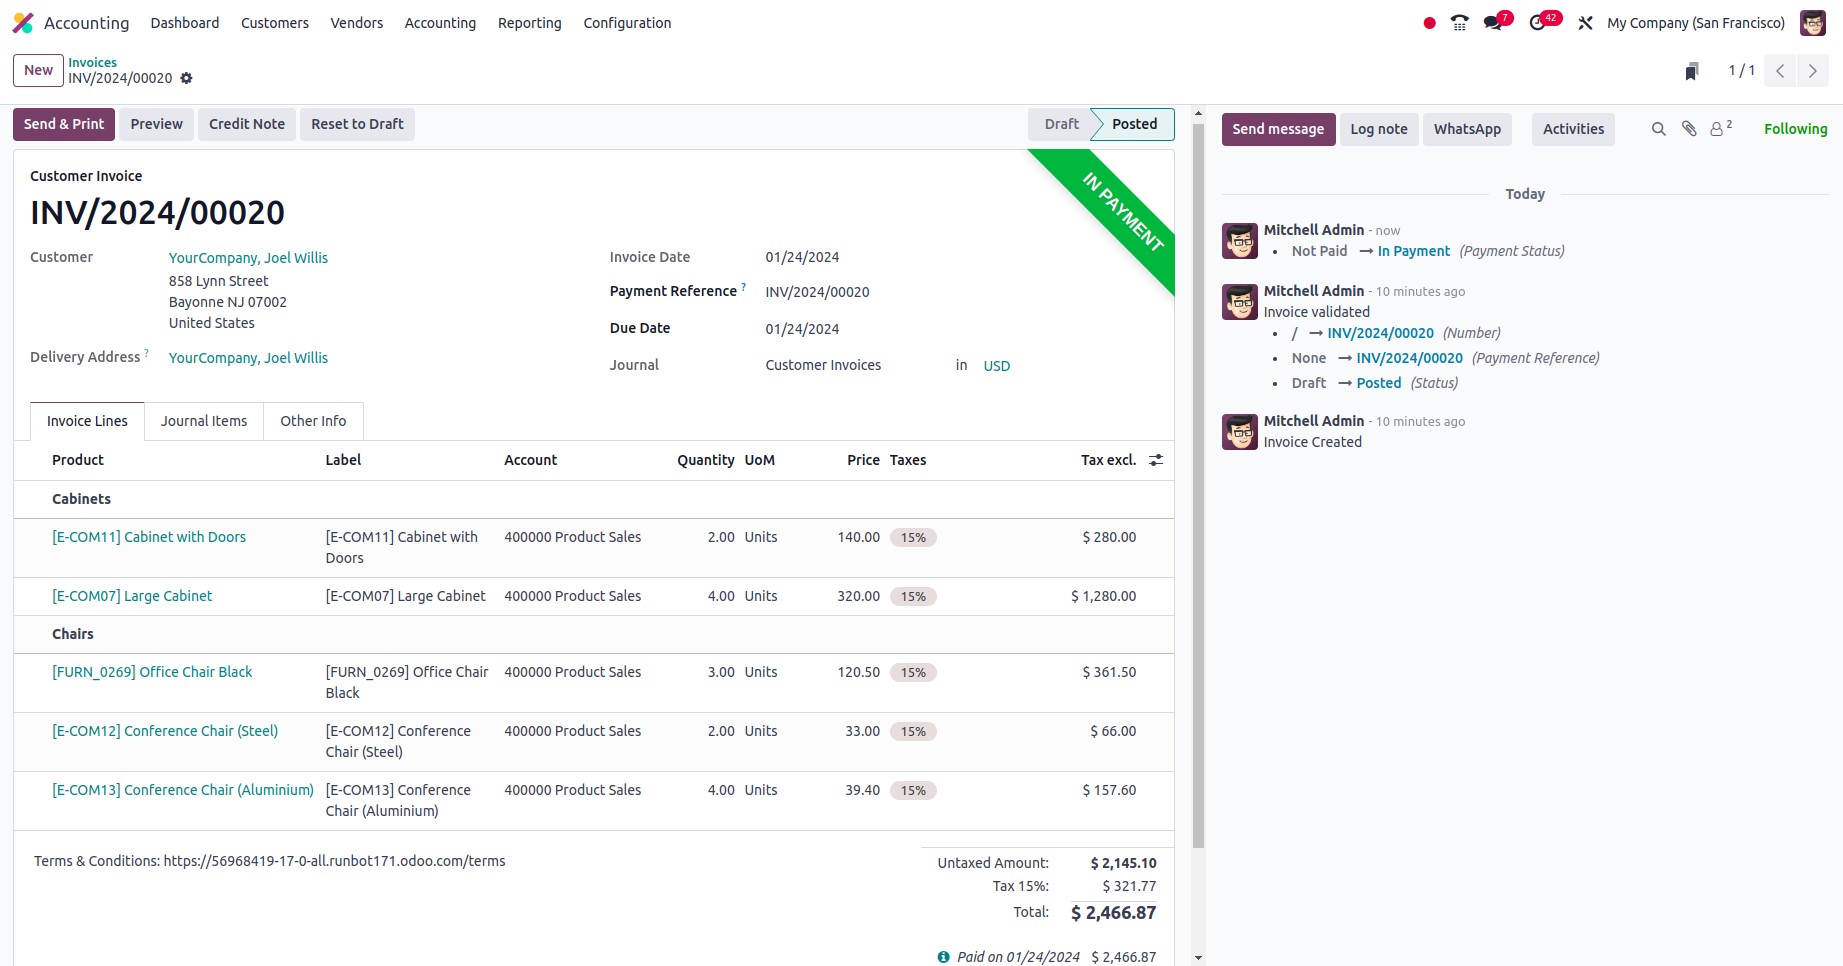
With all the functional menus and windows related to managing invoices in the Odoo accounting module, you can create customer invoices and perform various related functions. From now on, with the help of the Odoo accounting module, the aspects of managing invoices are clear. Now we go to the next menu related to customer management, the Credit Note, in regards to customer management.