The supervision of an organization's accounting operation is among the crucial and important
components. Your financial operation will become a headache if it is not properly handled with
care and attention. Therefore, it is necessary to implement appropriate management controls
and procedures. Sufficient administration and regulating options are provided by the top
Odoo17 software, which is quite advantageous for smooth accounting-related processes. Its
cutting-edge tools and features let you set up everything quickly.
This specialized Odoo17 Accounting application can handle all of the company's financial
tasks. The platform's well-designed management features have the ability to completely change
how an organization manages its finances. The available management options in the Accounting
module's Configuration tab are examined in detail in the section that follows.
Asset Models
Asset management is crucial to the functioning of any organization. It involves managing a
company's intangible, physical, and financial assets to maximize their effectiveness and
worth. It entails keeping tabs on how the assets are used and maintained, taking proactive
steps to lower the risks connected to them, and making sure they are promptly replaced when
required. Organizations can use asset management to make educated choices about where to
invest in new resources and how to manage those that already exist.
Asset management done right may help businesses cut costs, lower liabilities, and foster
long-term growth.
The Asset Models in the Odoo 17 Accounting module setup gives you the ability to manage the
fixed assets of your business and produce depreciation entries. You can track asset costs,
compute depreciation, and produce financial reports thanks to it. You may manage and keep
track of the insurance, maintenance, and other relevant information for each asset with this
function. It also aids in keeping track of asset costs over the course of their useful lives
and the accompanying depreciation costs. Additionally, the asset models offer a mechanism to
track the asset's worth through time as well as its present book value. Asset models can also
be used to generate reports that detail the asset's past performance as well as its current
worth.
The following asset models are definable in the Odoo17 Accounting module:
Fixed assets: Fixed assets are physical items that a company uses for a considerable amount
of time and have long-term worth. Land, structures, furniture, and equipment are some
examples.
Impaired: When an asset's fair value drops, it is said to be impaired. This may be the result
of several things, like market conditions, competitive forces, or technical obsolescence. The
financial statements must reflect the impairment.
Leasing: A third-party seller may lease assets to you.
Intangible Assets: Non-physical assets such as patents, copyrights, and trademarks are
considered intangible assets. On the balance sheet, these assets are listed as assets that
will be depreciated over time.
Depreciation: Assets lose value over time due to depreciation. Different depreciation
techniques, including Straight lines, declining balances, and based on day per period, can be
used to accomplish this.
You can establish the parameters for how assets are tracked and handled in Odoo17 using the
Asset Models feature. You can set the asset value, the depreciation rate, and the depreciation
calculation method for an asset using this feature. Users can also configure particular
depreciation rules for various asset models, such as various calculation techniques for one
type of asset and a various rate for a different type of asset. As a result, Odoo17's asset
management options are expanded, and the information is kept current and correct.
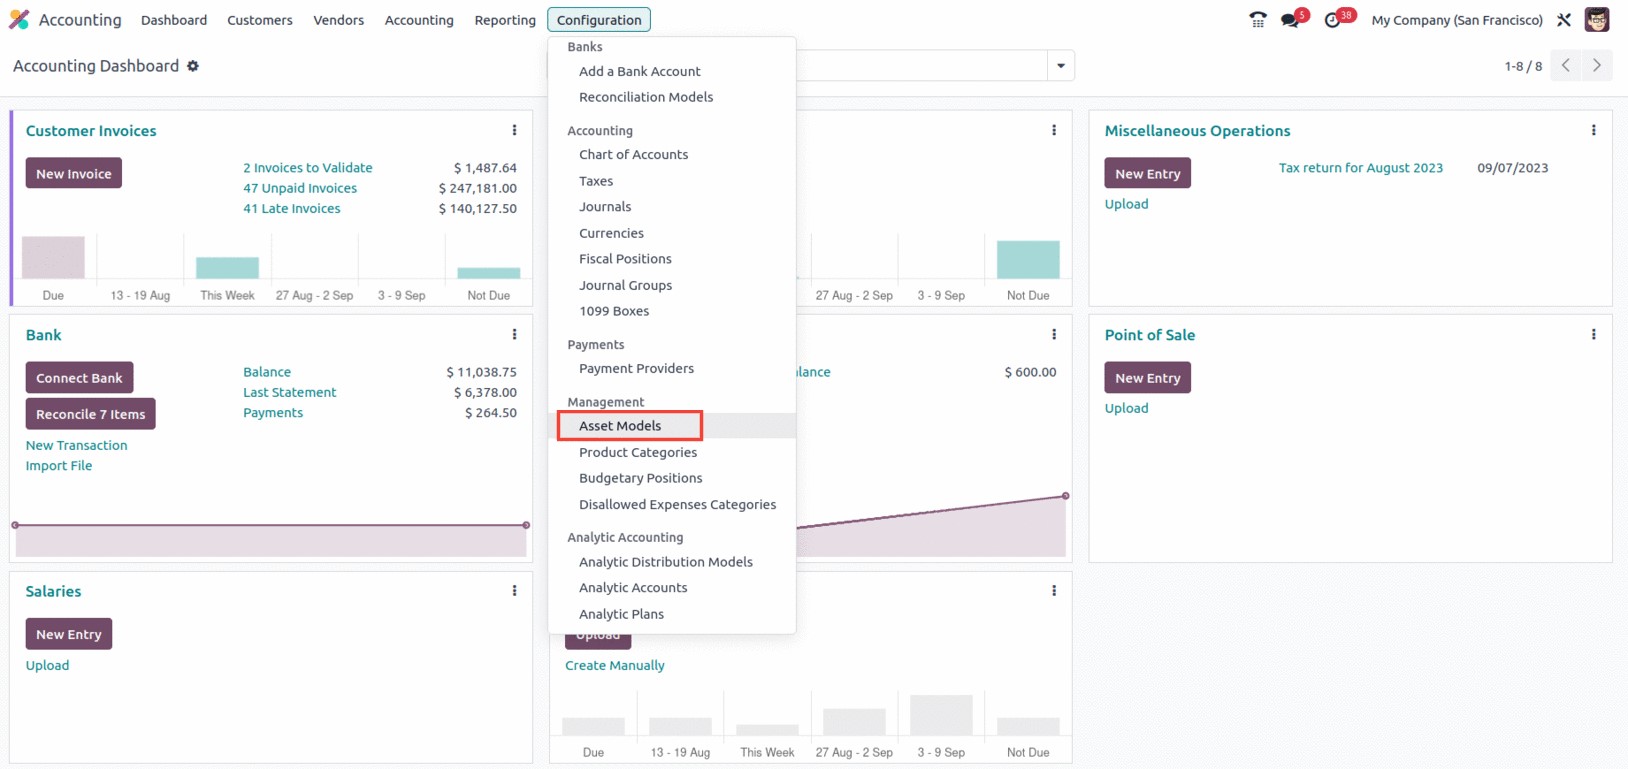
The asset models feature's primary goal is to give an organization a simple method for
managing and tracking its assets. With the aid of the Assets Models menu, which is accessible
through the Management section of the Configuration tab of the module, the dedicated Odoo17
Accounting module frames the asset management processes.
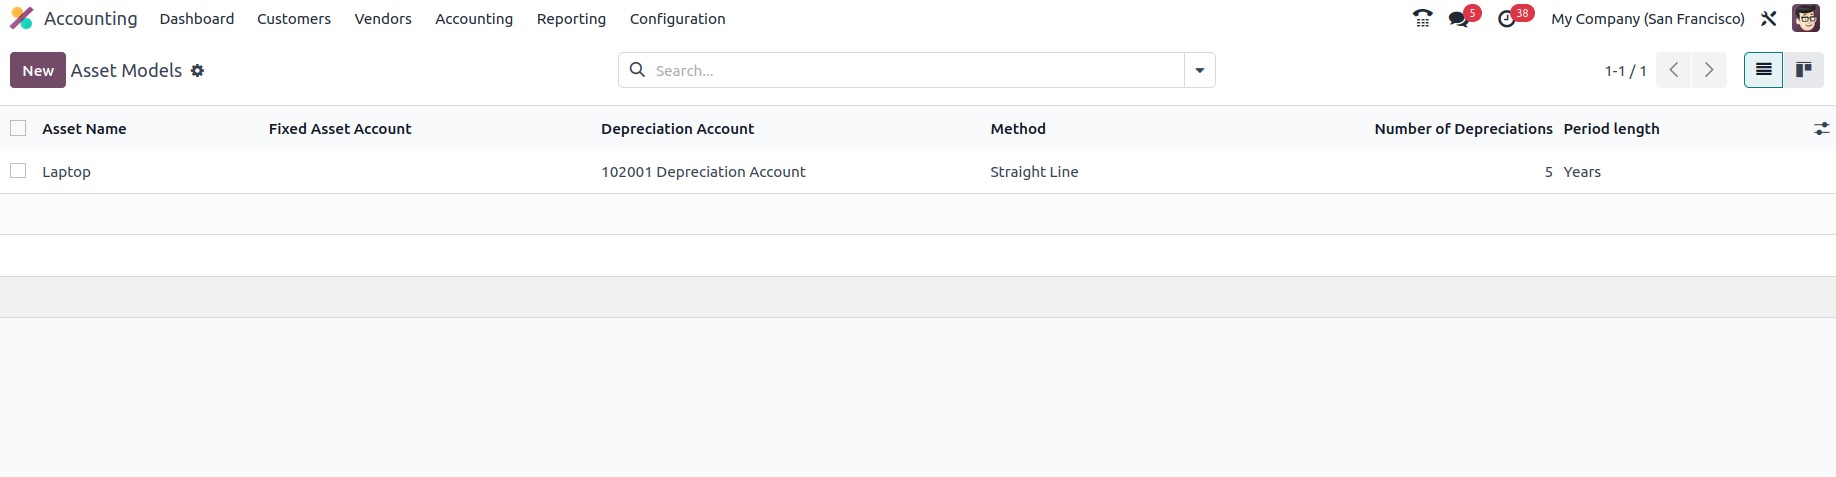
You may access the Assets page by using this menu. On this page, you can view all of the
asset models that are currently in use as well as information about them, such as the Asset
Name, Fixed Asset Account, Depreciation Account, Method, Number of Depreciations, and Period
duration, as shown in the screenshot below.
Select one of the previously configured asset models to view it in more detail. You may find
and group the desired asset model from the entire list using the Filter, Group By, and Search
options in the interface. By selecting NEW, the new Asset model can be built. The creation
form screenshot is shown below.
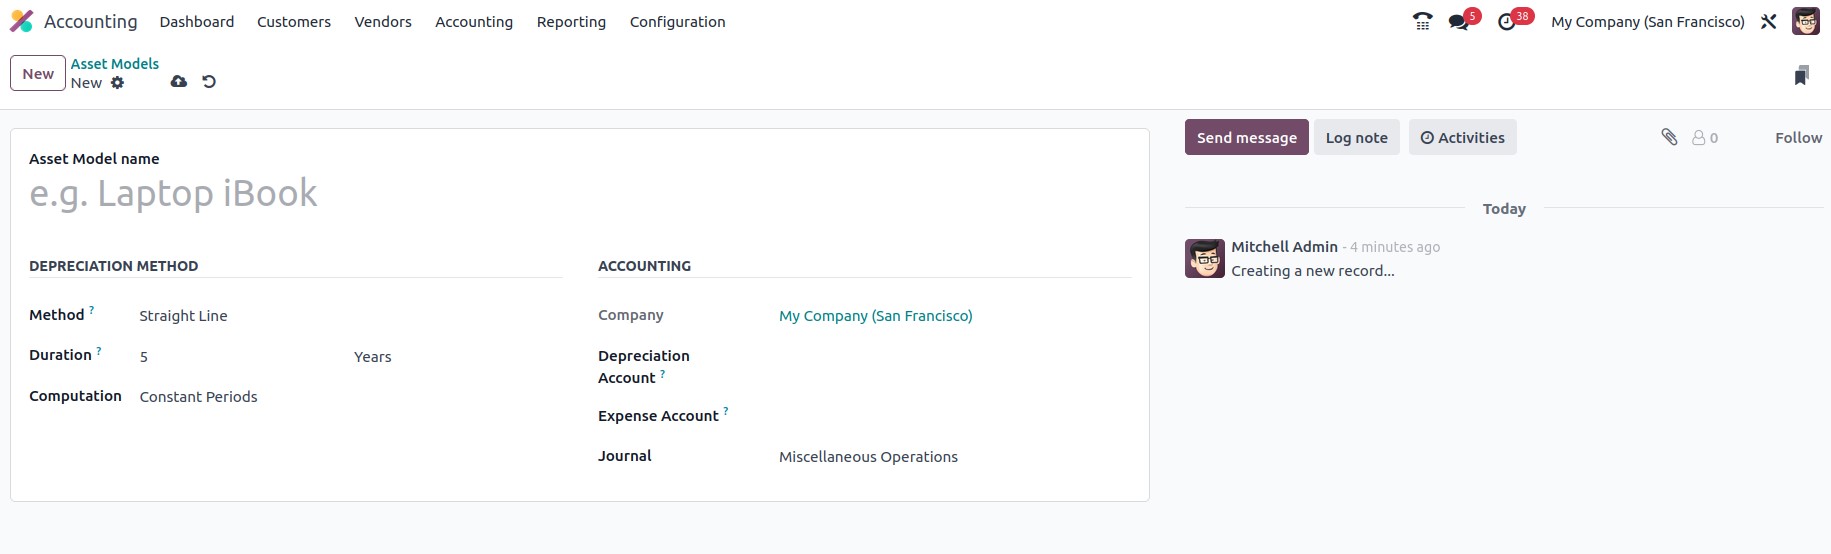
Enter the asset model's name in the Asset Model name field to define a new asset model. Then,
in the designated fields, you can configure the operating components of it. A few fields to
determine depreciation features are shown in the DEPRECIATION METHOD section. In order to
determine the quantity of depreciation lines, you can select the appropriate method to use. It
can be described as either Declining or Declining then Straight Line, or simply Straight Line.
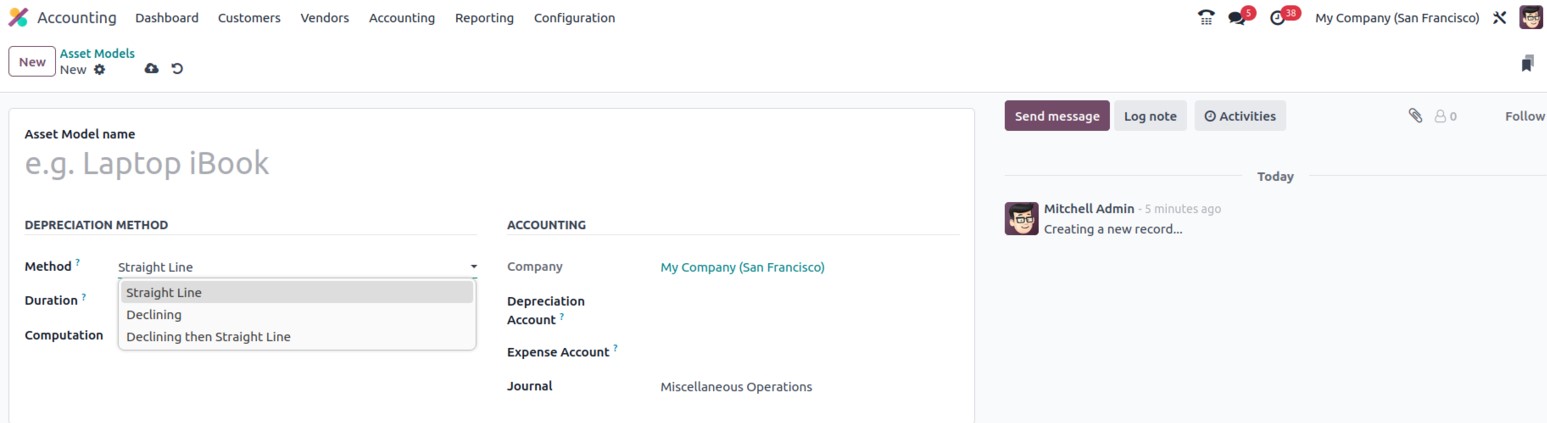
The Gross Value/Duration will be computed when you select the Straight line. It will be determined
based on residual value in the case of declining. Finally, a minimal depreciation value equal to the
straight line value will result from a decline followed by a straight line, but with a declining trend.
The number of depreciations required to depreciate your asset can then be allocated in the Duration box
based on Years or Months.
Depending on the value entered in the computation section, the depreciation calculation may be based on
"No Prorata," "Constant Periods," or "Based on Days Per Period." No protara indicates that the asset's
acquisition date will not be taken into account, and that the depreciation period will begin at the
beginning of the fiscal year. When the computation is set to "Constant Periods," the depreciation board
is determined starting from the purchase date or prorata date. Depreciation board each day for each
period will be calculated using the third computing method, "Based on days per period."
It will first calculate the daily depreciation taking into account the entire period. Based on the daily
depreciation, a monthly or annual (duration frequency) depreciation board will be calculated.
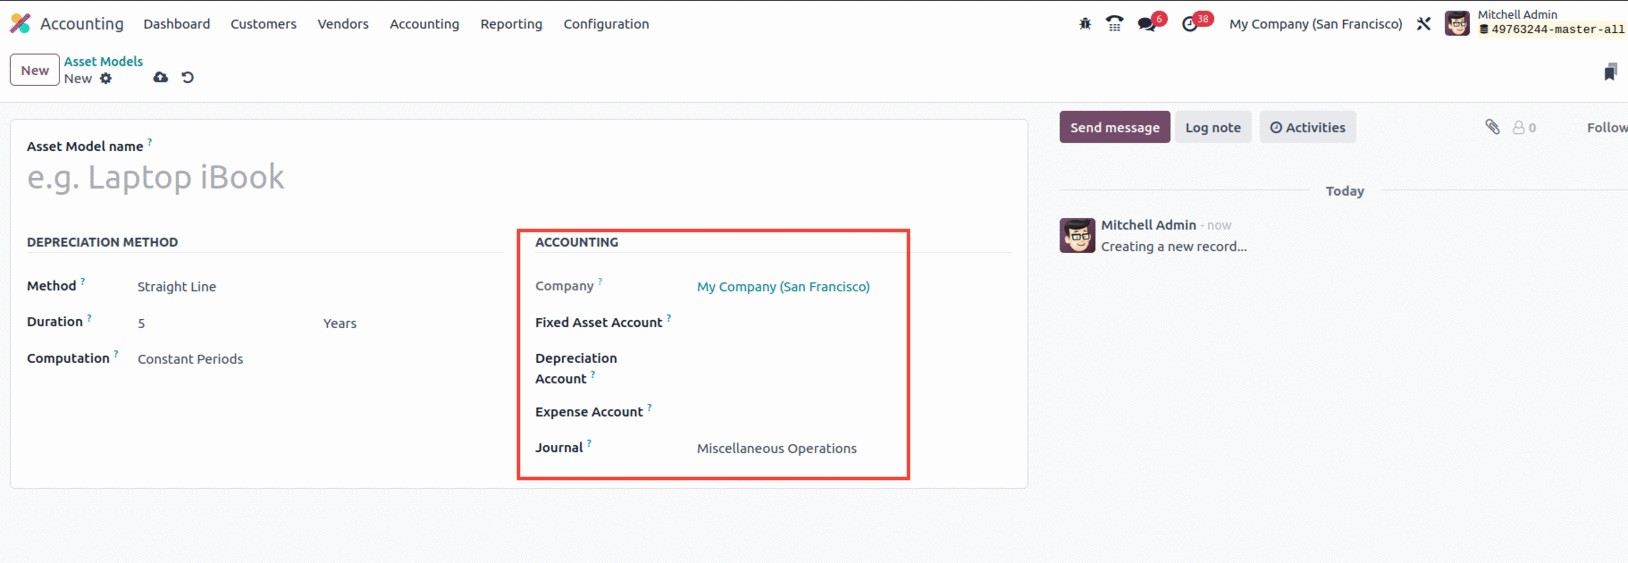
Similar to this, you may specify the Company associated operation in the Company field of the
Accounting portion of the Asset models creation window. The system will automatically assign the field.
The Fixed Asset Account area is where you can specify the account that was used to record the asset's
initial purchase price. The Depreciation Account, which is the account utilized in the depreciation
entries to reduce the asset value, can then be selected. The Expense Account, which is the account used
in periodic entries for recording a portion of the asset as an expense, can also be defined. In the
Journal area, you can finally select a journal. Here, all of the accounts and journals that we
have previously set up on the platform are shown in dropdown menus so that you can select the one you
need.
The new Asset model will be saved into the system once you have provided all the necessary information.
By selecting the Follow option located on the bottom left, you can now add followers to this specific
Asset model. The system also offers the Attachment option and the Knowledge Article Search option, as
seen in the image below.
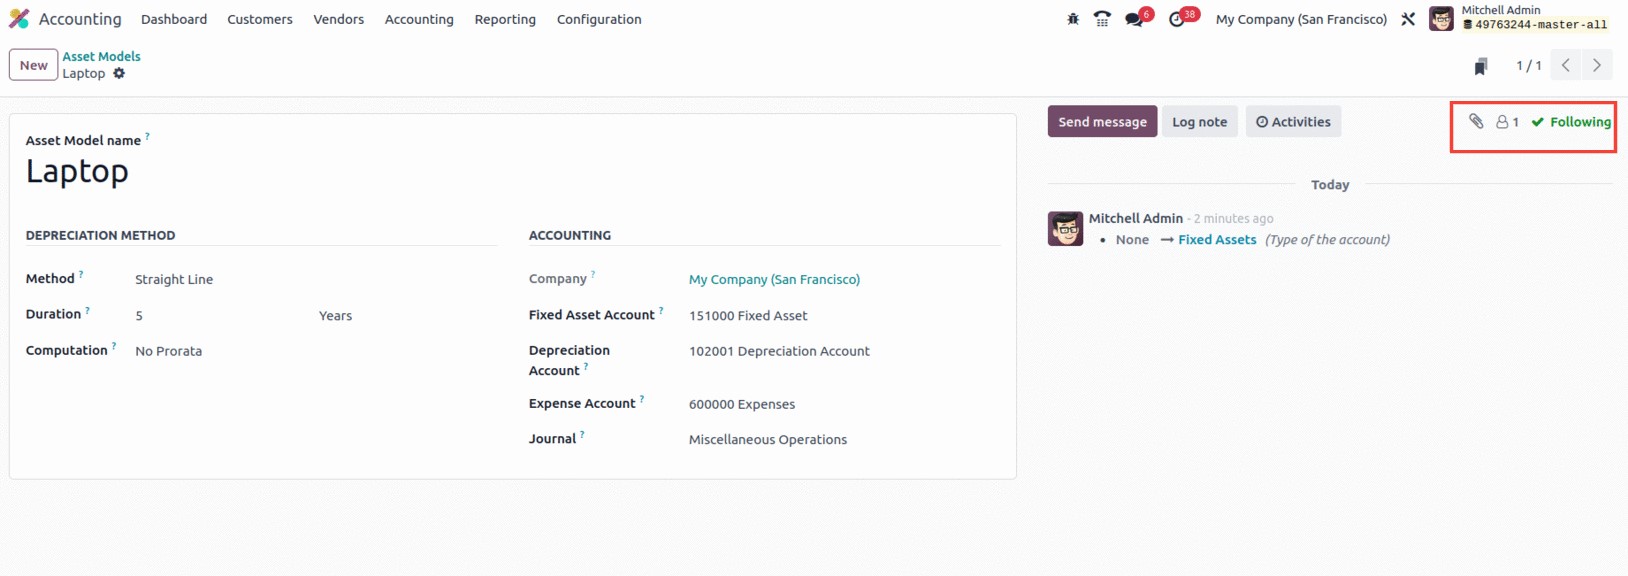
You may track the asset model's development using the Follow option, and you'll get alerts when
anything changes. You can upload documents, pictures, and other types of materials that are relevant to
the asset model using the Attachment option. The new feature included in the 17 version of Odoo allows
users to browse the Odoo 17 Knowledge Base for pertinent articles that may be helpful during the
building of an asset model. The Send Message, Log note, and Activities options
are visible in the bottom left corner of the creation form, as illustrated in the image below.
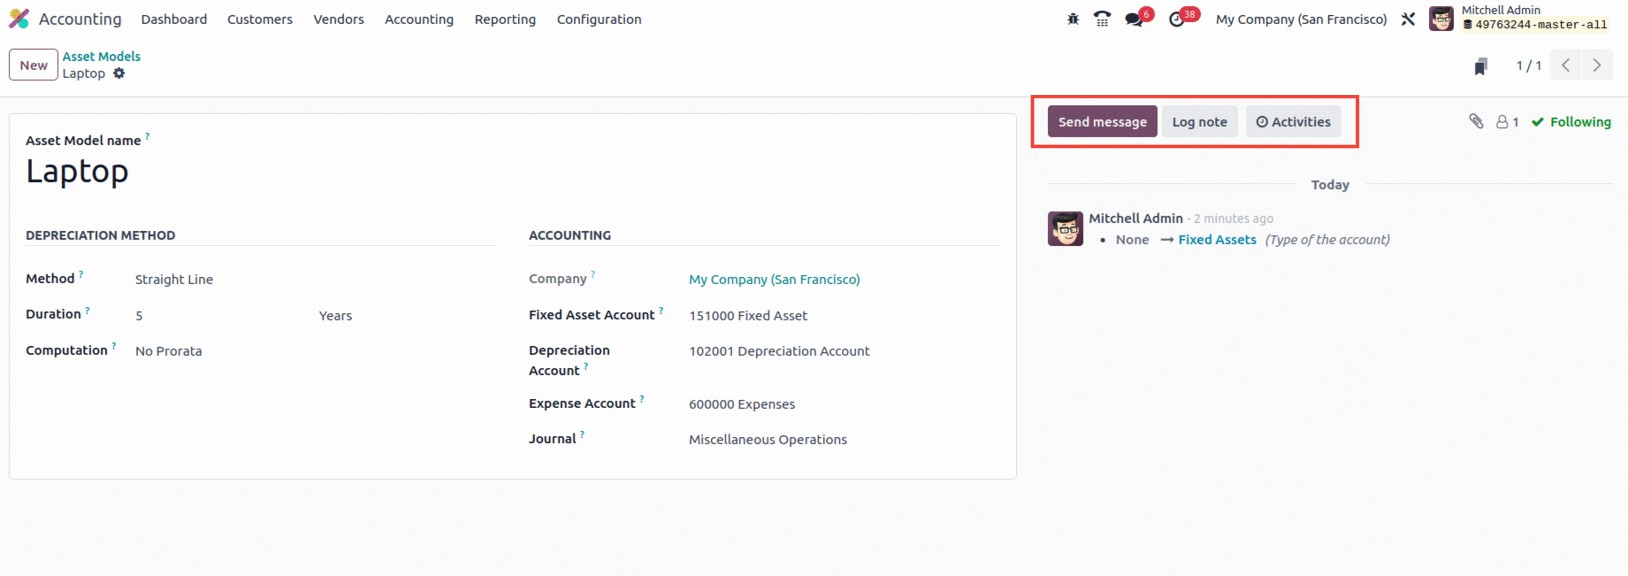
You can transmit information to the recipients of the asset model using the transmit messages option.
In addition to having the ability to schedule an activity with the followers regarding the asset model
using the Activities menu, the Log note option will feed all modifications made to the asset model. You
can add, view, and keep track of activities associated with the asset model using this option.
We can learn about the Product Categories feature based on what we deduced about the Asset Management
option that is already available in Odoo17 Accounting.
Product Categories
Large amounts of inventory can be organized and managed using Product Categories in business software.
It makes it simpler to identify, order, and report on things while also assisting in the development of
an effective system for tracking products. Making sure that clients are shown things that are relevant
to them can also be accomplished by maintaining an organized list of products and commodities. Product
categories can also assist firms in identifying patterns in consumer purchasing behaviors.
Product Categories are a feature of the Odoo 17 Accounting module that allows users to more effectively
organize and manage the products in their inventory. You can categorize things using product categories,
which makes it easy to find them in the inventory.
To make it simpler to set different prices for various product kinds, Product Categories also allows
you to set various pricing criteria for each category. Additionally, reports that provide an overview of
products and their sales performance can be produced using product categories. This function makes it
simple to break down your financial information into several product categories. You may quickly
classify your products into various categories and view the associated financial data. Additionally, you
can use this capability to undertake budgeting and forecasting by product categories and assess how well
they performed in comparison to industry standards.
Additionally, you may keep track of each product category's profitability and examine the effect that
pricing tactics have on overall performance.
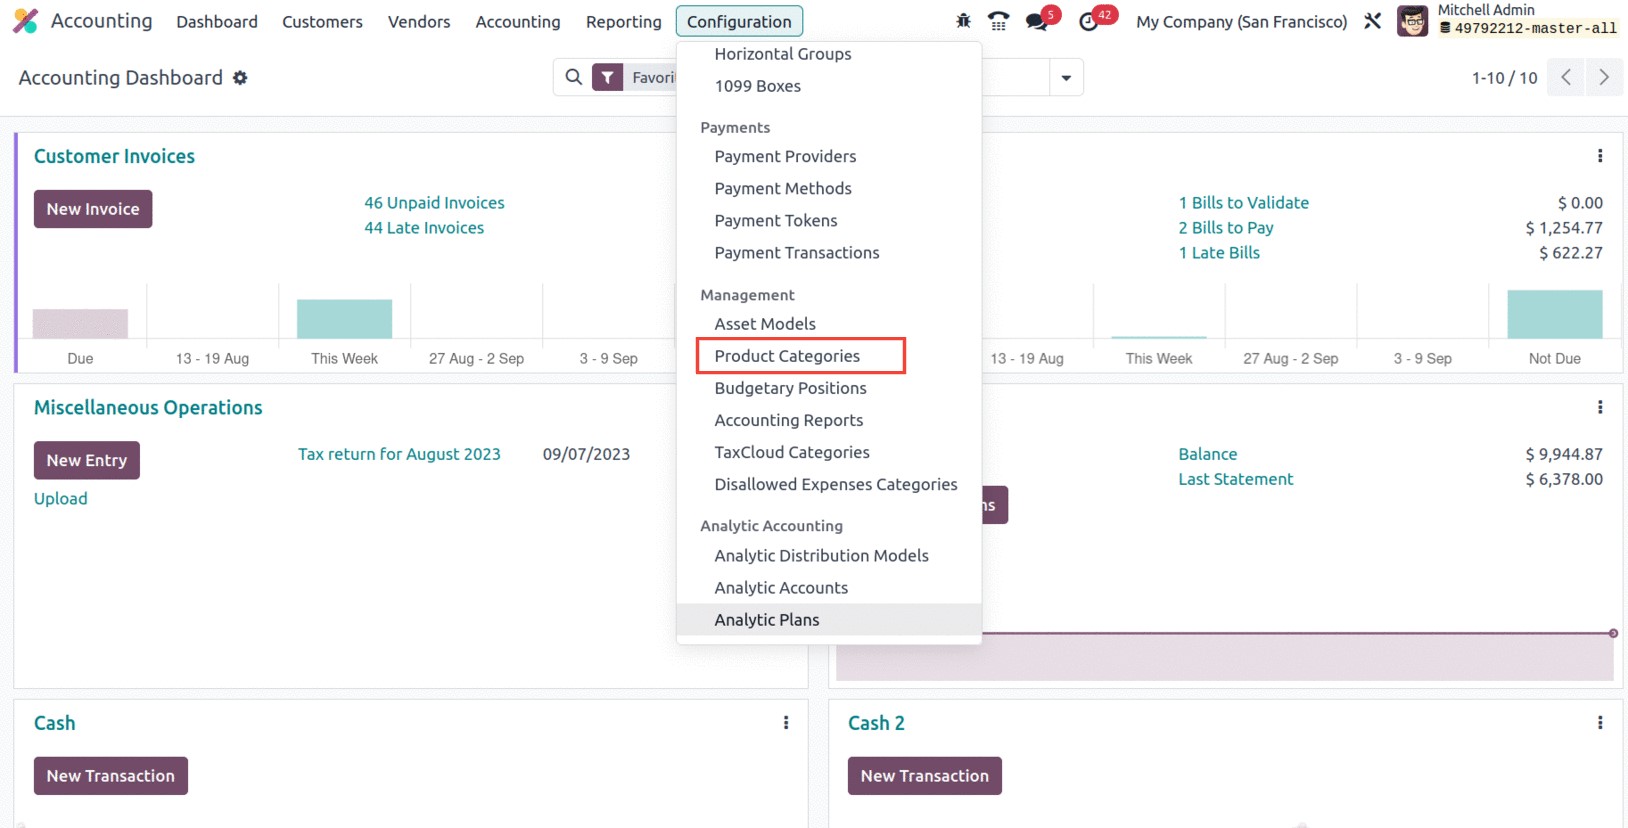
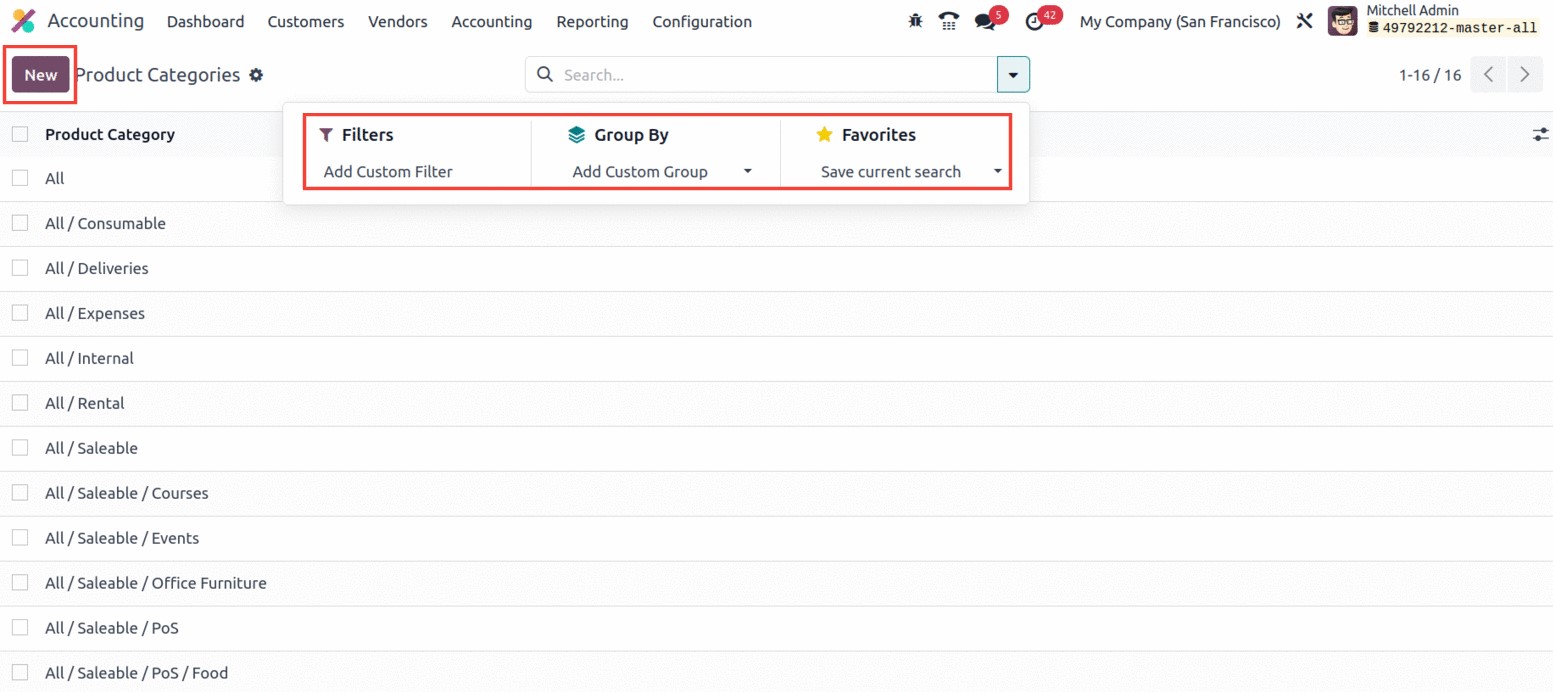
The Products Categories menu in the Management portion of the Odoo 17 Accounting module is located
under the Configuration tab. You may quickly access the Product Categories window by using this option.
The window will keep a list of all the entries for previously defined categories, as seen in the
illustration below.
You can quickly find and group the product category you need by using the Filters and Group By options.
You can choose from any of the defined categories, view them in detail, and edit the records if
necessary. Additionally, you can use the NEW button to add a new Product category.
You can enter the category name in the Category area of the Product Categories creation form at first.
After that, you can assign the Ava tax category and the Parent Category. The next choice is TAX CLOUD,
where a drop-down menu allows you to select the Tax Cloud Category. The TIC, or Taxability Information
Code, is displayed in the TaxCloud Category field and is used by TaxCloud to determine the appropriate
tax rates for each type of product. When the TIC is not set on the product, this value is utilized. If
no value is entered, the invoicing settings' default value is applied.
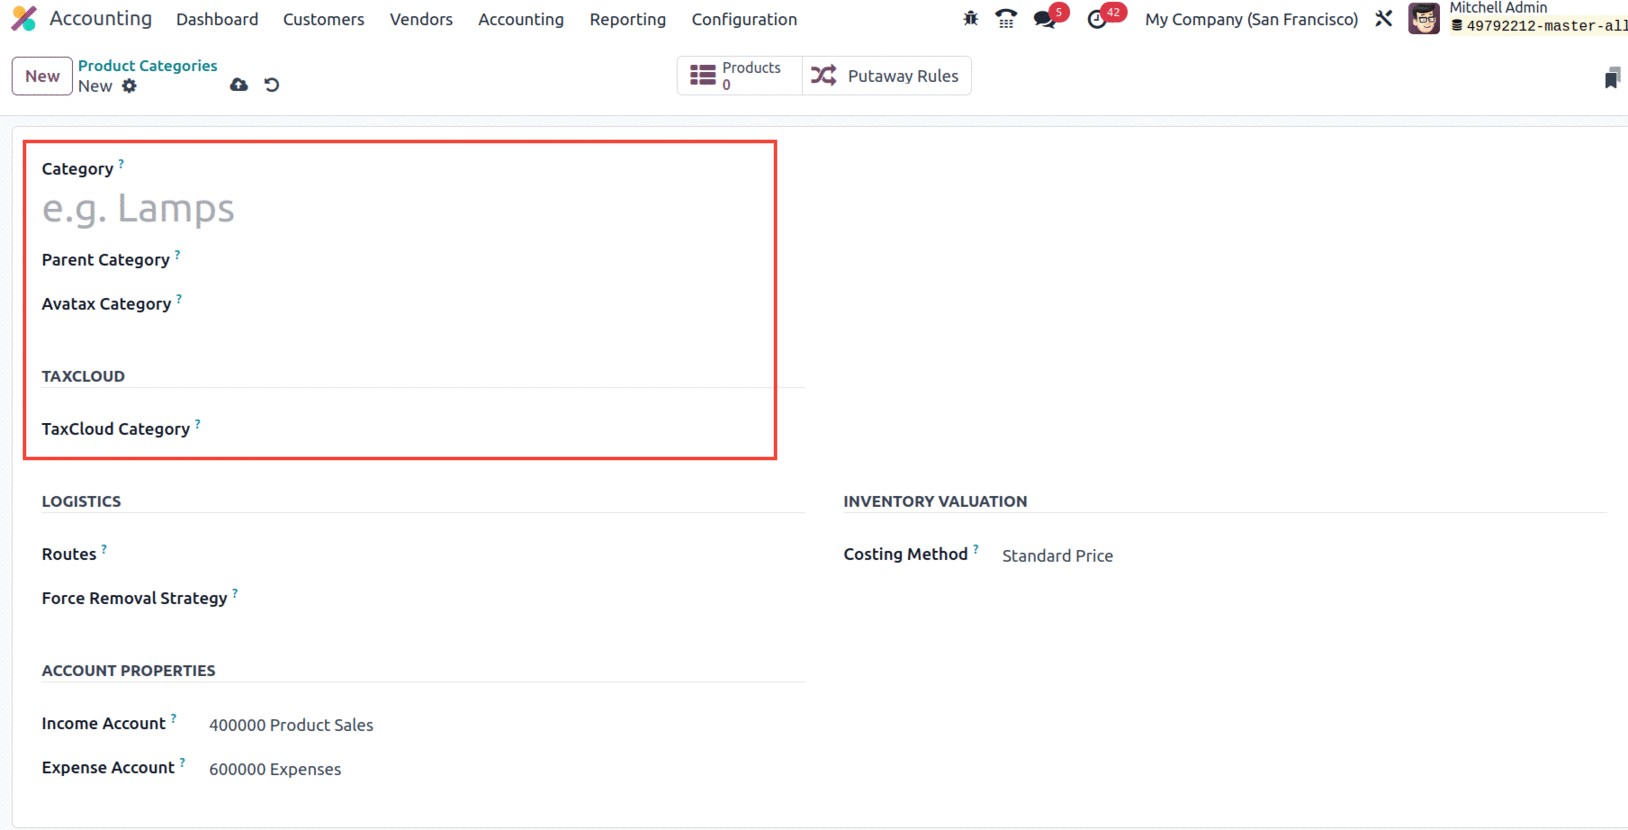
Similar to this, you can define fields relating to ACCOUNT PROPERTIES, such as the Income Account and
the Expense Account, by selecting an option from a dropdown menu or by defining a new one. The revenue
account will keep track of all the profits made from this product
category, and the expense account will keep track of all the costs connected to it.

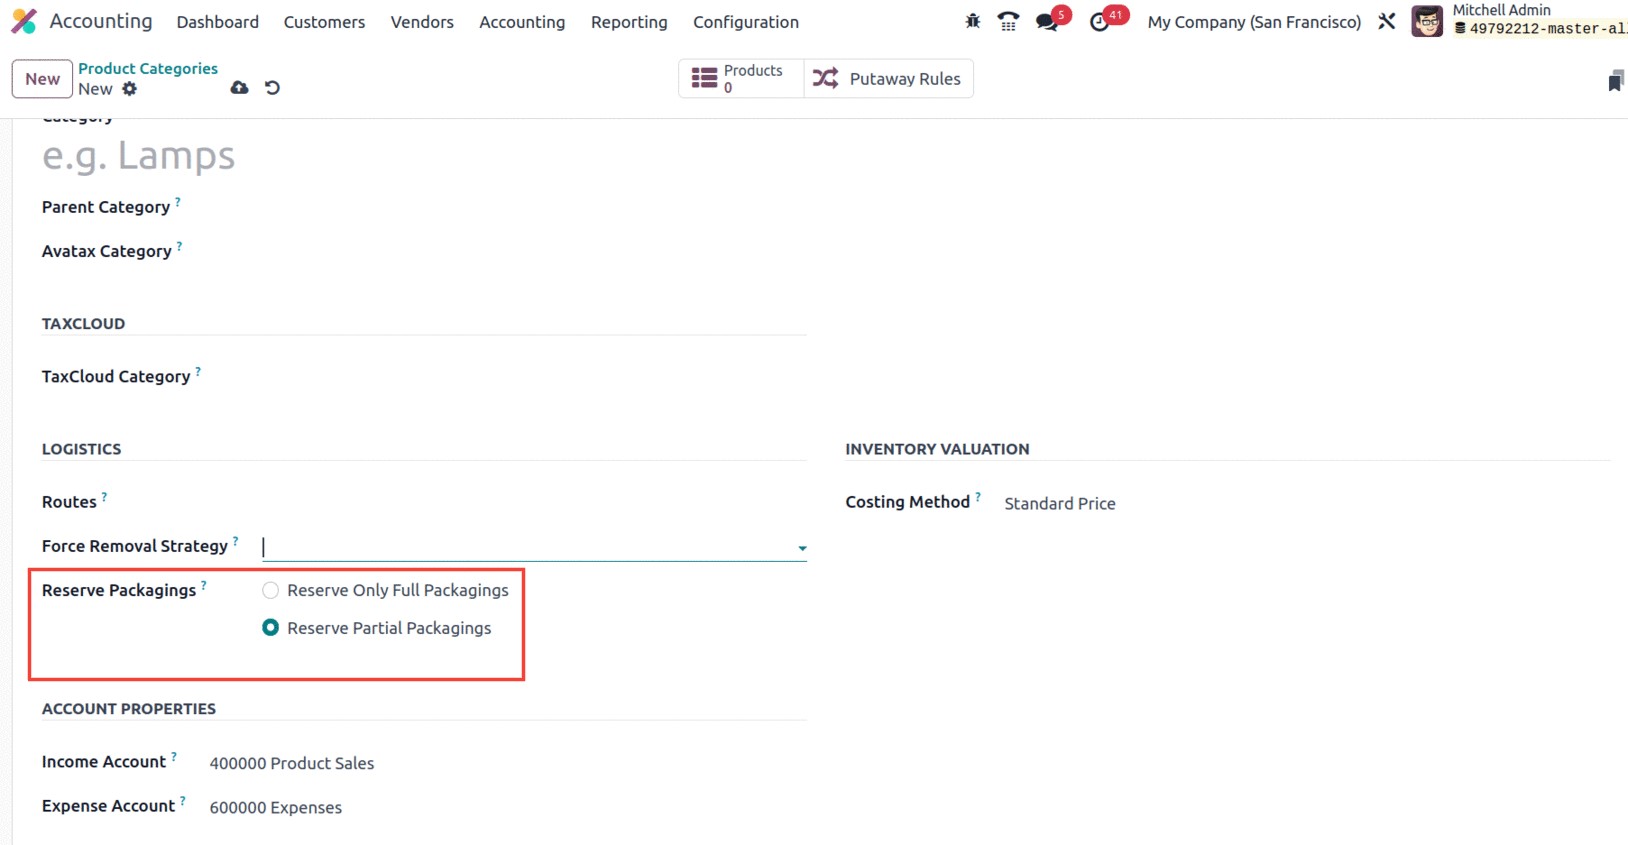
The 'Force Removal Strategy' the Routes and Reserve Packaging can be discussed in the LOGISTICS
section. You can select a specific removal method using the dropdown menu in the Force Removal method
column. In that case, regardless of the location of the source for this product category, the removal
technique will be used.
The many removal techniques proposed by Odoo17 include:
-
● FIFO (First In First Out): The First In First Out approach can be used when you
want to sell the item that was stocked first. After that, the items or lots that were stocked
initially will be removed. When products must be utilized or sold in the order in which they were
purchased or created, this method is employed. When organizing product categories, this approach is
frequently used because it guarantees that the oldest item gets used up first.
- LIFO (Last In Last Out): When it is necessary to transfer the item that was stocked last into first
place, the LIFO approach might be used. When products bought or produced last are used first, this
method—which is the opposite of FIFO—is
applied. When prices are rising and taxes must be kept to a minimum, this tactic is most advantageous.
- Closest Location: The products must first be taken from the closest storage facility if you choose
the closest location option. This is advantageous when things need to be transported to a
client because it takes less time and effort to do so.
- FEFO (First Expiry First Out): The final method, FEFO, is utilized when products have an expiration
date. It is crucial to make sure that the products with the earliest expiration date are used up
first. This is crucial
for products like food, medicines, and other goods with a short shelf life.
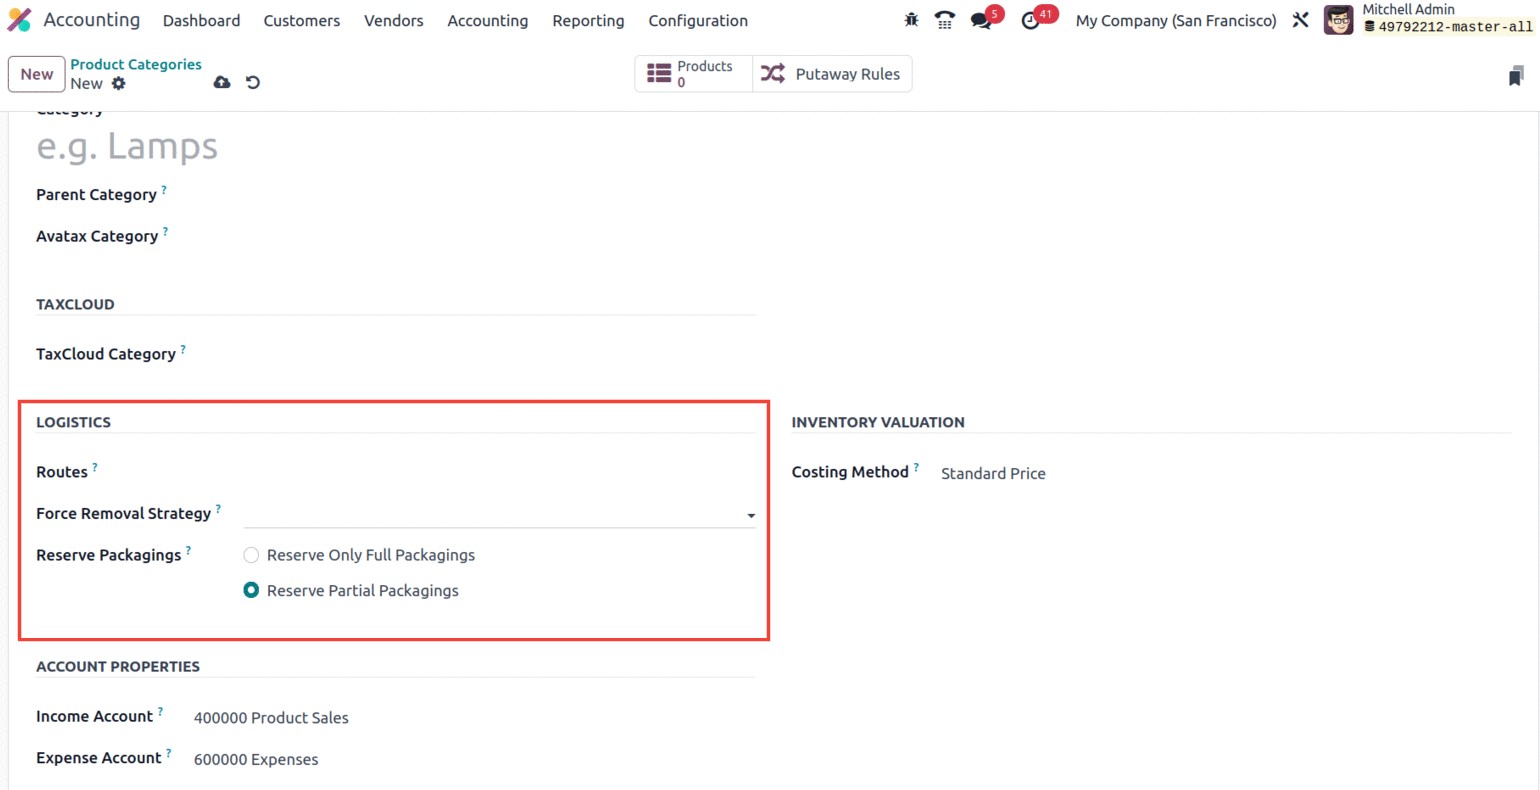
Reserve Packaging is related to product packaging. There are two options
- Reserve Only Full Packagings: This won't reserve partial packing. Only 10 units will be reserved if
the buyer wants
2 packets of 10 units each and you only have 18 units in stock.
-
Reserve Partial Packagings: This permits partial packaging in portions. The 18 units will be held for
the customer if
they order two packets of 10 units each and you only have 18 units available.
Additionally, under the INVENTORY VALUATION section, the configuration choices for inventory valuation,
including Costing Method and Inventory Valuation, can be configured. Either Standard Price, First In
First Out (FIFO),
or Average Cost (AVCO) are definitions for the costing methodology. While FIFO and Average Cost are
dynamic techniques
depending on the product's purchase price and the quantity in stock, the Standard Price option enables
you to establish a fixed cost per product. While FIFO uses the purchase price of the oldest stock on
hand, average
cost uses the purchase price of all stock on hand.
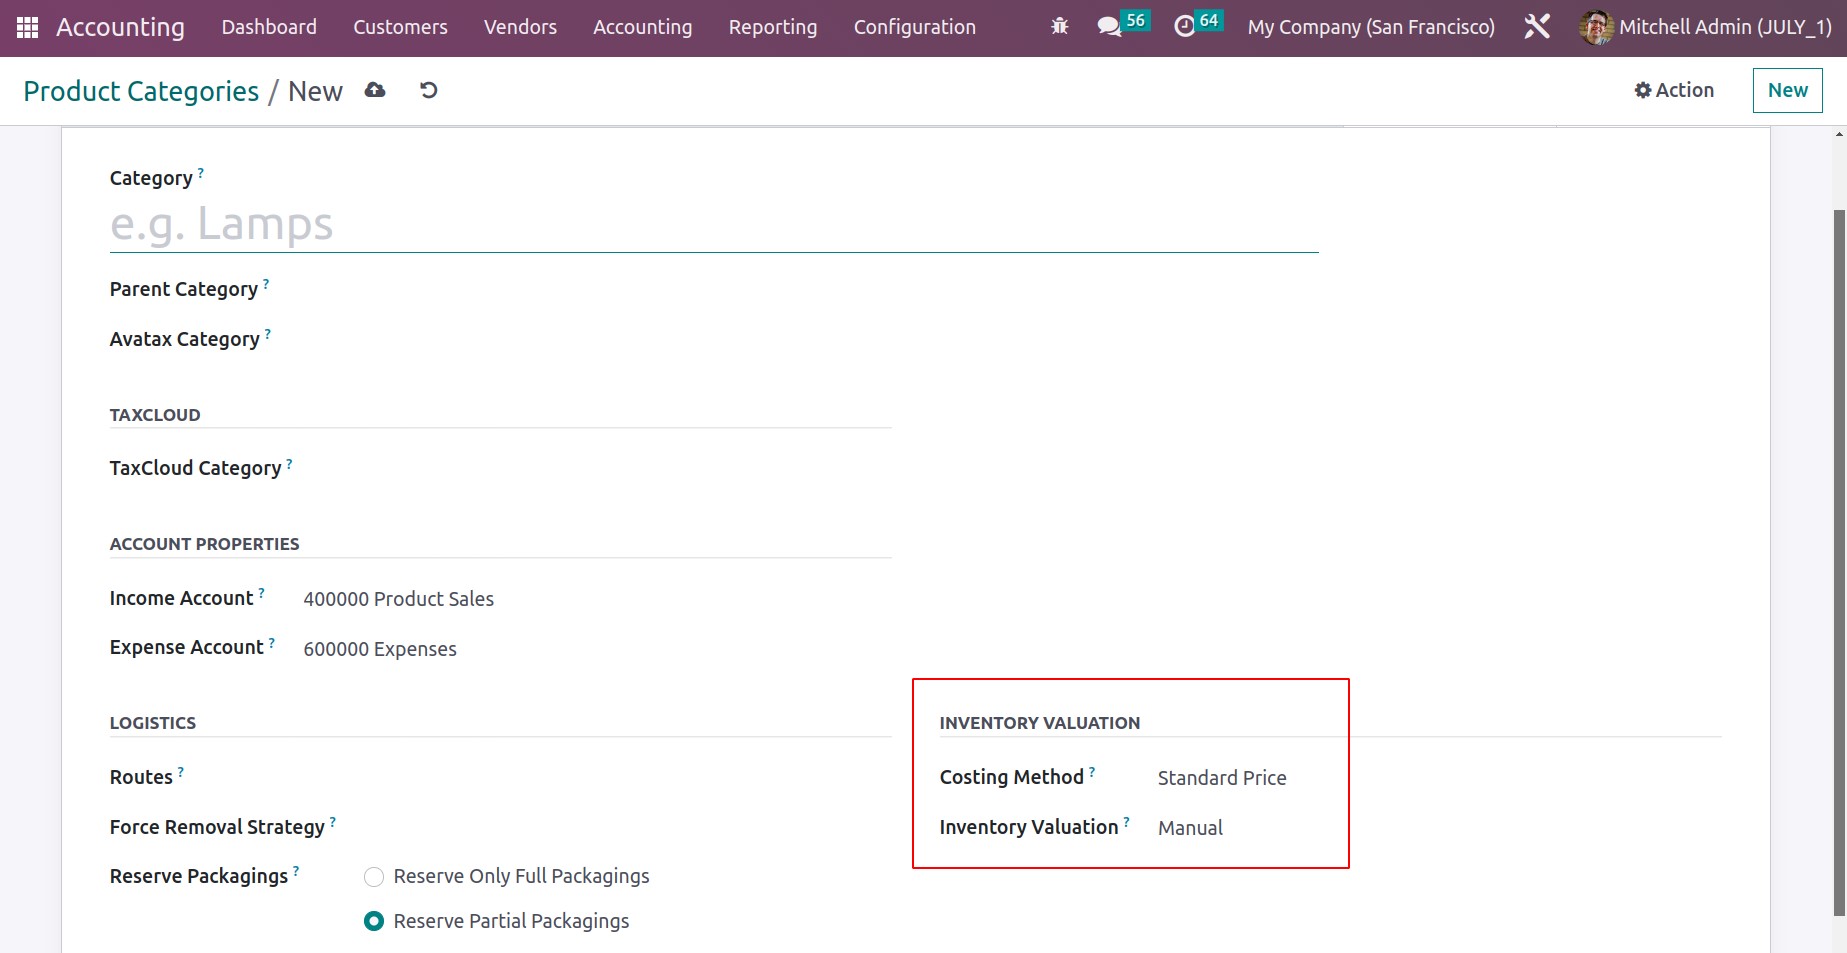
The Inventory Valuation is performed to confirm how stock journals should be defined for this specific
category, and the platform provides you with the ability to carry out both manual and automatic
activities. You must set up the necessary definitions of the stock accounting attributes under the
ACCOUNT STOCK attributes
section before starting Automated Inventory Valuation.
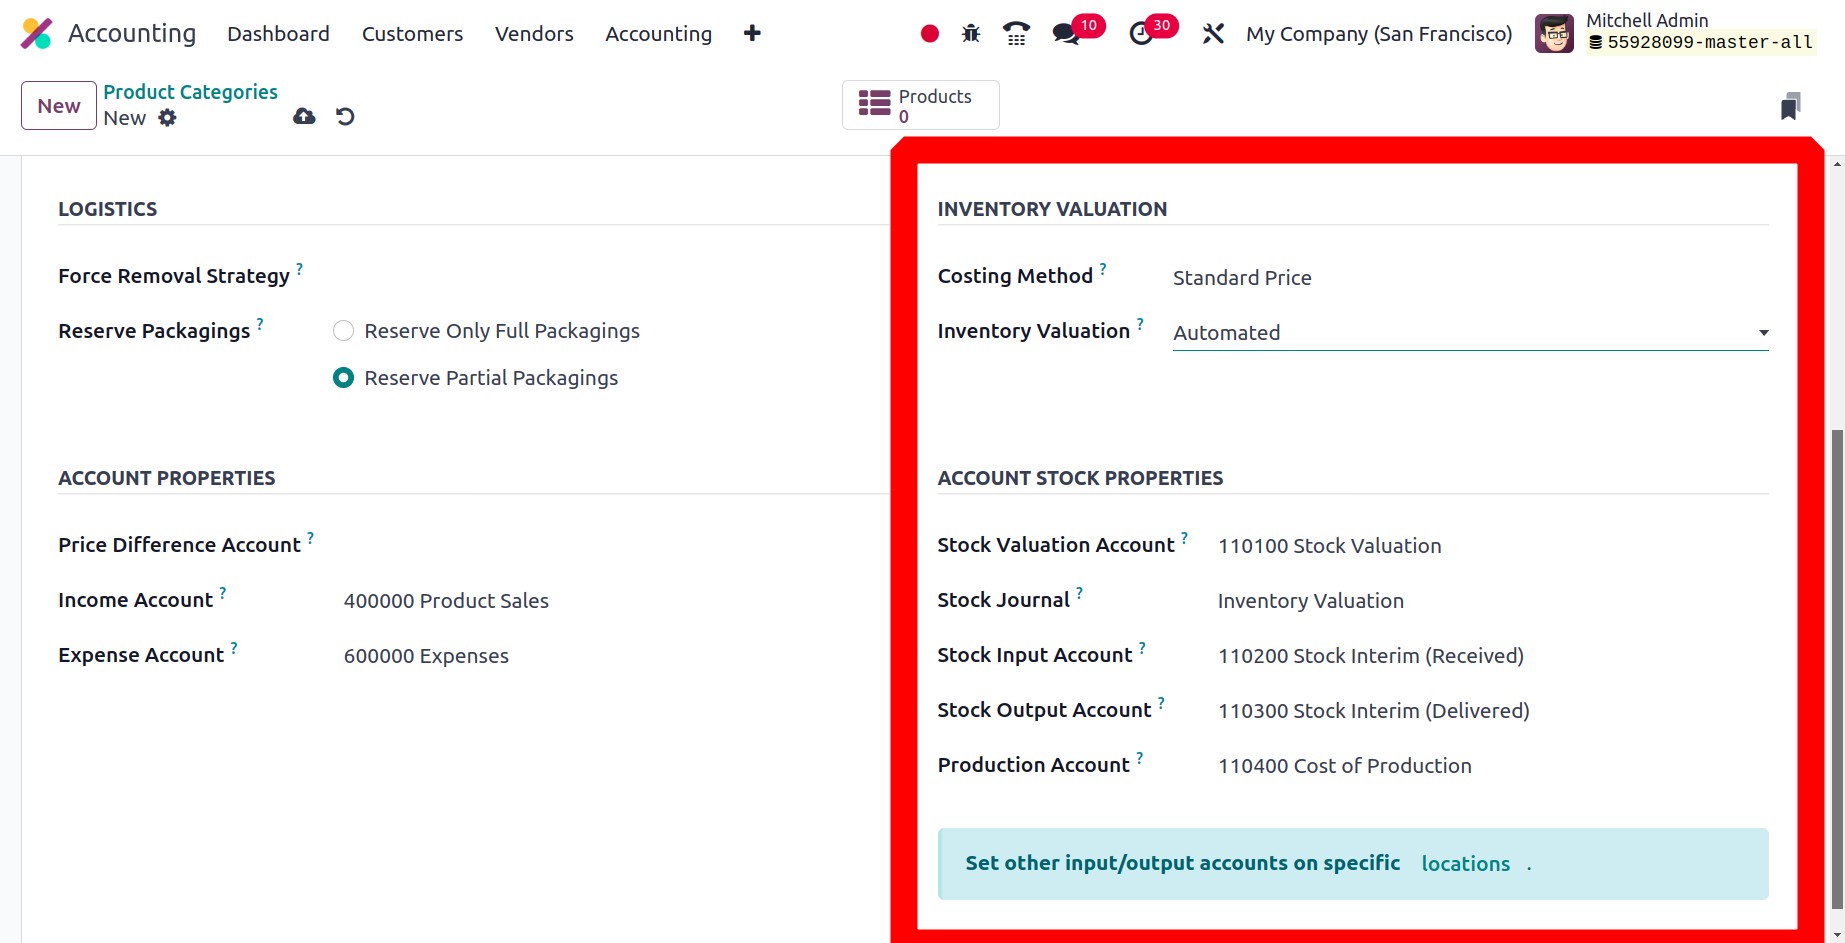
You can include the Stock Valuation Account in this section so that when automatic inventory valuation
is enabled for a product, this account will contain the products' current value. The Stock Journal can
then be brought up. When automating inventory valuation, this stock journal will be quite helpful. When
stock moves are made, the entries will automatically be placed in this account journal. If there isn't a
designated valuation account, you can define the Stock Input Account to publish equal journal items for
all incoming stock moves. You'll close by mentioning the Stock Output Account, which is used to track
all stock movement. This will be the default value for all products in this category if no unique
valuation account is used at the destination location. Only after you choose the Automatic
Accounting option in the Settings will the accounting tools become accessible here.
You have successfully set a Product Category once you have completed filling out all of these options.
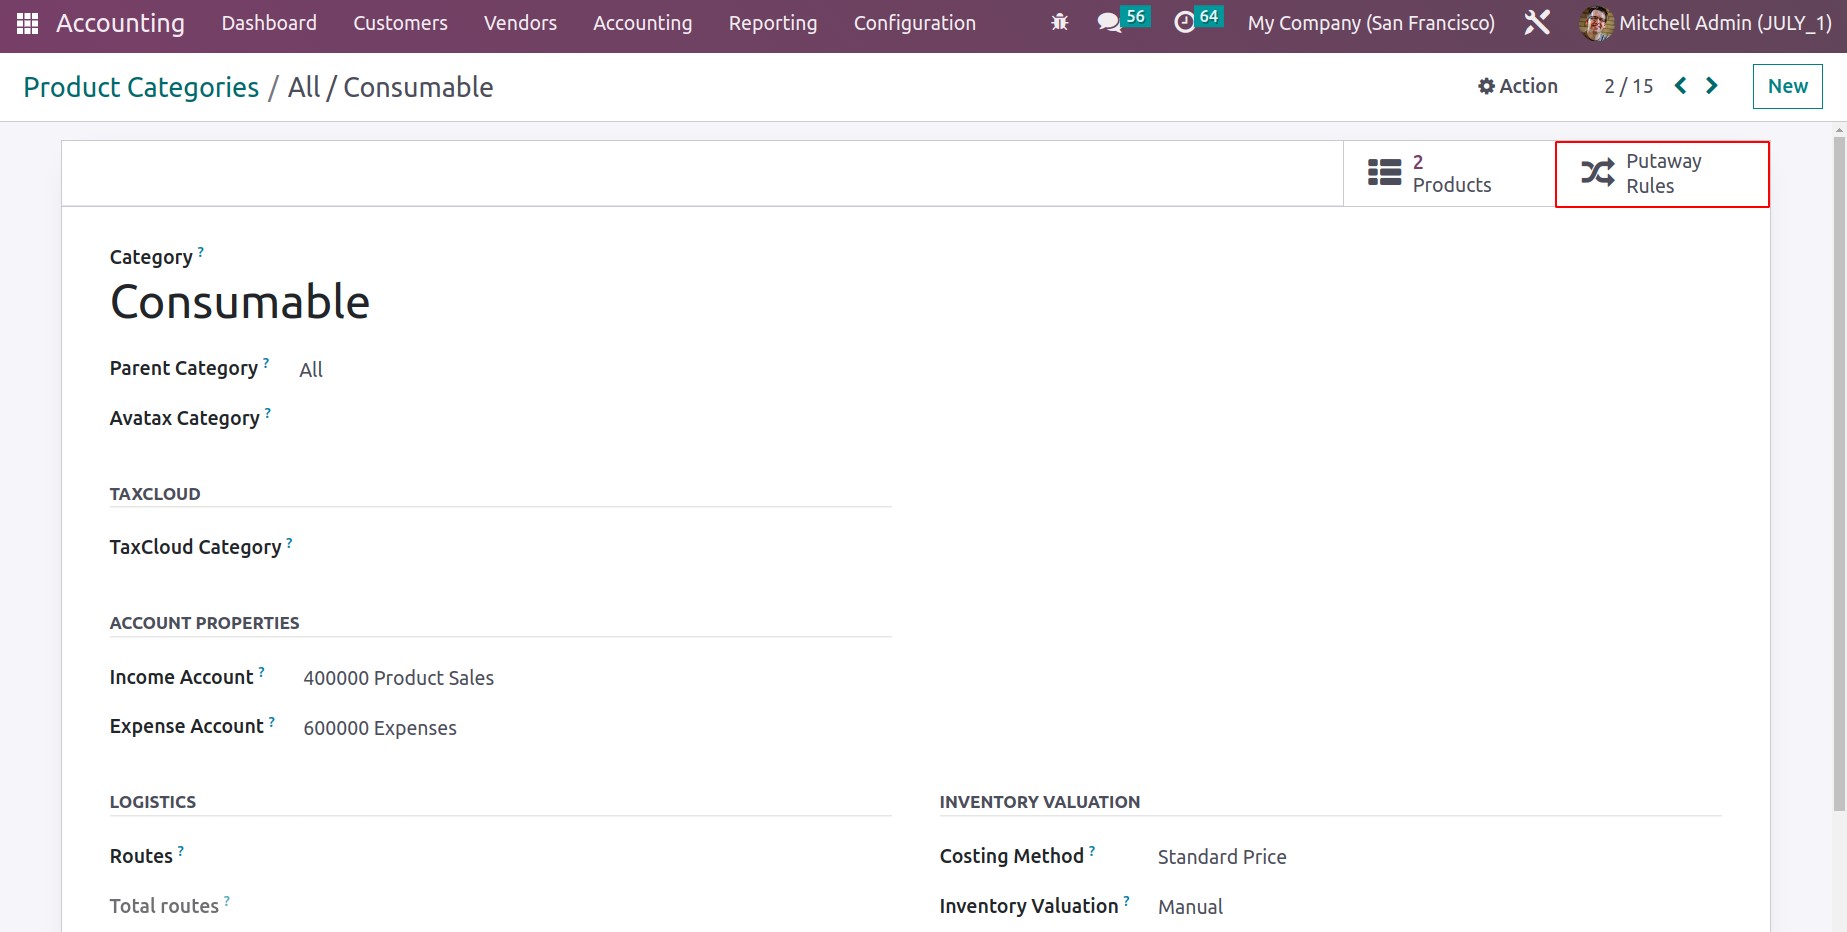
Along with all the options, the window will also reveal smart tabs in the upper right corner, as seen in
the image below, where you can see the Products and Putaway Rules tabs.
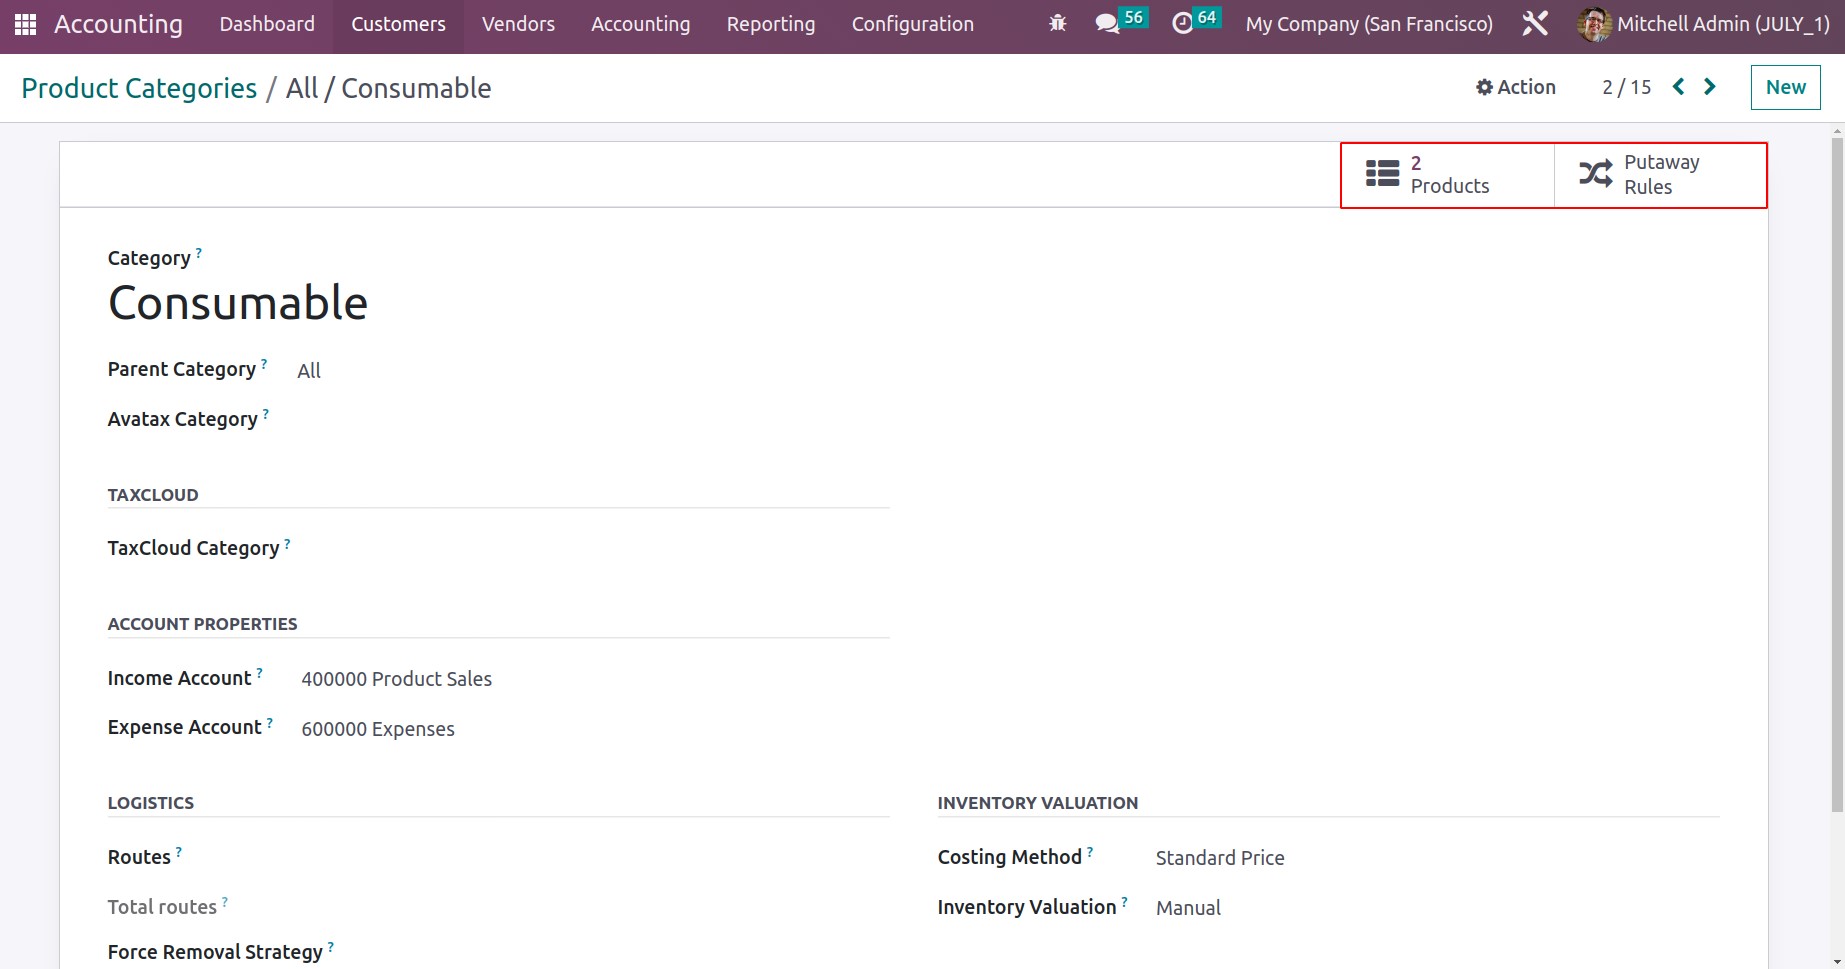
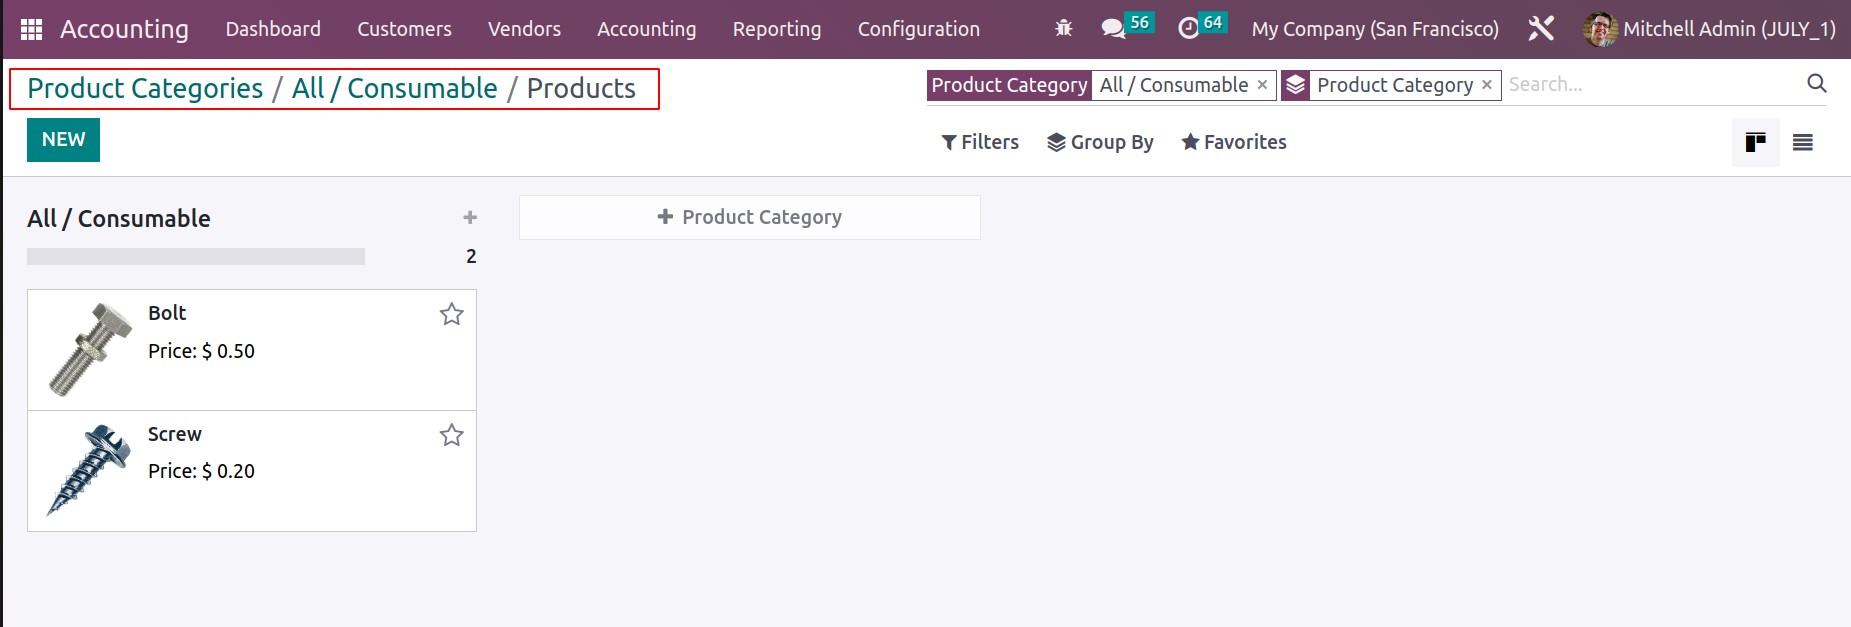
The smart tab "Products," which may be accessed by clicking the button, will show all the products that
fall within this product category. As soon as you choose the smart tab, you'll be taken to the Products
window, where you can see every item that fits into this category.
Based on the different stages and the construction of the specific category of the product that are
stated, the product information in the product menu will be displayed. You can also view the entire
products that are being stored if you remove the filters.
All configured putaway rules for the product falling under that specific category are displayed in the
category form's smart tab Putaway rule. Define the routes and removal strategy under Logistics so that
all items falling under this category will be taken out of the warehouse in accordance with the removal
strategy specified.
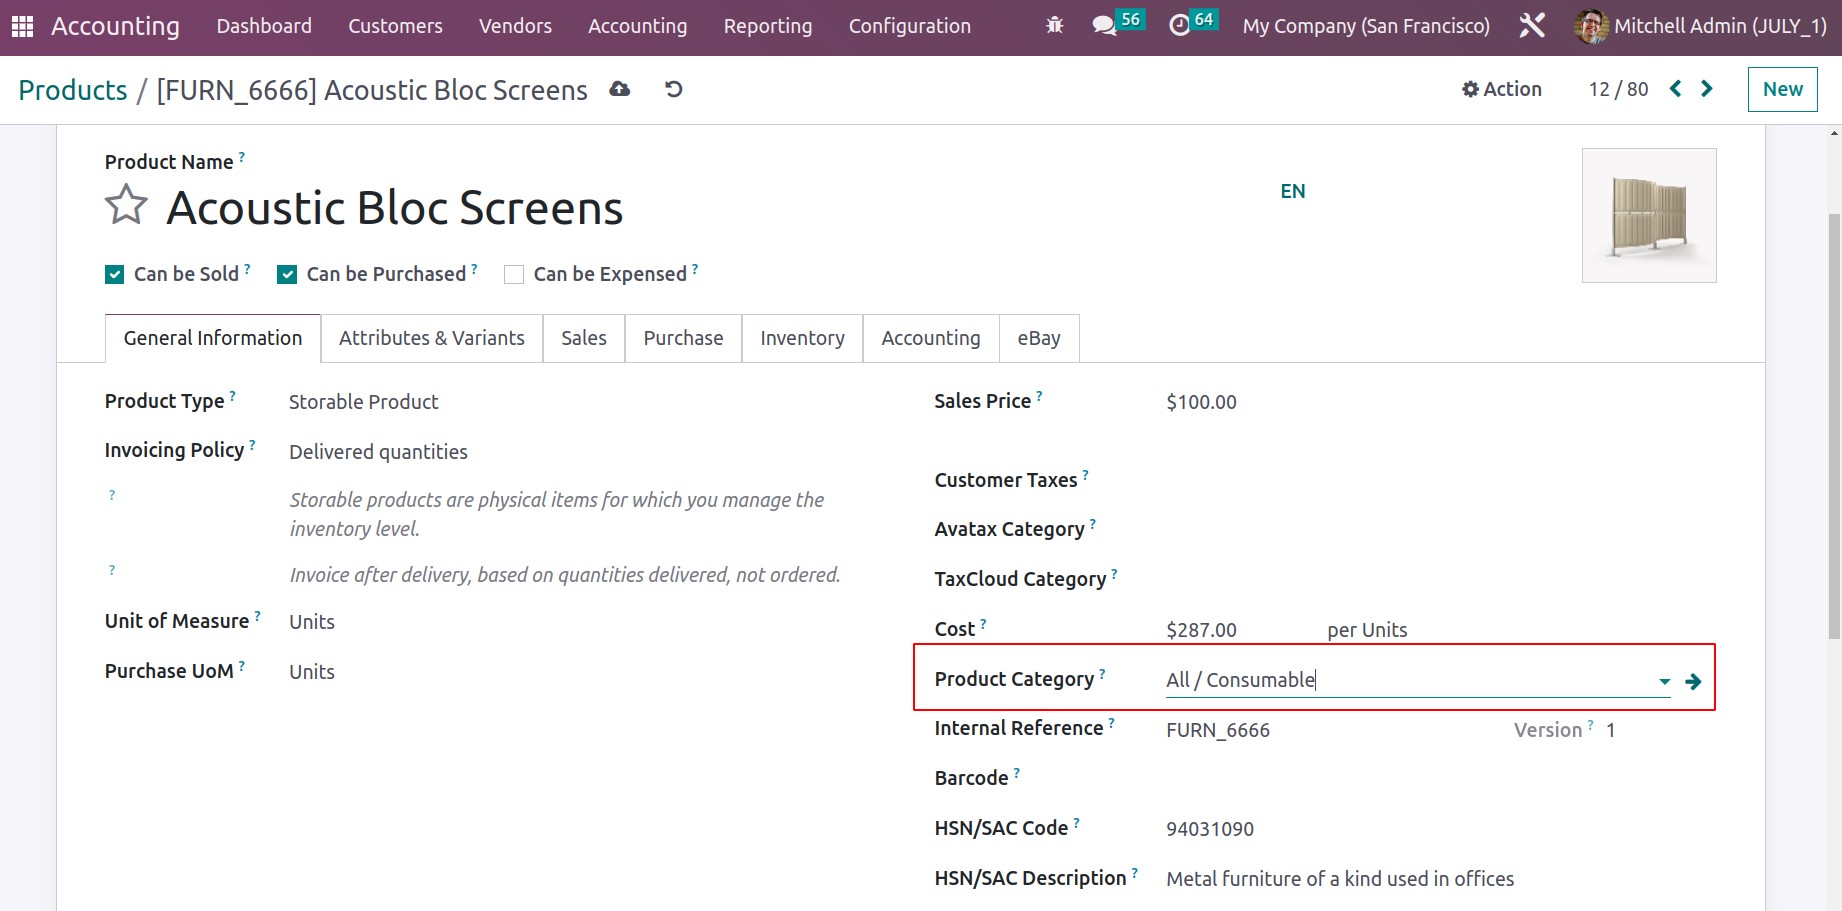
The created product category can be easily added to the product.
Let's move on to the following section, where the Cash Roundings setups are discussed, now that we are
clear on the Product Categories configuration in the Odoo17 Accounting module.
Cash Roundings
You can quickly and precisely round off the total amount of a sale or purchase invoice using the Cash
Rounding feature in the Odoo17 Accounting module. This can be used to quickly round up, down, or to the
next whole number, depending on your preferences. This function guarantees that the whole invoice amount
is rounded off correctly and accurately, making it particularly helpful for companies that accept cash
payments. If necessary, this feature can be set up to selectively apply to particular invoices or to
apply automatically to all invoices. Avoiding using pennies or small bills as payment is beneficial. The
quantity is automatically rounded to the next smaller denomination. Businesses that receive a lot of
cash payments, like merchants, can benefit from this service. It assists in reducing both the time
required to complete payments and the quantity of coins or tiny notes required for such payments.
Businesses that frequently handle cash transactions must ensure that all currency amounts are rounded to
the next denomination can use it.
In the Accounting Settings section of the Configuration page, this feature can be made active. Once
enabled, users can choose between 0.05, 0.10, 0.25, or 1.00 as the rounding increment. The amounts will
be rounded up or down to the designated increment when issuing an invoice or creating a receipt. In
order to avoid the need for manual rounding off of cash payments, this tool is helpful for organizations
that need to make sure that all cash transactions are rounded off to the nearest denomination. You can
set up rounding rules in the Accounting module if this functionality is enabled. With the use of this
tool, users can effortlessly round up or down any sum to the closest suitable denomination.
Users can set the system up to, for instance, round off all payment amounts to the nearest dollar.
Businesses that accept cash payments and must round off consumer payments exactly can benefit from this
functionality. Additionally, invoices and other financial documents can be automatically rounded off
using cash rounding. This function aids in ensuring that all transactions are accurately recorded and
that payment sums are correct.
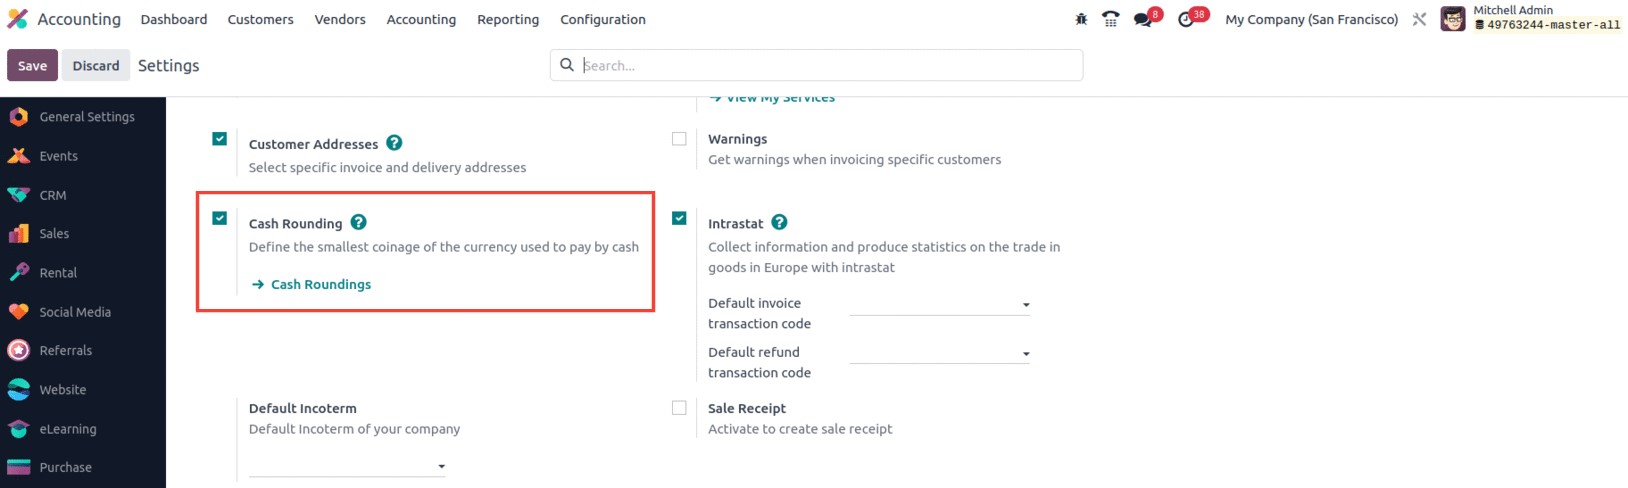
The Configuration Settings of the Odoo Accounting module contain the Cash Rounding option. By turning
on the Cash Rounding option, you can specify the smallest denomination of the currency that is used to
make cash payments. You will be able to view the menu in the Accounting module once you have enabled the
setting in settings.
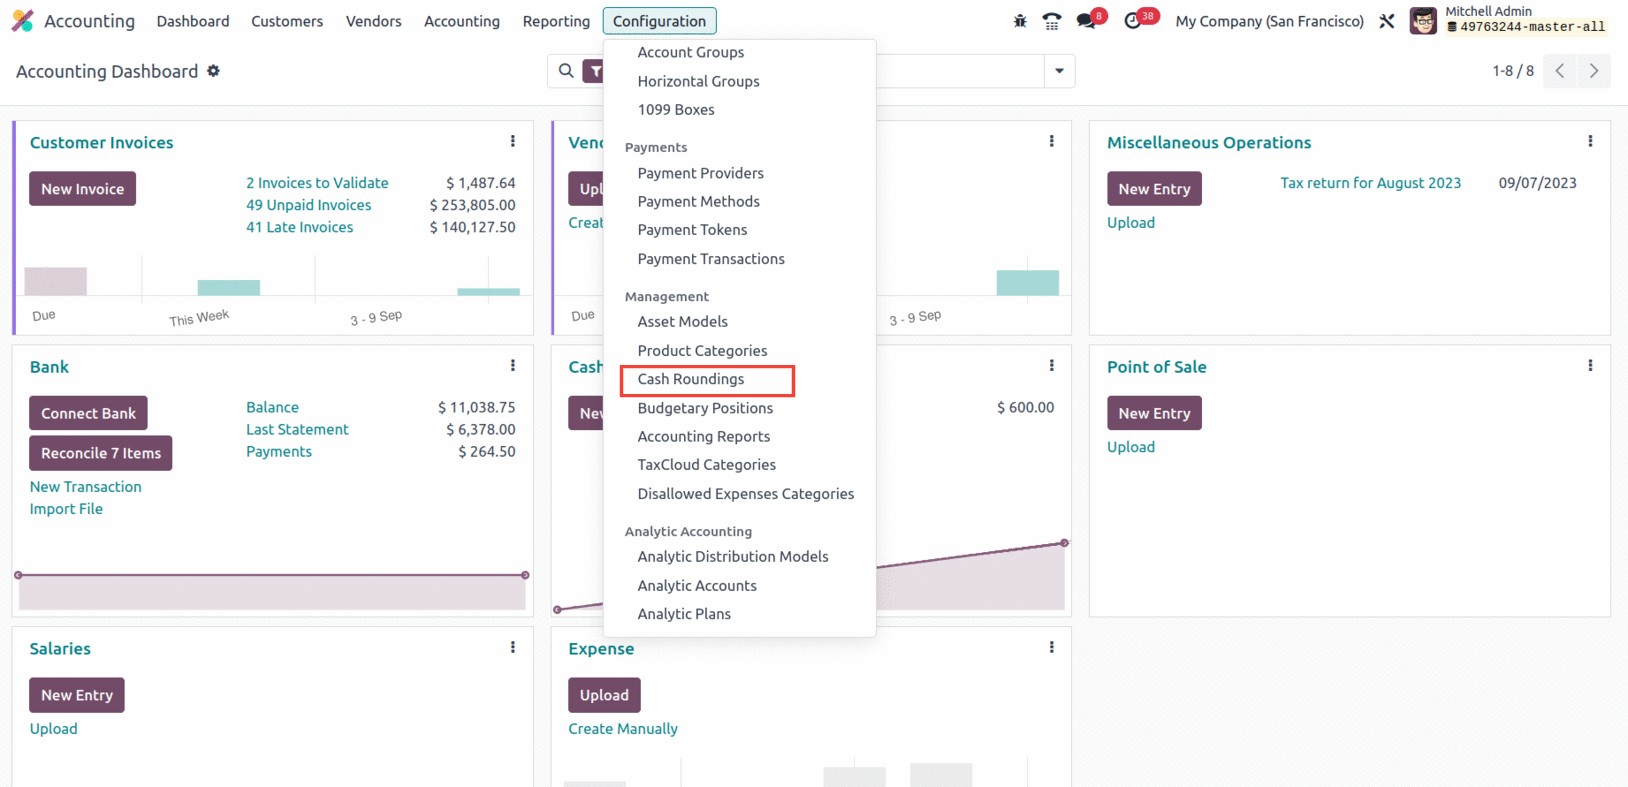
You may view and define the Cash Roundings by selecting the Cash Roundings option from the Management
section of the Odoo17 Accounting tab.
Here in the window, you can see a sneak peek of all the Cash Roundings records that have already been
defined. The specifics are shown, including Name, Rounding Precision, and Rounding Method. These fields
are all configurable and have detailed views available. Additionally, you may use the many pre-set and
programmable filters and grouping options to quickly search for and locate the necessary data. You may
access the Cash Rounding creation form with the
help of the NEW button. The window is shown in the screenshot that follows.
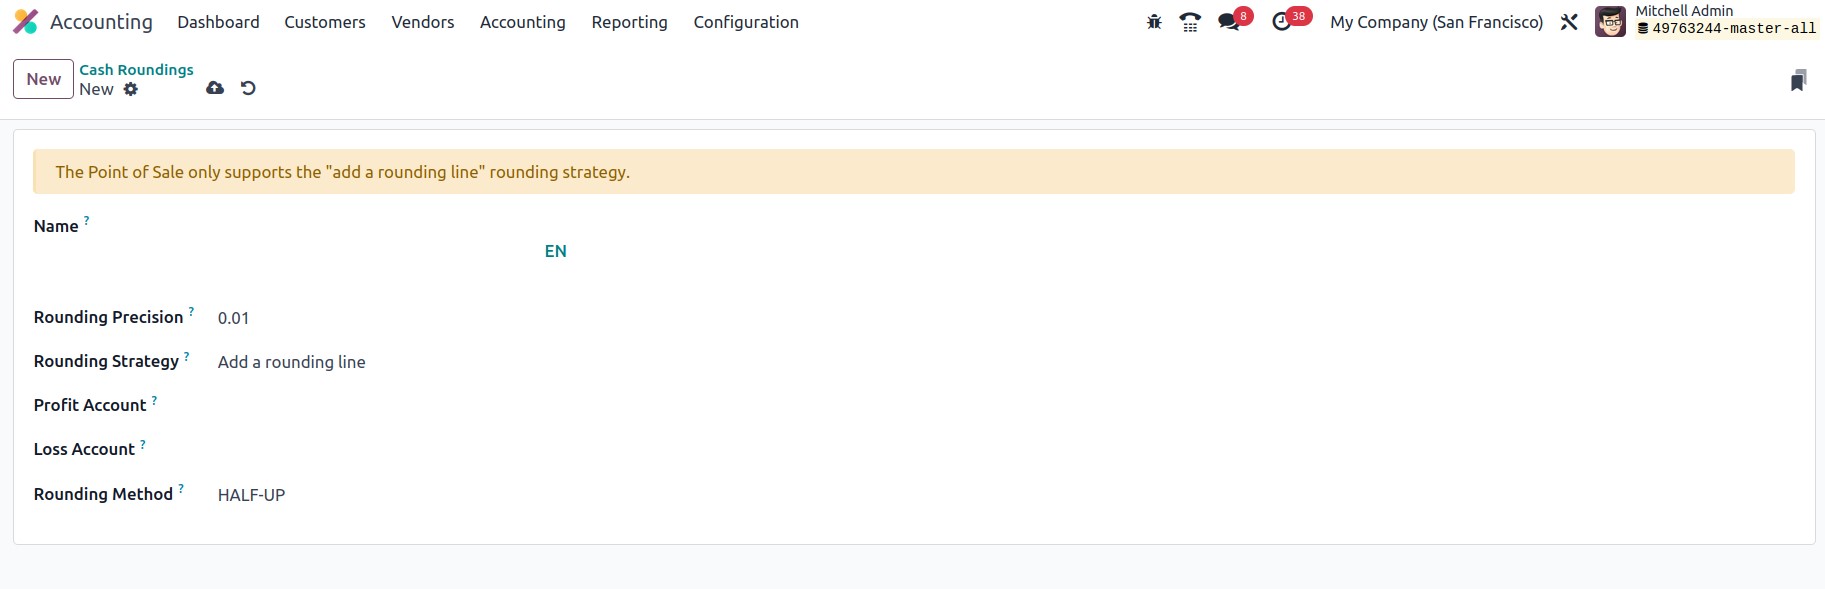
You can assign the name of the cash roundings in the Name field of this form view. The smallest
denomination with a non-zero value can then be represented in the Rounding Precision field. The Rounding
Strategy section is where you may define how the invoice amount will be rounded to the desired rounding
accuracy. Here, you have two options for using the rounding strategy: Add a rounded line or Modify tax
amount.
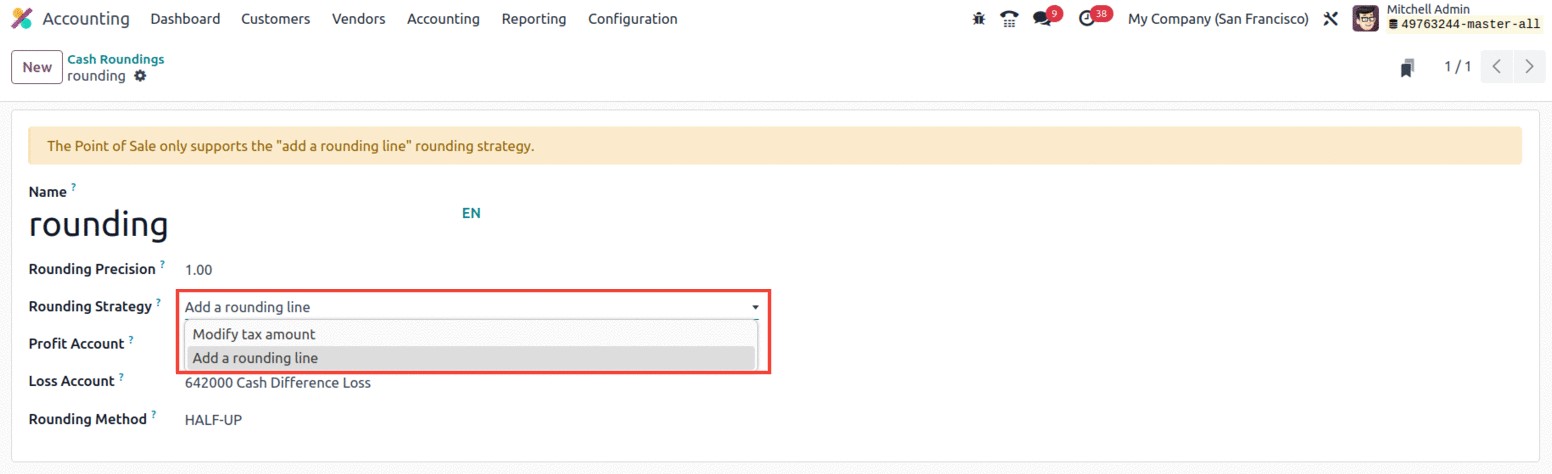
When producing invoices in the Accounting module of Odoo17, you can use these parameters to specify how
you want Odoo17 to handle rounding amounts. When you choose Add a Rounding Line, you add an additional
line at the end of the invoice with the Rounding Amount, and when you choose Modify Tax Amount, you can
change the invoice's tax amount to include the Rounding Amount. When the rounding amount is not
substantial enough to merit its own line item, this can be utilized.
The Profit Account and Loss Account can be mentioned following the definition of the Rounding Strategy.
Due to the rounding process, the total rounded value will eventually shift to a higher infinity,
producing a profit that will be recorded in the profit account. A loss will be created and recorded in
the Loss Account if the total round value shifts to the lower infinity. The Rounding Method can be
specified as a final option. You have three options for defining it on the Odoo17 platform. UP, DOWN,
HALF UP.
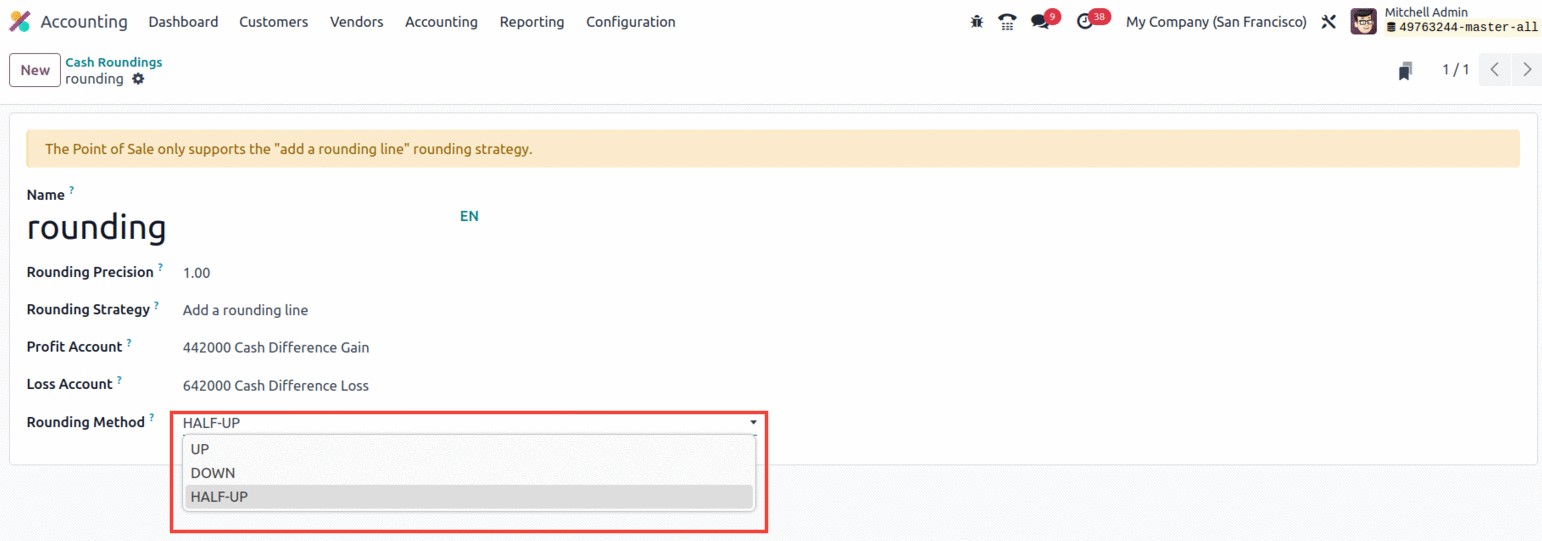
UP: Value rounds to plus infinity when it is UP. By selecting this option, the value will be rounded to
the nearest stated amount. For instance, if the specified amount is 20 cents and the amount is $15.20,
the outcome is $15.40.
DOWN: The value rounds to the negative infinity. In this instance, it will round the sum down to the
closest given figure. For instance, if the specified amount is 20 cents and the amount is $15.20, the
outcome is $15.00.
HALF-UP: The decimal value will be rounded up if it is larger than 0.5 and down if it is less than 0.5.
In other words, the sum will be rounded up to the nearest given amount. When using an example, the
outcome would be $15.20 if the amount was $15.20 and the required amount was 20 cents.
After you've specified Cash Rounding, you may save it, and it will then appear in the menu. To round
the total amount, this rounding can be used on vendor or customer invoices. Rounding can be used on the
invoice's additional info tab. Additionally, you have the option to change your defined Cash Rounding
setup whenever you like.

Let's go on to the next section, where the budgetary situations are discussed, now that we are clear on
the configuration of Cash Rounding.
Budgetary Positions
An innovative tool to design and manage various budgeting positions, which offers a structure for
tracking funds allocated to particular projects or departments, is available in the Odoo 17 Accounting
module. Each budgetary position has a set of budget lines that users can designate. The money can then
be spent in accordance with the established budget thanks to their real-time monitoring of budget
expenses. Additionally, you may specify a budget cap for each position and get warnings if the cap is
surpassed. Users can also create a variety of reports to monitor budget allocations and expenditures.
Tracking budget allocations, expenses, and associated data is made very simple by the advanced feature
featured in the Odoo17 Accounting module. It makes sure that resources are being used effectively and
aids in keeping your finances organized.
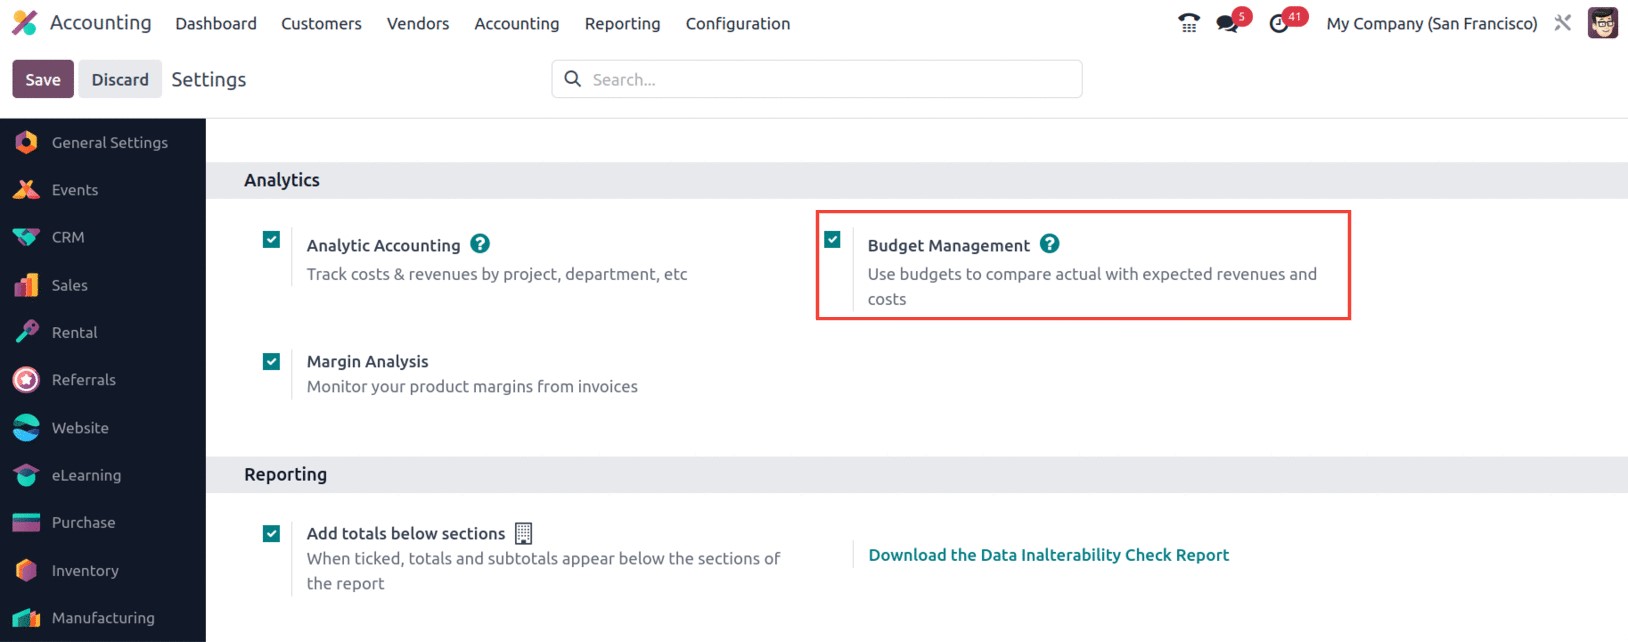
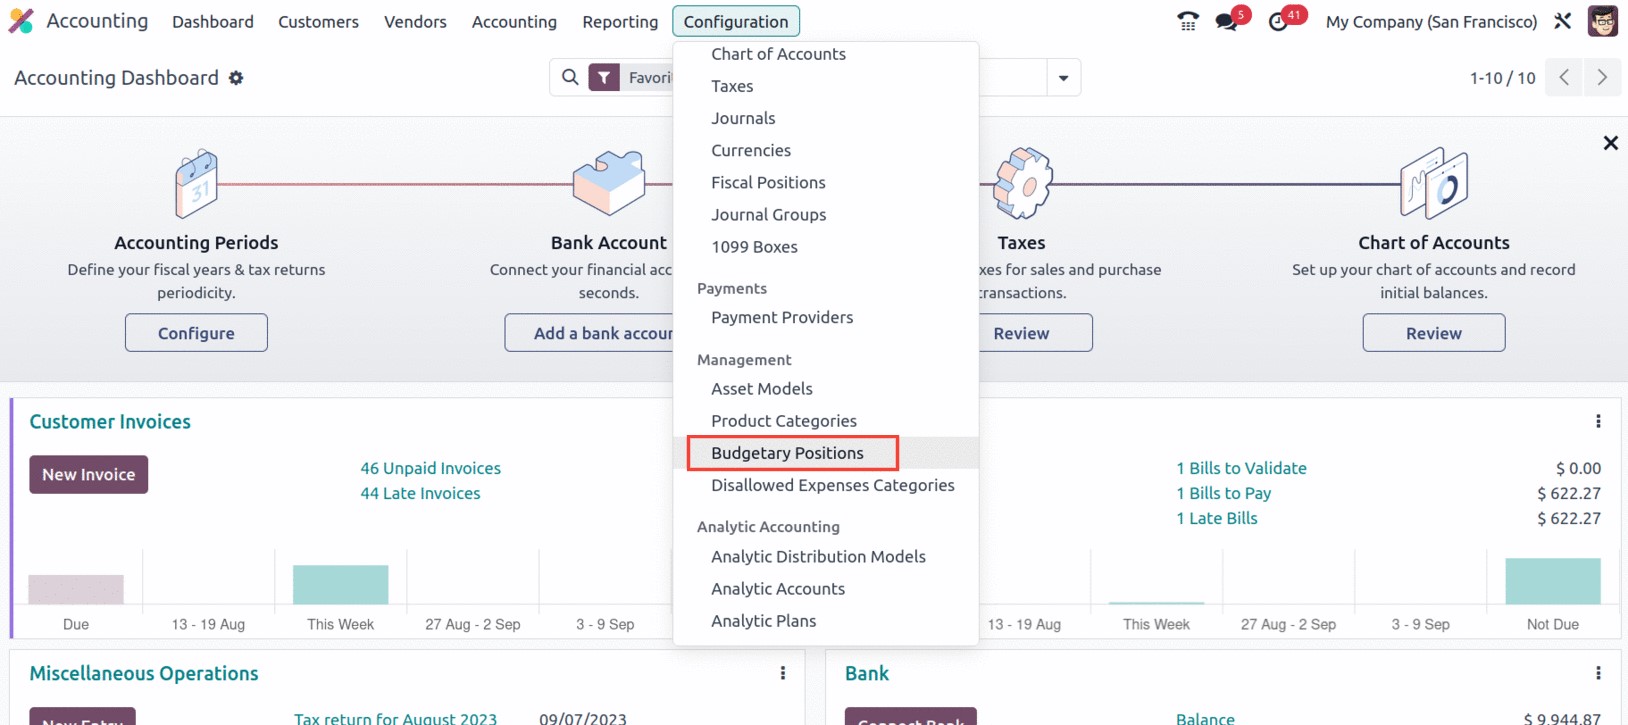
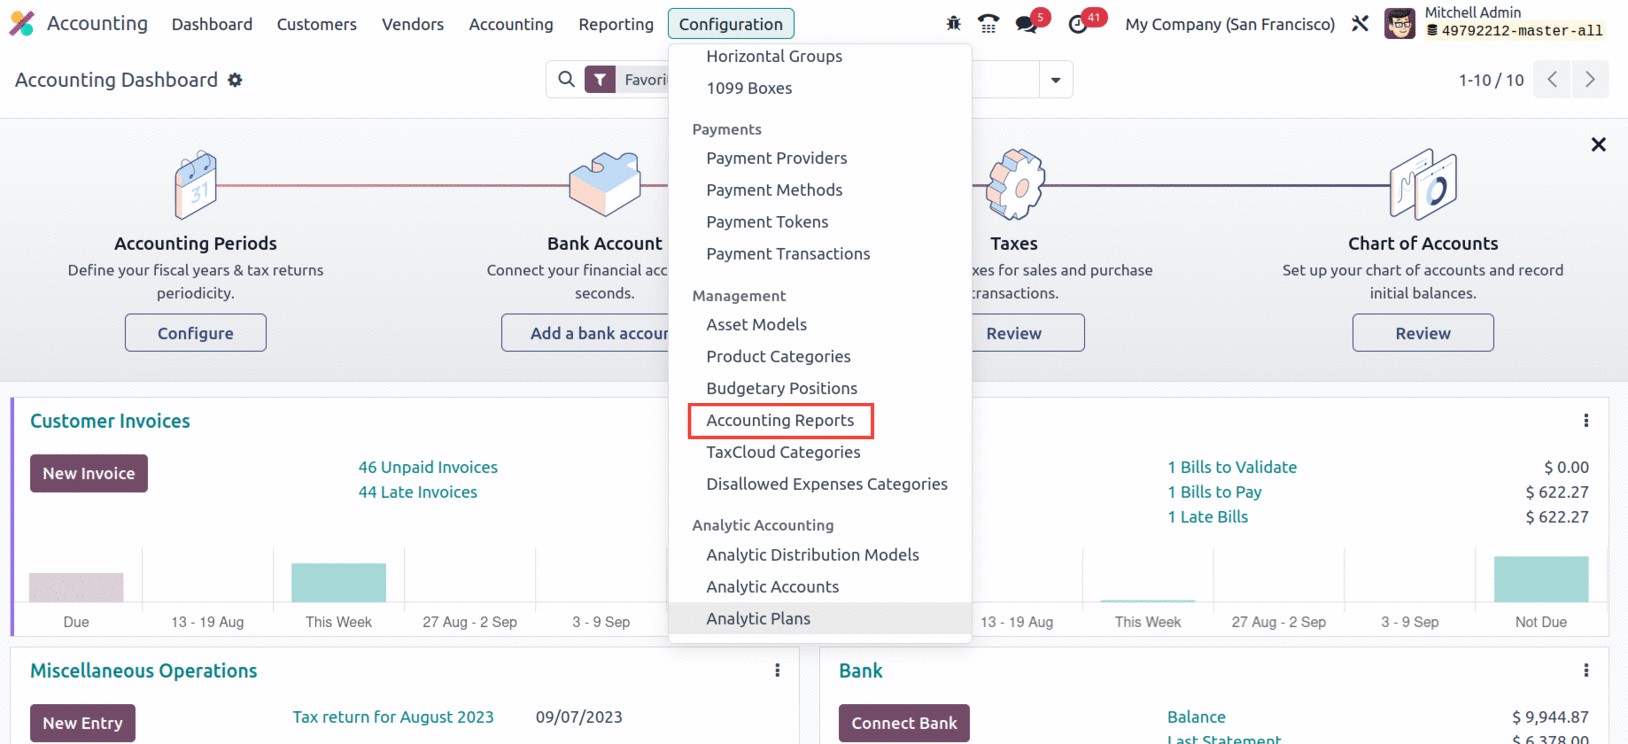
You must enable the Budget Management feature available in the Configuration Settings window of the
Accounting module in order to make the Budgetary Positions menu accessible on the Configuration tab. As
seen in the figure below, you can find the option in the Analytics area.
You may now access the Budgetary Positions menu from the Configuration tab's Management section.
You may access the Budgetary Positions window, which is displayed in the screenshot below, with only
one click on the Budgetary Positions menu.
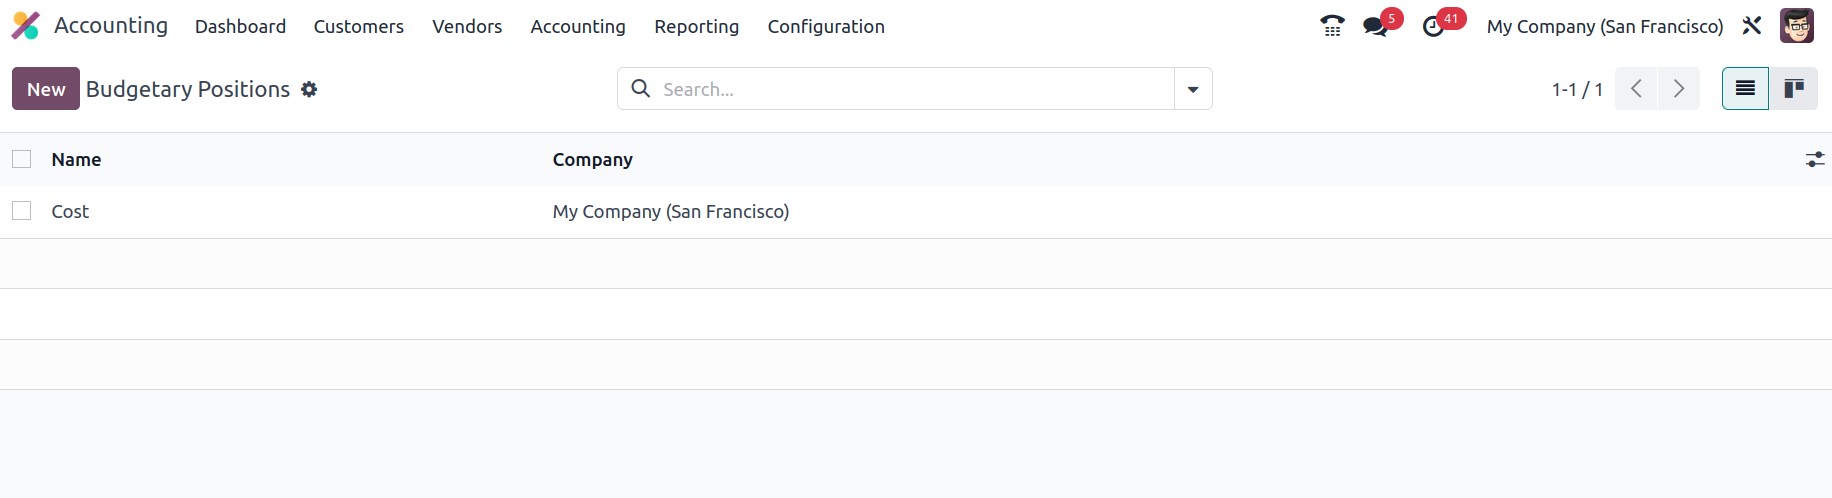
The Odoo17 platform's Budgetary Positions window controls all of the previously stated Budgetary
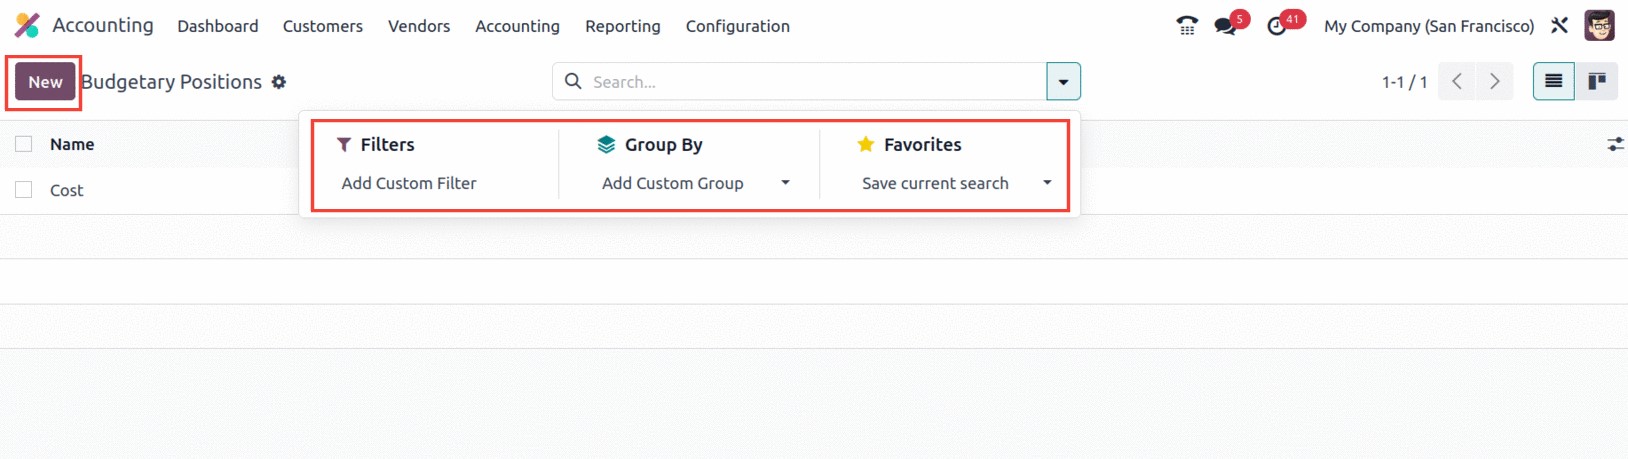
Positions and lets you define new Budgetary Positions. You can simplify your search using the filters,
group by, and search options. The Save current search, Import records, Link menu in spreadsheet, and
Insert list in spreadsheet
choices are all found on the Favourites tab, as shown in the figure below.
To set up new Budgetary Positions, use the NEW button. The accompanying screenshot shows the clear
window used to create budgetary positions. You can enter a name in the Name area of the creation window.
Next, you have the Company filed, which can be updated and will be automatically allotted. The accounts
for
the Budgetary Positions can then be described in the Accounts tab.
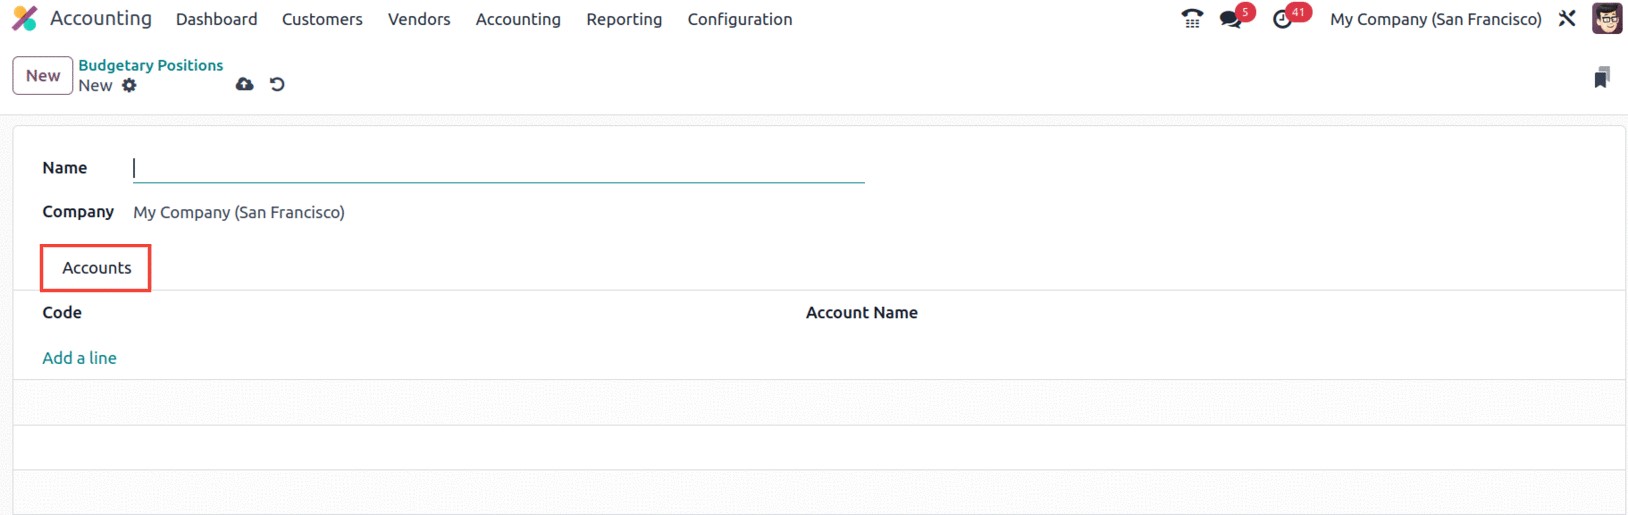
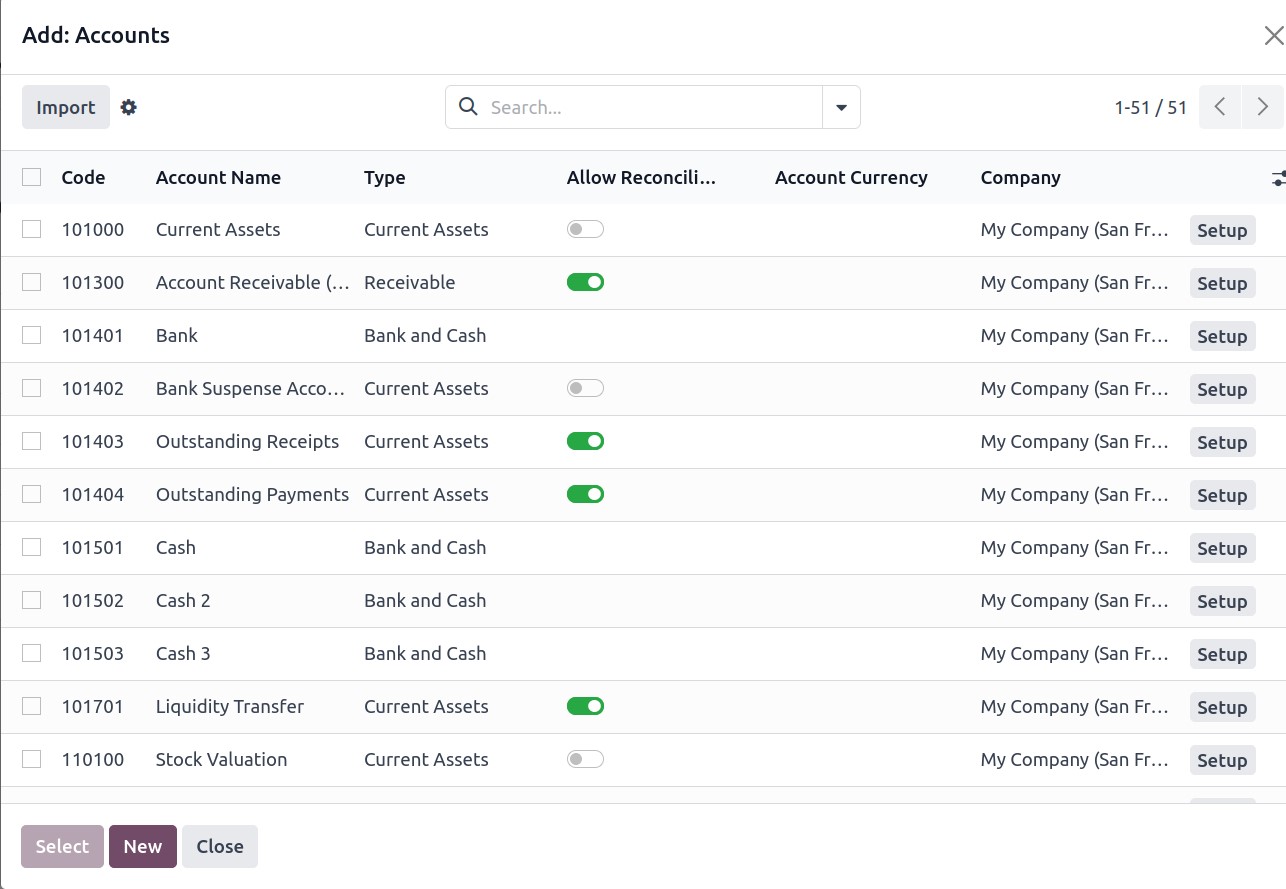
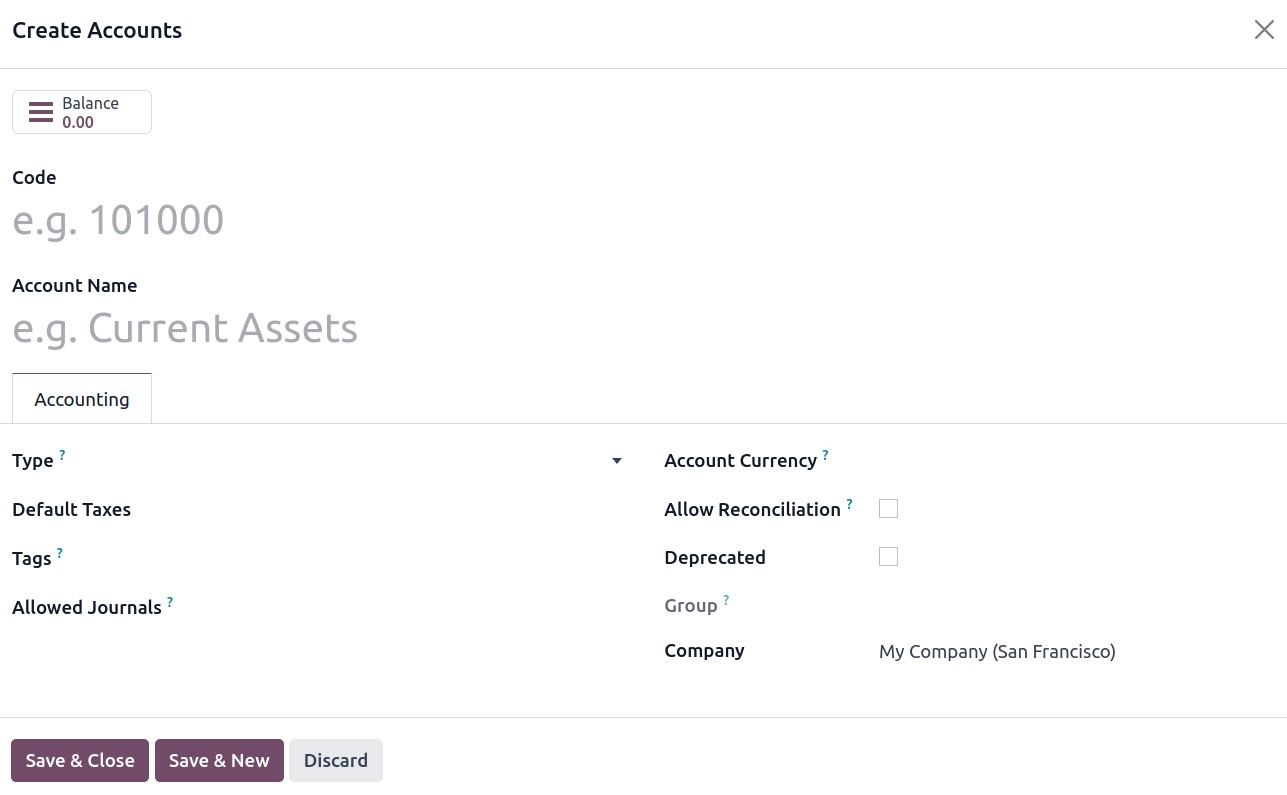
You can select the Add a Line option to add accounts. You will now draw the pop-up window where the
system lists every account that has ever been set up. If it's a new account, you can choose it from the
pop-up box or use the NEW option to create a new one.
You can choose the NEW option to create a new budgetary position. This will display the creations box
shown below, where you can first provide a Name.
By choosing the Add a line option, you can also offer the Accounts of the Budgetary Positions, which
have an impact on this.
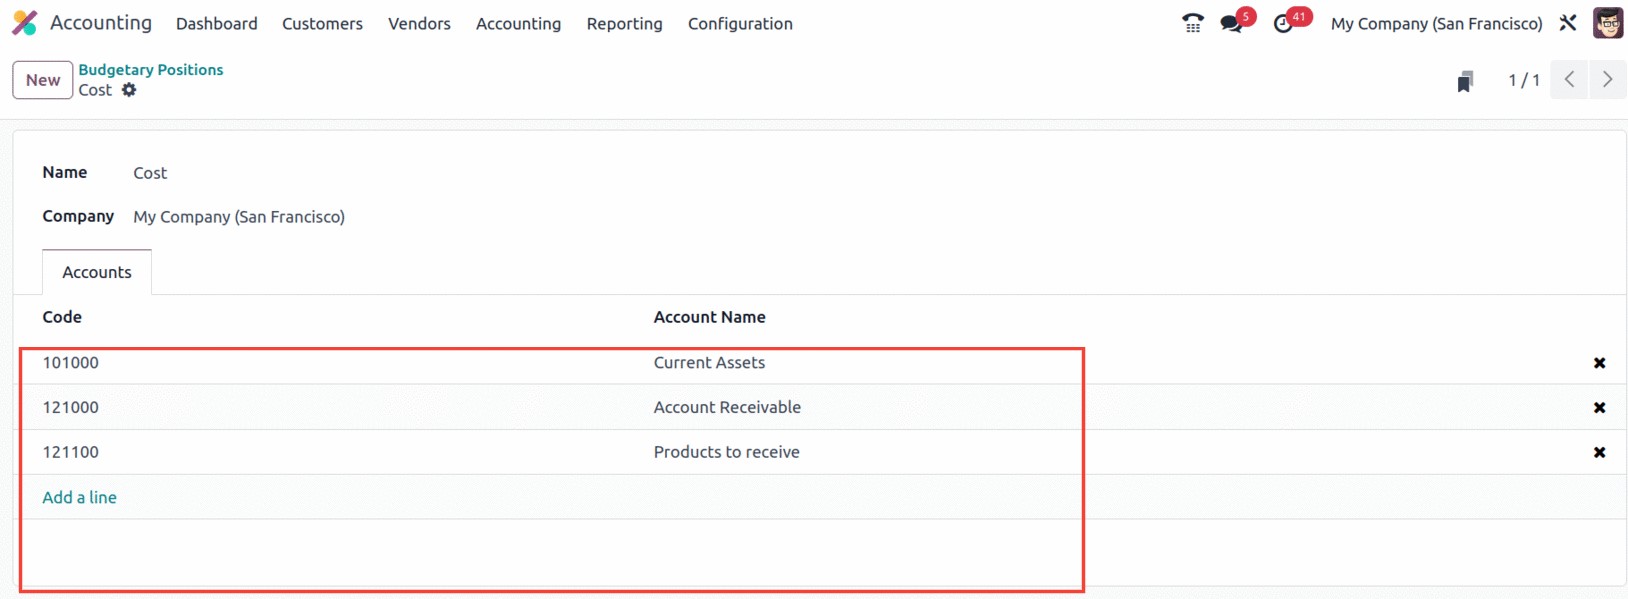
You can also add the necessary accounts.
We have been talking about the Odoo 17 Accounting module's Budgetary Positions Management option up to
this point, which serves as the ideal remedy for budget management for organizations. Let's move on to
the following section, where we'll talk about the Accounting reports portion of the configuration menu.
Accounting Reports
The Accounting reports in Odoo 17 are yet another improved feature. Financial reports from earlier
versions can be viewed as an enhanced version of accounting reports. Accounting reports give customers
the ability to somewhat customize the financial statements by setting rules and formulating new lines.
Odoo 17 allows users to customize practically all financial reports, in contrast to the previous
version. Users of Odoo17 can add additional rows to each report and define domains, equations, and
related values. These values will then be updated in the new line in accordance with the equation
supplied.
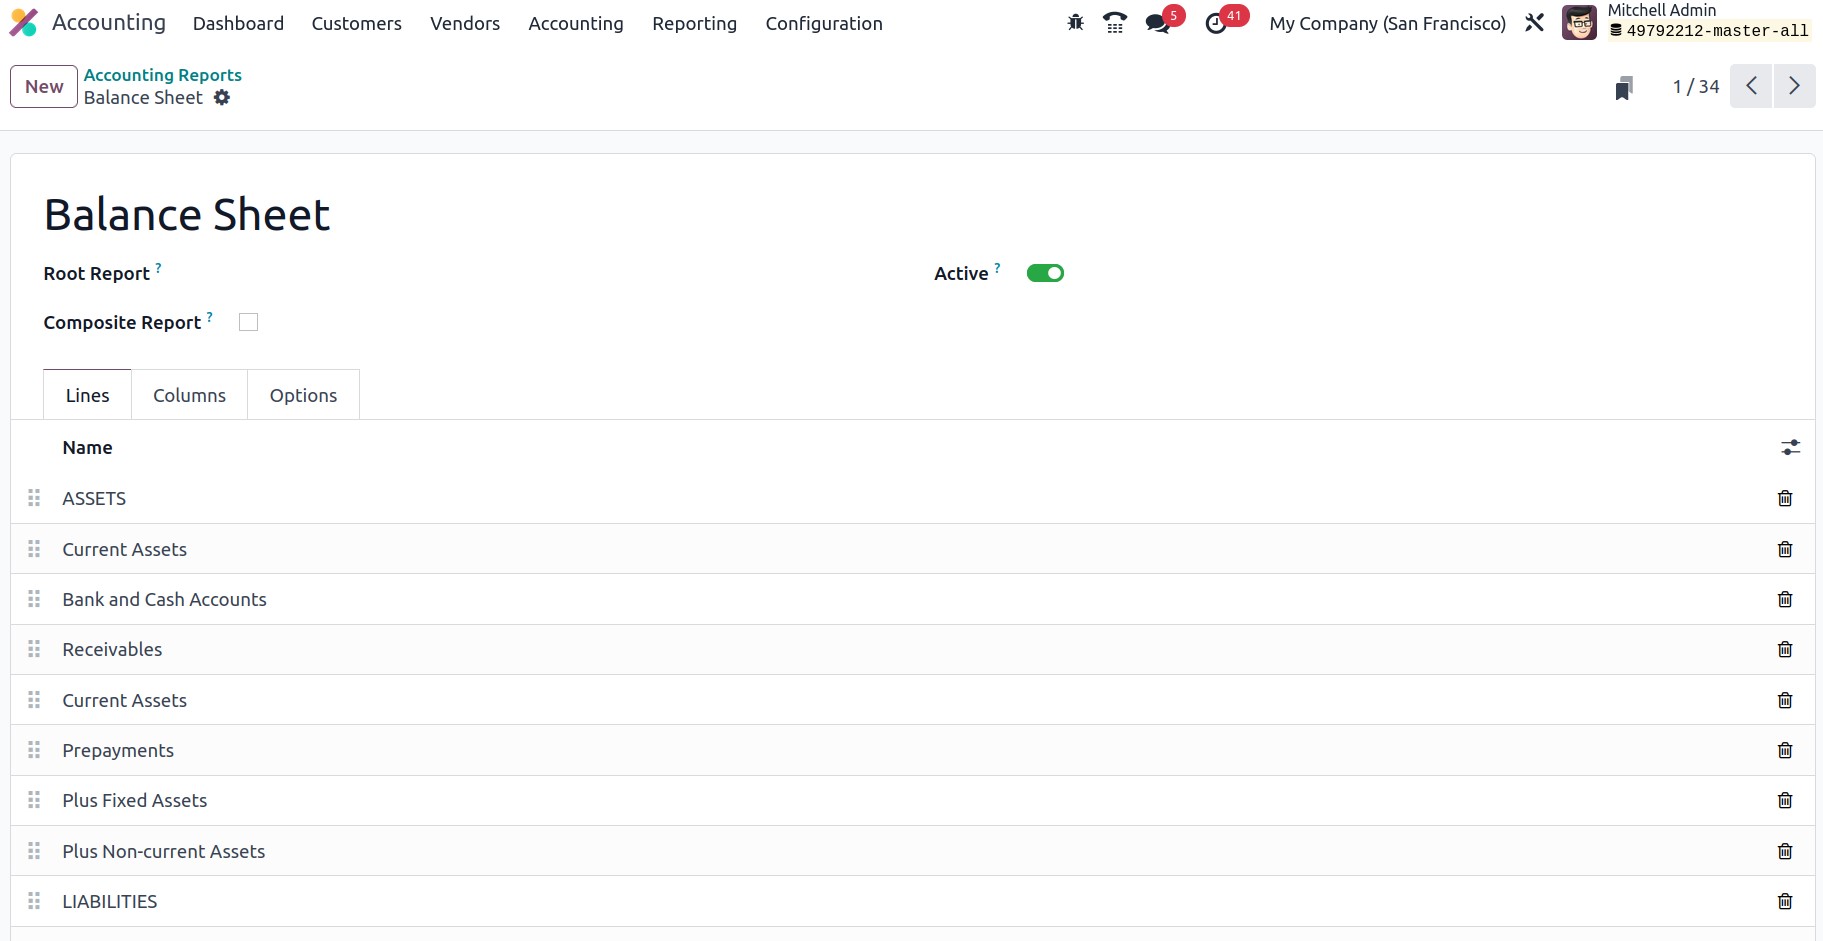
You can add new lines once the report has been opened by selecting the Lines tab.
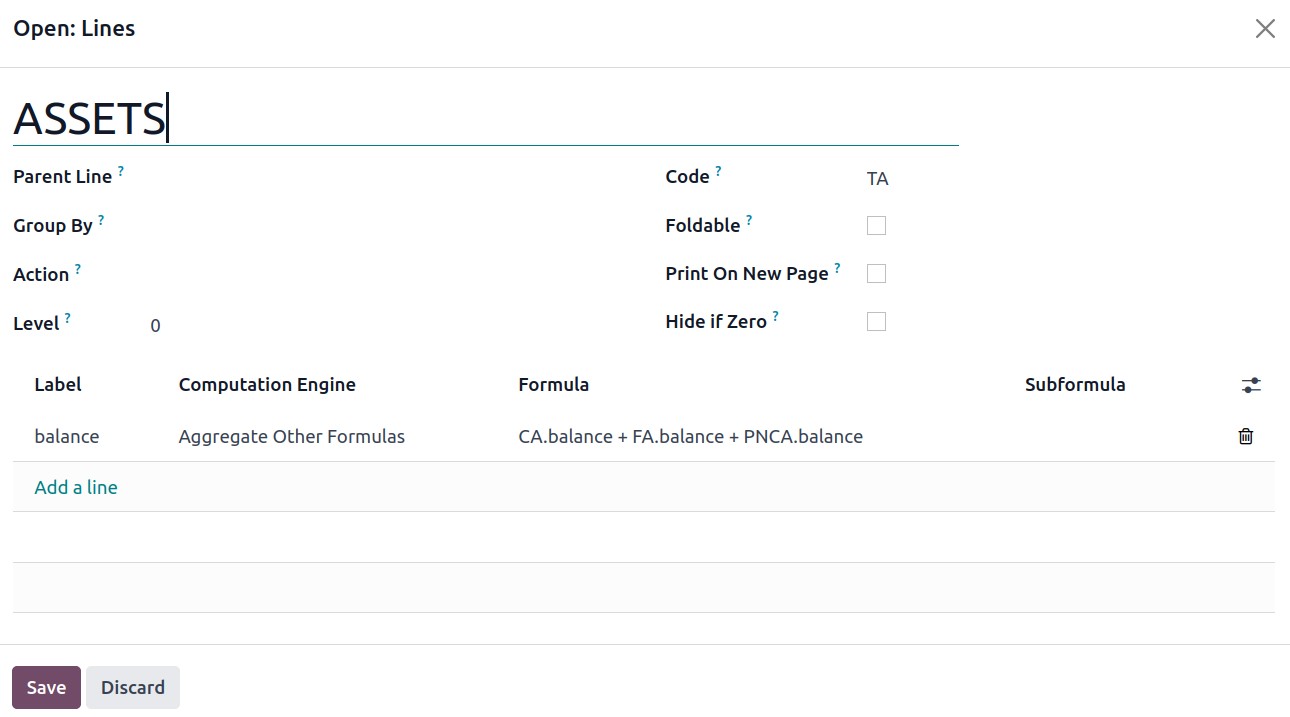
You can add the parent line's code while drafting a new line so that it will appear below the parent
line. Additional information may be included, such as the foldability of the line, whether or not the
text that follows this line prints on a new page and the under-label calculation for the new line.
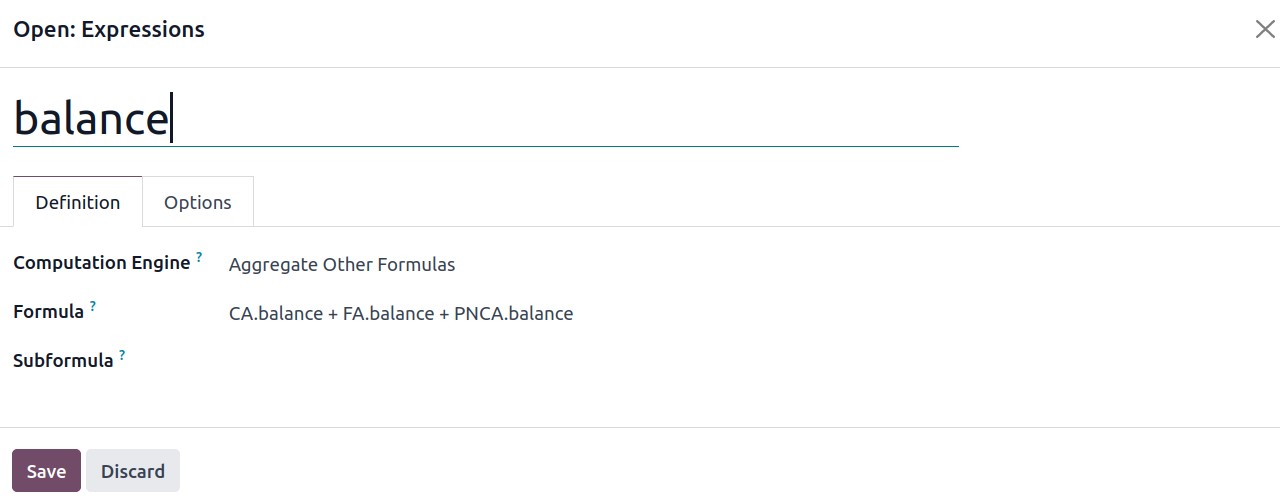
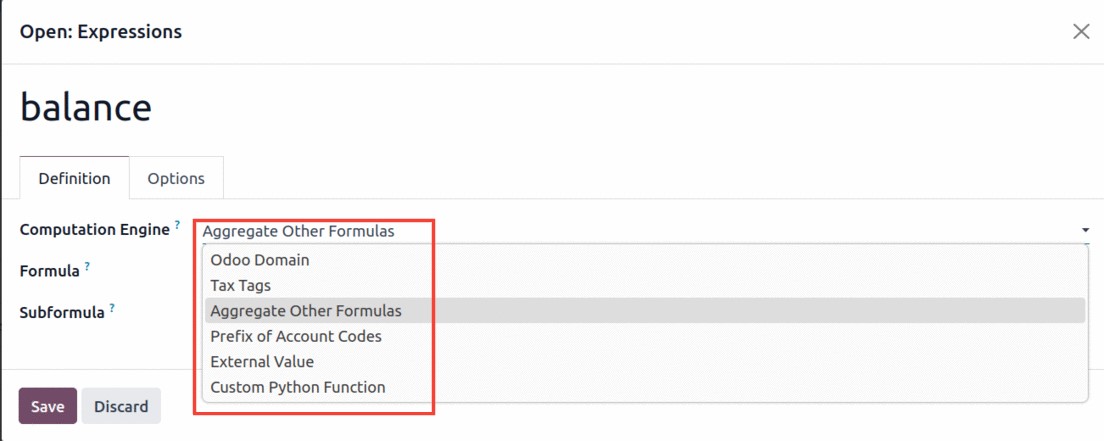
You can define the computing engine, the formula, and the sub-formula after adding the expression on
the definition tab. We can compute the formula thanks to the computation engine. Various computing
engines are available with Odoo17, as shown in the screenshot below.
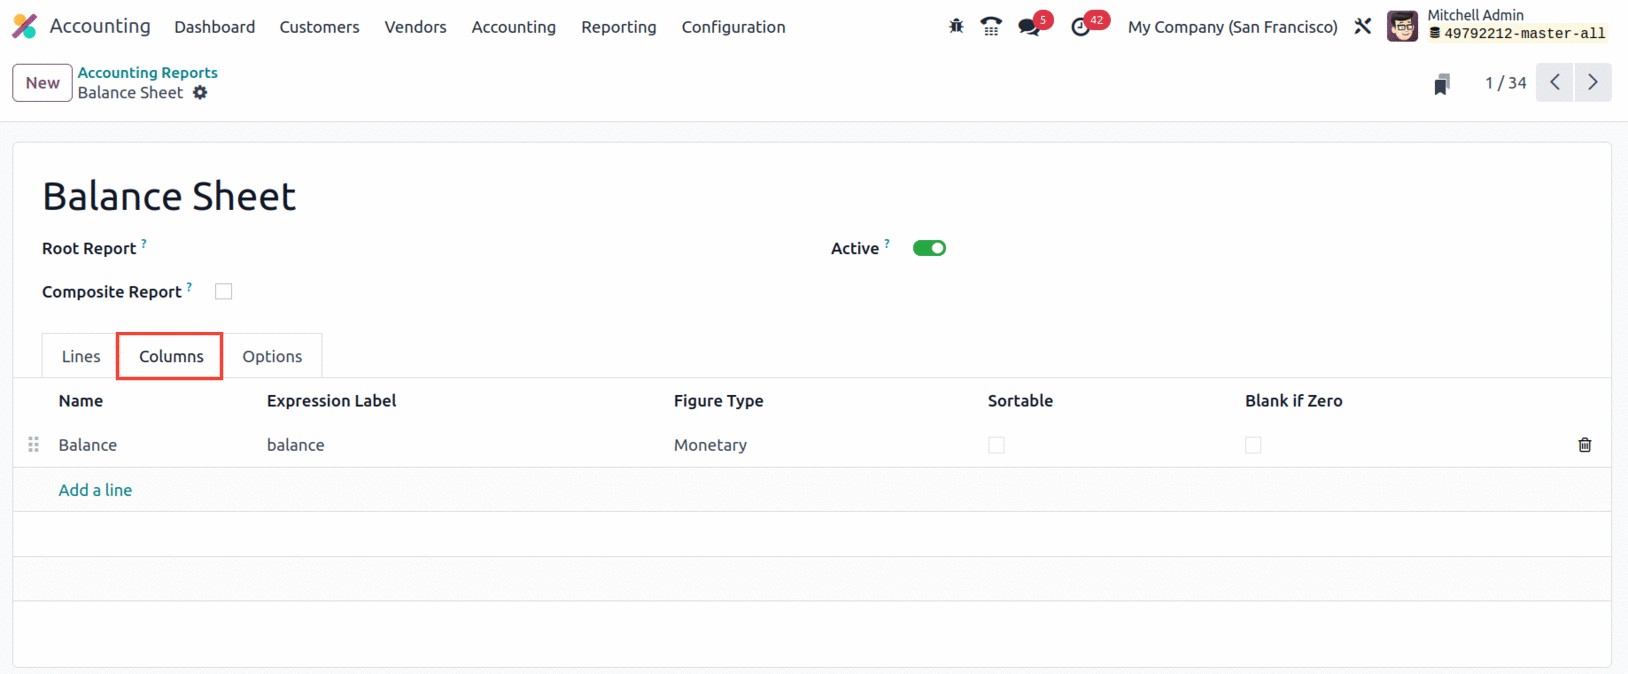
The columns in the corresponding financial statements are defined on the columns tab of the accounting
report.
The financial statement filters for the accounting report can be chosen under the 'Options' tab.
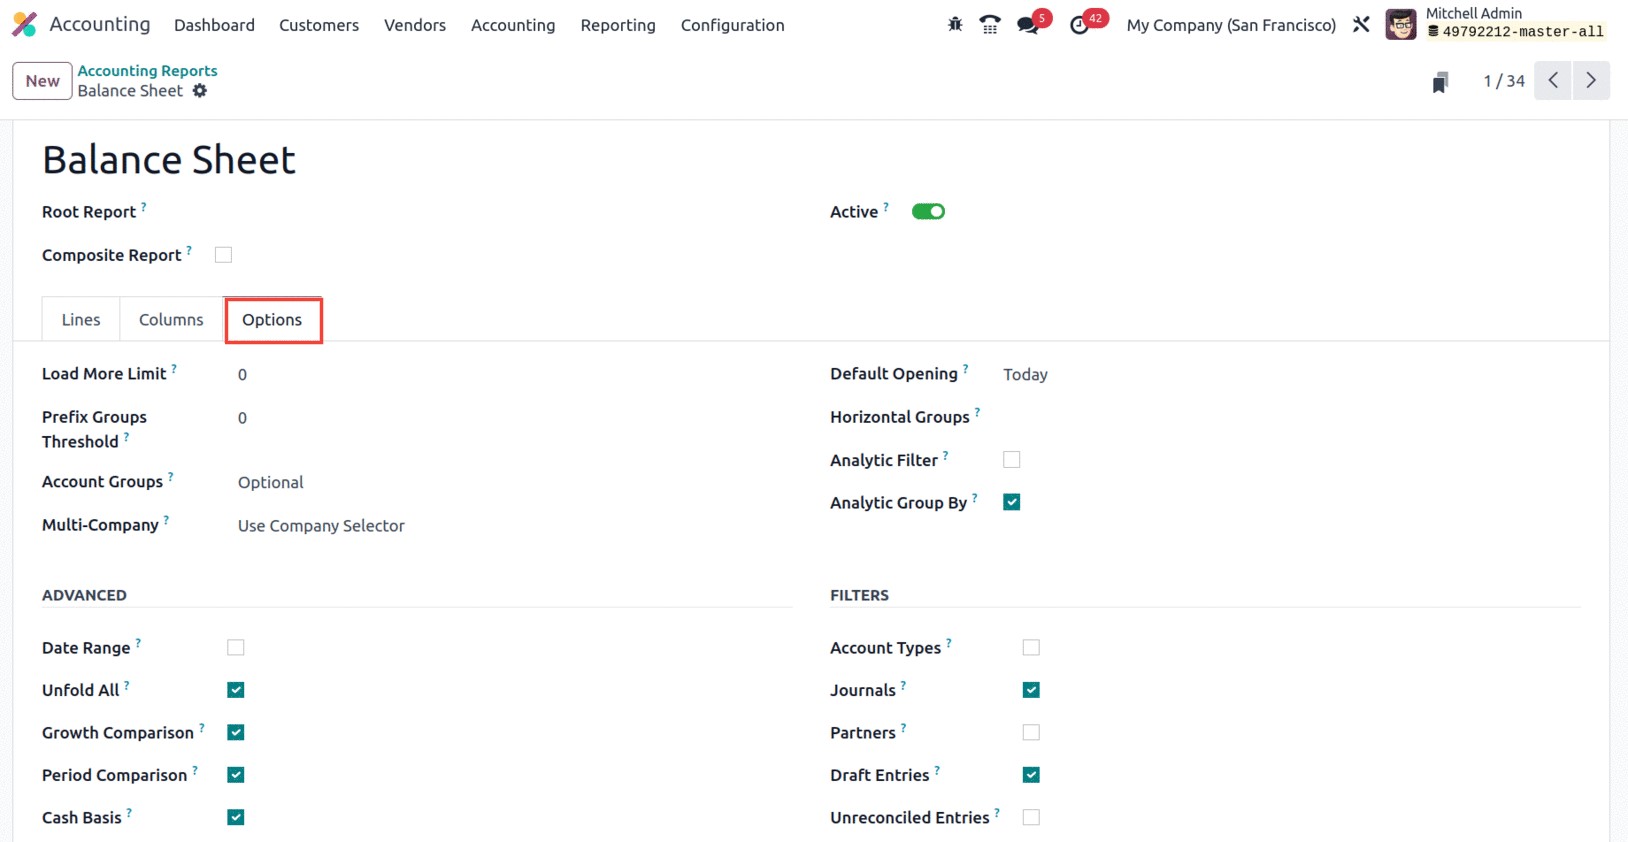
When it unfolds, the amount of rows that are visible is limited by the 'Load more Limit' parameter. The
default filter data that will be based on this year, this month, today, etc. is defined by the default
opening. Additionally, additional settings can be made for account groups, multi-company, default
horizontal groups, analytic filter, and group by. We will also be able to check the necessary default
filter for the financial report under advanced and filter by section.
Moving on to the following topic, Disallowed Expenses Categories, let's continue our discussion of Odoo
17 accounting reports.
Disallowed Expenses Categories
Disallowed expenses are those that cannot be reported as deductible expenses or items for tax purposes
and are listed in the Accounting module of Odoo 17. These include costs for food, entertainment, travel,
presents, and other non-work-related expenses for the individual, the household, and the family.
Disallowed expenses have a variety of advantages, including
Reduced taxable income: Unallowable expenses lower the amount of taxable income that applies to an
individual or corporation. By reducing tax liabilities, this can increase cash flow and profitability.
Avoid penalties and interest: By failing to claim Disallowed expenses as deductions on tax returns,
individuals and corporations can avoid the penalties and interest that may be imposed.
Better Accuracy: The Internal Revenue Service (IRS) may have issues if disallowed expenses are not
properly reported. Organizations can improve the correctness of their filings by correctly classifying
these expenses that aren't claimed on tax returns.
Streamlined Compliance: Making a distinction between costs that are authorized and those that don't
help people and businesses comply with tax laws, lowering the likelihood of an audit.
Therefore, you can subtract the appropriate charges from the bookkeeping result without deducting them
from the fiscal result with the use of Odoo17's Disallowed Charges function. As a result, by configuring
prohibited spending categories and obtaining periodic updates, you will receive the financial results in
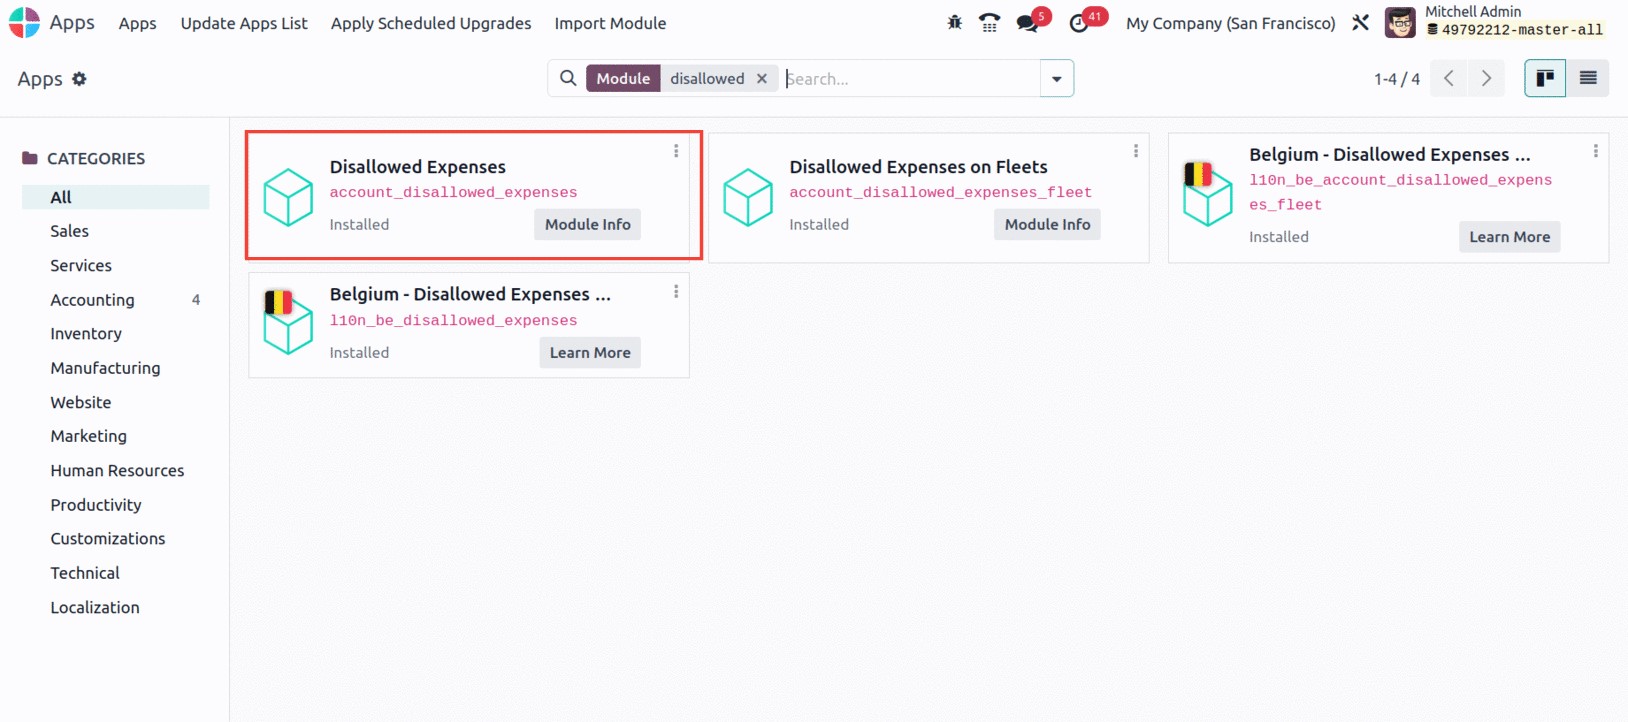
real time. First, you must activate the Disallowed Expenses modules from the App Store in order to have
access to this option's rights in your system. You can search for Disallowed Expenses in the search box
after removing the Apps filter to install the module.
The system will now display the outcome as seen in the below-displayed image.
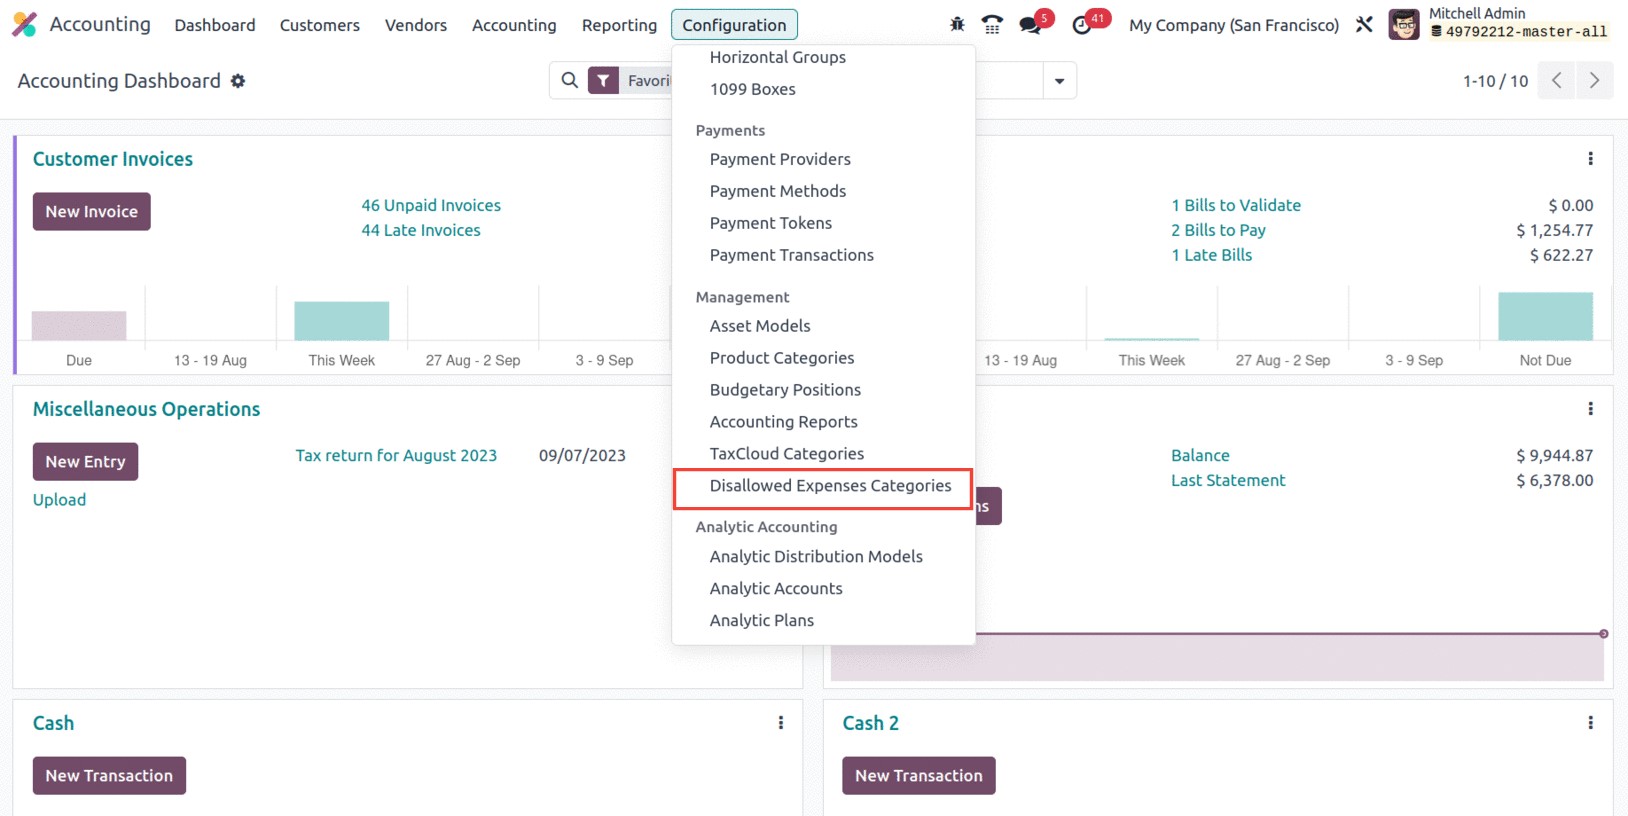
The Disallowed Expenses Categories menu may be found in the Management part of the Configuration tab of
the Odoo17 Accounting once the module has been activated.
You can add new Disallowed Expenses Categories using the NEW button, and the system will assist you in
keeping track of all the configured Disallowed Categories.

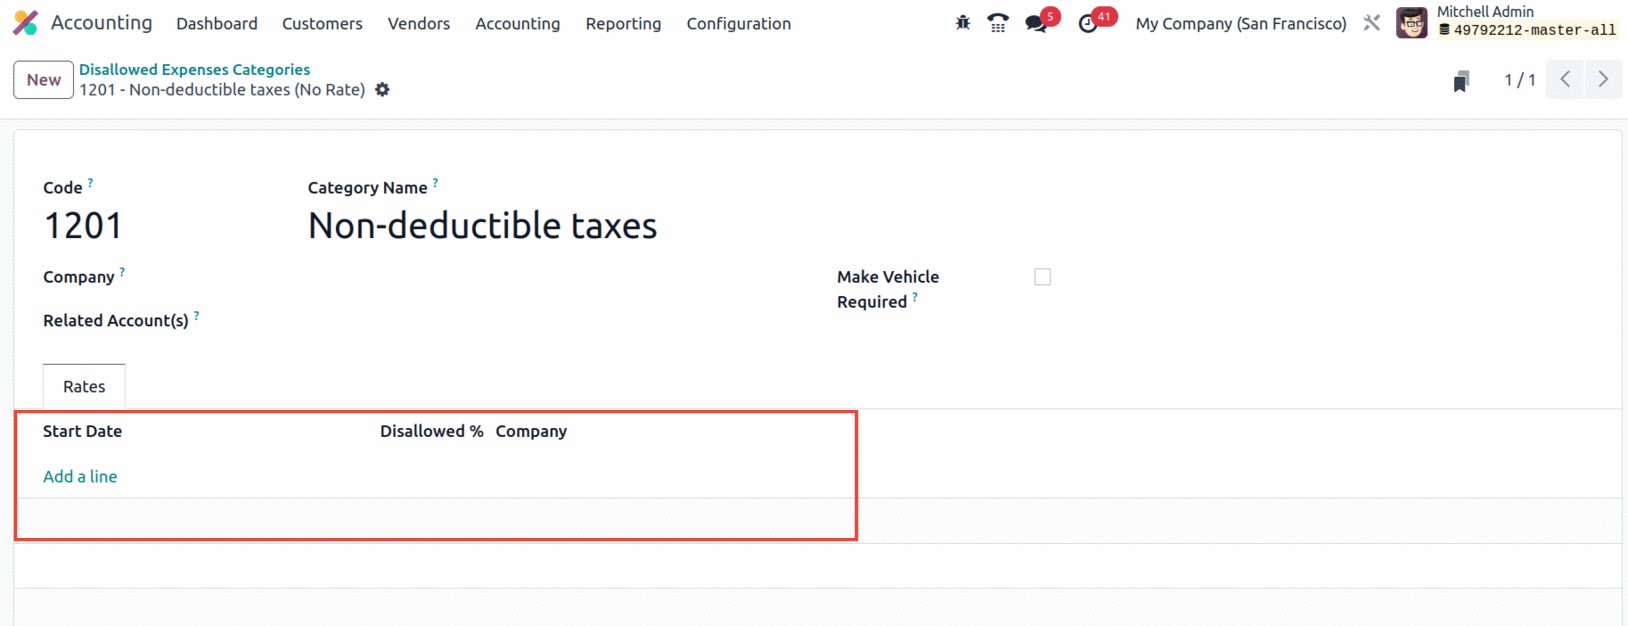
You can first enter the Code and the Name when creating a new category of disallowed expenses. then,
utilizing the list of preconfigured accounts, you can select associated Accounts. Additionally, new
accounts can be made right from this page. Additionally, you can assign the Current Rate by selecting
the SET RATES option located on the far left. The window where you can specify the rate under the Rates
tab will then be fully visible to you.
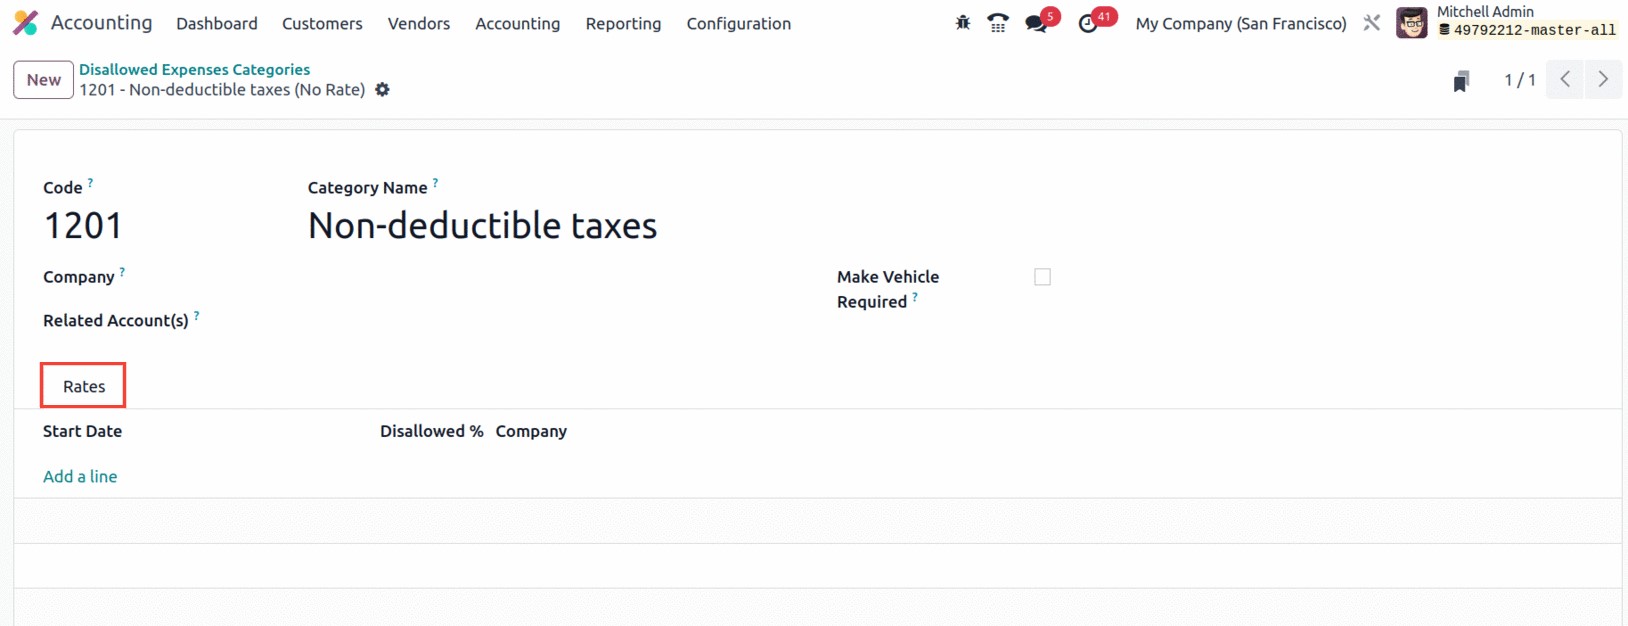
When you choose the Add a Line option, the Company field will be automatically assigned once you
provide the Start date and the rate of the Disallowed Expenses. This field is helpful for managing
multiple companies.
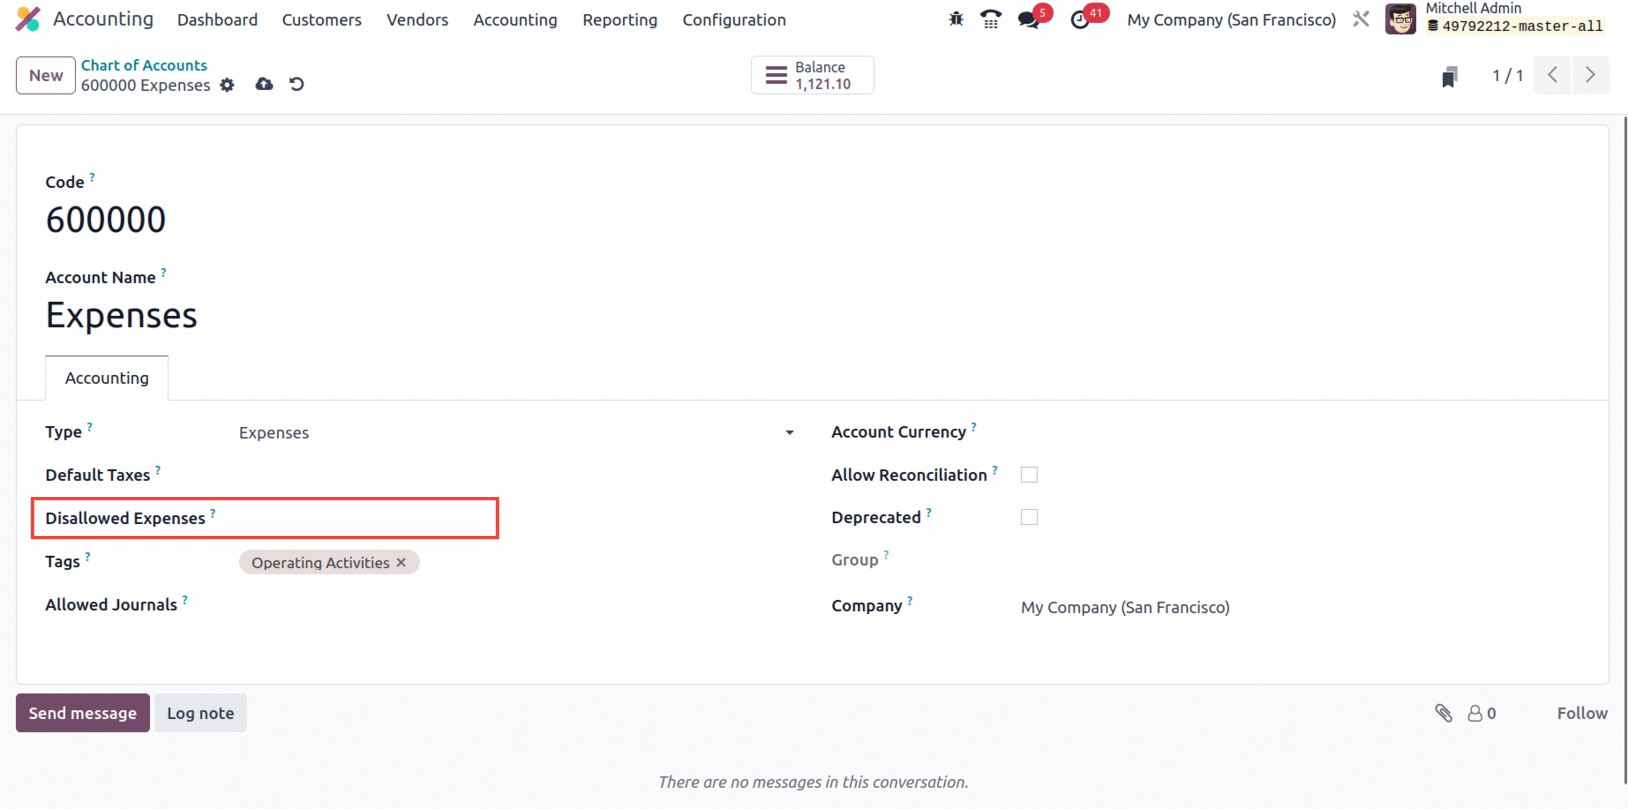
Additionally, when you set up a Chart of Accounts, the Disallowed Expenses Category is directly linked
to the Expense Account. Go to the Chart of Account window where you can build up a Chart of Account with
an expenses type in order to view it. You can now see the Disallowed Expenses Category selection option,
and it will be closely related to the respective account.
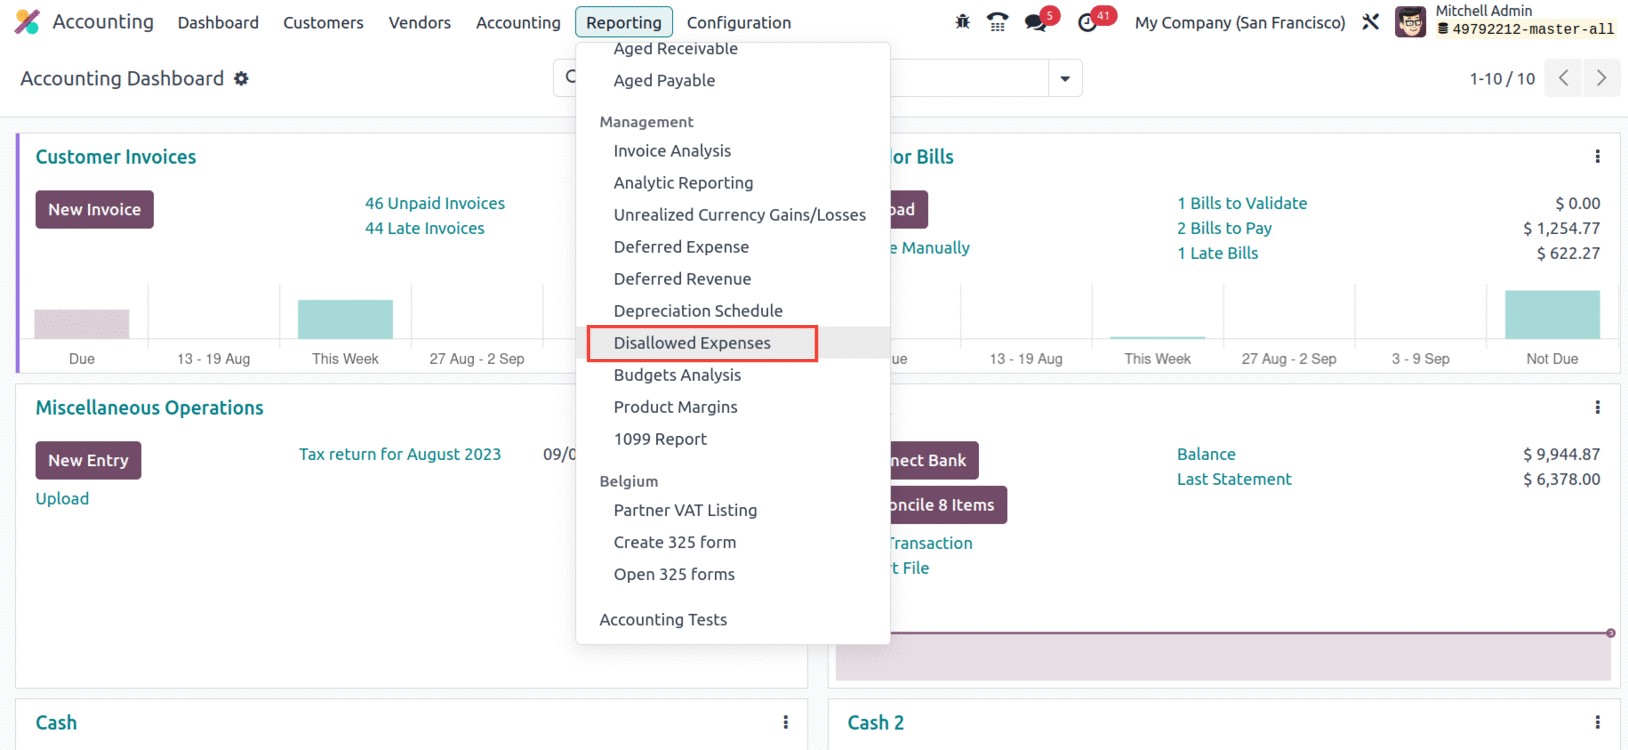
Under the module's Reporting menu, you may access the new report titled Disallowed Expenses.
The platform's ability to create a variety of Disallowed Expenses Categories is one of its main
advantages. Now that we are clear on these characteristics, we can look at the next features, which
manage the analytical items.