For effective and seamless finance management operations, it is necessary to integrate bank activities
at the appropriate moment with corporate accounting. The platform provides outstanding support and
guidance to it, and the Odoo17 Accounting explores a fantastic route for it. You are urged by Odoo17 to
create the bank accounts and the business payments linked to those accounts. Configuring bank payments
in business accounting software has a number of advantages, such as,
- By decreasing the need for manual data entry and processing, automating bank payments can help your
accounting and finance staff work more efficiently.
-
By removing mistakes that can happen when processing payments manually, automating bank payments can
assist in increasing the accuracy of your accounting records.
-
You can gain more insight into your company's financial operations by configuring bank payments in
your accounting software. This can aid in the detection and prevention of fraud.
-
Automating bank transfers can assist in cutting back on processing fees like postage and office
supplies.
-
Additionally, the platform's reconciliation feature will validate that there is a strong correlation
between the organization's operational ledgers and bank account operations.
Add a Bank Account
The Odoo 17 Accounting module contains the 'Add a Bank Account' option. With the help of this
functionality, the user can expand the Odoo17 database with new bank accounts. The account type, bank
name, and number can all be entered by the user. The user may additionally provide the account's
currency, owner's name, and owner's address. It is helpful for businesses that need to keep track of
their transactions and balances across various bank accounts. The easiest and fastest way to add bank
accounts is with this method. By enabling you to automatically reconcile your bank statements, this can
be seen as a good way to keep track of your finances and can also save you time and money.
The Configuration tab's Banks section contains the Add a Bank Account menu as its first menu, as shown
below.
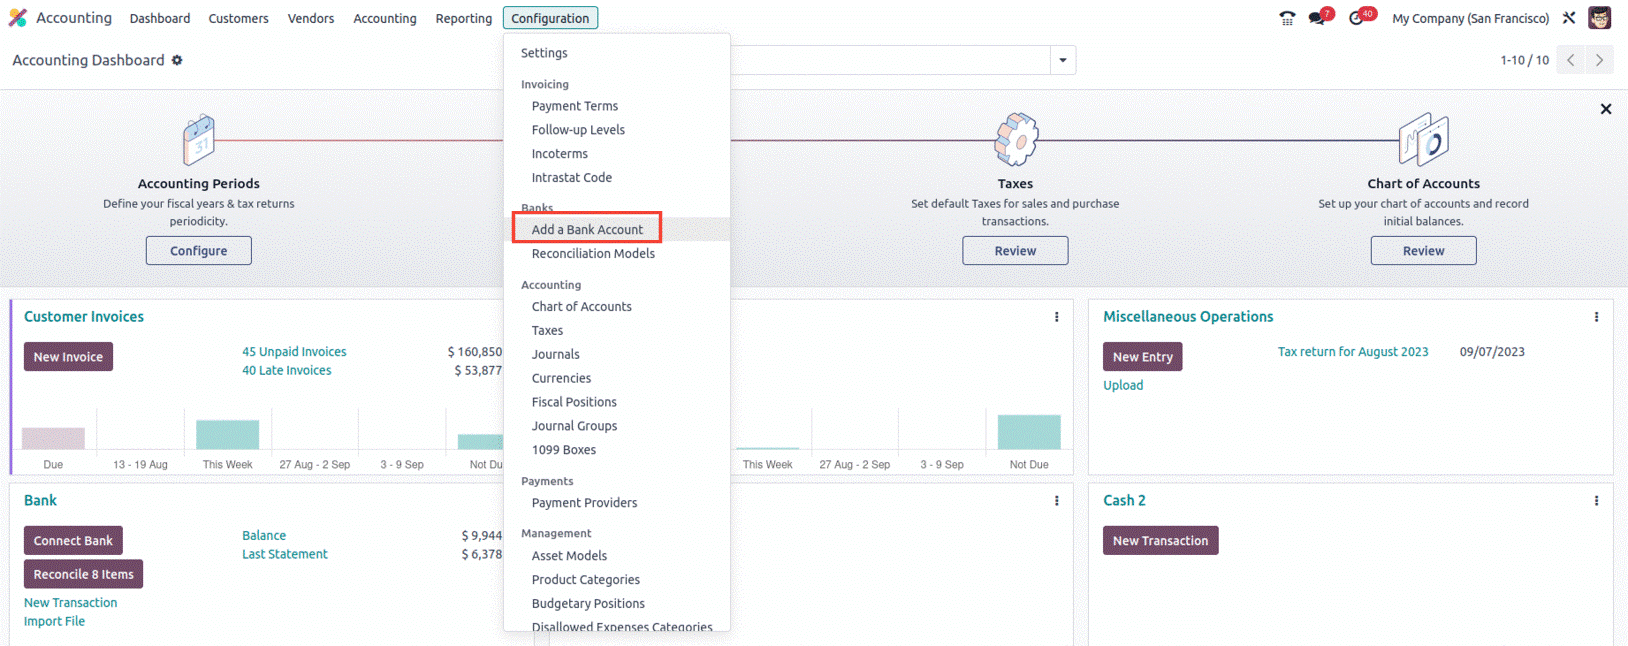
You can set up different bank accounts using this Add a Bank Account menu in accordance with your
company's needs. As soon as you select a menu item, a pop-up window for adding a bank account will
appear, allowing you to see the default bank's details.
You can select your bank from this pop-up and confirm that it will be configured for use with the Odoo17
platform operations.

Nearly all bank information from around the world will by default be presented in this window. You can
select the "Create it" option from the menu in the bottom right corner if your bank isn't listed in the
window. As a result, a new pop-up window for configuring a bank account will appear as shown in the
illustration.
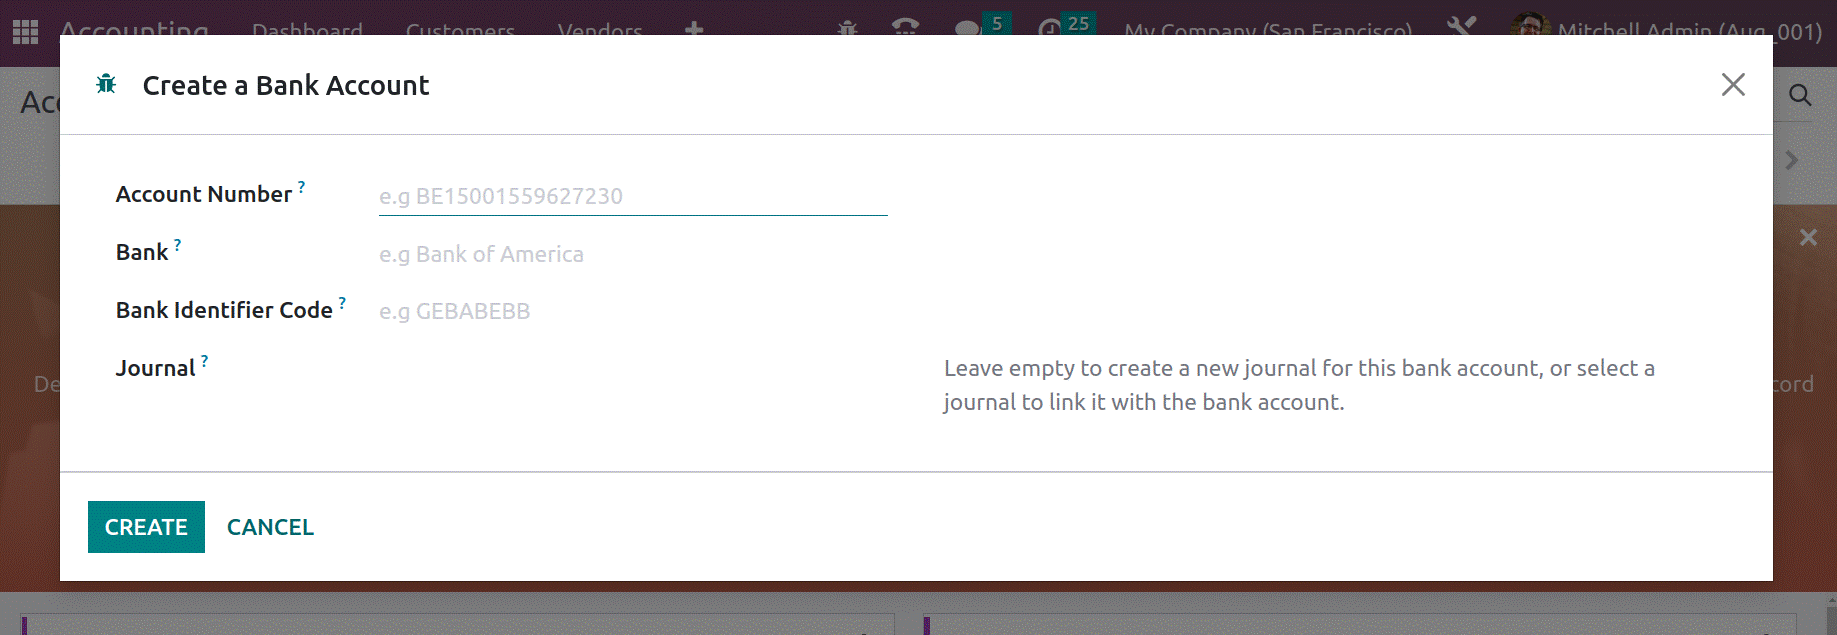
The Account Number, Bank, Bank Identifier Code, and Journals can all be entered in the appropriate
fields here. You have the option to choose an existing journal to link with the bank account, or you can
leave the Journal form blank to create a new diary for this bank account. After providing all the
information, activate your bank account in the Odoo17 system by clicking the CREATE button in the
pop-up's lower left corner.
We can now move on to the Reconciliation tool found in the Configuration tab of the Odoo17 Accounting
module since it is clear how to Add a Bank Account to the Odoo17 platform at this point.

Reconciliation Models
A Reconciliation Models tool is very helpful for reconciling account transfers in the Odoo17 Accounting
module. You can pick and reconcile numerous move lines with this tool at once. To make sure that the
books of accounts are in sync with the actual transactions, this tool is important in Odoo17 Accounting.
This is accomplished by making the necessary adjustments
to the entries after comparing the transactions reported in the books of account with the
actual transactions. This procedure guards against financial irregularities and maintains the
correctness of the financial accounts.
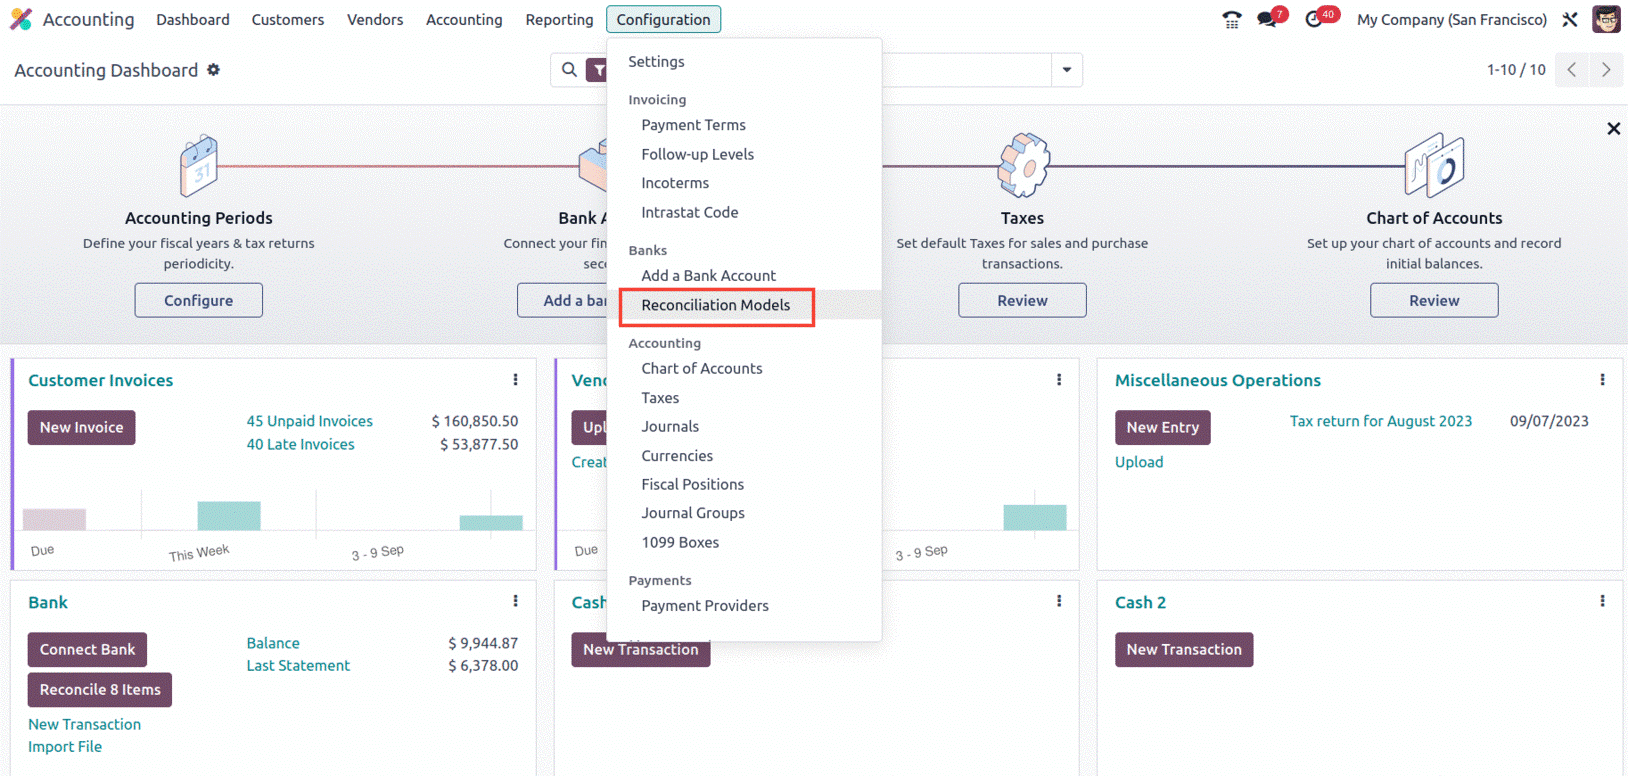
The Configuration Bank section includes a reference to the system's Reconciliation menu. As shown in
the screenshot below, one mouse button is sufficient to reach out to the window.
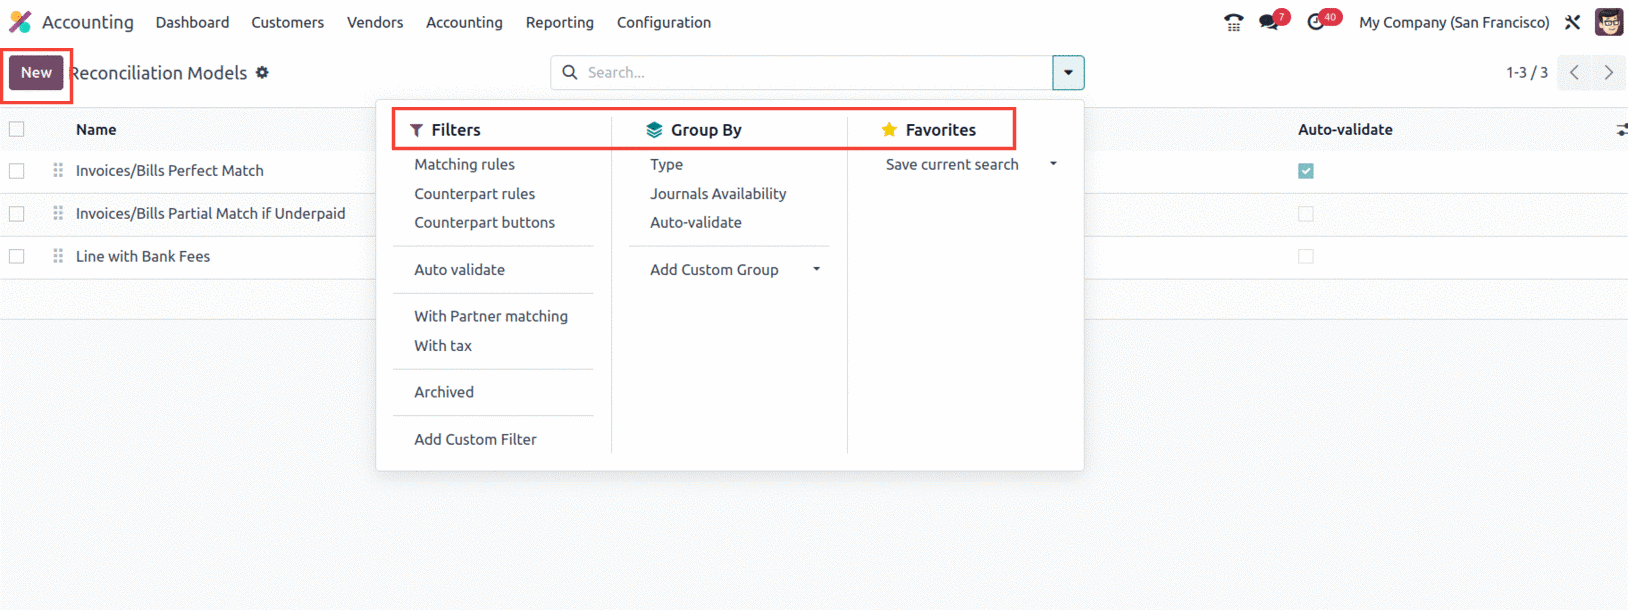
For efficient operations in Odoo17, the Reconciliation Model window that you can see in the screenshot
will maintain all the records of previously described Reconciliation Models. To provide you with a
general overview without opening and carefully reviewing each record, the preview includes the Name of
each Reconciliation, Type, and Auto-validate field. Additionally, it is quite straightforward to filter
out and group necessary reconciliation models because of the default and custom Filters and Group By
capabilities. As seen in the screenshot below, the Favourites tab is where you'll find the Save Current
Search,
Import Records, Link menu in Spreadsheet, and Insert list in Spreadsheet menus.
The Odoo17 platform gives you the option to specify Reconciliation models in one of three categories by
default. Those are
- Button to generate counterpart entry
- Rule to suggest counterpart entry
- Rule to match invoices/bills
Button to generate counterpart entry
the button reconciliation model, in which you create a button on one or more journal items to generate
a counterpart entry. This button makes the reconciliation automatically when you click it and offers a
counterpart based on the selected journal article. In contrast, you can set up a set of rules for "Rules
to suggest counterpart entry." When you click the suggest button, these rules are used to recommend a
counterpart based on the selected journal item and automatically produce the reconciliation. It will
confirm that only the immediately adjacent counterpart values need to be verified. Additionally, this
model will ensure that the automation takes place in accordance with the Reconciliation model's set of
rules.
'Rule to match invoices/bills' The ability of the reconciliation model to automatically post the
accurate customer invoices and vendor bills that correspond to the payment amount. The reconciliation
activities are completed automatically if the entries are confirmed. Additionally, each and every
reconciliation is carried out in accordance with the guidelines established in this mode during
configuration.
In Odoo17 Accounting, establishing a new Reconciliation Model is simple. Simply review the NEW button
that is there in the Reconciliation Models window. You will enter the creation window shown in the frame
below as soon as you select the NEW button.
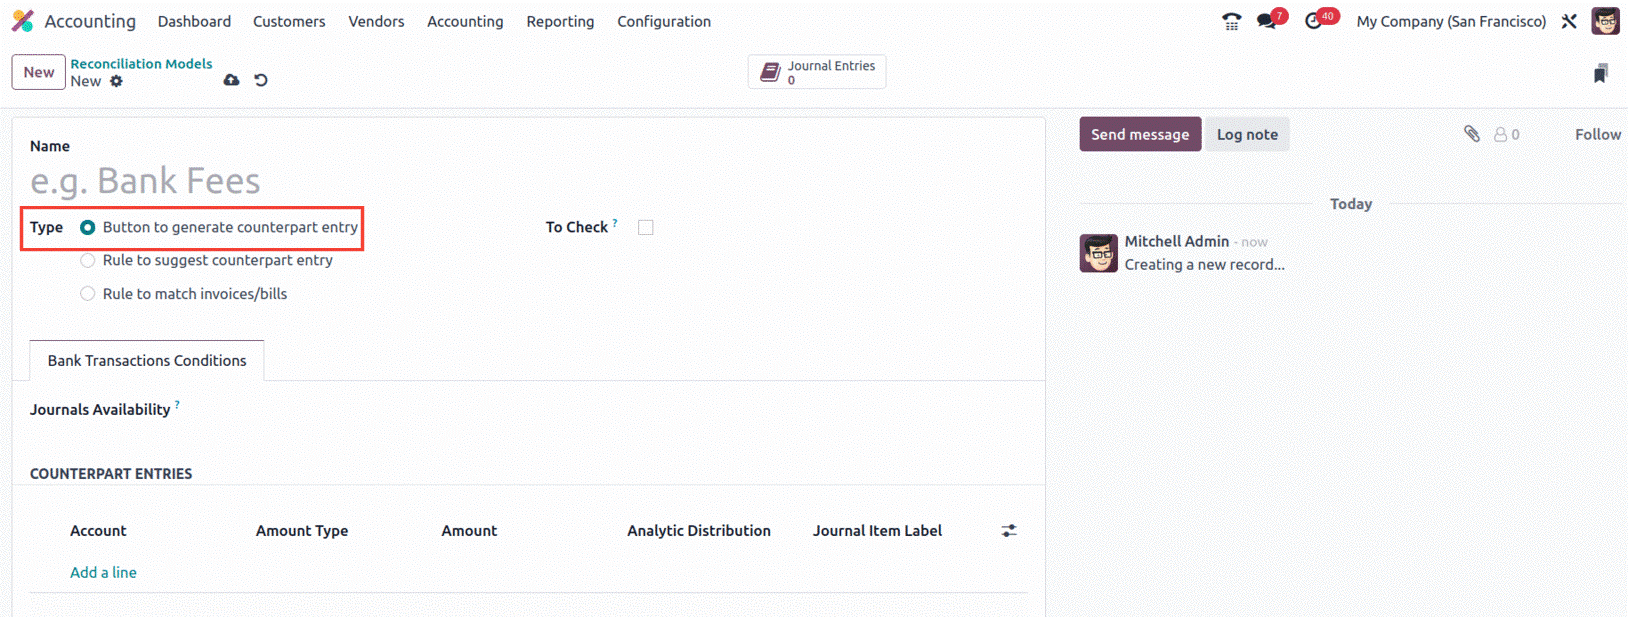
In the Name field, you can first give the Reconciliation model a name. The next step is to define the
Type by selecting one of the previously covered options for creating a counterpart entry. The three
types include Button for counterpart entry generation, Rule for counterpart entry suggestion, and Rule
for matching invoices and bills. The additional fields that are accessible will be presented based on
the type. This implies that if you select the "Button to generate counterpart entry," a field titled "To
Check" will appear, which you can activate or deactivate depending on your needs.
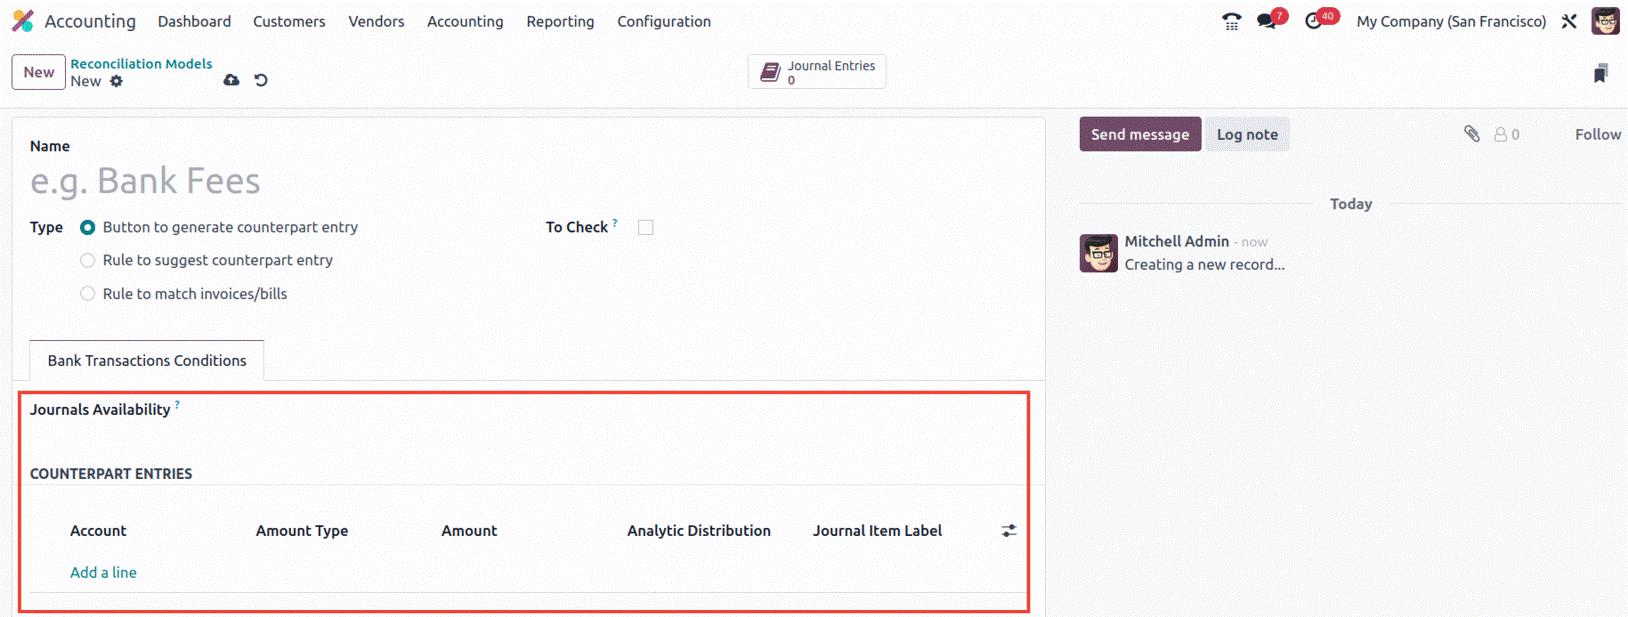
When this option is enabled, the matching rule is used when the user is unsure of all the counterpart's
information. Additionally, you may use the dropdown menu to provide details about the Journals
Availability under the Bank Transactions Conditions tab. The Add a Line menu can then be used to
allocate the COUNTERPART ENTRIES. When you select Add a Line, a new line will appear with a drop-down
menu where you may select the Account to see a list of all the available procedures.
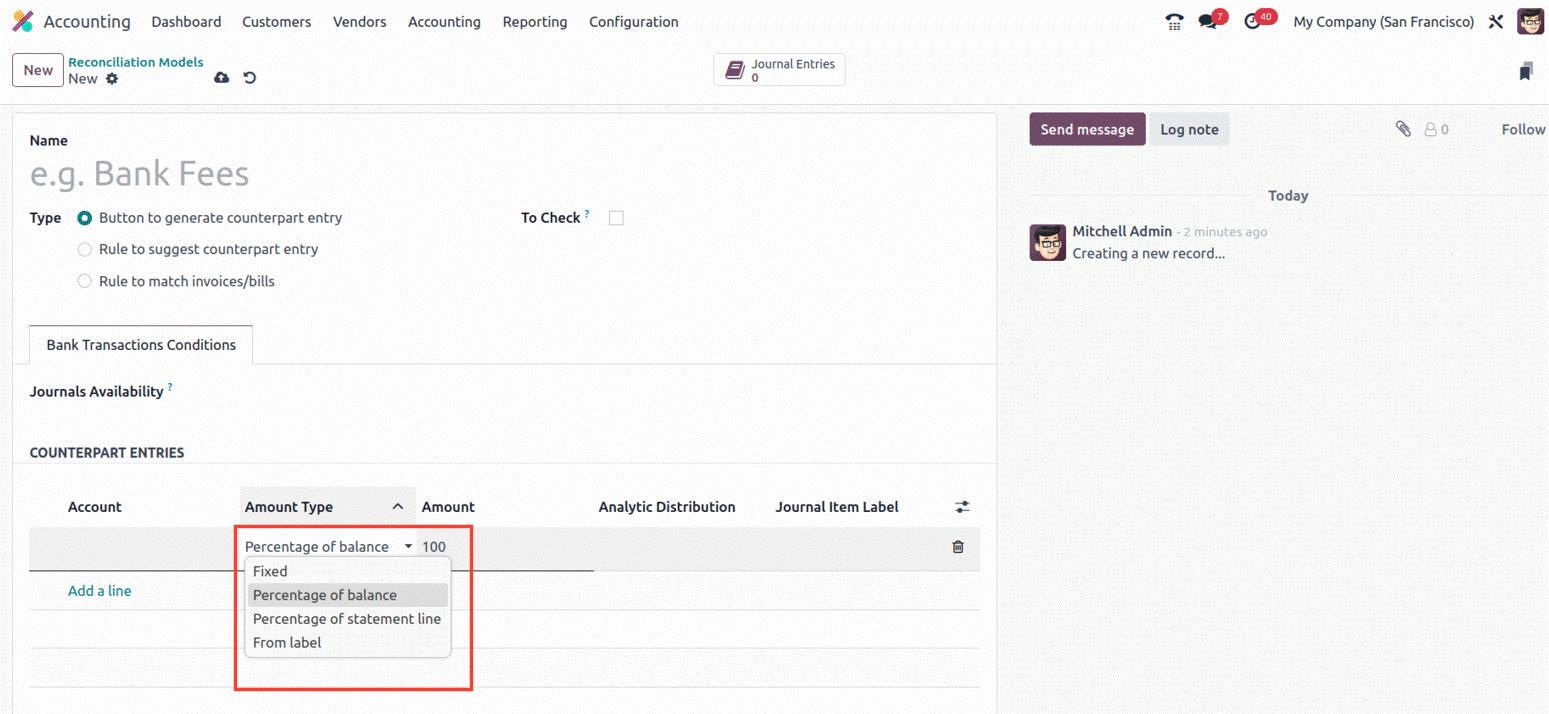
Next, choose the Amount Type, where you'll also discover a drop-down menu with options for Fixed,
Percentage of Balance, Percentage of Statement Line, and From label types.
You also have the option to make it display extra fields in the counterpart entries, along with the
Amount, Analytic, and Journal Item Label. Click the icon that is present on the right end to do that, as
seen in the screenshot below.
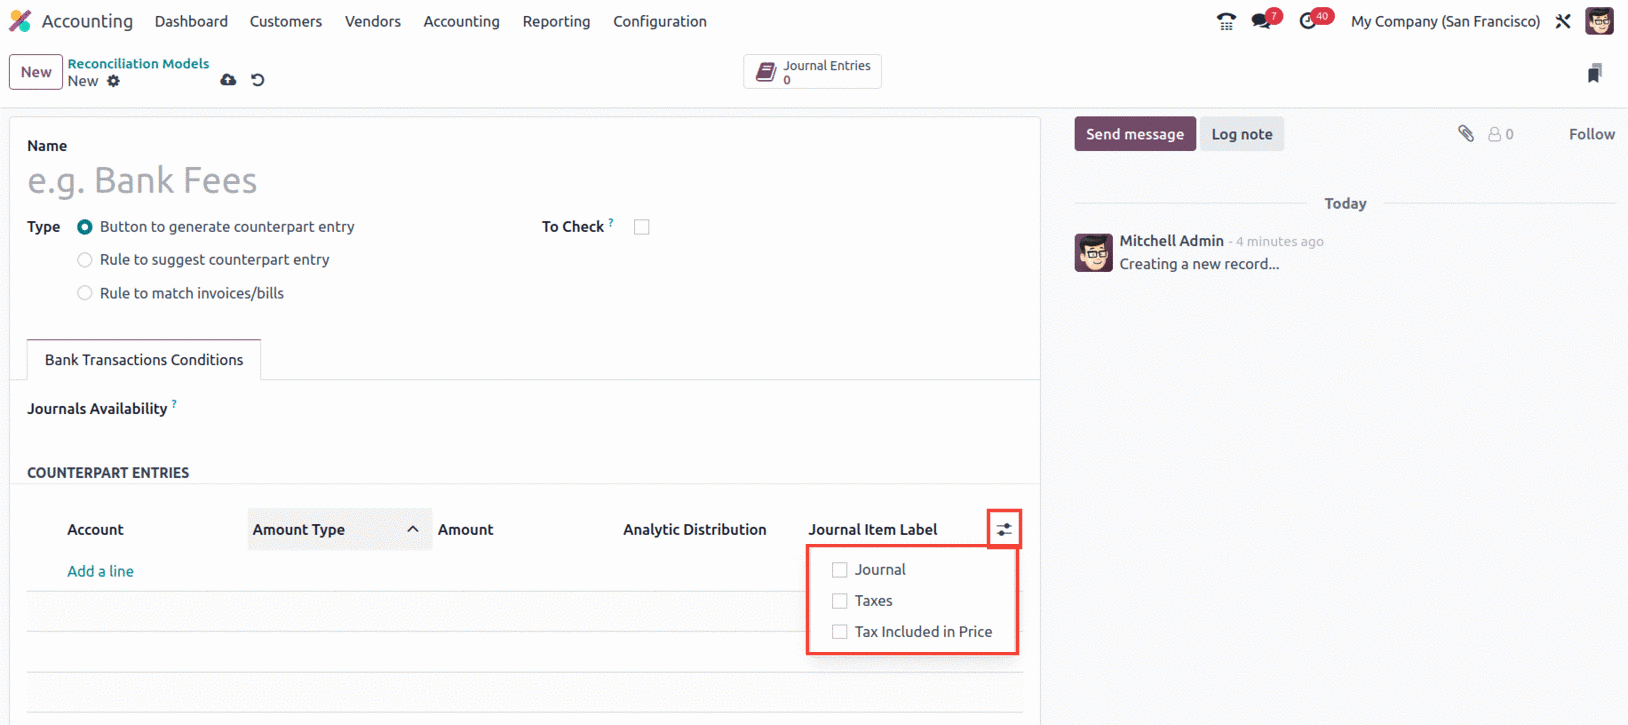
It will be added to the line if you turn on the Journal, Taxes, and Tax Included in Price fields. The
equivalent entries can also be removed by selecting the Delete option that is present at the right end
of each line. The reconciliation model will be usable once the Button's setting to create a counterpart
entry is complete.
Rule to suggest counterpart entry
Applying the 'Rule to suggest counterpart entry' as the Reconciliation model type will result in the
addition of extra fields and tabs, as seen in the screenshot below. This type offers more
customizations, as shown in the screenshot above.
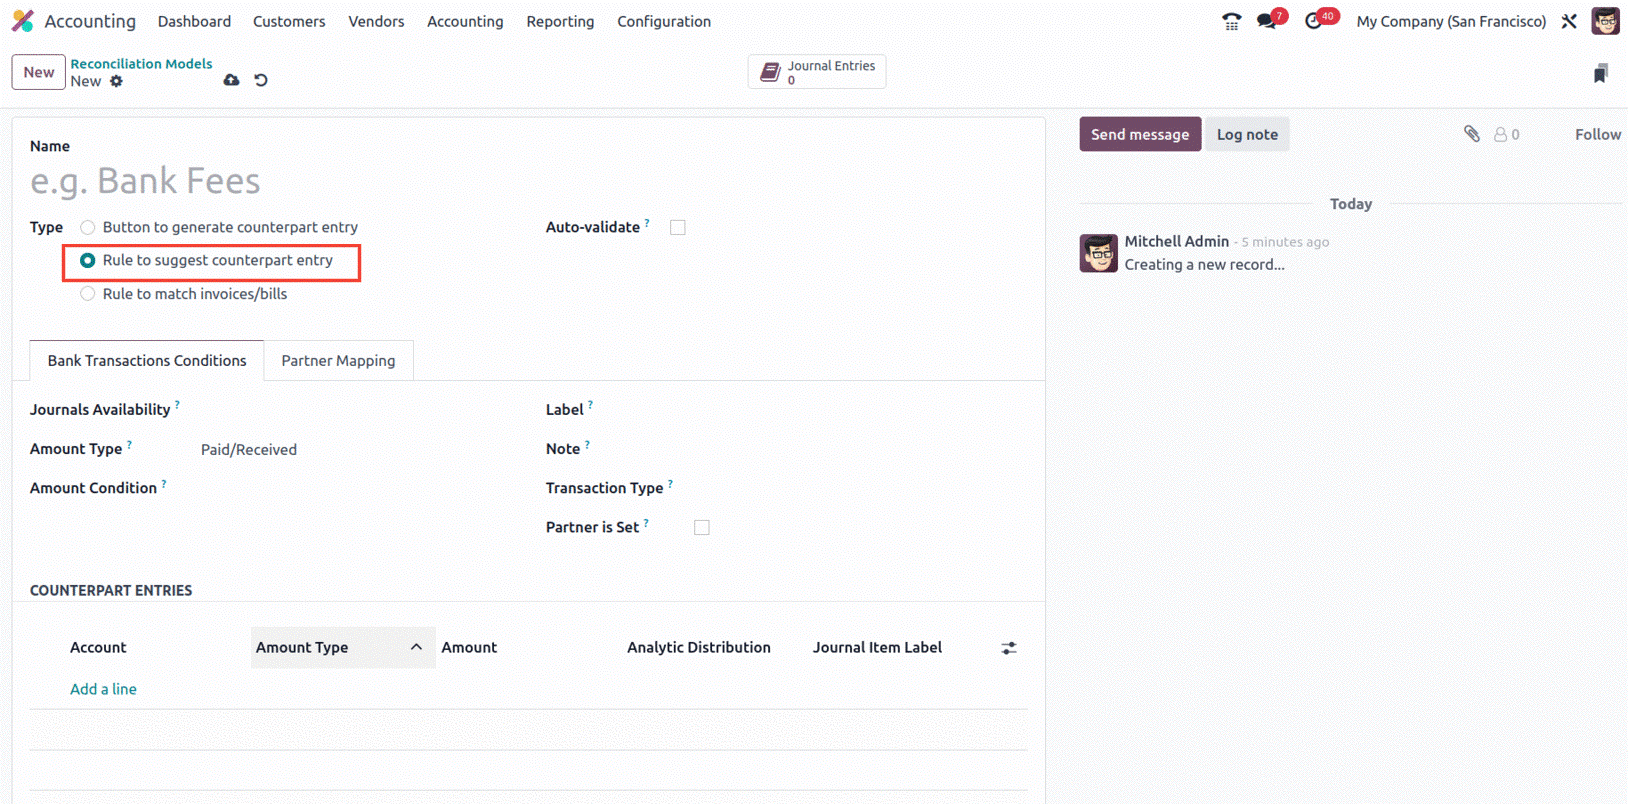
You can choose whether or not to auto-validate the statement line first. The Bank Transaction
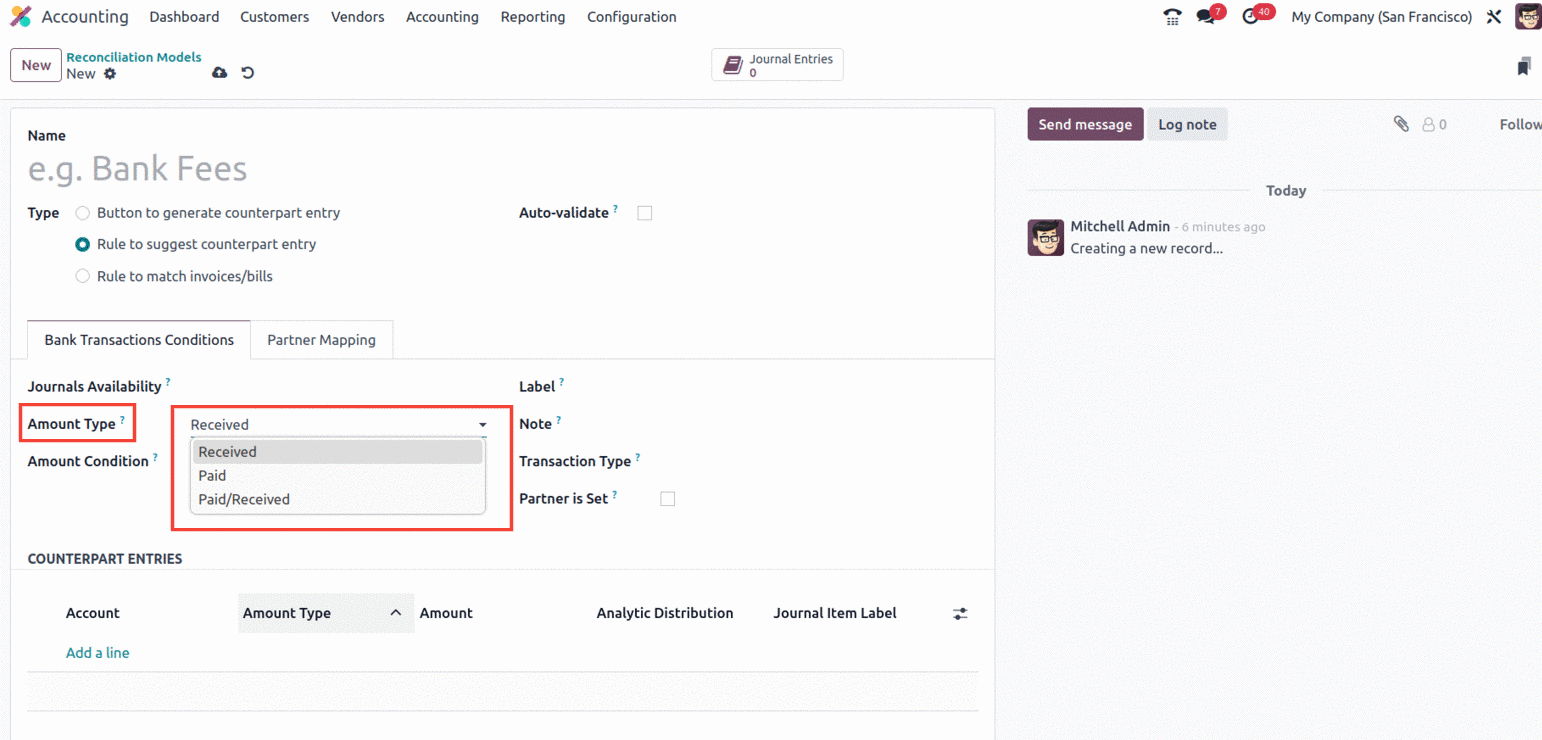
Conditions can then be set up under the relevant tab. You can specify the reconciliation model under the
Journals Availability option to make it accessible in a certain journal. The amount type can then be
allocated in the designated field.
You can select it from the dropdown menu to be Received, Paid, or Paid/Received. So that the chosen
transaction type will be the only one to which the reconciliation model is applied. Only when receiving
an amount does the option "Received" apply. You can only apply using the Paid option after making a
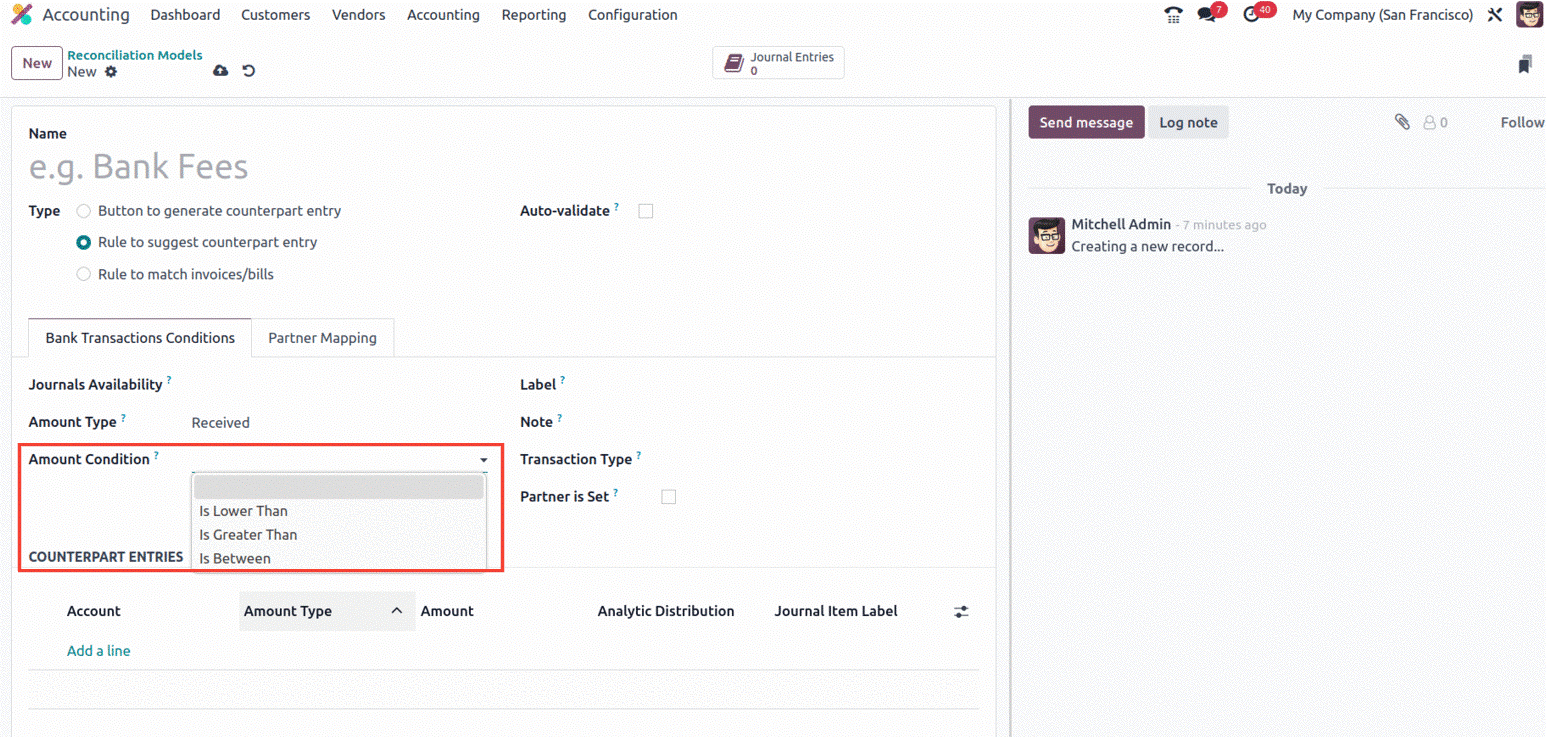
payment. In both situations, the third one, "Paid/Received," will be used. The Amount Condition can be
examined next.
It will also show a dropdown menu with alternatives like Is Lower Than, Is Greater Than, and Is
Between.
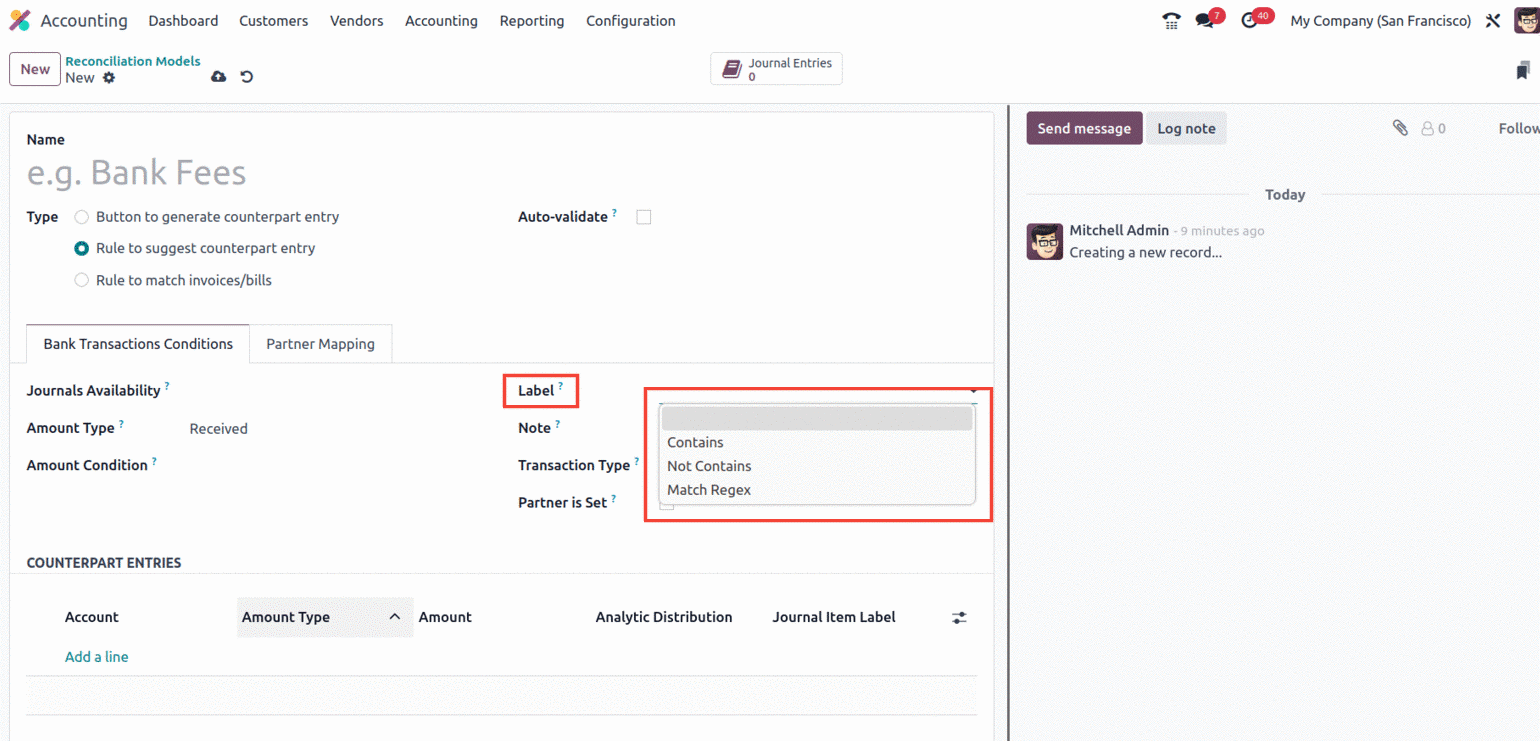
You can now complete the fields label, note, transaction type, and partner is set on the right side of
the tab. The dropdown menu, which has options such as, is located in the Label field.
- Contains: When this option is selected, the reconciliation model will only be used if the
preposition label contains the specified string.
- Not Contains: The opposite of "Contains" is "Not Contains."
- Match Regex : Create a regular expression on your own.
The reconciliation model will only be used when the note satisfies the requirement, so you can assign
the note in a similar manner. The Player Should be set option, which will provide you with more
possibilities to choose the partners as shown below, can also be used to configure the partners. You can
choose the Transaction Type as well. You can also enable or disable the Partner Set field. The chosen
reconciliation model will only be used if a customer or vendor is set if the field is activated. By
turning on this option, other fields like "Matching partners" and "Matching categories" will become
available. as seen in the following screenshot.
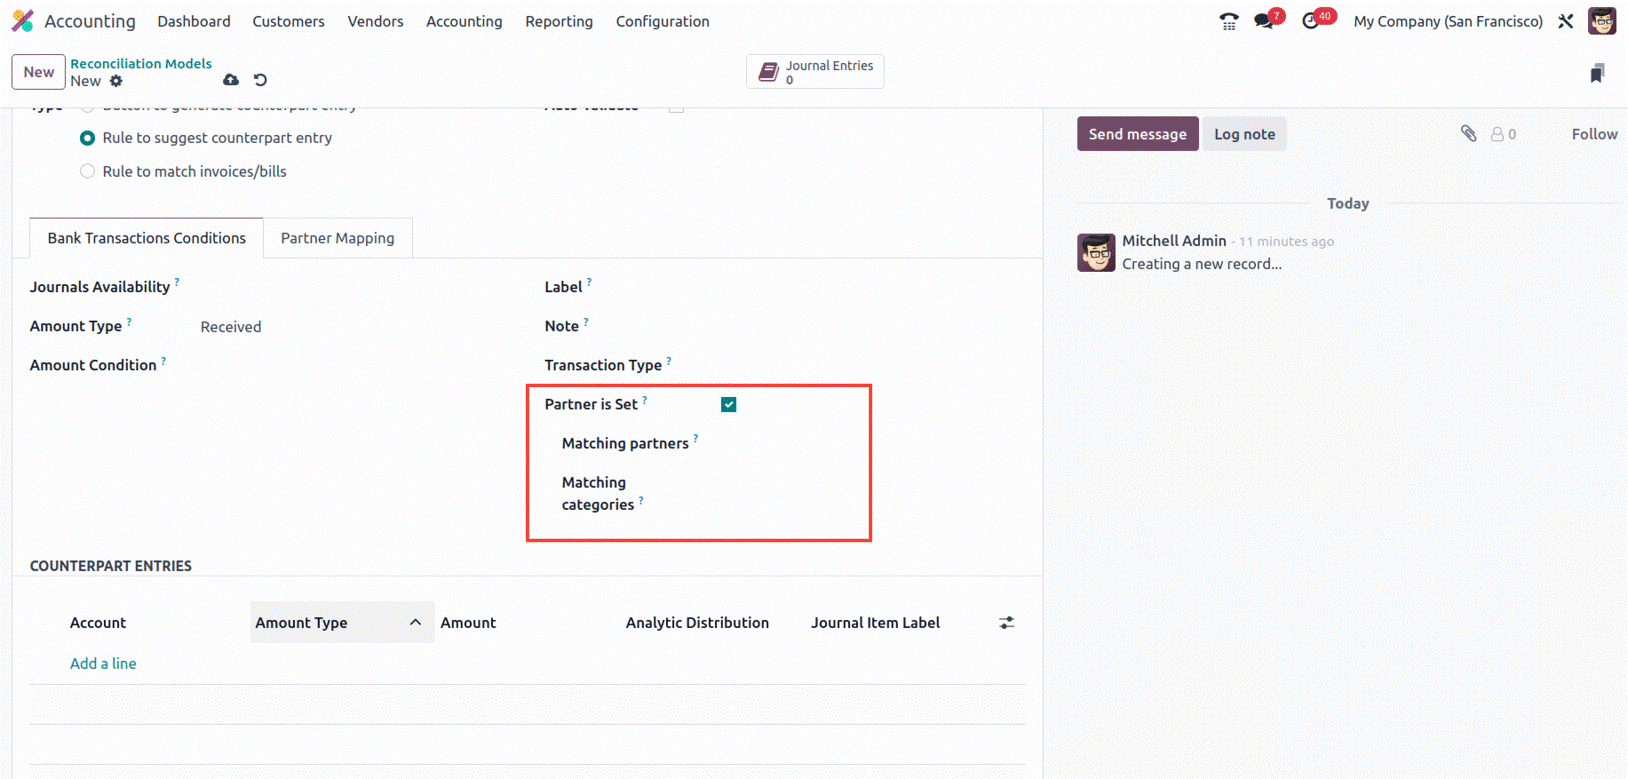
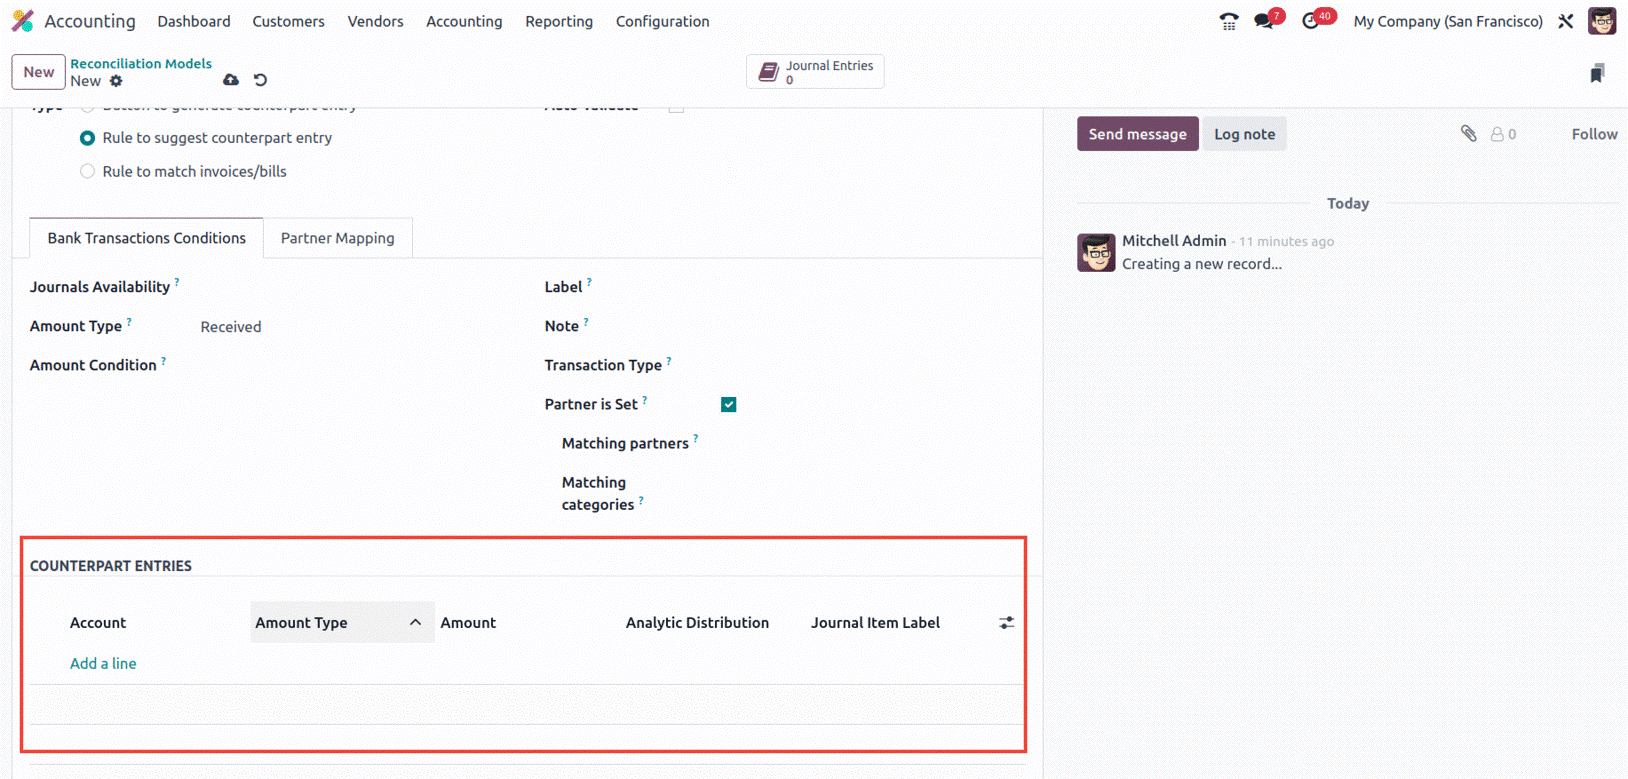
By turning on this function, a dropdown menu will appear with a selection of predefined partners and
categories, from which you can select the partners and categories that match. You can add the entries in
the COUNTERPART ENTRIES column.
The setting can then be started by assigning the Find Text in Label and Find Text in Note fields, as
well as by selecting the appropriate partner using the dropdown menu available under Partner, under the
next tab, which is called "Partner Mapping."

The newly built Reconciliation model will be instantly saved into the system after all the necessary
information has been provided. If not, you can save the record manually using the icon that is provided
at the top, as seen in the screenshot above.
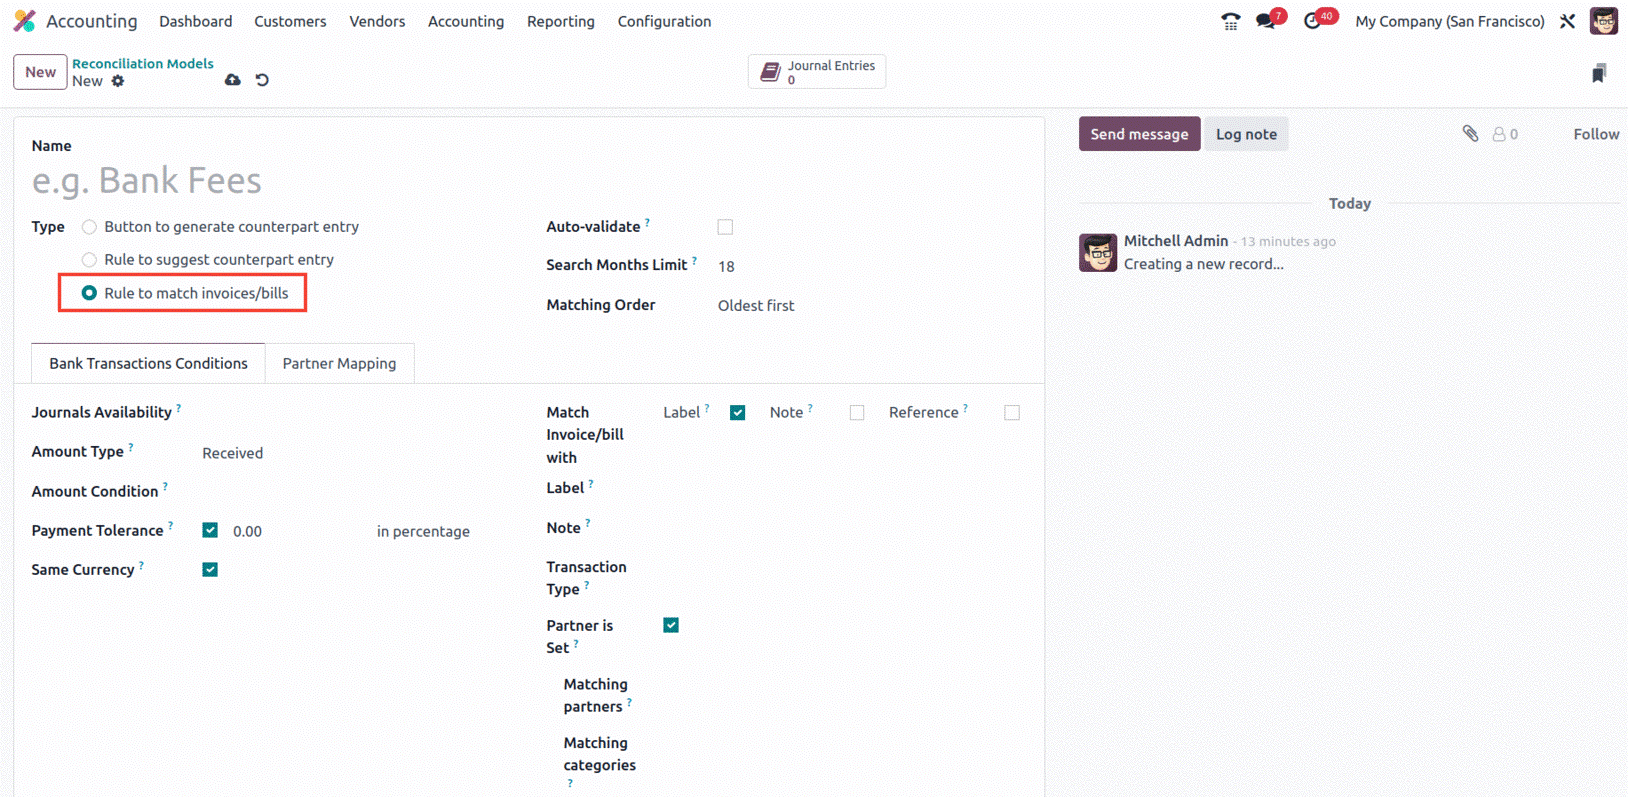
Rule to match invoices/bills.
'Rule to match invoices/bills' is the last reconciliation type. You must complete the extra fields that
we will cover below in order to configure the reconciliation applying this (Rule to match
invoices/bills).
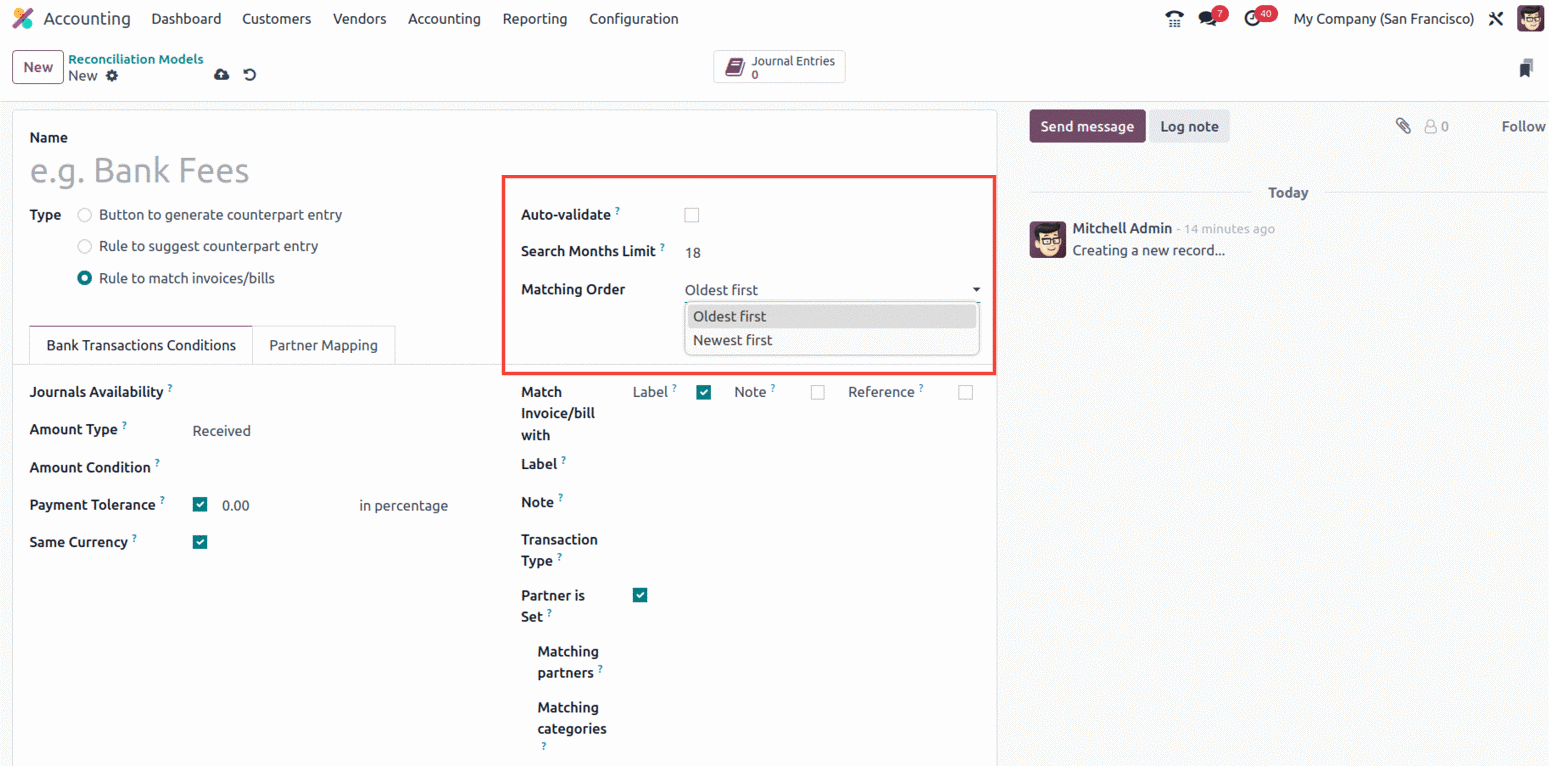
The 'Search Months Limit' field, where you can define the number of months to be utilised for the
reconciliation process, must be filled in after you have mentioned the Name, Type, and Auto validate.
This can be used to restrict the reconciliation process's application, for as by limiting it to
transactions from the last three months or something similar. Additionally, the dropdown option allows
you to fill up the Matching Order box using either the Oldest First or Newest First order. You can
arrange the reconciliations in order of importance using this field.
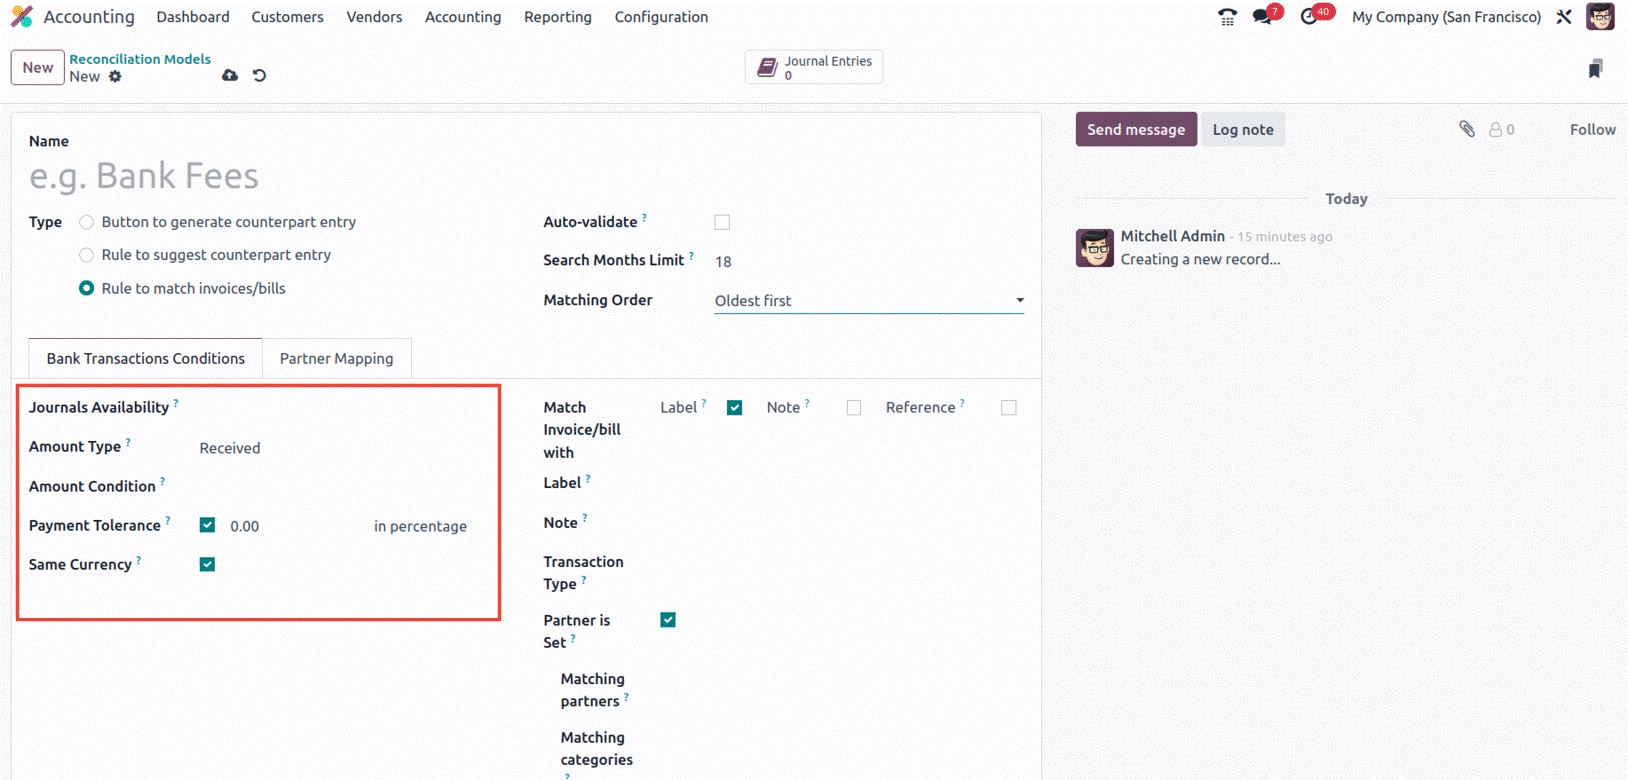
Later, under the Bank Transactions Conditions tab, the condition on the bank statement can be
specified. Here, you must first determine the Journal Availability in order for the reconciliation model
to only be accessible from the designated journals. Then, as we said before, the Amount Type can be set
to Received, Paid, or Paid/Received. Then, by selecting the appropriate option from the dropdown, you
can define the Amount Condition. Additionally, if any underpayment happens, the Payment Tolerance
feature can be activated to accept the payment difference. It may be configured percentage-wise.
Similarly, whether or not the reconciliation procedure should utilize the same currency for all sums
included in the reconciliation is indicated by the boolean field Same Currency being activated.
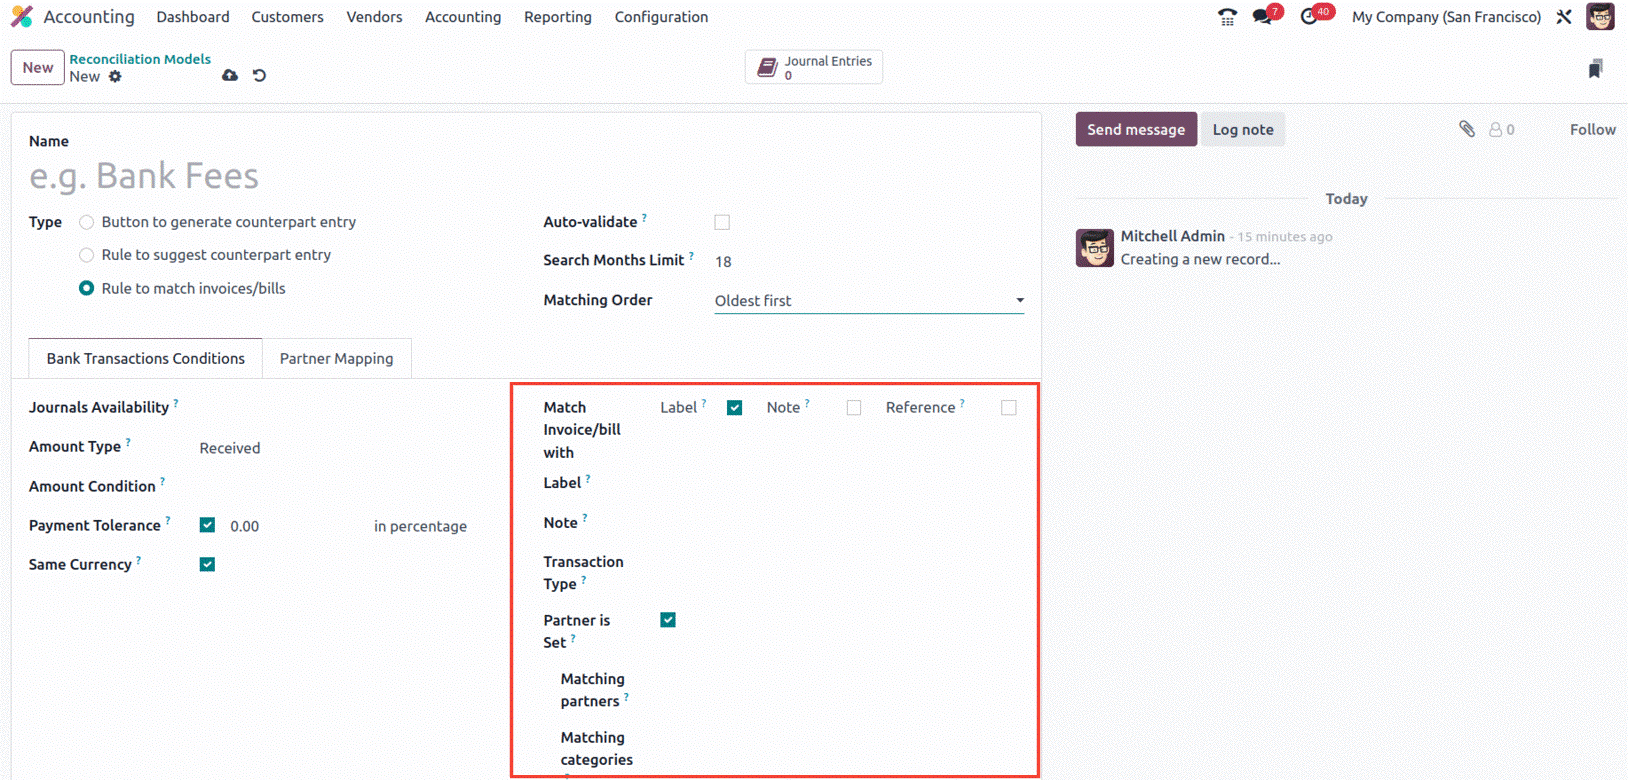
Additionally, the 'Match Invoice/bills with' option can be set to Label, Note, or Reference on the
right side of the tab. Then, using the appropriate options from the dropdown, you can describe the
Label, Note, and Transaction Type fields. The bank statements can be filtered with the use of these
options. In order to mention the Matching Partners and the Matching Categories, you can activate the
Partner is Set field.
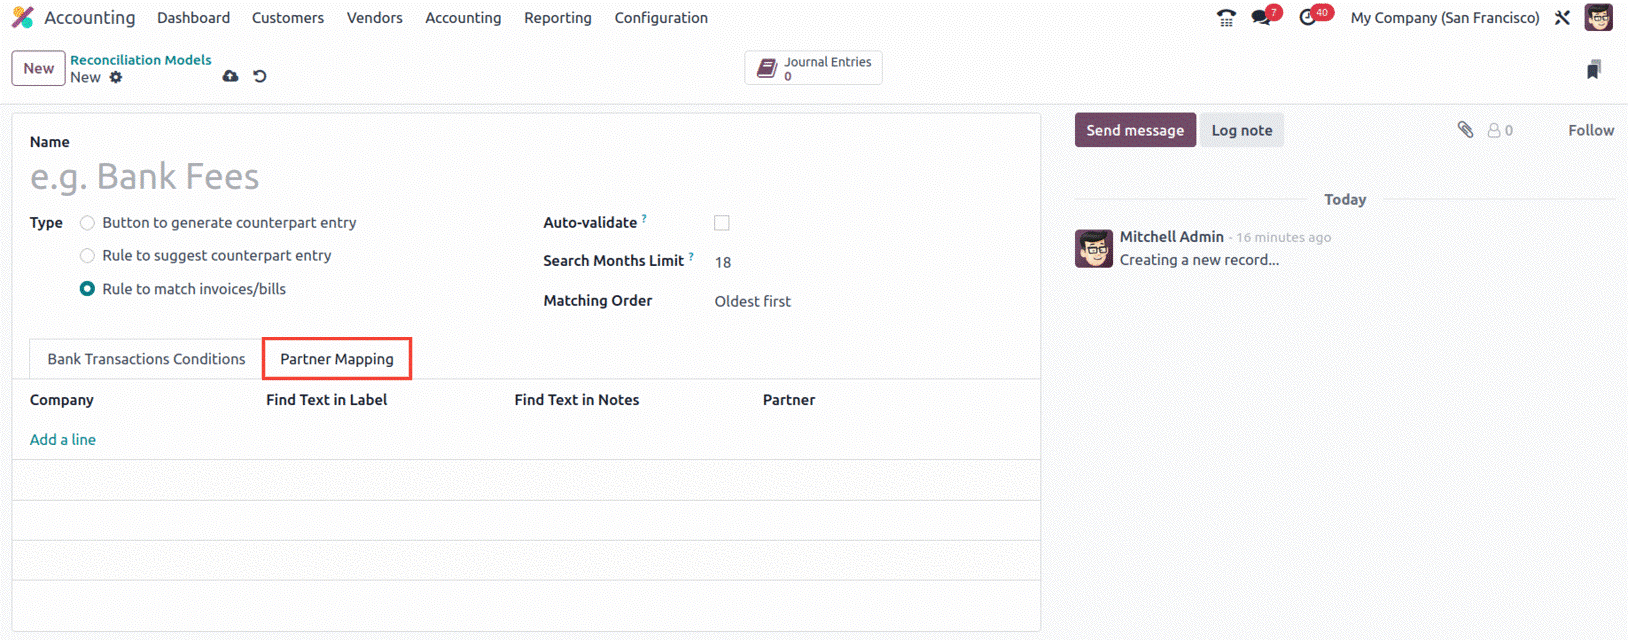
In order to complete the Partner Mapping tab, use the Add a Line button to provide information about
Partner, Field Test in Label, and Find Text in Notes. You can automatically associate accounting entries
with various partners using this tab. It enables you to instantly spot any anomalies or irregularities
in the accounting and reconcile transactions with ease. When it comes to minimizing data entry errors
and improving decision-making, the Partner Mapping tab is extremely helpful.
The configuration procedures for various Reconciliation model kinds are as follows.
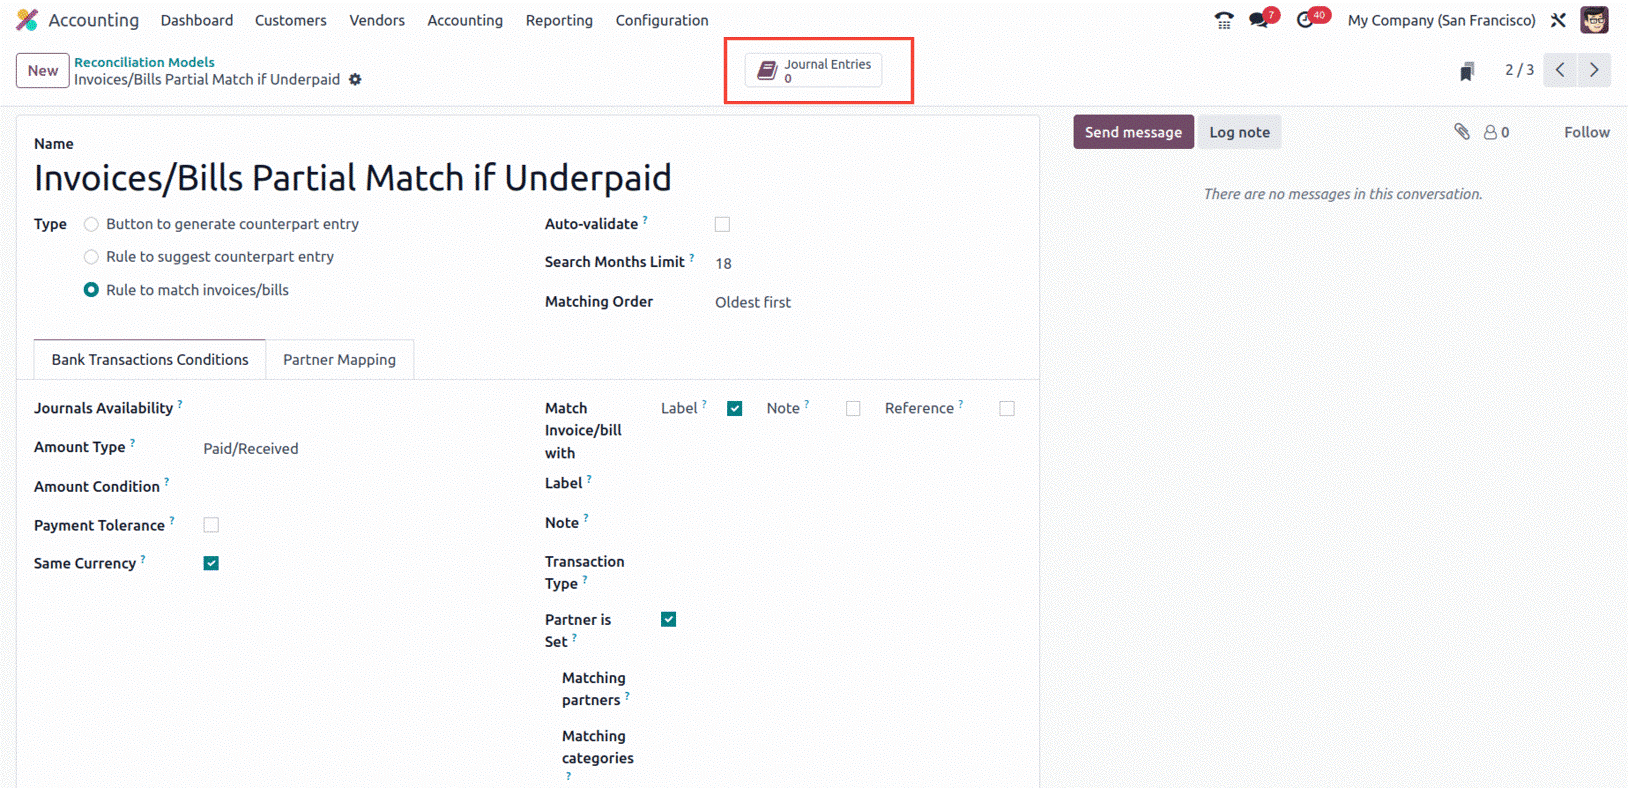
The Reconciliation Model Creation Form also shows a smart button named Journal Entries, which is
highlighted in the screenshot below. By clicking this button, you can access all the Journal Entries
connected to the Reconciliation Model that has already been defined.
The form view in Odoo17 has changed, and the 'NEW' button now allows for the creation of bank
statements.
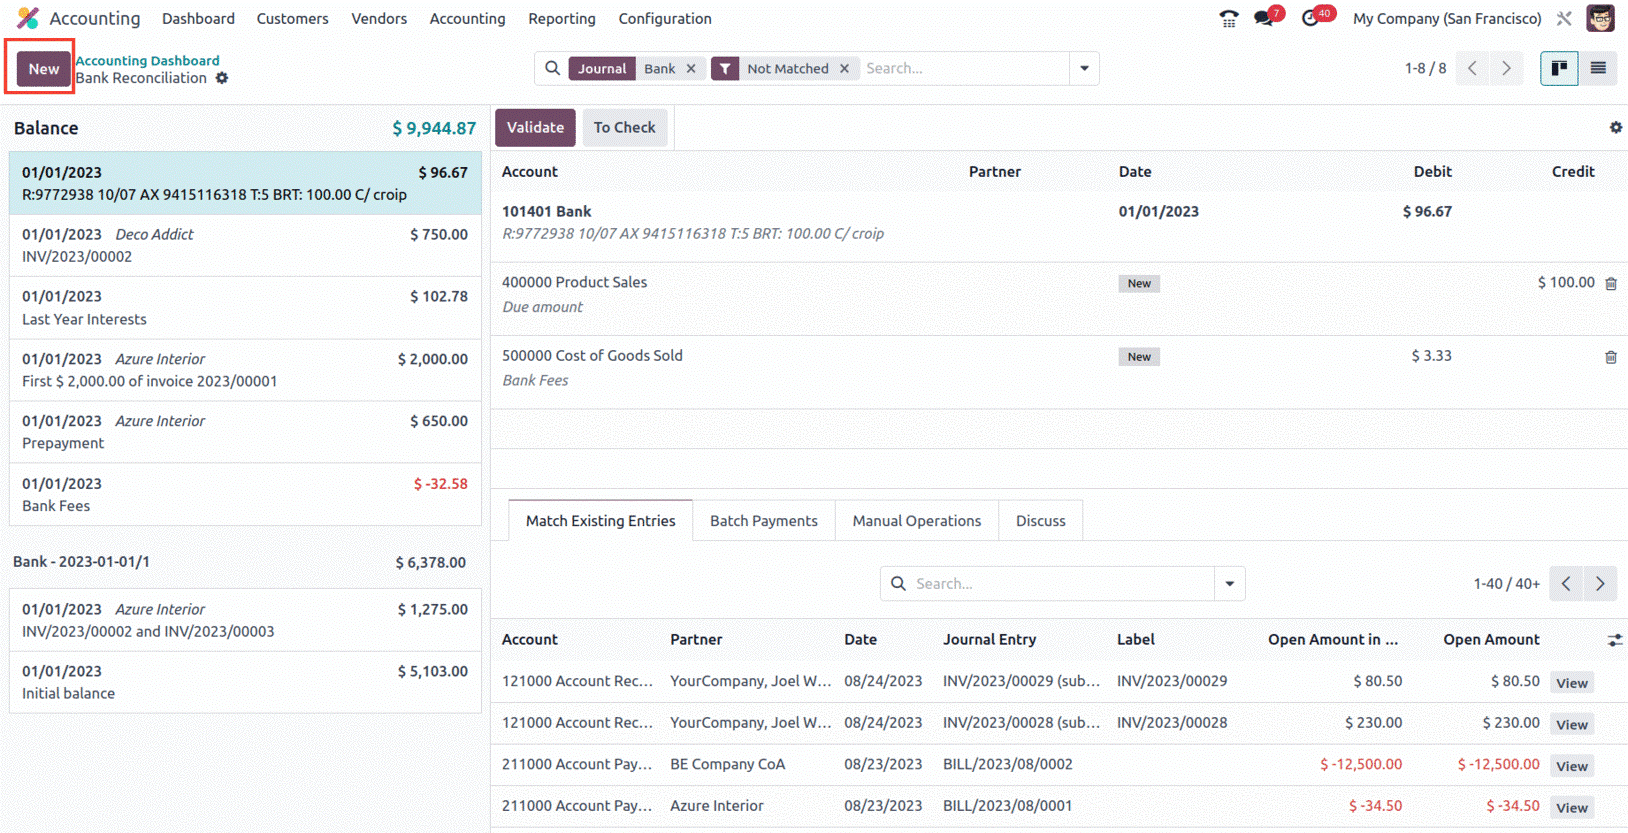
To reconcile the corresponding invoices or bills, select the line that corresponds to the statement.
Or, entries are reconciled automatically in accordance with the rules and reconciliation model
established.
You may automatically match bank and other financial transactions to the relevant accounts in their
Odoo17 Accounting system by using the Reconciliation model, which is an essential component of the
accounting process. As transactions are automatically matched to their appropriate accounts, this
assures accurate and timely accounting while reducing the need for manual data entry. Additionally,
since transactions are automatically reconciled, it aids in removing errors and discrepancies. This
makes it easier to make sure that the financial data entered into the system is accurate and current.
Therefore, we covered every aspect of the unique Configuration tools and menus available in the Odoo17
Accounting module in this chapter.
The many tabs of activities in the Odoo17 Accounting module, which support efficient financial
administration, will be the subject of the following chapter.