To manage the finances and bookkeeping of your company, you can choose one of the several
accounting configurations available in Odoo 17. In comparison to other settings, it has the
highest priority. You can configure financial records in the system using the accounting
configuration tool in Odoo17. You can use it to manage your accounts, set up taxes, set up
invoices, and balance your bank accounts. Additionally, it enables you to set up
multi-currency accounting, manage budgets, and construct charts of accounts. It can also be
used to generate reports and offers a variety of options for controlling payment terms. Before
beginning the organization's financial management operations, the accounting settings must be
established. Because it affects all of the company's operations, changing the accounting
setups after they are set up will be quite challenging. Chart of Accounts and Taxes are the
two primary components that need to be set up first under this page. In the parts that follow,
we may fully comprehend the configurational features of accounting.
Configuring Chart of Accounts
A company's financial management processes must include the Chart of Accounts. It is a list
of all the accounts or ledgers a company utilizes to monitor its income, expenses, assets,
liabilities, and equity. The Chart of Accounts normally comprises equity accounts, sales and
expense accounts, cost of goods sold, and operating expenses, along with asset accounts like
cash, accounts receivable, inventory, and fixed assets. Liability accounts include accounts
payable and loans. A crucial component of financial reporting is the chart of accounts, which
ensures that financial transactions are reported in the appropriate accounts.
The form of the accounts used in the financial reports is defined by a chart of accounts,
which plays a significant role in accounting. It is a crucial tool for monitoring a company's
financial health and enables users to evaluate their overall results swiftly. Additionally, it
aids in ensuring the truthful and accurate reporting of financial transactions. It will
facilitate the simple creation, editing, and viewing of all financial accounts and allow you
to manage and customize your financial statements and reports.
Balance sheets, income statements, and other accounts are included in Odoo17's Chart of
Accounts, a traditional double-entry bookkeeping system. You can design your own accounts and
categories and tailor the system to your own accounting needs, thanks to its adaptability. The
system will always ensure that your financial operations' records are accurate and fit for
usage in the future. The configuration of the Chart of Accounts is the primary and initial
step you take when starting your accounting and financial management using the Odoo17
accounting system. It's just because it serves as the foundation for all future operations.
For total oversight of the administration of the financial operations, Odoo17 offers the
option to construct a bespoke chart of accounts based on the needs of the organization.
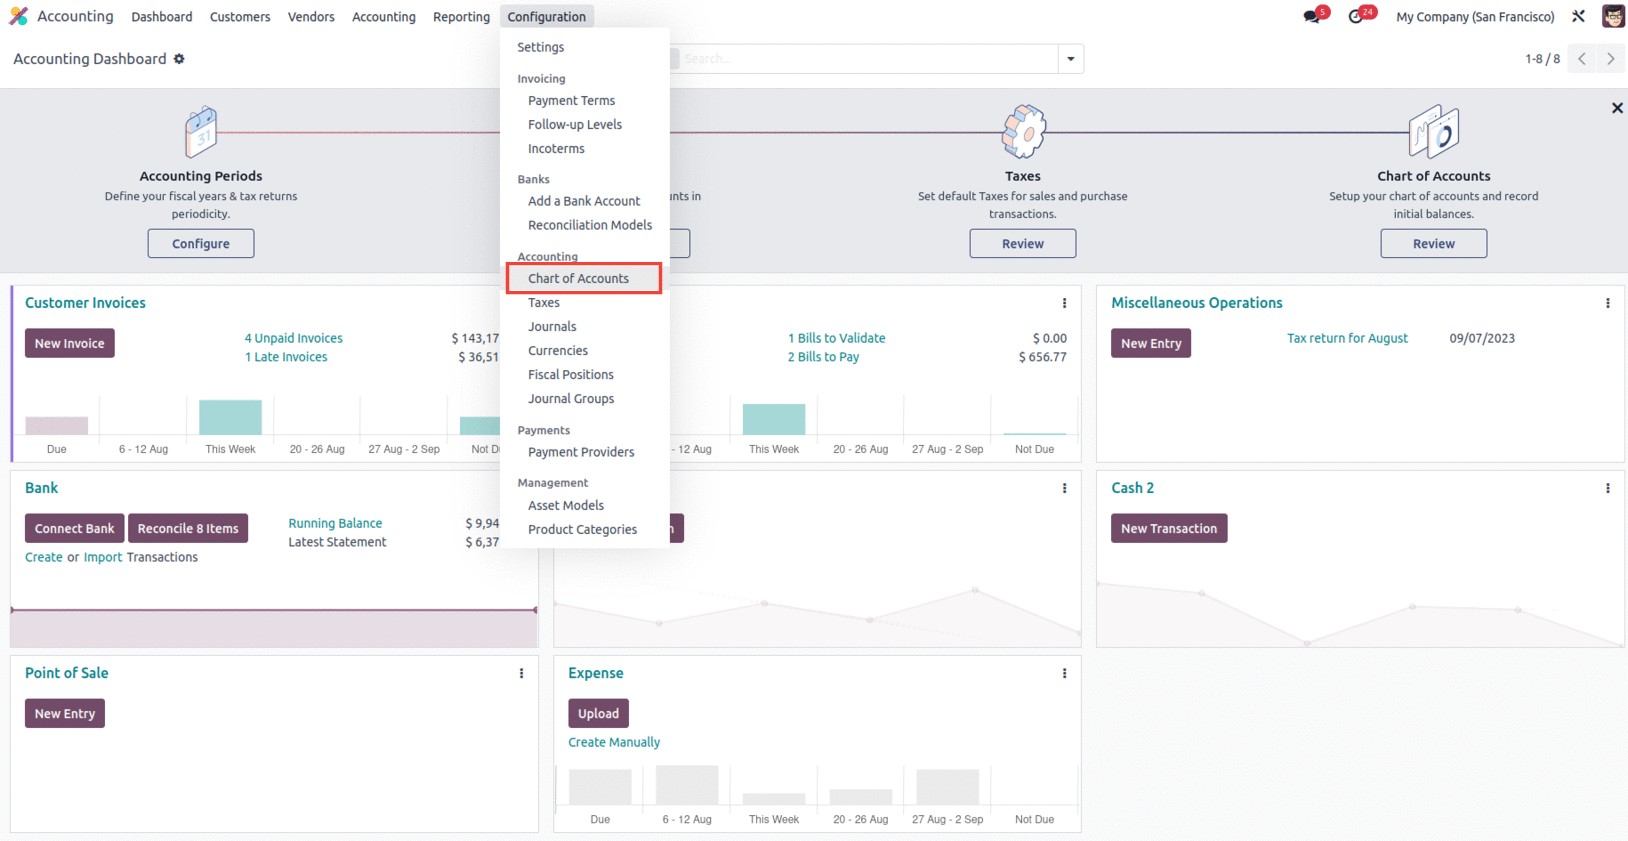
In Odoo, the chart of accounts is relatively easy to define. In the Accounting part of the
Configuration
tab of the Odoo 17 Accounting module, as seen in the figure below, you only need to pick the
Chart of Account menu.
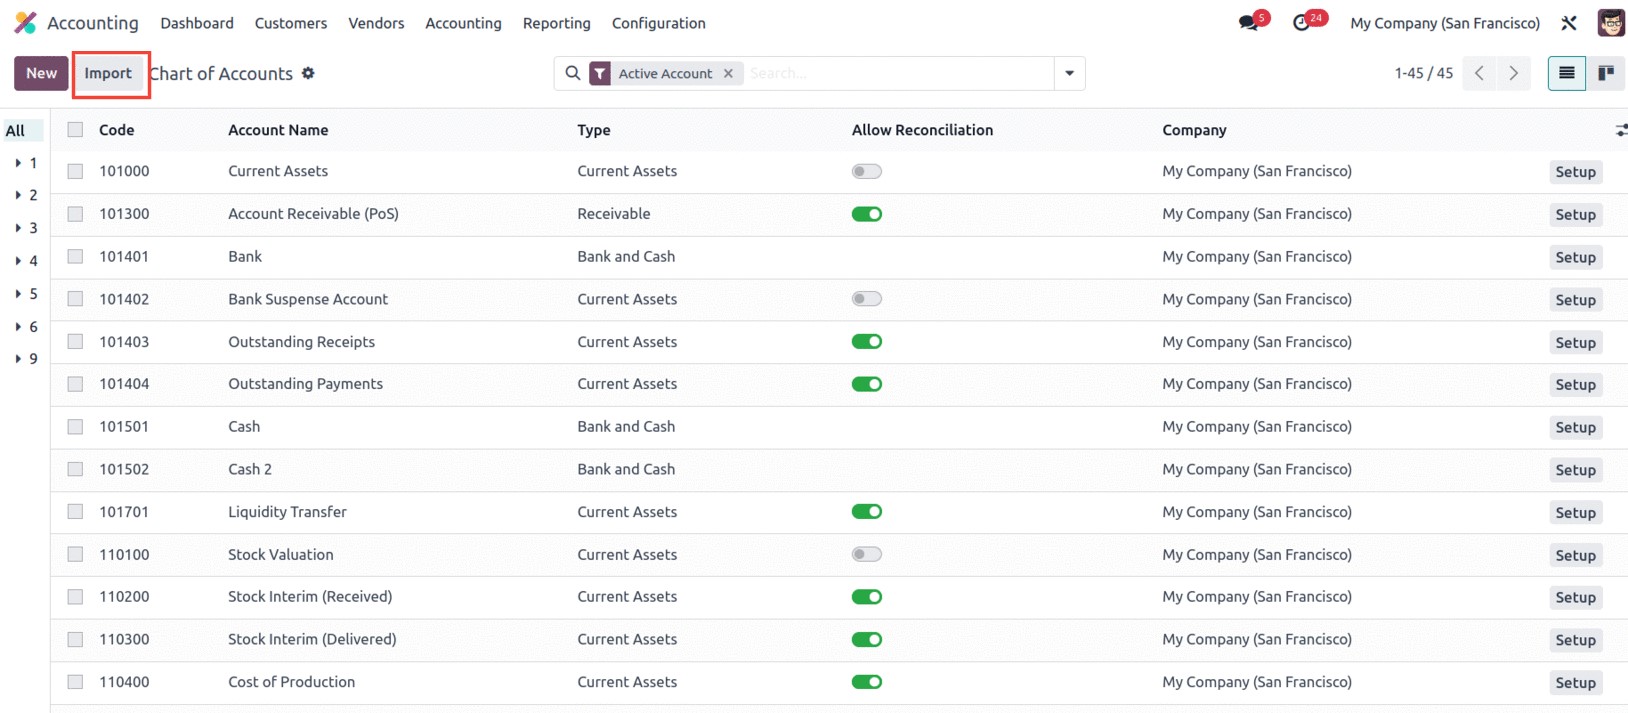
The pre-configured chart of accounts details shown below can all be seen in the Chart of
Accounts window.
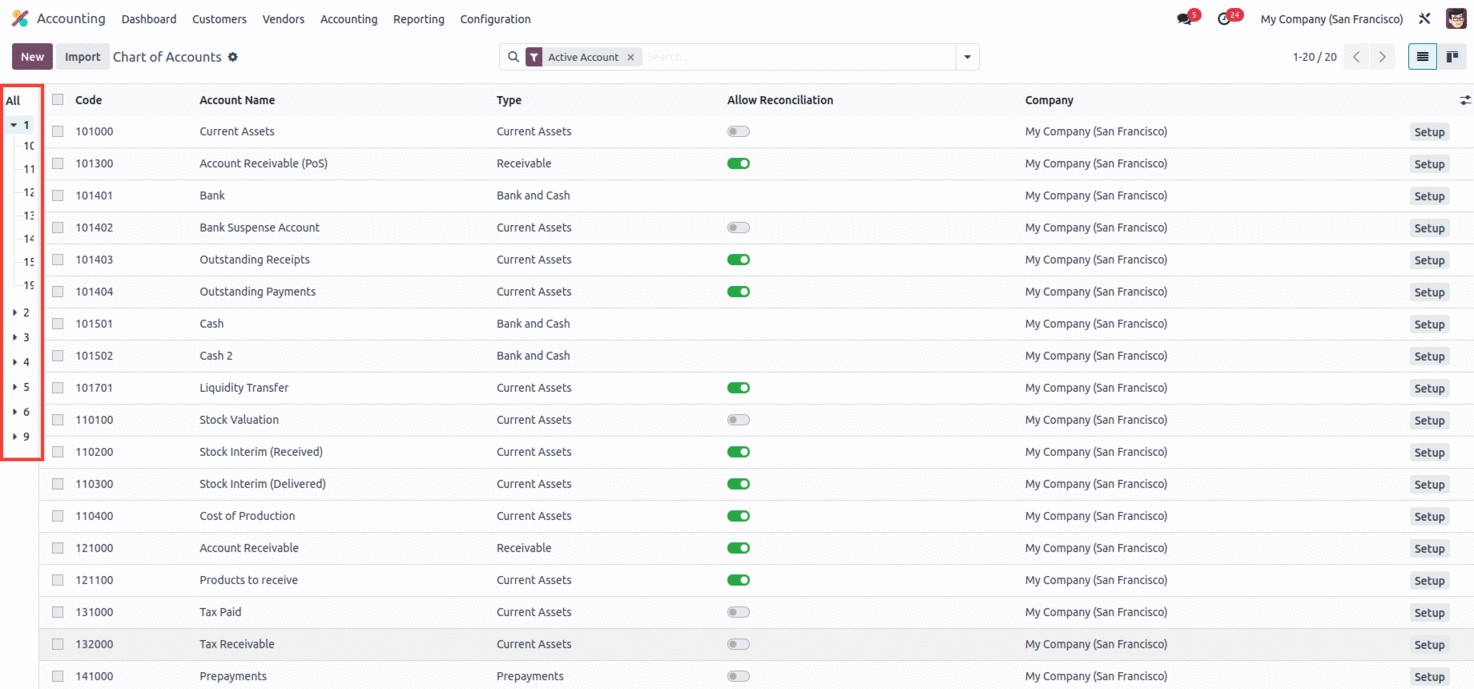
As seen in the screenshot below, all of the generated Chart of Accounts records are displayed
with pertinent information, including Code, Account Name, Type, Account Currency, Company, and
other specifics.
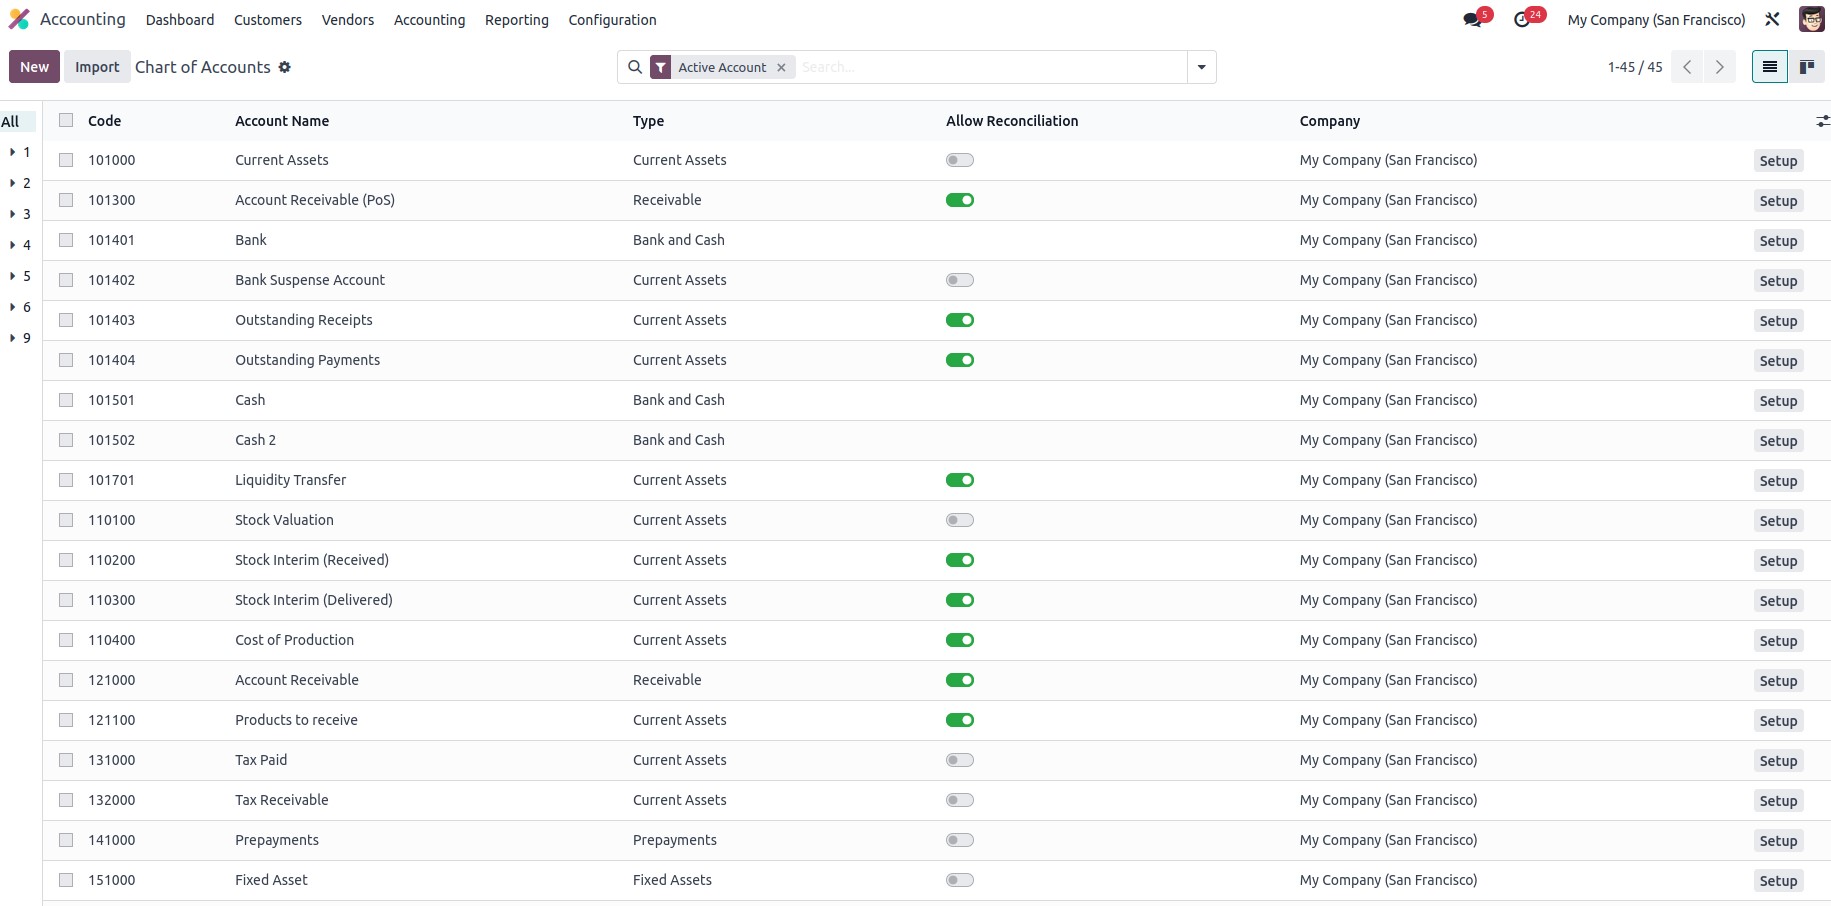
You can also observe a setting that can be turned on or off. You can set up reconciliation
for the specific chart of accounts if you enable this option. By choosing the Kanban view menu
icon, you can also see the details in the Kanban view since it is
a list view. For the purpose of obtaining any specific Chart of Accounts, robust sorting tools
such as Filters, Group By, and Search options can be employed. You can define a group of
entries using the Group By option based on similarity or other criteria.
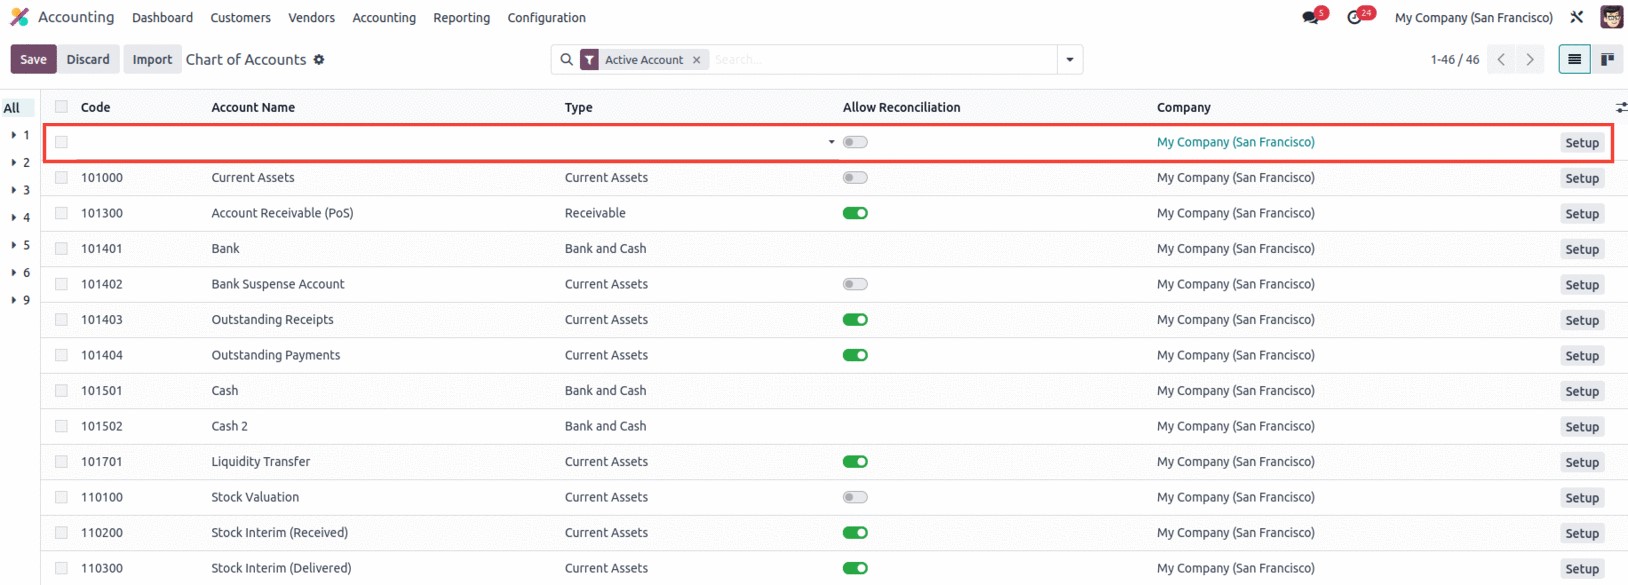
You can click the New button located in the top left corner of the window to start a new
Chart of Account. As seen below, the system will now display a new row in the same window to
construct a new chart of accounts.
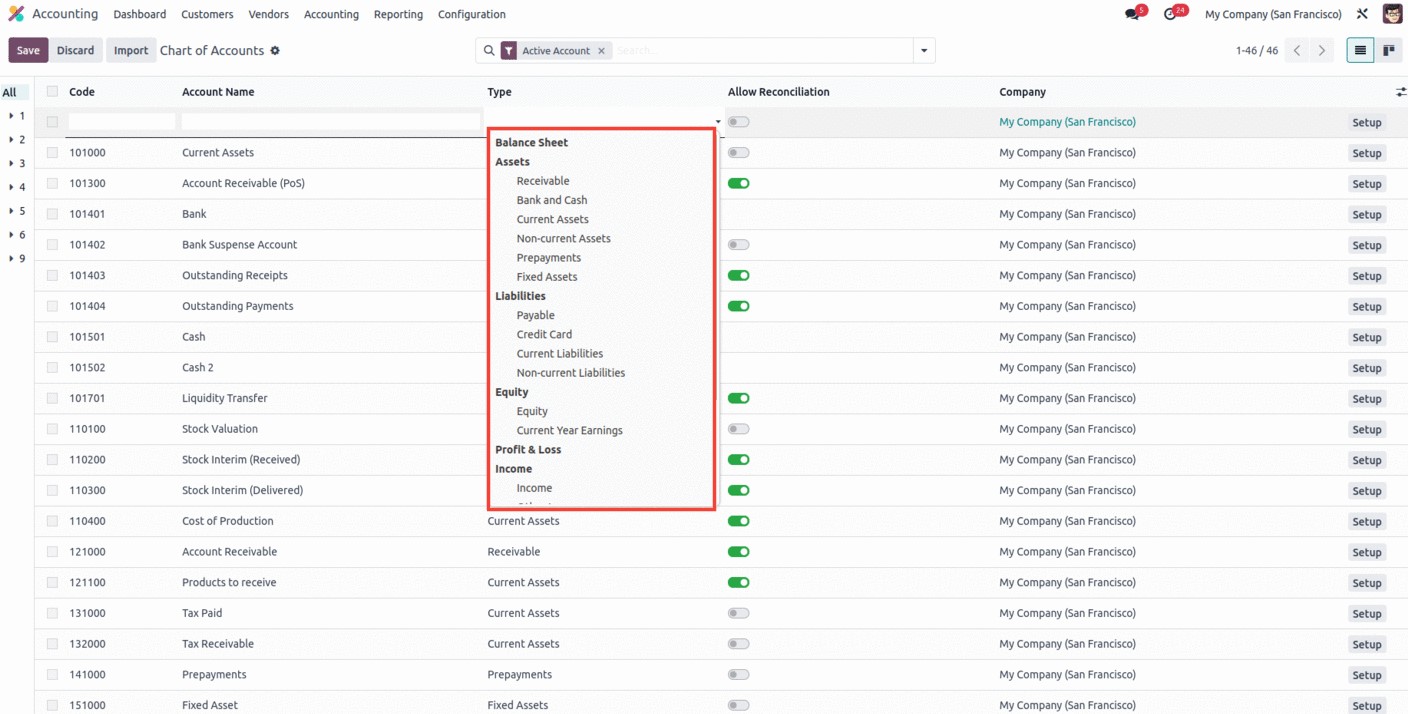
The allocated field is where you can enter the Account Name. Then, using the dropdown menu,
choose the Account Type in the Type area. All of the default types will be shown in the
dropdown menu. Asset, Liability, Equity, Profit Loss, Expense, Income, or Other are the
possible categories. Additionally, each type of account will have a number of subtypes, as
seen in the screenshot below.
According to your preferences, you can also set or disable the Allow Reconciliation area.
Include the Company and the Account Currency as well.
At the beginning of the process, it is easy to define the hierarchy of the Chart of Account
operations for the Odoo17 platform. The concerned responsible team can set up the hierarchy of
operations for the specific chart of accounts as soon as your business activities are
established.
You can see the numbers as they relate to the hierarchy on the very left side of the Chart of
Accounts window. You only need to choose the arrow alternatives for that, which are displayed
on the window's left side, as seen in the figure below.
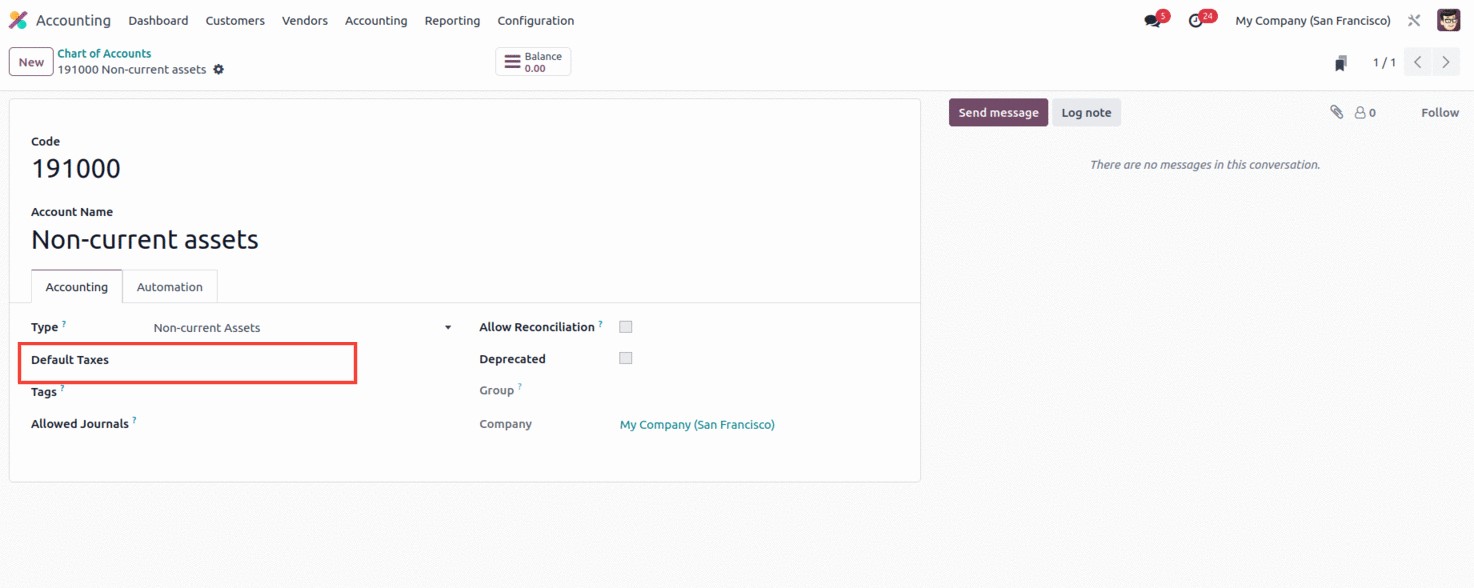
Additionally, it will be possible to view the relevant journal entries concerning the Chart
of Accounts in the smart button ‘Balance,’ and this will serve as a precise definition of the
financial activities of the Chart of Accounts in the organization. For the appropriate chart
of accounts, it is also possible to establish the default tax of activities, which will be
extremely helpful for saying that the financial operations carried out are combined with the
defined taxes. Additionally, you are free to select and explain the tags for the relevant
chart of accounts based on the company's operational region.
Additionally, you can restrict the use of this specific chart of accounts by selecting the
'Deprecated' option. To do this, select the Deprecated option from the Chart of Account menu,
as shown in the example below.

The only Chart of Accounts that can see this special feature are the ones that are currently
in use. You cannot immediately stop using and operating with a Chart of Account if you are
compelled to do so since it contains all of the financial information for the operations that
were in use and will be very valuable in the future.
The Deprecate option can be quite useful in certain circumstances. You can stop its activity
in finance management by enabling this option. You will still receive the corresponding chart
of account entries and data. However, they won't be operational.
How to create a new Chart of Accounts?
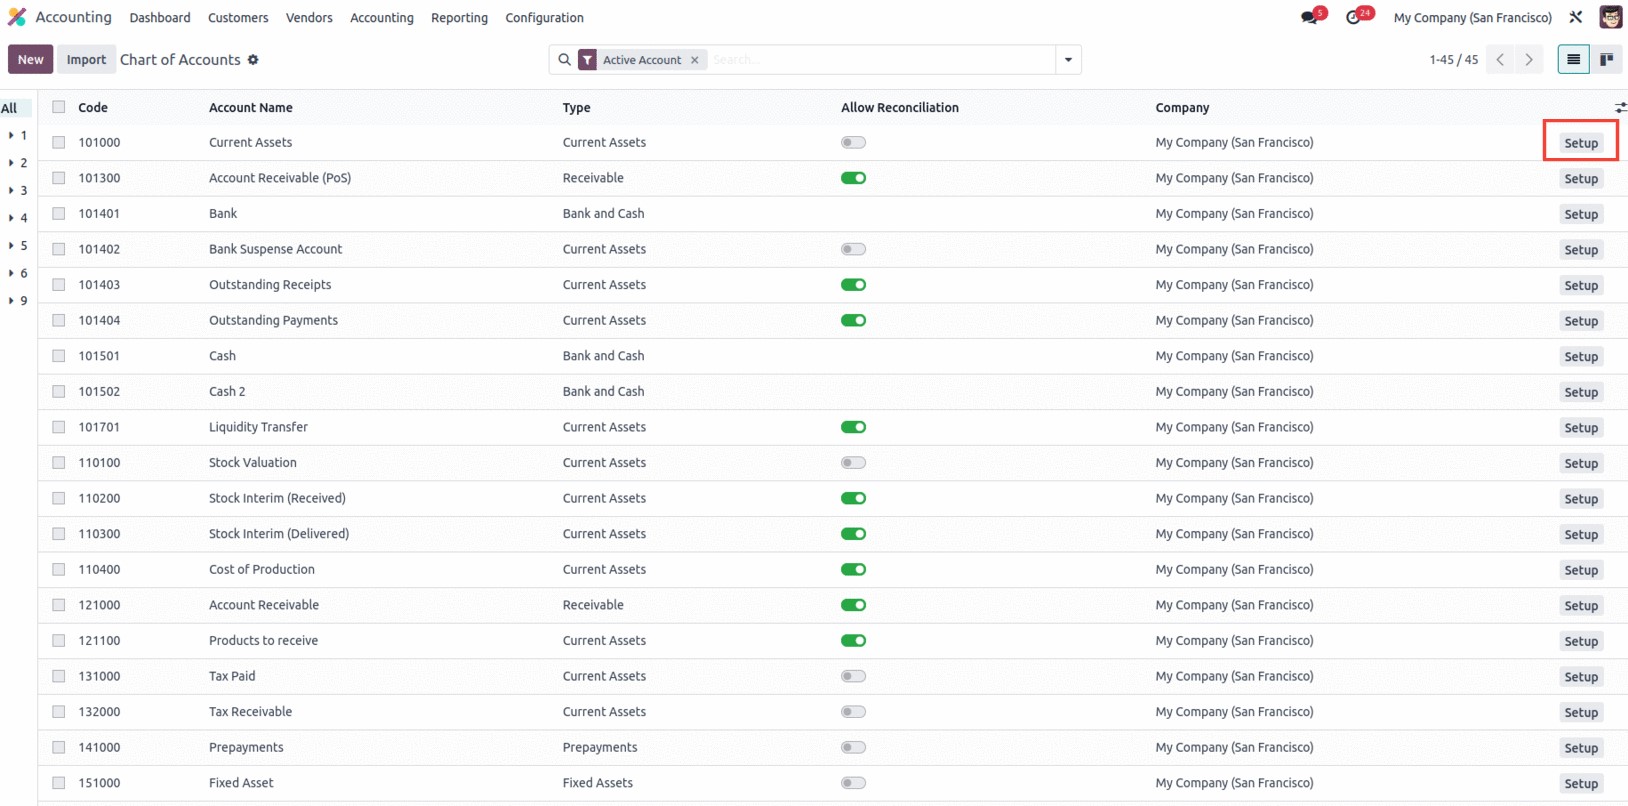
With the Odoo 17 Accounting module, you merely need to select the CREATE button, which is
located on the Chart of Accounts panel as we previously described. You can explain the new
Chart of Account on the new line that is shown. You can configure the Reconciliation option
after entering the Code, Account Name, and Chart of Account Type. The SETUP option is then
available under each of the Chart of Accounts that are indicated in the provided image.
The SETUP menu item directs you to a different window where you can configure the relevant
Chart of Account. The window in question is shown in the screenshot below.
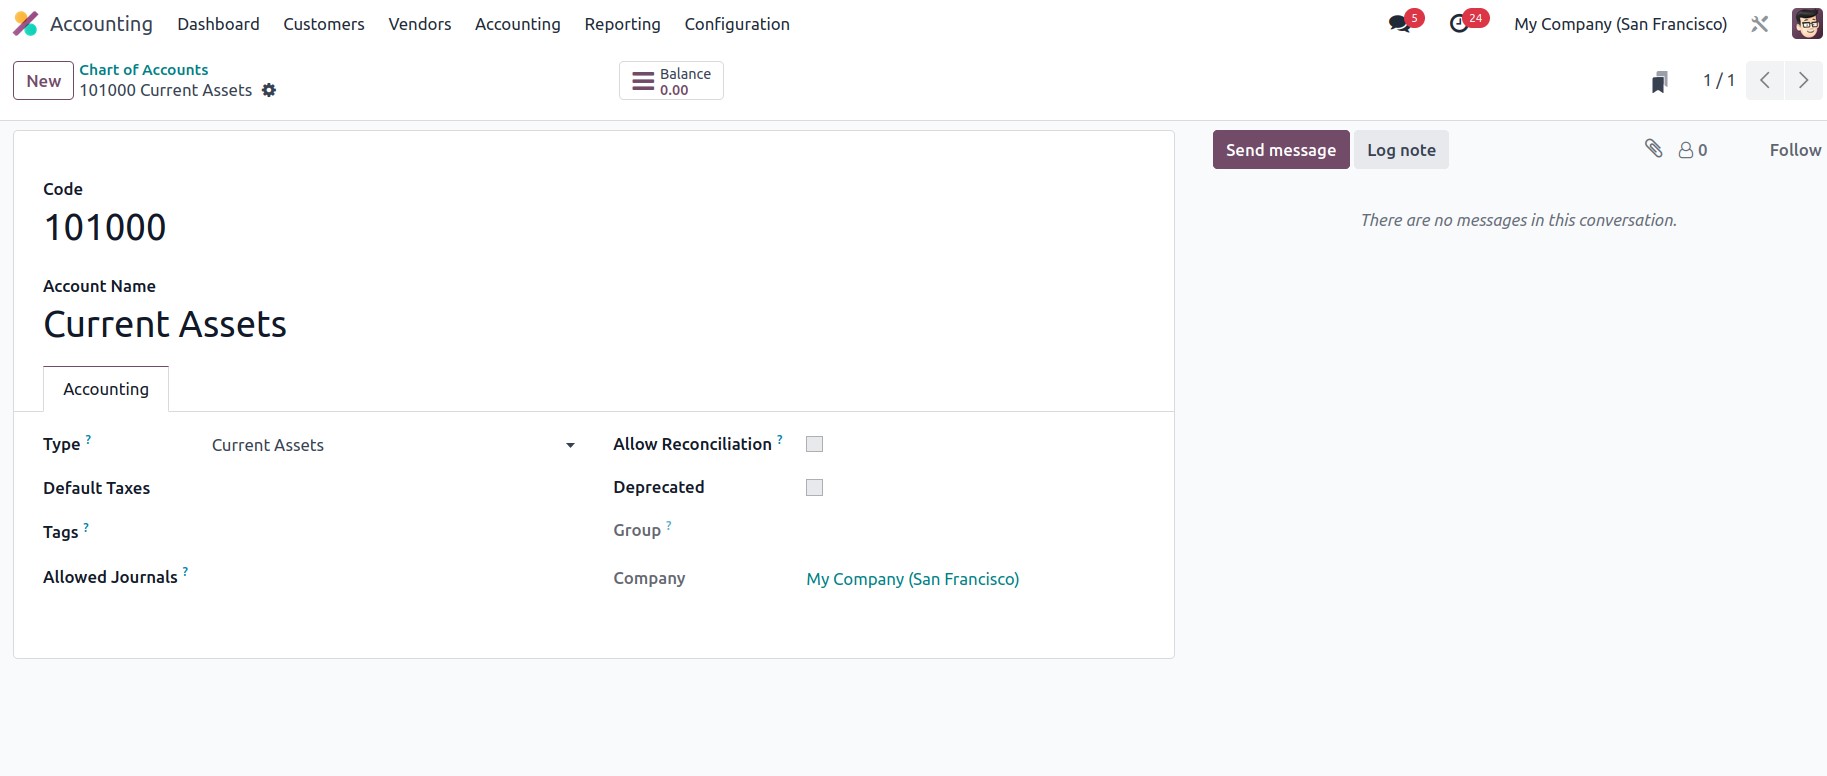
You can define the necessary details in this Chart of Account setting window. It will display
the previously specified information, including Code, Account Name, and Account Type.
Additionally, settings are available on the Accounting and Automation tabs.
You can specify the Account Type under the Accounting tab. The account type is used for
informational purposes to provide legal reports created for individual countries, to establish
the guidelines for ending a fiscal year, and to produce opening entries. Then, there is the
Default Taxes option, which we just mentioned. Then, you can list the optional tags you need
to apply for custom reporting in the Tags area. You can now list the journals in which this
account may be used in the Allowed Journals section. This account can be used in any journal
if it is left blank. The Account Currency is then an option for you to mention. So that you
can force this account's entire journal to use this particular currency. Entries may use any
currency if there is no specified currency. If this account permits the matching of journal
items to invoices and payments, you can then enable the Allow Reconciliation field. You also
have the Deprecated option, which was previously covered.
The Chart of Account can also be edited; simply move the cursor over the appropriate fields
to make it editable, and an upload icon will show up at the top to save your changes.
Additionally, the 'NEW' button is now visible in the form view's upper right corner, which
simplifies the process of creating a chart of accounts. Additionally, the 'Balance' smart tab
displays the balance amount in that account, which is derived from several journal entries.

According to the needs of the business operation, you can import or construct a variety of
Charts of Accounts using the Odoo 17 Accounting module. You can use this facility to quickly
and easily summarize each finance management's accounting processes. The option to import
records is simple to locate. The 'import records' option is available next to the New button,
which allows you to import Chart of Accounts information in CSV or xlsx format.
Let's move on to the following session, establishing Taxes, where we may explore the various
aspects of establishing taxes on business activities based on the region. Up to this point, we
have been talking about the Chart of Accounts option.
Configuring Taxes
To guarantee that the company complies with local rules, taxes are a crucial component of the
business process that must be managed correctly. Taxes can be set up in the Accounting
application of Odoo 17 Accounting. This section will walk you through the process of
configuring taxes in Odoo 17. Due to the fact that taxes are an expense that must be disclosed
on financial statements, they play a crucial part in accounting. Understanding the various tax
rules and regulations is necessary for accounting for taxes. You also need to be able to
accurately record, submit, and pay taxes to the appropriate tax authorities. Both accounting
and tax knowledge are combined in tax accounting.
Tax returns must be prepared, the correct tax liability must be determined, and returns must
be filed with the correct tax authorities. In addition, it entails the recording of
tax-related transactions, including payments, credits, and deductions. Additionally, the
creation of financial statements to reveal a person's or a company's tax liability.
The amount that needs to be deducted from employee wages for taxes is also determined using
tax accounting. Tax accounting is also used to figure out how much money should be deducted
from employee paychecks for benefits and other deductions. It also entails creating tax
budgets and projections that can be utilized by a business or individual to plan their tax
obligations and cash flow. To ensure that a business or individual complies with the relevant
tax rules and regulations, tax planning is crucial. It is, however, a complicated topic that
necessitates a full knowledge of the numerous tax laws and rules. Tax preparation, filing, and
payment help can be obtained from qualified accountants and tax preparers. The process of
preparing, filing, and computing taxes can also be automated using software tools like Odoo17
Accounting.
Taxes are regarded as a debt owed by the client to the service provider in exchange for a
favor. When submitting taxes, the organizations must pay the same amount to the government or
other authorities. All nations operate their taxes in a variety of ways, with varying
percentages, and it solely depends on the local governing bodies in each nation. Because of
this, the accounting management tool you use in your company needs to have the ability to
configure specific taxes for various operations, and the Odoo17 Accounting software excels at
this.
For defining all tax kinds for their sales, purchases, and services offered, the Odoo 17
Accounting platform is very convenient, and it can be defined based on the nation in which the
firm works. One of the localization tools that the Odoo17 platform provides may provide this
capability.
You can use the following procedures to arrange taxes for your business activity.
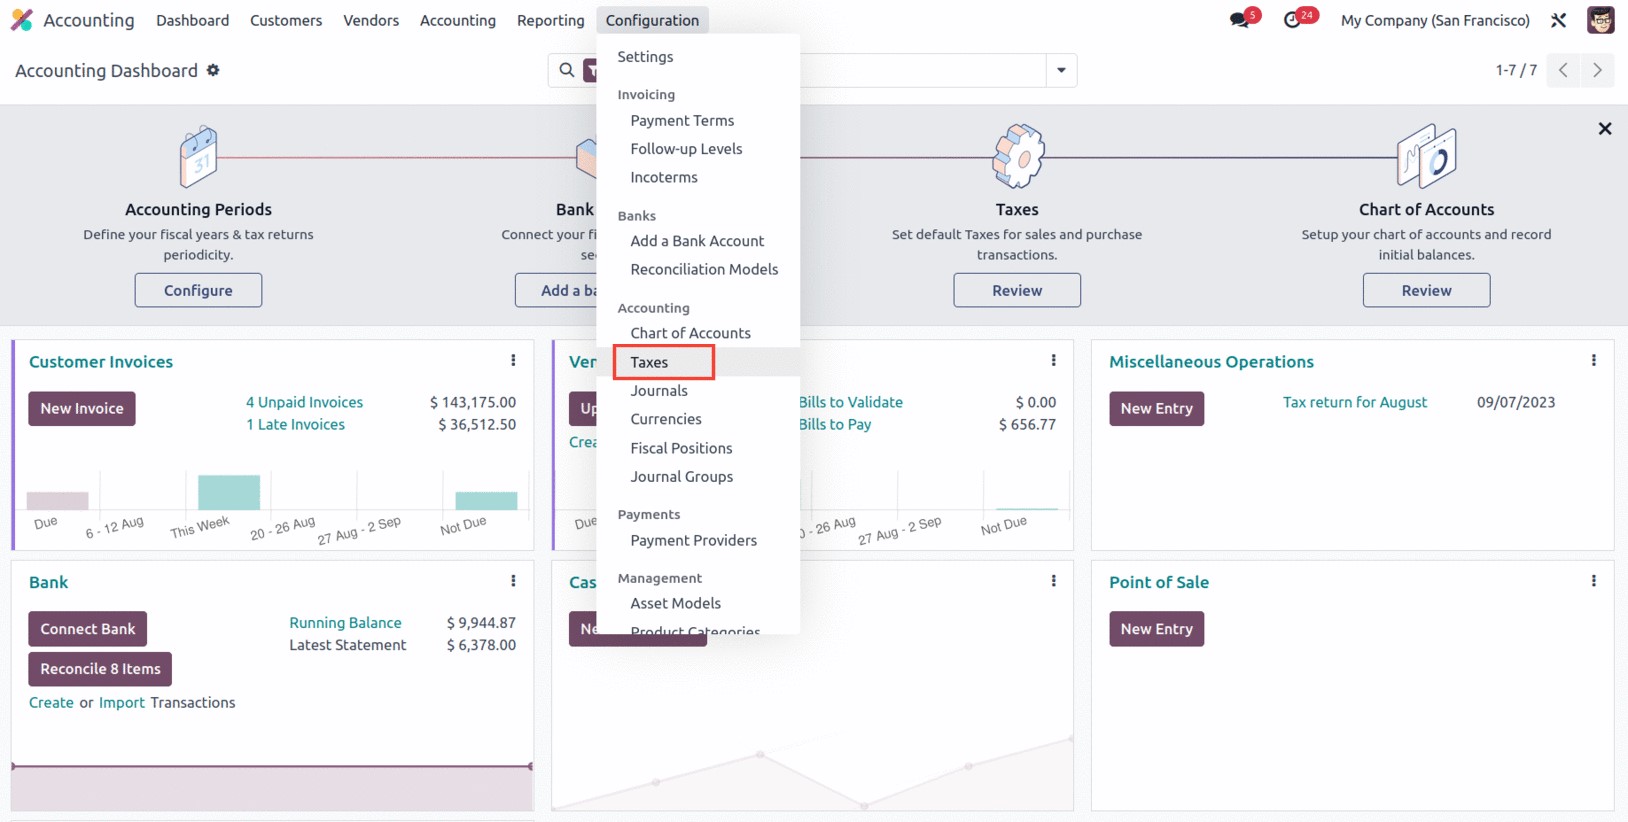
Navigate to the Accounting module and select the "Configuration" menu from the left-hand menu
list. As illustrated in the image below, select the 'Taxes' menu under the Accounting part of
the Configuration menu.
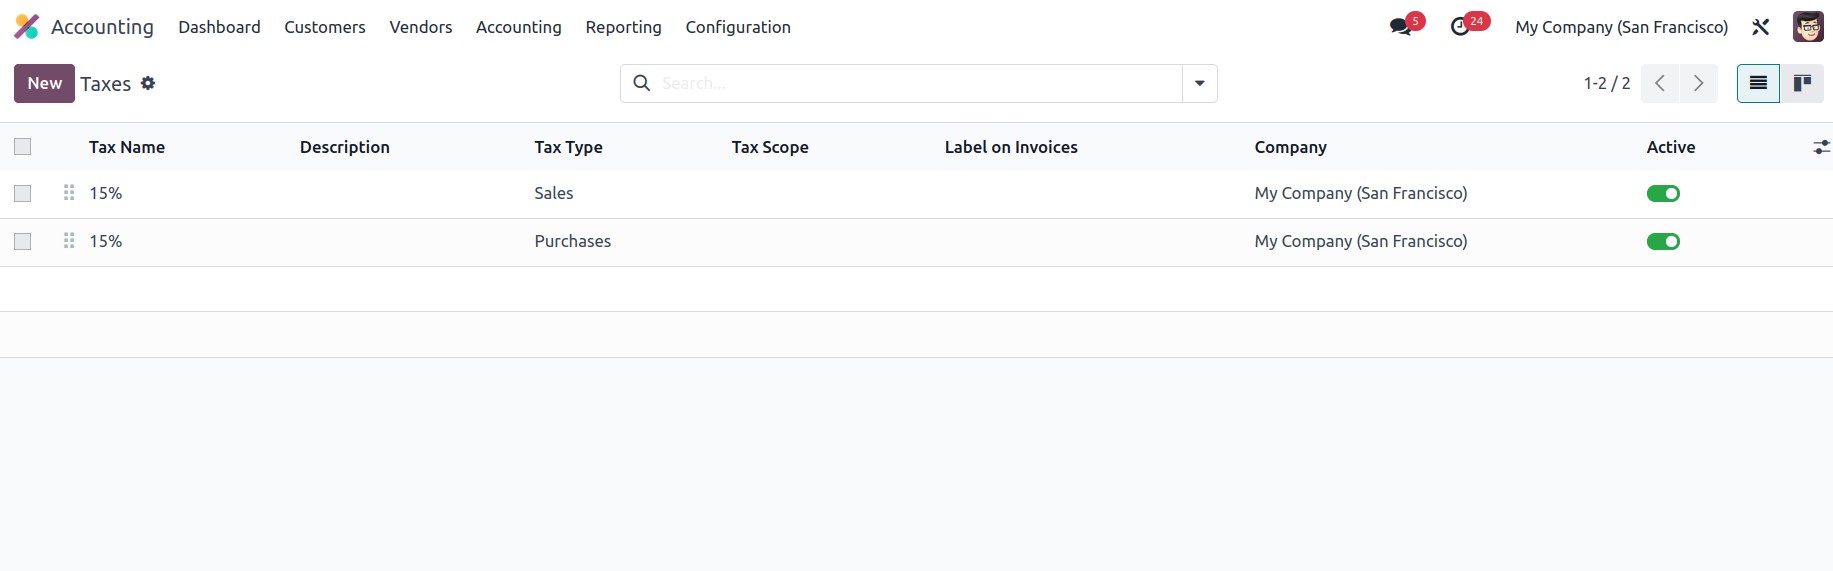
To add a new tax, use the NEW button in the Taxes window. Additionally, as seen in the
picture below, the Taxes window will show all of the previously configured taxes' specifics.
The present taxes can also be changed. The crucial information about the configured taxes,
including Tax Name, Tax Type, Tax Scope, Label on Invoices, and Company, will be shown in the
window. In addition to these choices, you may view a boolean field called Active to enable or
disable the particular tax.
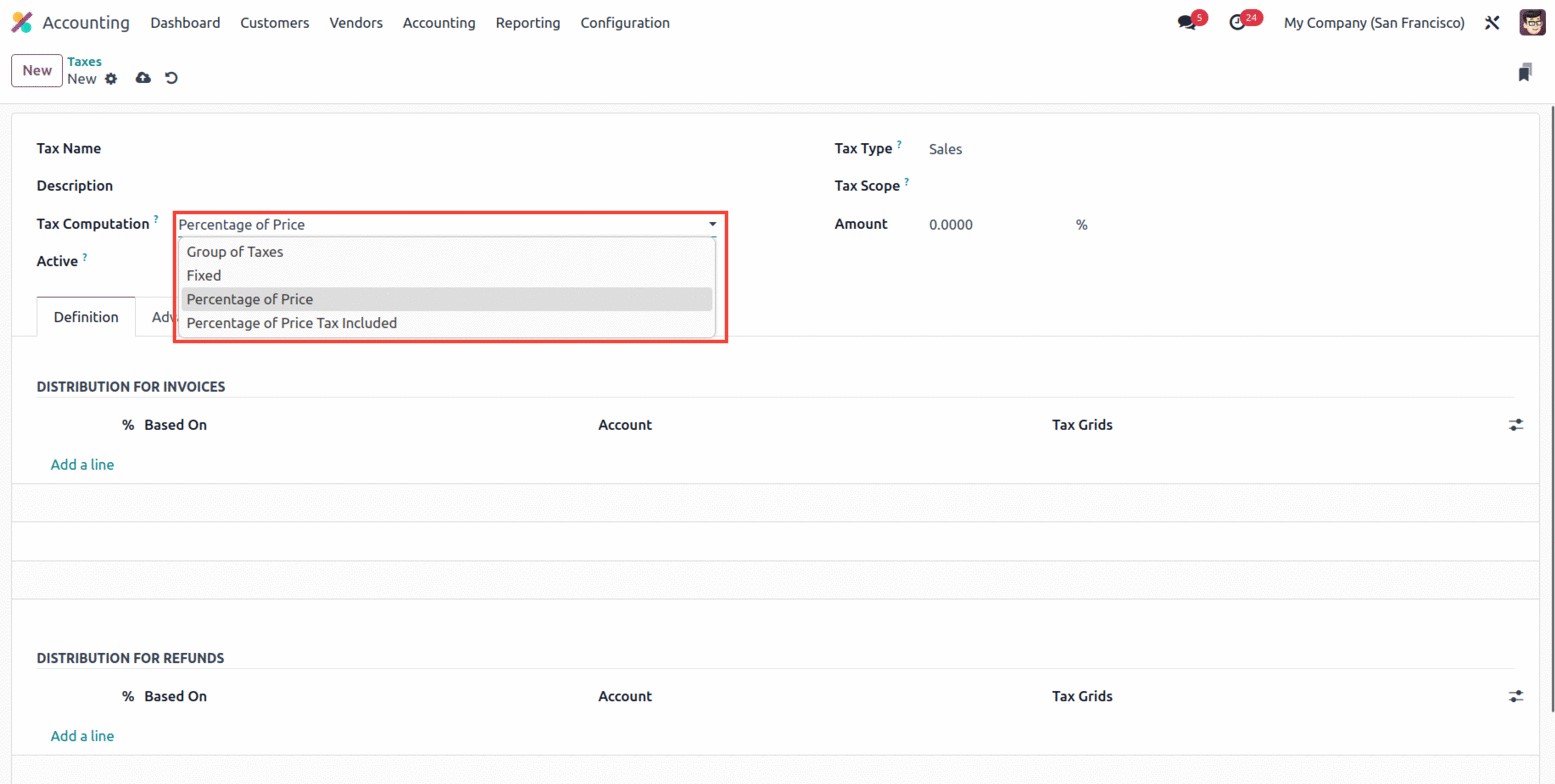
Therefore, it is extremely easy to build tax computation for the applicable taxes that are
already defined utilizing the Odoo17 platform. Additionally, the platform provides a number of
default tax computations, including Fixed, Percentage of Price, Percentage of Price Tax
Included, Group of Taxes, and Percentage of Price.
Fixed Tax Computation: The automated tax calculation method known as Fixed Tax Computation in
Odoo17 Accounting enables the calculation of taxes based on a preset set of guidelines and tax
rates. Taxes, sales, and purchase calculations, as well as payroll and other financial
operations, can all be done using this system. Businesses that need to swiftly and precisely
calculate taxes and have a lot of transactions can benefit from this solution. Businesses that
need to keep accurate records for tax compliance might benefit from fixed tax computation in
Odoo17.
Group of Taxes: You may set up and manage various tax rates using the Group of Taxes
Computation tool in Odoo17 Accounting. You can also group taxes and apply them to
transactions. Users can make various tax groups, allocate taxes to them, and then apply those
taxes to their transactions. This makes it easier to guarantee that all taxes are calculated
accurately and consistently.
Percentage of Price: It depends on the kind of taxes being used in the Percentage of Price
Tax Computation. For illustration, a conventional VAT rate might be 20%, but a custom duty
rate might be 10%. Different sorts of transactions may be subject to a certain tax at a
specific rate. It will be based on the predetermined fixed percentage of the total amount.
Percentage of Price Tax Included: Finally, the setup of the tax regulations affects how the
Percentage of Price Tax Included computation is calculated. The percentage of tax that is
included in the price will be determined automatically when the tax rules are configured,
depending on the applicable tax rate. The tax configuration options in Odoo17 Accounting
contain the proportion of the price tax included in the computation. The award sum will
include the tax amount.
Returning to the Taxes window, you can view the different fields that must be filled out to
establish a tax in the Taxes Creation window. Below is a screenshot of the creation form.
First, you can enter the tax name in the Tax Name area here in the window. The Tax Type can
then be mentioned. Using the dropdown menu, you can choose between Sales, Purchase, or None.
Where the tax is selectable is determined by this Tax Type. The 'None' selection indicates
that the tax is ineffective on its own. However, a group can still use it.

You can fill up the Tax Scope form after selecting the appropriate option in this field.
Either services or goods may be chosen. You can limit the application of taxes to a certain
product category, such as services or goods, by using this parameter. Then, in the Amount
area, you can include the tax amount in percentage.
Additionally, you can use the dropdown to select the Tax Computation. Options like Group of
Taxes, Fixed, Percentage of Price, Percentage of Price Tax Included, and Python Code are
available in the drop-down menu. You can specify the Definition tab based on the chosen
option. The option to set the Tax active's boolean field to false will, therefore, allow you
to conceal the tax without actually eliminating it.
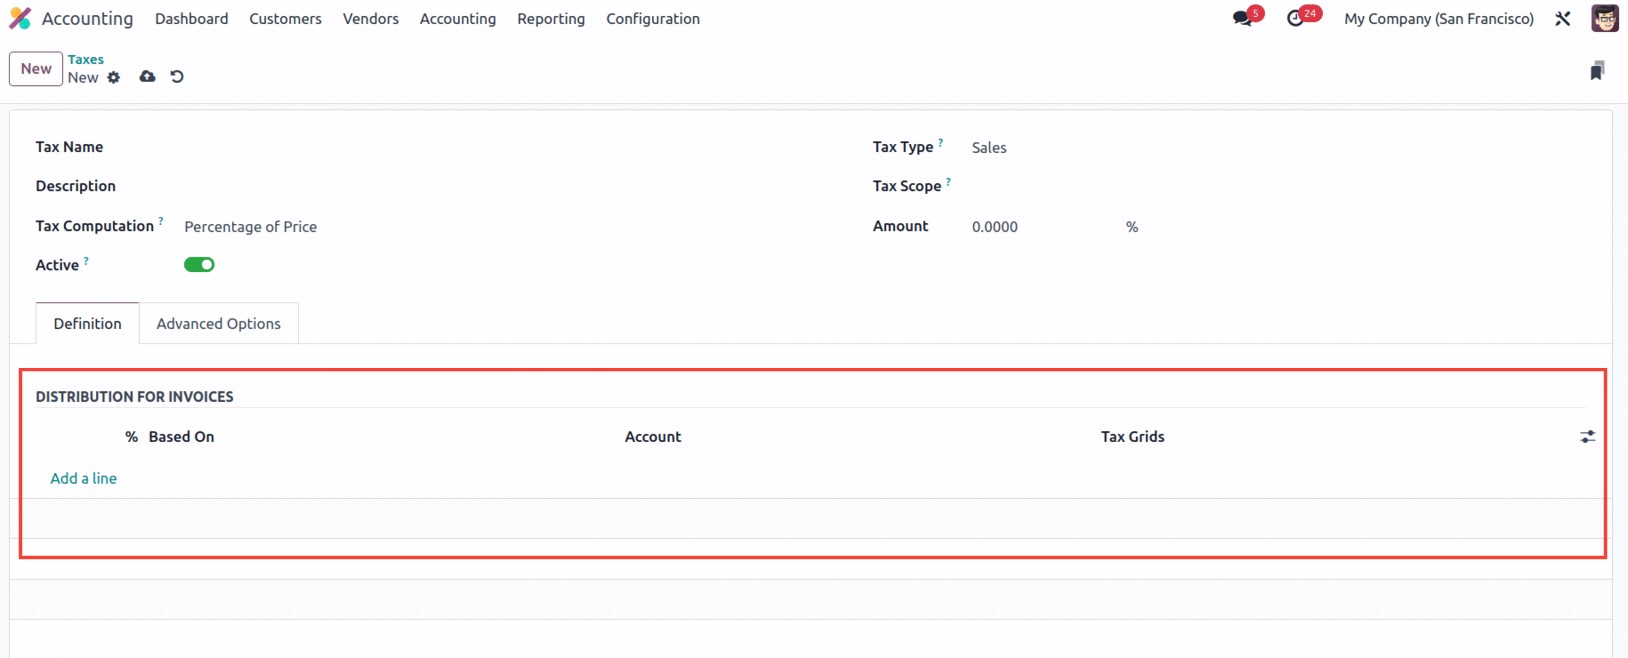
Additionally, under the Definition tab, you may define the definition of the tax on the many
aspects of business operations. The Distribution of Invoices should be described in the
DISTRIBUTION FOR INVOICES part of any tax computations other than the Group of Taxes. Where
you can use the ‘Add a Line’ option to describe the Tax definition, the ‘% based on’, the
Account on which to post the Tax Amount, and the Tax Grids.
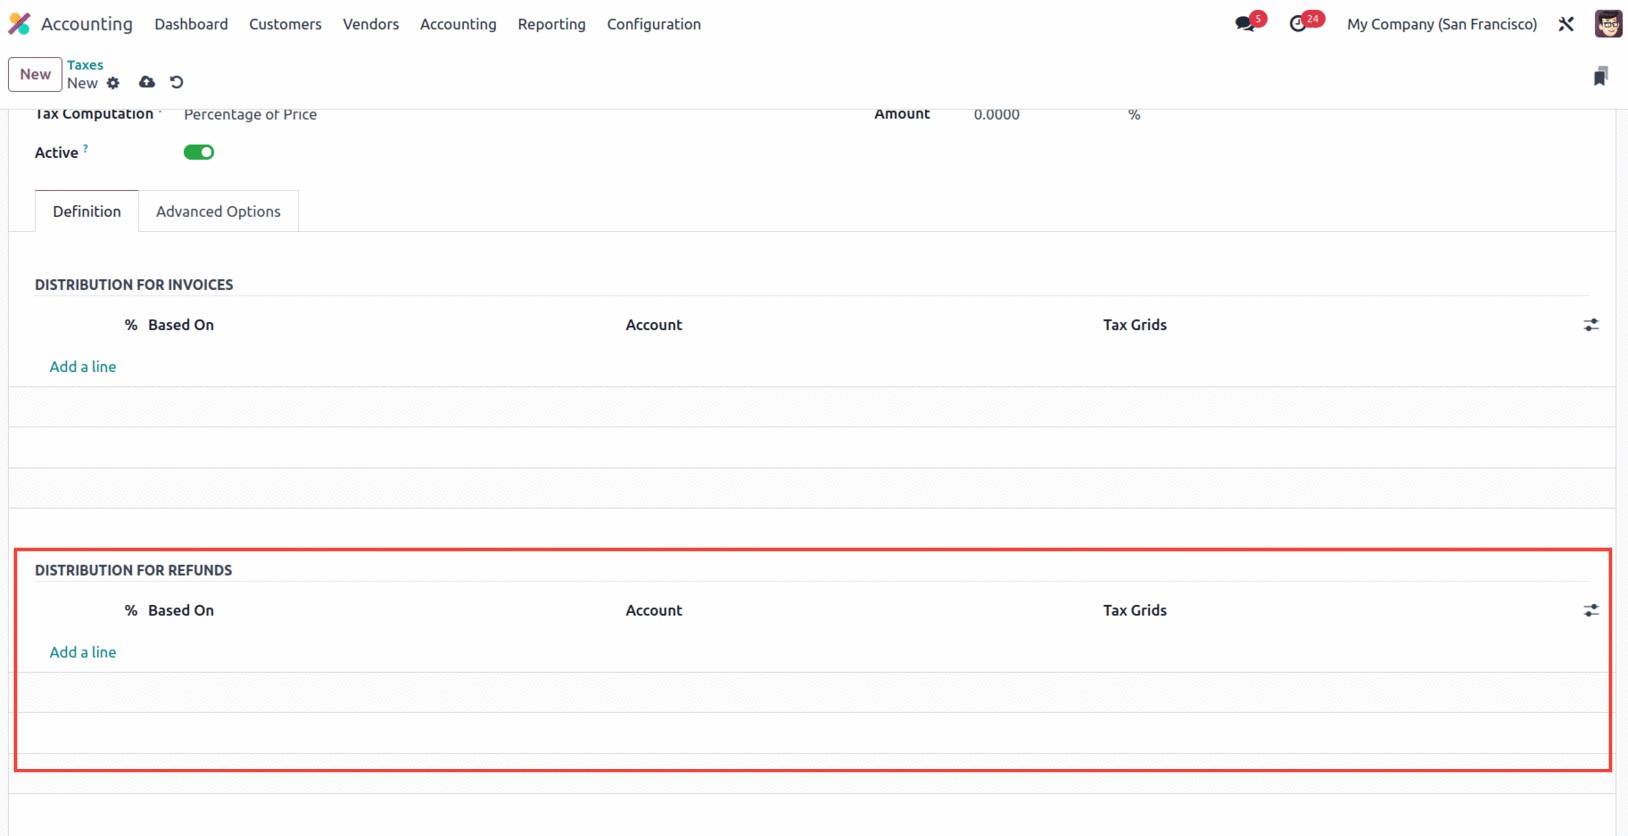
With the aid of creating a line, it is also possible to delete the current definition and
create a new one. The DISTRIBUTION FOR REFUNDS can likewise be defined using the same
approach.
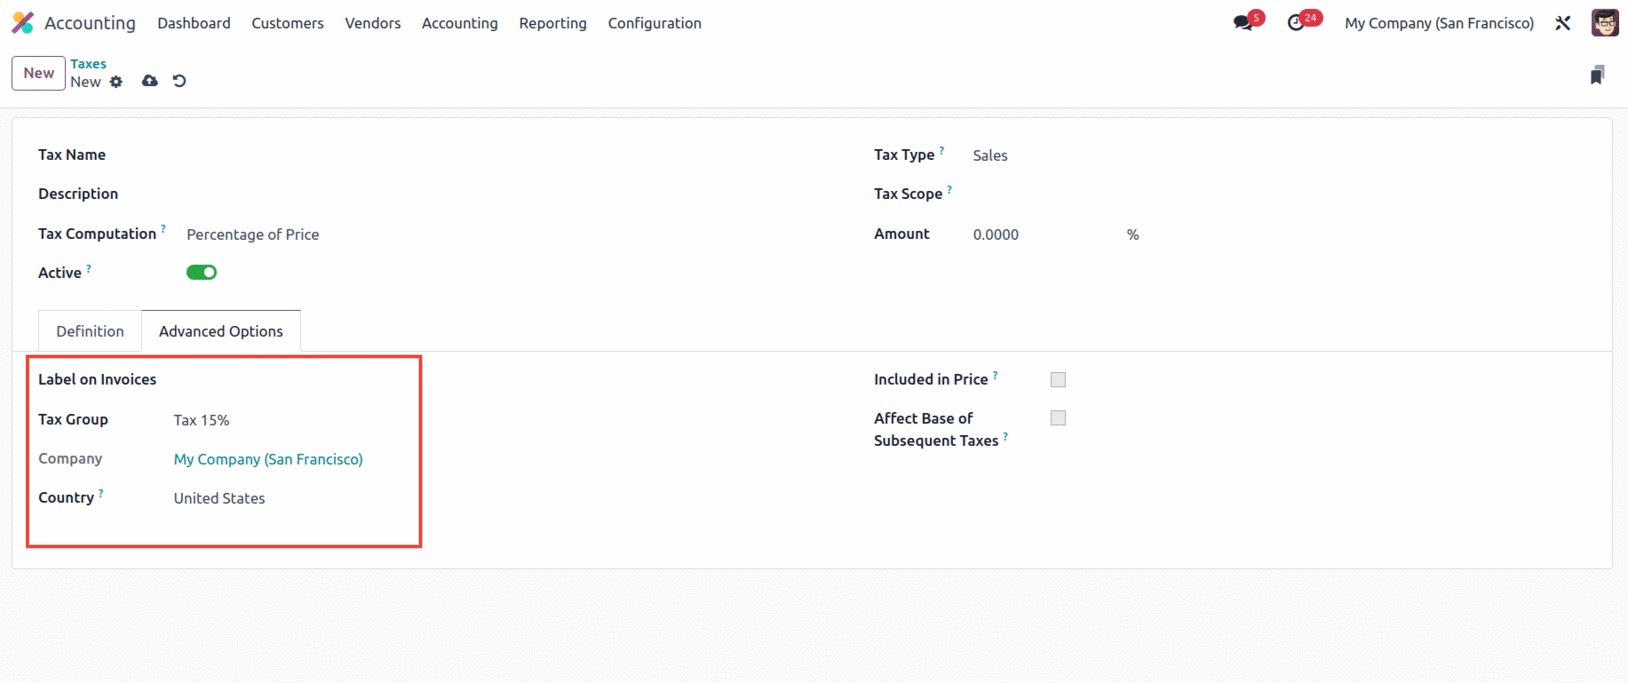
Furthermore, additional fields like Label on Invoices, Tax Group of the defined tax, and many
more were available under the Advanced Options tab in the Taxes creation window. You can
enable or uncheck the 'Include in Analytic Cost' option. The amount calculated by this tax
will be assigned to the same analytic account as the invoice line if you enable this option.
The 'Include in Analytic Cost' option is only accessible if Analytic Accounting is turned on.
The Company and the Country for whom this tax is applicable can then be specified in the
corresponding fields.
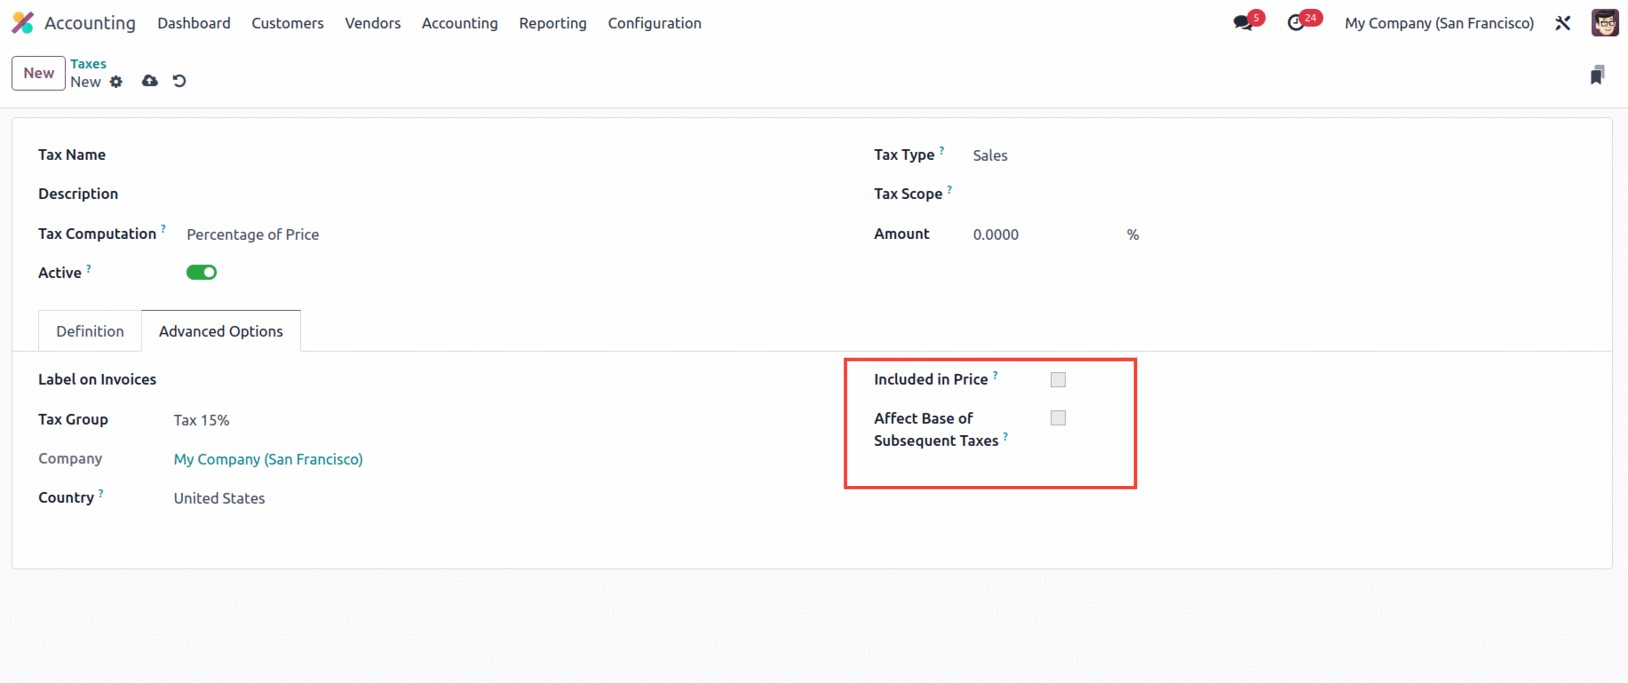
If the price you use on the goods and invoices includes the tax amount, you may also check
the box next to the option "Included in Price." You also have a field called "Effect Base of
Subsequent Taxes" that, if enabled, will cause taxes higher in the series than this one to be
affected. The 'Base Affected By Previous Taxes' field is another option that you have, and it
can be turned on or off. If you make this field active, taxes at lower positions in the
sequence might attempt to affect this one.
The Tax Exigibility field, which has the options ‘Based on Invoice’ and ‘Based on Payment’,
is the last one. The tax is due as soon as the invoice is validated if you choose Based on
Invoice. If the tax exigibility is based on payment, it must be paid as soon as the invoice
payment is received.
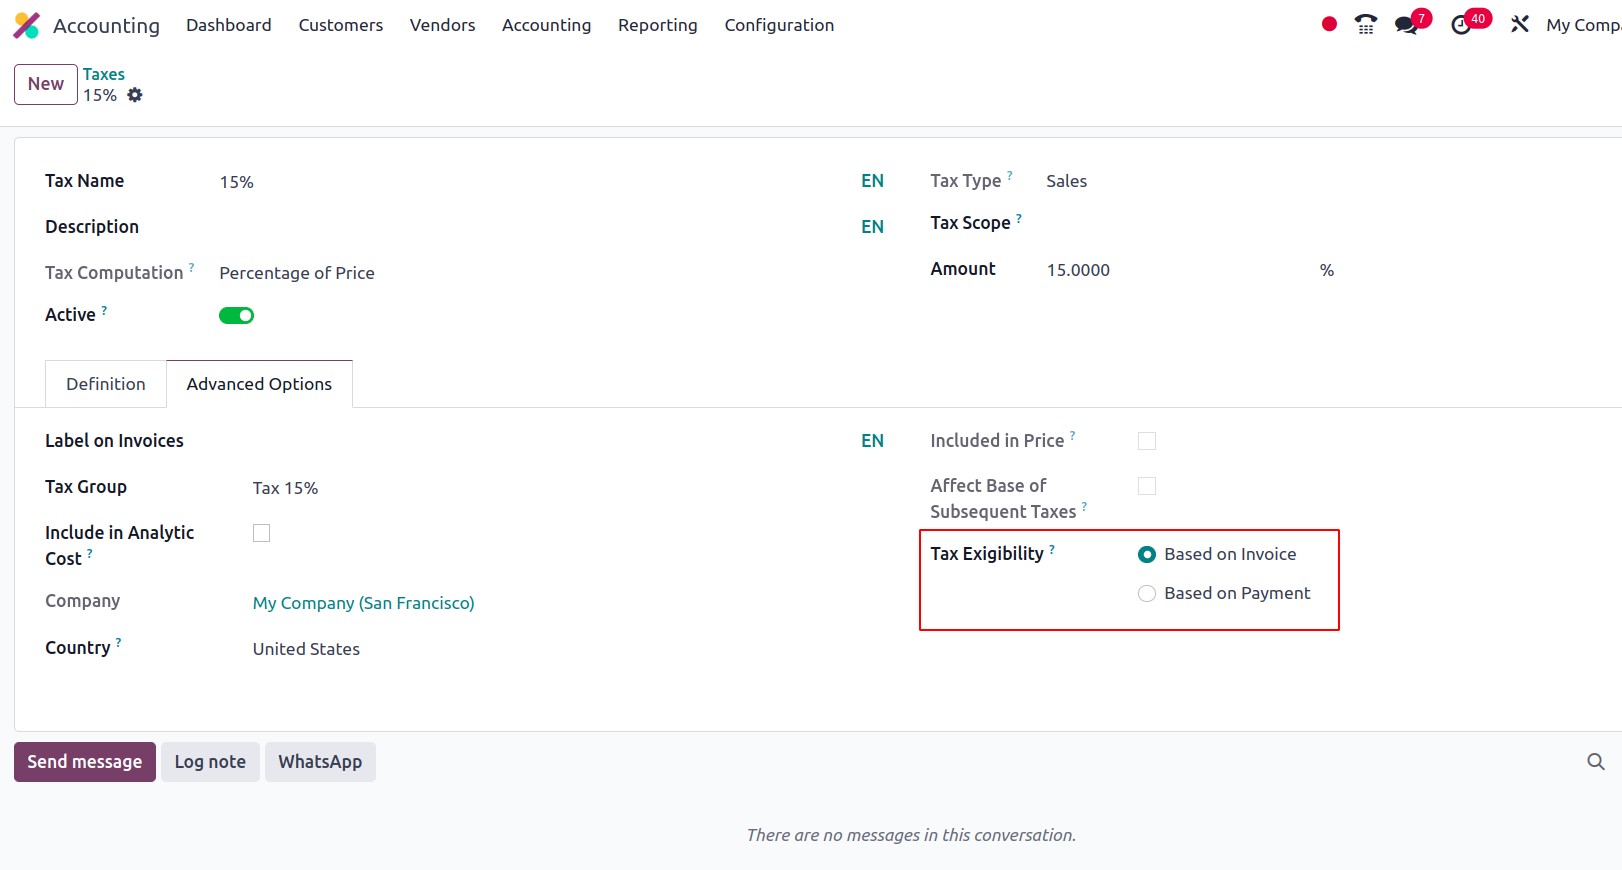
The screenshot above highlights the creation widow of the taxes for the advanced options.
Only after enabling cash basis in the configuration settings will the Tax Exigibility field
appear there.
Everything pertaining to the Tax Configuration is included here. If a tax configuration is
successful, you can use it in business activities. With the help of this function, you may
specify all sales taxes, purchase taxes, and service taxes, which can then be applied to every
good and service in accordance with the specifications.
Cash Basis Tax Configuration
When using a cash basis tax setup, revenue is recorded when funds are received, and expenses
are recorded when funds are dispersed. Businesses that have a lot of expenses but little sales
benefit from this form of accounting. This is one of the crucial elements to consider when
your company operates with cash. Taxes are recorded when the payment is finished, not when the
goods or service is delivered, or the invoice is validated, according to how Cash Basis is
defined in Odoo17. You can use this feature to record and report your taxes using a cash basis
rather than an accrual basis. Smaller companies that must immediately disclose their taxes or
companies that must adhere to certain rules may find this handy. Odoo 17 Accounting will
record your taxes as you pay them under the Cash basis tax setup, providing you with a more
precise and up-to-date picture of your financial condition. This can assist you in making
better tax payment plans and ensuring that you pay your taxes on time.
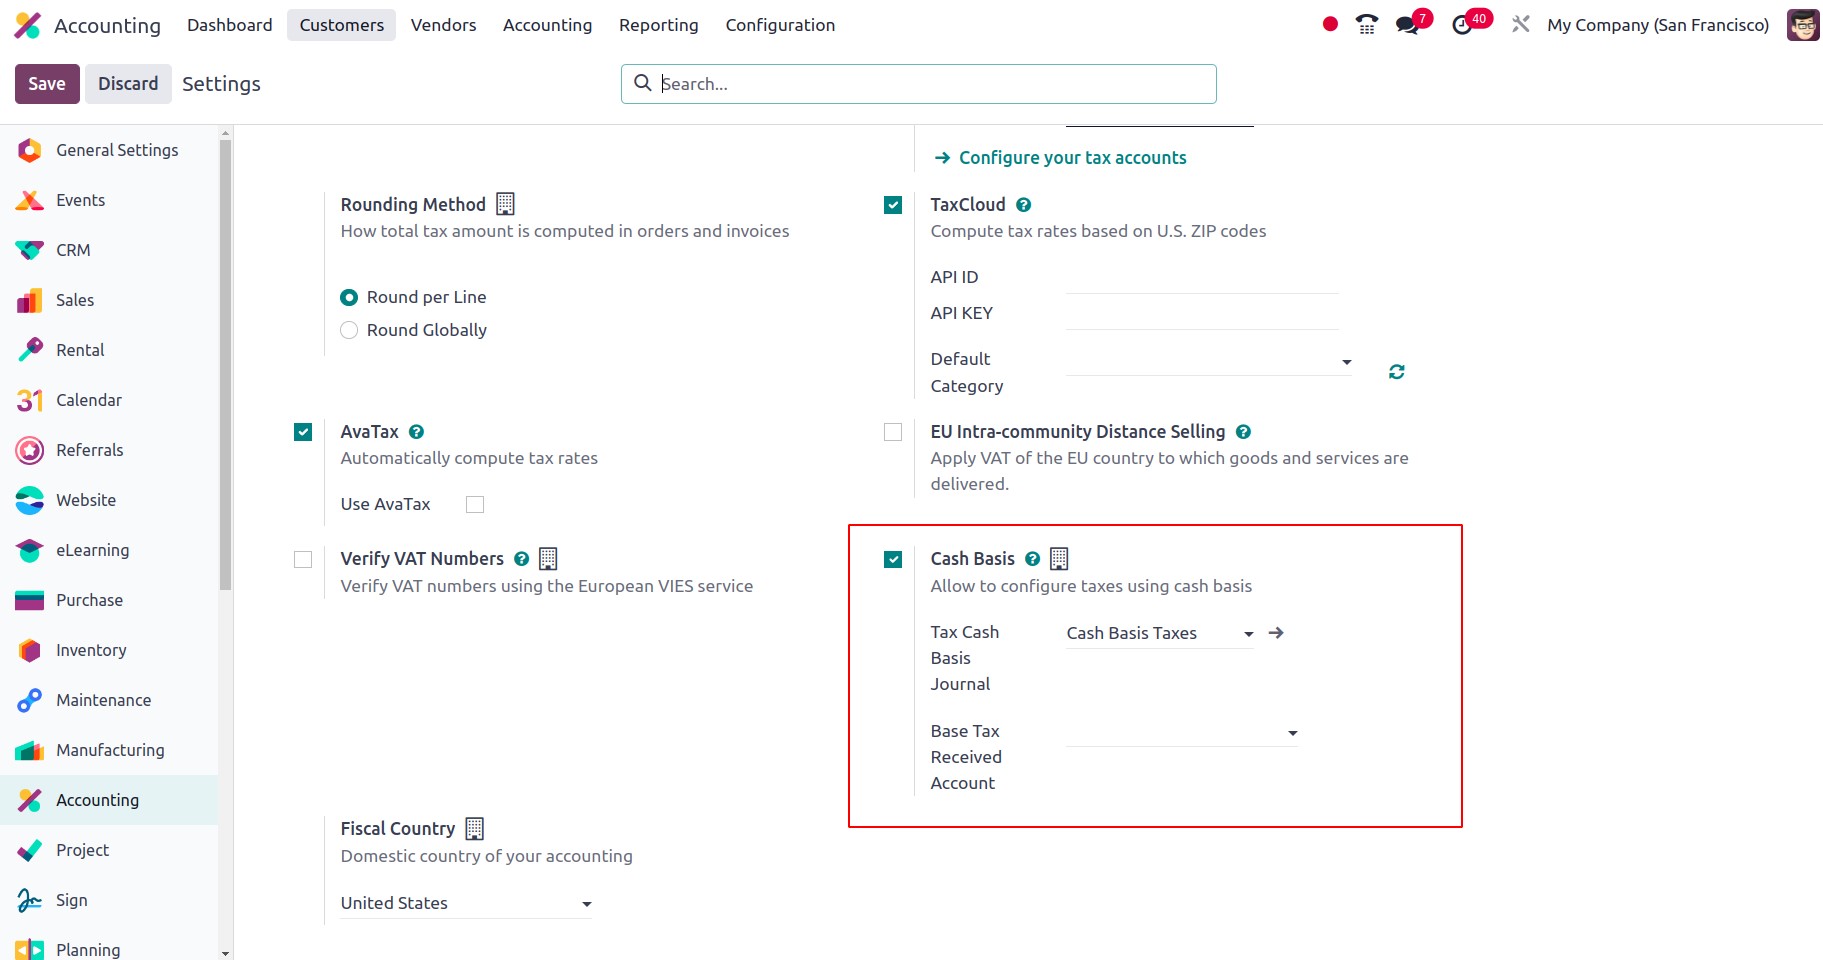
You must first activate the Cash Basis option from the Configuration Settings window of the
Odoo Accounting platform in order to make the Cash Basis Taxation feature available on your
Odoo17 platform. As seen in the figure below, the 'Taxes' area is located here in Settings.
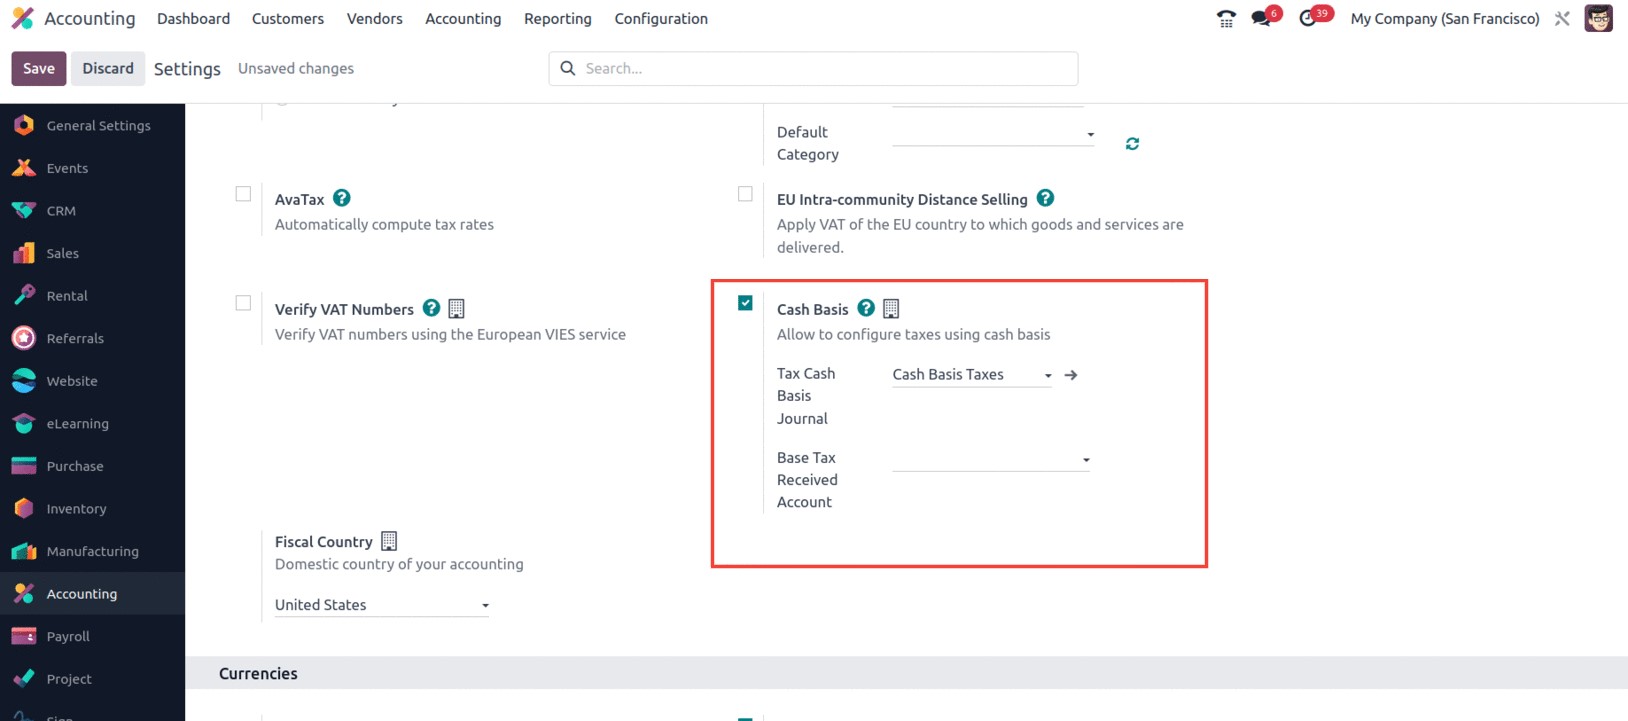
The Base Tax Received Account and the Tax Cash Basis Journal should be defined if you want to
configure taxes on a cash basis. Therefore, during reconciliation, it will make an entry for
such taxes on the specified account.
Only you, as we indicated earlier, will be able to specify the tax due in the Tax
configuration window once you activate the option from Settings. This indicates that the
option labeled Tax Exigibility will appear in the Advanced Options tab when configuring taxes,
as seen below.
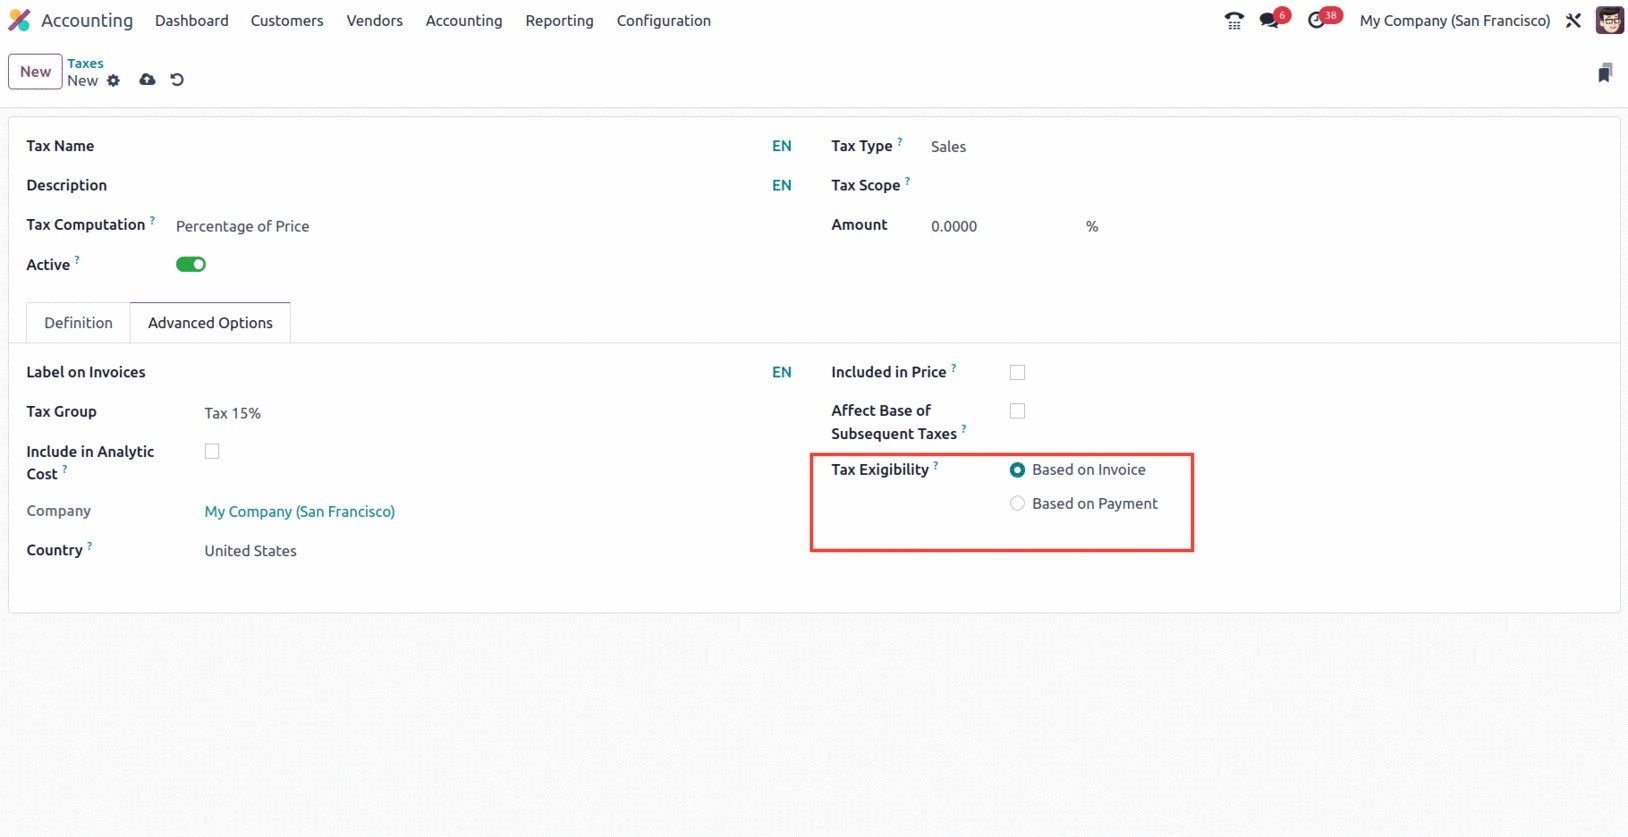
The tax structure and financial management of a business will take a blow if this alternative
is chosen in order to comply with local or state regulations.
The tax on the good or service will therefore, be credited to the temporary tax account upon
reconciliation once the Cash Basis Tax has been established. The Tax Received Account will be
credited with the equivalent sum.
Everything regarding the arrangement of taxes is now pretty clear, so let's move on to the
following section, where we'll talk about Tax Group.
Tax Group
To categorize various taxes, tax groups are utilized in the advanced Options of tax setup.
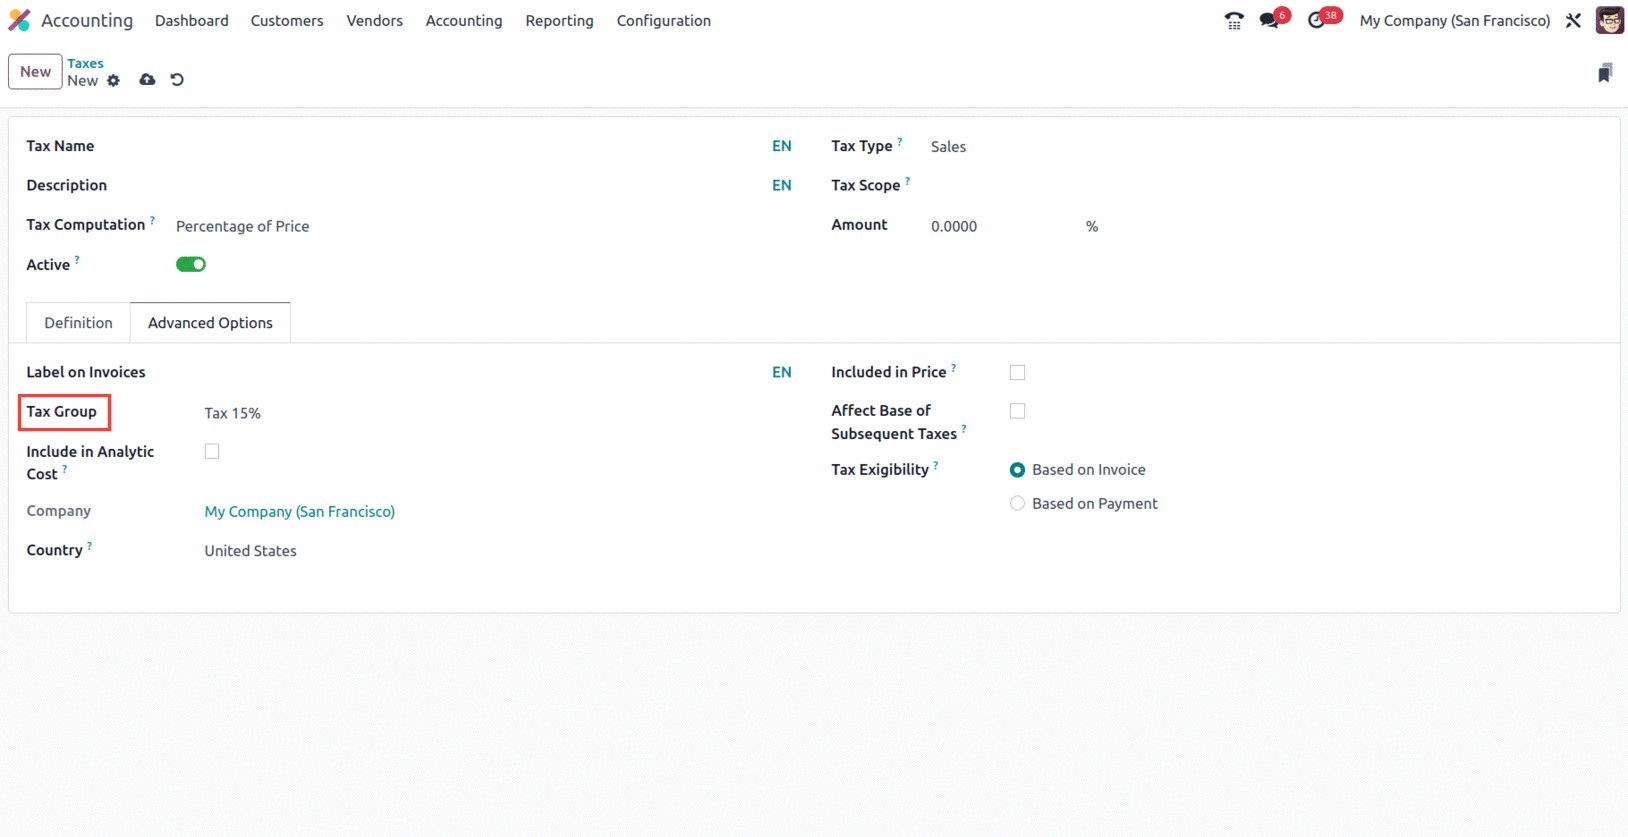
There are several tax types, such as VAT, CESS, Retention Taxes, GST, etc., depending on the
nation. Odoo17's tax configuration and application to invoices and bills result in a
calculation of the total that includes the tax amount.
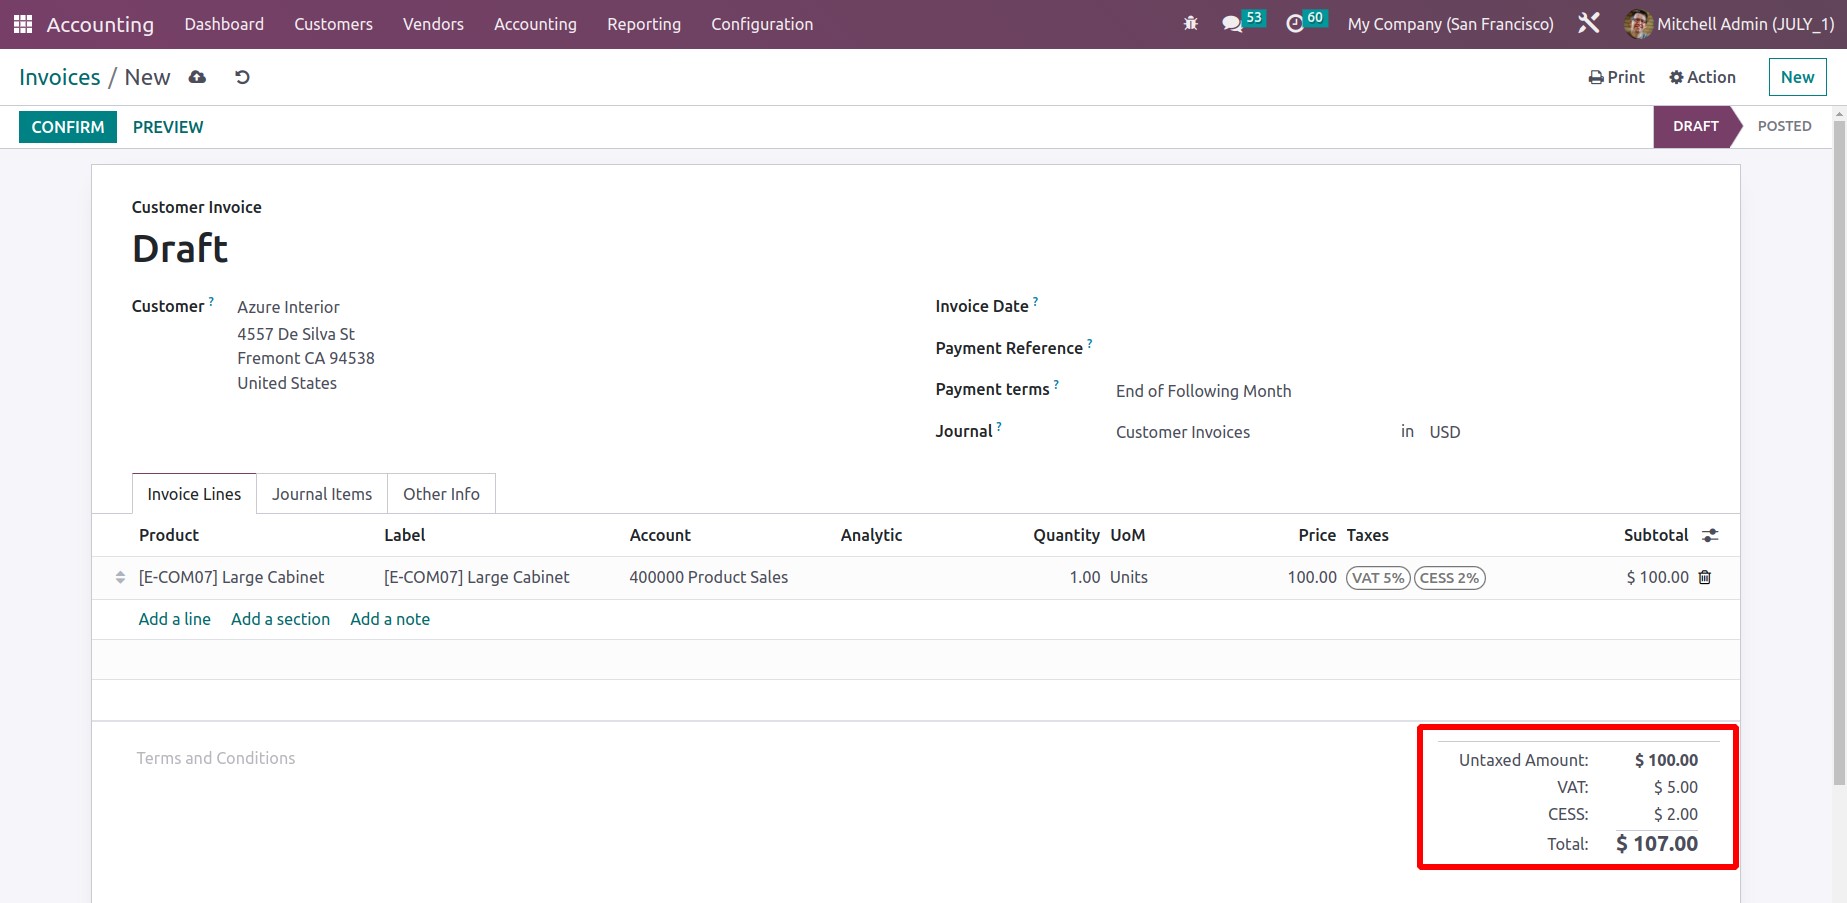
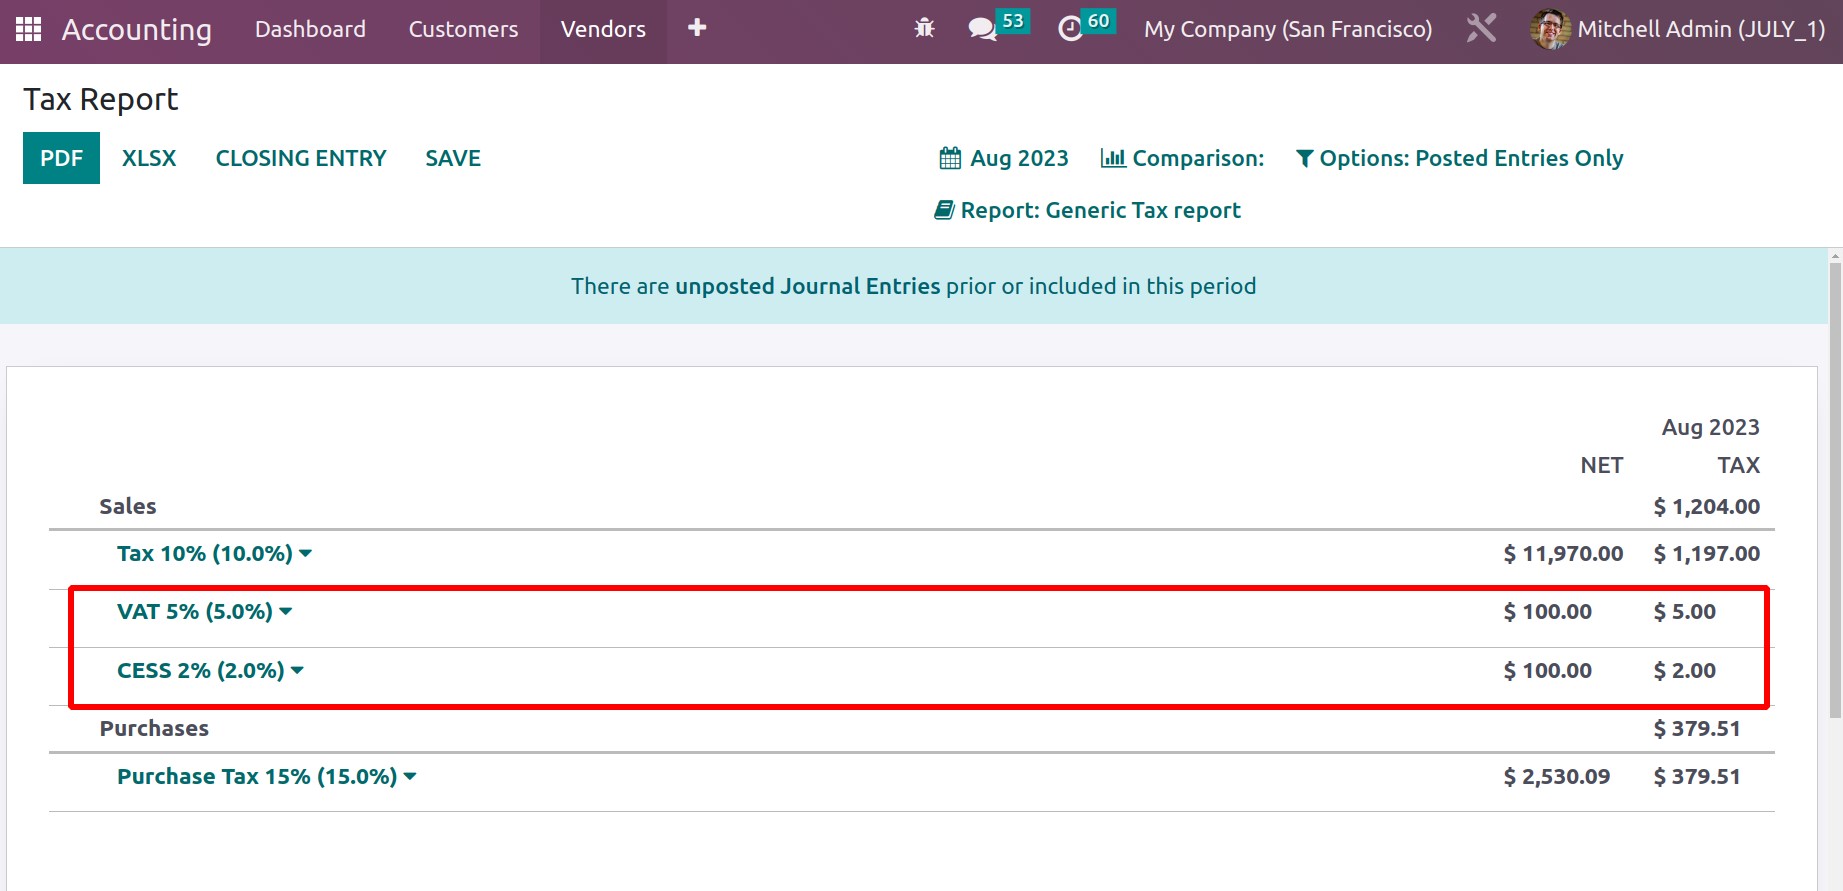
Multiple taxes may be charged to an invoice in specific circumstances. So, we can use a tax
group to identify each tax specifically. Therefore, individual taxes are shown in the tax
report and invoice.
Now that we have a clear understanding of Tax, let's move on to the journals in the following
section.
Configuring Journals
All financial transactions are recorded in the accounting system using journal entries, which
are the first phase of the accounting cycle. The term "journal entry" refers to a simple
accounting record of a business transaction that includes information about the transaction's
specifics, including the date, amount, account impacted, and a brief description. The
double-entry accounting system, which mandates that every financial transaction be documented
in at least two accounts, relies heavily on journal entries.
Journals are the records that are used to record accounting transactions in Odoo 17
Accounting. Sales, purchases, receipts, payments, and other transactions that have an impact
on the company's financial status are entered in journals. A summary of the company's
financial situation at any given time is also included in the journals. Accounts may be
reconciled, financial patterns can be examined, and reports can be generated. It will offer a
record of the occasion, sum, and goal of every transaction. For certain time frames, such as
monthly, quarterly, or yearly, journals can be produced.
Journals, as we all know, are crucial components of accounting operations in any business.
They assist in categorizing certain processes and serve as the foundation for financial
operations. Every form of business must keep and require journal entries. A strong feature of
the Odoo 17 Accounting module enables the construction and administration of custom journals.
This option allows you to specify each journal. Odoo17 provides a distinct menu for
controlling it, titled Journals, within the Accounting portion of the Configuration menu.
Below is a screenshot of the Journals window.
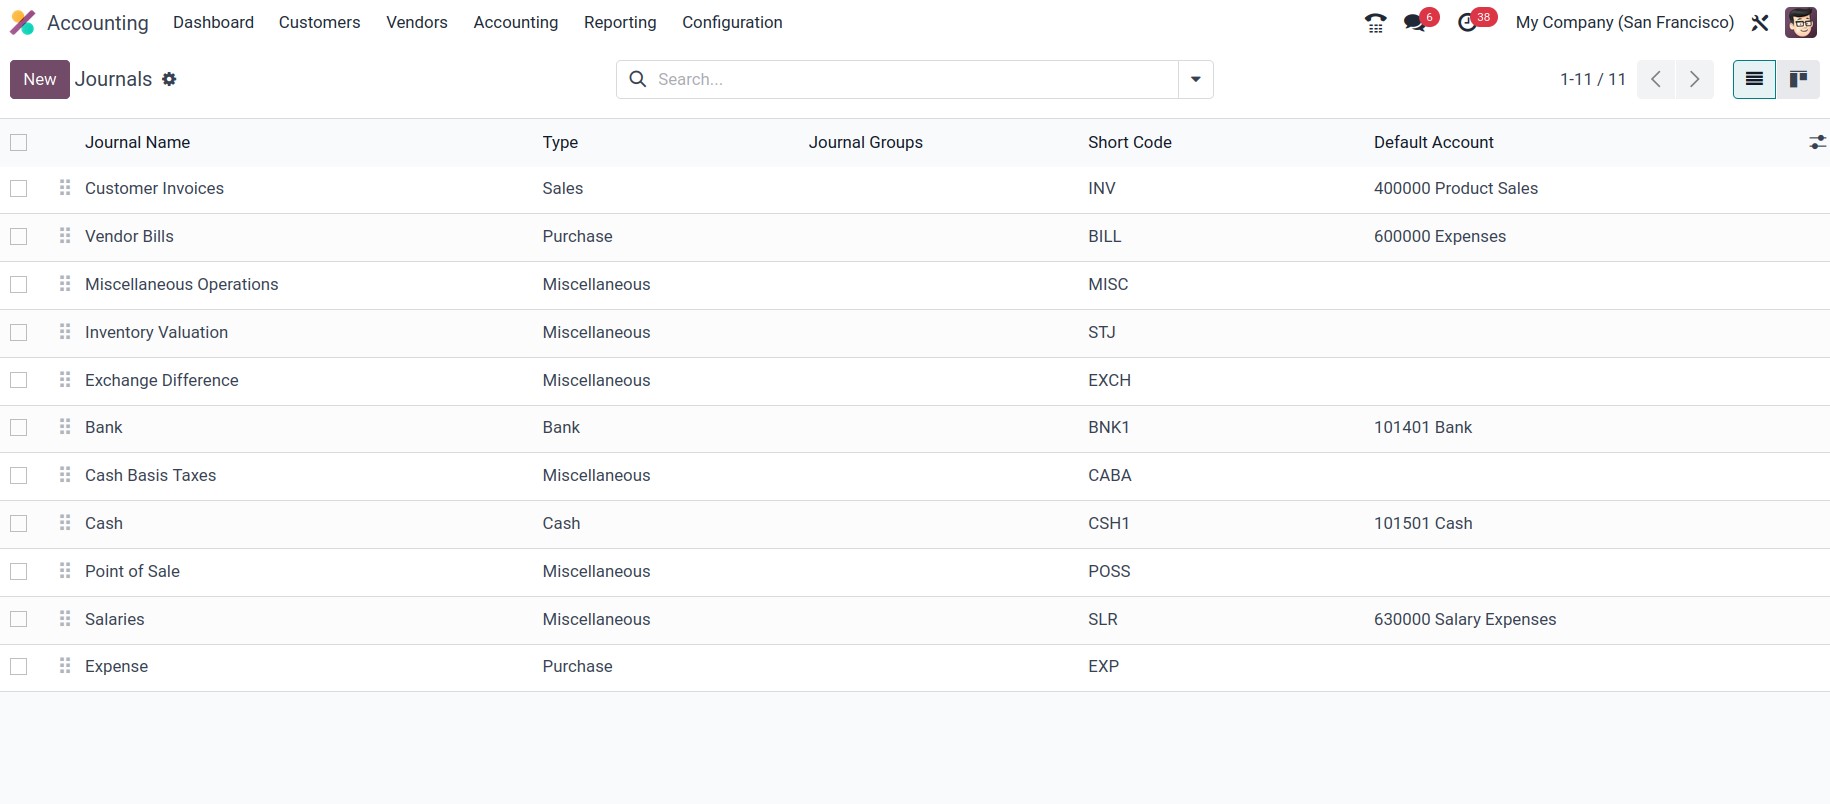
The Journals window gives a New option to start a new Journal as well as a clear preview of
the previously established Journals. As seen in the image above, the window shows important
information about the journals, including the default account, short code, and journal names,
types, and groups.
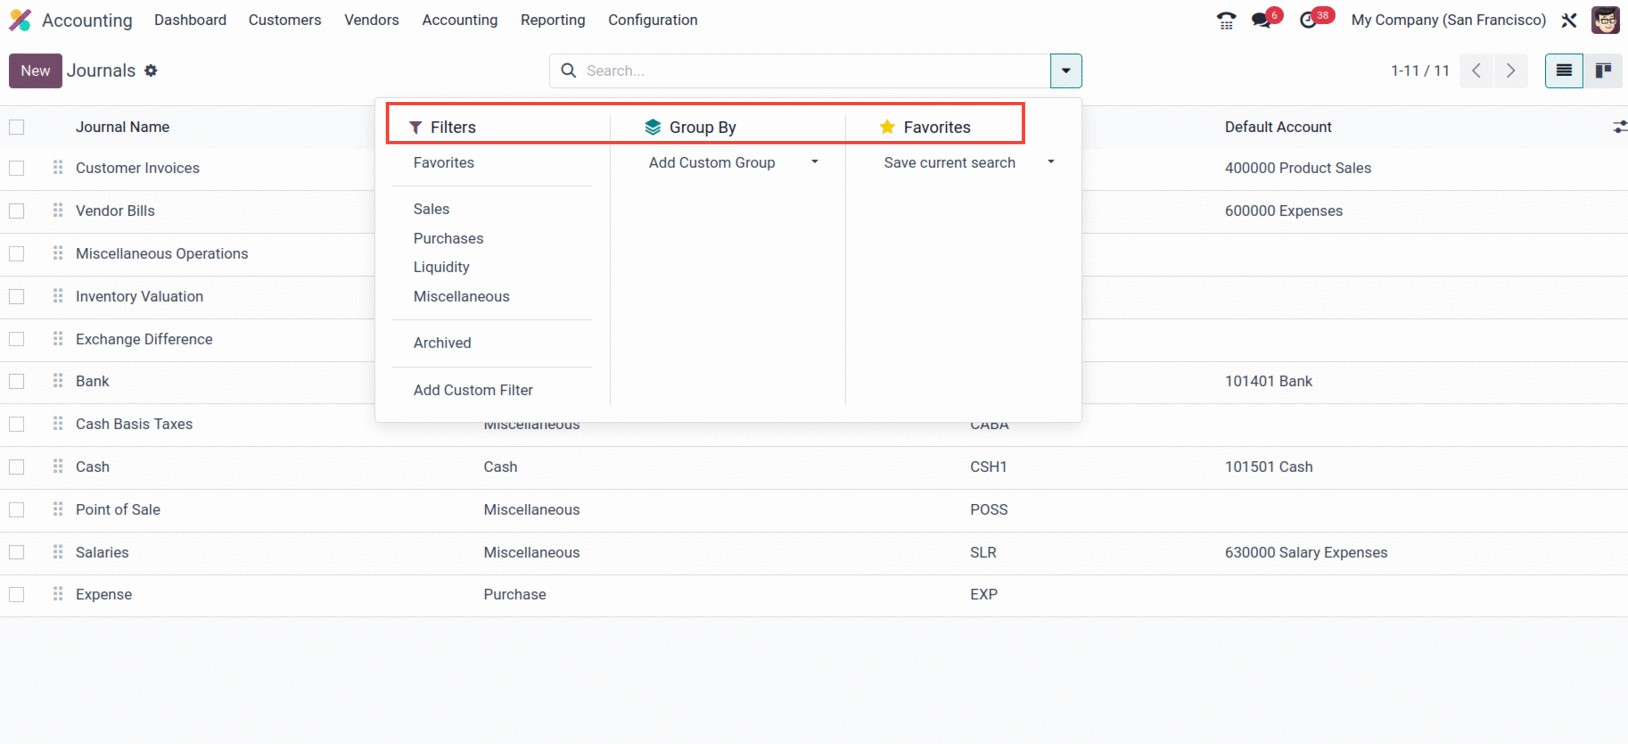
By selecting the appropriate menu icon located in the window's top right corner, you can
switch between the Kanban and List views of the window. Along with the search bar, the
Filters, and Group By choices can both be customized and defaulted under Favourites that
accomplish the necessary functions, including Save Current Search.
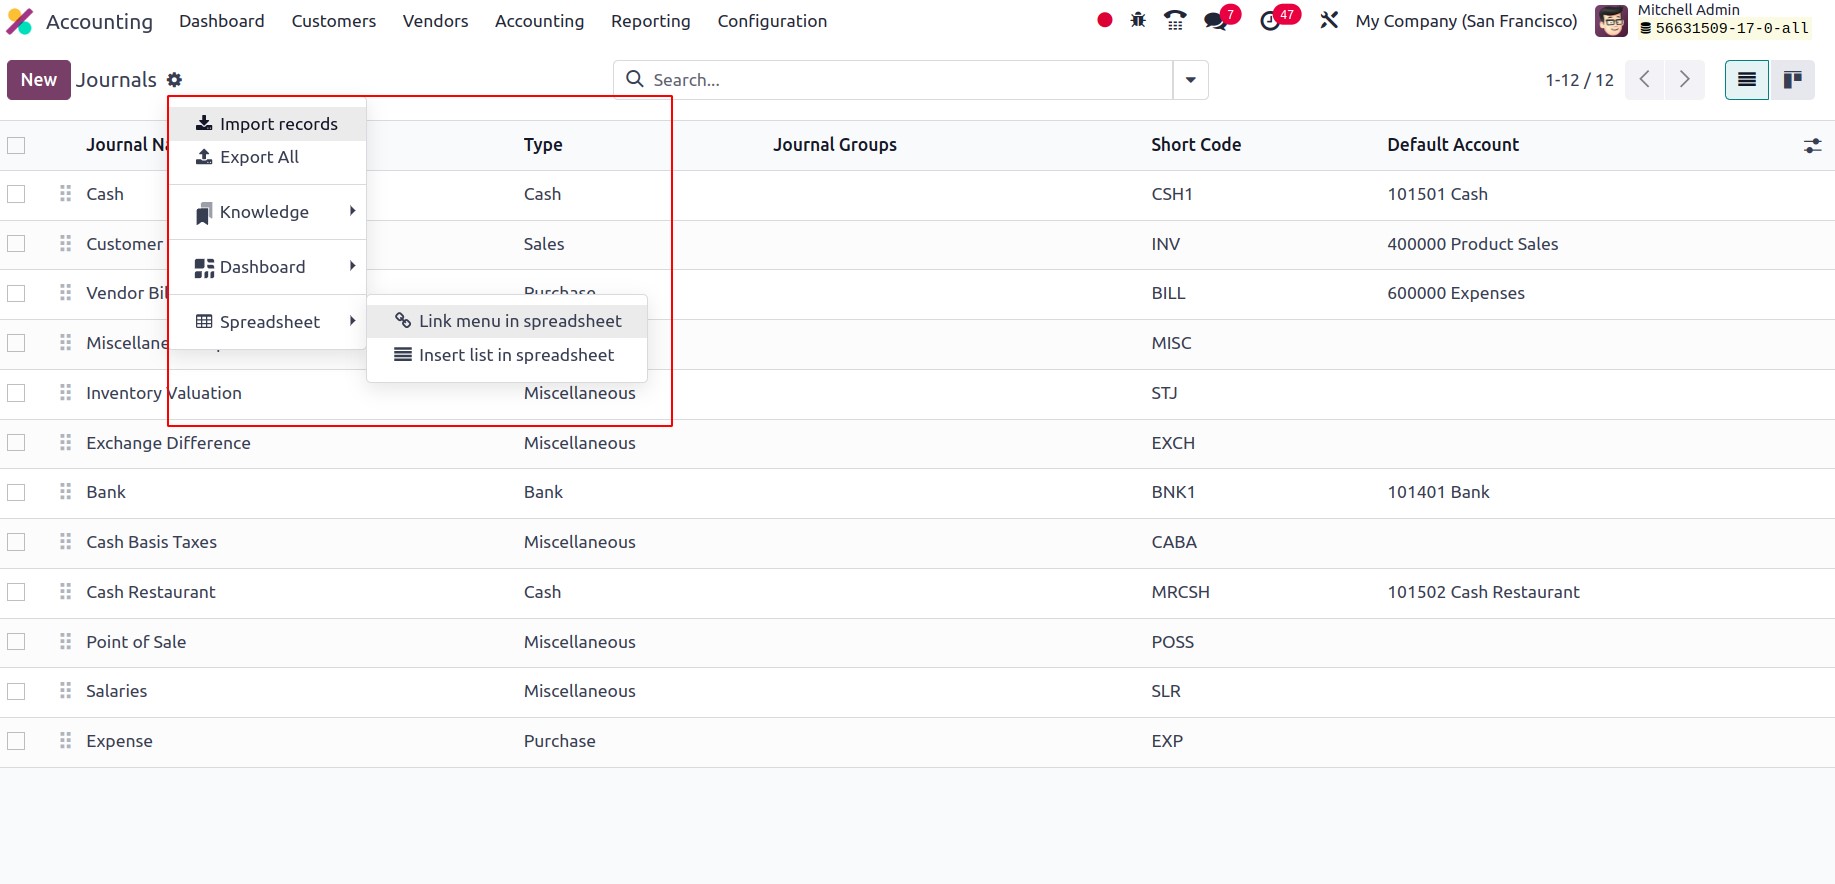
From the actions, one will be able to import and export records, with knowledge functionality
like ‘Insert view in article’ and ‘Insert in article.’ Also, we will be able to add the
journals to ‘My Dashboard,’ and with the spreadsheet feature, one can add details to the
spreadsheet using the ‘Link menu in spreadsheet’ and ‘Insert list in spreadsheet.’
These options are all very helpful for finding the required journal from the longer list of
designated journals rapidly. Additionally, the specific Odoo17 module makes it very easy to
specify journal Types based on those that are already established as defaults. Additionally,
for each journal that is defined, a journal type can be selected. The type of journal can be
Miscellaneous, Cash, Bank, Sales, or Purchases.
All sales transactions in a company are recorded in the sales journals in Odoo17 Accounting.
Sales orders, delivery, invoices, partner payments, as well as any other connected
transactions, may be included in these transactions. Sales journals make it simple to keep
track of all sales-related data and can be used to produce many reports, including sales
reports and analyses of sales trends, among others.
You can use purchase journals to keep track of every business-related purchase transaction.
These journals are employed to keep tabs on the price of the products and services acquired as
well as to produce financial statements. The debit and credit sides of the purchase are
recorded in the journal entries, and the entries are then posted to the general ledger. The
cost of the goods and services, as well as any applicable taxes, are recorded in the purchase
journals. The acquisition of inventory, raw materials, and completed goods are all documented
in the buy diaries.
As we previously stated, the Purchase journal defines all of the company's purchase
operations, just as the Sales journal is used to define all of the sales operations entries.
Similar to how the Cash Journal will characterize each cash operations entry in relation to
how the business is run with cash payments. Additionally, it is the same as the Bank Journal,
where all bank-based transactions are entered.
Any transactions that do not fall under one of the predefined categories of transactions are
recorded in a miscellaneous journal entry in Odoo17 Accounting. Discounts, returns,
allowances, bank charges, and other erroneous things can all be entered into it. The account
balance of any accounts that need modifications outside of the typical accounting period can
likewise be changed in this manner. The Odoo17 Accounting's Miscellaneous Journals include:
- General Journal
-
Adjustment Journal
-
Inventory Adjustment Journal
-
Currency Exchange Journal
-
Stock Valuation
-
Expense Journal
- Miscellaneous Journal Entries
-
Tax Journal
You can organize all the entries that don't fit into any other journals in the Miscellaneous
journal.
Now, select the New button in the top left corner of the Journals box to configure a new
Journal.
You can first mention the Journal Name in the creation form. Then, using the dropdown menu,
select the appropriate Journal Type. All of the journals,
including Sales, Purchase, Cash, Bank, and Miscellaneous, are represented in the dropdown
menu.
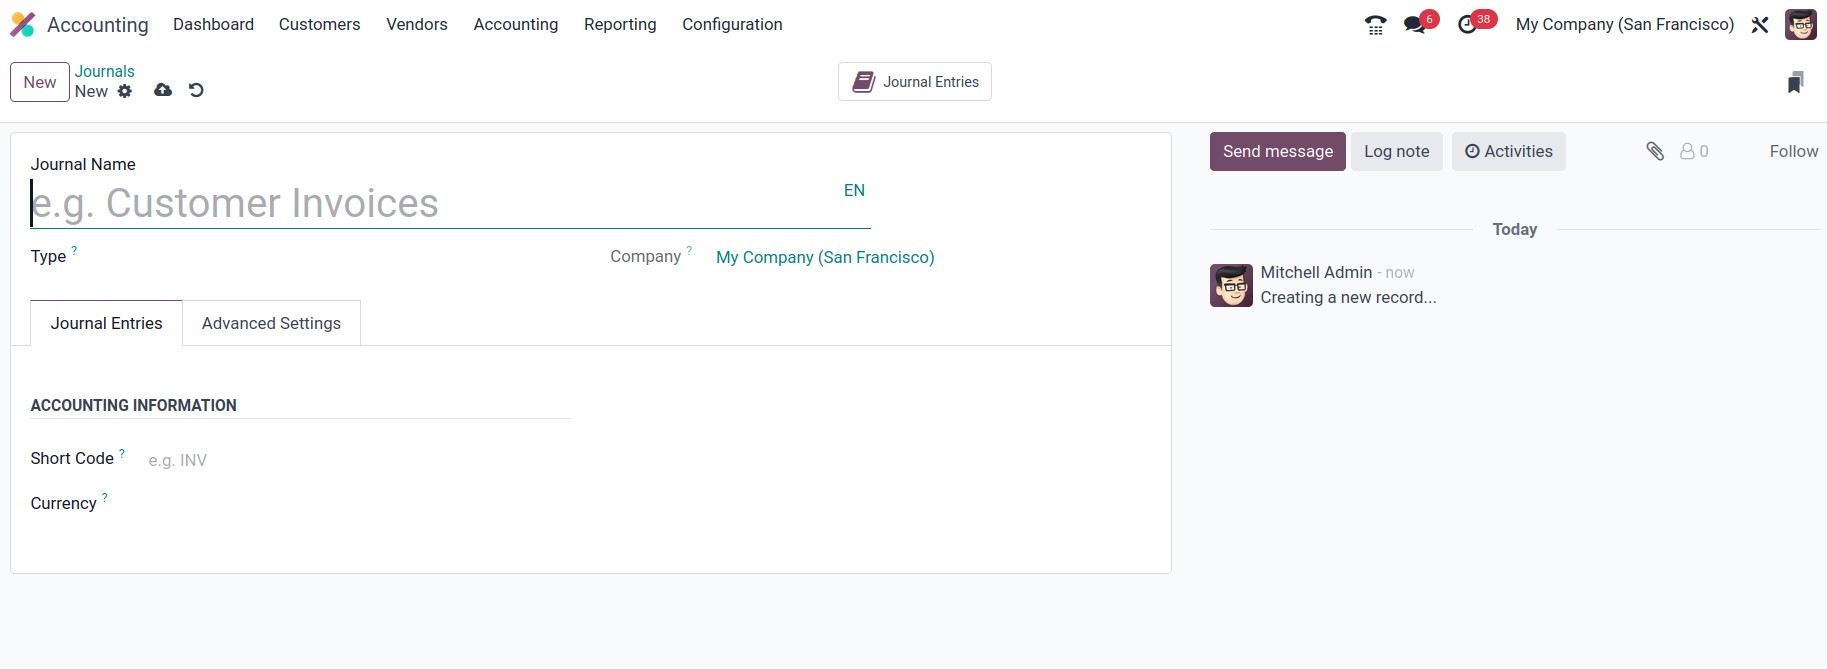
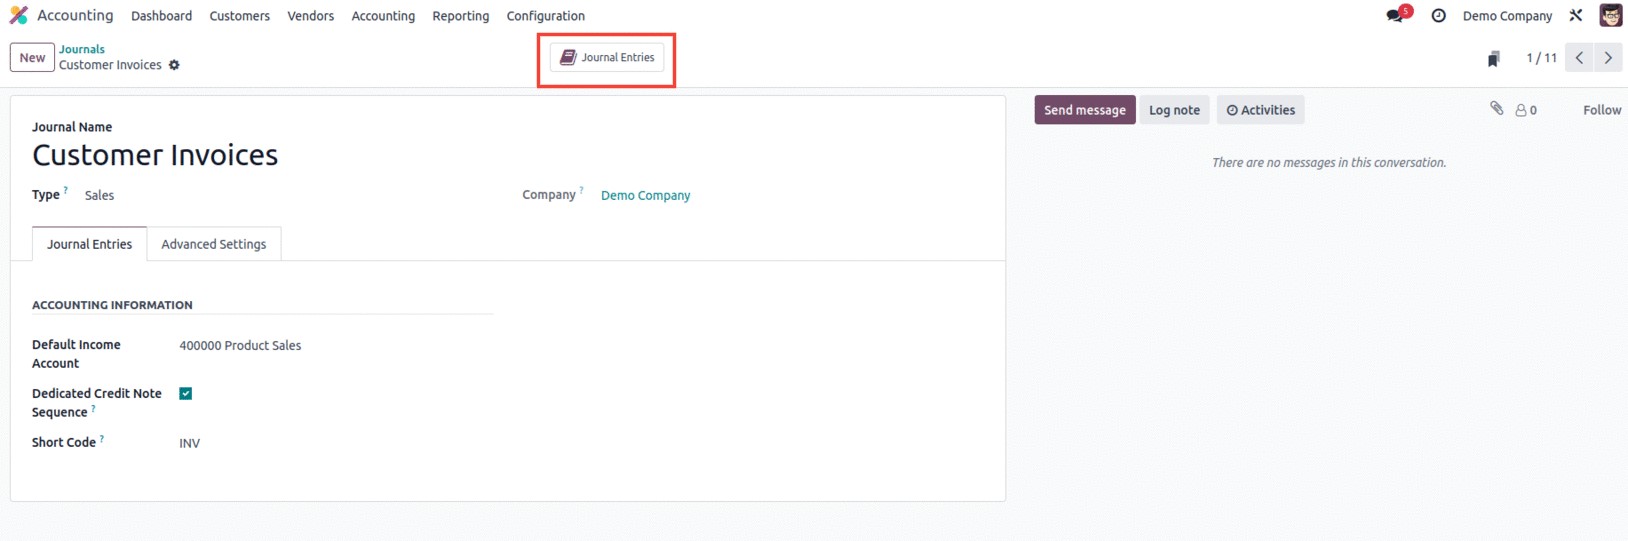
You can also define the accounting information, such as the short code and currency, using
the Journal Entries menu. You can enter the shorter name you want to display in the Short Code
field. This prefix will also be used by default to name the items in this journal. It is quite
helpful for ensuring that the credit note entries and invoices begin with the designated code.
For instance, if we define a short code as INV,
invoice generation will begin with that word before moving on to the sequence number.

The Currency section also specifies the currency that will be used to enter statements.
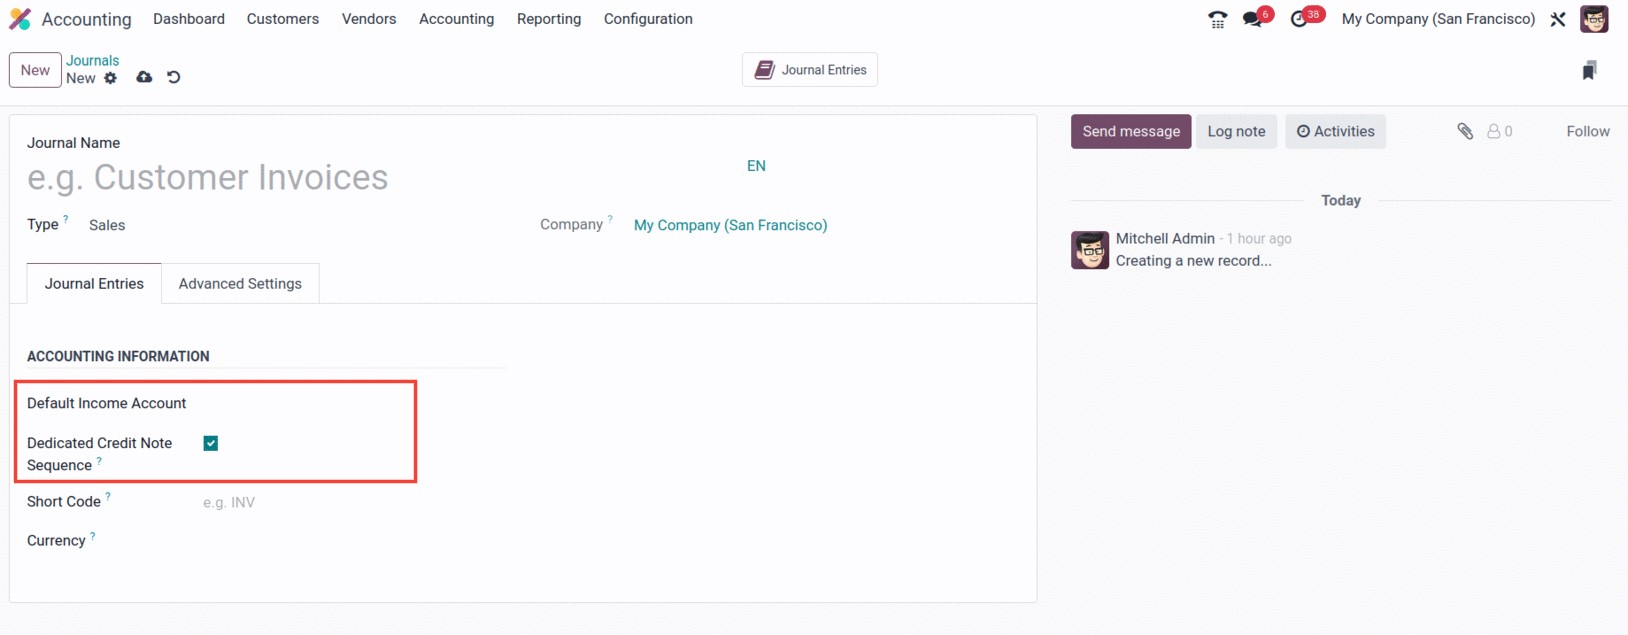
Additionally, the window will display additional fields according to the journal type you have
chosen. Default Income Account and Dedicated Credit Not Sequence are additional fields that
are available if you choose Sales as the category. You can choose the default one from the
dropdown menu or create a new one. If you don't want to share the same sequence for invoices
and credit notes created from this journal, you can activate the Dedicated Credit Note
Sequence option.
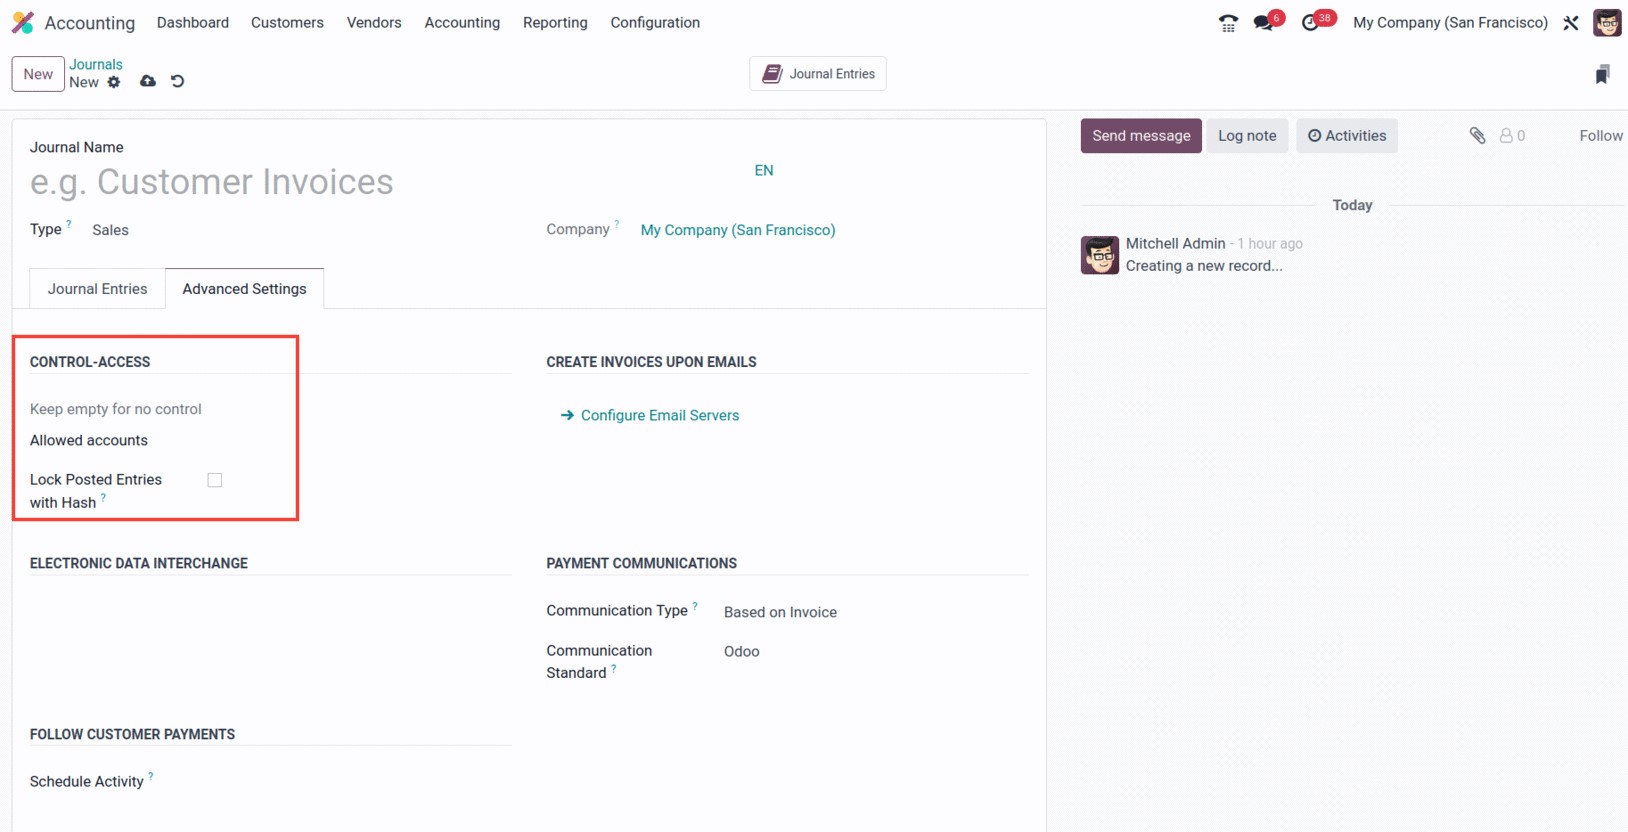
Additionally, the CONTROL ACCESS area of the Advanced Settings tab is where you may choose the
Allowed accounts in the corresponding field with the aid of the dropdown menu. You can leave
these fields blank if you don't wish to exercise any control. It is possible to enable or
disable the "Lock Posted Entries with Hash" box. If you enable this field, the accounting
record or invoice is hashed as soon as it is posted and cannot be changed again. This is a
great way to guarantee that no invoice created under a certain journal is altered. Once it is
posted, it cannot be changed to any other form or returned to draft status.
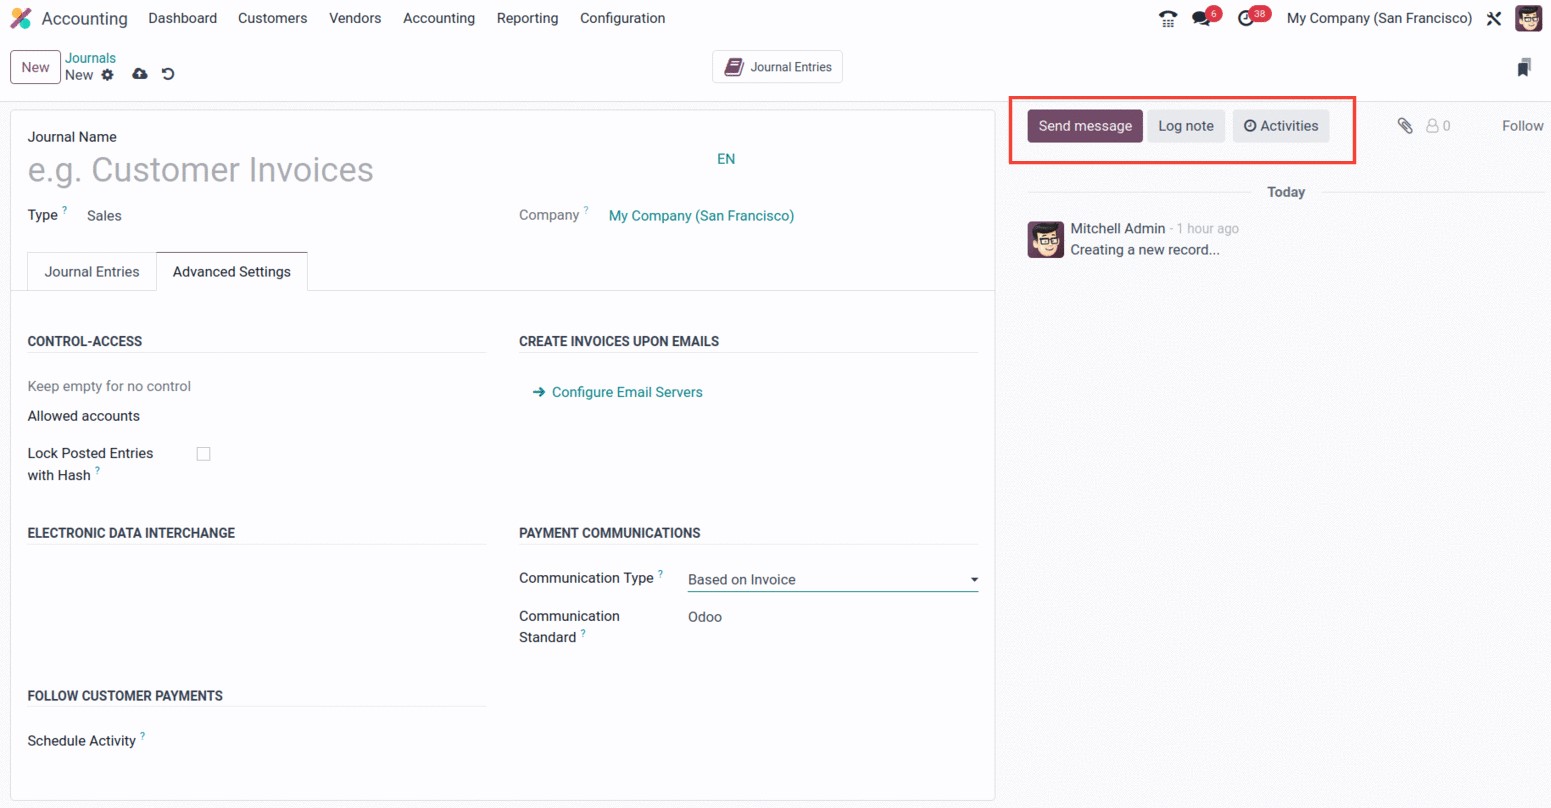
If the Type is Sales, you'll additionally show the extra fields under several headings, such
as PAYMENT COMMUNICATIONS, CREATE INVOICES UPON EMAILS, and FOLLOW CUSTOMER PAYMENTS.
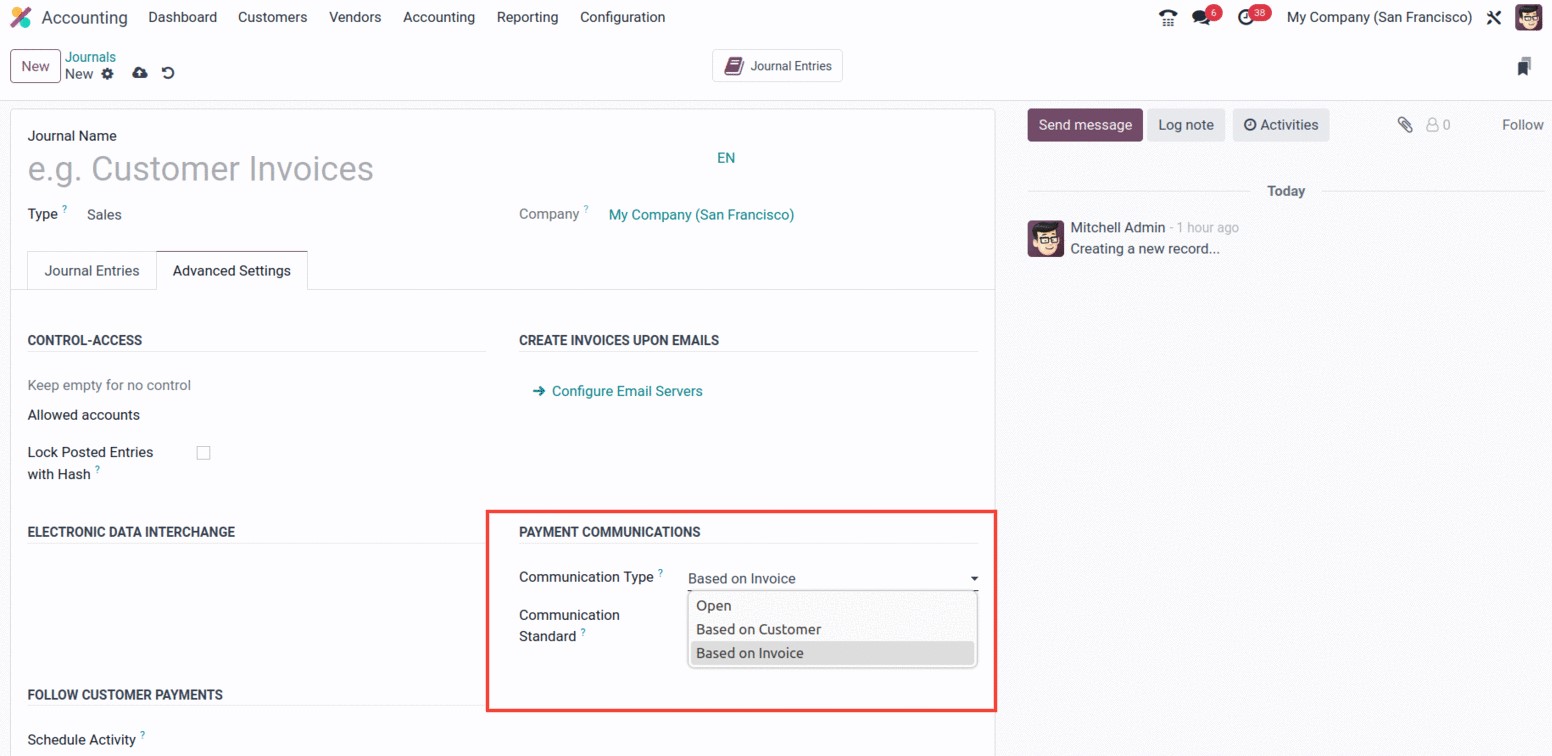
Communication Type and Communication Standard fields are included in the PAYMENT COMMUNICATION
section. To make it easier for customers to remember to refer to a specific invoice when
making a payment, you can define the default communication that will appear on their invoices
once they have been validated in the Communication Type area. Open, Based on Customer, and
Based on Invoice are the three options available here. You may do the same for the
Communication Standard field. For each sort of reference, you can select a different model
using this field; the default option is the "Odoo reference."
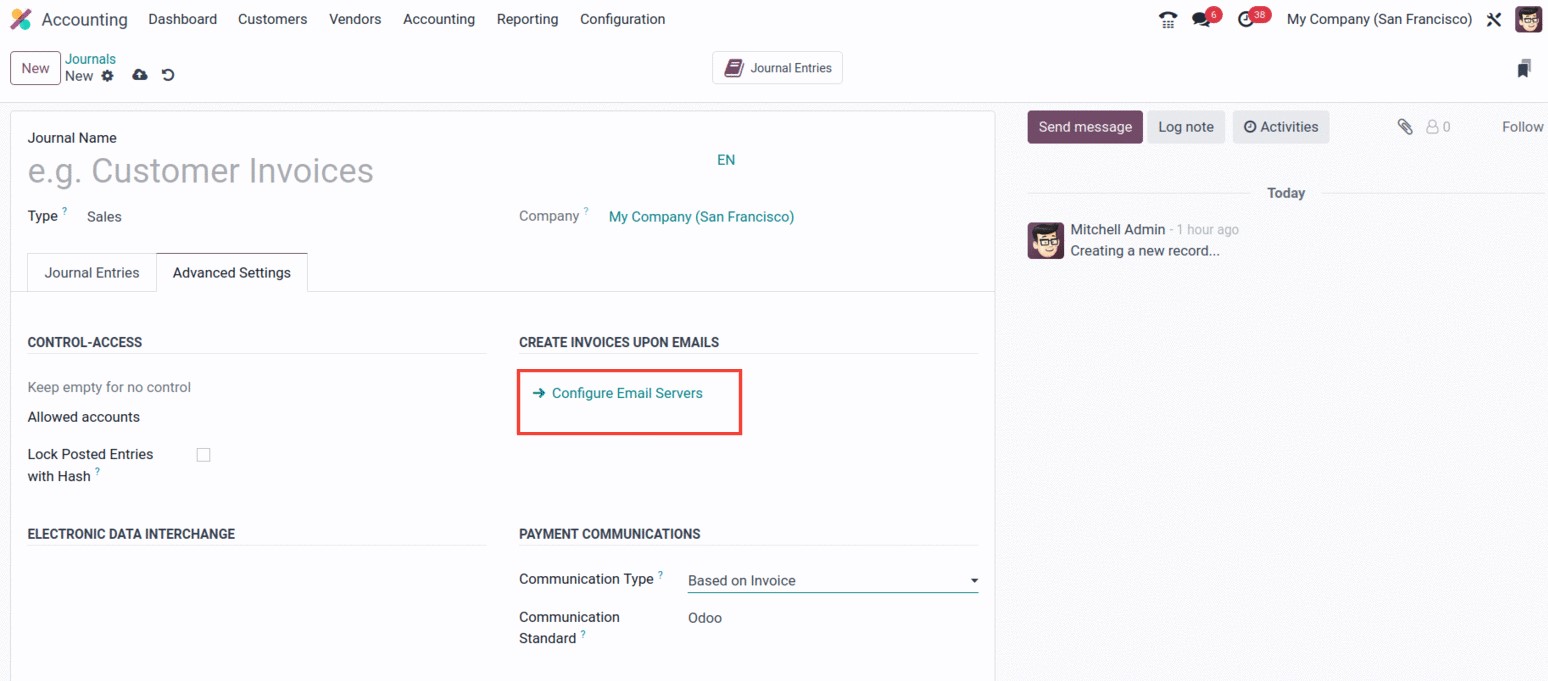
In the CREATE INVOICES UPON EMAILS section, you may also configure Email Servers. It will
work well to guarantee that an invoice will be generated if the email is received under the
appropriate server domain.
Additionally, you can submit XML or EDI invoices via electronic invoicing by using the
section on ELECTRONIC DATA INTERCHANGE. You can do that by turning on the E-Invoice option. If
the appropriate localization module for "e-invoicing" is installed, which will be possible
with accounting localization, then electronic invoicing will be available. An XML/EDI document
will be generated and attached once this capability is enabled, along with invoices and credit
notes.
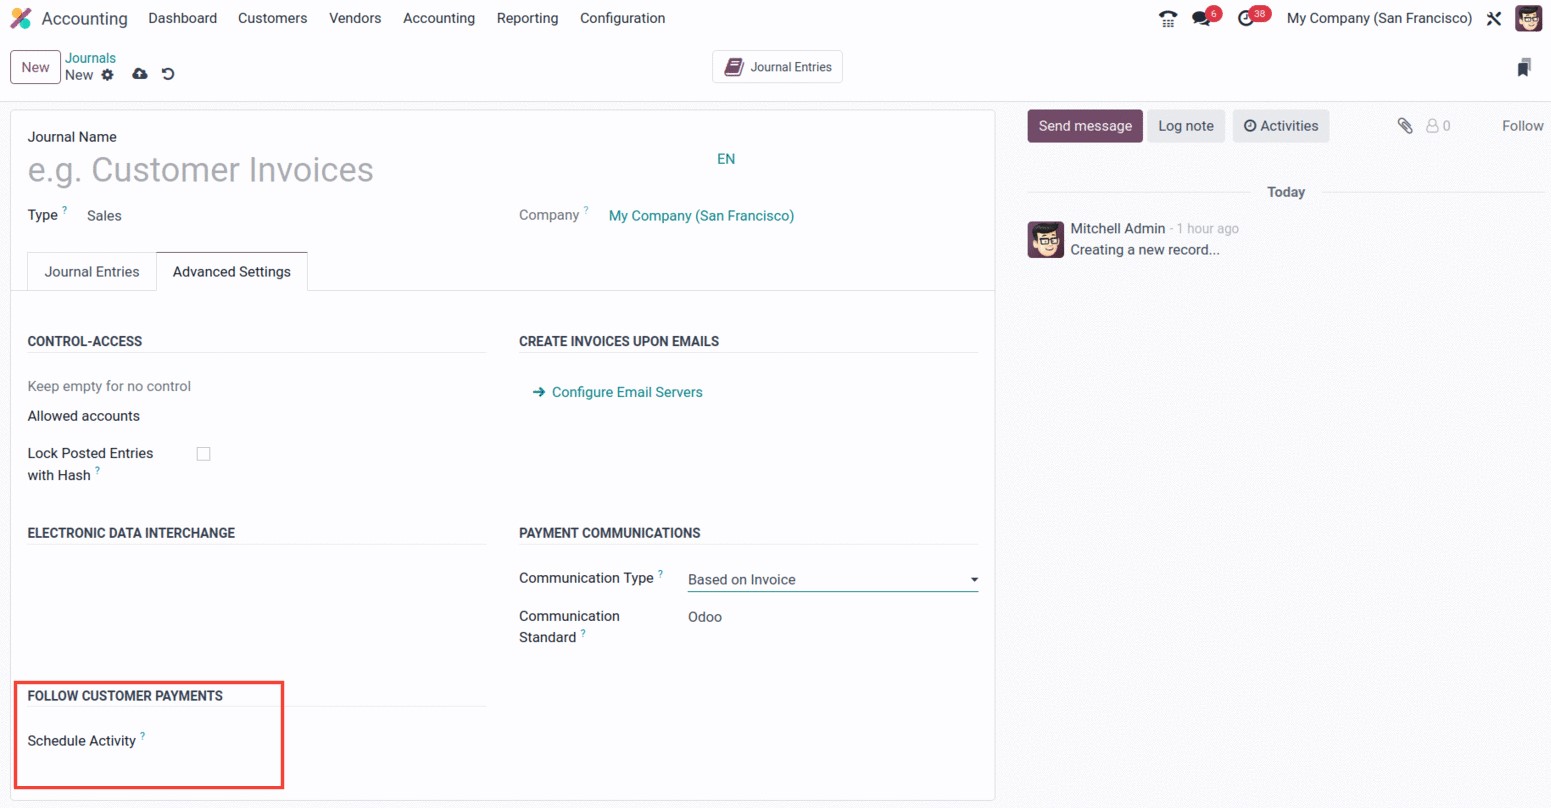
You also have a space for scheduling an activity for the upcoming payments from customers.
Any activity you indicate will automatically be scheduled on the due date for payments, which
will improve the collection process. The drop-down menu can be used to select an activity.
Finally, you have the choice to communicate with readers of the associated journal by sending
messages and describing log notes. Other users of your Odoo 17 platform, who may be members of
the staff of your business or affiliated members, could be followers. The Log Note option
helps you record the changes made by the employees and describes them together with the time
and date, while the Send Message option is quite helpful for notifying any pertinent
information.
In addition to all of these choices, you can also see the smart tab in the window's upper
right corner, as seen in the illustration below. The 'Journal entries' smart tab will display
every entry made in that specific journal.
We now understand how to configure the Sales journal type. In Odoo17, the steps for creating
the Sales, Purchase, and Miscellaneous journals are all the same. Let's now talk about the
Bank journal's configuration processes, which differ from those for Sales, Purchase, and
Miscellaneous journal kinds.
The creation window will show the various sections, including Journal Entries, Incoming
Payments, Outgoing Payments, and Advanced Settings when you choose Bank as the Journal Type.
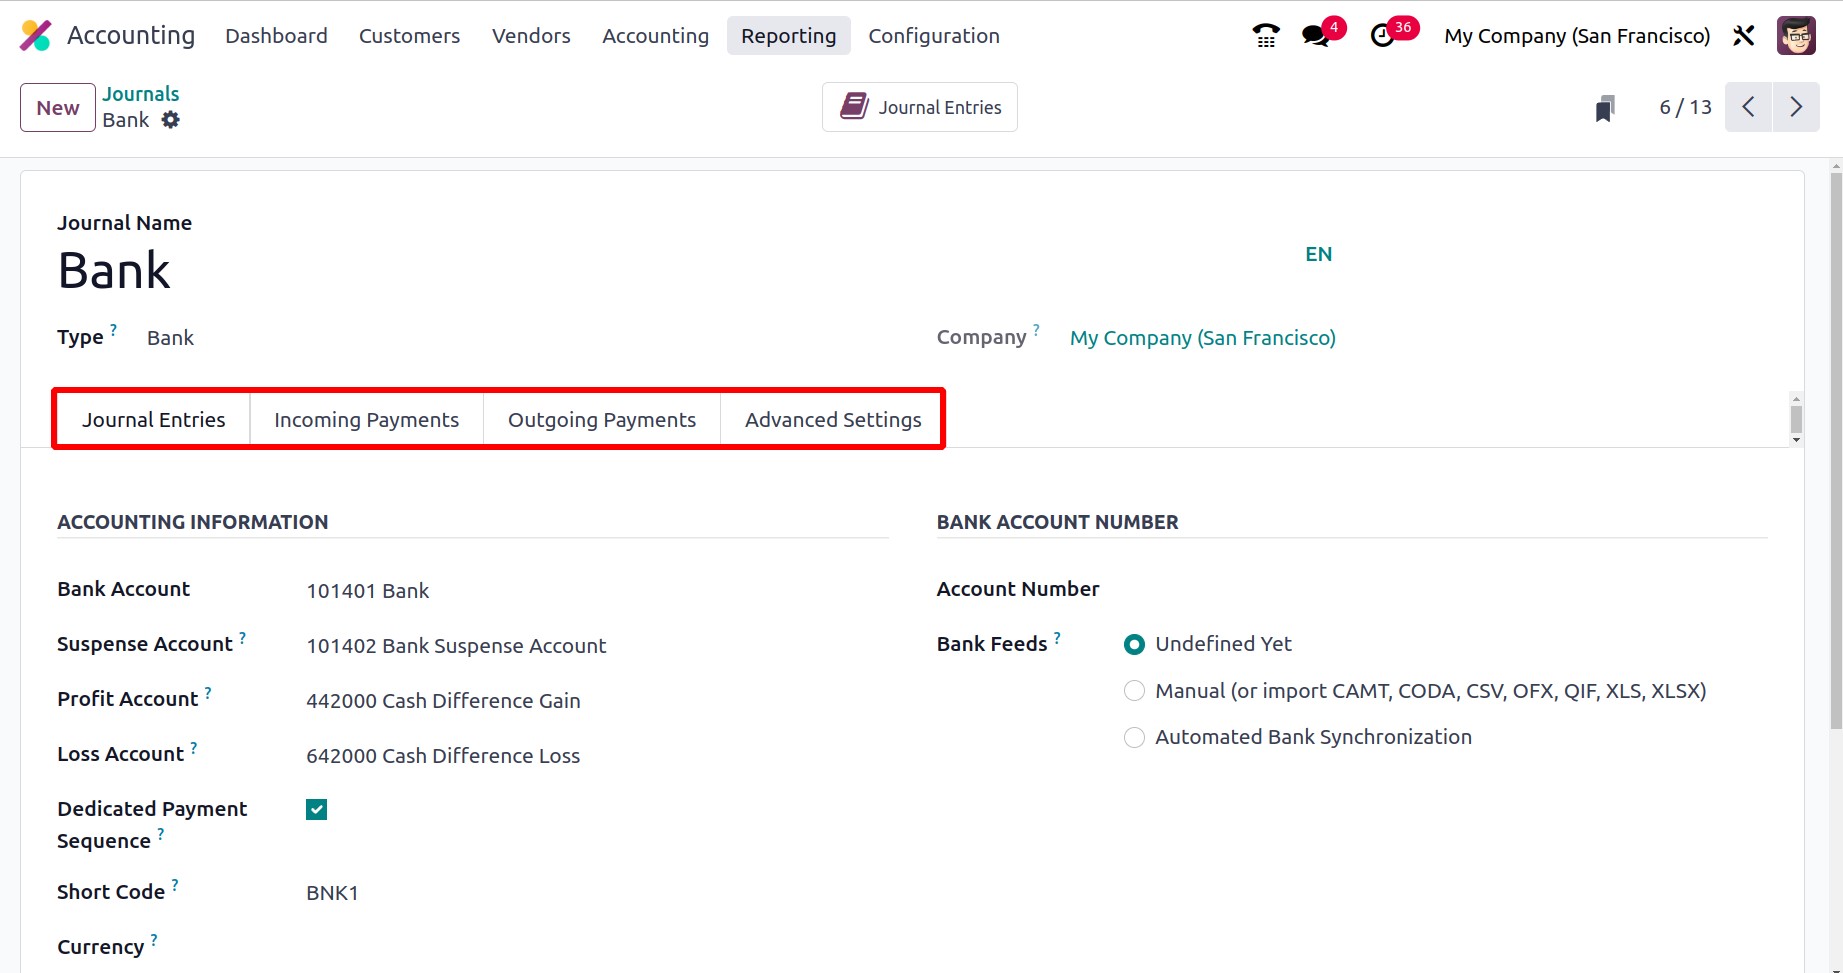
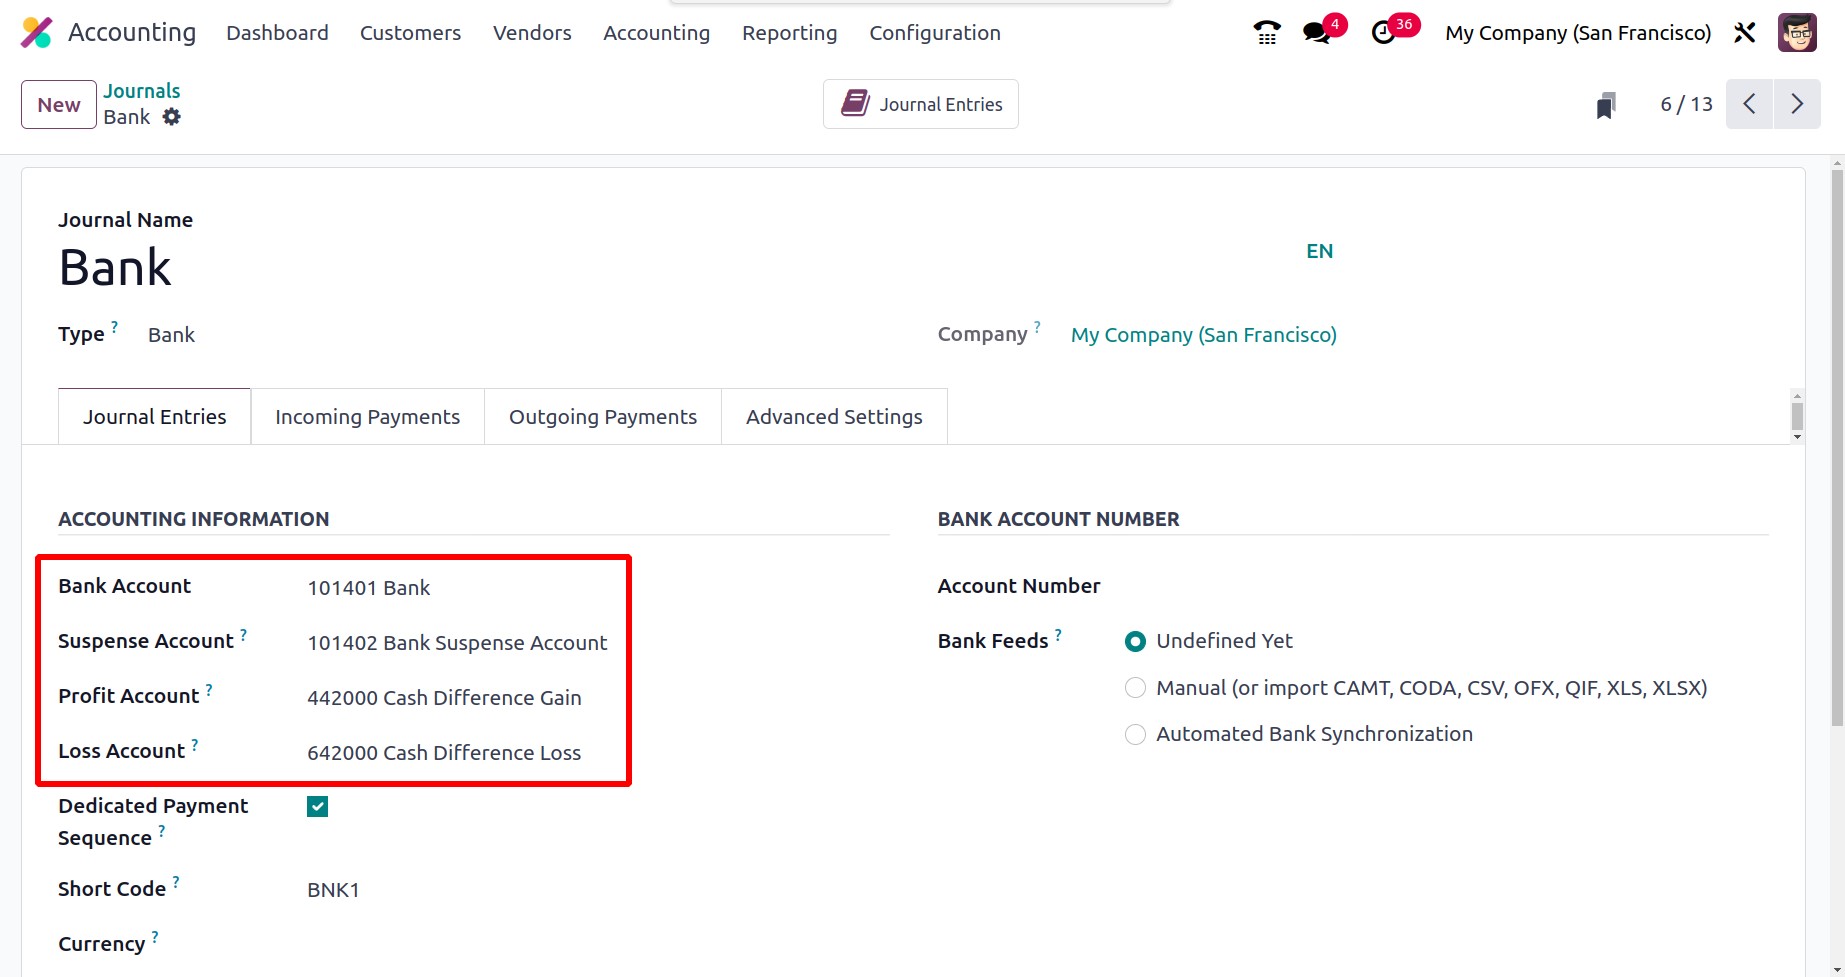
You must provide details about journal entries under the "Journal Entries" tab. As a result,
you can provide the ACCOUNTING INFORMATION, including the Bank Account, Suspense Account,
Profit Account, Loss Account, Short Code, and Currency information. The Suspense Account
serves as a temporary account until the bank statement transactions for each journal activity
are reconciled, and is used to post bank statement transactions until the bank account is
balanced with the payments.
The Profit Account is also used to record a profit when a cash register's ending balance
deviates from the calculation made by the system. When the cash register's closing balance
differs from what the computer calculates, it is advantageous to record a loss in the loss
account. The Dedicated Payment Sequence option for activating is also shown in this section.
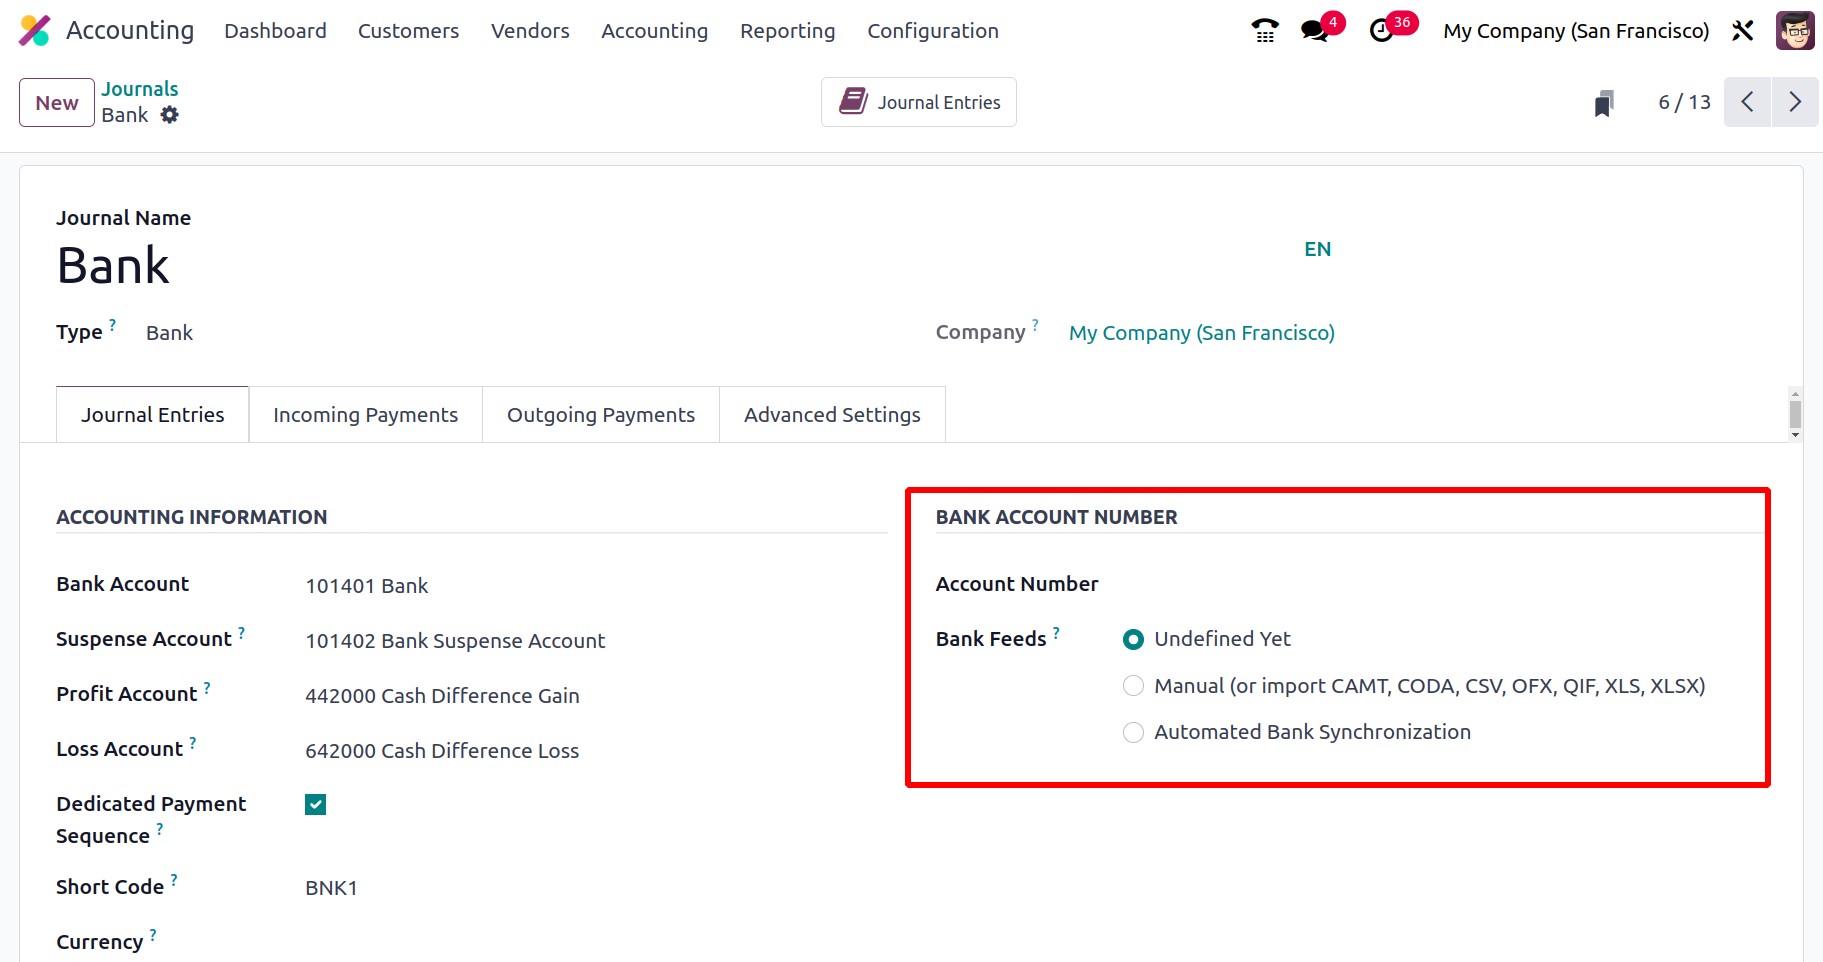
In the 'BANK ACCOUNT NUMBER' section, the Account Number can also be specified in the
appropriate field. Additionally, you have the choice to designate Bank Feeds, and the
registration of bank statements will be carried out in accordance with your choice. Three
options are available here: Automated Bank Synchronisation, Import (CAMT, CODA, CSV, OFX,
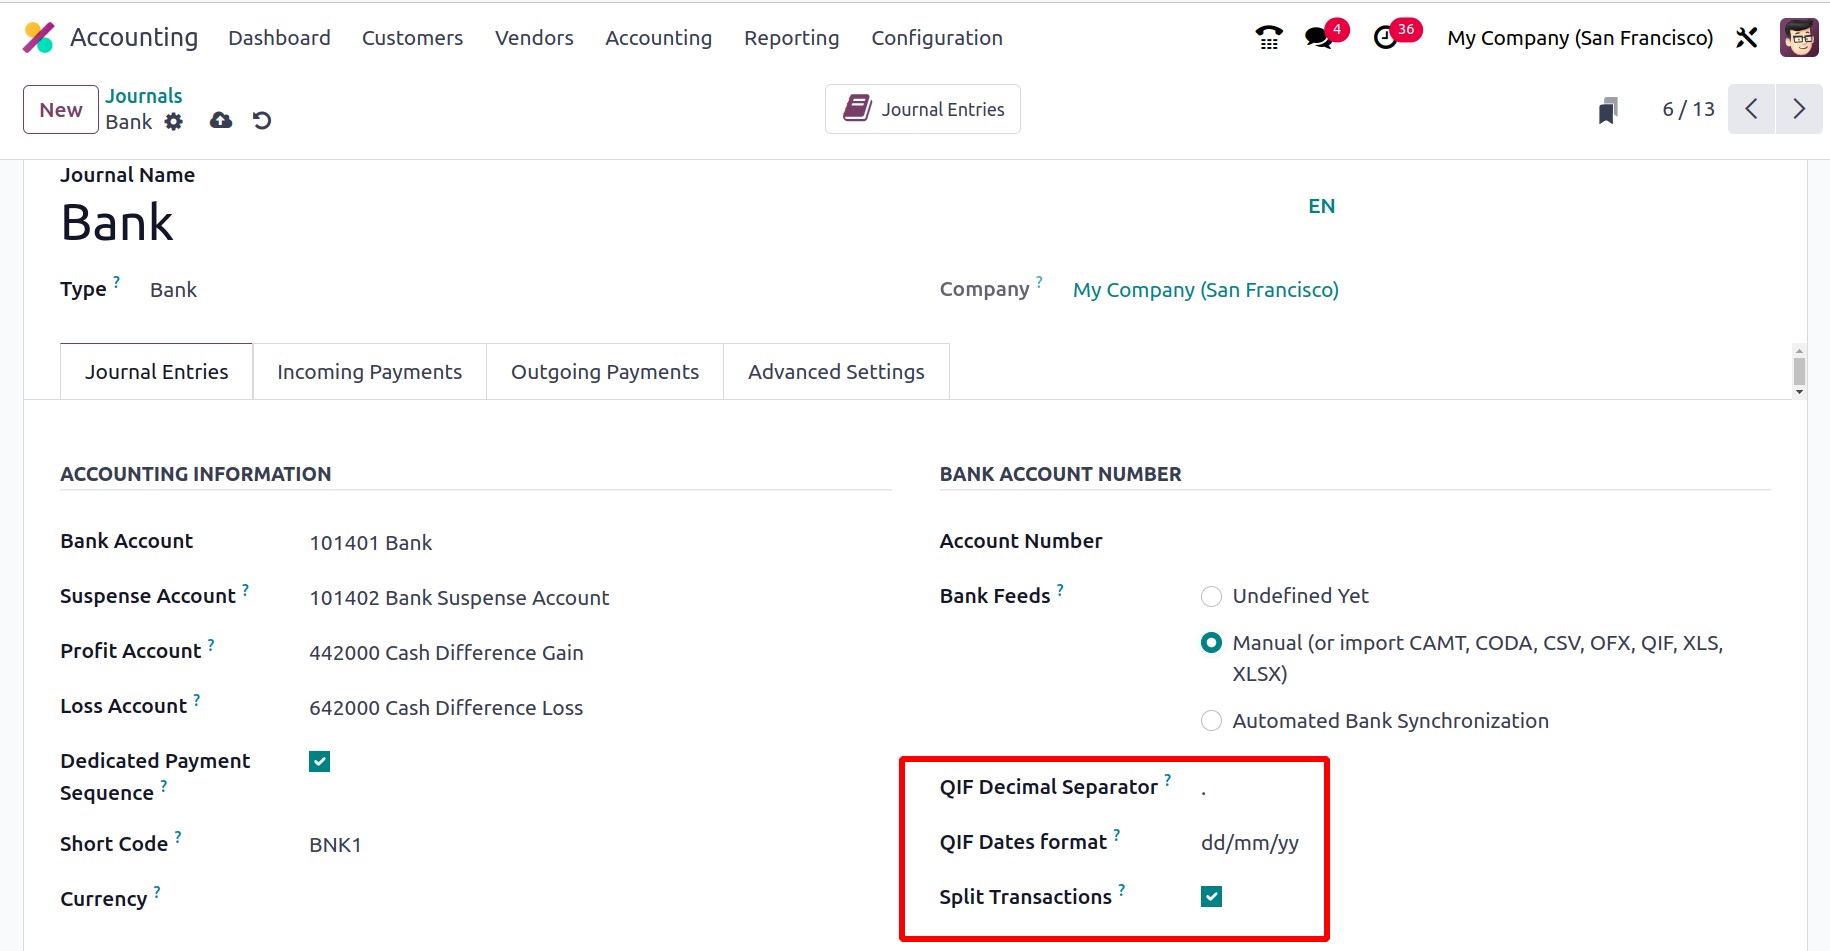
QIF), and Undefined Yet. When you select the Import option, more fields will be displayed,
including the QIF Decimal Separator, which is necessary to prevent conversion problems, and
the QIF Dates format, where you can select either dd/mm/yy or mm/dd/yy depending on the firm.
Split Transactions, the third field, can be turned on to split group payments for CODA files.
You can import information from the dashboard using the Import option.
The Odoo 17 platform can be made accessible for directly retrieving the invoice payment
information from the bank servers by selecting Automated Bank Synchronisation. Additionally,
you will have control over the review of the synchronized operations via the Dashboard.
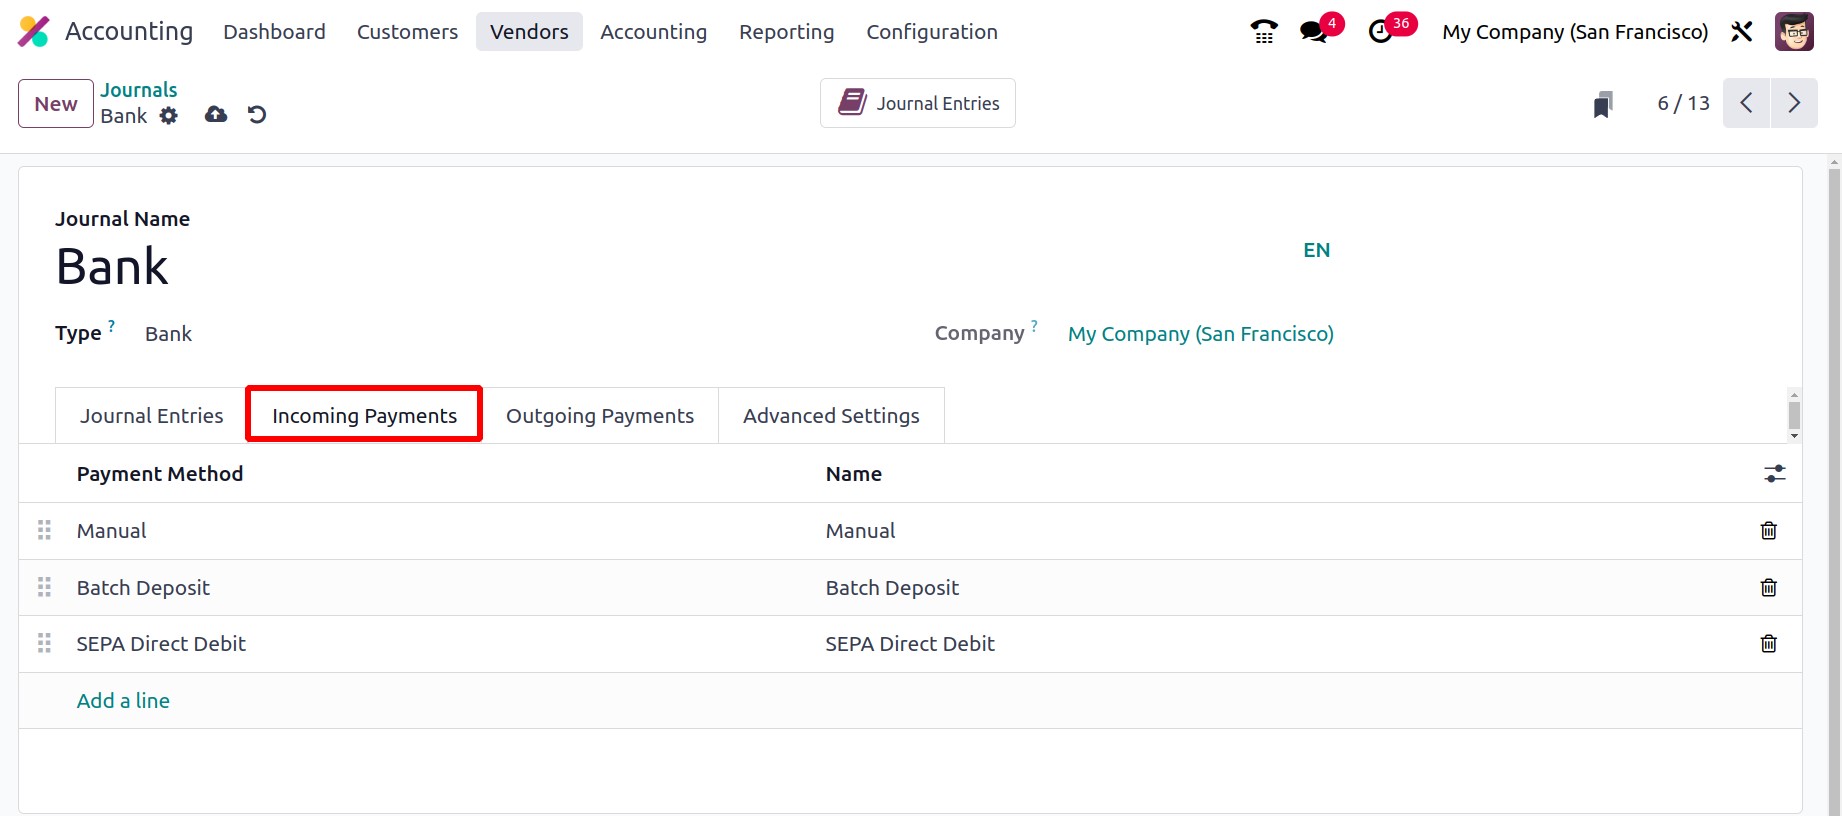
The incoming payment setup details can now be defined under the Incoming Payments tab.
Therefore, you can specify the Name and Payment Method using the Add a line option.
You must set up the outgoing payment methods under the Outgoing Payments tab. The 'Payment
Method' and 'Name' can be defined using the Add a Line option because it is almost the same as
the Incoming Payments. You can select a method from the drop-down menu and then apply it. If
the payment method is brand-new, configuring it won't take much work.
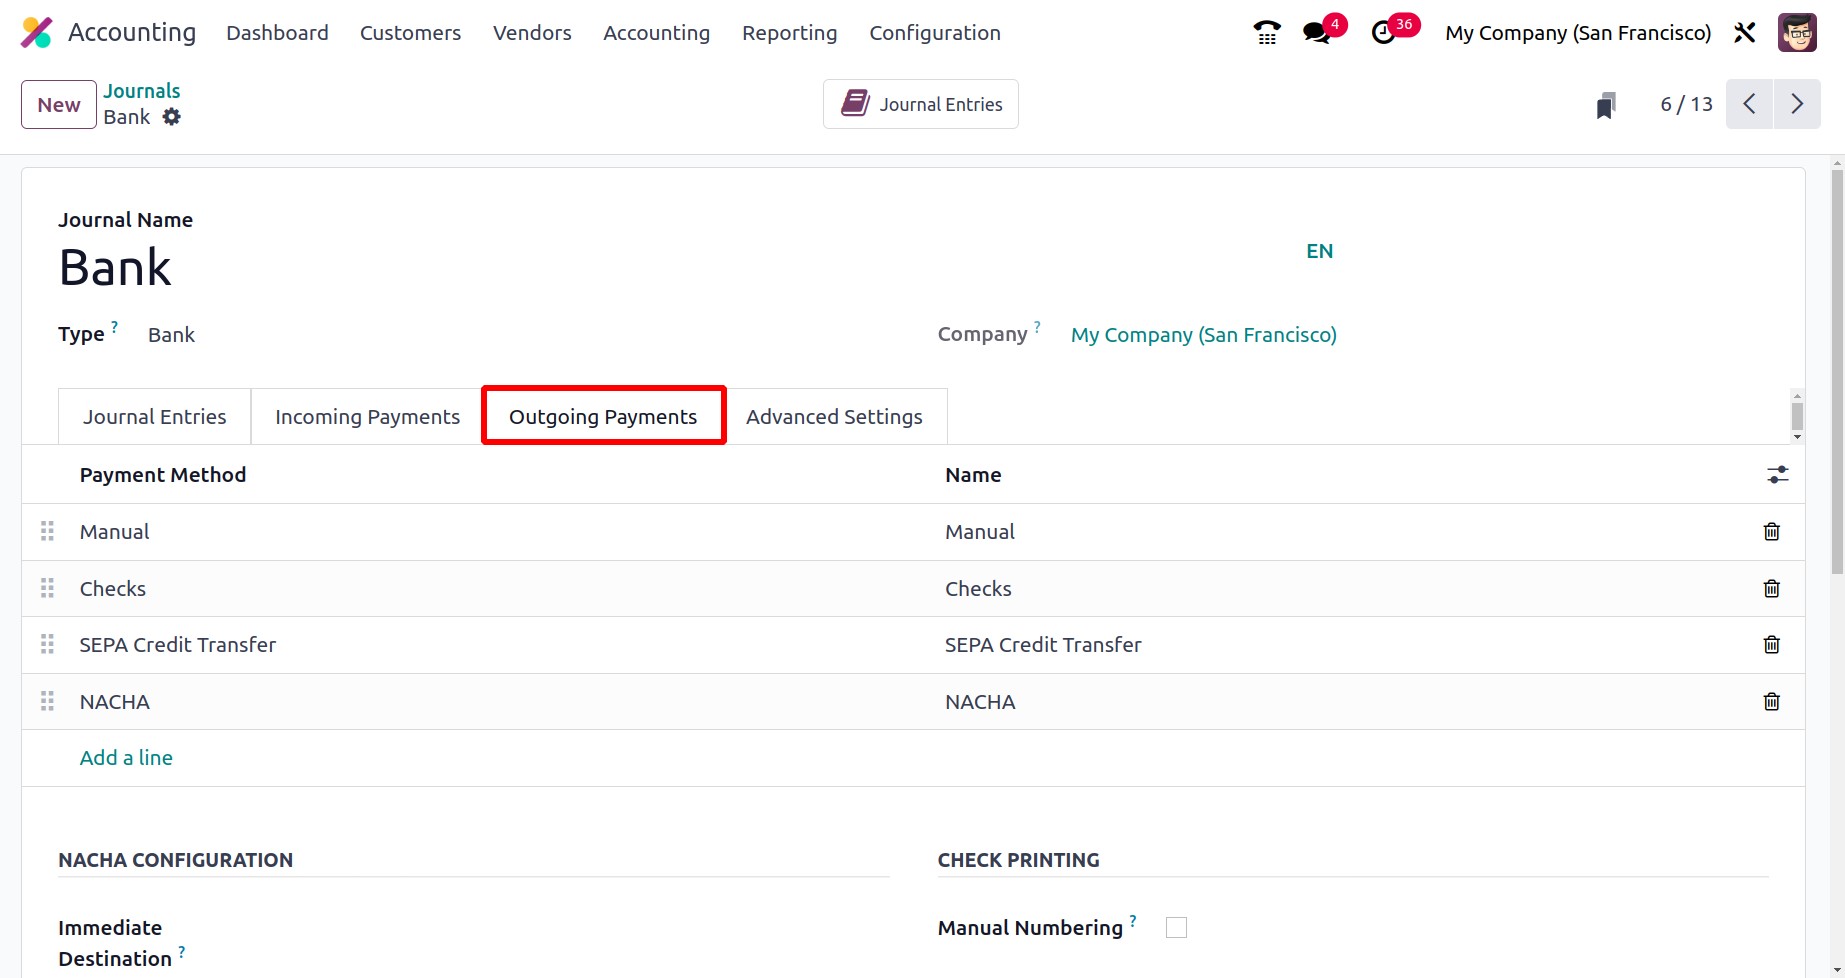
Furthermore, if your pre-printed checks aren't numbered, you can enable the Manual Numbering
field found in the CHECK PRINTING section.
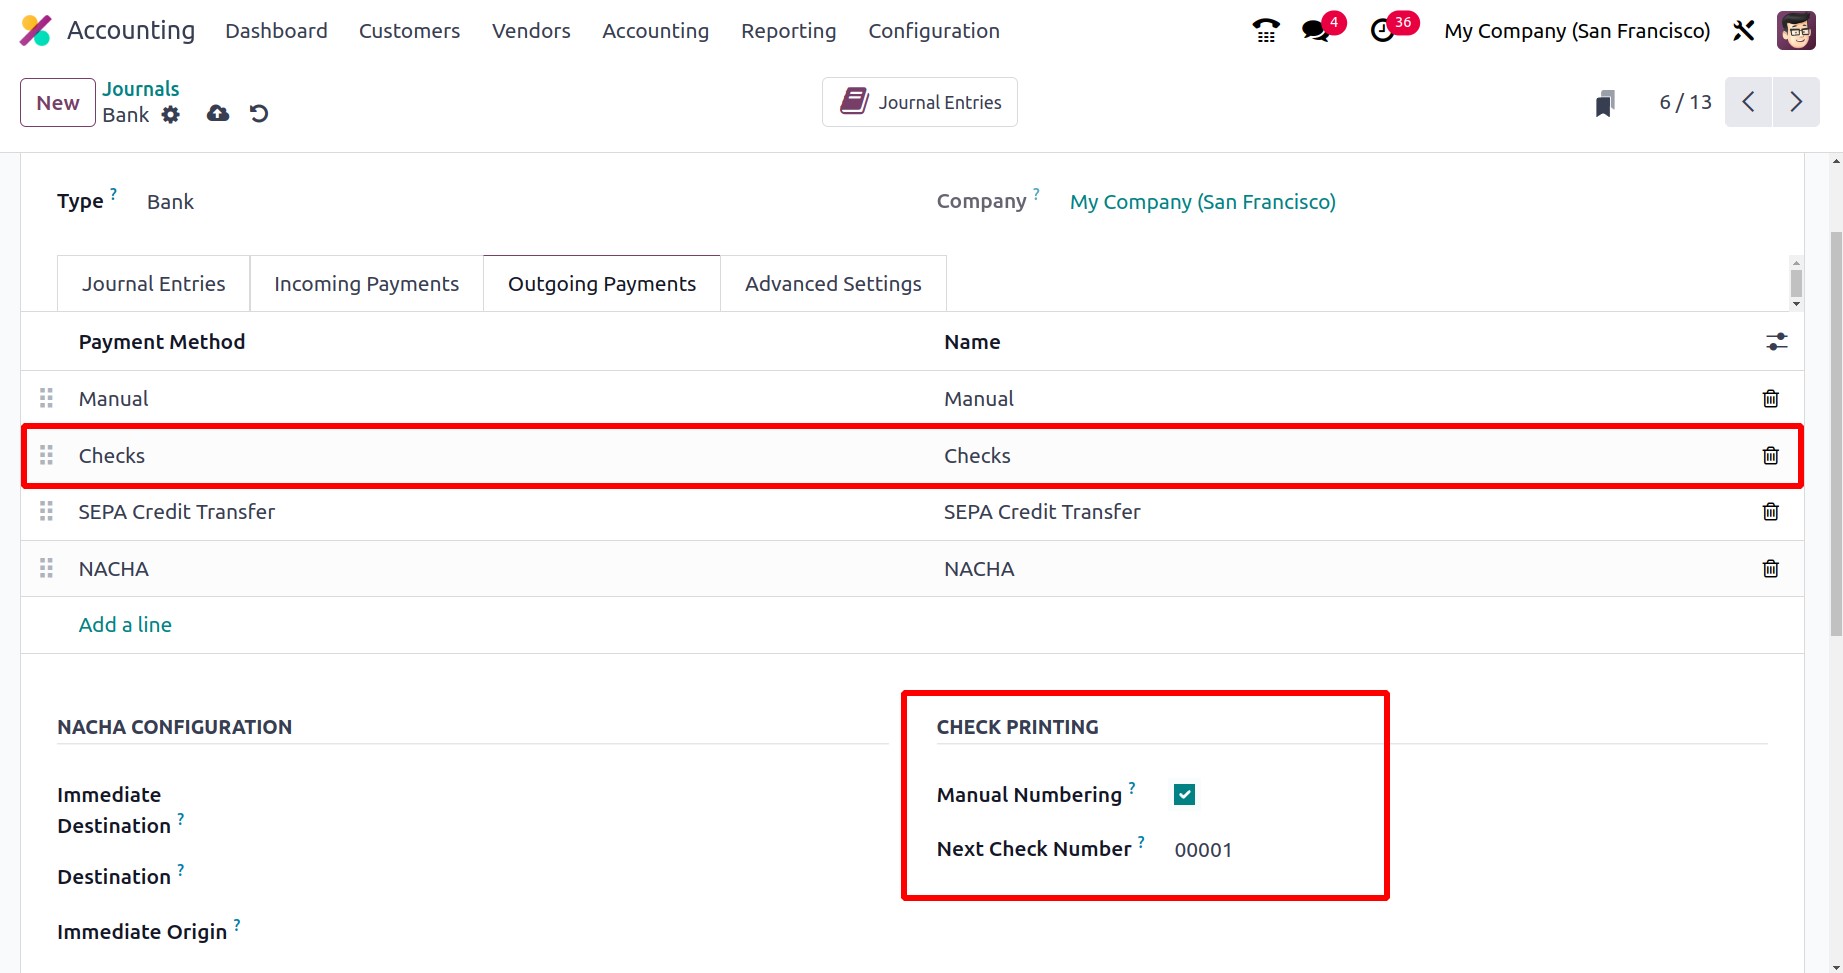
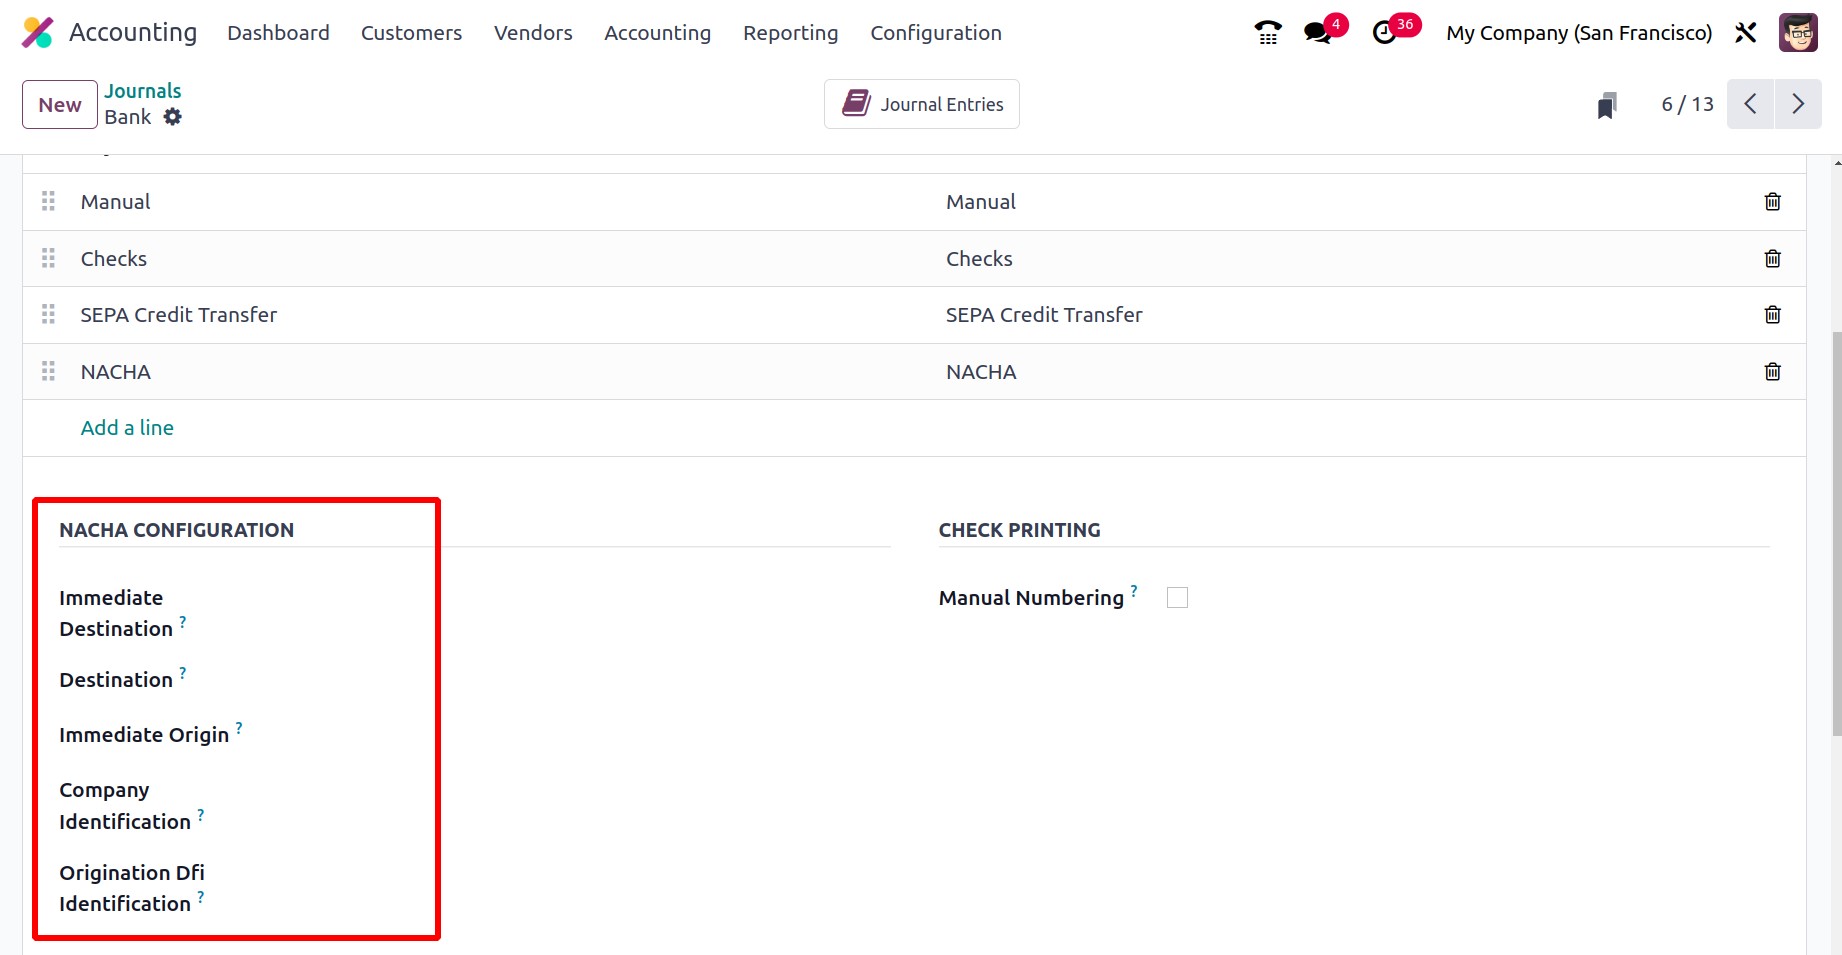
Additionally, there is the NACHA CONFIGURATION, where a number of fields are available,
including Immediate Destination, Destination, Immediate Origin, Company Identification, and
Originating DFI Identification. The bank will supply all of these facts.
NACHA CONFIGURATION: The term NACHA stands for National Automated Clearing House Association
compliant ACH file, which will be produced using US localization. At the appropriate location,
information such as the immediate destination, the immediate origin, the company
identification, and the origination DFI identifier can be provided. Your bank will frequently
inform you when you are authorized to send payments using ACH. With this payment method, you
can pay a vendor and create the NACHA file that goes with it.
When a customer generates an invoice payment, the funds are not directly credited to the bank
account; instead, they are placed in the Outstanding Receipt Account, which is described here.
Only the payment will be deposited to the company's bank account following the automatic or
manual reconciliation of the bank statement and the payment is done. The amount for the vendor
bill will also be generated from Accounts Payable in the case of Purchase Payment, moved to
the Outstanding Payments Account, and then when the bank statement reconciliation process is
carried out in relation to the vendor bill, the bank will be reconciled with outstanding
payment entries rather than the payable account.

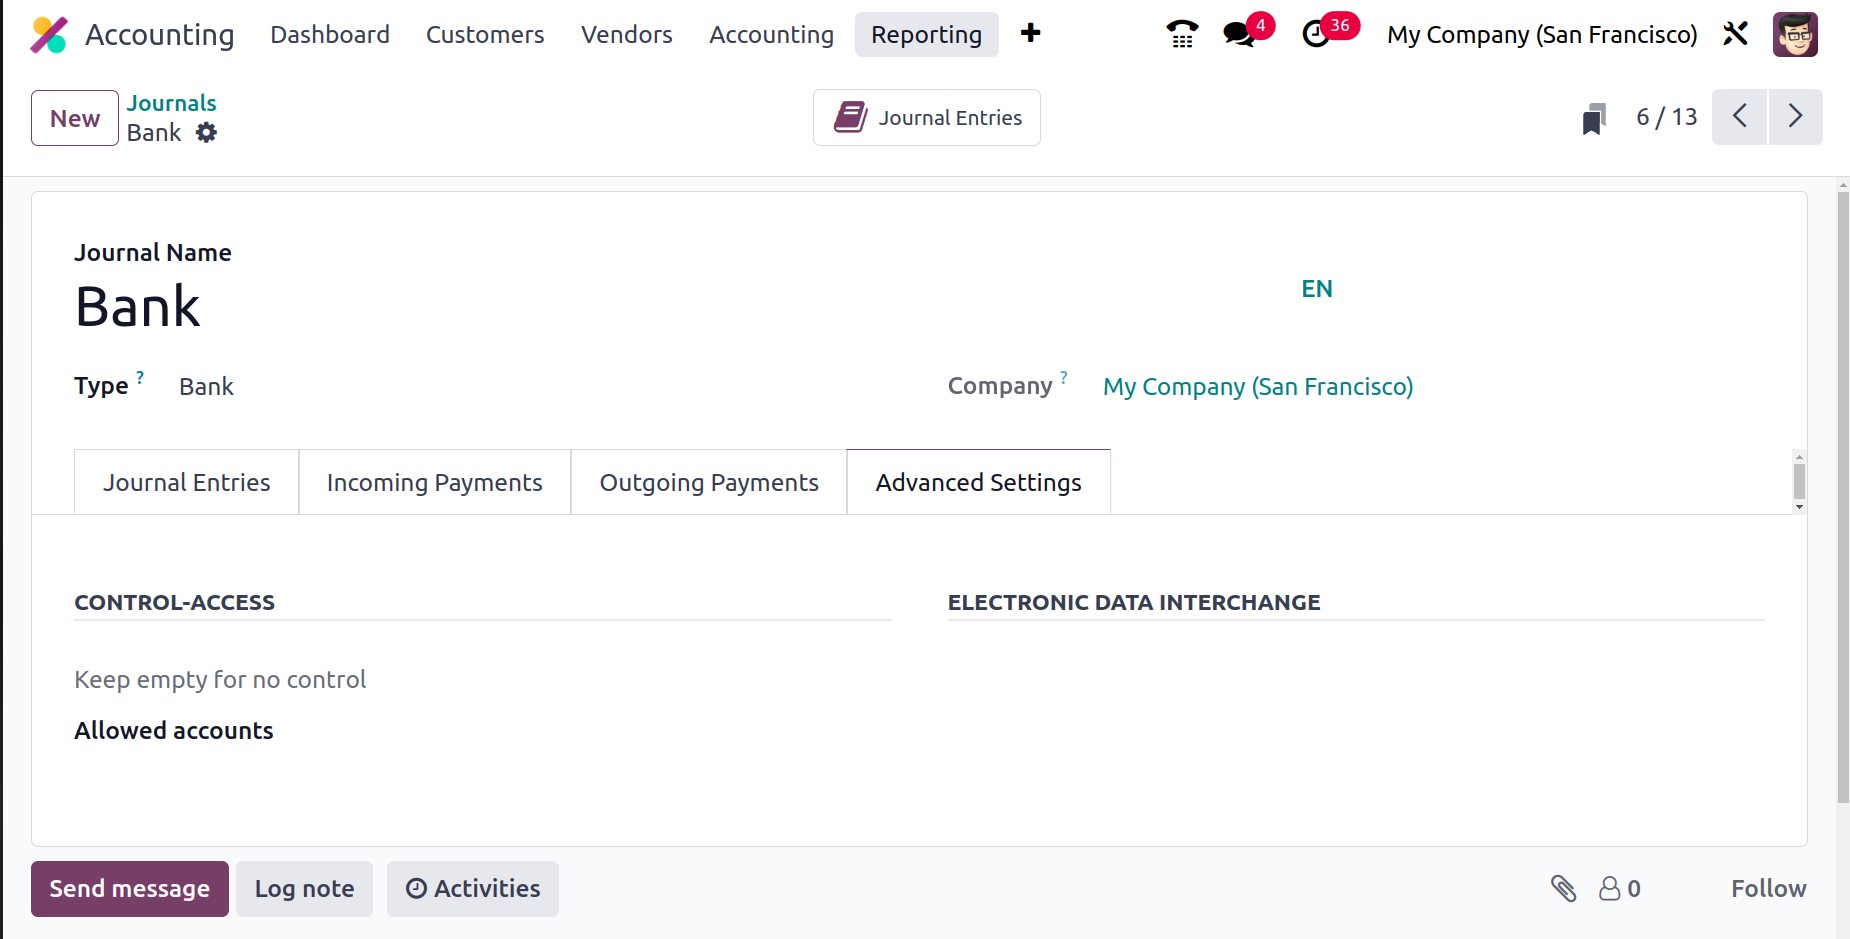
The final option, Advanced Settings, is identical to the Sales, Purchase, and Miscellaneous
accounts in the Journals configuration. Therefore, based on the operational requirements, the
account operation details for the Cash and Bank journals can be modified.
These are the proper methods for creating and editing journals, and these journals can be
used to create journal entries for the financial administration of an organization. Now that
we have covered every component of journal design, we can examine journal groups, which are
important for categorizing journals.
Journal Groups
You will have the opportunity to categorize numerous business operations elements through
categorization, which is a crucial aspect of business operations. It will enable you to divide
the process into delicate discs. For a company's accounting procedures to run smoothly, you
can define several journals using the Odoo17 platform. There is a good probability that
entries will be confused when defined in various journals. Thus, a special ability to group
the journals was provided by the Odoo17 platform. This cutting-edge function will provide a
lot of assistance in categorizing all the configured journals.
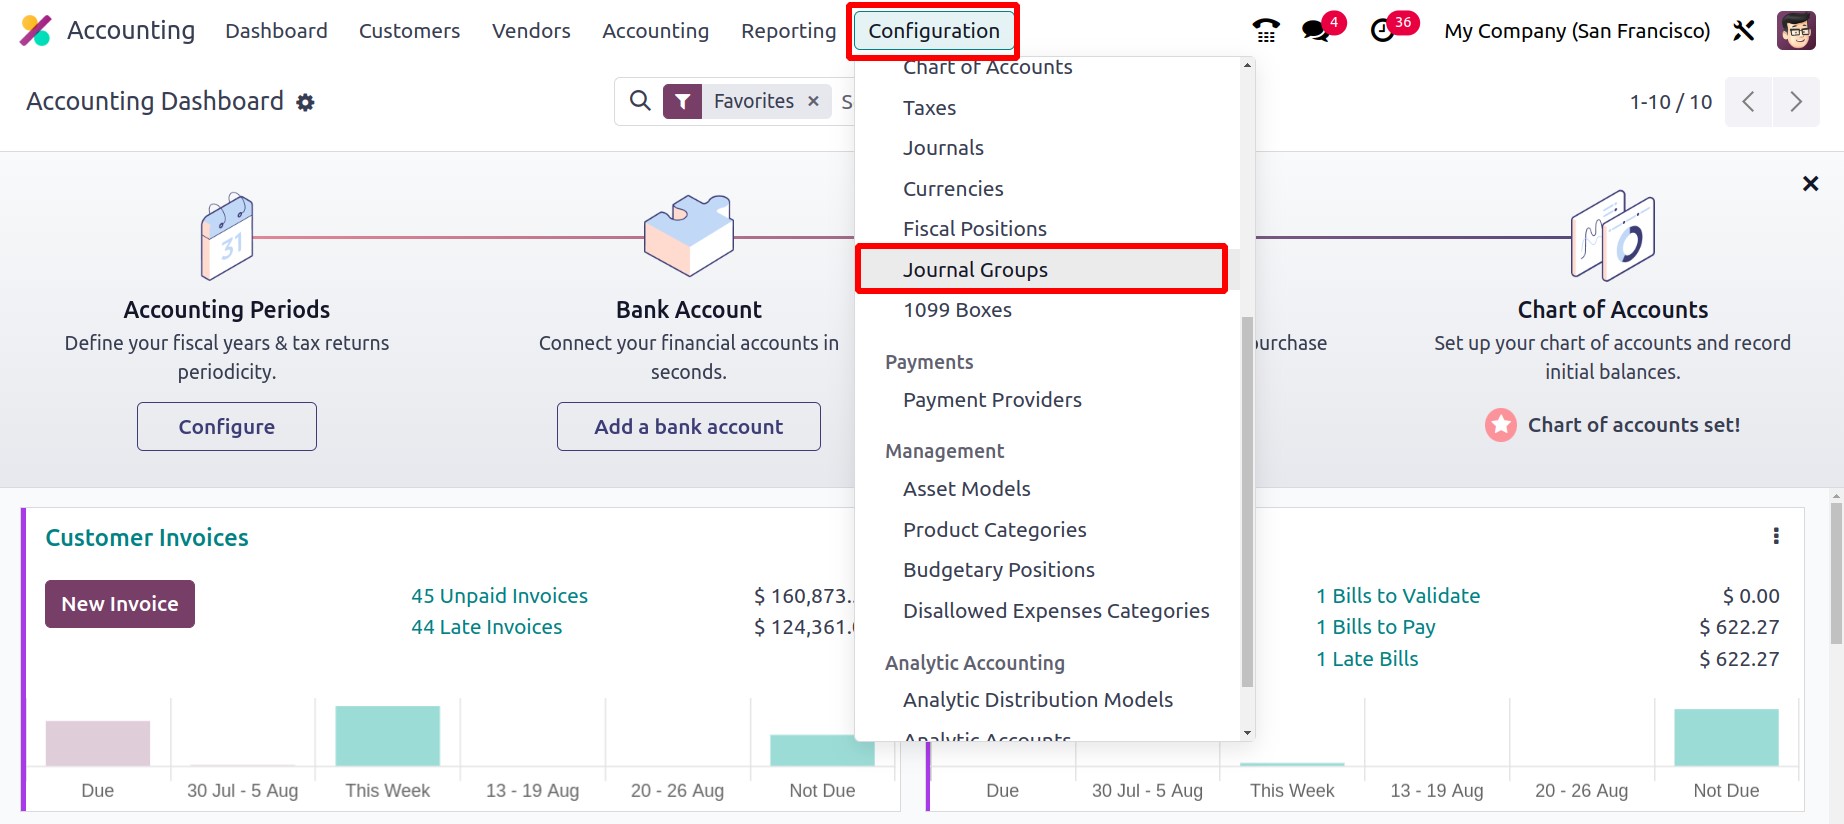
Go to the Configuration menu of the Accounting module to access the Journal Groups menu,
where you can view all the journal groups that were previously described in the Journal Groups
window, as shown below.
You will enter the window when you select the Journal Groups menu. You can make brand-new
Journal Groups by pressing the New button. The instant your cursor passes over the New button,
a new line for configuring journal groups will appear in the same window.
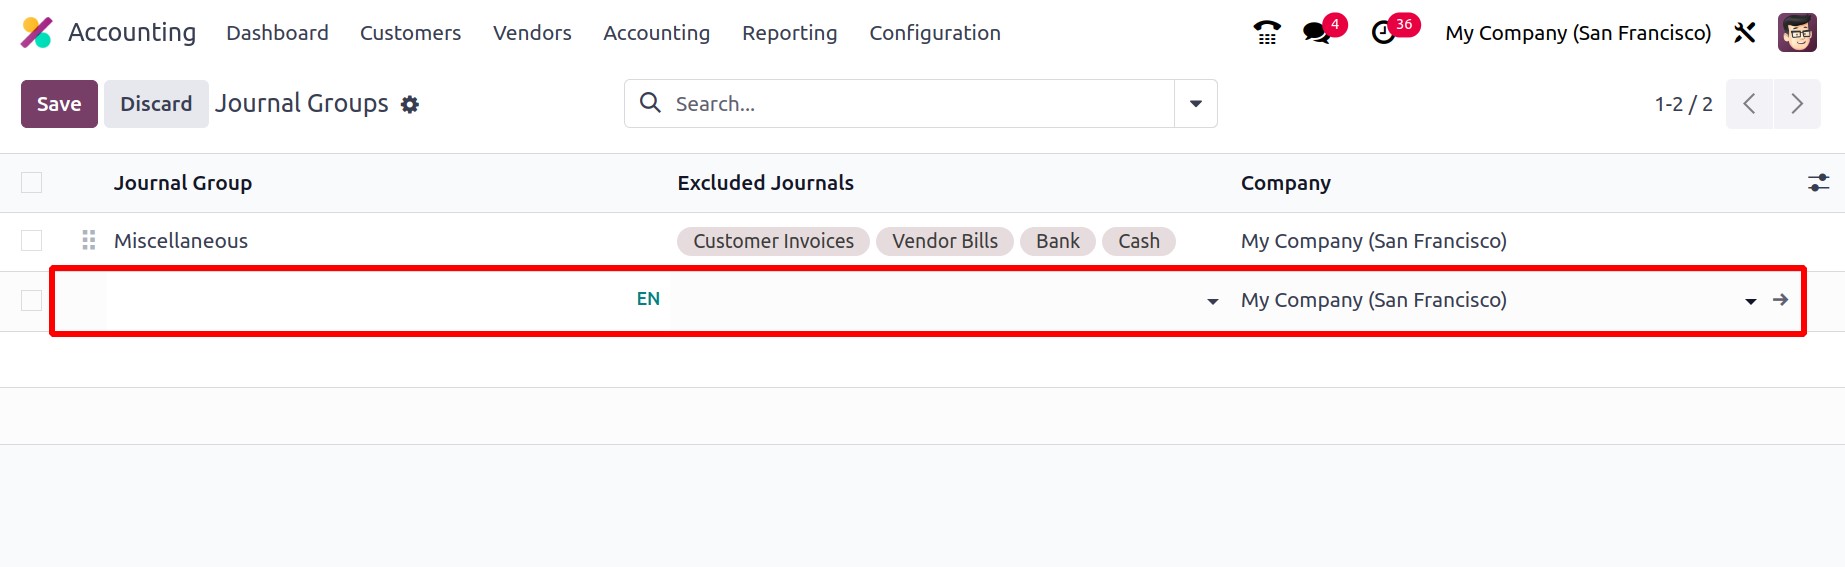
There, you can list the Excluded Journals and enter the names of the Journal Groups. The
Company field can be customized and will be automatically assigned.
This window also has access to the many sorting features offered by Odoo17. You can rapidly
sort out the necessary groups using the pre-set and configurable filters, as well as the Group
By choices.
One of the standout features of the Odoo17 Accounting module that enables you to classify
your accounting journals into categories is Journal Grouping. The groups can be used to
streamline reporting and more effectively manage accounting data. Users will find it simpler
to track and view all of your transactions with the help of this feature. By giving a
centralized mechanism to compare the various sorts of transactions, journal grouping also
contributes to the accuracy of the financial records. Then, financial data may be more
effectively organized and analyzed using these categories.
Journals can be grouped using this functionality based on the company, transaction type, or
other factors. Users can now easily look up and access particular journals as needed, thanks
to this. Users can arrange journals based on the type of transaction, which aids in keeping
their finances organized. Users may quickly discover which journals require reconciliation,
which aids in accounting reconciliation.
In reporting, these Journal groupings are used to bundle pertinent data together for display.
You can complete the Filtering and Group By requirements for various accounting and journal
activities. The Odoo17 platform places a high priority on report generation, and with the use
of filtering features, a variety of reports connected to accounts may be acquired in a matter
of seconds. To simplify the procedure, you only need to select Journal Types as the filtering
criteria.
While defining it, it is also possible to choose the appropriate Chart of Account Types
because doing so makes it easier to sort out the requirements for the accounting information
in relation to the Chart of Account Types that are being established.
While defining it, the Chart of Account Types can also be chosen for the relevant one; this
is advantageous for the filter of the accounting data with regard to the Chart of Account
Types that are being defined.
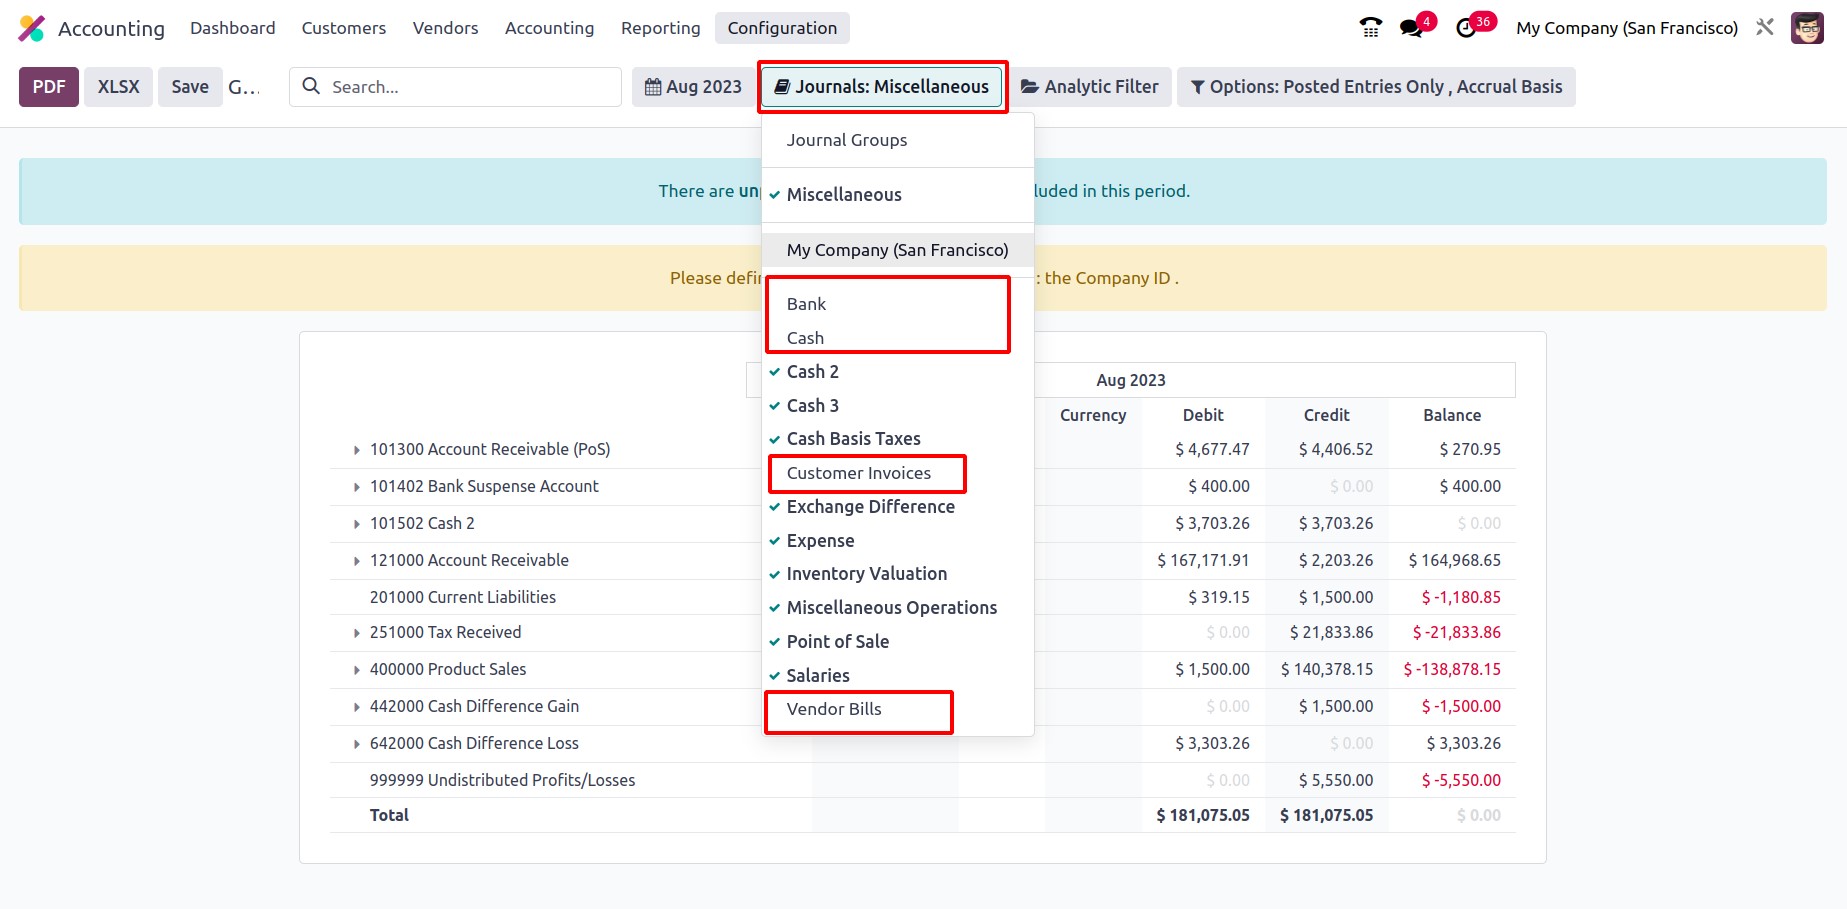
The accounts Customer Invoices, Vendor Bills, Bank, and Cash mentioned in the journal will
not be included in the filter of reports since the journal group "Miscellaneous" has been
selected in the report. Therefore, for the efficient operation of journal management
operations, the Journal Group feature has a considerable impact on the accounting department
of any organization.
After thoroughly understanding the capabilities of Journal Groups, let's have a look at the
Currency Management tool that is included in the Odoo17 Accounting module in the part that
follows.
Currency Management
Users may simply manage numerous currencies in their accounts thanks to the extensive
Currency management capability included in the Odoo 17 Accounting module. A currency rate
system and an automatic currency conversion method are included in this feature.
Users can specify the exchange rate and choose the preferred rate for each type of currency
using the currency rate method. Users can also establish various rates for various kinds of
transactions using this approach.
Users can automatically convert any transaction amount from one currency to another using the
automated currency conversion method. The mechanism for determining currency rates and the
rate established for each type of transaction is used for this. Additionally, it gives you the
option to choose the currency symbol that will be used when showing quantities in various
currencies. This guarantees that all quantities are shown in the proper currency and that the
exchange rates are properly applied. Users can also simply monitor and report on transactions
made in various currencies. Getting a clear image of their accounts and transactions in
several currencies is quite beneficial.
Multinational corporations will frequently have a large number of clients and suppliers from
different countries. Therefore, the great and potent currency management system that we have
built into the Odoo17 platform is extremely relevant. The primary reason for this is that
various payments, including vendor bills and invoices, must be made in accordance with their
respective currencies, and the organization will keep to a specific set of currencies whereby
all of the organization's operations are carried out. Therefore, the platform's Currency
Management tool is useful for managing multiple currencies.
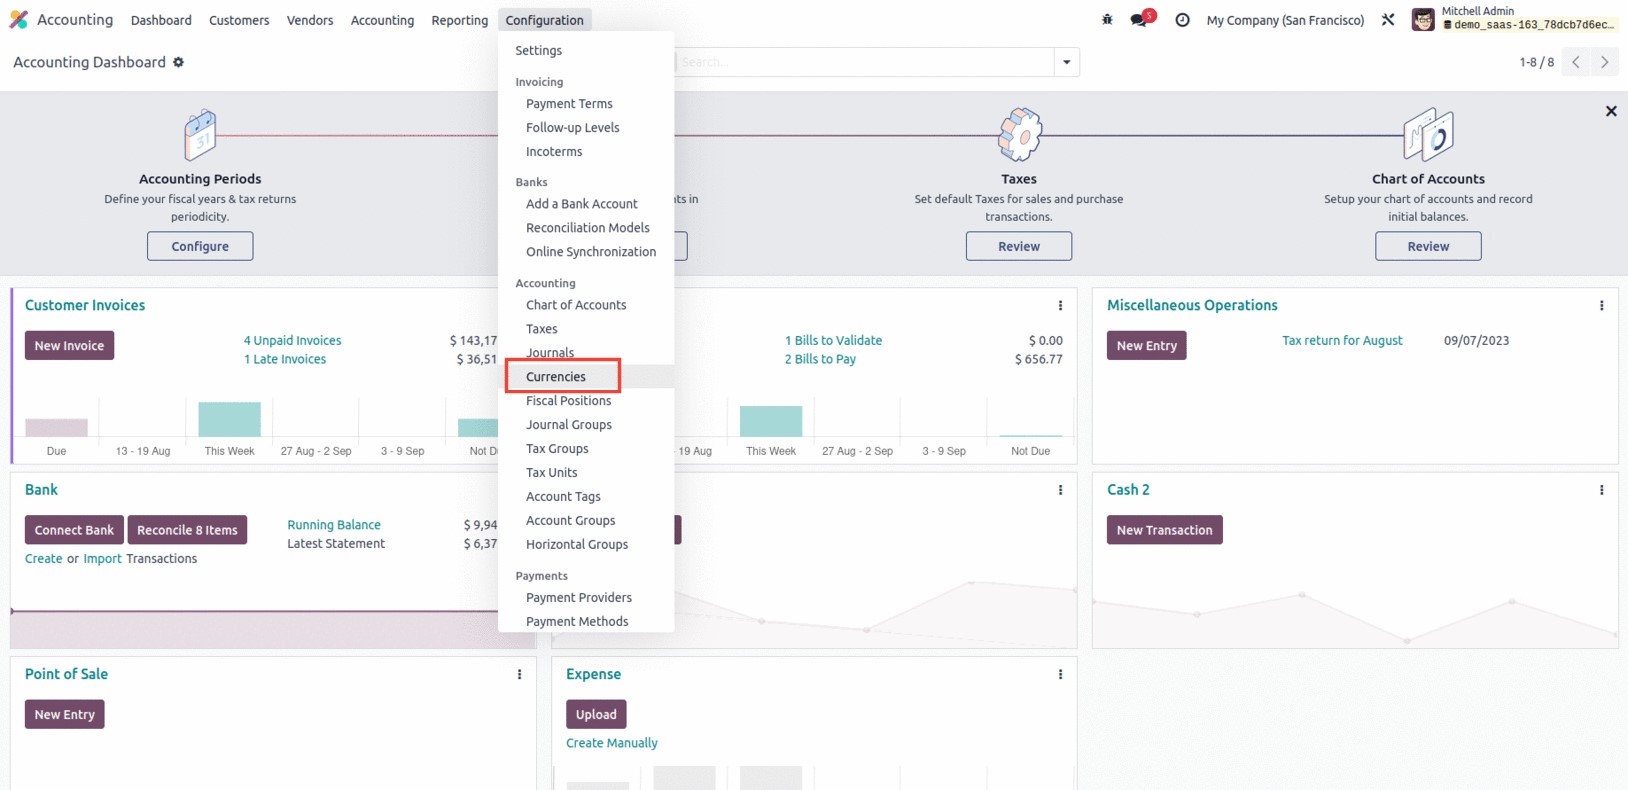
The Currencies menu may be found in the Odoo 17 Accounting module's Configuration menu, as
can be seen in the screenshot below. With only one click, you may access the Currencies pane,
as displayed below.
The Important Currencies of Operation in the World list will be displayed in the Dedicated
Window. By selecting the Kanban menu icon in the window's upper right corner, you can also
open the window in Kanban view. You can view each currency's details in this window, including
the Currency Name, the specific currency's symbol, Name, the Last Updated Date, and the
Current Rate (as it relates to the base currency set). The "Use on eBay" section to specify
the operation is also visible, as is the Active option, which can be activated or disabled in
accordance with the wishes of the organization.
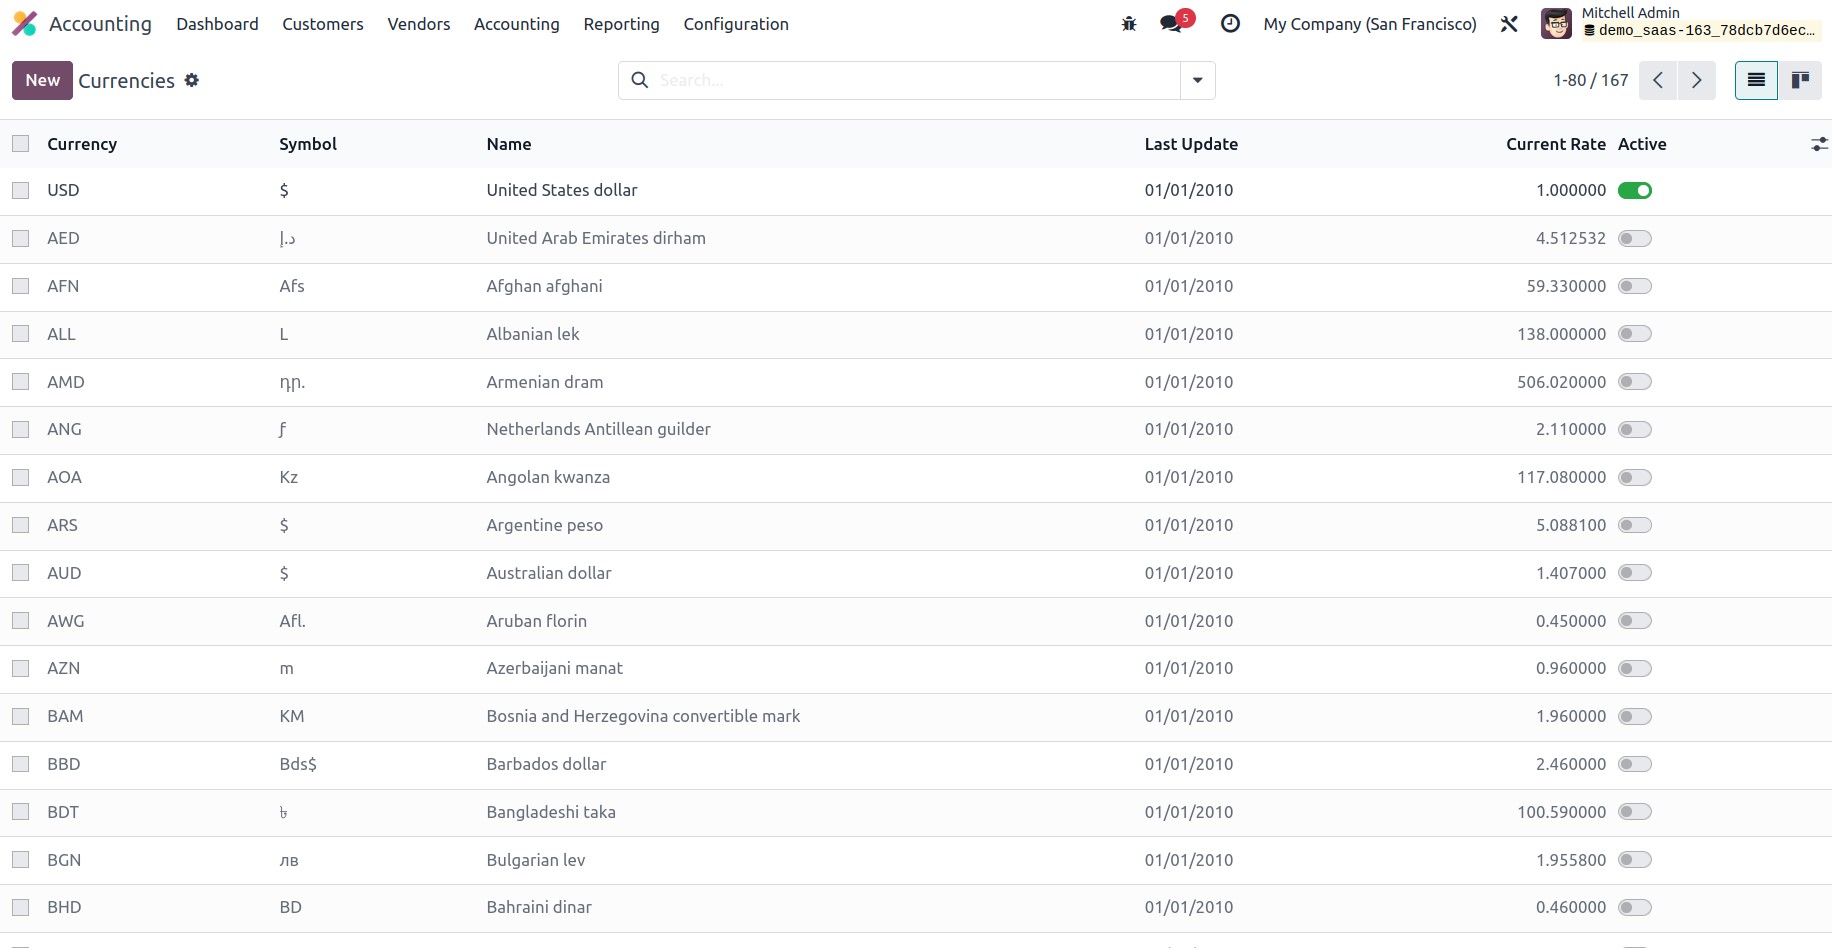
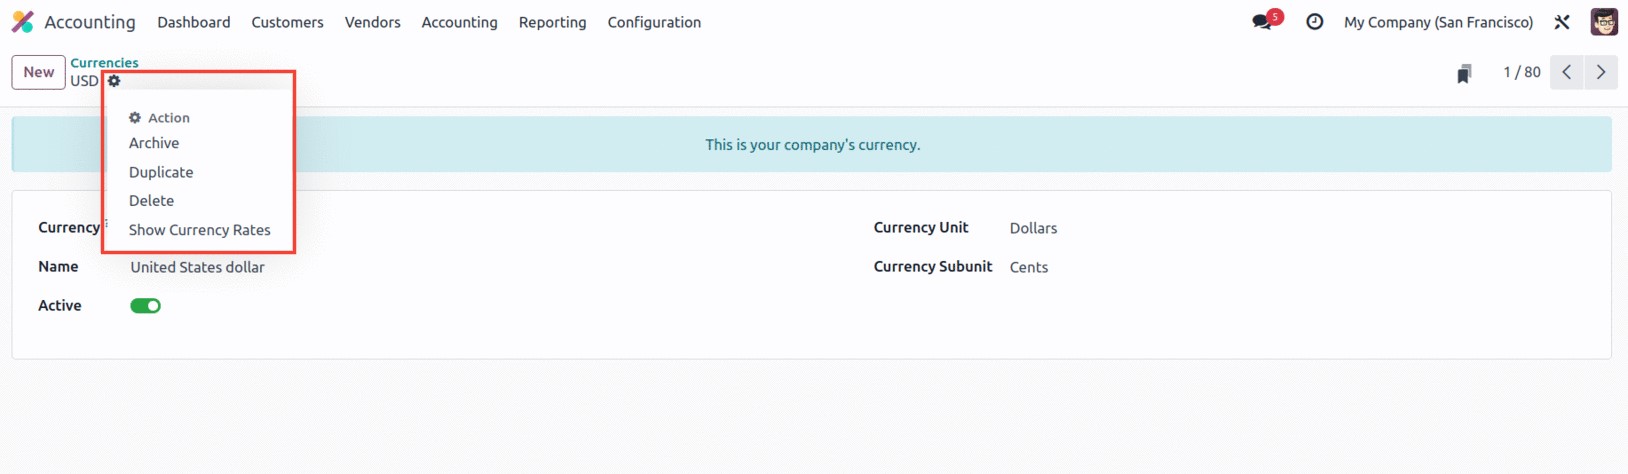
All of the default currency records are selectable, and using the associated options under
the Action button, you may carry out various operations including archiving the currency,
making a duplicate record, deleting it, or showing currency rates.
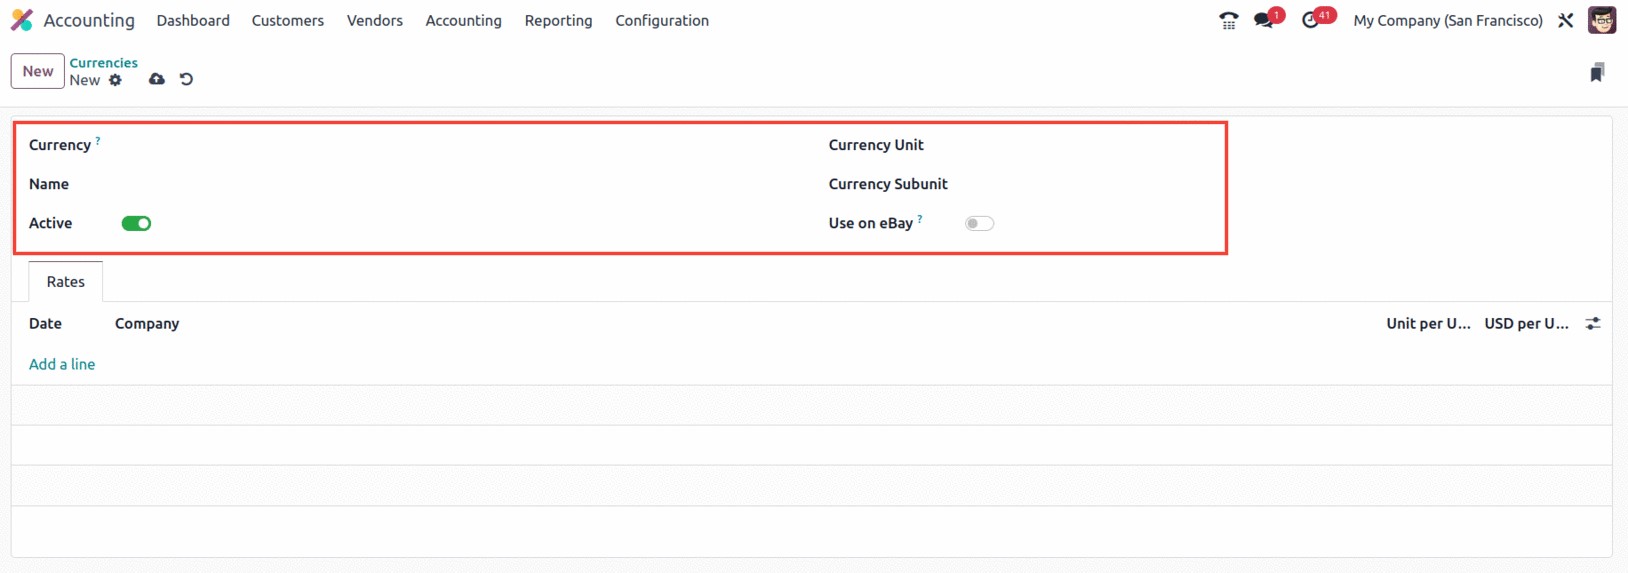
If you need to set up a new currency, you can do so by selecting the NEW button in the
Currencies window. You will now draw the creation form as it is displayed below.
The Currency area is where you can enter the currency code. The AFIP Code must then be
assigned so that it can be utilized for electronic invoicing. The Name, Currency Unit, and
Currency Sub unit can be mentioned in the respective fields. The 'Use on eBay' option can also
be turned on to make this currency available on eBay. The Active field is similar in that it
can be activated or removed depending on the needs.
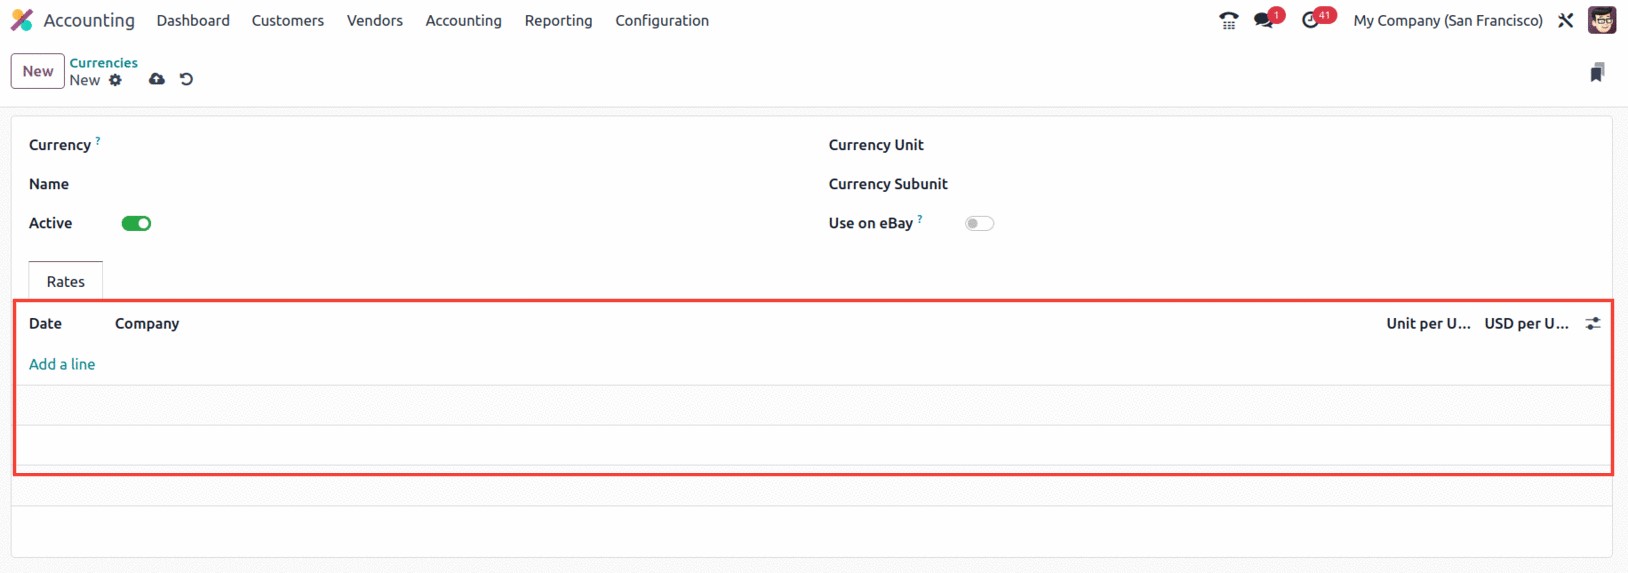
Finally, you can find the currency rates under the Rates tab. Based on the most recent
updates to exchange rates, you can establish new rates for the currency here. Under the Rates
tab, you can define the Date, Company Name, Unit per USD, and USD per Unit.
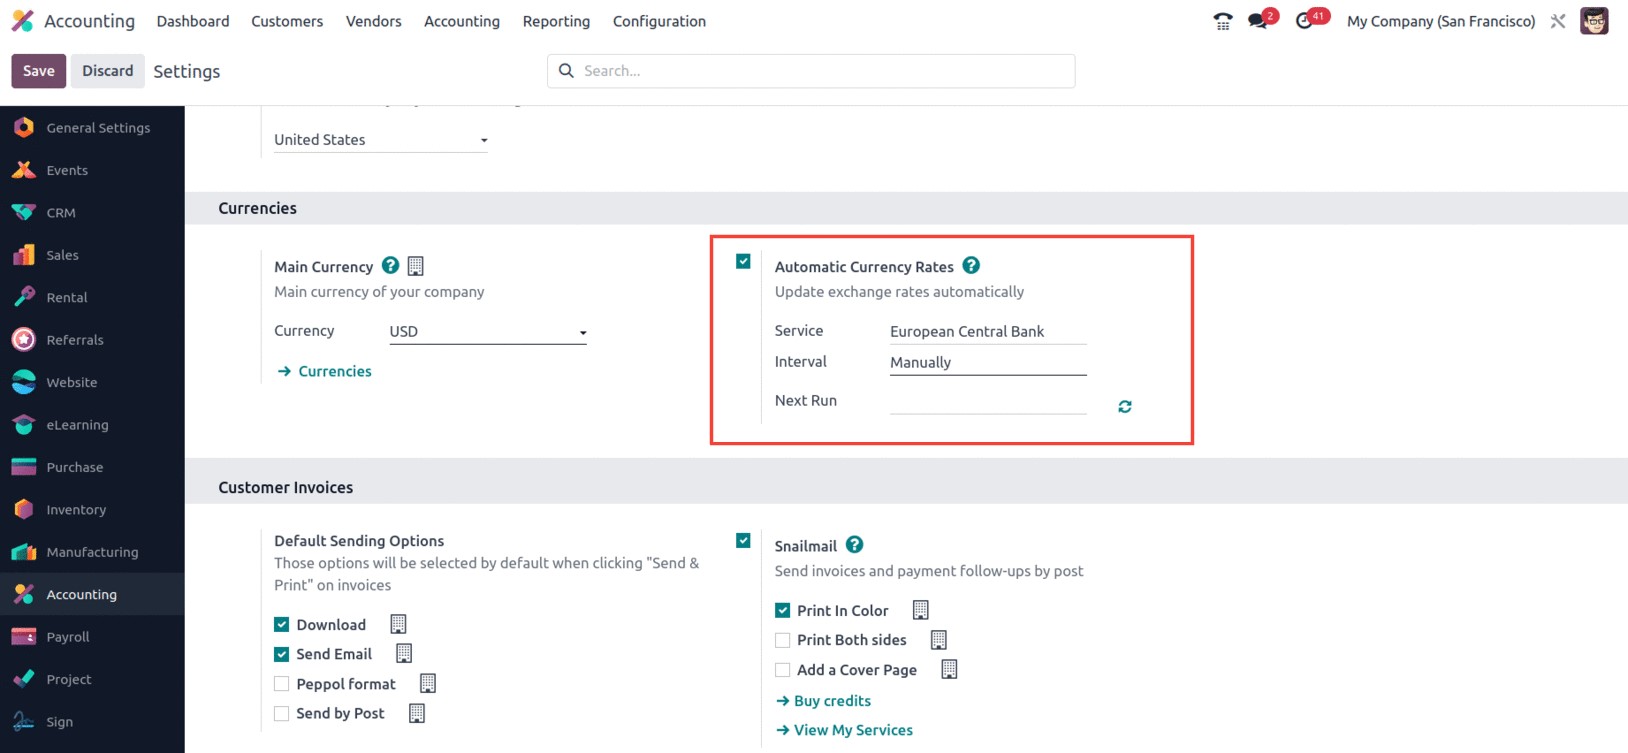
The Automated Currency Rates option is another feature provided by the Odoo17 platform. It
can be accessed via the Settings window of the Odoo17 Accounting module. You may find the
option under the Currencies area of the Configuration Settings, as seen in the figure below.
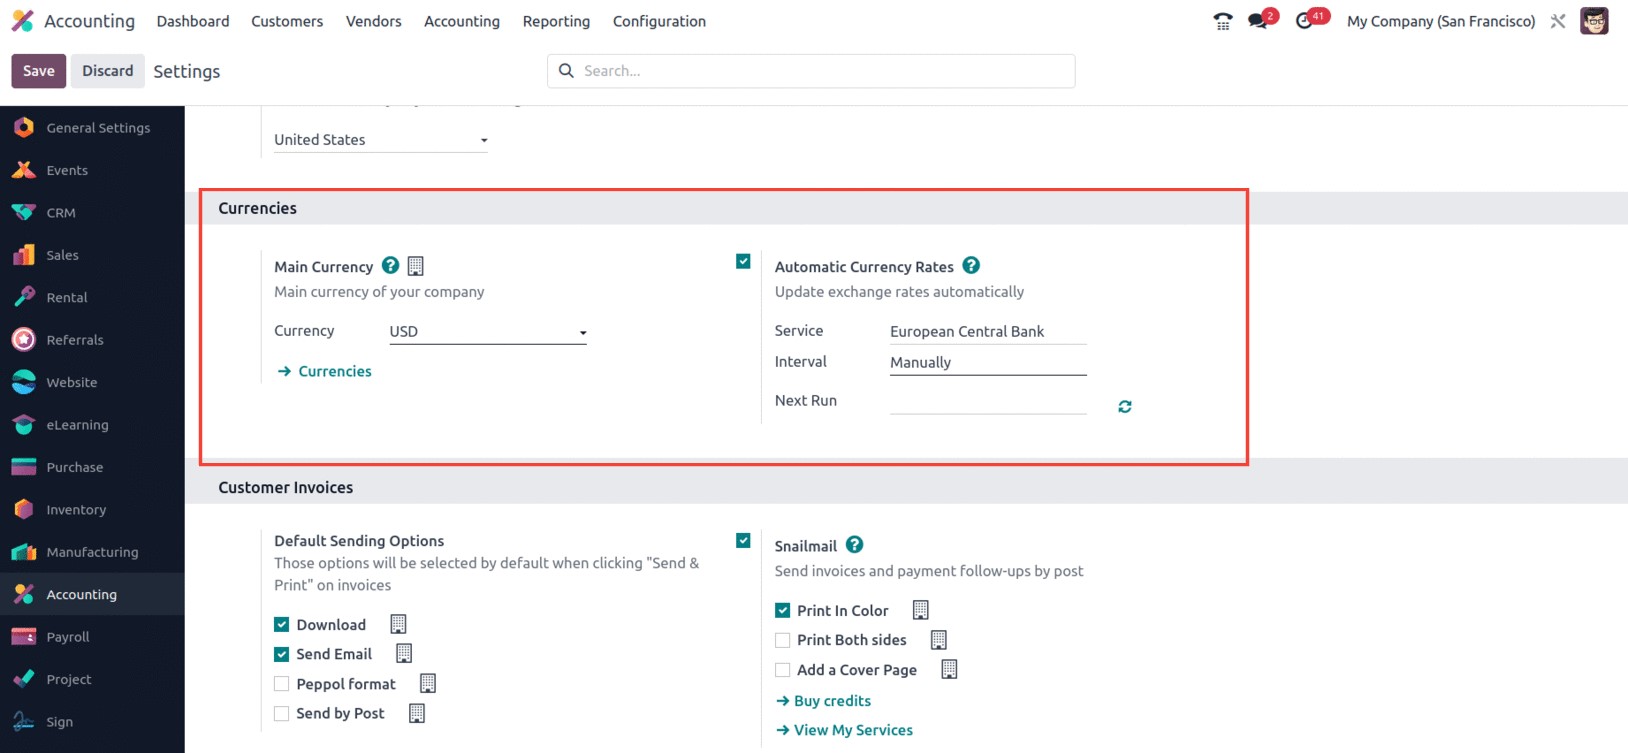
You can update exchange rates automatically if you turn on the Automated Currencies Rates
option. You must do this by selecting the service provider for the currency rate update from
the dropdown list that is presented in the Service field. For instance, it can use the
dropdown to select the European Central Bank, the Bank of Canada, the Mexican Bank, etc.
according to the location in which your business works. Additionally, you can specify whether
the currency will be updated manually, daily, weekly, or monthly. The calendar pop-up under
the "Next Run" column allows you to change the update's next date.
As a result, the Odoo 17 Accounting module provides a unique tool for controlling currency
exchange rates. It enables you to quickly update a currency's exchange rate within the system,
enabling them to function with other currencies. Users will be able to follow their
transactions in several currencies thanks to the module's support for multi-currency
transactions. It also offers reports for examining currency exchange rates and monitoring
currency performance. The module also gives consumers a variety of options to personalize the
settings for their currency exchange rates. They are able to better manage and have more
control over their finances as a result.
The Post Exchange difference entries tool, found in the Default Accounts section of the
Odoo17 Accounting Settings window, can help you manage currency exchange rates more
effectively. The tool's screenshot is displayed below.
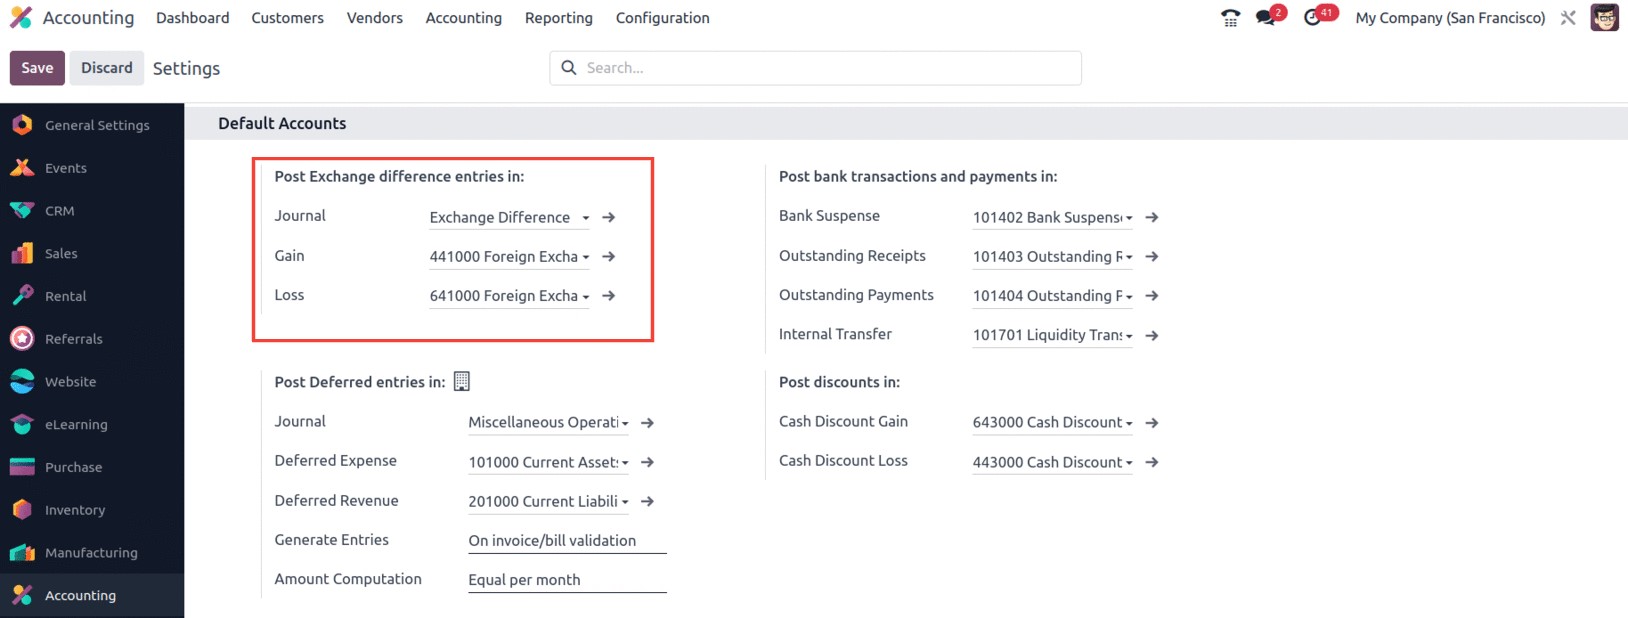
The platform gives users the possibility to define the Journal, the Gain Account, and the
Loss Account using this option. In light of this, if the transaction experiences a loss as a
result of exchange rate variations, it will be recorded in the Loss Account, which is
currently being developed. The Gain Account that you have mentioned here will be credited with
the amount if, on the other hand, the transaction gains money due to changes in exchange
rates. These developments, along with the platform's capable Multi currency management
capability, may help you run professional international commercial operations.
Let's move on to the system's fiscal position management feature now that we are familiar
with the multi-currency management features of the Odoo17 Accounting platform.
Fiscal Position
Tax regulations that can be imposed on a customer, supplier, or product are mapped out in the
Fiscal Position section of the Odoo 17 Accounting module. Based on their nation, state, and
other factors, you can assign different tax laws to clients. This aids in managing the various
tax laws in various nations. This is helpful for businesses that provide goods or services to
clients abroad. This makes it simple to comply with the tax laws of several nations, which is
quite helpful. With the help of this function, you may set up tax regulations differently
depending on the area or type of product purchased by the customer. It can be used to specify
various tax rates for certain clients or goods. This account management organization is the
ideal solution for a company's global financial management. The taxes and the bank accounts
specified for the transactions can be automatically adjusted using this tool.
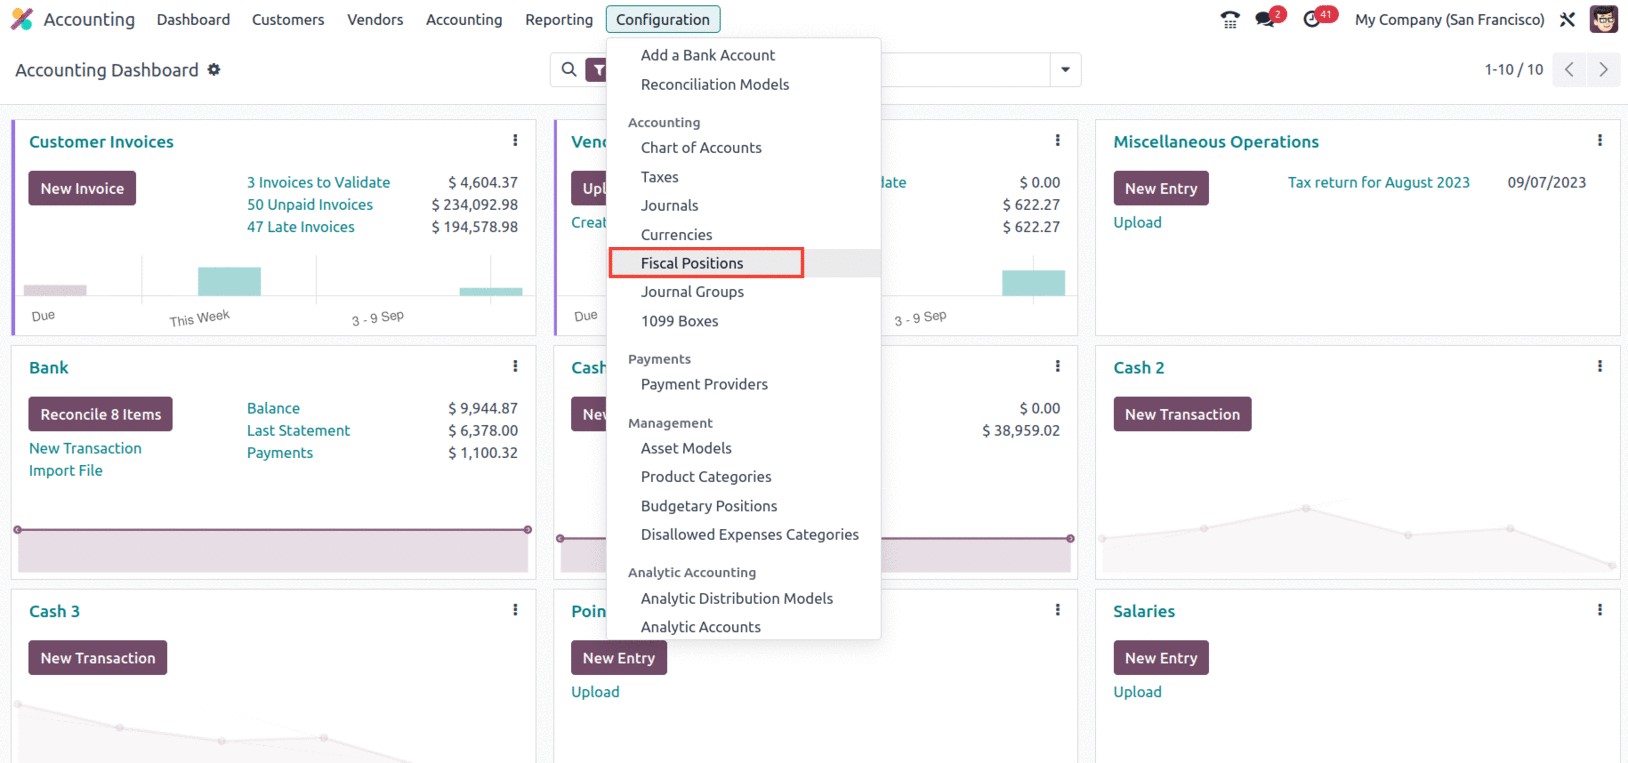
The Accounting part of the Configuration tab in the Odoo17 Accounting software includes a
menu called Fiscal Positions that can be accessed.
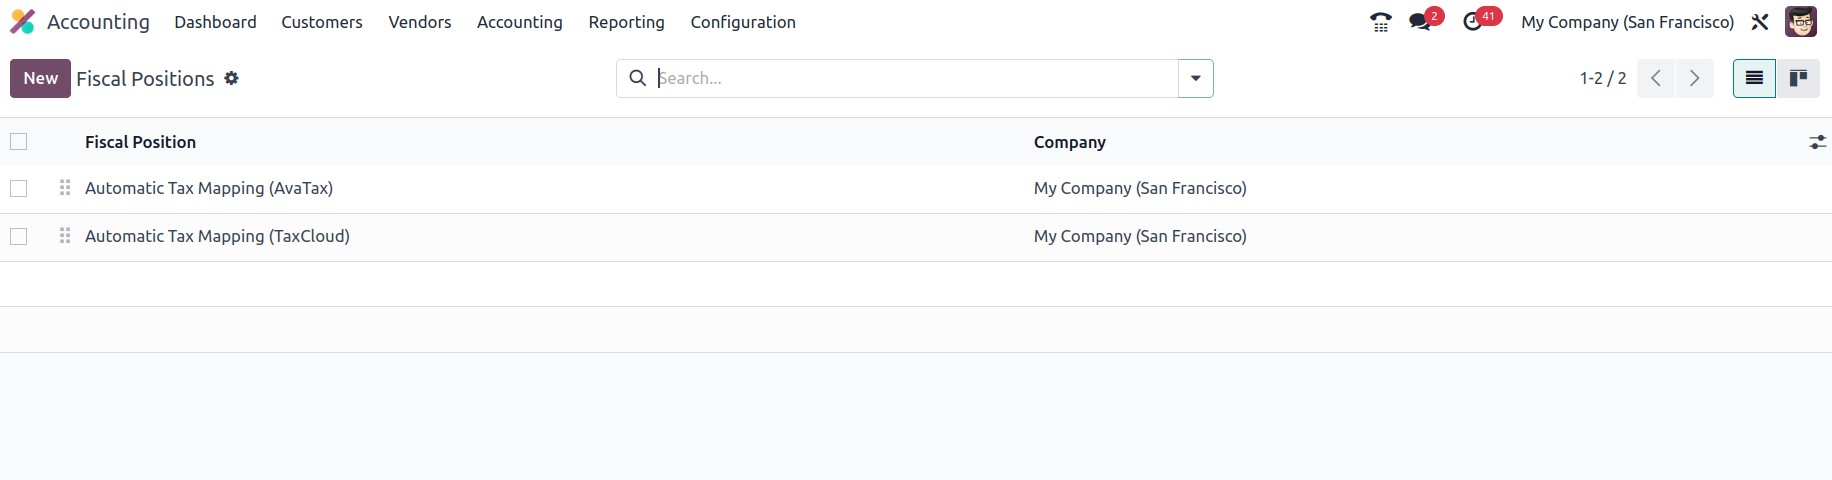
You may manage all the fiscal position entries in the Fiscal Positions window by using the
Fiscal Positions menu as its key. Every predefined Fiscal position will be displayed in the
window, as seen in the illustration below.
All of the fields in the window's display are selectable, and you may choose from among the
defined fiscal position records to see all of the information for that particular one. If the
platform manages additional Fiscal Positions, you can also retrieve the necessary Fiscal
Position using the Filters, Group By, and advanced Search tools, and to Save Current Search.
The gear wheel icon facilitates Import Records, Link menu in spreadsheet, Insert view in
article, Insert link in article, Insert list in spreadsheet, and Add to my dashboard choices.
List view and Kanban view both provide access to the window. The window's Kanban view is
provided below.
An excellent technique to provide necessary Fiscal Positions is to use the NEW button. The
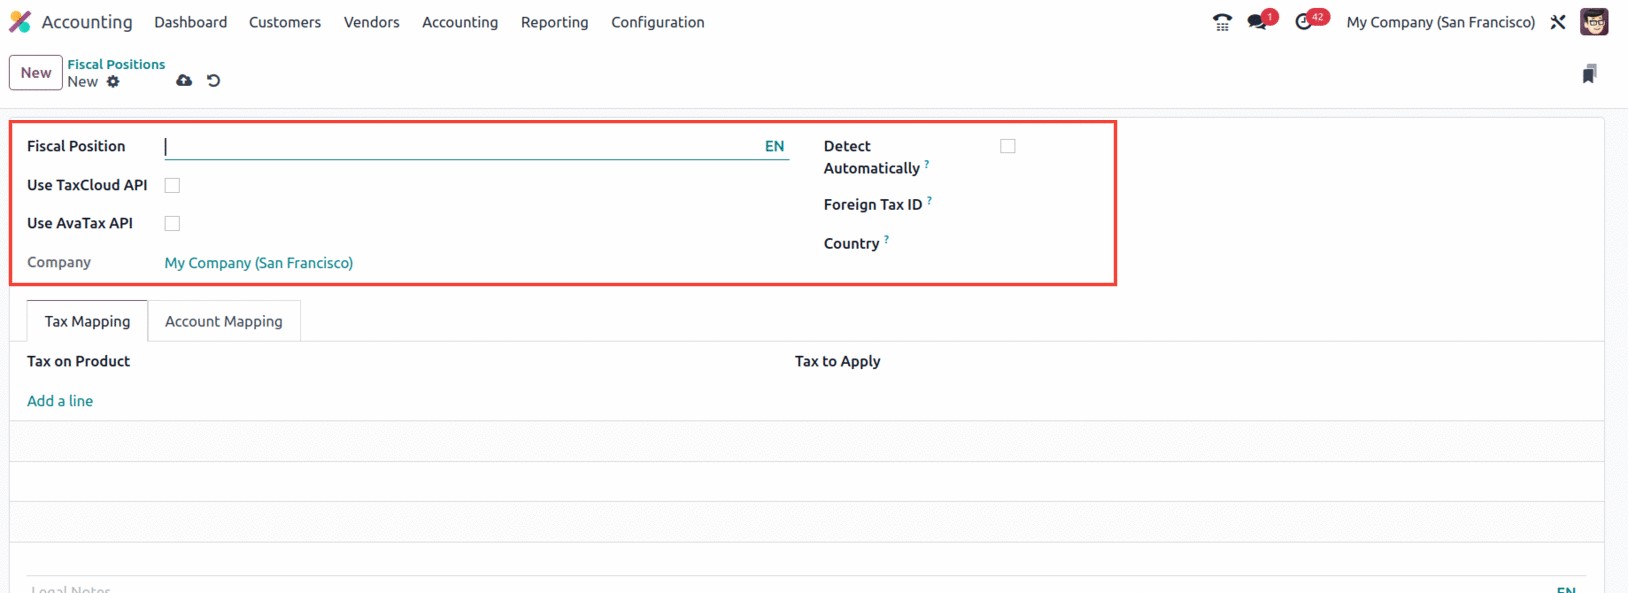
Fiscal Positions creation form is provided below.
The Fiscal Position field is where you can specify the name of the fiscal position. Following
that, you may see other fields to set, including Use TaxCloud API, Use AvaTax API, Detect
Automatically, and Foreign Tax ID. Depending on the options, each of these fields can be
enabled or disabled. To automatically calculate tax rates, you must input your TaxCloud
credentials if the Use TaxCloud API option is selected. The Detect Automatically box allows
you to automatically apply this financial position to the partner operation's country, country
group, cities, or federal state. If you want to apply just to a specific country, you also
have the choice to specify the country where you can mention the country.
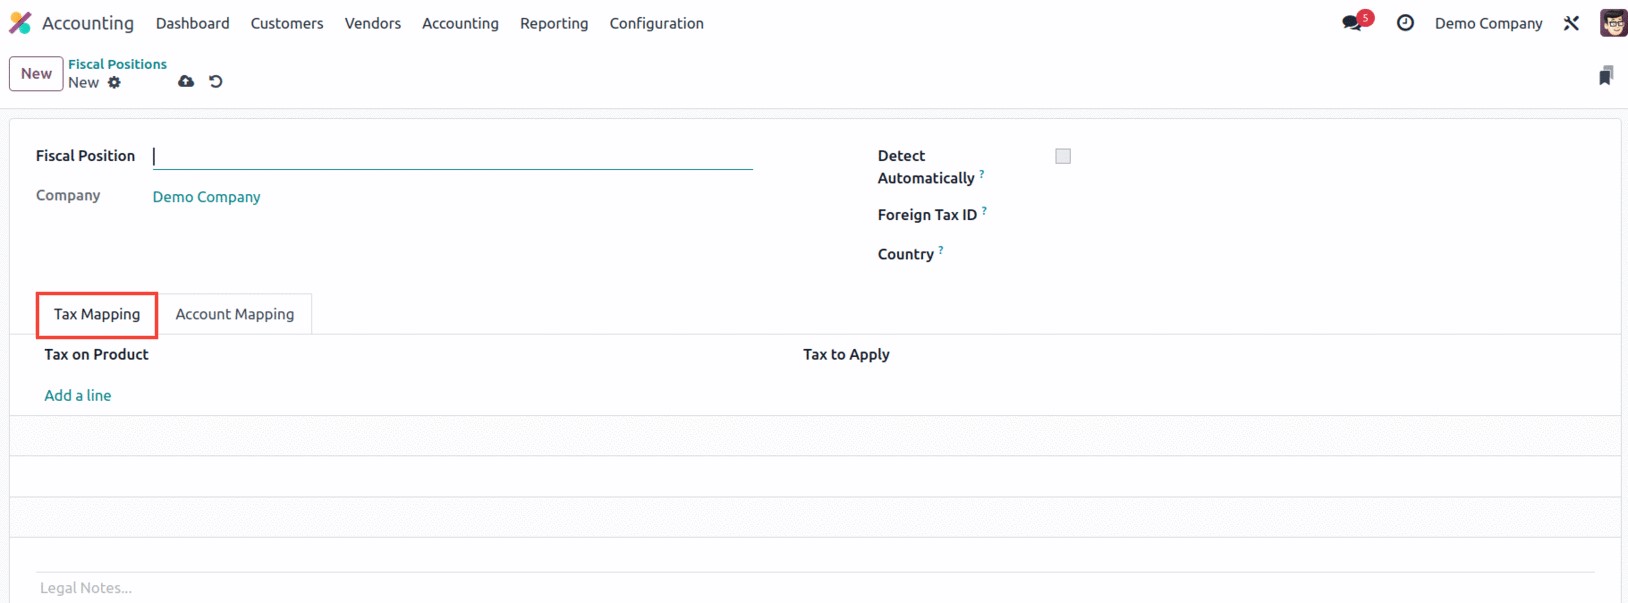
You can now define the "Tax on Product" and the "Tax to Apply" in the setup window's Tax
Mapping tab. In this way, the applicable tax that must be applied to the goods can be stated.
Additionally, the matching product tax will be used in accordance with the fiscal position if
the fiscal mapping is approved by the Odoo17 system when the partner is allocated for the
operation.
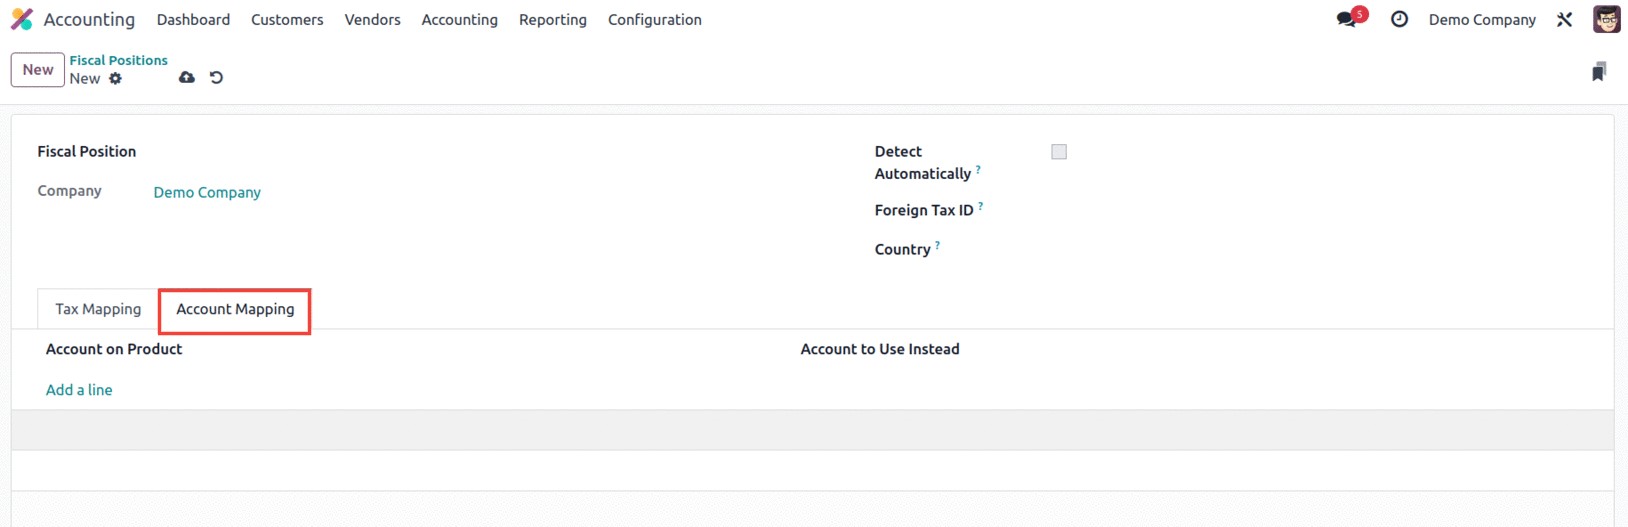
Similar to the ‘Add a line’ option, the Accounting Mapping tab enables you to choose the
Account on Product and the Account to use instead. Additionally, you may include the legal
remarks that must be printed on the invoices in the given Legal Note line.
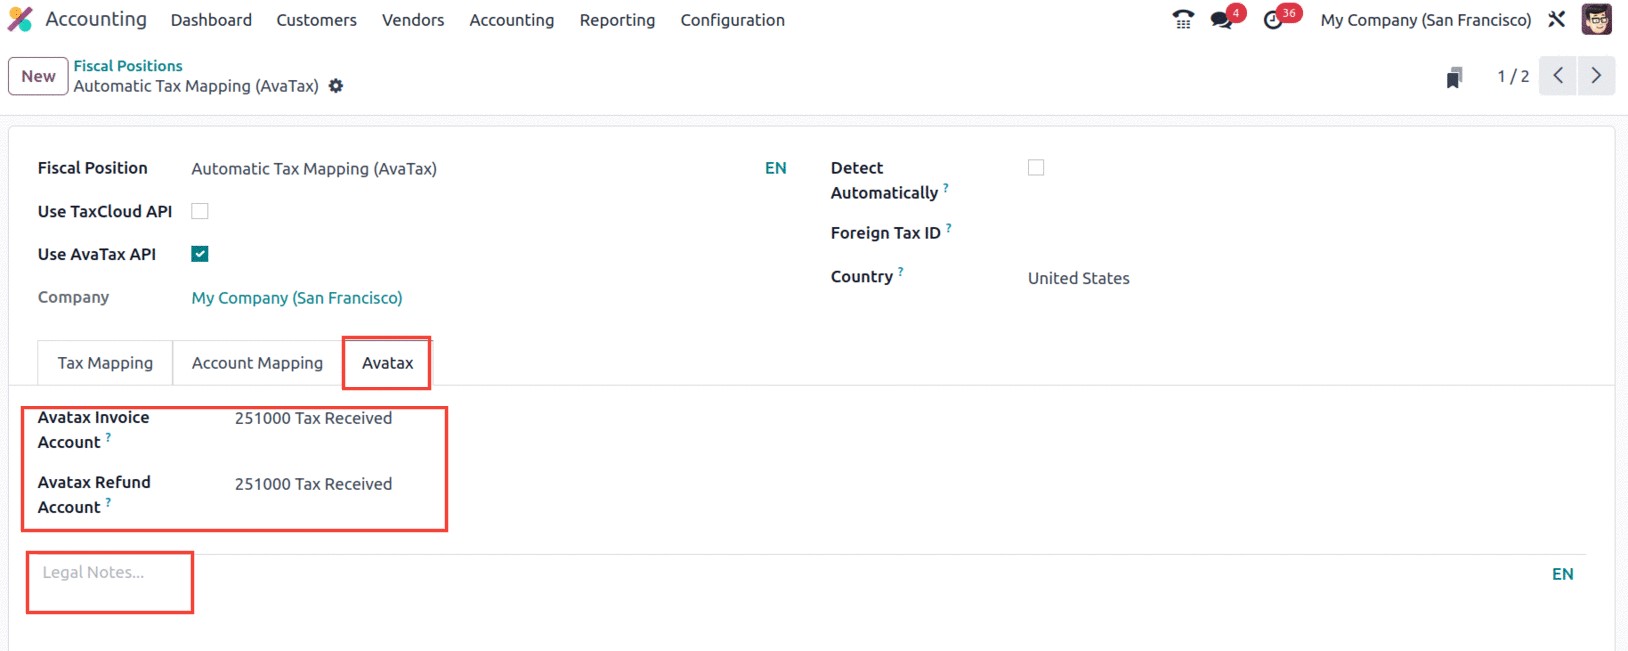
The Avatax Invoice Account and Avatax Refund Account, which are the accounts that Avatax will
use for invoices and refunds, respectively, can be defined under the Avatax settings tab of
the Fiscal Positions creation form. In the space provided, you may also add Legal Notes here.
After setting up all of these components, you can apply them to bills and invoices to have
the tax and accounts mapped in accordance with the example's established rule.

Financial standing for partners is automatically determined based on the specified country
group, country, and federal states.
Let's move on to the Online Synchronisation feature of the Odoo17 Accounting module now that
we are clear on the Fiscal Position menu and its configurable components.
Online Synchronization
Odoo 17's Online Synchronisation, a useful feature of accounting is that enables users to
maintain their books or records current and in sync with their external accounts. Data from
external accounting systems is immediately imported and synced. Users can map their accounts
and have transactions like invoices, payments, and journals generated automatically. Users can
maintain accurate and balanced books with the feature's double-entry bookkeeping capabilities.
To make sure all of your bank account transactions are recorded, you may quickly reconcile
them.
This useful tool makes it easy to communicate data with other systems by allowing you to
synchronize your Odoo17 Accounting data with an external system and keep your accounting data
accurate and up-to-date. By connecting two systems, such as Odoo 17 and an external accounting
system, the online synchronization capability operates. The two systems can share data in real
time after the connection has been made. This implies that whenever an entry is made in one
system, the other will be updated automatically.
You can define choices for how data is transferred between the two systems using this
capability. You can decide which fields are excluded from synchronization, for instance.
Additionally, you can specify how data is handled when the two systems disagree about how to
use it.
The Online Synchronisation tool is the most effective approach to keep track of each time
your bank account and Odoo 17 are synchronized. You can synchronize your Odoo17 database with
your Odoo cloud instance using this. This function is intended to streamline and improve the
reliability of data transfers between various databases. The sync functionality transfers data
from the Odoo database to the cloud instance on a regular basis, and then downloads updates
from the cloud instance. By doing this, it is made sure that both databases are current and
that any changes made in one are mirrored in the other.
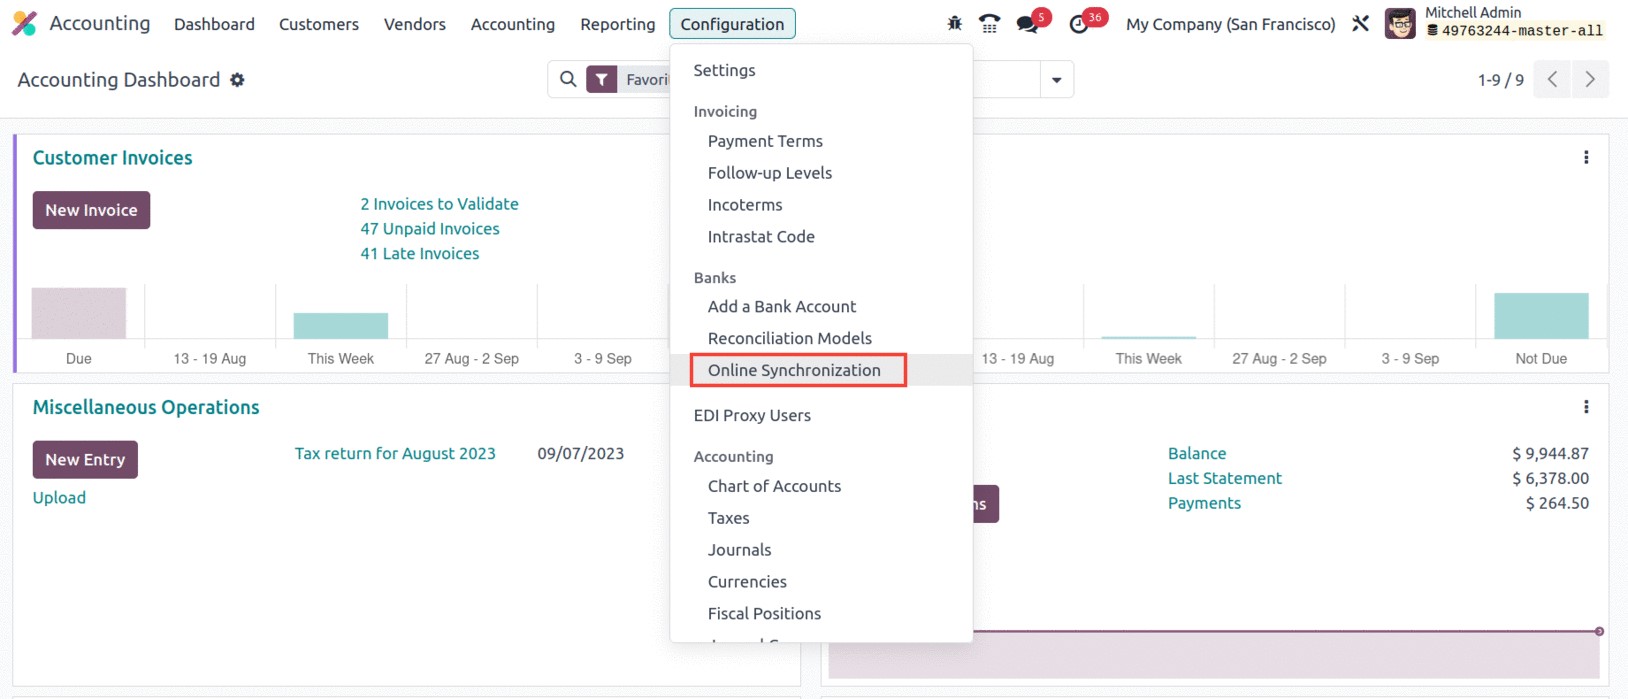
You must first establish the connection and authentication between their local database and
the Odoo cloud instance in order to use the synchronization capability. The Configuration part
of the Odoo interface is where this is done. You can reach the Online Synchronisation menu via
the Configuration tab's Banks section, as seen below.
You can set the synchronization parameters, such as frequency and the data to be synced, once
a link has been made.
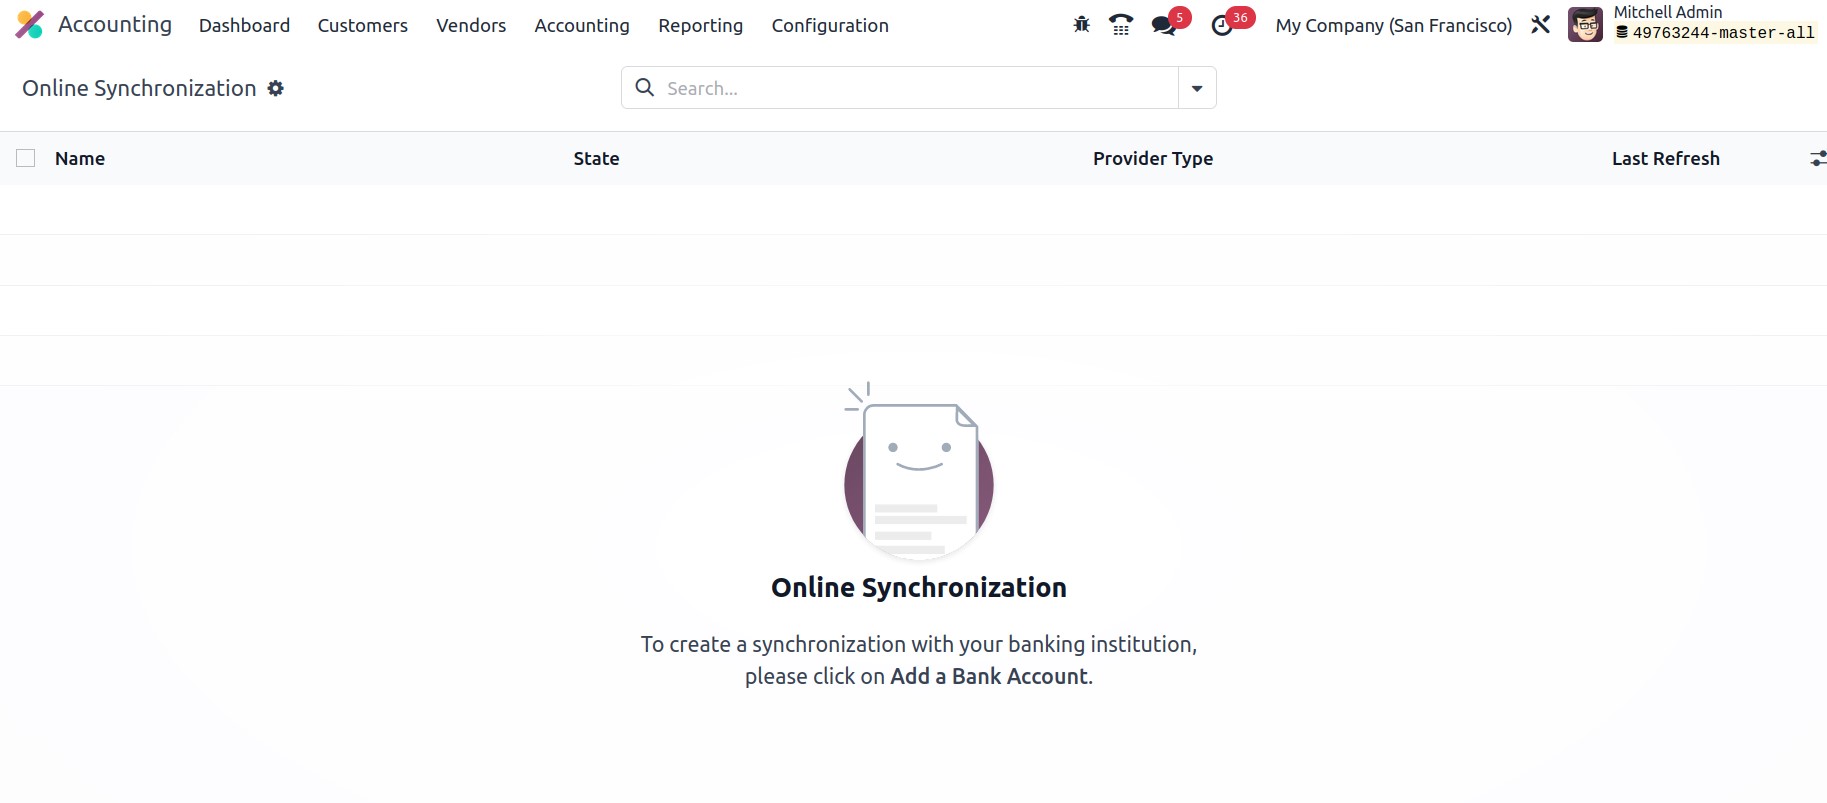
You can add a bank account using the ADD A BANK ACCOUNT menu found in the top left corner of
the Online Synchronisation window. You will then draw a second window containing descriptions
of all the operational banks, as seen below.
You can choose the bank accounts for your business operation from the list you've already
outlined. Click the Connect button after selecting the necessary bank to connect to the
associated bank account.
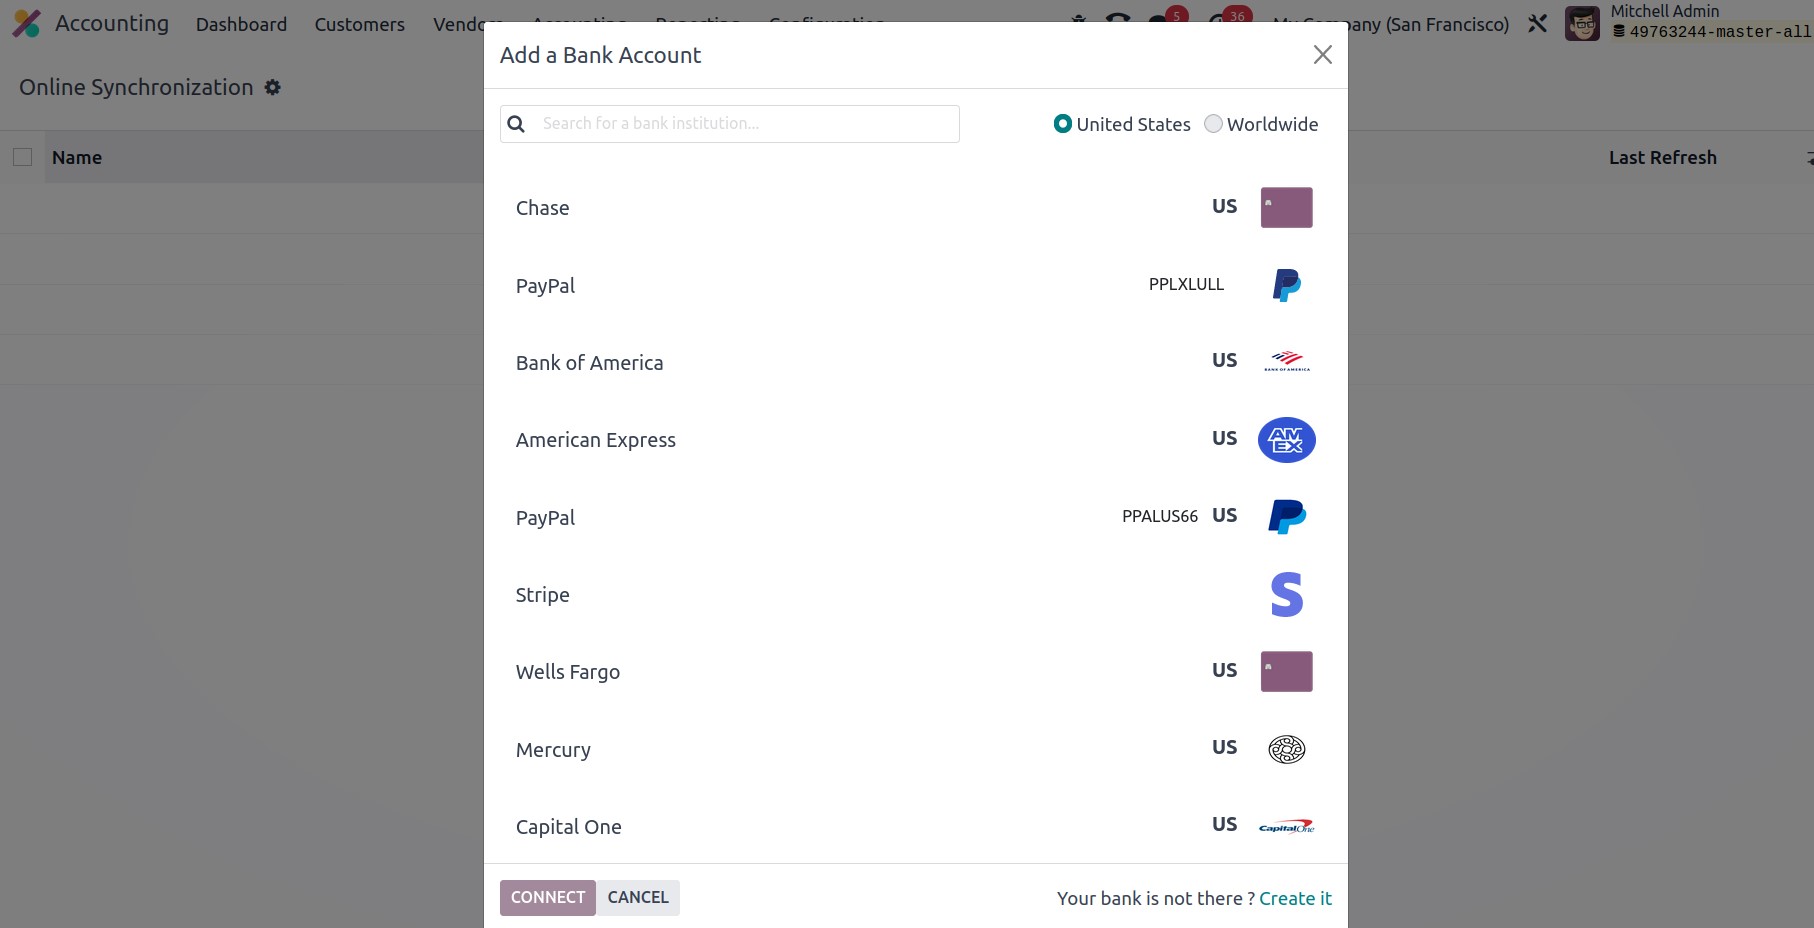
The 'Create it' option, which is visible in the window's bottom right corner, allows you to
create a new bank if the one you need is not among those listed. When you click this button, a
pop-up menu allowing you to create a new bank account will appear.
You can choose the bank accounts from the list you've already listed for your business
operations. Click the Connect button once you've selected the necessary bank to connect to
that account.
If the bank you need is not listed, you can establish a new one with the help of the "Create
it" option shown in the window's bottom right corner. After clicking this button, a pop-up
menu will appear where you can open a new bank account.
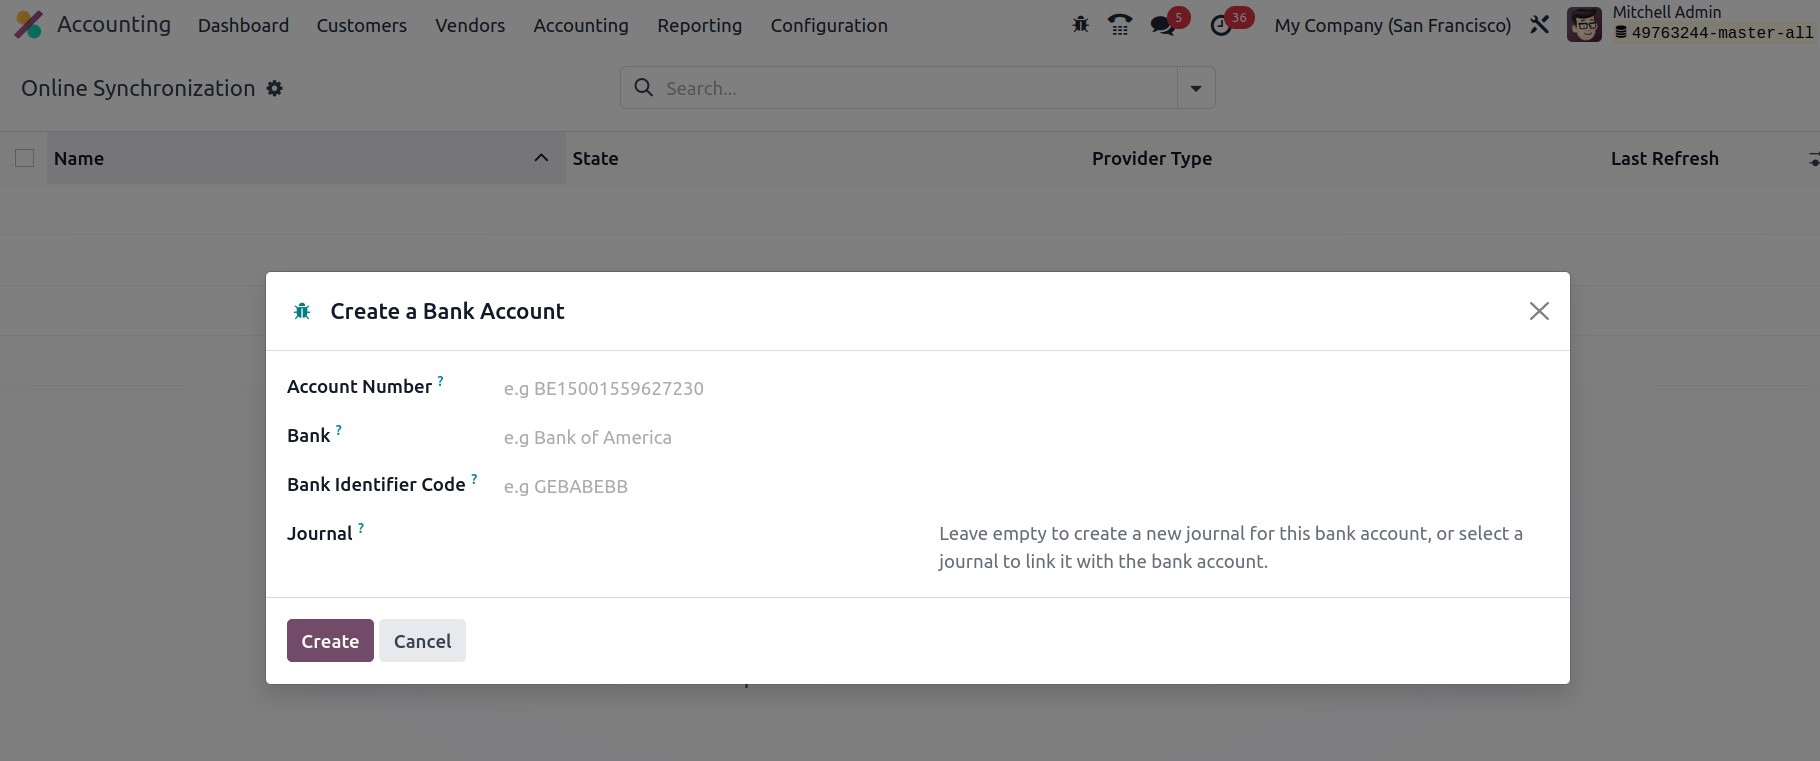
By entering the necessary details, including Account Number, Bank, Bank Identifier Code, and
Journal, in this window, you can open a new bank account.
For seamless operation, the very user-friendly Odoo17 instance offers a list of bank accounts
that includes practically all well-known banks operating globally. You also have the
opportunity to build bespoke bank accounts according to your requirements.
The bank statements will be automatically fetched from the bank server to Odoo17 at a
specific interval of time, say every 4 hours or every 12 hours, which may be set in the
scheduled action for the online synchronization, once the bank has been set up and connected
with Odoo17. Therefore, during online synchronization, it will keep track of all the time
spent in sync with the bank, as well as its status (such as whether it is connected,
experiencing a problem, or not), and the most recent refresh time and date.
We have so far covered the many elements included in the Accounting Configuration menu as
well as the tools explained in the Accounting module's Configuration tab. Let's now go into
more detail about the various Payment setting options offered by the Odoo 17 Accounting
module.
Everything regarding the configuration of Online Synchronization is now pretty clear, so
let's move on to the next section, where we'll talk about how to define horizontal groups.
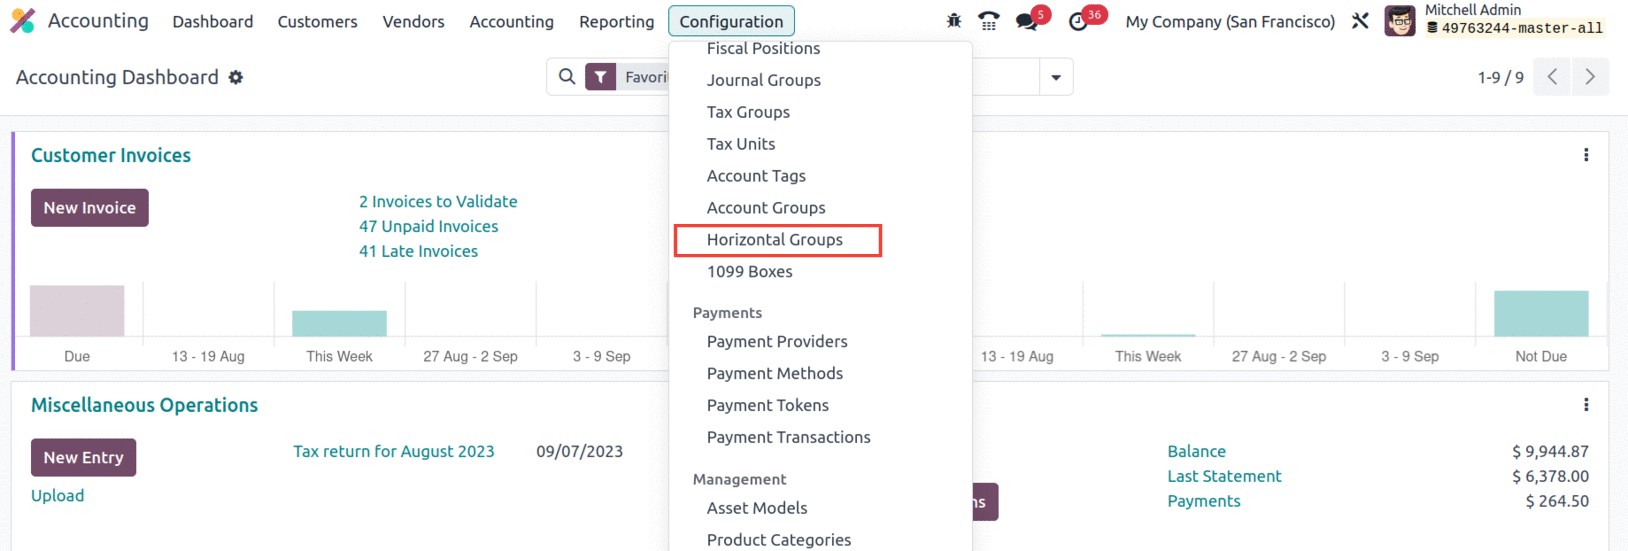
Defining Horizontal Groups
One of the improved features of the Odoo 17 Accounting module, which formulates specific
requirements, is Horizontal Groups. The financial statements can be filtered using these
horizontal groups. Only if the developer mode is enabled will this functionality be accessible
through the accounting application's configuration menu.
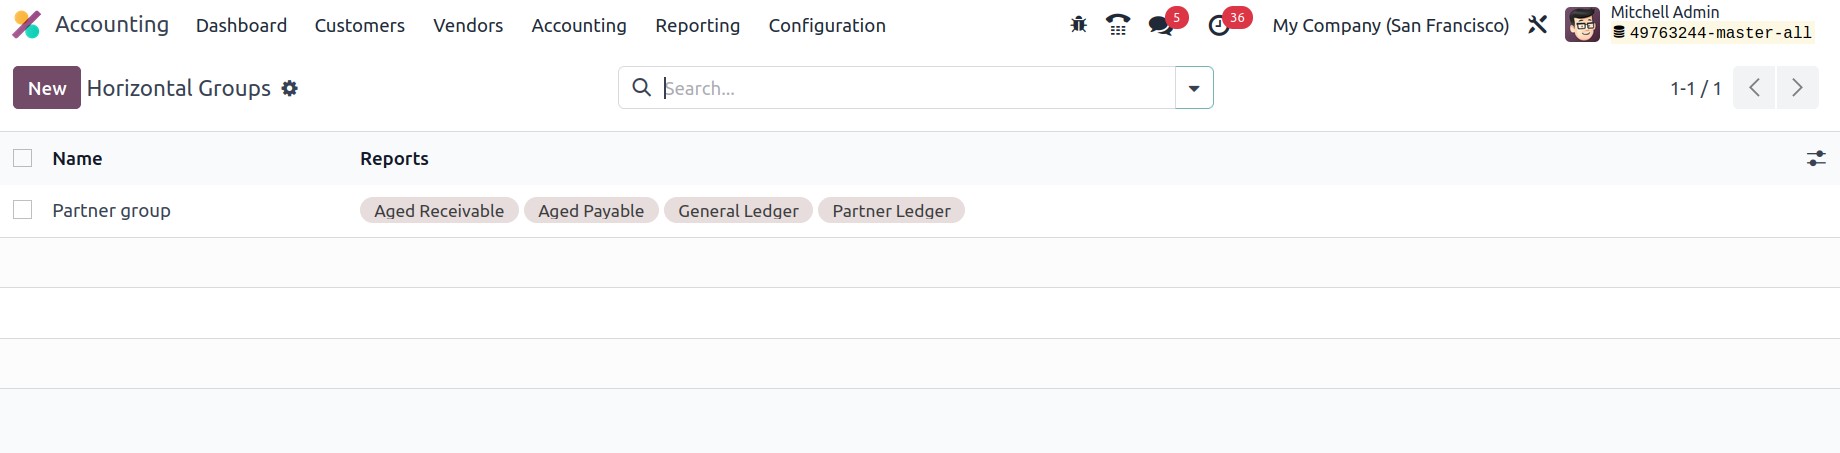
The ability to create horizontal groups is provided by the NEW button in the horizontal
groups. When constructing horizontal groups, we can specify which financial reports will
contain this horizontal group.
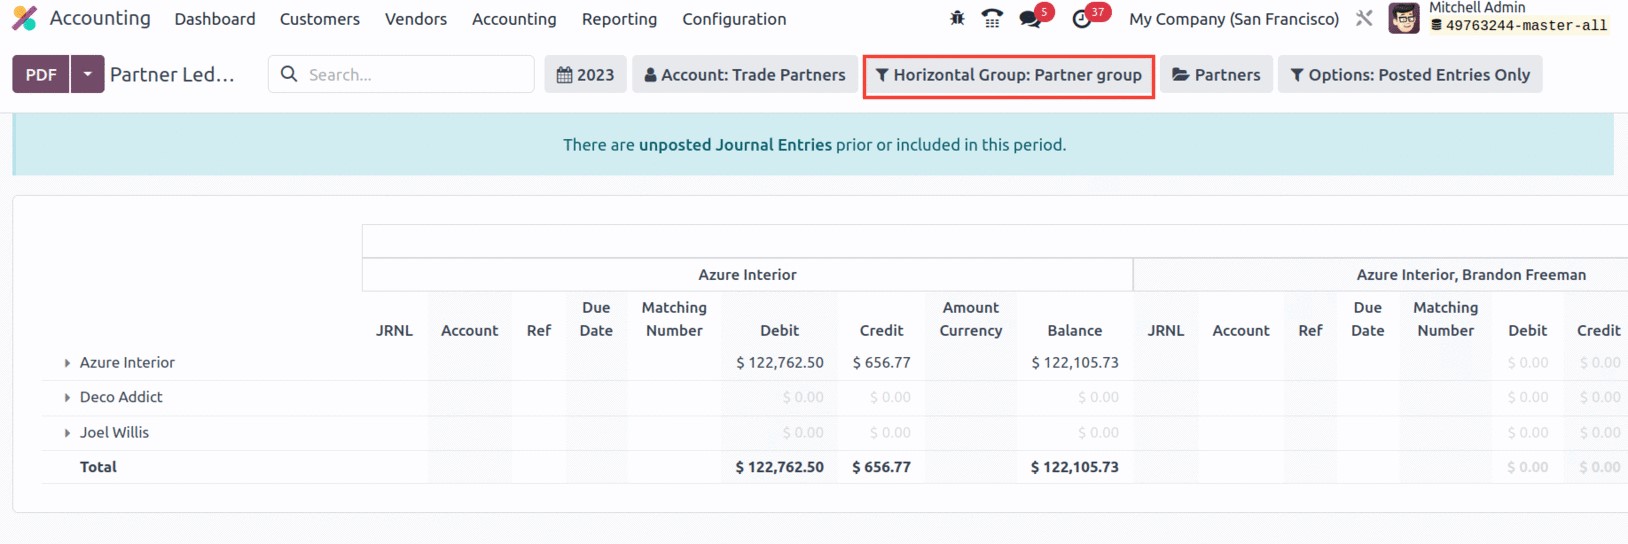
We can enter the domain under the section field.

As a result, the data was filtered according to the domain in the financial reports after
applying the horizontal group.
Payment Options
For completing the operational requirements of Accounting operations management, Odoo17 has a
variety of configuration tools and methods. The management of Payments and their associated
functions can be regarded as one of the core elements of Accounting management operations. The
finance department is responsible for collecting all incoming and outgoing funds. You must
therefore be prepared with all the cutting-edge features and tools in this digital age in
order to specify and accept the payment appropriate for accepting funding from a variety of
sources.
The Odoo17 platform prioritizes payment alternatives above all else, and it makes it simple
and quick to manage and see payment terms, payment modes, and payment methods. You may quickly
set up various payment terms, payment mechanisms, and payment options for all of their
clients, vendors, and consumers using the platform. This enables reporting on payment patterns
and tracking incoming and outgoing payments. Additionally, it makes it simple to send payment
requests and bills fast. It offers a more efficient method of managing and processing
payments. This involves setting up and managing payment terms, controlling automated payments,
and setting up and managing payment options. Payment options offer a thorough and practical
method of managing and processing payments, freeing up time and resources to concentrate on
other areas of the company.
The Payment Acquirers, which are the most practical means of accepting payment, are the main
component of the Payment choices of configurations provided in the Odoo17 instance. Therefore,
we may list the Payment Acquirers that are present in the Odoo17 system in the part that
follows.
Payment Providers
The services that allow you to process payments for your clients are known as payment
providers. The Odoo 17 Accounting module's Payment Providers feature enables you to accept
payments and pay suppliers, customers, or vendors. This streamlines the payment and collection
process, lowers manual errors, and guarantees on-time payment. Additional advantages offered
by payment providers include integrated accounting, fraud prevention, and automatic
reconciliation. It allows connectivity with several banks as well as online payment processors
like PayPal and Stripe. Customers can now pay orders or bills online from the Odoo17 website
using a safe and secure payment gateway. Through streamlining the payment process and
increasing consumer satisfaction, this integration enables speedier payments.
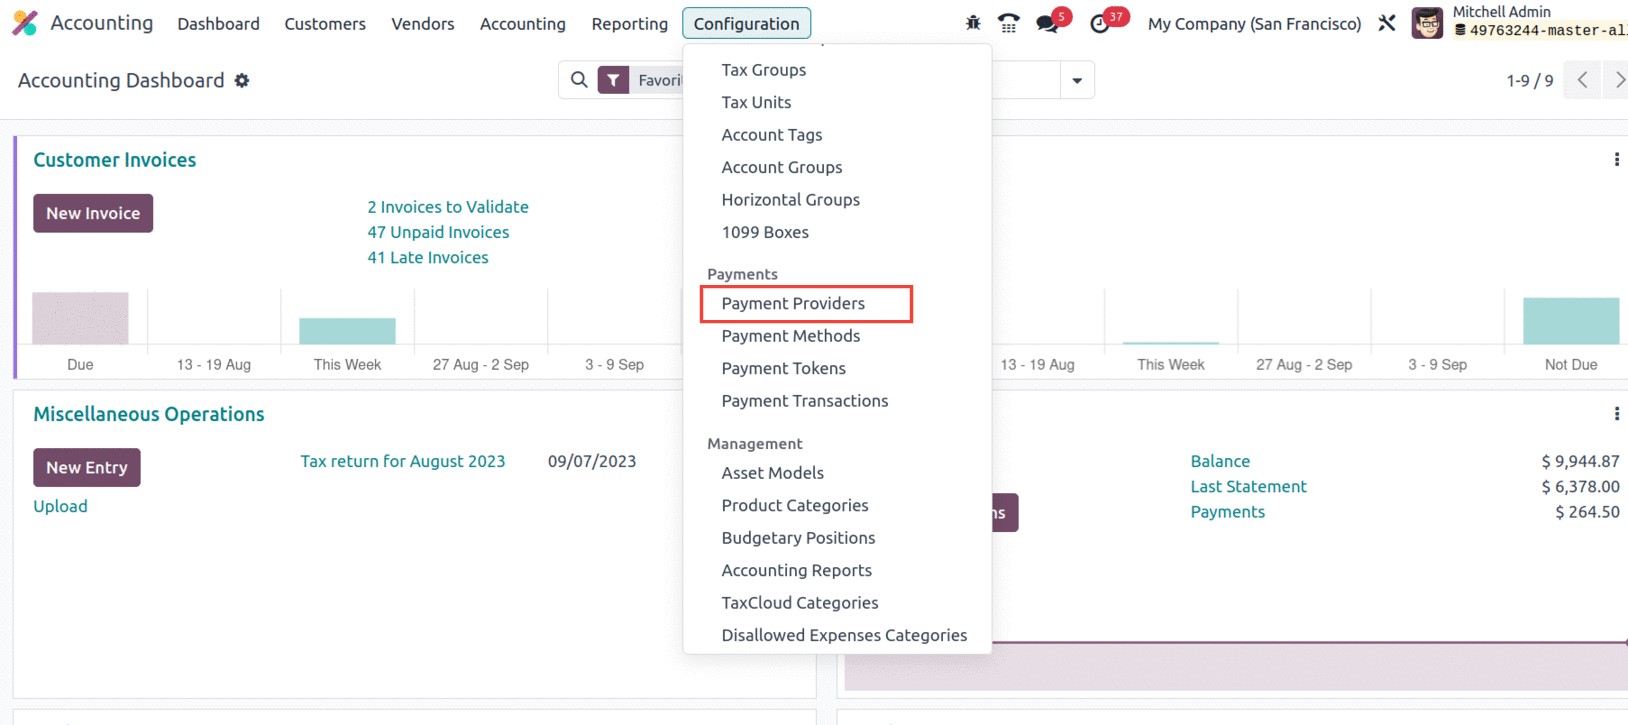
The Payment Providers option is easily accessible in the Odoo17 instance. You may access the
Payment Providers menu icon in the Payments section of the Accounting module by selecting the
Configuration tab, which is displayed in the image below.
The Payment Providers window, which is accessible from the menu and displays all of the
installed and defined payment providers, is a link that can be used to access the menu.
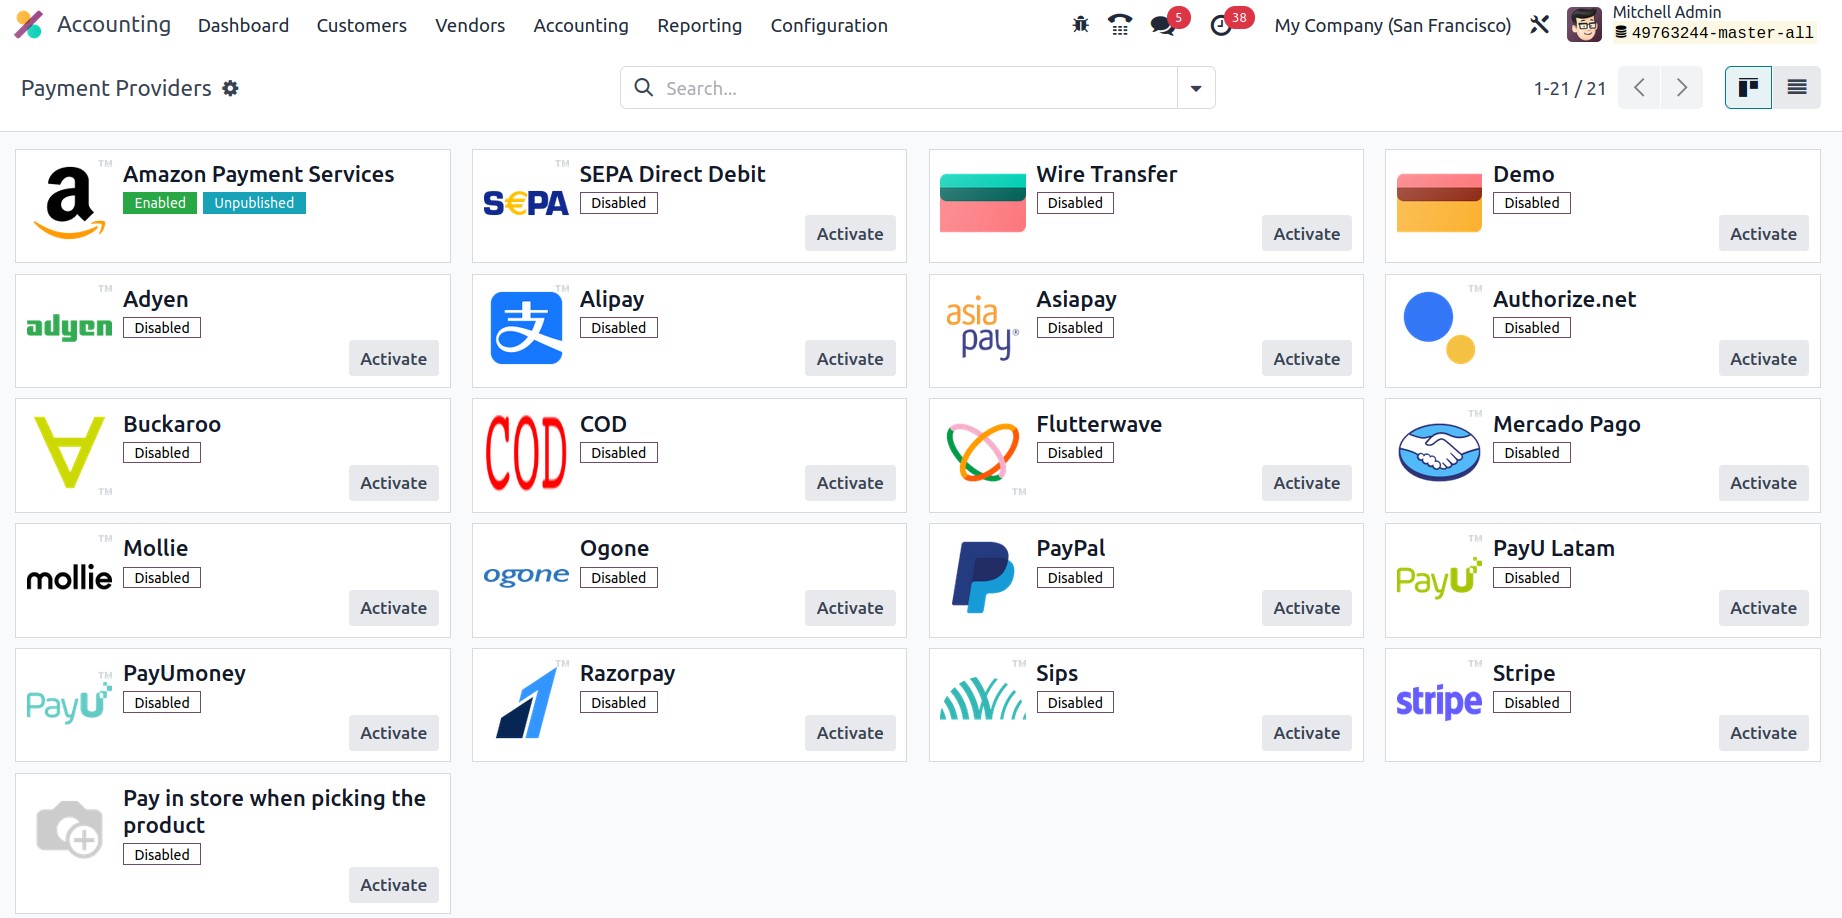
You can see the names and logos of the Payment Providers that are being made operational
right here in the window. Additionally, the necessary Payment Providers can be enabled by
simply choosing and turning on the appropriate provider. In order to quickly find the
appropriate Payment Provider, you also have the opportunity to filter and organize using the
different default as well as configurable Filters and Group By options. You can choose from
any of these listed Payment Providers to view the configuration information, and you also have
the option to modify the information.
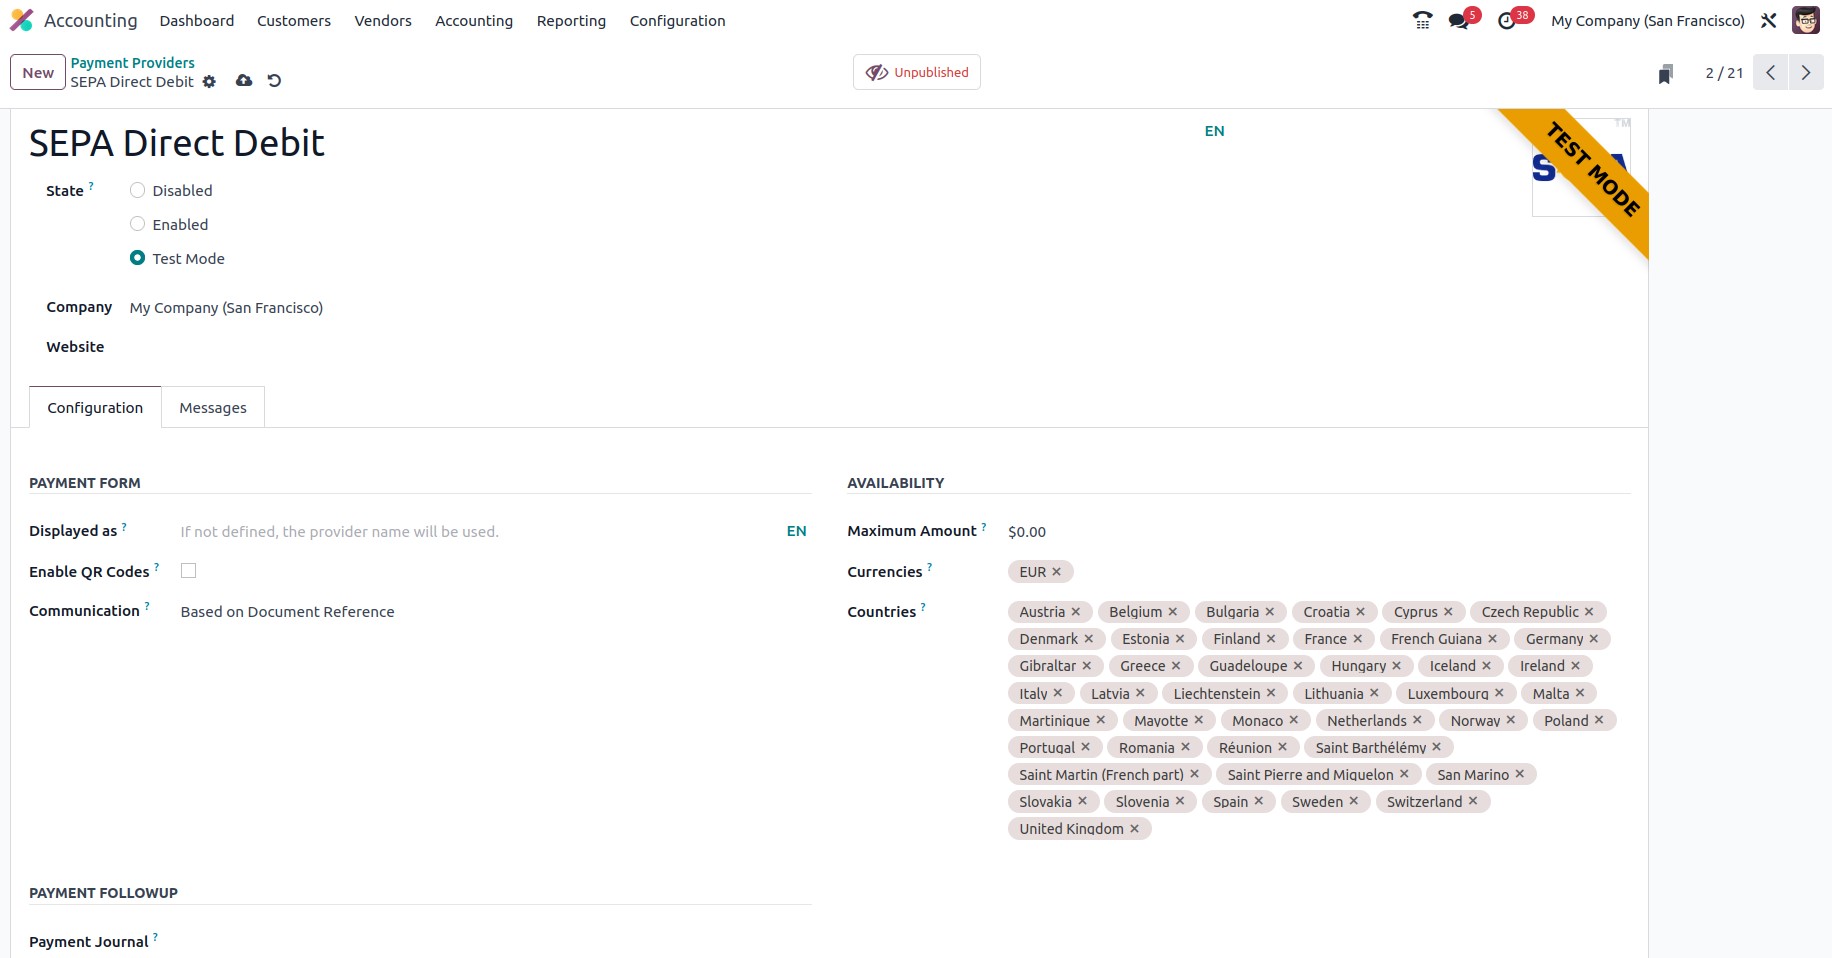
You can choose a certain provider to access all of its information. For instance, by clicking
on this record, we may read the details of the "SEPA Direct Debit." As seen in the image
below, you will see a new window where you may view all of the details.
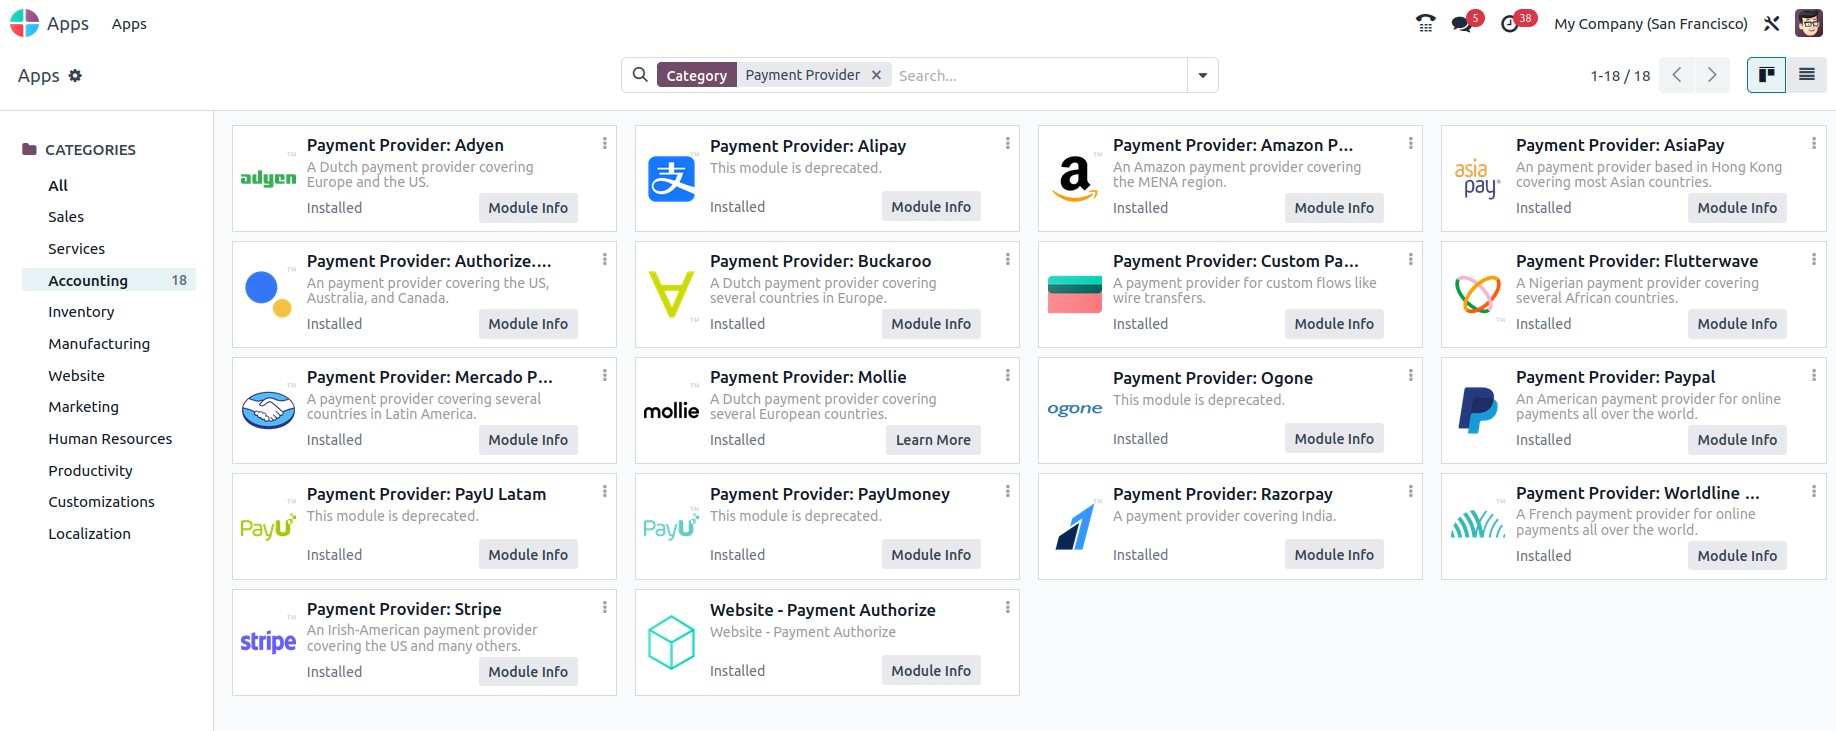
From the Odoo17 platform's App Store, users can access the various Payment Providers intended
for the platform's operations. You may access all the accounting-related software that can
only be installed from here under the Accounting category.
The management options for the Odoo17 Accounting module can then be covered.