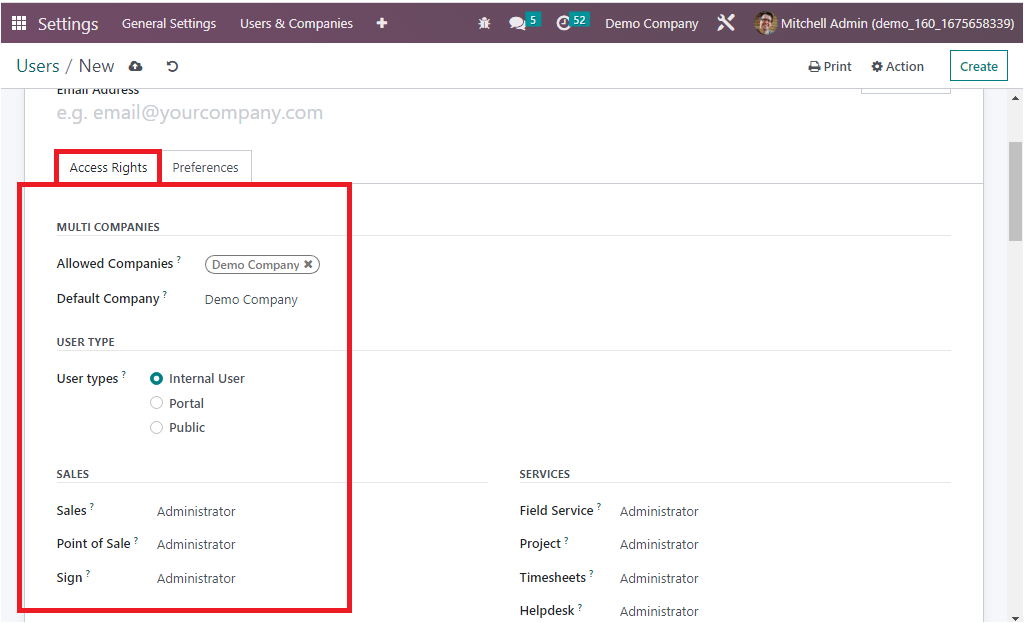
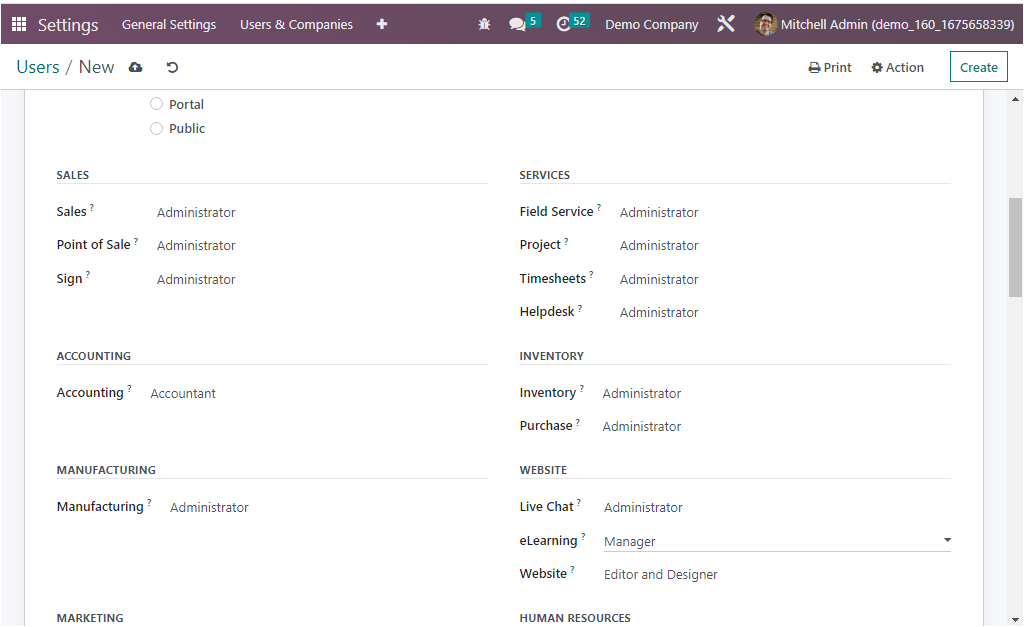
The Access Rights tab existing in the Users configuration form will allow you to define the user’s access rights-related information. Here under the Access Rights tab, you have several fields. First of all, you can describe the Multi companies' associated information, such as Allowed Companies and Default Company. In the Allowed Companies field, you can mention the company names which the user has access to if it works on a multi-company basis. The default company of the user can be specified under the Default Company field. Next, under the User types section, the platform provides you with three options such as Internal User, Portal, and Public, from which you can select the apt one. Then you can mention the sales aspects of the user. In the Sales field, you will find a dropdown menu where you have three options such as User: Own Documents Only, User: All Documents, and Administrator. If you select the first one, the user will get access to his own data in the Sales application. In the second case, the user will have access to all records of everyone in the sales application. In the case of the Administrator, the user will have access to the sales configuration as well as statistical reports.

Further, in the Point of Sale field, you have the User and Administrator options in the dropdown menu. Setting a suitable one here in the field helps you get the most out of your point of sale with fast sale encoding, simplified payment mode encoding, automatic pricing list generation, and more. Similarly, the Sign field helps you to sign and complete your documents easily by defining the most suitable one from the list ‘User Own Templates or Administrator.’
Next, you can define the Accounting related aspects, which will make it easy to manage accounting needs. Here you have different choices like Billing, Read-only, Bookkeeper, and Accountant which we can discuss in detail later. Likewise, the Manufacturing aspects of the user can be defined as either Administrator or User in the respective field.
Then in the Services section, you have the Field Services, Project, Timesheet, and Helpdesk to define. Further, to manage the inventory operations and the stock operations, you have the Inventory and Purchase fields under which you can specify either Administrator or User based on the corresponding user. Then in the Website section, you have the Live Chat, eLearning, and Website fields. If you set the Live Chat field as Administrator, the user will be able to delete support channels. If it is set as a User, the user will have the power to delete the support channel. Likewise, in the eLearning field, you can make the user either Manager or Officer. You can choose ‘Restricted Editor’ or ‘Editor and Designer’ in the Website field from the dropdown.

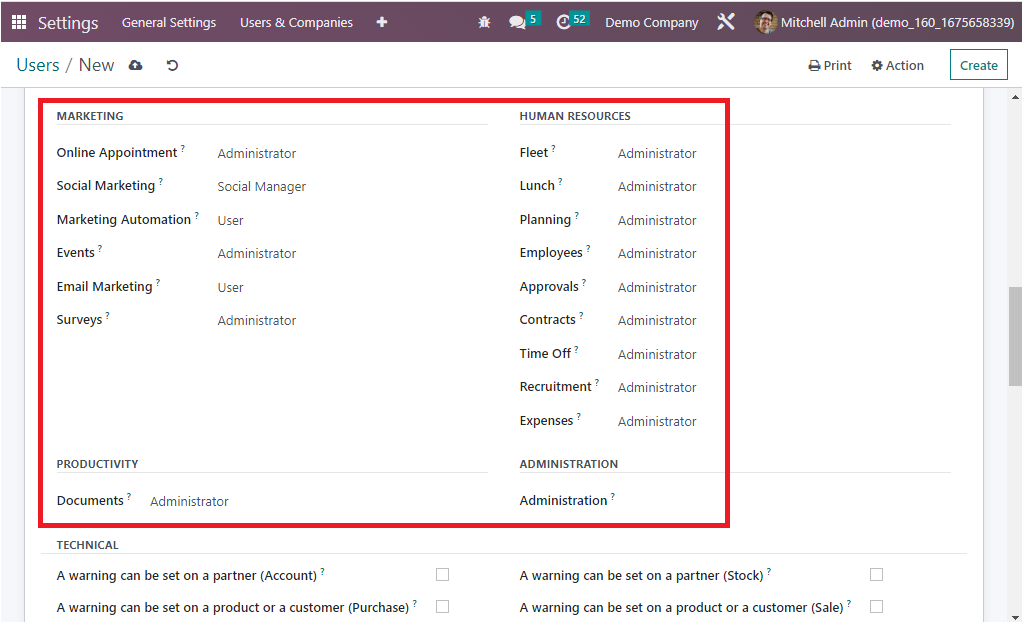
Further, in the Marketing section, you have the Online Appointment, Social Marketing, Marketing Automation, Events, Email Marketing, and Surveys fields to define the relevant aspects.

Then in the Human Resources section, you can view various fields such as Fleet, Lunch, Planning, Employees, Approvals, Contracts, Time Off, Recruitment, and Expenses. Moreover, the Administration field allows you to mention the ability of the user to either ‘Access Rights’ or ‘Settings’. Similarly, the Documents field available under the Productivity can be filled with a suitable option from the dropdown menu.
Now the Technical section provides boolean fields that can be enabled or disabled based on the user aspect. The different fields are ‘A warning can be set on a partner (Account), A warning can be set on a product or a customer(Purchase), Access to Private Addresses, Advanced Pricelists, Allow to define fiscal years of more or less than a year, Basic Pricelists, Create a new quotation directly from the tasks, Discount on lines, Display Serial & Lot Number in Delivery Slips, Display incoterms on Sales Order and related invoices, Lock Confirmed Sales, Manage Different Stock Owners, Manage Mass Mailing Campaigns, Manage Multiple Units of Measure, Manage Packages, Manage Product Variants, Manage Storage Categories, Manage template access, Prnt GS1 Barcodes for Lots & Serial Numbers, Produce residual products, Quotation Templates, Referral Reward Responsible User, Sale Reciept, Show Customer Ratings, Show Recurring Revenues Menu, Tax display B2B, Time Off Responsible, Unlocked by default, Use Operation Dependencies, Use Reception Report, Use Recurring Tasks, Use Subtasks, Use Time Billing, A warning can be set on a Partner( Stock), A warning can be set on a product or a customer(Sale), Access to export feature, Allow the cash rounding management, Analytic Accounting, Comparison Price, Delivery Address, Display CV on application form, Display Serial & Lot Number on Invoices, Enable Signing Order, Mail Template Editor, Manage Lots/ Serial Numbers, Manage Multiple Stock Locations, Manage Multiple Warehouses, Manage Product Packaging, Manage Push and Pull inventory flows, Manage Work Order Operations, Multi websites, Pro-forma Invoices, Purchase Reciept, Recruitment Interviewer, Require a signature on your delivery orders, Send an automatic reminder email to confirm delivery, Show Lead Menu, Show SLA Policies, Tax Display B2C, UOM Price Display for eCommerce, Use Milestones, Use rating on Project, Use Reception Report With Manufacturing Orders, Use Stages on Project, Use Task Dependencies, Use wave pickings. Similarly, you have the extra rights fields, such as Contact Creation and Multi Currencies, which can also be activated or deactivated. Further, the Multi companies and another field available in the other section, ‘Bypass HTML Field Sanitize’, also need to be defined. The configuration of both the Technical and Access Rights aspects will aid the respective user in managing all these actions in your platform. Further, all these configuration fields will easily assist you with the authorization aspect of the respective user in your Odoo platform.
So far, we have been discussing the operations and the management of the Access Rights description of the User, and now we can take a glance at the next section where the Preference options configuration will be described.