Journal entries are the first step in the accounting cycle and are used to record
all financial transactions in the accounting system. A journal entry is simply an
accounting record of a business transaction that includes the details of the transaction,
such as the date, amount, account affected, and a brief description of the transaction.
Journal entries are a key part of the double-entry accounting system, which requires
that every financial transaction be recorded in at least two accounts.
In Odoo 16 Accounting, Journals are the documents that are used to record accounting
transactions. Journals are used to record sales, purchases, receipts, payments,
and other transactions which affect the financial position of the company. Journals
also provide a summary of the company’s financial position at any given point in
time. It can be used to reconcile accounts, analyze financial trends, and produce
reports. It will provide a record of the date, amount, and purpose of each transaction.
Journals can be created for specific periods such as monthly, quarterly, and annually.
As we know, Journals are the significant facets of accounting operations in any
company that will help you to define the specific operations as categorizing and
the financial operations are based on it. Every type of business requires journal
entries and maintains them. The Odoo Accounting module possesses a powerful feature
that allows for the creation and management of custom journals. Using this option,
you can define every journal. For managing it, Odoo furnishes a separate menu called
Journals under the Accounting section of the Configuration menu. The screenshot
of the Journals window is depicted below.
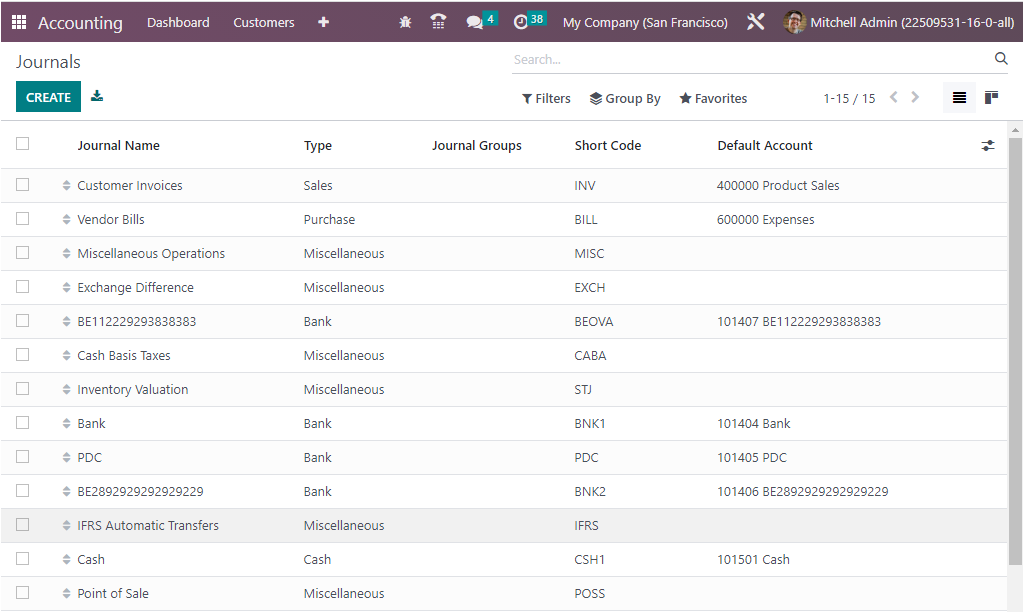
The Journals window clearly depicts the preview of the previously configured Journals
and also offers a CREATE button to create a new Journal. The window depicts the
significant details of the Journals, such as Journal Name, Type, Journal Group,
Short Code, and Default Account, as seen in the image above. The window can be viewed
in both Kanban and List view by choosing the respective menu icon placed on the
top right corner of the window. The default and customized Filters and Group By
options are also available together with the Search bar. The Favourite tab includes
various menus such as Save current search, Import records, Link menu in spreadsheet,
Insert view in article, Insert link in article, Insert list in spreadsheet, and
Add to my dashboard performing respective operations.
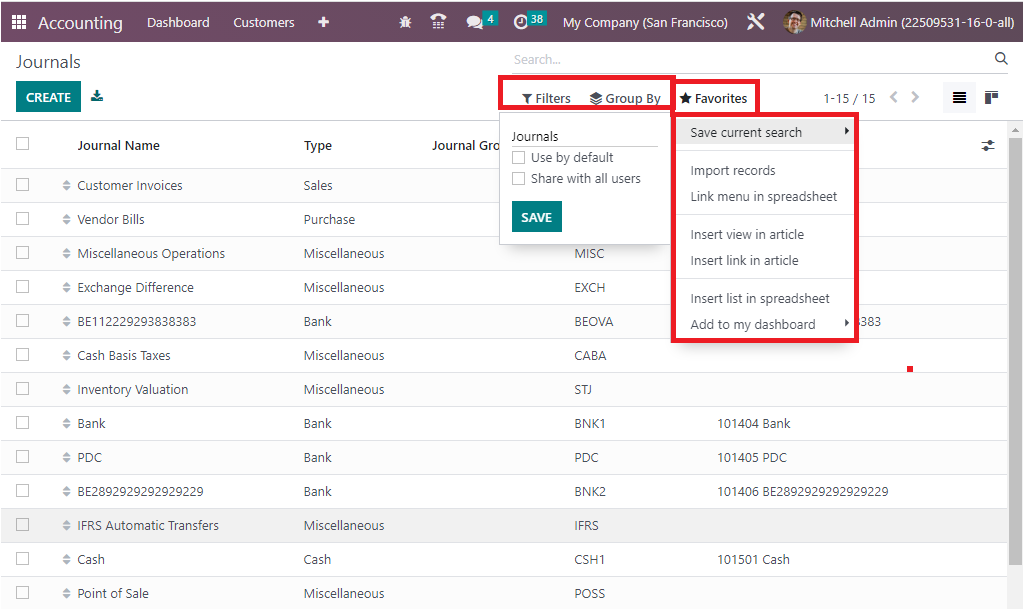
All these options are very useful for quickly retrieving the needful journal from
the longer list of defined journals. In addition, the dedicated Odoo module is very
comfortable in specifying the journal Types based on the default ones that are already
defined. Also, you can choose a journal type for a respective journal that is being
defined. The journal can be Sales, Purchase, Cash, Bank, and Miscellaneous.
The Sales journals in Odoo Accounting are journals used to record all sales transactions
in a company. These transactions may include Sales orders, deliveries, invoices,
customer payments, and any other related transactions. Sales Journals allow for
easy tracking of all sales-related information and can be used to generate various
reports such as Sales reports, sales trend analysis, and more.
Purchase Journals can be used to record all the purchase transactions that are related
to the business. These journals are used to track the cost of the goods and services
purchased and to create financial statements. The journal entries are used to record
the debit and credit side of the purchase and to post the entries to the general
ledger. The Purchase Journals are used to track the cost of the goods and services
and any tax associated with the purchase. The purchase journals are used to record
the purchase of inventory, the purchase of raw materials, and the purchase of finished
goods.
As we defined earlier, the Sales Journal is used to define all the Sales operations
entries of an organization likewise, the Purchase journal defines all the purchase
operations of the company. Similarly, the Cash Journal will define all the cash
operations entries with respect to the functioning of the company. Moreover, the
same as in the case of Bank Journal, where all the Bank based transactions are being
entered.
A miscellaneous Journal in Odoo Accounting is a type of journal entry used to record
any transactions that do not fit into the standard categories of transactions. It
can be used to record such items as discounts, returns and allowances, bank charges,
and other miscellaneous items. It is also a way to adjust the account balance of
any accounts that require adjustments outside of the normal accounting period. The
Miscellaneous Journals in Odoo Accounting include:
- General Journal
- Adjustment Journal
- Inventory Adjustment Journal
- Currency exchange journal
- Stock valuation
- Expense Journal
- Journal Entries
- Tax Journal
The Miscellaneous journal will allow you to manage all the entries which do not
fall into the other journals.
Now, to configure a new Journal, go for the CREATE button that can be accessed from
the top left corner of the Journals window.
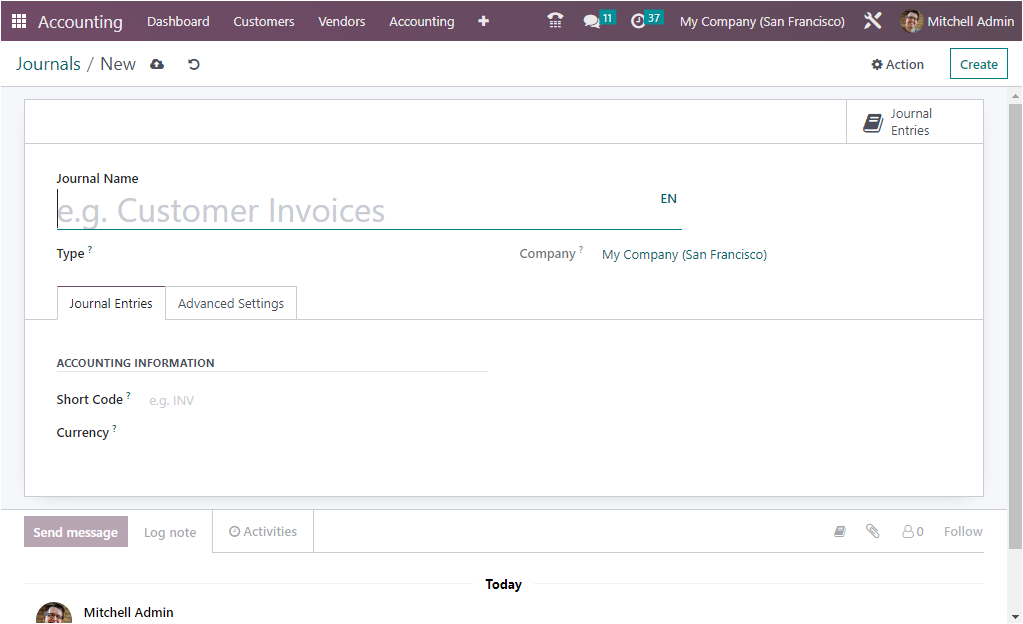
First of all, in the creation form, you can mention the Journal Name. Then you can
pick the corresponding Journal Type using the dropdown menu. The dropdown menu depicts
all the journals, such as Sales, Purchase, Cash, Bank, and Miscellaneous. In addition,
the Journal Entries menu will allow you to define the Accounting Information, such
as Short Code and Currency. The Short Code field can be filled with the shorter
name which you want to display. The journal entries of this journal will also be
named using this prefix by default. It is very useful for ensuring that the invoices
and the credit note entries starts with the allocated code. For example, if we define
short code as INV, then when generate invoices, it will start with the term INV
and then follows the sequence number. Also, the currency used to enter statements
is mentioned in the Currency field. Additionally, based on the selected Type of
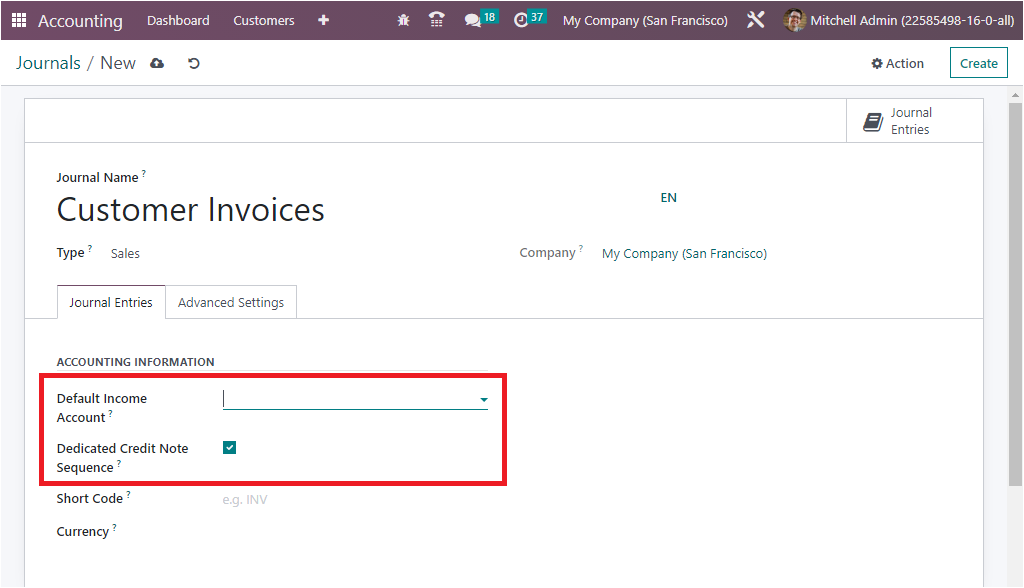
journal, the window will display additional fields. If you select Sales as the type,
you will get additional fields such as Default Income Account and Dedicated Credit
Not Sequence. You can create a new one or can also select the default one from the
dropdown menu. The Dedicated Credit Note Sequence option can be activated if you
don’t want to share the same sequence for invoices and credit notes made from this
journal.
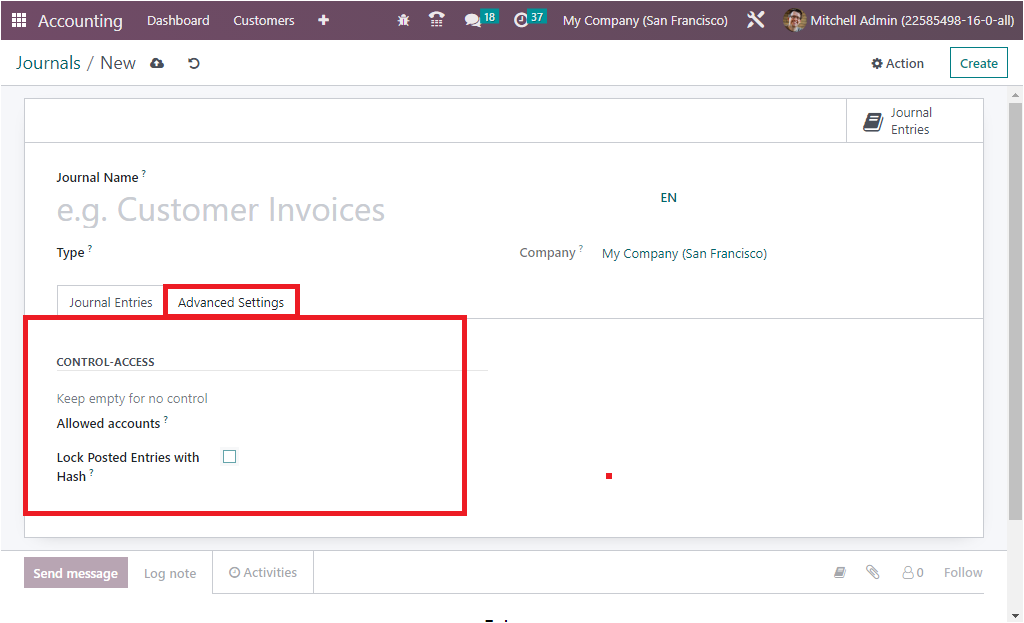
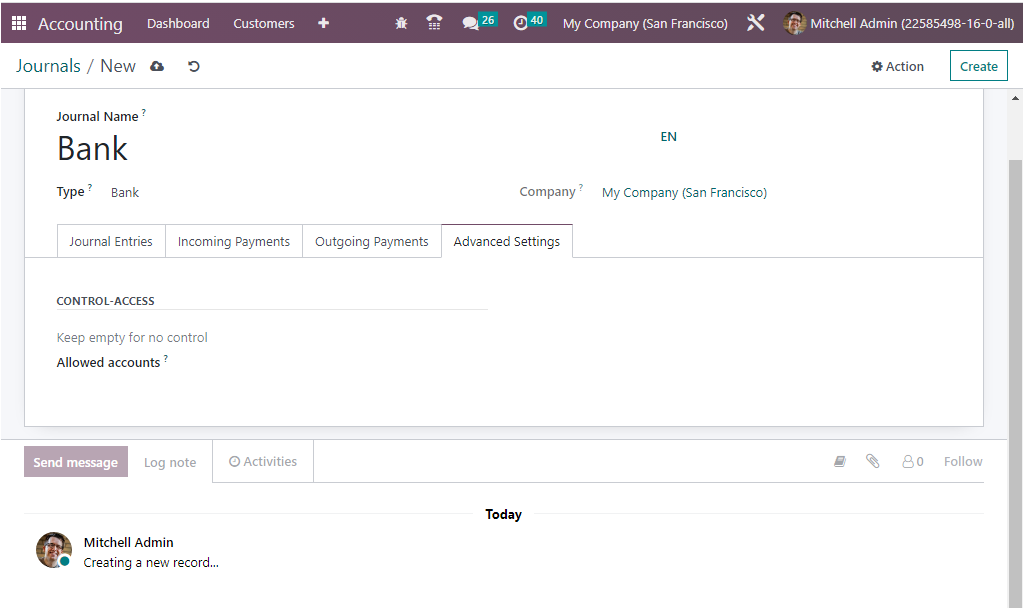
Further, under the Advanced Settings tab, you have the CONTROL ACCESS section, where
you can specify the Allowed accounts in the corresponding field with the help of
the dropdown menu. If you don't want any control, you can keep these fields empty.
The ‘Lock Posted Entries with Hash” field can be enabled or disabled. The accounting
entry or invoice receives a hash as soon as it is posted and cannot be modified
anymore if when you activate this field. This is very advantageous to ensure that
any invoice created under a specific journal does not undergo any changes. That
means it cannot be reset to draft or modified to any form once it is posted.
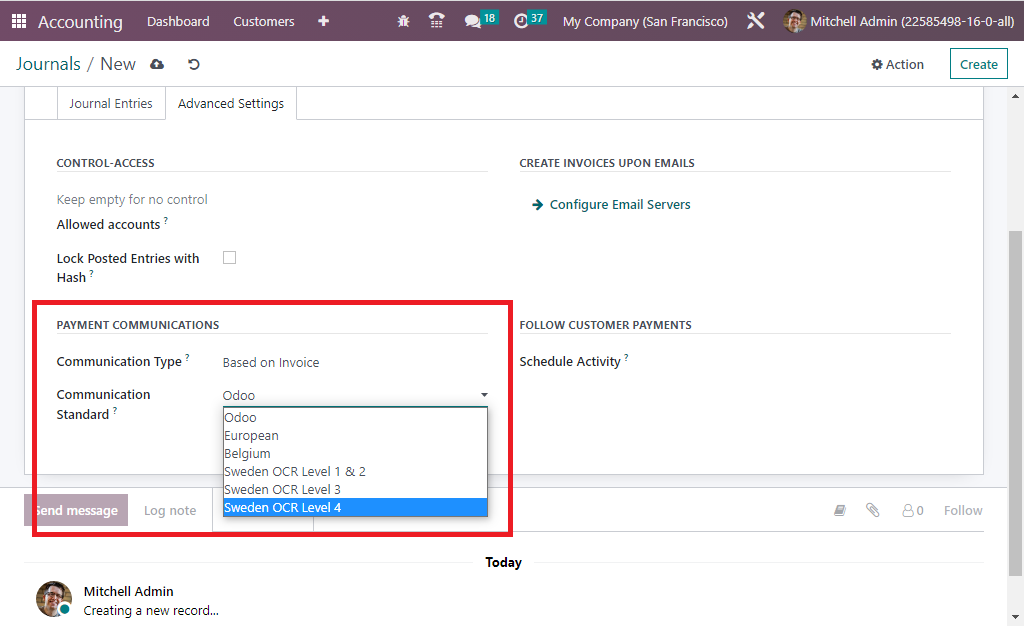
If the Type is Sales, you will also depict the additional fields under different
sections, such as PAYMENT COMMUNICATIONS, CREATE INVOICES UPON EMAILS, and FOLLOW
CUSTOMER PAYMENTS.
PAYMENT COMMUNICATION includes Communication Type and Communication Standard fields.
In the Communication Type field, you can set the default communication that will
appear on customer invoices, once validated, to help the customer to refer to that
particular invoice when making the payment. Here you have three options to choose
from, which are Open, Based on Customer, and Based on Invoice. Like wise, you can
also describe the Communication Standard field. With this field, you can choose
different models for each type of reference the default one is the ‘Odoo reference.’
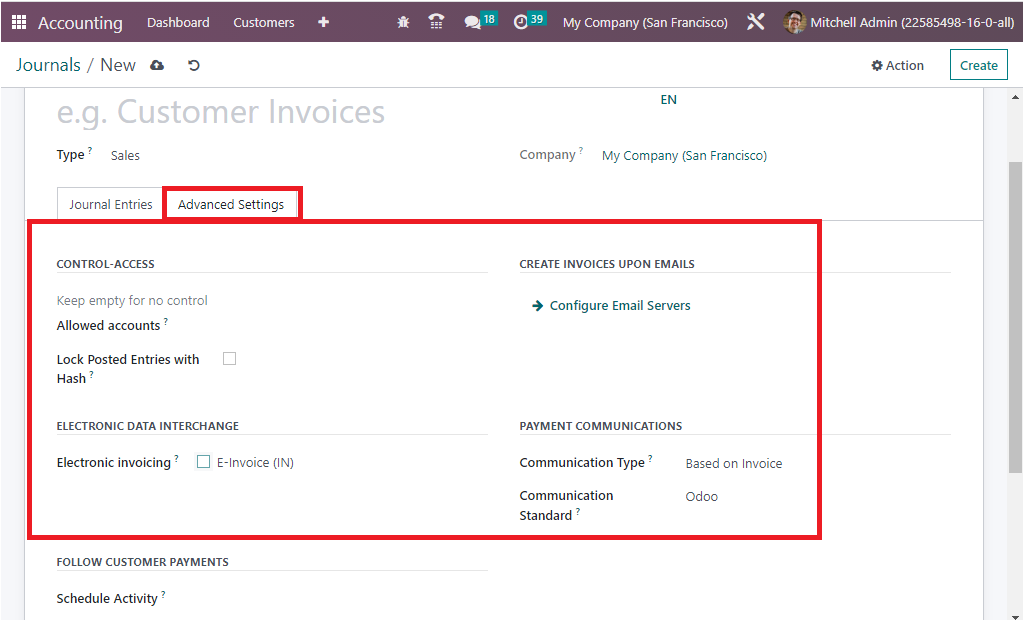
Further, you can configure Email Servers in the CREATE INVOICES UPON EMAILS section.
It will be effective for making sure that if the email is being received under the
respective server domain, an invoice will be created. Also, the ELECTRONIC DATA
INTERCHANGE section allows you to send XML /EDI invoices through Electronic invoicing.
For that, you can activate the E-Invoice(IN) option. Electronic Invoicing will be
available if the respective module for ‘e-invoicing’ is installed, which will be
available with accounting localization. On enabling this feature an XML/EDI document
will be generated and attached along with invoices and credit notes.
Also, you have the field to Schedule Activity for the following customer payments.
When you define any activity, it will be automatically scheduled on the payment
due date, improving the collection process. You can choose the activity with the
help of the drop-down menu.
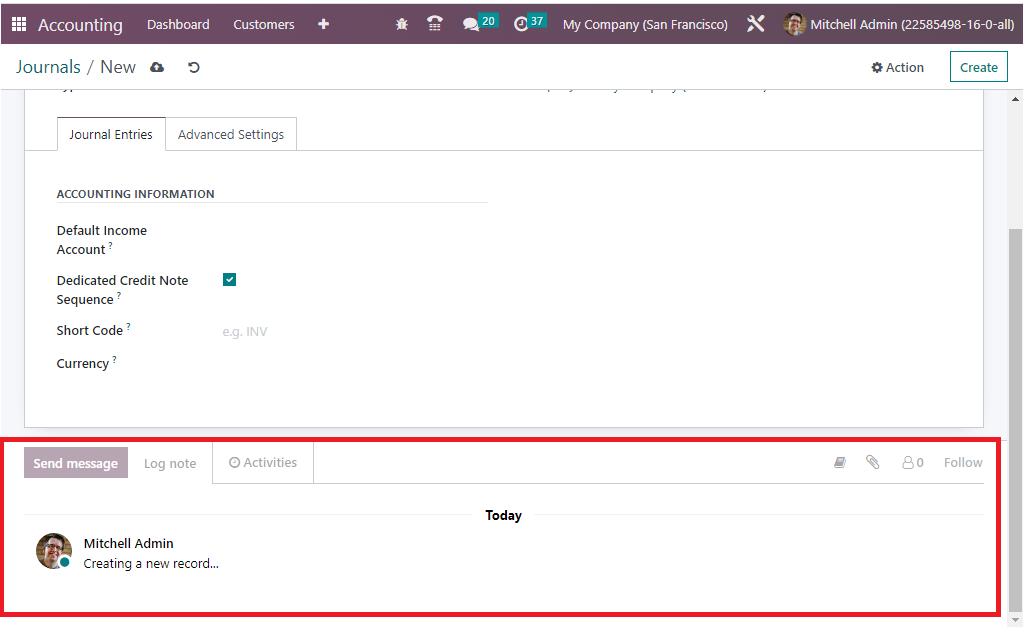
Finally, you have the option for sending messages as well as for describing log
notes to the followers of the corresponding journal. These followers may be the
other users of your Odoo platform who may be employees of your company or associated
members. The Send Message option is very useful for notifying any relevant information,
and the Log Note option assists you in marking the changes done by the employees
and details it together with the time and date.
In addition to all these options, you can view the smart tab on the top right corner
of the window, as picturized in the image below.
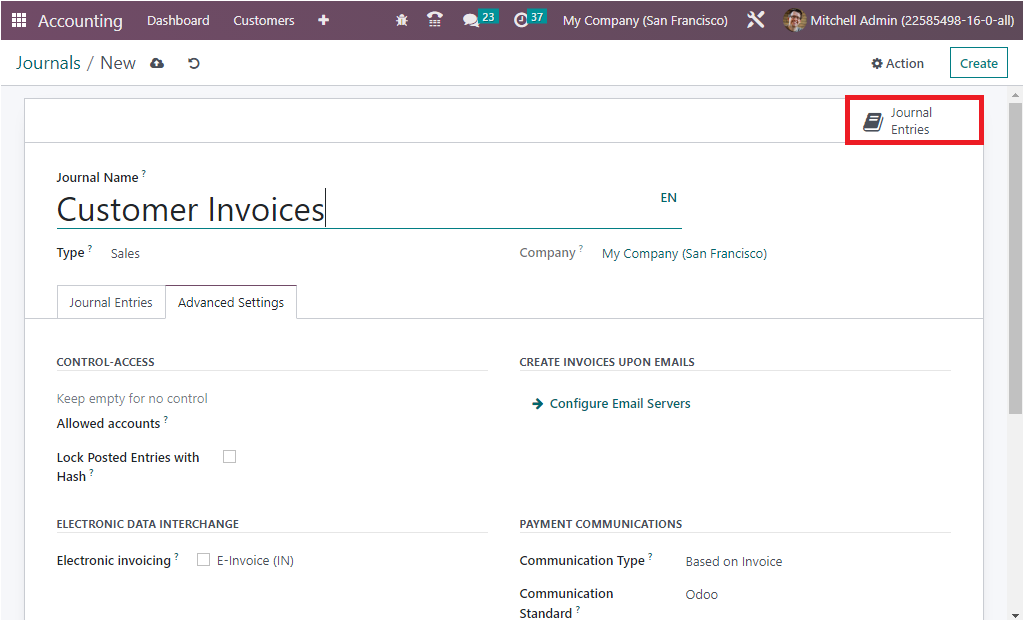
The smart tab ‘Journal entries’ will show all the journal entries recorded in that
particular journal.
Now we are clear on the configuration of the Sales journal type. The Journal creation
steps of the Sales, Purchase and Miscellaneous are the same in the Odoo. now let
us discuss the configuration steps of the Bank journal, which show differences from
the Sales, Purchase, and Miscellaneous journal types.
When you select the Journal Type as Bank, the creation window will depict the different
tabs such as Journal Entries, Incoming Payments, Outgoing Payments, and Advanced
Settings.
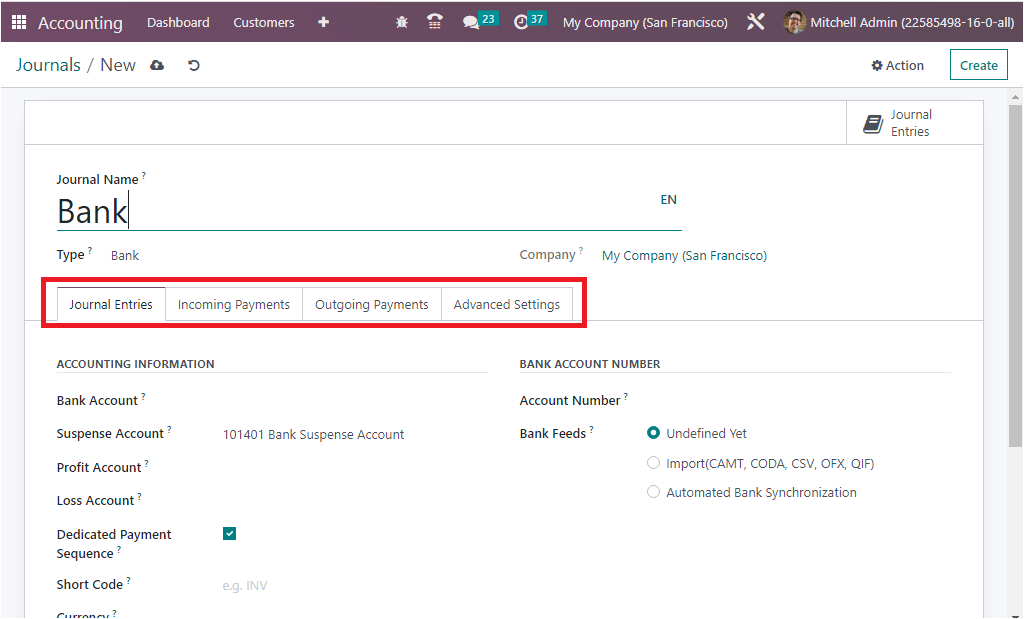
Under the Journal Entries tab, you are required to describe the detail regarding
Journal Entries. So you can define the ACCOUNTING INFORMATION such as the Bank Account,
Suspense Account, Profit Account, Loss Account, Short Code and Currency details.
The Suspense Account is used to post bank statement transactions until the bank
account is reconciled to the payments, so the suspense account will function as
the temporary account till the reconciliation of the bank statement transactions
for the respective journal operation. Likewise the Profit Account is used to register
a profit when the ending balance of a cash register differs from what the system
computes. Similarly, the Loss Account are beneficial to register a loss when the
ending balance of the cash register differs from what the system computes. The section
also displays the Dedicated Payment Sequence option for activating.
Furthermore, in the ‘BANK ACCOUNT NUMBER’ section, the Account Number can be defined
in the corresponding field. Also, you have the option to define Bank Feeds, and
based on your selection, the bank statement registration will be done. Here you
have three options such as Undefined Yet, Import(CAMT, CODA, CSV, OFX, QIF), and
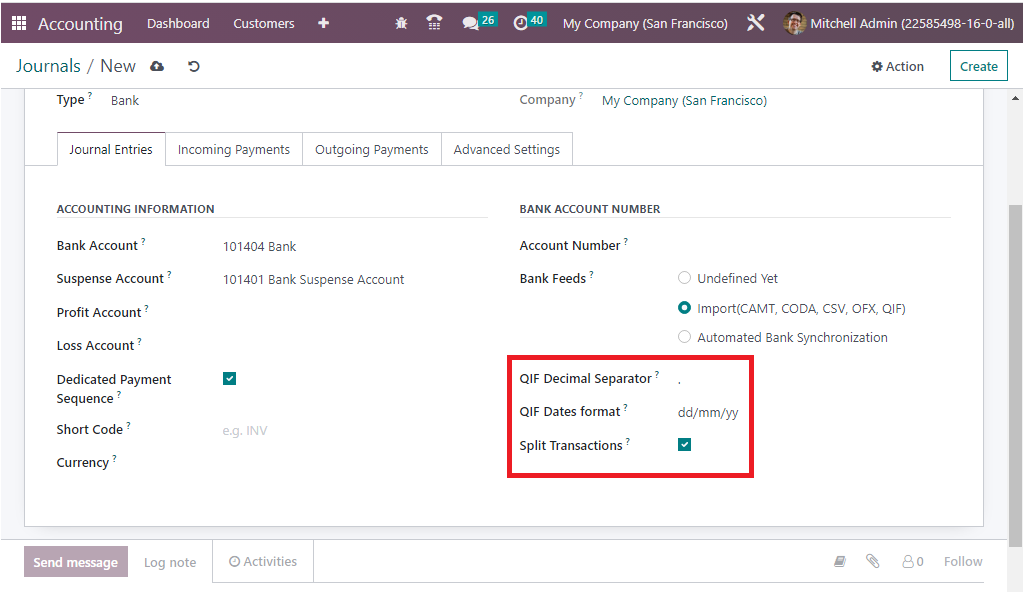
Automated Bank Synchronization. When you are choosing the Import option, you will
depict further fields such as QIF Decimal Separator- which is applicable to avoid
conversion issues and QIF Dates format - here, you can choose either dd/mm/yy or
mm/dd/yy based on the company. The third field is Split Transactions which can be
activated for split collective payments for CODA files. The Import option allows
you to import details from the dashboard.
Automated Bank Synchronization can be chosen for making the Odoo platform accessible
for fetching the invoice payment information straightly from the bank servers. Also,
from the Dashboard, you will prevail the review of the synchronized operations.
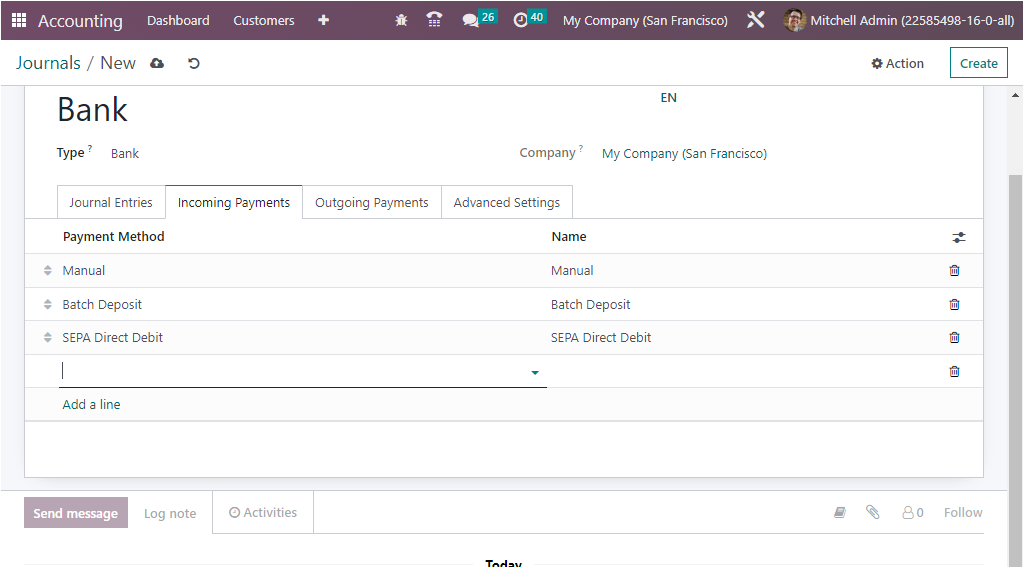
Now in the Incoming Payments tab, the incoming payment configuration details can
be defined. So you can define the Payment Method and Name using the Add a line option.
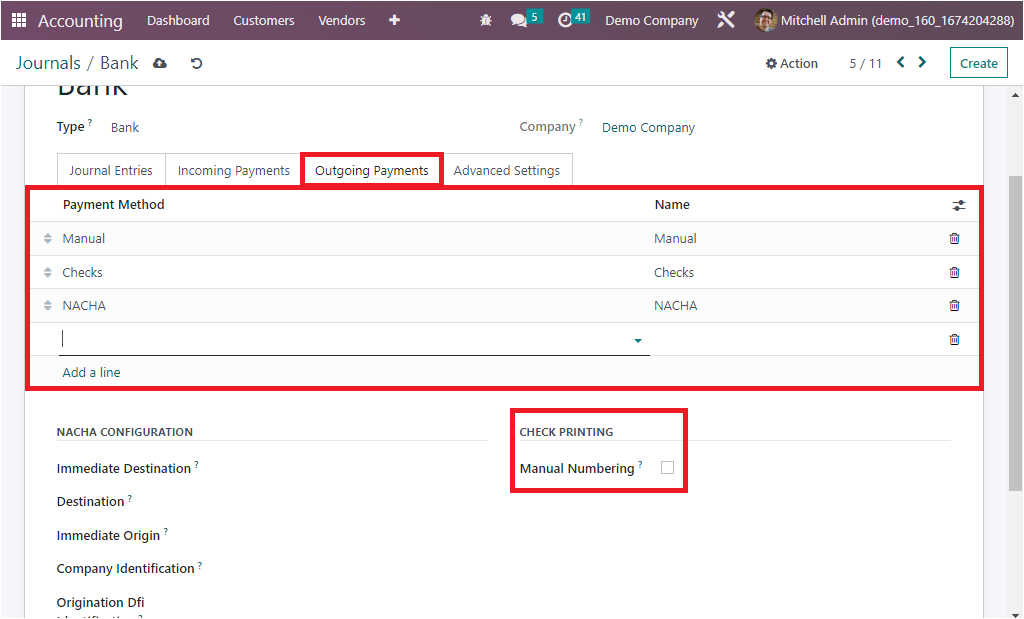
Under the Outgoing Payments tab, you have to configure the outgoing payment methods.
It is almost the same with the Incoming Payments, so you can define the ‘Payment
Method’ and ‘Name’ using the Add a line option. You can view the dropdown menu and
can choose the method and can apply. If the payment method is a new one, you can
configure it without much effort. Moreover, the Manual Numbering field displayed
in the CHECK PRINTING section can be activated if your preprinted checks are not
numbered.
Also you have the NACHA CONFIGURATION and where you have a lot of fields such as
Immediate Destination, Destination, Immediate Origin, Company Identification, Origination
Dfi Identification, and all these details will be provided by the bank. Also, Manual
Numbering under the CHECK PRINTING field can be checked if your pre printed checks
are not numbered.
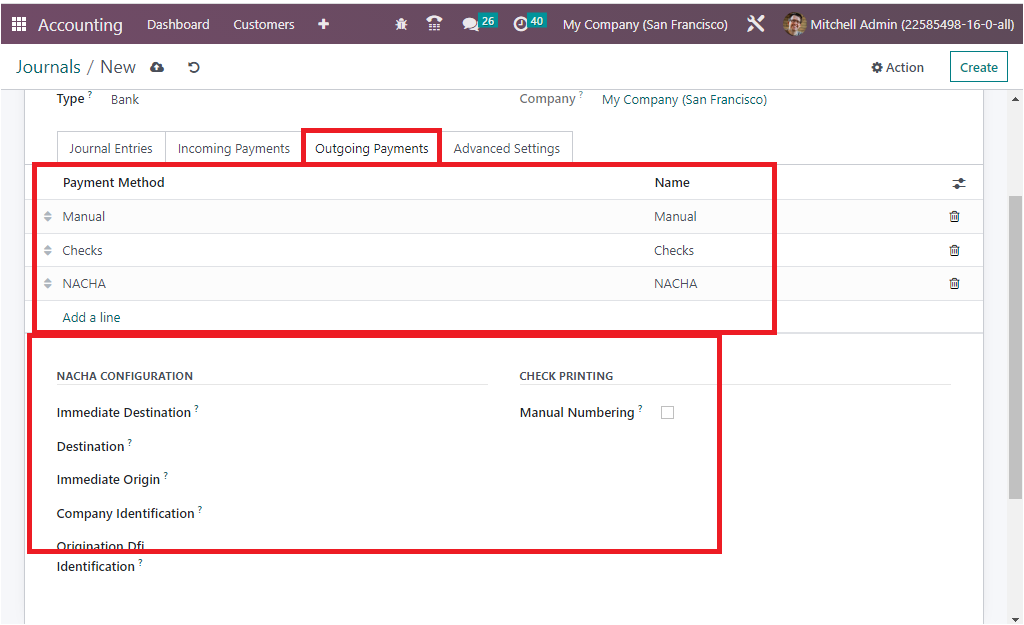
NACHA Configuration
NACHA is an acronym for National Automated Clearing House Association compatible
ACH file, which will be available in US localization in order to generate the NACHA
file. Details like immediate destination, immediate origin, company identification,
and origination Dfi identification can be provided at the required place. When you
are approved to transmit payments via ACH, your bank will often give you the details.
Vendor payment can be done with this payment method and its corresponding NACHA
file can be generated.
If we consider the Outstanding Account operations, it will be like, whenever a customer
generates the payment for the invoice, it doesn’t credit the bank account directly,
instead, it will be fall into the Outstanding Receipt Account, which can be defined
here. After reconciling the Bank statement and the payment automatically or manually,
only the payment will be credited to the bank account of the company. Likewise,
when we consider the case of Purchase payment, the amount for the vendor bill will
be generated from the Accounts payable, and will be moved to the Outstanding Payments
Account and then, when the bank statement reconciliation takes place in relation
with the vendor bill bank will be reconciled with outstanding payment entries instead
of the payable account.
The last tab available in the Journals configuration, Advanced Settings, is same
as the Sales, Purchase, and Miscellaneous accounts. So the account operation details
for the Cash and the Bank journals can be configured based upon the operational
requirements.
These are the right way you can define and edit the Journals and these journals
can be used for defining journal entries for an organization’s finance management.
Now we have every aspect regarding the Journal configuration and now we can take
a look at the Journal Groups which is significant for classifying the journals.
Group your journals
Categorization is an important factor in business operations where you will get
a chance to categorize various elements of business operations. Which will help
you to segregate the whole operation into delicate discs. The Odoo platform allows
you to define multiple journals for the smooth functioning of the accounting operations
of a company. While defining journal entries in different journals, there is a great
chance for mixing up the entries. So the Odoo platform developed a unique feature
to group the journals. This advanced feature will be excessive support for the classification
of all the configured journals.
To get access to the Journal Groups menu, go for the Configuration menu of the Accounting
module, where you can view all the journal groups previously described in the Journal
Groups window as shown below.
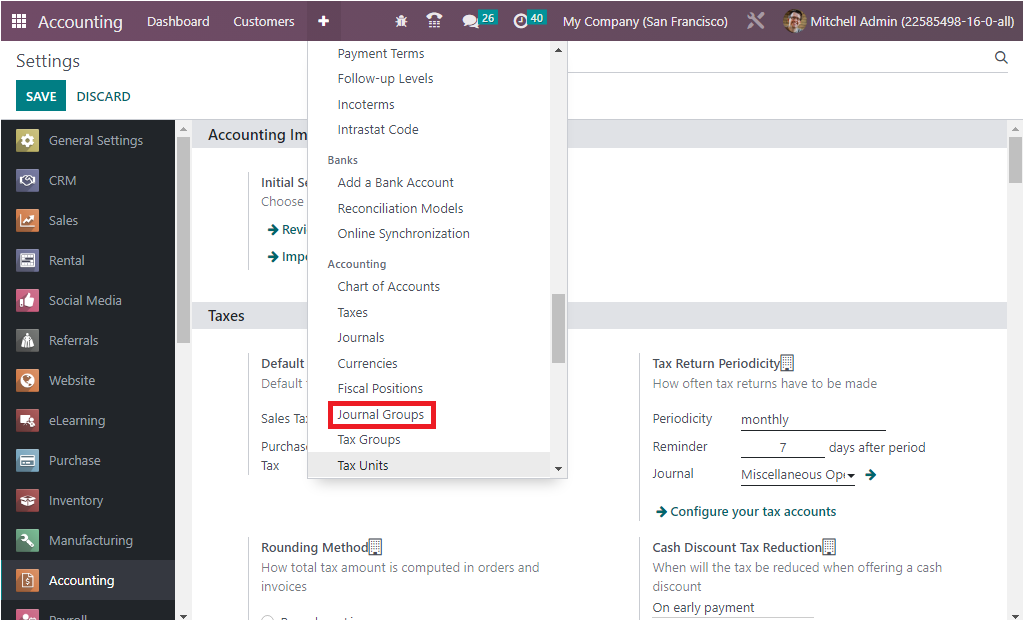
When you click on the Journal Groups menu, you will enter into the window.
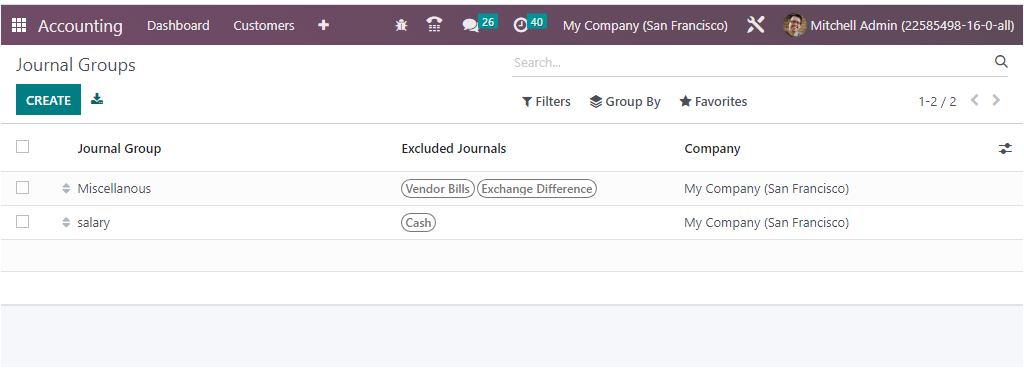
The CREATE button allows you to create new Journal Groups. The moment you go over
the CREATE button, a new line will be displayed in the same window for configuring
journal groups. There you can provide the Journal Groups Name, and can give out
the Excluded Journals. The Company field will be auto-allocated and can be altered.
The different sorting functionalities available in the Odoo is also available in
this window. The default and customizable filters and Group By options help you
to quickly sort out the required groups.
In the Odoo Accounting module, Journal Grouping is one of the outstanding features
that allows you to organize your accounting journals into groups. The groups can
be used to better manage accounting information and simplify reporting. This feature
makes it easier for users to track and view your transactions in one place. Journal
grouping also helps to ensure accuracy in the financial records by providing a centralized
way to compare the different types of transactions. These categories can then be
used to organize and analyze financial data in a more efficient manner. This feature
can be used to group journals by company, type of transaction, or other criteria.
This allows users to quickly search for and access specific journals when needed.
Journal gro
uping also helps users keep their accounts organized, as journals can
be grouped according to the type of transaction. It also helps with accounting reconciliation,
as users can easily identify which journals need to be reconciled.
These Journal groups are used in reporting to display relevant data together. You
can fulfill the Filtering and Group By aspects of different journal’s operations
and accounting operations. The Odoo platform gives extreme prominence for report
generation, and various kinds of accounts-related reports can be obtained within
seconds with the help of filtering tools. You only need to set Journal Types as
the filtering aspect to make the process easier.
It is also possible to select the Chart of Account Types for the respective one
while defining it because it has the convenience of sorting out the needs of the
accounting information as regards to the Chart of Account Types which are being
defined.
The Chart of Account Types can be also be selected for the respective one while
defining it, this will be beneficial for the filtration aspects of the accounting
information with respect to the Chart of Account Types which are being defined.
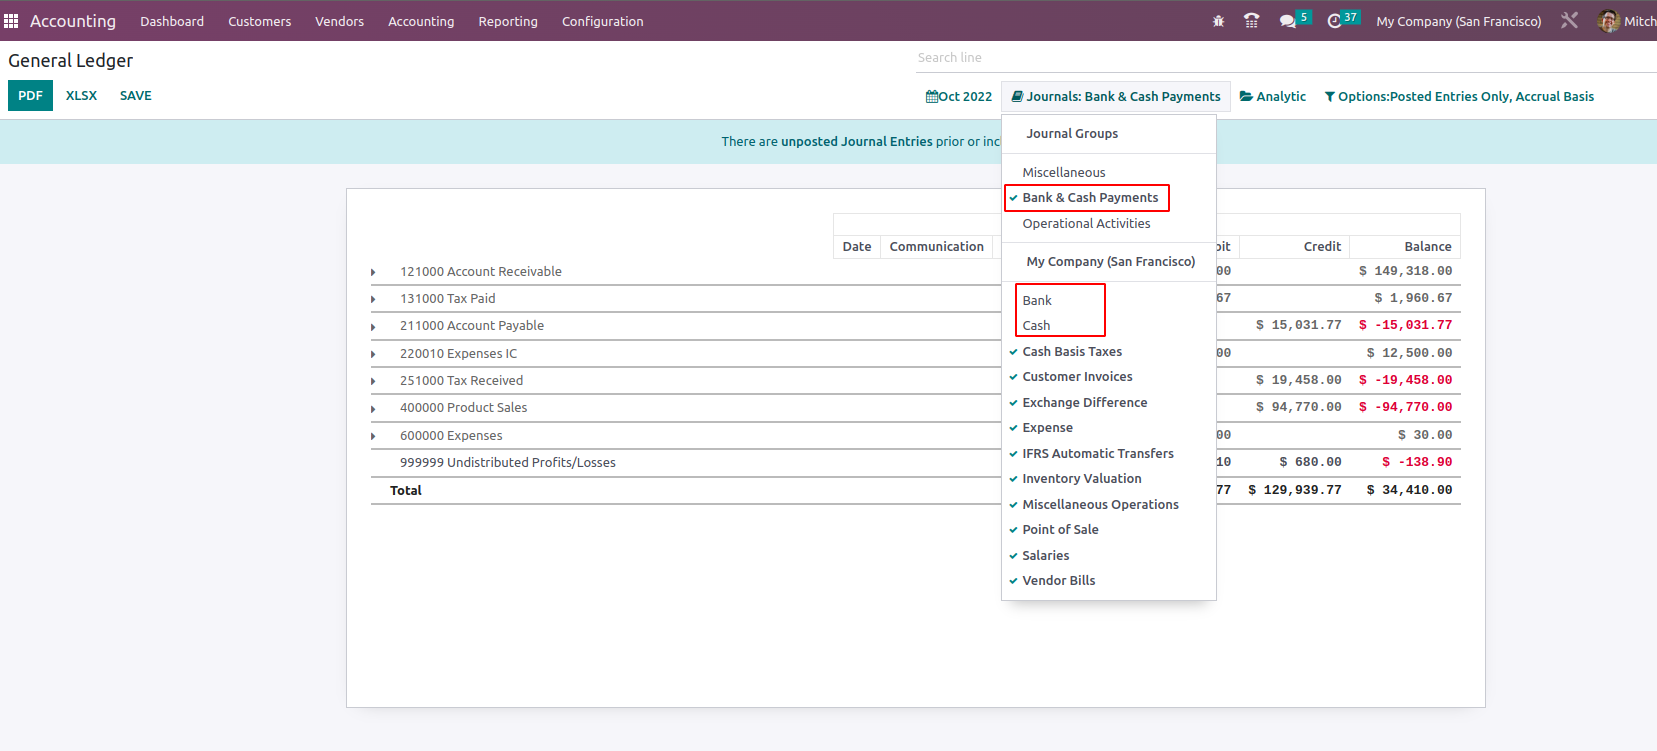
As the journal group ‘Bank & Cash Payments’ is chosen in the report, it will exclude
the accounts mentioned in the journal from the filter of reports.
So the Journal Group feature has a significant impact on the accounting department
of any organization for the smooth running of journal management operations.
We had an understanding of everything regarding the Journal Groups functionality,
and now let us catch a glimpse of the Currency Management tool available in the
Odoo Accounting module in the following section.