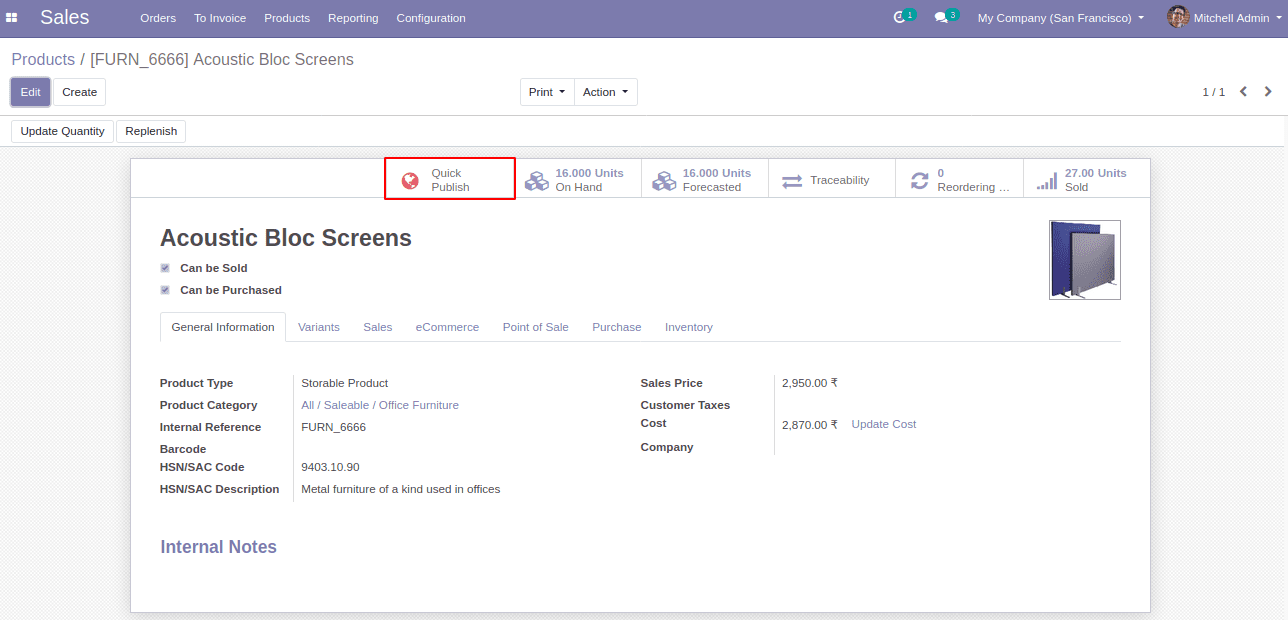
Custom Widgets:
In Odoo, there are different field widgets that provide various functionalities in our
fields. For instance, we can use widget=” date” for date fields, widget=” image” for
binary fields to show an image, and so on.
Let’s see how we will create a custom widget with our preferred functionalities in odoo
15.
Let’s take an instance of creating a widget called “quick_publish_button” that allows you
to publish/unpublish products from the website without redirecting to the website view.
This widget can be used for boolean fields.
To create our custom widget, we can follow the steps mentioned below.
1.First, we need to add a static/src/js/quick_publish.js file in our
module.
odoo.define('website_product_publish.quick_.button', function (require) {
'use strict';
var AbstractField = require('web.AbstractField');
var core = require('web.core');
var field_registry = require('web.field_registry');
var _t = core._t;
2. For developing a custom widget we need to extend AbstractField class which is the
basic field widget used to render fields in a view after which register the widget
to the field_registry.
var QuickWebsitePublishButton = AbstractField.extend({
	template: 'QuickWebsitePublishButton',
	events: {
    	'click': '_onClick',
	},
	start: function () {
    	this.$icon = this.$('.o_button_icon');
    	return this._super.apply(this, arguments);
	},
	isSet: function () {
    	return true;
	},
	_render: function () {
    	this._super.apply(this, arguments);
    	var published = this.value;
    	var info = published ? _t("Published") : _t("Unpublished");
    	this.$el.attr('aria-label', info)
            	.prop('title', info);
    	this.$icon.toggleClass('text-danger', !published)
            	.toggleClass('text-success', published);
	},
	_onClick: function () {
    	var self = this;
    	this._rpc({
        	model: this.model,
        	method: 'quick_publish_products',
        	args: [this.res_id],
    	}).then(function (result) {
        	self.do_action(result);
    	});
	},
});
field_registry
	.add('quick_publish_button', QuickWebsitePublishButton)
});
3.Then load the js file in the assets as shown below.
'assets': {
    	'web.assets_backend': [
        	'website_product_publish/static/src/js/quick_button.js',
    	],
    	'web.assets_qweb': [
        	  'website_product_publish/static/src/xml/website_backend_quick_publish.xml',
    	],
	},
4. Next, we will set the is_published field to true from the _onClick function using
rpc query. For that, we need to add a python file in the models directory in which
we will define the function specified in rpc.
from odoo import models, api, fields, _
class ProductTemplate(models.Model):
	_inherit = 'product.template'
	def quick_publish_products(self):
    	for rec in self:
        	rec.is_published = True if not rec.is_published else False
    	return {
        	'type': 'ir.actions.client',
        	'tag': 'reload',
    	}
5. Now we need to add the template inside static/src/Xml.
<templates id="template_quick_publish" xml:space="preserve">
  <t t-name="QuickWebsitePublishButton">
    <button type="button" class="btn oe_stat_button">
      <i class="fa fa-fw o_button_icon fa-globe"/>
      <div class="o_stat_info">
         <span class="o_stat_text">
           <t t-if="widget.value">
              Quick<br/>Unpublish
           </t>
           <t t-if="!widget.value">
              Quick<br/>Publish
           </t>
          </span>
       </div>
     </button>
  </t>
</templates>
6. Finally, we need to add this “quick_publish_button” widget to the field. For that,
let’s add the xml file with code as shown below.
<odoo>
  <record id="product_template_form_view_inherit" model="ir.ui.view">
   <field name="name">product.template.product.website.forms.inherit</field>
   <field name="model">product.template</field>
   <field name="inherit_id" ref="website_sale.product_template_form_view"/>
   <field name="arch" type="xml">
      <xpath expr="//field[@name='is_published']" position="attributes">
         <attribute name="widget">quick_publish_button</attribute>
      </xpath>
   </field>
 </record>
</odoo>
7. To view the newly created widget simply upgrade the module and open the products
form view. Then we can see the Quick Publish button as shown below.
