Assets
The management of the Assets in the hand of the company is an important aspect of
the financial management operations. As the companies keep on growing and their
assets both financial as well as non-financial keep on growing the management aspects
of them might get out of hand. Therefore, the need for a dedicated Assets management
solution or tools is essential. The Odoo platform has a dedicated Assets management
menu defined in the Accounting module where all the Assets of the company can be
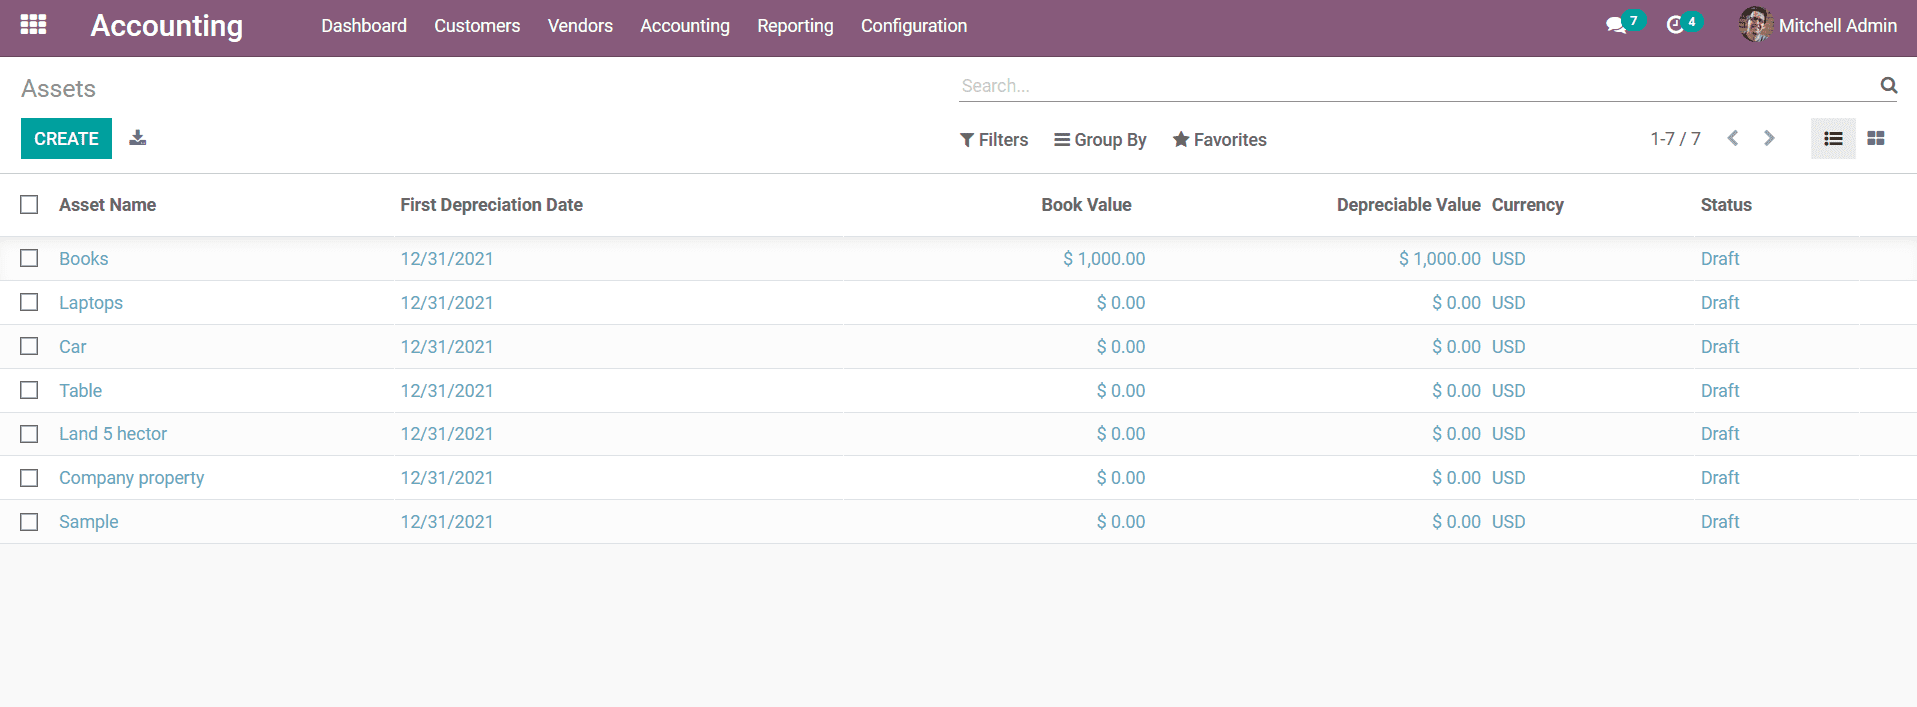
defined. To access the option, you can select the Accounting menu in the module
and select the Assets option which will depict you with the window as shown in the
following screenshot. Here all the defined assets will be depicted with the Assets
Name, First Depreciation Date, Book Value, Depreciation Value Currency as well as
the Status of the Asset. You will also have the Filtering as well as Group by options
that are available which will help you to retrieve the respective Assets from the
menu.

You will have the provision to edit the defined Assets by selecting them from the
menu and to create new Assets you can select the Create option that is available.
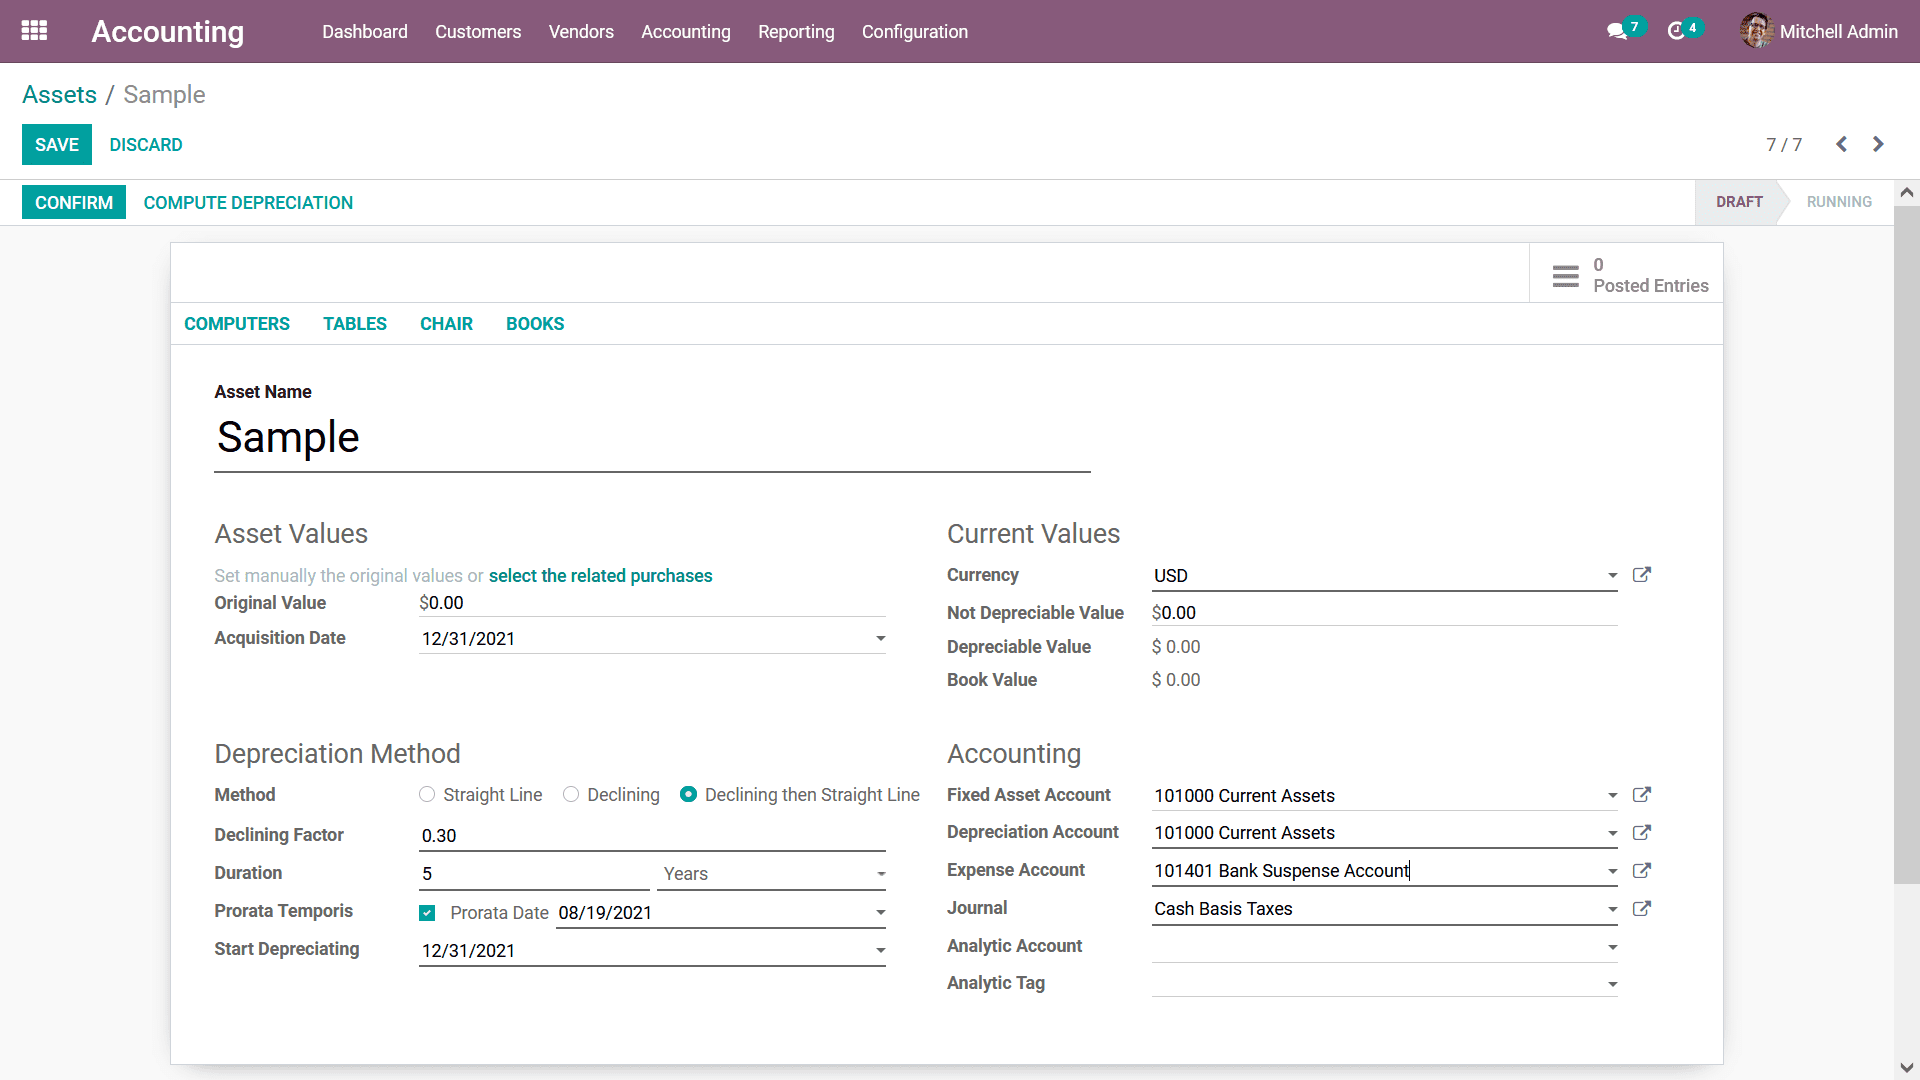
Upon selecting to Create New Assets you will be depicted with the form as depicted
in the following window. Here, initially, you have to provide the Assets Name, then
define the Assets Values such as the Original Value, and the Acquisition Date. Additionally,
either Asset Value can be directly added to create the Asset or you can choose the
Asset from any related purchase. Therefore, its purchase amount will be taken to
the Asset Value. Next, the Current Values should be defined where the Currency,
Non Depreciative Value, Depreciative Value, and Book Value can be defined. Under
current values, only the currency and non-depreciable values are updated. The Non-depreciable
value is the amount that you will get at the time of selling that product and it
will not depreciate any further. For example, if the asset value is 1000 and the
non-depreciable value is 200, then the depreciable value will be 800 and it is the
residual value on which the depreciation is calculated.
Furthermore, the Depreciation Method aspects can be defined such as the Method as
a Straight Line, Declining or Declining then Straight Line. Straight Line depreciation
is where the Asset value will not depreciate but will remain constant throughout
the operation of the Asset in the company or for the specified Duration which has
been defined. Declining depreciation is the method of Asset where the Value of the
Asset will depreciate based on the Depreciation Factor which has been provided.
Declining then Straight Line Depreciation is the one where initially the Asset Value
Will Depreciate based on the Depreciation Factor which has been defined and then
will change to a straight line model after the specified period.
Further, the Declining Factor can also be defined along with the duration of the
Declination in years or months. The Prorata Temposis can be enabled and the data
from which the depreciation should be calculated can be defined. Additionally, there
is a section where the Start Depreciation can be defined. The Current Value details
of the respective Assets Can be defined as the aspects such as the Currency, Not
Depreciable Value, Depreciable Value as well as the Book Value can be defined.
Moreover, an Asset can be assigned to be functioning with an Existing Depreciation
Schedule by defining it in the Asset menu where the Depreciation Amount, Existing
Depreciation, and the First Depreciation Date can be defined. The configuration
of the Existing Depreciation Schedule will ensure that the Assets get depreciated
based on the existing terminology.

The Accounting aspects of the Budget can also be defined where the Fixed Asset Account,
Depreciation Account, Expense Account, Journal, Analytical Account, and the Analytical
Tags can be defined by selecting them from the drop-down menu of the respective
option that is available.

Once the details and the configuration aspects of the Asset are being defined you
can save the Asset in the window and you will be depicted with Compute Depreciation
options. Upon selecting the Compute Depreciation, the depreciation of the Asset
will be computed and displayed in the Depreciation Board as depicted in the following
image. Here the Depreciation aspects and the computation will be defined. The Reference
of the Depreciation, Depreciation Date, Depreciation amount, Cumulative Depreciation,
the Depreciation Value, and the Journal Entry details with respect to the Depreciation
will be mentioned.

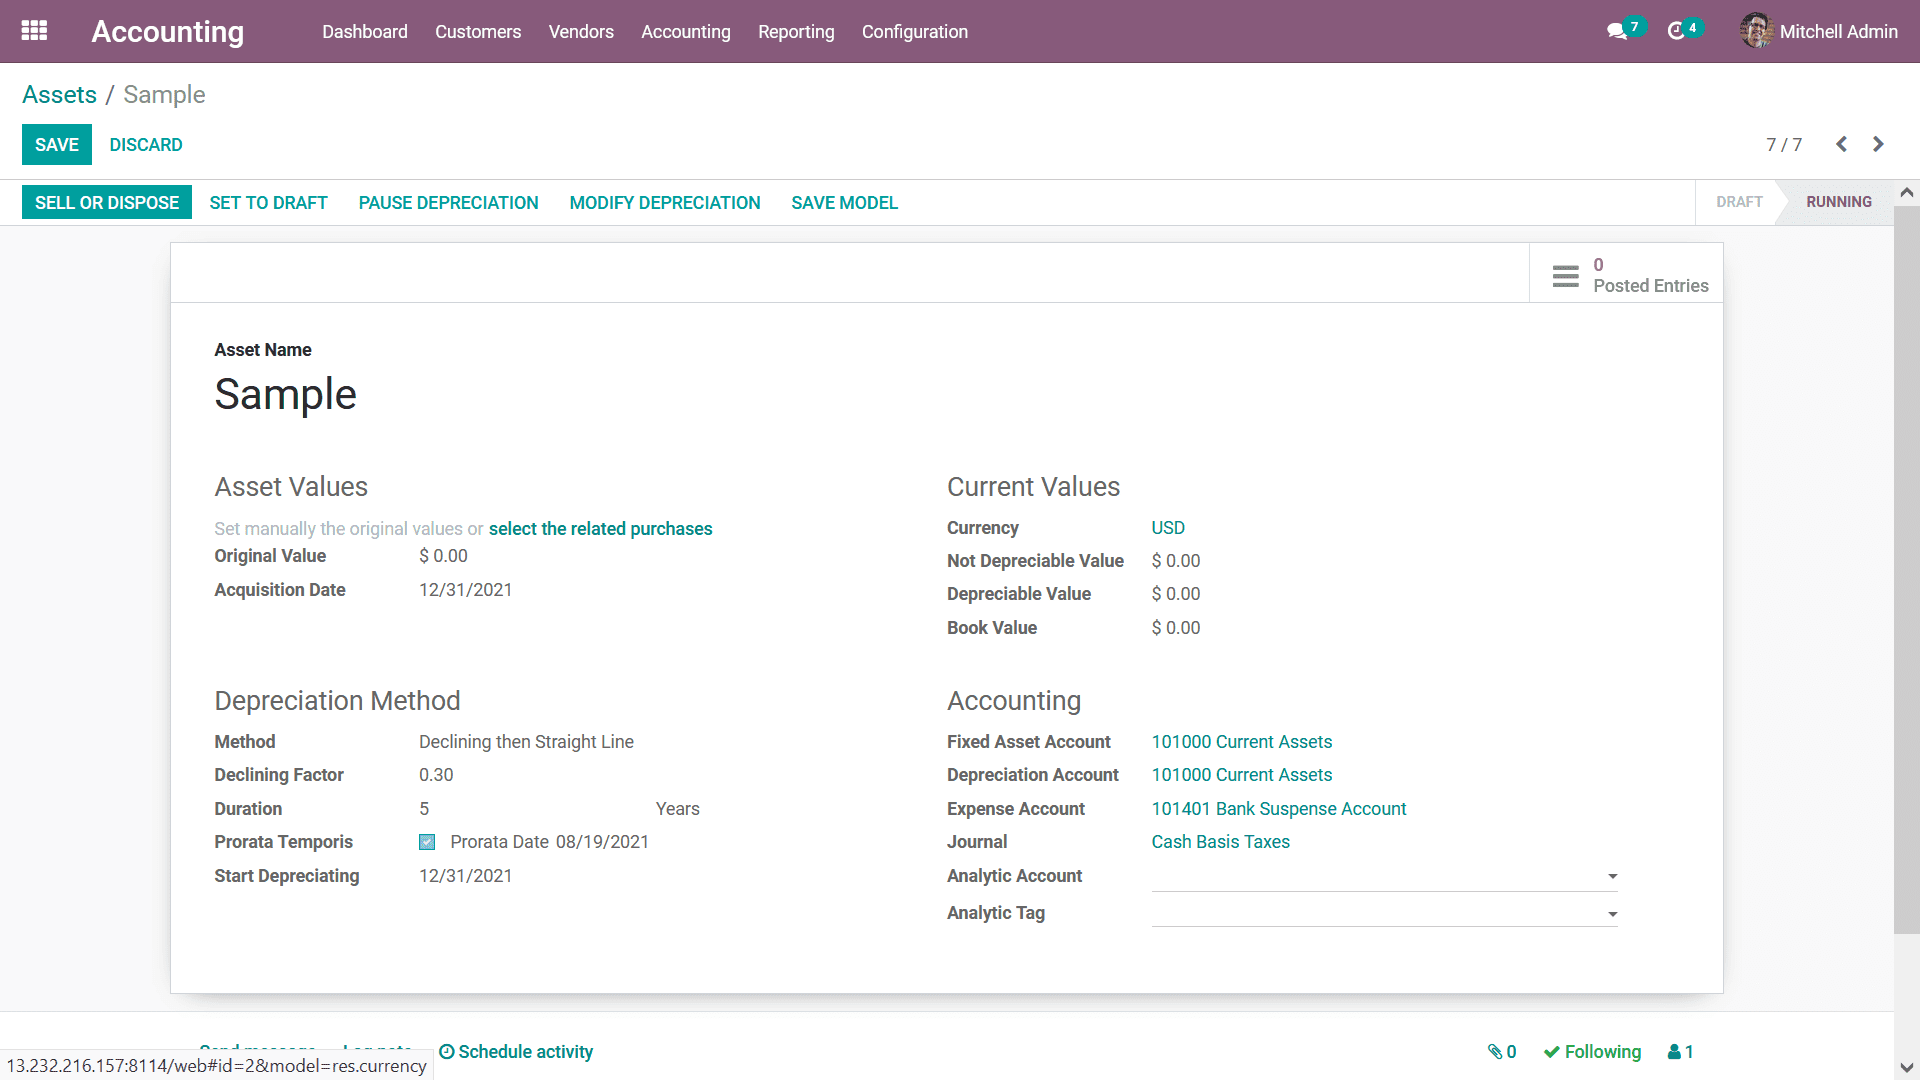
Once the Asset has been defined you can save the menu and Confirm the operations
which will depict you the window with various other options such as Pause Depreciation,
Modify Depreciation, Save Model, Sell or Dispose and Set as a Draft option. You
can choose the Pause Depreciation options which will pause the process of the Asset
Depreciation and upon selecting the option you will be depicted with the pop-up
window as shown in the below screenshot. Here you can define the Pause date of the
deprecation and these can be custom-defined ones which can be previous to current
date as well as in future of the current date as well as the same days as today.
Once the date is being defined you should select the available Pause option.

The next option available in the Assets menu is the Modify Depreciation option which
will help you to modify the depreciation values and various aspects in regards to
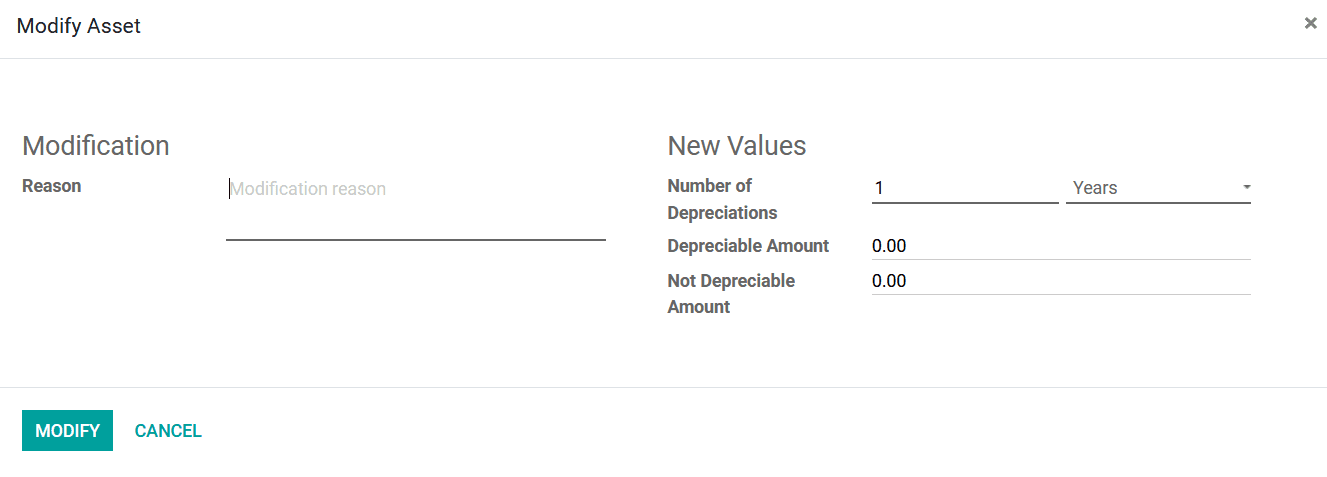
the ones which have already been defined. Upon selecting the Modify Depreciation
option you will be depicted with the pop-up window as depicted in the following
image. Here the Reason for the Modifications should be defined. Additionally, New
Values in respect to the Modification can be defined such as the Number of Depreciation
and the duration in years, months, or days. Furthermore, the Depreciation Amount
and the Non-Depreciation Amount can also be defined.

Finally, for the modification to run you should select the Modify option that is
available which will modify the depreciation operations of the Asset being defined.
The next option available under the Asset menu is that of the Sell Asset which will
make sure that the Asset has been defined as sold once it moved out of the hand
of the company. You can select the sell Asset option which will depict you with
the pop-up image as depicted in the following screenshot. Here, the Action, Customer
Invoice, and the Invoice Line details can be defined by selecting the required option
from the drop-down menu. Once the configuration aspects have been defined you can
select the Sell option available which will make the Asset as sold.

The Asset management menu available under the Accounting module will help you to
define the various Assets of the company in a defined and well-structured manner
and will also support the Depreciation operations on them. You can refer to section
3.3 Of the book where the Asset Models, their configuration and the operations aspects
are being well defined to have a clearer understanding of the operations aspects
of the Assets. Let's now move on to understand the aspects of the Deferred Revenues
management menu available in the Odoo Accounting module in the next section of this
chapter.