Customer Finance Management With Odoo Accounting Module
Customer management is vital in the business operations as without proper control
of their operation with regards to the company you will fall back on the operation,
receiving payments, the aspects of product movement, and many more. The financial
aspects regarding the customer operations are important as you will have to have
dedicated operational tools to manage them. In Odoo there is a dedicated tab of
menus that will help you to deal with the customer finance management operations.
The Customer tabs which can be accessed from the dashboard of the Accounting module
will depict you with optional menus such as Invoices, Credit Note, Receipts, Payments,
Batch Payments, Follow-ups, Direct debit Mandates, Products, and Customers. Each
of these menus will be serving to add up the financial management aspects related
to the customer operations towards the company. Let's now move on to each of the
configurational menus which help you in the aspects of customer finance management,
one by one in detail for the next section.
Creating your Customer Invoices
The Invoices of customers are to be handled efficiently and with at most care and
concerns. Moreover, you should have dedicated systems and tools to do so. The Odoo
Accounting module holds a dedicated Invoice management menu for the customers, which
can be accessed from the Customers Menu of the Accounting module. The following
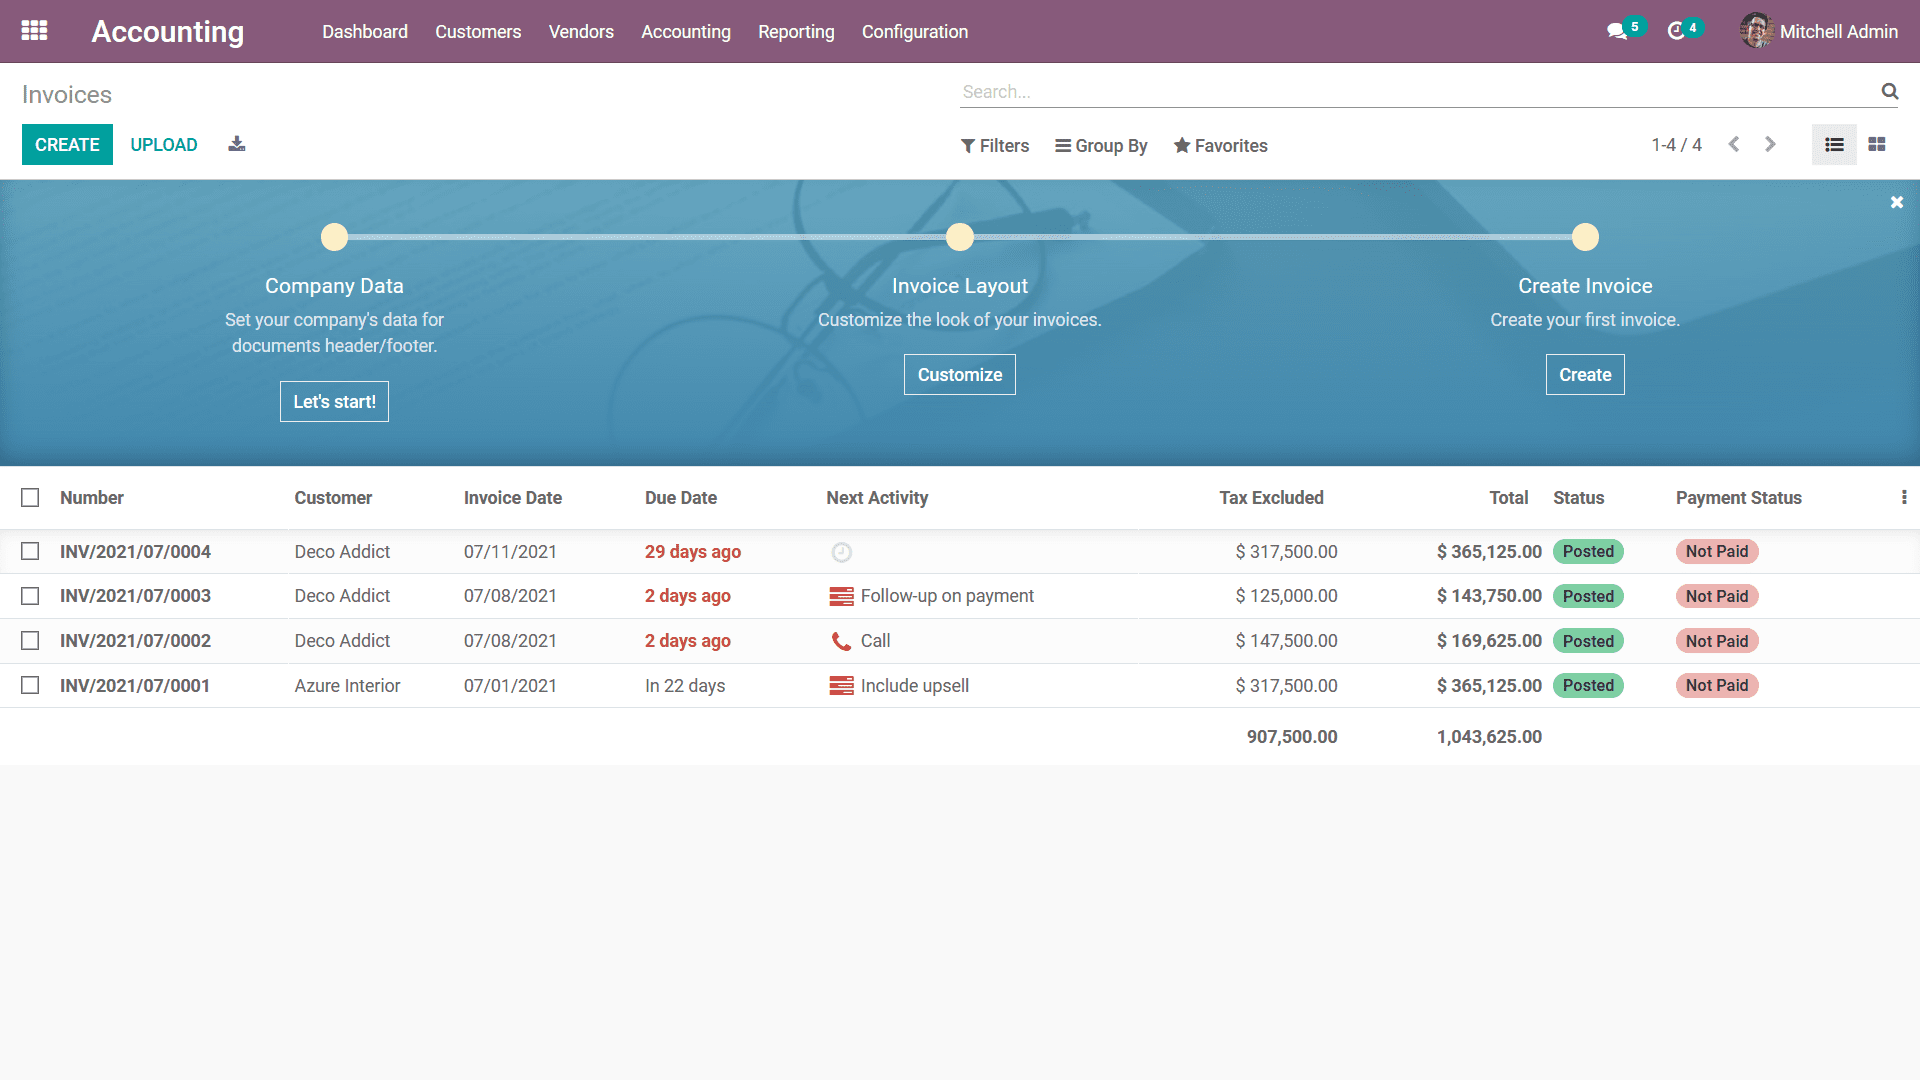
screenshot depicts the Invoices menu of the Accounting module where all the invoices
related to company operations towards the customers are depicted. The Invoice Number,
Customer details, Invoice Date, Due Date, next Activity, Tax Excluded details, Total
invoice amount, Status and the Payment status will be depicted.
As you can see in the following screenshots there is color coordination on the Due
date as well as the Status. This advanced feature of Odoo helps you to identify
as well as classify the various operations. The red indication in the Due Date indicates
that the date is over, and yellow will indicate that the Due Date is today. Under
the status, if it's Posted or Paid.
You have the provision to edit the existing invoice details if required providing
you the ability to modify it based on the requirement but only by authorized persons
so that the security is not disrupted. You also have the provision to create new
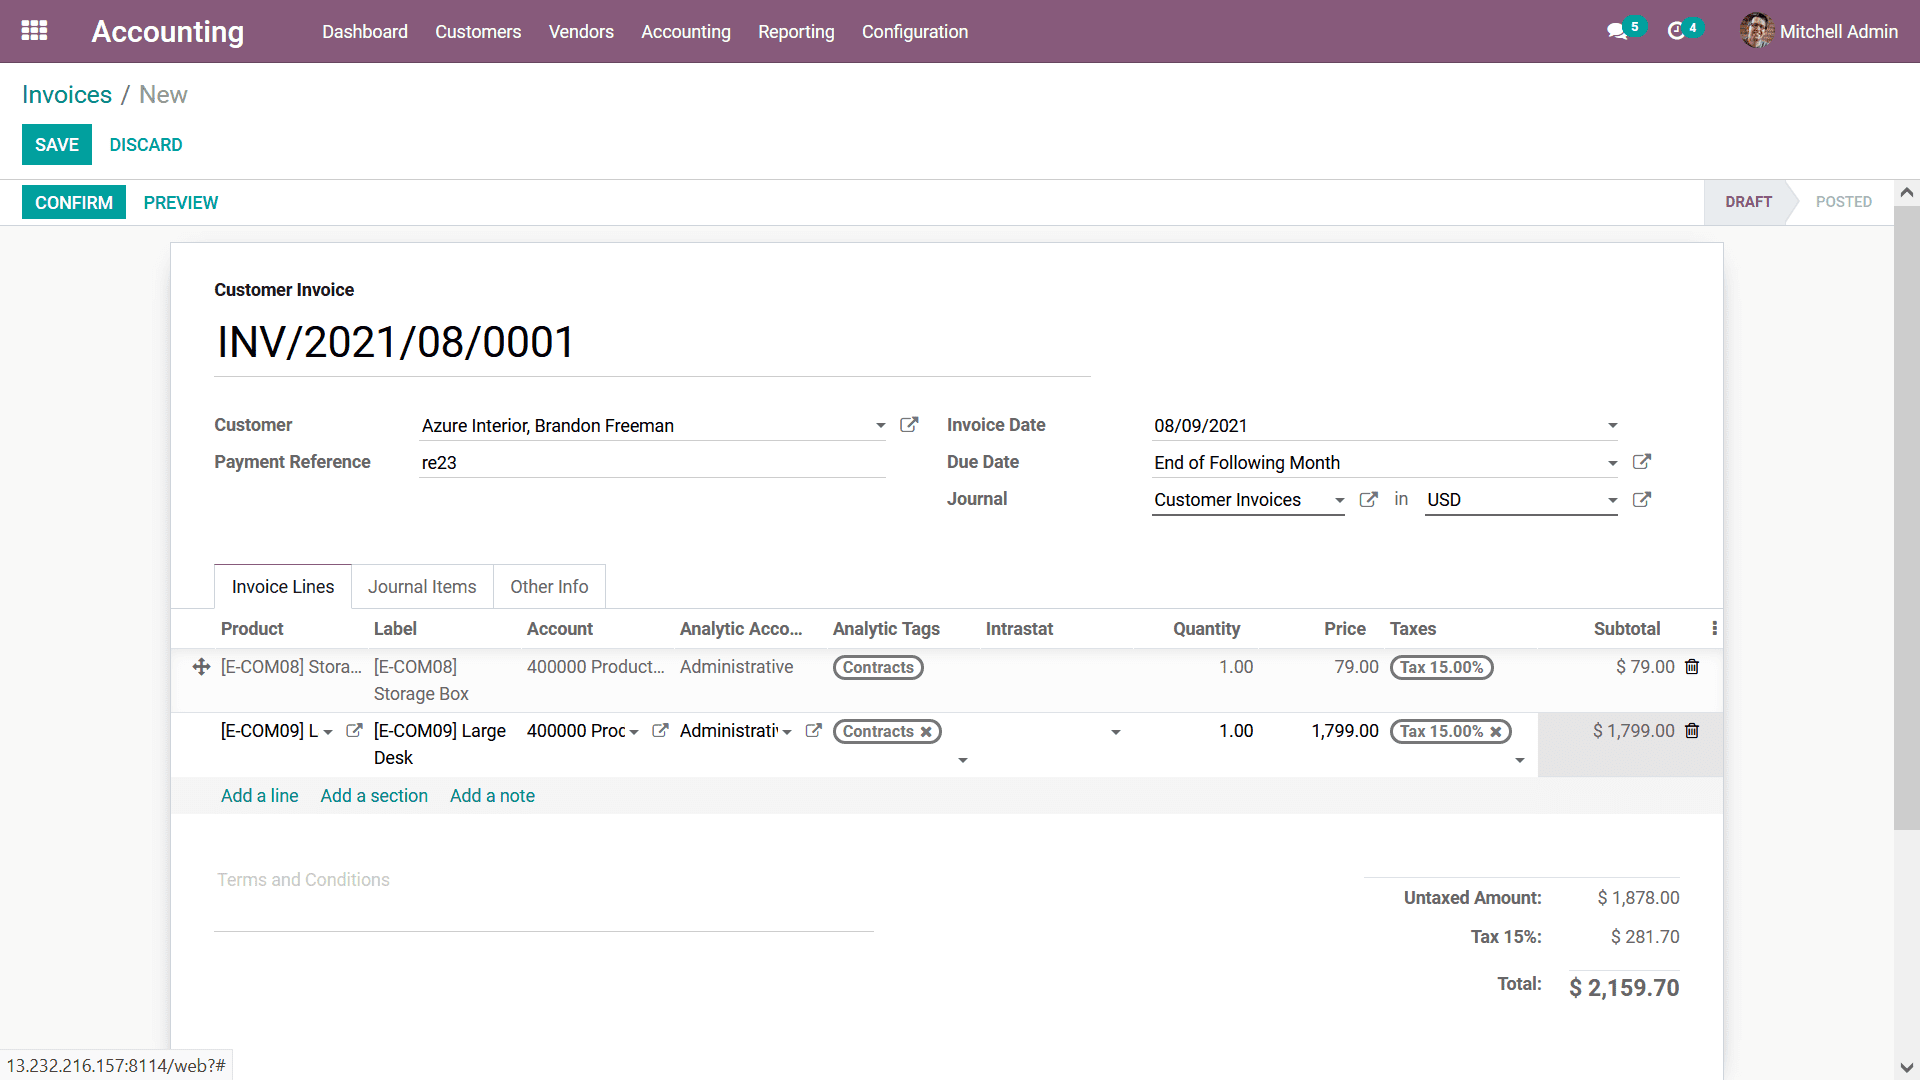
invoices by selecting the Create option available in the Invoices menu. In the Invoice
creation menu just as depicted in the following screenshot, the Customer Invoice
number will be also depicted and the shortcode INV is taken as the prefix of the
invoice which is in respect to the operations of the Journal and it can be modified.
Further, you can select the Customer, Payment Reference, Invoice date, Due Date
and the Journal where the entries should be defined can be provided.
Under the Invoice Lines tab, the Product of the sales can be defined. Here you can
select the Add a line option to add the products and the Add a section to add a
new section to the invoice lines. Furthermore, the Add a note option will allow
you to describe a note to the customer on the invoice itself. Here, you can add
the Product, Label, Account, Analytical Account, Analytical Tag, Intrastat, Quantity,
Price, Taxes, and the Subtotal of the products being defined. Furthermore, you can
define the Terms and Conditions with respect to the Invoice which has been defined.
The Untaxed Amount along with the Tax with the percentage indication and the Total
amount will be described.
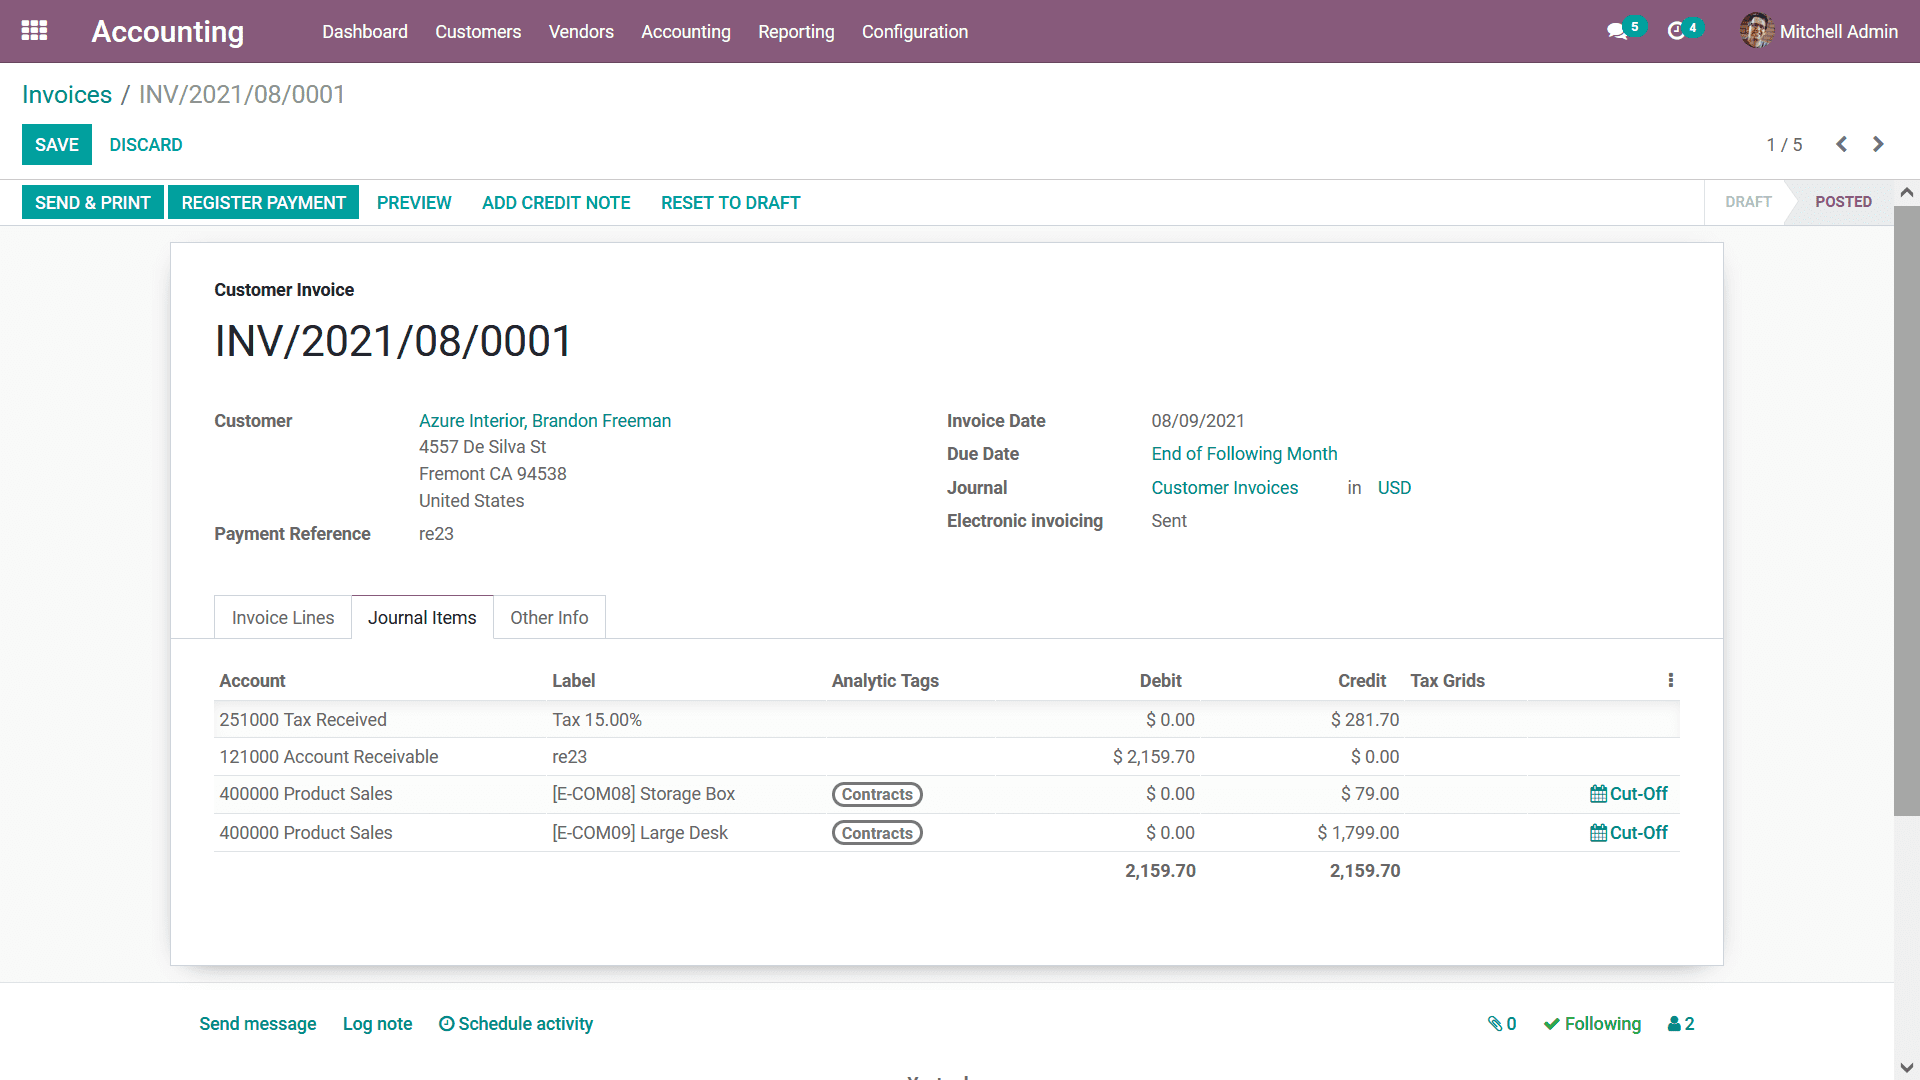
The Journal Items of the respective Invoice will be defined in the respective menu
based on the products and other attributes which have been mentioned in the Invoice.
Once the products are added to the invoice the respective ledgers will be added
in the Journal items. It includes the income account defined in the Product/Product
category, the Receivable Account, and Tax Account. The Account details, Label, Analytical
Tags, Debit, Credit, and Tax Grids will be defined. You will also be able to view
the Cut-Off of the respective Account as shown in the following screenshot.
The ledger posting operations in Odoo are conducted by Continental and Anglo Saxon
Accounting lets understand both in detail. In Continental Accounting when an Invoice
is created, the Income Account is credited and the Account Receivable is debited.
Since the Account Receivable is in the nature of 'Assets' and as the Assets value
increases the Account Receivable is debited. Similarly, as the Income Account is
of nature 'Income' and as the Income increases, the Income Account is credited.
Now the tax account is also credited since its nature is 'Liability' and as the
liabilities increase the Tax Account is credited. Moreover, in Anglo Saxon Accounting,
during an Invoice creation, the Accounts affected are the same.
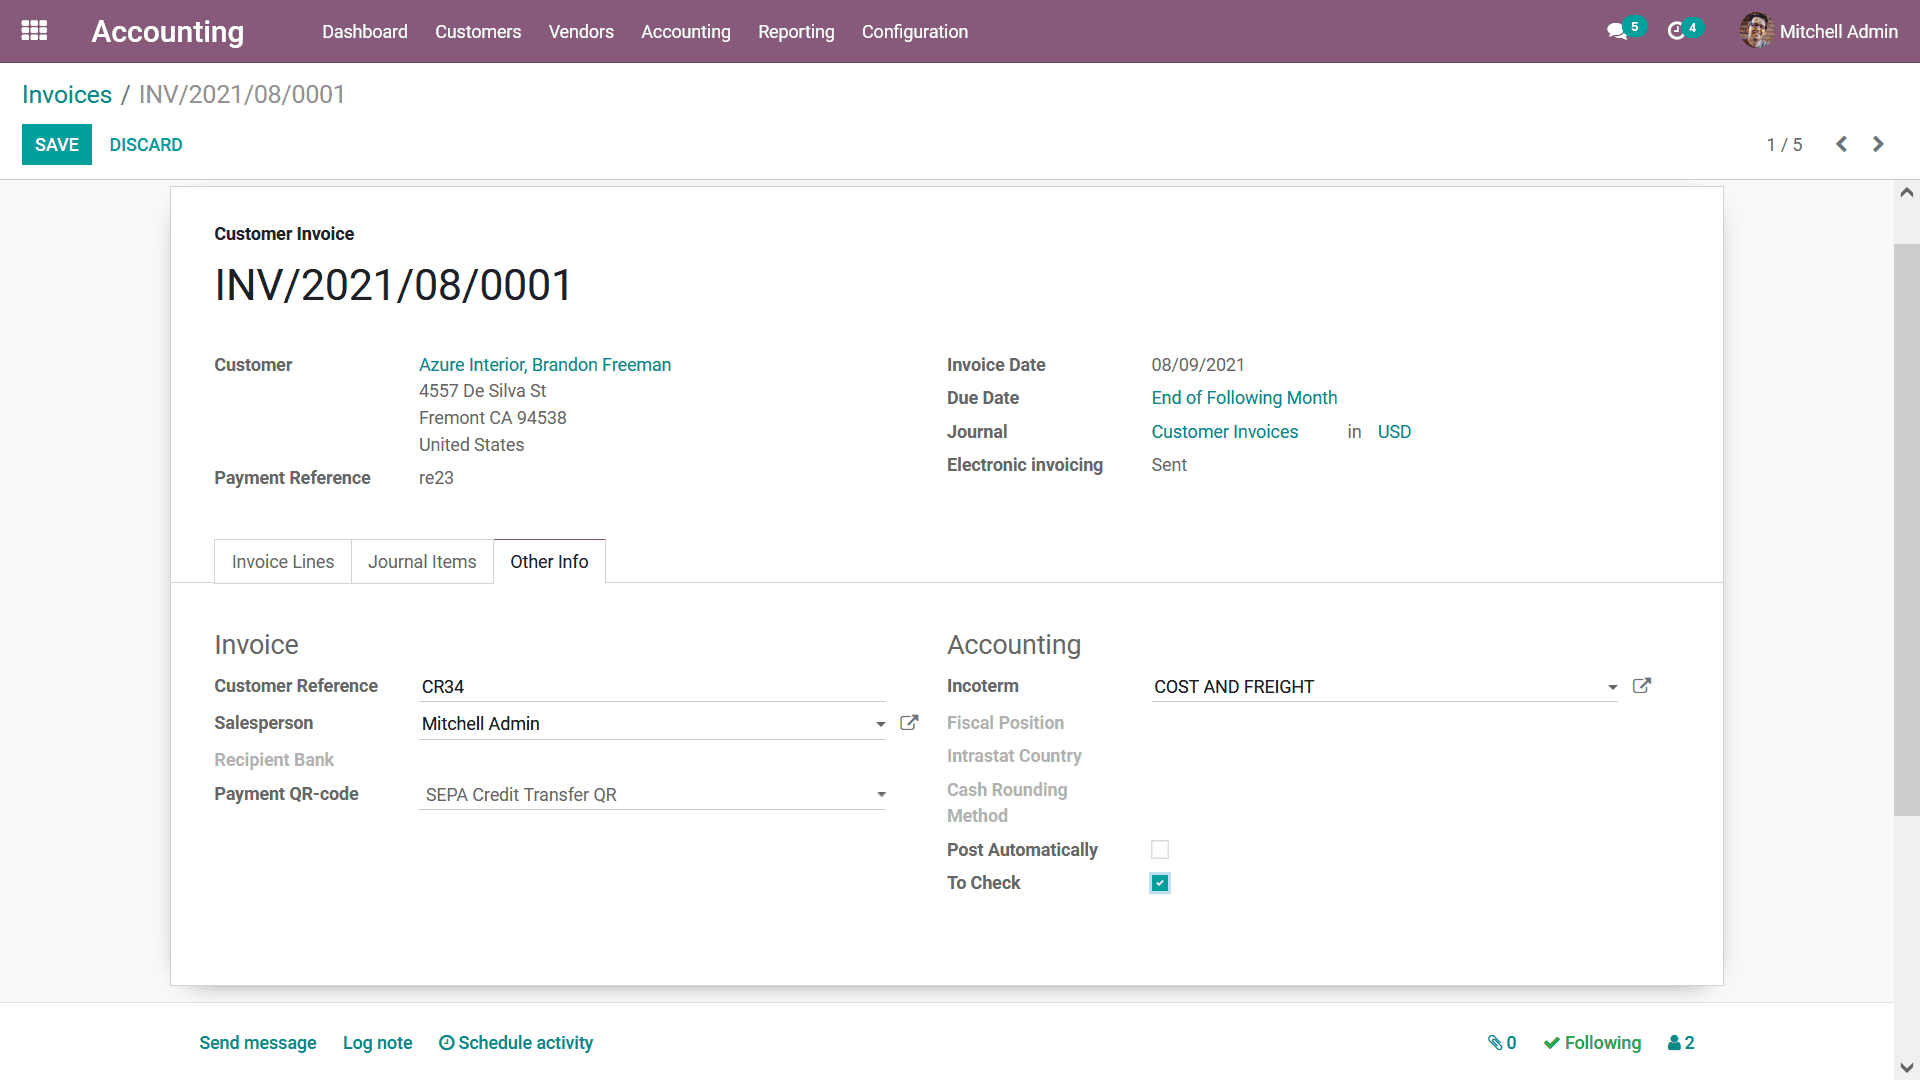
The Other Info tab will give you further information regarding the respective invoice
which has been created and you will have certain aspects which can be configured.
In the Other Info tab, the Invoice menu will provide you options to define customer
References, Salespeople, Receipt Link if any, and the Payment QR- Code can be defined.
Furthermore, the Accounting aspects such as the Incoterm, Fiscal Position, Interests
Country, and the Cost Rounding Method will be defined. There is also an option to
enable or disable based on your need to Post Automatically To Check. Moreover, when
the Post Automatically option is set the Journal entries are posted automatically
based on the Accounting Date mentioned. In addition, if you or any user of the Odoo
platform is unsure of the operations of the To Check options can be enabled which
will indicate that the respective document needs to be checked.
Once the Invoice configuration is finished for the invoice to be sent to the customer
you can select the Send & Print option which will not only send the Invoice but
also print you a copy if a printer is connected to the system. The printed copy
will help to handle the customer the invoice or can be used to be posted by mail
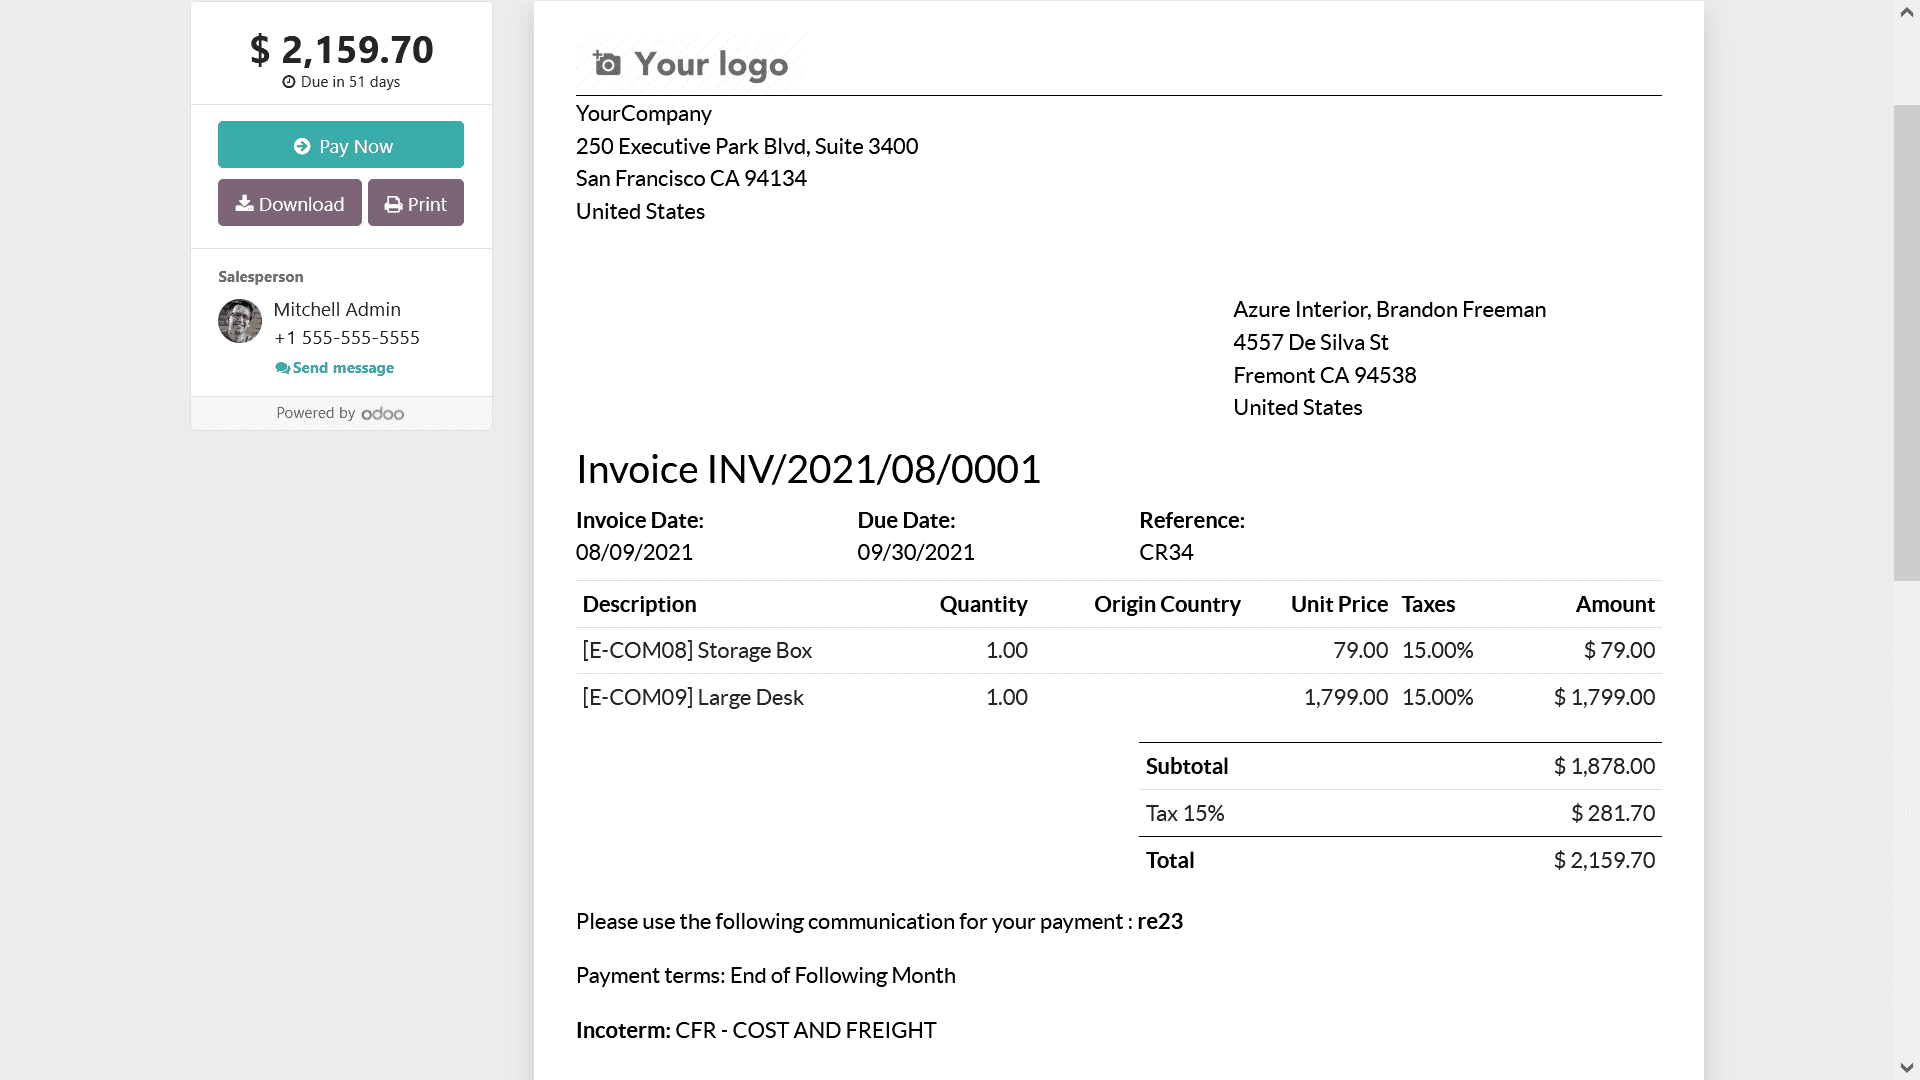
with a custom letter to the customer. In case you need to preview the invoice which
has been defined to understand how the invoice to be sent to the customer will look
like you can select the Preview option. The following screenshot depicts how the
invoice will be previewed to the customer here, all the information that has been
defined while creating the invoice will be depicted other than the ones which are
based on the in-house operations of the company. Moreover, the details such as the
Journal and Chart of accounts will not be depicted.
Once the Invoices are provided and the required modifications are being done you
can opt for them to be sent to the customer. The invoice will be sent to the customer
via mail or by post as per the requirements. As the customer generates the payment
in regards to the invoice sent you can register the payment generated towards you
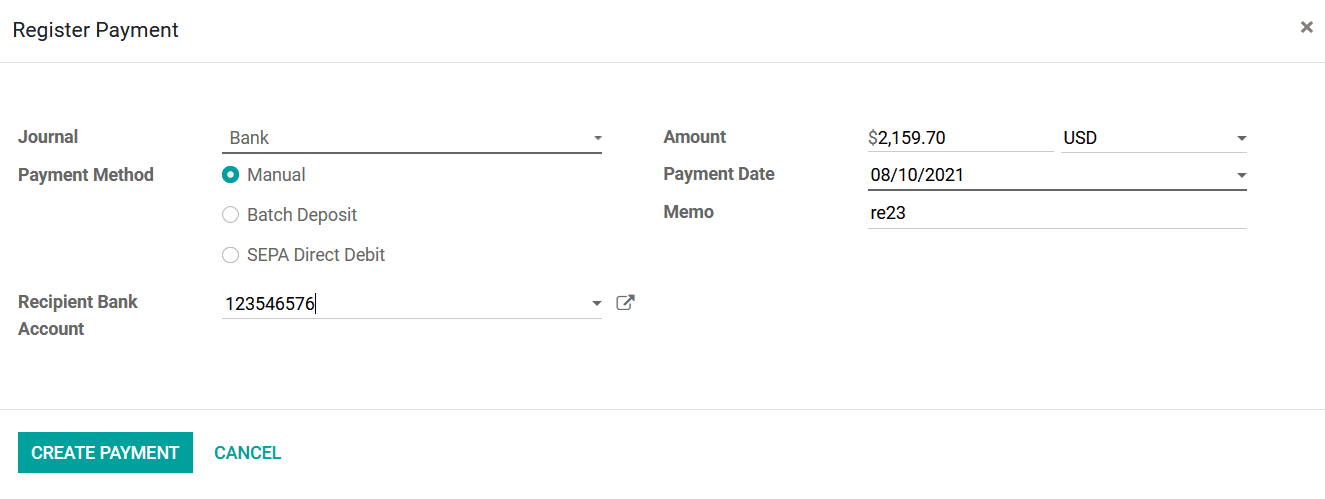
by selecting the Register Payments option available in the respective invoice window.
Upon selecting to register the payments you will be depicted with the following
pop-up window where you can define the Journal Payment Method as Manual, Branch
Deposit, or SEPA Direct Debit. Furthermore, the Receipt Bank Account details can
be defined along with the Amount and Currency. In addition, the Payment Date and
the Memo can also be defined. Finally, select the Create Payment option that is
available to register the payment in the Odoo platform.
The Payment revival operations of Continental Accounting, as well as the Anglo Saxon
Accounting, differs in operation this will provide an operations control of the
operations of the accounting operations of the business. Let's understand the operational
aspects of those. In the Continental accounting, once the payment is registered,
the Account Receivable is credited and the Outstanding Receipts Account is debited.
After reconciliation with the bank statement, only the Outstanding Receipts Account
is credited and the Bank Account is debited. This is the new feature introduced
in Odoo 14 in 'Cash' and 'Bank' Journals. An Outstanding Receipt Account is the
Account where all the incoming payment entries triggered by Invoice/Refunds will
be posted. During reconciliation, they are shown in blue color in the widget and
reconciled with the concerned transaction instead of Account Receivable. Further,
the ribbon IN PAYMENT will be changed to PAID in the invoice.
While in Anglo Saxon accounting, once the invoice has been posted we can see the
Expense Account also get affected. Since the Anglo Saxon accounting expense is affected
once the Sales process has been validated. Thus the stock output account gets credited
and the Expense account gets debited.
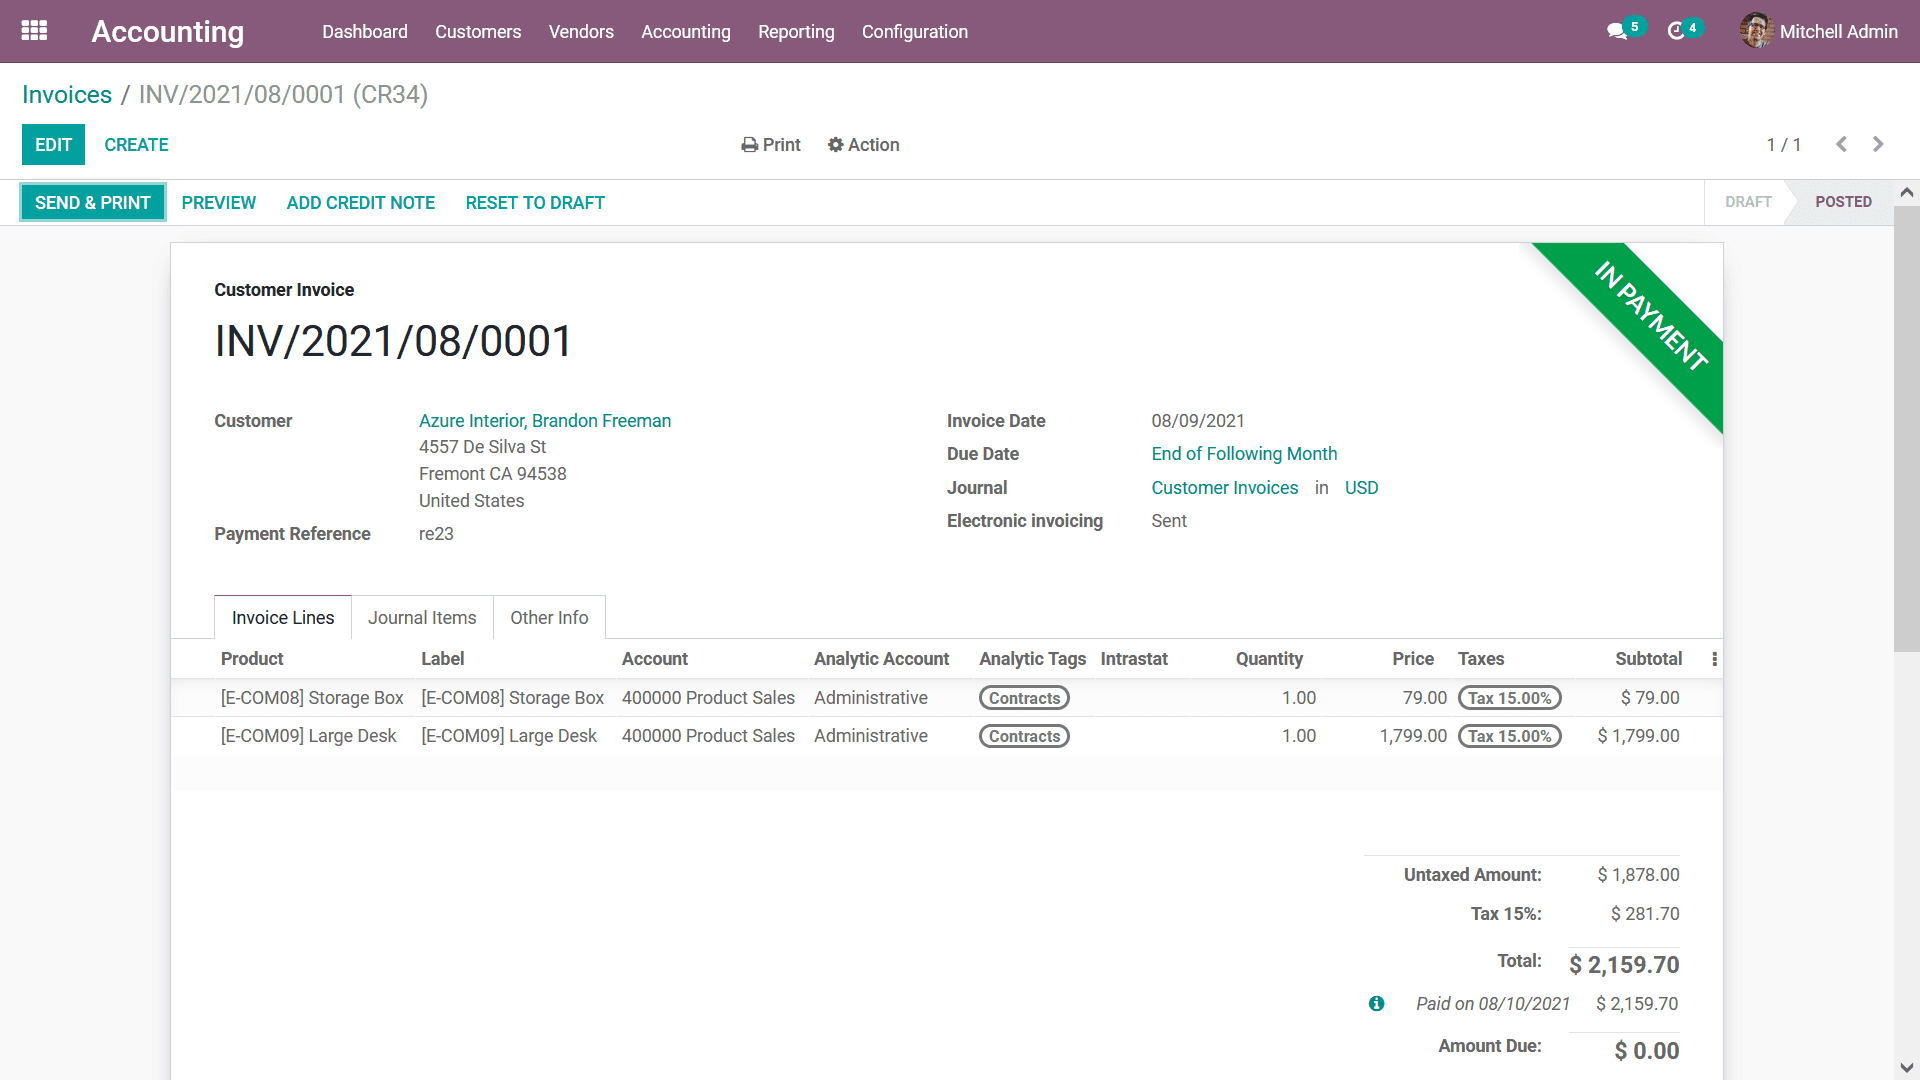
Once the payment is registered the respective invoice menu will depict an In Payment
label as shown in the following screenshot. If the payment has been completed, the
Paid label will be depicted as the status of the respective invoice.
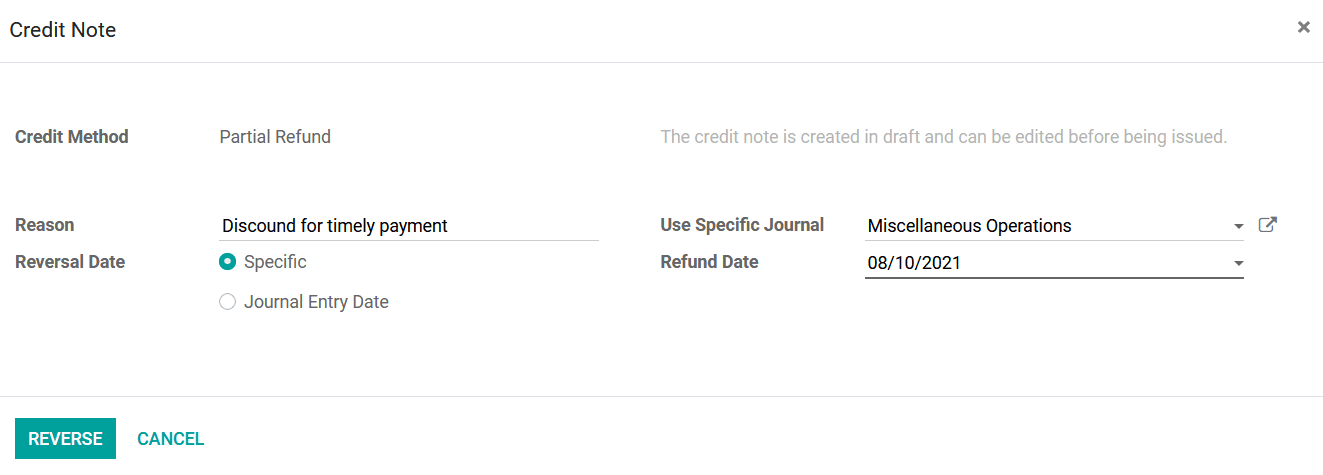
Once the Payments have been received and you want to refund the amount due to certain
internal reasons or a percentage of the amount you can define the Credit Note to
the respective invoice by selecting the Credit Note smart invoice and you will be
depicted with the following menu where the Credit Note details such as the Credit
Method, Reason, Reverse Date can be defined as Specific or Journal Entry Date. Furthermore,
the Use Specific Journal details along with the Refund Date can be defined as your
need. Finally, you should select the Reverse option for the amount to be refunded
to the customer or else select the Cancel option.
With all the functional menus and the windows that are available in the Odoo Accounting
module concerning invoice management, you can generate customer Invoices and perform
the various operations regarding them. As of now, you will be clear on the aspects
of Invoice management with the Odoo Accounting module. Let now move on to the next
customer management menu, the Credit Note in regards to customer management.