Product Management
The Odoo ERP system will give you an efficient platform to configure new products into
the system. You can easily add products to the Inventory module using the ‘Products’
menu available in the main menu bar. The Kanban view of the products will show all
available products in the module and you can also change the view of the products into a
list view using the List option given in the window. You are allowed to use the ‘Create’
button to create a new product for inventory.

The Filters and Group By options can be used to categorize products on the basis of
various default and customizable sorting features. This will also help you to reduce the
difficulty in locating any particular products to perform inventory-related operations.
The preview of the product will show the name and image along with the price of the
product. By clicking a product will give you a detailed view of the particular product.
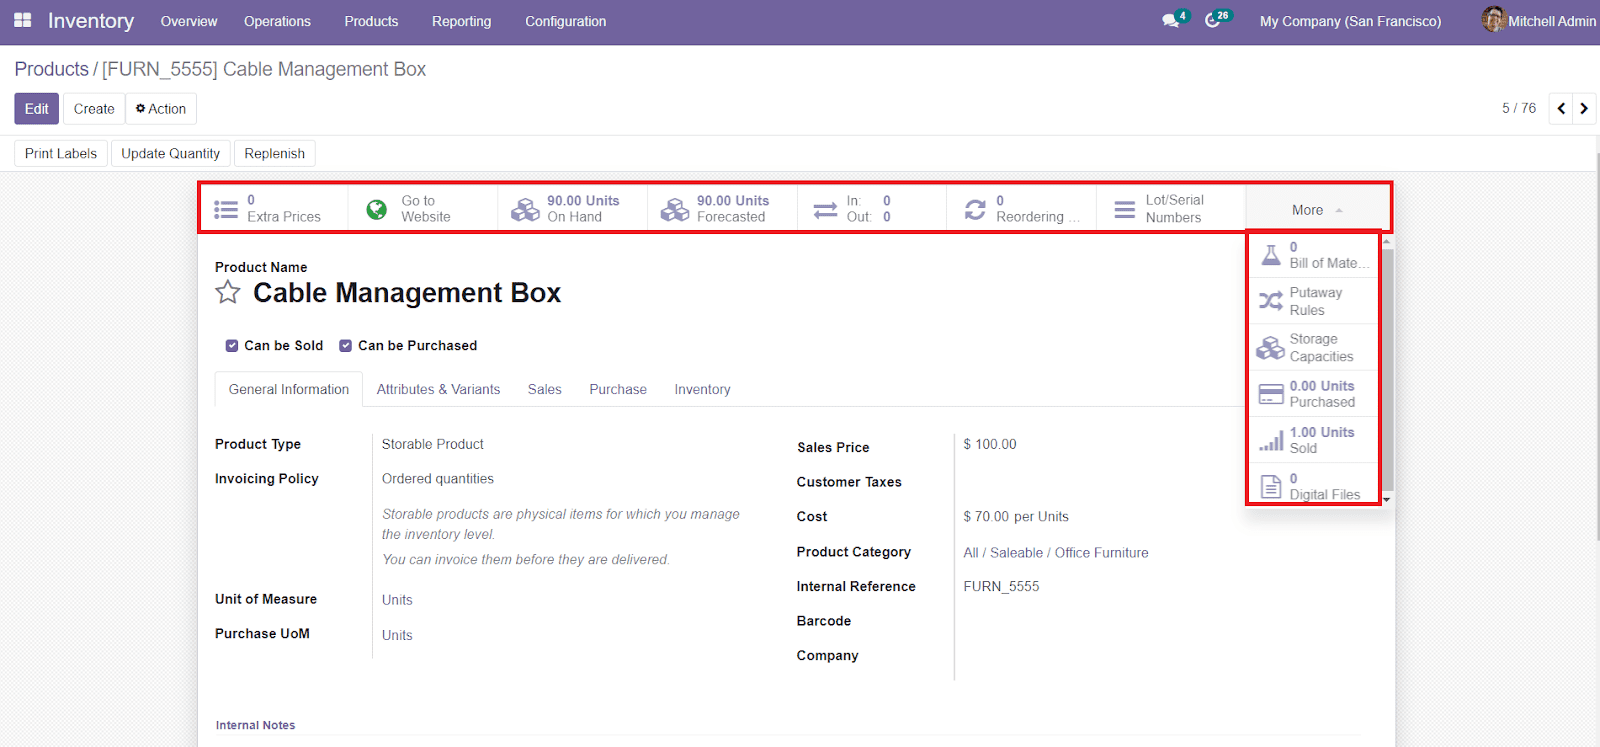
Along with the details about the product, the product description also contains fields to
operate Extra Prices, Go to Website, Units On Hand, Units Forecasted, Product moves,
Reordering Rules, Lot/Serial Numbers, Bill of Materials, Putaway Rules, Storage
Capacities, Units Purchased, Units Sold, and Digital Files.
By clicking on the ‘Create’ button from the home dashboard of the products, you will be
directed into a new window where you have to add necessary information such as General
Information, Product Attributes & Variants, Sales, Purchase, and Inventory. You can use
the ‘Star’ icon near the Product Name, to add this particular product to your favourite
list.
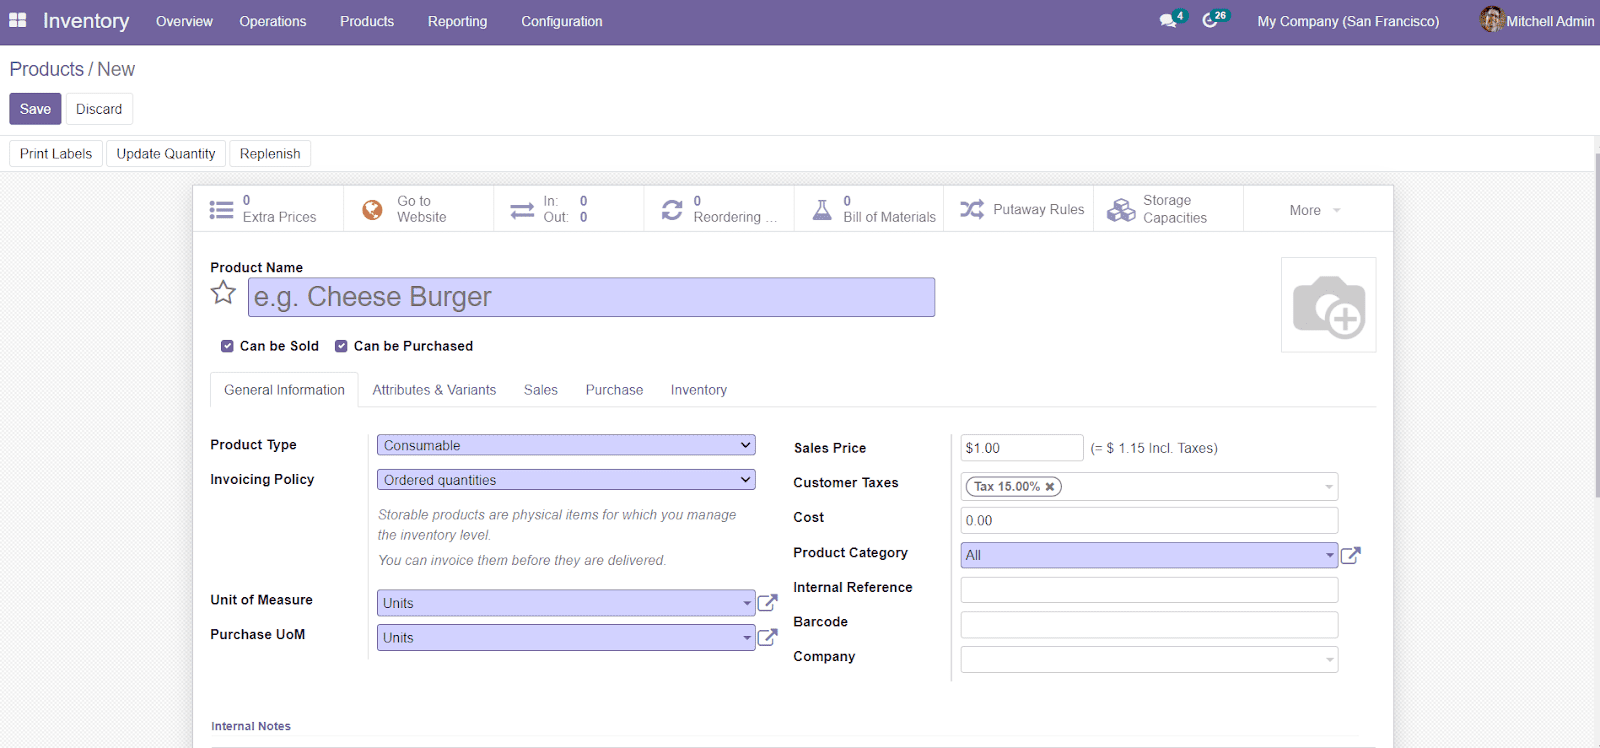
You can give the name of the product and an image of it in the respective fields.
Additionally, you can also decide whether the product Can be Sold or Purchased. Under
the GeneralInformation tab, you can define the Product Type from the given list. It can
be Consumable, Service, Gift Card, Storable Products, Event Tickets, or Event Booth.
Consumable Product: This type of product is a physical product but stock
is not managed. You can receive and deliver it.
Services Product: The Services Product is the type of non-material
product that you provide. It is an intangible commodity.
Storable Product: we can manage the stock of Storable Products.
Gift Card: Gift Cards are service products that can be configured as
normal products to sell on eCommerce.
Event Ticket: This type of product includes the tickets of an event. You
can configure the tickets of an event using the Event Ticket as Product Type.
Event Booth: This type of Product will include the Booths for events.
You can set the Invoicing Policy on the Ordered Quantities or Delivered Quantities.
Invoicing Policy on Ordered Quantities means the user can create invoices for the
Ordered Quantities from Sales Order after confirming the Order for Quotation. On the
other hand, the Invoicing Policy on Delivered Quantity is the policy of creating
invoices on the Delivered Quantity.
Specify the Unit of Measure, Purchase UoM, Sales Price, Customer Taxes, Cost, Product
Category, Internal Reference, Barcode, and Company name in the respective fields. You
can also add an Internal Note regarding the product under the General Information tab.
The Attributes & Variants tab can be used to add different variants of the particular
product.

You can click on the ‘Add a Line’ button to add various attributes of the product and
respective values.
The sales-related details of the product can be configured under the Sales tab.
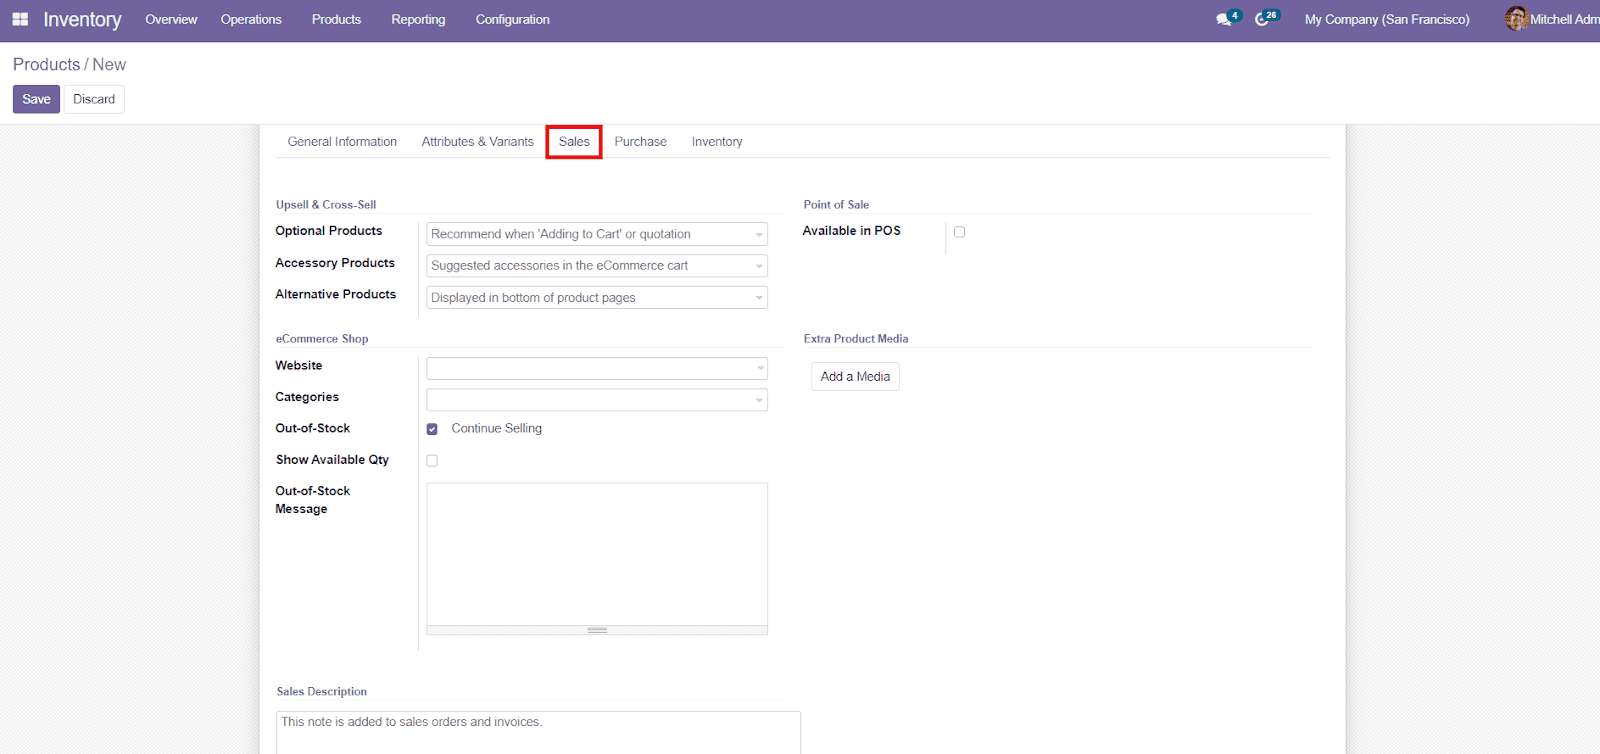
By defining Optional Products, you can offer additional products to the customer while
doing online purchases on your company website. This will be recommended when adding a
product to the cart or creating a new quotation with the particular product. Similarly,
you can add Accessory Products and Alternative Products in the given fields. These are
helpful to increase upselling and cross-selling processes. Alternative Products are the
products that appear as an alternative suggestion for the main product to the customer
on the product page on your eCommerce Website. On the other hand, Accessory Products
show up when the customer reviews the cart before payment.
In the eCommerce shop, you can add Website, Categories, and enable the Out-of-Stock
field. You will also get an additional field to add Out-of-Stock Message. You can enable
the Show Available Quantity to get the number of products available. To make the product
available in Point of Sale, you can activate the Available in POS field. In the Extra
Product Media, Odoo allows you to add additional media by clicking on the ‘Add a Media’
button.
You will be able to add notes under the Sales Description field which will be later added
to sales orders and invoices. In the Configuration menu, you will get an option to
enable the Sales Warnings under the Settings option as shown below.
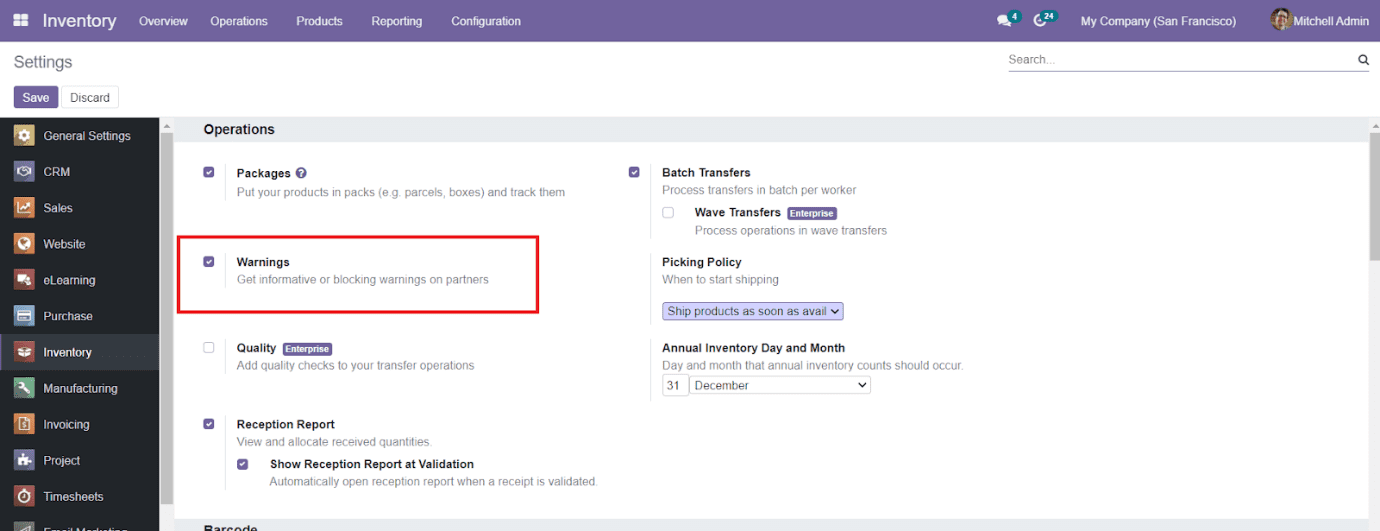
By enabling this field, you can generate Sales Warnings under the Sales tab of the
product configuration when selling this product.

Under the Purchase tab, you can add vendors for a particular product. You can easily
configure vendors to a product by clicking on the ‘Add a Line’ button.
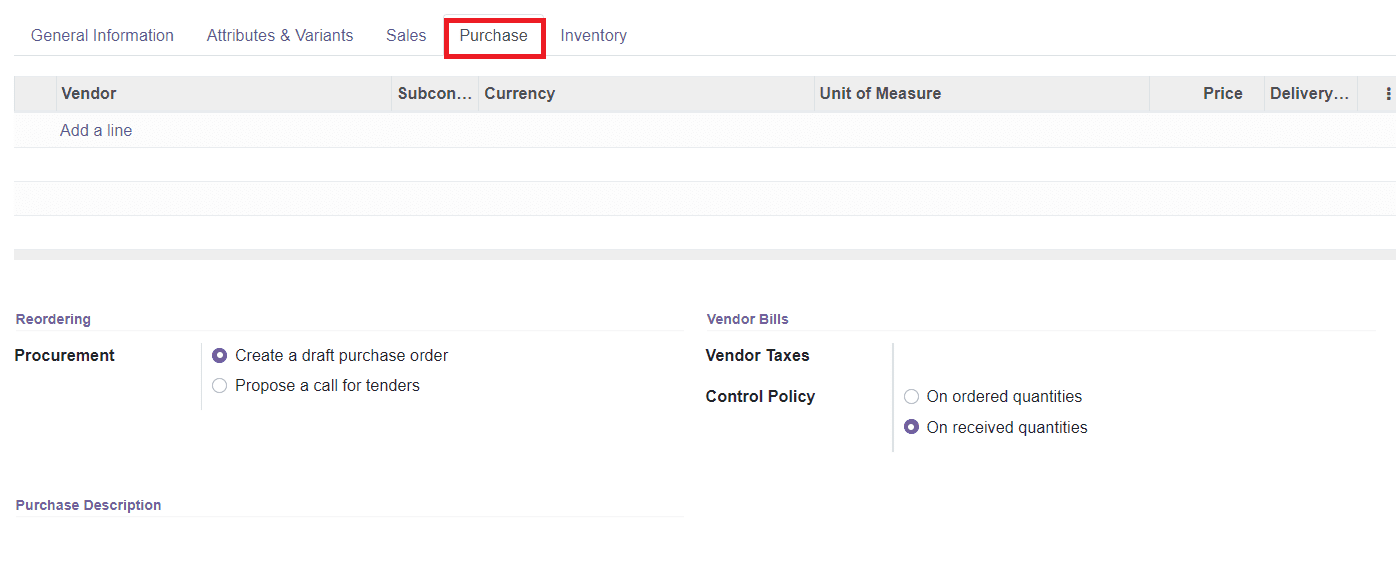
You can mention the name of the Vendor, Currency, Subcontracted, Unit of Measures, Price,
and Delivery Lead Time of the product. Delivery Lead Time is the lead time in days
between the confirmation of the Purchase Order and the receipt of the product in your
warehouse. The field Subcontracted can be seen as enabled only when you select the
vendor same as that you configured under the Bill of Material of the corresponding
product in the Manufacturing module.
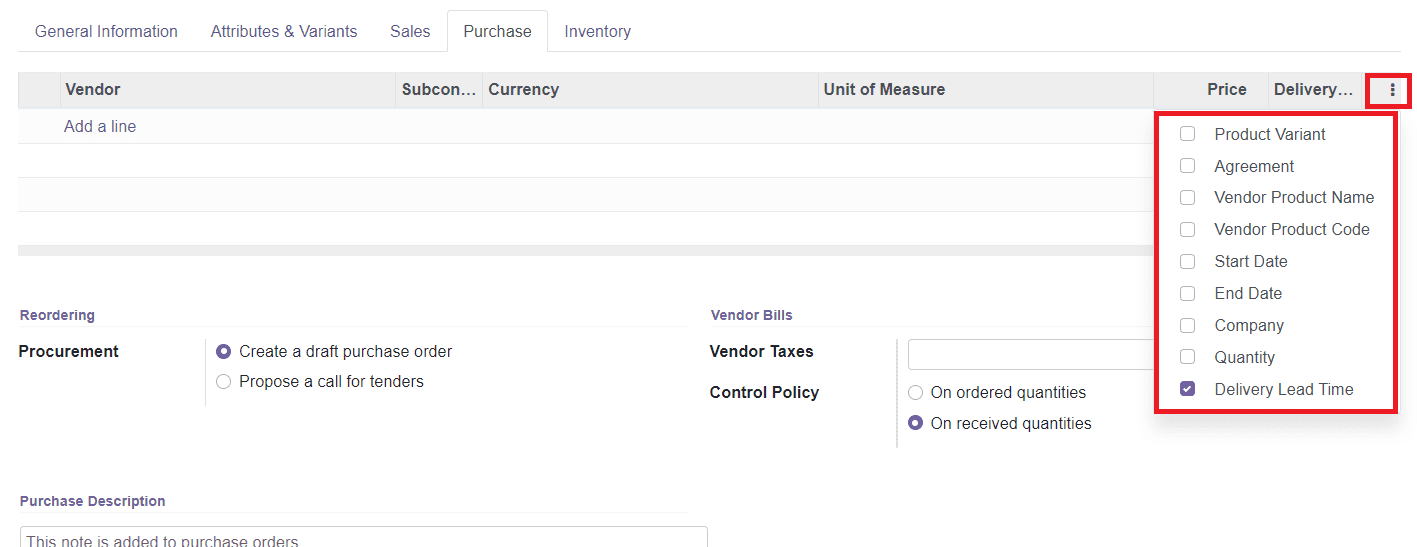
You can also add additional fields to improve the visibility of the data by clicking on
the three dots available on the top right side of the window.
In the Reordering menu, you can set the Procurement as Create a draft purchase order or
Propose a call for tenders. You can add Vendor Taxes and define the Control Policy under
the Vendor Bill menu. There are two types of Control Policies available, On Ordered
Quantities and On Received Quantities. Control Policy On Ordered Quantities will help
you to create bills based on the ordered quantities and Control Policy On Received
Quantities will create bills on received quantities.
Additionally, add a Purchase Description about the product in the specified space.
Under the Inventory tab, you can define the Route Operations of the product. In the
Logistics menu, you can add the Responsible employee for the inventory actions of the
product, Weight, Volume, Manufacturing Lead Time, Customer Lead Time, and HS Code in the
respective field. Manufacturing Lead Time is the average lead time in days required to
complete the manufacturing of this product. The Customer Lead Time is the delivery lead
time in days promised to the customers. HS Code is a standardized code used for
international shipping.
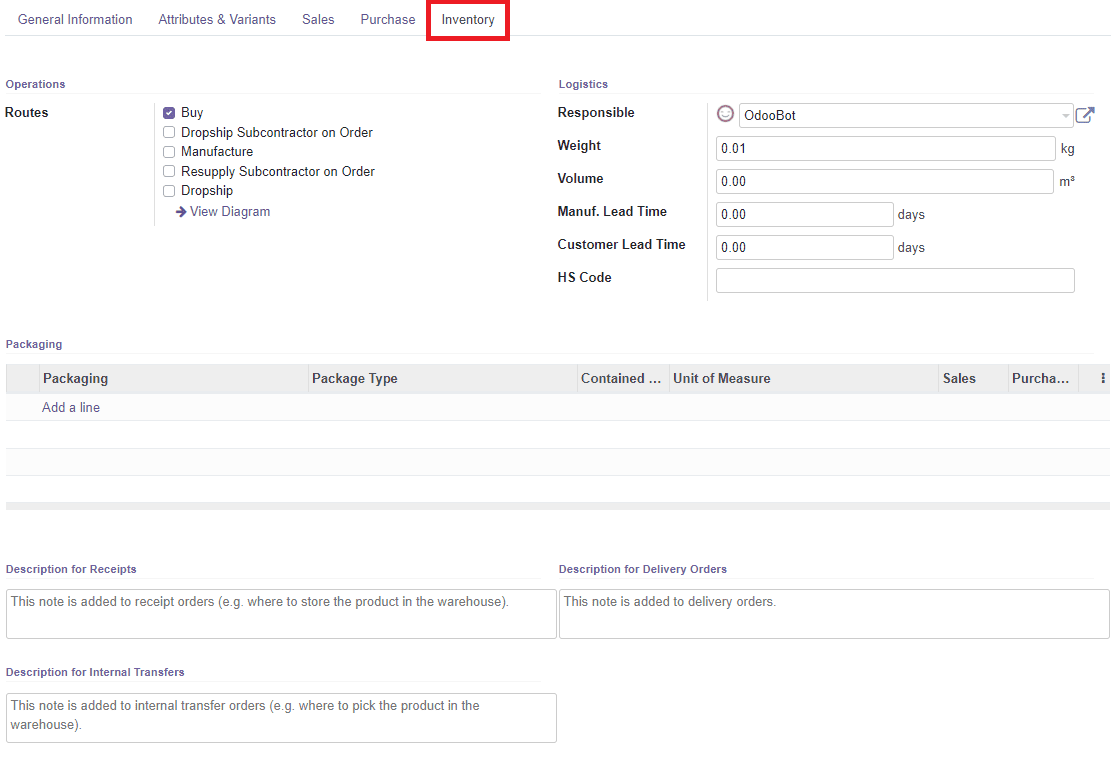
You can mention different packaging methods for the product by selecting the ‘Add a Line’
button. You can add the Package Type, Contained Quantity, Unit of Measure, Sales,
Purchase, Barcode, and Company in the Packaging field. This page also contains fields to
add descriptions for receipt, delivery orders, and internal transfers.
After adding all necessary data to the product creation window, you can click the ‘Save’
button to save the product to the module.
Product Variants
Sometimes, a product will have different variants with different attributes and you can
easily configure the variants of the same product under the Product Variants menu in the
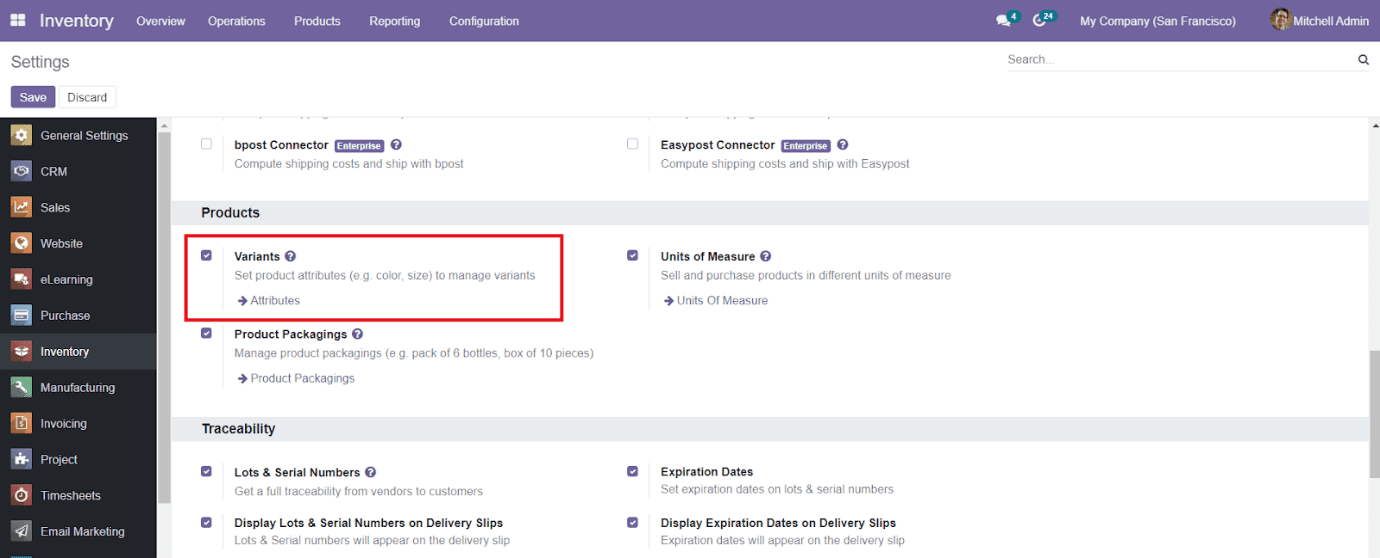
Inventory module. In order to get access to this platform, first, you have to enable the
Variants option under the Product field in the Settings menu of the Inventory module as
shown below.
When you click on the Product Variants menu, you will get a view of all available product
variants in the field. The list view of the product can be also changed into Kanban
views. Like any other Odoo platform, this field also contains sorting options such as
Filters and Group By options. The preview of the list includes details about the
Internal Reference, Name, Website, Variant Values, Sales Price, Cost, Quantity On Hand,
Forecasted Quantity, and Unit of Measures.
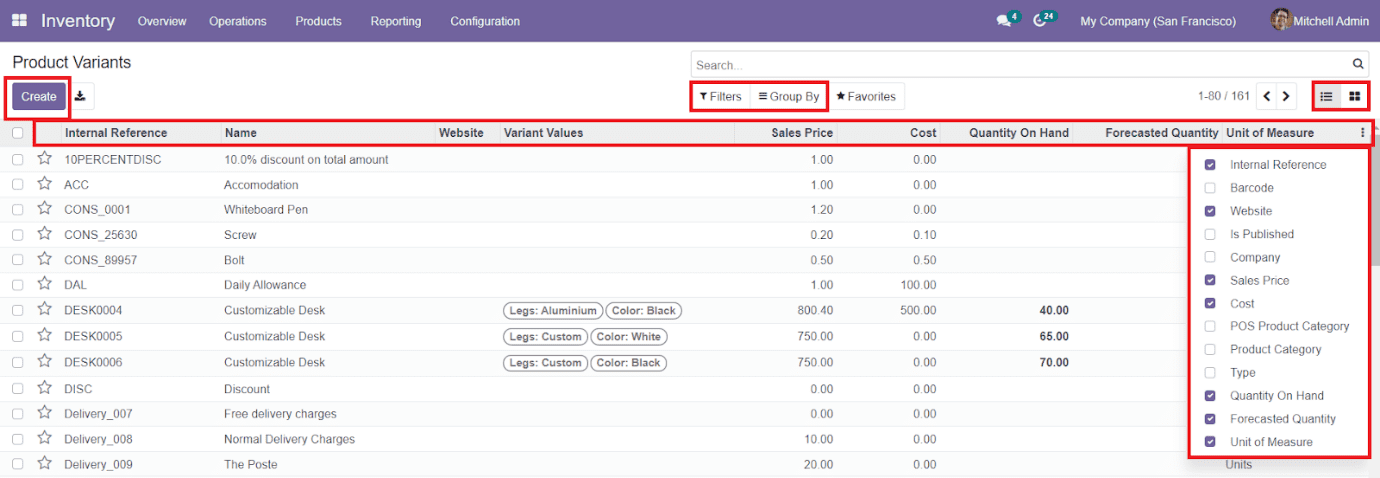
You can also expand the list by using the additional options given under the three dots
on the top of the right corner of the list. In order to add a new product variant to the
list, you can click on the ‘Create’ button.
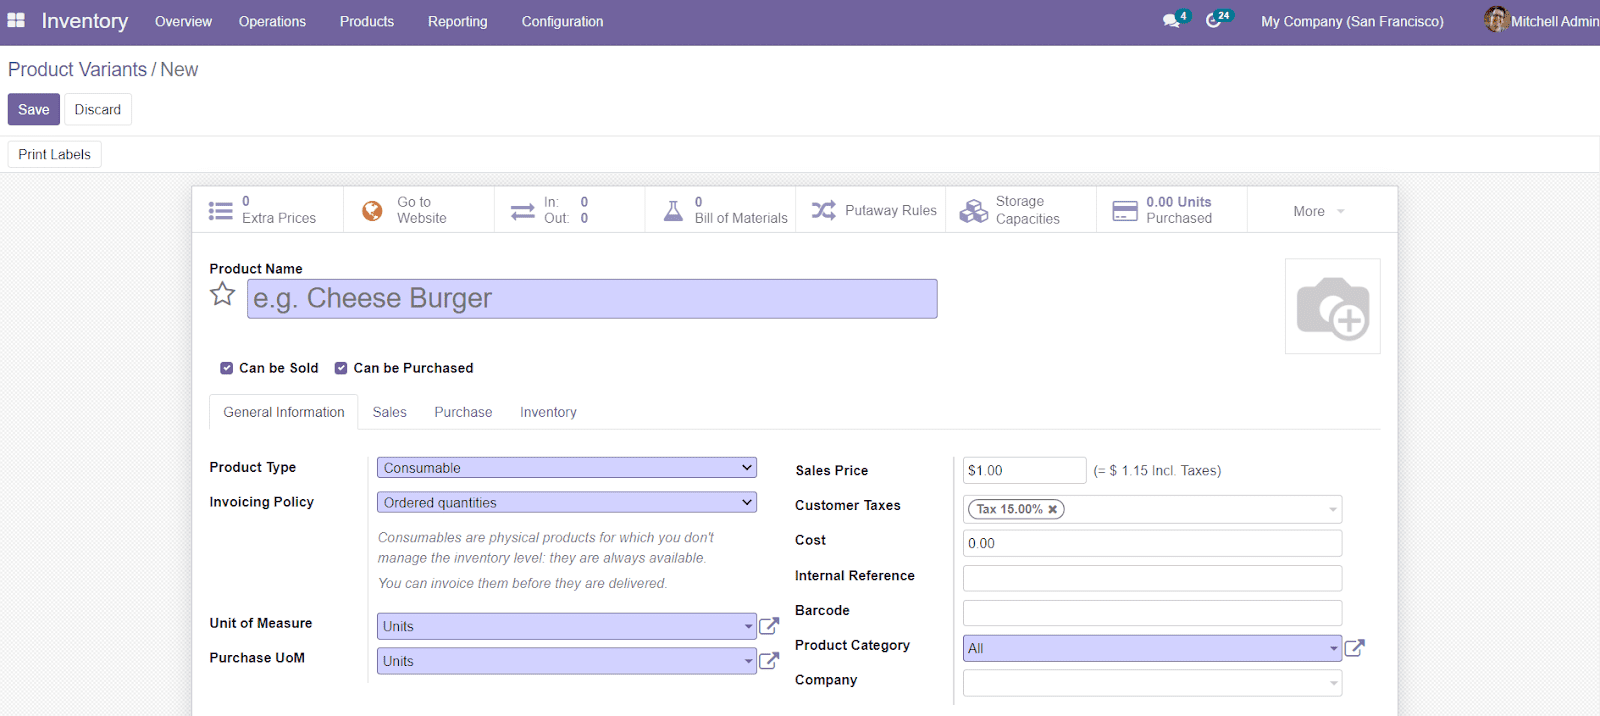
You can add details about the product just as we have done in the product configuration
part.
Product Attributes
You can find the Product Attributes menu from the Configuration menu of the Inventory
module. This platform will display all configured attributes in the system.

The list will show the Attribute, Category, Display Type, Variants Creation Mode, and
eCommerce Filter Visibility. Click the ‘Create’ button to add a new attribute.
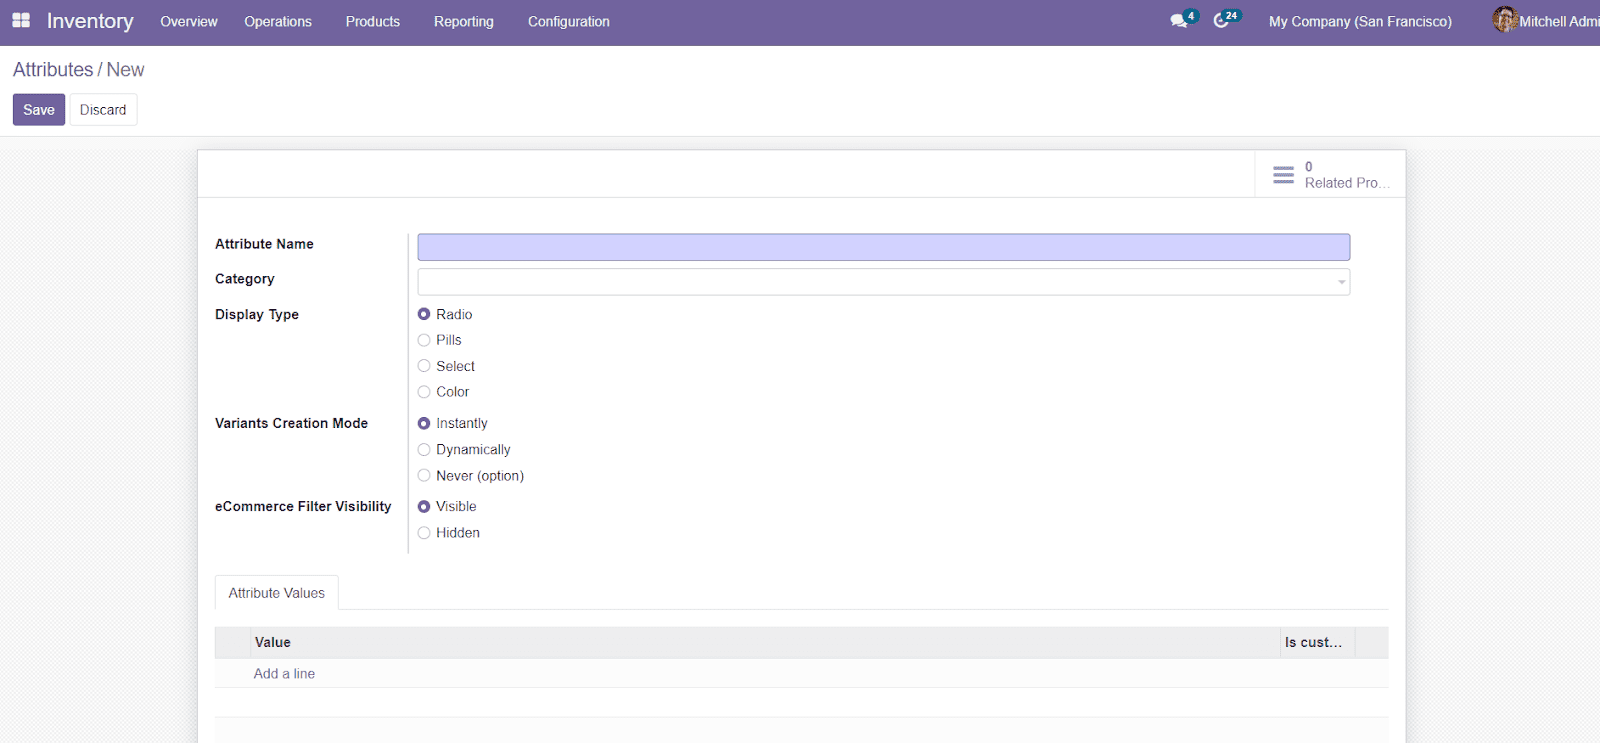
Add the Attribute Name and the Category of the product in the given fields. You can
define the Variants Creation Mode, Display Type, and eCommerce Filter Visibility from
the given options. In order to describe the Attribute Values, you can use the ‘Add a
Line’ button to specify the respective values of the attributes.
Product Categories
To define specific categories for the products in the Inventory module, you will get the
Product Category options under the Configuration menu.

This window will display the existing Product Categories and you can use the ‘Create’
button to create a new one.
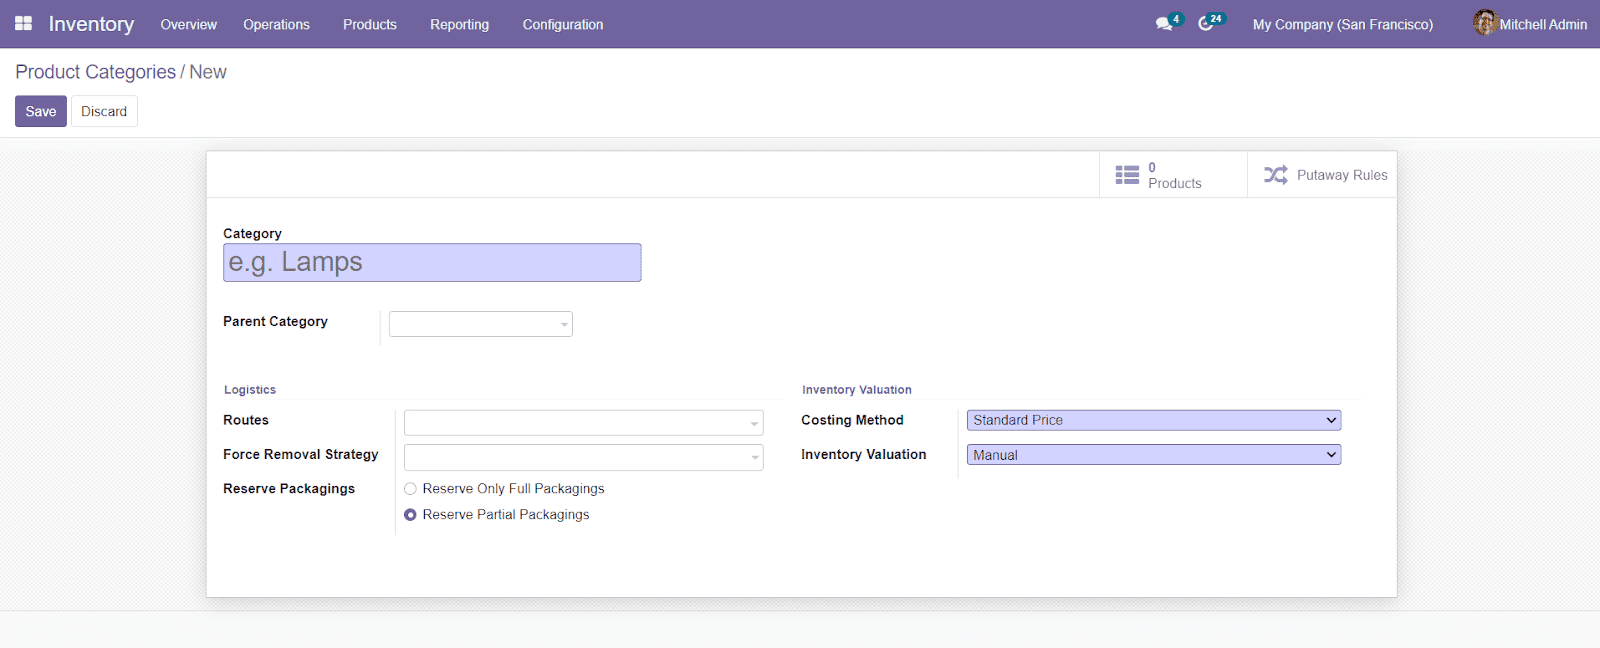
You can specify the Category and Parent Category of the Product in the given field. Under
the Logistics menu, you can add Routes, Force Removal Strategy, and Reverse Packaging.
Add Costing Method and Inventory Valuation type in the form and save the data by
clicking the ‘Save’ button.
Product Packaging
To define various product packaging methods, Odoo has enabled a specialized platform in
the Inventory module. The Product Packaging option under the Configuration menu will
give you access to the platform where you can define various product packaging methods.

The ‘Create’ button will help you to create a new packaging method.

In the new creation window, you can define the Packaging, Product, Routes, Package Type,
Contained Quantity, Barcode, and Company. You can also enable the packaging for Purchase
as well as Sales. Save the new product packaging by clicking the ‘Save’ button and you
can use this data while creating new sales orders and quotations.
In order to define the Package Type, you are allowed to use the Package Type option from
the Configuration menu.

This field will show all available package types in the platform along with the Carrier,
Package Type, Height, Length, Maximum Weight, and Carrier Code details. You can easily
create a new package type by using the ‘Create’ button.

The new Package Type creation window includes the fields to add Package Type, Size,
Maximum Weight, Barcode, Carrier, and Carrier Code. You can define different Storage
Category Capacities of the particular packing type by using the ‘Add a Line’ button.
Save the data and use this while creating new product packaging methods.
Units of Measurement
While defining different types of products, it is important to specify the units in which
the products should be measured. The unit of measure will change in accordance with the
type of the product. The settings menu of the module will show you the field to enable
the Unit of Measure platform in the Inventory module.
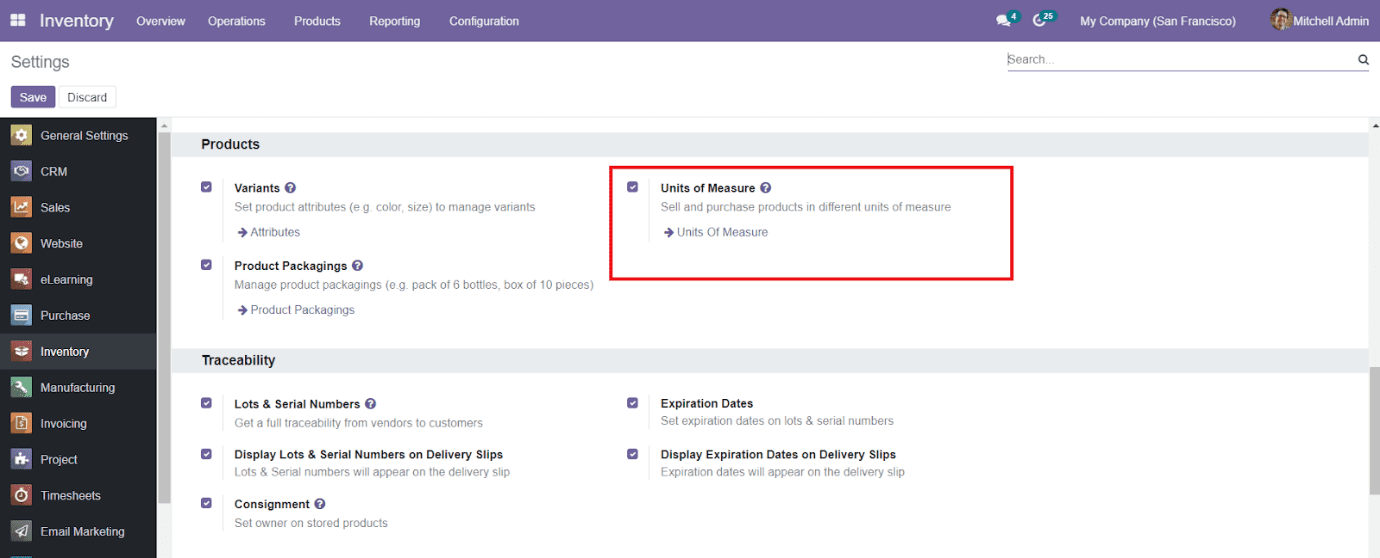
After enabling this field, you will get access to the platform from the Configuration
menu. While entering into this platform, you will be able to see the list of Unit of
Measure Category and corresponding Unit of Measures.

To add a new unit for measuring the product, click on the ‘Create’ button.

You have to mention the Unit of Measure Category in the specified field. Using the ‘Add a
Line’ button, you are allowed to add the Unit of Measure, Type, Ratio, Active status,
and Rounding Precision in the given spaces. You can use this Unit to measure suitable
products after saving the data by clicking on the ‘Save’ button.