The Odoo Sales module is a key resource for complex sales management activities. Through the coordination of quotation development, customer administration, sales team organization, sales order confirmation, and invoice production, it simplifies workflows. Manual management and monitoring are no longer necessary as a result. The newest release of Odoo provides quicker processing speeds without sacrificing good execution. A separate smart button for managing subscriptions has been added to the Sales module to combine subscriptions with sales orders. In addition, the Sales module now allows users to create and manage subscriptions directly from the module. In general, the Odoo Sales module is a potent tool for effective sales management. Here, we are going through the process of creating products and configuring product variants inside the Odoo 17 Sales Module.
Product Variants in Sales
Products having several related variants are referred to as product variants and are used to provide clients with different versions of the same product. Odoo concentrates on managing product variations and offers a distinct area for doing so. Product variants provide unique characteristics like size and color to single products, which can be managed at the product template level for all attributes and variants or at the variant level for individual variants. Some of the advantages of creating product variations on a sales platform are;
* Since each variant's barcode is distinct, it may function as its own unique barcode rather than being associated with the product template.
* The public price of any product variant is the total of the product template price and any extra fees for certain qualities.
* As opposed to the product template form, which displays the total number of variants, real inventory is determined for each product variant.
* Each product variety can have a distinctive picture.
Configuring Product Variants Feature
The “Product” menu of the module has the “Product Variants” option, and the Odoo Sales module's Product Variants window neatly arranges every generated Product Variant. Before creating a sales product with multiple variants, you have to configure some specifics from the “Settings” menu. So go to the “Settings” window from the “Configuration” menu and just activate the “Variants” option from the “Product Catalog” tab section as shown below.
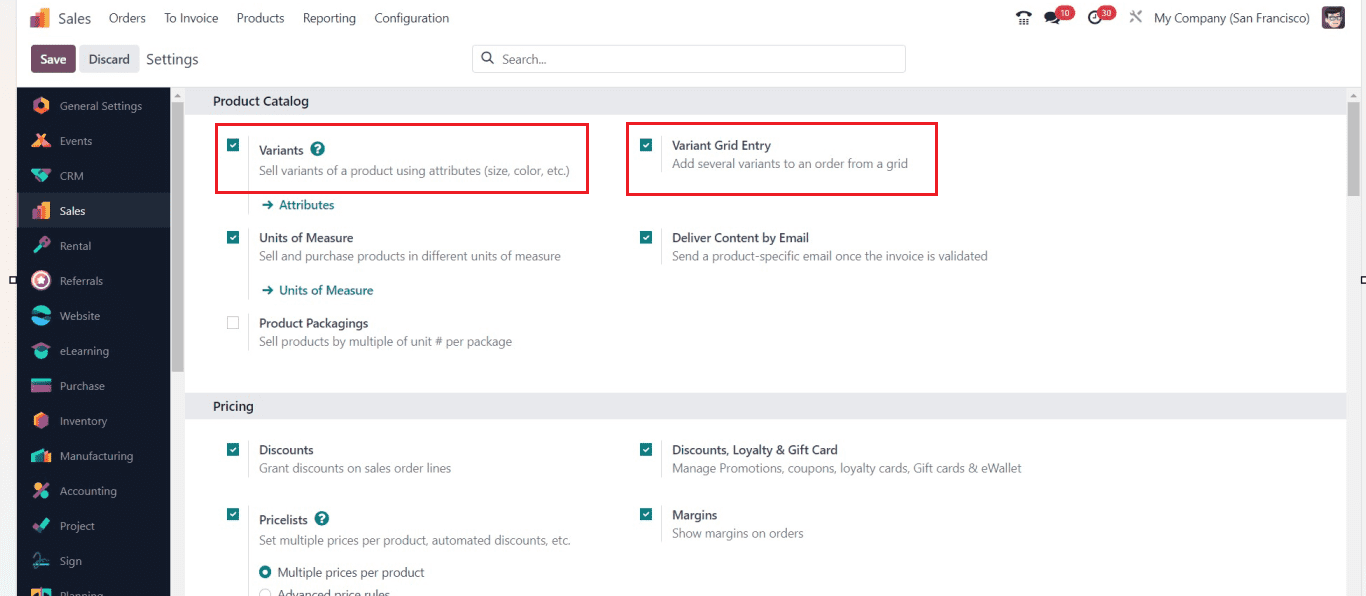
After activating these essential features, you must have to save the configuration changes.
Setting Attributes
The qualities of a product or object are its attributes, such as its color, size, pattern, brand, etc. Users can set various attributes for the products available in their sales inventory using the “Attributes” link available inside the “Variants” option illustrated in the above screenshot. This can also be done using the “Attributes” option available inside the “Configuration” menu dropdown section.
Both methods will lead you to the “Attributes” dashboard window, as shown below.
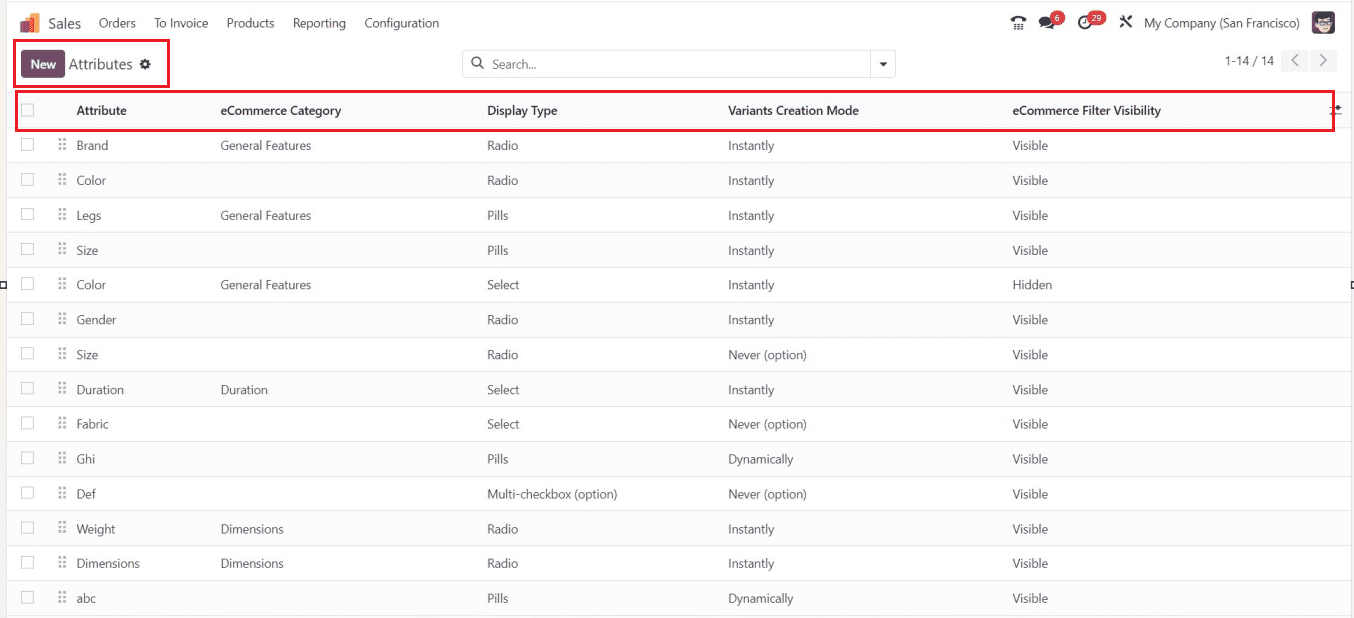
All of the attributes that have ever been generated in the Odoo system are displayed in this window. Along with each attribute's name, the panel will also display information about its "eCommerce Category," "Display Type," "Variation Creation Mode," and "eCommerce Filter Visibility." Additional custom fields can be added if necessary.
You can access the Attribute creation window seen in the below image by clicking the “New” button located in the upper left corner of the screen.
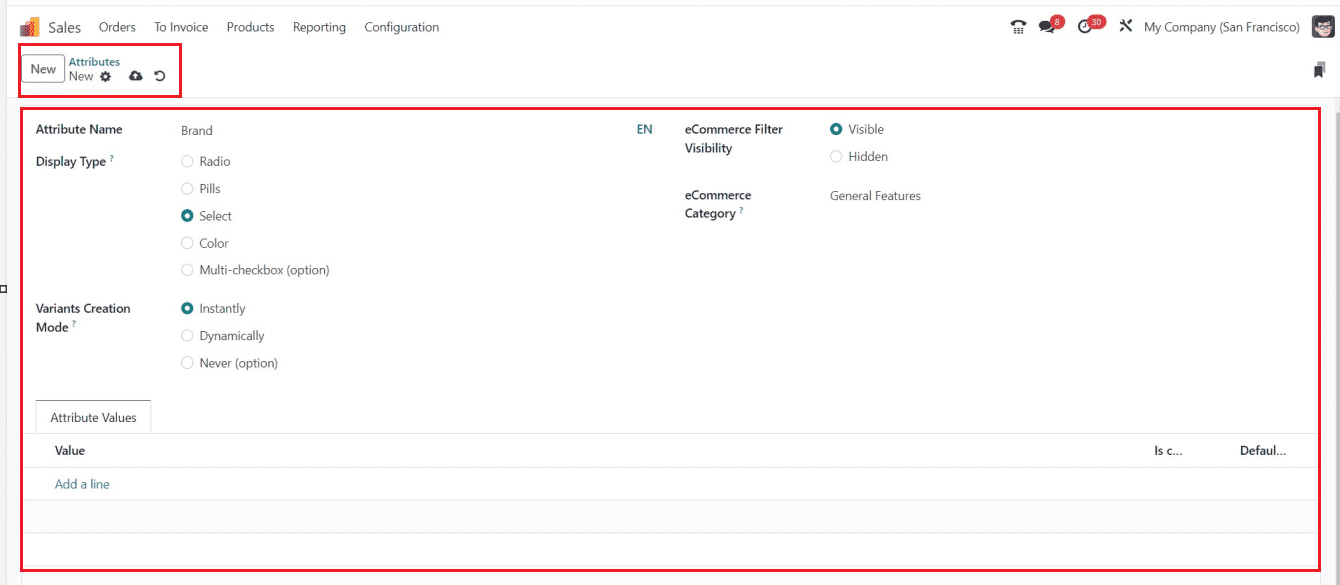
You have to enter the “Attribute Name” first in the creation form window before setting a category to put related attributes together under the same heading on the eCommerce comparison page. Then, you can select the “Display Type” from a list of possibilities that includes Radio, Pills, Select, and Colour. Additionally, there are three possibilities for the “Variants Creation” Mode: Instantly, Dynamically, and Never. The “eCommerce Filter Visibility” set also has two options: Visible and Hidden. You can choose an attribute category corresponding to the new record in the "eCommerce Category" field.
Attribute Value Tab
You can assign a value under the ”Attribute Values” tab and choose the “Add a line” option to activate or disable the option “Is custom value.” You can also provide the “Default Extra Price” for the attribute. When the form is finished, you can save the information by selecting the save icon available at the top of the form.
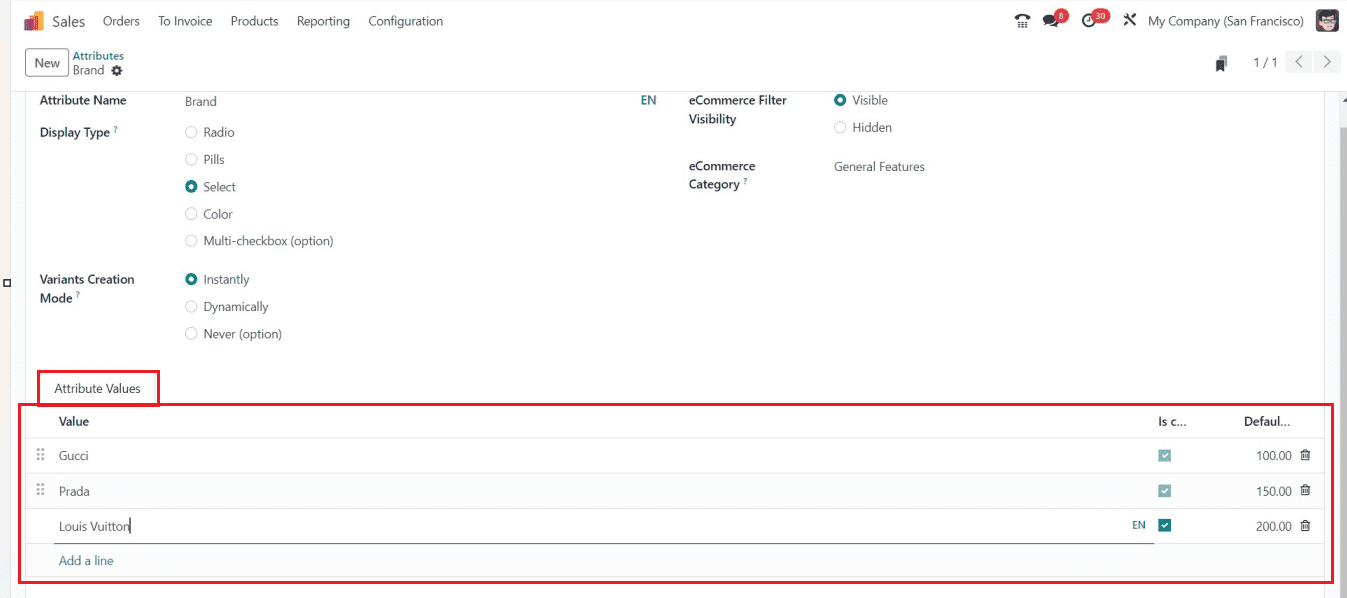
I've established a brand attribute in the "Attribute Value" tab and included a few brand names. The attribute is now available for application in the future. Users can create any type of attribute using the same method.
Configuring Product Variants
After configuring the Attributes, you can create the products with multiple variants and attributes using the “Products” menu. Select the “Products” option from the menu. You will see the products category window as shown below.
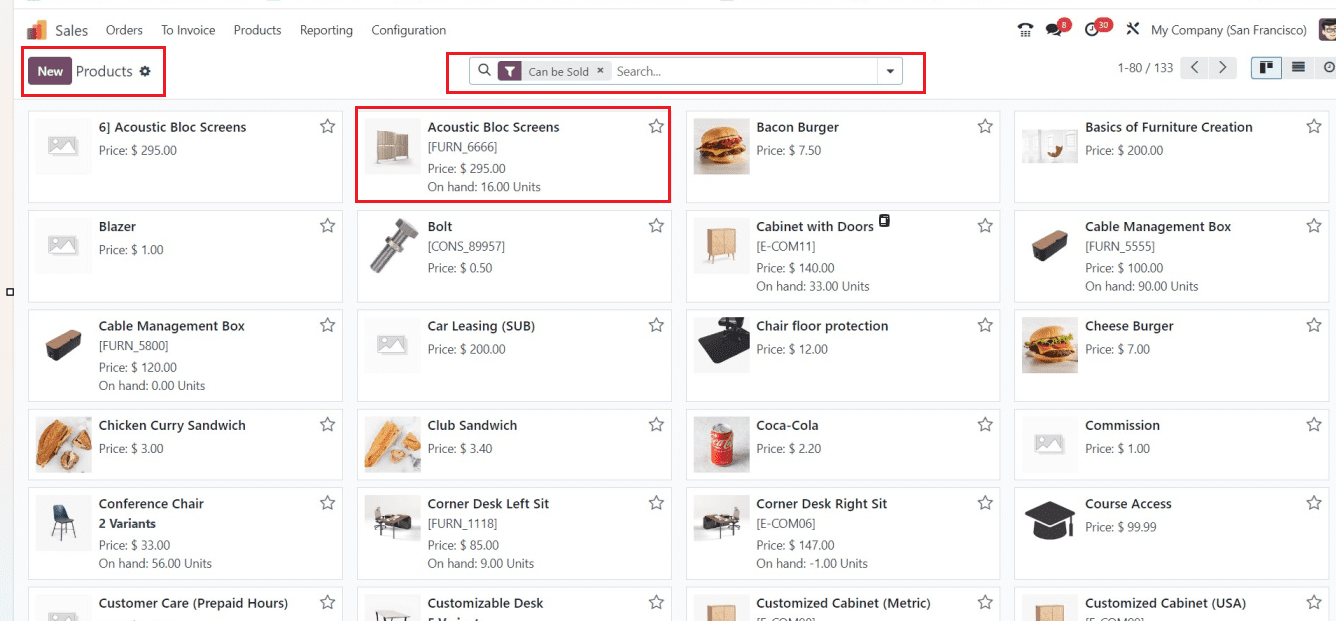
Details like Product Name, Reference Number, Sales Price, Quantity on Hand, and Number of Variables are displayed in the Kanban view of the product window. Sort or Filter the required products using the compact search bar provided by Odoo in the top center of the window. Selecting the Kanban card of a desired item will open its form view, and you can update it to change the goods that are currently offered in Odoo.
Creating a new Product
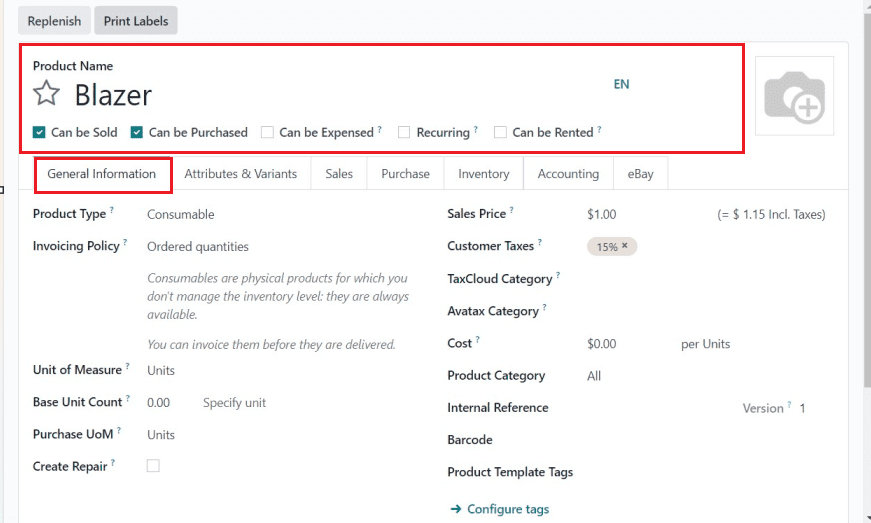
To make a new record, click the "New" button. The Product Name field is where the product name may be typed. By choosing the star icon, you can then add the item to your list of favorites. The product can be sold, purchased, expensed, recurring, or rented, depending on the chosen options. Enabling the “Can be sold” permits selling, “Can be Purchased” allows purchasing, “Can be Expensed” allows expenses, “Recurring” allows subscriptions, and “Can be Rented” permits leasing.
General Information tab: You can set the basic features of the product inside this tab. This comprises a number of elements, as seen in the picture above, such as the Product Type, Invoicing Policy, Unit of Measure, Purchase UoM, Sales Price, Customer Taxes, TaxCloud Category, Avatax Category, Cost, Product Category, Internal Reference, Barcode, and many others.
Attributes &Variants Tab: Users can customize attributes, variants, and values for products, including brand names, colors, sizes, patterns, and fabrics. They can also provide values based on specific variants and brand names.
Sales Tab: This tab can be used to edit the UPSELL & CROSS-SELL products, PRODUCT DESCRIPTION FOR SELF ORDER, POINT OF SALE, E-COMMERCE SHOP, and EXTRA PRODUCT MEDIA. You can upload extra product media like photos and videos. It also provides information on website details, sales descriptions, and POS availability.
Purchase Tab: This section displays vendor details, including vendor names, subcontract services, purchase descriptions, and vendor bill details. Users can select or create new vendor names, and an RFQ is generated for each sale. Also, you can set the VENDOR BILLS and PURCHASE DESCRIPTION.
Inventory Tab: This tab area can give inventory information for the OPERATIONS, LOGISTICS, DESCRIPTION FOR RECEIPTS, DESCRIPTION FOR DELIVERY ORDERS, and DESCRIPTION FOR INTERNAL TRANSFERS.
Accounting Tab: The accounting section can be used to set details like income, expense, and price difference accounts in the fields named RECIEVABLES, PAYABLES, INTRASTRACT, AUTOMATIC EMAIL AT INVOICE, and UNSPSC.
eBay Tab: Users can sell their products through the eBay platform by enabling the “Sell on eBay” option. They can also configure the product’s eBay specifics, such as the Product Title, Subtitle, Condition, Category, Store Category, Listing Type, Starting Price, Buy Now Price, Duration, Best Offer, Private Listing, Payment Policies, Return Policies, Shipping policies, and many other options.
Creating Attributes & Variants:
You can create multiple product variants using the “Attributes & Variants” tab present in the product configuration form, as shown below.
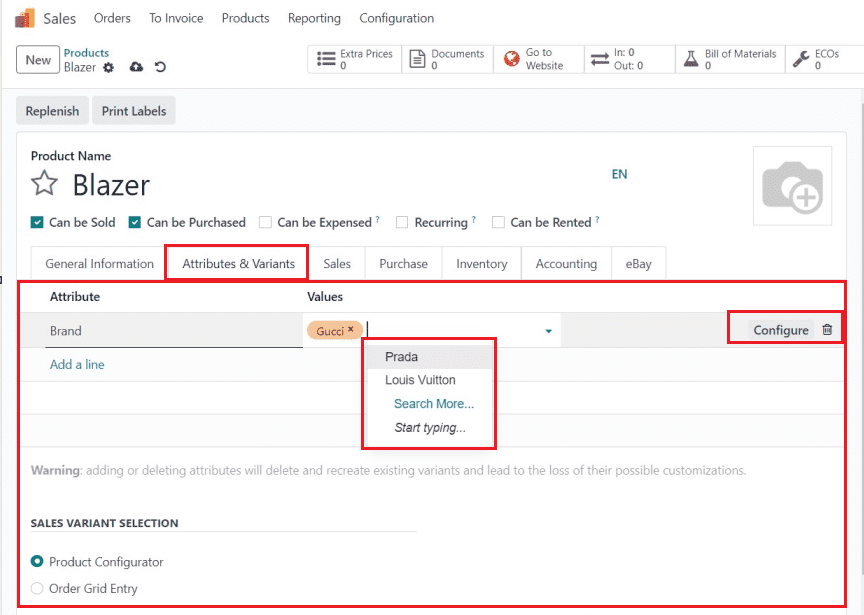
The "Add a line" button must be clicked to add a new product variant. You are able to provide both the "Attribute" and its "Values." Here, I have added Brand as an attribute. From the drop-down list, you can make your selections. Then, choose the attribute values from the “Values” field. You may customize the new set of product attributes by using the "Configure" button, which will launch a new configuration form.
The type of variant selection display may be set by selecting the necessary choices in the "SALES VARIANT SELECTION" provided in the new Odoo 17 interface. Afterward, use the save icon located at the form's top to save your data. To see the product variants inside the sales page, you can go to the “Go to Website” smart tab located at the top left side of the form. A website interface for the product shopping section will open due to the above action, as seen below.
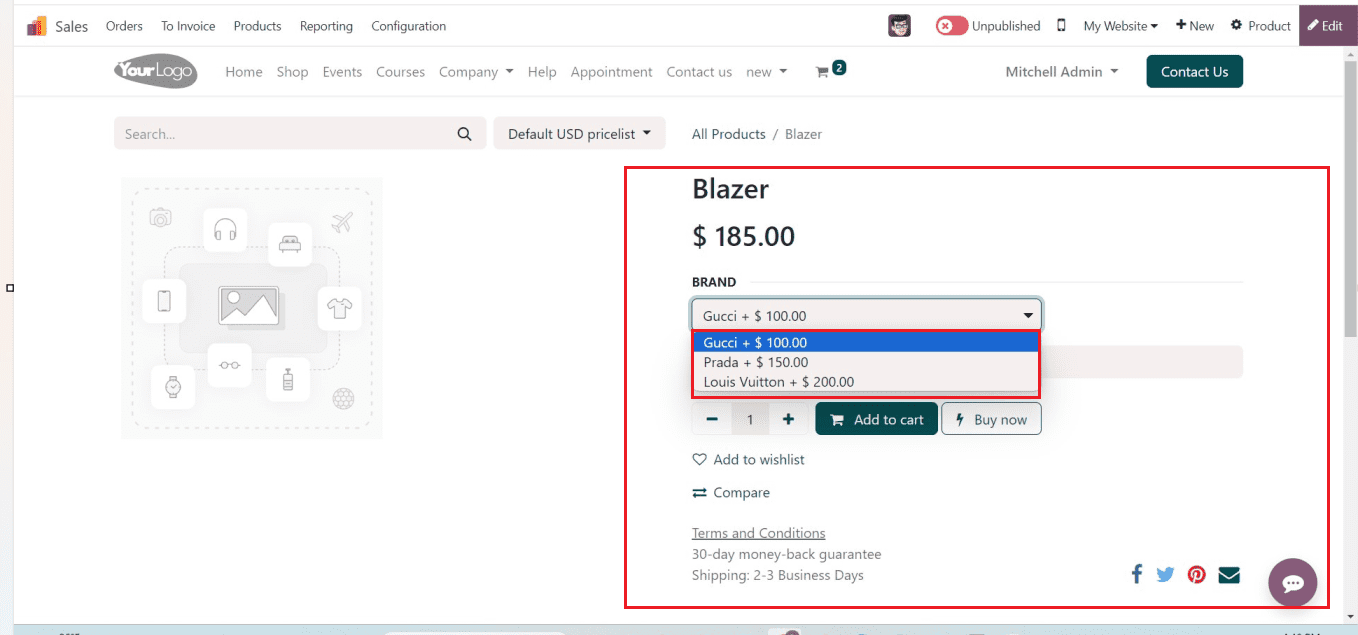
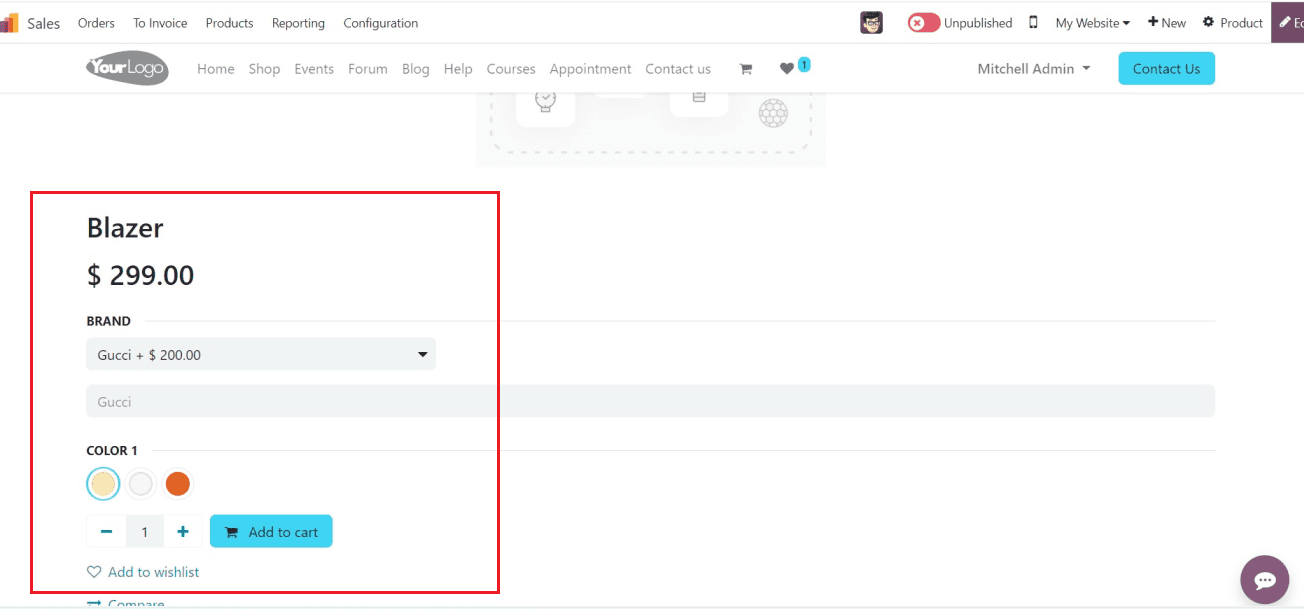
You can see the product's different variants from the attribute column named “BRAND.” After selecting the variant, you can continue the shopping process.
Return to the Sales Module so that you can examine the product variants that are stored in your Odoo Products database. This can be accessed from the “Product Variants” option available in the “Products” menu.
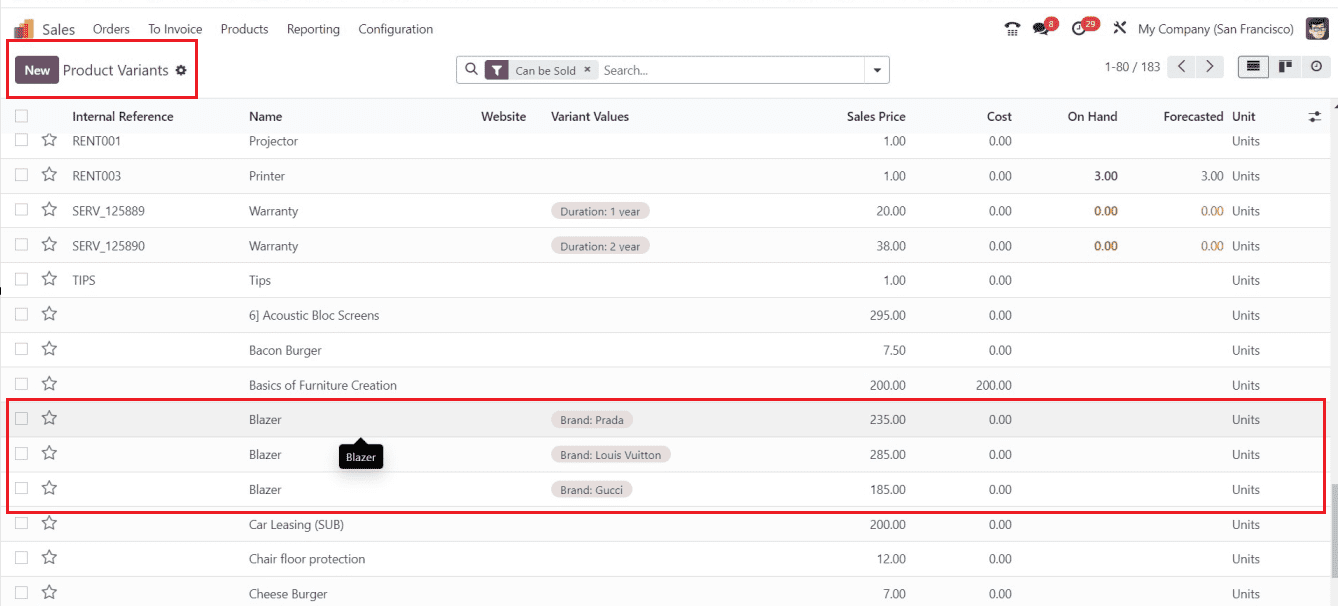
This dashboard will give you an outlook of all the Product Variables available in your database, including Internal Reference, Name, Website, Variant Value, Sales Price, Cost, On-hand, and Forecasted Unit. To configure the settings form for a specific product variation, simply click on the variant column you want; this action will open the form view of the variant as depicted below.
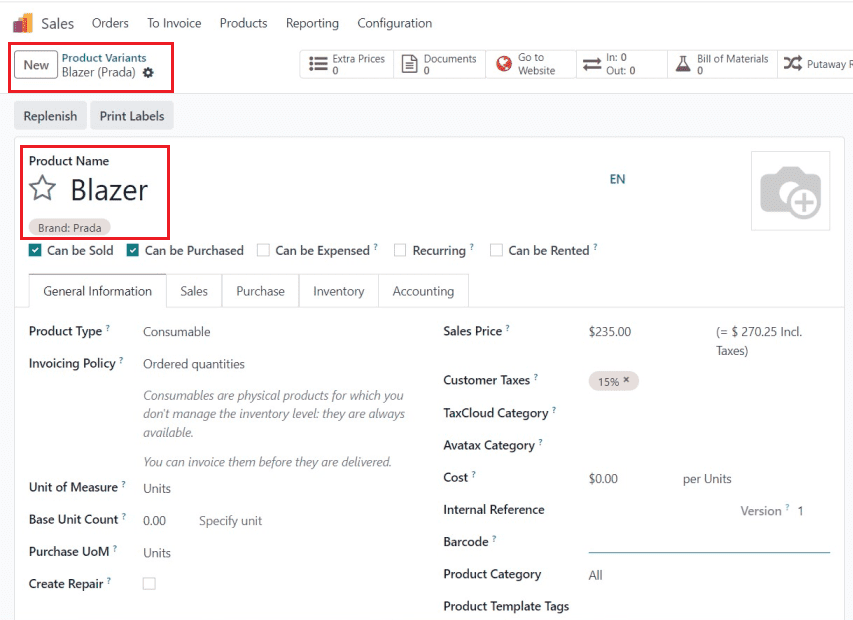
you can modify the variants Price, Inventory, Accounting, Purchase, and other specifics individually by this method. Therefore, each variation can have its own set of specifics configured.
Configuring Extra Prices for Variants
Regardless of their initial worth, users can establish extra selling prices for distinct variation products. Setting the characteristics in the "Attributes" window makes this simple procedure easy. To add a new attribute and decide an additional price for this specific version, let's open the "Attributes" panel and access a new attribute configuration form.
I've set the attribute to Color and added additional costs for this color-variant product to demonstrate this feature easily.
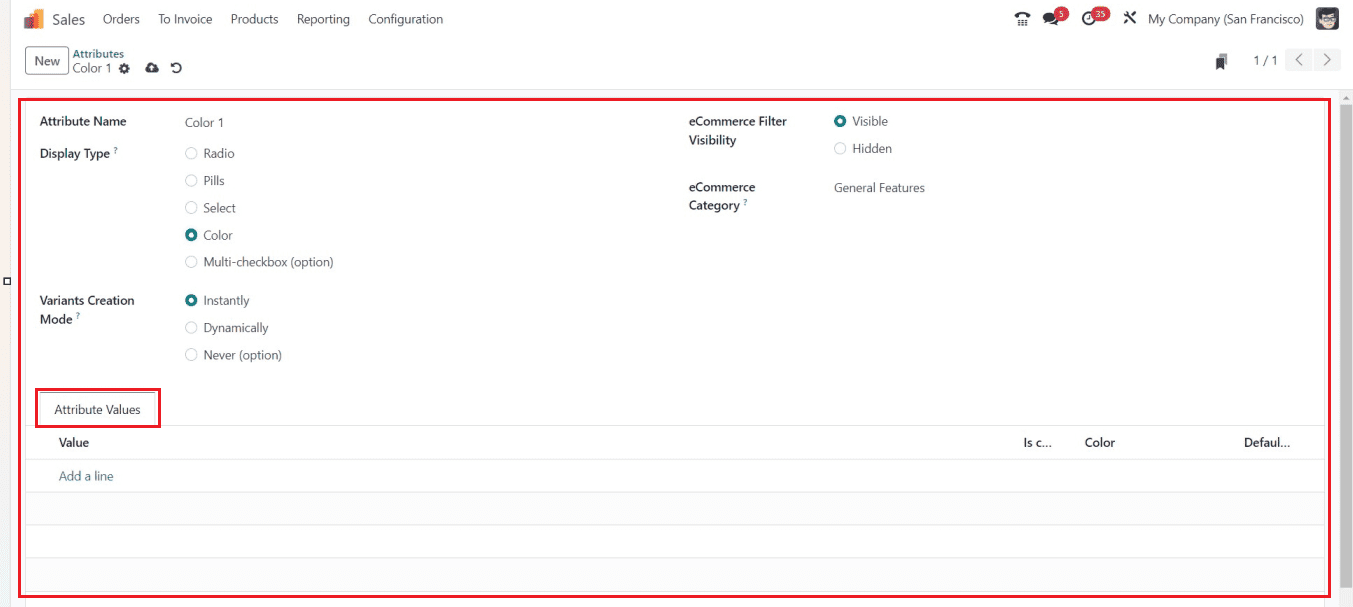
After entering the “Attribute Name” as Color, choose the “Display Type” as Color. You can see the color highlights for this attribute as tiny colored circles that correspond to HTML color codes inside the e-commerce interface of the product.
The “Variants Creation Mode” in Odoo allows users to set the frequency of automatically creating new variants based on the addition of attributes to a product, with options including Instantly, Dynamically, or Never. This feature ensures efficient and accurate product customization. You can also choose visibility from the “eCommerce Filter Visibility” field, and the category of the attribute can be specified inside the “eCommerce Category” area.
Attribute Values Tab and Setting Extra prices
The “Attribute Values” tab can be used to configure multiple Variants, Values, and Extra prices. You can click on the “Add a line” option to edit the new data.
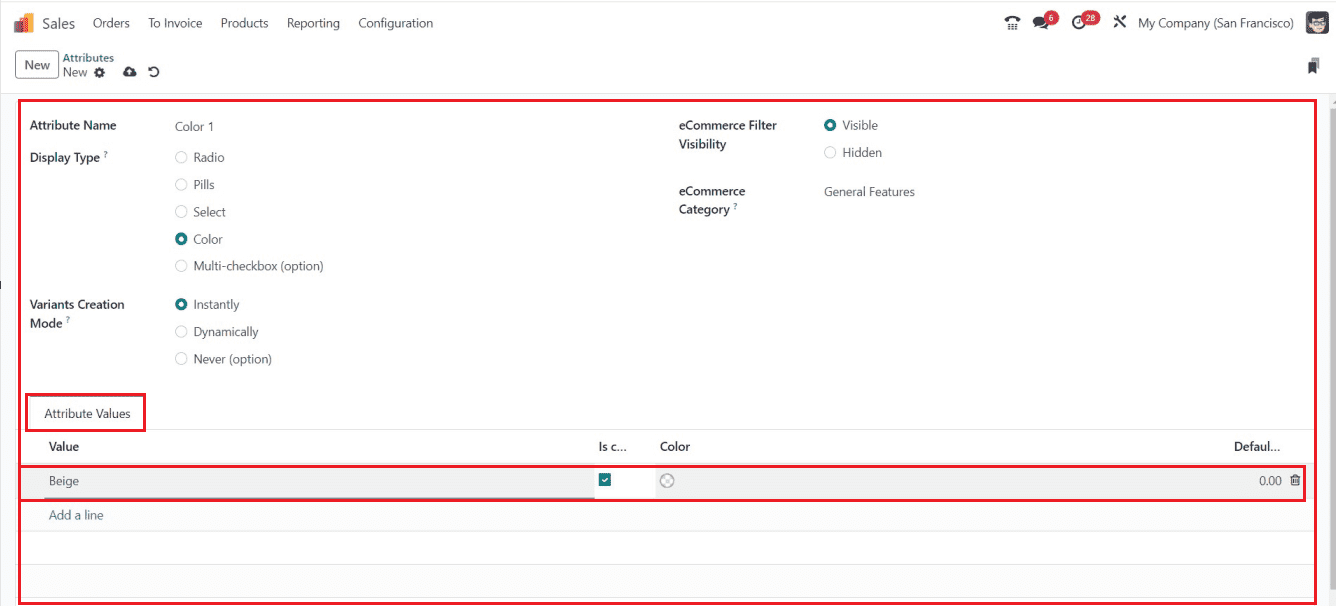
Inside the tab, I have just added a color name in the “Value” section and enabled the “Custom Value” option. You can enter the value name, check the custom box, and add an HTML color code for color selection. Select color code by dragging the slider or entering a specific HTML code, as illustrated in the screenshot below.
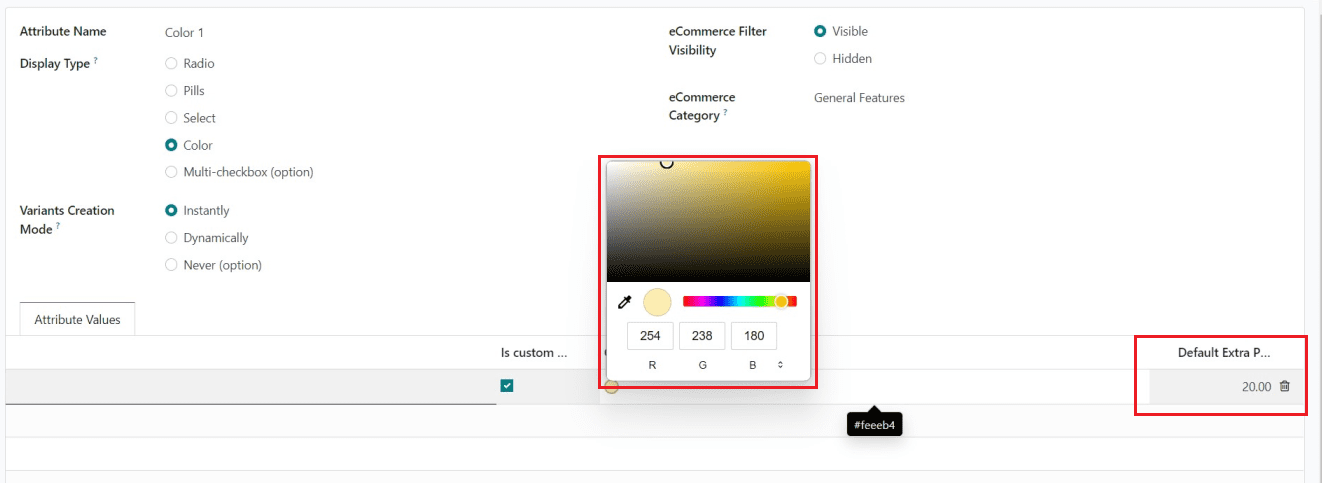
Inside the “Default Extra Price” section, you can provide the extra price for this color variant. This same step can be followed to create multiple variants.
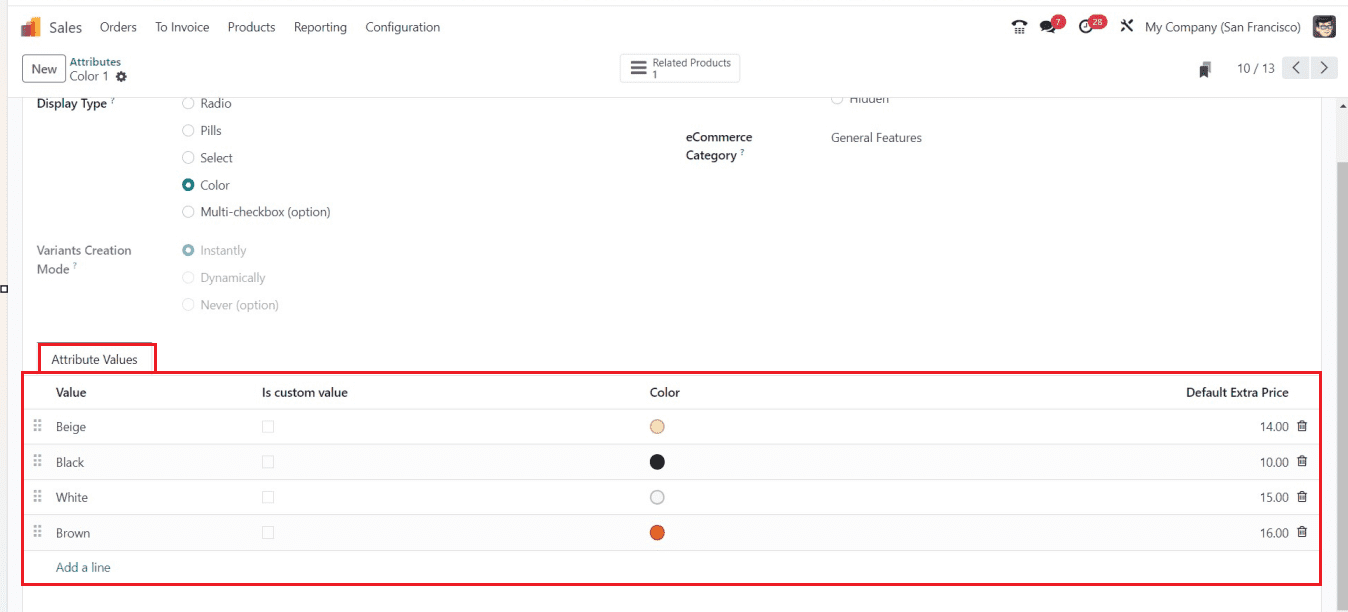
After creating the variants and providing extra prices for each variant, you can assign them to various products. Here, I am assigning these color Attributes and variants to the previously created product.
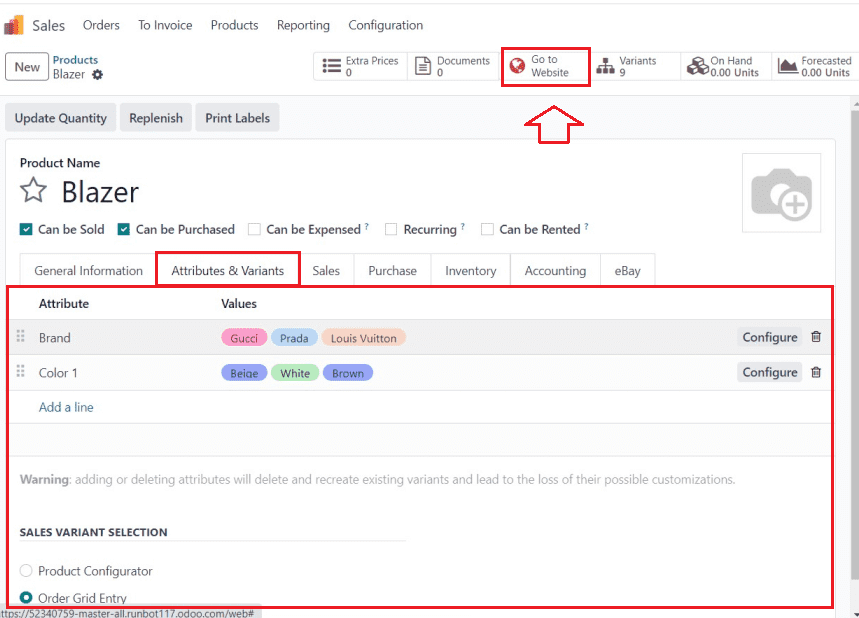
After inserting the attribute and value data inside the “Attribute & Variants” tab of the Product Configuration form, you can check the products shopping section inside the website by pressing the “Go to Website” smart button, as shown below.
You can manage and edit the product specifics whenever required as per the updations in your product inventory. This feature set of the Odoo 17 platform focuses on managing product variants, offering separate regions for controlling distinctive qualities like size and color at the product template or variant level.