POS means a point of sale that will manage shops or restaurants with or without the internet. POS is another type of Odoo ERP module. This can be used to execute and register every daily sales transaction in Odoo.
In this blog, we can discuss how to customize POS receipts in Odoo 15. OWL is an abbreviation form of the Odoo Web Library. It is the latest javascript framework for Odoo, which is used to create pos receipts in Odoo.
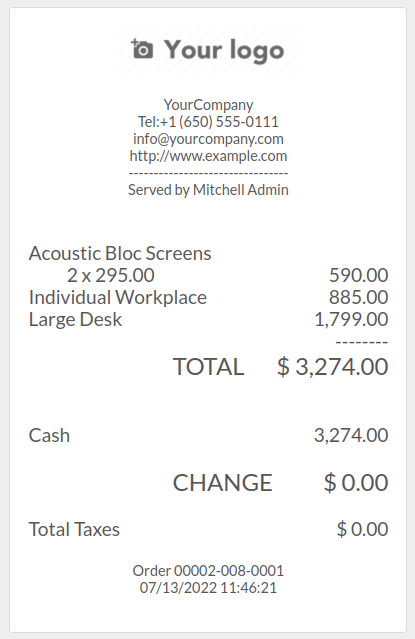
You can see that this is an example of a default POS receipt.

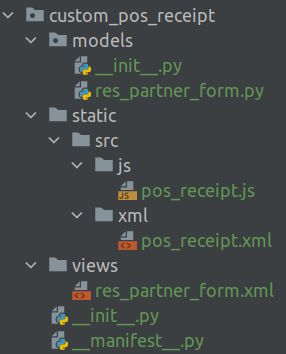
This default receipt does not contain any information about customer details. So we can customize the receipt to display the customer name in the pos receipt. First, you have to create a custom module for this customization. You can see the default structure of creating a module in odoo.

An XML file is added inside the static>src>xml folder and adds the following XML code into that XML file.
<?xml version="1.0" encoding="UTF-8"?>
<templates id="template" xml:space="preserve">
    <t t-name="OrderReceipt" t-inherit="point_of_sale.OrderReceipt" t-inherit-mode="extension" owl="1">
        <xpath expr="//div[hasclass('pos-receipt-contact')]" position="inside">
            <t t-if='receipt.client'>
                <div style="font-weight:bold;">Customer:
                    <t t-esc='receipt.client.name' />
                </div>
            </t>
        </xpath>
    </t>
</templates>
In this XML code, first, you have to inherit the OrderReceipt template from pos by using t-inherit-mode=”extension” and owl=”1”.The owl=”1”, which denotes it is an owl template. Then you have to extend the corresponding class and print the customer name on the receipt. The qweb template is added in the assets section of web.assets_qweb in __manifest__.py file.
'assets': {
    'web.assets_qweb': [
        'custom_pos_receipt/static/src/xml/pos_receipt.xml',
    ],
},
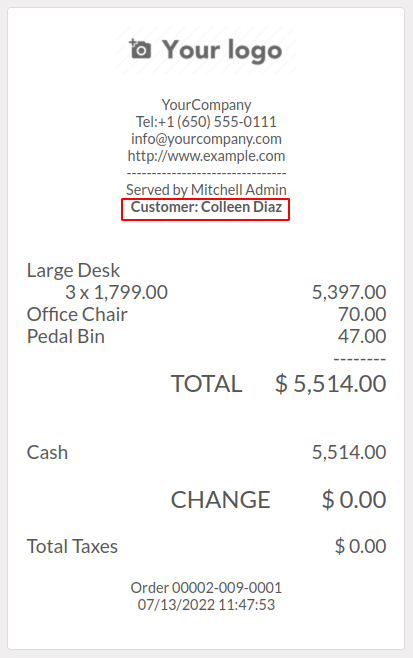
The below receipt, Shows that the customer's name is added after the company details.

The name field of the customer is already loaded in pos models. So there is no extra js file needed for printing the customer name on the receipt. Suppose you want to add an extra field on this receipt, then first you have to load the field in pos models.
For example, You want to display a new field in a pos receipt. So first you have to create a new field nick_name in res.partner and add this field into the res_partner form view. Then load the field nick_name in pos models by using the following code.
odoo.define('custom_pos_receipt.receipt', function (require) {
    'use strict';
    const models = require('point_of_sale.models');
    models.load_fields('res.partner', 'nick_name');
});
The nick_name field is added to the pos receipt template after loading the nick_name field in the pos model. And also specify the js file in the assets section web.assets_backend of __manifest__.py.
'assets': {
    'web.assets_qweb': [
        'custom_pos_receipt/static/src/xml/pos_receipt.xml',
    ],
    'web.assets_backend': [
        'custom_pos_receipt/static/src/js/pos_receipt.js',
    ],
},
Now you can change the XML file like this,
<?xml version="1.0" encoding="UTF-8"?>
<templates id="template" xml:space="preserve">
    <t t-name="OrderReceipt" t-inherit="point_of_sale.OrderReceipt" t-inherit-mode="extension" owl="1">
        <xpath expr="//div[hasclass('pos-receipt-contact')]" position="inside">
            <t t-if='receipt.client'>
                <div style="font-weight:bold;">Customer:
                    <t t-esc='receipt.client.name' />
                </div>
                <t t-if="env.pos.get_client().nick_name">
                    <div style="font-weight:bold;">NickName:
                        <t t-esc="env.pos.get_client().nick_name" />
                    </div>
                </t>
            </t>
        </xpath>
    </t>
</templates>
You will get all the information about the currently selected customer in pos by calling the function get_client(). By calling get_client().nick_name, it will return the nickname of the current customer.
The overall structure of the __manifest__.py file is given below,
{
    'name': "custom POS Receipt",
    'version': '15.0.1.0.0',
    'author': 'Cybrosys Techno Solutions',
    'company': 'Cybrosys Techno Solutions',
    'maintainer': 'Cybrosys Techno Solutions',
    'website': 'https://www.cybrosys.com',
    'summary': 'Customized Receipt of Point Of Sales',
    'description': ""
    "Customized Receipt of Point Of Sales"
    "",
    'depends': ['point_of_sale'],
    'data': [
        'views/res_partner_form.xml'
    ],
    'assets': {
        'web.assets_qweb': [
            'custom_pos_receipt/static/src/xml/pos_receipt.xml',
        ],
        'web.assets_backend': [
            'custom_pos_receipt/static/src/js/pos_receipt.js',
        ],
    },
    'images': ['static/description/banner.png'],
    'license': 'AGPL-3',
    'installable': True,
    'auto_install': False,
}
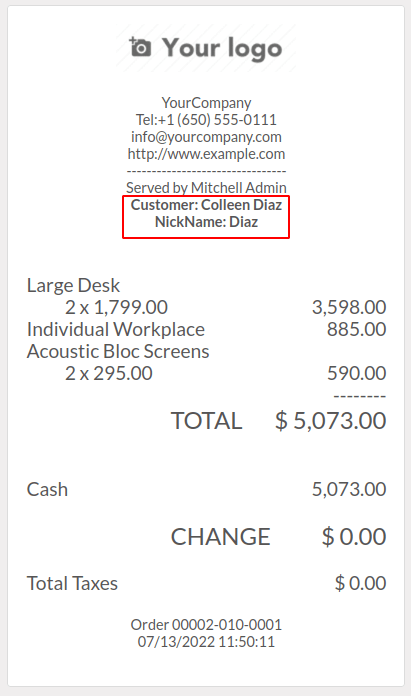
Finally, you can see that the name and nickname of the customer are displayed in the pos receipt.

Going through this blog, you can easily get How to customize pos receipt in odoo15.