SignalR is a pretty new and very exciting feature in ASP.NET. It offers a simple and clean API that allows you to create real-time web applications where the server needs to continuously push data to clients. Common applications are chat, news feeds, notifications, and multi-player games. Below shown are the steps for using the signal-R in the chat between the users.
Steps to Create a Chat Application using ASP.NET
1. Create a new project by selecting ‘File’. After that select the option ‘New’ under that. And then select the option ‘project’. Select ‘ASP.NET Empty Web Application’ from Web in Visual C# and name the project as ‘ChatApplication’.
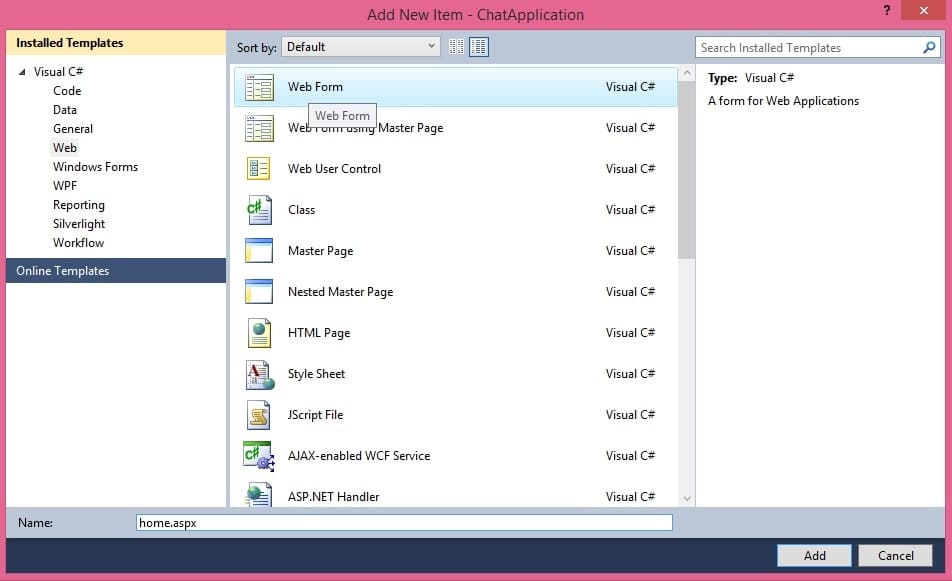
2. Add a New Web Form to the project. And name it as ‘home.aspx’

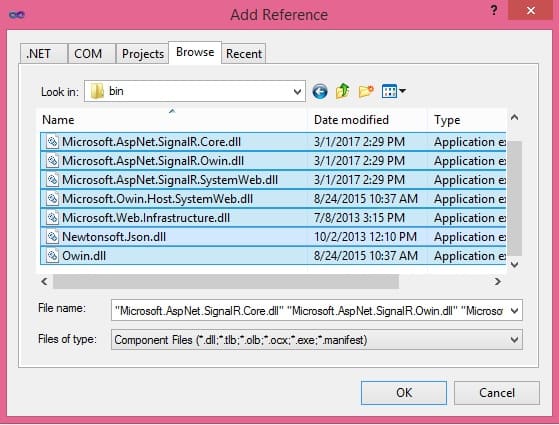
3. Then add ‘Microsoft.AspNet.SignalR.Core.dll’, ’ Microsoft.AspNet.SignalR.Owin.dll’, ‘Owin.dll ‘, ‘Microsoft.Web.Infrastructure.dll’, ’Microsoft.AspNet.SignalR.SystemWeb.dll’, ‘Newtonsoft.Json.dll’, ‘Microsoft.Owin.Host.SystemWeb.dll’ as the reference.

4. Insert a new folder for adding scripts and name that folder as ‘Scripts’ and then add ‘jquery-1.6.4.js’, ‘jquery.signalR-1.0.1.js’, ‘jquery.signalR-1.0.1.min.js’, ’ jquery-1.6.4.min.js’, ‘jquery-1.6.4-vsdoc.js’ after downloading it from Google.
5. Add a Class to the project and name it ‘chatHub.cs’. And then add the following code in the class.
using System;
using System.Collections.Generic;
using System.Linq;
using System.Web;
using Microsoft.AspNet.SignalR;

namespace ChatApplication
{
    public class chatHub:Hub
    {
        public void Send(string name, string message)
        {
            Clients.All.sendMessage(name, message);
        }
    }
}
6. Then Add a Global Application Class and name it as Global.asax and put the following code in it.
using System;
using System.Collections.Generic;
using System.Linq;
using System.Web;
using System.Web.Security;
using System.Web.SessionState;
using System.Web.Routing;

namespace ChatApplication
{
    public class Global : System.Web.HttpApplication
    {
        protected void Application_Start(object sender, EventArgs e)
        {
            RouteTable.Routes.MapHubs();
        }
        protected void Session_Start(object sender, EventArgs e)
        {
        }
        protected void Application_BeginRequest(object sender, EventArgs e)
        {
        }
        protected void Application_AuthenticateRequest(object sender, EventArgs e)
        {
        }
        protected void Application_Error(object sender, EventArgs e)
        {
        }
        protected void Session_End(object sender, EventArgs e)
        {
        }
        protected void Application_End(object sender, EventArgs e)
        {
        }
    }
}
7. In the ‘home.aspx’ put the below code.
<%@ Page Language="C#" AutoEventWireup="true" CodeBehind="home.aspx.cs" Inherits="ChatApplication.home" %>
<!DOCTYPE html PUBLIC "-//W3C//DTD XHTML 1.0 Transitional//EN" "http://www.w3.org/TR/xhtml1/DTD/xhtml1-transitional.dtd">
<html xmlns="http://www.w3.org/1999/xhtml">
<head runat="server">
<title></title>
</head>
<body>
<form id="frmHome" runat="server">
<div>
<ul id="ulInbox">
<li><span id="lblName">Name:</span> <span id="lblMessage">Message</span></li>
</ul>
<ul>
<li>
<input type="text" id="txtMessage" value="" />
<input type="button" id="btnSend" value="Send" />
<input type="hidden" id="txtName" />
</li>
</ul>
</div>
</form>
<script src="http://code.jquery.com/jquery-1.8.2.min.js" type="text/javascript"></script>
<script src="Scripts/jquery.signalR-1.0.1.min.js" type="text/javascript"></script>
<script src="signalr/hubs" type="text/javascript"></script>
<script type="text/javascript">
$(function () {
// Proxy created on the fly
var chat = $.connection.chatHub;
// Get the user name and store it to prepend to messages.
$('#txtName').val(prompt('Enter your name:', ''));
// Declare a function on the chat hub so the server can invoke it
chat.client.sendMessage = function (name, message) {
var username = $('<div />').text(name).html();
var chatMessage = $('<div />').text(message).html();
$('#ulInbox').append('<li>' + username +': '+chatMessage+'</li>');
};
// Start the connection
$.connection.hub.start().done(function () {
$('#btnSend').click(function () {
// Call the chat method on the server
chat.server.send($('#txtName').val(), $('#txtMessage').val());
$('#txtMessage').val('');
});
});
});
</script>
</body>
</html>
In the above code, the chat.server.send is used to send the message, and send is a function in chatHub.cs with two parameters as shown below.
public void Send(string name, string message)
{
Clients.All.sendMessage(name, message);
}
From the ChatHub it will call Clients.All.sendMessage(name, message).That will call the function in all the client pages. All the clients who uses the sendMessage function will receive the name and message.
In the home page we have written the code for that,
chat.client.sendMessage = function (name, message) {
var username = $('<div />').text(name).html();
var chatMessage = $('<div />').text(message).html();
$('#ulInbox').append('<li>' + username +': '+chatMessage+'</li>');
};
8. After debugging the project we get the following output. The image below shows the project running on two browsers which is the same to work on two systems. First, it will ask the name of the users. In the first browser, We put the name Akhil and in the second user, we put the name, John.
9. In the text box of the first user which is Akhil, we put a message Hi and click the Send button.
10. The message sent by Akhil will be received in John without any action. Also, John will enter a hello message on the textbox and then click the send button.
11. The Hello message will reach all the clients.