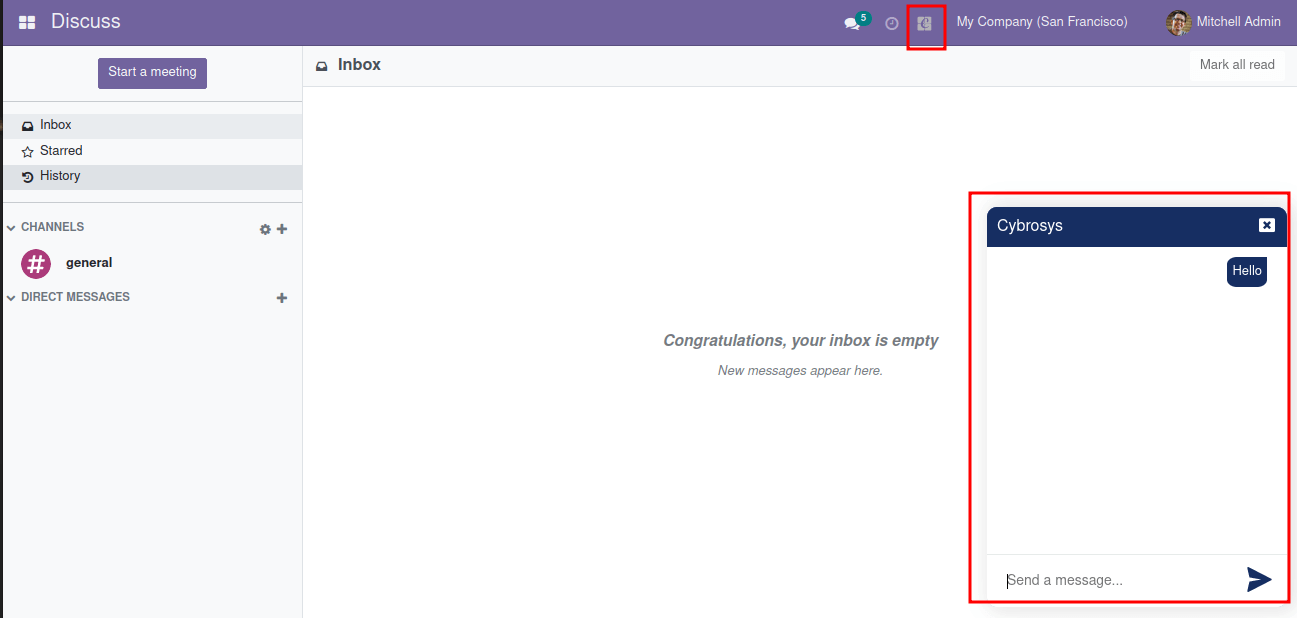
Here, in this blog, we are going to discuss how to create/open a chat window from the systray. What is systray? Systray is the top navbar of the Odoo interface.
We already have a blog regarding how to add an icon in Systray in Odoo 15. Please refer for more information, https://www.cybrosys.com/blog/how-to-add-an-icon-in-systray-in-odoo-15.
Let us come back to the chat window. First, I am going to add a chat icon on the systray.
/** @odoo-module **/import { registry } from "@web/core/registry";
import { useService } from "@web/core/utils/hooks";
import {ChatView} from './chat_notification';
class SystrayChatIcon extends owl.Component {
setup() {
super.setup(...arguments);
this.action = useService("action");
this.chat = new ChatView();
}
_onClick() {
this.chat.toggle();
}
}
SystrayChatIcon.template = "clientsupportSystray";

export const systrayItem = {
Component: SystrayChatIcon,
};
registry.category("systray").add("SystrayChatIcon", systrayItem, { sequence: 1 });
Create a js file for getting icons on systray. And we need to add a view for that. “clientsupportSystray” is the corresponding template for the systray icon. ( refer below)
<t t-name="clientsupportSystray" owl="1">
    <div class="dropdown">
        <a href="#" t-on-click="_onClick">
            <img id='create_chat' style="width: 15px; opacity: 0.9"
                src="cybrosys_support_client/static/src/img/systray_icon.svg" aria-label="client support" />
        </a>
    </div>
</t>
“ChatView” is the template for the chat window. This “ChatView” store to a variable ‘this.chat’
this.chat = new ChatView();
<t t-name="ChatView" owl="1">
    <!-- Chatbot -->
    <div class="botIcon">
        <div class="Layout Layout-open Layout-expand Layout-right">
            <div class="Messenger_messenger">
                <div class="Messenger_header">
                    <h4 class="Messenger_prompt">Cybrosys</h4> <span class="chat_close_icon"><i
                            class="fa fa-window-close" aria-hidden="false" t-on-click="close"></i></span>
                </div>
                <div class="Messenger_content">
                    <div class="Messages">
                        <div class="Messages_list" />
                    </div>
                    <form id="messenger">
                        <div class="Input Input-blank">
                            <!--                     <textarea name="msg" class="Input_field" placeholder="Send a message..."></textarea> -->
                            <input name="msg" class="Input_field" placeholder="Send a message..." />
                            <button type="button" class="Input_button Input_button-send" t-on-click="_sendMessage">
                                <div class="Icon">
                                    <img src="cybrosys_support_client/static/src/img/send-message.svg" />
                                </div>
                            </button>
                        </div>
                    </form>
                </div>
            </div>
        </div>
    </div>
    <!-- Chatbot -->
</t>
Next, we want to create a js file for getting chat notifications(See below codes). Here we are extending ‘ChatView’. And we are rendering old messages ‘willstart’ function. After that, add a key-down function for the purpose of sending. As per the below code, if we click enter, the message will send. Also, we have separate functions for sending messages and rendering messages.
/** @odoo-module **/import { registry } from "@web/core/registry";
import { useService } from "@web/core/utils/hooks";
import { useListener } from 'web.custom_hooks';
import ajax from 'web.ajax';
export class ChatView extends owl.Component {
setup(){
super.setup(...arguments);
this.state = owl.useState({
'open': false
});
useListener('keydown', this._onKeydown);
}
async willStart() {
await this._renderOldMessages();
}
_onKeydown(ev){
if(ev.key == "Enter"){
ev.preventDefault();
this._sendMessage(ev);
}
}
open(){
this.mount(document.body)
this.state.open = true;
}
close(){
this.unmount()
this.state.open = false;
}
toggle(){
if(this.state.open){
this.close();
} else {
this.open();
}
}
_sendMessage(ev){
let form = $(ev.target).closest('form');
let message = form.find('input').val();
if(message){
ajax.jsonRpc('/chat/send', 'call', {
message: message
}).then( (data) => {
form.find('input').val('');
this._renderOldMessages();
});
}
}
_renderOldMessages(){
$('.Messages_list').empty();
ajax.jsonRpc('/chat/load', 'call', {}).then(function (data) {
if(data){
for (var chat of data){
if(chat.send){
$('.Messages_list').append('<div class="msg user"><span class="responsText">' + chat.message + '</span></div>');
} else {
$('.Messages_list').append('<div class="msg"><span class="responsText">' + chat.message + '</span></div>');
}
}
}
});
}
}
ChatView.template = 'ChatView';
We need to add a controller for loading old chats and sending messages.
@route('/chat/load', type='json', auth='user')
def load_chat(self):
user_id = request.env.uid
chats = request.env['chat.support.chat'].search([
('user_id', '=', user_id)
])
if chats:
chats_list = []
for chat in chats:
chats_list.append({
'message': chat.message,
'send': chat.send,
'create_date': chat.create_date,
})
return chats_list
return False
@route('/chat/send', type='json', auth='user')
def send_message(self):
user_id = request.env.uid
request.env['chat.support.chat'].create({
'user_id': user_id,
'message': request.jsonrequest.get('params')['message'],
'send': True
})
These all are the development part. Next, let me share the view.

These are all about how to create/Open a chat window from the systray icon.