In this blog, we will explore the ability for users to customize settings in Odoo's Settings menu to align with their specific business needs, including the option to add new settings and perform corresponding operations.
A custom module, "sale_discount_limit," can be developed to introduce a discount limit feature for sale orders in Odoo. Users will have the option to enable or disable this functionality in Odoo's settings. When the feature is enabled, users can choose to set a discount limit as needed.
1. Add new fields to ‘res.config.settings’ model.
The Res Config Settings model in Odoo is transient, meaning that its data is regularly cleaned up. To ensure the preservation and retrieval of field data, you can incorporate the 'config_parameter' attribute into the field definition, which can be set up as follows.
config_parameter=module_name.field_name
Following the configuration of the 'config_parameter,' you can easily access the field values within the settings. In this context, we've introduced two fields, 'is_discount_limit' as a boolean and 'discount_limit' as a float field.
# -*- coding: utf-8 -*-
from odoo import fields, models
class ResConfigSettings(models.TransientModel):
   _inherit = 'res.config.settings'
   is_discount_limit = fields.Boolean(string='Discount limit',
         config_parameter='sale_discount_limit.is_discount_limit',
         help='Check this field for enabling discount limit')
   discount_limit = fields.Float(string='Limit amount',
         config_parameter='sale_discount_limit.discount_limit',
         help='The discount limit amount in percentage ')
2. Add custom view for ‘res.config.settings’ view.
In Odoo 17, when adding custom fields to a view, you can inherit the existing view and specify their position using the <xpath> tag. To add custom fields to the sale settings, you should inherit the view 'sale.res_config_settings_view_form' and indicate where you want these fields to appear. A new feature introduced in Odoo 17 is the <settings> tag. The <settings> tag in Odoo automatically aligns the fields, both to the left and right, for added convenience and flexibility in customization. This tag simplifies the process of adding boolean fields, as they are automatically left-aligned within it, and it has attributes that allow for customization and placement of these fields.
You can assign a unique ID to the field, which is immensely helpful when locating it during inheritance. The string serves as the visible heading for users, and if not set, the field's label is used. Providing a brief description in the help attribute allows users to access additional information under the heading. Furthermore, the title attribute is useful for explaining the field's purpose when users hover their mouse over it. You can include documentation by specifying a documentation path, allowing users to access additional details when users click the question mark near the field.
<?xml version="1.0" encoding="UTF-8" ?>
<odoo>
   <record id="res_config_settings_view_form" model="ir.ui.view">
       <field name="name">
           res.config.settings.view.form.inherit.bg.whatsapp
       </field>
       <field name="model">res.config.settings</field>
       <field name="inherit_id"
              ref="sale.res_config_settings_view_form"/>
       <field name="arch" type="xml">
           <xpath expr="//setting[@id='discount_sale_order_lines']"
                  position="after">
               <setting id="sale_discount_limit"
            documentation="https://www.odoo.com/documentation/17.0"
            title="User can limit the discount amount in the
                    sale order line."
		invisible="not group_discount_per_so_line"
                 help="User can limit the discount amount">
                   <field name="is_discount_limit"/>
                   <div class="content-group"
                        invisible="not is_discount_limit">
                       <div class="mt16">
                           <label for="discount_limit"/>
                           <field name="discount_limit"/>
                       </div>
                   </div>
               </setting>
           </xpath>
       </field>
   </record>
</odoo>
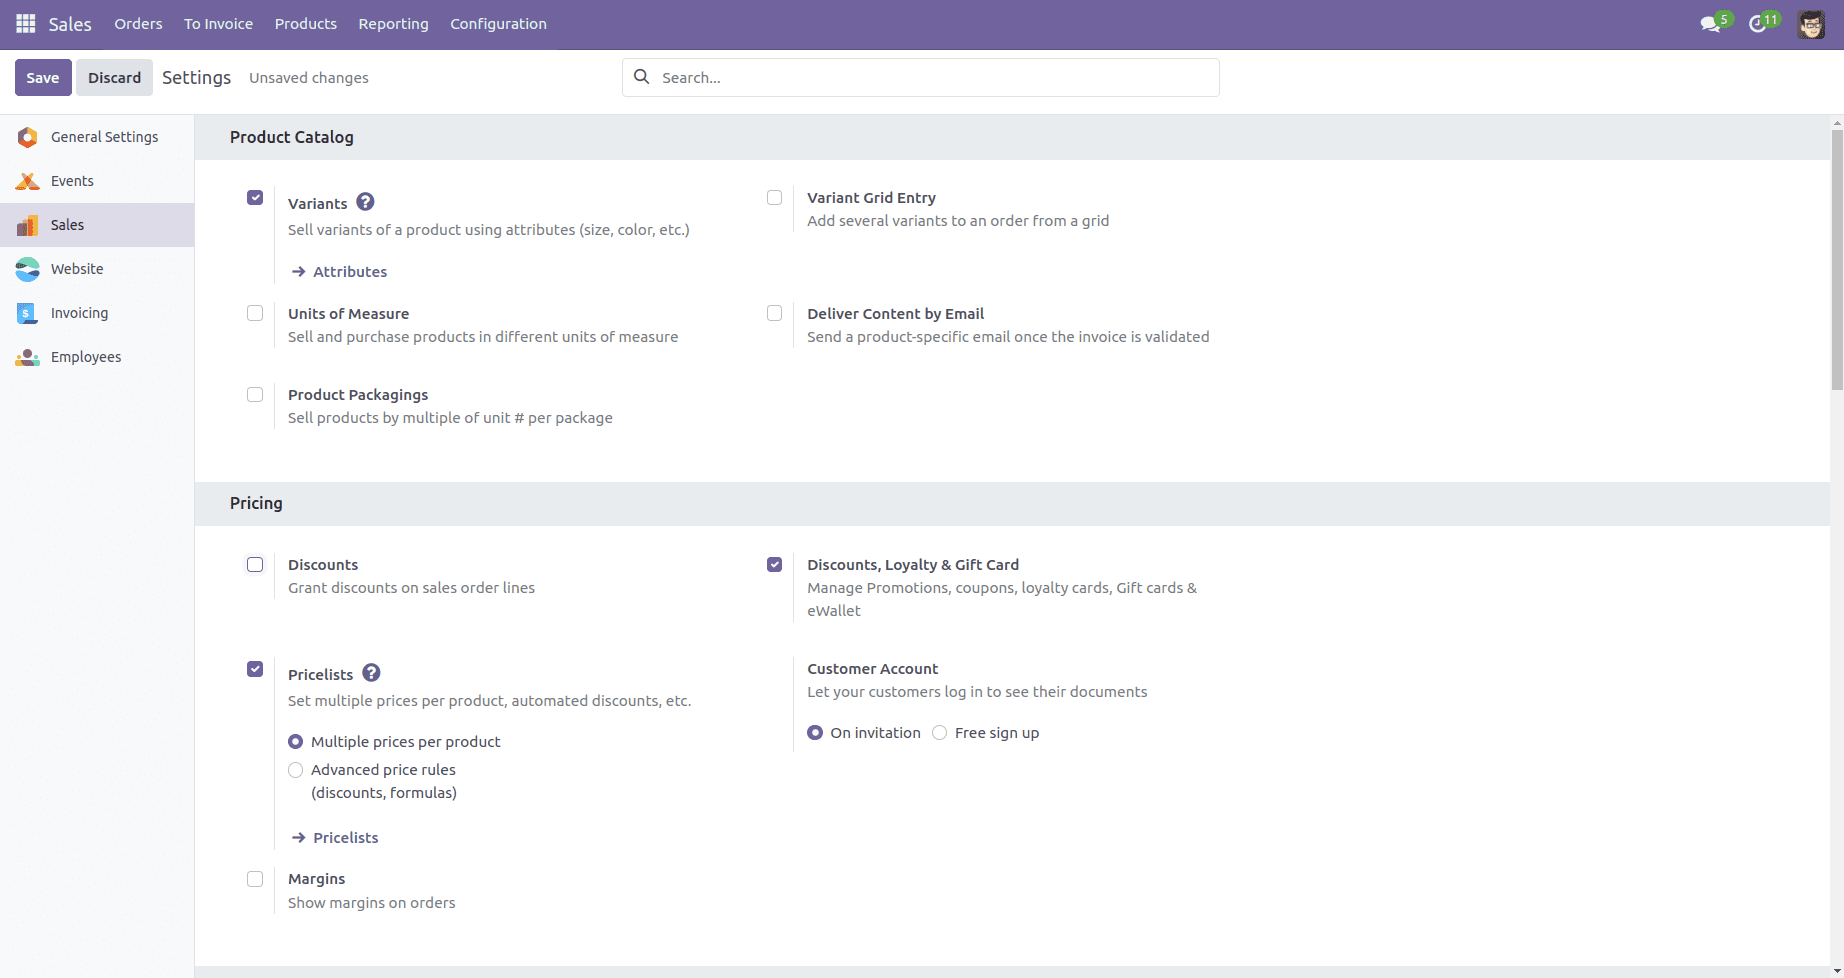
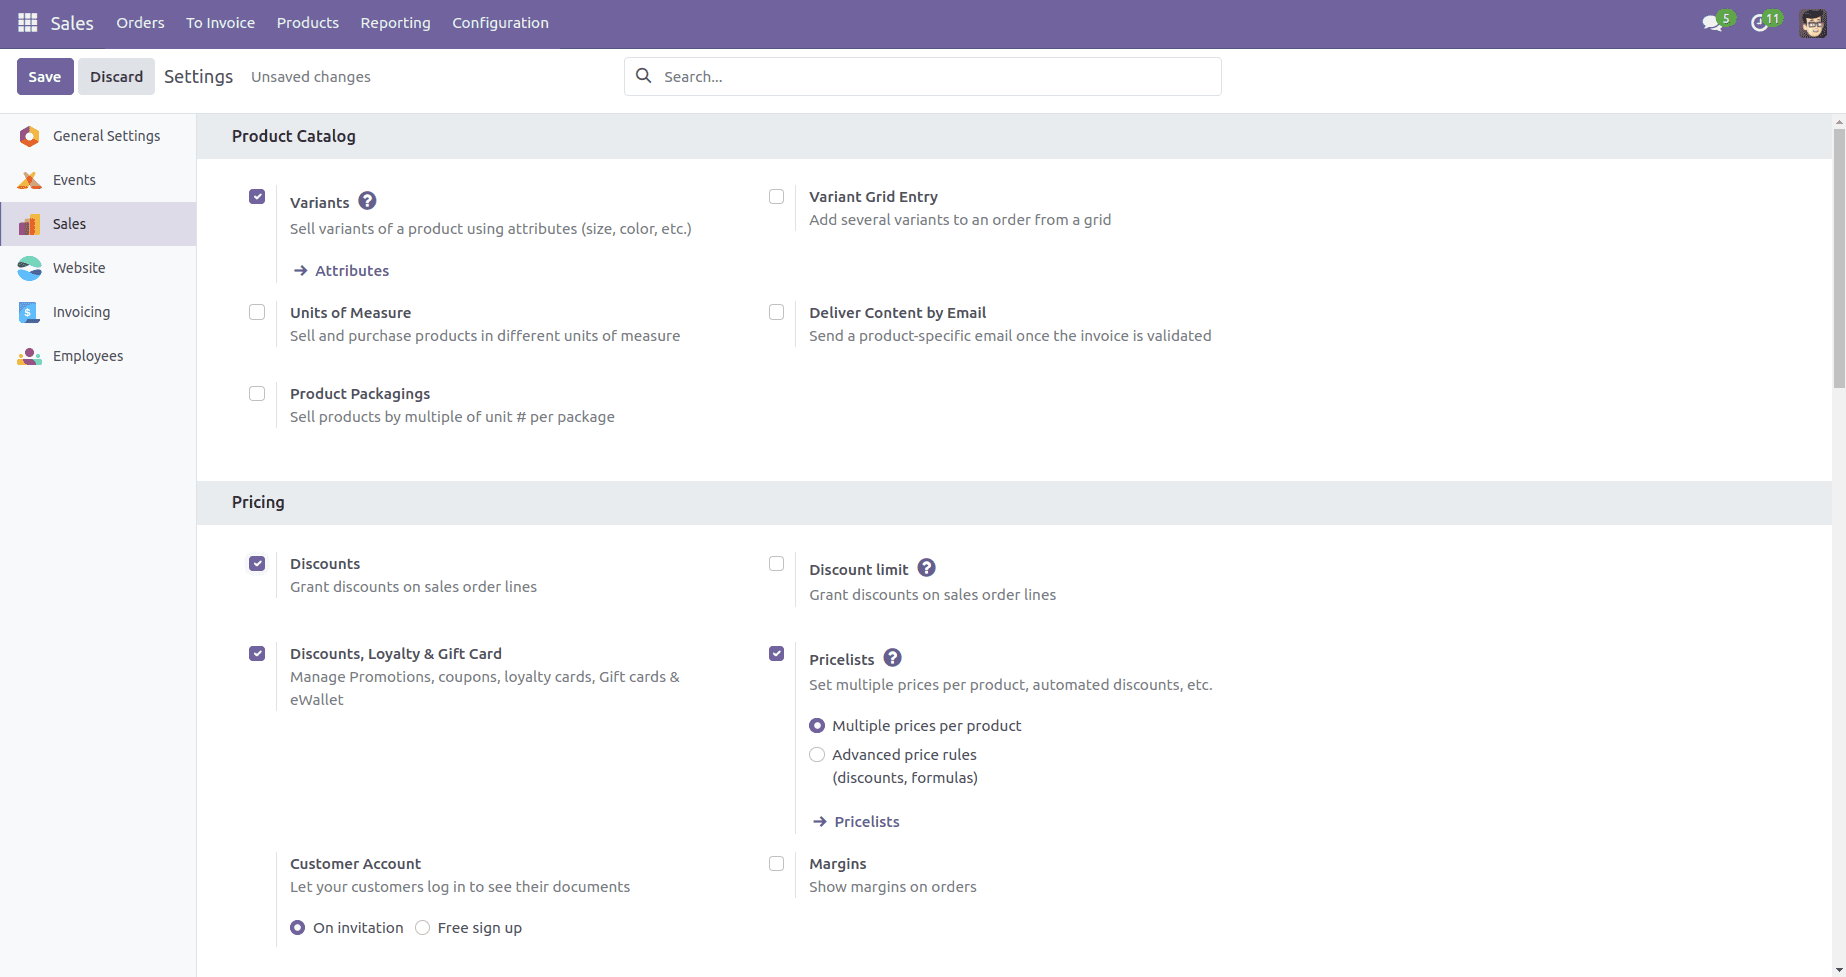
I added a custom field to the 'Pricing' section of the sale settings, positioning it after the sale order line discount field. This new field is only visible when the line discount option is enabled.

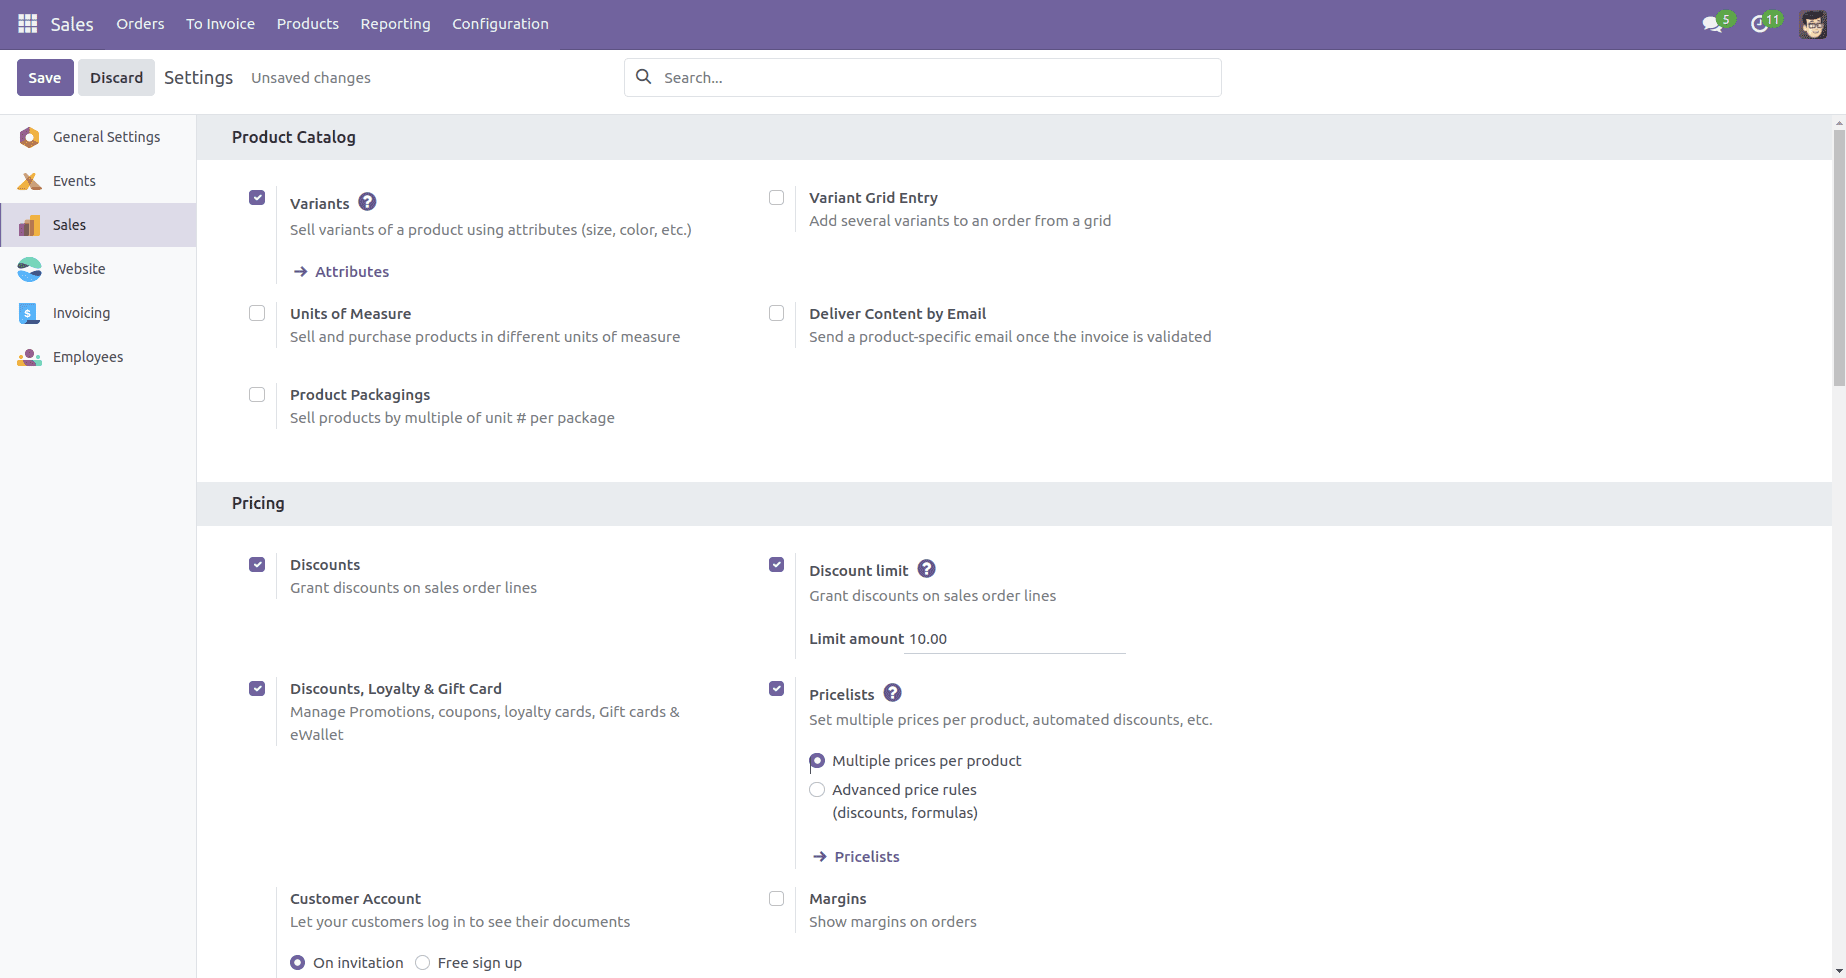
In the first picture, the discount feature is disabled, and consequently, there's no option to enable the discount limit. However, in the following image, after enabling the discount, users can now see the discount limit option, giving them the flexibility to choose whether to enable it or not.

Enabling the discount limit provides users with the option to input the desired discount limit in this field. Users can access the documentation by hovering their mouse over the question mark and clicking it, which will redirect them to the relevant information.

With this setup, it becomes entirely feasible to implement conditions or execute actions based on these field values, enabling the creation of customized settings options within the Res Config Settings in Odoo.