In any business operation, efficiently managing expenses and accurately invoicing them to clients is essential for maintaining financial transparency and maximizing profitability. When our employees incur expenses on behalf of the company, such as travel costs, accommodation, or meals during client meetings, we ensure they get their money back. These expenses directly contribute to our business operations, so it's only fair to reimburse our employees for these costs. For example, if an employee covers the bill for a client dinner, we'll reimburse them because that expense benefits the company.
Sometimes, we need to cover expenses upfront for projects we're doing for our clients. This could include things like purchasing materials, hiring subcontractors, or renting equipment necessary to complete the job. Once we've incurred these expenses, we document everything meticulously, including receipts and expense reports. Later on, we submit these records to the client and request reimbursement for the funds we've spent on their behalf. It's crucial to keep careful track of these expenses to ensure we're accurately reimbursed and to avoid any unnecessary financial strain on the company.
With Odoo 17, businesses can streamline the process of re-invoicing expenses, ensuring seamless integration between expense management and invoicing functionalities. In this blog, we'll explore the intricacies of re-invoicing expenses in Odoo 17, its features, benefits, and implementation strategies.
Consider this scenario where an employee is on a business trip to provide on-site services for a client. During their stay, they use their funds to cover hotel expenses. As a company policy, such expenses should be billed back to the client. With Odoo, including these expenses in the client's project invoice is effortless.
Let's start by either confirming an existing sales order in the Sales module or creating a new one. To start from scratch, head to the Sales module and click "New." This action opens a fresh quotation form.
Once the form appears, it's time to fill in the details. Begin by selecting the customer for whom you're creating this order. Then, move on to the "Order Lines" tab and click on "Add a product." From there, choose the product you'd like to include from the dropdown menu.
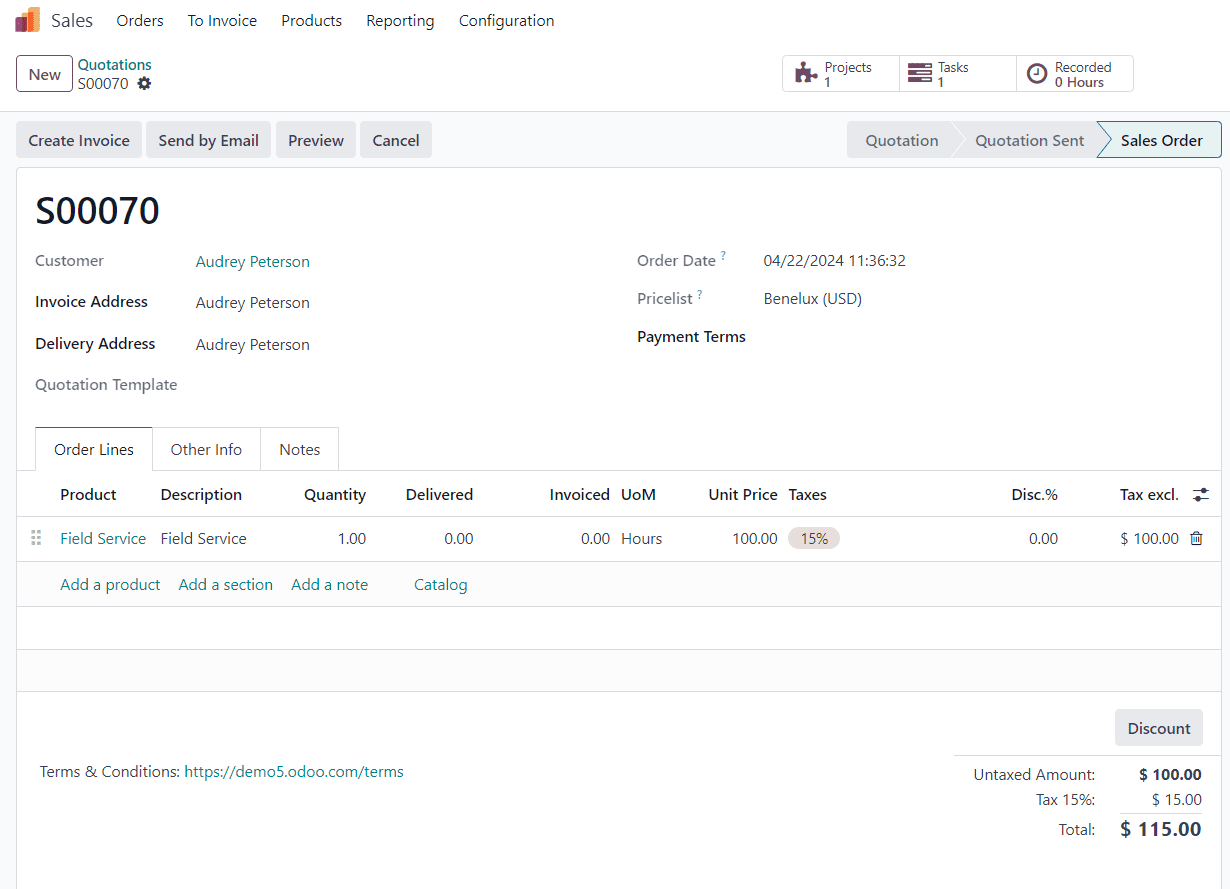
After you've added all the necessary information, give everything a final check, and when you're ready, hit "Confirm" to solidify the sales order.
Now that the sales order is confirmed, let's move on to creating an expense. To begin, head over to the Expenses application. You can find it on the main Odoo dashboard under "Expenses." Once you're in the Expenses dashboard, click on "New" to open up a blank expenses form.
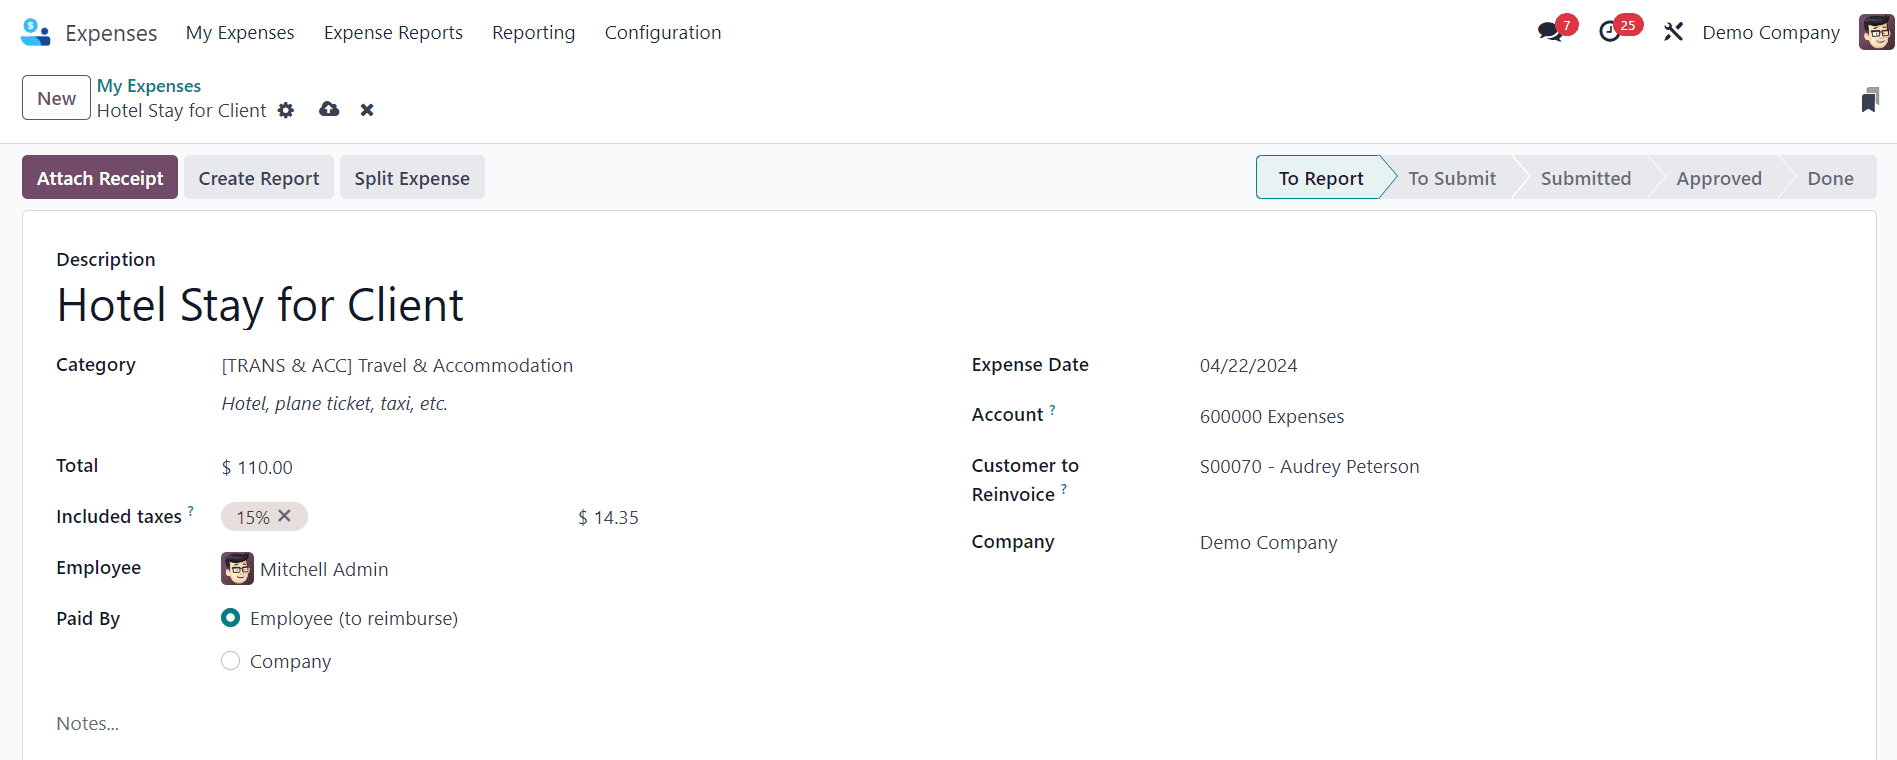
In the expense form, start by providing a clear description to easily identify and reference the expense. Next, navigate to the Category field and select the appropriate option from the dropdown menu. In this example, where we'll be invoicing a customer for a short hotel stay, select the [TRANS & ACC] Travel & Accommodation category for this expense.
Below the Category field, input the amount of the expense in the Total field. Then, specify whether any taxes are included in the total amount. If there are preconfigured tax rates, selecting one from the Included taxes field will automatically calculate the taxed amount based on the total entered.
Next, indicate which Employee incurred the expense, and select either "Employee (to reimburse)" or "Company" from the Paid By field. Since the employee paid for the hotel out of their pocket in this scenario, choose the "Employee (to reimburse)" option.
Now, proceed to the Customer to Reinvoice field and click on it to reveal a dropdown menu. From this menu, select the relevant sales order to which this expense should be linked. This step is essential for invoicing the customer for the expense.
Additionally, towards the bottom of the expense form, you'll find a Notes section. Feel free to add any relevant notes related to this expense if necessary.
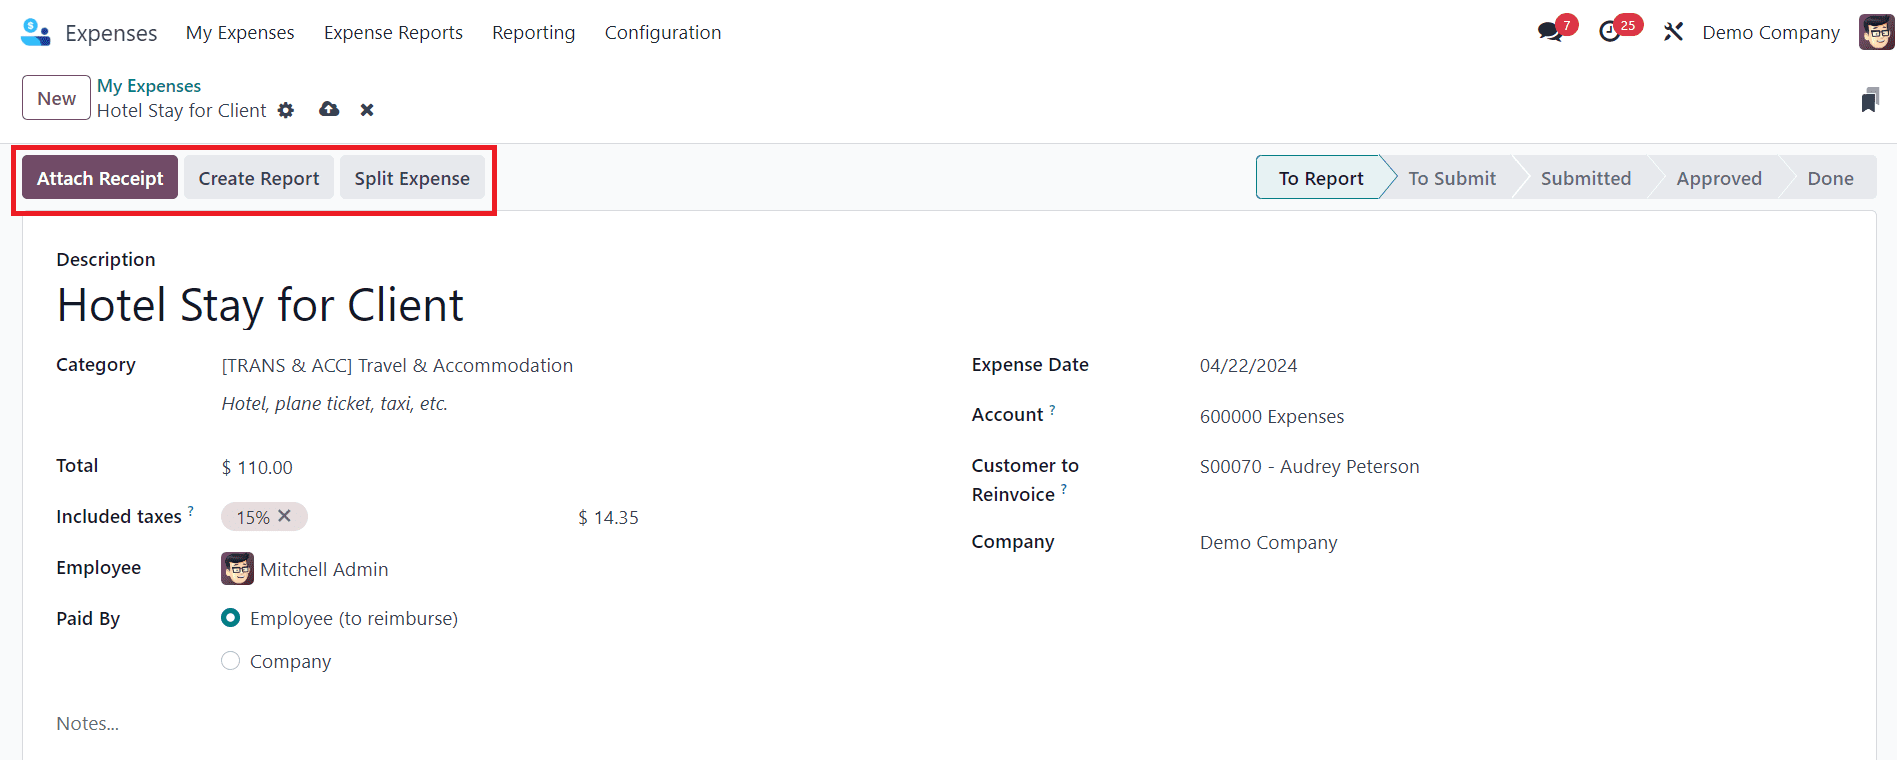
At the top of the expense form, you'll notice several buttons: Attach Receipt, Create Report, and Split Expense. If there's a receipt, whether physical or digital, that needs to be attached to the expense, click on Attach Receipt. If the expense needs to be split into multiple parts, click on Split Expense. If neither of these actions is required, click on Create Report to finalize the expense report.
Upon clicking Create Report, you'll be presented with an Expense Report Summary for the new expense.
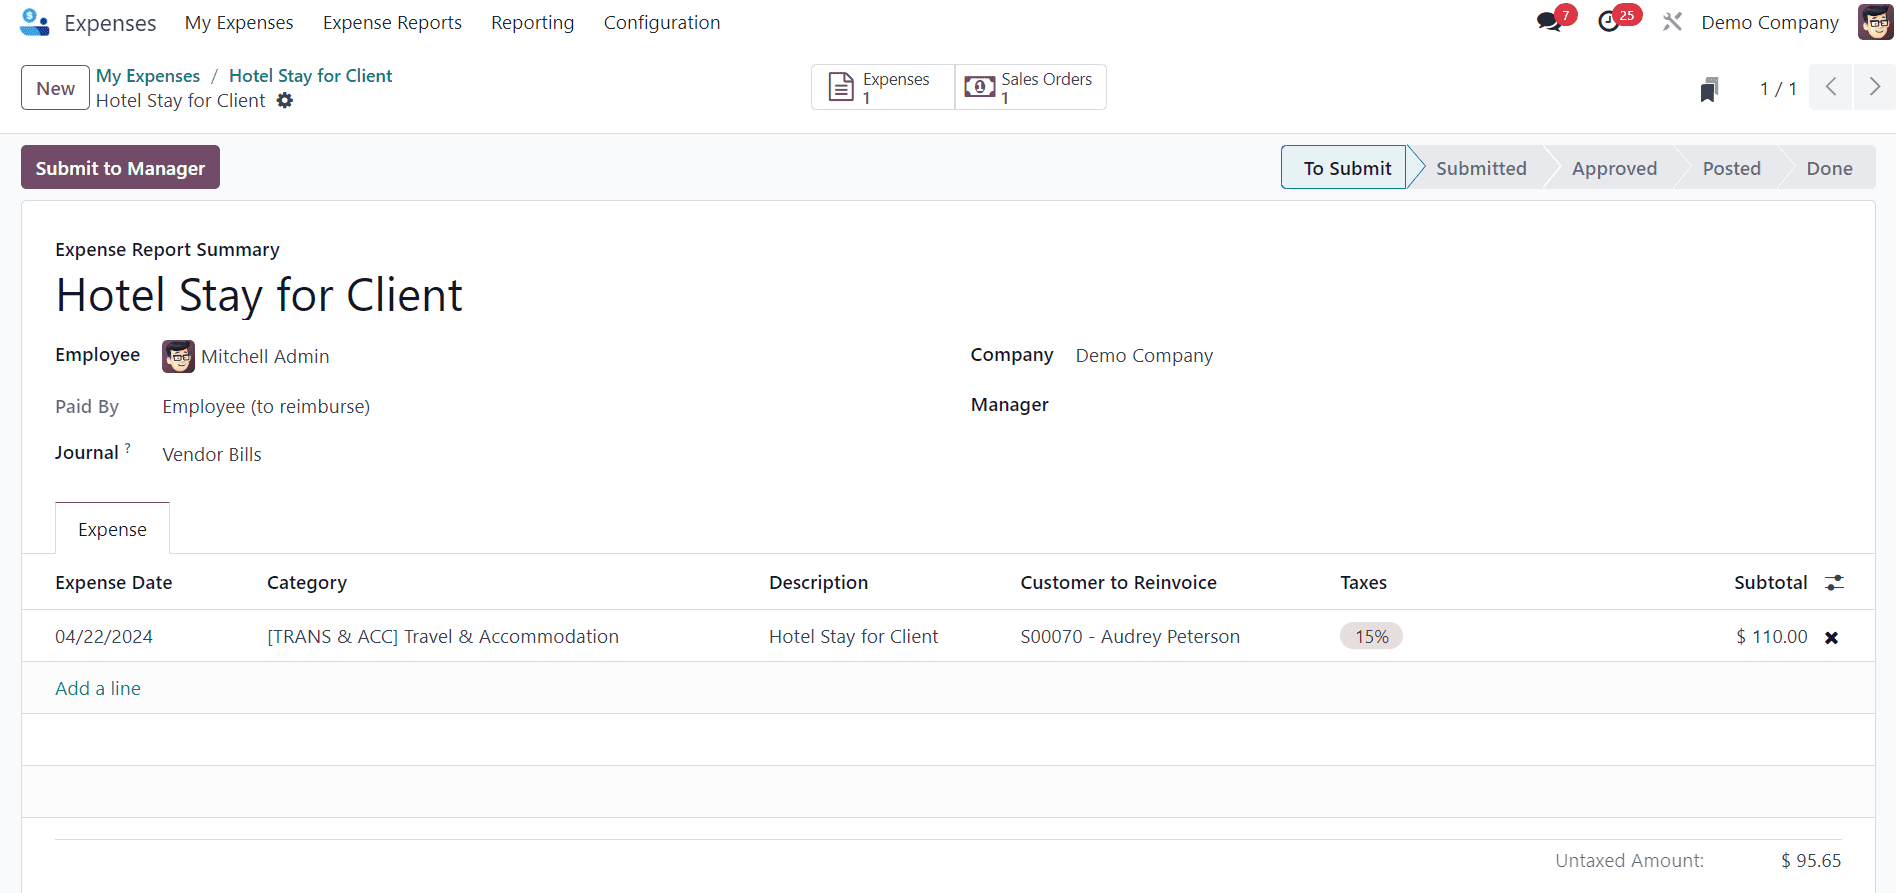
Once all the expense details have been verified, click on "Submit to Manager." This action sends the expense report to the manager responsible for approval.
The manager will then review the expense details. If everything looks good, they'll proceed to click the "Approve" button. Please note that this button is only visible on the manager's view of the Expense Report Summary that's been submitted by the employee.
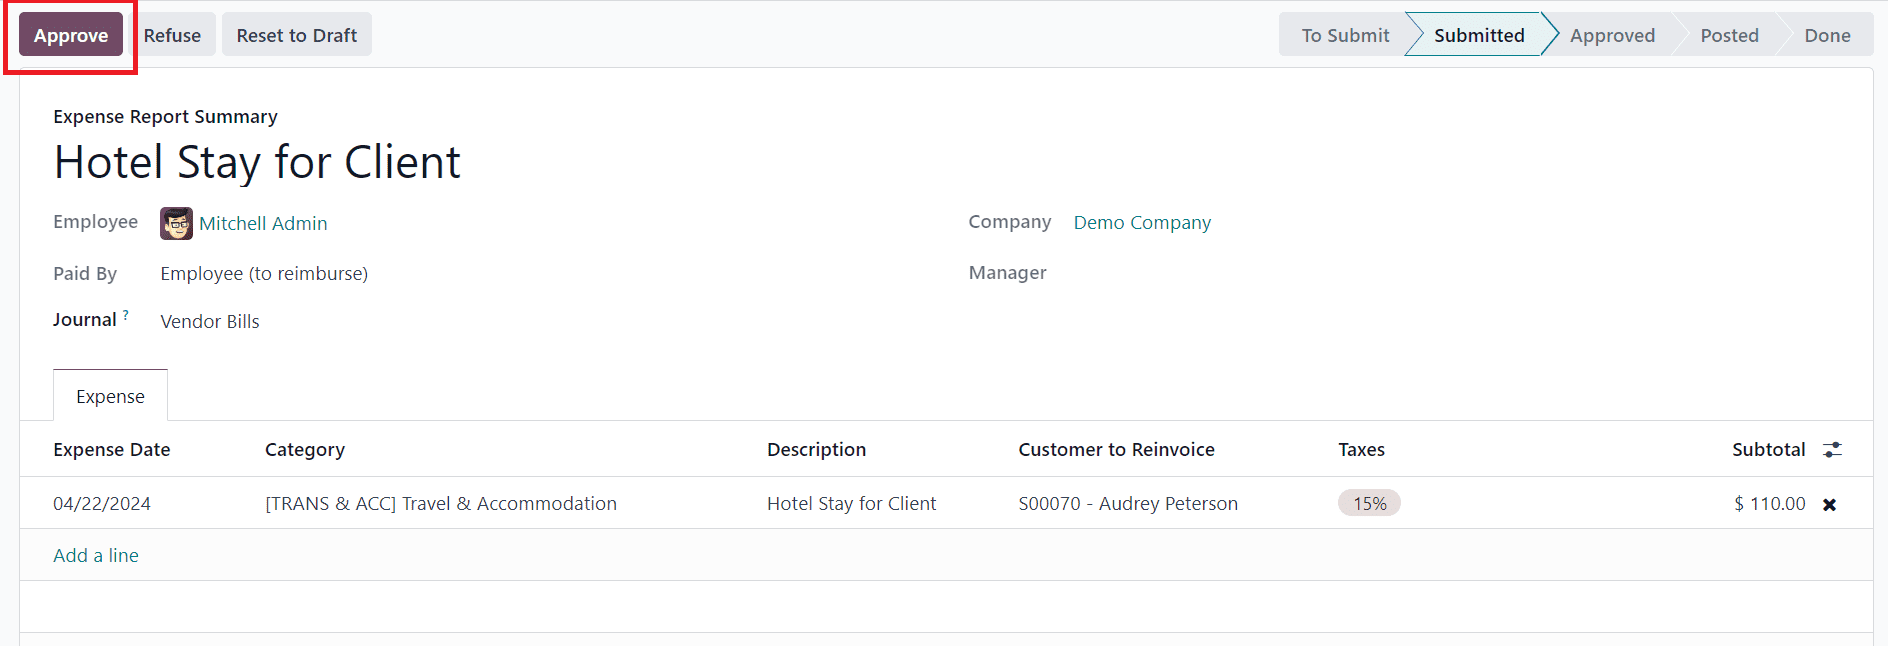
Afterapproval, the buttons at the top of the Expense Report Summary change oncemore. Now, you'll see options such as Post Journal Entries, Refuse, and Resetto Draft.
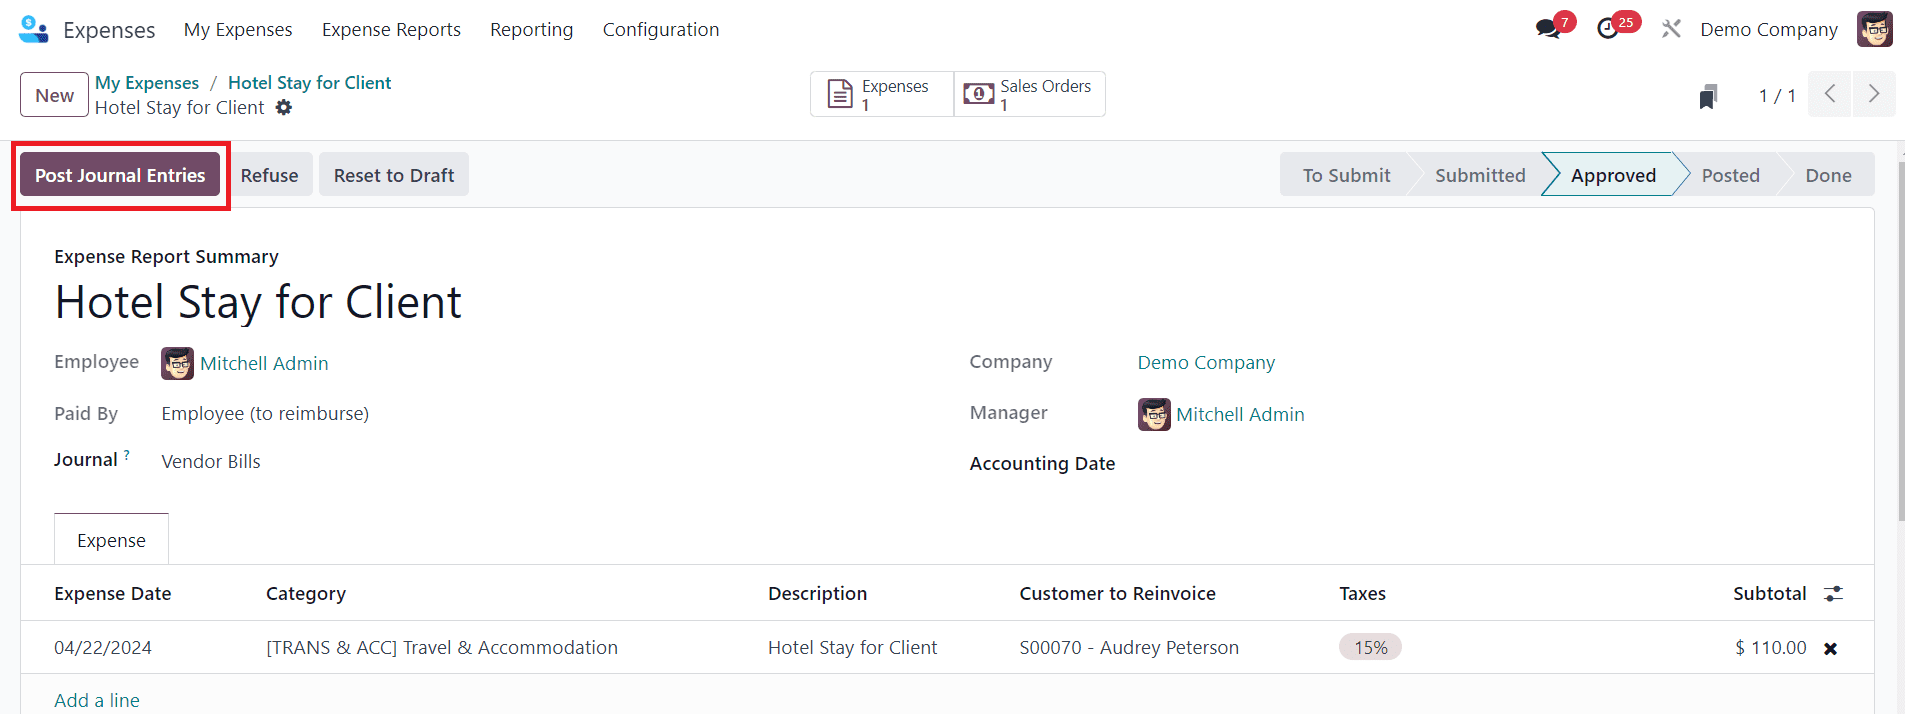
Once the manager is satisfied with theExpense Report Summary, they'll click on Post Journal Entries.
With the previous steps finished,let's head back to the sales order to finalize invoicing the expense to thecustomer. To do this, go to the main Odoo dashboard and select the Salesmodule. Then, choose the relevant sales order that needs to be invoiced for theexpense.
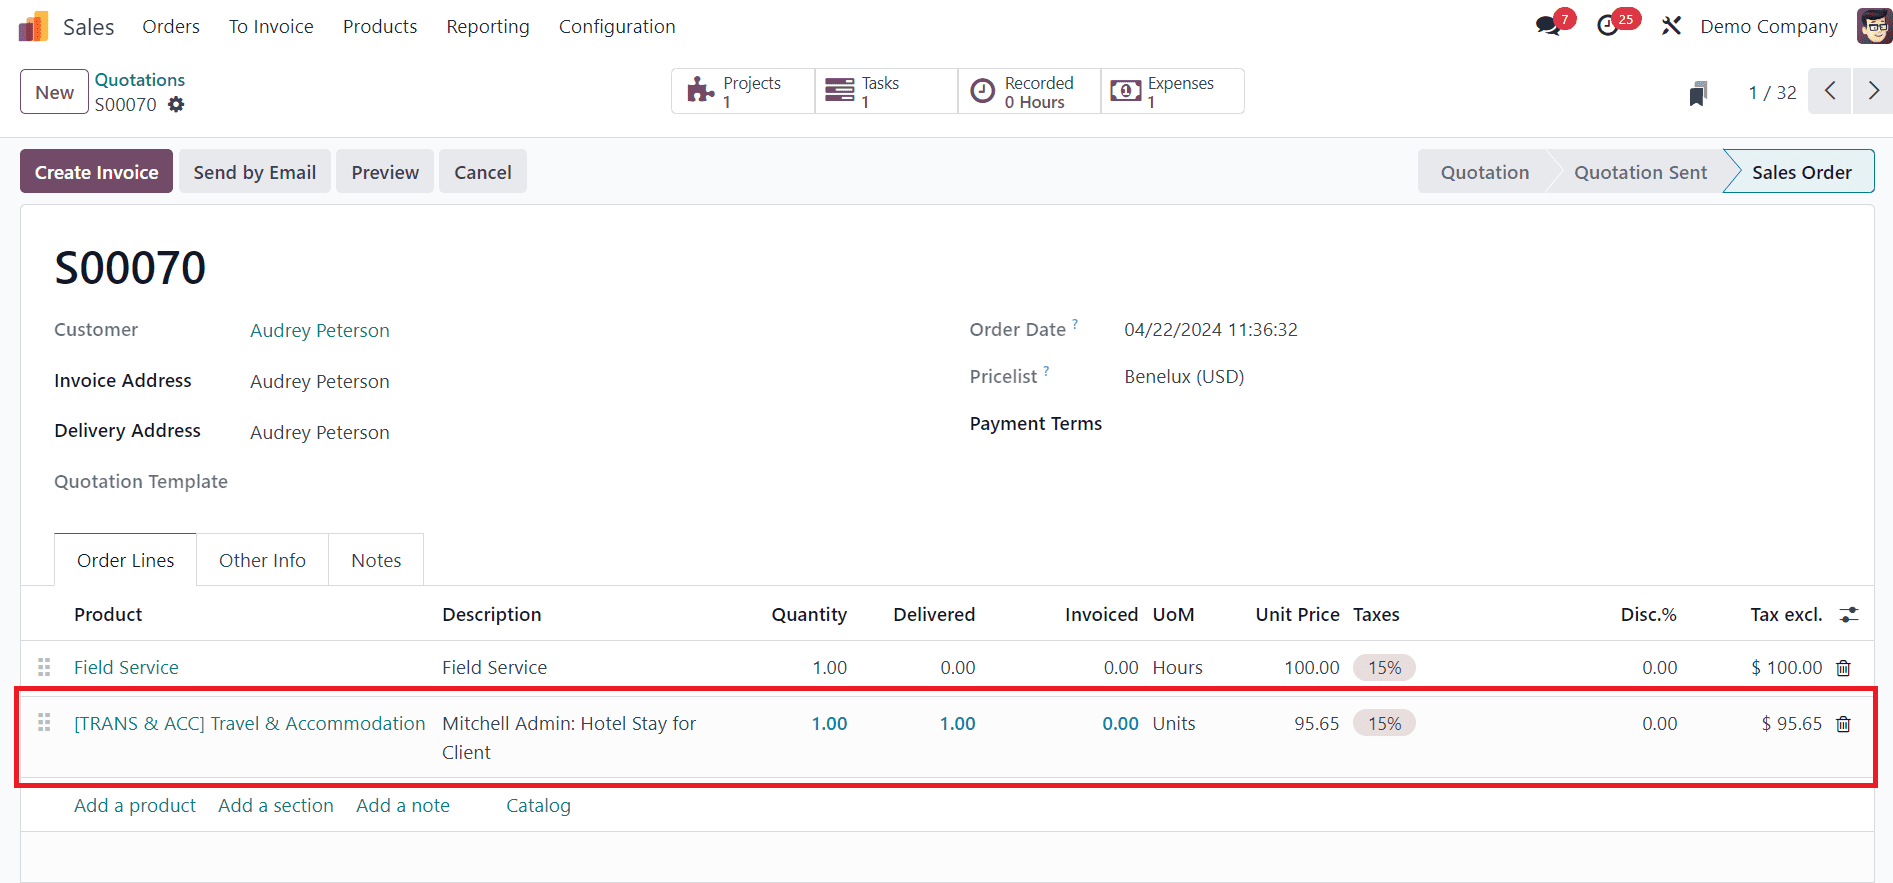
Inthe sales form, you'll now find the newly configured expense listed in theOrder Lines tab. The Delivered column will be filled in, indicating that theexpense is ready to be invoiced. Once you've verified the expense details,click on "Create Invoice" at the top of the sales order. This actionwill prompt a "Create invoices" pop-up window to appear.

In the pop-up window, keep the"Create Invoice" field set to the default option, which is"Regular invoice," and then click on "Create DraftInvoice." Upon doing so, a Customer Invoice Draft will be generated,displaying only the expense in the Invoice Lines tab.
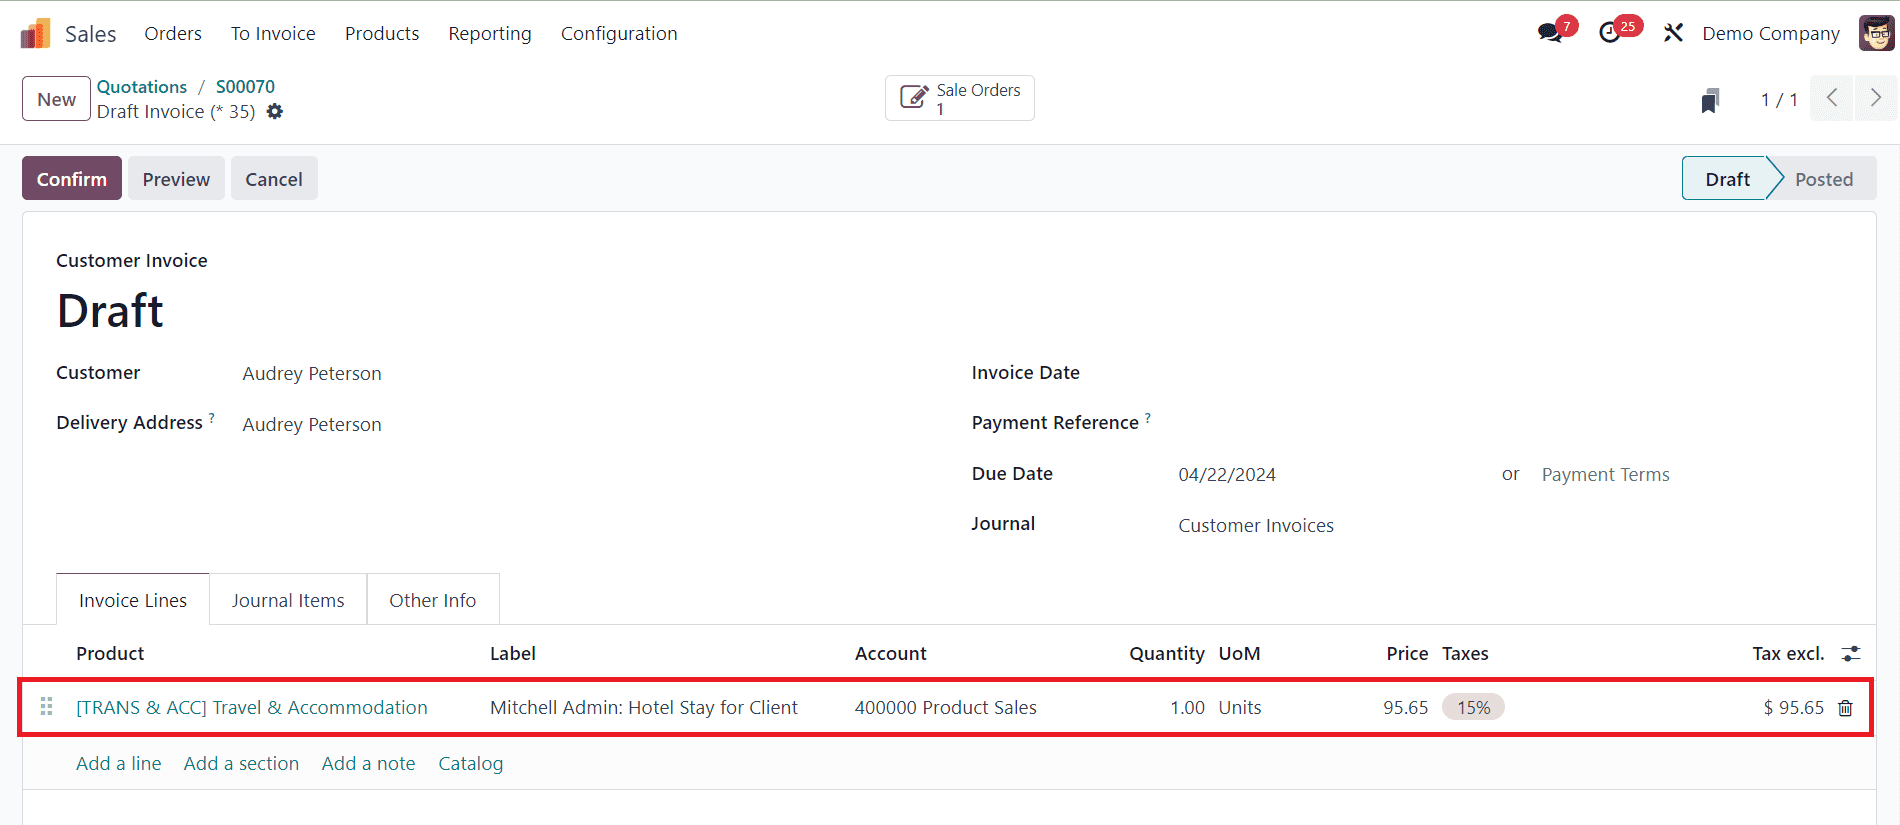
If all the expense information is accurate, click "Confirm" to confirm the invoice. This action changes the invoice status from Draft to Posted. When the customer pays for the invoiced expense, click on the "Register Payment" button. By following this workflow, businesses can efficiently track expenses, invoice clients for reimbursable expenses, and maintain financial transparency. Odoo's intuitive interface streamlines the entire process, ensuring accuracy and efficiency in expense management and invoicing.
While configuring the Expense Type in Odoo, we can define the Invoicing Policy for the Re-Invoice Expenses. In Odoo 17, valid expenses and vendor bills can be re-invoiced to a customer at its cost or sales price.
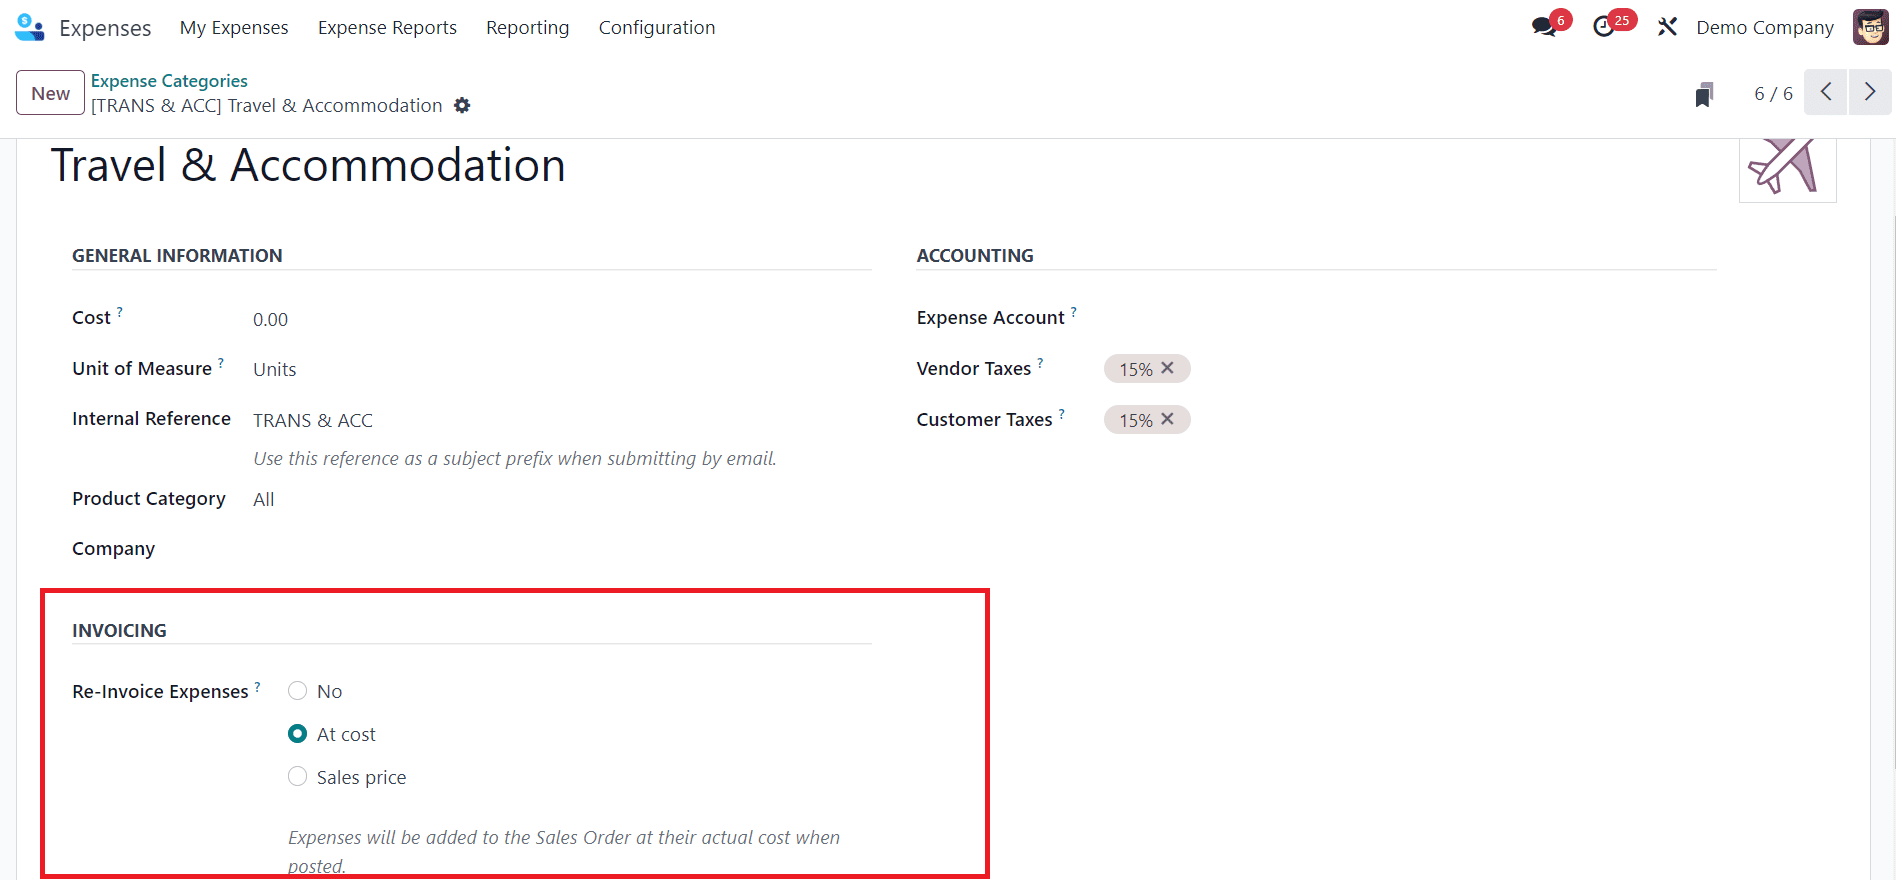
For expenses incurred at a specific cost, such as raw materials or subcontractor services, invoicing at cost provides a straightforward way to pass on these expenses to the client. It enables businesses to recoup their costs without any markup, maintaining fair and transparent pricing practices. When you select the At Cost option, expenses will be added to the sales order at their actual cost when posted.
In some cases, businesses may choose to invoice expenses at the sales price specified in the sales order. This method allows for consistent pricing across all invoiced items, ensuring that clients are billed according to agreed-upon rates and terms.
Re-invoicing expenses in Odoo 17 offers businesses a powerful solution for optimizing expense management and invoicing processes. By leveraging the comprehensive features and functionalities of Odoo 17, businesses can achieve greater efficiency, transparency, and profitability in their operations. With the insights and strategies outlined in this blog, businesses can successfully implement and maximize the benefits of expense re-invoicing in Odoo 17. To read more refer on How to Manage Employee Expenses & Company Expenses in Odoo 17 Expense App