Create an enterprise-grade website with odoo super easy builders. Use finely designed building blocks and edit everything inline.
Main Features:
1. Customize it without coding
2. Change to your own brand and website.
3. We can add visitors to customers
4. Extend website with a lot of Apps
1. Customize it without coding
Just drag & drop contents
Make a website, and then add features as you want. It acts as cms.
A Content Management System is a computer application will help you to manage and control the content on your website. Therefore, you do not need any technical training for managing or building a website. Using this cms system you can add contents very easily, erase images and edit text in your website.
2. Change to your own brand and website.
You will get a website that automatically adjusts to fit your brand and style concepts.
Branding is the must for business improvement. Odoo gives you the tools to achieve branding needs quickly.
3. We can add visitors to customers
SEO TOOLS
Odoo SEO tools combine with Google to check the relevancy of your content in real time. Get more visitors with better-targeted content.
In the case of Search Engine Optimization in the Odoo system, it is very powerful to make it optimized to search engines. We don't have to worry about technical 301 redirects like things done in most of the cases.
CALL TO ACTION
You can simply drag & drop call-to-actions to boost your conversion rates. Select the best call to action for all page, customize your forms, and add the pop-up on exits as you wish.
A/B TESTING
A/B testing helps to build the perfect website
A/B testing will send half of your site’s visitors to the original version (A) and half into test version (B) then select the best one.
Small Changes becomes Big Wins
Decide what you're going to do
The sentence you use, the color of the headlines and where you put the call-to-action can all have a big change in your bounce rate, your visits, and the conversions. With Odoo A/B testing, any element of your website can test easily!
Control distribution of the A/B tests
If you feel that 1 version is better than the other version. Then? With our A/B testing tool, you can run uneven tests by sending more traffic to one page. Therefore, you do not have to harm the performance just because of that you are testing.
TRACK VISITORS
you can Track visitors of the website. Measure the performance of the marketing campaign if it is by email or through external websites or any social media.
Track pages in just a click and are notified automatically in your CRM application when your leads visit the key pages. Start live chat to contact them in real time if they visit your website.
MASS MAILING
Forget about using third-party applications to do the mass mailing features because Odoo manages this too. Do not need the import/export list of your contacts, configure the trackers between emails, website, and orders.
4. Integrate your website with hundreds of Apps Sell Online
- e-Commerce
- Event Tickets
Full Marketing Stack
- Lead Acquisition
- Lead Tracking
- Live Chat
- Mass Mailing
Link Business Features
- Recruitment's
- Helpdesk
Marketplaces Integration's
- Amazon (coming soon)
- eBay
Content Management
- Blogs
- Presentation
- Forums, Q&A
Easy inline edition of highly dynamic content
User Guidelines:
In the case of Odoo, the Odoo website contains a .odoo.com domain name, it is a default thing. But we can change that to a custom domain name. (e.g.https://www.cybrosys.com/ ).
Your website address is important to your branding as the name of your organization, so put some ideas into changing it for a proper domain. Here are some tips:
- Simple and obvious
- Easy to remember and spell
- The shorter the better
- Avoid special characters
- Aim for a .com and/or your country extension
Buy your domain name from a trusted registrar:
- GoDaddy
- Namecheap
- OVH
How to translate your website
You can translate your website into different languages. Odoo provides that features for translating it in different languages.
You either can manually or automatically translate your website; you can use the Gengo application for this purpose. If it is automatically, then first you have to take the App module for installing the automated translations through Gengo API & Website Gengo Translator. If you want to do it manually, you do not have to install anything, and you can go through the further procedures.
After inside your website builder application. There is an option at the bottom right corner of the page, to add a language.
Select the language for your website and then click on Load.
- Search Engine Optimization in Odoo
- SEO is a tool used for optimizing the website for search engines. The site gets good ranking by this.
- It can make more traffic to our website.
- SEO has some basic rules like only one <h1> tag is good for improving the page loading speed.
- In addition, it should contain only one .xml file.
- Odoo’s website builder module is the most efficient and SEO optimized cms system now available in the market. SEO have high priority in Odoo. Both Odoo Website and e-Commerce users get the SEO facility.
- The time to load a page is an important thing for Google. Google gives a good page ranking if the page loads faster than your competitors do.
- Odoo gives you all the facilities to speed up the page loading time of your website. You can check your website's ranks using the following two tools.
- Google Page Speed
- Pingdom Website Speed Test
Tracking of website's traffic using Google Analytics
To identify the traffic of your website with Google Analytics:
Create a Google Analytics account if you do not have an account in Google Analytics. This is the creation form. Accept the conditions to get the tracking ID.
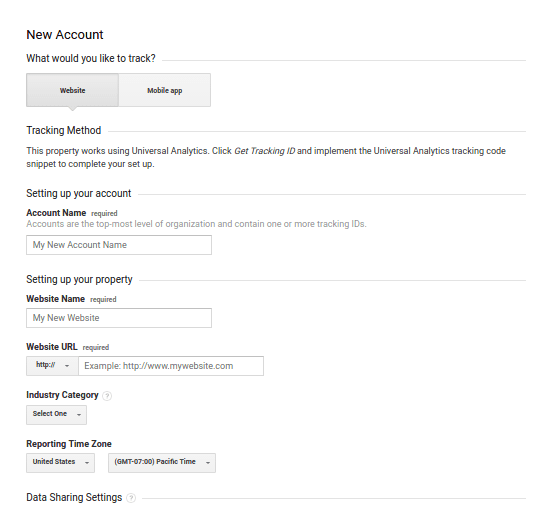
After getting the tracking id
Go to Odoo’s Website app ->Configuration ->Settings
Paste the tracking ID in Google Analytics Field
Track the website’s traffic from Odoo Dashboard
- The first step is creating a Google Analytics account. Update that tracking ID to Odoo website Settings.
- Generate Analytics API credentials. For that, you have to go to the APIs platform of Google. You can Log in to that by using your Google account.
- Select Analytics API.
- Create a new project then give a name (e.g. Cybrosys). This project is necessary to store your API credentials.
- Enable the API.
- Create credentials to use in Odoo
- Select Web browser (JavaScript) as calling source and User data as kind of data.
- Then you can create a Client ID. Enter the name of the application (e.g. Odoo) and the allowed pages on which you will be redirected.
- Go through the Consent Screen step by entering a product name (e.g. Odoo Google Analytics). There is an option to check the customizations but this is not necessary.
- At last, you get your Client ID. Copy and paste it in Odoo.
- Open your Website Dashboard in Odoo application and link your Analytics account.
- The last step is to authorize Odoo to access Google API.
Developer Guidelines:
To the browser
Controllers interpret browser requests and send the data back.
Add a simple controller and ensure it is by __init__.py (so Odoo can find it):
example :
            from odoo import http
            class Cybrosys(http.Controller):
                        @http.route('/company/company/', auth='public')
                        def index(self, **kw):
                        return "Hai, Avinash"
Templates
Generating HTML in Python is not easy.
We can use templates for this. Pseudo-documents with placeholders and display logic. Odoo allows any Python templating system, but it provides a QWeb templating method that integrates with other features.
Create a template. The template file must be registered in the __manifest__.py manifest.
Example:
                        <odoo>
                                    <data>
                                                <template id="template_panel">
                                                            <title>Cybrosys</title>
                                                            <t t-foreach="employee" t-as="employee">
                                                                        <p><t t-esc="employee"/></p>
                                                            </t>
                                                </template>
                                    </data>
                        </odoo>
Odoo has the freedom to create and edit the contents by the user’s choice.
To create an Odoo Theme:
If you are a fresher in Odoo then here you have the guidelines for building a theme.
Where is my header.php file? This is usually the first question from a web designer used to working with WordPress or Joomla and coming to Odoo for the first time.
Indeed, when using common CMSs, you have to code several files (like header.php, page.php, post.php, etc.) in order to create a basic structure for your website. With those systems, this base structure acts as a design foundation that you have to update over time to ensure compatibility within your CMS. Therefore, even after you have spent hours coding the files, you have not even started on the design yet.
This does not apply to create Odoo themes.
Odoo has a default theme structure. It contains a basic structure and layout. If you are creating a new theme, then you can extend this. It acts exactly like the CMS’s base structure. It will be there when you install the Website Builder module.
You can focus on your design; do not bother about other things.
Main features:
- Basic layouts for pages, blog, and e-commerce
- Website Builder integration
- Basic Snippets
- Automatic Less/Sass compiling
- Automatic Js and CSS minification and combination.
Main technologies:
- Twitter Bootstrap
- jQuery
- jQuery UI
- underscore.js
Odoo theme does not contain a folder that holds HTML or PHP files, it is a modular framework written in XML. If you are not familiar with XML files, do not worry, after following this tutorial, you can create your own theme with only basic knowledge of HTML.
If you follow the ordinary web development tools, you usually code the layout of the entire page. As a result, you get a “static” web page. You can update the content, but your client cannot.
Theme building in Odoo is a completely different process. Here you are creating snippets instead of defining the complete layout for a page. Then the user can “drag-drop” them where he wants it. We call this modular design.
Snippets (or building-blocks)
It is a piece of HTML code. The user can “drag-drop” the snippets anywhere on the page to make the design in their mind.
Pages
These are the normal web pages, but the difference is that user can create it. At first, it is empty. The user can add snippets to it.
Styles
CSS, Less/Sass files are used to create the Styles. You can define a style as default or optional. The default styles are always active in your theme, but the user enabled or disabled the optional styles.
For Creating Snippets
For creating snippets, you have to go to the view folder in Odoo and create an XML file called snippets.xml. Here you have an example for snippets.
<template id="snippet_options"> <t t-call="web_editor.snippet_options"/> <div data-js='background' data-selector="section, :not(.o_gallery > .container) > .carousel, .parallax, .s_banner .carousel-content"> <li class="dropdown-submenu"> <a tabindex="-1" href="#"><i class="fa fa-picture-o"/>Background Image</a> <ul class="dropdown-menu"> <li data-background=""><a href="#">None</a></li> <li class="divider"></li> <li data-choose_image="choose_image"><a href="#"><b>Set Custom Image...</b></a></li> <li class="divider"></li> <li data-background="/web/image/website.s_background_image_01"><a href="#">Peak</a></li> <li data-background="/web/image/website.s_background_image_02"><a href="#">Downtown</a></li> <li data-background="/web/image/website.s_background_image_03"><a href="#">Panama Sky</a></li> <li data-background="/web/image/website.s_background_image_04"><a href="#">Cubes</a></li> <li data-background="/web/image/website.s_background_image_05"><a href="#">Building Profile</a></li> <li data-background="/web/image/website.s_background_image_06"><a href="#">Type</a></li> <li data-background="/web/image/website.s_background_image_07"><a href="#">People</a></li> <li data-background="/web/image/website.s_background_image_08"><a href="#">City</a></li> <li data-background="/web/image/website.s_background_image_09"><a href="#">Sails</a></li> </ul> </li> </div> <div data-js='background_position' data-selector="section:not(.parallax), :not(.o_gallery > .container) > .carousel, .s_banner .carousel-content"> <li class="background_position_li" data-background_position="background_position"> <a tabindex="-1" href="#"><i class="fa fa-arrows"/>Background Image Sizing</a> </li> </div> <div data-js="colorpicker" data-selector="section:not(.parallax), :not(.o_gallery > .container) > .carousel"> <li class="dropdown-submenu"> <a tabindex="-1" href="#"><i class="fa fa-eyedropper"/>Background Color</a> <ul class="dropdown-menu"> <li></li> </ul> </li> </div> <div data-js="colorpicker" data-selector=".s_text_block_image_fw .row > div, .s_banner .carousel-content" data-palette-exclude="grayscale" data-palette-default="transparent_grayscale" data-palette-title="Overlay Color"> <li class="dropdown-submenu"> <a tabindex="-1" href="#"><i class="fa fa-eyedropper"/>Overlay color</a> <ul class="dropdown-menu"> <li></li> </ul> </li> </div> <div data-js='gallery' data-selector=".o_gallery"> <li class="dropdown-submenu"> <a tabindex="-2" href="#"><i class="fa fa-magic"/>Mode</a> <ul class="dropdown-menu"> <li data-mode="nomode"><a href="#">Float</a></li> <li data-mode="masonry"><a href="#">Masonry</a></li> <li data-mode="grid"><a href="#">Grid</a></li> <li data-mode="slideshow"><a href="#">Slideshow</a></li> </ul> </li> <li class="dropdown-submenu"> <a tabindex="-2" href="#"><i class="fa fa-clock-o"/>Slideshow speed</a> <ul class="dropdown-menu"> <li data-interval="1000"><a href="#">1s</a></li> <li data-interval="2000"><a href="#">2s</a></li> <li data-interval="3000"><a href="#">3s</a></li> <li data-interval="5000"><a href="#">5s</a></li> <li data-interval="10000"><a href="#">10s</a></li> <li data-interval="0"><a href="#">Disable autoplay</a></li> </ul> </li> <li class="dropdown-submenu"> <a tabindex="-2" href="#"><i class="fa fa-th"/>Columns</a> <ul class="dropdown-menu"> <li data-columns="1"><a href="#">1</a></li> <li data-columns="2"><a href="#">2</a></li> <li data-columns="3"><a href="#">3</a></li> <li data-columns="4"><a href="#">4</a></li> <li data-columns="6"><a href="#">6</a></li> <li data-columns="12"><a href="#">12</a></li> </ul> </li> <li class="dropdown-submenu"> <a tabindex="-2" href="#"><i class="fa fa-arrows-h"/>Images spacing</a> <ul class="dropdown-menu"> <li data-select_class="o_spc-none"><a href="#">None</a></li> <li data-select_class="o_spc-small"><a href="#">Small</a></li> <li data-select_class="o_spc-medium"><a href="#">Medium</a></li> <li data-select_class="o_spc-big"><a href="#">Big</a></li> </ul> </li> <li class="dropdown-submenu"> <a tabindex="-2" href="#"><i class="fa fa-paint-brush"/>Styling</a> <ul class="dropdown-menu"> <li data-styling=""><a href="#">Square</a></li> <li data-styling="img-rounded"><a href="#">Rounded corners</a></li> <li data-styling="img-thumbnail"><a href="#">Thumbnails</a></li> <li data-styling="img-circle"><a href="#">Circle</a></li> <li data-styling="shadow"><a href="#">Shadows</a></li> </ul> </li> <li class="separator"></li> <li data-images_add="true"><a href="#"><i class="fa fa-plus-circle"/>Add images</a></li> <li data-images_rm="true"><a href="#"><i class="fa fa-trash"/>Remove all images</a></li> </div> <div data-js='gallery_img' data-selector=".o_gallery img"> <li class="dropdown-submenu"> <a tabindex="-2" href="#"><i class="fa fa-refresh"/>Re-order</a> <ul class="dropdown-menu"> <li data-position="first"><a href="#">Move to first</a></li> <li data-position="prev"><a href="#">Move to previous</a></li> <li data-position="next"><a href="#">Move to next</a></li> <li data-position="last"><a href="#">Move to last</a></li> </ul> </li> </div> <div data-js='carousel' data-selector=":not(.o_gallery > .container) > .carousel"> <li class="dropdown-submenu"> <a tabindex="-2" href="#"><i class="fa fa-clock-o"/>Slideshow speed</a> <ul class="dropdown-menu"> <li data-interval="1000"><a href="#">1s</a></li> <li data-interval="2000"><a href="#">2s</a></li> <li data-interval="3000"><a href="#">3s</a></li> <li data-interval="5000"><a href="#">5s</a></li> <li data-interval="10000"><a href="#">10s</a></li> <li data-interval="0"><a href="#">Disable autoplay</a></li> </ul> </li> <li class="divider"></li> <li data-add_slide="true"><a href="#"><i class="fa fa-plus-circle"/>Add Slide</a></li> <li data-remove_slide="true"><a href="#" ><i class="fa fa-trash-o"/>Remove Slide</a></li> </div> <div data-js='margin-y' data-selector="section, .row > [class*='col-md-'], :not(.o_gallery > .container) > .carousel, .parallax, hr"> </div> <div data-js='resize' data-selector="section, :not(.o_gallery > .container) > .carousel, .parallax" data-drop-in=".oe_structure, [data-oe-type=html]"> </div> <div data-js='margin-x' data-selector=".row > [class*='col-md-']" data-drop-near=".row > [class*='col-md-']"> </div> <div data-js='content' data-selector="blockquote, .well, .s_panel, .oe_share, .o_image_floating" data-drop-near="p, h1, h2, h3, blockquote, .well, .s_panel, .oe_share" data-drop-in=".content"> </div> <div data-js='separator' data-selector="hr" data-drop-in=".oe_structure, [data-oe-type=html]"> </div> <div data-selector=".o_image_floating"> <li class="dropdown-submenu"> <a tabindex="-2" href="#"><i class="fa fa-expand"/>Margin</a> <ul class="dropdown-menu"> <li data-select_class="o_margin_xl"><a href="#">Extra-Large</a></li> <li data-select_class="o_margin_l"><a href="#">Large</a></li> <li data-select_class="o_margin_m"><a href="#">Medium</a></li> <li data-select_class="o_margin_s"><a href="#">Small</a></li> <li data-select_class=""><a href="#">None</a></li> </ul> </li> </div> <div data-selector=".o_image_floating"> <li class="dropdown-submenu"> <a tabindex="-2" href="#"><i class="fa fa-magnet"/>Float</a> <ul class="dropdown-menu"> <li data-select_class="pull-left" data-only="click"><a href="#">Left</a></li> <li data-select_class="pull-right" data-only="click"><a href="#">Right</a></li> </ul> </li> </div> <div data-js="parallax" data-selector=".parallax"> <li class="dropdown-submenu"> <a tabindex="-1" href="#"><i class="fa fa-clock-o"/>Scroll Speed</a> <ul class="dropdown-menu" name="parallax-scroll"> <li data-scroll="0"><a href="#">Static</a></li> <li data-scroll="0.3"><a href="#">Very Slow</a></li> <li data-scroll="0.6"><a href="#">Slow</a></li> <li data-scroll="1"><a href="#">Fixed</a></li> <li data-scroll="1.4"><a href="#">Fast</a></li> <li data-scroll="1.7"><a href="#">Very Fast</a></li> </ul> </li> </div> <div data-js='ul' data-selector=":not(li) > ul:has(ul,ol), :not(li) > ol:has(ul,ol)"> <li data-toggle_class="o_ul_folded"><a href="#">Folded list</a></li> </div> <div data-js='collapse' data-selector='.panel-group > .panel:has(> .panel-collapse)' data-drop-in='.panel-group:has(> .panel > .panel-collapse)'> </div> <div data-js="menu_data" data-selector="#top_menu li > a:not(.dropdown-toggle)" data-no-check="true"/> <div data-js="company_data" data-selector="img[src='/logo.png'], [data-oe-expression='res_company.partner_id']" data-no-check="true"/></template>
Using XPath, we can edit a snippet.
Example:
<template id="snippet_options" inherit_id="website.snippet_options"> <xpath expr="//div" position="after"> <!-- Form --> <div data-js='website_form_editor' data-selector='.s_website_form' data-drop-in=".oe_structure, [data-oe-type=html]"> <li data-website_form_model_modal=""> <a>Change Form Parameters</a> </li> <li data-website_form_field_modal=""> <a>Add a model field</a> </li> <li class="dropdown-submenu"> <a>Add a custom field</a> <ul class="dropdown-menu"> <li data-website_form_custom_field="char"><a>Text</a></li> <li data-website_form_custom_field="text"><a>Long Text</a></li> <li data-website_form_custom_field="integer"><a>Number</a></li> <li data-website_form_custom_field="float"><a>Decimal Number</a></li> <li data-website_form_custom_field="boolean"><a>Checkbox</a></li> <li data-website_form_custom_field="selection"><a>Radio Buttons</a></li> <li data-website_form_custom_field="many2one"><a>Selection</a></li> <li data-website_form_custom_field="one2many"><a>Multiple Checkboxes</a></li> <li data-website_form_custom_field="date"><a>Date</a></li> <li data-website_form_custom_field="datetime"><a>Date & Time</a></li> <li data-website_form_custom_field="binary"><a>File Upload</a></li> </ul> </li> </div> <!-- Field --> <div data-js='website_form_editor' data-selector=".form-field" data-drop-near=".form-field"> <!-- <li data-website_form_field_parameters=""> <a>Field Parameters</a> </li> --> <!-- <li data-website_form_editor_field_reset=""> <a>Reset Field</a> </li> --> <li data-toggle_class="o_website_form_field_hidden"> <a>Hidden</a> </li> </div> <!-- Add move, duplicate and remove controllers to checkboxes and radio buttons --> <div data-selector=".o_website_form_flex_item" data-drop-near=".o_website_form_flex_item"/> <!-- Add move and remove controllers to select items --> <div data-selector=".s_website_form .form-field.o_website_form_custom .o_website_form_select_item" data-drop-near=".o_website_form_select_item"/> <!-- Required option for fields that are not required fields of the model --> <div data-js='website_form_editor_field' data-selector=".form-field:not(.o_website_form_required)"> <li data-website_form_field_require="" data-toggle_class="o_website_form_required_custom"> <a>Required</a> </li> </div> <!-- Remove the duplicate options of model fields --> <div data-js="website_form_editor_field_model" data-selector=".s_website_form .form-field:not(.o_website_form_custom)"/> <!-- Remove the delete options of model required fields --> <div data-js="website_form_editor_field_required" data-selector=".s_website_form .o_website_form_required"/> <!-- Remove the duplicate options of radio and checkboxes of model fields --> <div data-js="website_form_editor_field_x2many" data-selector=".s_website_form .form-field:not(.o_website_form_custom) .o_website_form_flex_item"/> <!-- Transform the select inputs into editable constructs --> <div data-js="website_form_editor_field_select" data-selector=".s_website_form .form-field:has(select)"/> <!-- Remove the duplicate option of model select items --> <div data-js="website_form_editor_field_x2many" data-selector=".s_website_form .form-field:not(.o_website_form_custom) .o_website_form_select_item" data-drop-near=".o_website_form_select_item"/> <!-- Remove the delete options of the Submit button --> <div data-js="website_form_editor_field_required" data-selector=".s_website_form .o_website_form_send"/> </xpath></template>