This blog will use Odoo's latest JavaScript framework, OWL (Odoo Web Library), to create custom popups in Odoo 16 POS. OWL is a component-based framework inspired by React js and Vue Js written in Typescript. Odoo's POS app has all the tools you need in one place. This makes handling easier and saves a lot of time and money.
One of the minimal UI frameworks based on the Odoo Web Client is the Odoo Web Library. Use components as building blocks.
Now let's see how to create a custom popup in Odoo 16 when clicking a button in POS. For details on creating different types of buttons, please refer to the following blog: How to Add Buttons in POS using OWL.
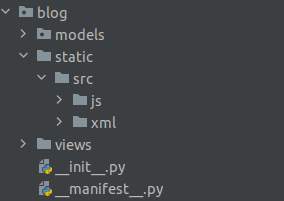
This blog will help you add custom popups to your POS. First, we need to create a custom module. The structure of the custom module is shown below.
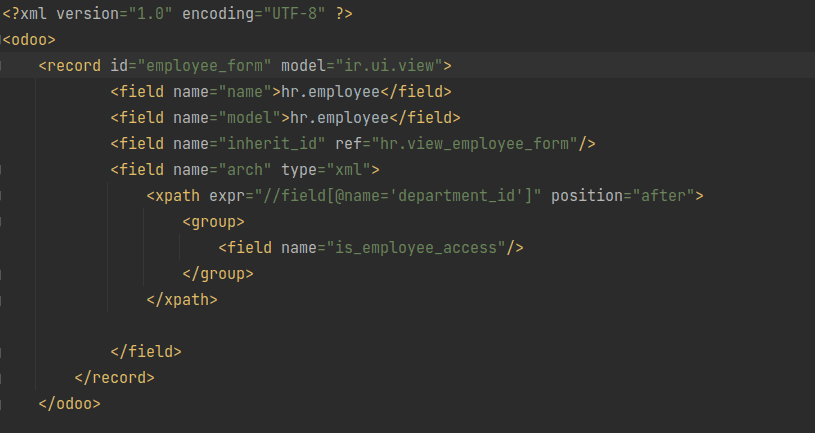
Here we are shown the list of employees who has access to the current POS So we add a new field, “is employee access” to the employee form,
So the corresponding PY and XML files are:
Py:

XML:
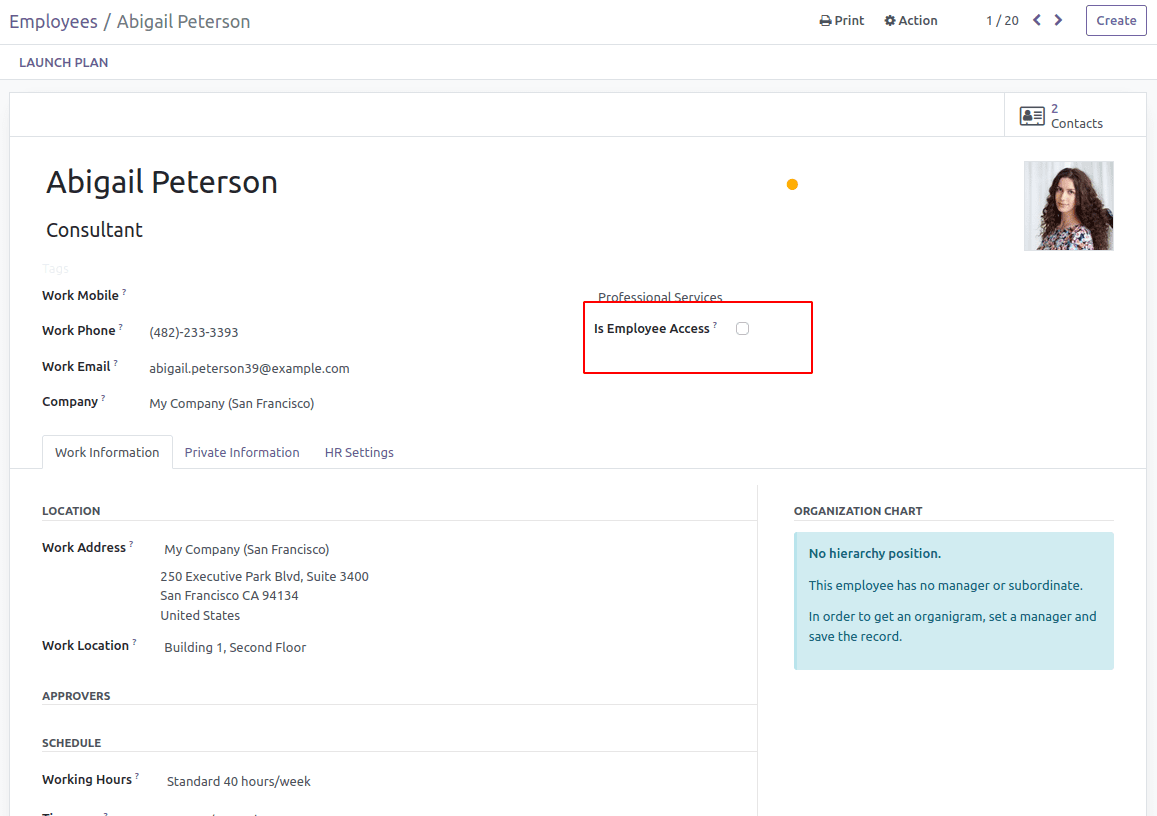
So we added a field; you can see the screenshot:
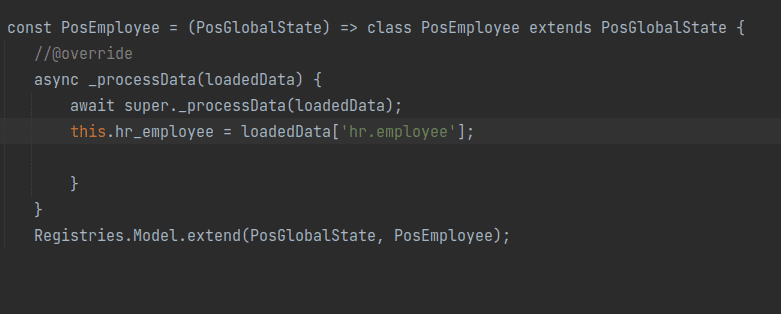
After that, we want to load the model with the employees who have access to the POS. To create a new py file and add the code for loading the model to POS. Using the function 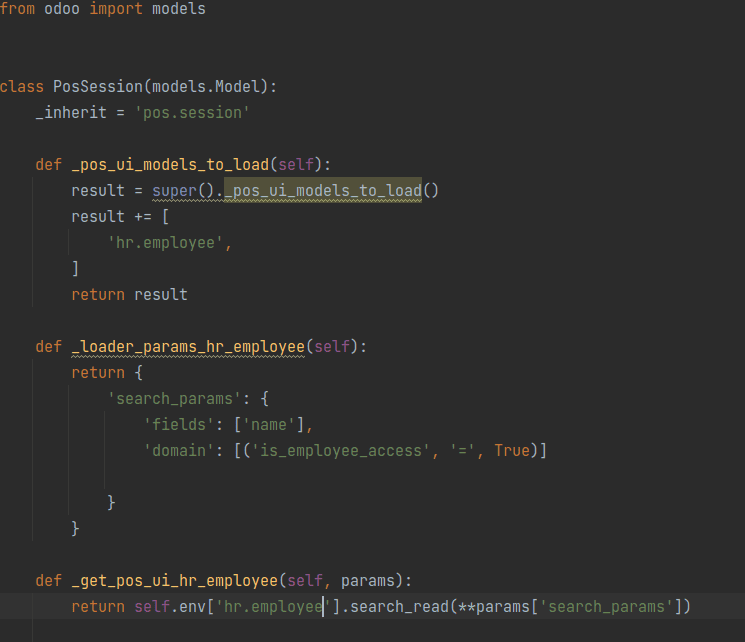
In js:
We want to load the model by overriding PosGlobalState,
And By adding the Button “Employee” the XML and Js files are required,
Employee button XML: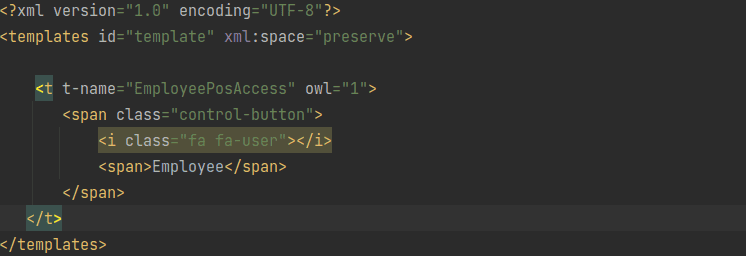
Employee button JS:
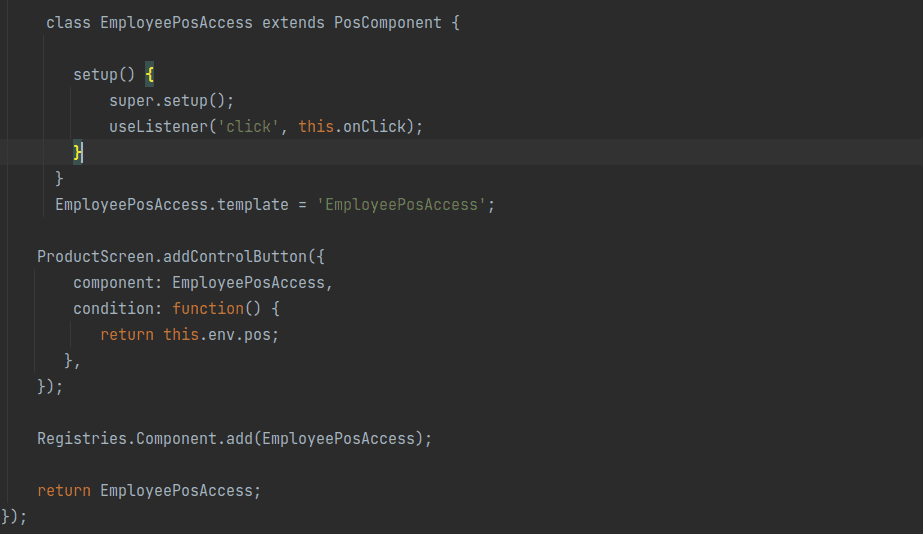
After extending the class, the corresponding click for the button must be specified. From here, we specify the pop-up that we are going to create,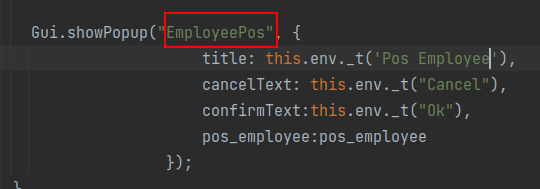
Here “EmployeePos” is the custom pop-up that we are going to create.
After extending the class, the corresponding click for the button must be specified. From here, we specify the pop-up that we are going to create,
odoo.define('blog.EmployeePosAccess', function(require) {
	'use strict';
 	const PosComponent = require('point_of_sale.PosComponent');
	const ProductScreen = require('point_of_sale.ProductScreen');
	const { useListener } = require("@web/core/utils/hooks");
	var { PosGlobalState } = require('point_of_sale.models');
	const Registries = require('point_of_sale.Registries');
	const { Gui } = require('point_of_sale.Gui');
 const PosEmployee = (PosGlobalState) => class PosEmployee extends PosGlobalState {
	//@override
	async _processData(loadedData) {
    	await super._processData(loadedData);
    	this.hr_employee = loadedData['hr.employee'];
    	}
	}
	Registries.Model.extend(PosGlobalState, PosEmployee);
 	class EmployeePosAccess extends PosComponent {
    	setup() {
        	super.setup();
        	useListener('click', this.onClick);
    	}

  	async onClick() {
    	console.log(this.env.pos.hr_employee,'this.env.pos.hr_employee')
     	var pos_employee = this.env.pos.hr_employee
     	for(var i=0; i < pos_employee.length; i++){
                   	pos_employee[i]['image_url'] = window.location.origin + "/web/image/hr.employee/" + pos_employee[i].id+ "/image_1920";
            	}
    	Gui.showPopup("EmployeePos", {
                       	title: this.env._t('Pos Employee'),
                       	cancelText: this.env._t("Cancel"),
                       	confirmText:this.env._t("Ok"),
                       	pos_employee:pos_employee
                   	});
  	}
  	}
  	EmployeePosAccess.template = 'EmployeePosAccess';
	ProductScreen.addControlButton({
    	component: EmployeePosAccess,
    	condition: function() {
       	return this.env.pos;
   	},
	});
	Registries.Component.add(EmployeePosAccess);
	return EmployeePosAccess;
});
By creating a popup, the XML and JS files are needed. In the XML, we specify the template of that pop-up:
XML:
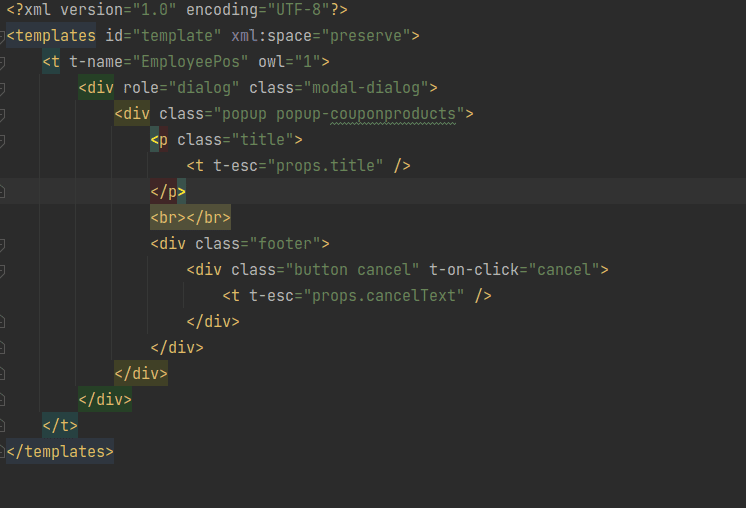
JS:
odoo.define('blog.EmployeePos', function (require) { 'use strict'; const { Gui } = require('point_of_sale.Gui'); const { useListener } = require("@web/core/utils/hooks"); const AbstractAwaitablePopup = require('point_of_sale.AbstractAwaitablePopup'); const Registries = require('point_of_sale.Registries'); const { _t } = require('web.core'); var rpc = require('web.rpc'); const { parse } = require('web.field_utils'); const { useRef, useState } = owl; class EmployeePos extends AbstractAwaitablePopup { setup() { super.setup(); useListener('click-employee', this.EmployeePos); } EmployeePos(item){ this.env.posbus.trigger('close-popup', { popupId: this.props.id, response: { confirmed: true, payload: null}, }); } } //Create EmployeePos popup EmployeePos.template = 'EmployeePos'; EmployeePos.defaultProps = { confirmText: 'Ok', cancelText: 'Cancel', title: 'Assign Sales Person', body: '', }; Registries.Component.add(EmployeePos); return EmployeePos;});Here We define the XML and JS, and we want to pass the employee values to the template in the click function of the button that we already defined
js:

In the template, it passes using the foreach
XML:
<?xml version="1.0" encoding="UTF-8"?>
<templates id="template" xml:space="preserve">
	<t t-name="EmployeePos" owl="1">
    	<div role="dialog" class="modal-dialog">
        	<div class="popup popup-couponproducts">
            	<p class="title">
                	<t t-esc="props.title" />
            	</p>
            	<div>
                	<t t-foreach="props.pos_employee" t-as="item" t-key="item.id">
                        	<span class='product product_content fix_product selected'
                              	t-on-click="() => this.trigger('click-employee', item)">
                            	<div class="product-list row" >
                                	<div class="product-img">
                                    	<img t-att-src='item.image_url'/>
                                	</div>
                                	<div class="product-name" style="text-center">
                                    	<t t-esc="item.name"/>
                                	</div>
                            	</div>
                        	</span>
                	</t>
                	</div>
            	<br></br>
            	<br></br>
            	<div class="footer">
                	<div class="button cancel" t-on-click="cancel">
                    	<t t-esc="props.cancelText" />
                	</div>
            	</div>
        	</div>
    	</div>
	</t>
</templates>
So on the pop-up, we can get the list of employees with their images and name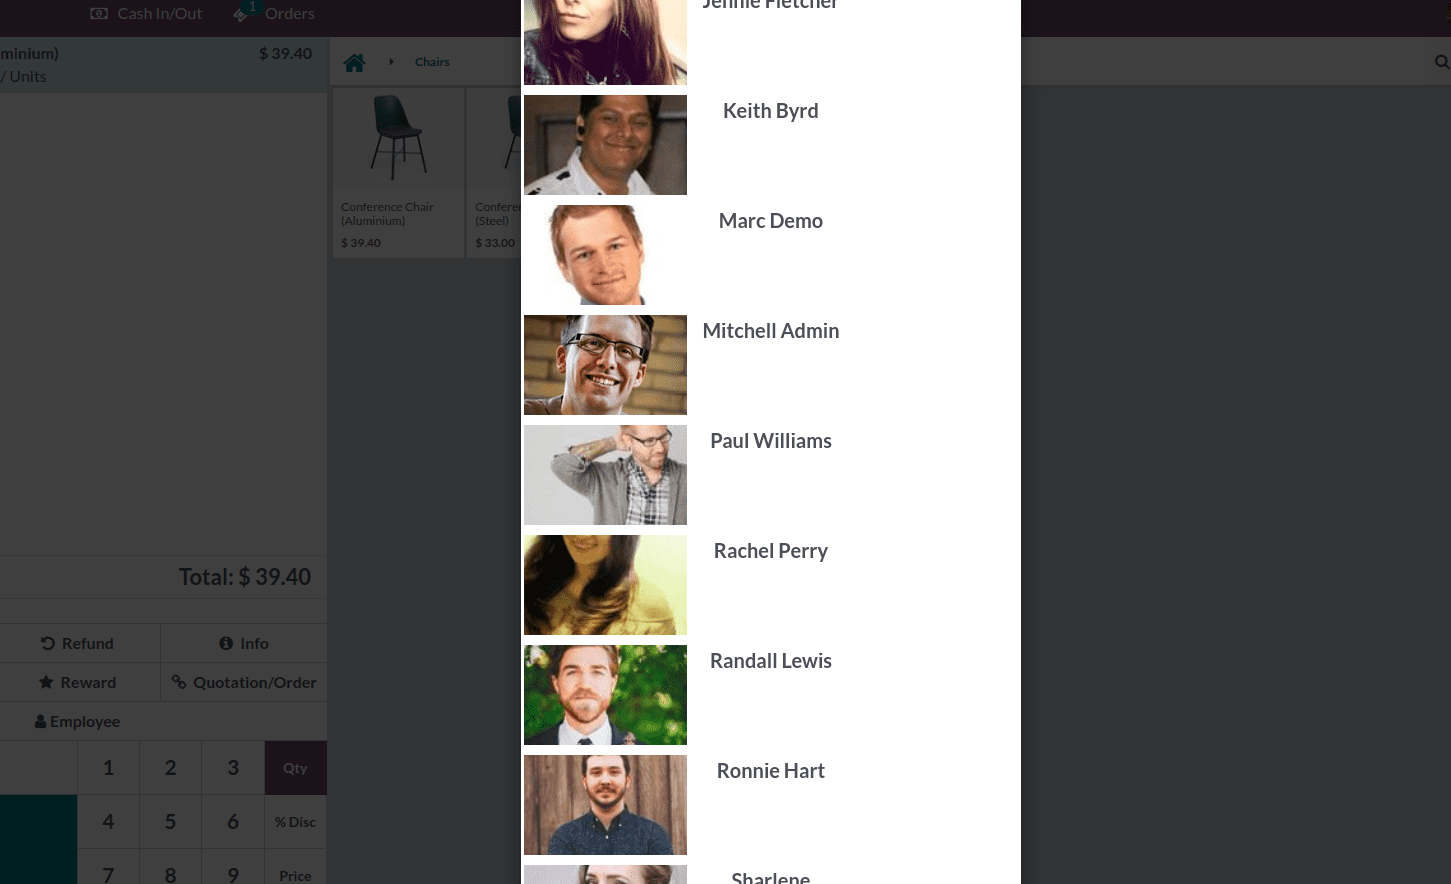
I hope you understand how to create a custom pop-up, and we can pass the values to that pop-up. For further information, you can refer to our blogs, Custom Popup in Odoo 14 POS Using OWL and How to Create a Custom Pop-Up in Odoo 15 Pos Using OWL which will help you create pop-ups in different versions.