In Odoo 17, users can easily customize their business applications to suit their needs.
In this blog, we will explore how to customize the form and tree view header by adding a custom button near the create button.
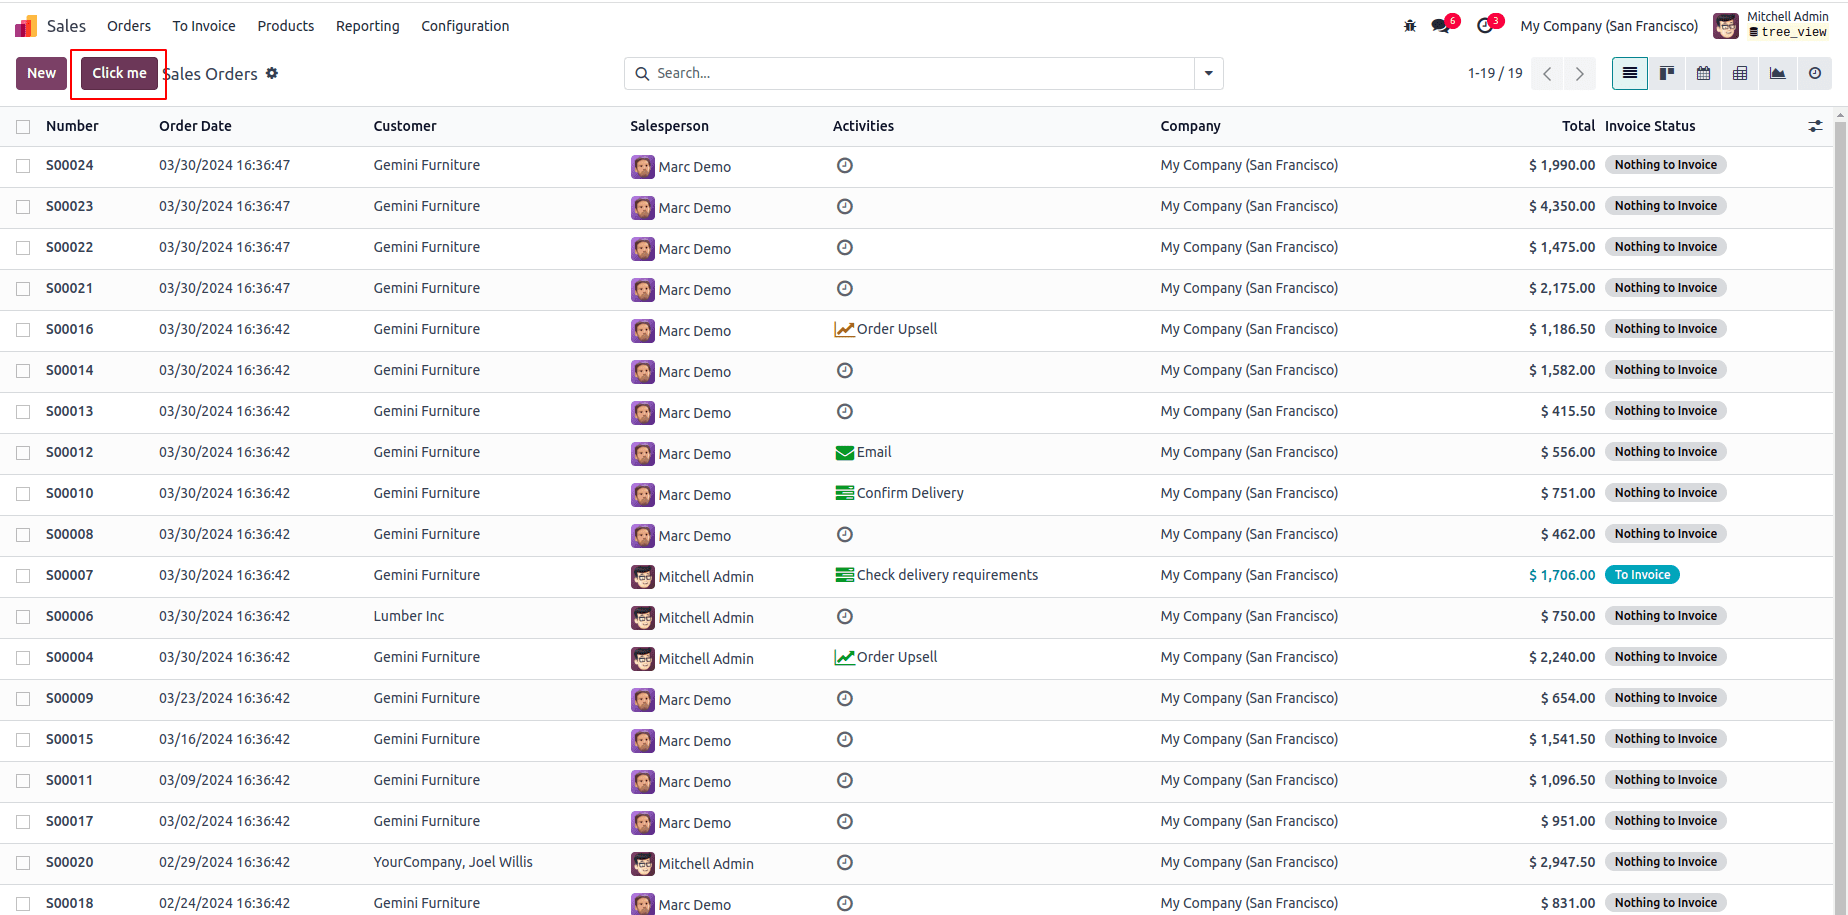
For instance, let's consider the sale order form and tree view. I plan to open a wizard by clicking the new button near to the create button in both the tree and form views.
First, we can look into how to add a button in the tree view header near the create button.
Custom Button in Tree View:
In certain situations, we may need to add a custom button to a specific tree view, such as the sales order tree view header.
The screenshot displays the 'Click Me' button adjacent to the 'New' button within the sale order tree view.
To get this, we can do the following things,
1. Create the templates file inside static/src/xml directory.
To include a button in the list view, we need to inherit the 'web.ListView.Buttons' template where the list view buttons are defined. Within this template, we'll add the 'Click Me' button along with its 't-on-click' functionality.
<?xml version="1.0" encoding="utf-8"?>
<templates>
   <t t-name="button_sale.ListView.Buttons" t-inherit="web.ListView.Buttons">
       <xpath expr="//div[hasclass('o_list_buttons')]" position="after">
           <button type="button" class="btn btn-primary" style="margin-left: 10px;"  t-on-click="OnTestClick">
               Click me
           </button>
       </xpath>
   </t>
</templates>
2. Create js file inside static/src/js directory
We can extend the default ListController component and our template. Then, we can register a new 'button_in_tree' item on the view register.
Within the JavaScript file, we can define the button's "t-on-click" function. Here, we can initiate the opening of a wizard for sale comparison using the "doAction" method. Since we've already added the action from the hook in the default ListController, there's no need to import it again.
/** @odoo-module */
import { ListController } from "@web/views/list/list_controller";
import { registry } from '@web/core/registry';
import { listView } from '@web/views/list/list_view';
export class SaleListController extends ListController {
   setup() {
       super.setup();
   }
   OnTestClick() {
       this.actionService.doAction({
          type: 'ir.actions.act_window',
          res_model: 'sale.compare',
          name:'Open Wizard',
          view_mode: 'form',
          view_type: 'form',
          views: [[false, 'form']],
          target: 'new',
          res_id: false,
      });
   }
}
registry.category("views").add("button_in_tree", {
   ...listView,
   Controller: SaleListController,
   buttonTemplate: "button_sale.ListView.Buttons",
});
3. Create the view file inside the viewdirectory
Now, we want to add this specific js_class in the treeview of the sale order.
<?xml version="1.0" encoding="UTF-8" ?>
<odoo>
       <record id="view_quotation_tree_with_onboarding" model="ir.ui.view">
       <field name="name">sale.view.tree.inherit</field>
       <field name="model">sale.order</field>
       <field name="inherit_id" ref="sale.view_order_tree"/>
       <field name="arch" type="xml">
           <xpath expr="//tree" position="attributes">
               <attribute name="js_class">button_in_tree</attribute>
           </xpath>
       </field>
   </record>
</odoo>
Now, users can find the 'Click Me' button on the sale list view, and upon clicking it, they can open our wizard.
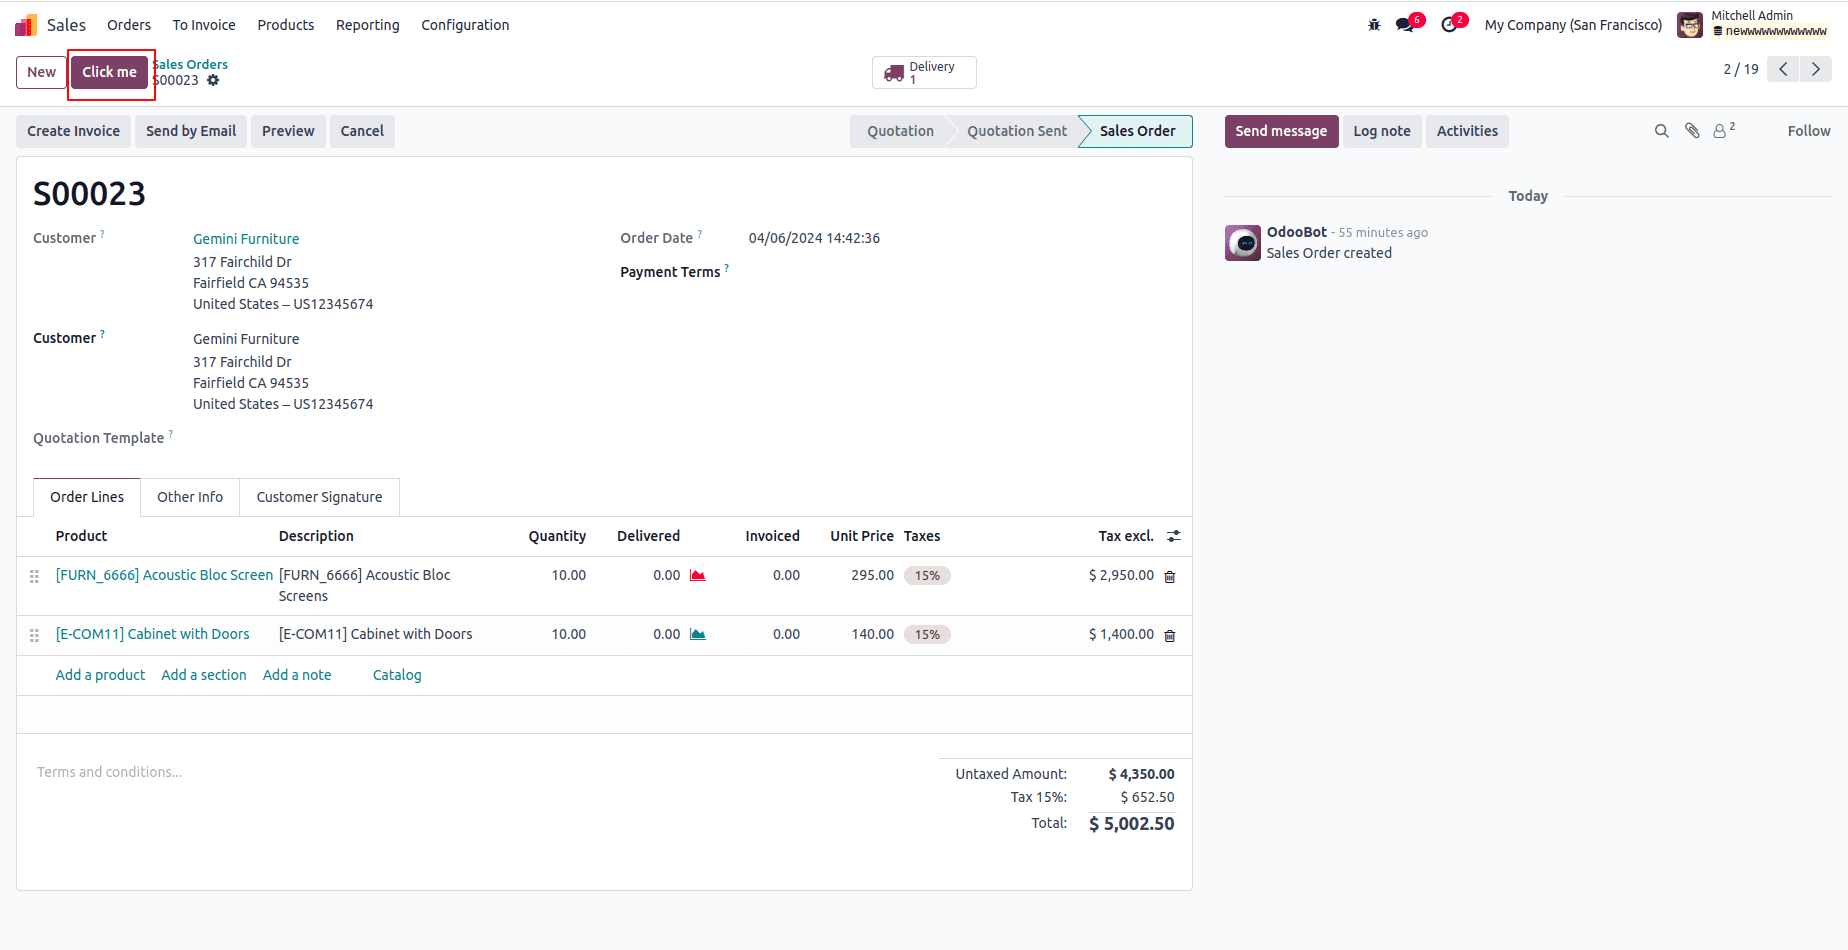
Custom Button in Form View:
Let's now explore how to incorporate a custom button into the form view of a sales order.
1. Add form_button.xml file to static/src/xml directory
In this case, we extend the "web.FormView" template by inheriting it and adding our button by using the xpath expression. Inside the <button> element, there is a <span> element with the text ‘Click me’ that will be displayed as the button's label.
<?xml version="1.0" encoding="utf-8"?>
<templates xml:space="preserve">
     <t t-name="button_sale.FormView.Buttons" t-inherit="web.FormView">
      <xpath expr="//t[@t-set-slot='layout-buttons']" position="inside">
           <button type="button" class="btn btn-primary"
               t-on-click="OnTestClick">
               <span>Click me</span>
           </button>
       </xpath>
   </t>
</templates>
2. Add form_button.js file into the static/src/js directory
In this case, we can extend the default FormController component and our template. Then we can register a new ‘button_in_form’ item on the view register. Also, add the ‘Click me’ button functionality.
In this, we want to import action from ‘useService’ hook.
/** @odoo-module */import { FormController } from "@web/views/form/form_controller";import { formView } from '@web/views/form/form_view';import { registry } from '@web/core/registry';import { useService } from "@web/core/utils/hooks";export class SaleFormController extends FormController { setup() { super.setup(); this.actionService = useService("action"); } OnTestClick() { this.actionService.doAction({ type: 'ir.actions.act_window', res_model: 'bom.compare', name:'Open Wizard', view_mode: 'form', view_type: 'form', views: [[false, 'form']], target: 'new', res_id: false, }); }}SaleFormController.template = 'button_sale.FormView.Buttons';export const modelInfoView = { ...formView, Controller: SaleFormController,};registry.category("views").add("button_in_form", modelInfoView);3. Add the sale_order_views.xml file intothe views directory.
Now, to see this new button in a specificform view of the sale.order model, we need to specify the new class in thespecific view. For that, we can use the attribute ‘js_class’ in the form tag ofthe view.
 <record id="view_order_form" model="ir.ui.view">
        <field name="name">sale.view.form.inherit</field>
        <field name="model">sale.order</field>
        <field name="inherit_id" ref="sale.view_order_form"/>
        <field name="arch" type="xml">
            <xpath expr="//form" position="attributes">
                <attribute name="js_class">button_in_form</attribute>
            </xpath>
        </field>
</record>
Now we can see the‘Click Me’ button near the Create button of the sale order form view.
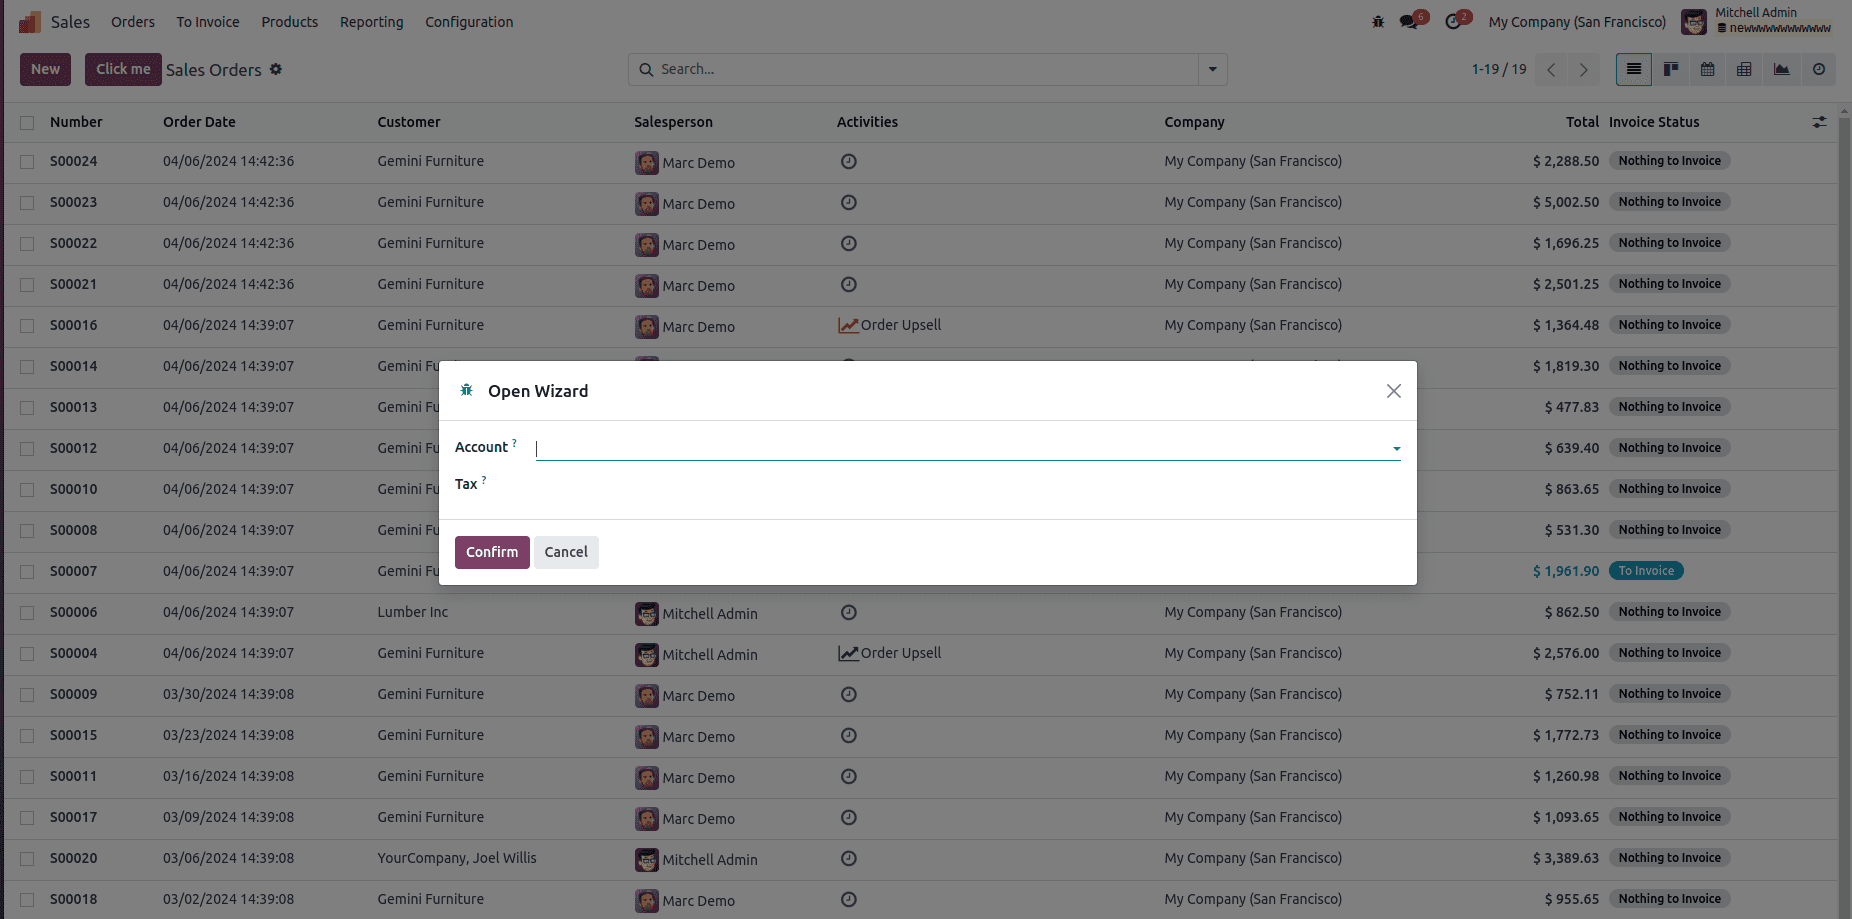
Upon clicking thenewly added button in both the form and tree views, it will trigger the openingof a specific wizard as defined in the do_action function. For this example, acustom wizard containing fields for Account and Tax.

Using the js_classfeature, we can place a button near the Create button in both the form and treeviews of Odoo. If you want to know more about How to Add a Create Button Near Tree & Kanban View in Odoo , refer to our previous blog.