For generating a report from the pos, first, let us create a button in pos for this purpose. We can add this by creating a file in static/src/XML for adding the button. For example, here I’m adding a button after the print receipt button in pos that is shown once we complete the order validation. So let us create a file with the path
‘static/src/xml/print_order_button.xml’.
Create a POS Button
<?xml version="1.0" encoding="utf-8"?>
<templates id="template">
<t t-extend="ReceiptScreenWidget">
<t t-jquery=".button.print" t-operation="after">
<div class="button order-print">
<i class='fa fa-print'></i>
Print POS Order
</div>
</t>
</t>
</templates>
Then we need to add it to the manifest file of the module as below.
'qweb': ['static/src/xml/print_order_button.xml'],
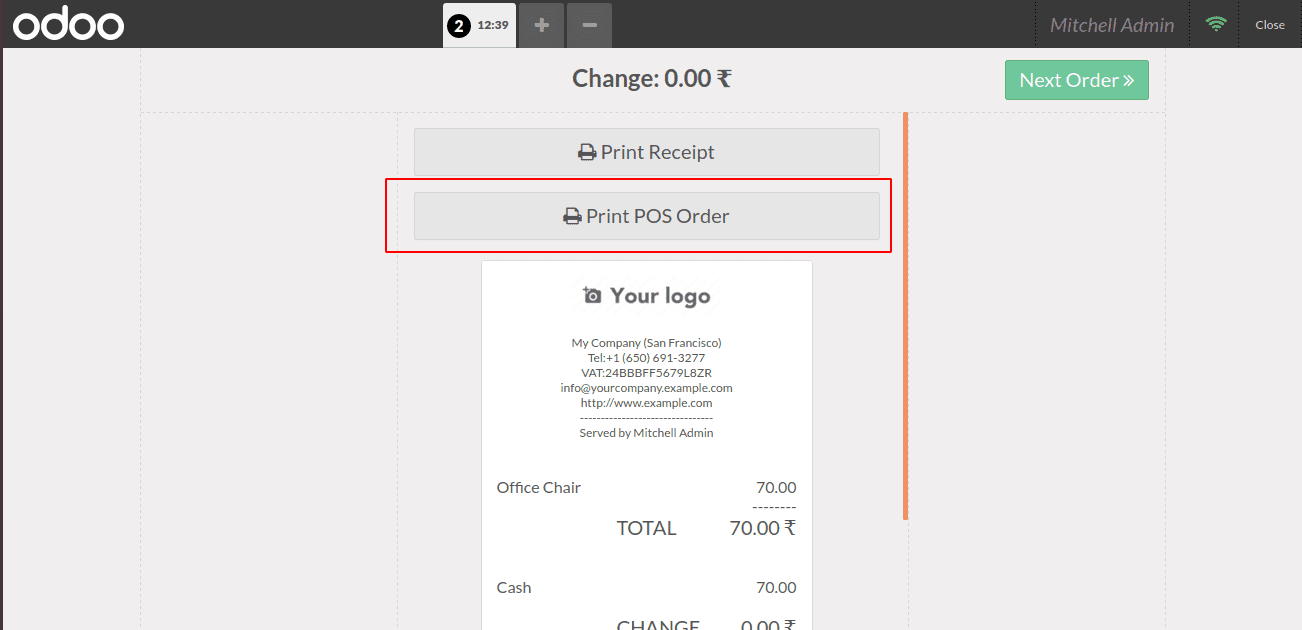
Now we have the button in the receipt screen as shown below.
Next, let us create a js file (static/src/js/pos_report.js) where we will define the click function for the added button.
odoo.define('a_test_module.pos_report', function (require) {
"use strict";
var screens = require('point_of_sale.screens');
var gui = require('point_of_sale.gui');
var core = require('web.core');
var _t = core._t;
screens.ReceiptScreenWidget.include({
events: {
'click .order-print': 'orderClickEvent',
},
orderClickEvent: function(e){
var self = this;
var order_name = self.pos.get_order().name
this._rpc({
model: 'sale.wizard',
method: 'print_report',
args: [[]],
}).then(function (result) {
self.do_action(result);
});
},
});
});
After this, we need to add the path to this js file, so I have added the path in ‘views/assets_path.xml’ and then added it to the data part of the manifest file of the module.
<?xml version="1.0" encoding="utf-8"?>
<odoo>
<template id="assets" inherit_id="point_of_sale.assets">
<xpath expr="." position="inside">
<script type="text/javascript"
src="/a_test_module/static/src/js/pos_report.js"></script>
</xpath>
</template>
</odoo>
Here in the js file, we have now added the click function for the button in ReceiptScreenWidget. Note that we should extend the events if it already exists in the original file where we are trying to include our click event. The ‘orderClickEvent' function will call the print_report function in the ‘sale.wizard’ model. In this model, we have to add the function for pdf as normally done and return the action for it. The python function print_report is added in ‘models/order_report.py’.
from odoo import models, api
class SalesReport(models.TransientModel):
_name = 'sale.wizard'
_description = "Sale Wizard Model"
def print_report(self):
return self.env.ref('a_test_module.pos_ord_session_reprt').
report_action(self,data={'name':'POS Order Report'})
From here in the ref part of the return, we can add the module name and the report id of the report to be printed same as the way we do for normal pdf.
Now add the report tag as below:
<?xml version="1.0" encoding="UTF-8"?>
<odoo>
<data>
<report
id="pos_ord_session_reprt"
string="Pos Order Report"
model="sale.wizard"
report_type="qweb-pdf"
file="a_test_module.pos_order_template"
name="a_test_module.pos_order_template"
/>
</data>
</odoo>
And report template as below:
<?xml version="1.0" encoding="utf-8"?>
<odoo>
<template id="pos_order_template">
<t t-call="web.html_container">
<t t-call="web.external_layout">
<div class="page">
<h2 align="center">POS Order Report</h2>
<h6 align="center">Add your custom code here</h6>
</div>
</t>
</t>
</template>
</odoo>
The pdf report will get printed on the button click as shown below.

You can work on the report template as a normal pdf report template and add the required data to the report.